
Guardian Sensor (3) - Medtronic Diabetes · The Guardian Sensor (3) is intended for use with the...
20
User Guide Guardian Sensor (3)
Transcript of Guardian Sensor (3) - Medtronic Diabetes · The Guardian Sensor (3) is intended for use with the...

User Guide
Guardian Sensor (3)


- 1 -
EnglishIntroductionThe Guardian™ Sensor (3) glucose sensor is part of your Continuous Glucose Monitoring (CGM) system. The sensor continuously converts tiny amounts of glucose from the interstitial fluid under your skin into an electronic signal. Your system then uses these signals to provide sensor glucose values.
C
D
AB
A. pedestalB. needle
housingC. sensorD. clear liner
Potential risks related to sensor useGeneral risks with sensor use include:• Skin irritation or other reactions• Bruising• Discomfort• Redness• Bleeding• Pain• Rash• Infection• Raised bump• Appearance of a small “freckle-like” dot where needle was
inserted• Allergic reaction• Fainting secondary to anxiety or fear of needle insertion• Soreness or tenderness• Swelling at insertion site• Sensor fracture, breakage or damage• Minimal blood splatter associated with sensor needle removal• Residual redness associated with adhesive or tapes or both• Scarring
Indications for useThe Guardian Sensor (3) is intended for use with the Medtronic MiniMed® 670G system to continuously monitor glucose levels in persons with diabetes. It is intended to be used for detecting trends and tracking patterns in persons aged fourteen years and older, and to be used by the MiniMed 670G system to automatically adjust basal insulin levels. It is indicated for use as an adjunctive device to complement, not replace, information

- 2 -
obtained from standard blood glucose monitoring devices. The sensor is intended for single use and requires a prescription. The Guardian Sensor (3) is indicated for 7 days of continuous use.
ContraindicationsNone known.
Assistance
Department Telephone Number24 Hour HelpLine (calls within the United States) 800 646 4633
24 Hour HelpLine (calls outside the United States) +1 818 576 5555
Website www.medtronicdiabetes.com
General warningsRead this entire user guide before attempting to insert the sensor. The one-press serter (MMT-7512) does not work the same as other Medtronic insertion devices. Failure to follow directions or using a different serter may result in improper insertion, pain, or injury.
The Guardian Sensor (3) was developed for use with and the performance evaluated with the approved system only. The sensor should not be used as part of unapproved systems, as it may provide inaccurate sensor glucose readings.
The sensor is designed to work with approved transmitters only. It is not interchangeable with transmitters and recorders that are not compatible with the sensor. Connecting your sensor to a transmitter or recorder that is not approved for use with the sensor may cause damage to the components or inaccurate sensor glucose values.
Do not make therapy decisions based on sensor glucose values because sensor glucose and blood glucose (BG) values may differ. If your sensor glucose reading is low or high, or if you feel symptoms of low or high glucose, do the following prior to making therapy decisions. Confirm your blood glucose with your meter using a fingerstick blood sample.
Taking medications with acetaminophen, such as Tylenol®, fever reducers, or cold medicine, while wearing the sensor may falsely raise your sensor glucose readings. The level of inaccuracy depends on the amount of acetaminophen active in your body and may be different for each person. Always check the label of

- 3 -
any medications to confirm whether acetaminophen is an active ingredient.
Do not expose your sensor to MRI equipment, diathermy devices, or other devices that generate strong magnetic fields as the performance of the sensor has not been evaluated under those conditions and may be unsafe. If your sensor is inadvertently exposed to a strong magnetic field, discontinue use and contact the 24 Hour HelpLine for further assistance.
A retractable needle is attached to the sensor and minimal blood splatter may occur. If you are a healthcare professional or caregiver, wrap sterile gauze around the sensor to minimize contact with blood. Keep as much distance as possible between you and the patient when removing the needle.
Keep the needle housing within sight at all times to avoid an accidental needlestick or puncture.
Always inspect the packaging for damage prior to use. Sensors are sterile and non-pyrogenic, unless the package has been opened or damaged. Do not use the sensor if the sterile package has been opened or damaged. Use of an unsterile sensor can cause site infection.
This product contains small parts and may pose a choking hazard for children.
Watch for bleeding at the insertion site (under, around, or on top of the sensor).
If bleeding occurs, do the following:1. Apply steady pressure, using sterile gauze or a clean cloth
placed on top of the sensor, for up to three minutes. The use of unsterile gauze can cause site infection.
2. If bleeding stops, connect the transmitter (or recorder) to the sensor.
If bleeding does not stop, do not connect the transmitter to the sensor because blood can get into the transmitter connector, and could damage the device.
If bleeding continues, causes excessive pain or discomfort, or is significantly visible in the plastic base of the sensor, do the following:
plastic base
1. Remove the sensor and continue to apply steady pressure until the bleeding stops. Discard the sensor in a sharps container.

- 4 -
2. Check the site for redness, bleeding, irritation, pain, tenderness, or inflammation. Treat based on instructions from your healthcare professional.
3. Insert a new sensor in a different location.
General precautionsWash your hands with soap and water before inserting the sensor to help prevent site infection.
Wear gloves when inserting the sensor into someone other than yourself to avoid contact with patient blood.
Do not insert the sensor through tape. Inserting the sensor through tape may cause improper sensor insertion and function.
Only use alcohol to prepare the insertion site, to ensure that residue is not left on the skin.
Rotate the sensor insertion site so that sites do not become overused.
Discard used sensors and needle housings in a sharps container after each use to avoid accidental needlestick or puncture.
Do not clean, resterilize, or try to extract the needle from the needle housing. An accidental needlestick or puncture may occur.
Do not reuse sensors. Reuse of a sensor may cause damage to the sensor surface and lead to inaccurate glucose values, site irritation, or infection.
Where to insert the sensorCAUTION: Avoid the 2 inch (5.0 cm) area around the navel to help ensure a comfortable insertion site and to help with sensor adhesion.Choose an insertion site that has an adequate amount of subcutaneous fat. Shown here are the best body areas (shaded) for sensor insertion.

- 5 -
Do not insert the sensor in muscle or areas constrained by clothing or accessories, areas with tough skin or scar tissue, sites subjected to rigorous movement during exercise, or in sites under a belt or on the waistline for best sensor performance and to avoid accidental sensor removal.
Removing the sensorWhen you are ready to change your sensor, disconnect the transmitter from the sensor as described in your transmitter user guide. Gently pull the sensor from your body to remove it. Place the sensor in a sharps container.
ReagentsThe sensor contains two biological reagents: glucose oxidase, and human serum albumin (HSA). Glucose oxidase is derived from Aspergillus niger and manufactured to meet industry requirements for extraction and purification of enzymes for use in diagnostic, immunodiagnostic, and biotechnical applications. The HSA used on the sensor consists of purified and dried albumin fraction V, derived from pasteurized human serum which is cross-linked via glutaraldehyde. Approximately 3 μg of glucose oxidase and approximately 10 μg of HSA are used to manufacture each sensor. HSA is approved for IV infusion in humans at quantities much larger than in the sensor.
Storage and handlingCAUTION: Do not freeze the sensor, or store it in direct sunlight, extreme temperatures, or humidity. These conditions may damage the sensor.
Only store sensors at room temperature between 36 °F to 80 °F (2 °C to 27 °C).
Discard sensor after the “Use by date” indicated on the label, if the package is damaged, or the seal is broken.
Sensor life of useThe sensor can be used one time, and it has a maximum life of 170 hours (seven days). The 170-hour life span of the sensor begins when the sensor is connected to the transmitter.

- 6 -
Components
A BOne-press serterA. bump on both buttonsB. thumbprint marking
C
D
AB
Glucose sensor assemblyA. pedestalB. needle housingC. sensorD. clear liner
A
B
Sensor baseA. sensor connectorB. sensor snaps
Transmitter
A CB
Tape and sensor componentsA. adhesive tabB. sensor baseC. oval tape

- 7 -
Inserting the sensorWARNING: Wear gloves when inserting the sensor into someone other than yourself to avoid contact with patient blood. Minimal bleeding may occur. Contact with patient blood can cause infection.
11. Wash your hands.
22. Choose an insertion site on the
abdomen that has an adequate amount of fat.
33. Clean the insertion site with
alcohol. Let the area air dry.
44. Open the sensor package.
- 8 -
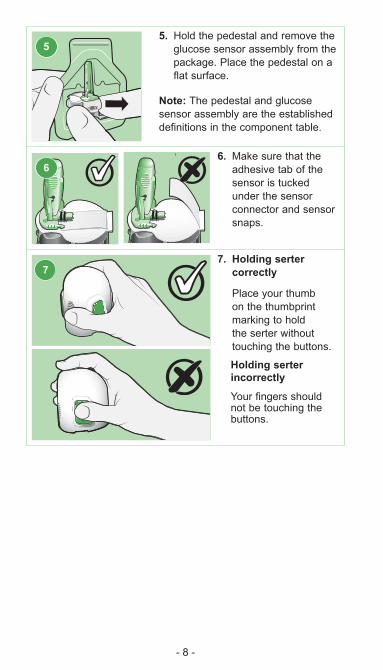
55. Hold the pedestal and remove the
glucose sensor assembly from the package. Place the pedestal on a flat surface.
Note: The pedestal and glucose sensor assembly are the established definitions in the component table.
66. Make sure that the
adhesive tab of the sensor is tucked under the sensor connector and sensor snaps.
7 7. Holding serter
correctly
Place your thumb on the thumbprint marking to hold the serter without touching the buttons.
Holding serter incorrectly
Your fingers should not be touching the buttons.

- 9 -
8a
8b
8a–8b. Grip the serter, placing your thumb on the thumbprint marking, without holding the buttons. Carefully push the serter down onto the pedestal until the base of the serter sits flat on the table and you hear a click.
9a9a. To detach the serter from the
pedestal, place the thumb of one hand on the thumbprint marking and grip the serter without touching any buttons. With your other hand, place two fingers on the pedestal arms.
9b9b. Slowly pull the serter straight
up without holding the buttons. Do not detach the pedestal from the serter in midair, as this might damage the sensor.
Note: The arrow on the side of the serter aligns with the needle inside the serter.

- 10 -
WARNING: Never point a loaded serter toward any body part where insertion is not desired. An accidental button-push may cause the needle to inject the sensor in an undesired location, causing minor injury.
10a
10a. Hold the serter steady against your cleaned insertion site, without pushing the serter too deeply into your skin.
Note: Failing to hold the serter securely flat against your body during insertion may let the serter spring back after pressing the buttons, and result in improper insertion of the sensor.
10b 10c10b-10c. Press and
release the bump on both buttons at the same time, while holding the serter flat against your body.
10d10d. Continue holding the serter flat
against your body for at least five seconds to let the adhesive stick to your skin.
10e10e. Slowly lift the serter away from
your body, making sure that the buttons are not pressed.

- 11 -
If you inserted the sensor into yourself, complete step 11a. If you are a healthcare professional or caregiver who inserted the sensor into a patient, complete step 11b.
11aPatient:11a. Gently hold the sensor
base against the skin at the sensor connector and the opposite end of sensor base. Hold the needle housing at the top and slowly pull straight out, away from the sensor.
OR
11b
Healthcare professional or caregiver:11b. Wrap sterile gauze around
the sensor (as shown in image 11b). Gently hold the sensor base against the skin at the sensor connector and the opposite end of sensor base. Hold the needle housing at the top and slowly pull straight out, away from the sensor.
WARNING: Watch for bleeding at the insertion site. If bleeding occurs under, around, or on top of the sensor, apply steady pressure using sterile gauze or a clean cloth placed on top of the sensor for up to three minutes. The use of unsterile gauze can cause an infection. If bleeding does not stop, remove the sensor and apply steady pressure until the bleeding stops.

- 12 -
Note: Medtronic adhesives are pressure-sensitive. Pressing the adhesive against the skin ensures that the sensor remains adhered to the skin throughout the wear period.
Note: After insertion, use of adhesive products such as Skin Tac™ in addition to the tape is optional. If optional adhesive products are used, apply to the skin under the adhesive pad prior to removing the liner. It can also be applied to the adhesive pad or the skin around the sensor base. Allow for product to dry.
12a12a. Hold the sensor in place and gently
remove the adhesive liner from under the adhesive pad. Do not remove the adhesive liner from the rectangular adhesive tab. This tab will be used to secure the transmitter in a later step.
12b12b. Firmly press the adhesive pad
against the skin to make sure that the sensor remains adhered to the skin.
13a13a. Untuck the adhesive tab from under
the connector.
- 13 -
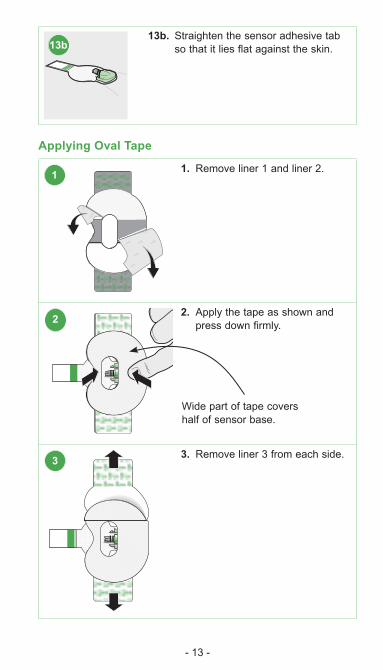
13b13b. Straighten the sensor adhesive tab
so that it lies flat against the skin.
Applying Oval Tape
1 1. Remove liner 1 and liner 2.
2 2. Apply the tape as shown and press down firmly.
3 3. Remove liner 3 from each side.
Wide part of tape covers half of sensor base.

- 14 -
4 4. Smooth the tape.
55. Connect the transmitter to the
sensor.
Note: Wait for the green light on the transmitter to flash. If the green light does not flash, refer to the Troubleshooting section of your transmitter user guide.
6 6. Cover the transmitter with the adhesive tab.
Note: Do not pull the tab too tightly.
7 7. To apply a 2nd tape, remove liner 1 and liner 2.

- 15 -
88. Apply the 2nd tape in the
opposite direction to the first tape and place it on the transmitter. Press down firmly.
99. Remove liner 3 from each side.
1010. Smooth the tape.
Note: Be sure to regularly check your sensor site. If the device is not secure, apply an additional off-the-shelf adhesive.
MiniMed® XXXGXxxx Xxxxxxx
1111. For details on how to enter
your sensor settings into your pump or monitor, refer to the corresponding user guide.
Icon table
Use by date
Wide part of tape covers end of transmitter and skin.

- 16 -
Do not reuse
(1x) One sensor per container/package
(5x) Five sensors per container/package
(2x) Two tapes per package
(10x) Ten tapes per package
Consult instructions for use
Catalogue or model number
Batch code
Sterilized using irradiation
Temperature limit
Open here
Manufacturer
Prescription only
Do not resterilize
Fragile, handle with care
Keep dry
Recycle cardboard, paper, plastic packaging supplies and unwanted written material.Magnetic Resonance (MR) unsafe: keep away from magnetic resonance imaging (MRI) equipment.
Non-pyrogenic - Does not contain endotoxins.
©2016 Medtronic MiniMed, Inc. All rights reserved. MiniMed® and Guardian™ are trademarks of Medtronic MiniMed, Inc.Skin Tac™ is a trademark of Torbot Group, Inc.Tylenol® is a registered trademark of Johnson & Johnson consumer Inc.


MMT-7020
6026096-011_a