GSTARCAD 2016 - IDEOMA intelligent systems bv or Server Name:input the server IP address(like...
59
GSTARCAD 2016 CAD DESIGN ENHANCED Activation and Return the License
Transcript of GSTARCAD 2016 - IDEOMA intelligent systems bv or Server Name:input the server IP address(like...
GSTARCAD 2016 CAD DESIGN ENHANCED
Activation and Return the License

Content
Part one: Software-encryption (Flexnet) Version
1. Software-encryption(Flexnet) Traditional Version ................................... 3
1 .1 Stand-alone (Flexnet) .......................................................................... 3
1.1.1 Stand-alone(Flexnet) Activation ........................................................................... 3
1.1.2 Stand-alone(Flexnet) Return the license ............................................................. 8
1.2 Network (Flexnet) ............................................................................... 10
1.2.1 Network (Flexnet) Activation .............................................................................. 10
1.2.2 Setting ................................................................................................................... 17
1.2.2.1 Server Setting ............................................................................................ 17
1.2.2.2 Client Setting ............................................................................................. 18
1.2.3 Borrow and Return the license on the client .................................................... 19
1.2.3.1 Borrow the license on the client ............................................................. 19
1.2.3.2 Return the license on the client .............................................................. 20
1.2.4 Return the Network license ................................................................................ 21
2. Software-encryption(Flexnet) On-line Version ....................................... 24
2.1 Stand-alone (Flexnet) .......................................................................... 24
2.1.1 Stand-alone (Flexnet) Activation ........................................................................ 24
2.1.1.1 Stand-alone (Flexnet) On-line Activation............................................... 24
2.1.1.2 Stand-alone (Flexnet) Off-line Activation .............................................. 26
2.1.2 Stand-alone (Flexnet) Return the license .......................................................... 31
2.1.2.1 Stand-alone (Flexnet) On-line Return the license ................................. 31
2.1.2.2 Stand-alone (Flexnet) Off-line Return the license ................................. 33
2.2 Network (Flexnet) ............................................................................... 38
2.2.1 Network (Flexnet) Activation .............................................................................. 38
2.2.1.1 Network (Flexnet) On-line Activation ..................................................... 38
2.2.1.2 Network (Flexnet) Off-line Activation ..................................................... 40
2.2.2 Setting ................................................................................................................... 45
2.2.2.1 Server Setting ............................................................................................ 45
2.2.2.2 Client Setting ............................................................................................. 46
2.2.3 Borrow and Return the license on the client .................................................... 47
2.2.3.1 Borrow the license on the client ............................................................. 47
2.2.3.2 Return the license on the client .............................................................. 48
2.2.4 Return the Network license ................................................................................ 49
2.2.4.1 Network (Flexnet) On-line Return the license ....................................... 50
2.2.4.2 Network (Flexnet) Off-line Return the license ....................................... 52
Part two: Hardware-encryption (USB Dongle) Version
1. Stand-alone (USB Dongle) Activation ...................................................... 57
2. Network (USB Dongle) Activation ............................................................ 58
3
Part one: Software-encryption (Flexnet) Version
1. Software-encryption(Flexnet) Traditional Version
1 .1 Stand-alone (Flexnet)
1.1.1 Stand-alone(Flexnet) Activation
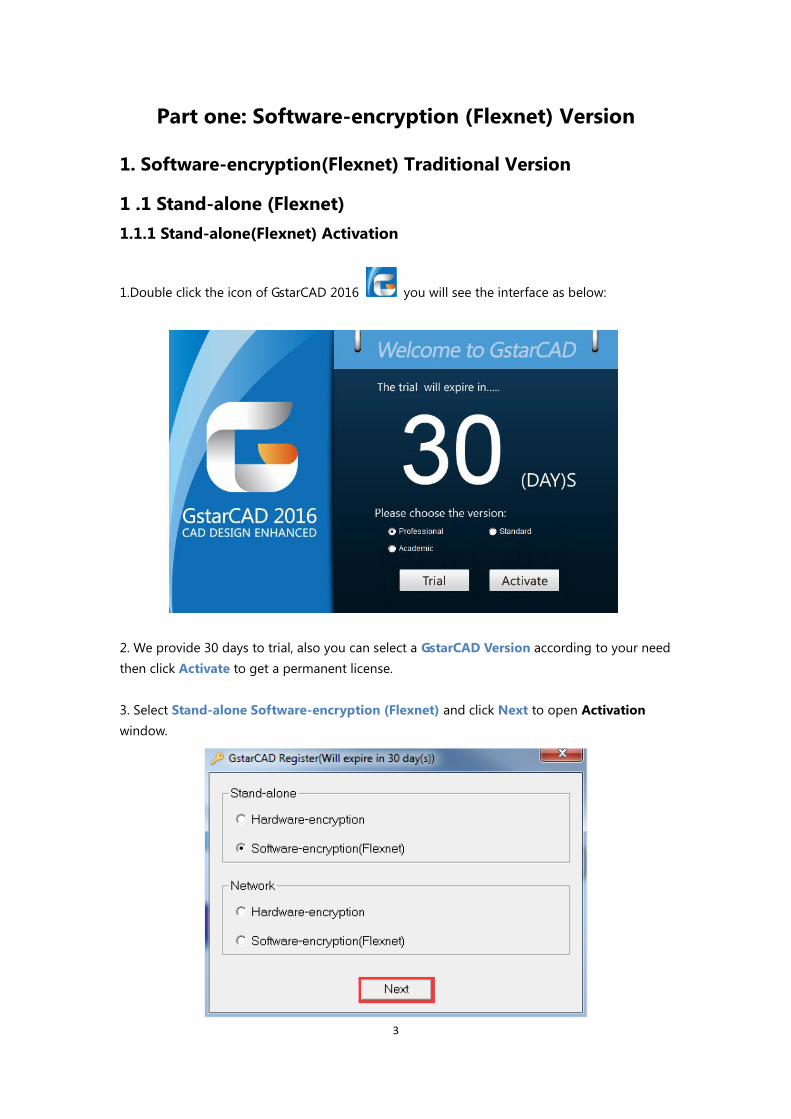
1.Double click the icon of GstarCAD 2016 you will see the interface as below:
2. We provide 30 days to trial, also you can select a GstarCAD Version according to your need
then click Activate to get a permanent license.
3. Select Stand-alone Software-encryption (Flexnet) and click Next to open Activation
window.
4
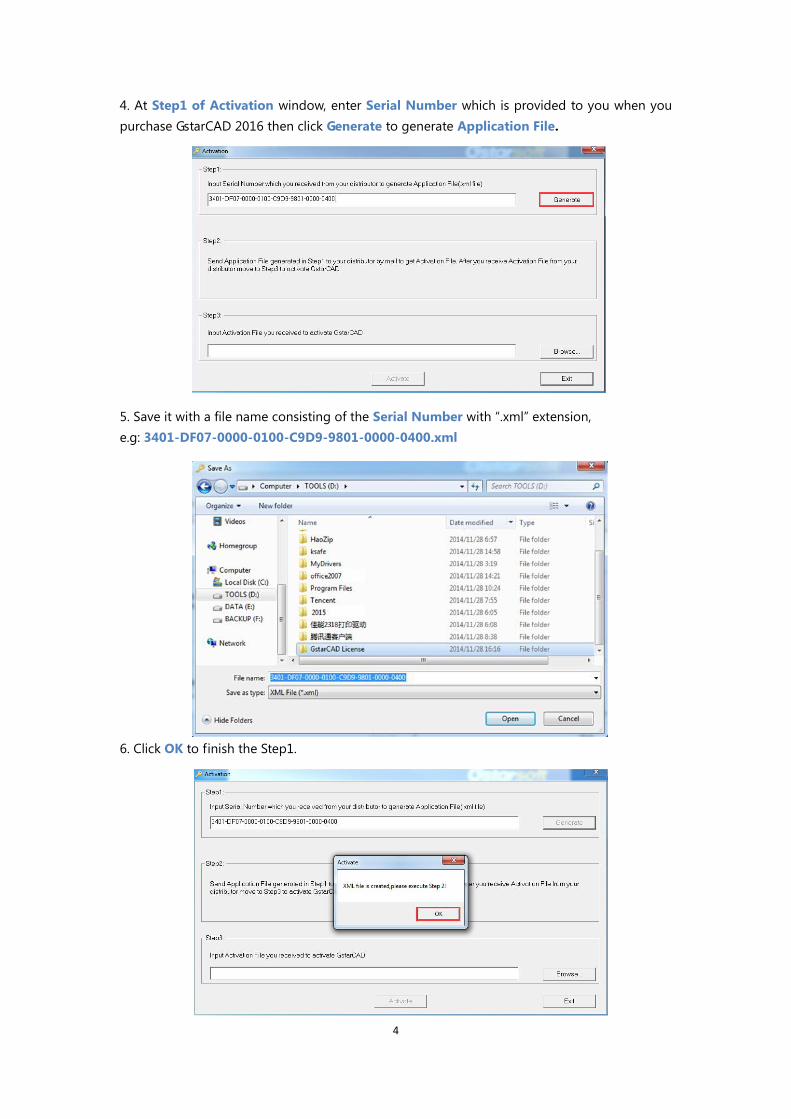
4. At Step1 of Activation window, enter Serial Number which is provided to you when you
purchase GstarCAD 2016 then click Generate to generate Application File.
5. Save it with a file name consisting of the Serial Number with “.xml” extension,
e.g: 3401-DF07-0000-0100-C9D9-9801-0000-0400.xml
6. Click OK to finish the Step1.

5
7. Send the generated Application File 3401-DF07-0000-0100-C9D9-9801-0000-0400.xml
to your local distributor from whom you purchase GstarCAD and you will receive an Activation
File correspondingly.
6
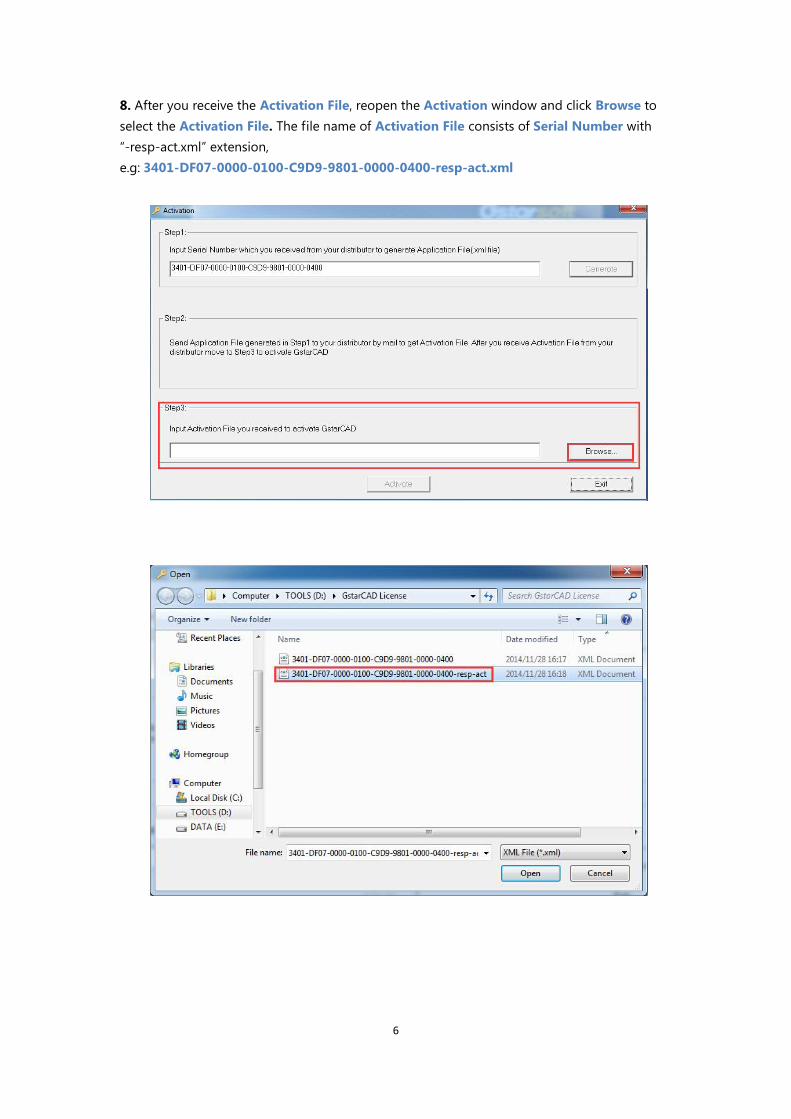
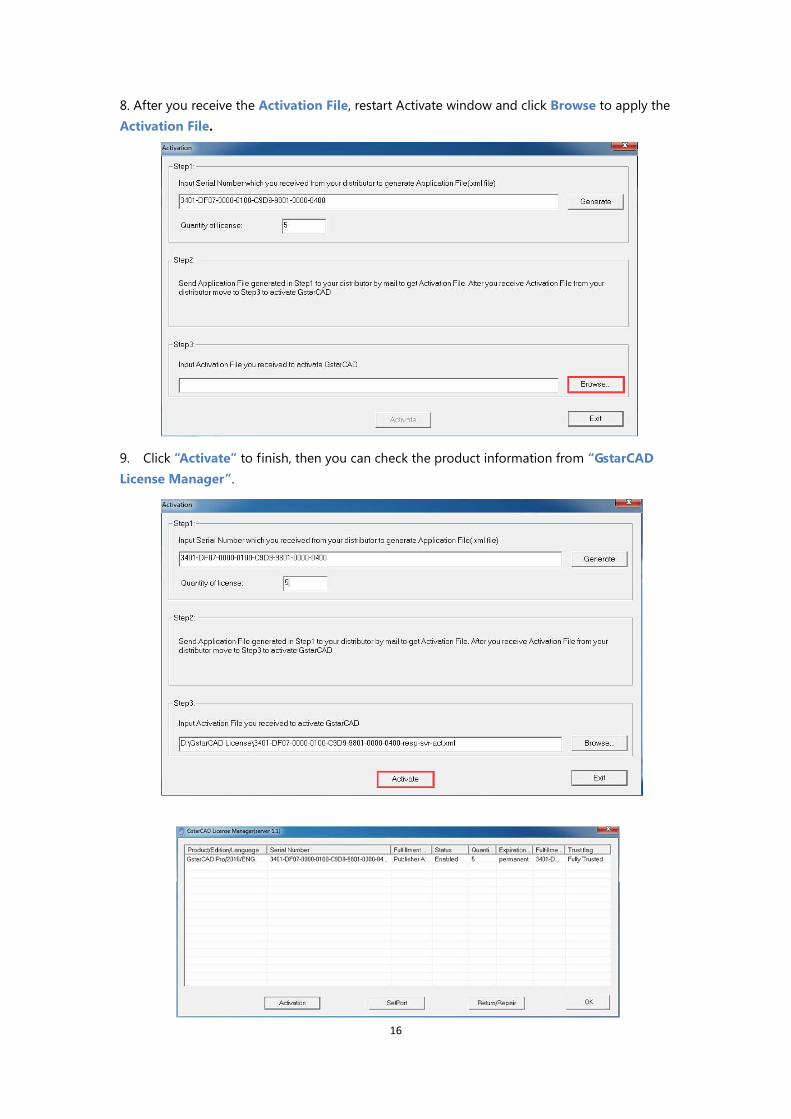
8. After you receive the Activation File, reopen the Activation window and click Browse to
select the Activation File. The file name of Activation File consists of Serial Number with
“-resp-act.xml” extension,
e.g: 3401-DF07-0000-0100-C9D9-9801-0000-0400-resp-act.xml

7
9. Click Activate to apply Activation File and click OK to finish activating GstarCAD.

8
1.1.2 Stand-alone(Flexnet) Return the license
1. You can find the menu in start-all program and click GstarCAD License Manager.
2. GstarCAD License Manager dialog box will pop up then select the Serial Number which
you want to return and click Return/Repair.
3. Click Generate to get the Activation Cancel File.

9
4. Save the xml file consisting of the same Serial Number with „-return.xml‟ extension.
5. Send Activation cancel file to your local distributor to get processing file.
6. You will get a processing file from your local distributor in a short time,
e.g: 3401-DF07-0000-0100-C9D9-9801-0000-0400-resp-return.xml
7. Reopen the return window, click Browse to select the Processing File and click Process to
clean the data.
8. Please note that processing file “-resp-return.xml” is for clearing the registration
information in the workstation which you returned the license. If you want to transfer your
license right to another workstation, please generate a new Application File “.xml” and send
to us. You will see in the license manager the status is disabled.

10
1.2 Network (Flexnet)
1.2.1 Network (Flexnet) Activation
Network Encryption System enables you to share a number of GstarCAD licenses on your office
LAN. It gives flexibility of license floating among a working group. Before the network
installation, the following confirmation is required:
1. Information of product you want to purchase, including version language, version type
(standard or professional) and the quantity of licenses.
2. Specify server computer to install and execute GStarLMS.exe.
Activation:
1. If it is your first time to install GstarCAD NetWork License Manager, please follow the steps
below:
(1) Double click GstarCAD_LMS-Online on the specified server computer, the following
window opens, Click Next to specify the installation directory of GstarCAD NetWork
License Manager.
(2) Click Install after specifying the directory.
11
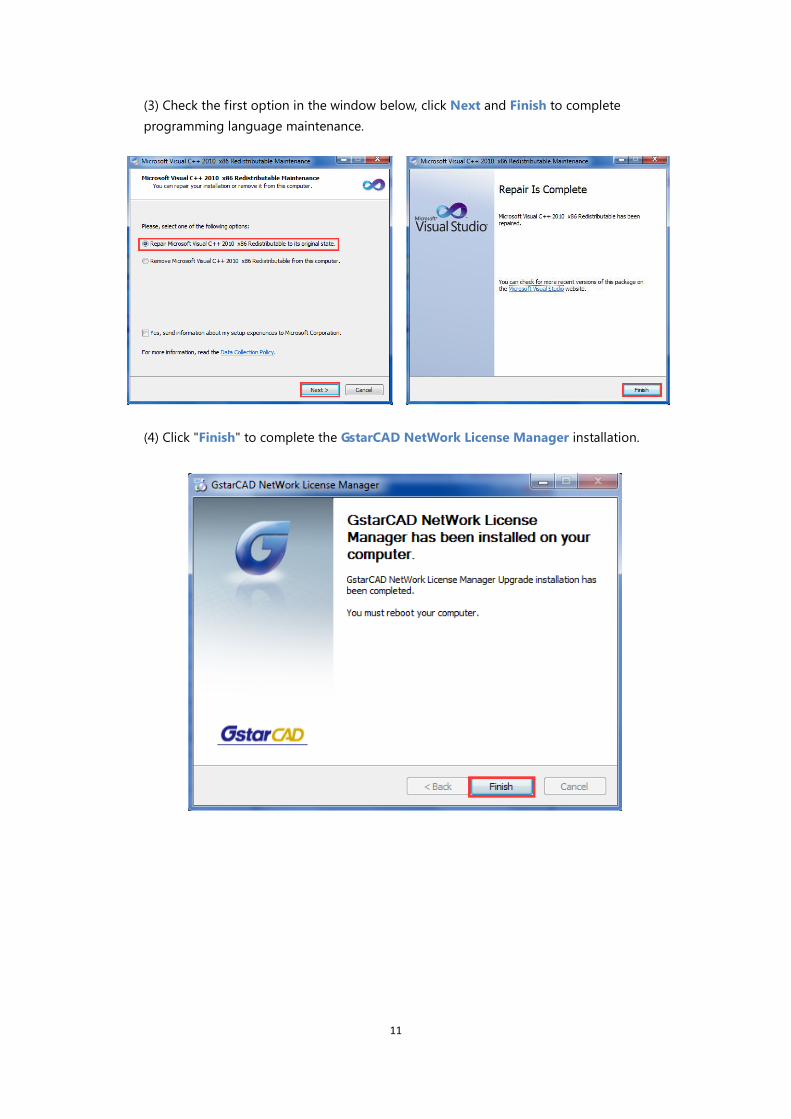
(3) Check the first option in the window below, click Next and Finish to complete
programming language maintenance.
(4) Click "Finish" to complete the GstarCAD NetWork License Manager installation.
12
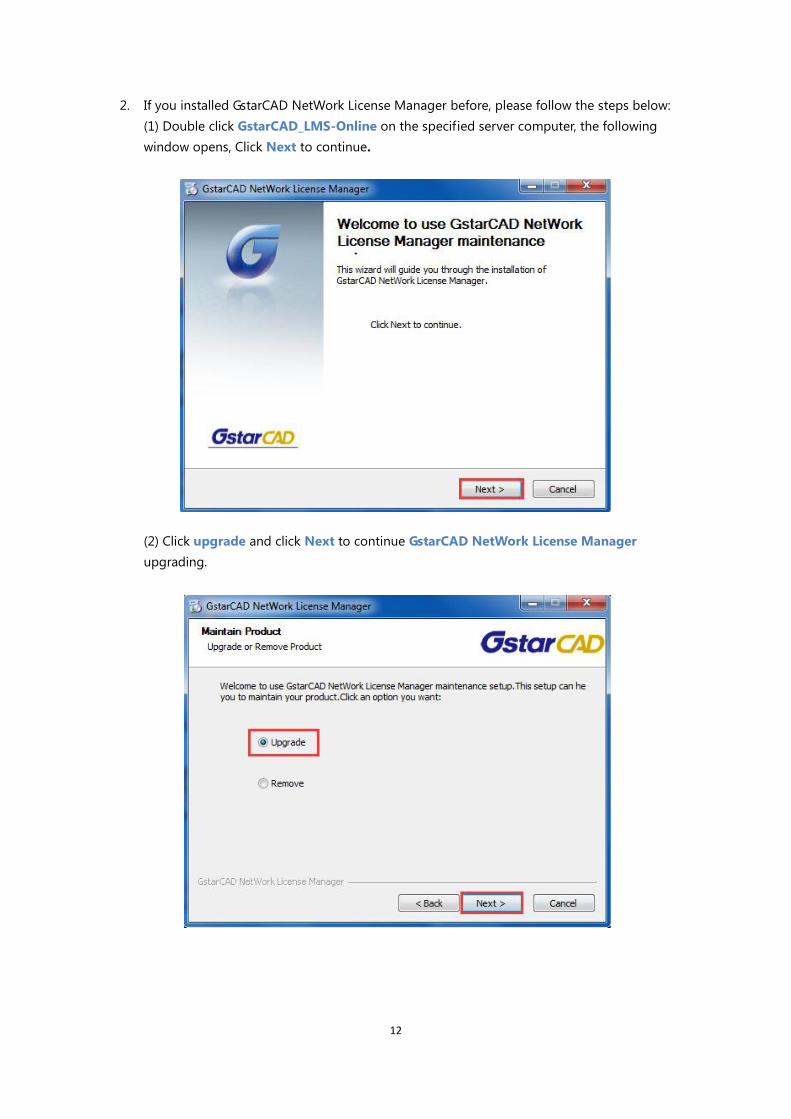
2. If you installed GstarCAD NetWork License Manager before, please follow the steps below:
(1) Double click GstarCAD_LMS-Online on the specified server computer, the following
window opens, Click Next to continue.
(2) Click upgrade and click Next to continue GstarCAD NetWork License Manager
upgrading.
13
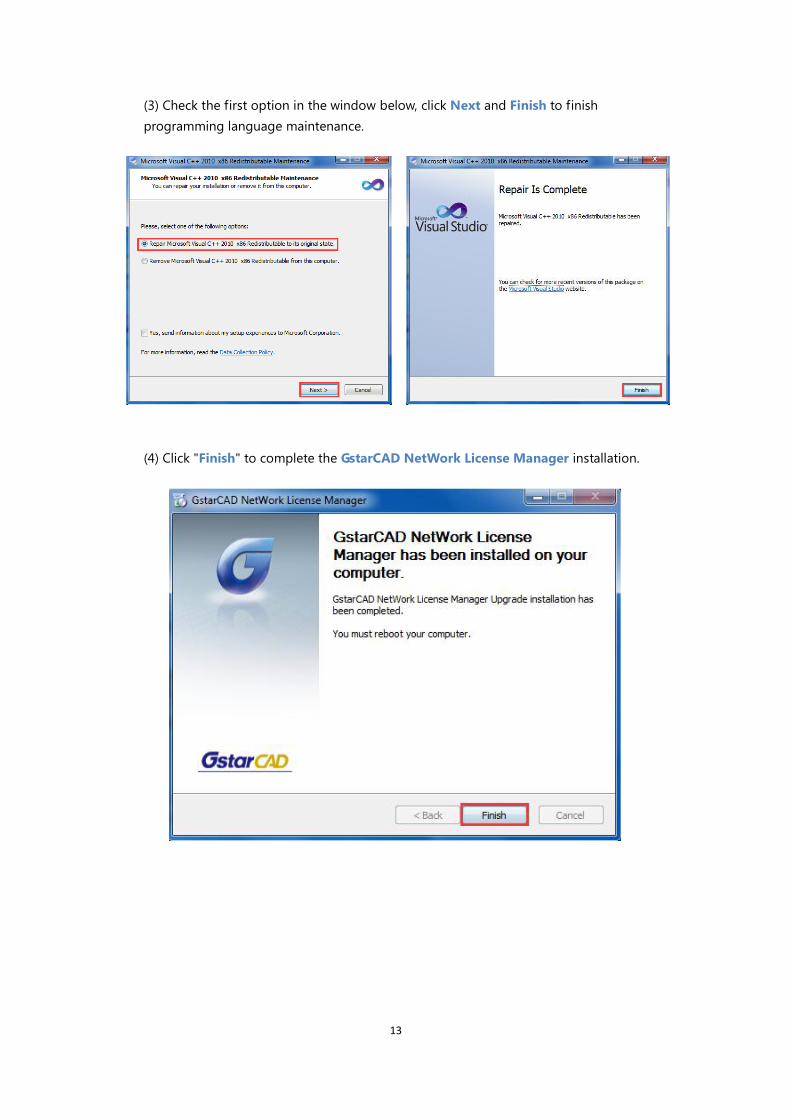
(3) Check the first option in the window below, click Next and Finish to finish
programming language maintenance.
(4) Click "Finish" to complete the GstarCAD NetWork License Manager installation.

14
3. After the installation is finished, a utility program group called “GstarCAD Network License
Manager)” is added to Windows Programs in which you will find:
GstarCAD License Manager (server): Managing the list of licenses on the server
computer.
LMTools: A tool which is used to manage license server for network.
Uninstall: Uninstall program
Click GstarCAD License Manager (server) to set license server:
4. Click to run GstarCAD License Manager (server)
5. Click Activation,the following window will pop up:

15
6. Enter Network License Serial Number which is provided to you when you purchase
GstarCAD 2016, and the quantity of License you purchased, then click Generate to generate
Application File with a file name consists of the Network License Serial Number and “.xml”
extension (e.g: 3401-DF07-0000-0100-C9D9-9801-0000-0400.xml)
7. Click Save to save the generated Application File and send the file by e-mail to your
distributor from whom you purchase GstarCAD, and you will receive an Activation File
correspondingly.
(e.g: 3401-DF07-0000-0100-C9D9-9801-0000-0400-resp-svr-act.xml).
16
8. After you receive the Activation File, restart Activate window and click Browse to apply the
Activation File.
9. Click “Activate” to finish, then you can check the product information from “GstarCAD
License Manager”.

17
1.2.2 Setting
1.2.2.1 Server Setting
1. Proceed to set LMTOOLS (This utility can only be set by Administrator)
All the information of the tabs you can keep default, you only need to operate in
Start/Stop/Reread tab to manage the server.
You can start server either manually or automatically, it is to select Start/Stop/Reread
option to control the server in Start/Stop/Reread tab or control sever automatically in
Config Services tab by checking User Services and Start Server at Power Up when start
the computer.

18
1.2.2.2 Client Setting
After the setting of server, you have connected server to user client in order to activate
GstarCAD 2016 from user client machine.
1. After finishing the installation of GstarCAD 2016 on user client machine, start GstarCAD 2016,
Welcome to GstarCAD window pops up automatically, Select a version and click Activate.
2. A GstarCAD Register window will pop up, click Next after selecting Network
Software-encryption(Flexnet).
3. Specify server IP address at Server IP Address window.
4. Click OK button to activate GstarCAD. With this client activation method, when you close
GstarCAD 2016 software ,the license will be returned to server automatically.

19
1.2.3 Borrow and Return the license on the client
What is more, GstarCAD 2016 provides the function that you can borrow and return license
from user client. This section describes how to borrow license on client. In some special case,
you need to transfer one or more than one nodes to individual computer. For example, you
need to activate GstarCAD 2016 on a laptop for a certain time, in order to bring it to other
place. It is great way to use this function.
Proceed to operate
Requirement conditions:
1. GstarCAD 2016 has to be installed on the machine or computer.
2. It has to be in a same local area network, and connect to server.
1.2.3.1 Borrow the license on the client
1. You can find the menu in start-all program:
2. Click GstarCAD License Manager, then GstarCAD License Manager window will pop up.
1. Click Borrow. Follow the introduction on your screen.

20
2. Input the Network license Serial Number in the space blank of Network license Serial
Number:(3401-DF07-0000-0100-C9D9-9801-0000-0400), the same one with the sever.
IP or Server Name:input the server IP address(like 192.168.0.66)
Expiration Date:Date to borrow and return, you just only need to fill in the date you
return because it is counted from the date when you borrow Click.
Click Borrow. Restart GstarCAD 2016, then GstarCAD 2016 succeed to activate, and you
can bring your computer to other place you want. However, the quantity of nodes is
reduced until the borrowed one is to be returned.
1.2.3.2 Return the license on the client
It is better to return the node to server if you do not need it.
1. Click GstarCAD License Manager, the following window opens. Then select the license you
want to return:

21
2. Click Return Borrowed. Then the following window open:
3. Click Return and click OK, the license you borrowed has been returned.
1.2.4 Return the Network license
After you finish the usage of network flexnet license, the following are the operation steps to
return license:
1. You can find the license manager in start-all program:
2. Click GstarCAD License Manager (server), you will get the following window:

22
3. Select Serial Number which is going to be return and click Return/Repair.
4. You will get Return/Repair window. Click Generate to get Activation Cancel File with
“-return.xml” extension.
5. Send the Activation Cancel File which you get from step 4 to your local distributor. You will
be given the Processing File with the extension -resp-svr-return.xml.
6. Reopen the License Manager (server) window. Click Browse to input Processing File
which you get from your local distributor.

23
7. Click Process to clean the data in License Manager (server).
8. You will find the license status in GstarCAD License Manager (sever) is Disable.
9. Please note that processing file “-resp-svr-return.xml” is for clearing the registration
information in the workstation which you returned the license. If you want to transfer your
license right to another workstation, please generate a new Application File “.xml” and send
to us.

24
2. Software-encryption(Flexnet) On-line Version
2.1 Stand-alone (Flexnet)
2.1.1 Stand-alone (Flexnet) Activation
2.1.1.1 Stand-alone (Flexnet) On-line Activation
Instruction: make sure your computer connect to the internet.
1. Double click the booting icon of GstarCAD 2016 and you will see the interface as below.
We provide 30 days to trial; you can also select a GstarCAD version according to your need,
and then click the “Activate” button to get a permanent license.
2.Select Stand-alone Software-encryption (Flexnet) and click the “Next” button.

25
3.Input your Serial Number and click the “Activate On-line” button.
4. After a few seconds you can see the Activation successful window, and then click the
“OK” button to finish the activation.

26
2.1.1.2 Stand-alone (Flexnet) Off-line Activation
Instruction: if your computer can not connect to the internet, you could use another one
with internet connection helping you to activate the GstarCAD 2016.
1. Double click the booting icon of GstarCAD 2016 and select a GstarCAD Version
according to your need, then click the “Activate” button to continue.
2.Select Stand-alone Software-encryption (Flexnet) and click the “Next” button.
3. Click the “click here” button to open the manual activate wizard.
27
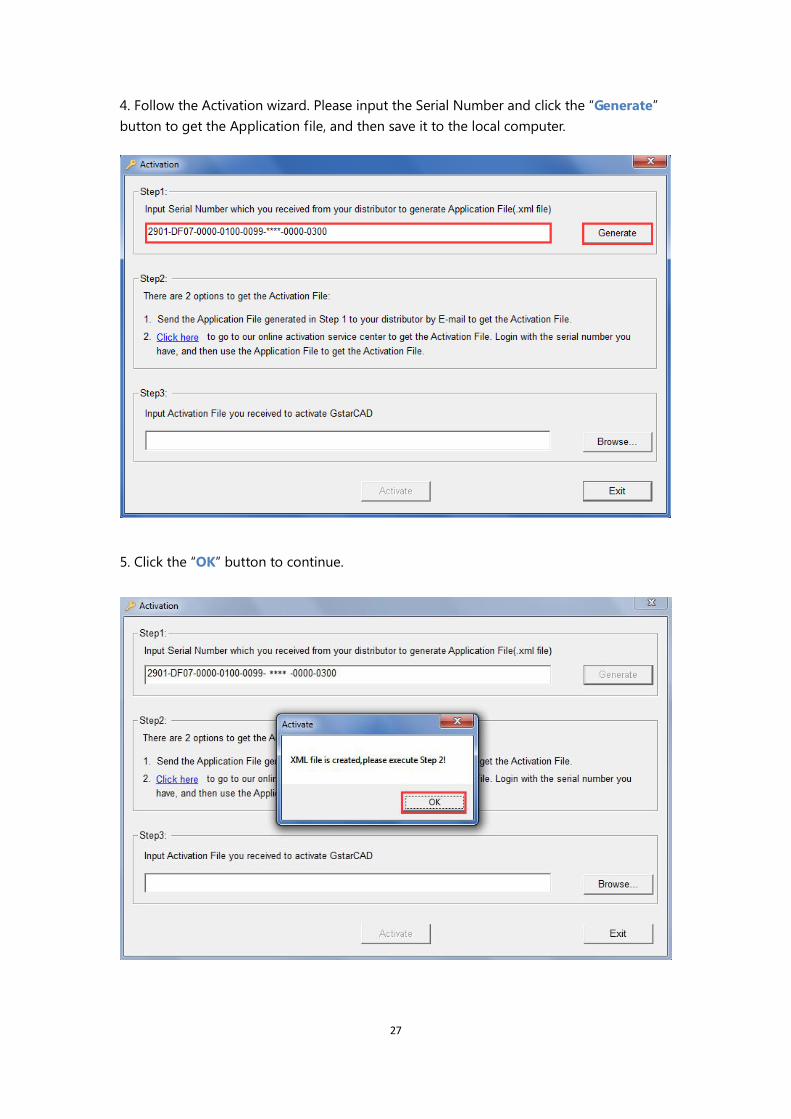
4. Follow the Activation wizard. Please input the Serial Number and click the “Generate”
button to get the Application file, and then save it to the local computer.
5. Click the “OK” button to continue.

28
6. Go to another computer with internet connection and use the Application file you have
just saved to acquire a corresponding Activation File via one of the two options as follow.
Option 1: E-mail
You can send the Application File to your distributor to get the Activation File.
Option2: online service
You can go to the GstarCAD online service center
(“http://support.gstarcad.net/flexnet/login.html”) to get the Activation File.
(1) Log in the GstarCAD online service center
(“http://support.gstarcad.net/flexnet/login.html”) by the computer with internet connection.
Input the Serial Number and click the “Login” button to continue.
(2) Click the “Activate” button to continue.
29
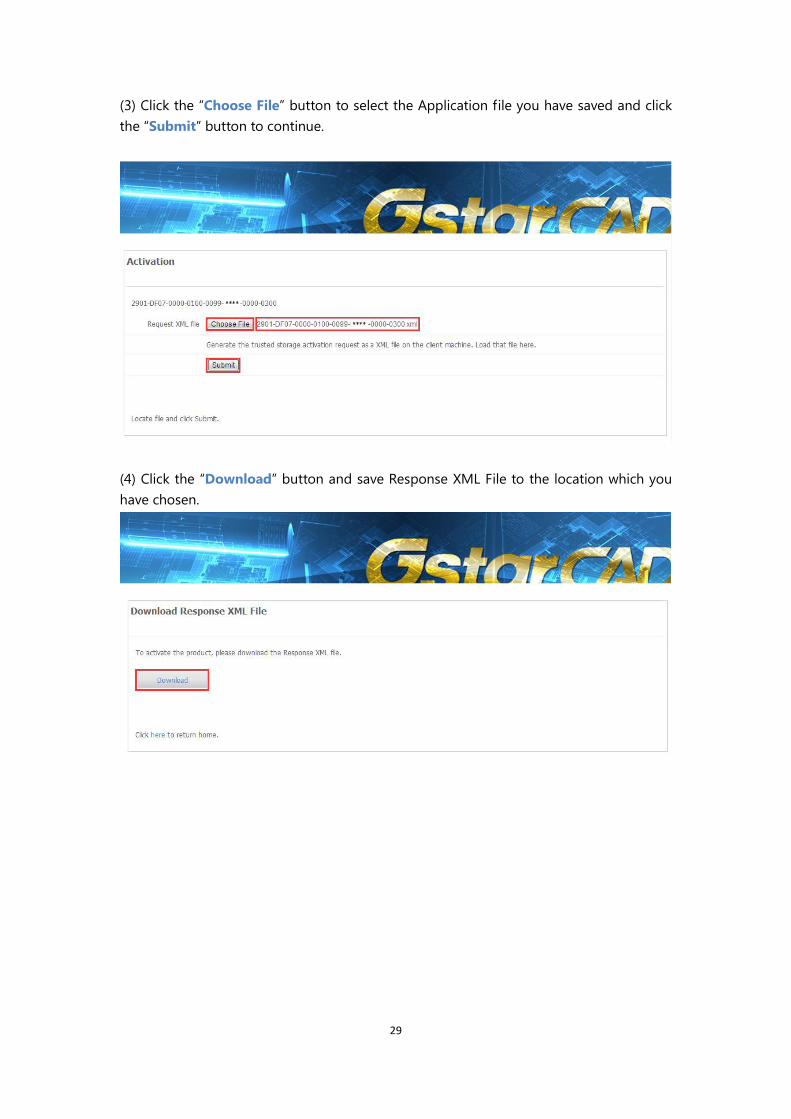
(3) Click the “Choose File” button to select the Application file you have saved and click
the “Submit” button to continue.
(4) Click the “Download” button and save Response XML File to the location which you
have chosen.

30
7. Take the Response XML File back to your computer and continue. In the Activation
wizard, please click the “Browse” button to select the Response XML File you have just
saved, and then click the “Activate” button.
8. After a few seconds you can see the Activation successful window, and then click the
“OK” button to finish the activation.

31
2.1.2 Stand-alone (Flexnet) Return the license
2.1.2.1 Stand-alone (Flexnet) On-line Return the license
Instruction: make sure your computer connect to the internet.
1. Click GstarCAD License Manager from Windows Start button>All Programs>
Gstarsoft> GstarCAD 2016.
2. Select the license which you want to return and click the “Return License” button.
3. Click the “Return On-line” button to continue.
32
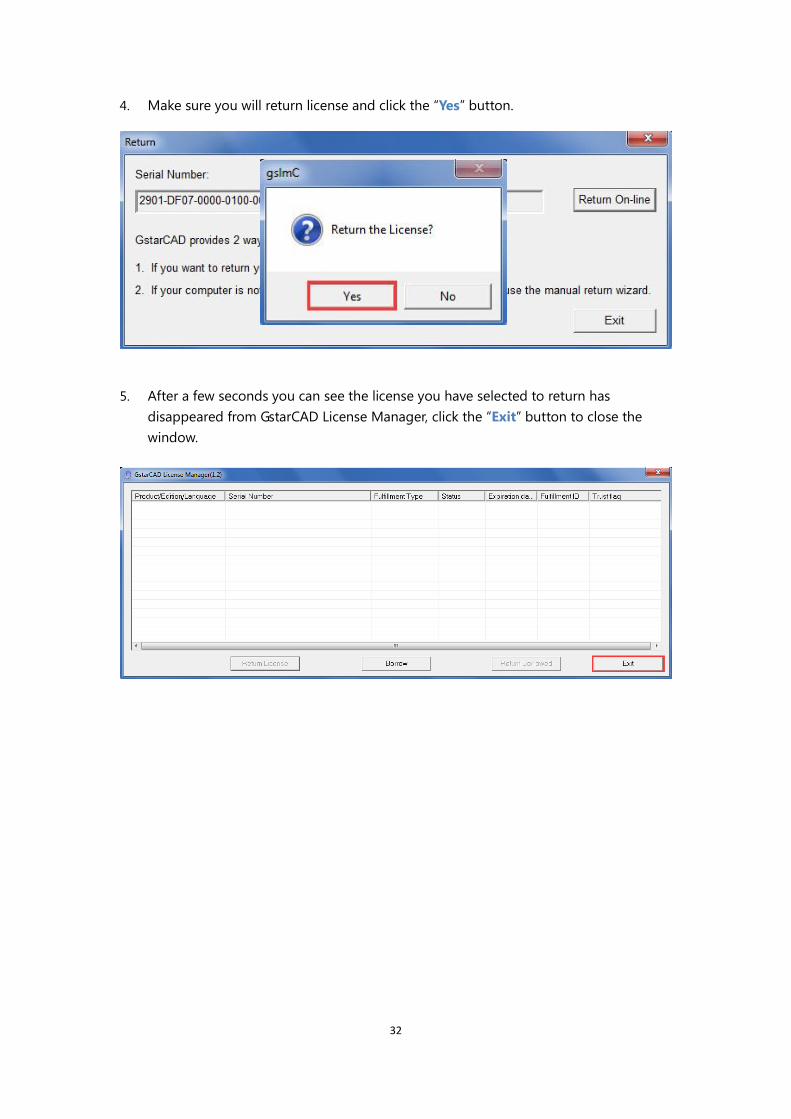
4. Make sure you will return license and click the “Yes” button.
5. After a few seconds you can see the license you have selected to return has
disappeared from GstarCAD License Manager, click the “Exit” button to close the
window.
33
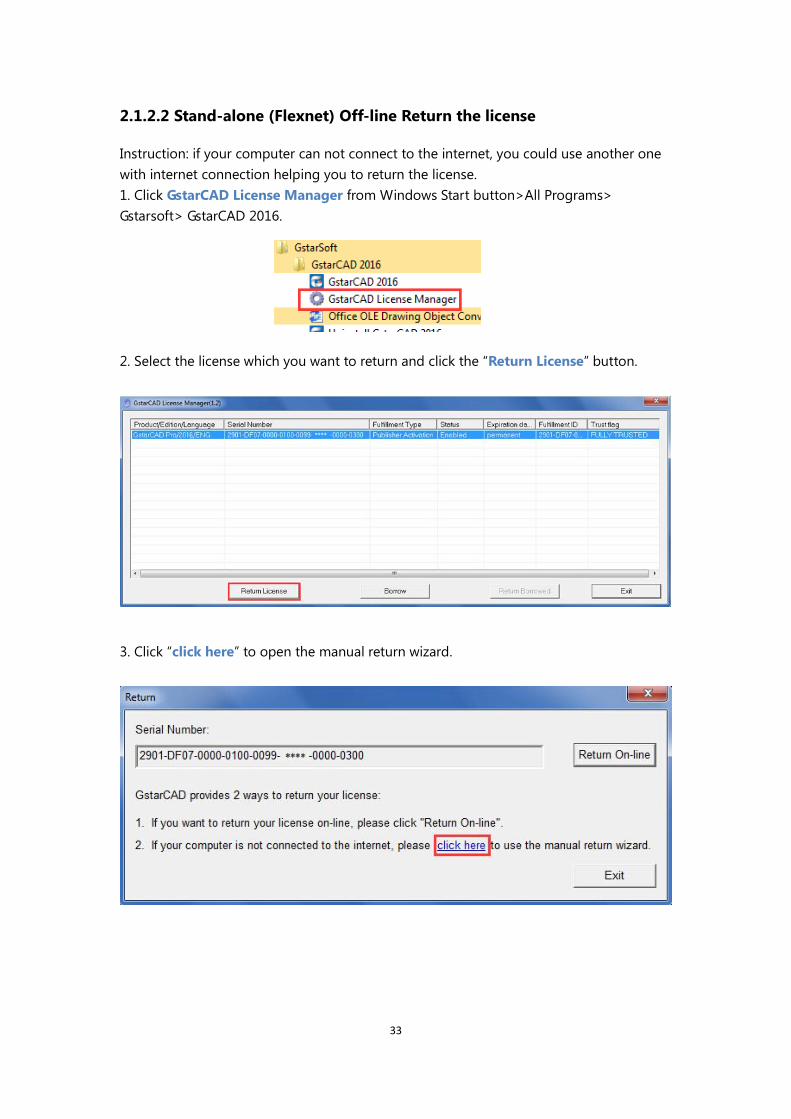
2.1.2.2 Stand-alone (Flexnet) Off-line Return the license
Instruction: if your computer can not connect to the internet, you could use another one
with internet connection helping you to return the license.
1. Click GstarCAD License Manager from Windows Start button>All Programs>
Gstarsoft> GstarCAD 2016.
2. Select the license which you want to return and click the “Return License” button.
3. Click “click here” to open the manual return wizard.
34
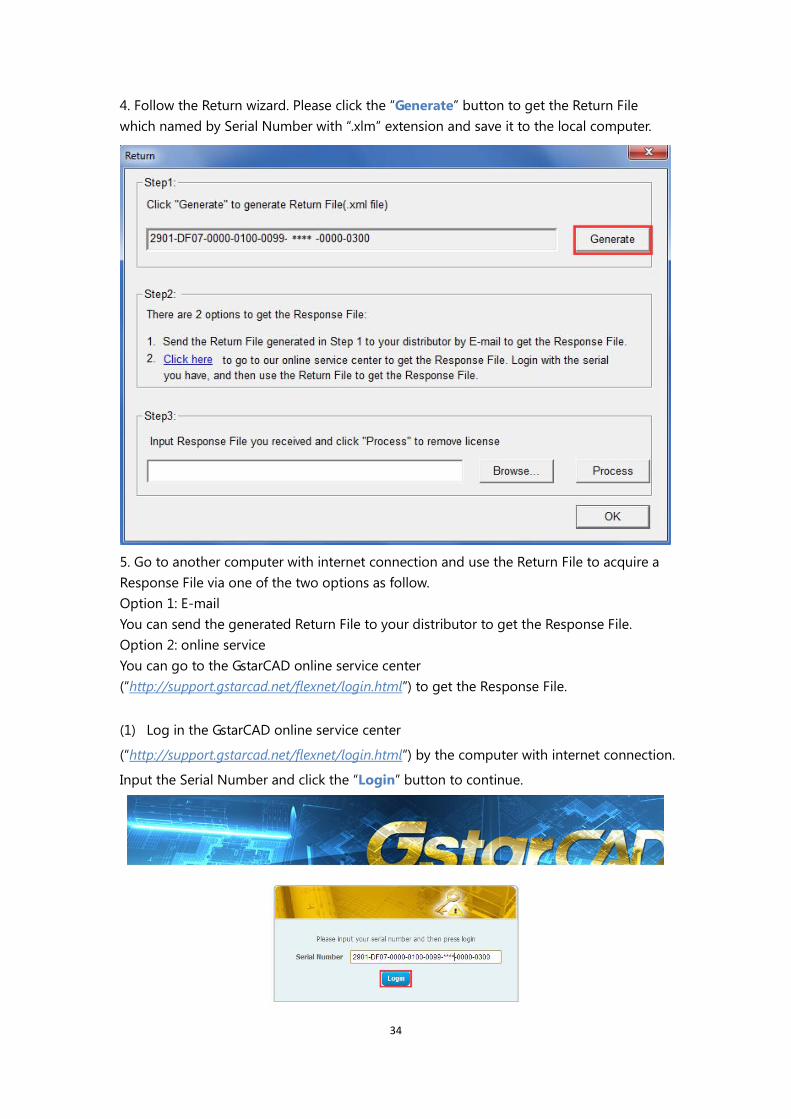
4. Follow the Return wizard. Please click the “Generate” button to get the Return File
which named by Serial Number with “.xlm” extension and save it to the local computer.
5. Go to another computer with internet connection and use the Return File to acquire a
Response File via one of the two options as follow.
Option 1: E-mail
You can send the generated Return File to your distributor to get the Response File.
Option 2: online service
You can go to the GstarCAD online service center
(“http://support.gstarcad.net/flexnet/login.html”) to get the Response File.
(1) Log in the GstarCAD online service center
(“http://support.gstarcad.net/flexnet/login.html”) by the computer with internet connection.
Input the Serial Number and click the “Login” button to continue.
35
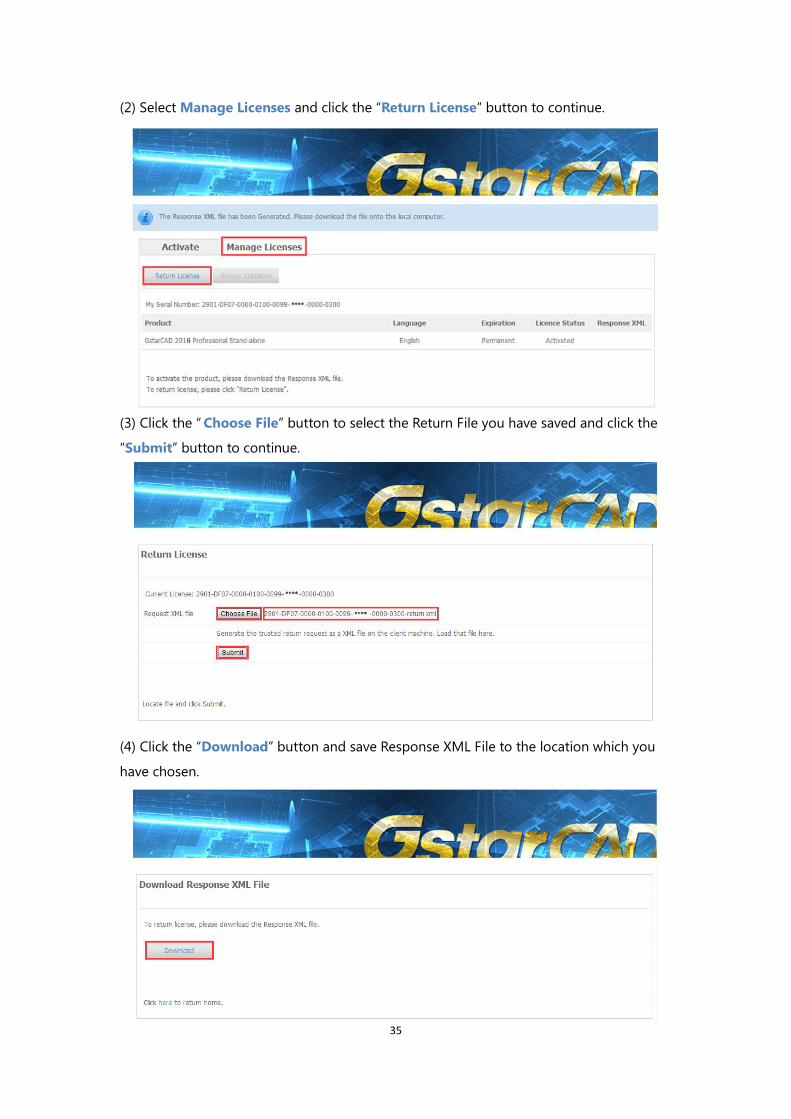
(2) Select Manage Licenses and click the “Return License” button to continue.
(3) Click the “ Choose File” button to select the Return File you have saved and click the
“Submit” button to continue.
(4) Click the “Download” button and save Response XML File to the location which you
have chosen.

36
6. Take the Response XML File back to your computer and continue. In the Return dialog
box, please click the “Browse” button to select the Response file you have just saved and
click the “Process” button.
7. Click the “OK” button and save the file named by Serial Number with
“return-Validation.xml” extension.

37
8. Then click the “OK” button to close the process Response File success window and click
the “OK” button to finish it.
9. Close the dialog box by clicking the “Exit” button.

38
2.2 Network (Flexnet)
2.2.1 Network (Flexnet) Activation
2.2.1.1 Network (Flexnet) On-line Activation
Instruction: make sure your computer connect to the internet.
1. Click “GstarCAD License Manager (server)” from Windows Start button> All
Programs> GstarCAD Network License Manager.
2. Then the following window will pop up. Click the “Activation” button.
3. Input your Serial Number and specify the quantity of license, then click the “Activate
On-line” button.

39
4. Click the “OK” button to close the Activation successful window.
5. Then click the “OK” button to finish the activation.
40
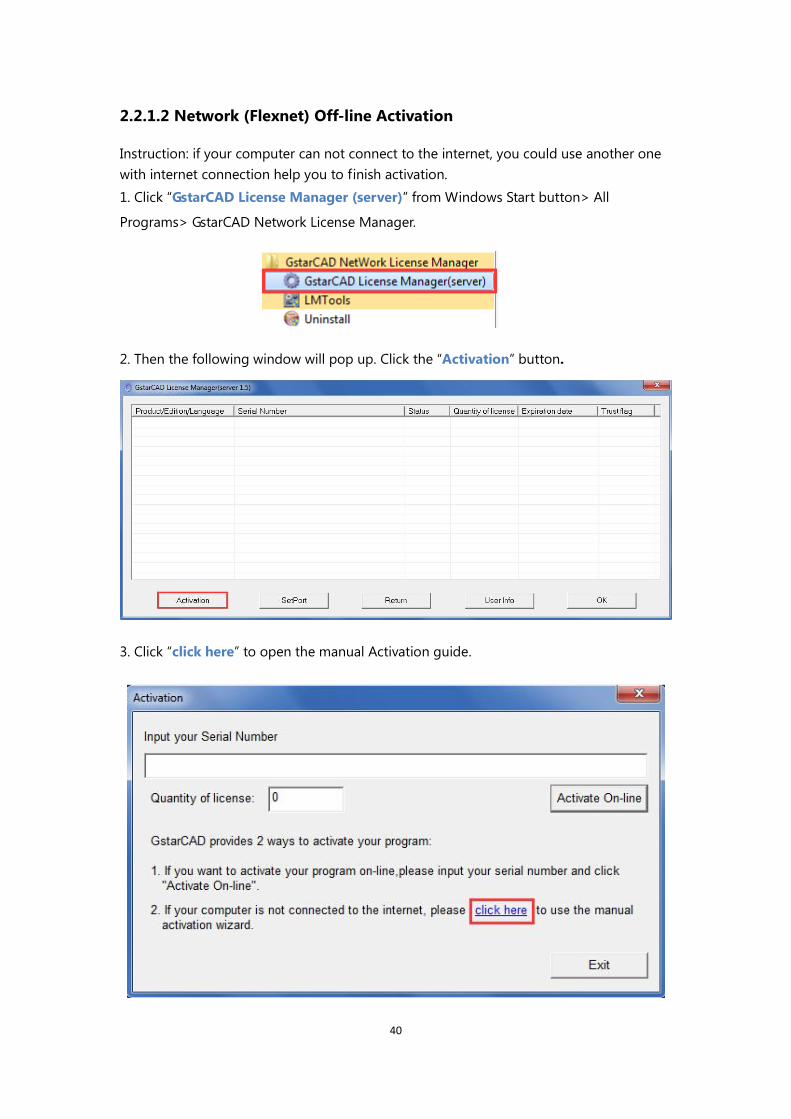
2.2.1.2 Network (Flexnet) Off-line Activation
Instruction: if your computer can not connect to the internet, you could use another one
with internet connection help you to finish activation.
1. Click “GstarCAD License Manager (server)” from Windows Start button> All
Programs> GstarCAD Network License Manager.
2. Then the following window will pop up. Click the “Activation” button.
3. Click “click here” to open the manual Activation guide.
41
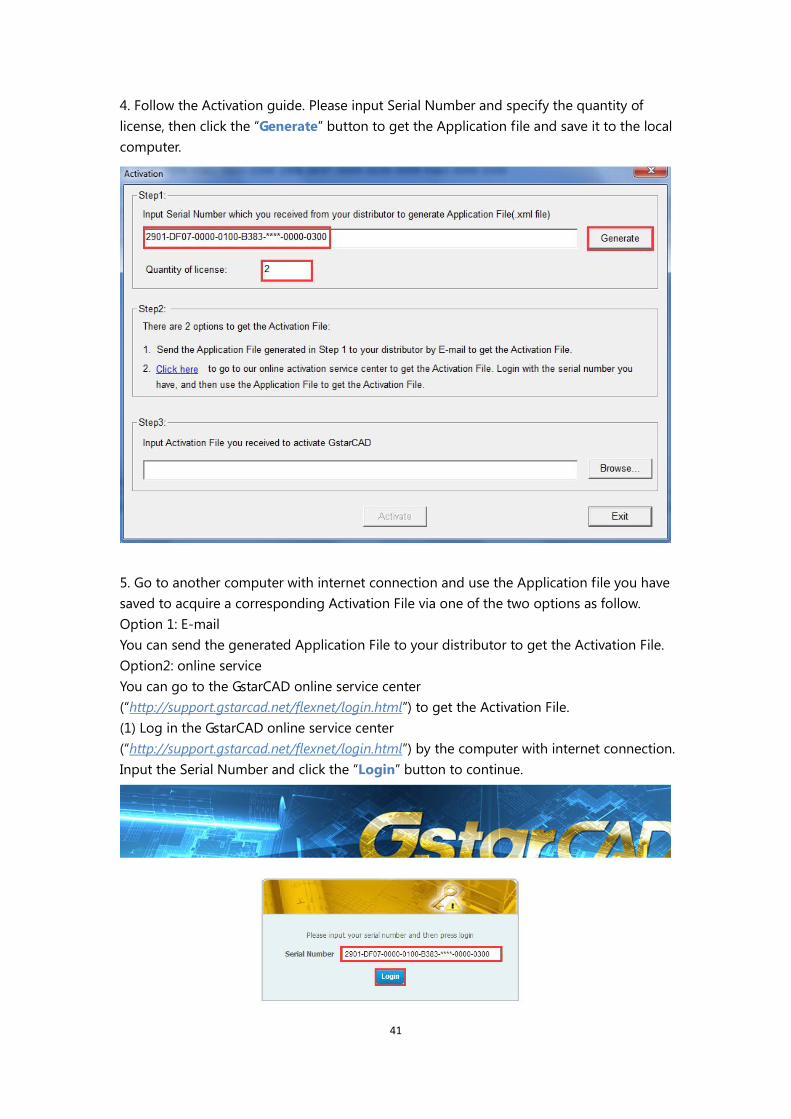
4. Follow the Activation guide. Please input Serial Number and specify the quantity of
license, then click the “Generate” button to get the Application file and save it to the local
computer.
5. Go to another computer with internet connection and use the Application file you have
saved to acquire a corresponding Activation File via one of the two options as follow.
Option 1: E-mail
You can send the generated Application File to your distributor to get the Activation File.
Option2: online service
You can go to the GstarCAD online service center
(“http://support.gstarcad.net/flexnet/login.html”) to get the Activation File.
(1) Log in the GstarCAD online service center
(“http://support.gstarcad.net/flexnet/login.html”) by the computer with internet connection.
Input the Serial Number and click the “Login” button to continue.

42
(2) Click the “Activate” button to continue.
(3) Click the “Choose File” button to select the Application File you have saved and click
“Submit” to continue.
(4) Click the “Download” button and save Response XML File to the location which you
have chosen.

43
6. Take the Response XML File back to your computer and continue. In the Activation
dialog box, please click the “Browse” button to select the Response XML File and click the
“Activate” button.
7. Then you can see the Activation successful window. Click the “OK” button to finish the
activation.

44
8. Click the “OK” button to exit.

45
2.2.2 Setting
2.2.2.1 Server Setting
1. Click “LMTools” from Windows Start button> All Programs> GstarCAD Network License
Manager.
2. Click the “Start/Stop/Reread” button to manage the server.
3. Click the “Start Server” button. Now you can turn to activate the client.
Note: you can start server either manually or automatically, it is to select
“Start/Stop/Reread” option to control the server, or control server automatically by select
User Services and Start Server at Power Up when start the computer.
46
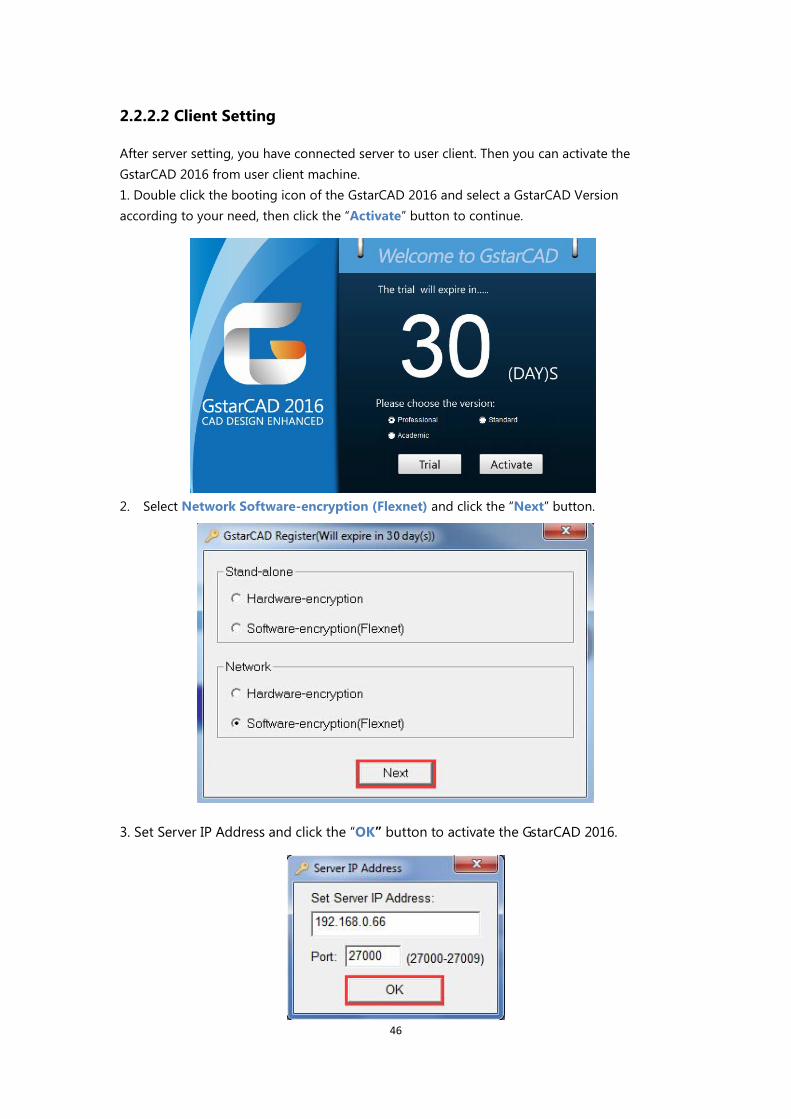
2.2.2.2 Client Setting
After server setting, you have connected server to user client. Then you can activate the
GstarCAD 2016 from user client machine.
1. Double click the booting icon of the GstarCAD 2016 and select a GstarCAD Version
according to your need, then click the “Activate” button to continue.
2. Select Network Software-encryption (Flexnet) and click the “Next” button.
3. Set Server IP Address and click the “OK” button to activate the GstarCAD 2016.

47
2.2.3 Borrow and Return the license on the client
2.2.3.1 Borrow the license on the client
1. Click “GstarCAD License Manager” from Windows Start button> All Programs>
Gstarsoft > GstarCAD 2016.
2. In the GstarCAD License Manager window, click the “Borrow” button.
3. Follow the introduction on your screen. Input the Network license Serial Number, IP or
Server Name and Expiration Data and click the “Borrow” button.
4. You have borrowed a license successfully. Click the “OK” button to close the window.
48
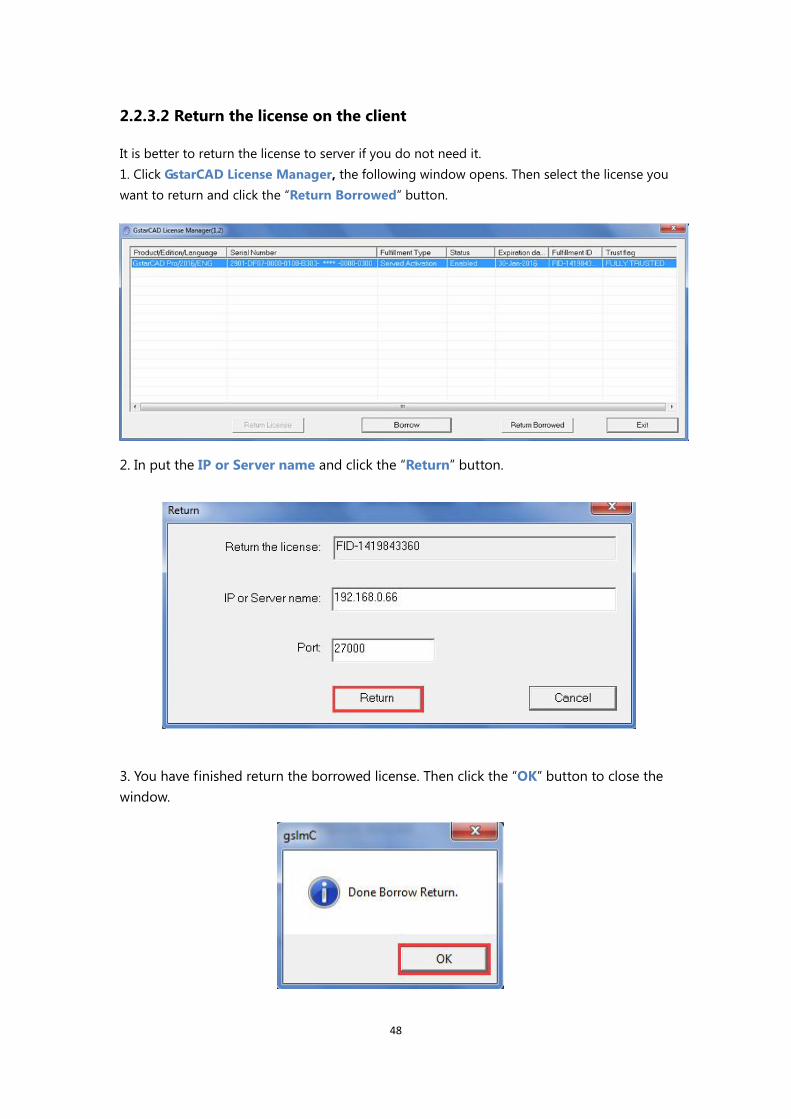
2.2.3.2 Return the license on the client
It is better to return the license to server if you do not need it.
1. Click GstarCAD License Manager, the following window opens. Then select the license you
want to return and click the “Return Borrowed” button.
2. In put the IP or Server name and click the “Return” button.
3. You have finished return the borrowed license. Then click the “OK” button to close the
window.

49
4. You can see the license you have selected to return has disappeared. Click the “Exit”
button to close the window.
2.2.4 Return the Network license
This task must be performed on the server.
Before you return the NetWork license, please make sure all the licenses applied on server
are not in use.
First step, click “LMTools” from Windows Start button> All Programs> GstarCAD Network
License Manager and click the “Stop service” button to stop the service on the server.

50
Second step, you have two options to continue: On-line return the license or Off-line
return the license. More details are shown as below.
2.2.4.1 Network (Flexnet) On-line Return the license
Instruction: make sure your computer connect to the internet.
1. Click “GstarCAD License Manager (server)” from Windows Start button> All
Programs> GstarCAD Network License Manager.
2. Select the license you want to return and click the “Return” button.
3. The following window will pop up, and then click the “Return On-line” button to
continue.
51
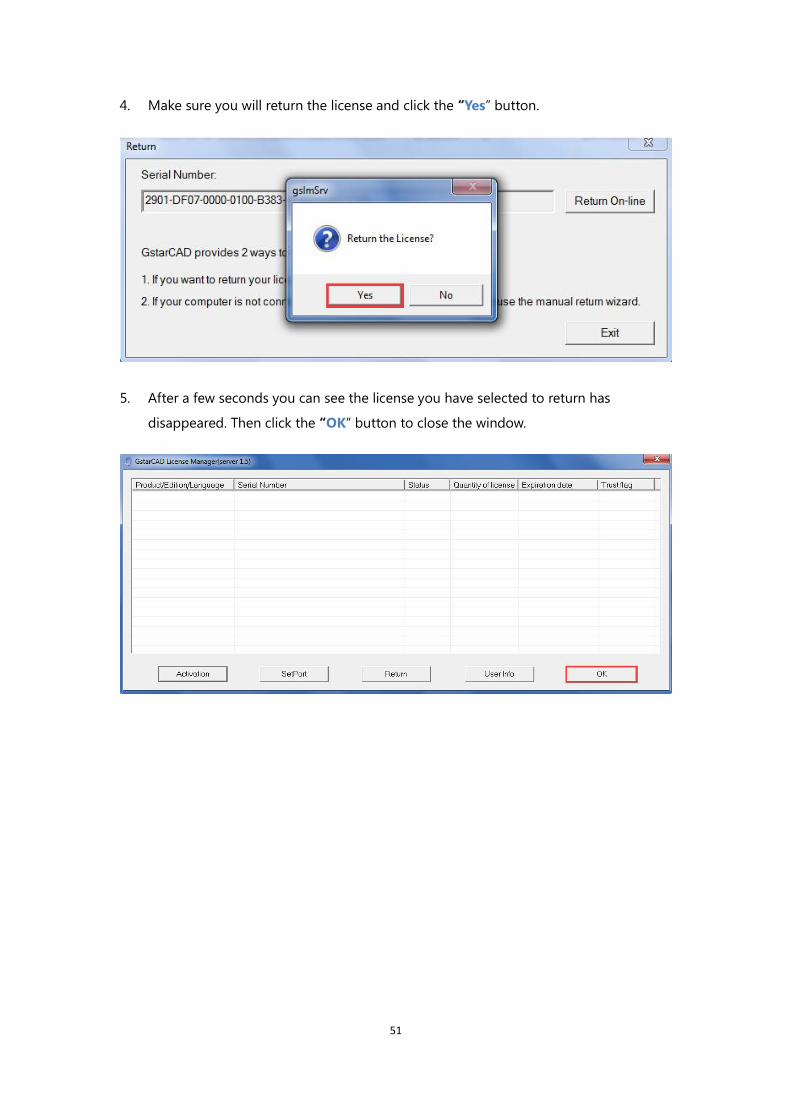
4. Make sure you will return the license and click the “Yes” button.
5. After a few seconds you can see the license you have selected to return has
disappeared. Then click the “OK” button to close the window.

52
2.2.4.2 Network (Flexnet) Off-line Return the license
Instruction: if your computer can not connect to the internet, you could use another one
with internet connection helping you to return the license.
1. Click “GstarCAD License Manager (server)” from Windows Start button> All
Programs> GstarCAD Network License Manager.
2. The following window will pop up. Then select the license you want to return and click
the “Return” button.
3. Click the “click here” button to open the manual return wizard.

53
4. Follow the Return wizard. Please click “Generate” to get the Return File which named by
Serial Number with “.xlm” extension and save it to the local computer.
5. Go to another computer with internet connection and use the Return File to acquire the
Response File via one of the two options as follow.
Option 1: E-mail
You can send the Return file to your distributor to get the Response File.
Option2: online service
You can go to the GstarCAD online service center
(“http://support.gstarcad.net/flexnet/login.html”) to get the Response File.
(1) Log in the GstarCAD online service center
(“http://support.gstarcad.net/flexnet/login.html”) by the computer with internet connection.
(2) Input the Serial Number and click the “Login” button to continue.

54
(3) Select “Manage Licenses” and click the “Return License” button to continue.
(4) Click the “Browse” button to select the Return File you have saved and click the
“Submit” button to continue.
(5) Click the “Download” button and save Response XML File to the location which you
have chosen.

55
6. Take the Response XML File back to your computer and continue. Follow the Return
wizard and click the “Browse” button to select the Response XML File you have just saved,
and then click the “Process” button.
7. Click the “OK” button and send the file named by serial number with
“return-Validation.xml” extension to your distributor.
56
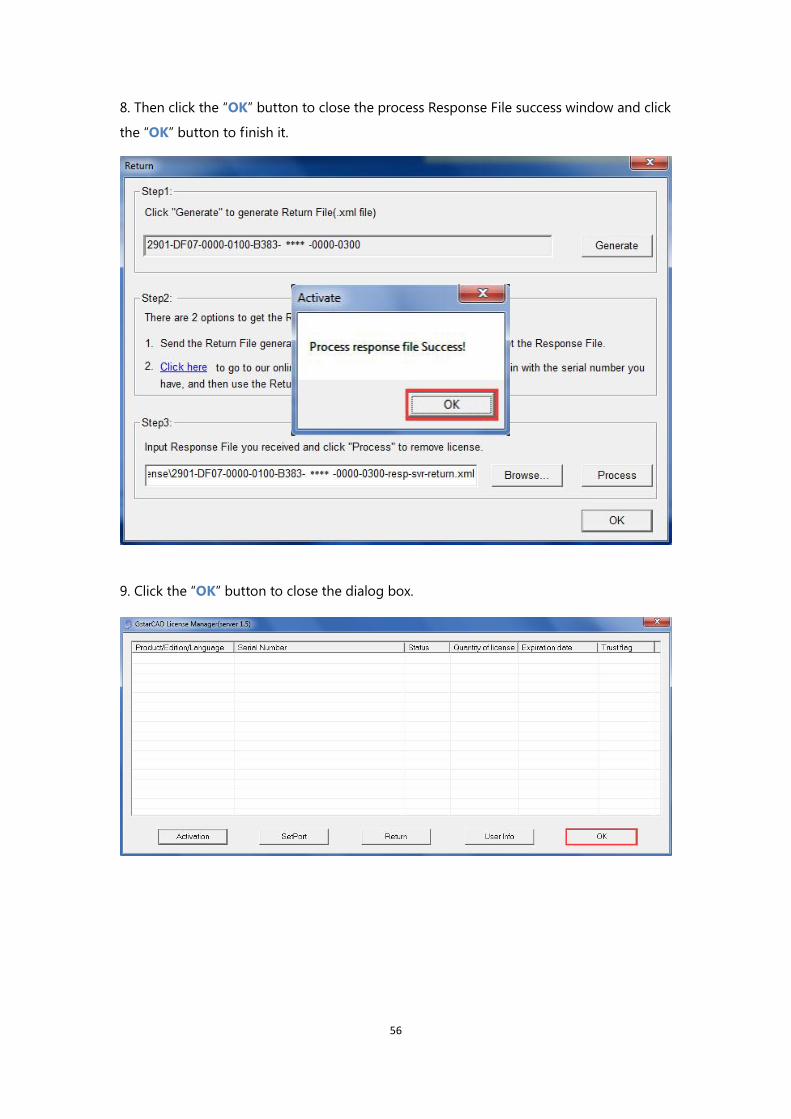
8. Then click the “OK” button to close the process Response File success window and click
the “OK” button to finish it.
9. Click the “OK” button to close the dialog box.

57
Part two: Hardware-encryption (USB Dongle) Version
1. Stand-alone (USB Dongle) Activation
1. Start GstarCAD 2016 after the installation and insert dongle to USB interface, and then the
Welcome to GstarCAD window will pop up, Select the version you need and click the
“Activate” button.
2. Select Hardware-encryption of Stand-alone and click the “Next” button to activate
GstarCAD 2016.

58
2. Network (USB Dongle) Activation
Sever Setting
You need to specify server computer and install network driver of the USB dongle . Insert the
network dongle to USB interface after the installation of GstarCAD 2016. The dongle will be
recognized automatically.
Client Setting
1. In a same local area network, start GstarCAD 2016 and then the Welcome to GstarCAD
window will pop up, Select the version and click the “Activate” button.
2. The GstarCAD Register window opens. Please select Hardware-encryption of Network
and click the “Next” button.

59
3. Specify the IP address of server and click the “OK” button and restart GstarCAD 2016 to
activate.
Note: The quantity of nodes is reduced in server until the one using in client is to be returned.