GSR Reference Station Software Reference Manual - Sokkia · GSR Reference Station Software...
84
Reference Manual GSR Reference Station Software GNSS Reference Station
-
Upload
hoangkhanh -
Category
Documents
-
view
298 -
download
0
Transcript of GSR Reference Station Software Reference Manual - Sokkia · GSR Reference Station Software...
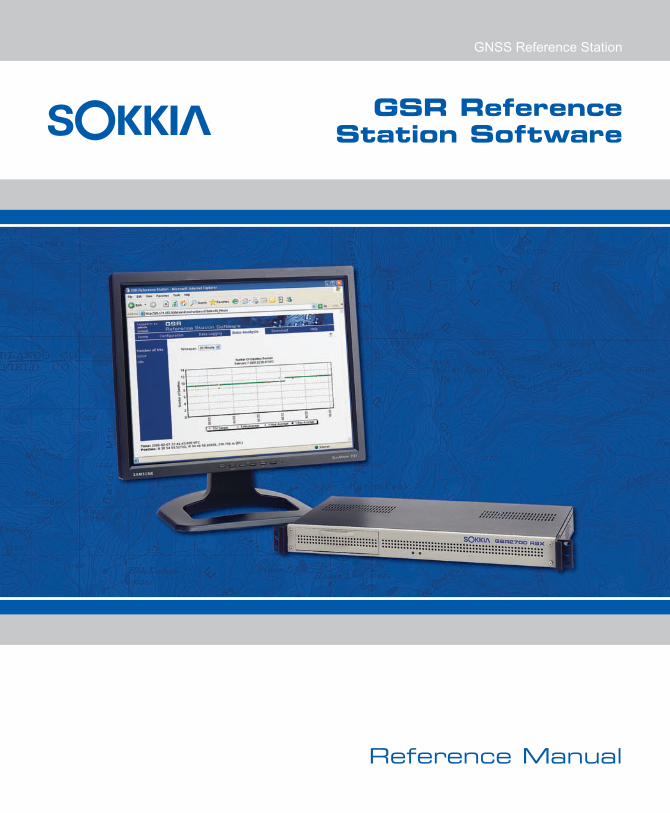
Reference Manual
GSR Reference Station Software
GNSS Reference Station

Tplljb
Preliminary—For Internal Use Only
GNSS Reference Station
GSR ReferenceStation Software
Version 7.2.1
Reference Manual

Preliminary—For Internal Use Only
© 2007 POINT, Inc. All rights reserved.
Printed in the U.S.A.
The software in this product is copyright protected and POINT, Inc. reserves all rights. Each licensed copy of the software allows the licensed user to solely execute the programs. Failure to comply with the provisions of this product's license agreement is a violation of copyright law.
The information in this document is subject to change without notice, and is supplied without warranty of any kind. POINT, Inc. assumes no responsibility or liability arising from the supply or use of theinformation in this document.
No part of this publication may be reproduced, translated, stored in a retrieval system, or transmitted in any form or means (electronic, photocopy, record, or otherwise) without prior written permission from POINT, Inc. The copyright laws of the United States of America (“U.S.A.”) and/or the jurisdiction where you are located determine any limits or restrictions of your rights with regard to this publication.
SOKKIA® and Spectrum® are registered trademarks of SOKKIA Co., Ltd. SDR® is a registeredtrademark of POINT, Inc. The following are trademarks or registered trademarks of their respective organizations:
Firefox® is a registered trademark of the Mozilla Foundation.
Netscape® is a registered trademark of Netscape Communications Corporation.
Windows® is a registered trademark of Microsoft Corporation.
All other product and brand names are trademarks or registered trademarks of their respective holders.
POINT, Inc.16900 West 118th TerraceOlathe, Kansas 66061 U.S.A.www.point-inc.com
Part Number: 750-1-0056Rev 2A14 JUN 2007
GSR Reference Station Software Reference Manual i
Preliminary—For Internal Use Only
Chapter 1: Introduction 1
1.1 About the GSR Reference Station Software................................................11.2 What’s New in Version 7.2.1........................................................................21.3 Document Conventions................................................................................21.4 Obtaining Technical Assistance...................................................................3
Chapter 2: Installing the Software 5
2.1 System Requirements..................................................................................52.2 Installing the GSR Reference Station Software ...........................................62.3 Activating the Software ..............................................................................12
Chapter 3: Getting Started 15
3.1 Getting Started Workflow ...........................................................................153.2 Quick Start Procedure................................................................................163.3 Quick Start: Day-to-Day Use......................................................................19
Chapter 4: Setting Up Site Access 21
4.1 Users and Access Levels...........................................................................214.2 Default Accounts........................................................................................224.3 Setting Up User Accounts..........................................................................23
4.3.1 Adding administrator accounts ................................................................... 234.3.2 Adding client accounts................................................................................ 24
4.4 Defining Public Access Rights ...................................................................274.5 Enabling RTK Data Streaming...................................................................274.6 Modifying Accounts....................................................................................284.7 Changing Passwords .................................................................................294.8 Deleting Accounts ......................................................................................29
Contents
ii GSR Reference Station Software Reference Manual
ContentsPreliminary—For Internal Use Only
Chapter 5: Entering Site Information 31
5.1 Entering Station Properties ........................................................................315.2 Entering Site Contact Information ..............................................................33
Chapter 6: Collecting Data 35
6.1 Setting Up Data Logging Schedules ..........................................................356.1.1 Configuring Logging to a File ..................................................................... 366.1.2 Configuring Correction Output to a COM Port ........................................... 39
6.2 Activating a Data Logging Session ............................................................406.3 Deactivating a Session ..............................................................................416.4 Specifying RINEX Header Information.......................................................41
Chapter 7: Analyzing and Downloading Data 43
7.1 Analyzing Data...........................................................................................437.2 Downloading Collected Data......................................................................45
Chapter 8: Configuring NTRIP Connections 49
8.1 Setting Up as an NTRIP Caster Site..........................................................498.1.1 Adding Source Accounts............................................................................ 508.1.2 Configuring NTRIP Caster Ports ................................................................ 518.1.3 Modifying an NTRIP source account ......................................................... 528.1.4 Deleting an NTRIP source account............................................................ 52
8.2 Setting Up NTRIP Server Data Streams....................................................538.2.1 Adding an NTRIP Server Data Stream ...................................................... 538.2.2 Modifying an NTRIP server data stream.................................................... 558.2.3 Deleting an NTRIP server data stream ...................................................... 55
8.3 Setting Up the Site as a Source for the Caster ..........................................55
Chapter 9: Site Administration and Maintenance 57
9.1 Viewing Active Connections and Statistics ................................................579.1.1 Active Connections .................................................................................... 579.1.2 Connection Statistics ................................................................................. 58
9.2 Viewing Download Statistics ......................................................................59
Contents
GSR Reference Station Software Reference Manual iii
Preliminary—For Internal Use Only
9.3 Managing Disk Space ................................................................................609.3.1 Configuring Disk Maintenance Settings...................................................... 609.3.2 Manually Deleting Files .............................................................................. 61
9.4 Monitoring System Events .........................................................................639.5 Entering Commands ..................................................................................649.6 Restarting the Server .................................................................................649.7 Reloading Receiver Firmware....................................................................659.8 Updating the Software ...............................................................................669.9 Reconfiguring the COM Port Setting..........................................................679.10 Setting an Advisory Message ....................................................................69
Index 71

GSR Reference Station Software Reference Manual 1
Preliminary—For Internal Use Only
Introduction
This manual provides instructions for installing the GSR Reference Station Software and using the software to communicate with the GSR2700 RS/RSX receiver or other SOKKIA GPS/GNSS receivers (GSR2700 ISX, GSR2700 IS, Radian IS, GSR2600, or GSR2650 LB). It describes how to use the software’s web interface to configure access to your reference station data.
1.1 About the GSR Reference Station Software
The GSR Reference Station Software is a high-performance reference station system designed to collect GPS+GLONASS and RTK data from a base station location to provide surveyors and other users with high-accuracy positioning information. The system is designed to generate a range of data from a base station for GPS/GNSS and GIS mapping services, including:
• Differential corrections for RTK surveys over any geographic region
• Raw data retrieval for survey post-processing
• Site monitoring (for example, for raw observation analysis and stability monitoring)
With the intuitive website interface that can be installed and operated locally or at a remote location, you can set up the software to log data continuously or to collect data on automated schedules.
The collected base station data can be accessed by users directly from the GSR Reference Station Software website, through a cellular phone connection, through an FTP site, or from an NTRIP caster site.
The website can also operate as an NTRIP caster site, accepting RTK data from other NTRIP sources and serving it from a single source.
Chapter 1
Chapter 1 Introduction
2 GSR Reference Station Software Reference Manual
Preliminary—For Internal Use Only
1.2 What’s New in Version 7.2.1
The following new features are included in this release:
• GLONASS support (when used with a GLONASS receiver).
• Support for configuring the website as an NTRIP caster site, accepting NTRIP data streams from other NTRIP sources and allowing users to log in and receive RTK correction data.
• Support for up to five TCP-based RTK data streams using raw data formats (no login required).
• Ability to simultaneously send RTK and DGPS data to the receiver’s COM2 port.
1.3 Document Conventions
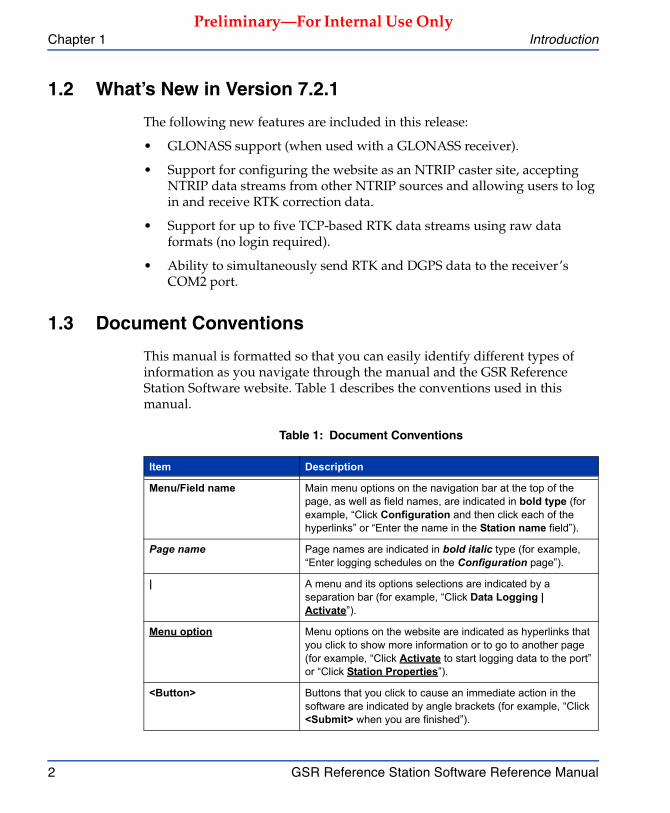
This manual is formatted so that you can easily identify different types of information as you navigate through the manual and the GSR Reference Station Software website. Table 1 describes the conventions used in this manual.
Table 1: Document Conventions
Item Description
Menu/Field name Main menu options on the navigation bar at the top of the page, as well as field names, are indicated in bold type (for example, “Click Configuration and then click each of the hyperlinks” or “Enter the name in the Station name field”).
Page name Page names are indicated in bold italic type (for example, “Enter logging schedules on the Configuration page”).
| A menu and its options selections are indicated by a separation bar (for example, “Click Data Logging | Activate”).
Menu option Menu options on the website are indicated as hyperlinks that you click to show more information or to go to another page (for example, “Click Activate to start logging data to the port” or “Click Station Properties”).
<Button> Buttons that you click to cause an immediate action in the software are indicated by angle brackets (for example, “Click <Submit> when you are finished”).
Introduction Chapter 1
GSR Reference Station Software Reference Manual 3
Preliminary—For Internal Use Only
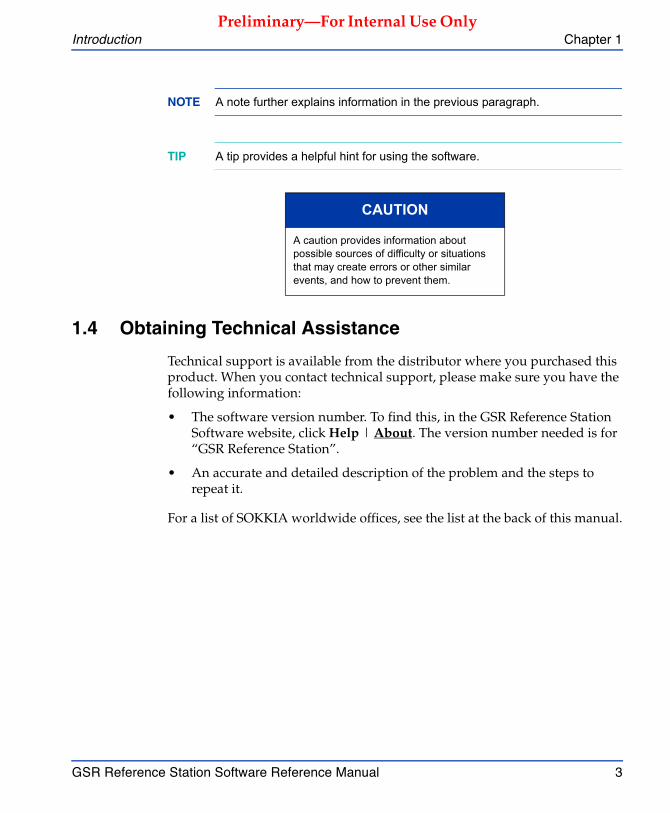
NOTE A note further explains information in the previous paragraph.
TIP A tip provides a helpful hint for using the software.
1.4 Obtaining Technical Assistance
Technical support is available from the distributor where you purchased this product. When you contact technical support, please make sure you have the following information:
• The software version number. To find this, in the GSR Reference Station Software website, click Help | About. The version number needed is for “GSR Reference Station”.
• An accurate and detailed description of the problem and the steps to repeat it.
For a list of SOKKIA worldwide offices, see the list at the back of this manual.
CAUTION
A caution provides information about possible sources of difficulty or situations that may create errors or other similar events, and how to prevent them.

GSR Reference Station Software Reference Manual 5
Preliminary—For Internal Use Only
Installing the Software
This chapter describes how to install, register, and activate the GSR Reference Station Software.
2.1 System Requirements
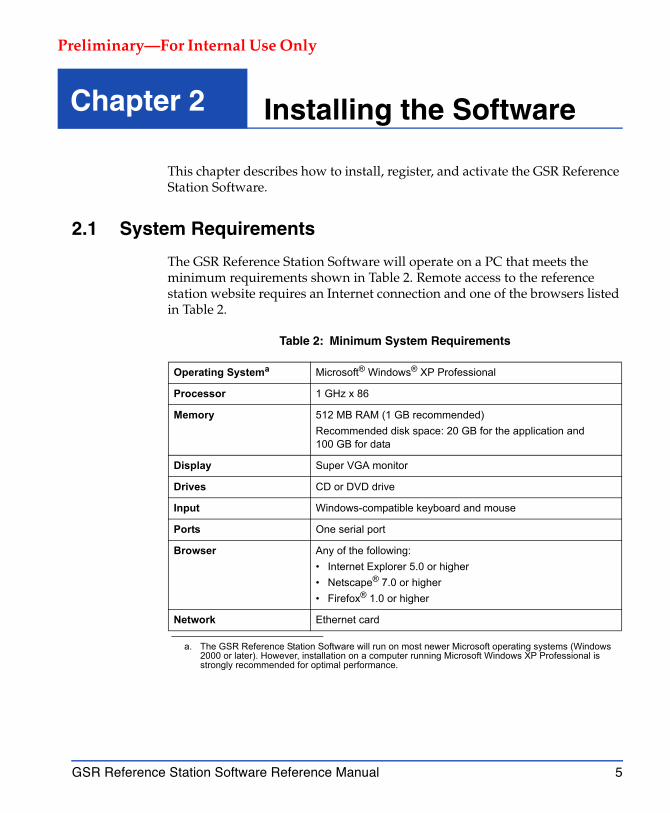
The GSR Reference Station Software will operate on a PC that meets the minimum requirements shown in Table 2. Remote access to the reference station website requires an Internet connection and one of the browsers listed in Table 2.
Table 2: Minimum System Requirements
Operating Systema
a. The GSR Reference Station Software will run on most newer Microsoft operating systems (Windows 2000 or later). However, installation on a computer running Microsoft Windows XP Professional is strongly recommended for optimal performance.
Microsoft® Windows® XP Professional
Processor 1 GHz x 86
Memory 512 MB RAM (1 GB recommended)Recommended disk space: 20 GB for the application and100 GB for data
Display Super VGA monitor
Drives CD or DVD drive
Input Windows-compatible keyboard and mouse
Ports One serial port
Browser Any of the following:• Internet Explorer 5.0 or higher• Netscape® 7.0 or higher• Firefox® 1.0 or higher
Network Ethernet card
Chapter 2
Chapter 2 Installing the Software
6 GSR Reference Station Software Reference Manual
Preliminary—For Internal Use Only
2.2 Installing the GSR Reference Station Software
Complete the following steps to install the GSR Reference Station Software from the product CD.
If you have purchased the GSR2700 RSX, the software is pre-installed—proceed to Section 2.3, Activating the Software, page 12.
NOTE We recommend that you accept the default directory paths throughout the installation.
1. Log in to the computer as an administrator.
If version 5.1.1 of the software is installed on the computer, you will need to back up specific files and data before starting to install the software. (If version 6.3.1 of the software is installed, or there is no previous version installed, skip to step 2.)
NOTE The data will be deleted upon installation, so you must back it up if you wish to reuse it.
To back up the necessary files and data, complete these steps:
• Create a backup folder (for example, C:\GSR_Backup).
• Navigate to C:\GSR-Reference-Station (or other location, if you modified the destination for Web Pages during your original installation) and copy the Data folder to the backup folder you created in the previous step. This folder contains GPS files and grapher plots.
• Navigate to C:\GSR-Reference-Station\web\GSR-Reference-Station\ripnode and copy the gsr.db file to the backup folder. This file contains the user account data.
• Navigate to your GSR Reference Station website and select Configuration. Make note of the Latitude, Longitude, and Height of your site. Save this information so you can re-enter it after you have installed the software.
2. Insert the GSR Reference Station Software product CD in your computer’s CD drive.
Installing the Software Chapter 2
GSR Reference Station Software Reference Manual 7
Preliminary—For Internal Use Only
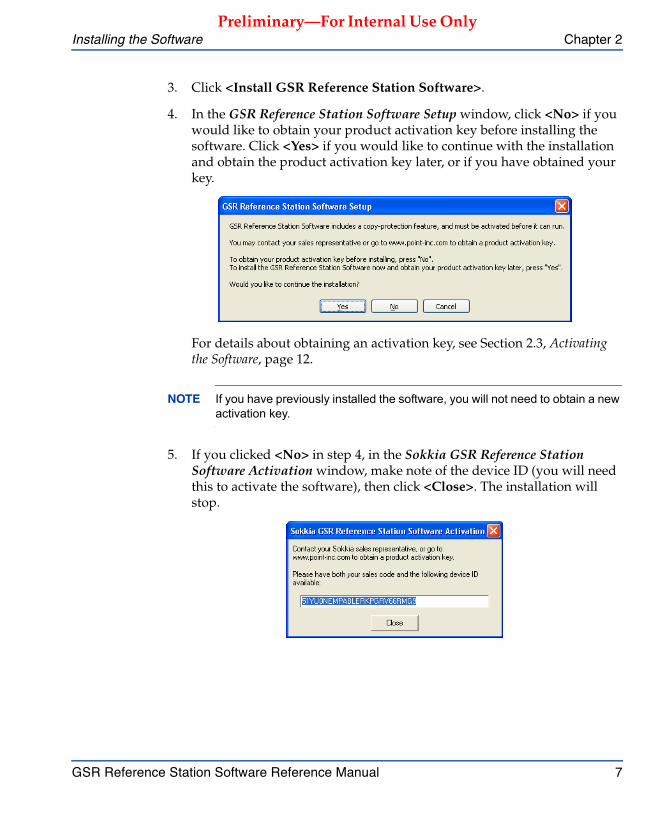
3. Click <Install GSR Reference Station Software>.
4. In the GSR Reference Station Software Setup window, click <No> if you would like to obtain your product activation key before installing the software. Click <Yes> if you would like to continue with the installation and obtain the product activation key later, or if you have obtained your key.
For details about obtaining an activation key, see Section 2.3, Activating the Software, page 12.
NOTE If you have previously installed the software, you will not need to obtain a new activation key.
5. If you clicked <No> in step 4, in the Sokkia GSR Reference Station Software Activation window, make note of the device ID (you will need this to activate the software), then click <Close>. The installation will stop.
Chapter 2 Installing the Software
8 GSR Reference Station Software Reference Manual
Preliminary—For Internal Use Only
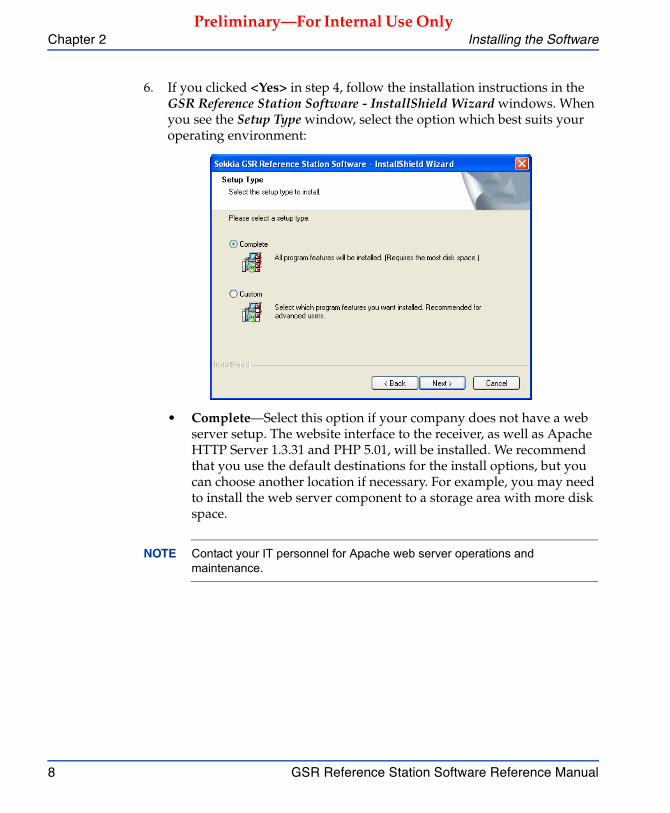
6. If you clicked <Yes> in step 4, follow the installation instructions in the GSR Reference Station Software - InstallShield Wizard windows. When you see the Setup Type window, select the option which best suits your operating environment:
• Complete—Select this option if your company does not have a web server setup. The website interface to the receiver, as well as Apache HTTP Server 1.3.31 and PHP 5.01, will be installed. We recommend that you use the default destinations for the install options, but you can choose another location if necessary. For example, you may need to install the web server component to a storage area with more disk space.
NOTE Contact your IT personnel for Apache web server operations and maintenance.
Installing the Software Chapter 2
GSR Reference Station Software Reference Manual 9
Preliminary—For Internal Use Only
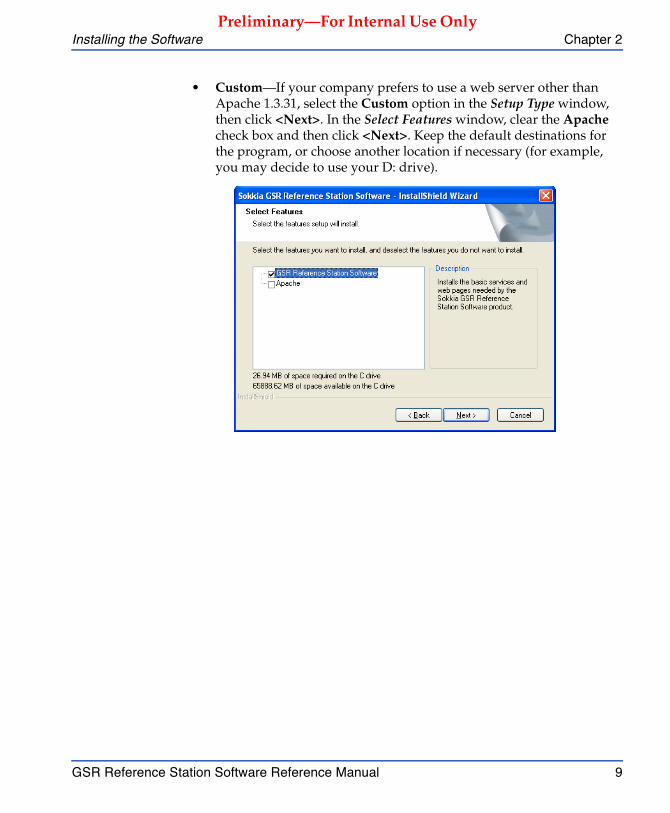
• Custom—If your company prefers to use a web server other than Apache 1.3.31, select the Custom option in the Setup Type window, then click <Next>. In the Select Features window, clear the Apache check box and then click <Next>. Keep the default destinations for the program, or choose another location if necessary (for example, you may decide to use your D: drive).
Chapter 2 Installing the Software
10 GSR Reference Station Software Reference Manual
Preliminary—For Internal Use Only
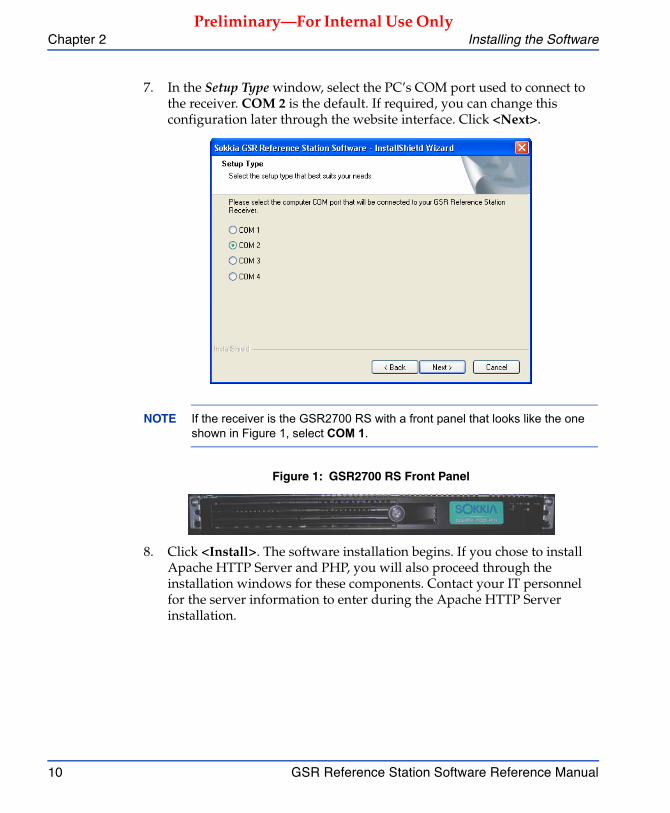
7. In the Setup Type window, select the PC’s COM port used to connect to the receiver. COM 2 is the default. If required, you can change this configuration later through the website interface. Click <Next>.
NOTE If the receiver is the GSR2700 RS with a front panel that looks like the one shown in Figure 1, select COM 1.
Figure 1: GSR2700 RS Front Panel
8. Click <Install>. The software installation begins. If you chose to install Apache HTTP Server and PHP, you will also proceed through the installation windows for these components. Contact your IT personnel for the server information to enter during the Apache HTTP Server installation.
Installing the Software Chapter 2
GSR Reference Station Software Reference Manual 11
Preliminary—For Internal Use Only
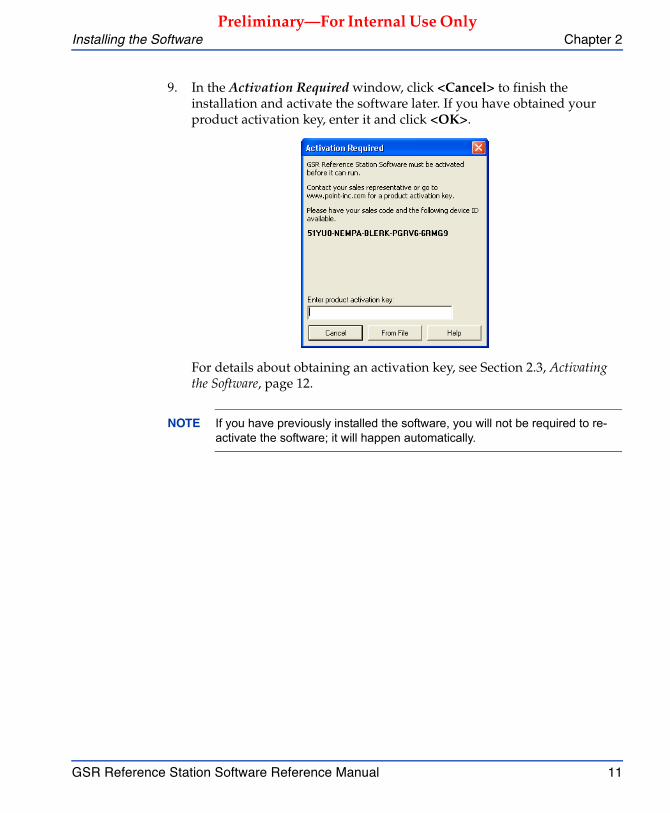
9. In the Activation Required window, click <Cancel> to finish the installation and activate the software later. If you have obtained your product activation key, enter it and click <OK>.
For details about obtaining an activation key, see Section 2.3, Activating the Software, page 12.
NOTE If you have previously installed the software, you will not be required to re-activate the software; it will happen automatically.
Chapter 2 Installing the Software
12 GSR Reference Station Software Reference Manual
Preliminary—For Internal Use Only
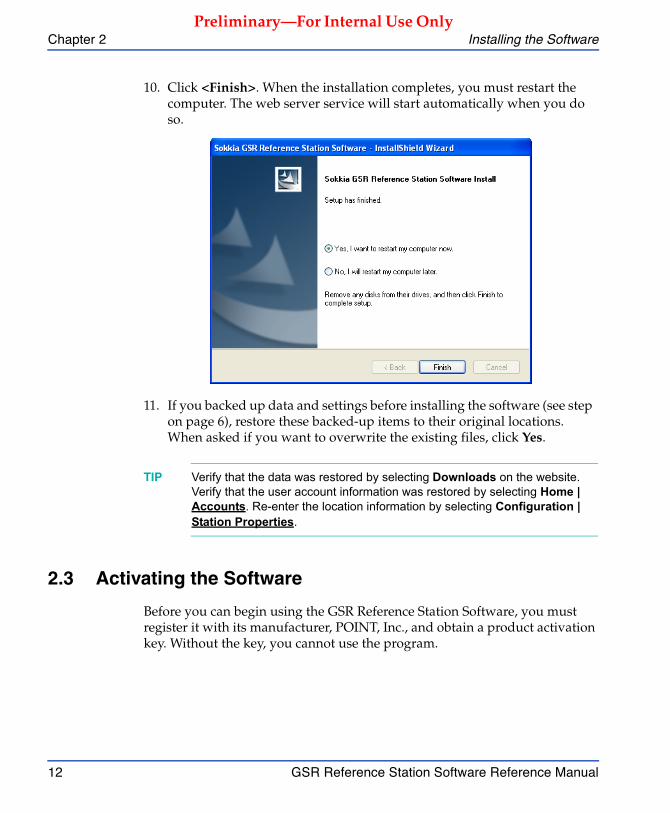
10. Click <Finish>. When the installation completes, you must restart the computer. The web server service will start automatically when you do so.
11. If you backed up data and settings before installing the software (see step on page 6), restore these backed-up items to their original locations. When asked if you want to overwrite the existing files, click Yes.
TIP Verify that the data was restored by selecting Downloads on the website. Verify that the user account information was restored by selecting Home | Accounts. Re-enter the location information by selecting Configuration | Station Properties.
2.3 Activating the Software
Before you can begin using the GSR Reference Station Software, you must register it with its manufacturer, POINT, Inc., and obtain a product activation key. Without the key, you cannot use the program.
Installing the Software Chapter 2
GSR Reference Station Software Reference Manual 13
Preliminary—For Internal Use Only
Complete the following steps to register and activate the software:
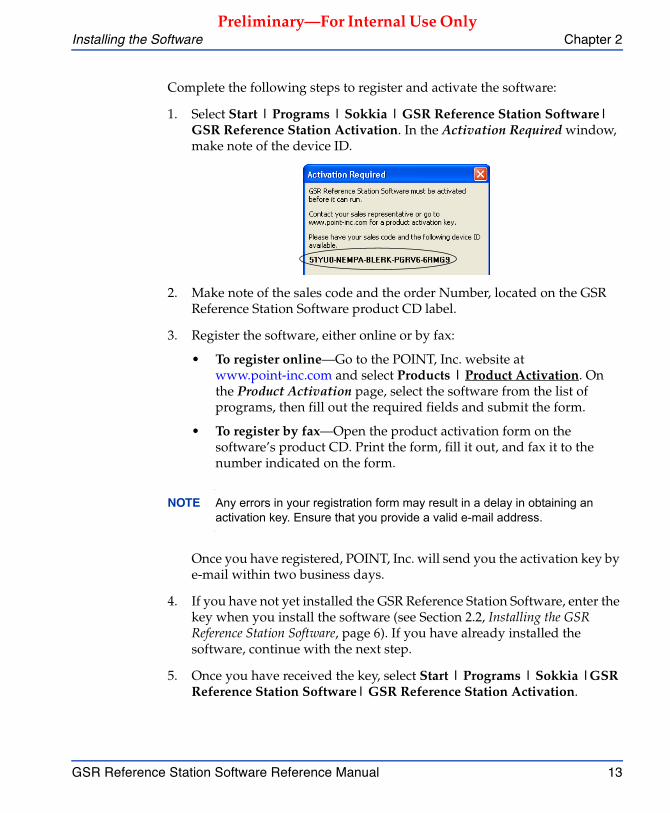
1. Select Start | Programs | Sokkia | GSR Reference Station Software| GSR Reference Station Activation. In the Activation Required window, make note of the device ID.
2. Make note of the sales code and the order Number, located on the GSR Reference Station Software product CD label.
3. Register the software, either online or by fax:
• To register online—Go to the POINT, Inc. website atwww.point-inc.com and select Products | Product Activation. On the Product Activation page, select the software from the list of programs, then fill out the required fields and submit the form.
• To register by fax—Open the product activation form on the software’s product CD. Print the form, fill it out, and fax it to the number indicated on the form.
NOTE Any errors in your registration form may result in a delay in obtaining an activation key. Ensure that you provide a valid e-mail address.
Once you have registered, POINT, Inc. will send you the activation key by e-mail within two business days.
4. If you have not yet installed the GSR Reference Station Software, enter the key when you install the software (see Section 2.2, Installing the GSR Reference Station Software, page 6). If you have already installed the software, continue with the next step.
5. Once you have received the key, select Start | Programs | Sokkia |GSR Reference Station Software| GSR Reference Station Activation.
Chapter 2 Installing the Software
14 GSR Reference Station Software Reference Manual
Preliminary—For Internal Use Only
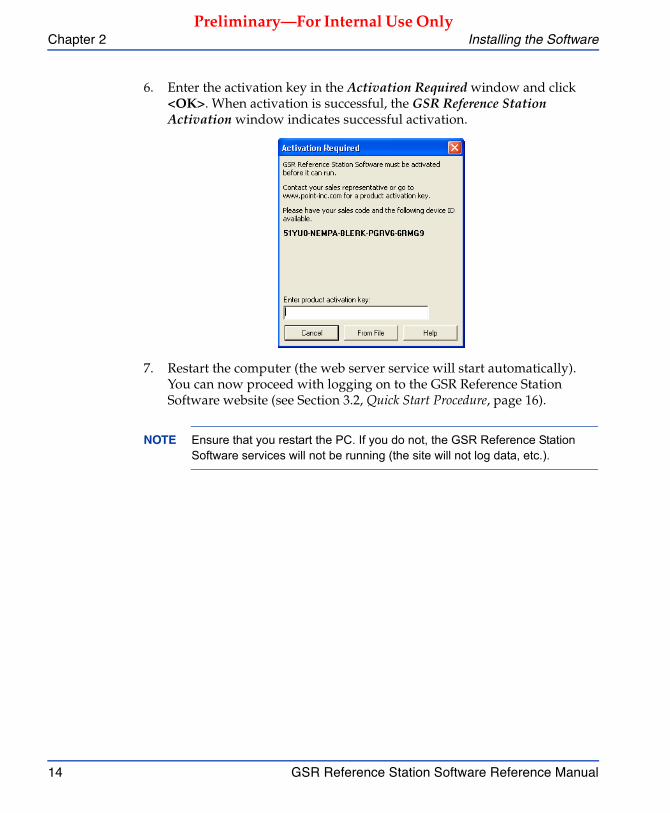
6. Enter the activation key in the Activation Required window and click <OK>. When activation is successful, the GSR Reference Station Activation window indicates successful activation.
7. Restart the computer (the web server service will start automatically). You can now proceed with logging on to the GSR Reference Station Software website (see Section 3.2, Quick Start Procedure, page 16).
NOTE Ensure that you restart the PC. If you do not, the GSR Reference Station Software services will not be running (the site will not log data, etc.).
GSR Reference Station Software Reference Manual 15
Preliminary—For Internal Use Only
Getting Started
This chapter will help you to get started using the GSR Reference Station Software website. Refer to Section 3.1, Getting Started Workflow for an overview and quick reference, and to the remaining sections in this chapter for step-by-step instructions.
3.1 Getting Started Workflow
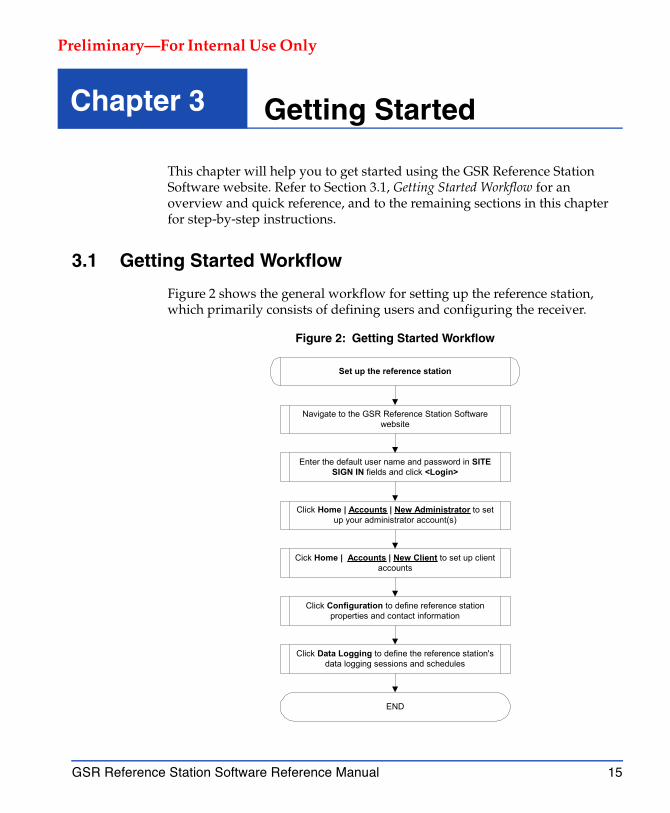
Figure 2 shows the general workflow for setting up the reference station, which primarily consists of defining users and configuring the receiver.
Figure 2: Getting Started Workflow
Click Data Logging to define the reference station'sdata logging sessions and schedules
Set up the reference station
END
Navigate to the GSR Reference Station Softwarewebsite
Enter the default user name and password in SITESIGN IN fields and click <Login>
Cick Home | Accounts | New Client to set up clientaccounts
Click Configuration to define reference stationproperties and contact information
Click Home | Accounts | New Administrator to setup your administrator account(s)
Chapter 3
Chapter 3 Getting Started
16 GSR Reference Station Software Reference Manual
Preliminary—For Internal Use Only
NOTE These steps assume that the reference station hardware, including the antenna and Internet connectivity, has already been configured. For more information about hardware setup, refer to the GSR2700 RS Operations Manual or the GSR2700 RSX Operations Manual, or contact your IT department.
3.2 Quick Start Procedure
The website interface of the GSR Reference Station Software makes it easy and quick for you to configure the receiver, define who can access the reference station, set up data logging schedules, and configure other features. The key steps in setting up the reference station are described in the following procedure.
Logging on
1. In your Internet browser, navigate to the GSR Reference Station Software website using the IP address provided by your IT department.
TIP If you are locally logged on to the machine where the GSR Reference Station Software is installed, type “localhost” in your web browser address field to open the website.
2. To log on to the website, enter the default administrator user name and password (see Table 4, Default Accounts, page 22) in the SITE SIGN IN fields and click <Login>. For more information about default accounts, see Table 4, Default Accounts, page 22.
Getting Started Chapter 3
GSR Reference Station Software Reference Manual 17
Preliminary—For Internal Use Only
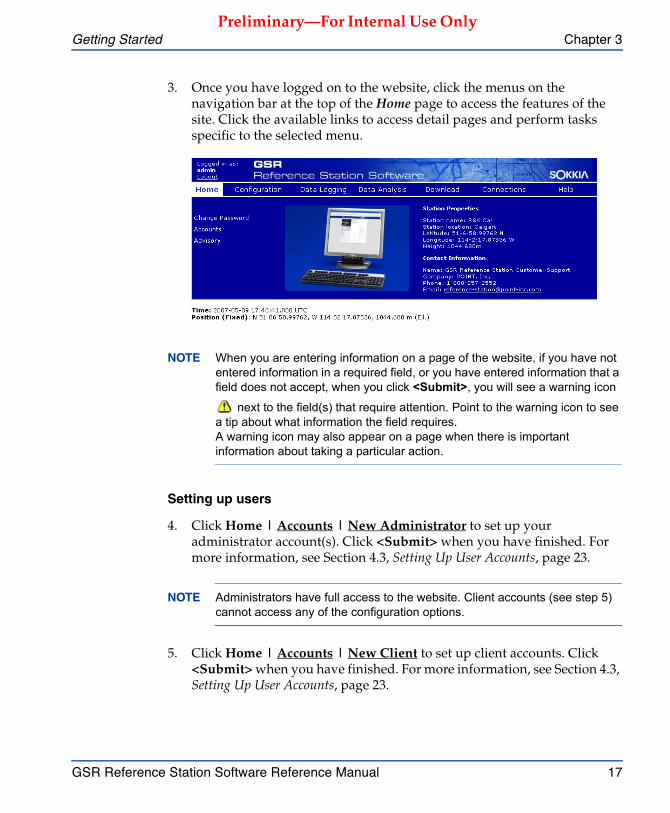
3. Once you have logged on to the website, click the menus on the navigation bar at the top of the Home page to access the features of the site. Click the available links to access detail pages and perform tasks specific to the selected menu.
NOTE When you are entering information on a page of the website, if you have not entered information in a required field, or you have entered information that a field does not accept, when you click <Submit>, you will see a warning icon
next to the field(s) that require attention. Point to the warning icon to see a tip about what information the field requires.A warning icon may also appear on a page when there is important information about taking a particular action.
Setting up users
4. Click Home | Accounts | New Administrator to set up your administrator account(s). Click <Submit> when you have finished. For more information, see Section 4.3, Setting Up User Accounts, page 23.
NOTE Administrators have full access to the website. Client accounts (see step 5) cannot access any of the configuration options.
5. Click Home | Accounts | New Client to set up client accounts. Click <Submit> when you have finished. For more information, see Section 4.3, Setting Up User Accounts, page 23.
Chapter 3 Getting Started
18 GSR Reference Station Software Reference Manual
Preliminary—For Internal Use Only
6. Click Configuration | Public Access and set up public access rights for the site. For more information, see Chapter 4, Defining Public Access Rights, page 27.
Entering site information
7. Click Configuration and then click each of the hyperlinks on the page to display entry fields to configure the reference station properties, including the station name, antenna type, and reference position. Click <Submit> when you have finished. For more information, see Chapter 5, Entering Site Information, page 31.
NOTE Most of these configuration properties will appear to all users on the site’s Home page, and control how users access the data. This information must be entered correctly for accurate data collection.
Collecting data
8. Click Data Logging and then click each of the session hyperlinks to configure data collection schedules. Click <Submit> when you have finished. The data format you choose will determine which fields display for data log formatting options (see Section 6.1, Setting Up Data Logging Schedules, page 35).
NOTE The reference station site allows you to configure a data logging schedule and choose when to turn it on. Once you configure a session, in order to begin logging data, you must activate the session (see Section 6.2, Activating a Data Logging Session, page 40).
Configuring RTK data streaming
9. If you want users to be able to connect to the site for TCP-based RTK correction data streams (no login required), see Section 4.5, Enabling RTK Data Streaming, page 27.
Configuring NTRIP connections
10. If you want to set up either NTRIP caster or source functionality, see Chapter 8, Configuring NTRIP Connections, page 49.
Getting Started Chapter 3
GSR Reference Station Software Reference Manual 19
Preliminary—For Internal Use Only
3.3 Quick Start: Day-to-Day Use
Typically, you should need to configure the reference station and the data logging schedules only once. After that, on a day-to-day basis, the options that you will probably use most often are the Download and Data Analysis options in the navigation bar.
Changes to the Data Logging options will typically only be required if you want to modify the schedule or file content of an existing session, or create a new session.
You can check the receiver’s tracking status by clicking Data Analysis (see Chapter 7, Analyzing and Downloading Data, page 43).
See Chapter 9, Site Administration and Maintenance, page 57, for information about system monitoring, troubleshooting, and maintenance.

GSR Reference Station Software Reference Manual 21
Preliminary—For Internal Use Only
Setting Up Site Access
This chapter describes the types of users and their access rights for the GSR Reference Station Software website, and explains how to set up user accounts. It also describes how to enable the site for RTK data stream connections.
4.1 Users and Access Levels
There are two types of user accounts for the website:
• administrator
• client
When you have set up your administrator and client accounts, these users can log in to access the website. You can also enable public access to the site.
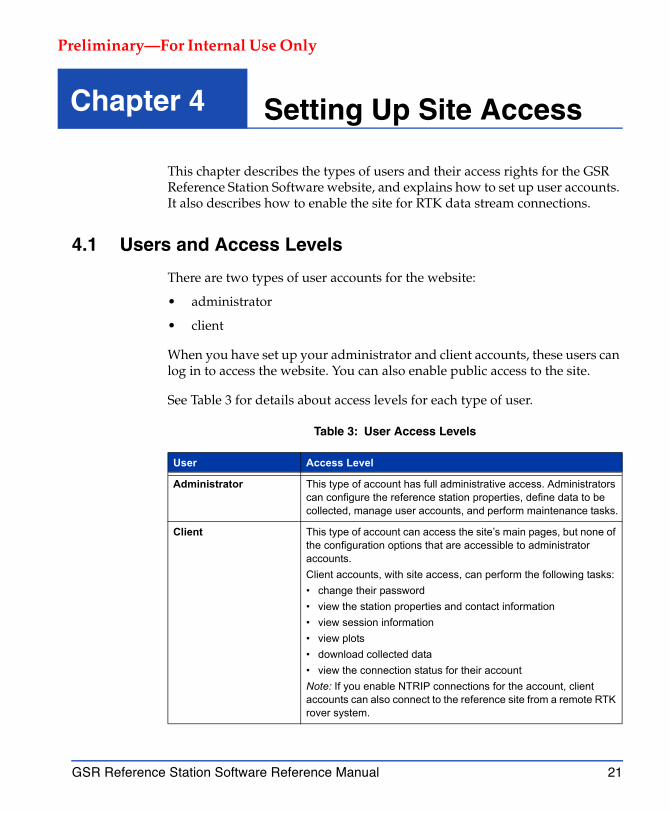
See Table 3 for details about access levels for each type of user.
Table 3: User Access Levels
User Access Level
Administrator This type of account has full administrative access. Administrators can configure the reference station properties, define data to be collected, manage user accounts, and perform maintenance tasks.
Client This type of account can access the site’s main pages, but none of the configuration options that are accessible to administrator accounts.Client accounts, with site access, can perform the following tasks:• change their password• view the station properties and contact information• view session information• view plots• download collected data• view the connection status for their accountNote: If you enable NTRIP connections for the account, client accounts can also connect to the reference site from a remote RTK rover system.
Chapter 4
Chapter 4 Setting Up Site Access
22 GSR Reference Station Software Reference Manual
Preliminary—For Internal Use Only
4.2 Default Accounts
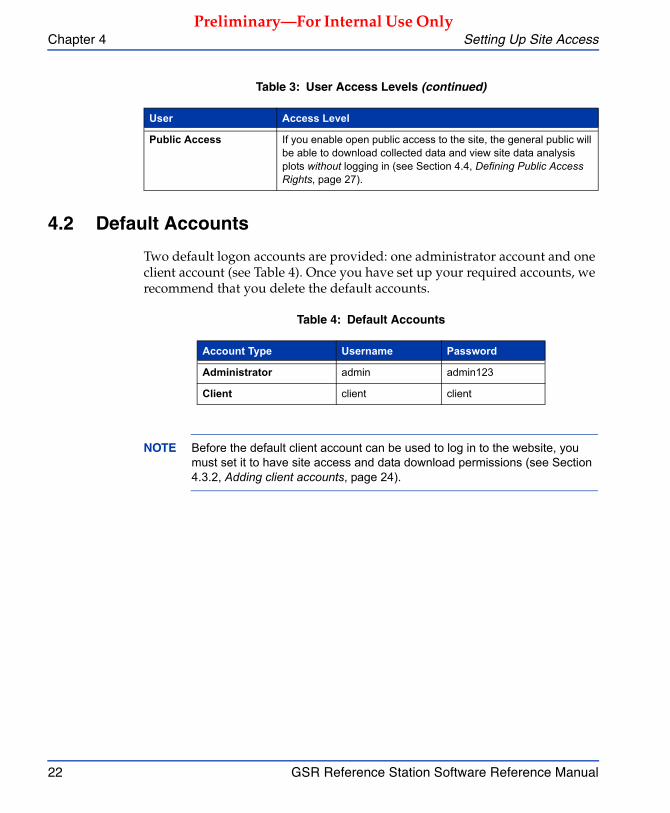
Two default logon accounts are provided: one administrator account and one client account (see Table 4). Once you have set up your required accounts, we recommend that you delete the default accounts.
NOTE Before the default client account can be used to log in to the website, you must set it to have site access and data download permissions (see Section 4.3.2, Adding client accounts, page 24).
Public Access If you enable open public access to the site, the general public will be able to download collected data and view site data analysis plots without logging in (see Section 4.4, Defining Public Access Rights, page 27).
Table 3: User Access Levels (continued)
User Access Level
Table 4: Default Accounts
Account Type Username Password
Administrator admin admin123
Client client client
Setting Up Site Access Chapter 4
GSR Reference Station Software Reference Manual 23
Preliminary—For Internal Use Only
4.3 Setting Up User Accounts
As an administrator, you can create and manage administrator and client accounts.
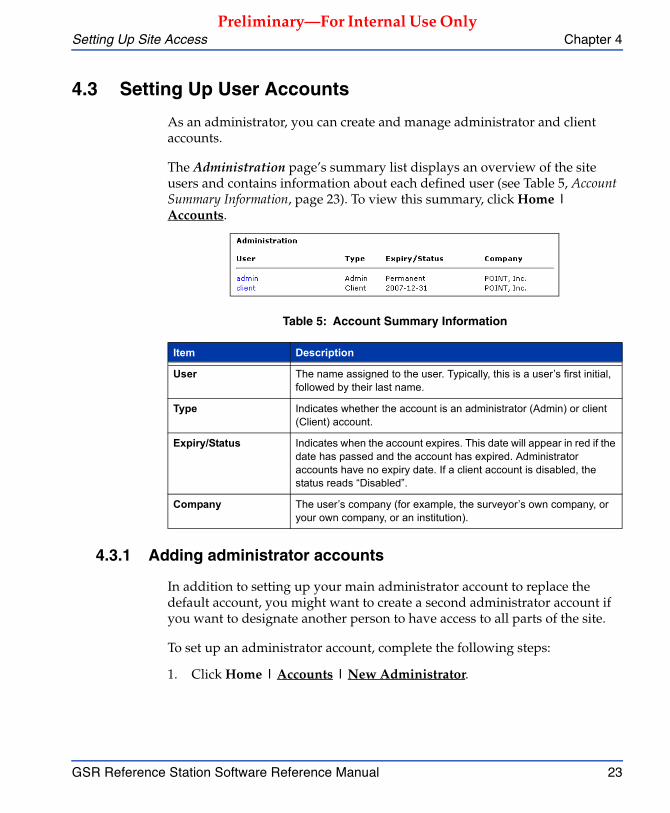
The Administration page’s summary list displays an overview of the site users and contains information about each defined user (see Table 5, Account Summary Information, page 23). To view this summary, click Home | Accounts.
4.3.1 Adding administrator accounts
In addition to setting up your main administrator account to replace the default account, you might want to create a second administrator account if you want to designate another person to have access to all parts of the site.
To set up an administrator account, complete the following steps:
1. Click Home | Accounts | New Administrator.
Table 5: Account Summary Information
Item Description
User The name assigned to the user. Typically, this is a user’s first initial, followed by their last name.
Type Indicates whether the account is an administrator (Admin) or client (Client) account.
Expiry/Status Indicates when the account expires. This date will appear in red if the date has passed and the account has expired. Administrator accounts have no expiry date. If a client account is disabled, the status reads “Disabled”.
Company The user’s company (for example, the surveyor’s own company, or your own company, or an institution).
Chapter 4 Setting Up Site Access
24 GSR Reference Station Software Reference Manual
Preliminary—For Internal Use Only
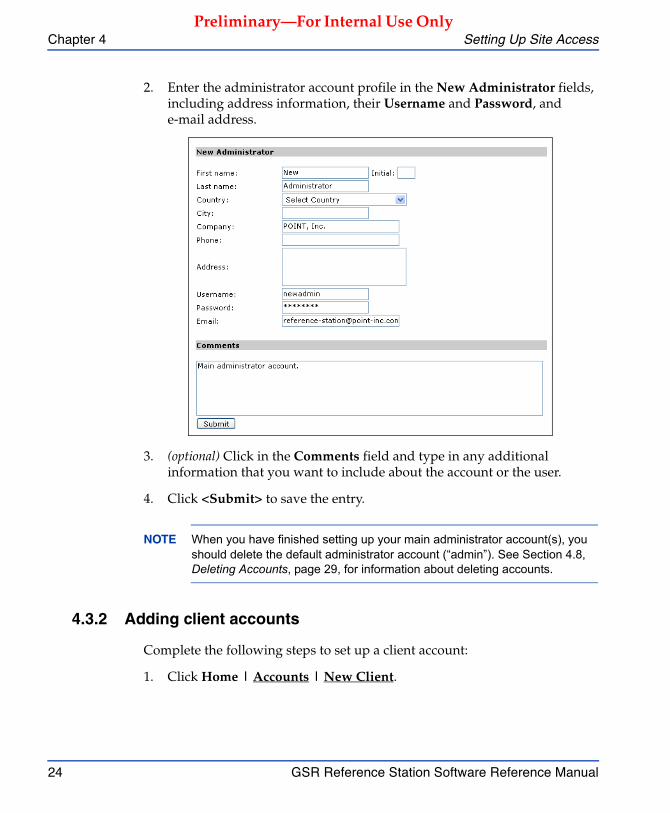
2. Enter the administrator account profile in the New Administrator fields, including address information, their Username and Password, ande-mail address.
3. (optional) Click in the Comments field and type in any additional information that you want to include about the account or the user.
4. Click <Submit> to save the entry.
NOTE When you have finished setting up your main administrator account(s), you should delete the default administrator account (“admin”). See Section 4.8, Deleting Accounts, page 29, for information about deleting accounts.
4.3.2 Adding client accounts
Complete the following steps to set up a client account:
1. Click Home | Accounts | New Client.
Setting Up Site Access Chapter 4
GSR Reference Station Software Reference Manual 25
Preliminary—For Internal Use Only
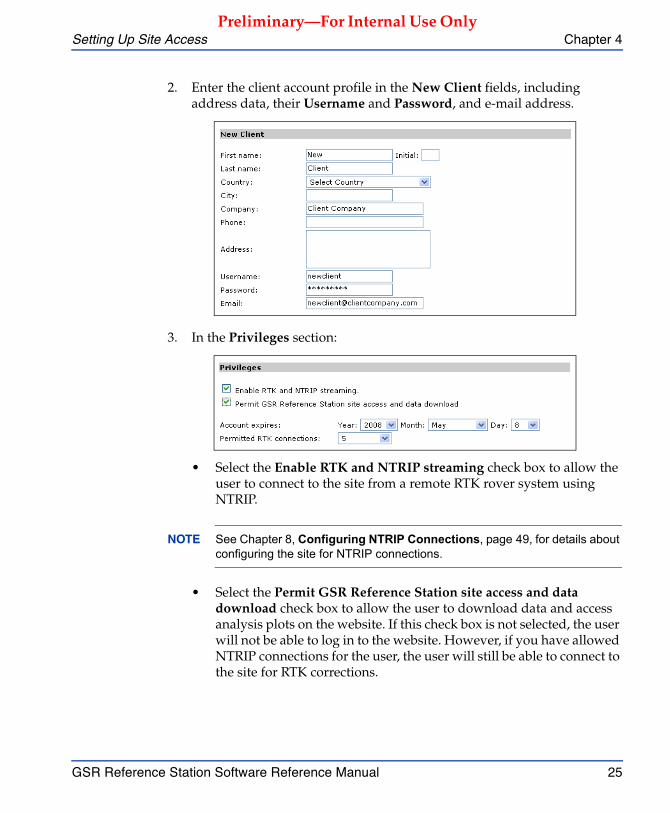
2. Enter the client account profile in the New Client fields, including address data, their Username and Password, and e-mail address.
3. In the Privileges section:
• Select the Enable RTK and NTRIP streaming check box to allow the user to connect to the site from a remote RTK rover system using NTRIP.
NOTE See Chapter 8, Configuring NTRIP Connections, page 49, for details about configuring the site for NTRIP connections.
• Select the Permit GSR Reference Station site access and data download check box to allow the user to download data and access analysis plots on the website. If this check box is not selected, the user will not be able to log in to the website. However, if you have allowed NTRIP connections for the user, the user will still be able to connect to the site for RTK corrections.

Chapter 4 Setting Up Site Access
26 GSR Reference Station Software Reference Manual
Preliminary—For Internal Use Only
• Select the account’s expiry date (year, month, and day) from the Account expires drop-down lists. By default, a client account expires after one year.
NOTE For example, you can set up surveyors employed at your company to have long-term access, but you might set up a short-term user account for visitors to your company to have access for only a week.
• In the Permitted RTK connections drop-down list, define the user’s data collection privileges by selecting the number of simultaneous NTRIP connections this user account can make to the site. The default setting is 5. If you do not allow any connections, the user will not be able to connect to the site for RTK data using NTRIP.
TIP To view active connections for user accounts, click Connections on the navigation bar.
4. (optional) Click in the Comments field and enter any additional information that you want to include about the account or the user.
5. Click <Submit> to save the account.
NOTE If a user attempts to log on to the site using a client account that has expired or is disabled, an error message will be displayed, informing the user of this condition.
Setting Up Site Access Chapter 4
GSR Reference Station Software Reference Manual 27
Preliminary—For Internal Use Only
4.4 Defining Public Access Rights
By setting public access rights, you can choose whether to allow the general public to download collected data and to view site data analysis plots. If you do not enable this feature, public users will not be able to use the site without having an account and logging in.
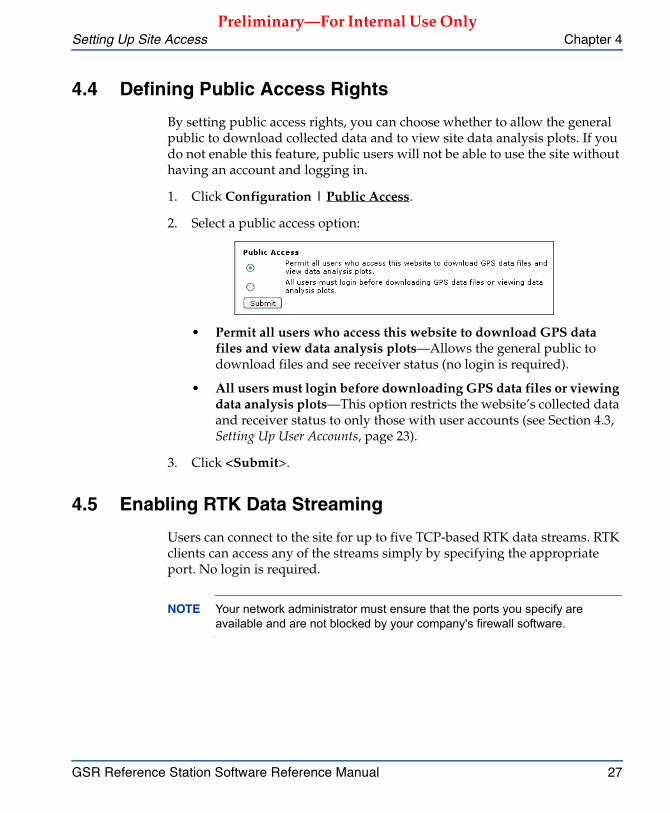
1. Click Configuration | Public Access.
2. Select a public access option:
• Permit all users who access this website to download GPS data files and view data analysis plots—Allows the general public to download files and see receiver status (no login is required).
• All users must login before downloading GPS data files or viewing data analysis plots—This option restricts the website’s collected data and receiver status to only those with user accounts (see Section 4.3, Setting Up User Accounts, page 23).
3. Click <Submit>.
4.5 Enabling RTK Data Streaming
Users can connect to the site for up to five TCP-based RTK data streams. RTK clients can access any of the streams simply by specifying the appropriate port. No login is required.
NOTE Your network administrator must ensure that the ports you specify are available and are not blocked by your company's firewall software.
Chapter 4 Setting Up Site Access
28 GSR Reference Station Software Reference Manual
Preliminary—For Internal Use Only
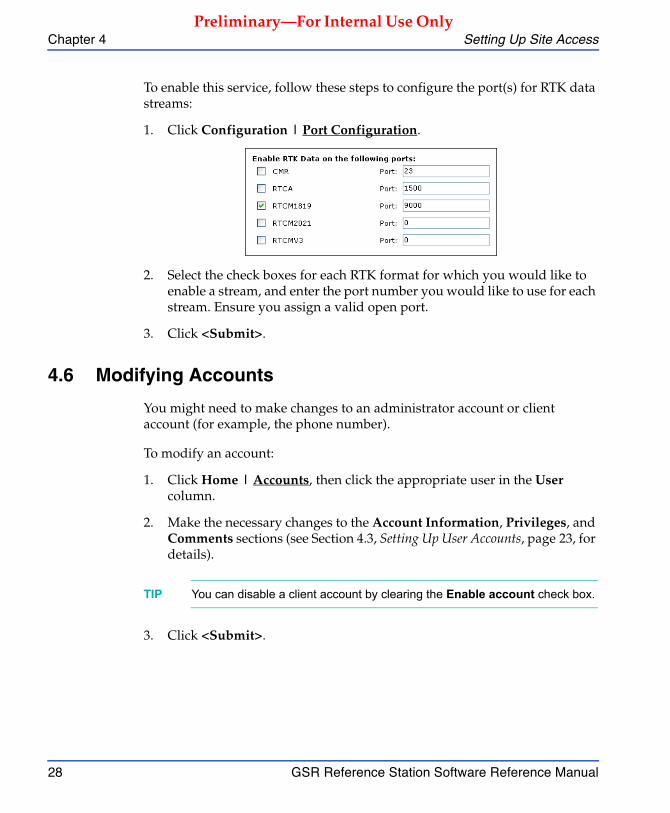
To enable this service, follow these steps to configure the port(s) for RTK data streams:
1. Click Configuration | Port Configuration.
2. Select the check boxes for each RTK format for which you would like to enable a stream, and enter the port number you would like to use for each stream. Ensure you assign a valid open port.
3. Click <Submit>.
4.6 Modifying Accounts
You might need to make changes to an administrator account or client account (for example, the phone number).
To modify an account:
1. Click Home | Accounts, then click the appropriate user in the User column.
2. Make the necessary changes to the Account Information, Privileges, and Comments sections (see Section 4.3, Setting Up User Accounts, page 23, for details).
TIP You can disable a client account by clearing the Enable account check box.
3. Click <Submit>.
Setting Up Site Access Chapter 4
GSR Reference Station Software Reference Manual 29
Preliminary—For Internal Use Only
4.7 Changing Passwords
To change your account password:
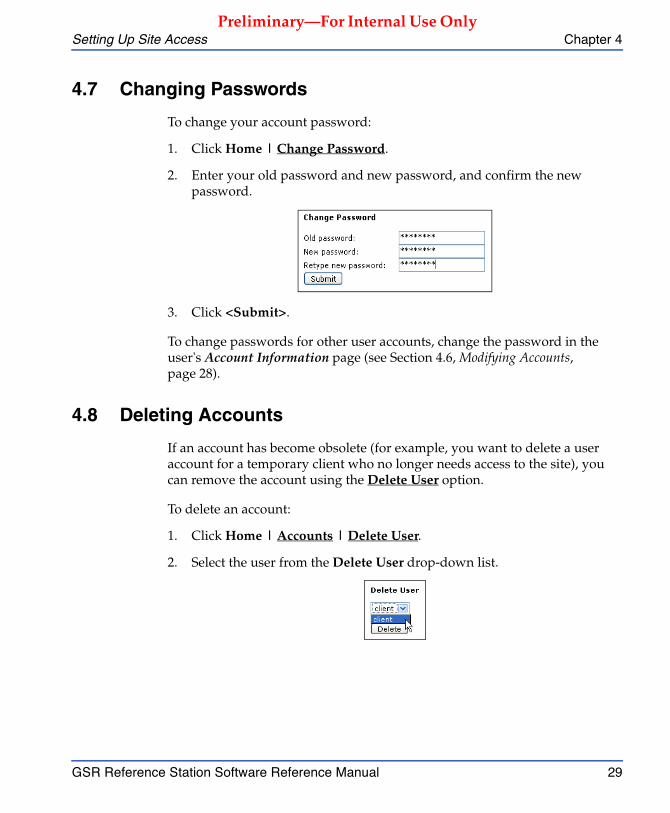
1. Click Home | Change Password.
2. Enter your old password and new password, and confirm the new password.
3. Click <Submit>.
To change passwords for other user accounts, change the password in the user's Account Information page (see Section 4.6, Modifying Accounts, page 28).
4.8 Deleting Accounts
If an account has become obsolete (for example, you want to delete a user account for a temporary client who no longer needs access to the site), you can remove the account using the Delete User option.
To delete an account:
1. Click Home | Accounts | Delete User.
2. Select the user from the Delete User drop-down list.
Chapter 4 Setting Up Site Access
30 GSR Reference Station Software Reference Manual
Preliminary—For Internal Use Only
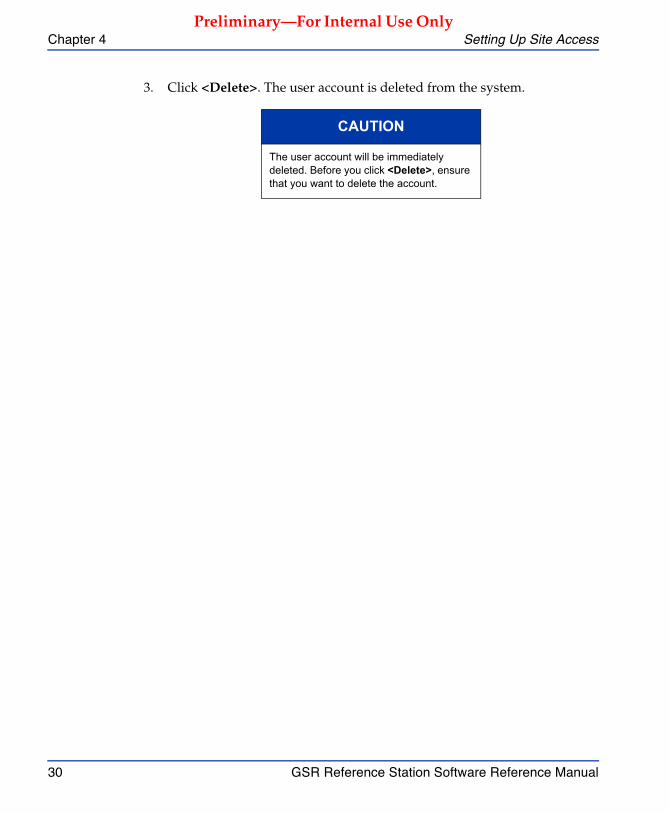
3. Click <Delete>. The user account is deleted from the system.
CAUTION
The user account will be immediately deleted. Before you click <Delete>, ensure that you want to delete the account.
GSR Reference Station Software Reference Manual 31
Preliminary—For Internal Use Only
Entering Site Information
This chapter describes how to enter station properties and contact information for the site.
5.1 Entering Station Properties
You must enter the station properties to enable the receiver for data collection at your reference station location. Typically, you should only need to enter this information once.
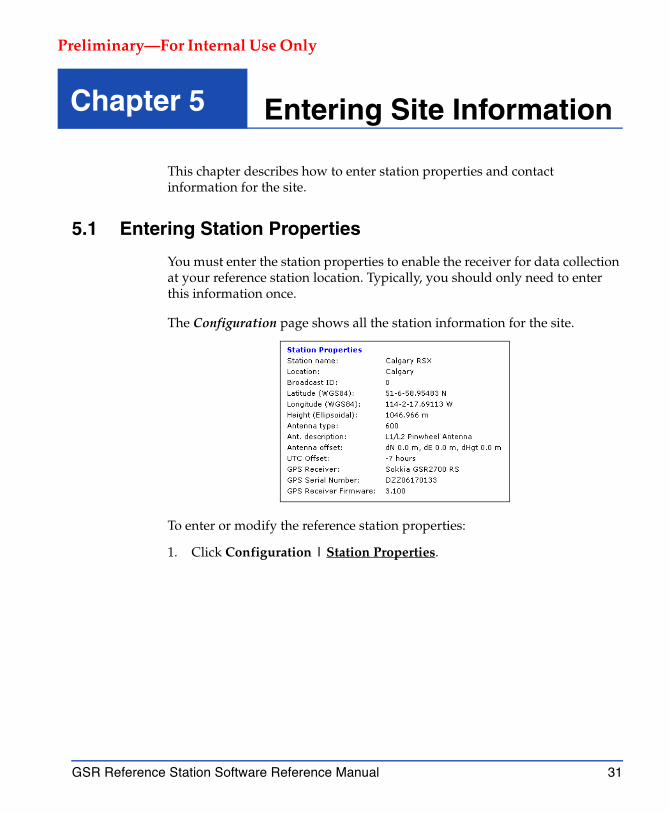
The Configuration page shows all the station information for the site.
To enter or modify the reference station properties:
1. Click Configuration | Station Properties.
Chapter 5
Chapter 5 Entering Site Information
32 GSR Reference Station Software Reference Manual
Preliminary—For Internal Use Only
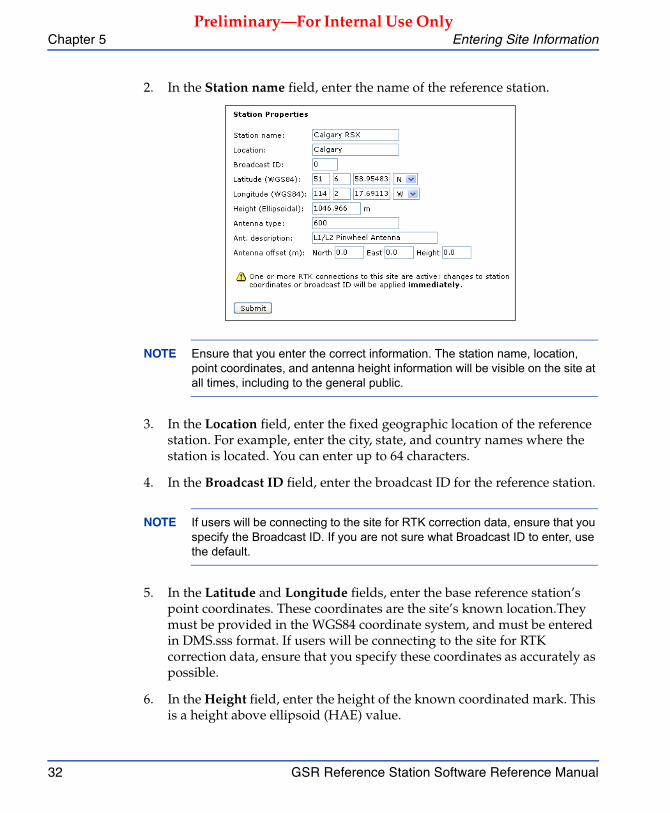
2. In the Station name field, enter the name of the reference station.
NOTE Ensure that you enter the correct information. The station name, location, point coordinates, and antenna height information will be visible on the site at all times, including to the general public.
3. In the Location field, enter the fixed geographic location of the reference station. For example, enter the city, state, and country names where the station is located. You can enter up to 64 characters.
4. In the Broadcast ID field, enter the broadcast ID for the reference station.
NOTE If users will be connecting to the site for RTK correction data, ensure that you specify the Broadcast ID. If you are not sure what Broadcast ID to enter, use the default.
5. In the Latitude and Longitude fields, enter the base reference station’s point coordinates. These coordinates are the site’s known location.They must be provided in the WGS84 coordinate system, and must be entered in DMS.sss format. If users will be connecting to the site for RTK correction data, ensure that you specify these coordinates as accurately as possible.
6. In the Height field, enter the height of the known coordinated mark. This is a height above ellipsoid (HAE) value.
Entering Site Information Chapter 5
GSR Reference Station Software Reference Manual 33
Preliminary—For Internal Use Only
7. In the Antenna type field, enter the antenna model name.
8. (Optional) In the Antenna description field, enter the antenna’s tracking capability and information manufacturer. You can enter up to 64 characters.
9. In the North, East, and Height fields, enter the antenna offset from the known coordinated mark. Typically, you will enter the Height and leave North and East as zero. If your known coordinate is referenced to the phase center location of the antenna, you will typically enter zero in all three fields.
10. Click <Submit>.
Station Properties also displays the following read-only information:
• the UTC offset
• receiver type, serial number, and firmware version
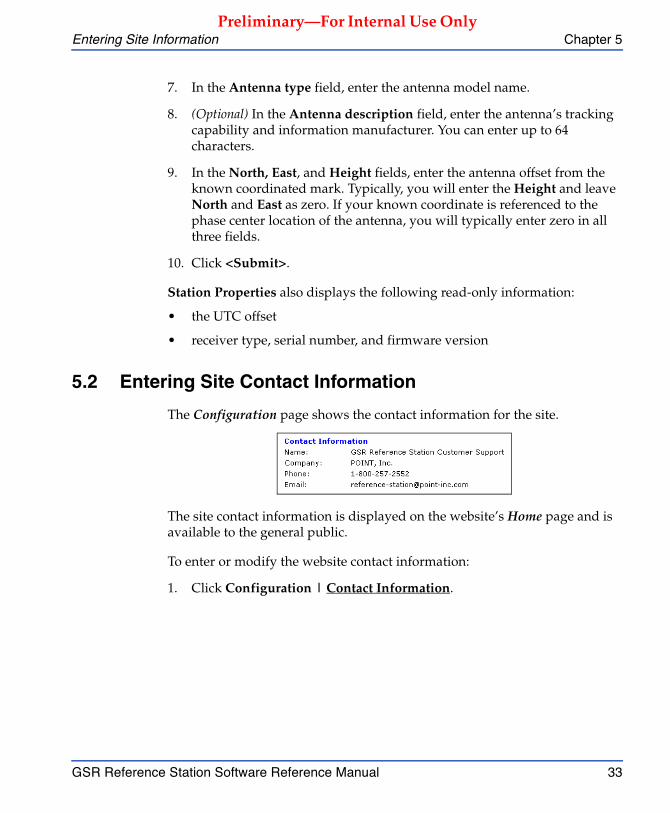
5.2 Entering Site Contact Information
The Configuration page shows the contact information for the site.
The site contact information is displayed on the website’s Home page and is available to the general public.
To enter or modify the website contact information:
1. Click Configuration | Contact Information.
Chapter 5 Entering Site Information
34 GSR Reference Station Software Reference Manual
Preliminary—For Internal Use Only
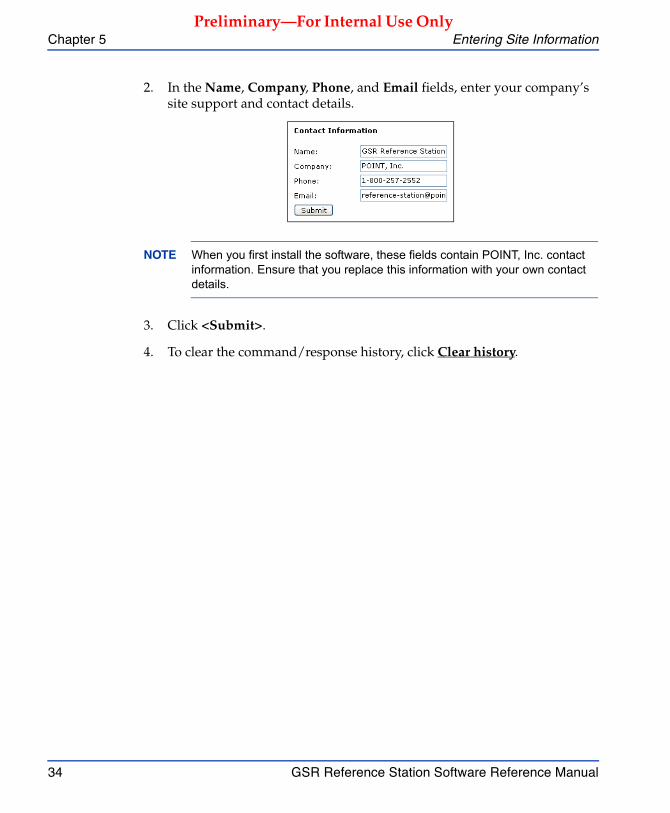
2. In the Name, Company, Phone, and Email fields, enter your company’s site support and contact details.
NOTE When you first install the software, these fields contain POINT, Inc. contact information. Ensure that you replace this information with your own contact details.
3. Click <Submit>.
4. To clear the command/response history, click Clear history.
GSR Reference Station Software Reference Manual 35
Preliminary—For Internal Use Only
Collecting Data
To collect data, use the Data Logging settings to configure the receiver’s data collection sessions. You can log data to a file stored on the server computer. You can also output correction data to a communication port on the server computer or on the receiver. Once you set up a schedule for the session, use the activation option to enable the session and start logging data for users.
6.1 Setting Up Data Logging Schedules
You can configure up to four simultaneous data logging sessions. The main Data Logging page displays a summary of all defined data collection sessions.
The information that is displayed about a session depends on the session’s specific configuration. Status information is shown for each session (for example, “Logging in progress…”).
To configure the receiver’s data logging schedules, use the options available in the Data Logging page.
1. Click Data Logging |Session n (where n is the number of the session).
2. In the Session page, enter a descriptive name for the session in the Session name field.
Chapter 6
Chapter 6 Collecting Data
36 GSR Reference Station Software Reference Manual
Preliminary—For Internal Use Only
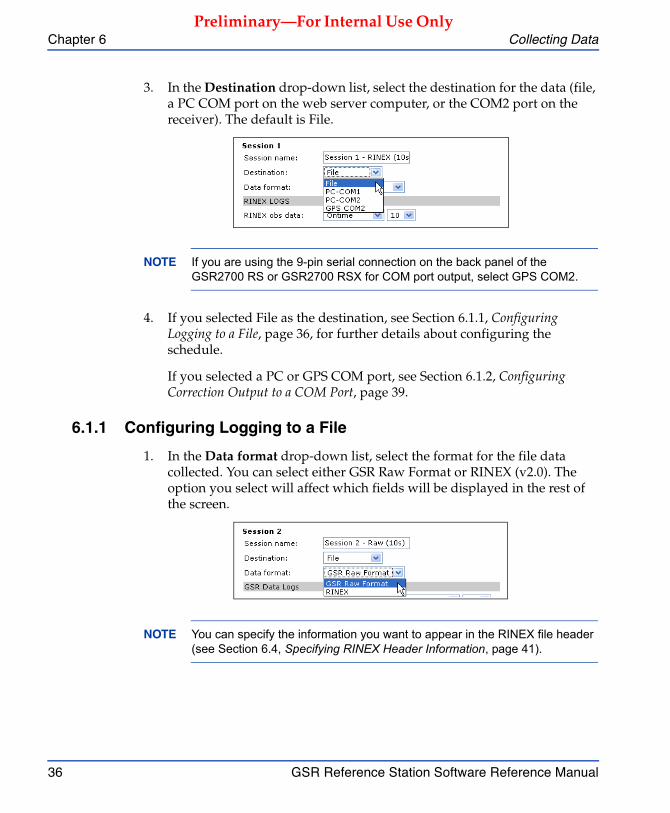
3. In the Destination drop-down list, select the destination for the data (file, a PC COM port on the web server computer, or the COM2 port on the receiver). The default is File.
NOTE If you are using the 9-pin serial connection on the back panel of the GSR2700 RS or GSR2700 RSX for COM port output, select GPS COM2.
4. If you selected File as the destination, see Section 6.1.1, Configuring Logging to a File, page 36, for further details about configuring the schedule.
If you selected a PC or GPS COM port, see Section 6.1.2, Configuring Correction Output to a COM Port, page 39.
6.1.1 Configuring Logging to a File
1. In the Data format drop-down list, select the format for the file data collected. You can select either GSR Raw Format or RINEX (v2.0). The option you select will affect which fields will be displayed in the rest of the screen.
NOTE You can specify the information you want to appear in the RINEX file header (see Section 6.4, Specifying RINEX Header Information, page 41).
Collecting Data Chapter 6
GSR Reference Station Software Reference Manual 37
Preliminary—For Internal Use Only
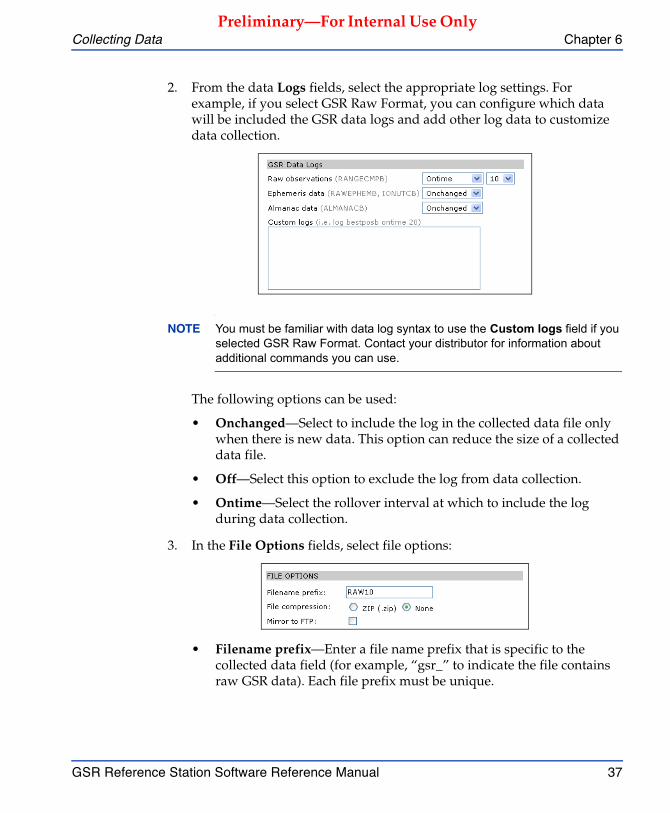
2. From the data Logs fields, select the appropriate log settings. For example, if you select GSR Raw Format, you can configure which data will be included the GSR data logs and add other log data to customize data collection.
NOTE You must be familiar with data log syntax to use the Custom logs field if you selected GSR Raw Format. Contact your distributor for information about additional commands you can use.
The following options can be used:
• Onchanged—Select to include the log in the collected data file only when there is new data. This option can reduce the size of a collected data file.
• Off—Select this option to exclude the log from data collection.
• Ontime—Select the rollover interval at which to include the log during data collection.
3. In the File Options fields, select file options:
• Filename prefix—Enter a file name prefix that is specific to the collected data field (for example, “gsr_” to indicate the file contains raw GSR data). Each file prefix must be unique.
Chapter 6 Collecting Data
38 GSR Reference Station Software Reference Manual
Preliminary—For Internal Use Only
• File compression—Select ZIP to automatically compress the data before it is stored. The resulting files will have a .gz extension, and can be opened using WinZip. Select None if you don’t want the data compressed.
• Mirror to FTP—Select this check box to copy the file to an FTP site when data logging is complete. Additional fields are displayed if you select this option, where you must enter the FTP site address, directory, user name, and password.
NOTE Contact your own technical support for FTP site access and configuration information. Take care when entering the FTP information. The characters are case-sensitive, and must exactly match your FTP configuration.
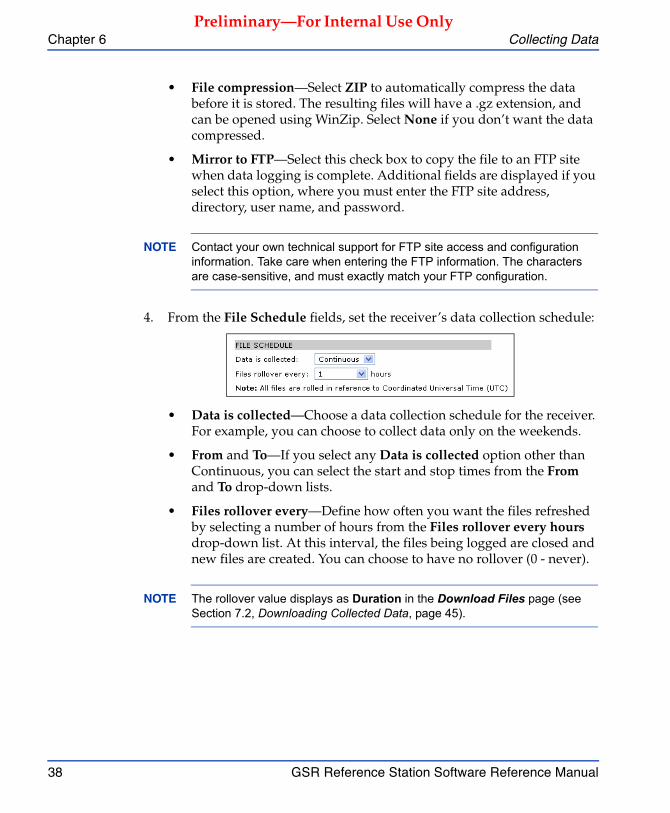
4. From the File Schedule fields, set the receiver’s data collection schedule:
• Data is collected—Choose a data collection schedule for the receiver. For example, you can choose to collect data only on the weekends.
• From and To—If you select any Data is collected option other than Continuous, you can select the start and stop times from the From and To drop-down lists.
• Files rollover every—Define how often you want the files refreshed by selecting a number of hours from the Files rollover every hours drop-down list. At this interval, the files being logged are closed and new files are created. You can choose to have no rollover (0 - never).
NOTE The rollover value displays as Duration in the Download Files page (see Section 7.2, Downloading Collected Data, page 45).
Collecting Data Chapter 6
GSR Reference Station Software Reference Manual 39
Preliminary—For Internal Use Only
5. Click <Submit>. The session configuration is saved to the receiver and you will return to the main page.
NOTE To start logging data, you must first activate the session (see Section 6.2, Activating a Data Logging Session, page 40).
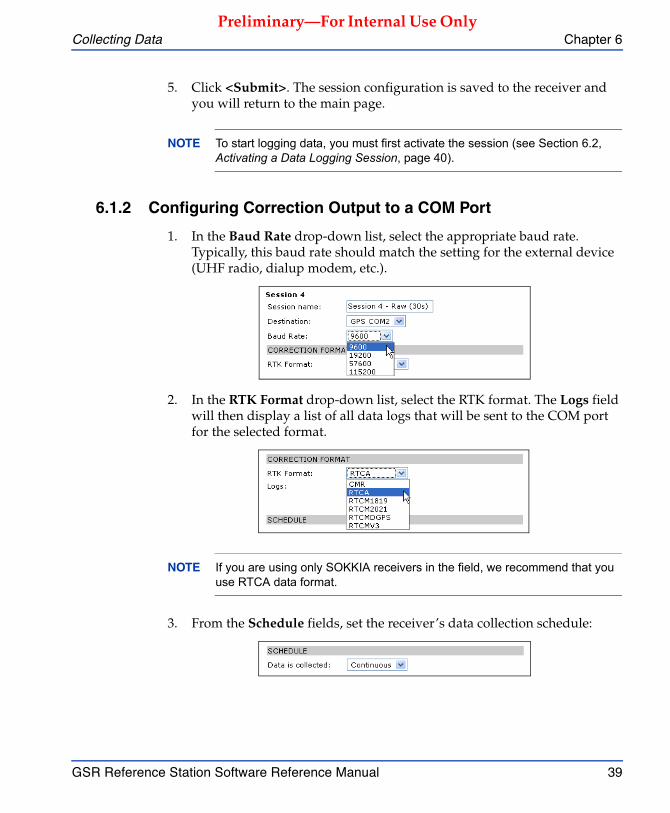
6.1.2 Configuring Correction Output to a COM Port
1. In the Baud Rate drop-down list, select the appropriate baud rate. Typically, this baud rate should match the setting for the external device (UHF radio, dialup modem, etc.).
2. In the RTK Format drop-down list, select the RTK format. The Logs field will then display a list of all data logs that will be sent to the COM port for the selected format.
NOTE If you are using only SOKKIA receivers in the field, we recommend that you use RTCA data format.
3. From the Schedule fields, set the receiver’s data collection schedule:
Chapter 6 Collecting Data
40 GSR Reference Station Software Reference Manual
Preliminary—For Internal Use Only
• Data is collected—Select how often you want data to be broadcast (the default is Continuous).
• From and To—If you select any Data is collected option other than Continuous, you can select the start and stop times from the From and To drop-down lists.
4. Click <Submit>. The session configuration is saved to the receiver and you will return to the main page.
NOTE To start logging data, you must first activate the session (see Section 6.2, Activating a Data Logging Session, page 40).
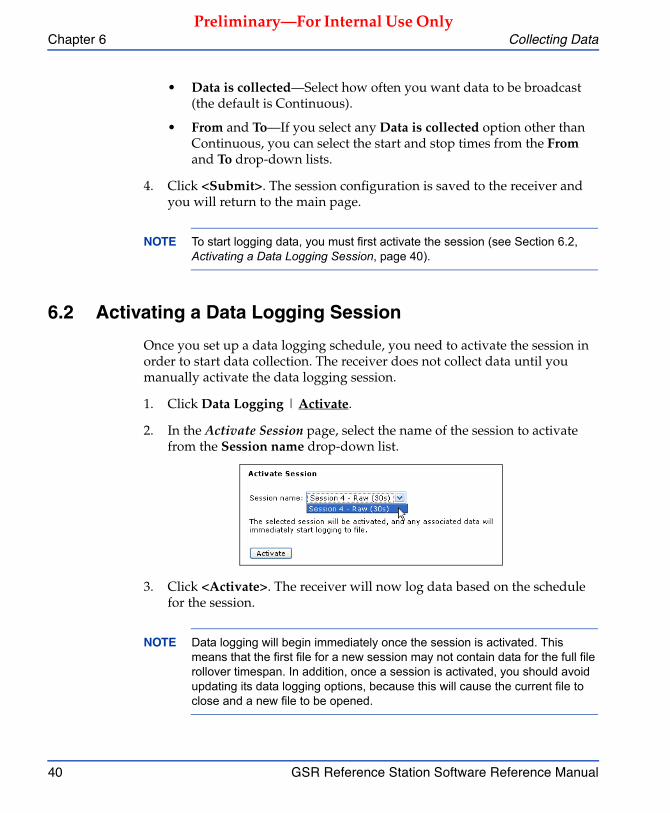
6.2 Activating a Data Logging Session
Once you set up a data logging schedule, you need to activate the session in order to start data collection. The receiver does not collect data until you manually activate the data logging session.
1. Click Data Logging | Activate.
2. In the Activate Session page, select the name of the session to activate from the Session name drop-down list.
3. Click <Activate>. The receiver will now log data based on the schedule for the session.
NOTE Data logging will begin immediately once the session is activated. This means that the first file for a new session may not contain data for the full file rollover timespan. In addition, once a session is activated, you should avoid updating its data logging options, because this will cause the current file to close and a new file to be opened.

Collecting Data Chapter 6
GSR Reference Station Software Reference Manual 41
Preliminary—For Internal Use Only
6.3 Deactivating a Session
When you deactivate a session, the receiver will no longer collect data according to that session’s configuration. To resume data collection, you will need to activate the session.
TIP De-activating a session allows you to suspend data logging without having to delete the session and re-enter the session details when you want to activate it again.
1. Click Data Logging | De-Activate.
2. In the De-Activate Session page, select the name of the session to deactivate from the Session name drop-down list.
3. Click <De-Activate>. All data collection associated with the selected session will immediately terminate, and any associated data files will be closed.
NOTE To start the session again, click Data Logging | Activate (see Section 6.2, Activating a Data Logging Session, page 40).
6.4 Specifying RINEX Header Information
If you are using RINEX format for data collection, you can specify the RINEX file header information (the information that will be placed at the beginning of the RINEX files that are being logged).
To specify RINEX header information:
1. Click Data Logging | RINEX Header.
Chapter 6 Collecting Data
42 GSR Reference Station Software Reference Manual
Preliminary—For Internal Use Only
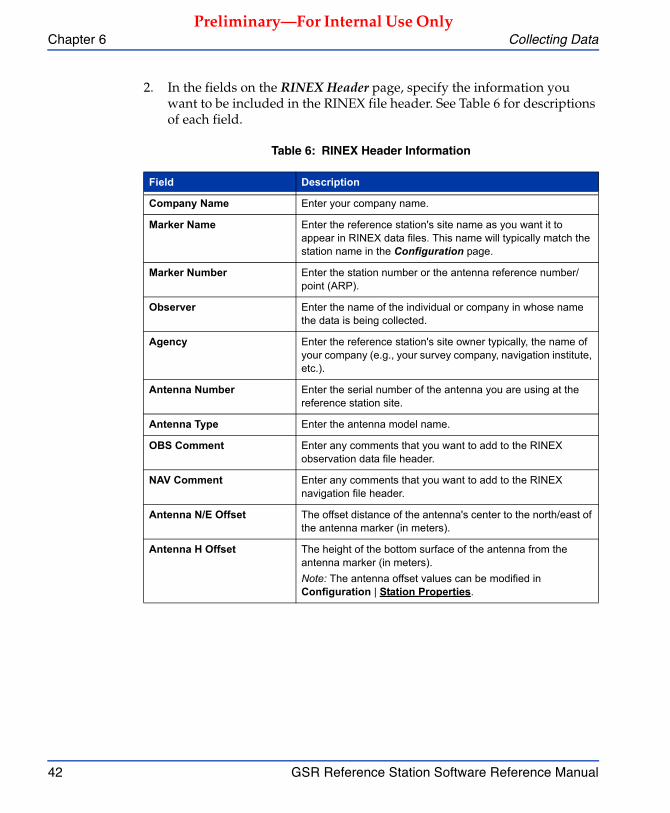
2. In the fields on the RINEX Header page, specify the information you want to be included in the RINEX file header. See Table 6 for descriptions of each field.
Table 6: RINEX Header Information
Field Description
Company Name Enter your company name.
Marker Name Enter the reference station's site name as you want it to appear in RINEX data files. This name will typically match the station name in the Configuration page.
Marker Number Enter the station number or the antenna reference number/point (ARP).
Observer Enter the name of the individual or company in whose name the data is being collected.
Agency Enter the reference station's site owner typically, the name of your company (e.g., your survey company, navigation institute, etc.).
Antenna Number Enter the serial number of the antenna you are using at the reference station site.
Antenna Type Enter the antenna model name.
OBS Comment Enter any comments that you want to add to the RINEX observation data file header.
NAV Comment Enter any comments that you want to add to the RINEX navigation file header.
Antenna N/E Offset The offset distance of the antenna's center to the north/east of the antenna marker (in meters).
Antenna H Offset The height of the bottom surface of the antenna from the antenna marker (in meters).Note: The antenna offset values can be modified in Configuration | Station Properties.
GSR Reference Station Software Reference Manual 43
Preliminary—For Internal Use Only
Analyzing and Downloading Data
This chapter describes how to access data analysis and download collected data.
NOTE In order to have access to download collected data, user accounts must be enabled for this option (see Section 4.3, Setting Up User Accounts, page 23).
7.1 Analyzing Data
To help you or your users determine whether or not to download the collected data files, the Data Analysis options enable review of the receiver’s tracking status.
For example, you can see a history of the receiver’s GDOP values or the number of satellites that have been tracked at the site.
To view data graphically, use the options on the Data Analysis page:
1. Click Data Analysis.
2. Click a chart option in the list at the side of the page (for example, GDOP). The default view shows you the status of data for the last hour.
3. To see a full-screen view, click the chart.
TIP Depending on your Windows screen setting, the new chart that opens might not fit on your desktop. If this is the case, you can increase your screen resolution setting so that you can view the whole chart at once.
Chapter 7
Chapter 7 Analyzing and Downloading Data
44 GSR Reference Station Software Reference Manual
Preliminary—For Internal Use Only
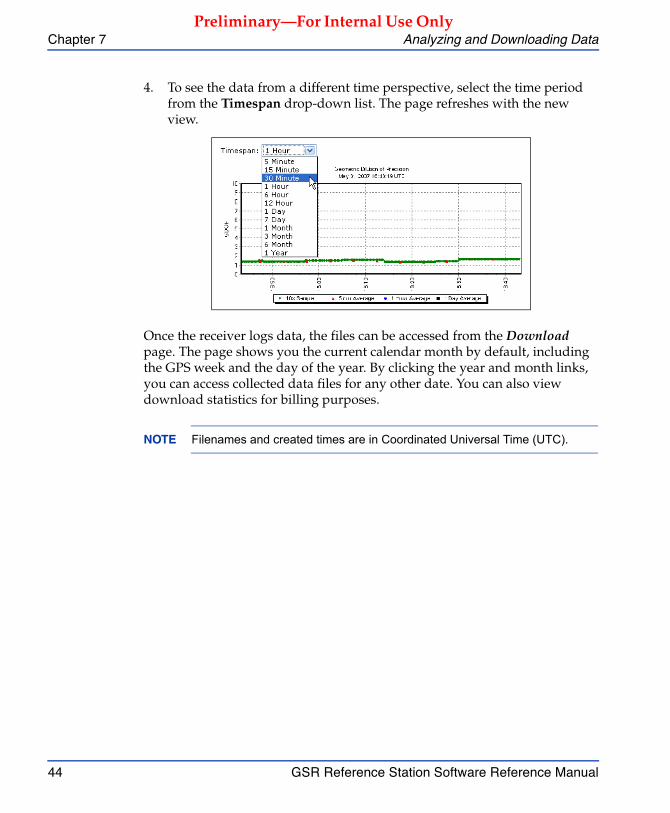
4. To see the data from a different time perspective, select the time period from the Timespan drop-down list. The page refreshes with the new view.
Once the receiver logs data, the files can be accessed from the Download page. The page shows you the current calendar month by default, including the GPS week and the day of the year. By clicking the year and month links, you can access collected data files for any other date. You can also view download statistics for billing purposes.
NOTE Filenames and created times are in Coordinated Universal Time (UTC).
Analyzing and Downloading Data Chapter 7
GSR Reference Station Software Reference Manual 45
Preliminary—For Internal Use Only
7.2 Downloading Collected Data
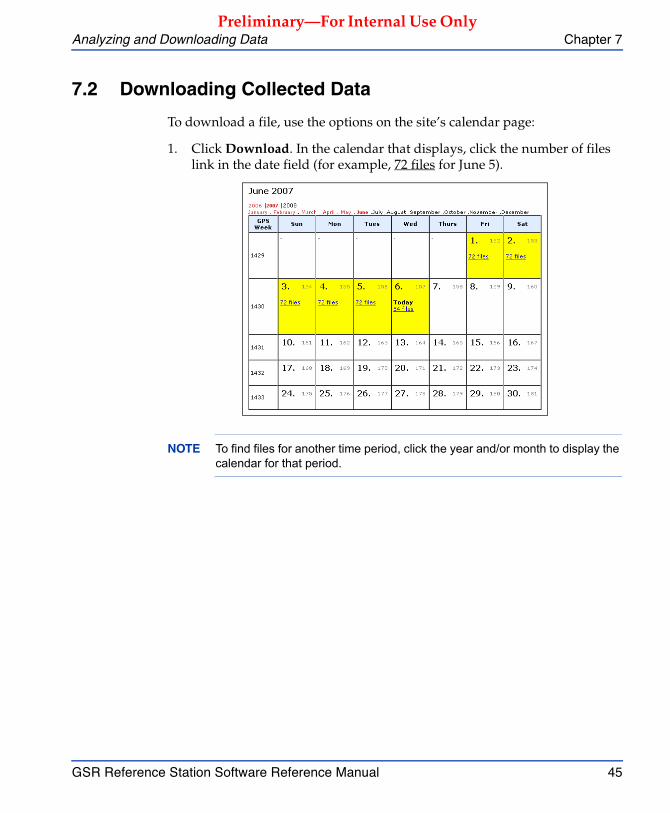
To download a file, use the options on the site’s calendar page:
1. Click Download. In the calendar that displays, click the number of files link in the date field (for example, 72 files for June 5).
NOTE To find files for another time period, click the year and/or month to display the calendar for that period.
Chapter 7 Analyzing and Downloading Data
46 GSR Reference Station Software Reference Manual
Preliminary—For Internal Use Only
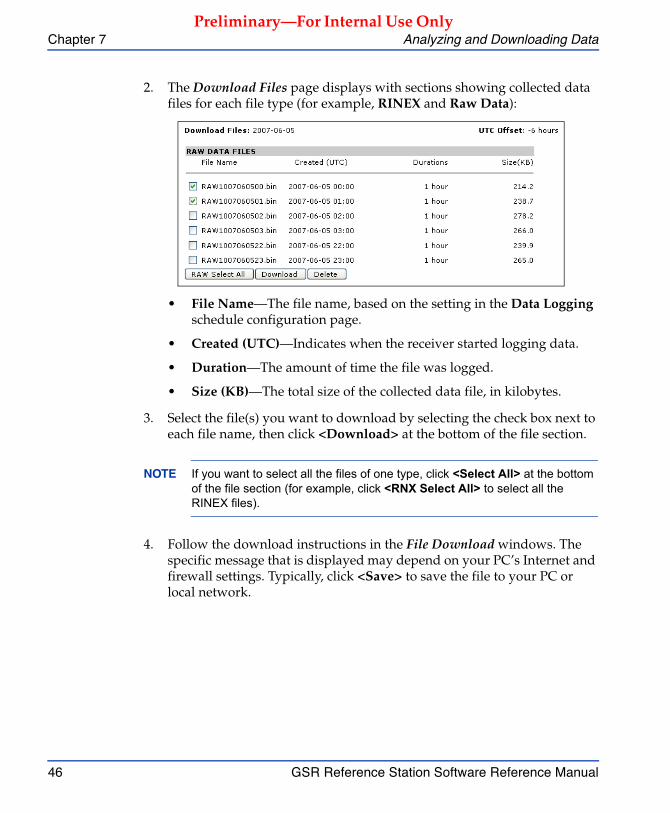
2. The Download Files page displays with sections showing collected data files for each file type (for example, RINEX and Raw Data):
• File Name—The file name, based on the setting in the Data Logging schedule configuration page.
• Created (UTC)—Indicates when the receiver started logging data.
• Duration—The amount of time the file was logged.
• Size (KB)—The total size of the collected data file, in kilobytes.
3. Select the file(s) you want to download by selecting the check box next to each file name, then click <Download> at the bottom of the file section.
NOTE If you want to select all the files of one type, click <Select All> at the bottom of the file section (for example, click <RNX Select All> to select all the RINEX files).
4. Follow the download instructions in the File Download windows. The specific message that is displayed may depend on your PC’s Internet and firewall settings. Typically, click <Save> to save the file to your PC or local network.
Analyzing and Downloading Data Chapter 7
GSR Reference Station Software Reference Manual 47
Preliminary—For Internal Use Only
Selected files are downloaded in a single .zip file. The default file name takes the form “archiveMM-DD-YYYY-HH-MM-SS.zip”, where MM-DD-YYYY-HH-MM-SS is the date and time when you started the download.
NOTE Once you download the file(s) you need, you can then use post-processing software to work with the data (for example, SOKKIA Spectrum Survey Suite).

GSR Reference Station Software Reference Manual 49
Preliminary—For Internal Use Only
Configuring NTRIP Connections
The GSR Reference Station Software supports operation of the site both as an NTRIP caster site and as an NTRIP source. You can also set up the site as a source for its own caster service. This chapter describes how to configure these setups.
8.1 Setting Up as an NTRIP Caster Site
The GSR Reference Station Software site can operate as an NTRIP caster site redistributing RTK correction data, to which NTRIP sources can log in.
You will need to create an account for each NTRIP source so it can log in to the caster service on the GSR Reference Station Software site. You must also configure primary and alternate ports for the caster service. Users will then be able to log in to one of these NTRIP sources to access the data, using their site account.
NOTE You can also set up a source account for the reference station site itself (see Section 8.3, Setting Up the Site as a Source for the Caster, page 55).
Chapter 8
Chapter 8 Configuring NTRIP Connections
50 GSR Reference Station Software Reference Manual
Preliminary—For Internal Use Only
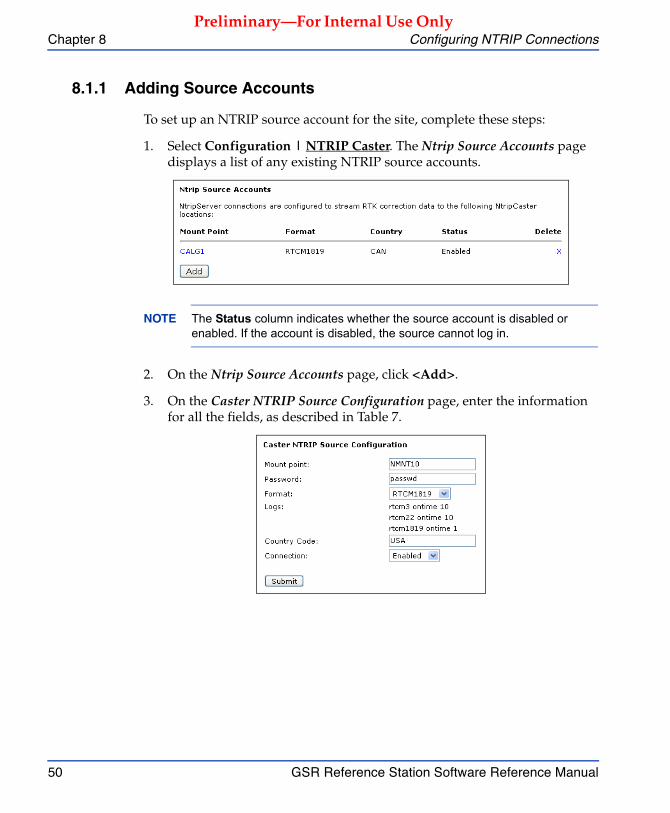
8.1.1 Adding Source Accounts
To set up an NTRIP source account for the site, complete these steps:
1. Select Configuration | NTRIP Caster. The Ntrip Source Accounts page displays a list of any existing NTRIP source accounts.
NOTE The Status column indicates whether the source account is disabled or enabled. If the account is disabled, the source cannot log in.
2. On the Ntrip Source Accounts page, click <Add>.
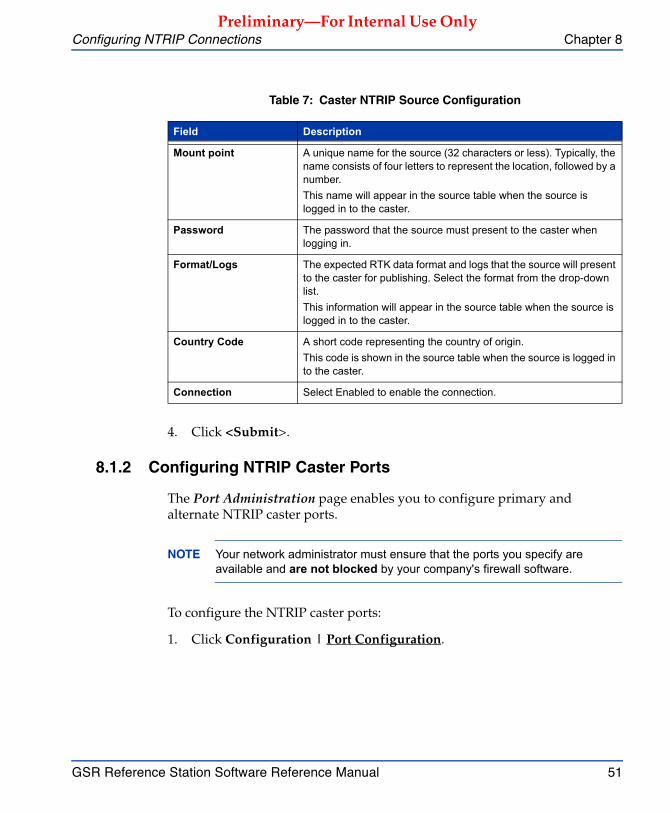
3. On the Caster NTRIP Source Configuration page, enter the information for all the fields, as described in Table 7.
Configuring NTRIP Connections Chapter 8
GSR Reference Station Software Reference Manual 51
Preliminary—For Internal Use Only
4. Click <Submit>.
8.1.2 Configuring NTRIP Caster Ports
The Port Administration page enables you to configure primary and alternate NTRIP caster ports.
NOTE Your network administrator must ensure that the ports you specify are available and are not blocked by your company's firewall software.
To configure the NTRIP caster ports:
1. Click Configuration | Port Configuration.
Table 7: Caster NTRIP Source Configuration
Field Description
Mount point A unique name for the source (32 characters or less). Typically, the name consists of four letters to represent the location, followed by a number.This name will appear in the source table when the source is logged in to the caster.
Password The password that the source must present to the caster when logging in.
Format/Logs The expected RTK data format and logs that the source will present to the caster for publishing. Select the format from the drop-down list.This information will appear in the source table when the source is logged in to the caster.
Country Code A short code representing the country of origin.This code is shown in the source table when the source is logged in to the caster.
Connection Select Enabled to enable the connection.
Chapter 8 Configuring NTRIP Connections
52 GSR Reference Station Software Reference Manual
Preliminary—For Internal Use Only
2. To enable the NTRIP primary and alternate caster ports, select the appropriate check box, and enter the port number you want to use for each port. Ensure you assign a valid open port.
3. Click <Submit>.
8.1.3 Modifying an NTRIP source account
To modify an NTRIP source account:
1. On the NTRIP Source Accounts page, click on the appropriate name in the Mount Point column.
2. On the Caster NTRIP Source Configuration page, make the necessary changes (see Table 7, Caster NTRIP Source Configuration, page 51, for details about each field).
NOTE To disable a connection, in the Connection field, select Disabled from the drop-down list. Any connection to the associated NTRIP source will be stopped. (The connection definition is not deleted.)
3. Click <Submit>.
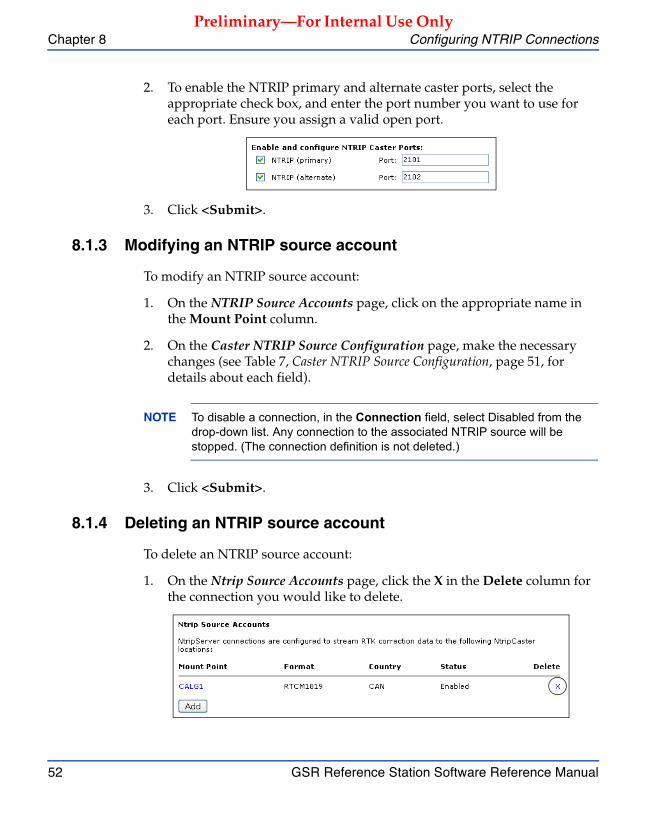
8.1.4 Deleting an NTRIP source account
To delete an NTRIP source account:
1. On the Ntrip Source Accounts page, click the X in the Delete column for the connection you would like to delete.
Configuring NTRIP Connections Chapter 8
GSR Reference Station Software Reference Manual 53
Preliminary—For Internal Use Only
2. In the message box that is displayed, click <OK> to delete the account.
8.2 Setting Up NTRIP Server Data Streams
The GSR Reference Station Software site can be operated as an NTRIP server (source) to continuously stream RTK correction data to specified remote NTRIP caster site locations, which pass the data to client users.
NOTE In order to set the site up as an NTRIP source, you first need to have an account on the NTRIP caster(s).
8.2.1 Adding an NTRIP Server Data Stream
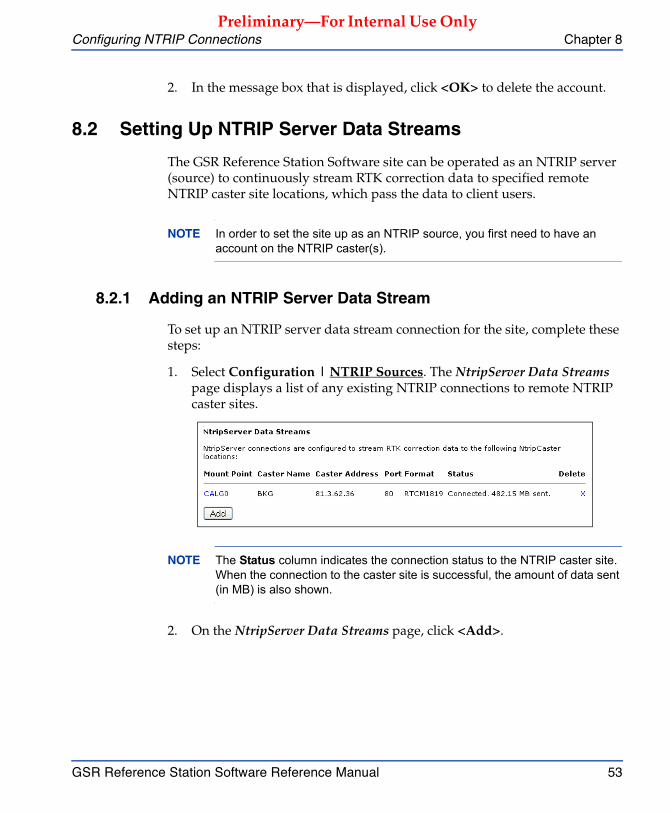
To set up an NTRIP server data stream connection for the site, complete these steps:
1. Select Configuration | NTRIP Sources. The NtripServer Data Streams page displays a list of any existing NTRIP connections to remote NTRIP caster sites.
NOTE The Status column indicates the connection status to the NTRIP caster site. When the connection to the caster site is successful, the amount of data sent (in MB) is also shown.
2. On the NtripServer Data Streams page, click <Add>.

Chapter 8 Configuring NTRIP Connections
54 GSR Reference Station Software Reference Manual
Preliminary—For Internal Use Only
3. On the NtripServer Configuration page, enter the information for all the fields, as described in Table 8.
4. Click <Submit>.
Table 8: NtripServer Configuration
Field Description
Caster name A name for the NTRIP caster site. This name must be a unique name of 32 characters or less.
Caster address The IP address of the NTRIP caster site.
Port The port number of the NTRIP caster site (provided by the NTRIP caster site administrator). The default port is 80.
Password The password for the NTRIP caster site (provided by the NTRIP caster site administrator).
Mount point The mount point ID for the NTRIP source as defined at the NTRIP caster site (provided by the NTRIP caster site administrator). This must be a unique mount point for each connection.
Format/Logs The data format in which to send the streamed data. Select the format from the drop-down list. The logs for the selected format are displayed.
Connection Select Enabled to enable the connection.
Configuring NTRIP Connections Chapter 8
GSR Reference Station Software Reference Manual 55
Preliminary—For Internal Use Only
8.2.2 Modifying an NTRIP server data stream
To modify an NTRIP server data stream connection:
1. On the NTRIP Sources page, click on the appropriate name in the Mount Point column.
2. On the NtripServer Configuration page, make the necessary changes (see Table 8, NtripServer Configuration, page 54, for details about each field).
NOTE To disable a connection, in the Connection field, select Disabled from the drop-down list. Any connection to the associated NTRIP caster site will be stopped. (The connection definition is not deleted.)
3. Click <Submit>.
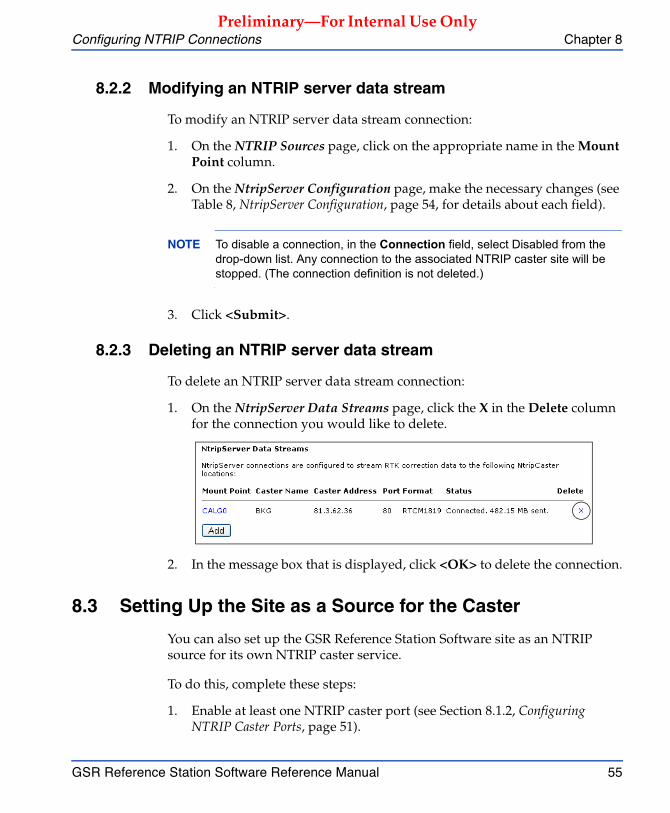
8.2.3 Deleting an NTRIP server data stream
To delete an NTRIP server data stream connection:
1. On the NtripServer Data Streams page, click the X in the Delete column for the connection you would like to delete.
2. In the message box that is displayed, click <OK> to delete the connection.
8.3 Setting Up the Site as a Source for the Caster
You can also set up the GSR Reference Station Software site as an NTRIP source for its own NTRIP caster service.
To do this, complete these steps:
1. Enable at least one NTRIP caster port (see Section 8.1.2, Configuring NTRIP Caster Ports, page 51).
Chapter 8 Configuring NTRIP Connections
56 GSR Reference Station Software Reference Manual
Preliminary—For Internal Use Only
2. Create an NTRIP source account for the site (see Section 8.1.1, Adding Source Accounts, page 50).
3. Create an NTRIP server data stream connection (see Section 8.2.1, Adding an NTRIP Server Data Stream, page 53). Use the port number you used in step 1, and the mount point and password information you used in step 2. Use the loopback IP address 127.0.0.1 as the Caster address.
GSR Reference Station Software Reference Manual 57
Preliminary—For Internal Use Only
Site Administration and Maintenance
This chapter describes the site’s administration and maintenance options, including how to view activity and statistics, how to manage disk space, and how to monitor for and resolve problems.
9.1 Viewing Active Connections and Statistics
Using the Connections main page, you can view information about all active RTK connections to the reference station site. You can also perform queries for connection statistics over specified time periods, for specific data formats.
9.1.1 Active Connections
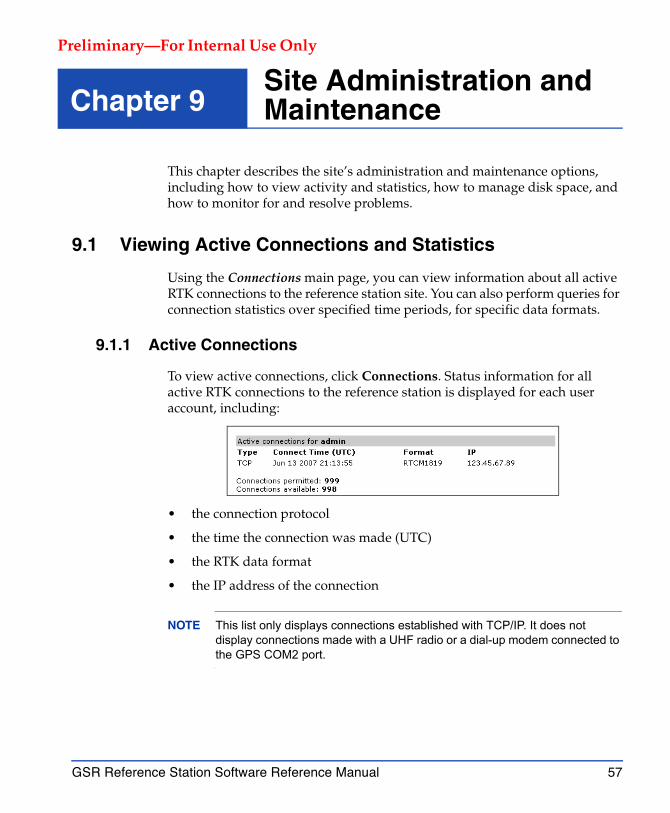
To view active connections, click Connections. Status information for all active RTK connections to the reference station is displayed for each user account, including:
• the connection protocol
• the time the connection was made (UTC)
• the RTK data format
• the IP address of the connection
NOTE This list only displays connections established with TCP/IP. It does not display connections made with a UHF radio or a dial-up modem connected to the GPS COM2 port.
Chapter 9
Chapter 9 Site Administration and Maintenance
58 GSR Reference Station Software Reference Manual
Preliminary—For Internal Use Only
In addition, the number of permitted and available RTK connections for the user are displayed.
NOTE Client accounts will see the connection status information only for their own account.
9.1.2 Connection Statistics
To view connection statistics:
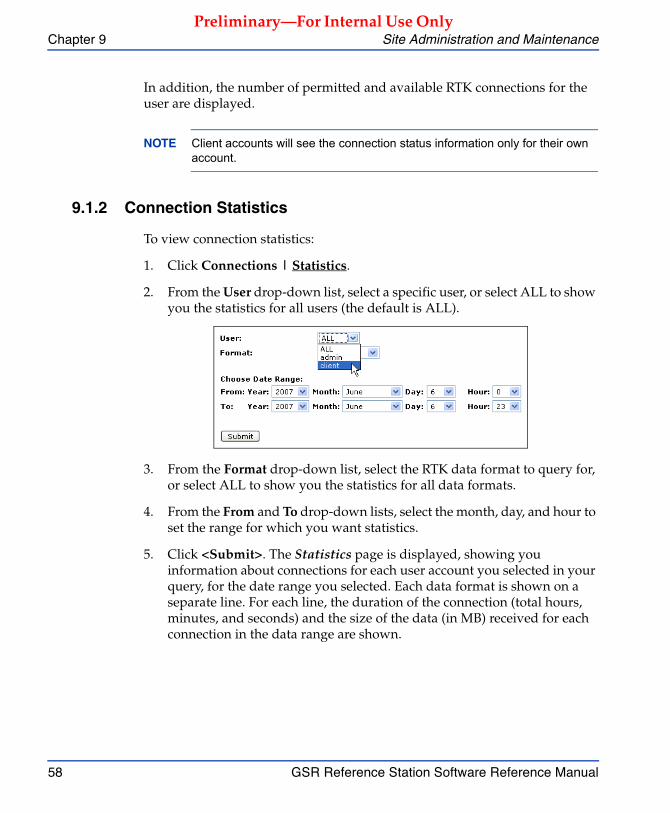
1. Click Connections | Statistics.
2. From the User drop-down list, select a specific user, or select ALL to show you the statistics for all users (the default is ALL).
3. From the Format drop-down list, select the RTK data format to query for, or select ALL to show you the statistics for all data formats.
4. From the From and To drop-down lists, select the month, day, and hour to set the range for which you want statistics.
5. Click <Submit>. The Statistics page is displayed, showing you information about connections for each user account you selected in your query, for the date range you selected. Each data format is shown on a separate line. For each line, the duration of the connection (total hours, minutes, and seconds) and the size of the data (in MB) received for each connection in the data range are shown.
Site Administration and Maintenance Chapter 9
GSR Reference Station Software Reference Manual 59
Preliminary—For Internal Use Only
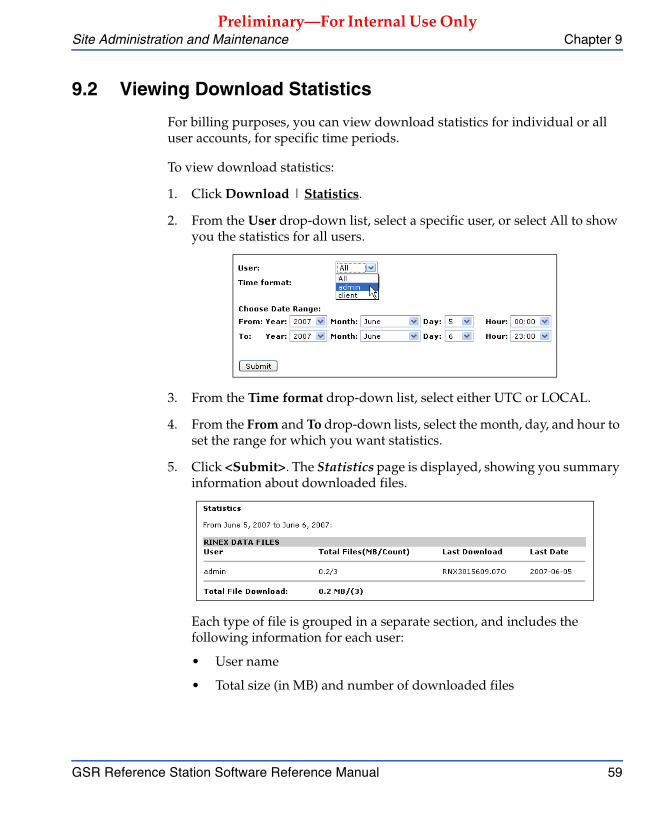
9.2 Viewing Download Statistics
For billing purposes, you can view download statistics for individual or all user accounts, for specific time periods.
To view download statistics:
1. Click Download | Statistics.
2. From the User drop-down list, select a specific user, or select All to show you the statistics for all users.
3. From the Time format drop-down list, select either UTC or LOCAL.
4. From the From and To drop-down lists, select the month, day, and hour to set the range for which you want statistics.
5. Click <Submit>. The Statistics page is displayed, showing you summary information about downloaded files.
Each type of file is grouped in a separate section, and includes the following information for each user:
• User name
• Total size (in MB) and number of downloaded files
Chapter 9 Site Administration and Maintenance
60 GSR Reference Station Software Reference Manual
Preliminary—For Internal Use Only
• Name of the last downloaded file
• Date of the last download
In addition, a total file size and number of downloaded files is shown for each data file type.
9.3 Managing Disk Space
The website offers two options for managing disk space. You can set up automatic disk cleanup based on criteria you specify, and you can manually delete files as needed.
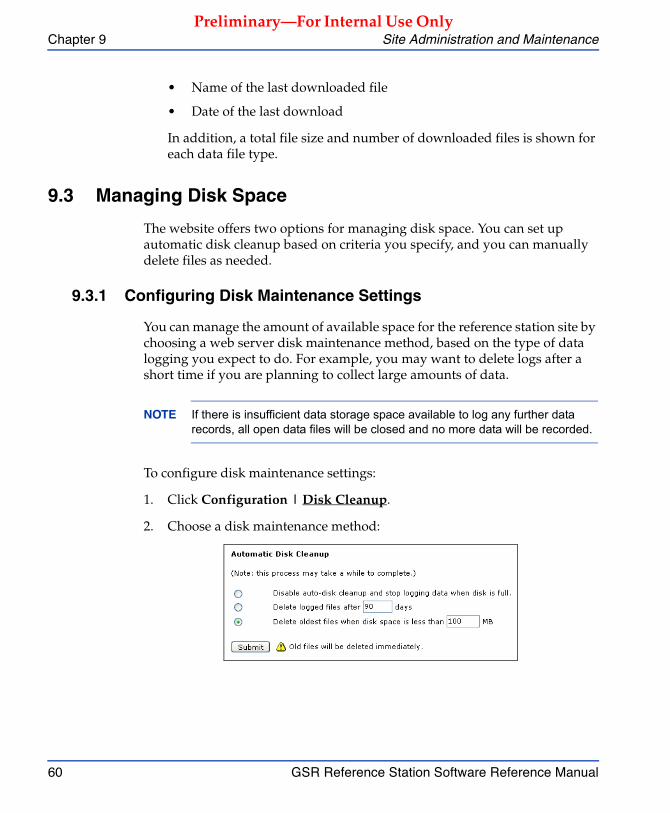
9.3.1 Configuring Disk Maintenance Settings
You can manage the amount of available space for the reference station site by choosing a web server disk maintenance method, based on the type of data logging you expect to do. For example, you may want to delete logs after a short time if you are planning to collect large amounts of data.
NOTE If there is insufficient data storage space available to log any further data records, all open data files will be closed and no more data will be recorded.
To configure disk maintenance settings:
1. Click Configuration | Disk Cleanup.
2. Choose a disk maintenance method:
Site Administration and Maintenance Chapter 9
GSR Reference Station Software Reference Manual 61
Preliminary—For Internal Use Only
• Disable auto-disk cleanup and stop logging data when disk is full—This option will collect data until the space allotted to collected data files is full. If you select this option, you must manually delete files to restore disk space when the disk is full (see Section 9.3.2, Manually Deleting Files, page 61). For most applications, this setting is not recommended.
• Delete logged files after n days—If you select this option, data files will automatically be deleted after they have been stored for the specified number of days.
NOTE If changes are made to this setting value, files older than the selected value will be immediately deleted.
• Delete oldest files when disk space is less than n MB—(the default) This option enables you to assign disk space for collected data. The receiver will delete the oldest file(s) when the receiver’s disk space falls to the specified limit. This is the recommended configuration.
3. Click <Submit>.
9.3.2 Manually Deleting Files
In addition to the automatic disk cleanup options, you can also manually delete collected data files to maintain file storage on the web server.
To delete data files:
1. Click Download. On the Download page calendar, find the date for which you want to delete the file and click the number of files link in the date field (for example, 72 files for January 6).
Chapter 9 Site Administration and Maintenance
62 GSR Reference Station Software Reference Manual
Preliminary—For Internal Use Only
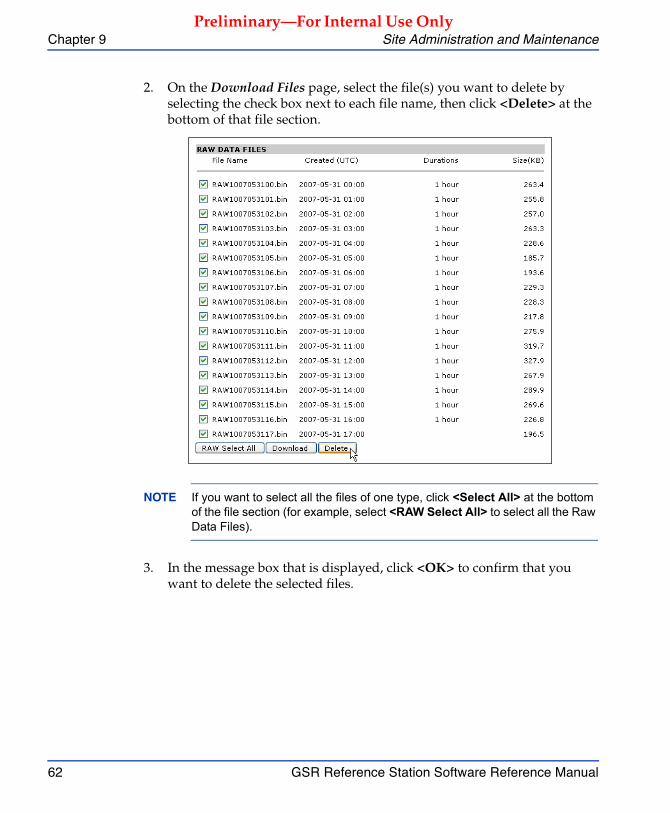
2. On the Download Files page, select the file(s) you want to delete by selecting the check box next to each file name, then click <Delete> at the bottom of that file section.
NOTE If you want to select all the files of one type, click <Select All> at the bottom of the file section (for example, select <RAW Select All> to select all the Raw Data Files).
3. In the message box that is displayed, click <OK> to confirm that you want to delete the selected files.
Site Administration and Maintenance Chapter 9
GSR Reference Station Software Reference Manual 63
Preliminary—For Internal Use Only
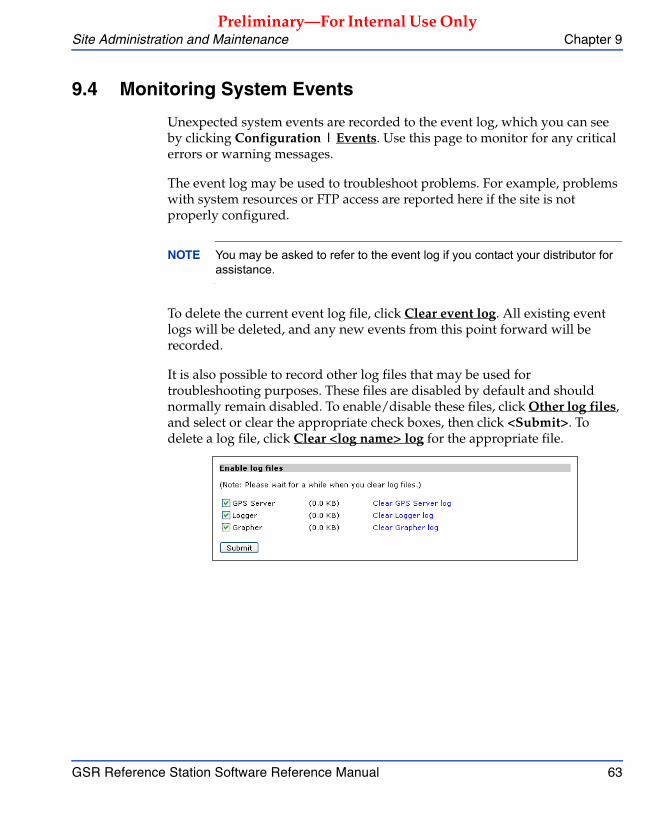
9.4 Monitoring System Events
Unexpected system events are recorded to the event log, which you can see by clicking Configuration | Events. Use this page to monitor for any critical errors or warning messages.
The event log may be used to troubleshoot problems. For example, problems with system resources or FTP access are reported here if the site is not properly configured.
NOTE You may be asked to refer to the event log if you contact your distributor for assistance.
To delete the current event log file, click Clear event log. All existing event logs will be deleted, and any new events from this point forward will be recorded.
It is also possible to record other log files that may be used for troubleshooting purposes. These files are disabled by default and should normally remain disabled. To enable/disable these files, click Other log files, and select or clear the appropriate check boxes, then click <Submit>. To delete a log file, click Clear <log name> log for the appropriate file.
Chapter 9 Site Administration and Maintenance
64 GSR Reference Station Software Reference Manual
Preliminary—For Internal Use Only
9.5 Entering Commands
If you want to directly communicate with the receiver (for example, to run diagnostics), you can enter commands. For information about the commands that you can use, contact your distributor.
To enter commands:
1. Click Configuration | Command Line.
2. Type a command in the Command text field at the bottom of the page.
3. Click <Send>.
4. Review the receiver response in the Receiver Command Line window.
5. To clear the command/response history, click Clear history.
9.6 Restarting the Server
In the event that you need to restart the web server, you can do so by clickingConfiguration | Reboot server, then click <Reboot>. The web server will be restarted (all open data files will be closed, and data logging will resume after the server has been restarted).
NOTE You may be prompted to restart the server following a firmware reload (see Section 9.7, Reloading Receiver Firmware, page 65).
CAUTION
This feature is recommended for advanced users only. Incorrect use of command line options may disable certain features, or prevent the software from operating correctly.
Site Administration and Maintenance Chapter 9
GSR Reference Station Software Reference Manual 65
Preliminary—For Internal Use Only
9.7 Reloading Receiver Firmware
If the GSR Reference Station Software software is installed on the GSR2700 RS or GSR2700 RSX, you can upgrade the firmware on the receiver.
To upload a new firmware file to the receiver:
1. Contact your distributor to obtain all the necessary information, including the firmware upgrade file and the authorization code to install the upgrade.
2. Store the firmware upgrade file in a location on your PC that you can easily access through the GSR Reference Station Software website.
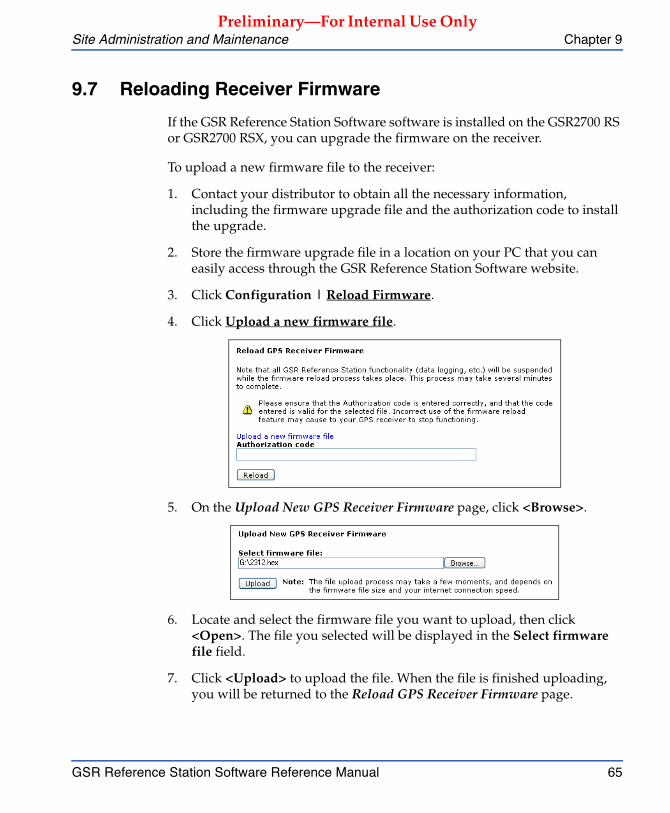
3. Click Configuration | Reload Firmware.
4. Click Upload a new firmware file.
5. On the Upload New GPS Receiver Firmware page, click <Browse>.
6. Locate and select the firmware file you want to upload, then click <Open>. The file you selected will be displayed in the Select firmware file field.
7. Click <Upload> to upload the file. When the file is finished uploading, you will be returned to the Reload GPS Receiver Firmware page.
Chapter 9 Site Administration and Maintenance
66 GSR Reference Station Software Reference Manual
Preliminary—For Internal Use Only
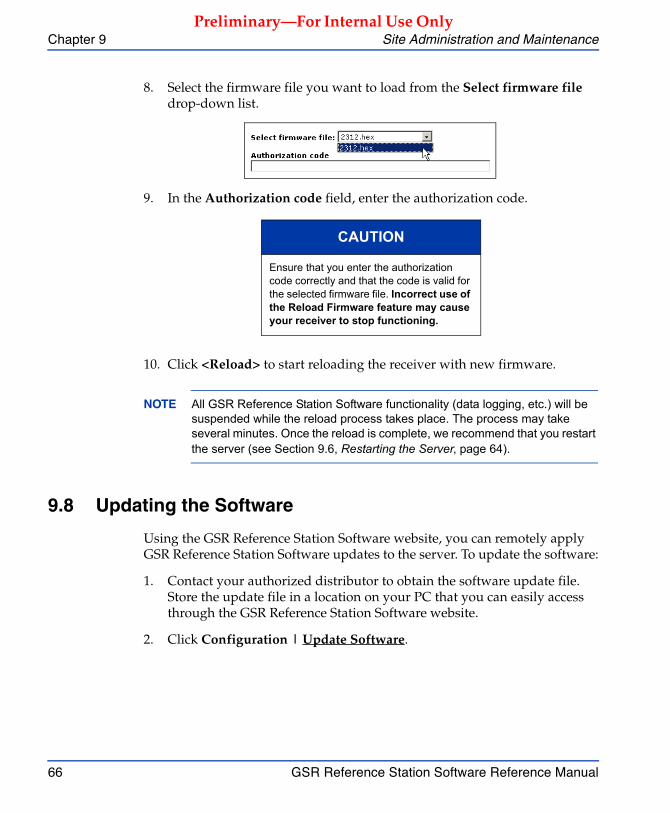
8. Select the firmware file you want to load from the Select firmware file drop-down list.
9. In the Authorization code field, enter the authorization code.
10. Click <Reload> to start reloading the receiver with new firmware.
NOTE All GSR Reference Station Software functionality (data logging, etc.) will be suspended while the reload process takes place. The process may take several minutes. Once the reload is complete, we recommend that you restart the server (see Section 9.6, Restarting the Server, page 64).
9.8 Updating the Software
Using the GSR Reference Station Software website, you can remotely apply GSR Reference Station Software updates to the server. To update the software:
1. Contact your authorized distributor to obtain the software update file. Store the update file in a location on your PC that you can easily access through the GSR Reference Station Software website.
2. Click Configuration | Update Software.
CAUTION
Ensure that you enter the authorization code correctly and that the code is valid for the selected firmware file. Incorrect use of the Reload Firmware feature may cause your receiver to stop functioning.
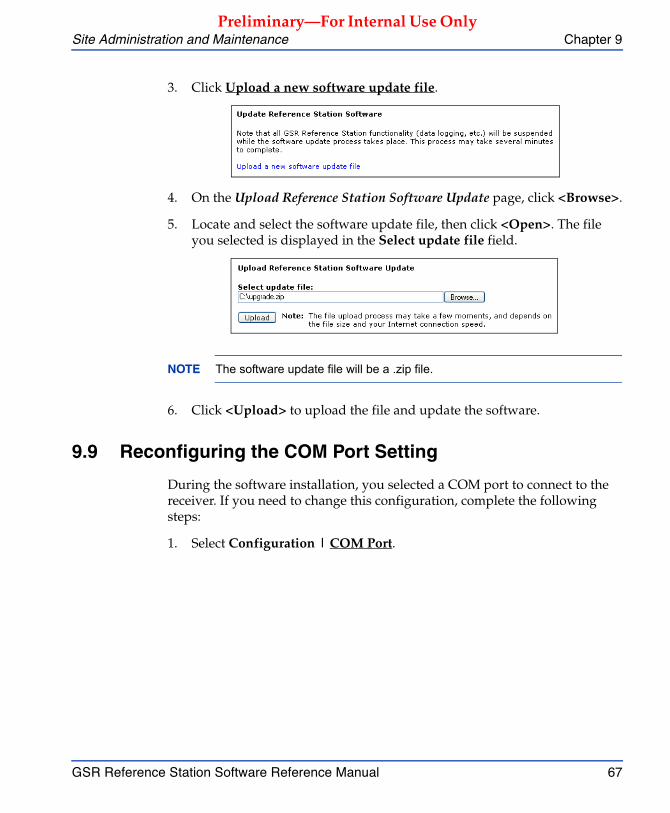
Site Administration and Maintenance Chapter 9
GSR Reference Station Software Reference Manual 67
Preliminary—For Internal Use Only
3. Click Upload a new software update file.
4. On the Upload Reference Station Software Update page, click <Browse>.
5. Locate and select the software update file, then click <Open>. The file you selected is displayed in the Select update file field.
NOTE The software update file will be a .zip file.
6. Click <Upload> to upload the file and update the software.
9.9 Reconfiguring the COM Port Setting
During the software installation, you selected a COM port to connect to the receiver. If you need to change this configuration, complete the following steps:
1. Select Configuration | COM Port.
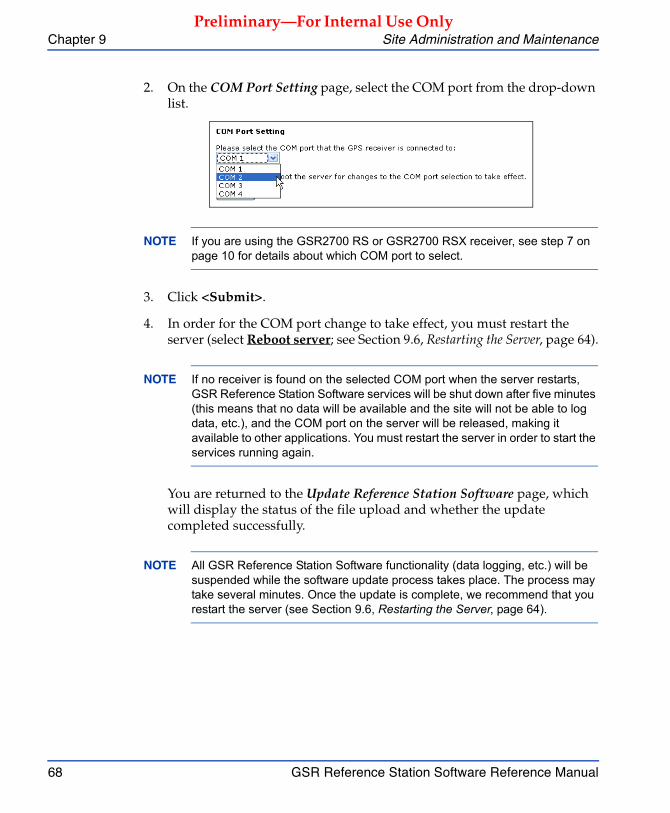
Chapter 9 Site Administration and Maintenance
68 GSR Reference Station Software Reference Manual
Preliminary—For Internal Use Only
2. On the COM Port Setting page, select the COM port from the drop-down list.
NOTE If you are using the GSR2700 RS or GSR2700 RSX receiver, see step 7 on page 10 for details about which COM port to select.
3. Click <Submit>.
4. In order for the COM port change to take effect, you must restart the server (select Reboot server; see Section 9.6, Restarting the Server, page 64).
NOTE If no receiver is found on the selected COM port when the server restarts, GSR Reference Station Software services will be shut down after five minutes (this means that no data will be available and the site will not be able to log data, etc.), and the COM port on the server will be released, making it available to other applications. You must restart the server in order to start the services running again.
You are returned to the Update Reference Station Software page, which will display the status of the file upload and whether the update completed successfully.
NOTE All GSR Reference Station Software functionality (data logging, etc.) will be suspended while the software update process takes place. The process may take several minutes. Once the update is complete, we recommend that you restart the server (see Section 9.6, Restarting the Server, page 64).

Site Administration and Maintenance Chapter 9
GSR Reference Station Software Reference Manual 69
Preliminary—For Internal Use Only
9.10 Setting an Advisory Message
You can set an advisory message to be displayed on the Home page, notifying users of important events affecting the site (for example, if the site is unavailable due to regular maintenance.)
To set an advisory message:
1. On the Home page, click Advisory.
2. Type the text of the advisory message in the entry field.
3. Select the Enable Advisory check box to enable the advisory.
4. Click <Submit>.
To disable the message:
1. On the Home page, click Advisory.
2. Clear the Enable Advisory check box.
3. Click <Submit>.

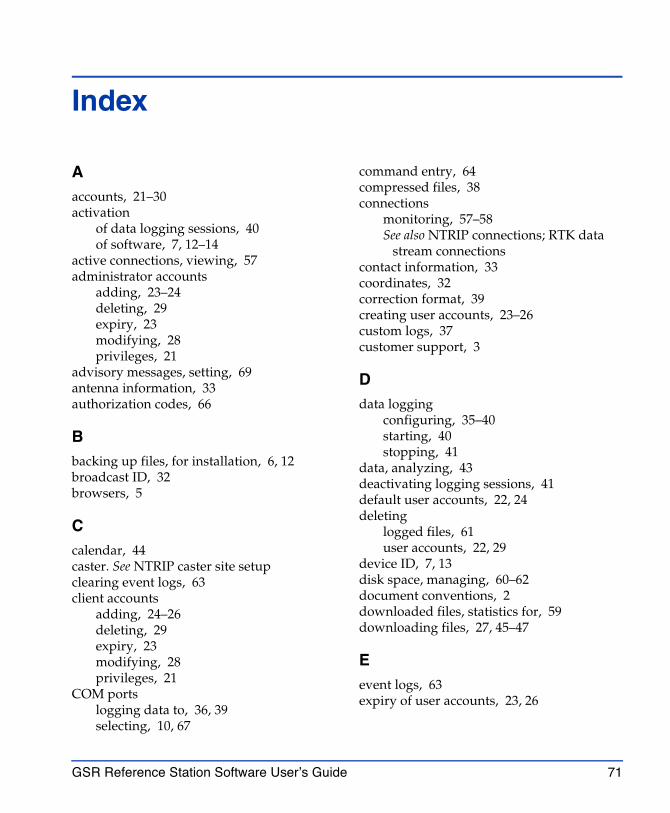
GSR Reference Station Software User’s Guide 71
Aaccounts, 21–30activation
of data logging sessions, 40of software, 7, 12–14
active connections, viewing, 57administrator accounts
adding, 23–24deleting, 29expiry, 23modifying, 28privileges, 21
advisory messages, setting, 69antenna information, 33authorization codes, 66
Bbacking up files, for installation, 6, 12broadcast ID, 32browsers, 5
Ccalendar, 44caster. See NTRIP caster site setupclearing event logs, 63client accounts
adding, 24–26deleting, 29expiry, 23modifying, 28privileges, 21
COM portslogging data to, 36, 39selecting, 10, 67
command entry, 64compressed files, 38connections
monitoring, 57–58See also NTRIP connections; RTK data
stream connectionscontact information, 33coordinates, 32correction format, 39creating user accounts, 23–26custom logs, 37customer support, 3
Ddata logging
configuring, 35–40starting, 40stopping, 41
data, analyzing, 43deactivating logging sessions, 41default user accounts, 22, 24deleting
logged files, 61user accounts, 22, 29
device ID, 7, 13disk space, managing, 60–62document conventions, 2downloaded files, statistics for, 59downloading files, 27, 45–47
Eevent logs, 63expiry of user accounts, 23, 26
Index
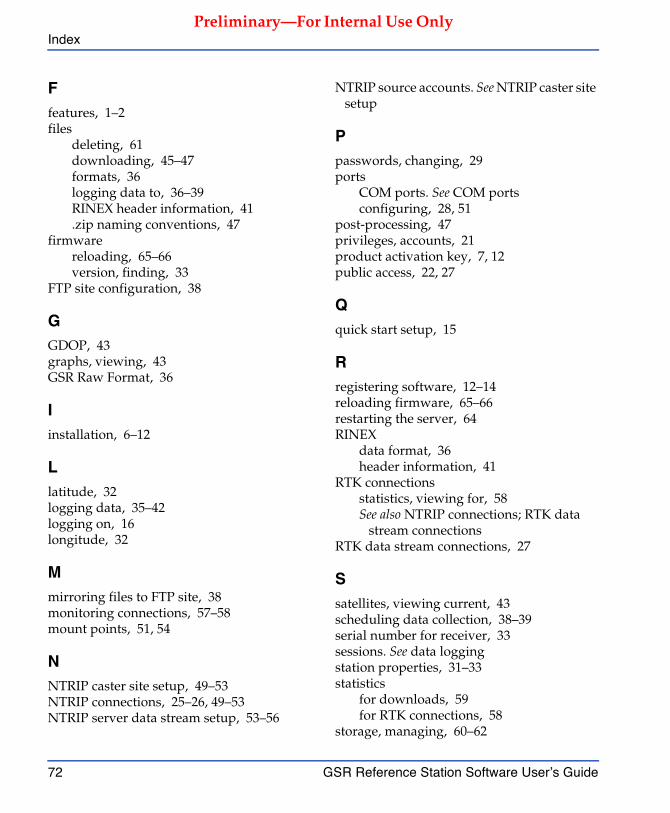
Index
72 GSR Reference Station Software User’s Guide
Preliminary—For Internal Use Only
Ffeatures, 1–2files
deleting, 61downloading, 45–47formats, 36logging data to, 36–39RINEX header information, 41.zip naming conventions, 47
firmwarereloading, 65–66version, finding, 33
FTP site configuration, 38
GGDOP, 43graphs, viewing, 43GSR Raw Format, 36
Iinstallation, 6–12
Llatitude, 32logging data, 35–42logging on, 16longitude, 32
Mmirroring files to FTP site, 38monitoring connections, 57–58mount points, 51, 54
NNTRIP caster site setup, 49–53NTRIP connections, 25–26, 49–53NTRIP server data stream setup, 53–56
NTRIP source accounts. See NTRIP caster site setup
Ppasswords, changing, 29ports
COM ports. See COM portsconfiguring, 28, 51
post-processing, 47privileges, accounts, 21product activation key, 7, 12public access, 22, 27
Qquick start setup, 15
Rregistering software, 12–14reloading firmware, 65–66restarting the server, 64RINEX
data format, 36header information, 41
RTK connectionsstatistics, viewing for, 58See also NTRIP connections; RTK data
stream connectionsRTK data stream connections, 27
Ssatellites, viewing current, 43scheduling data collection, 38–39serial number for receiver, 33sessions. See data loggingstation properties, 31–33statistics
for downloads, 59for RTK connections, 58
storage, managing, 60–62
Index
GSR Reference Station Software User’s Guide 73
Preliminary—For Internal Use Only
support, technical, 3system events, 63system requirements, 5
Ttechnical support, 3troubleshooting, 63
Uupdating the software, 66user accounts, 21–30
Z.zip files, 38, 47


Preliminary—For Internal Use Only
SOKKIA has been delivering superior products, sales and support around the world since 1920. You can find an authorized SOKKIA representative in nearly every region of the globe. For customer service, we recommend that you contact your local SOKKIA distributor. If you need assistance locating a distributor in your area, please contact the appropriate SOKKIA worldwide office listed below.
CENTRAL & SOUTH AMERICA
SOKKIA Latin AmericaMiami, Florida, U.S.A.Phone: +1 305-599-4701Web: www.sokkialatinamerica.com
CHINA
SOKKIA CO., LTD. Shanghai Representative OfficeShanghai, People’s Republic of ChinaPhone: +86-21-63541844Web: www.sokkia.com.cn
SOKKIA CO., LTD. Beijing Representative OfficeBeijing, People’s Republic of ChinaPhone: +86-10-65056066Web: www.sokkia.com.cn
EUROPE
SOKKIA B.V.Almere, The NetherlandsPhone: +31-(0)36-5496000Web: www.sokkia.net
JAPAN
SOKKIA CO., LTD., International Dept.Atsugi, Kanagawa, JapanPhone: +81-46-248-7984Web: www.sokkia.co.jp
U.S.A.
SOKKIA Corporation (U.S.A.)Olathe, Kansas, U.S.A.Phone: +1 800-4-SOKKIA or +1 913-492-4900Web: www.sokkia.com
CANADA
SOKKIA Corporation (Canada)Mississauga, Ontario, CanadaPhone: +1-800-476-5542 or +1 905-238-5810Web: www.sokkiacanada.com
Preliminary—For Internal Use OnlyOCEANIA (AUSTRALIA/NEW ZEALAND)
SOKKIA Pty. Ltd.Rydalmere, New South Wales, AustraliaPhone: +61-2-9638-2400Web: www.sokkia.com.au
SOUTH KOREA
SOKKIA Korea Co., Ltd.Seoul, Republic of KoreaPhone: +82-2-514-0491Web: www.sokkia.co.kr