Growatt Manual
35
GROWATT NEW ENERGY CO LTD ., + 86 755 2747 1942 + 86 755 2747 2131 [email protected] www.growatt.com T F E W Growatt 3600MTL-10 Growatt 4200MTL-10 Growatt 5000MTL-10 Installation & Operation Manual No 28 Guangming Road, Shiyan, Baoan District, Shenzhen, P.R. China . GR - UM - 012 - 06 044.0002801
description
manual
Transcript of Growatt Manual

GROWATT NEW ENERGY CO LTD.,
+ 86 755 2747 1942
+ 86 755 2747 2131
www.growatt.com
T
F
E
W
Growatt 3600MTL-10
Growatt 4200MTL-10
Growatt 5000MTL-10
Installation&
Operation Manual
No 28 Guangming Road, Shiyan, Baoan District,
Shenzhen, P.R. China
.
GR - UM - 012 - 06044.0002801

1.1 Validity1.2 Target Group1.3 Additional information1.4 Symbols in this document1.5 Glossary
Safety
Product description
Unpacking and inspection
5.1 Safety instructions5.2 Selecting the installation location5.3 Mounting the Inverter
list
1
2
3
4
2.1 Intended Use2.2 Qualification of skilled person2.3 Safety instruction2.4 Assembly Warnings2.5 Electrical Connection Warnings2.6 Operation Warnings
Installation5
Electrical connection
Commissioning
Start-Up and shut down the inverter
8.1 Start-Up the inverter8.2 Turn-off the Inverter
6
7
8
7.1 General LCD display7.2 Operate by knock7.3 Communications
Maintenance and Cleaning
9.1 Checking Heat Dissipation9.2 Cleaning the Inverter9.3 Checking the DC Disconnect
9
10.1 Warnings(W)10.2 Errors(E)
Trouble shooting10
3.1 MTL-10 Overview3.2 Type label3.3 Size and weight3.4 Storage of Inverter3.5 The advantage of the unit
6.1 Safety6.2 Wiring AC Output6.3 connecting the second protectiveconductor
6.4 Connecting the PV Array (DC input)6.5 RS485 cable connection6.6 Using shinetool to set theinformation of the inverter6.7 Grounding the inverter6.8 Selecting country by DIP switch
Notes on this manual

Notes on this manual 1Notes on this manual 1
1.1 Validity
1.2 Target Group
1.3 Additional information
This manual describes the assembly, installation, commissioning and maintenance of
the following Growatt Inverter model:
Growatt 3600 MTL-10Growatt 4200 MTL-10Growatt 5000 MTL-10
This manual is for qualified personnel. Qualified personnel have received training and
have demonstrated skills and knowledge in the construction and operation of this
device. Qualified Personnel are trained to deal with the dangers and hazards involved
in installing electric devices.
Contact
11.1 Warranted products11.2 Limited Product Warranty11.3 Liability11.4 Warranty conditions
Manufacturer Warranty
Decommissioning
Technical Data
PV system installation
Compliance Certificates
11
12
13
14
15
16
This manual does not cover any details concerning equipment connected to the
Growatt MTL-10( e.g. PV modules). Information concerning the connected
equipment is available from the manufacturer of the equipment.
1
13.1 Specification13.2 DC connector info13.3 Torque13.4 Accessories
15.1 List15.2 Download Address
12.1 Dismantling the Inverter12.2 Packing the Inverter12.3 Storing the Inverter12.4 Disposing of the Inverter
F ind fur ther in fo rmat ion on spec ia l top i c s in the download area at
www.ginverter.com
The manual and other documents must be stored in a convenient place and be
available at all times. We assume no liability for any damage caused by failure to
observe these instructions. For possible changes in this manual, GROWATT NEW
ENERGY TECHNOLOGY CO.,LTD accepts no responsibilities to inform the users.
1.4 Symbols in this document

1.4.1 Warnings in this document
A warning describes a hazard to equipment or personnel. It calls attention to a
procedure or practice, which, if not correctly performed or adhered to, could result in
damage to or destruction of part or all of the Growatt equipment and/or other
equipment connected to the Growatt equipment or personal injury.
Symbol description
DANGER
DANGER indicates a hazardous situation which, if
not avoided, will result in death or serious injury.
WARNING
WARNING indicates a hazardous situation which, if
not avoided, could result in death or serious injury.
CAUTION
CAUTION indicates a hazardous situation which, if
not avoided, could result in minor or moderate
NOTICE
NOTICE is used to address practices not related to
personal injury.
Information
Information that you must read and know to
ensure optimal operation of the system.
1.4.2 Markings on this product1.4.2 Markings on this product
Symbol Explanation
2
Electrical voltage!
Risk of fire or explosion!Risk of fire or explosion!
Risk of burnsRisk of burns
Operation after 10 minutes
Point of connection for grounding protection
Direct Current (DC)
Alternating Current (AC)
The inverter has no transformer.
Read the manual
Bluetooth communication is enabled.
CE mark.The inverter complies with the requirementsof the applicable EC guidelines.
CE mark.The inverter complies with the requirementsof the applicable EC guidelines.
The inverter must not be disposed ofwith the household waste.The inverter must not be disposed ofwith the household waste.
1.5 Glossary
3
Abbreviation for "Alternating Current”
Abbreviation for "Direct Current”
Energy is measured in Wh (watt hours), kWh (kilowatt hours) or MWh (megawatt
hours). The energy is the power calculated over time. If, for example, your inverter
operates at a constant power of 4600 W for half an hour and then at a constant
AC
DC
Energy

4 5
power of 2300 W for another half an hour, it has fed 3450Wh of energy into the
power distribution grid within that hour.
Power is measured in W (watts), kW (kilowatts) or MW (megawatts). Power is an
instantaneous value. It displays the power your inverter is currently feeding into the
power distribution grid.
Power rate is the radio of current power feeding into the power distribution grid and
the maximum power of the inverter that can feed into the power distribution grid.Power FactorPower factor is the ratio of true power or watts to apparent power or volt amps. They
are identical only when current and voltage are in phase than the power factor is 1.0.
The power in an ac circuit is very seldom equal to the direct product of the volts and
amperes. In order to find the power of a single phase ac circuit the product of volts
and amperes must be multiplied by the power factor.
Abbreviation for photovoltaic
The external wireless communication technology is a radio technology that allows
the inverter and other communication products to communicate with each other. The
external wireless communication does not require line of sight between the devices
and it is selective purchasing.
2.1 Intended Use
The unit converts the DC current generated by the photovoltaic (PV) modules to grid-
compliant alternating current and performs single-phase feed-in into the electricity
grid. Growatt 3600MTL-10 Growatt 4200 MTL-10 Growatt 5000MTL-10 inverters
are built according to all required safety rules. Nevertheless, improper use may cause
lethal hazards for the operator or third parties, or may result in damage to the units
and other property.
, ,
Principle of a PV plant with this GROWATT XXXXMTL-10 single-phase inverter
Power
Power rate
PV
wireless communication
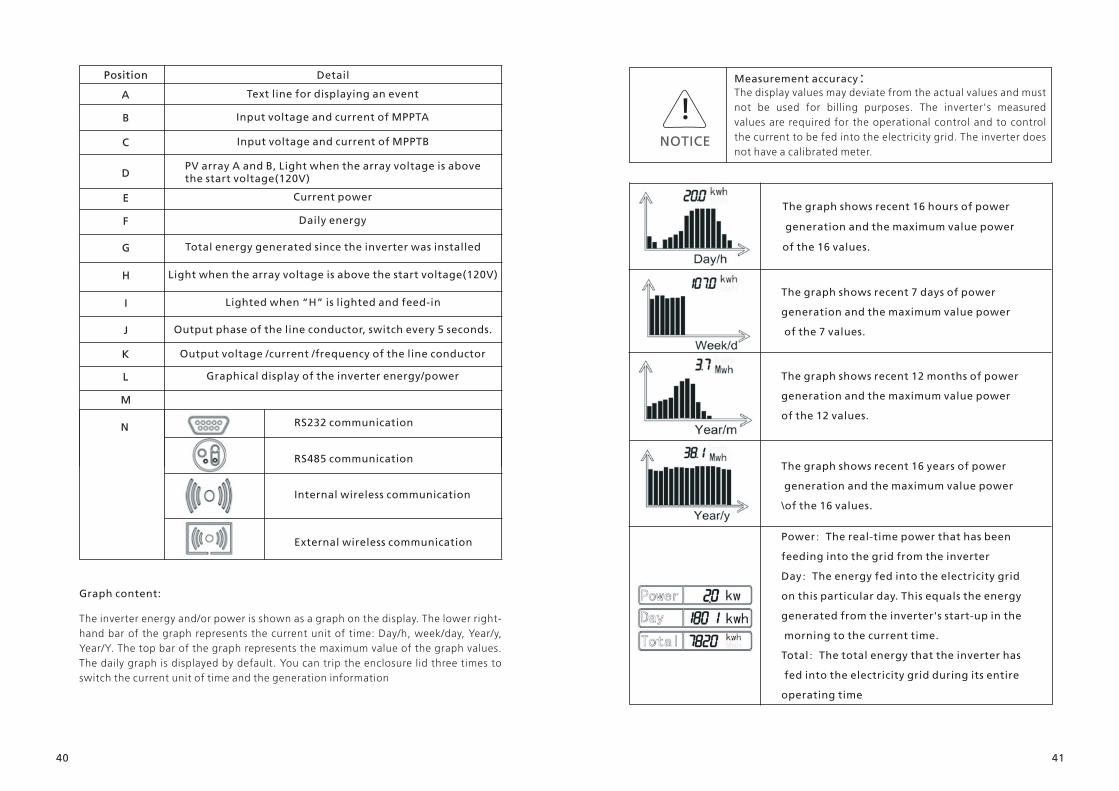
Position Description
A PV modules
B
C
D
E
F
DC load circuit breakerDC load circuit breaker
Growatt Inverter
AC load circuit breakerAC load circuit breaker
Energy meter
Utility grid
The inverter may only be operated with a permanent connection to the public power
grid. The inverter is not intended for mobile use. Any other or additional use is not
considered the intended use. The manufacturer/supplier is not liable for damage
caused by such unintended use. Damage caused by such unintended use is at the
sole risk of the operator.
2 Safety2 Safety

6
PV modules Capacitive Discharge Currents
PV modules with large capacities relative to earth, such as thin-film PV modules with
cells on a metallic substrate, may only be used if their coupling capacity does not
exceed 470nF. During feed-in operation, a leakage current flows from the cells to
earth, the size of which depends on the manner in which the PV modules are installed
(e.g. foil on metal roof) and on the weather (rain, snow). This "normal" leakage
current may not exceed 50mA due to the fact that the inverter would otherwise
automatically disconnect from the electricity grid as a protective measure.
2.2 Qualification of skilled person2.2 Qualification of skilled person
This grid-tied inverter system operates only when properly connected to the AC -
distribution network. Before connecting the Growatt MTL-10 to the power
distribution grid, contact the local power distribution grid company. This connection
must be made only by qualified technical personnel to connect, and only after
receiving appropriate approvals, as required by the local authority having
jurisdiction.
2.3 Safety instruction
The GROWATT MTL-10 Inverters is designed and tested according to international
safety requirements IEC62109-1 VDE-AR-N4105 CE VDE0126-1-1 CEI 0-21
however, certain safety precautions must be observed when installing and
operating this inverter. Read and follow all instructions, cautions and warnings in
this installation manual. If questions arise, please contact Growatt's technical
services at +86 (0)755 2747 1900.
( ; ; ; ; )
;
2.4 Assembly Warnings
Prior to installation, inspect the unit to ensure absence of
any transport or handling damage, which could affect
insulation integrity or safety clearances; failure to do so
could result in safety hazards.Assemble the inverter per the instructions in this manual.
Use care when choosing installation location and adhere to
specified cooling requirements.Unauthorized removal of necessary protections, improper
use, incorrect installation and operation may lead to serious
safety and shock hazards and/or equipment damage.In order to minimize the potential of a shock hazard due to
hazardous voltages, cover the entire solar array with dark
material prior to connecting the array to any equipment.
WARNING
CAUTION
DANGER
WARNING
7
2.5 Electrical Connection Warnings
Grounding the PV modules The Growatt MTL-10 is a
transformerless inverter. That is why it has no galvanic
separation. Do not ground the DC circuits of the PV modules
connected to the Growatt MTL-10. Only ground the
mounting frame of the PV modules.If you connect grounded
PV modules to the Growatt MTL-10, the error message "PV
ISO Low".Comply with the local requirements for grounding the PV
modules and the PV generator. GROWATT recommends
connecting the generator frame and other electrically
conductive surfaces in a manner which ensures continuous
conduction with ground in order to have optimal protection
of the system and personnel.
:
The components in the inverter are live. Touching live
components can result in serious injury or death.
Do not open the inverter except the wire box by
qualified persons.
Electrical installation, repairs and conversions may only
be carried out by electrically qualified persons.
Do not touch damaged inverters.
Danger to life due to high voltages in the inverter
There is residual voltage in the inverter. The inverter
takes 20 minutes to discharge
Wait 20 minutes before you open the wire box.
Persons with limited physical or mental abilities may only
work with the Growatt inverter following proper instruction
and under constant supervision. Children are forbidden to
play with the Growatt inverter. Must keep the Growatt
inverter away from children.
Make all electrical connections (e.g. conductor termination,
fuses, PE connection, etc.) in accordance with prevailing
regulations. When working with the inverter powered on,
adhere to all prevailing safety regulations to minimize risk of
accidents.Systems with inverters typically require additional control
(e.g., switches, disconnects) or protective devices (e.g.,
fusing circuit breakers) depending upon the prevailing safety
rules.
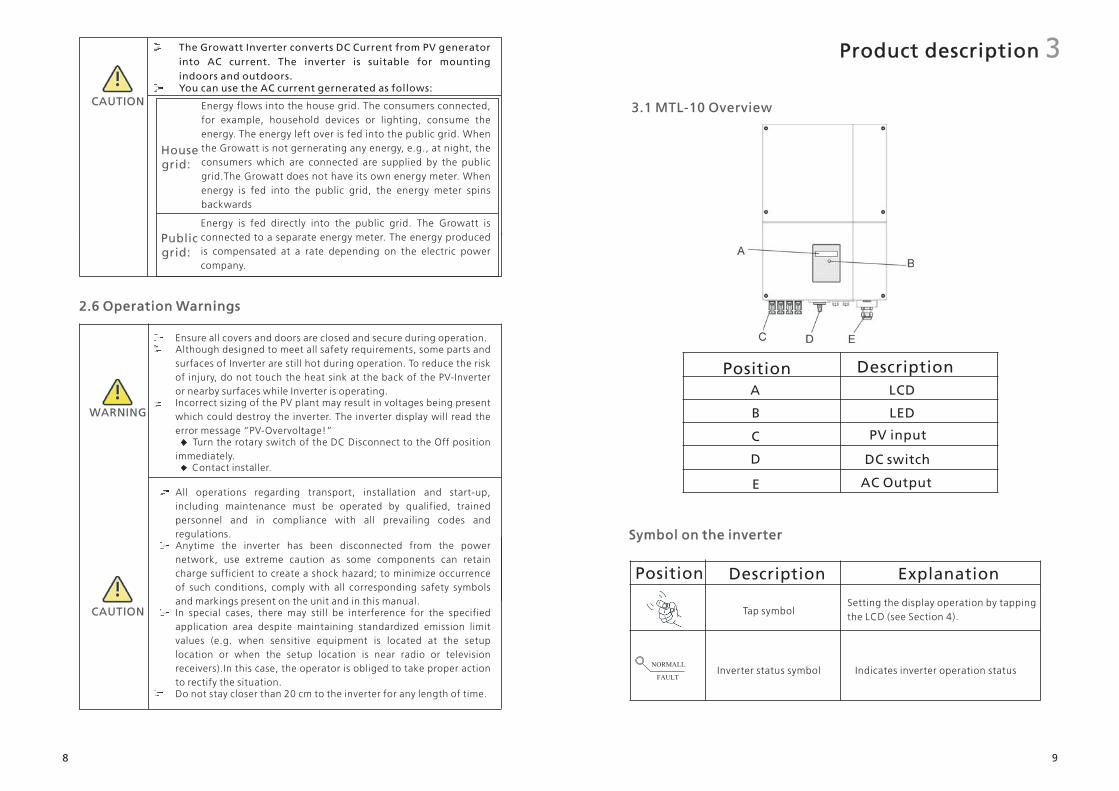
Product description 3Product description 3
98
The Growatt Inverter converts DC Current from PV generator
into AC current. The inverter is suitable for mounting
indoors and outdoors.You can use the AC current gernerated as follows:
CAUTION Energy flows into the house grid. The consumers connected,
for example, household devices or lighting, consume the
energy. The energy left over is fed into the public grid. When
the Growatt is not gernerating any energy, e.g., at night, the
consumers which are connected are supplied by the public
grid.The Growatt does not have its own energy meter. When
energy is fed into the public grid, the energy meter spins
backwards
Energy is fed directly into the public grid. The Growatt is
connected to a separate energy meter. The energy produced
is compensated at a rate depending on the electric power
company.
2.6 Operation Warnings2.6 Operation Warnings
Ensure all covers and doors are closed and secure during operation.Although designed to meet all safety requirements, some parts and
surfaces of Inverter are still hot during operation. To reduce the risk
of injury, do not touch the heat sink at the back of the PV-Inverter
or nearby surfaces while Inverter is operating.Incorrect sizing of the PV plant may result in voltages being present
which could destroy the inverter. The inverter display will read the
error message “PV-Overvoltage!”Turn the rotary switch of the DC Disconnect to the Off position
immediately.Contact installer.
All operations regarding transport, installation and start-up,
including maintenance must be operated by qualified, trained
personnel and in compliance with all prevailing codes and
regulations.Anytime the inverter has been disconnected from the power
network, use extreme caution as some components can retain
charge sufficient to create a shock hazard; to minimize occurrence
of such conditions, comply with all corresponding safety symbols
and markings present on the unit and in this manual.In special cases, there may still be interference for the specified
application area despite maintaining standardized emission limit
values (e.g. when sensitive equipment is located at the setup
location or when the setup location is near radio or television
receivers).In this case, the operator is obliged to take proper action
to rectify the situation.Do not stay closer than 20 cm to the inverter for any length of time.
3.1 MTL-10 Overview
Position
A
B
C
D
E
Description
LCD
LED
PV input
DC switch
AC Output
Symbol on the inverterSymbol on the inverter
Position Description Explanation
Tap symbolSetting the display operation by tapping
the LCD (see Section 4).
NORMALL
FAULTInverter status symbol Indicates inverter operation status
Housegrid:
Publicgrid:
WARNING
CAUTION

1110
3.2 Type label
More detail about the type label as the chart below:
Model NameGrowatt3600MTL-10
Growatt4200MTL-10
Growatt5000MTL-10
Max input DC voltage 600V 600V 600V
Max input DC current 10A/10A 15A/15A 15A/15A
PV voltage range 100V~600V 100V~600V 100V~600V
AC nominal voltage 230V 230V 230V
AC grid frequency 50Hz
Max. apparent power
50Hz 50Hz
3600VA 4200VA 4600VA
AC normal output current 15.6A 18.5A 20A
Power factor 0.95 leading-0.95laging
EnvironmentalProtection Rating
Ip65
Operation Ambienttemperature
25...+60 (-13...+ 140°F)with derating above 45°C 113°F
℃
( )
3.3 Size and weight
Dimensions and weight
Model Height (H) Width (W) Depth (D)
Growatt3600MTL-10
Growatt4200MTL-10
Growatt5000MTL-10
Weight
538mm 21.1inch 360mm 14.2inch 166mm 6.5inch 20.3kg
538mm 21.1inch 360mm 14.2inch 185mm 7.3inch 25.7kg
538mm 21.1inch 360mm 14.2inch 185mm 7.3inch 25.7kg
3.4 Storage of Inverter
If you want to storage the inverter in your warehouse, you should choose an
appropriate location to store the inverter.
The unit must be stored in original package and desiccant must be left in the
package.
The storage temperature should be always between -25 and +60 . And the
storage relative humidity should be always between 0 and 95%.
If there are a batch of inverters need to be stored, the maximum layers for
original carton is four.
After long term storage, local installer or service department of GROWATT
should perform a comprehensive test before installation
℃ ℃
3.5 The advantage of the unit
Maximum efficiency of 97.1%
Wide input voltage range from 100--600Vdc
Reactive power regulate
Integrated DC switch
Multi MPP controller
DSP controller
Sound control
Multi communication pattern
Easy installation
The type labels provide a unique identification of the inverter (The type of
product, Device-specific characteristics, Certificates and approvals). The type
labels are on the right-hand side of the enclosure.
0.95 leading-0.95laging
0.95 leading-0.95laging

12 13
4 Unpacking and inspection4 Unpacking and inspection
The inverter is thoroughly tested and inspected strictly before delivery. Our
inverters leave our factory in proper electrical and mechanical condition.
Special packaging ensures safe and careful transportation. However,
transport damage may still occur. The shipping company is responsible in such
cases. Thoroughly inspect the inverter upon delivery. Immediately notify the
responsible shipping company if you discover any damage to the packaging
which indicates that the inverter may have been damaged or if you discover
any visible damage to the inverter. We will be glad to assist you, if required.
When transporting the inverter, the original or equivalent packaging should
be used, and the maximum layers for original carton is four, as this ensures
safe transport.
After opening the package, please check the contents of the box. It should contain
the following, Please check all of the accessories carefully in the carton. If anything
missing, contact your dealer at once.
Item Name Number
A
B
C
D
E
F
G
H
I
J
Inverter
Mounting frame
Safety-lock screws
Mounting screws
Mounting frame screws sleeve
Output Shell
M4 cross recessed countersunkhead screws
RS 485 connectors
Cable gland for AC connection
User Manual
1
1
4
8 (for Growatt 4200MTL-10&Growatt 5000MTL-10)
6 (for Growatt 3600MTL-10)
8 (for Growatt 4200MTL-10&Growatt 5000MTL-10)
6 (for Growatt 3600MTL-10)
1
1
2
4
1
Installation 5Installation 5
5.1 Safety instructions
Danger to life due to fire or explosionDespite careful construction, electrical devices can cause
fires.Do not install the inverter on easily flammable materials
and where flammable materials are stored.
Risk of burns due to hot enclosure partsMount the inverter in such a way that it cannot be touched
inadvertently.
5.2 Selecting the installation locatio5.2 Selecting the installation locatio
This is guidance for installer to choose a suitable installation location, to avoid
potential damages to device and operators.
The installation location must be suitable for the inverter's weight and dimensions for a
long period time.
Select the installation location so that the status display can be easily viewed.
Do not install the inverter on structures constructed of flammable or thermolabile
materials.
Never install the inverter in environment of little or no air flow, nor dust environment.
That may derate the efficiency of the cooling fan of the inverter.
The Ingress Protection rate is IP65 which means the inverter can be installed outdoors
and indoors.
The humidity of the installation location should be 0~95% without condensation.
The installation location must be freely and safely to get at all times.
Vertically installation and make sure the connection of inverter must be downwards.
Never install horizontal and avoids forward and sideways tilt.
14 15
Please make sure the inverter is installed at the right place The inverter can't
install close to trunk
。
。
Be sure that the inverter is out of the children's reach.
Don't put any things on the inverter. Do not cover the inverter.
Do not install the inverter near television antenna or any other antennas and
antenna cables.
Inverter requires adequate cooling space. Providing better ventilation for the
inverter to ensure the heat escape adequately. The ambient temperature should
be below 40°C to ensure optimum operation.
Do not expose the inverter to direct sunlight, as this can cause excessive heating
and thus power reduction.
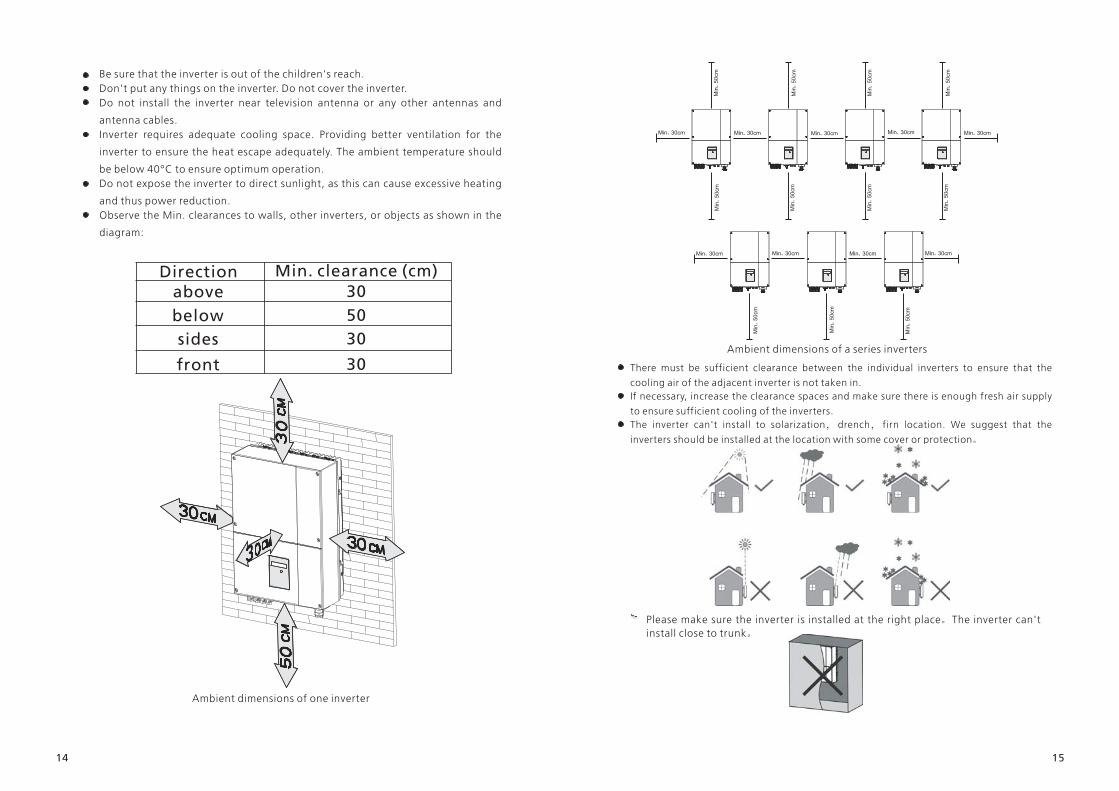
Observe the Min. clearances to walls, other inverters, or objects as shown in the
diagram:
Directionabove
below
sides
front
Min. clearance (cm)
30
50
30
30
Ambient dimensions of one inverter
Ambient dimensions of a series inverters
There must be sufficient clearance between the individual inverters to ensure that the
cooling air of the adjacent inverter is not taken in.
If necessary, increase the clearance spaces and make sure there is enough fresh air supply
to ensure sufficient cooling of the inverters.
The inverter can't install to solarization drench firn location. We suggest that the
inverters should be installed at the location with some cover or protection
, ,
。
5.3 Mounting the Inverter
For Growatt 4200MTL 10 and Growatt 5000MTL 10- -
For Growatt 3600MTL 10-
Fix the mounting frame as the figure shows. Do not make the screws to be
flush to the wall. Instead, leave 2 to 4mm exposed.
5.3.2 Fixed the inverter on the wall
1716
5.3.1 Mounting the Inverter with bracket
Using the mounting frame as a template, drill 4 holes as illustrated in image.
DANGER
In order to avoid electrical shock or other injury, inspect
existing electronic or plumbing installations before drilling
holes.
Falling equipment can cause serious or even fatal
injury, never mount the inverter on the bracket
unless you are sure that the mounting frame is
really firmly mounted on the wall after carefully
checking.WARNING

1918
After confirming the inverter is fixed reliably, fasten four M6 safety-lock sokets
head cap screws on the left and right side firmly to prevent the inverter from
being lifted off the bracket.
Electrical Connection 6Electrical Connection 6
6.1 Safety
6.2 Wiring AC Output
When using inverter with VDE-AR-N 4105 because the
inverter's displacement factor adjust function had to accorded to
VDE-AR-N 4105.the PV-inverter system total capacity cannot be
over 13.8KVA.When using inverter with CEI 0-21: if the inverter system total
capacity more than3KW and up to 6KW,the displacement factor is
adjustable between 0.95leading to 0.95 lagging ,and not need the
external SPI.if the inverter system total capacity more than
6KW,,the displacement factor is adjustable between 0.9leading to
0.9 lagging ,and need the external SPI .
,
!
NOTICE
Rise up the inverter a little higher than the bracket. Considered the weight of
them.During the process please maintain the balance of the inverter.
Hang the inverter on the bracket through the match hooks on bracket.
Danger to life due to lethal voltages!High voltages which may cause electric shocks are
present in the conductive parts of the inverter. Prior
to performing any work on the inverter, disconnect
the inverter on the AC and DC sides
WARNING
Danger of damage to electronic components due to
electrostatic discharge.Take appropriate ESD precautions when replacing
and installing the inverter.
WARNING
You must install a separate single-phase circuit-breaker or other
load disconnection unit for each inverter in order to ensure that
the inverter can be safely disconnected under load.NOTE: The inveter have the residual current detect and protect
function,if you have device the AC breaker have the residual
current detect function,you must choice breaker the rating
residual current more than 100mA.

Position Description
A
B
C
D
E
F
PV modules
DC load circuit breaker
Growatt Inverter
AC load circuit breaker
Energy meter
Utility grid
2120
You must install a separate single-phase circuit-breaker or other load disconnection
unit for each inverter in order to ensure that the inverter can be safely disconnected
under load.
We suggest you choice the AC breaker rating current in this table:
Growatt 3600MTL-10
Growatt 4200MTL-10
Growatt 5000MTL-10
24A/230V
28A/230V
30A/230V
we recommend electrical connection as follows
The AC wiring step:
1. The AC side terminals of the inverter are like the following figure, it is clear to
confirm that ‘L’ represents single-phase line output, ‘N’ representsneutral line andis grounding line.
2. Connect three standard cables into relevant terminals. The three cables should be
put through the protection shell, as figure below.
Pin L
Pin NGround
shell
pressing screw cap
terminal

22 23
Max. cable length
Growatt 3600MTL-10 Growatt 4200MTL-10 Growatt 5000MTL-10
44m
55m
38m
47m
34m
43m
Wire suggestion length:
If the installation requires,the ground terminal can be used to connect a second
protective conductor or as a equipotential bonding.the second protective poing local
as figure below.
3. Fasten the protection shell onto the bottom of the inverter, make sure the
four screws are tightened, the completed appearance is like the below figure.
Conductor crosssectionConductor crosssection
5.2 mm² 10AWG
6.6 mm² 9AWG
6.3 connecting the second protective conductor
The Growatt MTL-10 single-phase inverter has 2 independent input : input A & input
B.
6.4 Connecting the PV Array (DC input)
6.4.1 Conditions for DC Connection
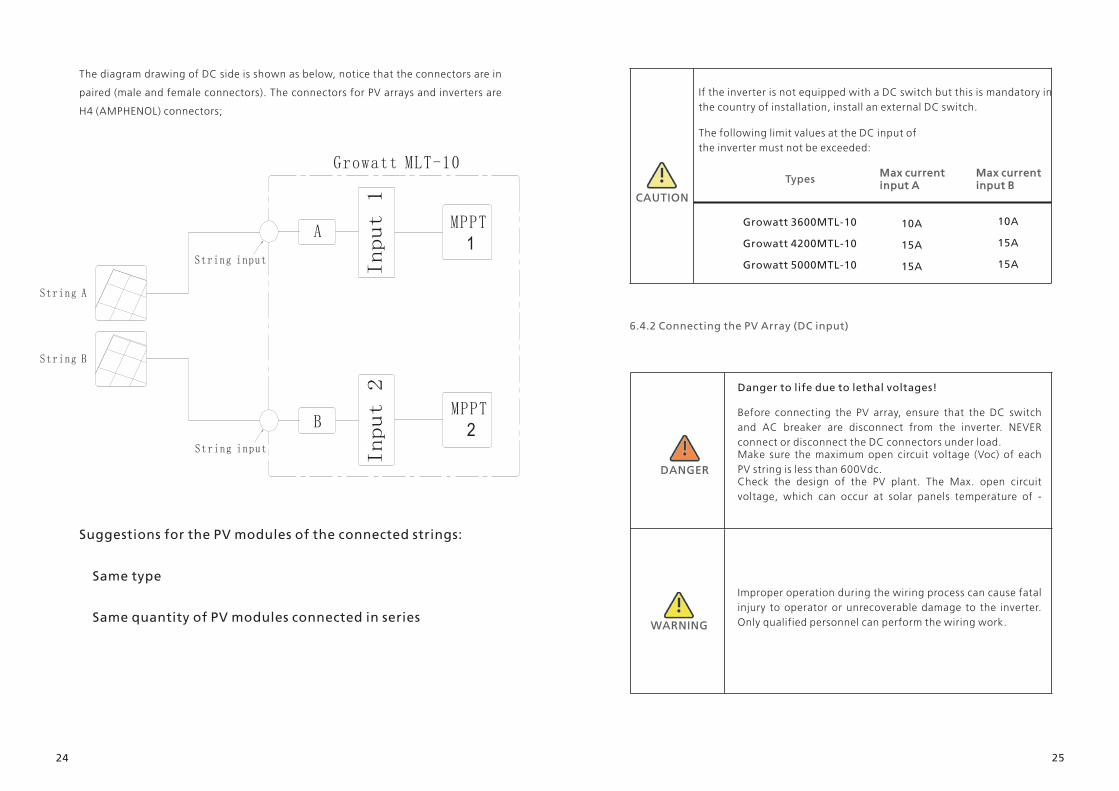
24 25
The diagram drawing of DC side is shown as below, notice that the connectors are in
paired (male and female connectors). The connectors for PV arrays and inverters are
H4 (AMPHENOL) connectors;
Suggestions for the PV modules of the connected strings:
Same type
Same quantity of PV modules connected in series
If the inverter is not equipped with a DC switch but this is mandatory in
the country of installation, install an external DC switch.
The following limit values at the DC input of
the inverter must not be exceeded:
TypesMax currentinput AMax currentinput A
Max currentinput BMax currentinput B
10A
15A
15A
10A
15A
15A
Growatt 3600MTL-10
Growatt 4200MTL-10
Growatt 5000MTL-10
CAUTION
6.4.2 Connecting the PV Array (DC input)
DANGER
Danger to life due to lethal voltages!
Before connecting the PV array, ensure that the DC switch
and AC breaker are disconnect from the inverter. NEVER
connect or disconnect the DC connectors under load.Make sure the maximum open circuit voltage (Voc) of each
PV string is less than 600Vdc.Check the design of the PV plant. The Max. open circuit
voltage, which can occur at solar panels temperature of -
Improper operation during the wiring process can cause fatal
injury to operator or unrecoverable damage to the inverter.
Only qualified personnel can perform the wiring work.WARNING
String A
String input
Input
1
String input
String B
A
B
Input
2
Growatt MLT 10-
MPPT
1
MPPT
2

NOTICE
6.5 RS485 cable connection
1. Unscrew the plastic connector.
2. Make the RS485 cable go through the connector.
3. Put two heat shrink tubes onto the front head of RS485 cable.
4. Insert the two metal head into relevant small cupreous hole, and fasten theconnection by soldering.
2726
The RS485 port have two types of installation mode, Please
choice the corresponding installation instructions!
RS485 port typel:
5. Make the heat shrink tubes wrap the joint.
6. Assemble the connector.

7. Connect the RS485 connector onto the inverter. Make sure the connection matched(‘1’ to ‘1’, ‘2’ to ‘2’).
RS485 port type2:
1. Please take out the RS485 waterproof device from the Accessories bag, even if you
don't choose RS485 as communication method, the RS485 waterproof device still
has to be locked on the inverter.
2. Twist off the waterproof connector, and pull out one or two Stopper according to
your demand.
2928
3. Make the cable through the hole of rubber stopper and the RS485 waterproof
cover. The type of cable is recommended as “KVVRP22/2*1.5”.
4. Take out the RS485 connection terminal
6.6 Using shinetool to set the information of the inverter
About the software of shinetool and the usage of it please download from the web:
www.ginverter.com/Download.aspx
3130
5. Connect the cable to the RS485 terminal (‘1’ to ‘1’, ‘3’ to ‘3’, and ‘2’ to the
shielding net) plug RS485 terminals into the inverter tight waterproof
connector lock waterproof device onto the inverter.
→ →
→
Information
Information
As to the connection between inverters, please refer to the
following figure.
As to the connection between inverters, please refer to the
following figure.
6.7 Grounding the inverter
The inverter must be connected to the AC grounding conductor of the power
distribution grid via the ground terminal (PE)
6.8 Selecting country by DIP switch
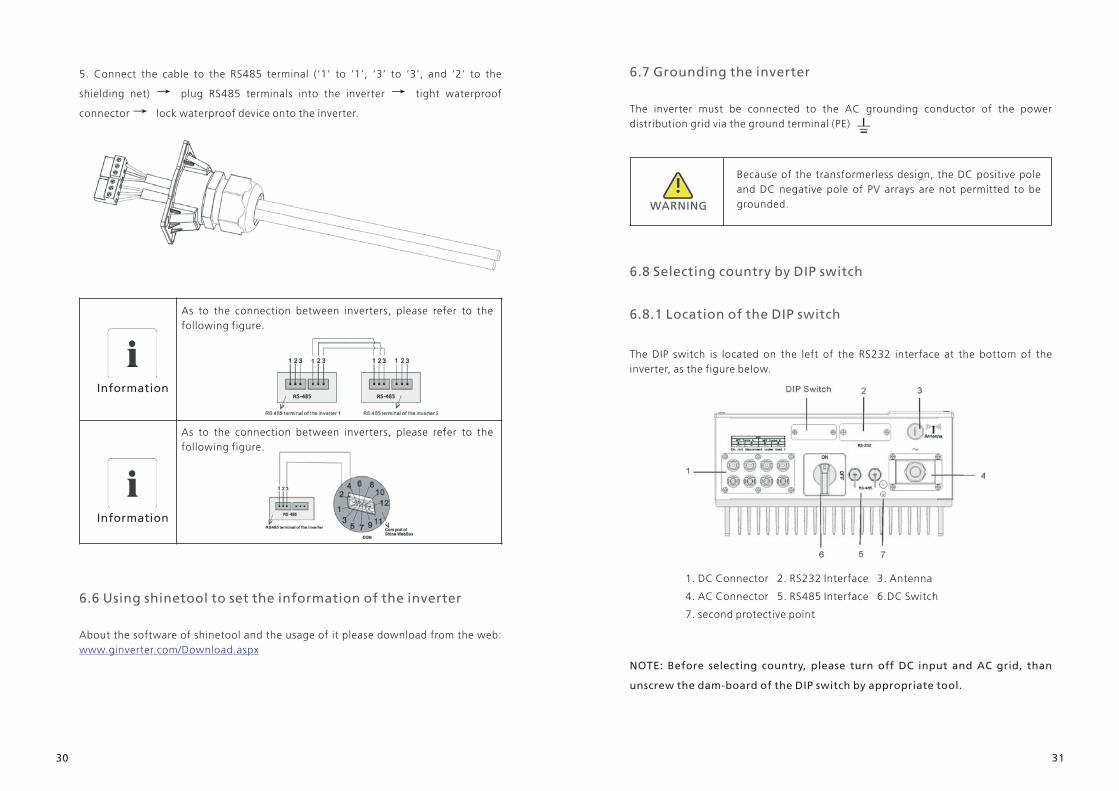
6.8.1 Location of the DIP switch
The DIP switch is located on the left of the RS232 interface at the bottom of the
inverter, as the figure below.
Because of the transformerless design, the DC positive pole
and DC negative pole of PV arrays are not permitted to be
grounded.WARNING
1. DC Connector 2. RS232 Interface 3. Antenna
4. AC Connector 5. RS485 Interface 6.DC Switch
7. second protective point
NOTE: Before selecting country, please turn off DC input and AC grid, than
unscrew the dam-board of the DIP switch by appropriate tool.

VDE 0126
AS4777
CEI 0-21
Spain
Greece
VDE-AR-N 4105
3332
When the cables of AC side and DC side are all well connected, before
commissioning, the country safety standard must be selected by the DIP switch.
The DIP switch is composed of four-digit binary number PINS. The different
combination of the four PINS can represent different inverter's model, which is
corresponding to the local grid standard. Each small white PIN has two statuses,
when set upward to 'ON', its value turns to '1', when set downward, its value turns
to'0'. Concerning the matching of the PIN status and the country safety standard,
please refer to the table below:
MTL-10 DIP switch to country table
The internal structure of the DIP switch is as the following figure:
4.2 Selecting the installation location4.2 Selecting the installation location
When you setting the DIP, you must turn off the AC breaker
and DC breaker.
After setting the DIP, please power on the inverter and
check the model display. If the last character of the model
name is corresponding to the country safety standard as
the above table, it means your setting is successful.
you should change the time displayed on the LCD of
inverter to your local time after inverter starts up.
DIP switch status Country Model display
GTXXXXXXX1
GTXXXXXXX3
GTXXXXXXX4
GTXXXXXXX5
GTXXXXXXX6
GTXXXXXXX7
DANGER
!
NOTICE
If the country is set incorrectly, please shut down the
inverter and set again.

Do not disconnect the DC connectors under load.
Improper operation during the wiring process can cause fatal
injury to operator or unrecoverable damage to the inverter.
Only qualified personnel can perform the wiring work.
DIP switch status Country Model display
UK_G83
Ireland
CGC
Denmark
UK_G59
Belgium
Reserved
Reserved
GTXXXXXXX8
GTXXXXXXX9
GTXXXXXXXA
GTXXXXXXXB
GTXXXXXXXC
GTXXXXXXXD
GTXXXXXXXE
GTXXXXXXXF
3534
Commissioning 7
7.2 General LCD display
7.2.1 Power on display
Requirements
The AC cable is correctly connected.
The DC cable is correctly connected.
The the country is set incorrectly(See section6.10)
:
When inverter powered on, LCD background will light automatically. Starting-up
display sequence, once the PV power is sufficient, inverter displays information as
shown in the flow chart as follow:
Module: xxxxxx
SerNo: xxxxxxxxxx
FW Version: x.x.x
Connect in: xxS
Connect : OK
xxxx.xVA xxxx.x W
7.2.2 LCD Display when background light off
After power on information displayed, there will be another 4 interfaces displayed in
turn, if there is no knock signal input.
DANGER
WARNING

!
NOTICE
The Growatt MTL-10 series have two different display, please
select the corresponding content for different LCD display.
The will be note of LCD1(small LCD), LCD2(large LCD).
LCDI:
37
ProgrammingProgram State
The First Line Of LCD
STATE DISPLAY CONTENT
Wait State Standby
Waiting
Connect in xxS
Reconnect in xxS
Connect OK
xxxx.xVA xxxx.x W
Error: xxx
Auto Testing
Inverter State
Fault State
Auto Test State
Update Software
REMARK
PV voltage low
Initial waiting
System checking
System checking
Connect to Grid
Inverter watt at working
System Fault
Protection auto test
7.2.3 The Second line can change by knock on
CYCLE DISPLAY DISPLAY TIME/S REMARK
2
2
The inverter model
The software version
Position Detail
A Inverter operation message
B Inverter state information
2
4
The Serial Number
The energy today
36

39
4 The energy all
4 PV input watt
4 The PV and Bus Votage
4 The grid system
4
4
The enable auto test
Set Language
Set Communications Address4
4
4
4
Setting exter wireless or interwireless ,RS 232
Setting Zigbee PIN
Setting Zigbee Channel
4 The last 5dated failure reports
4 Setting year/month/day/time
LCD2:
38
Position Detail
A
B
C
D
E
F
G
H
I
J
K
L
M
Text line for displaying an event
Input voltage and current of MPPTA
Input voltage and current of MPPTB
PV array A and B, Light when the array voltage is abovethe start voltage(120V)
Current power
Daily energy
Total energy generated since the inverter was installed
Light when the array voltage is above the start voltage(120V)
Lighted when “H” is lighted and feed-in
Output phase of the line conductor, switch every 5 seconds.
Output voltage /current /frequency of the line conductor
Graphical display of the inverter energy/power
N RS232 communication
RS485 communication
Internal wireless communication
External wireless communication
Graph content:
The inverter energy and/or power is shown as a graph on the display. The lower right-
hand bar of the graph represents the current unit of time: Day/h, week/day, Year/y,
Year/Y. The top bar of the graph represents the maximum value of the graph values.
The daily graph is displayed by default. You can trip the enclosure lid three times to
switch the current unit of time and the generation information
!
NOTICE
Measurement accuracy:The display values may deviate from the actual values and must
not be used for billing purposes. The inverter's measured
values are required for the operational control and to control
the current to be fed into the electricity grid. The inverter does
not have a calibrated meter.
The graph shows recent 16 hours of power
generation and the maximum value power
of the 16 values.
The graph shows recent 7 days of power
generation and the maximum value power
of the 7 values.
The graph shows recent 12 months of power
generation and the maximum value power
of the 12 values.
The graph shows recent 16 years of power
generation and the maximum value power
\of the 16 values.
Power The real-time power that has been
feeding into the grid from the inverter
Day The energy fed into the electricity grid
on this particular day. This equals the energy
generated from the inverter's start-up in the
morning to the current time.
Total The total energy that the inverter has
fed into the electricity grid during its entire
operating time
:
:
:
40 41

42
CYCLE DISPLAY DISPLAYTIME/S
REMARK
The inverter apparentpower
2
The inverter power rate2
2 The inverter power factor
2 The Serial Number
2 The inverter model
2 The software version
4 Set Language
4 Set CommunicationsAddress
4 Setting exter wireless orinter wireless ,RS232
4 Setting Zigbee PIN
4 Setting Zigbee Channel
4 Settingyear/month/day/time
4 The enable auto test
7.2.4 Connecting messages
When inverter started to connect to grid, the following message will appear on LCD
screen.
Connect to gird interface
LCD1
LCD2
7.3 Operate by knock
7.3.1 Knock type and definition
The inverter can support three kinds of knock: single knock, double knock and thrice
knock. Each kind of knock has different function. Refer to specified definition in
Table below:
Knock type
Single knock
Double knock
Thrice knock
Definition
KeyDown
KeySET
KeyEnter&ESC
7.3.2 Light background and check running information
Before light the background, the three types of knock functions are the same: just
light the background.
That the background light will automatically off if there is no knock detected in
10 seconds.
Note:
43

Language Sequence Number
Italian
English
German
Spanish
French
0
1
2
3
4
7.3.5 Auto test (only for Italy)
Knock to make the display bright knock to“Enable Auto test” double knock to
enter “Waiting to start” knock to start auto test and wait for the test result.
→
→
→
7.3.6 Inverter faulty messages
When system faulty or inverter error occurred, inverter will display faulty message or
error code on its LCD screen.
● RS 232 Inter wireless Exter wireless
(NOTE: RS485 is the standard communication type of the inverter)
● ●
Communication Mode Setting Steps:
1. When the LCD stays bright, single knock until the LCD displays ‘RS232’, at this
interface the communication type can be selected.
7.3.7 Communication Type choice
2. Double knock to enter the options, the options will flash. Single knock to select
the option you want.
3. When setting finishes, wait for 30s or triple knock to save your setting.
45
Attention:
1. If you select RS232 or Exter wireless, you must set the 2-PIN switch to different
status. The 2-PIN switch is located beside the RS232 interface, as the figure below.
When the LCD stays bright, single knock to ‘set language’, and then double knock to
enter the language options. Single knock to select the language you want, when
setting finishes, wait for 30s or triple knock to save your setting.
The inverter provides five languages: English, German, Spanish, Italian and French.
The number on Set language interface is sequence number of these five languages,
the sequence number and its corresponding language are showing in Table below:
7.3.4 Set inverter display language
7.3.3 Set inverter’s COM address
When communicating with monitoring software or device, the software or device
may regard inverter’s COM address as communication address (Also may use
inverter’s serial number as communication address).
When the LCD stays bright, single knock to ‘COM Address: xxx’, and then double
knock to enter the setting status, single knock to change the COM Address. When
setting finishes, wait for 30s or triple knock to save your setting.
44

46 47
2. When ‘RS232’ is selected, you have to set PIN1 of the switch downward to OFF.
3. When ‘Exter wireless’ is selected, you have to set PIN1 of the switch upward to ON.
When ‘Inter wireless’ is selected, RS 232 interface will be disabled. Under this
mode,if what integrated internally is Zigbee, PIN and Channel need to be set, if what
integrated internally is Bluetooth, only PIN needs to be set.
7.3.8 PIN XXXX
Single knock on LCD to ‘PIN XXXX’, and then double knock to make each number of
the PIN flashes. Then single knock to change the number to what you want it to be,
the PIN should be same as ShineWebbox or ShinePano. When setting finishes, wait
for 30s or triple knock to save your setting.
7.3.9 Channel: XX
Single knock on LCD to ‘Channel: XX’, and then double knock to make each number
of Channel flashes. Then single knock to change the number to what you want it to
be, the PIN should be same as ShineWebbox or ShinePano. When setting finishes,
wait for 30s or triple knock to save your setting.
7.3.10 Set inverter time
When the LCD stays bright, single knock until LCD displaying ‘xxxx/xx/xx xx:xx’, and
then double knock to enter the setting status, the numbers begin to flash. Single
knock to change the number, each knock makes the flashing number add ‘1’, and
double knock to shift to next number setting. When setting finishes, wait for 30s or
triple knock to save your setting.
7.3.11 AC Error Record Checking
When the LCD stays bright, single knock to ’AC Error Record’, and then double knock
to enter the checking status. Single knock to check each error item, triple knock can
exit.
1. If the inverter connects with PV panel arrays and the input voltage is higher
than 150Vdc, while the AC grid is not connected yet, LCD will display messages in
order as below:Growatt Inverter”-> “NO AC CONNECTION”. The display repeats “NO AC
CONNECTION” and the LED will be red.2. Turn on the AC breaker or close the fuse between inverter and grid, the system
will operate normally.3. Under normal operating conditions, the LCD displays 'xxxx.xVA xxxx.x W' at
State info, this is the power fed into grid. LED turns green.4. Finish commissioning.
”
12
4948
7.4 Communications
7.4.1 RS485 (standard)
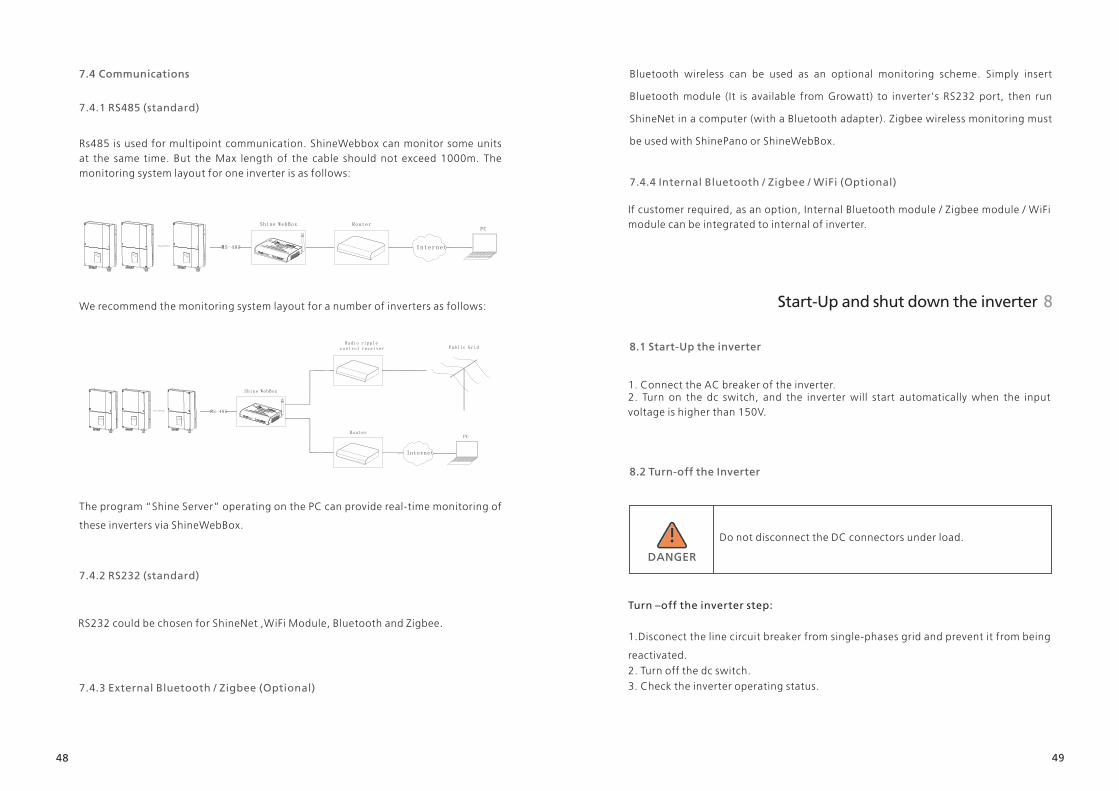
Rs485 is used for multipoint communication. ShineWebbox can monitor some units
at the same time. But the Max length of the cable should not exceed 1000m. The
monitoring system layout for one inverter is as follows:
InternetRS 485-
PCRouterShine WebBox
We recommend the monitoring system layout for a number of inverters as follows:
RS 485-
Radio ripple
Shine WebBox
Internet
PCRouter
control receiver Public Grid
The program “Shine Server” operating on the PC can provide real-time monitoring of
these inverters via ShineWebBox.
7.4.2 RS232 (standard)
RS232 could be chosen for ShineNet ,WiFi Module, Bluetooth and Zigbee.
7.4.3 External Bluetooth / Zigbee (Optional)
Bluetooth wireless can be used as an optional monitoring scheme. Simply insert
Bluetooth module (It is available from Growatt) to inverter's RS232 port, then run
ShineNet in a computer (with a Bluetooth adapter). Zigbee wireless monitoring must
be used with ShinePano or ShineWebBox.
7.4.4 Internal Bluetooth / Zigbee / WiFi (Optional)
If customer required, as an option, Internal Bluetooth module / Zigbee module / WiFi
module can be integrated to internal of inverter.
Start-Up and shut down the inverter 8
8.1 Start-Up the inverter
1. Connect the AC breaker of the inverter.2. Turn on the dc switch, and the inverter will start automatically when the input
voltage is higher than 150V.
8.2 Turn-off the Inverter
Do not disconnect the DC connectors under load.
Turn –off the inverter step:
1.Disconect the line circuit breaker from single-phases grid and prevent it from being
reactivated.
2. Turn off the dc switch.
3. Check the inverter operating status.
DANGER
50 51
9 Maintenance and Cleaning9 Maintenance and Cleaning
If the inverter regularly reduces its output power due to high temperature, please
improve the heat dissipation condition. Maybe you need to clean the heat sink
9.1 Checking Heat Dissipation
9.2 Cleaning the Inverter
If the inverter is dirty, turn-off the AC breaker and DC switch ,waiting the inverter
shut down ,then clean the enclosure lid, the display, and the LEDs using only a wet
cloth. Do not use any cleaning agents (e.g. solvents or abrasives).
9.3 Checking the DC Disconnect
Check for externally visible damage and discoloration of the DC Disconnect and the
cables at regular intervals.If there is any visible damage to the DC Disconnect, or
visible discoloration or damage to the cables, contact the installer.
Once a year, turn the rotary switch of the DC Disconnect from the On position
to the Off position 5 times in succession. This cleans the contacts of the rotary switch
and prolongs the electrical endurance of the DC Disconnect.
10Trouble shooting 10Trouble shooting
Sometimes, the PV inverter does not work normally, we recommend the following
solutions for common troubleshooting. The following table can help the technician
to understand the problem and take action.
10.1 Warnings(W)
Warnings(W) identify the current status of the Growatt MTL-10. Warnings do not
relate to a fault. When a (W) with a number after it appears in the display, it indicates
a Warning Code and is usually cleared through an orderly shutdown/re-set or a self
corrective action performed by the inverter. See the (W) codes in the following table.
Error message Description Suggestion
No ACConnection
AC VOutrange
No utility gridconnected or utilitygrid power failure
1.Check AC wiring, especially the ground wire2.Contact Growatt.
Utility grid voltageis out of permissiblerange.
1.Check grid voltage.2.If the error message still exists despite the gridvoltage being within the tolerable range, contactGrowatt.
AC FOutrange
Utility gridfrequency out ofpermissible range.
1.Check grid frequency.2.If the error message is displayed despite the gridfrequency being within the tolerable range,contact Growatt.
OverTemperature
Temperatureoutrange
1.check the inverter operation state2.If the error message is displayed still,pleasecontact Growatt.
PV IsolationLow
Insulation problem 1.Check if panel enclosure ground properly.2.Check if inverter ground properly.3.Check if the DC breaker gets wet.4.If the error message is displayed despite theabove checking passed, contact Growatt.
Output HighDCI
Output current DCoffset too high
1.Restart inverter.2.If error message still exists,contact Growatt.
Residual IHigh
Leakage currenttoo high
1.Restart inverter.2.If error message still exists, contact Growatt.
PV VoltageHigh
The DC input voltageis exceeding themaximum tolerablevalue.
Disconnect the DC switch immediately.
Auto TestFailed
Auto test didn'tpassed.
Contact power company By they decide whetherto manually cancel.
,

10.2 Errors(E)This certificate represents a 5 year warranty for the Growatt inverter products
listed below. Possession of this certificate validates a standard factory
warranty of 5 years from the date of purchase.
5352
Errors(E) codes identify a possible equipment failure, fault or incorrect inverter
setting or configuration. Any and all attempts to correct or clear a fault must be
performed by qualified personnel. Typically, the (E) code can be cleared once the
cause or fault is removed. Some of the (E) codes, Error as indicated in the table
below, may indicate a fatal error and require you to contact the supplier or the
Growatt to replace a new one.
Error code Description Suggestion
Error: 101
Communication fault Slaveprocessor can't receive datafrom Master processor.
1.Restart inverter2.If error message still exists, contact Growatt.
Error: 102
Consistent fault. Data receivedby Master and Slave processorare different. The reason can beutility grid voltage or frequencychange frequently.
1.Restart inverter.2.If error message appears frequently or errormessage still exists after replacement, checkutility grid. f you require help, contact Growatt.3.If error message still exists, contact Growatt.
Error: 116 EEPROM fault Contact Growatt.
Error: 117
Error: 118
Error: 119
Error: 120
Error: 121
Error: 122
Relay fault Contact Growatt.
Contact Growatt.
Contact Growatt.
Init model fault
GFCI Device Damage
HCT fault
Communication fault.Master processor can'treceive data from Slaveprocessor.
Bus voltage fault Contact Growatt.
1.Restart the inverter2.If error message still exists, contactGrowatt.
Contact Growatt.
Note:
:
The latest 5 NS(Network and System) protection records can be read by LCD
or communication software. An interruption of 3 Sec to the power supply does not
lead to any loss of fault records (according to VDE-AR-N 4105, cl.6.5.1).Note The
latest 5 NS(Network and System) protection records can be read by LCD or
communication software. An interruption of 3 Sec to the power supply does not
lead to any loss of fault records (according to VDE-AR-N 4105, cl.6.5.1).
≤
≤
11Manufacturer Warranty 11Manufacturer Warranty
11.1 Warranted products
This warranty is applicable solely to the following products:
Growatt 1500, Growatt 2000, Growatt 3000, Growatt 4000, Growatt 5000, Sungold
1500, Sungold 2000, Sungold 5000, Growatt 3600MTL, Growatt 4200MTL, Growatt
5000MTL, Growatt 4000TL 3ph , Growatt 5000TL 3ph ,Growatt 6000TL 3ph,
Growatt 3600MTL-10, Growatt 4200MTL-10, Growatt 5000MTL-10 Growatt
10000UE, Growatt 12000UE, Growatt 18000UE, Growatt 20000UE
,
11.2 Limited Product Warranty
(Applicable under normal application, installation, use and service conditions)Growatt warrants the above listed products to be free from defects and/or failure
specified for a period not exceeding five (5) years from the date of sale as shown in
the Proof of Purchase to the Original purchaser.The warranties described in these “Limited Warranties” are exclusive and are
expressly in lieu of and exclude all other warranties, whether written, oral, express or
implied, including but not limited to, warranties of merchantability and of fitness for
a particular purpose, use or application, and all other obligations or liabilities on
the part of GROWATT unless such other obligations or liabilities are expressly
agreed to it in writing signed and approved by GROWATT GROWATT shall have no
responsibility or liability whatsoever for damage or injury to persons or property, or
for other loss or injury resulting from any cause whatsoever arising out of or related
to the modules, including, without limitation, any defects in the modules or from use
or installation. Under no circumstances shall GROWATT be liable for incidental ,
consequential or special damages howsoever caused; loss of use, loss of production,
loss of revenues are therefore specifically and without limitation excluded to the
extent legally permissible, GROWATT's aggregate liability, if any, in damages or
otherwise, shall not exceed the invoice as paid by the customer.
,
,
,

54 55
The “Limited Product Warranties” described above shall not apply to, and
Growatt shall have no obligation of any kind whatsoever with respect to, any
inverter which has been subjected to:
Misuse, abuse, neglect or accident;
Alteration, improper installation or application;
Unauthorized modification or attempted repairs;
Insufficient ventilation of the product;
Transport damage;
Breaking of the original manufacturers seal;
Non-observance of Growatt installation and maintenance instruction;
Failure to observe the applicable safety regulations
Power failure surges, lighting, flood, fire, exposure to incorrect use,
negligence, accident, force majeure, explosion, terrorist act, vandalism
or damage caused by incorrect installation, modification or extreme
weather conditions or other circumstances not reasonably attributable
to Growatt.
The warranty shall also cease to apply if the product cannot be correctly
identified as the product of Growatt. Warranty claims will not be honored if
the type of serial number on the inverters have been altered, removed or
rendered illegible.
11.3 Liability
The liability of Growatt in respect of any defects in its PV inverters shall be
limited to compliance with the obligations as stated in these terms and
conditions of warranty. Maximum liability shall be limited to the sale price of
the product. Growatt shall accept no liability for loss of profit, resultant of
indirect damage, any loss of electrical power and/or compensation of energy
suppliers within the express meaning of that term.
The warranty rights as meant herein are not transferable or assignable to any
third party excepting the named warranty holder.
11.4 Warranty conditions
If a device becomes defective during the agreed Growatt factory warranty
period and provided that it will not be impossible or unreasonable, the device
will be, as selected by Growatt.Shipped to a Growatt service centre for repair, or repaired on-site, or
exchanged for a replacement device of equivalent value according to model
and age.
The warranty shall not cover transportation costs in connection with the
return of defective modules. The cost of the installation or reinstallation of
the modules shall also be expressly excluded as are all other related logistical
and process costs incurred by all parties in relation to this warranty claim.
12Decommissioning 12Decommissioning
12.1 Dismantling the Inverter
1.Disconnect the inverter as described in section 8.2.Remove all connection cables from the inverter.
1Disconnect the inverter as described in section 8.Remove all connection cables from the inverter.
3. Screw off all projecting cable glands.4. Lift the inverter off the bracket and unscrew the bracket screws.
CAUTION

Input data
Specifications
Growatt3600MTL-10
5756
12.2 Packing the Inverter
If possible, always pack the inverter in its original carton and secure it with
tension belts. If it is no longer available, you can also use an equivalent carton.
The box must be capable of being closed completely and made to support both
the weight and the size of the inverter.
12.3 Storing the Inverter
Store the inverter in a dry place where ambient temperatures are always
between -25°C and +60°C.
12.4 Disposing of the Inverter
Do not dispose of faulty inverters or accessories together with
household waste.Please accordance with the disposal regulations
13 Technical Data13 Technical Data
13.1 Specification
Model Growatt4200MTL-10
Growatt5000MTL-10
Max. DC power 3800W 4400W 5000W
Max. DC voltage 600V 600V 600V
Start voltage 150V 150V 150V
PV voltage range 100V-600V 100V-600V 100V-600V
MPP voltagerange/ nominalvoltage
175V-550V /360V 175V-550V /360V 175V-550V /360V
Number of independentMPP inputs / strings perMPP input
2/2 2/2 2/2
Max. input currentof tracker A/tracker B
10A/10A 15A/15A 15A/15A
Output (AC)
Nominal AC output power 3600W 4200W 4600W
Max. AC apparent power 3600VA 4200VA 4600VA
AC nominal voltage;range
220V/230V/240V;
180Vac-280Vac
220V/230V/240V;
180Vac-280Vac
220V/230V/240V;
180Vac-280Vac
AC grid frequency;range
50,60H;±5 Hz 50,60H;±5 Hz 50,60H;±5 Hz
Phase factor at ratepower
1 1 1
Displacement powerfactor, configurable*
0.8leading…0.8lagging
0.8leading…0.8lagging
0.8leading…0.8lagging
THDI <3% <3% <3%
Single phase Single phase Single phaseAC connection
Max. output current 18A 21A 23A

5958
Efficiency
Max. efficiency 97.1% 97.1% 97.1%
Euro - eta 96.5% 96.5% 96.5%
MPPT efficieny 99.5% 99.5% 99.5%
Protection devices
DC reverse polarityprotection
yes yes yes
DC switch ratiing foreach MPPT
yes yes yes
Output Overcurrentprotection
yes yes yes
Output OvervoltageProtection-varistor
yes yes yes
Ground fault monitoring yes yes yes
Grid monitoring yes yes yes
Integrated all - polesensitive leakage currentmonitoring unit
yes yes yes
General Data
Dimensions (W / H / D) inmm
360/538/166 360/538/185 360/538/185
Weight 20.3KG 25.7KG 25.7KG
Operatingtemperaturerange
-25...+60(-13...+ 140°F)
with derating above45°C 113°F
℃
( )
-25...+60(-13...+ 140°F)
with derating above45°C 113°F
℃
( )
-25...+60(-13...+ 140°F)
with derating above45°C 113°F
℃
( )
Noise emission(typical)
≤ 25 dB(A) ≤ 25 dB(A) ≤ 25 dB(A)
Altitude Up to 2000m 6560ft without power derating( )
Relative humidity 95%
Consumption: operating(standby) / night
<5W / < 0.5 W <5W / < 0.5 W <5W / < 0.5 W
Topology transformerless transformerless transformerless
Cooling concept Natural Natural Natural
Environmental ProtectionRating
Ip65 Ip65 Ip65
Features
DC connection: H4/MC4(opt) H4/MC4(opt) H4/MC4(opt)
AC connection Screw terminal Screw terminal Screw terminal
display LCDLCD LCD
Interfaces: RS485/RS232/Bluetooth/Zigbee/Wi-fi
yes/yes/opt/opt/opt
yes/yes/opt/opt/opt
yes/yes/opt/opt/opt
Warranty: 5 years / 10 years yes /opt yes /opt yes /opt
Certificates and approvals CE,IEC 62109, VDE 0126-1-1, VDE-AR-N4105, CEI 0-21RD1663,G59,G83, AS4777, AS/NZS 3100.
0.95leading…0.95lagging with VDE-AR-N 4105
0.95leading…0.95lagging with CEI 0-21 (System power less than 6KW)
0.9leading…0.9lagging with CEI 0-21 (System power larger than 6KW)
13.2 DC connector info
DC connector info H4/MC4(opt)
95% 95%

·Shipped to a Growatt service centre for repair, or repaired on-site, or exchanged
for a replacement device of equivalent value according to model and age.
The warranty shall not cover transportation costs in connection with the return of
defective modules. The cost of the installation or reinstallation of the modules shall
also be expressly excluded as are all other related logistical and process costs
incurred by all parties in relation to this warranty claim.
PV system installation 14
6160
13.3 Torque
Enclosure lid screws
Shell and RS232 screws
AC terminal
M6 soket head cap screws for securingthe enclosure at the bracket
Additional ground screws
7kg.cm
7kg.cm
6kg.cm
20kg.cm
20kg.cm
13.4 Accessories
In the following table you will find the optional accessories for your product.
If required, you can order these from GROWATT NEW ENERGY TECHNOLOGY
CO.,LTD or your dealer.
Name
External Bluetooth
External WIFI
External ZIGBEE
Internal Bluetooth*
Brief description
Internal WIFI*
Internal ZIGBEE*
*The internal modules should only be installed by Growatt due to the
operation of opening the inverter cover, thus the modules will not be sold
alone.
(B) multi inverter
Installation with multiple inverters on a single phase system
(A) Single inverter

6362
15.1 List
15 Compliance Certificates15
Certified countries
With the appropriate settings, the unit will comply with the requirements specified in
the following standards and directives (dated: March/2013):
GROWATT can preset special grid parameters for other countries installation
locations according to customer requests after evaluation by GROWATT.
You can make later modifications yourself by changing software parameters with
respective communication products (e.g. shinebus or shineNet ect). To change the
grid-relevant parameters, you need a personal access code, if you need it ,please
contact with GROWATT.
15.2 Download Address
www.ginverter.com
16Contact 16
If you have technical problems about our products, contact the
GROWATT Serviceline. We need the following information in order
to provide you with the necessary assistance:
Inverter type
Serial number of the inverter
Event number or display message of the inverter
Type and number of PV modules connected
Optional equipment
GROWATT NEW ENERGY TECHNOLOGY Co.,LTD
www.ginverter.com
Serviceline
Tel + 86 755 2747 1942
Fax + 86 755 2747 2131
:
:
:
Buiding B,Jiayu Industrial Zone,No.28 Guanghui Road,Longtent,Shiyan,
Baoan District,Shenzhen,P.R.china
VDE0126-1-1
VDE-AR-N4105
CEI 0-21(2012)
CE
RD1663
G59
G83
AS4777
AS/NZS 3100
IEC62109-1

64 65
Annex:
Auto test (only for Italy):
Knock to make the display bright knock to“Enable Auto test” double knock to
enter “Waiting to start” the inverter will start auto test and wait for the test
result.When the inverter start auto test,the LCD will display below message:
→ →
→