GRASP 3D Scanner ALPHA Quick Start Guide
11
GRASP ALPHA Quick Start 1 GRASP 3D Scanner ALPHA Quick Start Guide
Transcript of GRASP 3D Scanner ALPHA Quick Start Guide

GRASP ALPHA Quick Start 1
GRASP 3D Scanner ALPHA Quick Start Guide

GRASP ALPHA Quick Start 2
Disclaimer
GRASP 3D Scanner ALPHA PUBLICATION
GRASP 3D Scanner ALPHA DESIGN
Copyright © 2006-2009 intricad
This software and publication pertains to the workings, manufacturing, assembly and
operation of a machine apparatus and the use of a laser. This can be a dangerous
undertaking. The use of this software and any information provided is therefore at the users
own risk.
In no event shall the author and owner intricad, suppliers nor any related parties that
contributed to the creation, marketing and sale of this publication be liable to any party for
any direct, indirect, special, punitive or consequential damages (including but not limited to,
damages to property, business, person(s), or other pecuniary or loss or claims suits or
causes of action involving alleged infringement of copyrights, patents, trademarks, trade
secrets, or unfair competition), arising out of the availability, use, reliance on, or inability to
use the information contained in this publication.
In addition this applies to any accompanying or further information provided by any
means, or any other damage that may result in any way whatsoever, even if this
organization or owner shall have been advised of the possibility of such damages, and
regardless of the form of action, whether in contract, tort, or otherwise, or for any claim
attributed to errors, omissions, or any other inaccuracies in, or destructive properties of any
information and/or software/hardware material. The author and owner of this software is
under no obligation to provide support, service, corrections, or upgrades to the software
programs. This software is supplied “as is” and no warranty of any kind is attributed to it.
It is the responsibility of the reader of this publication and/or user of the included
software to determine the integrity and required safety precautions regarding the fabrication
techniques, electrical circuits, mechanical construction and software which are described,
explained and provided in this Publication and/or software. This project is only for adults
with basic understanding of electronics and home machining skills. It is certainly not for
children and should be kept out of their reach. If the reader lacks the required skill and/or
knowledge to produce and/or operate the apparatus described then he/she should not
proceed with this project or should seek professional engineering assistance.
The information and software supplied is for educational purposes and not intended
for commercial use. Extensive effort has been undertaken to insure that the information
contained in this manual and the supplied software does not breach any currently protected
art or intellectual property. To the best of our knowledge it does not as it is based on
technology/art that is now become public domain. However given current practices in
industry this cannot be fully ascertained. Use of this software for commercial purposes is at
the users own risk.
By proceeding to read or use the information contained in this publication and/or
software the user agrees to the above stated.
Grasp 3D Scanner Alpha
DO NOT LOOK INTO LASER BEAM
All rights reserved. No Warranty of Any Kind. Information subject to change without notice

GRASP ALPHA Quick Start 3
Important Notice:
This is an ALPHA version release of GRASP 3D Scanner. It is by no means an official
release. While the core scanning functionality does work certain functions may not fully work
or not work at all. This ALPHA release has been provided in order to allow you to take part in
the development cycle. Please check for updates regularly.
1. Introduction
This document describes the basic functionality of the GRASP 3D scanner system.
GRASP is still under development and this manual only serves to give a very quick insight
into its basic workings. The incentive of the example is to provide a simple overview of the
process without taking advantage of more advanced ways to perform the scan.
3D scanning is not a trivial task and involves the adjustment of many parameters. Its
good to practice and evaluate. GRASP has many features to make the scan job less difficult
and more accurate. These will become apparent as you progress. Practice makes perfect.
2. Required Materials
1. PC, 2GHz CPU or better, OpenGL support graphics card with 64mb dedicated memory
or more, 2Gb system memory
2. Video camera connected to PC or web camera
3. Line laser (part of the TriAngels scanner system or to be purchased separately)
4. Flat stick with square or rectangle cross section (ratio 1:1 to 3:1) 5. White piece of paper
6. Pen or pencil

GRASP ALPHA Quick Start 4
3. Scanner Layout
Set up object and markers
These are important steps. Please read carefully. The better the markers are set up the
better the scans will be.
1. Place the paper on a flat horizontal surface 2. Place the wooden stick one side of the paper. 3. using the stick as a ruler, draw 3 lines on the paper. Make sure that they are parallel
to each other and that the space between the lines exactly is the same as the width
of the sick.
4. Place the camera above the paper looking straight down onto the paper.
5. Also ensure that in the view of the camera the lines are vertical as possible, the
maximum allowed deviation is ±5º, preferred within ±1º
6. Place the stick on its side exactly in the middle of the center line.

GRASP ALPHA Quick Start 5
7. Place the object on the paper. Place it as close to the lines as possible while making
sure the lines are NOT obscured by the object.
8. If not done already, adjust the zoom of the camera such that the objects and lines
are maximized while remaining visible. Leave a small space above and below the
object roughly equal as the space between the lines.
Set up scan
Start the GRASP 3D scanner program
Start Camera
Browse to the Camera tab
Select the camera (Device).
Select the resolution. Start with a low resolution setting (preferably no less than 640x480).
For subsequent scans you can set to a higher resolution.
After selecting the camera and resolution click Video On Button. The screen will now show
the streaming video.
GRASP ALPHA Quick Start 6
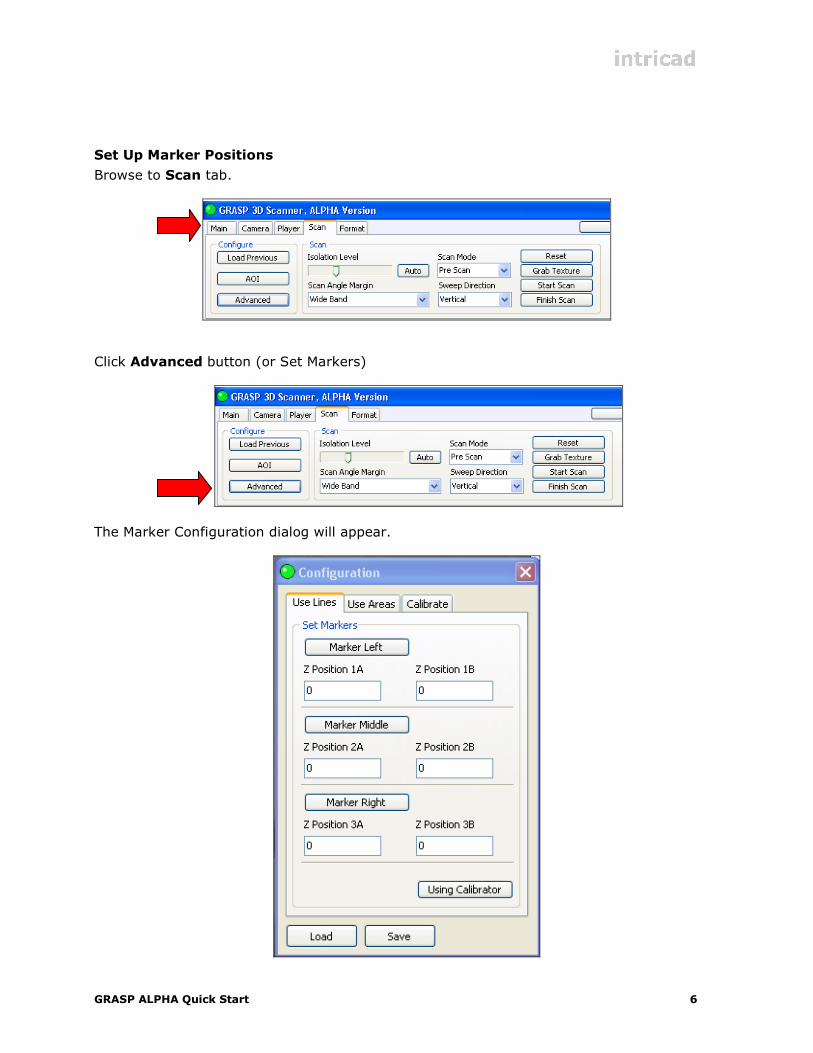
Set Up Marker Positions
Browse to Scan tab.
Click Advanced button (or Set Markers)
The Marker Configuration dialog will appear.

GRASP ALPHA Quick Start 7
Set up the markers in Grasp
Press the “ALT” button on your keyboard and left mouse click on the top of the line/marker.
Press the “ALT” button on your keyboard and left mouse click on the bottom of the left
line/marker (ALT + Right mouse click will erase marker position).
In the popup window click the Marker Left Button. If you make a mistake then click the
Right mouse button while holding the Alt key down.

GRASP ALPHA Quick Start 8
Repeat these steps for the Middle and Right Markers, for the middle marker, select exactly
the middle of the stick on the top and the bottom.
Click Using Calibrator button to calculate the z Values of the middle marker.
Close the Configuration dialog.
4. Scan
Click the Reset button to initialize the scan

GRASP ALPHA Quick Start 9
Verify Isolation Level
Turn on the line laser and while making sure the laser line is near horizontal, slowly
sweep the laser over the object and the 3 markers.
Verify that the laser line is being recognized by the system. When it is recognized the
laser line is overlaid by a thin green line. If the laser line is not recognized or if there are
gaps in the green line, adjust the isolation level and / or lighting conditions to compensate
until the image looks like the image below right. It is best to turn the room lighting down.
Scanning in the dark works better. A Isolation Level of about 85 is a typical setting.
Laser Line Not Recognized
Laser Line Recognized
Scan object
Turn on room lighting. Press the Grab Texture Button. The color of the object will be
captured. Turn down room lighting.
Press the Start Scan Button.
While making sure the laser line stays horizontal slowly sweep over the object
making sure that the laser line crosses all 3 markers. Hold the laser at a 45 degree angle in
relation to the camera or more while sweeping the laser line over the object. The system will
respond with the GRASP Ping sound when all conditions are met. The system will also
visually aid the sweeping by the use of the GRASP Bar. This is the bar on the right side that
will change color to indicate if the conditions have been met. It will also show the present up
or downward angle and what the limits are.

GRASP ALPHA Quick Start 10
Correct Laser Angle
Too Small Laser Angle
5. Viewing Options
By double clicking on the view window during the scan, it is possible to change from
camera view to real-time 3d view. This will help to find and fill in the gaps in the scan.
By right clicking on the view window a menu with the view options will appear.
Shown below is the Picture in Picture option (note the small video window in the left top
corner).
3D view: Format -> render -> output: texture

GRASP ALPHA Quick Start 11
6. Finished scan
Final scan (Format -> Render -> Adjustments)
7. Important Tips
• To be able to scan the complete object, ensure enough added marker length to be
captured by the camera.
• The setting up and selecting the markers is vital towards the accuracy of the scan.
The more precisely this is done the better the scans will be.
• Do not set up the camera too close to the object as lens distortion will be more
pronounced. Instead, set the camera at a greater distance and use zoom. This will
flatten the image.
• Using a narrower band scan angle margin will improve the scan accuracy.
• Viewing the video in actual video size helps to improve the performance on older
computer systems.
• Grab the texture under normal lighting conditions but do the actual scanning in a
dark environment.