GPS Vehicle tracker GT03A User manual - Concox · GPS Vehicle tracker GT03A User manual (Version...
15
GPS Vehicle tracker GT03A User manual (Version V1.3) Please read this manual carefully before attempting installation and online activation. Pictures are for indication and illustration purposes only.
Transcript of GPS Vehicle tracker GT03A User manual - Concox · GPS Vehicle tracker GT03A User manual (Version...
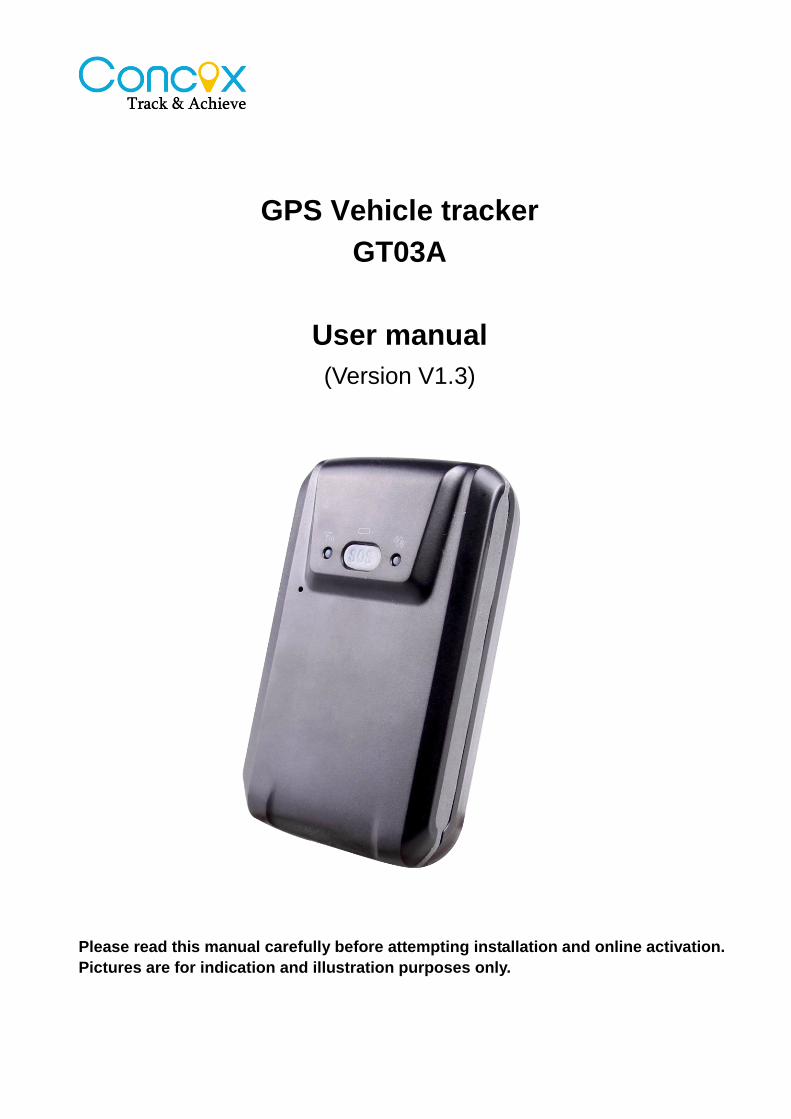
GPS Vehicle tracker
GT03A
User manual
(Version V1.3)
Please read this manual carefully before attempting installation and online activation.
Pictures are for indication and illustration purposes only.

1. Accessories
Please check whether these accessories are included, Pictures are for indication and
illustration purposes only.

2. Appearance
SOS button
Short press SOS button twice to activate/deactivate defense status
Long press SOS button to activate SOS alarm
2.1 LED status (non-sleep mode)
2.1.1Red LED (Power/working status)
LED Status Indication
Flash quickly (interval 0.1S) Low battery
Flash slowly (interval 2s) Full charge/Working normally
Flash slowly (Flash 1s after every 2s) Working normally
Bright charging
2.1.2 Blue LED(GPS signal status)
LED Status Indication
Flash quickly (interval 0.1s) Searching GPS signal
Flash slowly (Flash 0.1s after every 2s) GPS signal has been acquired
successfully
Totally dark GPS stop working

2.1.3 Green LED (GSM signal status)
LED Status Indication
Flash quickly (interval 0.1s) Receive GSM signal normally
Flash slowly (flash 0.1s after every 2s) GPRS on line
bright Incoming/outgoing calls
totally dark No GSM signal or no SIM card
installed
2.1.4 Defense Status Indication
While the three LEDs (blue/red/green) flash cyclically, it means the device begins to enter
defense status. When the device is in defense status, the 3 LEDs flash quickly in cycling.
Note:
1. When it runs firstly with battery supplying, after GPS being located over 5s, all LEDs will
be automatically turned off.
2. If there is no press operation to the device over 20s in the LEDs lightening progress, all
LEDs will be automatically turned off
3. Short press SOS button could light LEDs and press again could close it.
3. Technical parameters
● GSM frequency band: 900/1800MHz 850/1900Mhz (quad band)
● GPRS: Class12,TCP/IP Build in GSM Module
● GPS sensitivity: -159dBm(tracking sensitivity)
-144dBm(acquisition sensitivity)
● GPS positioning time: cold start: 38s
Warm start: 32s
Hot start: 2s
● GPS positioning accuracy: <10m(2DRMS)
● Ambient temperature: 20°- +70°
● Ambient humidity: 20%-80% RH
● Lithium battery: 2600mAH/3.7V
● Dimension: 91.5(L)×57.0(W)×24.0(H)
● Weight: 100g
4. Before use
Open the packing box to check whether the type of device is correct and the following
accessories are included. If there is any lack, please contact the distributor.
Device 1pc; Li battery 1pc; charger 1pc; charging cable 1pc; User manual 1pc
5. Operating instructions
5.1 Install/Remove the SIM card
● Power off the device, remove the battery and external power
● put the SIM card in the SIM card slot
Note: 1. Please use a GSM SIM card
2. SIM card in the device should be enabled for GPRS
3. Caller ID of the SIM card in the device should be on
Warning: turn off the device before removing the SIM card. It is forbidden to install or
remove the SIM card while the power is on, otherwise the SIM card may be damaged.
5.2 Power on
The device is designed without power key and it will be turned on after installing a battery.
5.3 Charge the battery
When the red LED on the device starts to flash quickly, the battery should be charged.
Please remember to charge it before the first use.
● Connect the charger to power
● connect the charger with the device
● The charging process will take about 4-6 hours.
● The device can work normally during charging. Red LED being light indicates that it is
charging. When charging is finished, red LED will flash slowly.
Warning:the ambient temperature shall be 0℃~40℃ while charging. Please use the
charger provided by the manufacturer.
5.4 Device installation
The device has a strong magnet in rear cover which could attach to any mental surface.

The recommended installation position is as follows;
1. Below the front windshield with the device front up and make sure there are no sunshade
mask and other anti-GPRS reception material on it
2. On the bottom of a car such as the side place below door. Do not put it too far inside,
otherwise it can not receive GPS signal.
Note: 1. Device should be in the place with good GPS reception.
2. Do not put the device in some place where may get rusty easily.
3. Do not put the device in some place with extremely high temperature, such
as around the radiator pipe or exhaust port, for that it may lower the magnetism greatly.
4. To place the device under the car, please make sure GPS is located first.
6. Functions and Parameter settings
6.1 Settings of APN
Please send SMS command to the number of device so as to set up the APN parameter.
The device will reply “OK” automatically after setting successfully. The SMS command is as
follows:
APN,APN name#
E.g: APN,internet#
Note: The APN of some countries have user name and password, you may need to send
SMS command as following:
APN,APN name,user name,password#
E.g: APN,internet,CLIENTE,AMENA#

6.2 SOS numbers setting
6.2.1 Add SOS number by SMS
SMS command: SOS,A,number 1,number 2,number 3,number 4#(A means add number)
For example: SOS, A,13510682360,13511685136,13612687248,13612683621#
4 SOS numbers can be set at one time. It will reply “OK” if succeeded.
SOS,A,13527852360# means set the first specific number
SOS,A,,,13527852360,12510682360#means set the third and fourth SOS number
6.2.2 Delete SOS numbers by SMS
SMS command: SOS,D,1,2,3,4# (D means to delete SOS number)
For example: SOS,D,1# means to delete the first number
SOS,D,3# means to delete the third number
To delete several numbers at one time, SMS command can be: SOS,D,1,2,4# means to
delete the first, second and the fourth numbers
If you do not know the serial number, you can also delete number by SMS command like
this: SOS,D,number#
For example: SOS,D,13527852360# means delete this SOS number directly.
It will reply “OK” if succeeded.
6.2.3 Add SOS number via platform
You can set SOS numbers via the platform when the device connects to the platform.
Note: Only the SOS number can make the operation as remote defense, monitoring and
SMS checking position.
6.3 Arm/disarm
There are 3 methods to activate/deactivate defense status.
6.3.1 Via SOS button
Short press SOS button twice to activate defense status. The three LEDs will flash slowly
one by one. After 3mins, the device will enter the defense status, and the LEDs will then
flash quickly one by one.

Short press SOS button twice again to deactivate defense status
6.3.2 Via Calls
Any SOS number calls the device and then ends up the call by the mobile side in 10s, the
device will enter defense status and then reply SMS “Remote setting up defense
Successful”. If the SOS number does not end up the call in 10s, it will activate monitoring
function.
Any SOS number calls the device and then ends up the call by the mobile side in 10s, it will
disarm status from the arm status and then reply SMS “Remote disarm succeeded”. if not
ends up the call in 10s, the device will enter voice-monitoring status.
6.3.3 Via SMS command
Send SMS “111” to arm. And the device will reply SMS “Remote setting up defenses
Successful” if it is set successfully. Only SMS from SOS numbers is valid.
Send SMS “000” to disarm. And the device will reply SMS “Successful remote disarm” if it is
set successfully. Only SMS from SOS numbers is valid.
Note:
1 If you put the device in the car, please do not set arm when you are driving as it will
activate the vibration sensor.
2 Only SOS numbers can set arm or disarm.
3 Device SIM card should activate caller-ID function.
6.4 Anti-theft alarm
In defense status, once there is a vibration, the device will send alarm SMS to the SOS
numbers in 10s.
If the device is located, it will send accurate GPS location to SOS numbers. Otherwise, it
will send LBS location first. Once it is located successfully in 2 minutes, the device will send
a GPS location.
Example:
GPS location: “vibration ,Alarm: Date time:”12-10-31 20:08:18
http://maps.\google.com/maps?q=N22.577169,E113.916790.”
LBS location: “vibration ,Alarm: Date time:12-10-31 20:08:18
http://maps.\google.com/maps?q=N22.577169,E113.916754.“

During vibration alarm time, if the device is located, but fail to connect to the platform, the
device will send longitude and latitude information.
For example, “Vibration alarm: N23.111748, E114.409215, 11
While if the GPS is neither located nor connect to the platform, the device can not get the
position information. Then it will send SMS “vibration alarm! Attention” to SOS numbers.
Note:
1. The device will only alarm once in 5mins.
2. If device can not send SMS normally, please check whether there is enough balance in
the SIM card.
6.5 SOS alarm
Press SOS button for more than 3s to activate GPS automatically. The device will vibrate
twice and then send a location message to the preset SOS numbers.
If the device is located, it will send an accurate GPS location SMS “Emergency call: Date
time:”12-10-31 20:08:18 http://maps.\google.com/maps?q=N22.577169,E113.916790.”
Otherwise, the device will send a LBS location SMS “Emergency call: Date time:”12-10-31
20:08:18 http://maps.\google.com/maps?q=N22.577169,E113.916754.”
After the message, the device will dial the preset SOS numbers in turn. If any SOS number
answers the call or no response from all the number which been dialed for three cycles, it
will stop dialing. After dialing the SOS numbers, if GPS is located, the device will send GPS
location SMS again.
After activating SOS alarm, if the GPS is not located and fail to connect to the platform
either, the device can not get the position information, and it will send SMS “Emergency call,
Attention” to the preset SOS numbers.
Note: SOS numbers should be preset for this function!
6.6 Geo-fence
You can set a special area as geo-fence field. When the car or person gets in/out of this
area, the device will send alarm to SOS numbers when the geo-fence function is ON.
6.6.1 Activate geo-fence function
Geo-fence function is off as default. You can activate it by SMS command.
There are two kinds of Geo-fences, circular and rectangle.
(1) Circular fence
Set a coordinate as the centre of the circular fence, and then set a distance as radius.
Go in/out fence SMS:
“FENCE,ON,0,latitude,longitude,radius#”
e.g.: FENCE,ON,0,N22.57139,E113.87710,5#
It means the radius is 500 meters(radius 1=100M,2=200M····and so on)
The device will reply “OK” if set successfully. As long as the device goes in or out of this
circular area, it will send alarm to the SOS numbers.
You can also set current location coordinates as the centre of the circular fence,
“FENCE,ON,0,0,0,radius#” (This SMS is only available when device get located)
Go in fence SMS:
Any number can send the following message”FENCE,ON,0,latitude,longitude,radius,IN#”
to turn on circular fence function
e.g.: FENCE,ON,0,N22.57139,E113.87710,5,IN#
It means the radius is 500 meters(radius 1=100M,2=200M····and so on)
The device will reply “OK” if set successfully. As long as the device goes in this circular area,
it will send alarm to the SOS numbers.
Go out fence SMS:
“FENCE,ON,0,latitude,longitude,radius,OUT#”
e.g.: FENCE,ON,0,N22.57139,E113.87710,5,OUT #
It means the radius is 500 meters.(radius 1=100M,2=200M····and so on)
The device will reply “OK” if set successfully. As long as the device goes out of this circular
area, it will send alarm to the SOS numbers.
(2) Rectangle fence
Specify two points in the map and use them as diagonal line, you can draw a rectangle area,
which is the rectangle fence.
Go in/out fence SMS:
Any number send the command “FENCE,ON,1,the latitude of upper left corner, the
longitude of upper left corner, the latitude of lower right corner, the longitude of
lower right corner#”.

e.g.: FENCE,ON,1,N22.541183,E113.916,N22.557743,E113.892334#
The terminal will reply “OK” if set successfully. Any time the terminal enter or leave this
rectangle fence, it will send alarm message to the preset SOS numbers.
Go in fence SMS:
Any number send the command “FENCE,ON,1,the latitude of upper left corner, the
longitude of upper left corner, the latitude of lower right corner, the longitude of
lower right corner, IN#”.
e.g.: FENCE,ON,1,N22.541183,E113.916,N22.557743,E113.892334,IN#
The terminal will reply “OK” if set successfully. Any time the terminal enters this rectangle
fence, it will send alarm message to the preset SOS numbers.
Go out fence SMS:
Any number send the command “FENCE,ON,1,the latitude of upper left corner, the
longitude of upper left corner, the latitude of lower right corner, the longitude of
lower right corner, OUT#”.
e.g.: FENCE,ON,1,N22.541183,E113.916,N22.557743,E113.892334,OUT#
The terminal will reply “OK” if set successfully. Any time the terminal leaves this rectangle
fence, it will send alarm message to the preset SOS numbers.
(3) Example of alarm message
While the Geo-fence function is activated, each time the terminal enters or leaves the fence
area, there will be alarm message sent to the preset SOS numbers.
Examples:
GEO FenceOut[DateTime:12-06-01 14:58:03] http://maps.google.com/maps?q=N22.5771
37,E113.916785
GEO FenceIn[DateTime:12-06-01 14:58:03] http://maps.google.com/maps?q=N22.57713
7,E113.916785
6.6.2 Disable Geo fence
Send SMS to disable geo-fence function: FENCE,OFF#
After get reply “OK”, geo fence function is off.
6.6.3 Check Geo fence status
Send the command SEEFENCE# to check whether geo fence function is on or off.
If geo fence is off, it will reply SMS “Switch:OFF”.
If geo fence is on, it will reply SMS
“Switch:ON;State:IN&OUT;Lat:N22.567000;Lon:E113.890000,Radius:100M;Fence
Type:Circle.”
6.7 Low battery alarm
When battery is low, device will send low battery alarm SMS to SOS numbers
Low battery alarm SMS: “Warning! Battery is low, please charge in time!”
When battery is too low, it will send SMS: Warning! Battery is too low, power off
automatically.
6.8 Voice monitoring
Any SOS number calls the device and keep ringing for more than 10s, the device will enter
voice monitoring status. In this case, caller can monitor the sound around the device.
Note: 1. Caller ID function is needed for voice monitoring.
2. Only SOS numbers can monitor the device.
6.9 Terminal position query
6.9.1 Address information query
SOS number can send the command WHERE# to query the address information.
If GPS is located successfully, the device will reply the accurate GPS address information.
Otherwise, it will send LBS location first. And then if GPS located within 2mins, device will
send another SMS with accurate location.
Example:
Lat:N22.571285,Lon:E113.877115,Course:42.20,Speed:0.0740,DateTime:10-11-23
22:28:51
If GPS is never located successfully, the terminal will reply the following message after 2
minutes;
GPS fail to locate, no data, please try again!
6.9.2 Google link query
SOS number can send the command URL# to query the Google link.
If GPS is located, it will reply the Google link of the current position. If GPS is not located
over 2 minutes, it will send the link of last position.
e.g.:
<DateTime:10-11-2323:42:51>http://maps.google.com/maps?q=N22.571490,E113.877103
If GPS is never located, the device will reply “No Data!”
Note: 1. GPS can only be located at the open place outdoor. While at the place without no
or little GPS signal, such as, indoor, under the tree or besides the tall building, it can not be
located. Yet LBS can be located wherever there is GSM signal.
2. Only SOS numbers can query the position by SMS.
6.9.3 Position query via platform
The device will send position information to the platform server timely. The user can check
the position on the platform.
The platform website: www.gpsyeah.com.
Please contact your dealer for the login methods and operations.
LBS are a rough locating way. For more accurate information, GPS locating function must
be activated. Its positioning accuracy is around 10m.
Note: to realize this function, you need the support of the network operator. And GPRS
function should be activated for the SIM card.
6.10 Restore Factory Setting
While the terminal can not work normally because of some incorrect parameter setting, you
can try to reset the settings and see whether it works.
The command: FACTORY #
6.11 Reboot setting
If the terminal can not work normally while the parameter settings are right, you can send
command to reboot the terminal.
The command: RESET#

After receiving this command, the terminal will reboot in 1 minute.
7. Appendix
7.1 Battery security
● Please use the original battery. The warranty will be invalid by using any other accessory.
The manufacturer will not take any responsibility for any damage caused by not using the
original battery.
● The new battery can realize the optimal performance after fully- charging for 2 or 3 times.
● The battery can be used for hundreds of times, yet it will wear out eventually. When its
talking time and standby time shrinks sharply, you need a new one.
● Cut off power supply when not using the charger. Don’t charge the battery for more than
one week, since over charging will reduce its using time.
● Do not short-circuit the battery with metal stuff (such as the key in your pocket)
● Do not bend or open the battery.
● Do not put the battery into water or fire.
● The battery should never be charged at temperature below 0 degrees or above 45
degrees Celsius.
7.2 Trouble shooting
If there is any problem while operating the terminal, please refer to the following table,
or contact your service provider.
Common problems Causes Solution
Bad reception Near the tall building or in the
basement
Change to a place with good
signal
The terminal can not
switch on No battery power Change a new battery
Can not make voice
monitoring
No preset SOS numbers Set SOS numbers
SIM card is without Caller ID function Activate the function

can not connect to the
network
SIM card is not inserted correctly Check the SIM card
The sheet mental of SIM card is
dusty Wipe it clean
Invalid SIM card Contact your internet service
provider
Out of GSM service area Move back to the GSM
service covered area.
weak signal Try again in a strong signal
area
can not charge
Voltage is out of charging range of the
charger Change to the proper voltage
Non-standard charger Use charger that come with
the package
Poor contact Check if the plug is in
Can not check
address information
GPRS function is not activated Please contact the SIM card
operator to activate GPRS
Can not get the position data ①restart the device
②contact with your distributor
It is not a SOS number set SOS number
ShenZhen Concox Information Technology CO.,Ltd
Tel: +86 755 2912 1200
Fax: +86 755 2912 1290
E-mail: [email protected].
Add: 4/F, Building B, Gaoxinqi Industrial Park,
Liuxian 1st Road, No.67 Bao'an District, Shenzhen
www.iconcox.com