GPS Tracker User Manual Draft 1 - Canada GPS … Tracker 3 1 GPS T racke 1.1 I ntr oduc i The GPS...
26
GPS Tracker User Manual Draft 1.0
Transcript of GPS Tracker User Manual Draft 1 - Canada GPS … Tracker 3 1 GPS T racke 1.1 I ntr oduc i The GPS...

GPS Tracker
User Manual Draft
1.0

GPS Tracker2
Table of Contents
0
Part I GPS Tracker 3
................................................................................................................................... 31 Introduction
................................................................................................................................... 32 Overview
Part II Getting Started 5
Part III LED Indication 7
Part IV Device Configuration 8
................................................................................................................................... 91 Main
................................................................................................................................... 112 Geofence
Part V Operations 12
................................................................................................................................... 121 Button control
................................................................................................................................... 132 SOS
................................................................................................................................... 143 Call
................................................................................................................................... 144 Audio Surveillance
................................................................................................................................... 155 Report
................................................................................................................................... 156 SMS Commands
Part VI Track Manager 16
................................................................................................................................... 171 UI Overview
................................................................................................................................... 172 Software Settings
................................................................................................................................... 183 Import Track
................................................................................................................................... 204 Add New Activity
................................................................................................................................... 225 Activity Calendar
................................................................................................................................... 236 Analyze Activity
Part VII Product & Safety Information 24
................................................................................................................................... 241 Taking care of your device
................................................................................................................................... 242 Operating Environment
................................................................................................................................... 253 Battery
................................................................................................................................... 264 WEEE
0

GPS Tracker 3
1 GPS Tracker
1.1 Introduction
The GPS Tracker is a portable and easy-to-use GPS tracking device that you can carry with you to logdown your daily routes, give it to salespeople for their business trip tracking, or give it to the elders andkids for protection purpose, and many more.
Portable Emergency Bell f or
Elderly /Kids Care
Tracking/Recording of
Business Trips
Vehicle Tracking and Fleet
Management
Asset Guarding and
Tracking
Tracking of Pets and
Animals
Main features:
Emergency SOS Alarm w/ two-way calling capabilityAudio surveillance for prompt rescueIPX7 waterproof protection for tracking in rigorous environmentsGPS and Cell-Tower Positioning for better position determinationBuilt-in motion sensor for unexpected movement detectionGeo-fencing alarm to safeguard valuable assetsDetailed map view in Smart SMS location report available for quick look on the handsetMicro-SD memory available for long-period trackingTrack Manager software for efficient track management
1.2 Overview
Device Overview
Get acquainted with the basic structure of your device.

GPS Tracker4
(1) Call (2) Power (3) SOS button (4) MIC (5) LED indicator (6) Micro-USB port (7) Micro-SD socket (8) Speaker

Getting Started 5
2 Getting Started
To get started with your GPS Tracker, please follow the steps described below:
1. Open the battery cover; insert the SIM card and battery.
To insert the SIM card, please:Open the back cover by unscrewing it as illustrated on the cover.Insert your SIM card as shown in the following steps: first push it down in the slot (step 1), and thenslide it leftwards (step 2).
2. Install Track Manager Software and device driver on PC. (Software CD)

GPS Tracker6
3. On Track Manager, click [Manual] for a detailed on-line help.
4. Launch Track Manager to complete hardware settings by setting up a tracking profile and SOSnumbers for the GPS Tracker. Make sure the PIN Code of the SIM card is entered when required.(See more information about hardware settings in Device Configuration .)
5. Charge the GPS Tracker via USB for at least 4 hours prior to first use.
6. Once the GPS Tracker is fully charged, have it unplugged from PC, and it will power on automaticallywith a Green LED flashing once every 5 seconds.
7. The device is now ready to use. Please send a [Position] message to the GPS Tracker via admin'sphone as instructed in the online help to see how it works.
Once you're ready to track, send a test message to the tracker to get started: Send a text message including "Position" as the message content to the tracker from the Adminphone.You should then receive a reply message including an URL to the map where you're currentlylocated. Click on the URL, and you'll see a map indicating your current position.
Note:
8

Getting Started 7
1. Do not plug in the USB cable to PC before you install the software.2. A service charge may be incurred by click ing on the URL in the SMS message depending on your
data plan subscribed. Contact your mobile service provider for more details.
3 LED Indication
LED Indicator Indication Description
Power ON The Power LED flashes Greenonce every 5 seconds.
Charging The Power LED stays ON Redwhen device is being charged, andturns off after it is fully charged.
Battery Low The Power LED flashes Red onceevery 5 seconds.
GSM ON The GSM LED flashes Orangeindicating GSM communication isactivated.
GPS ON, no fix yet The GPS LED flashes Blue onceevery 5 seconds indicating thatGPS is ON, but not yet a fix hasbeen determined.
GPS fixed The GPS LED flashes Blue twiceat a time indicating a fix has beendetermined.
SOS or Call The Red & Green Power LEDsand Blue GPS LED stay ON incase of SOS or during a call.
SOS: causes alerting sound.Call: causes a dial tone.

GPS Tracker8
LED Indicator Indication Description
Device Error / HardwareMalfunction
The Error LED stays ON Redindicating the occurrence of a deviceerror or hardware malfunction.
Note: To acquire detailedinformation about the error thatoccurs, please connect your GPStracker to Track Managersoftware.
4 Device Configuration
Device configurations must be completed prior to starting tracking with your GPS Tracker.To complete device configuration of your GPS Tracker, please follow the instructions below:
1. Launch Track Manager.
2. On Track Manager, click on the main menu bar to complete hardware settings.
Device Configuration 9
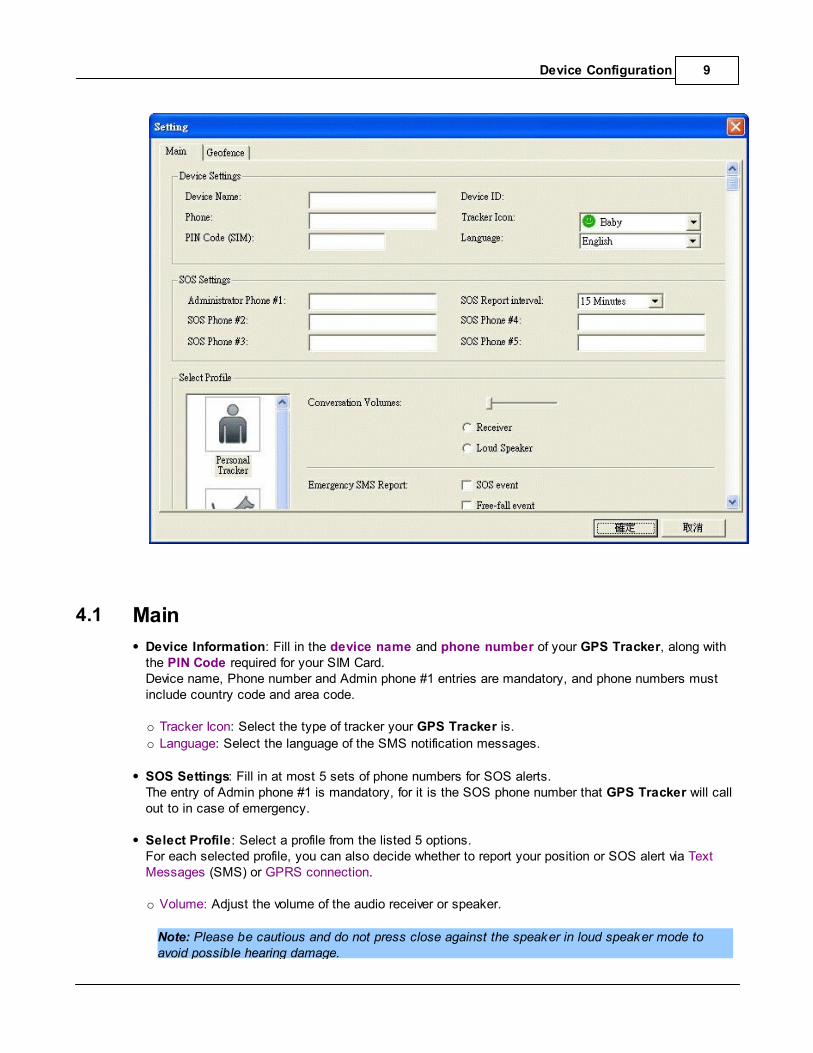
4.1 Main
Device Information: Fill in the device name and phone number of your GPS Tracker, along withthe PIN Code required for your SIM Card.Device name, Phone number and Admin phone #1 entries are mandatory, and phone numbers mustinclude country code and area code.
o Tracker Icon: Select the type of tracker your GPS Tracker is.
o Language: Select the language of the SMS notification messages.
SOS Settings: Fill in at most 5 sets of phone numbers for SOS alerts. The entry of Admin phone #1 is mandatory, for it is the SOS phone number that GPS Tracker will callout to in case of emergency.
Select Profile: Select a profile from the listed 5 options. For each selected profile, you can also decide whether to report your position or SOS alert via TextMessages (SMS) or GPRS connection.
o Volume: Adjust the volume of the audio receiver or speaker.
Note: Please be cautious and do not press close against the speaker in loud speaker mode toavoid possible hearing damage.

GPS Tracker10
o Emergency SMS Report: Select the event that you want to receive an emergency report for via
SMS, such as SOS event, Free-fall event, Geofence event, Unexpected movement event,and Battery-low event.
o Report tracking data via: Select the method how you want the tracking data be reported, either via
SMS to the Admin phone, GPRS connection to the server, or none. If GPRS Connection to server is selected, click Register to Server to register your GPS Trackerwith the Tracking Server first.While registering, create a new account with the Tracking Server or log in with your accountinformation if you're an existing user.
o Tracking Interval: Select the tracking interval for your GPS Tracker.
o Report Interval: Select the interval for your GPS Tracker to send a tracking report.
o Free-fall detection: This option alerts the owner when the device falls down from somewhere with
great altitude. Cases like this include working at a spot with great heights, mountain climbing orhiking and etc.
o Unexpected movement detection: This option alerts the owner when the device has been detected
with movement for the time period selected.

Device Configuration 11
Note: Since GSM is not activated until the GPS Tracker detects movements, the time of SMS alertreceived will be later than the time of movements detected.
o Reset: Click to reset hardware settings back to defaults.
4.2 Geofence
Click to set the geofence area by dragging and moving the frame shown on the map.
Enable Geofence Alert: Click to start receiving geofence alerts.
Alert Type: Select whether you want to receive the geofence alert when the device enters thegeofence area, exits the geofence area or both.
Geofence Area: Here lists the measurement details of the geofence area.
Disable Geofence Alert: Click to stop receiving geofence alerts.

GPS Tracker12
5 Operations
5.1 Button control
Button Operation Outcome
Power Press down the Powerbutton for 2 seconds.
Turns ON or OFF the GPS Tracker.
Call Press down the Callbutton for 2 seconds.
1. Activates quick-dial to the Admin phone.2. Answers a call when the GPS Tracker rings.3. Hangs up a call after it is answered.
SOS Press down the SOSbutton for 2 seconds.
Activates the SOS alert.The SOS alert can be de-activated by pressing either theCall or Power button.
Call + Power 1. Remove the battery.2. Press down both Call
+ Power buttonssimultaneously, andthen insert thebattery back in. Do
Resets the device back to factory defaults.

Operations 13
not let go of thebuttons before thebattery is inserted.
5.2 SOS
SOS function
To send out a SOS alert:
1. Press down the SOS button for 2 seconds to activate SOS alarm.
2. When it is activated, the GREEN/RED power LEDs and BLUE GPS LED will stay on.
3. The device will then start an alerting/warning sound.
4. GPS will start getting a fix of where you are.
5. SOS alerts will be submitted to all the SOS phone numbers that are previously defined before a GPSfix has been determined, and will be re-submitted again when a fix has been acquired.
6. Once SOS alerts are submitted, the GPS Tracker will start calling SOS phone numbers based onpriorities configured. If one phone number cannot be reached within 2 minutes, the GPS Tracker willproceed with the next phone number in priority and so on.
7. Before the SOS emergency is cleared, the GPS Tracker will repeat steps 5 and 6 based on the SOSinterval (once every 15 mins by default) as needed.
Note: 1. Click on the URL shown in the SMS message, and you'll see a map indicating your current
position. 2. A service charge may be incurred by click ing on the URL in the SMS message depending on your
data plan subscribed. Contact your mobile service provider for more details.
How to dismiss a SOS alert:
1. The SOS alert will be dismissed automatically after the call is answered and finished.
2. Press the Power or Call button once on the GPS Tracker will dismiss the SOS alert.
3. Send out a message containing the command "Dismiss" (excluding the quotes) from the Adminphone will also dismiss the SOS alert.
4. Click on "Dismiss SOS" on ITC, and the SOS alert will be dismissed upon the next connection of theGPS Tracker and Tracking Center.
Important: This device operates using radio signals, wireless networks, landline networks, and user-programmed functions. Connections in all conditions cannot be guaranteed. You should never rely

GPS Tracker14
solely on any wireless device for essential communications like medical emergencies.
5.3 Call
To make a quick-dial:
1. Press down the Call button for 2 seconds, and the GPS Tracker will enable the quick-dial to theAdmin phone.
2. The RED/GREEN power LED and BLUE GPS LED will stay on while a call is being made.
3. After pressing the Call button, a telecommunication carrier tone will appear, indicating a call is beingattempted.
4. Once the call is answered, you can then push the Call or Power button to hang up and finish the call.
To answer a call coming in the GPS Tracker:
1. When GSM is enabled, the GPS Tracker is capable of receiving calls made from the Admin/SOSphone number previously defined.
2. When the GPS Tracker rings, simply press the Call button to answer the call.
3. Once the call is answered, you can then push the Call button again to hang up and finish the call.
Note: Calls that are not made from the Admin or SOS phone numbers will not come through, and nor willthe GPS Tracker ring.
5.4 Audio Surveillance
To start audio surveillance on the GPS Tracker, you may:
1. Send a SMS message including "Listen" as the message content from the Admin phone to the GPSTracker.
2. Afters the SMS message is received, the GPS Tracker will return a call back to the Admin phoneautomatically and silently without alerting the owner.
3. In the meanwhile, the speaker of the GPS Tracker is muted while the MIC is amplified.
4. This surveillance call will be ended automatically in 30 minutes by default.
5. Consequently, the speaker and MIC will go back to normal state.
Operations 15
5.5 Report
To report device position:
1. Send a SMS message from the Admin phone to the GPS Tracker including "Position" as themessage content.
2. After the SMS message is received, the GPS Tracker will start obtaining a fix and report its positiondetails back to the Admin phone via SMS.
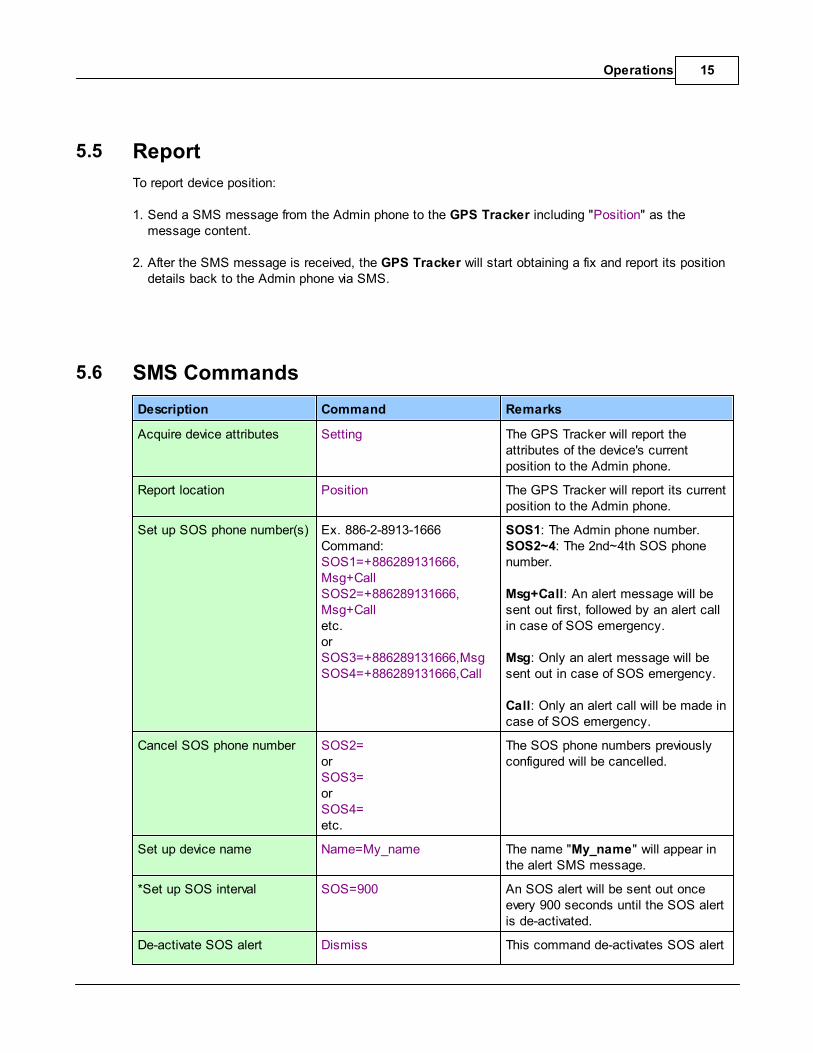
5.6 SMS Commands
Description Command Remarks
Acquire device attributes Setting The GPS Tracker will report theattributes of the device's currentposition to the Admin phone.
Report location Position The GPS Tracker will report its currentposition to the Admin phone.
Set up SOS phone number(s) Ex. 886-2-8913-1666Command:SOS1=+886289131666,Msg+CallSOS2=+886289131666,Msg+Calletc.orSOS3=+886289131666,MsgSOS4=+886289131666,Call
SOS1: The Admin phone number.SOS2~4: The 2nd~4th SOS phonenumber.
Msg+Call: An alert message will besent out first, followed by an alert callin case of SOS emergency.
Msg: Only an alert message will besent out in case of SOS emergency.
Call: Only an alert call will be made incase of SOS emergency.
Cancel SOS phone number SOS2=orSOS3=or SOS4=etc.
The SOS phone numbers previouslyconfigured will be cancelled.
Set up device name Name=My_name The name "My_name" will appear inthe alert SMS message.
*Set up SOS interval SOS=900 An SOS alert will be sent out onceevery 900 seconds until the SOS alertis de-activated.
De-activate SOS alert Dismiss This command de-activates SOS alert

GPS Tracker16
Description Command Remarks
tracking. When de-activated, a reply of"Dismiss" will be submitted.
Activate continuous tracking Start This command enables the GPSTracker to continuously report itsposition details and reply "Start:OK"once continuous tracking is activated.
Stop continuous tracking Stop This command stops the GPS Trackerfrom continuously reporting its positiondetails and reply "Stop:OK" oncecontinuous tracking is de-activated.
*Set up position logginginterval
Log=900 This command enables the GPSTracker to log its position once every900 seconds.
*Set up position report intervaland positioning method
Report=900,SMSReport=900,GPRS
This command enables the GPSTracker to report its position onceevery 900 seconds.
SMS: Report position via SMS.GPRS: Report position to the TrackingServer.
*Set up Heartbeat interval Response=3600 This command enables the GPSTracker to connect with the TrackingServer once every 3600 seconds.
Note: Connection can be establishedeven when the device is set on motiondetection entering the sleep mode.
Activate Geofence Zone=ON This command activates Geofenacearea.
De-activate Geofence Zone=OFF This command de-activates Geofencearea.
Activate audio surveillance Listen This command enables the GPSTracker to call out to the Admin phoneand then activate audio surveillance.This surveillance call will hang upautomatically in 30 minutes.
*Note: Intervals can be set at most 86400 seconds (1 day).
6 Track Manager
With the advancement of global positioning system network, you can now advance your GPS tracking tothe next level. Track Manager is a small and handy tool that can be utilized to analyze all sorts of track data.

Track Manager 17
6.1 UI Overview
Main menu bar
Main menu bar allows you to quickly access the main functions and information concerned.
Import GPS Track : Click to to launch Import Wizard to import GPS track data.
New Activity : Click to add a new activity.
Hardware Settings : Click to customize the tracking modes of your GPS Tracker .
Clear Device Data: Click to clear the GPS logs saved on your GPS Tracker.
Software Settings : Click to customize the software settings of Track Manager.
Help: Click to bring up the Help file.
6.2 Software Settings
Upon the launch of Track Manager for the first time, you'll be prompted to complete software settings.
or
Click on the main menu bar to configure Track Manager.
1. Time Zone: Select the time zone of your current location.By default, the selection of time zone will be presented according to your system configuration.
2. Measurement: Select either Imperial or Metric as your measurement unit for GPS logging.
18
20
8
17

GPS Tracker18
6.3 Import Track
To import existing GPS track data from the GPS Tracker, Micro-SD memory card or file, you may:
1. Click on the main menu bar to launch Import Wizard.Select the source of your track data (GPS Tracker, memory card or file) to be imported, and clickNext to continue.
2. If you choose to import track data from a memory card, you'll be prompted to select the folder wherethe track data are saved.If you choose to import track data from an existing GPS file (*.gpk, *.gpx), you'll be prompted tolocate the file.

Track Manager 19
3. The Import Wizard will then start downloading track data from selected source.
4. Finally, the track data are then successfully imported.

GPS Tracker20
6.4 Add New Activity
To add a new activity (whether sports, personal, business related and etc.), you may:
1. Click on the main menu bar to start adding a new activity.
2. Select track(s) from the list, and click Next to continue.
3. The Import Wizard will then start processing track data.

Track Manager 21
4. Finally, an activity is then created.

GPS Tracker22
6.5 Activity Calendar
The calendar gives a clear view of all the activities you've participated in the month indicated.
1. Move your mouse over the activity icon shown on the calendar, and a description bubble will pop updisplaying the activity details.
2. Click on the activity icon, and the activity track/route will be highlighted on the Google map at theright.
3. Click on the arrows to see more activities in one day.
4. Click on the arrows to go between month pages to see more activities.
5. Right-click on the activity icon shown on the calendar to see more options:
Delete: The selected activity can be deleted.Export to GPX: The selected activity can be exported to a GPX file (.gpx).Export to CSV: The selected activity can be exported to a CSV file (.csv).Reload Map: The map of selected activity will be refreshed.

Track Manager 23
Update Cell-Tower Fix: The cell-tower fix will be re-acquired via the server.
6.6 Analyze Activity
1. The data table shown on the bottom at the left gives you an overview as well as a list of waypointsdetected of the selected activity.
2. The diagram shown on the bottom at the right gives you 6 different track views with respectivemeasurements.
3. Use the axis with dotted lines to move horizontally back and forth to a fixed point, and you'll see the
position of that fixed point on the map indicated with .
4. Drag and move the and axes to highlight a section of the activity.
5. In the activity data table, the 2nd column shows the data of the entire activity, while the 3rd columnindicates the data of highlighted activity section.
6. Switch between , , , , and to see different demonstrative diagrams inrespective measurements.

GPS Tracker24
7 Product & Safety Information
7.1 Taking care of your device
Your device is a product of superior design and craftsmanship and should be treated with care. Thefollowing suggestions will help you protect your warranty coverage.
Keep the device dry. Precipitation, humidity, and all types of liquids or moisture can contain mineralsthat will corrode electronic circuits. If your device does get wet, remove the battery, and allow thedevice to dry completely before replacing it.
Do not use or store the device in dusty, dirty areas. Its moving parts and electronic components canbe damaged.
Do not store the device in high or cold temperature. High temperatures can shorten the life ofelectronic devices, damage batteries, and warp or melt certain plastics. When the device warms to itsnormal temperature from a cold temperature, moisture can form inside the device and damageelectronic circuit boards.
Do not attempt to open the device other than as instructed in this guide.
Do not drop, knock, or shake the device. Rough handling can break internal circuit boards and finemechanics.
Do not use harsh chemicals, cleaning solvents, or strong detergents to clean the device. Only use asoft, clean, dry cloth to clean the surface of the device.
To reset the device from time to time for optimum performance, power off the device and remove thebattery.
7.2 Operating Environment
1. Medical devices
Operation of radio transmitting equipment, including wireless phones, may interfere with the functionof inadequately protected medical devices. Consult a physician or the manufacturer of the medicaldevice to determine whether they are adequately shielded from external RF energy. Switch off yourdevice when regulations posted instruct you to do so. Hospitals or health care facilities may useequipment sensitive to external RF energy.
2. Implanted medical devices
Manufacturers of medical devices recommend a minimum separation of 15.3 centimetres (6 inches)between a wireless device and an implanted medical device, such as a pacemaker or implantedcardioverter defibrillator, to avoid potential interference with the medical device. Persons who havesuch devices should:

Product & Safety Information 25
• Always keep the wireless device more than 15.3 centimetres (6 inches) from the medical device.• Not carry the wireless device in a breast pocket.• Hold the wireless device to the ear opposite the medical device.• Turn the wireless device off if there is any reason to suspect that interference is taking place.• Follow the manufacturer directions for the implanted medical device.
If you have any questions about using your wireless device with an implanted medical device, consultyour health care provider.
3. Vehicles
RF signals may affect improperly installed or inadequately shielded electronic systems in motorvehicles such as electronic fuel injection, electronic antilock braking, electronic speed control, and airbag systems. For more information, check with the manufacturer of your vehicle or its equipment.Only qualified personnel should service the device or install the device in a vehicle. Faulty installationor service may be dangerous and may invalidate your warranty. Check regularly that all wirelessdevice equipment in your vehicle is mounted and operating properly. Do not store or carry flammableliquids, gases, or explosive materials in the same compartment as the device, its parts, oraccessories. Remember that air bags inflate with great force. Do not place your device or accessoriesin the air bag deployment area.
Switch off your device before boarding an aircraft. The use of wireless teledevices in an aircraft may bedangerous to the operation of the aircraft and may be illegal.
7.3 Battery
The battery can be charged and discharged hundreds of times, but it will eventually wear out. When thetalk and standby times are noticeably shorter than normal, replace the battery.
Safe removal. Always switch the device off and disconnect the charger before removing the battery.
Avoid extreme temperatures. Always try to keep the battery between 15°C and 25°C (59°F and 77°F). Extreme temperatures reducethe capacity and lifetime of the battery. A device with a hot or cold battery may not work temporarily.Battery performance is particularly limited in temperatures well below freezing.
Disposal. Do not dispose of batteries in a fire as they may explode. Dispose of batteries according to localregulations. Please recycle when possible. Do not dispose as household waste.
Correct use. Use the battery only for its intended purpose. Improper battery use may result in a fire, explosion, orother hazard. If the device or battery is dropped, especially on a hard surface, and you believe thebattery has been damaged, take it to a service centre for inspection before continuing to use it. Neveruse any charger or battery that is damaged. Keep your battery out of the reach of small children.

GPS Tracker26
7.4 WEEE