GPS Advising Manual - Kent State University · GPS Advising Manual ... o FIND results are limited...
47
GPS Advising Manual July 2012
Transcript of GPS Advising Manual - Kent State University · GPS Advising Manual ... o FIND results are limited...

GPSAdvisingManual
July2012

GPSAdvisingManual
Page 2 of 47
ContentsGPS Advising Manual .................................................................................................................................... 1
July 2012 ....................................................................................................................................................... 1
What is GPS? ................................................................................................................................................. 3
Accessing GPS ............................................................................................................................................... 4
GPS Functionality Summary and Overview ................................................................................................... 5
Using GPS for Advising ................................................................................................................................ 10
Section 1: GPS Audits .............................................................................................................................. 10
A. Selecting Students ...................................................................................................................... 10
B. Student Context Information: .................................................................................................... 12
C. GPS Audit Blocks ......................................................................................................................... 13
D. What If Audits: ............................................................................................................................ 20
E. Look Ahead Audit: ...................................................................................................................... 20
Section 2: Using the Degree Planner ...................................................................................................... 22
A. The Individualized Degree Plan.................................................................................................. 23
B. Special Plans ............................................................................................................................... 35
Section 3: Approving/Rejecting a Submitted Plan .................................................................................. 39
A. The Planner tab .......................................................................................................................... 39
B. Review the validation results..................................................................................................... 40
C. Approve the Plan ........................................................................................................................ 41
D. After approving .......................................................................................................................... 41
E. Reject the Plan: ........................................................................................................................... 41
F. Making a few changes before approving a plan ....................................................................... 42
Section 4: GPS Terms and Concepts ....................................................................................................... 44
Section 5: Unenforced Exceptions ......................................................................................................... 45
Section 6: Pre‐1979 Coursework ............................................................................................................ 46
GPSAdvisingManual
Page 3 of 47
WhatisGPS? The Graduation Planning System is designed to provide you and your students with an easy to understand, clearly defined pathway toward degree completion. It consists of four parts: Roadmaps (semester plans), Degree Audit (official graduation requirements), Individualized Degree Plan (each student’s approved plan of study defined by semester), and Tracking (coming in the near future). This document will focus on the Degree Audit, Individualized Degree Plan and Tracking.
Roadmaps: Kent State’s degree program Roadmaps are available on the Kent State homepage, or from within the FlashLine portal. They are available in PDF format and can be printed. Once students have been admitted into a program of study you and your students will be able to create an individualized Degree Plan that is designed for each student and is based upon the Roadmap. If students are considering changing their program of study, they may want to refer to the Roadmap as part of that initial decision. Degree Audit: The GPS has a degree audit which is a summary of the student's degree requirements merged with the student's academic record which will provide a real‐time assessment of the student's progress toward graduation. The audit is organized in blocks of like requirements. Examples include the Kent Core block, major block, university requirements block, etc. The Degree Audit is the official list of all requirements for graduation. Individualized Degree Plan: Working with your student, you will help them create a Degree Plan that begins with the requirements in the Degree Audit, organized in a Roadmap format, but tailored for each student’s unique situation. For example, if a student transfers to Kent State or brings post‐secondary or AP credit as a new student, this will be accounted for in the Degree Audit and only remaining unmet requirements (courses) will be reflected in their individualized Degree Plan. The Degree Plan can be adjusted to fit each student’s needs, including shortening their program for graduation in a shorter timeframe, adding summer terms, or expanding their program length to accommodate a work schedule or family responsibilities. Once approved, their Degree Plan is what they will follow to graduation. Tutorials: A series of tutorials for the GPS Audit and Plan are available at www.kent.edu/gps/plan
GPSAdvisingManual
Page 4 of 47
AccessingGPSStudents will access GPS through FlashLine, choosing the Student Tools & Courses tab. Advisors and other university officials (such as College Dean’s offices, the GPS Office, campus Student Services Offices) will also access GPS through FlashLine using the Faculty & Advisor Tools tab. There are three levels of access available for advisors – see below.
ALL ACCESS LEVELS INCLUDE: VIEWING THE GPS AUDIT AND
ADVX Plan creation and approval; updating the Audit Notes and Plan Notes
ADVP Plan creation (cannot approve/reject Plans); updating the Audit Notes and Plan Notes
Read Only Updating the Audit Notes and Plan Notes
Access to GPS is requested using the Request for GPS Audit Access Form, available on the IS Security and Access management webpage: http://www.kent.edu/is/security/accessusers.cfm Users should contact their Departmental Security Administrator for approved procedures within your area.

GPSAdvisingManual
Page 5 of 47
GPSFunctionalitySummaryandOverview ADVX View
FlashLine takes you back to your FlashLine log in
FAQ tab provides FAQ and video tutorials
Print tab prints the page
NOTE: to move beyond this page you need to select a student. See Section 1.1 – Selecting Students (below).

GPSAdvisingManual
Page 6 of 47
ADVP View
FlashLine takes you back to your FlashLine log in
FAQ tab provides FAQ and video tutorials
Print tab prints the page
NOTE: to move beyond this page you need to select a student. See Section 1.1 – Selecting Students (below).

GPSAdvisingManual
Page 7 of 47
Read Only View
FlashLine takes you back to your FlashLine log in
FAQ tab provides FAQ and video tutorials
Print tab prints the page
NOTE: to move beyond this page you need to select a student. See Section 1.1 – Selecting Students (below).

GPSAdvisingManual
Page 8 of 47
GPS Functionality Description
GPS AUDITS TAB
1. Student View (default) Provides general information about the student’s complete and incomplete requirements, grouped into logical blocks (sections).
2. Graduation Checklist (not available to Students)
This is a quick tool to assist colleges and campuses with graduation checkout. It shows a summary of the status of each block, including courses used to fulfill the requirements.
3. Registration Checklist Shows only the unfulfilled requirements that are “Still Needed” on the audit
4. Student Data Report (not available to Students)
Provides a view of the data that has been brought into the audit from Banner. Attributes such as “Kent Core” and “Diversity” are attached to both transfer and native courses are found here under Attr‐Dtl.
5. What If Provides a view of a degree audit for a proposed new program of study using a student’s current class history. This is helpful for change of program planning.
6. Look Ahead Provides the ability to list courses that may be taken in the future to see their effect on the student’s audit.
7. Class History Link Shows chronological list of all classes competed and in registration.
PLANNER TAB See Section 2: Planner for additional functionality
1. Planner Used by students and advisors to create and view Degree Plans. Advisors with Read Only access can only view plans once they have been saved.
2. Management (only available for ADV and ADVX)
Listing of students with Degree Plans waiting to be reviewed for approval.
NOTES TAB
1. View Notes Provides a view of all of the notes entered in the student’s audit. The Notes can also be viewed at the end of the audit. Audit and Plan notes are also available in WebScheduler.
2. Add Notes User may enter either a predefined note from the dropdown list or write their own notes. IMPORTANT: Notes entered in the GPS system are part of the student’s educational record and will be disclosed as part of that record when complying with any legal requests for the release of information in the educational record. Notes should be factual and of a nature that would bear up under public scrutiny.
3. Modify Notes This tab allows the user to modify notes that they have created.
4. Delete Notes This tab allows the user to delete notes.

GPSAdvisingManual
Page 9 of 47
GPA CALC TAB
Graduation Calculator This can be used to give the student a general view of the average GPA needed throughout their final credits to achieve their desired GPA.
Advice Calculator This can be used to figure out how a student can impact their GPA using actual grades as advice. It is more specific than the graduation calculator.
GPSAdvisingManual
Page 10 of 47
UsingGPSforAdvising
Section1:GPSAudits What is a Degree Audit? The GPS has a degree audit which is a summary of the student's degree requirements merged with the student's academic record which will provide a real‐time assessment of the student's progress toward graduation. The audit is organized in blocks of like requirements. Examples include the Kent Core block, major block, university requirements block, etc. The Audit is the official list of all requirements for graduation.
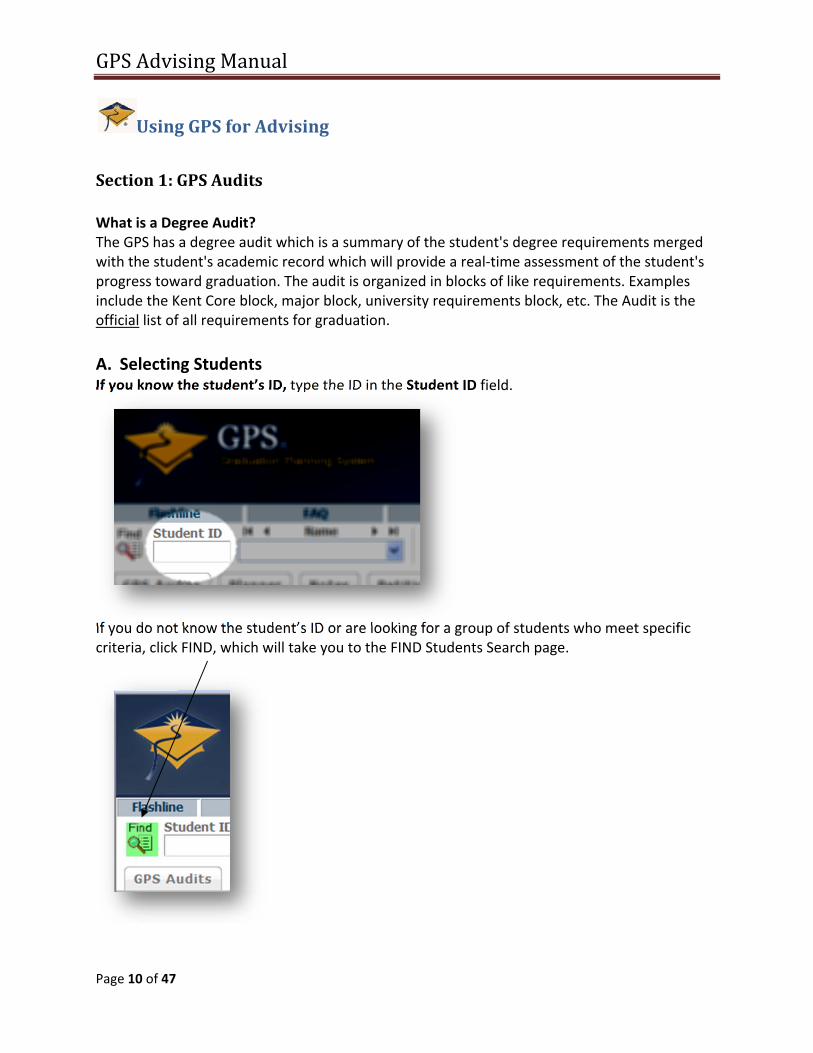
A. Selecting Students If you know the student’s ID, type the ID in the Student ID field.
If you do not know the student’s ID or are looking for a group of students who meet specific criteria, click FIND, which will take you to the FIND Students Search page.
GPSAdvisingManual
Page 11 of 47
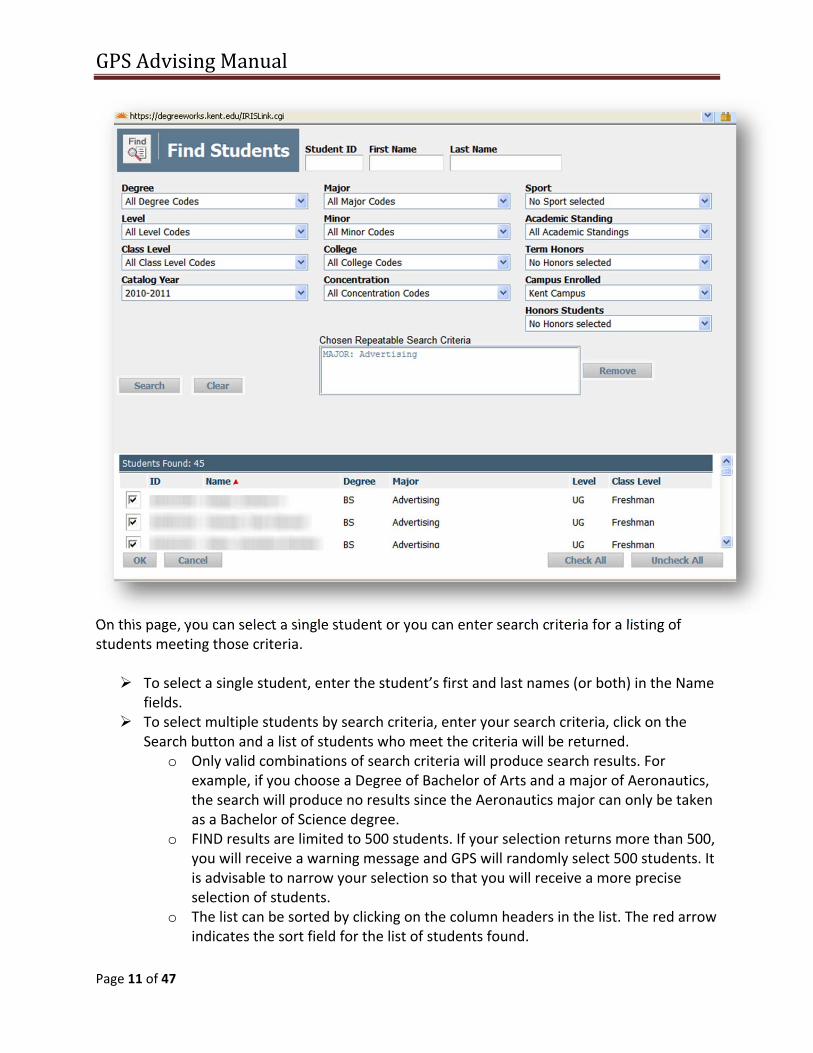
On this page, you can select a single student or you can enter search criteria for a listing of students meeting those criteria. To select a single student, enter the student’s first and last names (or both) in the Name
fields. To select multiple students by search criteria, enter your search criteria, click on the
Search button and a list of students who meet the criteria will be returned. o Only valid combinations of search criteria will produce search results. For
example, if you choose a Degree of Bachelor of Arts and a major of Aeronautics, the search will produce no results since the Aeronautics major can only be taken as a Bachelor of Science degree.
o FIND results are limited to 500 students. If your selection returns more than 500, you will receive a warning message and GPS will randomly select 500 students. It is advisable to narrow your selection so that you will receive a more precise selection of students.
o The list can be sorted by clicking on the column headers in the list. The red arrow indicates the sort field for the list of students found.

GPSAdvisingManual
Page 12 of 47
From this list, you may select all or only certain students and then click OK to load them into your GPS audit page.
From the GPS audit page you can move among the students on your list by either clicking the arrows above the Name field, or clicking on the dropdown list and selecting the student’s name.
B. Student Context Information:
The Context information includes the following: Student ID, Name, Degree, Major, Level, Class Level, Last Audit, and Last Refresh.
If a student has multiple degrees, the Degree dropdown box will display all of the degrees.
If the student has multiple majors within the same degree, all majors will be reflected in the audit for that degree.
Class History provides a term‐by‐term summary of all of the student’s coursework. The Last Audit date is the most recent date on which the audit was run for the chosen
program. This updates each time “Process New” is chosen. The Last Refresh is the date on which the Banner data was updated.
The symbol allows the user to Refresh the student’s Banner data, on demand. Students do not have this option. This process runs automatically every night and updates if there was a change on the student record during the day. Advisors can use this button to update the audit prior to the nightly run to reflect a change in Banner data if a change has occurred during the day.
When running the Audit, advisors should always click on the Process New button
to ensure that the most up‐to‐date data for both the student and the audit are being viewed. Updates made by the scribers will not appear until Process New has been pressed.

GPSAdvisingManual
Page 13 of 47
C. GPS Audit Blocks
STUDENT HEADER: Demographic information related to the student.
HOW TO CALCULATE HOURS TO DEGREE USING THE GPS AUDIT In order to properly calculate a student’s hours that count toward completion of the degree, follow these steps:
1. Begin with Earned Hours on the Audit
2. Deduct all hours in the “Ineligible” block
This number is the total of all completed and eligible hours that count toward graduation. In this example those hours are 113 – 3 = 110.
3. If you want to include hours registered + hours that are IP, IN, NR in the calculation of hours to
degree, simply add the hours indicated in the “In‐Progress” block. The total is displayed in this
block.
This student has 110 (Hours to Degree) + 12 (Credits Applied in “In‐Progress”) to equal 122 Hours to Degree that include registered, IN, IP, NR grades.
GPSAdvisingManual
Page 14 of 47
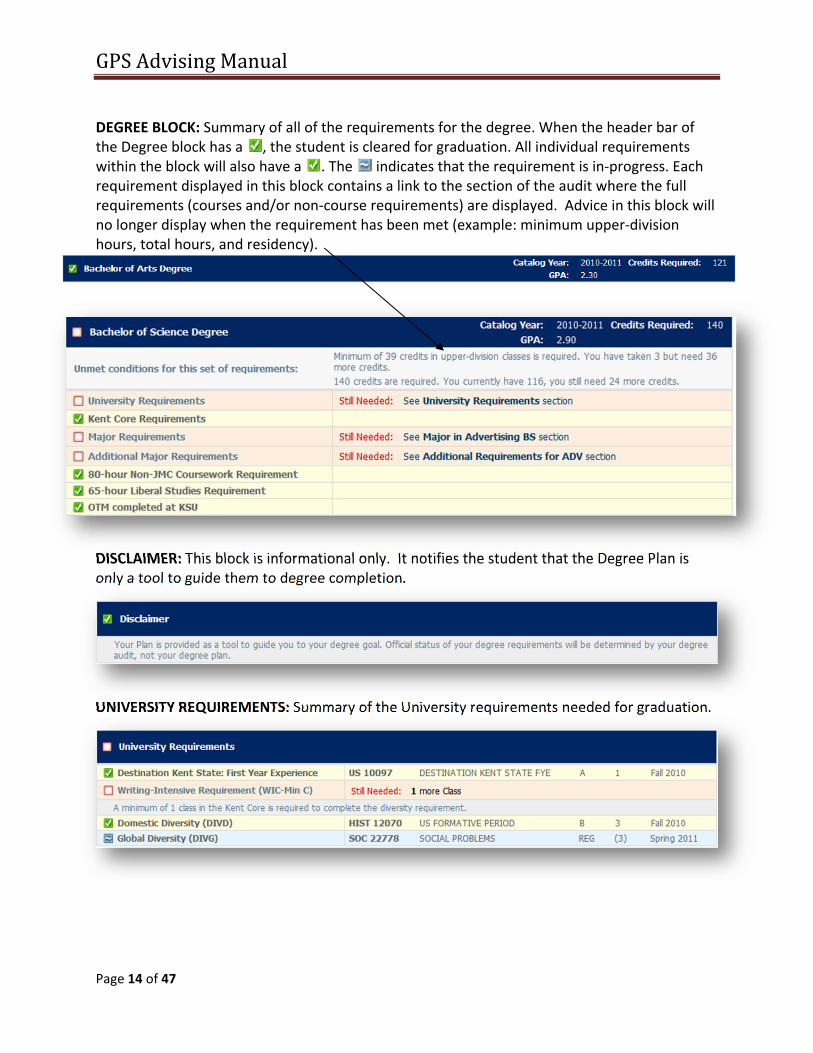
DEGREE BLOCK: Summary of all of the requirements for the degree. When the header bar of the Degree block has a , the student is cleared for graduation. All individual requirements within the block will also have a . The indicates that the requirement is in‐progress. Each requirement displayed in this block contains a link to the section of the audit where the full requirements (courses and/or non‐course requirements) are displayed. Advice in this block will no longer display when the requirement has been met (example: minimum upper‐division hours, total hours, and residency).
DISCLAIMER: This block is informational only. It notifies the student that the Degree Plan is only a tool to guide them to degree completion.
UNIVERSITY REQUIREMENTS: Summary of the University requirements needed for graduation.

GPSAdvisingManual
Page 15 of 47
KENT CORE REQUIREMENTS: Kent Core requirements are displayed in this block.
NOTE: Clicking on the Course ID of a “Still Needed” course in any block opens a separate window (CourseLink) which provides the course description, including prerequisites. If registration is currently open, CourseLink will also indicate the registration status of each section.
FOREIGN LANGUAGE REQUIREMENTS: This block will appear only for programs that require a foreign language.

GPSAdvisingManual
Page 16 of 47
MAJOR REQUIREMENTS: Major requirements are displayed in this block. Students with multiple majors within the same degree will have multiple major blocks. The advice in this block will no longer display after the requirements are met.

GPSAdvisingManual
Page 17 of 47
ADDITIONAL REQUIREMENTS: Some programs have additional requirements which are defined in this block.
CONCENTRATION REQUIREMENTS: Concentration requirements are displayed in this block. Students with multiple concentrations will have multiple concentration blocks.
ADDITIONAL CONCENTRATION REQUIREMENTS: Some programs have additional concentration requirements which are listed in this block.

GPSAdvisingManual
Page 18 of 47
TRANSFER MODULE STATUS: This block is informational only. The Ohio Transfer Module (OTM) is not a graduation requirement, therefore this block will always display with the and will not affect the student’s graduation status. If the student would like to see their individual OTM completion status, they can follow the instructions within the block. The OTM block will not appear if it has been completed.
GENERAL ELECTIVES: Coursework that does not fulfill any of the specific course requirements in the audit. These courses count in earned hours.
INSUFFICIENT: Coursework that has a grade that does not qualify to be used toward the degree, or has been forgiven (Repeat for Recalc/Academic Forgiveness) will appear here. These courses cannot be used to satisfy degree requirements but will count in the GPA unless they have been forgiven.
IN‐PROGRESS: Current or future term coursework is displayed in this block, in addition to appearing in the correct requirement block.

GPSAdvisingManual
Page 19 of 47
INELIGIBLE: Coursework that is not eligible to be counted toward graduation requirements. This includes developmental coursework as well as attempts that exceed a limit, and duplicate courses. The grades earned in these courses will count in the GPA.
EXCEPTIONS: View Exceptions entered into the audit.
NOTES: View Notes entered in the GPS Audit. Advisors can write their own notes or choose them from a drop‐down list. Notes can be viewed by the student and may be subpoenaed. They will also be copied into WebScheduler.
LEGEND: Terminology and symbols used in the GPS Audit.
DISCLAIMER: A statement of responsibility regarding the GPS audit and graduation application deadlines.

GPSAdvisingManual
Page 20 of 47
D. What If Audits: Displays the results when a proposed program change is considered, using a student’s current class history. Select the What If criteria for the scenario to be examined, then click the Process What‐If button to view the results of the audit. NOTE: You must choose the college that is associated with the major to ensure that all requirements will appear correctly.
E. Look Ahead Audit: Provides audit results utilizing courses for which the student plans to register in future terms. Enter the subject and number of the planned course and click “Add Course.” This will move it to the right side of the page. Once you have entered all desired courses, click Process New to view the results.

GPSAdvisingManual
Page 21 of 47

GPSAdvisingManual
Page 22 of 47
Section2:UsingtheDegreePlannerSee tutorials at www.kent.edu/gps/plan
What is a Degree Plan? A Degree Plan is a student’s path to graduation that begins with the requirements in the Degree Audit, organized in a Roadmap format, and is tailored for each student’s unique situation. The Plan can be adjusted to fit each student’s needs, including shortening or lengthening their time to graduation, depending upon their individual circumstances. Once approved, their Degree Plan is what they will follow to graduation.
Who gets a Plan? All undergraduate students in catalog years 2010 and beyond, except those in a non‐
degree program, will have a Degree Plan.
Plans should be updated at each advising appointment.
The Plan
GPSAdvisingManual
Page 23 of 47
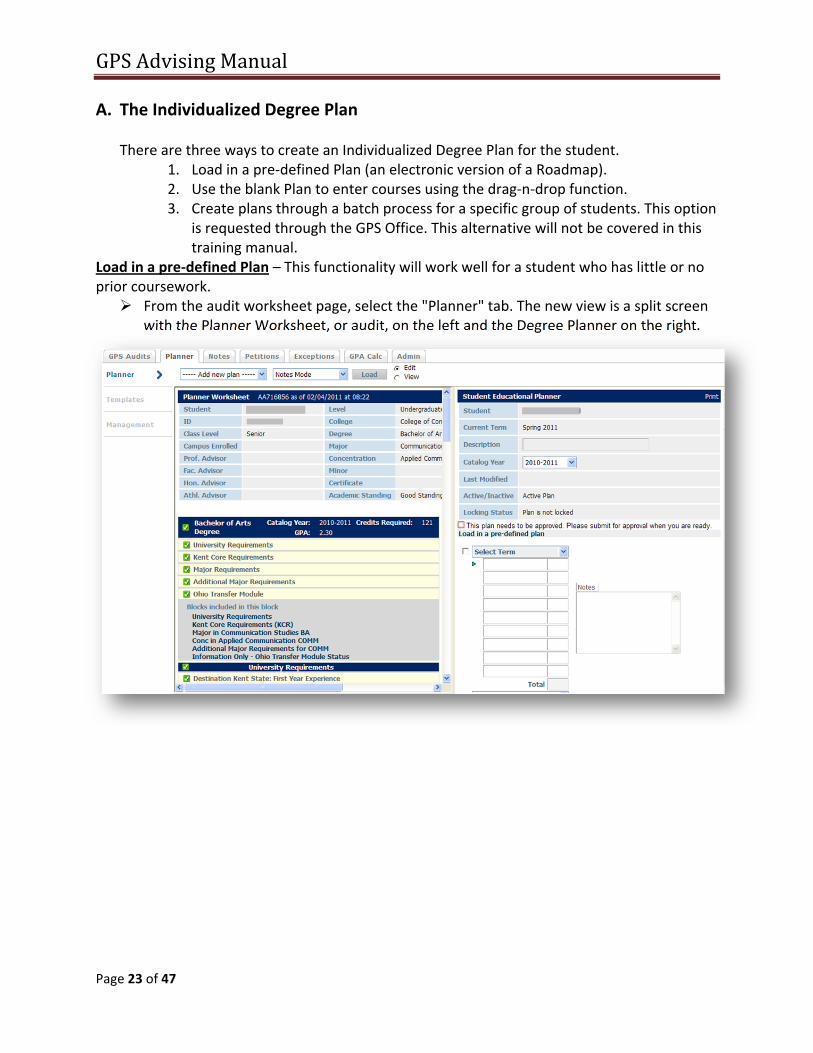
A. The Individualized Degree Plan There are three ways to create an Individualized Degree Plan for the student.
1. Load in a pre‐defined Plan (an electronic version of a Roadmap). 2. Use the blank Plan to enter courses using the drag‐n‐drop function. 3. Create plans through a batch process for a specific group of students. This option
is requested through the GPS Office. This alternative will not be covered in this training manual.
Load in a pre‐defined Plan – This functionality will work well for a student who has little or no prior coursework. From the audit worksheet page, select the "Planner" tab. The new view is a split screen
with the Planner Worksheet, or audit, on the left and the Degree Planner on the right.

GPSAdvisingManual
Page 24 of 47
To load a pre‐defined plan, click the "Load a Pre‐Defined Plan" button in the Planner on the right hand side of the screen.
o The search criteria are already populated with information for your student’s declared program.
o Choose the student’s official catalog year. (This is displayed on the Audit side of the page). Be sure to choose the correct catalog year.
o Click the "search" button.
GPSAdvisingManual
Page 25 of 47
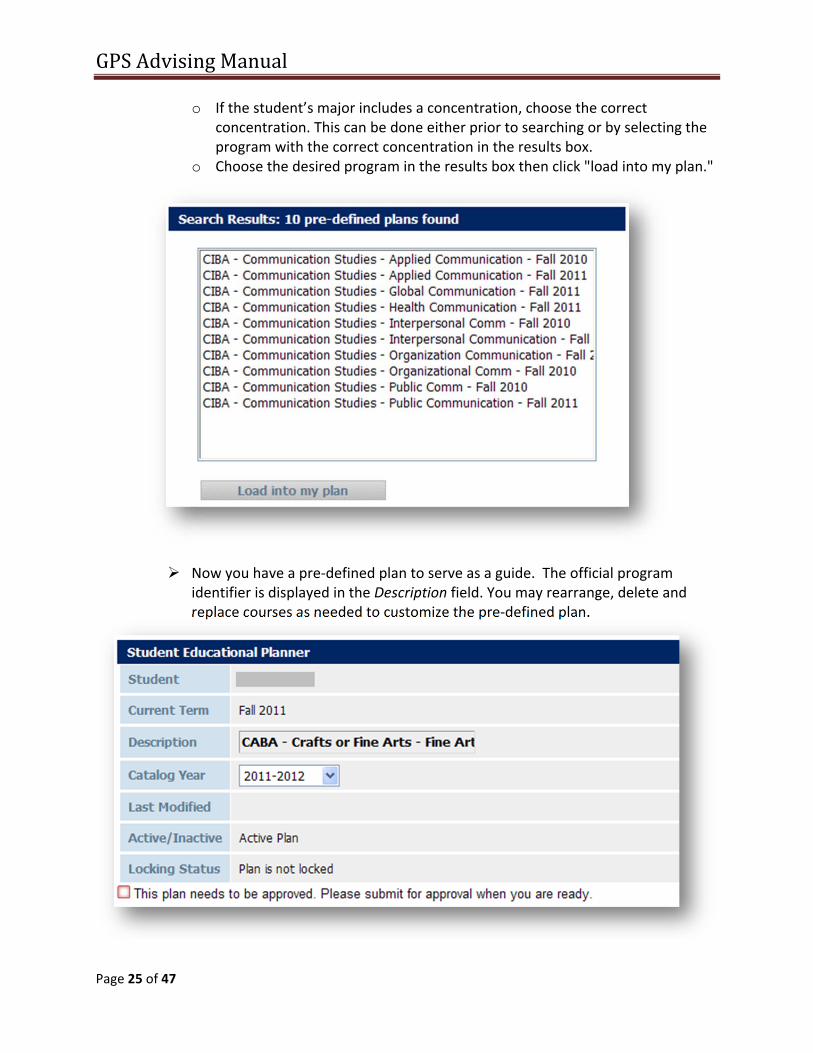
o If the student’s major includes a concentration, choose the correct concentration. This can be done either prior to searching or by selecting the program with the correct concentration in the results box.
o Choose the desired program in the results box then click "load into my plan."
Now you have a pre‐defined plan to serve as a guide. The official program
identifier is displayed in the Description field. You may rearrange, delete and replace courses as needed to customize the pre‐defined plan.

GPSAdvisingManual
Page 26 of 47
o Within all pre‐defined plans there are place holders where specific courses need to be entered as the Plan is developed. The place holders begin with a hyphen ("‐") and must be followed by a space.
o Placeholders may carry notes that will assist you in working with your student to select specific courses to schedule. (See Tips ‘n Tricks section.)
o At any point in time you may validate the Plan against the audit by clicking “Check All Terms,” followed by “Process New.” It is recommended that you do this frequently in order to verify that you are accounting for all courses in the Plan.
GPSAdvisingManual
Page 27 of 47
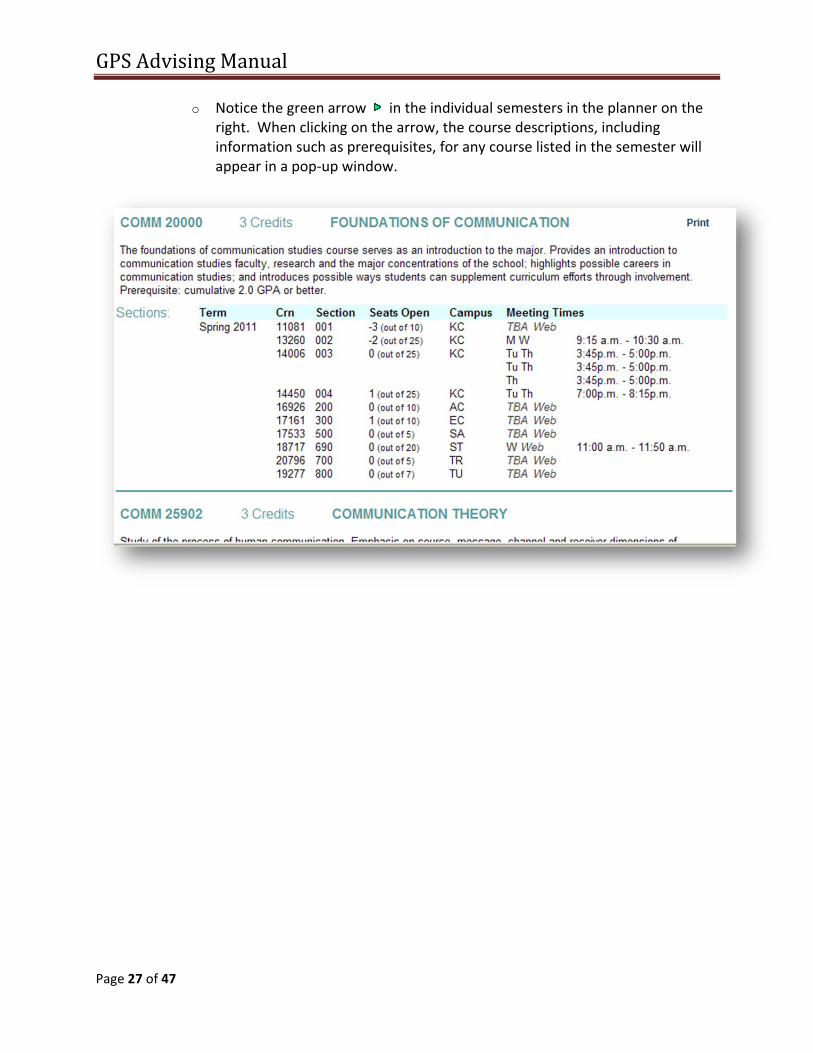
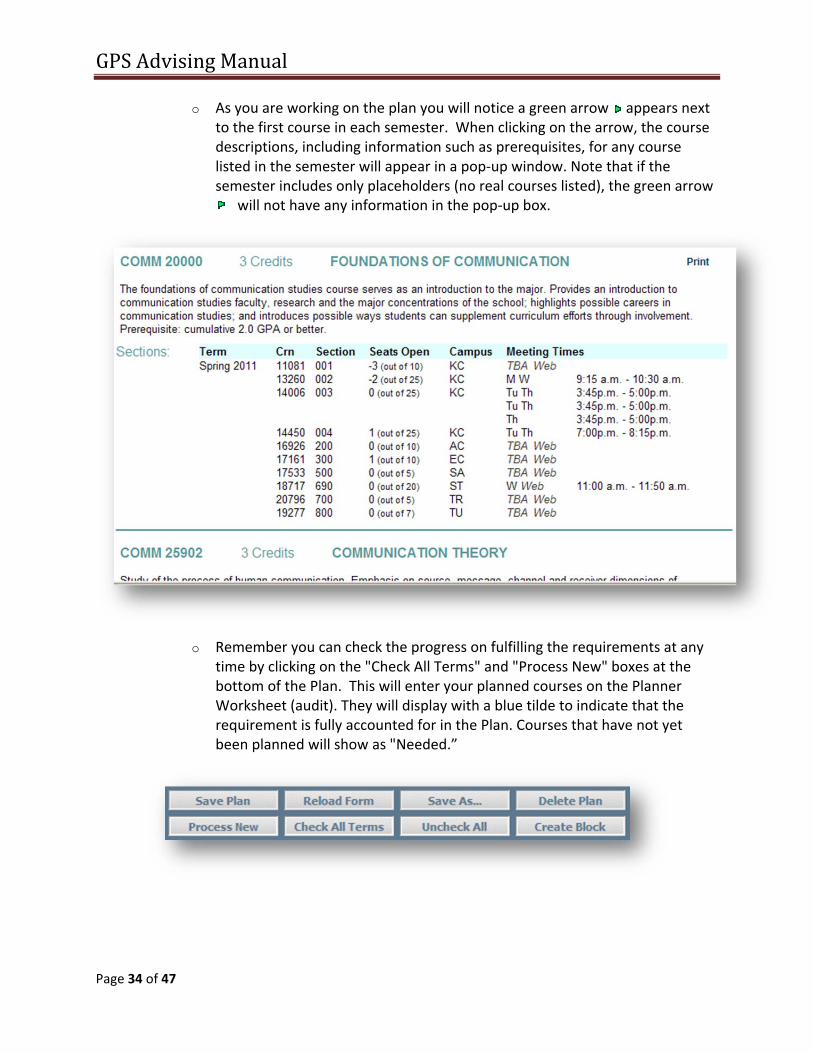
o Notice the green arrow in the individual semesters in the planner on the right. When clicking on the arrow, the course descriptions, including information such as prerequisites, for any course listed in the semester will appear in a pop‐up window.
GPSAdvisingManual
Page 28 of 47
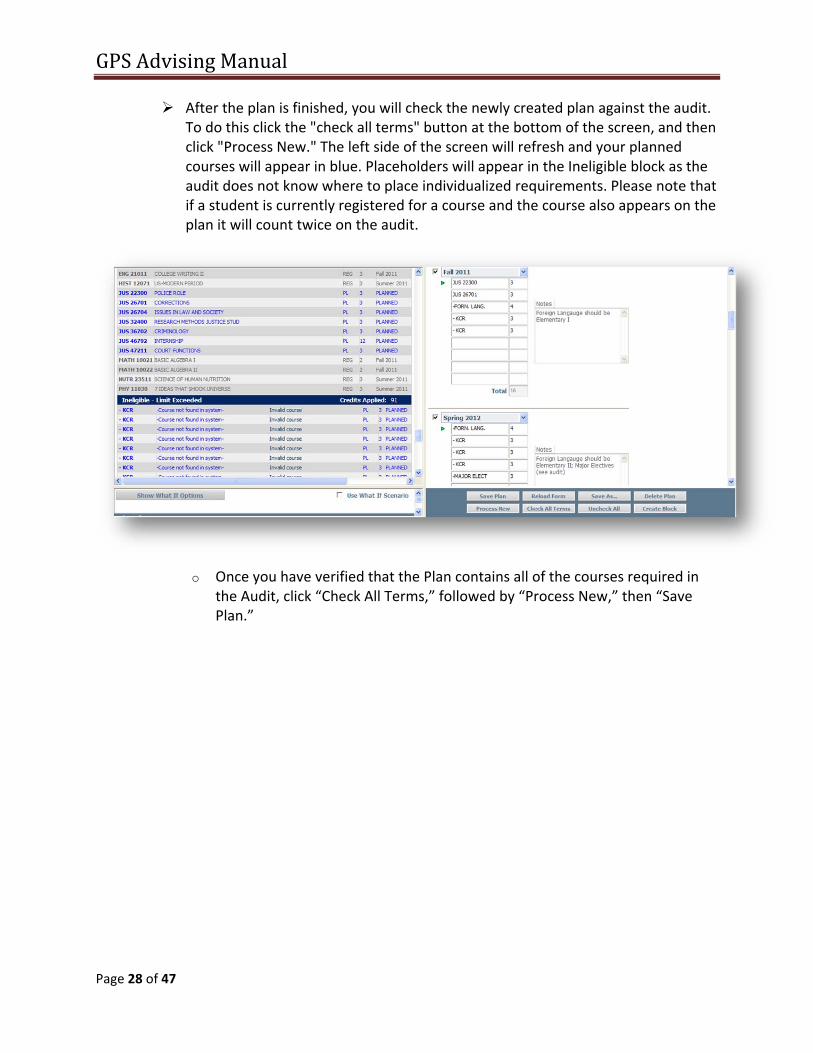
After the plan is finished, you will check the newly created plan against the audit. To do this click the "check all terms" button at the bottom of the screen, and then click "Process New." The left side of the screen will refresh and your planned courses will appear in blue. Placeholders will appear in the Ineligible block as the audit does not know where to place individualized requirements. Please note that if a student is currently registered for a course and the course also appears on the plan it will count twice on the audit.
o Once you have verified that the Plan contains all of the courses required in the Audit, click “Check All Terms,” followed by “Process New,” then “Save Plan.”

GPSAdvisingManual
Page 29 of 47
o You will see a pop‐up identifying duplicate and placeholder courses. If they are appropriate at this point, click “OK.” If not, make corrections then “Save” again.
o When you click “Save,” if there is an error in the Plan, you will be notified and a red arrow will appear in the Plan. If this happens, correct the error, then “Save” again.
OR

GPSAdvisingManual
Page 30 of 47
o Whenever you click “Save,” you will be prompted to submit the Plan for approval.
1. If “yes,” the Plan will be locked and moved to the queue (management tab) for advisor approval.
2. If “no,” the Plan will save, allowing the student and/or advisor to continue to work on it. This will be useful if placeholder courses need to be selected.
3. If you would like to adjust a locked plan, you must click "save as" and save it under a new name. It must be reapproved from the Management Tab.
GPSAdvisingManual
Page 31 of 47
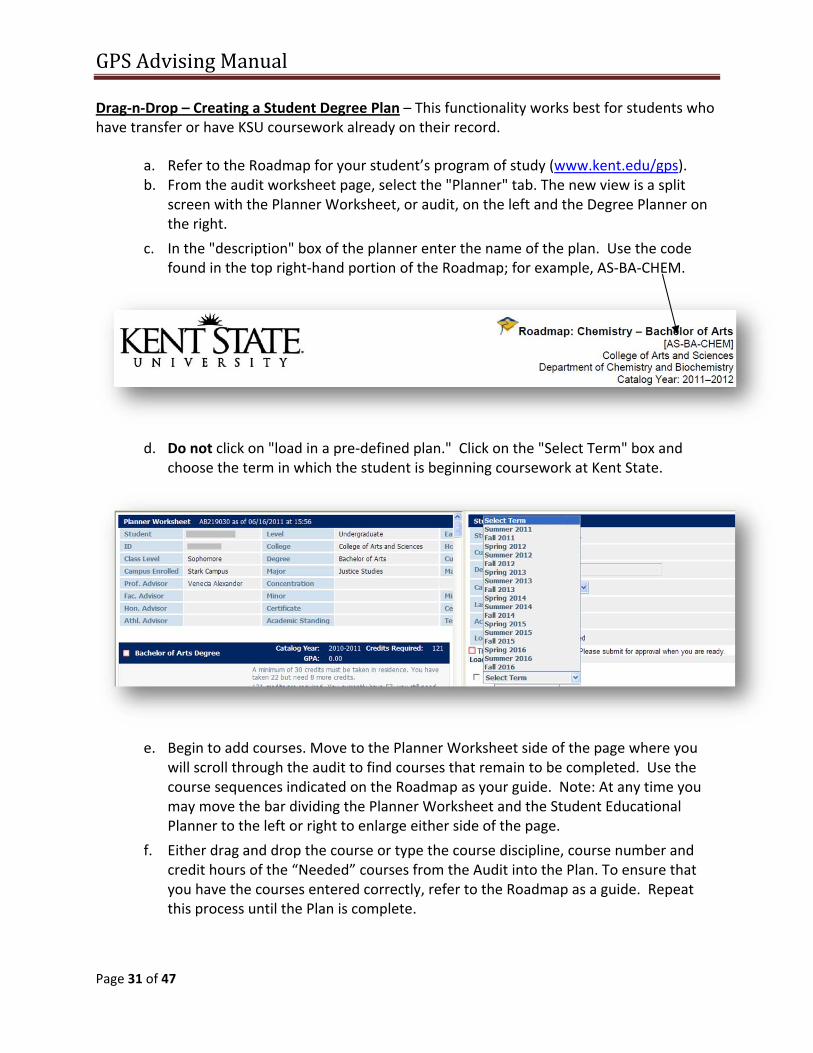
Drag‐n‐Drop – Creating a Student Degree Plan – This functionality works best for students who have transfer or have KSU coursework already on their record.
a. Refer to the Roadmap for your student’s program of study (www.kent.edu/gps). b. From the audit worksheet page, select the "Planner" tab. The new view is a split
screen with the Planner Worksheet, or audit, on the left and the Degree Planner on the right.
c. In the "description" box of the planner enter the name of the plan. Use the code found in the top right‐hand portion of the Roadmap; for example, AS‐BA‐CHEM.
d. Do not click on "load in a pre‐defined plan." Click on the "Select Term" box and choose the term in which the student is beginning coursework at Kent State.
e. Begin to add courses. Move to the Planner Worksheet side of the page where you will scroll through the audit to find courses that remain to be completed. Use the course sequences indicated on the Roadmap as your guide. Note: At any time you may move the bar dividing the Planner Worksheet and the Student Educational Planner to the left or right to enlarge either side of the page.
f. Either drag and drop the course or type the course discipline, course number and credit hours of the “Needed” courses from the Audit into the Plan. To ensure that you have the courses entered correctly, refer to the Roadmap as a guide. Repeat this process until the Plan is complete.

GPSAdvisingManual
Page 32 of 47
o For listings of course options in categories such as Writing Intensive, Kent Core or diversity, refer to the Undergraduate Catalog. (www.kent.edu/catalog).
o If the Roadmap indicates courses that provide the opportunity for a choice, such as an "upper‐division elective," you may enter a "placeholder" course by typing a dash and naming the placeholder such as “‐ MAJUD” ( these are limited in length and almost always have to be abbreviated.) Make sure to include a space following the dash (‐). (See Tips ‘n Tricks, below.)
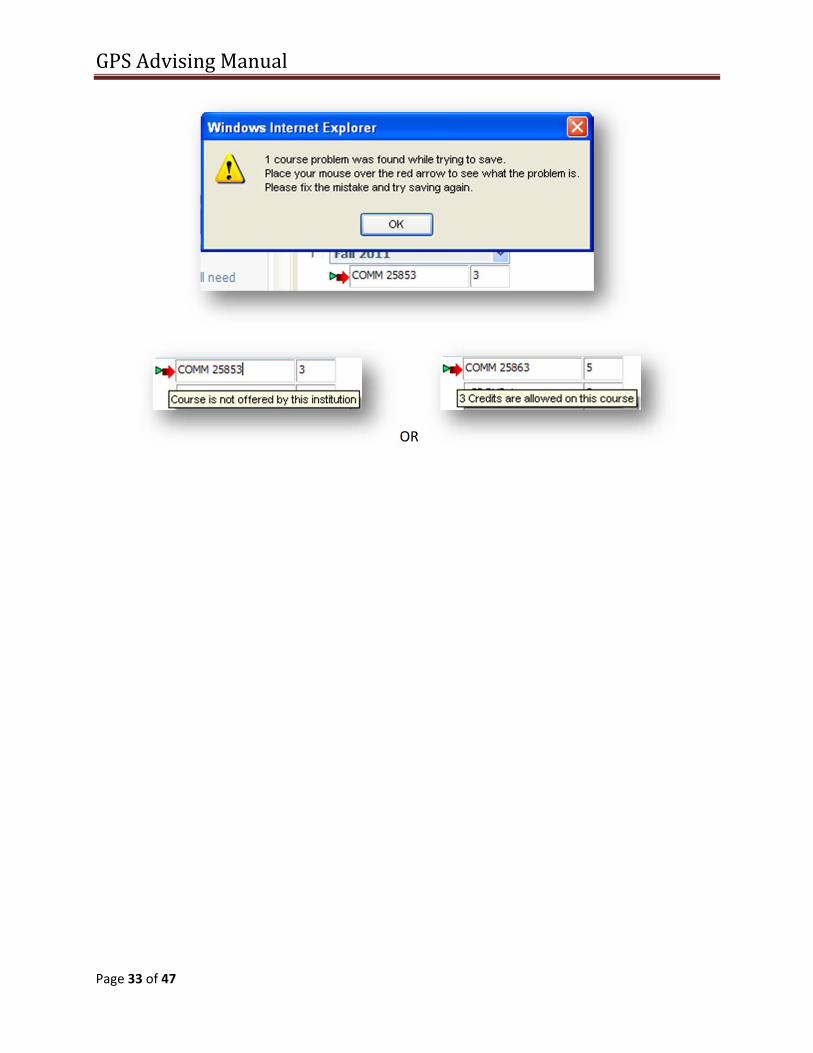
o It is recommended that you frequently SAVE the plan by clicking on the SAVE PLAN box and choosing the NO option. This will save the plan and allow you, or the student, to continue working on it at a later time. If you have made an error in entering your courses, you will receive the following error message: 1 course problem was found while trying to save. Place your mouse over the red arrow to see what the problem is. Click "OK," check the message displayed when you hover over the red arrow , and make the correction. You may then click "Save Plan" and proceed with selecting the "NO" option to continue until you have finished working on the plan.
GPSAdvisingManual
Page 33 of 47
OR
GPSAdvisingManual
Page 34 of 47
o As you are working on the plan you will notice a green arrow appears next to the first course in each semester. When clicking on the arrow, the course descriptions, including information such as prerequisites, for any course listed in the semester will appear in a pop‐up window. Note that if the semester includes only placeholders (no real courses listed), the green arrow
will not have any information in the pop‐up box.
o Remember you can check the progress on fulfilling the requirements at any time by clicking on the "Check All Terms" and "Process New" boxes at the bottom of the Plan. This will enter your planned courses on the Planner Worksheet (audit). They will display with a blue tilde to indicate that the requirement is fully accounted for in the Plan. Courses that have not yet been planned will show as "Needed.”

GPSAdvisingManual
Page 35 of 47
g. Once you have finished entering all of the courses and have reviewed the results of your plan in the Planner Worksheet, click on "Save Plan" and when you see a Plan Approval text box select "Yes, save and submit for approval."
h. If you have access to the Management option, you can then select the Plan for approval.
B. Special Plans
1. Multiple Majors: Students who have multiple majors with the same degree will have all of the majors reflected in the GPS Audit. Generally, it will be easiest to start with a blank plan and use the drag‐and‐drop to customize these students’ plans. If you choose to use a pre‐defined plan, you will load in the plan corresponding with one major, and then customize it by dragging and dropping the additional requirements from the other major into the plan.
2. Multiple Degrees: If the student is in more than one degree program:
a. Click on the Planner tab. b. Create the Plan for the student’s first degree program.
o Save this Plan as you would a single plan, but include the second program (example: AS‐BA‐CHEM/CA‐BS‐FM), using the “Save, but don’t submit” option.
o If the student already has an existing plan, do a “Save As”.
c. On the Planner Worksheet side (audit), at the bottom of the screen, check the Use
What If Scenario option
( ), click on “Show What If Options” and select the degree/major for the additional program.

GPSAdvisingManual
Page 36 of 47
d. On the Plan side, click Check All Terms and Process New. This will run a What If audit and display the currently planned courses.
e. You can now review the What If audit for the additional degree program, and add courses for the additional degree to the plan as necessary, keeping in mind that the audit will currently/now show the Planned courses for only the first program.
3. What If Plans: What If Plans should be used when the student wants to plan for a major
that they want to pursue. By using the What If Plan the student will know what coursework they should be taking, and the university will be able to account for these courses in creating the Course Combination reports used for scheduling. a. Click on the Planner tab b. If no plan currently exists, click “Load in a pre‐defined plan” c. Select degree and program information for the intended major. d. Load the template into the Plan.
e. On the Planner Worksheet side, check the “Use What If Scenario” box at the bottom
of the screen. f. Click on “Show What If Options” and select the degree/major for the planned
program. g. On Plan side click “Check All Terms” and “Process New”. This will process the plan for
the What If major. h. You can now review the What If audit for the intended program, and use it to
customize and complete the unofficial “What If” plan that you are building. i. Save As – Be sure to include “UNOFFICIAL” at the beginning of the title to indicate
that the plan is for an intended major. Using “UNOFFICIAL” in the title will ensure that others who review this plan will know that the student is not currently enrolled in the “planned for” program. The Plan can be submitted and approved at this point.
GPSAdvisingManual
Page 37 of 47
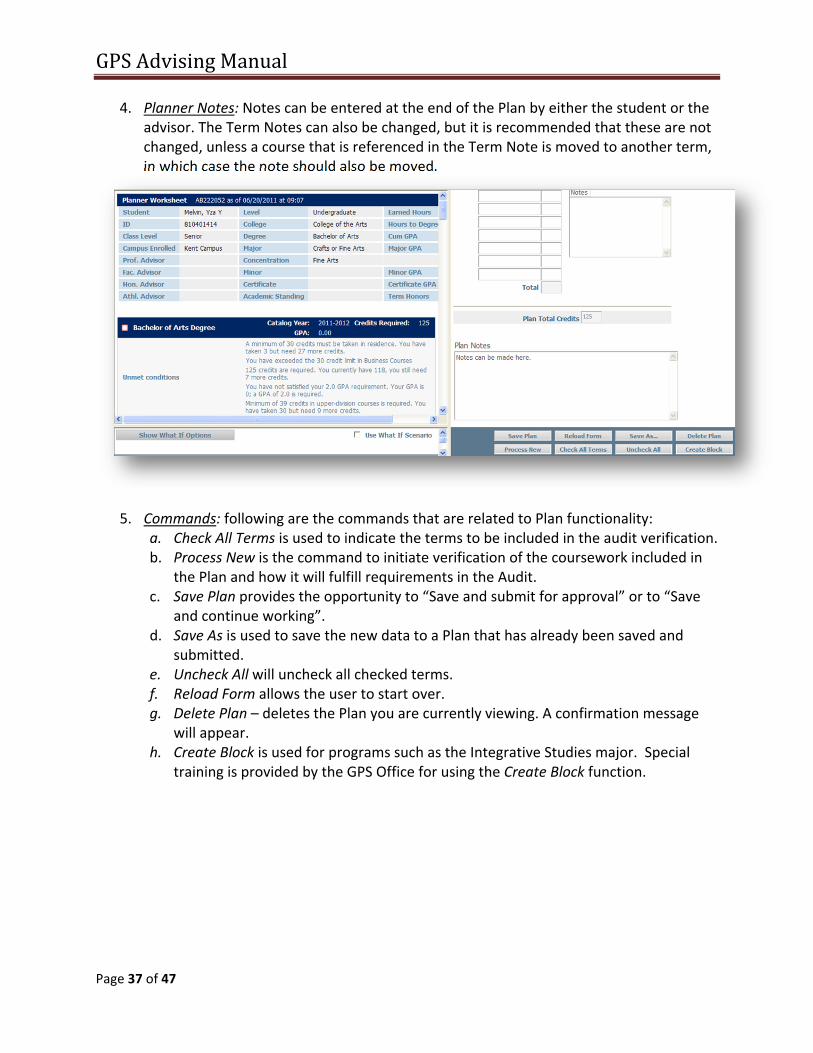
4. Planner Notes: Notes can be entered at the end of the Plan by either the student or the advisor. The Term Notes can also be changed, but it is recommended that these are not changed, unless a course that is referenced in the Term Note is moved to another term, in which case the note should also be moved.
5. Commands: following are the commands that are related to Plan functionality: a. Check All Terms is used to indicate the terms to be included in the audit verification. b. Process New is the command to initiate verification of the coursework included in
the Plan and how it will fulfill requirements in the Audit. c. Save Plan provides the opportunity to “Save and submit for approval” or to “Save
and continue working”. d. Save As is used to save the new data to a Plan that has already been saved and
submitted. e. Uncheck All will uncheck all checked terms. f. Reload Form allows the user to start over. g. Delete Plan – deletes the Plan you are currently viewing. A confirmation message
will appear. h. Create Block is used for programs such as the Integrative Studies major. Special
training is provided by the GPS Office for using the Create Block function.
GPSAdvisingManual
Page 38 of 47
6. Plan Tips ‘n Tricks a. Green Arrow – This is a great tool when working with students during DKS.
When clicking on the green arrow , a pop‐up box appears, listing all the courses in that semester, including the course description, any attribute attached to the course and the course schedule. This schedule is live, so giving the student the exact CRN for the course they should take will help when registering.
b. If you are creating a Plan by pulling courses from the audit (drag‐n‐ drop), it will be helpful to “process new” periodically to be certain you have not duplicated or missed placeholders or other courses.
c. An easy way to remove a class from one term and move it to another is to drag
and drop, using the icon. When creating a Plan, you may get a single window to open indicating that “this plan needs to be approved” before you have entered any data into the Plan. If this occurs, you will need to exit GPS, log out of FlashLine and then close your browser. This should correct the problem.
d. Choosing NO ‐ Save, but do not Submit option will let the student and/or advisor go back into the plan to continue readjusting courses. Once the plan is finished, choosing YES will send the Plan to the advisor to approve or reject.
e. Placeholders in the Plan: Use the following descriptors as placeholders (Important Note: there is a space after each hyphen (–) before the attribute.)
f. Pre‐79 Coursework: Please see section below. g. Duplicated courses on the validated audit: Uncheck the current (registered) term
as well as any past term that may still be editable. This will ensure that there will not be any duplication of coursework while validating the plan against the audit.
‐ KHUM ‐ KCMP1 ‐ KLAB ‐ KBS ‐ GEN.ELECT ‐ CONC.ELECT
‐ KFA ‐ KCMP2 ‐ DIVD ‐ KADL ‐ GEN.ELECT.UD
‐ KSS ‐ KMCR ‐ DIVG ‐ WIC ‐ MAJ.UD

GPSAdvisingManual
Page 39 of 47
Section 3: Approving/Rejecting a Submitted Plan
A. The Planner tab 1. If you have a list of students who have submitted a Plan for approval, enter the
student’s ID and click on the Planner tab. Then move to step 2. If you do not have a list, follow the instructions in step 1.b.
2. If you do not have a list of students:
1. Click on the Management tab on the left side of the page. 2. Click on the “Select a plan to manage” dropdown box. 3. This will bring up an alphabetical list of all students who have a Plan waiting
for review. 4. Select your student, then click View.
GPSAdvisingManual
Page 40 of 47
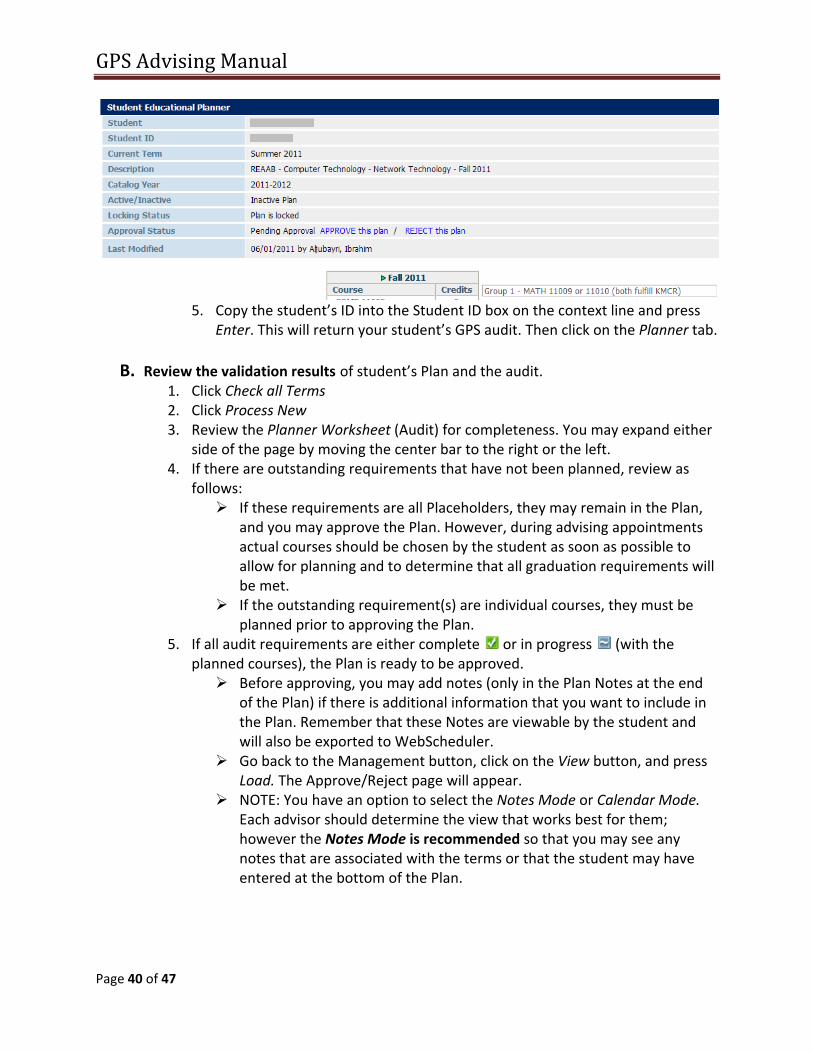
5. Copy the student’s ID into the Student ID box on the context line and press
Enter. This will return your student’s GPS audit. Then click on the Planner tab.
B. Review the validation results of student’s Plan and the audit. 1. Click Check all Terms 2. Click Process New 3. Review the Planner Worksheet (Audit) for completeness. You may expand either
side of the page by moving the center bar to the right or the left. 4. If there are outstanding requirements that have not been planned, review as
follows: If these requirements are all Placeholders, they may remain in the Plan,
and you may approve the Plan. However, during advising appointments actual courses should be chosen by the student as soon as possible to allow for planning and to determine that all graduation requirements will be met.
If the outstanding requirement(s) are individual courses, they must be planned prior to approving the Plan.
5. If all audit requirements are either complete or in progress (with the planned courses), the Plan is ready to be approved. Before approving, you may add notes (only in the Plan Notes at the end
of the Plan) if there is additional information that you want to include in the Plan. Remember that these Notes are viewable by the student and will also be exported to WebScheduler.
Go back to the Management button, click on the View button, and press Load. The Approve/Reject page will appear.
NOTE: You have an option to select the Notes Mode or Calendar Mode. Each advisor should determine the view that works best for them; however the Notes Mode is recommended so that you may see any notes that are associated with the terms or that the student may have entered at the bottom of the Plan.

GPSAdvisingManual
Page 41 of 47
C. Approve the Plan by clicking on the APPROVE this plan option on the Approval Status
line. Once approved, the Plan will display a message confirming it has been approved. D. After approving the Plan, Send the student an email informing them that you have
approved their Plan. Each college/campus should have a standard email to provide information to the student. This should include the following information:
1. Remind them that if there are any outstanding placeholders in the Plan they must be selected no later than one year prior to the term in which they are planned.
2. Who to contact if they have questions.
E. Reject the Plan: Each College/campus has protocols for Rejecting Plans, such as, 1. Rejecting or Approving with outstanding Placeholders. 2. Determining whether the advisor or the student will complete the plan if there
are outstanding requirements. If the student is to make corrections:
o Reject the Plan via the Management screen. o Click on the Planner tab to go back to the split view. The Plan will now
say This plan has been rejected - please make changes and resubmit for approval.
o Add an explanatory note to the bottom of the Plan. o Click “Save Plan”. This will allow you to save the note that was just
added. Choose the NO option when asked about submitting the plan.

GPSAdvisingManual
Page 42 of 47
o From the GPS Audits tab, you can click on the student’s name to bring up an email informing the student that the Plan has been rejected. The SUBJECT should be changed to “Plan Review” and the body of the email should provide specific information for the student regarding the expected action.
If the advisor is making the correction(s) for the student: o Reject the Plan via the Management screen. o Click on the Planner tab to go back to the split view. The Plan will
now say This plan has been rejected - please make changes and resubmit for approval.
o Update the Plan. o When you have made all of your changes, Check All Terms and
Process New to ensure that the Plan is complete. o Click “Save Plan” and choose YES when asked about submitting
the plan and click “OK.” Review the warnings and if the Plan is ready to be finalized, click on the “Yes=save and submit” option.
o Click on “Management” and Approve the Plan.
F. Making a few changes before approving a plan
1. Click “Reject this plan” if a few changes need to be made that can be done by the
advisor. At this point, you should email the student to make them aware that you will be making changes before approving the plan and that the changes will be noted in the Plan Notes.

GPSAdvisingManual
Page 43 of 47
2. Go back to the Planner view and make the changes. Also add notes at the
bottom of the plan. 3. Then take the necessary steps to Save, Submit and Approve the plan.

GPSAdvisingManual
Page 44 of 47
Section 4: GPS Terms and Concepts Advice is information that is scribed to provide “regular English” advice concerning the information in that Block. Best Fit is the concept of finding the optimal application of courses so that the audit will be most beneficial to the student. Pre‐defined Plan is created from a template, which reflects all of the information in the Roadmap. Scribe is the application used to code GPS Audits. Coding the requirements is called “scribing”; as in “scribe this!” Student Context is the area at the top of the degree Audit that includes the student’s Banner ID, name, etc.
GPSAdvisingManual
Page 45 of 47
Section 5: Unenforced Exceptions
1. If a student changes degree programs it is likely that exceptions applied to the previous program will become unenforced. You will notice these listed at the bottom of the audit in the exceptions block with a “no” in the Enforced column.
2. When you find exceptions that are not applying to audit requirements where you believe they should, contact [email protected]. They will be able to reconnect the exceptions.
GPSAdvisingManual
Page 46 of 47
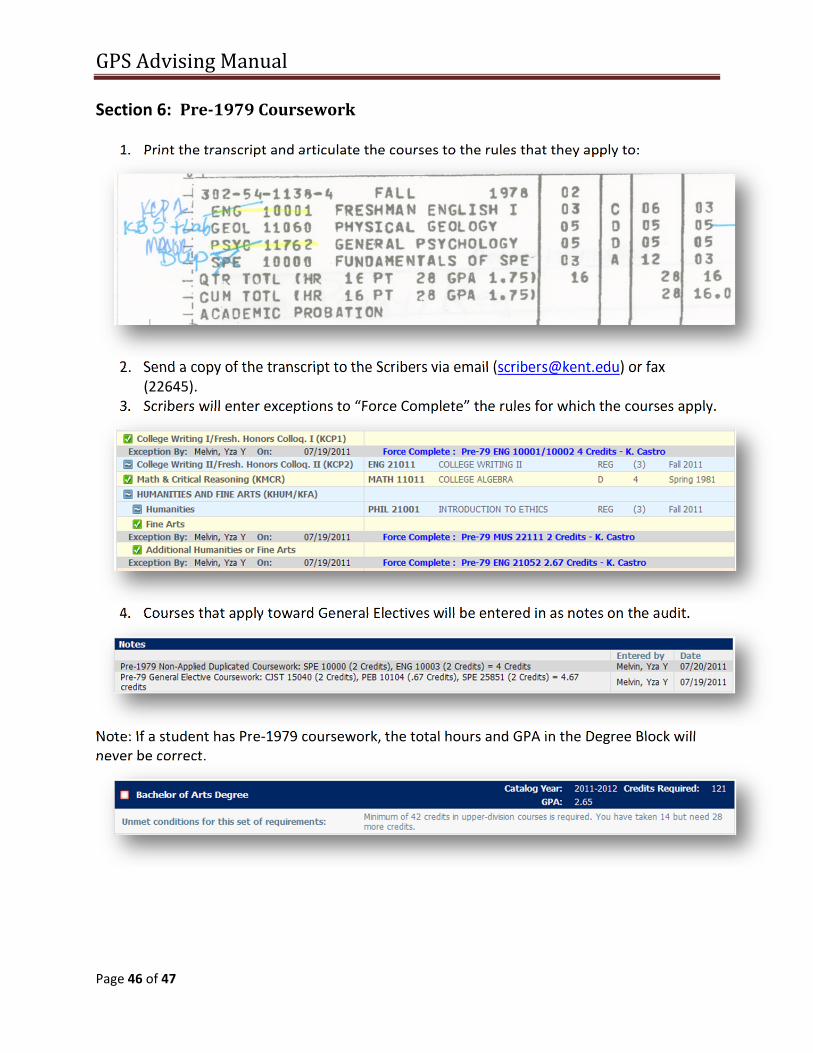
Section 6: Pre‐1979Coursework
1. Print the transcript and articulate the courses to the rules that they apply to:
2. Send a copy of the transcript to the Scribers via email ([email protected]) or fax
(22645). 3. Scribers will enter exceptions to “Force Complete” the rules for which the courses apply.
4. Courses that apply toward General Electives will be entered in as notes on the audit.
Note: If a student has Pre‐1979 coursework, the total hours and GPA in the Degree Block will never be correct.
GPSAdvisingManual
Page 47 of 47
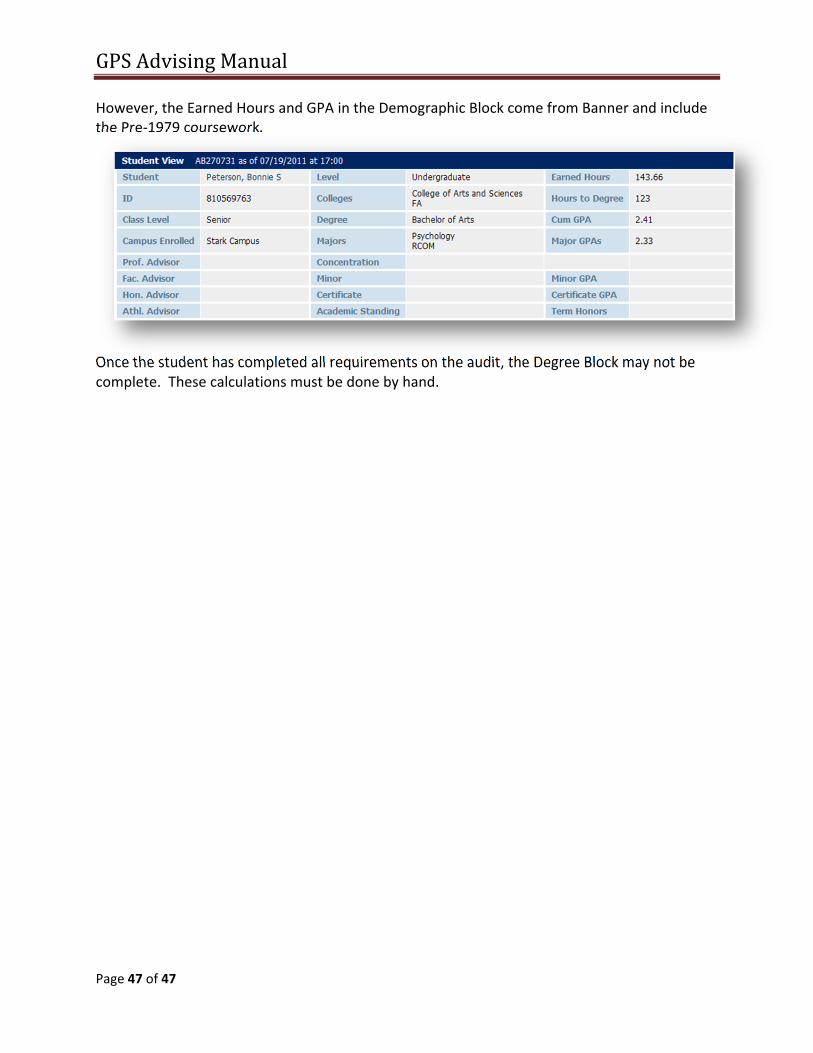
However, the Earned Hours and GPA in the Demographic Block come from Banner and include the Pre‐1979 coursework.
Once the student has completed all requirements on the audit, the Degree Block may not be complete. These calculations must be done by hand.


![Advising Manual 2016-2017 - Monfort College of Businessmcb.unco.edu › pdf › advising › MCB-Advising-Manual-2016-2017.pdf · Advising Manual 2016-2017. 2 [AdvisingManual] 3 ...](https://static.fdocuments.in/doc/165x107/5f1169150273b0207c355cff/advising-manual-2016-2017-monfort-college-of-a-pdf-a-advising-a-mcb-advising-manual-2016-2017pdf.jpg)