GPEC Digital TMA Image User Guide Bliss Digital … · To access images that are associated with...
14
GPEC Digital TMA Image User Guide Below is a brief description regarding how to access and capture GPEC’s digital images scanned by the Bliss system (Olympus, originally Bacus Lab: http://www.olympusamerica.com/seg_section/seg_vm.asp ). Bliss Digital Images Organization This is a brief description regarding how Bliss digital images are organized. Bliss images are organized into project folders. One project represents one set of tissue block samples cohort. For example, images related to samples used in the SPECs array are located inside the folder, named “SPECS”. The images related to samples used in the UBC breast cancer series (495 patients’ cohort, known as the “VGH Series” among GPEC people) are located inside the folder, named “01-011”. The images related to the big breast cancer array (4000+ cases) are located inside the folder, named “02-008” Inside each project folder are a number of subfolders. Each subfolder represents images relating to at most two sectors of a TMA block. In most cases, this would be half a TMA block as most of GPEC TMA blocks have 3 to 4 sectors. Subfolder has the following naming convention: [project name]_[biomarker name]_[block letter][block number(s)]_[TMA block version]_[slice/batch number] For example, the subfolder “01-011_Skp2_C12_v6_s18” contains images for the Skp2 staining of the UBC Series (495 cases), block C, sector 1 and 2. The version of the TMA block is 6 and the slice number is 18. The subfolder “01-011_Skp2_C34_v6_s18” contains images for the Skp2 staining of the UBC Series (495 cases), block C, sector 3 and 4. The version of the TMA block is 6 and the slice number is 18. In reality, “01- 011_Skp2_C12_v6_s18” and “01-011_Skp2_C34_v6_s18” contain images on the same physical slide. Please note, since the SPECS array has only one block, the block letter is represented by “-”. For example, “SPECS_BCL2_-12_v1_s7” contains images for the Bcl-2 staining on the SPECS series, sector 1 and 2. The version of the TMA block is 1 and the slice number is 7. Access Digital Images There are four ways to access our digital images. 1. WebSlide Browser This is the best and easiest way to browse and capture our digital images. This is a free Windows program written by Bacus Lab. You can download the setup program at:
Transcript of GPEC Digital TMA Image User Guide Bliss Digital … · To access images that are associated with...

GPEC Digital TMA Image User Guide Below is a brief description regarding how to access and capture GPEC’s digital images scanned by the Bliss system (Olympus, originally Bacus Lab: http://www.olympusamerica.com/seg_section/seg_vm.asp).
Bliss Digital Images Organization This is a brief description regarding how Bliss digital images are organized. Bliss images are organized into project folders. One project represents one set of tissue block samples cohort. For example, images related to samples used in the SPECs array are located inside the folder, named “SPECS”. The images related to samples used in the UBC breast cancer series (495 patients’ cohort, known as the “VGH Series” among GPEC people) are located inside the folder, named “01-011”. The images related to the big breast cancer array (4000+ cases) are located inside the folder, named “02-008” Inside each project folder are a number of subfolders. Each subfolder represents images relating to at most two sectors of a TMA block. In most cases, this would be half a TMA block as most of GPEC TMA blocks have 3 to 4 sectors. Subfolder has the following naming convention: [project name]_[biomarker name]_[block letter][block number(s)]_[TMA block version]_[slice/batch number] For example, the subfolder “01-011_Skp2_C12_v6_s18” contains images for the Skp2 staining of the UBC Series (495 cases), block C, sector 1 and 2. The version of the TMA block is 6 and the slice number is 18. The subfolder “01-011_Skp2_C34_v6_s18” contains images for the Skp2 staining of the UBC Series (495 cases), block C, sector 3 and 4. The version of the TMA block is 6 and the slice number is 18. In reality, “01-011_Skp2_C12_v6_s18” and “01-011_Skp2_C34_v6_s18” contain images on the same physical slide. Please note, since the SPECS array has only one block, the block letter is represented by “-”. For example, “SPECS_BCL2_-12_v1_s7” contains images for the Bcl-2 staining on the SPECS series, sector 1 and 2. The version of the TMA block is 1 and the slice number is 7.
Access Digital Images There are four ways to access our digital images.
1. WebSlide Browser This is the best and easiest way to browse and capture our digital images. This is a free Windows program written by Bacus Lab. You can download the setup program at:

http://www.olympusamerica.com/seg_section/seg_vm_downloads.asp To install this program, you will need the following:
1. Windows (2000 or higher) 2. administrative privileges on your computer 3. you must NOT be under a proxy server which prompts you for
username/password. E.g. When you open Internet Explorer for the first time after you login, if a window pops up to ask you for username and password, this means your proxy server DO prompt you for username/password and the current WebSlide Browser will NOT work for you.
After you have successfully installed the program, to access the SPECS images, you need to do the following.
1. open WebSlide Browser 2. Enter the following address to the “Address:” field in WebSlide Browser
and hit the “Enter” key. Please take note of the “/” at the end of the URL – it is needed.
3. After the images are loaded up, your WebSlide browser will look like the
following.
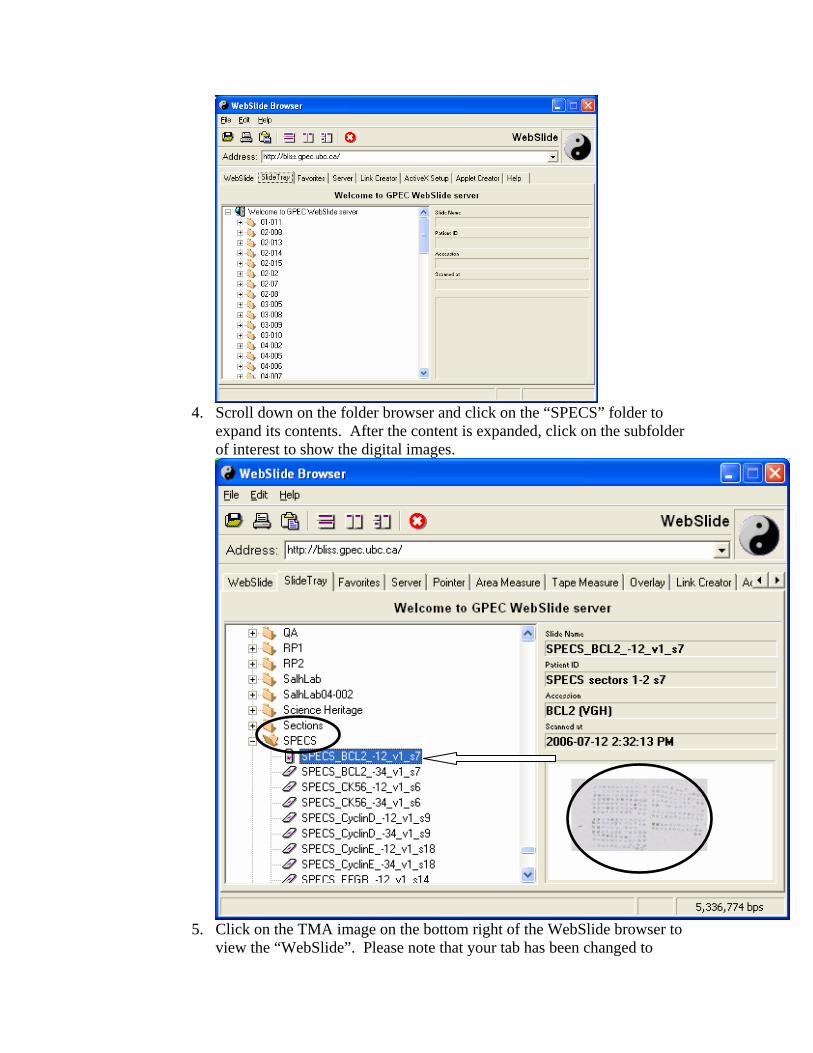
4. Scroll down on the folder browser and click on the “SPECS” folder to
expand its contents. After the content is expanded, click on the subfolder of interest to show the digital images.
5. Click on the TMA image on the bottom right of the WebSlide browser to
view the “WebSlide”. Please note that your tab has been changed to

“WebSlide”. To browse different slides (e.g. other biomarker staining of the SPECS array), you will need to click on the “SlideTray” tab.
6. Click on the slide image and a panable (i.e. interactive) window
containing that particular slide image will pop up. On this window, you can right-click to select different magnifications.

7. Click on particular cores on this window to show a higher resolution
image. The pop-up window with the higher resolution image is interactive as well.

8. You can save this image to a file.
2. Regular Web Browser One can access GPEC images using a regular web browser such as Internet Explorer, Safari, or Mozilla.
1. IMPORTANT: If you would like to use Internet Explorer and want to view the images through ActiveX control, please install “WebSlide Net Viewer ActiveX” first. This program can be downloaded at: http://www.olympusamerica.com/seg_section/seg_vm_downloads.asp
2. Open your favorite web browser and go to the URL: http://bliss.gpec.ubc.ca/

3. There are two view options.
• ActiveX. Use this option for best performance1. However, this option is not available if you are not on a Windows computer.
• Java viewer. Use this option if you are on a non-Windows computer. 4. After you have selected your view option by clicking on the “View” link, you will
be directed to the folder browser.
1 IMPORTANT: If you would like to use Internet Explorer and want to view the images through ActiveX control, please install “WebSlide Net Viewer ActiveX” first. This program can be downloaded at: http://www.olympusamerica.com/seg_section/seg_vm_downloads.asp

5. These folders are organized in the exact same way as seen on the WebSlide
browser. Web slides (i.e. the subfolders, e.g. “SPECS_HE_-34_v1_s1”) are sorted in alphabetical order. Click on a slide of interest and an interactive slide browser window will pop up.

6. Right-click on this window to change magnification.
7. Cores are zoomable up to the scanned resolution. E.g. 20x for the above case.

8. The upper left window is a high level view for navigating through the slide. It is interactive as well. Please note, even though the whole slide (i.e. 4 sectors) are shown, only the green-boxed sectors are zoomable up-to scanned resolution (20x). This is because, as mentioned earlier in this document at “Bliss Digital Images Organization”, GPEC scans at most 2 sectors per scan pass. This would result in each subfolder containing images from at most 2 sectors. For example, the above shown subfolder “SPECS_HE_-34_v1_s1” shows sector 3 and 4. To view high resolution core images from sector 1 and 2, one would need to view the subfolder “SPECS_HE_-12_v1_s1”.
3. GPEC Image Website To access images that are associated with GPEC publications, one can use the GPEC image web site using any web browser. The advantage of this method is that one could view associated diagnosis (e.g. histology annotations) and IHC scores (where applicable). One could also search for core images based on certain criteria using this web page. The URL for the GPEC image website is https://www.gpecimage.ubc.ca/tma/web/viewer.php
1. Login names and passwords are available on the above webpage. Once logged in,
you will be able to browse images associated with a particular GPEC publication. For example, log in to view images associated with “Cheang MCU et al :: Immunohistochemical detection of estrogen receptor in breast cancer using the

new rabbit monoclonal antibody SP1 predicts survival better than mouse monoclonal antibody 1D5.” Click on the “Slices” tab to view cores in different slides.
2. One can browse images by clicking on any of the links above. A window
showing the sector map will pop up. Annotation such as diagnosis and IHC scores (where applicable) is shown.

3. By clicking on any of the cores, a window will pop up showing details of this core. Click on the “Applet” link for an interactive high resolution core image2.
One can also search images via biomarkers and IHC scores by clicking on the “Cores” tab on the main window.
4. For example, one can search based on available IHC scores. E.g. the above figure
shows a search criterion of “cores with ER using SP1 scored 3+. Currently, only
2 IMPORTANT: If you would like to use Internet Explorer, you must install “WebSlide Net Viewer ActiveX” first. Otherwise, the interactive view will not work. This program can be downloaded at: http://www.olympusamerica.com/seg_section/seg_vm_downloads.asp

the OR logical operator is supported. Click on the “Search Cores” button to perform the search. The following search result will show up, showing images that corresponding to the above search request.
5. Clicking on “Details” would show additional details about this core. Once on this
detail page, one could click on the “Applet” link for an interactive high resolution core image3.
3 IMPORTANT: If you would like to use Internet Explorer, you must install “WebSlide Net Viewer ActiveX” first. Otherwise, the interactive view will not work. This program can be downloaded at: http://www.olympusamerica.com/seg_section/seg_vm_downloads.asp

4. Request via email One could request copies of particular images via email: [email protected] . Images could be sent via email for small number of images or FTP download or via mailing CD or DVD(s) for large number of images. Please note most Bacus Lab images (scanned at 20x and 9 frames per core) are approximately 0.5MB per core image.