GOOGLE MY MAPS MANUAL -...
11
GOOGLE MY MAPS MANUAL for OUR TOTTENHAM Eleanor Lowenthal • Sarabeth Bonett • Martin Bangratz
Transcript of GOOGLE MY MAPS MANUAL -...
GOOGLE MY MAPS MANUAL
forOUR TOTTENHAM
Eleanor Lowenthal • Sarabeth Bonett • Martin Bangratz
Our Tottenhamourtottenham.org.uk
UCL: Community Participation in City StrategiesSpring 2014
Eleanor Lowenthal, Sarabeth Bonett and Martin Bangratz
CONTENTS
INTRODUCTION ������������������������������������������������������������������������������������������������������ 1
MAPPING TOOL: GOOGLE MY MAPS ��������������������������������������������������������������������� 1
GETTING STARTED ������������������������������������������������������������������������������������������������� 1
ADDING DATA ���������������������������������������������������������������������������������������������������������3
1. ADDING MARKERS BY PLACING THEM ON THE MAP �����������������������������������������������������������������������3
2. ADDING MARKERS BY SEARCHING FOR PLACES ������������������������������������������������������������������������������3
3. ADDING DATA FROM A SPREADSHEET��������������������������������������������������������������������������������������������������4
STYLING MARKERS ����������������������������������������������������������������������������������������������� 6
COMBINING AND MOVING LAYERS BETWEEN DIFFERENT MAP ���������������������7
1. EXPORT THE LAYER AS A KML FILE ���������������������������������������������������������������������������������������������������������� 7
2. IMPORT THE LAYER INTO A CLASSIC MY MAP ������������������������������������������������������������������������������������8
3. IMPORT THE FILE ONTO A NEW LAYER ON THE MAIN MAP ����������������������������������������������������������9
1
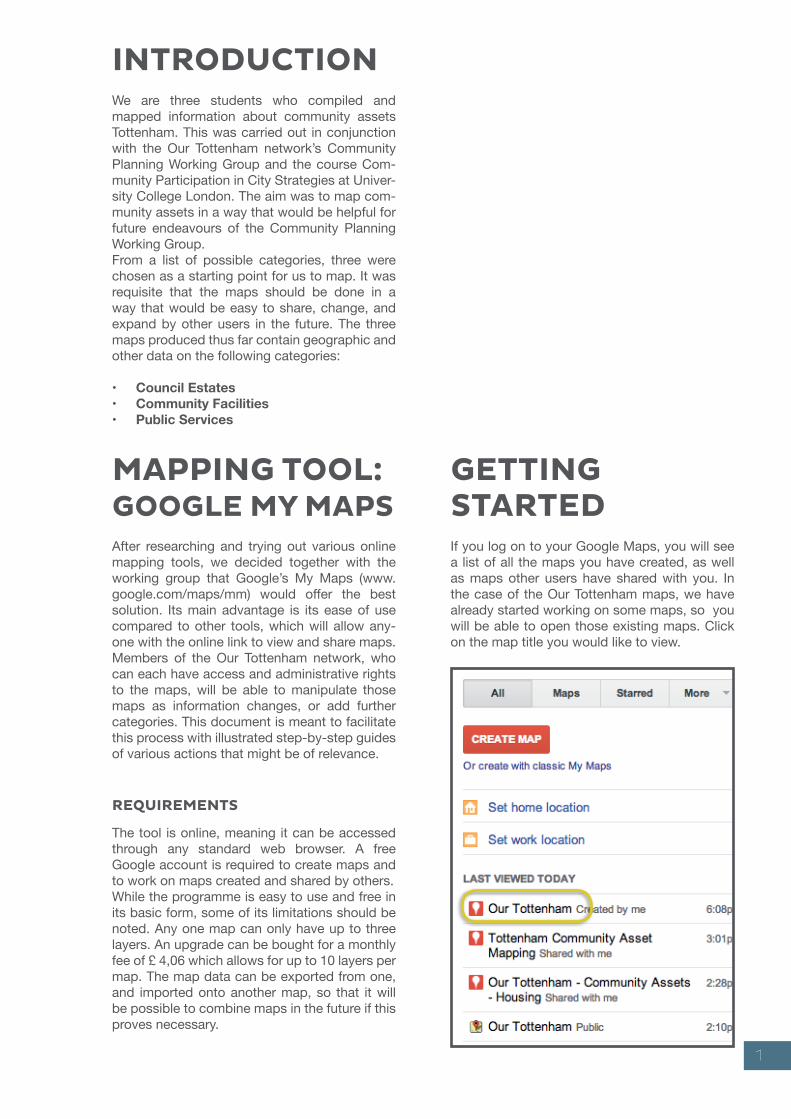
INTRODUCTIONWe are three students who compiled and mapped information about community assets Tottenham. This was carried out in conjunction with the Our Tottenham network’s Community Planning Working Group and the course Com-munity Participation in City Strategies at Univer-sity College London. The aim was to map com-munity assets in a way that would be helpful for future endeavours of the Community Planning Working Group. From a list of possible categories, three were chosen as a starting point for us to map. It was requisite that the maps should be done in a way that would be easy to share, change, and expand by other users in the future. The three maps produced thus far contain geographic and other data on the following categories:
• Council Estates• Community Facilities• Public Services
GETTING STARTEDIf you log on to your Google Maps, you will see a list of all the maps you have created, as well as maps other users have shared with you. In the case of the Our Tottenham maps, we have already started working on some maps, so you will be able to open those existing maps. Click on the map title you would like to view.
MAPPING TOOL: GOOGLE MY MAPSAfter researching and trying out various online mapping tools, we decided together with the working group that Google’s My Maps (www.google.com/maps/mm) would offer the best solution. Its main advantage is its ease of use compared to other tools, which will allow any-one with the online link to view and share maps. Members of the Our Tottenham network, who can each have access and administrative rights to the maps, will be able to manipulate those maps as information changes, or add further categories. This document is meant to facilitate this process with illustrated step-by-step guides of various actions that might be of relevance.
REQUIREMENTS
The tool is online, meaning it can be accessed through any standard web browser. A free Google account is required to create maps and to work on maps created and shared by others.While the programme is easy to use and free in its basic form, some of its limitations should be noted. Any one map can only have up to three layers. An upgrade can be bought for a monthly fee of £ 4,06 which allows for up to 10 layers per map. The map data can be exported from one, and imported onto another map, so that it will be possible to combine maps in the future if this proves necessary.

2
Layers
Subcategories
Click here to hide this layer
Add a marker Draw a shape

3
ADDING DATAThere are three basic ways to add new data to a map. One is to input data directly on the map by placing a marker or shape. The second is to search for a building or address and add it to the
map. The best option for adding multiple mark-ers is to upload a spreadsheet in .csv format containting geographic data such as addresses or coordinates.
1. Adding markers by placing them on the map
2. Adding markers by searching for places
Click on this symbol
Click on the map where you would like to add
your marker. You will find fields to enter a name
and other attributes for the new marker. Click
Save to finish.
Searching for addresses or places in the search bar will re-turn markers you have already
added, but also places that exist on Google Maps already. In this example, we are adding
the Broadwater Farm Com-munity Centre.

4
3. Adding data from a spreadsheet
The first column discribes the
category
The second column contains the name of
each marker
The third column contains the
address
The new marker appears on the
map.
Click on the marker, then on Add to map
The marker is now part of the active layer. Click the pencil symbol
to edit information.

5
Go to your Google map and add a new layer.
Choose the spreadsheet you want to use. You can upload .csv, .xlsx, or open a Google spreadsheet from your Drive.
Under the new layer, you will find the option Import.
Google will ask you to indicate the column that contains the
geographic information. Select it and click Continue.
Next, select the column that contains the markers’ names.
Et voilà, all the addresses appear as markers on your map. Note that they all look alike at this point, so we will work on their style next.
Click on data to see the spreadsheet and check if all the addresses seem correct.
6
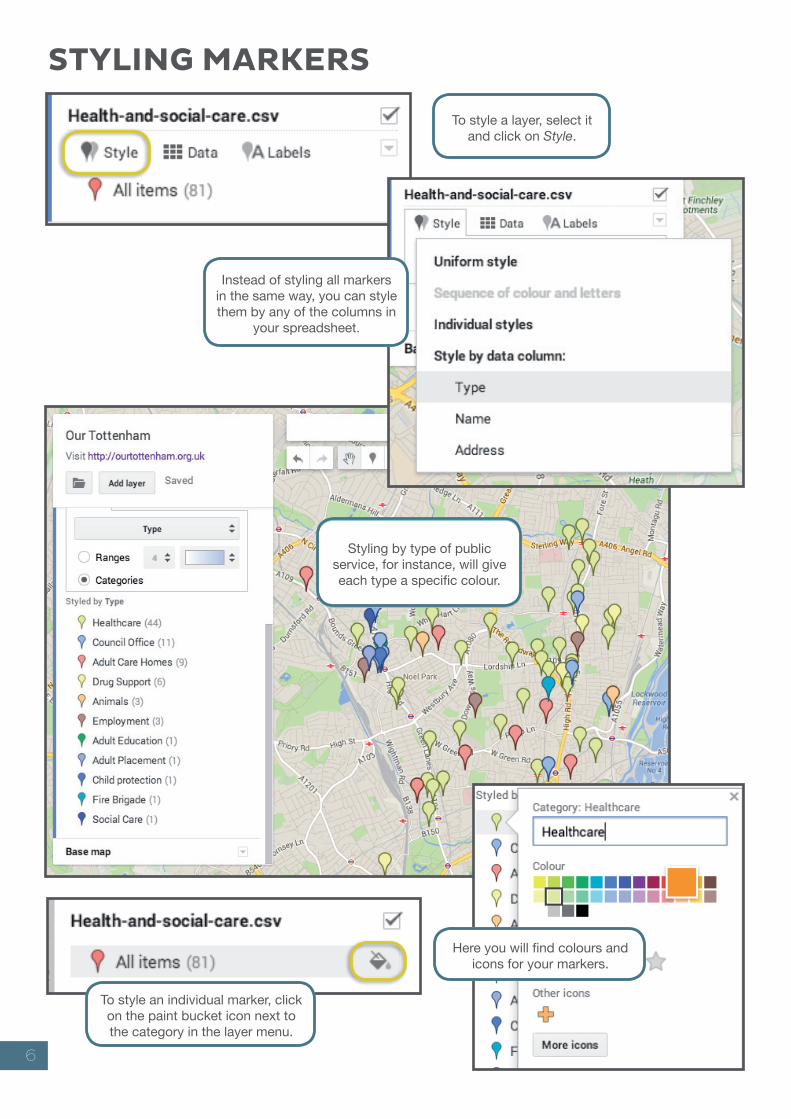
STYLING MARKERS
To style an individual marker, click on the paint bucket icon next to the category in the layer menu.
To style a layer, select it and click on Style.
Instead of styling all markers in the same way, you can style them by any of the columns in
your spreadsheet.
Styling by type of public service, for instance, will give each type a specific colour.
Here you will find colours and icons for your markers.

7
Go to an existing layer you would like to add to another map. In this example, we are ex-porting Community Centres.
Choose the layer you want and click Download. Save the file at a convenient location on your hard drive.
Click on the folder symbol, and choose Export to KML from the dropdown menu.
1. Export the layer as a KML file
Unfortunately, there is no option to add layers directly from one map to an-other,, unless they have been created by the same user. There is a slightly cumbersome workaround which goes as follows.
COMBINING AND MOVING LAYERS BETWEEN DIFFERENT MAPS
8
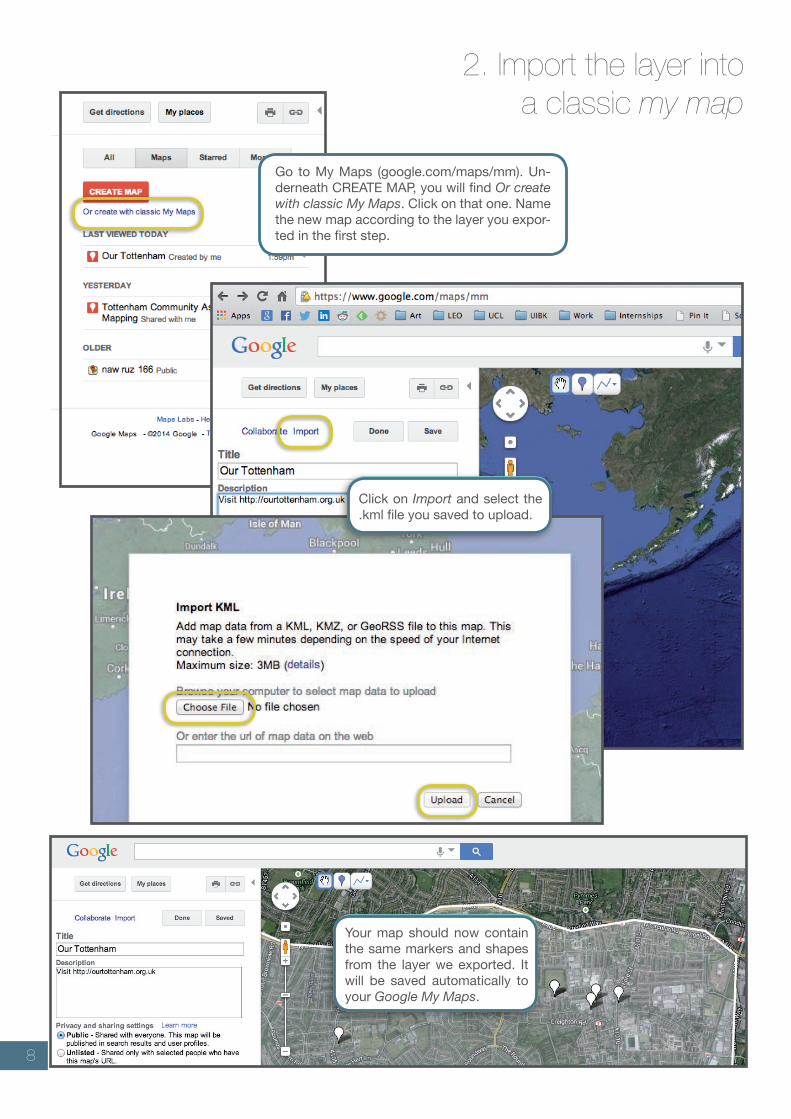
2. Import the layer into a classic my map
Go to My Maps (google.com/maps/mm). Un-derneath CREATE MAP, you will find Or create with classic My Maps. Click on that one. Name the new map according to the layer you expor-ted in the first step.
Click on Import and select the .kml file you saved to upload.
Your map should now contain the same markers and shapes from the layer we exported. It will be saved automatically to your Google My Maps.

9
Instead of uploading a file from your computer, click on My Maps in the left hand menu. Here you will find the map you just created by uploading the .kml layer file in the classic format. It will show up in the list of your maps, with the name you chose (Our Tottenham in this example). Select it and click Select.
3. Import the file onto a new layer on the main map On your main map,
create a new layer and click on Import.
The map will appear on the new layer with the same markers, shapes, and cor-responding information, as it was on the original map.