GOM Cam User Guide - cdn2.gomlab.com€¦ · purchased version are offered for free. Draw/Effects...
134
GOM Cam User Guide Please visit our website (cam.gomlab.com) regularly to check out our latest update.
-
Upload
vuongkhanh -
Category
Documents
-
view
214 -
download
0
Transcript of GOM Cam User Guide - cdn2.gomlab.com€¦ · purchased version are offered for free. Draw/Effects...

GOM Cam User Guide
Please visit our website (cam.gomlab.com) regularly to check out our
latest update.


From screen recording to webcam video and
gameplay recording
GOM Cam allows you to record anything on your computer screen, take snapshots during
recording and even add clip arts or special effects to your desktop. Both system and
microphone sound is recorded as well, making your video more vivid.
Use GOM Cam to record your desktop screen, gameplay, webcam video or PowerPoint
slideshow and share on SNS or Cloud Drive.
Key Features
Easy to use
The intuitive UI allows anyone to use
GOM Cam easily. GOM Cam saves
you time and effort by helping you
get straight to recording wonderful videos.
Easy sharing
Share your videos on YouTube or
Facebook, so more of your friends
can enjoy your creations. You can
also upload your videos to Google Drive or
attach your files to emails and documents.
Edit video
Recorded videos can be edited on
GOM Cam instantly. Select as many
sections as you like and set a
background music to bring your video to the
next level.
Set & search tags
You can set tags (keywords) for
saved files on the file list. Search
files easily using the set tags.
Lifetime license
GOM Cam is a life-time long
product once you purchase a
license, and minor updates for the
purchased version are offered for free.
Draw/Effects settings
Draw underlines, figures, stamps, or
arrows.
And add a variety of webcam shots,
images, and texts to your videos
while you are recording.

Scheduled recordings
Set a schedule for your recordings
so they will start automatically, even
if you are away from your computer.
Manual Conventions
The terminology and its usage in this Manual are listed below:
In-program UI Elements
Black bold text indicates a button or UI element.
Example:
Click Next on GOM Cam Setup.
Step by Step Instructions (1)
Numbered lists provide step-by-step procedures for using the program.
Example:
1. First step
2. Second step
3. Third step
Step by Step Instructions (2)
The order of buttons or icons to click on the program is listed from left to right by >.
Example:
4. Select License > Register the license from the menu bar.
Indent Instructions
Bulleted lists provide information on two or more options.
Example:
Indent instruction 1
Indent instruction 2
- Indent instruction 3

Program Components
Program components are marked with circled numbers in red. And, the element names are
listed in a grey text box below the program image.
Example:
Image 1. Top Bar
① Logo
② Setting
③ License informaion
④ Usage guide
Steps indicated in image
Two or more steps to be done in an image are indicated by squared numbers in red.
Example:
Tips
More information for the user is given with the following tips icon.
Example:
Specifications which do not meet the specified system requirements may result in
program installation, execution or recording not working properly. Also, low
performance of the PC may slow down the process speed in the program.
Reference
References in this manual are indicated in bold and red with double quotation marks.
Example:
Refer to “Main Menu” of “The Interface”
1 2 4 3
1
2 3

Installing GOM Cam .............................................. 1
1. Installing the Program ..................................................... 2
2. Upgrading to Full Version ................................................ 5
3. Uninstalling the Program ............................................... 12
The Interface ........................................................ 15
1. Main Screen ................................................................. 15
2. Main Menu .................................................................. 24
Making a Video Recording ..................................... 25
1. Real-time Recording ...................................................... 26
2. Scheduling a Recording ................................................. 41
3. Draw 51
4. Adding an Effect .......................................................... 55
Screen Capture..................................................... 65
1. Screen Capture ............................................................. 65
2. Continuous Capture ...................................................... 66
3. Scrolling Capture .......................................................... 69
Table of Contents
4. Making a GIF Animation ................................................ 71
Editing a Video Recording or GIF Animation............ 75
1. Cropping a Video ......................................................... 75
2. Editing a Video Recording ............................................. 79
3. Extracting Audio .......................................................... 89
4. Changing File Properties ................................................ 90
5. Editing a GIF Animation ................................................ 91
Sharing a Video or Image ...................................... 94
1. YouTube ...................................................................... 94
2. Google Drive ............................................................... 96
3. Facebook ..................................................................... 98
4. Vimeo ....................................................................... 101
Setting .............................................................. 103
1. General Settings ......................................................... 105
2. Device Settings .......................................................... 107
3. Recording Settings ..................................................... 109
4. Image Settings ........................................................... 111
5. Save Settings ............................................................. 112
Table of Contents

6. Hot Keys .................................................................... 114
Learn More ........................................................ 118
1. System Requirements .................................................. 118
2. FAQs 119
3. Payment .................................................................... 122
4. Refund Policy ............................................................. 123
5. About This Manual ..................................................... 124
Table of Contents

Installing GOM Cam 1
Installing GOM Cam
There are free and two full versions, GOM Cam Basic & GOM Cam Pro. On the free or
Basic version, some features and functions are restricted for use.
The scope and limitation in using each version are as follows:
Free version Basic Pro
Ads Included Remove Remove
Screen/Webcam/Game/
Lecture Recording 20 minutes Unlimited Unlimited
Quick video editing 10 times, Logo video
included
30 times, Logo video
included
Unlimited/Remove
Logo video
Advanced video editing 10 times, Logo video
included
10 times, Logo video
included
Unlimited/Remove
Logo video
GIF Animation 20 seconds 20 seconds Unlimited
Extract audio 5 30 Unlimited
Multi-schedule recording 3 3 Unlimited
Schedule recording O O O
Screenshot/
Continuous capture O O O
Drawing/
Insert effects & objects O O O
Upload O O O
Purchase and activate a license to use the full version of GOM Cam. There is no set expiry date
for the full version and free updates are provided.

Installing GOM Cam 2
1. Installing the Program
To install GOM Cam, you need to download the installer from the GOM Cam website.
Before installing the program, please check the “System Requirements” in the “Learn
More” section.
If the overall specifications of your PC is lower than the system requirements,
program installation, execution or editing may not work properly. Also, low
performance of the PC may slow down the process speed in the program.
Follow the steps below to install GOM Cam.
1. Download the installer from the GOM Cam website.
2. Run the installer.
3. Choose the language for the installation wizard and then click OK.
4. Click Next on GOM Cam Setup.

Installing GOM Cam 3
5. Please read the terms and conditions carefully before clicking on I Agree.
Please read the terms and conditions carefully before installing this
software. The program will not be installed if you do not agree to the terms
and conditions.
6. Choose the installation option and components and then click Next.
Select Type of Install: Choose the installation option.
- General: Choose this option to install the default components only.
- Reinstall: Choose this option to reinstall the program.
- Custom: Choose this option to customize the installation components.
Choose Components: Choose the components to install. Components can be
selected on Custom.
- Program Group: Create a shortcut to GOM Cam in the program group.
1
2

Installing GOM Cam 4
- Desktop Icon: Create a desktop shortcut to GOM Cam.
7. Check the installation location and click Install.
You can change the installation location by directly entering a new path
or click Browse.
8. When installation is finished, click Finish.
A guide to the functions of GOM Cam will pop up when you run it for the first
time after installation.

Installing GOM Cam 5
2. Upgrading to Full Version
This section explains how to activate a license for a full version of GOM Cam.
You can purchase a license on the GOM Cam website and one license is required per
computer.
Please note a single license activated for two or more computers may become
invalid.
1) Activating a License Key
A single license key for GOM Cam can only be activated on one PC. To use the
purchased license on a different PC, deactivate the key from the old PC before
activating it on a new one.
To activate a new license key
A license that has not been activated on any PC can be activated in the following
steps:
1. Run GOM Cam.
2. Go to > License > Register the license. The License information
window will pop up.
Alternatively, you can click on top right corner
of the main screen to see License Info.
1
2 3

Installing GOM Cam 6
3. Please make sure you enter your license key together with the email address you
provided with your order. Click Register license.
4. Check if it is a full version and click Close.
To cancel an activated license key from a PC and reactivate it on a
new one
A license already activated on a PC can be deactivated and re-activated on a different
PC as follows:
1. Run GOM Cam.
2. Go to > License > License Info. The License Information window will
pop up.
1
2

Installing GOM Cam 7
3. Please make sure you enter your license key together with the email address you
provided with your order. Click Register license.
4. Read the pop-up message and click Yes. License deactivation instructions are sent
to the email address provided at the time of purchase.
5. In the confirmation message box to send email, click OK.
6. Log in to your email account and check for the deactivation instruction email.
7. Click the URL link for verification included in the message. Then, the license will
be deactivated.
If there are several license keys activated, you are directed to a license
deactivation page. On the page, choose the license to deactivate.
8. Once the license is deactivated, use the license details (email address & license
key) to activate it again.
1
2

Installing GOM Cam 8
2) Deactivating a License
To use an already activated license on a different PC, it has to be deactivated from the
old PC.
Then, the deactivated license can now be activated on a different PC or re-
activated on the same PC.
An activated license on a PC can be deactivated in the following steps:
1. Run GOM Cam.
2. Go to > License > License Info. The License Details window will pop
up.
3. Click Deauthorize.

Installing GOM Cam 9
4. In the confirmation message box to send email, click OK.
5. Log in to your email account and check for the deactivation instruction email.
6. Click the URL link for verification included in the message. Then, the license will
be deactivated.
If there are several license keys activated, you are directed to a license
deactivation page. On the page, choose the license to deactivate.

Installing GOM Cam 10
3) Upgrading a License
If you’re using a Free version or GOM Cam Basic, you can buy a license key to upgrade
your version.
One license key must be purchased and used to upgrade a single
program.
A free or promotional license key cannot be used for upgrade.
To upgrade a Free version to GOM Cam Pro
The steps to upgrade a Free version to GOM Cam Pro are as follows:
1. Run GOM Cam.
2. Go to > License > GOM Cam Pro upgrade.
3. Enter your email address, existing license key and new upgrade key and click
Upgrade.
1
2
3
1
2

Installing GOM Cam 11
To upgrade GOM Cam Basic to GOM Cam Pro
The steps to upgrade a GOM Cam Basic version to GOM Cam Pro are as follows:
1. Run GOM Cam.
2. Go to > License > GOM Cam Pro upgrade.
3. Enter the upgrade key and click Upgrade.
1
2
3
1
2

Installing GOM Cam 12
3. Uninstalling the Program
GOM Cam can be uninstalled from the Control Panel or by running the uninstaller
located in the GOM Cam directory.
The default installation location of GOM Cam and the program uninstaller is as
follows: Run the uninstaller. Then, the GOM Cam Uninstall dialog box pops up.
Location
– 32bit: C:\Program Files (x86)\GOM\GOMCam
– 64bit: C:\Program Files\GOM\GOMCam
Program uninstaller file: Uninstall.exe
The steps to uninstall GOM Cam from the Control Panel are as follows:
1. Open the Control Panel and click Uninstall a program. The Programs and Features
window opens.

Installing GOM Cam 13
2. Right-click on GOM Cam and click Uninstall/Change. GOM Cam Uninstall dialog box
pops up.
3. Click Uninstall.
If there are files still left in the installation directory, the following dialog
box will open.
Yes: The installation folder and all the files in it will be deleted.
No: Only the files of the program installed initially will be deleted.

Installing GOM Cam 14
4. When the program is completely uninstalled, click Close.

The Interface 15
The Interface
This section describes the layout of the main interface screen and menu of GOM Cam.
1. Main Screen
The layout of the main screen is as follows:
Image 2. Main Screen
① Top bar
② Main menu
③ Info
④ File list
① Top bar
Configures the program, lists the main menu and displays license details.
② Main menu
This shows the menu items provided on GOM Cam. Click the button to record a
video or capture an image.
③ Info
You can see news notifications, information on the program features and FAQs.
1
22
3
4

The Interface 16
④ File list
This lists recorded video and captured image files. You can select a file from this
list to play, edit or share.
1) Top Bar
Configures the program, lists the main menu and displays license details.
Image 3. Top Bar
① Logo
② Setting
③ License info
④ Usage guide
① Logo ( )
Shows the drop-down menus. Click to view the list of menus.
② Setting ( )
Configures the program. Click to open Settings.
③ License info ( )
Shows the license details.
④ Usage guide ( )
Shows the usage guide of the program.
For a free version of GOM Cam, the icon is
shown in License Details. Click to activate a
license key. For information on how to activate a license key, refer to
“Installing the Program” in “Installing GOM Cam”.
1 2 4 3

The Interface 17
2) Main Menu
This shows the menu items provided on GOM Cam. Click the button to record a video
or capture an image.
Image 4. Main Menu
① Home
② Screen
③ Image
④ Webcam
⑤ Game
⑥ Lecture
① Home
Displays the home screen.
② Screen
Records a particular area of your computer screen. Click View more (▶) next to
the Screen icon to specify your recording area.
Full screen: Records the full computer screen. If two or more monitors are
connected, you have to select one.
Region: You can click and drag the mouse over the area to record.
Custom resolution: The width and height of an area to record can be entered
manually.
Predefined area: You can select the default area or Recently recorded area.
You can define the action of the Screen button when clicked in Setting ( )
> General

The Interface 18
③ Image
You can specify an area on the computer screen to capture or convert into a GIF
animation. Click View more (▶) next to the Image icon to specify your recording
area.
You can define the action of the Image button when clicked in Setting ( )
> General
④ Webcam
Records the images of a webcam connected to your PC.
⑤ Game
Records the screen of a game or program that runs on Direct X/Open GL.
⑥ Lecture
Records a PowerPoint presentation as a video.

The Interface 19
3) Information
You can see news notifications, information on the program features and FAQs.
Image 5. Notifications panel
① What’s new
② Short tips
③ Detailed guide
④ FAQ
⑤ Events
⑥ Contact us
① What's new
Shows notices and recent updating information.
② Short tips
Describes the function and use of each menu item.
③ Detailed guide
Detailed description of each function and use is given on the GOM Cam web
pages. Clicking this icon will open the GOM Cam Help page in a new window.
④ FAQ
Lists frequently asked questions and answers.
⑤ Events
Shows events information

The Interface 20
⑥ Contact us
You can ask questions regarding GOM Cam or give feedback. Clicking Contact us
will open the Contact page of the homepage.
4) File List
Lists recorded video and captured image files. You can switch between List and
Thumbnail view.
Thumbnail View
Displays recorded video and image files as thumbnail images. The editing tool appears
when the mouse pointer is over the thumbnail.
Image 6. Thumbnail View
① Listing tabs
② File list
③ Task
④ Search tags
① Listing tabs
Displays the video and image files by type.
All: Shows all recorded video and image files.
Video: Shows recorded video files only.
Image: Shows captured image files only.

The Interface 21
② File list
Lists video and image files. You can switch between Thumbnail and List view.
Thumbnail ( ): displays files as thumbnail images.
List ( ): lists files with name, size, duration time and creation date.
The video and image files are saved with the following name.
GOMCAM Date_Time
You can change the file name format in Setting.
③ Task
Shows scheduled recordings, audio extraction and uploads.
④ Search tags
Finds a specific tag in the file list.

The Interface 22
List View
Shows recorded video and image files in a list. Using the editing tools at the bottom
of the screen, you can play, edit or share a selected file.
Image 7. View list
① Listing tabs
② File list
③ Task
④ Search tags
⑤ Toolbar
① Listing tabs
Displays the video and image files by type.
All: Shows all recorded video and image files.
Video: Shows recorded video files only.
Image: Shows captured image files only.

The Interface 23
② File list
Lists video and image files. You can switch between Thumbnail and List view.
Thumbnail ( ): displays files as thumbnail images.
List ( ): lists files with name, size, duration time and creation date.
The video and image files are saved with the following name.
GOMCAM Date_Time
You can change the file name format in Setting.
③ Task
Shows scheduled recordings, audio extraction and uploads.
④ Search tags
Finds a specific tag in the file list.
⑤ Toolbar
You can see the details of the file selected in the list and edit or share. The toolbar
appears at the bottom of the screen when a file is selected in the list.
Play ( ): plays the selected video on a video player.
Open ( ): opens the selected image with an image viewer.
Edit name ( ): changes the name of the selected file.
Details ( ): shows the file details and allows the user to change the file name
or tags.
Upload ( ): uploads the selected media file to Web Drive or SNS.
Edit ( ): allows the user to edit the selected video.
Extract audio ( ): extracts audio data from the selected video. The audio is
extracted as an MP3 file. The extracted audio file is then saved in the directory
GomCam > ExtractAudio.
Delete ( ): deletes the selected video or image.
Play ( ), Edit ( ) and Extract audio ( ) buttons appear only
when a video file is selected.
Open ( ) button appears only when an image file is selected.
These buttons get disabled if the two file types are selected
together.

The Interface 24
2. Main Menu
To view the main menu, click the GOM Cam logo ( ) in the Top bar.
Image 8. Main Menu
① Open files folder
② Setting
③ About
④ License
⑤ Exit
① Open files folder
Opens the folder where the recorded videos and captured images are saved. In
Setting > Save, you can change the default location for saving files.
② Setting
Sets various options for the program.
③ About
Shows the program version and copyright information.
④ License
Allows you to activate or deactivate a license key. Here a Free version can be
upgraded to a full version, or if your program is a full version, the license details
appear.
⑤ Exit
Exits the program.

Making a Video Recording 25
Making a Video Recording
This section explains how to record your desktop screen with GOM Cam. Follow these
steps to record the screen.
1. Run GOM Cam and turn the recorder on.
- You can record the entire computer screen, webcam images, game or lecture video.
2. Set the size of the window to record.
- Select a standard size or customize.
3. Click “Record” to start recording.
- You can schedule a recording to automatically start and stop.
- A clip art or special effect can be added to the screen.
4. Click “Stop” to stop recording.
5. The recorded video can be edited or shared on SNS.

Making a Video Recording 26
1. Real-time Recording
This allows you to record what is being shown on your desktop in real time.
1) Desktop Screen Recording
This allows you to record the images and sound of a particular area on the screen.
Click the Screen icon from the main menu or click the View more (▶) icon and set an
area to record.
Screen Recording Window (Before Recording)
The following control menus are available before recording is started.
Image 9. Desktop Recording Window - Before Recording
① Start recording
② Screen capture
③ Draw
④ Effects settings/Preview
⑤ Reset area
⑥ Schedule recording
⑦ Open files folder
⑧ Automatic stop
⑨ Hide recording menu
① Start recording
Click to start recording.
1 21
3 4 5 6 7 8 9

Making a Video Recording 27
② Screen capture
Click to capture the image shown within the recording area. It also captures the
effects added to the area.
③ Draw
Allows you to draw a picture or add a stamp, shape or text to the screen.
④ Effects settings/Preview
You can add an webcam image, picture or subtitle and preview the screen.
⑤ Reset area
Allows you to resize the recording area. Click Reset area ( ) to select a different
window to record or resize the current recording area by click and drag.
⑥ Schedule recording
Allows you to schedule a recording. Click Schedule recording ( ) to view the
schedule menu bar at the bottom of the screen.
⑦ Open files folder
Opens the folder where the recorded video is to be saved.
⑧ Automatic stop
Sets the recording to finish at a specific time or file size.
⑨ Hide recording menu
Gives you an option to display only the recording area without the recording
menu bar. To view the menu again, simply double-click the GOM Cam ( ) icon
on the window taskbar.

Making a Video Recording 28
Screen Recording Window (While Recording)
The following control menus are available while recording is in progress.
Image 10. Desktop Recording Window – While Recording
① Pause
② Stop recording
③ Screen capture
④ Draw
⑤ Zoom In/Out
⑥ Effects settings/Preview
⑦ Duration
⑧ Automatic stop
⑨ Hide recording menu
① Pause
Click to pause recording. When it’s paused, the Pause ( ) icon changes to the
Resume ( ) icon. Click this icon to resume recording.
② Stop recording
Click to stop recording. The recorded file is then automatically saved in the default
folder.
③ Screen capture
Captures the image currently being shown within the recording area. Any pictures
and effects added to it are captured together.
1 21
3 4 5 6 7 8 9

Making a Video Recording 29
④ Draw
Allows you to draw a picture or add a stamp, shape or text to the screen.
⑤ Zoom In/Out
You can zoom in or out a specific zone in the recording area.
⑥ Effects settings/Preview
A webcam image, picture or subtitle can be added.
⑦ Duration
Shows the total recording time.
⑧ Automatic stop
Sets the recording to finish at a specific time or file size.
⑨ Hide recording menu
Gives you an option to hide the menu bar and display the recording area only. To
view the menu again, simply double-click the GOM Cam ( ) icon on the window
taskbar.

Making a Video Recording 30
Follow these steps to record the computer screen.
1. Click Screen > View more (▶).
You can define the action of the Screen button when clicked in Setting
( ) > General
2. Set the size of the recording area. A recording window appears.
Full screen: Records the full computer screen. If two or more monitors are
connected, you have to select one.
Region: You can click and drag the mouse over the area to record.
Custom resolution: The width and height of an area to record can be entered
manually.
Predefined area: You can select the default area or Recently recorded area.
3. Click Start recording ( ).
During recording, you can draw a picture or add a special effect to the screen.
The added effect can be viewed in the effects preview window.
For how to draw or add an effect, refer to “Draw” or “Effects
settings/Preview”.

Making a Video Recording 31
4. To end recording, click Stop recording ( ). The recording stops with a beep.

Making a Video Recording 32
2) Webcam Recording
This function allows you to record the images of a webcam device connected to your
PC. Click Webcam in the menu bar and configure the webcam device you wish to
record. Then, the following recording window appears.
Image 11. Webcam Recording Window
① Start recording
② Screen capture
③ Effects settings/Preview
④ Device Setting
⑤ Open files folder
⑥ Automatic stop
① Record
Click to start recording.
② Screen Capture
Click to capture the image shown within the recording area.
③ Effects settings/Preview
You can add a webcam image, picture or subtitle and preview the screen.
④ Device Setting
In this window, you can set camera resolution, brightness, contrast, or chroma.
You may also use the chroma-key function.
1 21
3 4 5 6

Making a Video Recording 33
⑤ Open files folder
Opens the folder where the recorded video is to be saved.
⑥ Automatic stop
Sets the recording to finish at a specific time or file size.
Follow these steps to record webcam images
1. Click Webcam.
2. Configure the settings for the webcam device.
For more information about the device settings, refer to “Adding
Webcam”.
3. Click Record ( ).
During recording, you can draw a picture or add a special effect to the screen. The
added effect can be viewed in the effects preview window.
For how to draw or add an effect, refer to “Draw” or “Effects
settings/Preview”.

Making a Video Recording 34
4. To end recording, click Stop recording ( ). The recording stops with a beep.

Making a Video Recording 35
3) Game Recording
This allows you to record a game or program screen that runs on Direct X/Open GL.
Click Game in the menu bar to open the window for game recording. Click the game
console or program you wish to record. The recording box tells you if the game or
program you’ve clicked can be recorded or not.
Image 12. Game Recording Window
① Start recording
② Screen capture
③ Effects settings/Preview
④ Display FPS
⑤ Game detection lock
⑥ Open file folder
⑦ Automatic stop
① Start recording
Click to start recording.
② Screen capture
Click to capture the image shown within the recording area.
③ Effects settings/Preview
You can add an webcam image, picture or subtitle and preview the screen.
④ Display FPS
An option to display the FPS (Frame Per Second) on the game screen. The same
FPS is displayed in the recorded video.
⑤ Game detection lock
An option to keep the detected game for recording even when a different screen
is clicked. When you pause and resume recording with this option, GOM Cam
continues recording the originally detected game screen.
⑥ Open files folder
Opens the folder where the recorded video is to be saved.

Making a Video Recording 36
⑦ Automatic stop
Sets the recording to finish at a specific time or file size.
Follow these steps to record a game screen.
1. Click Game.
2. When the game recording box appears, click the game console you wish to record.
Check if the selected game can be recorded.
3. Once the game screen is detected, click Start recording ( ).
Hot key for Record (Default: F12).

Making a Video Recording 37
4) Lecture Recording
This function allows you to make a lecture video by recording a PowerPoint slideshow
along with webcam images, microphone audio and other sound effects. Click
Lecture in the main menu to open the lecture recording box. Select the tools you wish
to use while recording and open a PowerPoint file. The recording control bar appears
at the top right corner.
Image 13. Lecture Recording Window
① Start recording
② Screen capture
③ Draw
④ Effects settings/Preview
⑤ Open files folder
⑥ Hide recording menu
① Start recording
Click to start recording.
② Screen capture
Click to capture the image shown within the recording area. It also captures the
effects added to the area.
③ Draw
Allows you to draw a picture or add a stamp, shape or text to the screen.
④ Effects settings/Preview
You can add a webcam image, picture or subtitle and preview the screen.
⑤ Open files folder
Opens the folder where the recorded video is to be saved.

Making a Video Recording 38
⑥ Hide recording menu
Gives you an option to display only the recording area without the recording
menu bar. To view the menu again, simply double-click the GOM Cam ( ) icon
on the window taskbar.
In lecture recording, GOM Cam records the PowerPoint document as a
slideshow. Therefore, how the slideshow is presented on the screen
depends on the PowerPoint monitor settings.
The position of the slideshow can be changed at Slideshow > Monitor
on the PowerPoint program.

Making a Video Recording 39
Follow these steps to record a lecture video.
1. Click Lecture.
2. Select the tools you wish to use while recording.
Webcam: Select the checkbox if you want to use a webcam. Then, select a device
from the dropdown menu. You can set a keyboard shortcut to show or hide the
webcam on the screen.
Mic: Click the checkbox if you want to use a microphone device.
Audio: Click the checkbox if you want to use an audio device.
3. Click Open ( ) and select a PowerPoint file to use as a lecture material.

Making a Video Recording 40
4. Click OK.
5. Click Start recording ( ) or use a keyboard shortcut (Default: F12) to start recording.
During recording, you enlarge the screen or add a special effect. The added effect
can be viewed in Effects settings/Preview.
For how to enlarge the screen or add an effect, refer to “Effects
settings/Preview”.
The recording control buttons shown on the top right corner of
the slideshow are also recorded. To hide the buttons, click Hide
recording menu ( ).
6. To end recording, click Stop recording ( ). The recording stops with a beep.

Making a Video Recording 41
2. Scheduling a Recording
This allows you to schedule or end a recording without having to manually control on the
program. The following recording options are available.
Item Screen
Recording
Webcam
Recording
Game
Recording
Lecture
Recording
Schedule
recording ○ Ⅹ Ⅹ Ⅹ
Auto Stop ○ ○ ○ Ⅹ
1) Scheduling a Single Recording
This function allows you to set a recording to start at a certain time and record for a
preset duration.
In the main interface screen, click Schedule recording ( ) to open the scheduling
control bar.
Image 14. Recording Schedule Menu
① Start time
② Duration
③ Action
1 21
3 1 2 3

Making a Video Recording 42
① Start time
Set the time to start recording.
② Duration
Sets the duration of recording. The recording ends after this period.
③ Action
Set the action when the recording is finished.
Stop recording: Ends the recording only.
Exit program: Closes GOM Cam at the end of the recording.
Shut down PC: Shuts down the PC at the end of the recording.
The steps to schedule a recording are as follows:
1. Open the Screen recording window.
For how to open the Desktop recording window, refer to “Desktop
Screen Recording”.
2. Click Schedule recording ( ). The recording schedule menu appears.
3. Set the start time and recording duration.
Making a Video Recording 43
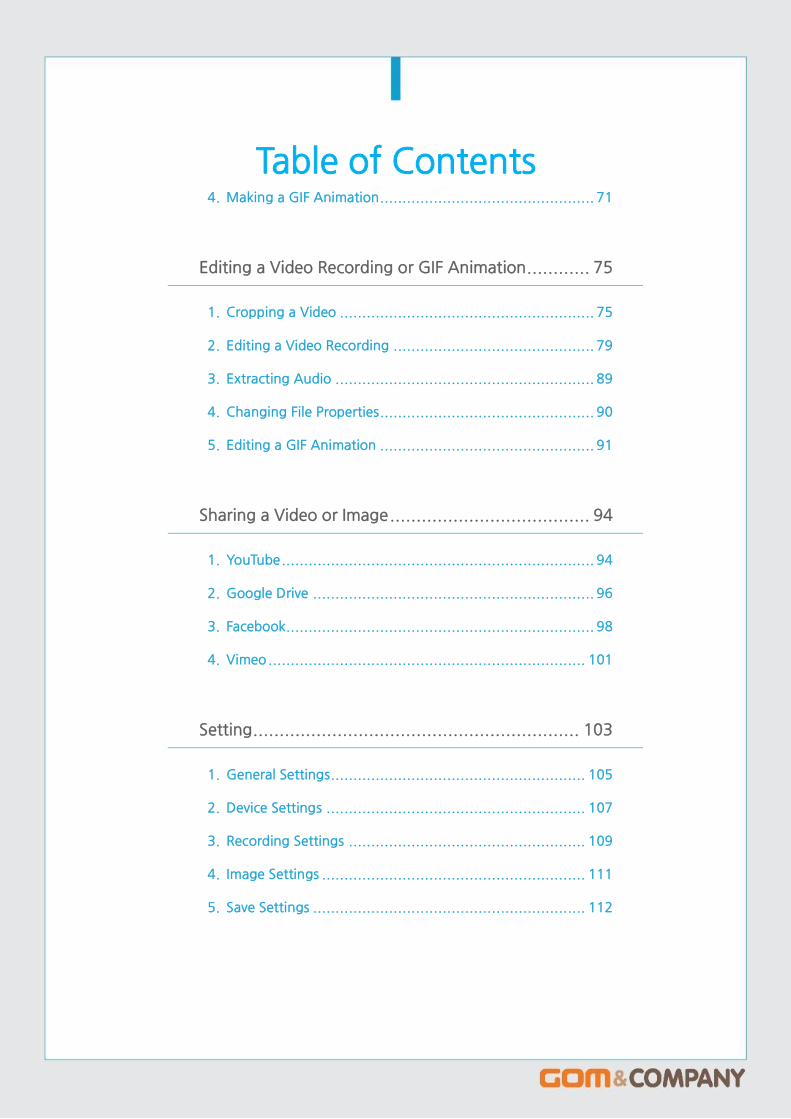
4. For the “Action” option, choose the action to be taken at the end of the recording.
Stop recording: Ends the recording but does not close the program.
Exit program: Closes the program.
Shut down PC: Shuts down the PC.
5. Click OK. It shows the timer for the next recording schedule.

Making a Video Recording 44
2) Multi-schedule recording
This function allows you to set a recording to start at a certain time and record for a
preset duration. Using this option, you can schedule multiple recordings. Click Task >
Schedule > Add to open the recording schedule pane.
Image 15. Recording Schedule Interface
① Record title
② Time
③ Recording time
④ Recording
⑤ Scheduler
① Record title
Gives a name for the schedule.
② Time
Sets the start date and time of recording.
③ Recording time
Sets the duration of recording. The recording ends after this period.
④ Recording
Allows you to set the recording area on the screen. Click Set region to click a
window or drag an area to record.
1
2
3
4
5

Making a Video Recording 45
⑤ Scheduler
Lists scheduled recordings.
Click Edit ( ) or Delete ( ) to edit or delete a scheduled recording.
The steps to schedule multiple recordings are as follows:
1. Click Task in the main interface screen.
2. Click Schedule > Add. The recording schedule interface appears.

Making a Video Recording 46
Tasks scheduled for auto recording are listed in the Schedule tab. Click
See details ( ) to view, edit or delete the schedule.
3. Enter a name for the schedule and set the start time and duration.
The start time cannot be a time that overlaps with any of the currently
scheduled recordings.

Making a Video Recording 47
4. Click the Set region button to set an area to record.
5. Click Save. This schedule is now added to the Schedule List.
Click Add to add another recording schedule.

Making a Video Recording 48
3) Automatic stop
Auto Stop allows you to stop recording after a certain period of time or when its file
reaches a certain size. Click Automatic stop ( ) in the recording menu to open the
auto stop settings.
A recording session which is set for automatic stop has a check mark
( ) on the Automatic stop ( ) icon. Now if you click Automatic stop
( ), the auto stop is disabled. If you click it again, the auto stop
settings pane appears.
Image 16. Auto Stop Settings Pane
① Recording Option
② Detailed Option
③ Action
① Recording Option
Select when to stop recording.
Recording time: Records for the set duration.
Recording Size: Ends the recording when the file reaches a certain size.
1 2 3

Making a Video Recording 49
② Detailed Option
Allows you to set the duration or file size. Different settings are available for
different options.
If Recording time is selected: Set the duration in the format of HH:MM:SS.
If Recording Size is selected: Choose a file size unit and enter the desired size.
(Max size: 4,096 MB or 4 GB).
③ Action
Set the action when the recording is finished.
Stop recording: Ends the recording only.
Exit program: Closes GOM Cam at the end of the recording.
Shut down PC: Shuts down the PC at the end of the recording.
The steps to set Automatic stop are as follows:
1. Click Automatic stop ( ) in the recording window.
2. Select a recording end option and set the condition.
Recording time: Ends the recording after the set duration.
Recording size: Ends the recording when the file reaches a certain size.

Making a Video Recording 50
3. Choose the action to be taken at the end of the recording.
Stop recording: Ends the recording but does not close the program.
Exit program: Closes the program.
Shut down PC: Shuts down the PC.
4. Click OK. A check mark appears on the Automatic stop ( ) icon.
A recording session with auto stop has a check icon marked on the
Automatic stop ( ) icon.
If Automatic stop is off:
If Automatic stop is on:

Making a Video Recording 51
3. Draw
This tool allows you to draw a line or add a shape, stamp or text to the recording screen.
Click Draw ( ) to open the drawing toolbar.
Image 17. Drawing Toolbar
① Drawing tools
② Properties
③ Color Palette
④ Editing tools
① Drawing tools
Use the pen, highlighter or shape tool to draw a line or picture on the screen. The
selected tool can be configured in the properties box.
Select: Use the mouse to select, click and dram an object in the recording
window.
For a drawing tool, the mouse pointer is used for drawing. The Select
tool must be selected if you want to use the mouse to select or drag
something in the recording window.
Pen: Draws lines and curves.
Highlight: Draws highlighted lines.
1 21
3 4

Making a Video Recording 52
Figure: Adds shapes.
Stamp: Adds stamps.
Text: Adds text.
② Properties
Sets the properties of the selected tool.
Pen: Sets the thickness of the line.
- Thickness: 2, 5, 10 or 20
Highlight: Sets the thickness of the highlighter.
- Thickness: 15, 25, 40 or 50
Figure: Sets the type and line thickness of the figure.
- Type: Rectangle ( ), Circle ( ), Straight Line ( ) or Arrow ( )
- Line thickness: 2, 5, 10 or 20
Stamp: Sets the type and line thickness of the stamp.
- Type: Star ( ), Like ( ), Dislike ( ), Check ( ), Circled numbers ( )
- Size: 16, 24, 32 or 64
Text: Sets the text size.
- Size: 14, 22, 32 or 48
The text font can be changed in Settings ( ) > Recording > Drawing
Toolbar Text Font.
③ Color Palette
Sets the color for the selected tool. To open the color selection box, click the large
square on the right. You can choose a color in the Select Color box.
④ Editing tools
Using these tools, you can edit the drawing or text already added to the screen.
Undo ( ): Cancels editing changes.
Redo ( ): Restores undone changes.
Eraser ( ): Erases the drawing or text where you drag the mouse over.
Erase all ( ): Erase all drawings and text from the screen.

Making a Video Recording 53
The steps to draw a picture on the screen are as follows:
1. Click Draw ( ) in the recording window. The drawing toolbar appears.
2. Select a drawing tool to use.
3. Set the properties and color for the selected tool.

Making a Video Recording 54
4. Use the mouse to draw on the screen.
Pen & Highlight: Drag the mouse to draw a shape you want.
Figure: Drag the mouse to add a figure. How much you drag the mouse determines
the size of the shape.
Stamp: Click to add a stamp.
Text: Click the place on the screen where you want to add a textbox and enter text.

Making a Video Recording 55
4. Effects settings/Preview
The feature allows you to decorate the recorded video of your PC screen by adding clip
arts, text or webcam images. Click Effects settings/Preview ( ) to open the Add Effect /
Preview pane.
Image 18. Effects settings/Preview Interface
① Effect list
② Add webcam
③ Add image
④ Add text
⑤ Volume control
⑥ Preview
⑦ Effect objects
① Effect list
Shows the list of added effects.
② Add webcam
This allows you to add webcam images to the recording screen.
If a microphone is connected to the PC, you can record your voice as
well.
③ Add image
You can add images to the video. You can adjust the transparency, position and
size of the images.
1
2
3
4
5
6 7

Making a Video Recording 56
④ Add text
Adds text to the video. After adding text, you can change its font and size, or
apply an animation effect.
⑤ Volume control
Controls the volume of any input devices (microphone, speakers, etc) connected
to the PC.
⑥ Preview
You can preview the added webcam images, pictures, text and animation effects
in real time. You can drag any of the added objects to resize or relocate on the
screen.
⑦ Effect objects
Lists the effects added to the recording screen. Click Use Effect ( ) to apply or
cancel the effect. Or, use the editing tools at the bottom to edit or delete the
effect.
, , , : Used to set the order.
: Opens the properties dialog of the selected effect. You can edit the
properties of the effect.
: Deletes the selected effect.
: Sets a keyboard shortcut to apply or cancel the selected effect.

Making a Video Recording 57
1) Adding Webcam
This allows you to add webcam images to the recording screen. Click Add webcam
( ) in the Effects settings/Preview interface to open the webcam device settings
dialog with the Camera & Decorate tabs.
Camera
On the Camera tab, you can set the resolution, colors and location of the webcam
images.
Image 19. Add webcam dialog - Camera
① Resolution ② Color
① Resolution
Sets the resolution of the webcam images. This can be adjusted during the
recording.
② Color
Sets the camera brightness, contrast, chroma and transparency. Click Reset ( ) to
reset the camera properties to default values.
1
2

Making a Video Recording 58
Decorate
On the Decorate tab, you can apply Chroma Key1 to the webcam images.
Image 20. Add webcam dialog - Decorate
① Use chromakey ② Background settings
① Use chromakey
An option to apply Chroma Key.
Similarity: Sets the color and similarity to be used for Chroma Key. The lower the
similarity value, the more similar to the set color the encoder recognizes.
Color Key: Sets the color to be used for Chroma Key. For example, if white is
chosen, the colors similar to white in the video change.
② Background settings
Sets a color or image to be inserted into the Chroma Key area.
1 Chroma Key: Chroma Key enables you to composite two images or video streams together.
To apply Chroma Key, you need to have a video recorded on the background of a single-color
hue and combine this background with an image or a different video.
1
2

Making a Video Recording 59
2) Adding an Image
You can add images to the video. Click Add Image ( ) in the Add Effect / Preview
window to open the window explorer pane. Select the image to add. Then, the image
appears in the preview pane.
Image 21. Add Image Interface
① File path
② Opacity
③ Position
④ Maintain original ratio
① File path
Shows the path of the added image. Click Open ( ) to view the folder where the
image is saved.
② Opacity
Sets the image transparency.
③ Position
Sets the position of the image on the screen. You can select one from the
predefined positions or click and drag the image to where you want it to be.
④ Maintain original ratio
Keeps the aspect ratio of the original image when it is resized.
1
2
3
4

Making a Video Recording 60
3) Adding Subtitles
You can insert subtitles to the recording video. Click Add text ( ) in the Effects
settings/Preview pane to add text and set text properties and effects.
Image 22. Add text Interface
① Text field
② Properties
③ Text effects
④ Position
① Text field
When you enter text, it will be displayed in the Preview area and the screen will be
recorded as displayed. You can also edit text that was entered previously.
② Properties
You can set various text styles, modifying elements such as text fonts, sizes and
alignments and colors.
③ Text effects
This menu enables you to set display effects, scroll directions and speed. You can
sue the scroll function to create an effect in which the text moves
up/down/left/right on the screen.
1
2
3
4

Making a Video Recording 61
④ Position
This menu enables you to set the location where text is displayed on the screen.
You can select a position from the predefined position list or move or change the
size of the text by dragging the mouse.

Making a Video Recording 62
4) Resizing the Screen
You can zoom in a specific zone in the recording area. The steps to record the screen
with a specific zone enlarged are as follows:
1. Click Zoom in ( ).
2. Click the spot on the screen you wish to enlarge. A zoom in box appears.
Click Zoom in ( ) once again to magnify the boxed area 4x bigger.

Making a Video Recording 63
3. Drag the Move ( ) icon to reposition the box.
4. Click Zoom out ( ). The magnified area returns to its previous zoom level.
If the zone was 4x magnified, you must click Zoom out ( ) twice to make it
return to its original size.

Making a Video Recording 64
5) Showing/Hiding the Mouse Pointer
You can choose to show or hide the mouse pointer in your recording. To show the
mouse pointer, select the option in Setting ( ) > General > Record mouse pointer.
Image 23. Recording Screen with Mouser Pointer
You can set a different color for each of the different button clicks. For
how to change the colors for mouse clicks, refer to “General” in “Setting”.

Screen Capture 65
Screen Capture
This feature allows you to capture a particular area on the screen or make a GIF
animation.
1. Screen Capture
It captures a screenshot of a particular area. The steps to capture an image are as
follows:
1. Click the View more (▶) icon next to the Image button.
You can define the action of the Image button when clicked in Setting
( ) > General
2. Choose the size of the area to capture.
Capture all screens: Captures the screens of all monitors connected to the PC.
Capture full screen: Captures the screen of one monitor connected to the PC.
Region: Captures the area specified with the mouse.
3. Set the area to capture. The captured screenshot is then saved automatically.
For the entire monitors screen capturing, GOM Cam captures and saves
the screen image without requiring you to adjust the area.

Screen Capture 66
2. Continuous Capture
This allows you to take screenshots continuously at regular time intervals. The steps to
capture screenshots continuously are as follows:
1. Click the View more (▶) icon next to the Image button.
You can define the action of the Image button when clicked in Setting
( ) > General
2. Select Continuous capture.

Screen Capture 67
3. Set the area to capture.
4. In the capture window, set the time interval and the number of screenshots to take.

Screen Capture 68
5. Click Start capturing ( ).
Click 1 Screen capture ( ) to capture the image shown on the screen
only once.

Screen Capture 69
3. Scrolling Capture
This option allows you to take the screen with a scroll bar as a single screenshot. The
steps to capture the screen with a scroll bar are as follows:
1. Click the View more (▶) icon next to the Image button.
You can define the action of the Image button when clicked in Setting
( ) > General
2. Select Scrolling capture.

Screen Capture 70
3. Place the mouse pointer over the window you wish to take screenshot with auto
scroll.
If auto scroll is applicable to the selected window, scroll arrows appear.
If no scroll arrow appears, only the screen currently in the view is
captured.
4. Please click the scroll arrow you want.
: captures a screenshot from top to bottom.
: captures a screenshot from left to right.
: captures a screenshot in the zigzag (Z) direction.

Screen Capture 71
4. Making a GIF Animation
This allows you to create an animation with consecutive gif image files. You can make an
animated image file from a certain part of the video stream.
Image 24. GIF Animator Window
① Start capturing
② Reset area
③ FPS
④ Speed
① Start capturing
Click to start capturing.
② Reset area
Allows you to resize the area to capture. Click Reset area ( ) and drag the
mouse to resize the area.
③ FPS
Sets the number of frames per second (speed of screen changing). The higher the
FPS, the smoother the animation becomes.
④ Speed
Sets the playback speed of the GIF animation compared to the original video
stream.
1 2 3 4

Screen Capture 72
The steps to make a GIF animation are as follows:
1. Click the View more (▶) icon next to the Image button.
You can define the action of the Image button when clicked in Setting
( ) > General
2. Select GIF Animation.

Screen Capture 73
3. Specify the area to capture for the animation.
You can click the window or drag the mouse to draw an area to capture.
4. In the GIF animator window, set the FPS and Speed of your GIF animation.
5. Click Start capturing ( ).
6. Click Stop ( ) when it has reached the desired point in the scenes.

Screen Capture 74
7. When the preview window opens, click Close. The GIF images are now saved as a
GIF animation.
You can edit the animation by clicking Edit. For how to edit a GIF
animation, refer to “Editing a GIF Animation” in “Editing a Video
Recording or GIF Animation”.

Editing a Video Recording or GIF Animation 75
Editing a Video Recording or GIF Animation
GOM Cam's quick and advanced editing features make it easy to edit the recorded video.
1. Cropping a Video
Allows you to crop out unwanted part from the recorded video.
Image 25. Quick Editing Interface
① Preview
② Playback controls
③ Set segment
1
2 3

Editing a Video Recording or GIF Animation 76
① Preview
Shows the video currently being edited.
② Playback controls
Plays or stops the segmented part and adjusts the volume.
③ Set segment
Set the start time and end time of the segment you want to save.
The steps to cut out unwanted segment are as follows:
1. Open the video file to edit from the file list.
2. Click Edit ( ).

Editing a Video Recording or GIF Animation 77
3. Select Quick edit.
4. Set the start time and end time of the segment you want to keep.
You can adjust the Time Marker in the timeline bar to set the segment.

Editing a Video Recording or GIF Animation 78
5. Click Convert.
6. Once the encoding is complete, click Play to view the edited video.

Editing a Video Recording or GIF Animation 79
2. Editing a Video Recording
While recording, you can edit a certain segment or change the video or sound quality.
You can even add background music to the stream.
Image 26. Advanced Editing Interface
① Preview
② Playback controls
③ Set segment
④ Video settings
⑤ Audio settings
⑥ Insert music
① Preview
Shows the video currently being edited.
② Playback controls
Plays or stops the segmented part and adjusts the volume.
③ Set segment
Set the start time and end time of the segment you want to edit.
④ Video settings
Sets the image quality
⑤ Audio settings
Sets the sound quality.
1
2 3
4
5
6

Editing a Video Recording or GIF Animation 80
⑥ Insert music
Inserts a background music.
1) Editing a Video Segment
The steps to edit a particular segment are as follows:
1. Open the video file to edit from the file list.
2. Click Edit ( ).

Editing a Video Recording or GIF Animation 81
3. Select Advanced edit.
4. Set the start time and end time of the segment you want to edit.
You can adjust the Time Marker in the timeline bar to set the segment.

Editing a Video Recording or GIF Animation 82
5. Click OK. The selected segment is shown in the segment pane at the bottom of
the window.
You can edit and add different segments. Set and edit a different
segment and click Select section to add the segment to the
encoding list.
Hovering the mouse over the thumbnail in the segment pane
shows icons to Edit ( ) or Delete ( ) the corresponding
segment.
6. Click Convert.
7. Once the encoding is complete, click Play to view the edited video.

Editing a Video Recording or GIF Animation 83
2) Changing the Video / Sound Quality
Follow these steps to change the video or sound quality.
1. Open the video file to edit from the file list.
2. Click Edit ( ).
3. Select Advanced edit.

Editing a Video Recording or GIF Animation 84
4. Check and change the video quality properties.
5. Check and change the sound quality properties.
To apply the sound quality property values, select the checkbox for
Enable Original audio.
6. Click Convert.

Editing a Video Recording or GIF Animation 85
7. Once the encoding is complete, click Play to view the edited video.
Editing a Video Recording or GIF Animation 86
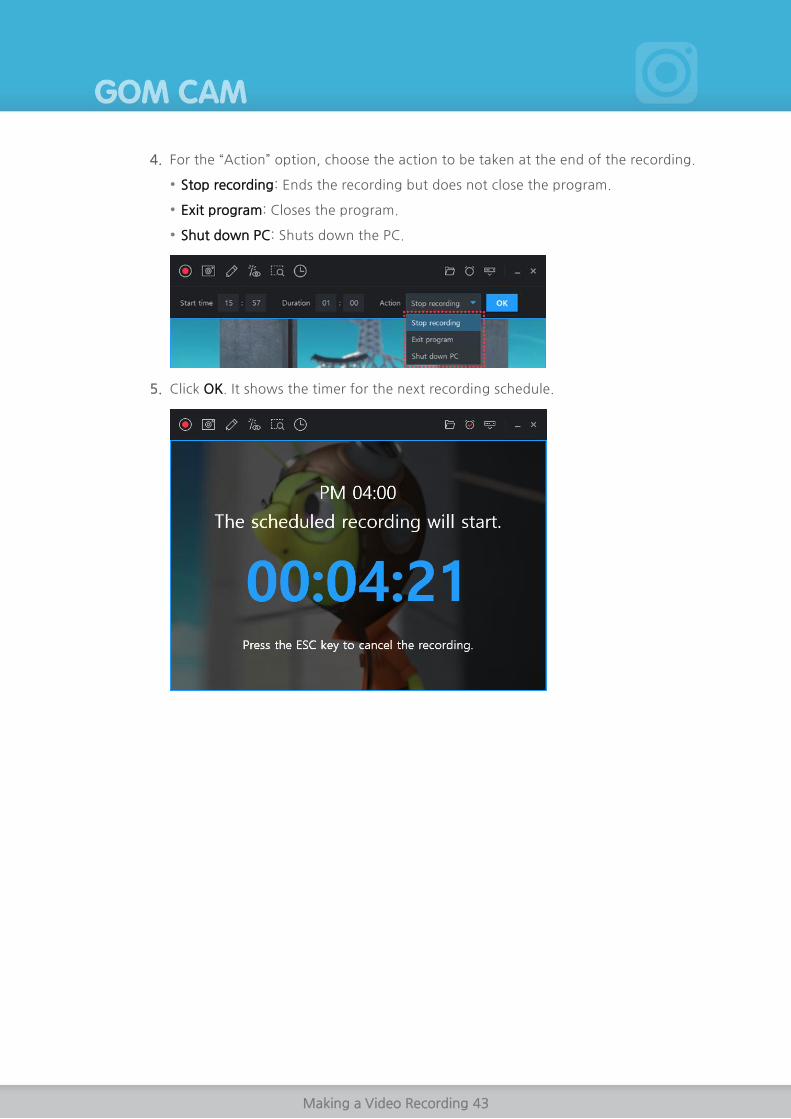
3) Adding Background Music
The steps to add background music to the video are as follows:
1. Open the video file from the file list you want to add background music to.
2. Click Edit ( ).
3. Select Advanced edit.

Editing a Video Recording or GIF Animation 87
4. In Insert Music, check Enable.
5. Click Open to choose a music file to add.
6. Adjust the volume of the music.

Editing a Video Recording or GIF Animation 88
Click Play ( ) to listen to the background music.
7. Click Convert.
8. Once the encoding is complete, click Play to view the edited video.
Editing a Video Recording or GIF Animation 89
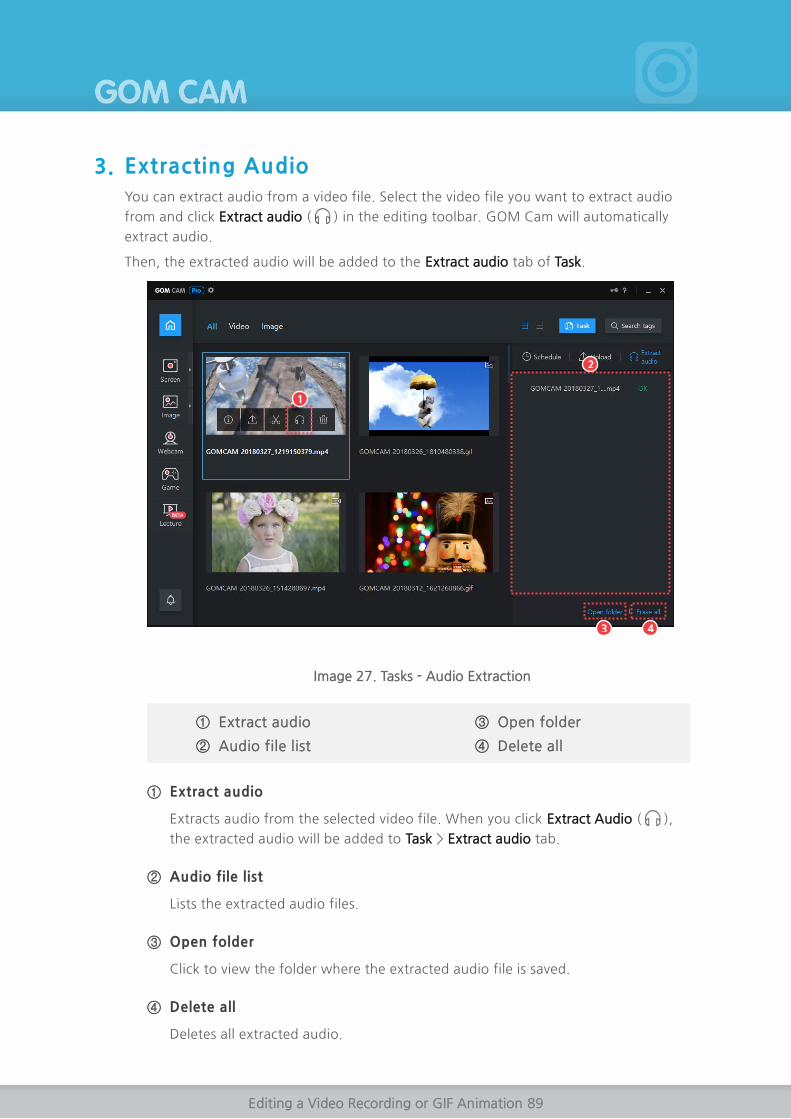
3. Extracting Audio
You can extract audio from a video file. Select the video file you want to extract audio
from and click Extract audio ( ) in the editing toolbar. GOM Cam will automatically
extract audio.
Then, the extracted audio will be added to the Extract audio tab of Task.
Image 27. Tasks - Audio Extraction
① Extract audio
② Audio file list
③ Open folder
④ Delete all
① Extract audio
Extracts audio from the selected video file. When you click Extract Audio ( ),
the extracted audio will be added to Task > Extract audio tab.
② Audio file list
Lists the extracted audio files.
③ Open folder
Click to view the folder where the extracted audio file is saved.
④ Delete all
Deletes all extracted audio.
1
2
3 4

Editing a Video Recording or GIF Animation 90
4. Changing File Properties
In the file properties dialog box, you can rename the file or change tags. Select the file
you want to make changes to and click Details ( ) in the editing toolbar. The detailed
file properties pane appears.
In the properties pane, click Edit next to the file name or tags to rename the file or add or
delete tags. The changes are applied to the file name and tags immediately.
Image 28. File Properties Pane
① Details ② File Properties Pane
① Details
Shows the details of the selected file. Click Details ( ) to open the file properties
pane on the right.
② File Properties Pane
Shows the details of the selected file. You can edit the File Name or Tags.
1
2

Editing a Video Recording or GIF Animation 91
5. Editing a GIF Animation
Allows you to crop out unwanted part from a GIF animation. In the preview window that
appears once capturing gif images is done, click Edit to open the GIF Animation Editor.
Image 29. GIF Animation Editor
① Preview
② Play/Stop
③ Set segment
① Preview
Shows the GIF animation currently being edited.
② Play/Stop
Plays and stops the selected segment of the GIF animation.
③ Set segment
Set the start and end time of the segment you want to save. The total playback
time of the segment is displayed at the top right corner of the preview window.
1
2 3

Editing a Video Recording or GIF Animation 92
The steps to edit animated gif images are as follows:
1. Make a gif animation from a video.
For how to make a GIF animation, refer to “Making a GIF Animation” in
“Screen Capture”.
2. When capturing is done, click Edit.
3. Set the start and end time of the segment you want to keep as a GIF animation.
You can adjust the Time Marker in the timeline bar to set the segment.

Editing a Video Recording or GIF Animation 93
4. Click Convert.
Once the encoding is complete, both the original file and edited file are
saved.
5. After encoding, click Play to view the edited GIF animation.

Sharing a Video or Image 94
Sharing a Video or Image
You can upload videos or images captured with GOM CAM to your SNS or Web Drive.
The following services are available.
Table 1. Service available for upload
Item YouTube Google Drive Facebook Vimeo
Video ○ ○ ○ ○
Image Ⅹ ○ ○ Ⅹ
1. YouTube
Follow these steps to upload a video to YouTube.
1. Select the file from the file list you want to upload.
2. Click Upload ( ) and select YouTube.
1
2

Sharing a Video or Image 95
3. Log in to YouTube.
4. When asked for access permissions, click Accept.
If you have 2 or more channels, choose one.
5. In the Upload to YouTube dialog box, specify the file details, tags, category and
privacy settings.
6. Click Upload.

Sharing a Video or Image 96
2. Google Drive
Follow these steps to upload a video or image to your Google Drive.
1. Select the file from the file list you want to upload.
2. Click Upload ( ) and select Google Drive.
1
2

Sharing a Video or Image 97
3. In the Upload to Google Drive dialog box, select the folder.
4. Click Upload.

Sharing a Video or Image 98
3. Facebook
Follow these steps to upload a video or image to your Facebook.
1. Select the file from the file list you want to upload.
2. Click Upload ( ) and select Facebook.
3. Log in to Facebook.
1
2

Sharing a Video or Image 99
4. When prompted to confirm the information to be provided, click Continue.
5. Set the privacy settings and click OK.
1
2

Sharing a Video or Image 100
6. Check if you have successfully logged into your Facebook account, click Upload.
1
2

Sharing a Video or Image 101
4. Vimeo
Follow these steps to upload a video to Vimeo.
1. Select the file from the file list you want to upload.
2. Click Upload ( ) and select Vimeo.
3. Log in to Vimeo.
1
2

Sharing a Video or Image 102
4. Set the access permissions for GOM Cam and click Allow.
5. In the Upload to Vimeo dialog box, click Upload.
1
2

Setting 103
Setting
This section describes how to configure the default and output settings of GOM Cam.
Click the Setting ( ) icon in the top bar or select Setting from the main menu.
Image 30. Settings
① Category tabs
② Options
③ Tips
④ Go to Home
⑤ Reset all
① Category tabs
Options are grouped by category.
② Options
Lists the options you can set for each category.
③ Tips
It gives useful tips that will make using the program easier. Click each item to view
the tip in a pop-up window.
1
2
3
4 5

Setting 104
④ Go to Home
Directs you to the main screen.
⑤ Reset all
Resets all setting options to the default values.

Setting 105
1. General Settings
On the General tab, you can set general options for using the program.
Image 31. General Settings
① Record mouse pointer
② Main menu buttons
③ Language
④ Other
① Record mouse pointer
You can choose to show or hide the mouse pointer in your recording. You can set
a different color for each of the different button clicks.
Record mouse pointer: Check the box to show the mouse pointer in your
recording.
Mouse pointer: A circle in the set color appears at the tip of the mouser pointer.
Left-click: A circle in the set color appears when the left button is clicked. If you
click and hold, the circle changes in size.
Right-click: A circle in the set color appears when the right button is clicked. If
you click and hold, the circle changes in size.
1
2
3
4

Setting 106
② Main menu buttons
You can specify the action of the Screen or Image button when clicked.
Screen recording: Sets the action when the Screen button is clicked. The option
View recording menu removes the Details (▶) icon next to the Screen button.
Screen capture: Sets the action when the Image button is clicked. The option
View capture menu removes the Details (▶) icon next to the Image button.
③ Language
Sets the language to use on GOM Cam.
④ Other
Display the usage guide if there is user help: Shows the user guide if there is any.
Display the toolbar menu tooltip during recording/image capture: Displays tool
tips in the toolbar menu while recording/capturing the screen.

Setting 107
2. Device Settings
On the Device tab, you can set the video or sound quality.
Image 32. Device Settings
① Video setting ② Audio setting
① Video setting
Sets the video quality.
This enables you to set the FPS, resolution and quality of the video. Increase the
bitrate to improve the video quality. You can set the quality of desktop screen
recording and game recording separately.
FPS: Sets the number of frames per second (speed of screen changing). The
higher the FPS, the smoother the images become.
Codec: Sets the video encoding method.
- H264(NVIDIA) or H264(Intel Quick Sync): Higher video quality and large file
size.
- H264(CPU): Lower video quality than H/W encoding and reduced file size.
H264(NVIDIA) or H264(Intel Quick Sync) appears in the box depending
on the graphic card installed on the PC. If none of these are supported,
the only available setting is H264(CPU).
1
2

Setting 108
Size: Sets the resolution of the video.
This Size applies regardless of the actual recording area. For instance, if
the size of the recording area is set to 640 x 360 in Settings and 400 x
200 in the actual recording, the video is saved with the resolution of
640 x 360.
Bitrate: The higher the bitrate, the higher the video quality and larger the file
size.
- General recording: Sets the bitrate for Screen recording.
- Game recording: Sets the bitrate for game recording.
② Audio setting
This enables you to set the type, channel and quality of the audio recorded in the
video.
Mic: Sets the default microphone device to use on the program.
Audio: Sets the default audio device to use on the program.
Format: Sets the audio frequency.
Channel: Selects Stereo or Mono.
Bitrate: The higher the bitrate, the higher the sound quality and larger the file
size.

Setting 109
3. Recording Settings
On the Recording tab, you can set recording-related options.
Image 33. Recording Settings
① Automatic stop
② Font style of the drawing
tools
③ Other
① Automatic stop
You can set a recording session to automatically stop.
Duration: Records for the set duration.
File Size: Ends the recording when the file reaches a certain size.
This setting applies to Automatic stop ( ) in the recording
menu.
For how to set Auto Stop, refer to “오류! 참조 원본을 찾을 수
없습니다.” in “Making a Video Recording”.
② Font style of the drawing tools
Sets the font of the text used in the drawing toolbar.
1
2
3

Setting 110
③ Other
Show countdown before recording: Displays a countdown for 3 seconds when
the Record button is clicked.
Record with audio: Adds the sound of the audio device, installed on the PC, to
the video.
Keep the last effect settings when exit the program: Saves all added effects in
the Effect List until they are manually deleted. You need to decide whether to
use this added effect for the next recording. If this effect is set to “Use”, it
automatically applies to the next recording.
Save recent drawing tools: Saves the last used drawing tool allowing you to
apply the same tool to the next recording.
Automatically increase the size when resolution is not right: Sets a higher
resolution for the recording area if an error occurs in the set resolution.
As the resolution is adjusted to be higher, black lines may appear
around the edges of the recorded video screen. So, this option is
highly recommended if there is a critical element (screen, image or
subtitles) around the edges that should not be cut out.

Setting 111
4. Image Settings
On the Image tab, you can set options related with the image quality.
Image 34. Image Settings
① Image quality ② Other
① Image quality
Sets the quality of captured images being saved to the clipboard.
② Other
Capture image to clipboard: Copies the captured images to the clipboard as well
as saves them in the default folder. These clipboard images can be added to a
word document or attached to an email.
Open captured images using a default program: Opens the captured image in an
image viewer.
Always open preview window after completing GIF capture: Automatically opens
the preview window for viewing the GIF animation when capturing gif images is
done.
1
2

Setting 112
5. Save Settings
On the Save tab, you can set the default save location, naming convention and file
format for the recorded video or captured image files.
Image 35. Save Settings
① Set the path
② File name
③ Divide file size
④ File format
① Set the path
Sets the path to the folder where the recorded video and captured image files are
saved. Click Open folder ( ) to change the default folder.
② File name
Sets the naming convention for the files automatically generated.
Custom + Date & Time: Includes a user-defined phrase, date and time in the file
name.
(i.e. GOMCAM 2018-01-30_15_00_00.mp4)
Date & Time: Includes only the date and time in the name.
(i.e. 2018-01-30_15_00_00.png)
1
2
3
4

Setting 113
③ Divide file size
Splits a single recording by certain file size and saves the segments. Check the
Divide file size option and select a size from the drop-down menu. For example, it
100 MB is set for the max file size, the recording is split and saved by 100 MB.
④ File format
Sets the file extension for the video and image files. The following extensions are
available:
Video: MP4 or FLV
Image: PNG, JPEG or BMP

Setting 114
6. Hot Keys
On the Hot keys tab, you can view and change hot keys used on the program.
Image 36. Shortcuts
① Category
② List of hot keys
③ Set
④ Release all
① Category
You can select a function you can set keyboard shortcuts for. Each functional
category has a set of keyboard shortcuts.
② List of hot keys
Lists the options and corresponding keyboard shortcuts. Click Delete ( ) to
disable the shortcut.
1 2
3 4

Setting 115
③ Set
Changes the keyboard shortcut selected from the list. To change a shortcut, enter
a new key or key combination in the field and click OK.
Keys such as F1 - F12, Ctrl, Alt and Shift can be entered directly.
The Ctrl, Alt and Shift keys cannot be used as keyboard shortcuts
alone. They must be combined with other keys.
The same shortcut cannot be used for two different options.
④ Release all
Release(delete) all hot keys.
Default Hot keys for Video Recording
Table 2. List of default hot keys for Video Recording
Function Shortcut Description
Start/Stop recording F12 Starts or stops recording.
Pause/Resume Shift + F12 Pauses or resumes recording.
Screen capture F11 Captures the screenshot of the screen in
the recording area.
Record/Hide mouse
pointer Ctrl + M
Shows or hides the mouse pointer in the
recording.
Show/Hide Menu Ctrl + Alt + H Shows or hides the menu while recording.
Show/Hide drawing
toolbar Ctrl + L Shows or hides the drawing toolbar.
Zoom in F10 Magnifies a specific zone in the recording
area.
Zoom out F9 Reduced the magnified area.
Full screen Ctrl + Enter Sets the recording area to full screen.
Set area with mouse
(Region) Ctrl + F Sets the recording area with the mouse.
Custom region Ctrl + I Manually sets the dimensions of the
recording area.
Move left ← Shifts the recording area to the left.
Move right → Shifts the recording area to the right.
Move up ↑ Shifts up the recording area.
Move down ↓ Shifts down the recording area.

Setting 116
Function Shortcut Description
Increase horizontal
size Ctrl + → Increases the width of the recording area.
Decrease horizontal
size Ctrl + ← Decreases the width of the recording area.
Increase vertical size Ctrl + ↓ Increases the height of the recording area.
Decrease vertical size Ctrl + ↑ Decreases the height of the recording area.
Default Hot keys for Drawing Tools
Table 3. List of default hot keys for Drawing Tools
Function Shortcut Description
Select Ctrl + R An arrow pointer for selecting an object.
Pen Ctrl + P Selects Pen for drawing.
Highlight Ctrl + H Selects Highlighter for drawing.
Figure - Rectangle Ctrl + 1 Selects the rectangle drawing tool.
Figure - Ellipse Ctrl + 2 Selects the circle drawing tool.
Figure - Line Ctrl + 3 Selects the straight line drawing tool.
Figure - Arrow Ctrl + 4 Selects the arrow drawing tool.
Stamp - Star Ctrl + 5 Selects the Star stamp.
Stamp - Like Ctrl + 6 Selects the Like stamp.
Stamp - Dislike Ctrl + 7 Selects the Dislike stamp.
Stamp - Check Ctrl + 8 Selects the Check stamp.
Stamp - Numbering Ctrl + 9 Selects the number stamp.
Text Ctrl + T Selects
Eraser Ctrl + E Selects the Eraser tool.
Erase all Delete Deletes all objects added to the screen.
Size up Ctrl + U Increases the size of the selected drawing
tool.
Size down Ctrl + D Decreases the size of the selected drawing
tool.
Undo Ctrl + Z Cancels editing changes.
Redo Ctrl + Y Restores canceled changes.

Setting 117
Default Hot keys for Screen Capture
Table 4. List of default Hot keys for Screen Capture
Function Shortcut Description
Capture all screens PrintScreen Captures all monitor screens.
Capture full screen Ctrl + PrintScreen Captures the screen of a specific monitor.
Set area with mouse
(Region) Alt + PrintScreen Sets the area to capture with the mouse.
Continuous capture Shift + PrintScreen Takes screenshots continuously.
Automatic scrolling
capture
Ctrl + Alt +
PrintScreen Turn on Auto Scroll for screen capture.
GIF Animation Ctrl + G Opens the GIF Animator Window.

Learn More 118
Learn More
This section gives useful information for use of GOM Cam.
1. System Requirements
The system requirements for running GOM Cam are as follows:
Table 5. System Requirements
Item Requirements
Operating System Windows 10 / 8.1 / 8 / 7 (32-bit / 64-bit)
Windows XP or lower versions are not supported.
Resolution 1280 x 1024 and above (Min. window size: 1260 * 800)
CPU Intel Pentium 4 CPU, AMD Athlon 64 CPU or better
Memory 1GB RAM or more
HDD 1GB or more of disk space is required.
VGA HD Graphics 4600 or higher
Network
When you use some features, such as license verification,
updates and SNS uploads, an internet connection is needed.
If you are offline, you will not be able to verify your license,
so free version will be provided.
DirectX DirectX 9.0c or higher (The latest version over DirectX 10
recommended)
If you get a DirectX error message when running the program, please
refer to the FAQs page on the GOM Cam website.
Internet connection may be required for some of the functions.
The program may not be properly installed or run on a PC with
specifications lower than the minimum and recommended system
requirements.
Even if it meets the minimum system requirements, you may experience
low video quality for game recording depending on the performance of
your PC.

Learn More 119
2. FAQs
This section gives some of the frequently asked questions and answers.
1) Where can I see the details of my purchased license key?
You can find the information on the license key you’ve purchased on License
Management > Retrieve License Key. In the Retrieve License page, enter the email
address you provided with your purchase and click Send. Then, the license key will be
sent out to your email.
If you have entered a secondary email address at the time of license
purchase, you can use this email address to find your license key. In this
case, please contact our customer service.
2) Can a single license key be used on multiple PCs?
A license key for GOM Cam can only be activated on one PC. If you wish to use the
program on a different PC, you must deactivate the license key from your old PC and
activate again on the new one.
3) Can I change my email address that I provided at the time of purchasing my license?
The email address provided at the time of license purchase is stored with the license
key, once the payment is cleared. Therefore, your email address cannot be changed
separately from the key. It is recommended that you enter a valid email address that
you have access to at all times as this email address is used for finding or deactivating
your purchased license key.

Learn More 120
If you have entered a secondary email address at the time of license
purchase, you can use this email address to find your license key. In this
case, please contact our customer service.
4) Can I still use the full version of GOM Cam on a formatted PC?
Your license key is stored on your PC and used every time you run the GOM Cam
program. So, if you have formatted your PC and reinstalled the operating system, the
license key data must have been deleted and deactivated. In this case, your GOM Cam
will be installed as a Free version.
If you have formatted your PC and reinstalled the operating system, please follow the
steps to activate a license key again.
5) The program shutdown when recording a video. How can I recover the recording file?
Even if you experience an abnormal program shutdown, you can still restore the video
file recorded up until the shutdown. When you restart the program after an
unexpected program shutdown, you get an alert message about file restoration. In
the alert dialog box, click Yes to recover the file recorded up until the shutdown.
Image 37. File Restoration Alert
Only the files larger than 1MB and longer than 1 minute can be
recovered.
The program saves and can restore files at different lengths
depending on the recording length.
Size Duration Recoverable length
1 MB
or
more
Up to 59 secs Up to 30 secs
Up to 1 min 59 secs 1 min
Up to 2 mins 59 secs 2 mins
Up to 3 mins 59 secs 3 mins
Up to 6 mins 59 secs 6 mins

Learn More 121
Longer than 7 mins
9 mins, 12 mins, 15 mins and so
on, as the file is saved at 3 min
intervals

Learn More 122
3. Payment
Please read the GOM Cam License purchase and Refund policy before purchasing a full
version license key.
Cancellation is available at any time within 14 days of your purchase date.(If you
registered your license, you can not cancel your payment. So, Please use the free version
sufficiently before purchasing the license.) Also, please note that the payment will not be
refunded after the number of days allowed for refund, even if you have not yet activated
your license key.
1. The Agreement regarding the paid license of this Software shall be established by
your consent to this Agreement, your application for the paid license, and acceptance
thereof by GOM & Company. The other matters shall be in accordance with the
policies issued by GOM & Company.
2. While using this Software on a paid basis, you may purchase the license at the GOM
product homepage, or from a service provider who is authorized to sell licenses by
GOM & Company.
3. When you make a normal payment for the charge, the license information will be
sent to you at the email address saved in your profile, if you are a registered member,
or to your email address entered by you for the purchase, if you are a non-registered
member.
4. Payment of the amount shall mean that you also consent to the following: GOM &
Company may provide to you various information that are deemed necessary for your
use of the service by such means as email or wireless text messages, provided that
you may refuse to receive such information at your discretion. However, GOM &
Company may notify you of such matters as changes in important policies for the use
of the service, which may include users who have refused to receive such information
by such means as email.
5. After you purchase a Software license, you may cancel the payment if the refund
warranty period defined by GOM & Company (no longer than 14 days) has not
expired. Because you may not cancel or request a refund once license key is registered
or after the refund warranty period has expired, it is recommended that you try using
the free version sufficiently before purchasing a license.
6. If you use the payment information of a third party without their consent thereof, you
shall be liable to civil/criminal liabilities, and may be subject to punishment under any
relevant laws.

Learn More 123
4. Refund Policy
Before you purchase a license for GOM Cam, it is highly recommended that you read our
refund policy.
1. Company will make a final refund of the remaining 10% of the amount paid for the
payment processing fee if the user exceeds the refund warranty period (within 14
days) determined by the company after purchasing the software license.
2. Refund of the software is only available before registering license.
3. In the case of a product bundle where more than two licenses are involved, since it is
considered a single product, a refund for the whole product is not possible if one of
the licenses is registered and partial cancellation or refund for any unused license is
also not allowed.
4. If you have acquired the license free of charge, and not through a normal payment,
but through special services (coupons, gift cards, bonus points given by
administrators), you may not cancel your payment or request a refund, because you
have not made any actual payment.
5. If you breach this Agreement or any relevant laws, by such acts as sharing of your
paid Software license with any third parties, or executing this Software concurrently
on a number of computers with only one paid license, payment cancellations or
refund requests may not be allowed.
6. In any of the following cases, it will not be counted as the number of days of service
use, and GOM & Company will not issue compensation for any damages:
In the event GOM & Company cannot provide the service due to force majeure,
such as national emergencies, or natural disasters.
In the event GOM & Company carries out regular checks according to a schedule
pre-defined by it, or expands the servers, or replaces any other equipment based on
advance announcements.
In the event the service cannot be provided due to causes imputable to you, such as
ill intention or negligence.
In the event the service cannot be provided due to inevitable causes by virtue of the
telecommunications services.
In the event the service cannot be provided due to faults of the telecommunications
services provided by communications services other than GOM & Company
In the event the service cannot be provided due to shortcomings or faults of the
lines and equipment owned by individual communications services used by and/or
based on your selection.

Learn More 124
5. About This Manual
This section describes the copyright and the revision history of this manual.
Copyright
Copyright 2018 GOM & Company All Rights Reserved.
All rights reserved. Every content contained in this manual is the intellectual property of
GOM & Company. For enquiries on this manual or our products, please contact us.
Published by: GOM & Company
Address: GOM & Company Building, 216 Gaepo-ro, Gangnam-gu, Seoul, Korea
Tel: +82 2 2193 5700
Website: http://www.gomcorp.com/
Revision History
Revision No. Date Description Note
1.0 2/14/2018 First draft created v2.0.1.1216

Learn More 125