Goalkeeper Coaching Notes
33
Goal Keepers Training Guide 2008
-
Upload
jose-duarte -
Category
Documents
-
view
29 -
download
6
description
goalkeeper training
Transcript of Goalkeeper Coaching Notes

Goal Keepers
Training Guide
2008

Goal Keeper Coaching Notes 2 of 33
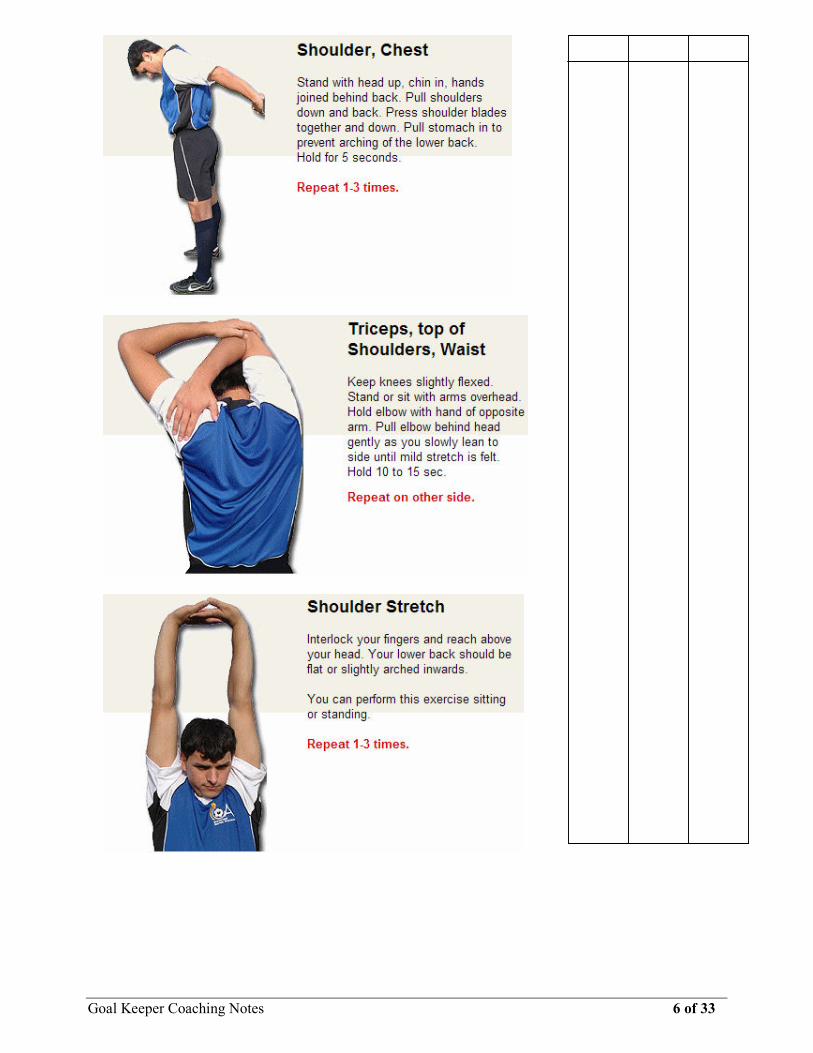
Stretches

Goal Keeper Coaching Notes 3 of 33

Goal Keeper Coaching Notes 4 of 33

Goal Keeper Coaching Notes 5 of 33
Goal Keeper Coaching Notes 6 of 33

Goal Keeper Coaching Notes 7 of 33
Keeper Warm-Ups
1. Jog and stretch WITH the rest of the team
The first thing any goalie should do is participate in the rest of the team's pre-warm-up. He/she should
always jog and stretch with the rest of the team, especially if they are a captain. This builds team unity.
It also gives the keeper a chance to loosen his/her muscles before continuing with the warm-up.
2. Toss and Catch
The first is it gets the keeper focused on the ball and his/her hands. They should catch the ball in the
"W" and they should focus on their stance.
A keeper's stance is very important part of his/her technique. They should be on their toes and
positioned with their back slightly arched forward with their knees bent a
3. V-Sits
Find some good grass around the 18 yard box to do these in. While the keeper is in the "V-Sit" position
toss the ball to one side (underhanded with BOTH hands) while standing about 3-4 yards in front of the
keeper.
Try to encourage forward progression. If they dive incorrectly make them pause and correct their form
before moving to the other side. After they've done about 10-15 to each side move to the next part.
4. Knees
This drill is virtually the same as "V-Sits" except it's a natural progression to a higher more
realistic position. We also feel that this is THE MOST IMPORTANT part of the diving warmup. If
the keeper has to choose one of the diving warm-up exercises, this one should be it.
The keeper should kneel and perform the same drill while demonstrating correct form and forward
progression. The only difference is now the keeper should take a "step" with his/her knee at a 45
degree angle towards the ball to help this forward movement. Also, your tosses can begin to be a
little bit further out.
5. Squats or "Catchers"
6. Light shots on goal
Light shots includes low balls, high balls, and anything within a simple area near the keeper.
Remember that you're not trying to score, you're just trying to give the keeper a lot of shots in his/her
vicinity to warm them up. Give them a few grounders and easy
COOL DOWNS AT END OF SESSION

Goal Keeper Coaching Notes 8 of 33
COACHING DRILLS
Cones = RED, GK = Green, Ball = White, Coach = Black

Goal Keeper Coaching Notes 9 of 33
Keeper starts in the lay down position touching the post
Gets to his feet and shuffles to the middle of the goal
Ball is delivered to the starting post for the save.

Goal Keeper Coaching Notes 10 of 33
Side to side around flags or cones
Sets for the shot, ball is delivered, high, middle, low.

Goal Keeper Coaching Notes 11 of 33
Jumps cross bars or three cones
Then sets for shot
Two balls delivered one high to left one low to right.

Goal Keeper Coaching Notes 12 of 33
Keeper jumps 3-4 cones or hurdles
Moves across to flag or cone
Sets for shot, deliver for save.

Goal Keeper Coaching Notes 13 of 33

Goal Keeper Coaching Notes 14 of 33
Coach indicates the ball he will attach, challenges for ball
Coach challenges, keeper dives and saves at feet.

Goal Keeper Coaching Notes 15 of 33
Starts at front cone
Moves back using small close steps
Large fast movement to make the save

Goal Keeper Coaching Notes 16 of 33
Makes a high save
Then dive behind to save ball on ground behind
Repeat

Goal Keeper Coaching Notes 17 of 33
Goal Keeper Coaching Notes 18 of 33
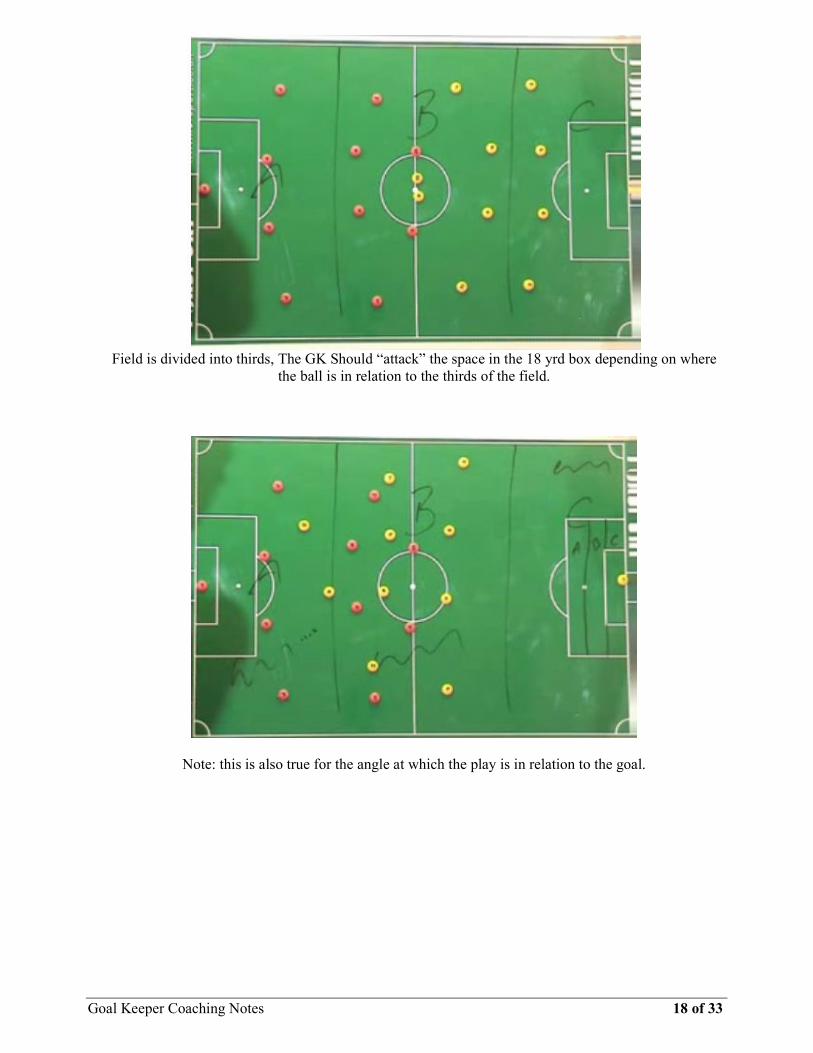
Field is divided into thirds, The GK Should “attack” the space in the 18 yrd box depending on where
the ball is in relation to the thirds of the field.
Note: this is also true for the angle at which the play is in relation to the goal.

Goal Keeper Coaching Notes 19 of 33
Move forward to each cone and set, make a save
move forward to next cone, allow keeper to stop and check the angle they have made coming out for
the save.
Goal Keeper Coaching Notes 20 of 33

Goal Keeper Coaching Notes 21 of 33

Goal Keeper Coaching Notes 22 of 33
The above goalkeeper training session is structured to train 1 to 3 goalkeepers. The value of this
session is that it effectively trains many variables, such as footwork, agility, coordination, handling and
diving technique, as well as positioning. At the collegiate level training sessions vary in length,
therefore economizing various aspect of the position is beneficial to player development.
Organization
· Place two discs 2-3 yards in front of the goal line, marking the middle third of the goal.
· GK1 stands in the goal between the cones. GK2 and GK3 stand outside the goal at the posts.
· Coach serves from 14-16 yards away.
Warm-up Progression: Basic Handling & Setting
· On the coaches’ command, GK1 will pre-stretch and set for a shot struck on the ground (scoop).
· After making the save, GK1 bowls the ball back to the coach and exits the goal toward GK2, who
enters the exercise and continues the sequence. 2 minutes.
· Using the same sequence. Coach progresses to volleys toward the midsection (basket). Goalkeepers
sling throw the ball back to the coach. 2 minutes.
· Coach strikes volleys towards chest/head (contour catch). Same distribution as above. 2-3 minutes.
· Finally, coach will take a touch prior to the shot. Goalkeepers will have to pre-stretch and set based on
the coach’s rhythm. Various shots will be taken within the cones. Goalkeepers bowl the ball back to the
coach. 5 minutes.
Variations
· Goalkeepers bowl the ball to the coach then react to the shot.
· Have goalkeepers shuffle and touch the cones or footwork around them.
· Coach serves half-volley (drop-kick).
Coaching Points · Emphasizing the middle third of the goal enforces the use of footwork, which should eliminate diving
and reinforce the use of basic techniques.
· Focus on setting and using proper ready position.
· Develop “shooters” rhythm (when to set).
· Reinforce footwork and getting the body behind the ball.
Exercise 1 Progression: Shot Stopping
· GK1 starts outside the cones. On the coaches’ command, GK1 shuffles and sets between the cones to
handle a shot towards the middle third of the goal (ball is struck off the ground). After making a save,
GK1 exits the goal towards GK2. Continue sequence.
· GK1 starts outside the cones. Coach touches the ball, GK1 shuffles and sets between the cones to
handle a shot towards the middle third of the goal.
· GK1 starts outside the cones. On the coaches’ command, GK1 shuffles and sets on the ball line to
handle a shot in the direction in which the goalkeeper is moving. The shot is being struck towards the
outer third of the goal (collapse dive/extension).
· GK1 starts outside the cones. On the coaches’ command, GK1 shuffles and sets on the ball line to
handle a shot back in the same direction from which the goalkeeper is moving. Again, the ball is struck
towards the outer third of the goal.

Goal Keeper Coaching Notes 23 of 33
· Utilizing the same sequence. The coach touches ball to initiate the exercise and may strike to either
side of the goal.
Variations · Based on the ability level. Coach progressively serves the ball: ground, mid-range, and upper third of
the goal.
· Vary service: hand, volley and half-volley.
· Vary the distance of the shots.
· Have goalkeepers face the flank outside the cones. This forces the goalkeepers to use a drop-step
and/or crossover step.
Coaching Points · Focus on setting and proper ready position.
· Address ball line and vertical position; based on the position and distance of the ball.
· Assess the type of ball being served.
· Emphasize the quality of the footwork.
· Diving technique: momentum is directed forward towards the ball.
· Decision making: catching versus tipping/parrying.
Exercise 2 Progression: Angle Play
· GK1 stands in a ready position between the cones. Coach is positioned either to the right/left of the
goal (outside the goal box). GK2 and GK3 stand outside the goal at the posts. On the coaches’
command, GK1 will footwork and set to handle a shot. After making a save, GK1 exits the goal
towards GK2. Continue sequence.
· GK1 stands in a ready position between the cones. After the coach touches the ball, GK1 will
footwork and set to handle a shot.
· GK1 starts outside the cones farthest from the coach in a ready position. On the coaches’ command,
GK1 will footwork across the goal and set to handle a shot.
· GK1 starts outside the cones farthest from the coach in a ready position. After the coach touches the
ball, GK1 will footwork across the goal and set to handle a shot.
· Train the other side, maintaining the same sequence.
Variations · Coach serves to pre-determined side: near post or far post.
· Vary service: volley / half-volley or in-swinging / out-swinging.
Coaching Points · Footwork speed.
· Positional play: ball line and angle arch.
· Assess the distance of the ball and which foot the ball is on: right/left.
· Technical set and ready position.

Goal Keeper Coaching Notes 24 of 33
What you need: 5 cones, 1 ball, a server and a goalkeeper (of course).
To set up the drill, place 5 cones in a line about 3 to 4 yards apart. The keeper should start at one end of
the cones, let’s say the keeper’s left for explanation purposes. He/She should start 2-3 yards behind the
line created by the cones in between the first “small goal” created by the first 2 cones.
The keeper then takes quick footwork-type steps forward through the “small goal” to about 1-2 yards in
front of the line. These steps should be as quick and short as possible. The idea here is to get as much
quick, precise movements as possible in before making a save. Plus, we want to work on foot speed
and getting set before the shot. With this movement, the goalkeeper should keep his/her head up,
focused and steady on the server (shooter) with their body in a concave, “gorilla-like” shape. Their
hands should also be in a ready position.
(figure 1)
Once in front of the line, the keeper should get set just as the server tosses the ball. The server’s toss
should be with 2 hands and he/she should toss it over his/her head as a high catch for the goalkeeper.
The server should try to aim about an arm’s length above the keeper’s head. When the goal keeper
catches the ball in the “high W” the keeper should push pass the ball back to the server.
The goalie should then take quick footwork steps backwards through the “small goal” and at a slight
angle towards the next small goal to the keeper’s right to about 2-3 yards behind the line of cones. All
this movement should be done while facing the server with their head up and in a ready position.
Once the back line is reached, the keeper comes forward with quick steps through the next small goal.
And the server, who is side stepping to stay parallel with the goalkeeper, tosses the ball again for the
keeper to make a high save.
When the save is made in front of the final “small goal”, the keeper should go back through in the
opposite direction (to the keeper’s left). This can be done about 3 times to each side.
The next variation of this drill can be done with the server volleying or drop-kicking the ball to the
keeper. During the volleying, it might be a good idea for the server to take a step or 2 back, to give the
goalie enough time for a reaction to a hard shot. The drill continues in the same fashion as the first.
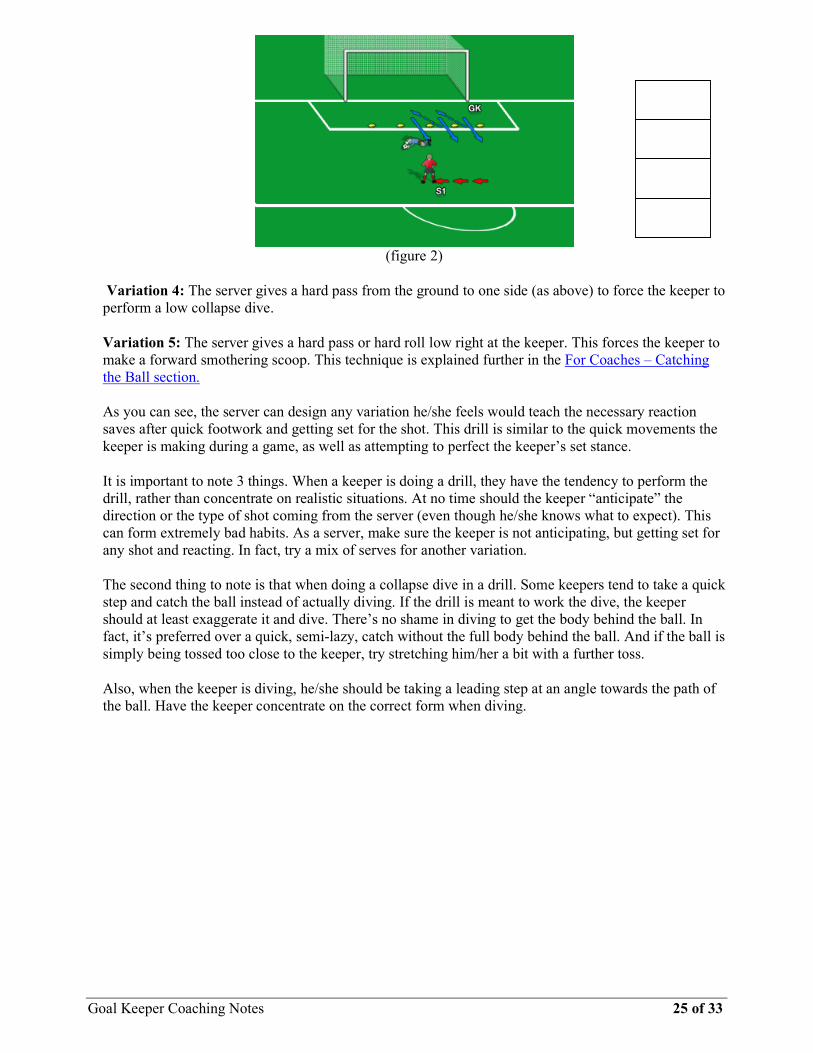
Variation 3: The server may toss the ball to one side (figure 2 below). If the keeper starts on the left
end of the cones the server would toss it to the keeper’s right for a quick collapse dive. This same side
should be tossed to until the keeper finishes on the last “small goal”. Then the server serves to the other
side as the keeper goes in the other direction.
Goal Keeper Coaching Notes 25 of 33
(figure 2)
Variation 4: The server gives a hard pass from the ground to one side (as above) to force the keeper to
perform a low collapse dive.
Variation 5: The server gives a hard pass or hard roll low right at the keeper. This forces the keeper to
make a forward smothering scoop. This technique is explained further in the For Coaches – Catching
the Ball section.
As you can see, the server can design any variation he/she feels would teach the necessary reaction
saves after quick footwork and getting set for the shot. This drill is similar to the quick movements the
keeper is making during a game, as well as attempting to perfect the keeper’s set stance.
It is important to note 3 things. When a keeper is doing a drill, they have the tendency to perform the
drill, rather than concentrate on realistic situations. At no time should the keeper “anticipate” the
direction or the type of shot coming from the server (even though he/she knows what to expect). This
can form extremely bad habits. As a server, make sure the keeper is not anticipating, but getting set for
any shot and reacting. In fact, try a mix of serves for another variation.
The second thing to note is that when doing a collapse dive in a drill. Some keepers tend to take a quick
step and catch the ball instead of actually diving. If the drill is meant to work the dive, the keeper
should at least exaggerate it and dive. There’s no shame in diving to get the body behind the ball. In
fact, it’s preferred over a quick, semi-lazy, catch without the full body behind the ball. And if the ball is
simply being tossed too close to the keeper, try stretching him/her a bit with a further toss.
Also, when the keeper is diving, he/she should be taking a leading step at an angle towards the path of
the ball. Have the keeper concentrate on the correct form when diving.

Goal Keeper Coaching Notes 26 of 33
Forward Progression Diving
What you need: 10 cones, a ball, server and a keeper
This is a simple drill designed to teach forward progression when diving. Goalkeepers, especially
beginners, tend to have the habit of diving at an angle backwards. It is important as a goalkeeper that
you meet the ball at the shortest distance. Like with any position on the field, you never wait for the
ball to come to you, you go to it. But with goalkeeping, this has an added bonus: diving slightly
forwards at a perpendicular angle to the flight path of the ball cuts down the distance needed to dive,
thus making it an easier save. As you’ll notice in figure 1, line “A” is shorter than line “B”. Diving at
an angle forward is much easier to save the ball than diving directly sideways. Can you imagine how
far you’d have to dive to make the save if you dove backwards?
(figure 1)
Another reason is that a perpendicular barrier has a better chance of stopping the ball than one at an
angle backwards. But that’s not as much of a bonus as an easy save, eh? Just technicalities.
Anyway, now that we’ve proven the point of why you want to dive forwards, let’s start with how to set
up the drill.
Position the cones in pairs of 2, essentially making 5 small “goals”. Each goal will be about 3 yards to
the side of the previous goal and about a yard in front, alternating directions. The goals should be about
2 yards wide. The goals should be angled slightly forward making sort of a “V” shape. Check it out in
figure 2:
(figure 2)
The goalkeeper starts in the middle of the “V” to the left of the first “small goal,” level with but about a
yard away from the first cone. The server stands about 5 yards away, in front. The service begins with a

Goal Keeper Coaching Notes 27 of 33
toss to the server’s left towards the first “goal”. The keeper takes a step at an angle forward with his/her
foot closest to the ball and dives to make the save in front of the first goal, as in figure 3:
(figure 3)
Once saved, the keeper tosses the ball back to the server while still on the ground and should
concentrate on recovering quickly and getting set to the right of the next “small goal.” Just as the
keeper gets set, the server tosses the ball to the right for the keeper to make a save in the opposite
direction. Each time the keeper is progressing and diving forward, in front of each “small goal.”
When the keeper reaches the last goal and makes a save, give them a breather and then do the same
drill a couple more times. Depending on the level of the goalkeeper and his/her ability to do this drill
CORRECTLY try to encourage quick recoveries and pick up the pace of the drill. The reason for 5
goals is that a goalkeeper won’t make a whole lot of saves or dives at a time during a game, so why do
it now? Keep it to about 5 consecutive dives. Then repeat after a quick break.
Variations can include low dives, spring dives with slightly larger “small goals” (simply space the
cones a little further apart), volleys, kicks from the ground, and for younger keepers or ones needing to
develop footwork you can have them side step/skip and scoop the ball as quick as possible.

Goal Keeper Coaching Notes 28 of 33
Breakaway Judgment Drill
What you need: a ball (or a few), server and 2 keepers, and a goal area.
This drill is a simple drill designed as a beginning part of a progression training sequence on
breakaway saves and sliding.
Now to set up the drill, the server stands at about the 18 yard box with the ball at his/her feet. Any extra
balls can be used for backup, and should be placed behind the server for easy retrieval. Goalkeeper 1 is
the first keeper to start. He/She stands just inside the 6 yard box. Keeper 2 will stand behind and
slightly to the side of the server. For ease of explanation we’ll start with the server’s left side. Then
later, the drill can and should be switched to the other side — training the keeper to slide on both sides,
which is an essential technique.
The drill starts by the server passing the ball with the inside of his/her foot at an angle towards the left
post (server’s left). The server should be aiming this pass to slow down about 12 yards in front of the
goal, midway between the goalkeeper 1 and goalkeeper 2. Goalkeeper 2, here, is filling in as an
attacker on a lose ball or breakaway. Goalkeeper 1 comes out quickly with quick footwork. The
keeper’s first step should be at an angle towards the ball’s path. If the keeper doesn’t step in the
right direction quickly enough, his/her chance of getting to the ball in time will be decreased.
Remember, keepers attack the ball, not just stop the ball. A goalie should try to get to the ball at the
soonest point in time as possible, minimizing the chance of an opponent receiving the ball.
(figure 1)
When goalkeeper 1 reaches the ball he/she slides forward at an angle towards the ball, through the ball
and catches the ball just at goalkeeper 2’s feet. Goalkeeper 1’s form should be almost the same as form
used in good diving technique. Hands first to the ball. Head, eyes, and hands come together to make
the save as in Figure 2. It is also important to note that the keeper should slide with his/her feet towards
the middle of the goal. At no point should the keeper curve around to have his/her feet towards the
post. Shortest distance to the ball, always!

Goal Keeper Coaching Notes 29 of 33
(figure 2)
When goalkeeper 1 has the ball, goalkeeper 2 hops over him/her and resets to where goalkeeper 2 is
next in net. Goalkeeper 1 secures the ball, recovers quickly and resets behind the server, with a little
roll to the server’s feet. Now the server passes the ball at the same angle and the keepers’ roles are
reversed.
The drill should be done so each keeper has about 6 slides to that side, and then switch to the server’s
right. At first the 2nd keeper/attacker should be trying to avoid the goalkeeper sliding. After both are
warmed up, you can mix it up so the attacker is able to score on the keeper sliding.

Goal Keeper Coaching Notes 30 of 33
Cutting Down the Angle
Run the exercise, stop and allow the keeper to look back and check his position with respect to the goal

Goal Keeper Coaching Notes 31 of 33

Goal Keeper Coaching Notes 32 of 33
Goal Keeper Coaching Notes 33 of 33
Reasons for keeper mental failure. Some of the responses were: 1. Poor concentration. 2. Fear 3. Anxiety 4. Poor preparation 5. Lack of team work 6. Poor decision making 7. Lack of specialized training 8. Poor communication 9. Leadership problems 10. Technical deficiency 11. Negative self talk 12. Not getting to position 13. Lack of ability to forgive Responses from some of the top level goalkeepers on what sets them apart from the rest – their responses were: 1. Leave all outside life in the locker room 2. Try to stay in line with the ball throughout the game 3. Focus on the present, don’t worry about past mistakes 4. Staying in the game through communication 5. The ability to rebound after a mistake;
Q - When is the next competition game? A - IT’S NOW –TODAY, Train like your in the game, and you’ll create a confidence that is only derived from match practice.