Glues and Gluing Wood - LSU AgCenter
16
Glues and Gluing Wood
Transcript of Glues and Gluing Wood - LSU AgCenter

Pub. # 2587 Glues and Gluing Wood 1
Glues and Gluing
Wood

2 Pub. # 2587 Glues and Gluing Wood
Table of Contents
Nature of Wood . . . . . . . . . . . . . . . . . . . . . . . . 3
Moisture Content of Wood . . . . . . . . . . . . . . . . . . 4
Joint Fit . . . . . . . . . . . . . . . . . . . . . . . . . . . . . 4
Assembly and Curing . . . . . . . . . . . . . . . . . . . . . 4
Types of Adhesives . . . . . . . . . . . . . . . . . . . . . . 7
Choosing Glues . . . . . . . . . . . . . . . . . . . . . . . . 8
Clamping Devices . . . . . . . . . . . . . . . . . . . . . . . 8
Gluing Procedures . . . . . . . . . . . . . . . . . . . . . . . 9
Edge Gluing
Spreading Glue
Applying Correct Pressure
Curing Time
Assembling Furniture and Cabinets . . . . . . . . . . . 12
Gluing Problems . . . . . . . . . . . . . . . . . . . . . . . 13
Alternatives to Wood-to-Wood Gluing . . . . . . . . . . . 13
Summary . . . . . . . . . . . . . . . . . . . . . . . . . . . 14
APPENDIX A . . . . . . . . . . . . . . . . . . . . . . . . . 15

Pub. # 2587 Glues and Gluing Wood 3
Nature of Wood
Since wood is porous, and different woods have different properties, wood is not an easy material to glue. Because of wood’s porosity, it can absorb liquid. Most glues used in the woodworking industry are liquid. Although some are water-based, others are not. Couple this with different ways to glue wood, and the complexities of gluing increase again. Because the properties of wood vary across one piece of wood, the adhesive is absorbed more in one direction than in the other two directions. The absorption of the adhesive is lowest on the edge grain and highest on the end grain. Absorption on the face is somewhere between the edge and end grains.
Given these different absorp-tion levels in wood, the simplest method of gluing is to glue two pieces edge to edge. Face-to-face gluing is more difficult, and gluing end grain to end grain is probably the most complicated because the end grain of wood absorbs so much adhesive.
At most every stage of woodwork construction, there is a need for quality gluing. During the early stages of construction, it may be required to glue several narrow pieces to form a wide panel, as in the case of a table top. In the later stages, it may be necessary to glue subassemblies. Gluing also allows you to use many pieces and parts of boards that would otherwise be scrap. All in all, proper gluing is a must. Also, special gluing operations, such as laminating, veneering, overlaying and marquetry, are important to different segments of the forest products industry, but they will not be dis-cussed in detail in this publication.
During the planning stages, the woodworker decides what pieces are needed and which pieces will need to be glued together. The proper selec-tion of adhesive and its curing process can save a lot of headaches, as well as reduce the amount of time the woodworker must be away from other jobs.
What needs to be considered when two pieces are to be glued? The first consideration is what type of glue, or adhesive, will be used. An adhe-sive is a substance capable of holding other materials together by surface attraction. Today, the use of all adhesives is collectively grouped as “gluing.” The decision of which adhesive to use depends on a number of things. Dif-ferent jobs require different adhesives, so let’s look at some factors which influence the adhesion process.
Annual Ring
Vessels -- Conducting tissue, carrying sap in sapwood from roots to leaves.Fibres -- Support tree.Rays -- Store and conduct food horizontally.Food Cells (Parenchyma)Store and conduct food vertically.Bast (Phloem) -- Carries food from leaves down stem to feed cambium and manufacture wood.Cambium -- Thin layer of cells capable of division, forming new cells towards the wood (Xylem), and bast (Phloem) cells towards the bark.
Hardwood structure
Spring-wood
Summer-wood
Rays
Heartwood
Rays
Sapwood
Cambium
Bark
Pith
Close-up of cross-section
Wood
Glues and Gluing
Structure of Wood

4 Pub. # 2587 Glues and Gluing Wood
The pressure required for a good bond of the adhesive var-ies with different adhesives. Some adhesives, like contact cement, require no clamping. Others re-quire long periods of clamping. The temperature also can influence the curing of the adhesive. Some adhe-sives require a certain temperature be maintained during application. For others, temperature is not that important.
The drying rate, or rate of curing, also varies considerably with different glues. Some synthetic glues dry almost instantly with high frequency drying equipment. Still others require longer periods of dry-ing time at room temperature.
The quality of the surfaces to be glued together also affects the curing of glue. Generally, a smooth, unsanded surface is needed to get good adhesion. If the surfaces are not smooth, the quality of the bond between the two pieces is poor, leading to glue failure in use. Carbide-tipped blades can help to eliminate the need for jointing wood before bonding, although it is a good practice to joint the surfaces to be glued.
The environment can also af-fect the bonding of the adhesive. The glue should be applied in a relatively dust-free area. Don’t over-apply the glue; use just enough and no more. After the application, wipe the squeeze-out to remove excess glue from the surfaces.
Moisture Content of Wood
The amount of moisture in wood affects how long it takes the glue to dry and the strength of the finished joint (Figure 2). If the moisture content is too high, the re-sulting joint will generally be weak. If the wood takes on too much moisture during the gluing process, the wood will shrink as it loses moisture below the fiber saturation point (approximately 30 percent moisture content for most domestic wood species). This sets up stresses along the glue line which could result in glue failure, wood failure or both. Wood failure occurs when a joint fails and both sides of the joint retain wood from the adjacent piece of the joint. Glue failure is often a sign of improper gluing procedures. Glue failure is evident on a joint that has failed in the glue line between adjacent pieces of wood. Both sides of the joint do not retain any wood fibers from the previously adjacent piece of wood.
Joint Fit
A well-constructed joint is very important in gluing. To make a good joint, the surface must be pre-pared by having very straight and
true edges and surfaces. This can be accomplished by using a jointer and a planer. Sometimes a good sharp carbide-tipped saw blade will give you a true edge. The truer the edge, the better the resulting glue line in terms of both bonding and appear-ance. If the joint is not smooth and straight, the glue might not bond all the pieces together well, and there will be spots where a gap exists. This gap could be visible to the customer.
Some adhesives fill gaps better than others. So, if the joint is not well constructed, an adhesive with good gap-filling capability must be used. You will make a better prod-uct if the glue line has no gaps. The gaps can be left out by taking the additional time to machine them to get a straight edge. A quality prod-uct can be made only if quality is used at every step in its manufacture.
Assembly and Curing
Several factors affect the parts’ assembly and the adhesive’s cur-ing. Some adhesives must be mixed immediately before applying; others are ready mixed. Some have to be heated and spread while hot. Oth-ers spoil if not used quickly; some remain usable for long periods if refrigerated.
Shrinking and swelling properties
vary within a log and in boards cut from
different parts of the log. (Courtesy of Forest Products Lab, U.S. Forest Service)
Pub. # 2587 Glues and Gluing Wood 5
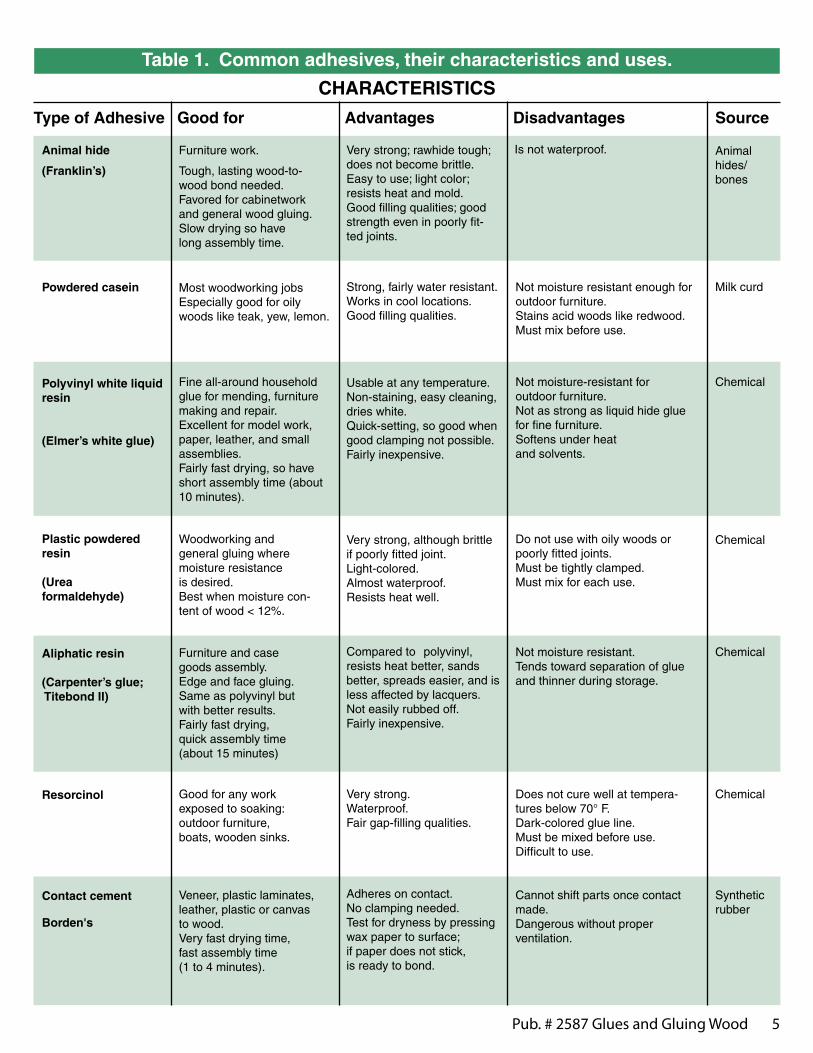
CHARACTERISTICS
Type of Adhesive Good for Advantages Disadvantages Source
Furniture work .
Tough, lasting wood-to-wood bond needed .Favored for cabinetwork and general wood gluing .Slow drying so havelong assembly time .
Animalhides/bones
Not moisture-resistant for outdoor furniture .Not as strong as liquid hide glue for fine furniture .Softens under heat and solvents .
ChemicalUsable at any temperature .Non-staining, easy cleaning, dries white .Quick-setting, so good when good clamping not possible .Fairly inexpensive .
Do not use with oily woods or poorly fitted joints . Must be tightly clamped .Must mix for each use .
Not moisture resistant enough for outdoor furniture .Stains acid woods like redwood .Must mix before use .
Fine all-around household glue for mending, furnituremaking and repair .Excellent for model work, paper, leather, and smallassemblies .Fairly fast drying, so have short assembly time (about 10 minutes) .
Furniture and casegoods assembly .Edge and face gluing .Same as polyvinyl butwith better results .Fairly fast drying,quick assembly time(about 15 minutes)
Not moisture resistant .Tends toward separation of glue and thinner during storage .
Cannot shift parts once contact made .Dangerous without proper ventilation .
Table 1. Common adhesives, their characteristics and uses.
Milk curd
Very strong; rawhide tough; does not become brittle .Easy to use; light color; resists heat and mold .Good filling qualities; goodstrength even in poorly fit-ted joints .
Is not waterproof .
Most woodworking jobsEspecially good for oily woods like teak, yew, lemon .
Strong, fairly water resistant .Works in cool locations .Good filling qualities .
Very strong, although brittle if poorly fitted joint .Light-colored .Almost waterproof .Resists heat well .
Woodworking and general gluing wheremoisture resistanceis desired .Best when moisture con-tent of wood < 12% .
Compared to polyvinyl, resists heat better, sandsbetter, spreads easier, and is less affected by lacquers .Not easily rubbed off .Fairly inexpensive .
Good for any workexposed to soaking:outdoor furniture,boats, wooden sinks .
Does not cure well at tempera-tures below 70° F . Dark-colored glue line .Must be mixed before use .Difficult to use .
Very strong .Waterproof .Fair gap-filling qualities .
Chemical
Chemical
Chemical
Syntheticrubber
Adheres on contact .No clamping needed .Test for dryness by pressing wax paper to surface;if paper does not stick, is ready to bond .
Veneer, plastic laminates, leather, plastic or canvas to wood .Very fast drying time, fast assembly time (1 to 4 minutes) .
Animal hide
(Franklin’s)
Powdered casein
Polyvinyl white liquid resin
(Elmer’s white glue)
Plastic powdered resin
(Urea formaldehyde)
Aliphatic resin
(Carpenter’s glue; Titebond II)
Resorcinol
Contact cement
Borden's

6 Pub. # 2587 Glues and Gluing Wood
CHARACTERISTICS
Type of Adhesive Good for Advantages Disadvantages Source
Table 1.(Cont'd) Common adhesives, their characteristics and uses.
USES
Kind Room temp. Preparation Apply 70° clamp time1
Any temperature above60° F, but the warmer the better .
Ready to use . H: 1 hrS: 1-½ hr
Must be 70° F or warmer .Sets faster at 90° F .
Thin coat to both surfaces . Use within 4 hours after mixing .
Brush on liberal coat . Dry for 30 minutes . Apply second coat .
Any temperature . Resin and hardener mixed in amounts stated on container .
Powdered casein
Polyvinyl white liquid resin glue
Plastic powdered resin
Contact cement
Epoxy cement
Urea resin
Must be 70° F or warmer .Sets faster at 90° F .
Any temperature above 45° F .
Any temperature above freezing .
Sets best above 70° F .If glue is warmed, can be used in colder room .
Animal hide Ready to use . Thin coat on both surfaces .Let get tacky before joining .
Stir together equal parts by volume glue and water .
Thin coat on both surfaces .Use within 8 hours after mixing .
Spread on and clamp at once .
Mix 2 parts powder with 1/2 to 1 part water .
Mix 3 parts powder to 4 parts liquid catalyst .
Thin coat to both surfaces .Use within 8 hours after mixing .
Ready to use .70° F or warmer .
70° F or warmer . Resin and catalyst in amounts on can .
Apply with roller .
Apply with stick or brush .
No clamping . Bonds in-stantly
H: 16 hrS: 16 hr
H: 1 hrS: 1-½ hr
High frequency heat .
No clamps .Cures better with heat
H: 16 hrsS: 16 hrs
H: 2 hrsS: 3 hrs
H: 2 hrsS: 3 hrs
Aliphatic resin Ready to use after stirring . Spread on and clamp .
Resorcinol
Epoxy cement Bond wood to metal or other dissimilar material . Use in combination with wood, tile, metal, glass, etc .Will not shrink or swell during hardening . Waterproof, oil proof, nonflammable .
Fast drying time, fast assem-bly time (5 minutes) .Paintable, sandable, fillable,drillable, and machineable .Can fill large holes .
Edge gluing with high fre-quency and steamheated pressing .Interior and limited exterior use .To bond, wood MC should be between 7 and 10 percent .
Urea resin Highly moisture resistant .Ideal for high frequency drying .Dries white or near colorless .
ChemicalNot good for wood-to-wood in large products .Must be used with good ventilation .Harmful to eyes .Expensive .
Poor gap-filling qualities .Short pot life .Careful mixing and handling required .
Chemical(thermo-set-ting resin)
1 H: hardwoods, S: softwoods

Pub. # 2587 Glues and Gluing Wood 7
Types of Adhesives
Many types of adhesives are available to the woodworking industry. Only the major adhesives used by the wood industry will be described here. Each is available under different trade names. The application process and mixing pro-cess (if applicable) are described in detail on the bottle or can in which the adhesive comes. Always follow label directions when mixing or applying adhesives. Table 1 lists the different adhesives and the common uses of each.
Animal glue. Animal or hide glues are made from hooves, blood, bones and hides of animals. These glues are one of the oldest forms of glue. In its liquid form, it is excellent for all types of interior furniture. It can also be purchased in flake form which requires care-ful mixing and heating. The flake form is not commonly used except in certain kinds of fine furniture manufacturing. Hide glue is a very good gap-filling adhesive. It gives the best results with wood between 4 percent to 6 percent moisture content.
Casein glue. Casein glue is made from milk curd and is avail-able in powdered form. This powder must be mixed with cold water to be usable. It has to be at a certain consistency or it will not bond well. Casein glue is not 100 percent wa-terproof, but it can withstand con-siderable moisture. Any temperature above freezing will allow this glue to bond properly, but it bonds better with higher temperatures. Casein glues are a fair gap-filling adhesive and work best with wood between 5 percent and 15 percent moisture content.
Two problems exist with casein glues. The first is that ca-sein is somewhat abrasive to cut-ting tools, which could make it not very usable. Second, it can stain some woods, so the wood has to be bleached around the wood joint before finishing.
Polyvinyl or white liquid glue. Polyvinyl glue is one of the most common glues available and is probably one of the handiest. It is always ready to use. It does not stain, it is economical and is virtu-ally odorless. The glue line is virtu-ally colorless, and it cures rapidly at room temperature. White glue cures by giving off water to the wood and the surrounding air, rather than by a chemical reaction as some glues. It is moderate in cost, offers good strength properties and is a good gap-filler. Polyvinyl glues are not resistant to water, and they tend to soften at high temperatures. These disadvantages tend to make polyvinyl glues better for interior applications.
Plastic resin glue. This glue comes as a powder and must be mixed with water. Consistency of the glue is important for good adhesion. Plastic resin glue is used for veneering and cabinetmaking. It gives a very hard, water-resistant bond and is very easy to use. Plastic resin glue also does not stain the wood.
Aliphatic resin glue. Ali-phatic resin glue is a cream-colored, ready-mixed glue that has a very high-strength bond. The joint itself is stronger than the wood. Aliphatic resins are very resistant to heat and solvents. It is easily sanded. Ali-phatic resins are not very resistant to water. This makes them satisfac-tory, predominantly, for interior applications.
Resorcinol resin glue. Resor-cinols are thermal setting adhesives; that is, they require heat to cure. This resin is made by mixing a liquid resin with a powder catalyst. It comes in a can divided into two compartments and must be mixed as needed. This is an excellent glue for exterior use because it is entirely waterproof. The major disadvantage of resorcinols is they leave a very dark glue line.
Contact cement. Contact ce-ments are ready-mixed rubber or butane material in a liquid form. It is very good for applying veneers or plastic laminates to wood. No pressure or clamps are required. The relatively low resistance to heat, cold and solvents are important disadvantages of contact cement. It is important to follow the manufac-turer’s directions on the container.
Epoxy resin. Generally, epoxies are two-part adhesives that produce a strong, waterproof bond on wood, plastics, ceramics and practically any other material. Epoxies are good gap-fillers and can be readily used on non-porous surfaces. Epoxy is ideal for gluing ceramic tile to a table top or cabinet top or metal to wood.
Urea resin. If you have or plan to get electronic gluing equipment, ureas are the best adhesive. Urea is a synthetic thermal setting adhesive. There are many combinations of this adhesive, and a glue manufac-turer should be contacted for any application other than those given on the container.

8 Pub. # 2587 Glues and Gluing Wood
Choosing glues
The selection of glue is im-portant, but so is a smooth surface, tight-fitting joints, glue application and clamping. The selection of your glue must be based on the quality objective of your individual proj-ects.
If the assembly is complicated, time consuming and the MC is not much of a problem, a hide glue is best. If moisture is a moderate problem, use a urea resin instead of an aliphatic resin. (Titebond II could be used in this case, since it is waterproof.)
For general use, aliphatic resins and polyvinyl white glues are best. Aliphatic resins give a lon-ger assembly time, better moisture resistance, easier sanding properties and thicker spreading qualities that fill gaps better. If water resistance is needed, use Titebond II, epoxy or a urea resin. The epoxy should be used only if the pieces are to be subjected to heavy loading or for gap-filling. The epoxies are too expensive for general use. If to-tal waterproofing is needed, use a resorcinol. Resorcinols are difficult to apply correctly and generally re-quire very tight-fitting joints. They tend to leave a glue line that needs further attention (sanding, stain-ing, bleaching, etc.) to satisfy many customers.
The type of glue chosen gen-erally determines the method of application, although brushes, sticks and rollers can be used for most glues. It is always better to follow the manufacturer’s direction for ap-plication and spreading rates for any glue used.
Hand screws should be used when gluing pieces face to face or for any other application which re-quires an equal pressure across the pieces, such as holding the sides of a small box together.
Steel bar clamps. Steel bar clamps, or cabinet clamps, are best for edge-to-edge gluing, clamp-ing large surfaces and furniture assembly. Generally, the length of bar clamps ranges from 2 feet to 10 feet. One end has a friction clutch or catch, and the other has a screw which can be turned to adjust the pressure. Figure 2 shows a steel bar clamp. The unfinished wood must be protected when using bar clamps, because the jaws of the clamp are prone to mar the surface. This can be easily accomplished by placing small scrap pieces of wood between the clamp and the pieces being glued.
Wooden bar clamp. The wooden bar clamp is similar to the steel bar clamp, except the bar is made of wood instead of steel. These clamps are used for fine cabi-netry, upholstery and antique work. The wooden bar is less likely to mar or damage the surface of the pieces being glued.
Spring clamp. Spring clamps are used for many different kinds of clamping. Spring clamps are like oversized clothespins. Figure 3 shows a spring clamp. Spring clamps are used to give light pres-sure or when a clamp may need to be removed quickly. Some spring clamps have rubber-covered jaws; some have toothed, stainless steel jaws. Depending on which type you have, you might need to provide some protection between the jaws and your work.
Clamping devices
To properly set some of the adhesives used in woodwork, some type of clamping system needs to be used. There are numerous types of clamps. This discussion will cover some of these. Also, Appendix A shows how you can make your own clamp rack out of lumber or ply-wood.
Hand screws. Hand screws, or wooden parallel clamps, are probably the best holding device for wood, plastic and many other materials. Hand screws can be used on unfinished surfaces without fear of marring the surface. The sizes of hand screws range from 5/0, with a jaw length of 4 inches, to size 7 with a jaw length of 24 inches. A typical hand screw is shown in Figure 1.
Figure 1. Example of a hand screw in use to repair a broken chair.

Pub. # 2587 Glues and Gluing Wood 9
C- or Carriage clamp. C-clamps come in a variety of sizes and shapes and are commonly used to glue pieces face to face. Figure 4 shows some C-clamps. The work should always be protected when using C-clamps.
A quick clamp is a type of C-clamp. Actually it is a short bar clamp. The quick clamp can be adjusted quickly by sliding the head up the bar to the position needed and then tightening the screw to the needed pressure. Figure 5 shows a quick clamp. The uses of the quick clamp are the same as those for the bar clamps and C-clamps.
Band clamp. Band clamps are made with a metal clamp and a band of metal or canvas. Their primary use is for round or irregu-lar-shaped pieces. Steel bands are better for round pieces, and canvas bands are better for irregular-shaped pieces.
Gluing procedures
One of the most important things to remember when gluing is to keep the moisture contents (MC) of the pieces the same. The moisture content of interior furni-ture or cabinets should be between 6 percent and 9 percent. If the moisture content is too high, the glue will be thinned by the excess moisture in the cells of the wood, and the resulting joint will be weak. If the moisture content is too low, the wood will absorb the glue too rapidly, and the resulting joint also will be weak. This type of joint is often called a starved joint. The per-meability of wood also determines adhesive penetration. In general, dense wood species are less perme-able than less dense wood species.
Figure 2. Example of use of steel bar clamps to make a short panel (longer clamp used here to show variety of lengths).
Figure 3. Example of a spring clamp being
used to hold workpiece before cutting with a jigsaw.
Figure 4. C- or carriage clamps can be used to hold two or more pieces face-to-face.
Figure 5. The quick clamp is another
version of the C-clamp and is used here
to hold a temporary fence on the table saw.
10 Pub. # 2587 Glues and Gluing Wood
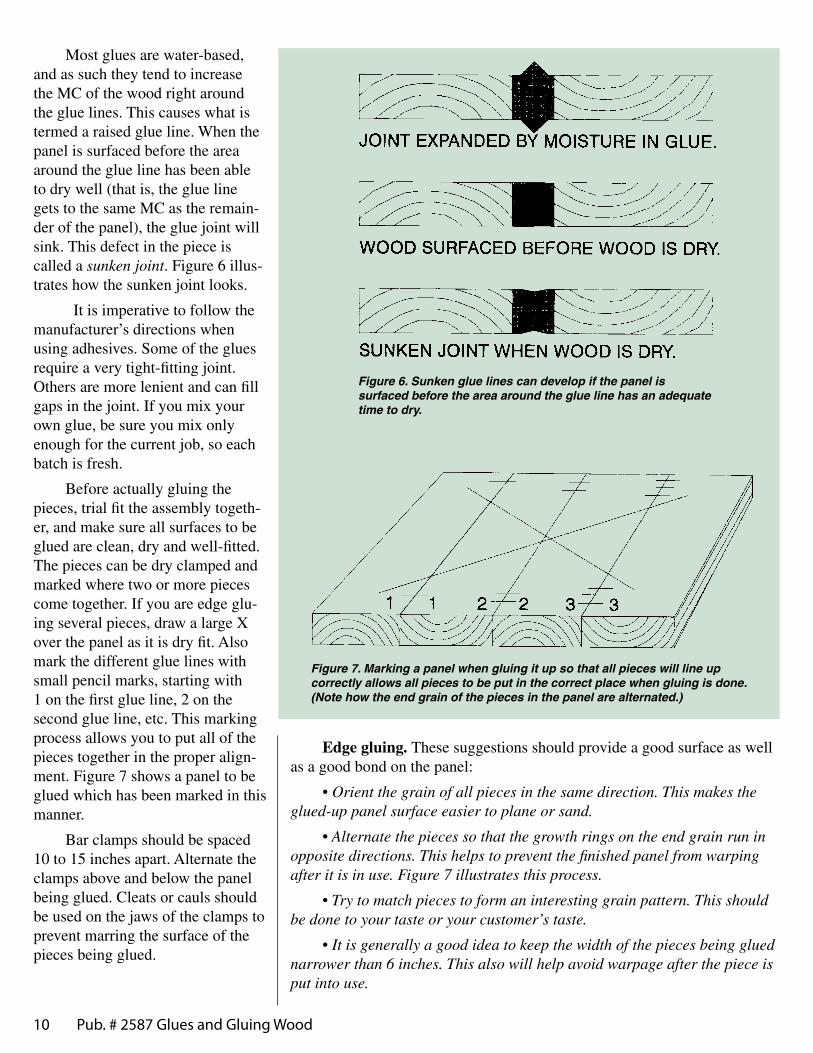
Most glues are water-based, and as such they tend to increase the MC of the wood right around the glue lines. This causes what is termed a raised glue line. When the panel is surfaced before the area around the glue line has been able to dry well (that is, the glue line gets to the same MC as the remain-der of the panel), the glue joint will sink. This defect in the piece is called a sunken joint. Figure 6 illus-trates how the sunken joint looks.
It is imperative to follow the manufacturer’s directions when using adhesives. Some of the glues require a very tight-fitting joint. Others are more lenient and can fill gaps in the joint. If you mix your own glue, be sure you mix only enough for the current job, so each batch is fresh.
Before actually gluing the pieces, trial fit the assembly togeth-er, and make sure all surfaces to be glued are clean, dry and well-fitted. The pieces can be dry clamped and marked where two or more pieces come together. If you are edge glu-ing several pieces, draw a large X over the panel as it is dry fit. Also mark the different glue lines with small pencil marks, starting with 1 on the first glue line, 2 on the second glue line, etc. This marking process allows you to put all of the pieces together in the proper align-ment. Figure 7 shows a panel to be glued which has been marked in this manner.
Bar clamps should be spaced 10 to 15 inches apart. Alternate the clamps above and below the panel being glued. Cleats or cauls should be used on the jaws of the clamps to prevent marring the surface of the pieces being glued.
Edge gluing. These suggestions should provide a good surface as well as a good bond on the panel:
• Orient the grain of all pieces in the same direction. This makes the glued-up panel surface easier to plane or sand.
• Alternate the pieces so that the growth rings on the end grain run in opposite directions. This helps to prevent the finished panel from warping after it is in use. Figure 7 illustrates this process.
• Try to match pieces to form an interesting grain pattern. This should be done to your taste or your customer’s taste.
• It is generally a good idea to keep the width of the pieces being glued narrower than 6 inches. This also will help avoid warpage after the piece is put into use.
Figure 6. Sunken glue lines can develop if the panel is surfaced before the area around the glue line has an adequate time to dry.
Figure 7. Marking a panel when gluing it up so that all pieces will line up correctly allows all pieces to be put in the correct place when gluing is done. (Note how the end grain of the pieces in the panel are alternated.)
Pub. # 2587 Glues and Gluing Wood 11
Spreading glue. Glue can be spread with any number of things, some of which are probably just lying around your shop. Common methods of spreading are a brush, stick, paddle, squeeze bottle or a squeeze bottle equipped with a glue roller. Power-operated glue spread-ers are also used, but these are more common in the veneer gluing operations. When glue is applied only to one surface, it is called single spreading. When it is applied to both surfaces, it is called double spreading. If you use a squeeze bot-tle without a roller, apply the glue in a zig-zag line. When the two pieces are put together, move them back and forth to get an even distribution of the glue onto both pieces.
If the glue is put on the joint correctly, there should be small beads of glue spaced about every 2 to 3 inches along the glue line. If not enough glue is used, or if too much pressure is used, a starved glue line can result. If excess squeeze-out occurs, when lots of glue appears above or below the glue line, separate the pieces, and remove some of the glue. Excess squeeze-out can cause a gap to be present in the piece after it has dried, which could give a visible shadow line after the piece is fin-ished. The shadow line is typically a white line running the full length of the piece along the glue line.
It is usually a good practice to let the glue become tacky before assembling the two pieces together. This helps to avoid slippage of the pieces when pressure is applied.
Applying correct pressure. Clamps are used for three reasons. The surfaces of the wood must be in direct and close contact with the adhesive. The adhesive has to flow into a continuous thin film, and the joint must be held steady until the adhesive dries.
After gluing, assemble the pieces. Some glues, such as hide glue, re-quire assembly quickly after gluing. For other glues, like polyvinyl or white glue, the assembly time can be longer. The glue should still be fluid when pressure is applied.
The necessary clamping pressure varies with glues but usually suits the thickness of the glue. The glue line needs to be thin and smooth, and not too dry, as can result if too much clamp pressure is applied.
Most glues on softwoods require a clamping pressure of between 100 and 150 pounds per square inch (p.s.i.). Some dense hardwoods require pressures up to 300 p.s.i. Softwoods generally do not need heavy clamping pressure and will not take it. Deformation can occur at pressures near 300 p.s.i.
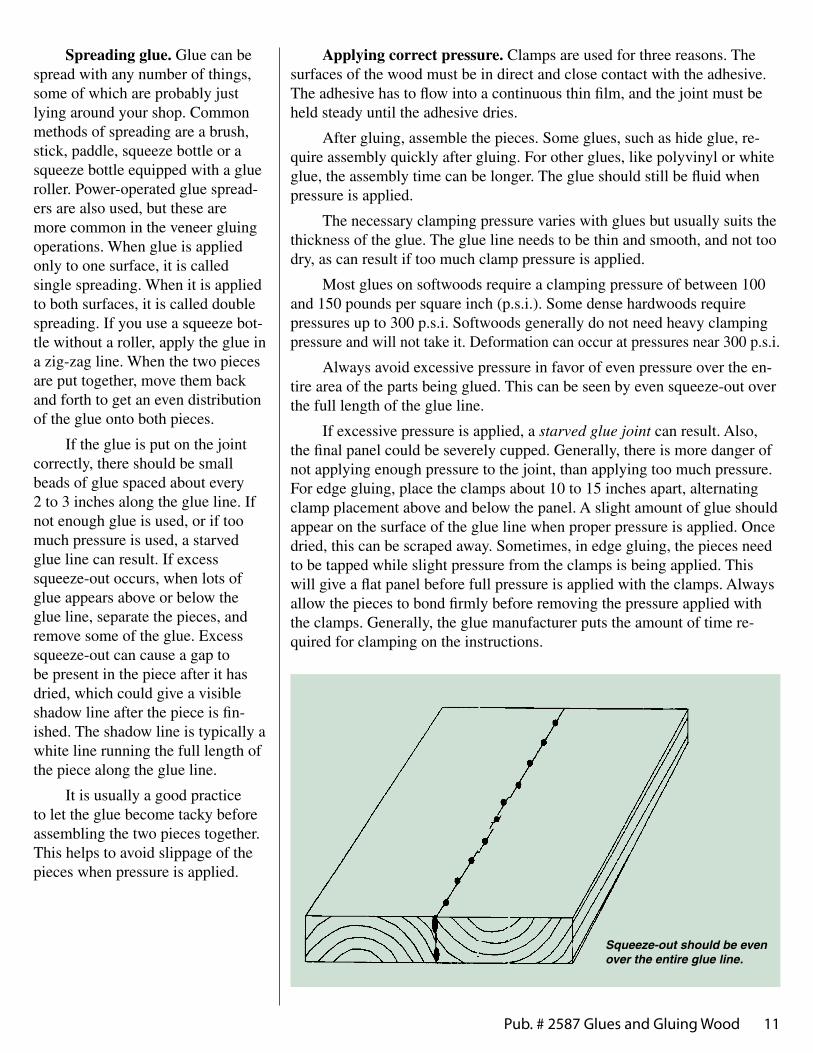
Always avoid excessive pressure in favor of even pressure over the en-tire area of the parts being glued. This can be seen by even squeeze-out over the full length of the glue line.
If excessive pressure is applied, a starved glue joint can result. Also, the final panel could be severely cupped. Generally, there is more danger of not applying enough pressure to the joint, than applying too much pressure. For edge gluing, place the clamps about 10 to 15 inches apart, alternating clamp placement above and below the panel. A slight amount of glue should appear on the surface of the glue line when proper pressure is applied. Once dried, this can be scraped away. Sometimes, in edge gluing, the pieces need to be tapped while slight pressure from the clamps is being applied. This will give a flat panel before full pressure is applied with the clamps. Always allow the pieces to bond firmly before removing the pressure applied with the clamps. Generally, the glue manufacturer puts the amount of time re-quired for clamping on the instructions.
Squeeze-out should be even over the entire glue line.
12 Pub. # 2587 Glues and Gluing Wood
Curing time. The speed at which a glue dries varies with the type of glue used as well as with the temperature of the room in which it is applied and is allowed to cure. With many of the chemical glues, heat is applied to speed the cure. The higher the temperature, the faster the glue will cure. Two com-mon methods are the use of a hot platen and a high-frequency electri-cal field. (A hot platen is typically two pieces of heated metal which apply pressure and heat simultane-ously.)
The high-frequency gluing equipment makes use of the wet glue joint, which is a good conduc-tor of electricity. An alternating cur-rent passes through the glue joint, generating heat. This heat cures the glue in a matter of minutes. Animal and casein glues are not suitable for this method of drying. This is used when one of the thermal setting res-ins is used. Typically, urea resins are used with high-frequency gluing; they account for about 90 percent of the high-frequency gluing.
Portable high-frequency gluers or welders are easy to use. They come equipped with a hand gun for
applying the electricity. A trigger turns the electricity on or off. A tun-ing knob allows you to change the electrical load for different glues, different woods, amount of glue or thickness of material. The glue is applied in the same manner as be-fore, with clamps in place. The hand gun is placed over each end and held in place until the glue stops boiling, usually about two to five seconds for softwoods and a little longer for hardwoods. When using a hand gun on edge glued pieces, apply the heat about every 8 inches and at each end. The clamps can then be removed. The full strength of the bond develops in about 8 to 24 hours, depending on the adhesive used.
Assembling furniture and cabinets
Before furniture or cabinets are assembled, decide whether or not the pieces can be assembled all at one time or whether subas-semblies are necessary. Tables and chairs are generally assembled in two steps, the legs and rails in one step, and then the whole assembly after the legs have dried. Casework can generally be done in one step, assuming all of the pieces are cut and ready. Generally, these steps should be followed when gluing up a piece:
1. Have the correct number of clamps adjusted to approximate openings.
2. Have enough cauls available to place under or between the work and the clamps to prevent marring the surface. Have a wooden mallet handy to tap the parts so they all fit together firmly. A straightedge and
some type of square need to be near at hand to check the assembly for straightness and square.
3. Test assemble the pieces. Once the glue is applied, mistakes are very difficult to correct. If the assembly can be fitted within the open time for the glue (how long before the glue loses its tacki-ness), then the glue can be applied and clamped. If the assembly time takes longer than the open time for the glue, something needs to be changed. (Another glue might be used, or the assembly could be sep-arated into smaller subassemblies.) Thicker coats of glue will generally give more open time, but they can also lead to excessive squeeze-out and poor joints.
4. Mix the required amount and type of adhesive to its proper consistency. If using a pre-mixed adhesive, have enough at hand to finish the job.
5. Apply the glue to the joints. Always apply the correct thickness for the glue. Don’t overapply. Cover both parts of the joint. If the pieces are mortise-and-tenon, apply most of the glue to the mortise since the glue can scrape off the tenon as it is being pushed into place. Do not overapply the glue. Apply only enough so that it squeezes out in small beads.
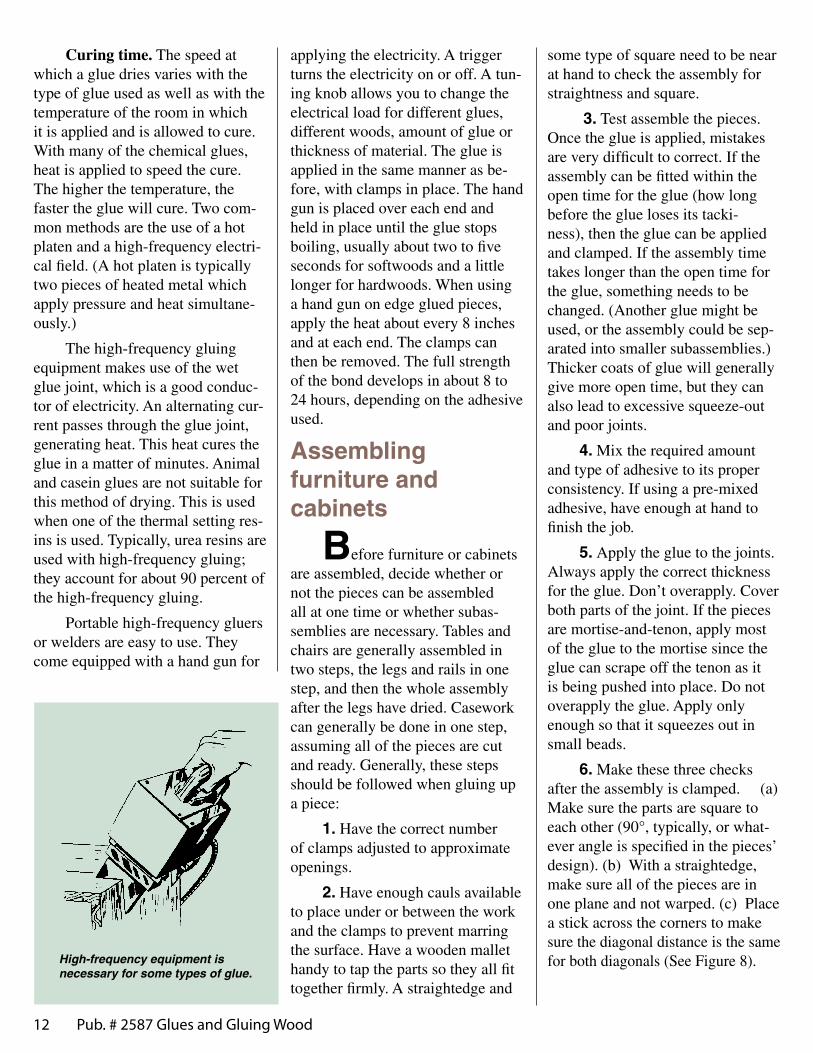
6. Make these three checks after the assembly is clamped. (a) Make sure the parts are square to each other (90°, typically, or what-ever angle is specified in the pieces’ design). (b) With a straightedge, make sure all of the pieces are in one plane and not warped. (c) Place a stick across the corners to make sure the diagonal distance is the same for both diagonals (See Figure 8).High-frequency equipment is
necessary for some types of glue.

Pub. # 2587 Glues and Gluing Wood 13
7. Allow the glue to dry thoroughly before the clamps are removed. If high-frequency drying is used, the clamps can be removed immediately after the drying.
8. Prepare the surfaces for finishing. With a sharp chisel or scraper, scrape the excess glue. Sand the joints thoroughly. If the glue is darker than the wood, and the glue needs to be covered, bleach the glue line to lighten the glue’s color.
9. Apply any molding or other exterior decorative woodwork.
10. Finish the piece according to the customer’s request.
Gluing problems
If you used the correct type of glue, the correct glue mixture and properly constructed joints, the glue line should be stronger than the wood itself. The strength of the glue joint can be tested by placing a blunt chisel at the center of the glue line and striking it with a hammer. A good joint will not split along the glue joint.
Many factors can cause weak glue bonds: poor fit of the joint, inadequate pressure, too short a pressure time, a fuzzy glue line (one not planed smooth), a starved glue joint (one with too little glue), a chilled glue joint (where the glue became jelly before or immediately after applying pressure), or a dried joint (where the glue dried without bonding).
Another problem that can sometimes develop is discoloration caused by iron in the glue. This is particularly evident in the oaks, walnut, cedar, cherry, maple and redwood. If the wood discolors in the vicinity of the glue line, bleach can sometimes be used to remove some of this stain. If bleach will not work, try using oxalic acid (available from chemical supply stores, some hardware stores and drug stores). The oxalic acid should remove the discoloration. If neither method works, it would be better to find a different type of glue the next time this particular wood is used.
Alternatives to wood-to-wood gluing
If a stronger panel is needed, it could be better to use other types of construction when building certain products. It goes beyond the scope of this report to cover in any detail joinery methods. Two other methods will be touched on, which, when combined with gluing, can create a very strong bond. Both of these methods are good when extra strength is needed in the panel. The premise of both is that more wood is in contact with the glue, thereby making a stronger joint.
The first method requires the use of dowels. For most applica-tions, the dowels need to be about 1-1/2 inches long, although some projects may require longer ones. A hole is bored into one of the pieces being glued approximately 1/4-inch longer than half the length of the dowel. The other piece which will be joined with this piece is marked with a centering pin (or a dowel center), and a corresponding hole is bored in that piece. A wooden dowel can then be glued into these holes. It is wise, of course, to glue all along the edges where the two pieces will be joined. Figure 9 shows some dowels and dowel cen-ters; Figure 10 shows an example of dowel joinery.
Good gluing practices during assembly are a small part of making quality cabinets and furniture.
Figure 8. Measuring the diagonal distance across a project will ensure it is square. If the diagonal distances are the same, the project is square.

14 Pub. # 2587 Glues and Gluing Wood
The second method involves the use of “biscuit” joinery. The bis-cuit is a piece of compressed beech which fits into a slot cut by a biscuit jointer (or a plate jointer). The bis-cuit jointer is used by marking both pieces and cutting a corresponding “slot” in each piece. Glue is then applied into the slot (and along the edges of the pieces) and a biscuit is placed into the slot. The pieces are then joined together and pressure is applied. The interesting thing about the biscuit is that as it absorbs the glue, it expands. This expansion makes for reduced clamp time for most glues, and also adds a large amount of extra area to the joint, increasing its strength. Figure 11 shows an example of biscuits and a biscuit jointer; Figure 12 shows an example of a biscuit joint.
Figure 12. An example of a biscuit-jointed project (note the pencil marks on the two pieces which align the slots for the biscuits).Figure 11. Examples of biscuits and a biscuit jointer.
Figure 10. A dowel joint showing a dowel in place on one piece, with the corresponding hole on the other piece. Note, a dowel center, like the one in the picture, should be used when marking dowel holes.)
Figure 9. Dowels, dowel centers, a drill bit with an adjustable collar and a doweling jig should be used when doweling.
Summary
Gluing can be a simple operation, but many complex factors affect the gluing process and, when not properly done, can make the gluing operation a nightmare. If care is used in cutting, as-sembly and gluing applications, a good and long-lasting joint will result. Clamp pressure should be moderate, never exceeding 300 p.s.i. Use enough clamps to apply even pressure over the entire panel without overtightening the clamps. Above all, allow adequate drying time for the glues.
When the gluing operation is controlled and good sense is em-ployed in the gluing and assembly of different pieces, the problems are generally minimized. More and more problems can occur as less control is exercised in this operation. So with proper planning, care and correct choices, the gluing operation can be done with great success.
Pub. # 2587 Glues and Gluing Wood 15
Glue-up Rack
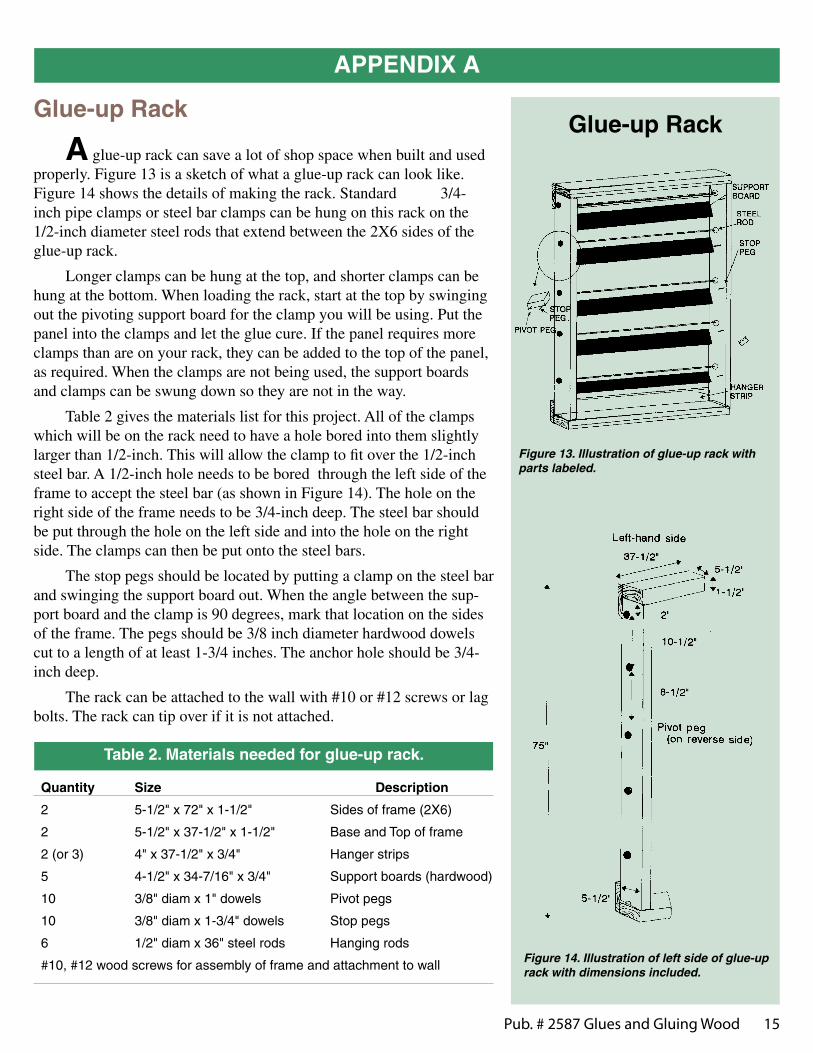
A glue-up rack can save a lot of shop space when built and used properly. Figure 13 is a sketch of what a glue-up rack can look like. Figure 14 shows the details of making the rack. Standard 3/4-inch pipe clamps or steel bar clamps can be hung on this rack on the 1/2-inch diameter steel rods that extend between the 2X6 sides of the glue-up rack.
Longer clamps can be hung at the top, and shorter clamps can be hung at the bottom. When loading the rack, start at the top by swinging out the pivoting support board for the clamp you will be using. Put the panel into the clamps and let the glue cure. If the panel requires more clamps than are on your rack, they can be added to the top of the panel, as required. When the clamps are not being used, the support boards and clamps can be swung down so they are not in the way.
Table 2 gives the materials list for this project. All of the clamps which will be on the rack need to have a hole bored into them slightly larger than 1/2-inch. This will allow the clamp to fit over the 1/2-inch steel bar. A 1/2-inch hole needs to be bored through the left side of the frame to accept the steel bar (as shown in Figure 14). The hole on the right side of the frame needs to be 3/4-inch deep. The steel bar should be put through the hole on the left side and into the hole on the right side. The clamps can then be put onto the steel bars.
The stop pegs should be located by putting a clamp on the steel bar and swinging the support board out. When the angle between the sup-port board and the clamp is 90 degrees, mark that location on the sides of the frame. The pegs should be 3/8 inch diameter hardwood dowels cut to a length of at least 1-3/4 inches. The anchor hole should be 3/4-inch deep.
The rack can be attached to the wall with #10 or #12 screws or lag bolts. The rack can tip over if it is not attached.
Quantity Size Description
2 5-1/2" x 72" x 1-1/2" Sides of frame (2X6)
2 5-1/2" x 37-1/2" x 1-1/2" Base and Top of frame
2 (or 3) 4" x 37-1/2" x 3/4" Hanger strips
5 4-1/2" x 34-7/16" x 3/4" Support boards (hardwood)
10 3/8" diam x 1" dowels Pivot pegs
10 3/8" diam x 1-3/4" dowels Stop pegs
6 1/2" diam x 36" steel rods Hanging rods
#10, #12 wood screws for assembly of frame and attachment to wall
APPENDIX A
Figure 14. Illustration of left side of glue-up rack with dimensions included.
Figure 13. Illustration of glue-up rack with parts labeled.
Table 2. Materials needed for glue-up rack.
Glue-up Rack

16 Pub. # 2587 Glues and Gluing Wood
Visit our website: www.LSUAgCenter.com
Louisiana State University Agricultural CenterWilliam B . Richardson, Chancellor
Louisiana Agricultural Experiment StationDavid J . Boethel, Vice Chancellor and DirectorLouisiana Cooperative Extension ServicePaul D . Coreil, Vice Chancellor and Director
Pub . 2587 Online only 12/10 Rev .
The LSU AgCenter is a statewide campus of the LSU System and provides equal opportunities in programs and employment .
Author: Victor Harding, Ph .D ., Former LSU AgCenter employee, Forest Products
Revised by: Todd Shupe, Ph .D ., Professor, Forest Products