Global IP Office Technical Bulletin 169 · IP Office Technical Bulletin Bulletin No: 169 ......
54
COMPAS ID 166569 Issue 1 Page 1 IP Office Technical Bulletin Bulletin No: 169 Date: 22 July 2014 Title: Guidelines for Securing IP Office
Transcript of Global IP Office Technical Bulletin 169 · IP Office Technical Bulletin Bulletin No: 169 ......
COMPAS ID 166569 Issue 1 Page 1
IP Office Technical Bulletin Bulletin No: 169
Date: 22 July 2014 Title: Guidelines for Securing IP Office
COMPAS ID 166569 Issue 1 Page 2
Contents 1. Introduction ............................................................................................................................ 3
1.1. Overview ......................................................................................................................... 3
1.2. Disclaimer ....................................................................................................................... 3
1.3. Information classifications and NDA requirements........................................................... 3
1.4. Intended Audience .......................................................................................................... 4
1.5. Applicability ..................................................................................................................... 4
1.6. Responsibility for IP Office Security ................................................................................. 4
2. General Guidelines ................................................................................................................ 5
3. Assessing IP Office Security Requirements ........................................................................... 6
4. Implementing IP Office Security ............................................................................................. 7
4.1. Change security defaults ................................................................................................. 7
4.2. Remove unnecessary accounts ....................................................................................... 9
4.3. Disable unused services/interfaces ................................................................................10
4.4. Enforce password policy.................................................................................................13
4.5. Securing IP Office (Telephony) Users & Extensions .......................................................14
4.6. Hardening for Remote Worker Operation .......................................................................16
4.7. Securing Trunks .............................................................................................................18
4.8. Preventing Unwanted Calls ............................................................................................19
4.9. Securing Voicemail .........................................................................................................25
4.10. Securing Contact Recorder ..........................................................................................28
4.11. Securing one-X Portal ..................................................................................................29
4.12. Limit IP Network Exposure ...........................................................................................32
4.13. Securing Management Applications & Configuration Data ............................................34
4.14. Securing Server Edition Servers ...................................................................................36
4.15. Securing Applications Server/UCM ..............................................................................39
4.16. Activate Reporting/Monitoring.......................................................................................41
4.17. Checks and Tests .........................................................................................................43
5. Monitoring IP Office ...............................................................................................................45
6. Response to Incidents ...........................................................................................................46
7. Appendix A – Password/PIN Strength and Management ......................................................47
8. Appendix B – Administrative Accounts ..................................................................................48
9. Appendix C – Users’ Passwords, Voicemail PINs and Login Codes ......................................50
10. Appendix D – Port/Protocol Interconnect Diagrams .............................................................51
COMPAS ID 166569 Issue 1 Page 3
IP Office Technical Bulletin Bulletin No: 169
Date: 22 July 2014
Region: Global
Guidelines for Securing IP Office
1. Introduction
1.1. Overview
The following document is a practical guide to checks and configuration changes required to increase the security of IP Office. All IP Office existing and new installations, regardless of usage, must be assessed with the following sections and immediate action taken where indicated.
Implementing these recommendations will substantially reduce the risk of compromise from security threats such as Denial of Service, Toll Fraud and theft of data.
This document does not provide an analysis of security-related topics, define security policy or discuss theory – it also cannot guarantee security. This document does however aim to provide useful and understandable information that can be used by installation, service and support personnel as well as customers to help harden IP Office against attacks.
1.2. Disclaimer
Avaya has used reasonable commercial efforts to ensure that the information provided here under is accurate at this date. Avaya may change any underlying processes, architecture, product, description or any other information described or contained in this document. Avaya disclaims any intention or obligation to update or revise the document, whether as a result of new information, future events or otherwise. This document is provided “as is,” and Avaya does not provide any warranty of any kind, express or implied.
1.3. Information classifications and NDA requirements
Avaya provides security‐related information according to the following information classifications:
Classification Description
Avaya Restricted This classification is for extremely sensitive business information, intended strictly for use within Avaya. Unauthorized disclosure of this information can have a severe adverse impact on Avaya and the customers, the Business Partners, and the suppliers of Avaya.
COMPAS ID 166569 Issue 1 Page 4
Avaya Confidential
This classification applies to less sensitive business information intended for use within Avaya. Unauthorized disclosure of this information can have significant adverse impact on Avaya, and the customers, the Business Partners, and the suppliers of Avaya.
Information that can be private for some people is included in this classification.
Avaya Proprietary This classification applies to all other information that does not clearly fit into the above two classifications, and is considered sensitive only outside of Avaya. While disclosure might not have a serious adverse impact on Avaya, and the customers, Business Partners, and suppliers of Avaya, this information belongs to Avaya, and unauthorized disclosure is against Avaya policy.
Public This classification applies to information explicitly approved by Avaya management as non-sensitive information available for external release.
As this document is generally available, the information herein is considered Public. This document contains references to additional information sources that may disclose both confidential and proprietary information and require a non‐disclosure agreement (NDA) with Avaya.
1.4. Intended Audience
This document is intended for IP Office customers, installation, administration, service and support personnel.
1.5. Applicability
The following information is applicable to IP Office IP500 V2, IP Office Server Edition, IP Office applications and endpoints for release 8.1 and 9.0. Some sections are also relevant to earlier releases and platforms.
The following areas are not covered:
Physical security
Non-Avaya component security
Security policy definition
Regulatory compliance
1.6. Responsibility for IP Office Security
Avaya is responsible for designing and testing all Avaya products for security. When Avaya sells a product as a hardware/software package, the design and testing process of the Avaya product also includes the testing of the operating system.
The customer is responsible for the appropriate security configurations of data networks. The customer is also responsible for using and configuring the security features on IP Office systems, gateways, applications and telephones.

COMPAS ID 166569 Issue 1 Page 5
2. General Guidelines
The recommended process to securing IP Office is to; Assess the requirements, Implement changes as needed, then to Monitor the system and Respond in a timely manner to any detected threats.
Assess:
Review existing installations
Plan new deployments
Identify security risks and requirements
Implement:
Change security defaults
Remove unnecessary accounts
Disable unused services/interfaces
Enforce password policy
Secure users and extensions
Secure trunks/lines
Prevent unwanted Calls
Secure voicemail and one-X Portal
Limit IP network exposure
Secure management applications & configuration data
Secure servers
Activate reporting/monitoring
Checks and tests
Monitor:
Monitor alarms and logs
Detect other unusual activity
Review Avaya Security advisories
Review Avaya IP Office Software updates and technical bulletins
Monitor telephony provider communication
Periodic security reassessment
Respond:
Investigate and react to any incident
Report to appropriate organizations
Ensure the latest software updates/service packs are installed
All guidelines and steps should be followed regardless of the actual IP Office deployment.

COMPAS ID 166569 Issue 1 Page 6
3. Assessing IP Office Security Requirements
It is vital that a security risk assessment is carried out on all IP Office installations, both initial (prior to deployment or for existing deployments if one has not yet been carried out), and periodically after initial assessment to review any change.
A primary differentiation of security risk for IP Office is whether the system is potentially accessible from external or unsecured networks, especially the Internet.
This document does not cover security assessments in any detail; however there are many resources available that cover this process, including for example:
US National Institute of Standards and Technology (NIST) Special Publication (SP) 800-30, Risk Management Guide for Information Technology System. http://csrc.nist.gov/publications/nistpubs/800-30-rev1/sp800_30_r1.pdf
UK British Standards Institute (BSI) ISO/IEC 27001, Self-assessment questionnaire http://www.bsigroup.co.uk/LocalFiles/en-GB/iso-iec-27001/resources/BSI-ISOIEC27001-Assessment-Checklist-UK-EN.pdf http://www.bsigroup.co.uk/en-GB/iso-27001-information-security/ISO-27001-for-SMEs/
The SANS Institute also provides a wide range of security-related information, including risk assessments and audits: http://www.sans.org/reading-room

COMPAS ID 166569 Issue 1 Page 7
4. Implementing IP Office Security
IP Office can be made a very secure product, however only a certain number of features are active by default. This is in order to ease the initial installation but will not fully protect the system without following the suggestions listed in this document, other Avaya security publications and the relevant IP Office installation/Administration manuals. It is therefore necessary to check and implement the configuration options listed here.
Additional setting may be necessary to further secure the individual deployment. Avaya is presenting this information for guidance only; the customer is responsible for ensuring their system is secure.
To improve IP Office security in practice, two main mechanisms are used:
Activation of IP Office security features
Reduction of exposure to external or internal attack
4.1. Change security defaults
All default passwords must be changed to a unique and ‘strong’ password. See Appendix A – Password/PIN Strength and Management for more information on password strength.
In IP Office Manager | Security Settings | General Tab:
1. For Security Administrator account: Change Password to a strong password of 8 or more characters.
Set Minimum Password Complexity to high:
2. Change service user account ‘Administrator’ password to a ‘strong’ password of 8 or more characters.
3. If required, add a customer administration account (again with strong password) with the minimum rights of access. The account status Force New Password should be set. This will enforce a password change at the next login (i.e. during customer/ engineering Installation).

COMPAS ID 166569 Issue 1 Page 8
4. Change the System, VM Pro and Monitor passwords to a ‘strong’ password of 8 or more characters.

COMPAS ID 166569 Issue 1 Page 9
4.2. Remove unnecessary accounts
All unnecessary administration and IP Office user accounts should be removed or disabled to reduce the likelihood of forgotten default accounts being used for unauthorized access. Any remaining accounts must have their passwords changed. See Appendix B – Administrative Accounts for more information on the differing account types and locations.
1. In IP Office Manager | Security Settings | Service User Tab and according to the following usage table, remove all unnecessary service user accounts; only retain accounts that are essential. The service user may be deleted or the account status set to Disabled:
Service User Name
Usage Notes
Administrator Manager, Web Manager, Web Control, SSA, CCR, Voicemail Pro*
Should not be removed or disabled
Should not be renamed
*Used by R9.0 Linux Voicemail Pro
Manager Manager – legacy Should be removed/disabled
Operator Manager – legacy Should be removed/disabled
EnhTcpaService one-X Portal CTI access Enable only when one-X Portal deployed
IPDECTService DECT R4 provisioning Enable only when DECT R4 deployed and provisioning mode active
SMGRB5800Admin System Manager (SMGR) access for branch deployment
Enable only when SMGR deployed
Must not be renamed
BusinessPartner Web Manager complete access
Should be removed/disabled unless required
Maintainer Manager (read-only), Web Manager (read-only), SSA, Backup/Restore
Should be removed/disabled unless required
2. For all remaining active Service Users accounts, change password to a strong one of 8 or more characters. If using Server Edition R9.0, see section 4.14 for alternative Service User administration using Web Manager
3. In Configuration I Users: Delete any RAS telephony user accounts (for example ‘RemoteManager’) that are not required. For any that are required, change password to a strong one of 8 or more characters.

COMPAS ID 166569 Issue 1 Page 10
4.3. Disable unused services/interfaces
All interfaces and services not required must be disabled. Additionally, consider enabling interfaces and services only when required.
1. In IP Office Manager | Security Settings | System | Unsecured Interfaces Tab: Uncheck all Application controls and enable only the minimum according to the following table:
Application Control
Application Notes
TFTP Configuration Read
SoftConsole* Also used for legacy applications: Delta Server, Compact Contact Centre (CCC), Compact Business Centre (CBC)
* When inactive, SoftConsole will continue operating but cannot change user settings via user properties
TFTP Configuration Write
Used for Legacy Manager
Should never be enabled
TFTP Directory Read
SoftConsole
Phone Manager
DECT R4*
Also used for legacy applications: IP DECT*, Analog DECT, Conferencing Centre, CRM, MMM
* When inactive, DECT will continue operating but without the system directory feature
Voicemail Voicemail Pro Enable only when Voicemail Pro used
Not applicable to embedded voicemail
EConf Used for Legacy Conference Centre
Should never be enabled
Program Code Manager Used for upgrades from IP Office Manager, recommend disabling when not required
Real Time Interface SoftConsole
Phone Manager
Also used for legacy applications: Delta Server, CCC, CBC, Analog DECT, CRM, MMM
Sys Monitor System Monitor
DevLink
Available only on R9.0
Recommend disabling when not required
TAPI TAPI Link Lite (1st party TAPI)
TAPI Link Pro (3rd party TAPI)
Enable only when TAPI used
HTTP Directory Read
one-X Portal*
IP Office Centralised Directory
Enable only when one-X Portal or IP Office Centralised Directory used
* When inactive, one-X Portal will continue operating but without the personal directory feature

COMPAS ID 166569 Issue 1 Page 11
HTTP Directory Write
one-X Portal* Enable only when one-X Portal deployed
* When inactive, one-X Portal will continue operating but without the personal directory update feature
COMPAS ID 166569 Issue 1 Page 12
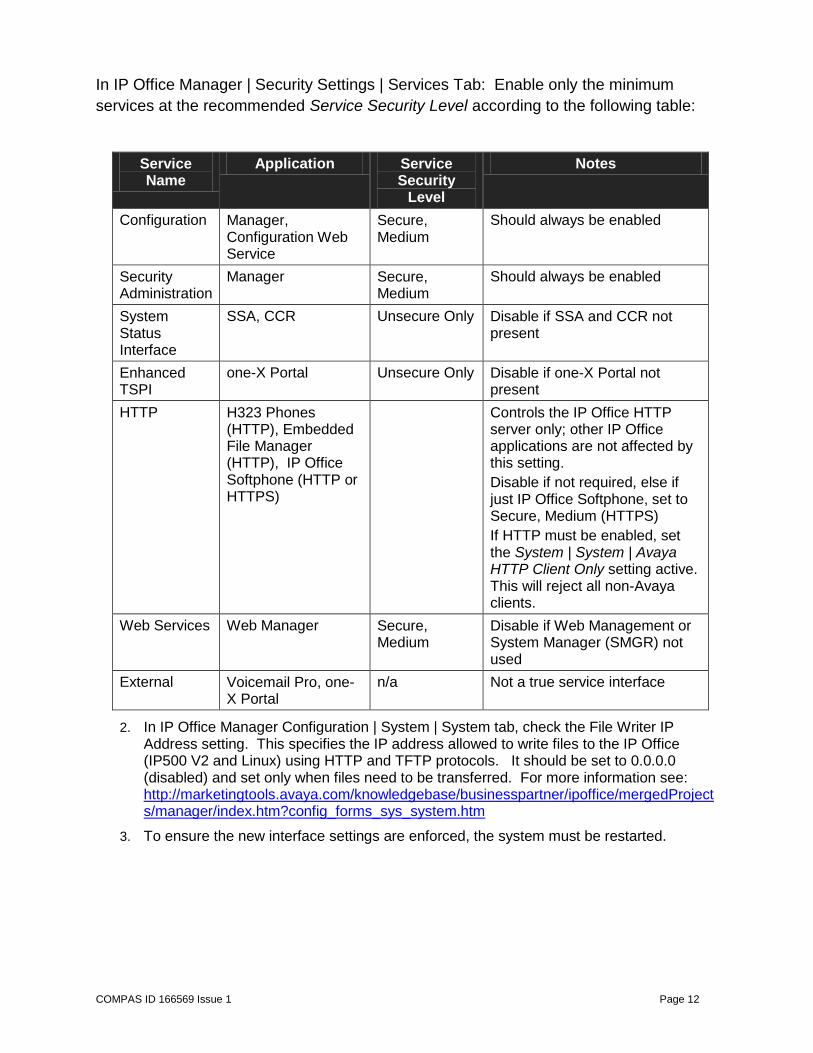
In IP Office Manager | Security Settings | Services Tab: Enable only the minimum
services at the recommended Service Security Level according to the following table:
Service Name
Application Service Security
Level
Notes
Configuration Manager, Configuration Web Service
Secure, Medium
Should always be enabled
Security Administration
Manager Secure, Medium
Should always be enabled
System Status Interface
SSA, CCR Unsecure Only Disable if SSA and CCR not present
Enhanced TSPI
one-X Portal Unsecure Only Disable if one-X Portal not present
HTTP H323 Phones (HTTP), Embedded File Manager (HTTP), IP Office Softphone (HTTP or HTTPS)
Controls the IP Office HTTP server only; other IP Office applications are not affected by this setting.
Disable if not required, else if just IP Office Softphone, set to Secure, Medium (HTTPS)
If HTTP must be enabled, set the System | System | Avaya HTTP Client Only setting active. This will reject all non-Avaya clients.
Web Services Web Manager Secure, Medium
Disable if Web Management or System Manager (SMGR) not used
External Voicemail Pro, one-X Portal
n/a Not a true service interface
2. In IP Office Manager Configuration | System | System tab, check the File Writer IP Address setting. This specifies the IP address allowed to write files to the IP Office (IP500 V2 and Linux) using HTTP and TFTP protocols. It should be set to 0.0.0.0 (disabled) and set only when files need to be transferred. For more information see: http://marketingtools.avaya.com/knowledgebase/businesspartner/ipoffice/mergedProjects/manager/index.htm?config_forms_sys_system.htm
3. To ensure the new interface settings are enforced, the system must be restarted.
COMPAS ID 166569 Issue 1 Page 13
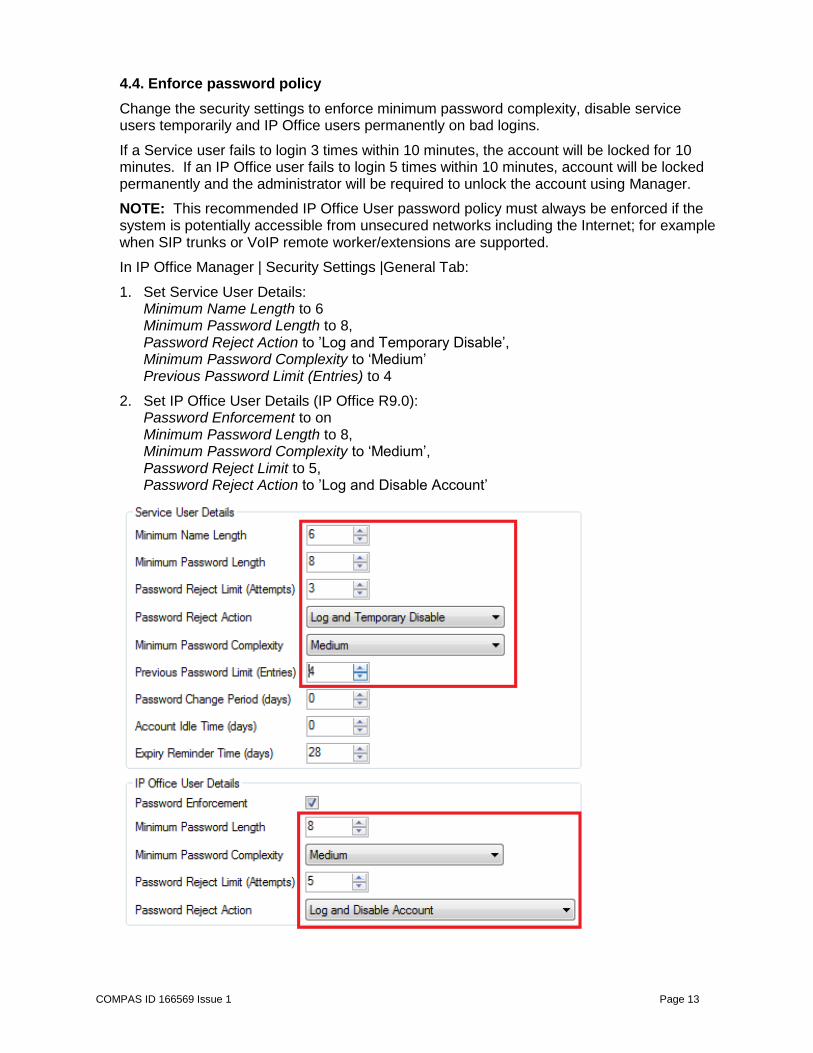
4.4. Enforce password policy
Change the security settings to enforce minimum password complexity, disable service users temporarily and IP Office users permanently on bad logins.
If a Service user fails to login 3 times within 10 minutes, the account will be locked for 10 minutes. If an IP Office user fails to login 5 times within 10 minutes, account will be locked permanently and the administrator will be required to unlock the account using Manager.
NOTE: This recommended IP Office User password policy must always be enforced if the system is potentially accessible from unsecured networks including the Internet; for example when SIP trunks or VoIP remote worker/extensions are supported.
In IP Office Manager | Security Settings |General Tab:
1. Set Service User Details: Minimum Name Length to 6 Minimum Password Length to 8, Password Reject Action to ’Log and Temporary Disable’, Minimum Password Complexity to ‘Medium’ Previous Password Limit (Entries) to 4
2. Set IP Office User Details (IP Office R9.0): Password Enforcement to on Minimum Password Length to 8, Minimum Password Complexity to ‘Medium’, Password Reject Limit to 5, Password Reject Action to ’Log and Disable Account’

COMPAS ID 166569 Issue 1 Page 14
NOTE: The IP Office user password policy only applies to the password field, not the voicemail or user login code. See Appendix C – Users’ Passwords, Voicemail PINs and Login Codes for more information.
4.5. Securing IP Office (Telephony) Users & Extensions
Users and extensions should be configured to restrict access to necessary features, default login codes changed and auto-create disabled.
1. All unused Users should be deleted – except NoUser.
2. The following auto-create settings must be disabled: - LAN1 | VoIP | H323 Gatekeeper | Auto-create Extn - LAN1 | VoIP | H323 Gatekeeper | Auto-create User - LAN1 | VoIP | SIP Registrar | Auto-create Extn/User - LAN2 | VoIP | H323 Gatekeeper | Auto-create Extn - LAN2 | VoIP | H323 Gatekeeper | Auto-create User - LAN2 | VoIP | SIP Registrar | Auto-create Extn/User - Line | IP DECT | Gateway | Auto-Create Extension - Line | IP DECT | Gateway | Auto-Create User
3. If any auto-create feature is used to assist installation, the settings must be deactivated as soon as possible.
4. If no H.323 extensions are supported, the LAN1/LAN2 | VoIP | H323 Gatekeeper Enable must be set disabled. If H.323 extensions are supported, only the relevant LAN’s gatekeeper should be enabled.
5. If no H.323 remote workers are supported, the LAN1/LAN2 | VoIP | H323 Gatekeeper | H323 Remote Extn Enable must be set disabled. If H.323 remote workers are supported, only the relevant LAN’s Remote Extn should be enabled.
6. If no SIP extensions are supported, the LAN1/LAN2 | VoIP | SIP Registrar Enable must be set disabled. If SIP extensions are supported, only the relevant LAN’s registrar should be enabled.
COMPAS ID 166569 Issue 1 Page 15
7. If no SIP remote workers are supported, the LAN1/LAN2 | VoIP | SIP Registrar | SIP Remote Extn Enable must be set disabled. If SIP remote workers are supported, only the relevant LAN’s SIP Remote Extn should be enabled.
8. All VoIP (SIP, H323, DECT) users’ User |Telephony | Supervisor Settings | Login Code must be set. The Login Code must not be a sequence, repeated digits, or same as the extension number. If a remote extension, this must not be less than 9 digits.
9. All auto-created VoIP users must have their User |Telephony | Supervisor Settings | Login Code changed from the default. Again if this is a remote extension, it must not be less than 9 digits.
10. All auto-created non-VoIP (Digital, Analog) users should have their name changed from the default.
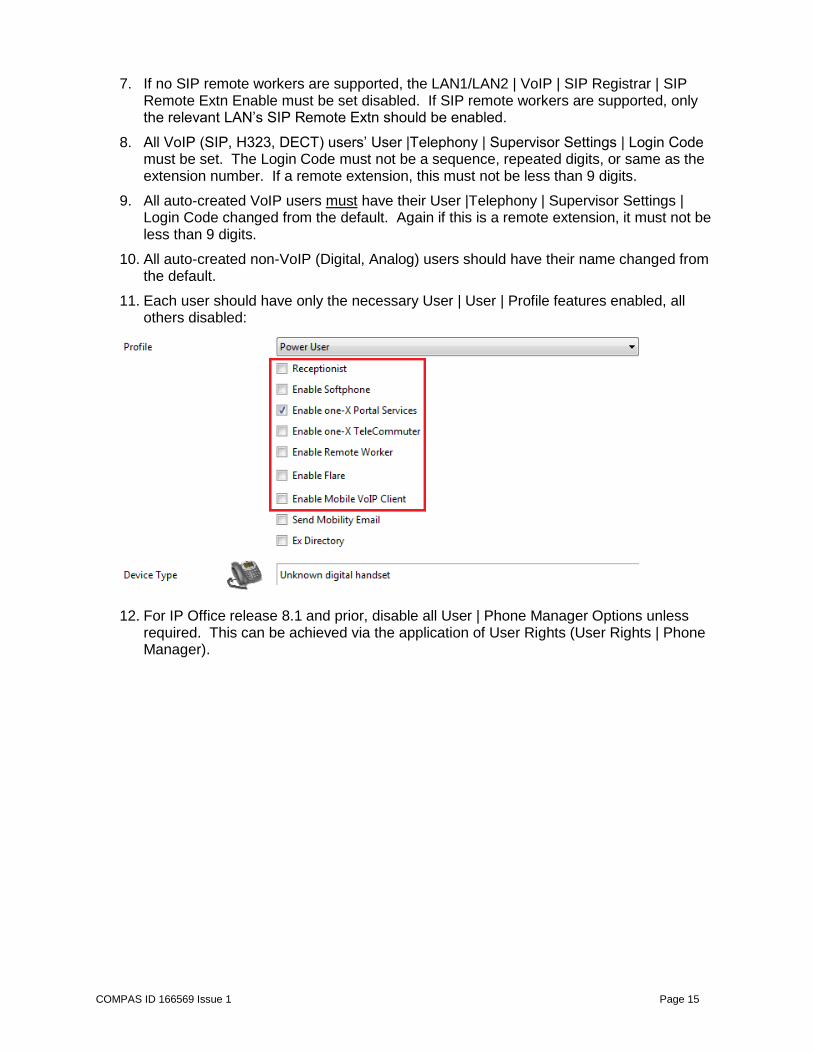
11. Each user should have only the necessary User | User | Profile features enabled, all others disabled:
12. For IP Office release 8.1 and prior, disable all User | Phone Manager Options unless required. This can be achieved via the application of User Rights (User Rights | Phone Manager).
COMPAS ID 166569 Issue 1 Page 16
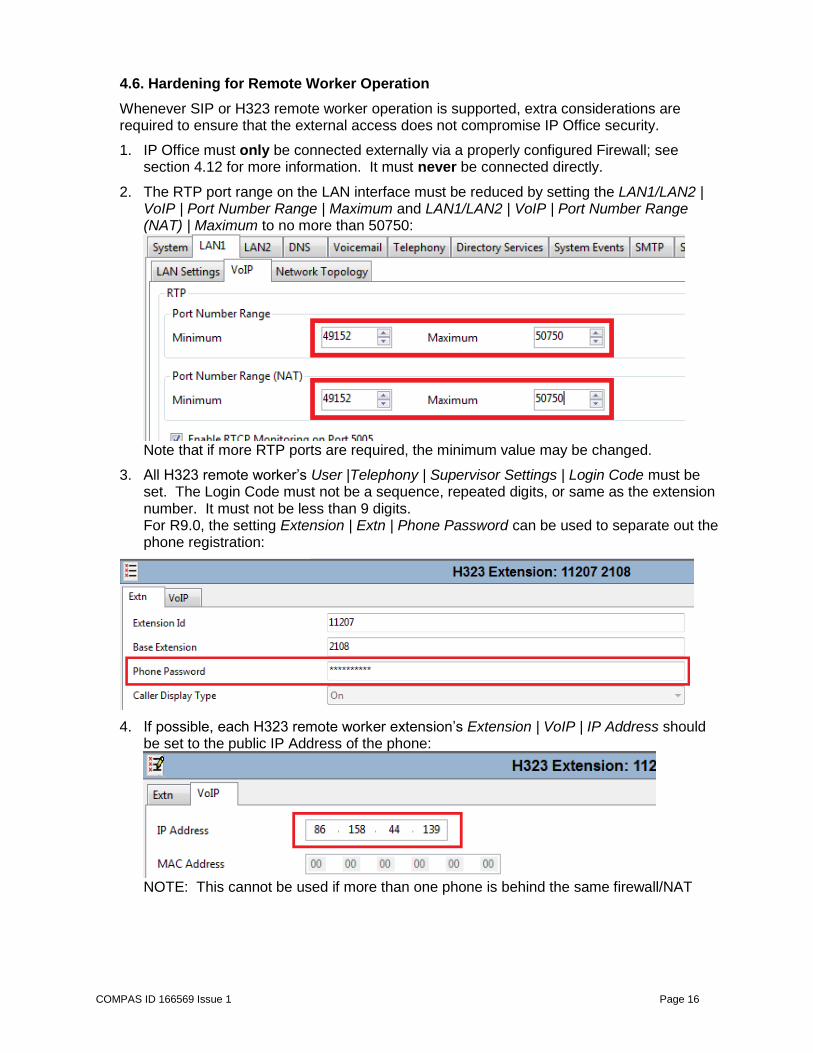
4.6. Hardening for Remote Worker Operation
Whenever SIP or H323 remote worker operation is supported, extra considerations are required to ensure that the external access does not compromise IP Office security.
1. IP Office must only be connected externally via a properly configured Firewall; see section 4.12 for more information. It must never be connected directly.
2. The RTP port range on the LAN interface must be reduced by setting the LAN1/LAN2 | VoIP | Port Number Range | Maximum and LAN1/LAN2 | VoIP | Port Number Range (NAT) | Maximum to no more than 50750:
Note that if more RTP ports are required, the minimum value may be changed.
3. All H323 remote worker’s User |Telephony | Supervisor Settings | Login Code must be set. The Login Code must not be a sequence, repeated digits, or same as the extension number. It must not be less than 9 digits. For R9.0, the setting Extension | Extn | Phone Password can be used to separate out the phone registration:
4. If possible, each H323 remote worker extension’s Extension | VoIP | IP Address should be set to the public IP Address of the phone:
NOTE: This cannot be used if more than one phone is behind the same firewall/NAT

COMPAS ID 166569 Issue 1 Page 17
5. As the IP Office remote worker feature support does not include native signalling or media encryption, a Virtual Private Network (VPN) solution between the remote endpoints and a secure gateway must be considered. The IP Office Knowledge Base has further information on VPN operation and options: http://marketingtools.avaya.com/knowledgebase/businesspartner/ipoffice/mergedProjects/productdescription/index.htm?vpn_phone_software.htm
6. A Session Border Controller (SBC) should be considered for enhanced SIP remote worker security – the Avaya SBC for Enterprise is a solution specifically tailored for IP Office SIP remote workers and SIP trunks. For more information see: http://www.avaya.com/usa/product/avaya-session-border-controller-for-enterprise
COMPAS ID 166569 Issue 1 Page 18
4.7. Securing Trunks
SIP trunking and off-switch or trunks-to-trunk forwards/transfers should be disabled when not required, and a Session Border Controller (SBC) used for enhanced SIP security.
1. If using SIP trunks, IP Office must only be connected externally via a properly configured Firewall; see section 4.12 for more information. It must never be connected directly.
2. Unless SIP trunks are configured for a particular LAN interface, the LAN1/LAN2 | VoIP | SIP Trunk Enable setting must be disabled.
3. Many IP Office customers rely on the Services Providers to provide a secure SIP trunk environment. For a stronger security posture, implementation of the Avaya Session Border Controller for Enterprise (Avaya SBCE) is recommended as a best practice. Avaya SBCE also provides Advanced Services such as Secure Remote Worker and Encryption Service supporting VPN-less access to IP Office for SIP endpoints outside the enterprise firewall. The Avaya SBC for Enterprise is a solution specifically tailored for IP Office. For more information see: http://www.avaya.com/usa/product/avaya-session-border-controller-for-enterprise
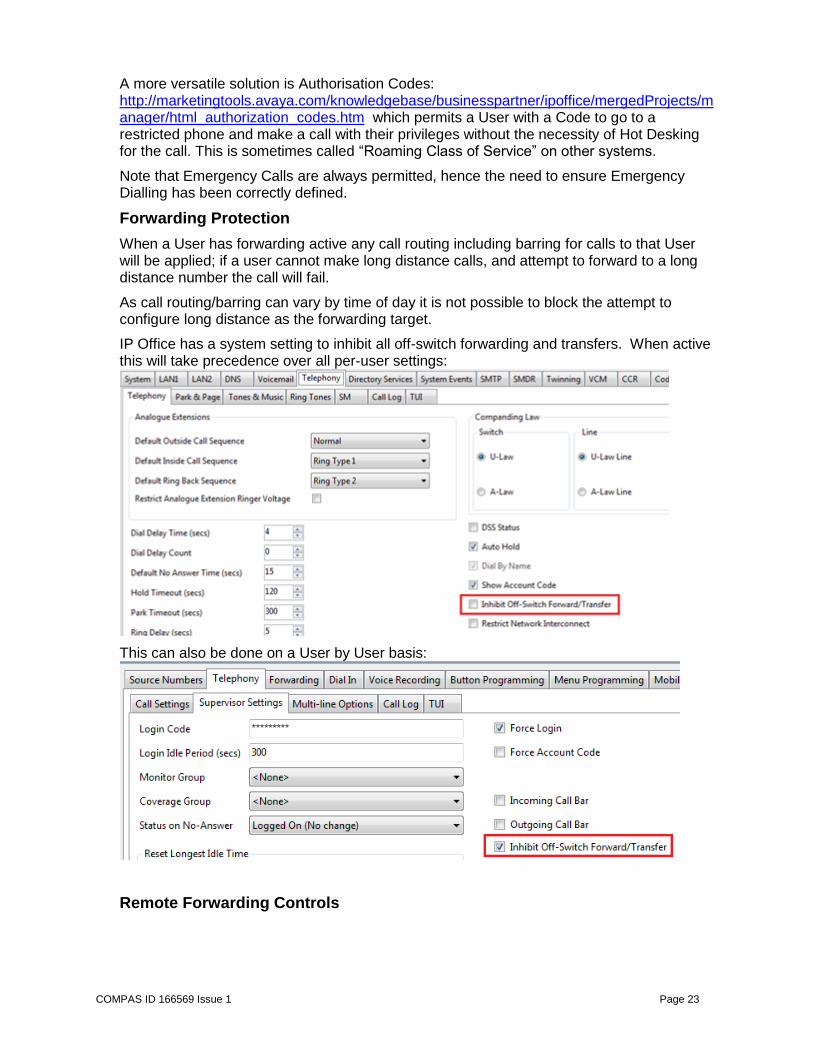
4. Off-switch forwards/transfers should be disabled on a per-system or per-user basis, with the system setting taking precedence over the user. Per-user setting is: User | Telephony | Supervisor Settings | Inhibit Off-Switch Forward/Transfer. This can also be set via User Rights. System-wide setting is: System | Telephony | Telephony | Inhibit Off-Switch Forward/Transfer.
5. Analog trunks-to-trunk forwards/transfers should be disabled on a per-line basis unless required, using Line | Analog Options| Analog Trunk to Trunk Connection.
6. Other changes to restrict calls are contained in section 4.8.

COMPAS ID 166569 Issue 1 Page 19
4.8. Preventing Unwanted Calls
The following recommendations cannot be precise due to the wide variation of national, international and customer dial plans, however they can be adapted as required for specific deployments.
Toll fraud, dial-through attacks or general unwanted incoming or outgoing calls can be mitigated in IP Office by:
Call barring
Authorization Codes
Call logging
Phone Lock
Auto Logout
Out of hours barring
Blocking off-switch and trunk-to-trunk transfers
Removing mobile call control
Ensuring Emergency Numbers are defined
Call Barring
The normal way of call barring is to have a default outgoing route and then lock down undesired numbers. When locking down un-desired numbers it is important to take in to account IP Office dialling rules and add an N after any dial string you are trying to block.
For example to block calls to Premium rate numbers (1900-xxx-xxxxx US or 09… UK):
US UK
Telephone Number 1900N 09N or 909N
Feature Barred Barred
It is important to ensure that the Telephone Number is followed by an N so that it matches even when dialled en-bloc (or redial).
Many countries have prefixes that may be dialled before normal PSTN numbers, for example to control CallerID presentation, (*67(US)/141(UK) to Withhold CallerID, *82(US)/1470(UK) to present CallerID) it is important to include versions of all barred short codes including these prefixes or just bar any call attempts using these prefixes.
User Based Barring
There are several potential methods for achieving different routing/barring rules for Users.
One effective method that minimises the per-user config, can be part of user rights templates, centralises the routing/barring config, and maintains features like secondary dial tone, is to create copies of the 50:Main ARS for the different access levels required.
As 50:Main is the default it makes sense for that to be the one that is used for most users, or on sites with specific concerns about security the most restricted.
For this example we will define two alternate ARS for Local & Long Distance, and Unrestricted, by copying the default Main then restrict Main to be local only.
All the ARS tables must route Emergency Calls.

COMPAS ID 166569 Issue 1 Page 20
The new Short Codes in the Main ARS will be:
The 0N; and 1N; codes have been changed to barred and barred codes added for *67 and *82 - note the addition of the N to ensure a match for redial, etc.
Short codes can be added for areas where 7 digit local dialling is still available if required, also it might be useful to create Short Codes to trap local Area Codes that have been dialled with a leading 1, also Freephone dialling.
The Local & Long Distance Short codes will be:
This will allow all calls starting ‘1’ except Premium Rate (1-900 numbers), the 1N; Short Code is modified to 1XXXN; to avoid people pausing during dialling matching a simple “1N;” short code. The barring for *67 and *82 is repeated.
The Unrestricted ARS short codes will be:
This is totally un-restricted, in real operation it is unlikely that there will be totally un-restricted out-dialling.
The Default system short code for dialling is Unchanged:

COMPAS ID 166569 Issue 1 Page 21
For Users who are to be allowed greater dialling privileges we add specific User Short Codes:
This will be used for all dialling from that User - including their call forwarding.
For more information on ARS operation see: http://marketingtools.avaya.com/knowledgebase/businesspartner/ipoffice/mergedProjects/manager/default_ars.htm
Protecting Phones
In some environments one of the risks is not from the normal Users of the phones but people who have physical access to the phone but you don’t want them to use phones. There are several mechanisms that can be used to protect the phones when the normal users are away from their desks:
Phone Lock - Phones can be locked through - Feature Phone menus. See: http://marketingtools.avaya.com/knowledgebase/businesspartner/ipoffice/mergedProjects/9600user/lock.htm The Feature phone feature locks the phone menus too - Short codes. See: http://marketingtools.avaya.com/knowledgebase/businesspartner/ipoffice/mergedProjects/manager/outgoing_call_bar_off.htm http://marketingtools.avaya.com/knowledgebase/businesspartner/ipoffice/mergedProjects/manager/outgoing_call_bar_on.htm The short code prevents the phone being used to make outgoing calls - Internal and Emergency calls are allowed. The Users’ Login code must be used to unlock the phone
Logging out/Hot Desking Users can log out of the phone - which will leave the phone with the special ‘NoUser’ account associated with it. This NoUser is Outgoing Call Barred. Users must have a login code to be able to log out of their default phone (the phone with their extension number).

COMPAS ID 166569 Issue 1 Page 22
Auto Logout The Extension | Telephony | Supervisor Settings | Login Idle Period can be used to force a User to be logged out if their phone is idle for a period of time - for example if they leave their Desk:
Out of Hours Call Routing A time profile can be associated to an ARS so that when the time Profile is inactive a different ARS is used for routing calls - for Our example we will set the extra ARS tables to point to Main out of hours so that only Local and Emergency Calls can be made:
Trusted Voicemail Source Where a phone is in an un-controlled area it is also advisable to remove the default Trusted Source Number for Voicemail access, so that all IP Office Voicemail access requires entering the Voicemail access code, even from the User’s home extension:
Making Calls from Protected Phones
Once phones have outbound dialling locked down it often becomes necessary to provide occasional exceptions. Since release 5.0 it has been possible for a privileged User (Receptionist for example) to transfer secondary dial tone to a restricted user to allow them to make a call that they would not otherwise be able to make.
COMPAS ID 166569 Issue 1 Page 23
A more versatile solution is Authorisation Codes: http://marketingtools.avaya.com/knowledgebase/businesspartner/ipoffice/mergedProjects/manager/html_authorization_codes.htm which permits a User with a Code to go to a restricted phone and make a call with their privileges without the necessity of Hot Desking for the call. This is sometimes called “Roaming Class of Service” on other systems.
Note that Emergency Calls are always permitted, hence the need to ensure Emergency Dialling has been correctly defined.
Forwarding Protection
When a User has forwarding active any call routing including barring for calls to that User will be applied; if a user cannot make long distance calls, and attempt to forward to a long distance number the call will fail.
As call routing/barring can vary by time of day it is not possible to block the attempt to configure long distance as the forwarding target.
IP Office has a system setting to inhibit all off-switch forwarding and transfers. When active this will take precedence over all per-user settings:
This can also be done on a User by User basis:
Remote Forwarding Controls

COMPAS ID 166569 Issue 1 Page 24
By default IP Office and the IP Office Voicemail applications do not provide any mechanisms for remote modification of User Forwarding settings, but Mobile Call Control: http://marketingtools.avaya.com/knowledgebase/businesspartner/ipoffice/mergedProjects/manager/mobile_call_control.htm can be enabled to give access.
There is also a VM Pro option ‘Configuration Menu’ http://marketingtools.avaya.com/knowledgebase/businesspartner/ipoffice/mergedProjects/voicemailpro/actions_playconfigurationmenu.htm that can be added to a custom call flow to allow Users to remotely change their forwarding and other settings.
Before enabling either of these options the warnings in the manuals must be considered and a judgement made to decide if the benefit is worth the risk of unauthorised access.

COMPAS ID 166569 Issue 1 Page 25
4.9. Securing Voicemail
Embedded Voicemail or Voicemail Pro if incorrectly configured can provide opportunity for unauthorized administrative or mailbox access and toll fraud via the outcalling feature.
Voicemail Pro
1. Using the Voicemail Pro client, the password for the default administration account ‘Administrator’ must be changed to a strong password of 8 or more characters. Any unused accounts must be deleted. NOTE: For Voicemail Pro R9.0 on Server Edition, UCM and Applications Server, all authentication is deferred to the local IP Office – the default administration account is only used under failure conditions. See Appendix B – Administrative Accounts for more information
2. Using the Voicemail Pro client, configure the password used to access the IP Office; it should match the password configured in section 4.1.4 above (‘strong’ and 8 or more characters):
3. The IP Office configuration setting System | Voicemail | Voicemail IP Address must not be left at 255.255.255.255, but set to the IP Address of the Voicemail Pro server.
4. Only users and groups that are entitled to use voicemail should have their mail box activated. All others should be disabled using the Voicemail Pro client disable mailbox feature:
NOTE: Disabling the mailbox will also disable IMAP, MAPI, email and Web Voicemail integrations for that user
COMPAS ID 166569 Issue 1 Page 26
5. All mailboxes must be protected by password/Voicemail Code access, except when connecting from trusted extensions (by the use of the User | Source Numbers field). The recommended minimum is 4 digits for internal use, 9 when the mailbox can be accessed externally.
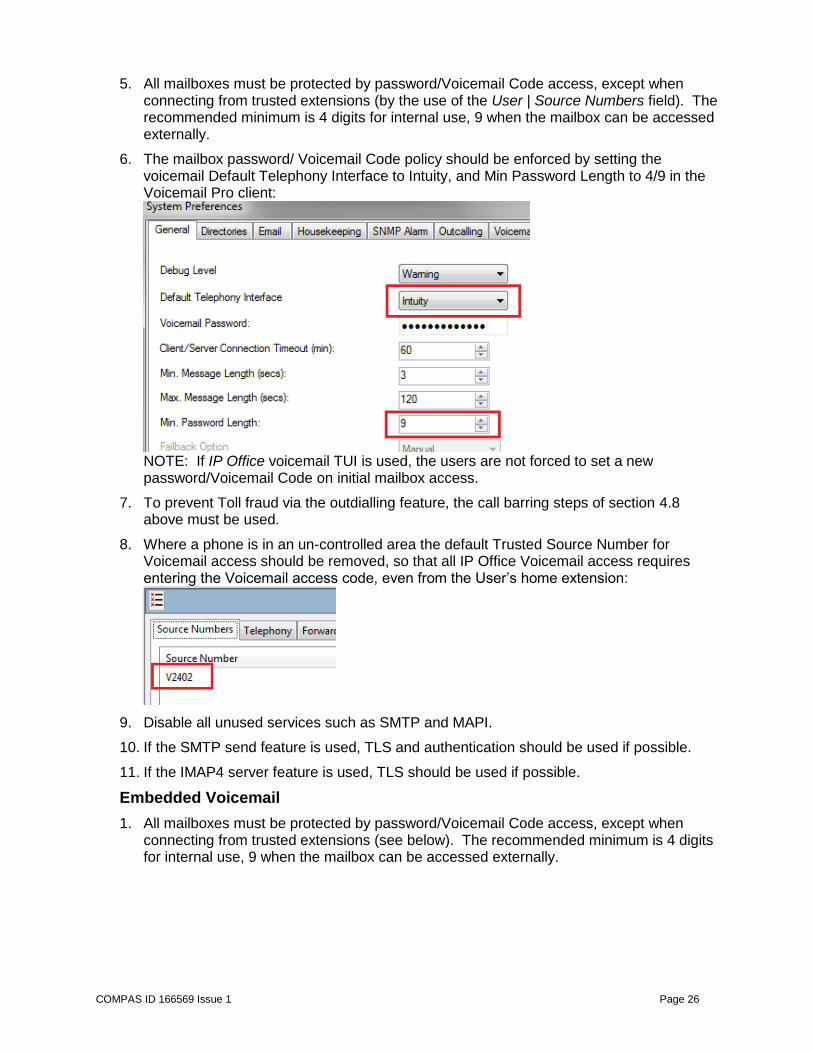
6. The mailbox password/ Voicemail Code policy should be enforced by setting the voicemail Default Telephony Interface to Intuity, and Min Password Length to 4/9 in the Voicemail Pro client:
NOTE: If IP Office voicemail TUI is used, the users are not forced to set a new password/Voicemail Code on initial mailbox access.
7. To prevent Toll fraud via the outdialling feature, the call barring steps of section 4.8 above must be used.
8. Where a phone is in an un-controlled area the default Trusted Source Number for Voicemail access should be removed, so that all IP Office Voicemail access requires entering the Voicemail access code, even from the User’s home extension:
9. Disable all unused services such as SMTP and MAPI.
10. If the SMTP send feature is used, TLS and authentication should be used if possible.
11. If the IMAP4 server feature is used, TLS should be used if possible.
Embedded Voicemail
1. All mailboxes must be protected by password/Voicemail Code access, except when connecting from trusted extensions (see below). The recommended minimum is 4 digits for internal use, 9 when the mailbox can be accessed externally.
COMPAS ID 166569 Issue 1 Page 27
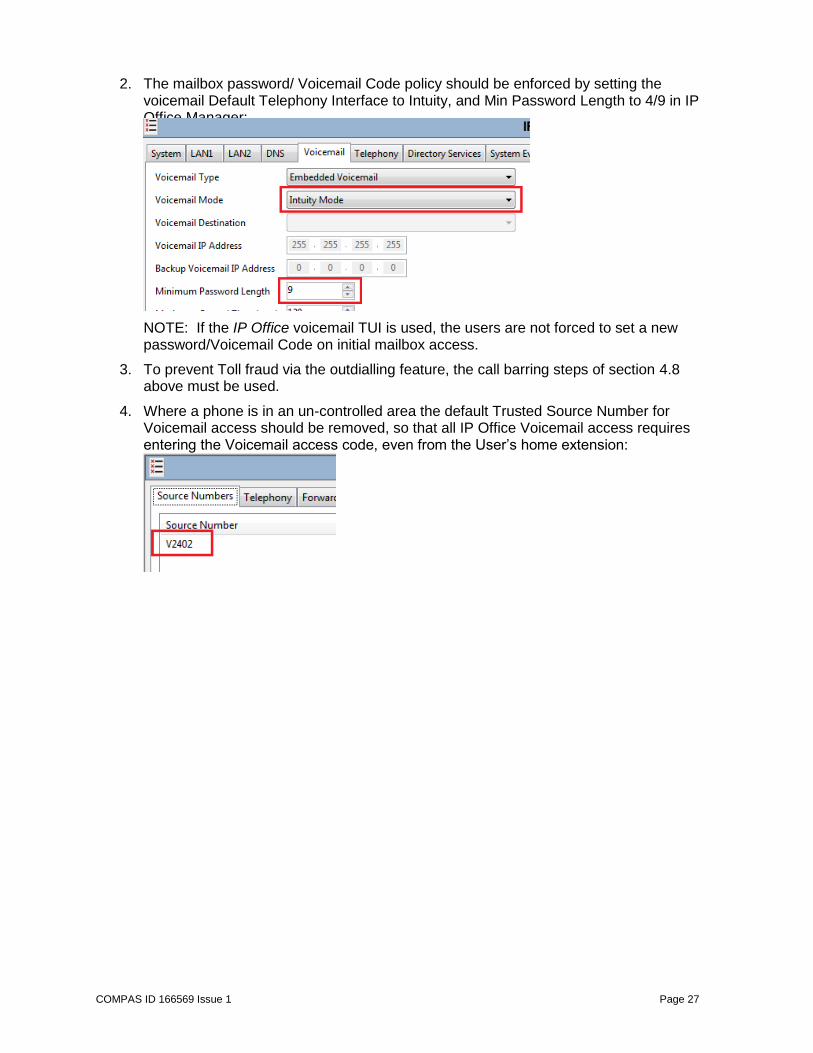
2. The mailbox password/ Voicemail Code policy should be enforced by setting the voicemail Default Telephony Interface to Intuity, and Min Password Length to 4/9 in IP Office Manager:
NOTE: If the IP Office voicemail TUI is used, the users are not forced to set a new password/Voicemail Code on initial mailbox access.
3. To prevent Toll fraud via the outdialling feature, the call barring steps of section 4.8 above must be used.
4. Where a phone is in an un-controlled area the default Trusted Source Number for Voicemail access should be removed, so that all IP Office Voicemail access requires entering the Voicemail access code, even from the User’s home extension:
COMPAS ID 166569 Issue 1 Page 28
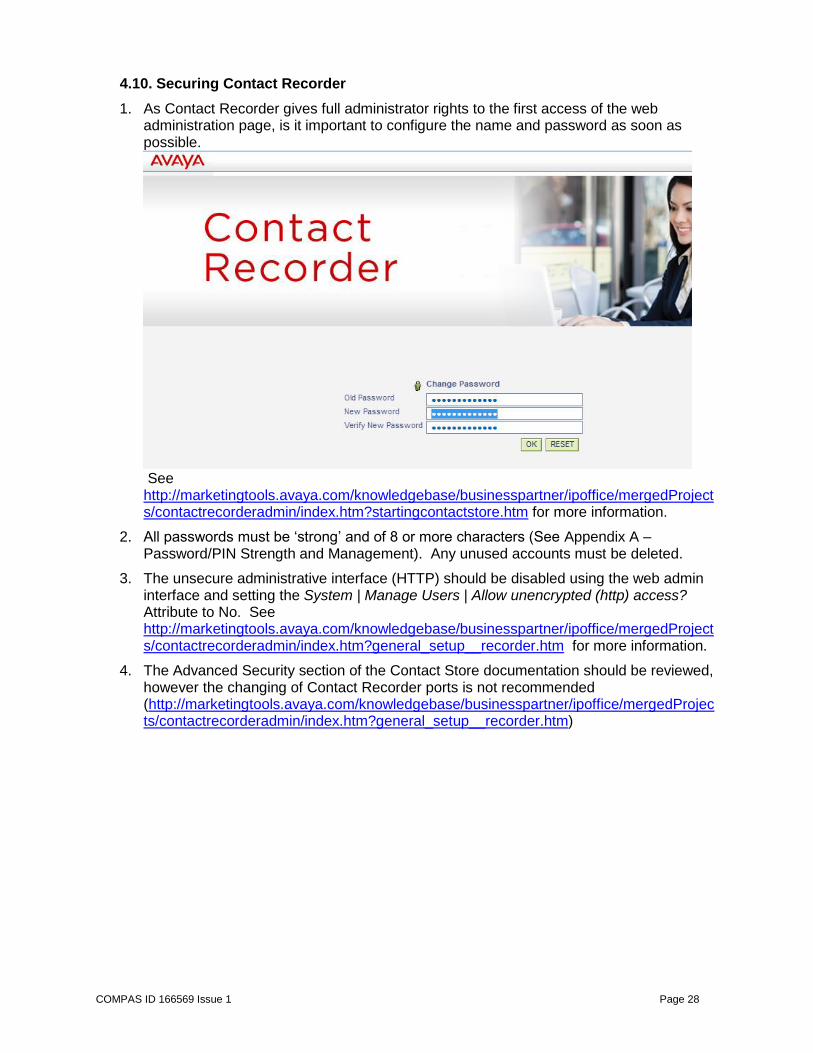
4.10. Securing Contact Recorder
1. As Contact Recorder gives full administrator rights to the first access of the web administration page, is it important to configure the name and password as soon as possible.
See http://marketingtools.avaya.com/knowledgebase/businesspartner/ipoffice/mergedProjects/contactrecorderadmin/index.htm?startingcontactstore.htm for more information.
2. All passwords must be ‘strong’ and of 8 or more characters (See Appendix A – Password/PIN Strength and Management). Any unused accounts must be deleted.
3. The unsecure administrative interface (HTTP) should be disabled using the web admin interface and setting the System | Manage Users | Allow unencrypted (http) access? Attribute to No. See http://marketingtools.avaya.com/knowledgebase/businesspartner/ipoffice/mergedProjects/contactrecorderadmin/index.htm?general_setup__recorder.htm for more information.
4. The Advanced Security section of the Contact Store documentation should be reviewed, however the changing of Contact Recorder ports is not recommended (http://marketingtools.avaya.com/knowledgebase/businesspartner/ipoffice/mergedProjects/contactrecorderadmin/index.htm?general_setup__recorder.htm)
COMPAS ID 166569 Issue 1 Page 29
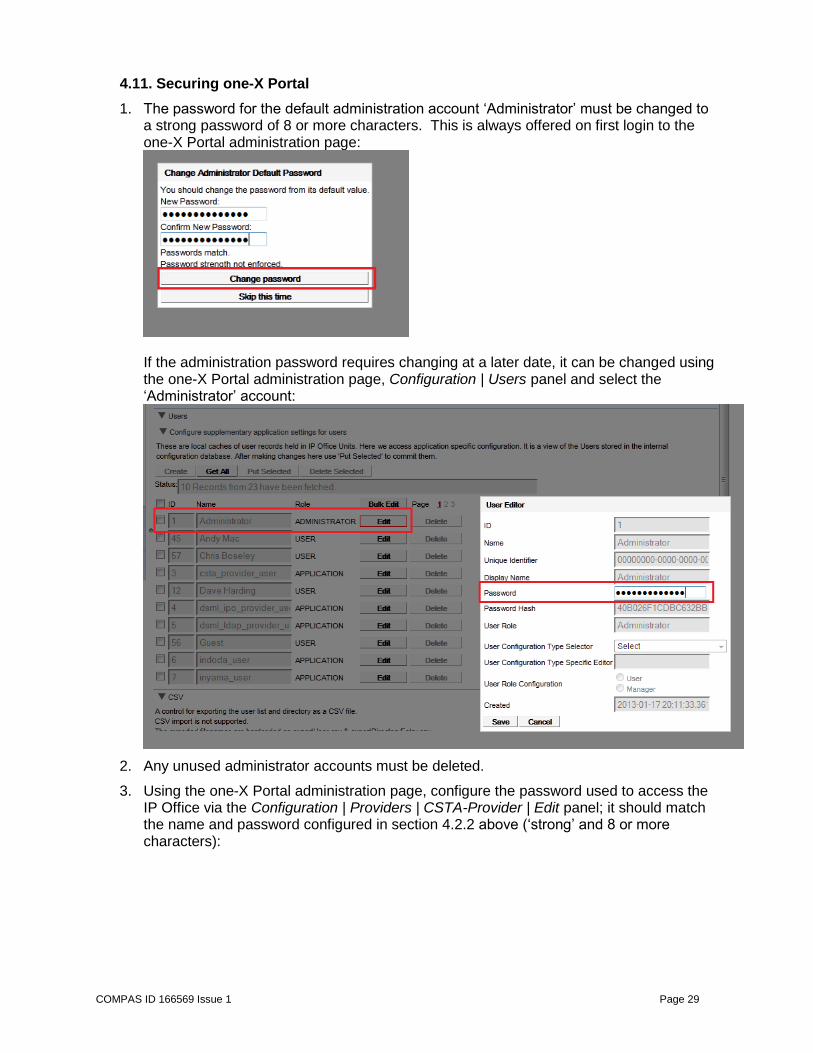
4.11. Securing one-X Portal
1. The password for the default administration account ‘Administrator’ must be changed to a strong password of 8 or more characters. This is always offered on first login to the one-X Portal administration page:
If the administration password requires changing at a later date, it can be changed using the one-X Portal administration page, Configuration | Users panel and select the ‘Administrator’ account:
2. Any unused administrator accounts must be deleted.
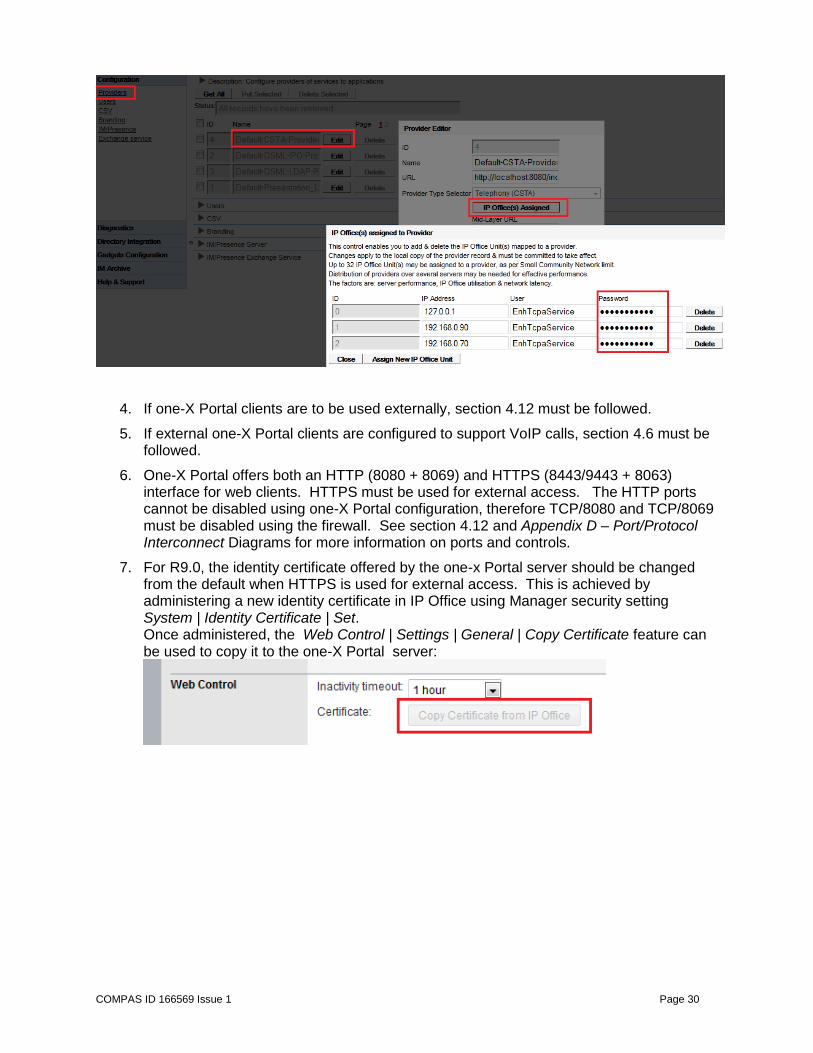
3. Using the one-X Portal administration page, configure the password used to access the IP Office via the Configuration | Providers | CSTA-Provider | Edit panel; it should match the name and password configured in section 4.2.2 above (‘strong’ and 8 or more characters):
COMPAS ID 166569 Issue 1 Page 30
4. If one-X Portal clients are to be used externally, section 4.12 must be followed.
5. If external one-X Portal clients are configured to support VoIP calls, section 4.6 must be followed.
6. One-X Portal offers both an HTTP (8080 + 8069) and HTTPS (8443/9443 + 8063) interface for web clients. HTTPS must be used for external access. The HTTP ports cannot be disabled using one-X Portal configuration, therefore TCP/8080 and TCP/8069 must be disabled using the firewall. See section 4.12 and Appendix D – Port/Protocol Interconnect Diagrams for more information on ports and controls.
7. For R9.0, the identity certificate offered by the one-x Portal server should be changed from the default when HTTPS is used for external access. This is achieved by administering a new identity certificate in IP Office using Manager security setting System | Identity Certificate | Set. Once administered, the Web Control | Settings | General | Copy Certificate feature can be used to copy it to the one-X Portal server:

COMPAS ID 166569 Issue 1 Page 31
8. The password for the backup/restore account ‘Superuser’ must be changed to a strong password of 8 or more characters. This is always offered on first login to the one-X Portal AFA page:
If the Superuser password requires changing at a later date, it can be changed using the one-X Portal AFA page, Configuration | Edit panel:

COMPAS ID 166569 Issue 1 Page 32
4.12. Limit IP Network Exposure
It is vital to control the IP network access of IP Office to reduce the exposure to attack. Network security integration is outside the scope of this document; however the following section covers some items that must be reviewed as part of network security hardening.
1. If using any level of external IP access, IP Office must only be connected via a properly configured Firewall or other network security mechanism (e.g. VPN). It must never be connected directly.
2. If no external IP access is required, IP Office must be isolated using a firewall or other mechanism.
3. Using Manager, the IP Office IP Route table should be inspected for any gateway routes that may have been unintentionally acquired via DHCP. These should be deleted if not required and the DCHP settings modified to prevent reoccurrence.
Firewall
1. Any Firewall used must be selected, deployed, tested and managed by competent personnel to meet the needs of the IP Office deployment. The NIST Special Publication (SP) 800-41, Guidelines on Firewalls and Firewall Policy: http://csrc.nist.gov/publications/nistpubs/800-41-Rev1/sp800-41-rev1.pdf provides background information, including other helpful resources.
2. Only the absolute minimum of Firewall ports and protocols should be opened for use with IP Office. For example set only the port direction and protocol needed. The relevant IP Office port matrix for each release must be used, and can be found at https://support.avaya.com/security
3. If a remote IP address is static – an ITSP SIP trunk for example – the source address should be configured to constrain the access further.
4. IP Office unsecure ports/protocols should never be exposed to the Internet.
5. Understanding the port matrix is important; please see Appendix D – Port/Protocol Interconnect Diagrams for additional information.
6. If using a stateful Firewall, H.323 inspection should be turned off as this will interfere with IP Office operation.
Session Border Controller
The Avaya SBCE is recommended to be located behind the Enterprise firewall, and serves as a security and demarcation device between the IP-PBX and the Carrier facility. Avaya also supports an implementation of the Avaya SBCE parallel to the firewall, although it is better as recommended for best practices security to put it behind the firewall as part of a layered defence strategy. The Avaya SBCE performs NAT traversal, securely anchors signalling and media, and can normalize SIP protocol implementation differences between carrier and Enterprise SIP implementations.
The Avaya SBC for Enterprise is a solution specifically tailored for IP Office. For more information see: http://www.avaya.com/usa/product/avaya-session-border-controller-for-enterprise
Remote Maintenance Access
Due to the combination of ports and protocols used in typical maintenance activities, Virtual Private Network (VPN) technologies should be used.

COMPAS ID 166569 Issue 1 Page 33
All IP Office systems supports secure and high integrity SSLVPN connectivity, and Avaya offers IP Office Support Services (IPOSS) based on this technology. For more information see: http://www.avaya.com/usa/service/ip-office-support-services
For IP Office deployment in an enterprise or branch environment, Avaya’s Secure Access Link (SAL) gateway can be used.

COMPAS ID 166569 Issue 1 Page 34
4.13. Securing Management Applications & Configuration Data
It is important that not only the IP Office and server applications, but the management tools and associated configuration data are secured from attack.
IP Office Manager
The following applies to both Standard and Server Edition Manager and will ensure secure IP Office communications and configuration data kept away from unauthorised users
1. In IP Office Manager’s File | Preferences | Security tab: - Set Request Login on Save to active - Set Close Configuration/Security Settings After Send to active - Set Save Configuration File After Load to inactive - Set Backup Files on Send to inactive - Set Enable Application Idle Timer (5 minutes) to active - Set Secure Communications to active:
2. In IP Office Manager’s File | Preferences | Directories tab: - Change the Working Directory (.cfg Files) to be different to the Binary Directory (.bin Files) - For more information, see: http://marketingtools.avaya.com/knowledgebase/businesspartner/ipoffice/mergedProjects/manager/index.htm?html_pref_directories.htm
3. Ensure all offline configuration files, exported files or other configuration data are controlled.
Web Manager/Web Control
Web Manger and the Linux Web Control Panel are browser-based online management tools that cannot be configured to use unsecured links.
1. Ensure all offline configuration files, exported files or other configuration data are controlled.
Configuration and Other Sensitive Data

COMPAS ID 166569 Issue 1 Page 35
IP Office security settings are automatically encrypted and locked to the individual IP Office and cannot be exported in any form, but configuration and other data for IP Office, Voicemail Pro and one-X Portal contain some unencrypted information that may pose a security or privacy threat.
1. Any backup data store (for example a file server used for backup/restore, copies of SD Cards) must be secured from unauthorised access
2. Any backup/restore mechanism itself should be secure; IP Office, Voicemail Pro and one-X Portal support secure backup/restore options such as HTTPS, SFTP and SCP
3. Access to call recordings which are held as files on the Voicemail Pro or Contact Recorder server should be controlled
4. Offline and exported configuration files, SysMonitor logs and Linux server logs should be controlled using, for example, encryption with password protection. This should include any configuration or other sensitive data sent outside of the organisation.
Remote Maintenance Access
Due to the combination of ports and protocols used in typical maintenance activities, Virtual Private Network (VPN) technologies should be used.
All IP Office systems supports secure and high integrity SSLVPN connectivity, and Avaya offers IP Office Support Services (IPOSS) based on this technology. For more information see: http://www.avaya.com/usa/service/ip-office-support-services
For IP Office deployment in an enterprise or branch environment, Avaya’s Secure Access Link (SAL) gateway can be used.
If remote maintenance access is required, section 4.12 must be followed.

COMPAS ID 166569 Issue 1 Page 36
4.14. Securing Server Edition Servers
All of the above apply to the IP Office, Voicemail Pro and one-X Portal servers that reside on Server Edition systems. In addition there are some Server Edition-specific actions that should be performed.
1. For Primary Server, follow sections 4.1 to 4.12 above. - All security administrator accounts need to be changed to the same credentials. - Service User changes can be done using Manager and security settings changes as indicated in sections 4.1 and 4.2. Alternatively for R9.0, Web Manager can be used to add, delete and edit all Service Users at once: - From the initial landing page, select Tools | Service Users; each user may be selected for change of password and deletion. Once completed, Synchronise Security Database should be selected to copy updates to every system.
NOTE that the security administrator account cannot be edited in this way.
2. For Secondary Server, follow sections 4.1 to 4.9 above.
3. For Linux Expansion, follow sections 4.1 to 4.8 above.
4. For stand-alone one-X Portal Server, follow section 4.15 below.

COMPAS ID 166569 Issue 1 Page 37
5. Change the Web Control Administrator account password to a strong password of 8 or more characters. This can be done from the initial Web Control login screen, not the Web Management login screen. To access the Web Control login screen in R8.1 use https://[ipaddress]:7070/login. To access the Web Control login screen in R9.0 use https://[ipaddress]:7071/login.
6. Change the Linux server root password to a strong password of 8 or more characters using Web Control | Settings | System | Change Root Password.
7. Change the Administrator and root account password policy using Web Control | Settings | System | Password Rules Settings: - Minimum password length to 8 - Minimum number of uppercase characters to 1 - Minimum number of lowercase characters to 1 - Maximum allowed sequence length to 3
8. For 9.0, set the Web Control Authentication method to Enable referred authentication – this will refer all Web Control logins to the local IP Office. This also means the local Administrator account credentials are only used under failure conditions

COMPAS ID 166569 Issue 1 Page 38
9. If not required, disable the syslog receiver on the Primary Settings | General Tab. Note that by default all Expansion Systems send syslog to the Primary, and this includes audit trail events (see point 10 below).
10. If not required, disable the syslog client in the Secondary and each Expansion System using Manager and the System | System Events | Alarms tab:
NOTE: Removing the syslog destination will stop audit trail and security events being sent to the Primary

COMPAS ID 166569 Issue 1 Page 39
4.15. Securing Applications Server/UCM
All of the above apply to the Voicemail Pro and one-X Portal servers that reside on the Applications Server and Unified Communications Module (UCM). In addition there are some Applications Server and UCM -specific actions that should be performed.
1. For R9.0, use manager to load the security settings of the IP Office management component (AKA ‘shell’ IP Office) that co-resides on the Applications Server/UCM at the same IP address. Note this is not the host IP500 V2 address for the UCM. Follow sections 4.1 to 4.3 above.
2. If Voicemail Pro installed, follow section 4.9 above.
3. If Contact Recorder installed, follow section 4.10 above.
4. If one-X Portal installed, follow section 4.11 above.
5. Change the Web Control Administrator account password to a strong password of 8 or more characters. This can be done from the initial Web Control login screen, not the Web Management login screen. To access the Web Control login screen for UCM and R8.1 Applications Server, use https://[ipaddress]:7070/login. To access the Web Control login screen for R9.0 Applications Server use https://[ipaddress]:7071/login.
6. Change the Linux server root password to a strong password of 8 or more characters using Web Control | Settings | System | Change Root Password.
7. Change the Administrator and root account password policy using Web Control | Settings | System | Password Rules Settings: - Minimum password length to 8 - Minimum number of uppercase characters to 1 - Minimum number of lowercase characters to 1 - Maximum allowed sequence length to 3
8. For 9.0, Set the Web Control Authentication method to Enable referred authentication – this will refer all Web Control logins to the local IP Office. This also means the local Administrator account credentials are only used under failure conditions. See http://marketingtools.avaya.com/knowledgebase/businesspartner/ipoffice/mergedProjects/appliance/index.htm?password_authentication.htm for more information.

COMPAS ID 166569 Issue 1 Page 40
COMPAS ID 166569 Issue 1 Page 41
4.16. Activate Reporting/Monitoring
To ensure timely indication of any untoward activities on any component, various reporting mechanisms should be enabled. It is important to ensure that the reporting mechanisms themselves are reliable and secure.
IP Office
The following events and logging features are available for IP Office:
System events for failed logins and SSL/TLS failures, potentially indicating attempts to gain unauthorized access to the system. Available as syslog, SMTP (email), SNMP traps and displayable in SSA. For more information see: http://marketingtools.avaya.com/knowledgebase/businesspartner/ipoffice/mergedProjects/ssa/index.htm?alarms_service_alarms.htm http://marketingtools.avaya.com/knowledgebase/businesspartner/ipoffice/mergedProjects/manager/index.htm?config_forms_snmp2.htm By default for Server Edition, all events are active and send via syslog to the Primary. See: http://marketingtools.avaya.com/knowledgebase/businesspartner/ipoffice/mergedProjects/serveredition/index.htm?syslog_event_viewer.htm
Audit trail of administrative logins, their source and result. Available as syslog events, also displayable in SSA and Manager. NOTE that user/phone based changes are not currently captured. For more information see: http://marketingtools.avaya.com/knowledgebase/businesspartner/ipoffice/mergedProjects/manager/index.htm?html_advanced_audit_trail.htm http://marketingtools.avaya.com/knowledgebase/businesspartner/ipoffice/mergedProjects/ssa/index.htm?resources_control_unit_audit.htm By default for Server Edition, all events are active and send via syslog to the Primary.
Detailed audit trail of all administrative changes, including security settings. Available as syslog events only. By default for Server Edition, all events are active and send via syslog to the Primary.
Reports of all calls available as Station Message Detail Reporting (SMDR) message that can be sent to 3rd party call loggers. For more information see: http://marketingtools.avaya.com/knowledgebase/businesspartner/ipoffice/mergedProjects/manager/index.htm?smdrcallrecord.htm
Voicemail Pro
The following events and logging features are available for Voicemail Pro server:
Audit trail of administrative logins. Available as syslog events only. For more information see: http://marketingtools.avaya.com/knowledgebase/businesspartner/ipoffice/mergedProjects/voicemailpro/index.htm?configuring_syslogs.htm By default for Server Edition, all events are active and send via syslog to the Primary.
Voicemail box login failures are reported via the IP Office failed login alarms, see above.
Contact Recorder

COMPAS ID 166569 Issue 1 Page 42
The following events and logging features are available for Contact Recorder:
Audit trail of administrative logins. Available as syslog events and displayable the web administration page. For more information see: http://marketingtools.avaya.com/knowledgebase/businesspartner/ipoffice/mergedProjects/contactrecorderadmin/index.htm?audit_trail.htm
One-X Portal
The following events and logging features are available for one-X Portal server:
Audit trail of administrative logins. Available as syslog events only. By default for Server Edition, all events are active and send via syslog to the Primary.
One-X client login failures are reported via the IP Office failed login alarms, see the IP Office section above.
Linux-based Servers
Server Edition, Application Server and UCM servers generate security and audit logs via syslog, either saved internally or sent to a remote server.
1. To enable the Linux OS security and audit logging, the following is required on the Web Control |Settings | General Tab: - Authentication and authorization privileges - Information stored by the Linux audit daemon (auditd) - Apache web server access_log and error_log:
2. By default for Server Edition, all events are active and send via syslog to the Primary where they can be stored, viewed and forwarded to external syslog servers. For more information see: http://marketingtools.avaya.com/knowledgebase/businesspartner/ipoffice/mergedProjects/serveredition/index.htm?settings__general.htm http://marketingtools.avaya.com/knowledgebase/businesspartner/ipoffice/mergedProjects/serveredition/index.htm?syslog_event_viewer.htm
Other Components
Firewall intrusion detection and reporting should be activated
SBC intrusion detection and reporting should be activated
Call logger unusual call activity detection and reporting should be activated
Avaya Security Advisories and IP Office Updates
1. Register for Avaya Security Advisory notifications by using the E-Notification subscription procedures described at http://support.avaya.com

COMPAS ID 166569 Issue 1 Page 43
2. Register for IP Office Knowledgebase news, which includes updates on technical bulletins, application notes and technical tips using the options available at: http://marketingtools.avaya.com/knowledgebase/
4.17. Checks and Tests
After performing the step listed in the sections above, thorough checks and tests should be carried out to ensure the deployment is secure and no previous attacks have compromised the system.
In addition, the following should be performed:
Check LAN1/LAN2 do not have public IP addresses
Check the IP Office for unsecure internet or inbound IP access by identifying the public IP address of the Firewall (e.g. by using http://whatismyipaddress.com), then attempting the following access: - IP Office Manager using the public IP address - VMPro client using the public IP address - System Monitor using the public IP address - Browser using http://[Public IP Address] - Browser using http:// [Public IP Address]:8080/onexportal-admin.html - Browser using https://[Public IP Address]:7071 - Browser using https://[Public IP Address]:7070 If any are successful, it indicates a misconfigured Firewall or other network protection system.
Use IP Office Manager to load the configuration and review all errors and warnings with particular reference to passwords. None should be present.
Check for unexpected Extensions and Users
Check all users’ settings for unusual forwarding destinations
Ensure All SIP Extensions’ Extension |Extn |Force Authorisation setting has not been disabled.
Check the special IP Office user ‘NoUser’ Source Number field; any unexpected entries should be clarified with support personnel. NoUser source numbers are sometimes used to enable specific features or behaviour.
Use IP Office Manager to load the security settings, if a warning is displayed regarding default settings, the service user accounts are at default.
Log on to one-X Portal administration page, if a warning is displayed ‘Change Administrator Default Password’ the administrator account is at default.

COMPAS ID 166569 Issue 1 Page 44
Log on to the Linux Web Control/Web Management, navigate to the System tab, if a warning is displayed regarding default password, the administrator account is at default.
For R9.0, if login to Web Control or Voicemail pro fails unexpectedly, check the IP Office security settings for the account being used; it must have a rights group assigned which contains the correct ‘External’ rights:
Check successful and failed logins produce the expected reports and results.
Test the call barring, emergency calls and authorisation codes
Review Firewall, SBC and call logger reporting.

COMPAS ID 166569 Issue 1 Page 45
5. Monitoring IP Office
Constant and consistent monitoring ensures any threats can be identified early and reacted to. In addition to threat monitoring, existing installations should be reviewed for changes in security requirements that may be caused by customer needs, technology, or regulation.
Monitor all alarms and logs, especially for repeated failed logins or other evidence of attack
Detect other unusual activity, for example: - New VoIP extensions - Forwarding set - Phones dialling unexpectedly - Unable to make outgoing calls - Unusual call destinations - Unusual call volumes or time of day/week - High phone bill - Unable to login to phones or applications - Unable to use voicemail
Review Avaya Security advisories
Review Avaya IP Office application notes, technical bulletins and tips
Ensure the latest IP Office service packs are applied
Monitor telephony provider communications
Conduct periodic security reassessment
COMPAS ID 166569 Issue 1 Page 46
6. Response to Incidents
Containment, eradication and recovery is the recommended process to follow if a security incident has been detected:
Attacked/compromised systems should be isolated or otherwise protected as soon as possible.
Avaya customers with information regarding any discovered security problems with Avaya products should create a Service Request using the Self Service link on https://support.avaya.com, or by contacting the Customer Support phone number under the Maintenance Support link (1-800-242-2121 for US domestic customers). Non-Avaya customers wishing to report a security finding with Avaya products should send this information to [email protected] .
If the attack is IP based, it may be possible to trace the source IP address to the ISP it's registered to and report it.
A general guide to incident handling is provided by NIST Special Publication (SP) 800-61, Computer Security Incident Handling Guide. http://nvlpubs.nist.gov/nistpubs/SpecialPublications/NIST.SP.800-61r2.pdf

COMPAS ID 166569 Issue 1 Page 47
7. Appendix A – Password/PIN Strength and Management
In general, password resistance to Guessing (attacks using default passwords, dictionary words, or brute force) and Cracking (attacks that attempt to match the login calculation without needing to know the actual password) can be greatly improved by ‘strong’ passwords and a password change policy.
A strong password is typically one that:
Is long (e.g. more than 8 characters)
Complex (e.g. contains upper, lower and numeric characters)
Does not contain sequences or repeated characters
Is not easily guessable. Guessable passwords include: - Password same as account name or extension number (or reversed) - Dictionary words - Dictionary words with number substitution - Backwards words - Personal or corporate information - Date of birth - Default passwords
Password strength and management is not covered here, but many publications exist including:
NIST Special Publication (SP) 800-118, Guide to Enterprise Password Management (Draft): http://csrc.nist.gov/publications/drafts/800-118/draft-sp800-118.pdf
Centre for the Protection of National Infrastructure (CPNI), PROTECTING SYSTEMS AND DATA, PASSWORD ADVICE http://www.cpni.gov.uk/documents/publications/2012/2012029-password_advice.pdf
COMPAS ID 166569 Issue 1 Page 48
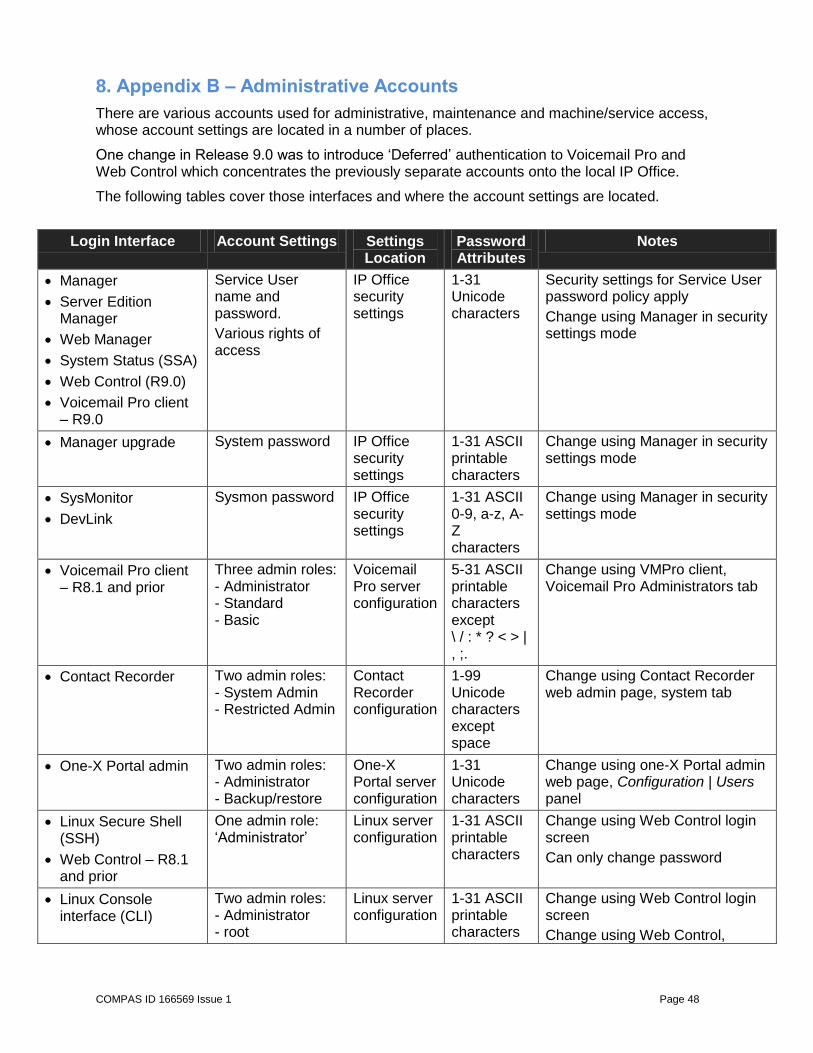
8. Appendix B – Administrative Accounts
There are various accounts used for administrative, maintenance and machine/service access, whose account settings are located in a number of places.
One change in Release 9.0 was to introduce ‘Deferred’ authentication to Voicemail Pro and Web Control which concentrates the previously separate accounts onto the local IP Office.
The following tables cover those interfaces and where the account settings are located.
Login Interface Account Settings Settings Location
Password Attributes
Notes
Manager
Server Edition Manager
Web Manager
System Status (SSA)
Web Control (R9.0)
Voicemail Pro client – R9.0
Service User name and password.
Various rights of access
IP Office security settings
1-31 Unicode characters
Security settings for Service User password policy apply
Change using Manager in security settings mode
Manager upgrade System password IP Office security settings
1-31 ASCII printable characters
Change using Manager in security settings mode
SysMonitor
DevLink
Sysmon password IP Office security settings
1-31 ASCII 0-9, a-z, A-Z characters
Change using Manager in security settings mode
Voicemail Pro client – R8.1 and prior
Three admin roles: - Administrator - Standard - Basic
Voicemail Pro server configuration
5-31 ASCII printable characters except \ / : * ? < > | , ;.
Change using VMPro client, Voicemail Pro Administrators tab
Contact Recorder Two admin roles: - System Admin - Restricted Admin
Contact Recorder configuration
1-99 Unicode characters except space
Change using Contact Recorder web admin page, system tab
One-X Portal admin Two admin roles: - Administrator - Backup/restore
One-X Portal server configuration
1-31 Unicode characters
Change using one-X Portal admin web page, Configuration | Users panel
Linux Secure Shell (SSH)
Web Control – R8.1 and prior
One admin role: ‘Administrator’
Linux server configuration
1-31 ASCII printable characters
Change using Web Control login screen
Can only change password
Linux Console interface (CLI)
Two admin roles: - Administrator - root
Linux server configuration
1-31 ASCII printable characters
Change using Web Control login screen
Change using Web Control,

COMPAS ID 166569 Issue 1 Page 49
Setting | System tab
Can only change passwords
VMPro <> IP Office service interface
VMPro password IP Office security settings
Voicemail Pro server configuration
1-31 ASCII printable characters
Change using Manager in security settings mode
Change using VMPro client, System Preferences | General tab
When zero length (default), IP Office will use the system password
One-X Portal <> IP Office service interface
Service User name and password
IP Office security settings
One-X Portal server configuration
1-31 Unicode characters
Change using Manager in security settings mode
Change using one-X Portal admin web page, Configuration | Providers | Default-CSTA-Provider | Edit panel
TAPI Link Pro (3rd party TAPI)
System password IP Office security settings
1-31 ASCII printable characters
Change using Manager in security settings mode
DECT R4 Provisioning
Service User name and password
IP Office security settings
Master base station configuration
1-31 Unicode characters
Change using Manager in security settings mode
Change using base station web admin interface
COMPAS ID 166569 Issue 1 Page 50
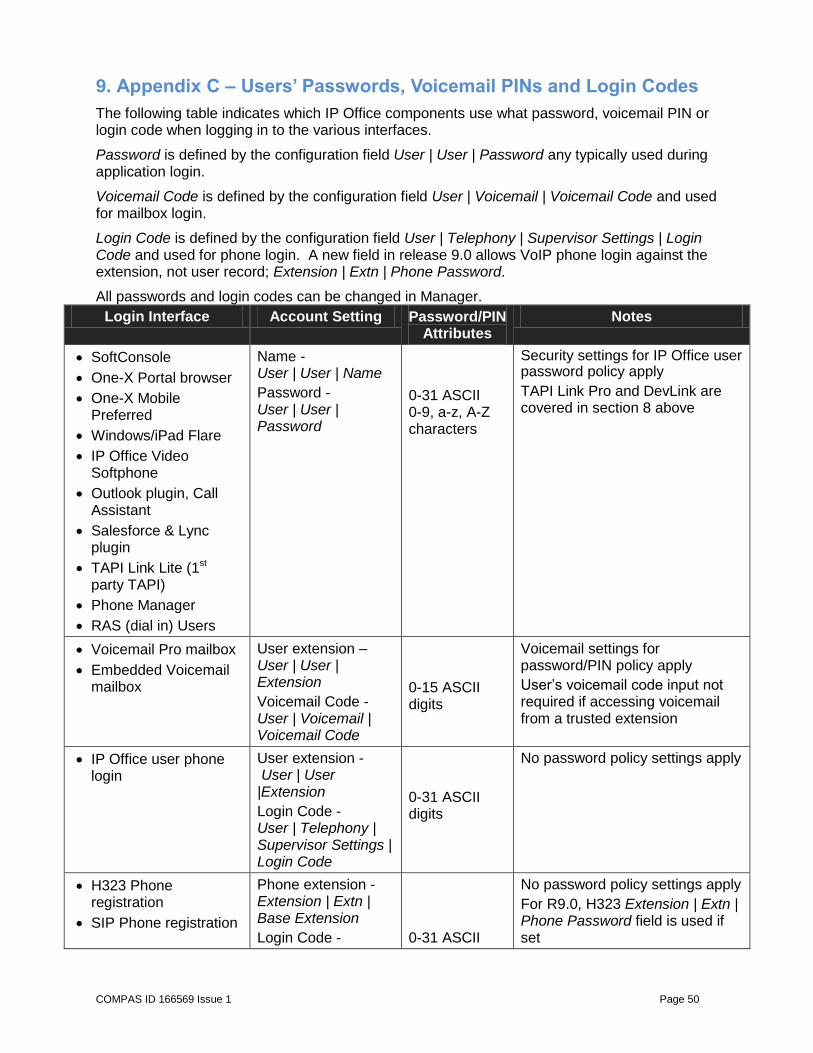
9. Appendix C – Users’ Passwords, Voicemail PINs and Login Codes
The following table indicates which IP Office components use what password, voicemail PIN or login code when logging in to the various interfaces.
Password is defined by the configuration field User | User | Password any typically used during application login.
Voicemail Code is defined by the configuration field User | Voicemail | Voicemail Code and used for mailbox login.
Login Code is defined by the configuration field User | Telephony | Supervisor Settings | Login Code and used for phone login. A new field in release 9.0 allows VoIP phone login against the extension, not user record; Extension | Extn | Phone Password.
All passwords and login codes can be changed in Manager.
Login Interface Account Setting Password/PIN Attributes
Notes
SoftConsole
One-X Portal browser
One-X Mobile Preferred
Windows/iPad Flare
IP Office Video Softphone
Outlook plugin, Call Assistant
Salesforce & Lync plugin
TAPI Link Lite (1st party TAPI)
Phone Manager
RAS (dial in) Users
Name - User | User | Name
Password - User | User | Password
0-31 ASCII 0-9, a-z, A-Z characters
Security settings for IP Office user password policy apply
TAPI Link Pro and DevLink are covered in section 8 above
Voicemail Pro mailbox
Embedded Voicemail mailbox
User extension – User | User | Extension
Voicemail Code - User | Voicemail | Voicemail Code
0-15 ASCII digits
Voicemail settings for password/PIN policy apply
User’s voicemail code input not required if accessing voicemail from a trusted extension
IP Office user phone login
User extension - User | User |Extension
Login Code - User | Telephony | Supervisor Settings | Login Code
0-31 ASCII digits
No password policy settings apply
H323 Phone registration
SIP Phone registration
Phone extension - Extension | Extn | Base Extension
Login Code -
0-31 ASCII
No password policy settings apply
For R9.0, H323 Extension | Extn | Phone Password field is used if set

COMPAS ID 166569 Issue 1 Page 51
User | Telephony | Supervisor Settings | Login Code
digits
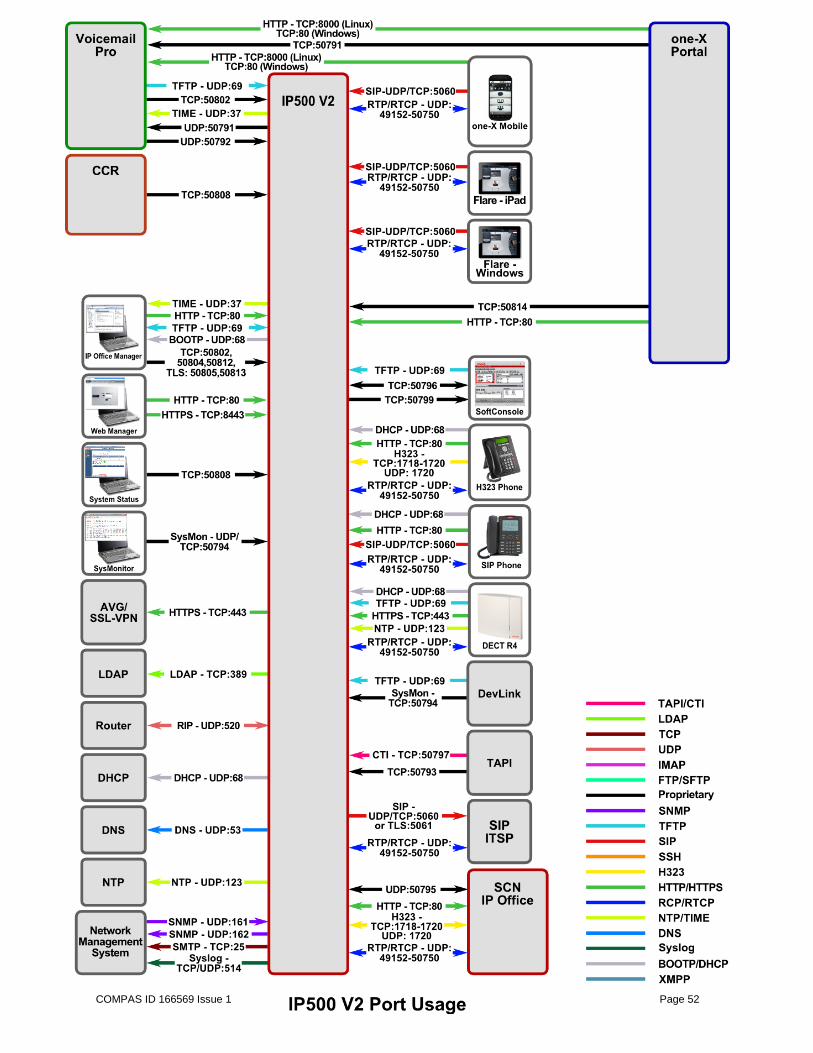
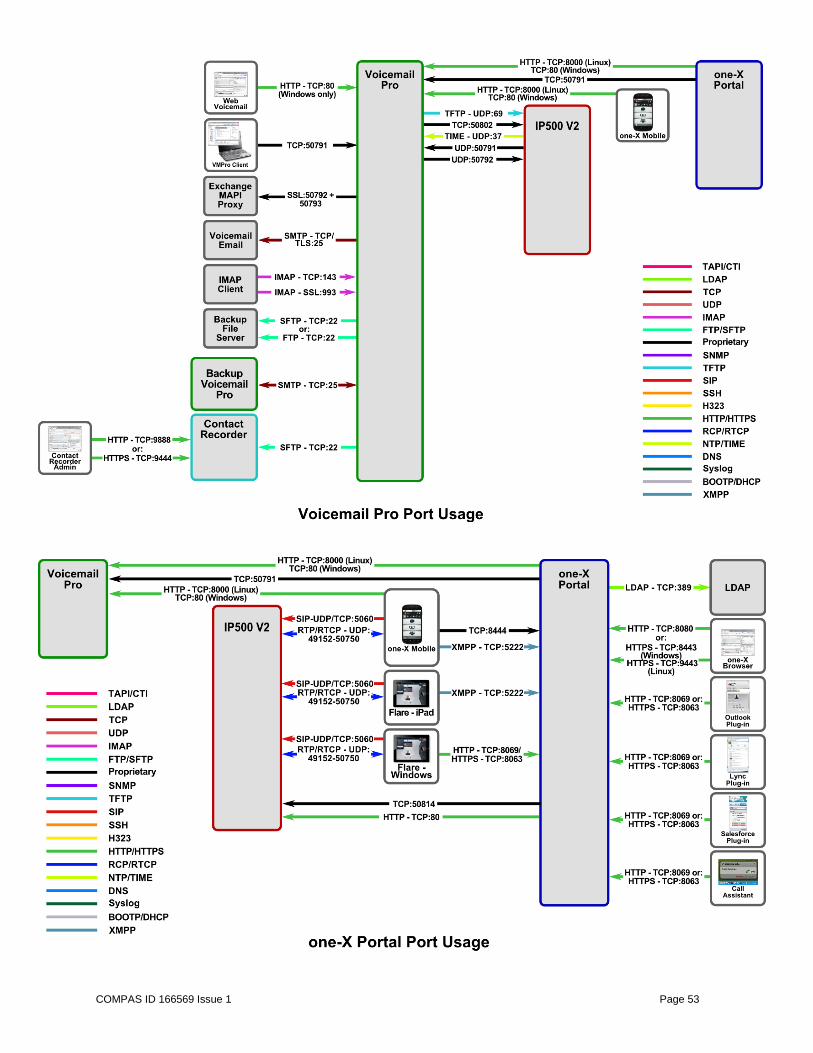
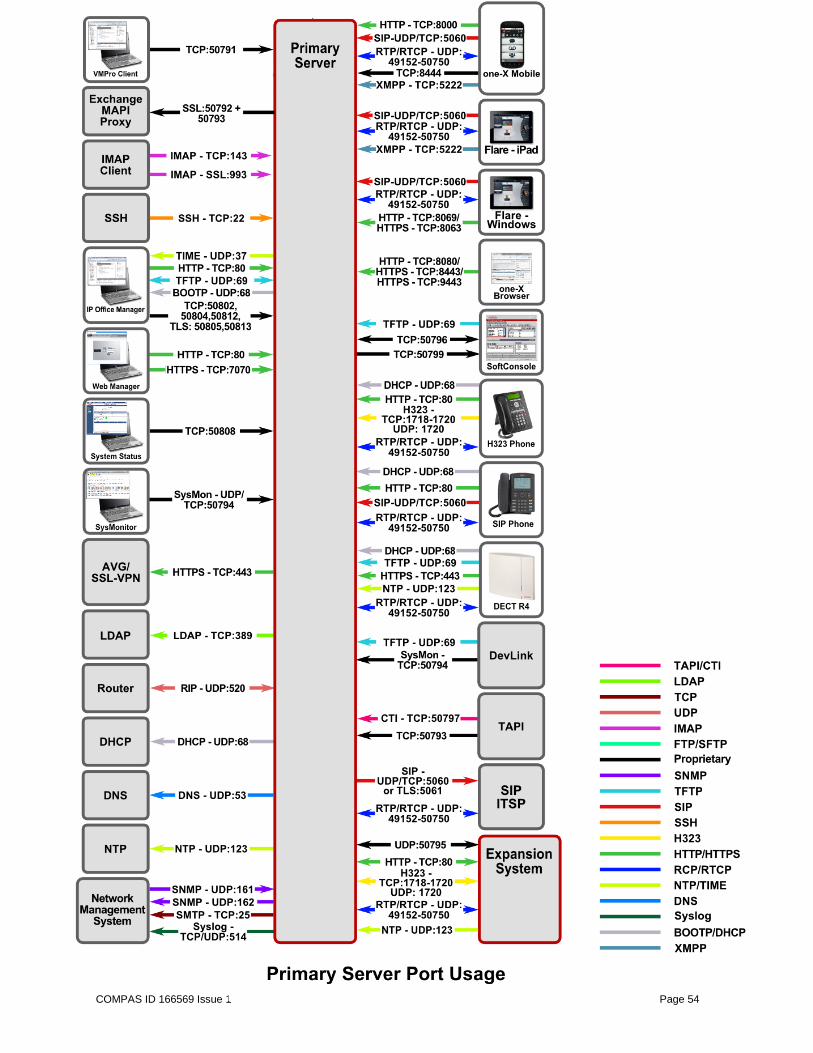
10. Appendix D – Port/Protocol Interconnect Diagrams
The following diagrams show port & protocol connections for IP Office Release 9.0 in various typical deployments. No legacy ports/protocols are shown.
The relevant IP Office port matrix has a complete list for each release, and can be found at https://support.avaya.com/security
COMPAS ID 166569 Issue 1 Page 52
COMPAS ID 166569 Issue 1 Page 53
COMPAS ID 166569 Issue 1 Page 54