glass bead field guide - SWARCO. INTRODUCTION This field guide is intended to serve as a quick...
14
Reflective Glass Bead Field Guide For Pavement Markings
Transcript of glass bead field guide - SWARCO. INTRODUCTION This field guide is intended to serve as a quick...

Reflective Glass BeadField Guide
For Pavement Markings

PAVEMENT MARKING FIELD GUIDE
TABLE OF CONTENTS
I. INTRODUCTION.................................................................................Page 1
II. GLASS BEADS & RETRO-REFLECTIVITY.......................................Page 2
A. Glass Beads.................................................................................Page 2
B. Measuring Reflectivity.................................................................Page 2
C. Wet / Night Visibility.....................................................................Page 3
D. Factors That Affect Retro-reflectivity.........................................Page 3
1. Bead Coverage........................................................................Page 3
2. Gradation.................................................................................Page 3
3. Color and Clarity......................................................................Page 3
4. Roundness...............................................................................Page 3
5. Binder Color & Quality............................................................Page 3
6. Embedment.............................................................................Page 4 a) Viscosity.............................................................................P. age 4
b) Coatings.............................................................................Page 4
c) Bead Size............................................................................Page 4
d) Temperature.......................................................................Page 4
Page 4 7. Refractive Index......................................................................
III. GLASS BEAD COATINGS.................................................................Page 5
IV. HANDLING AND STORING GLASS BEADS....................................Page 5
V. QUALITY CONTROL & APPLICATION RECOMMENDATIONS.......Page 5
A. Location and Application Conditions........................................Page 5
B. Choosing Your Application Requirements................................Page 6
C. Equipment Checklist...................................................................Page 6
D. Calibrating and Determine Proper Mil Thickness.... ................Page 6
E. Quality of Line..............................................................................Page 7
1. Applying Test Line with Glass Beads....................................Page 7
2. Glass Bead Adhesion Spot Test............................................Page 8
F. Quality Control During The Application......................................Page 8
VI. TROUBLE SHOOTING TABLE..........................................................Page 9
VII. TERMS & DEFINITIONS....................................................................Page 10
QUALITY INSTALLATION & INSPECTION OF GLASS BEADS

I. INTRODUCTION
This field guide is intended to
serve as a quick reference for the proper
installation of glass beads in order to assure
quality and long lasting reflective pavement
markings. If you have any questions about
proper installation techniques, or any other
information contained herein, please contact
your local sales representative or
Swarco Customer Service.
Page 1
All statements, technical information and recommendations contained herein are based on tests we believe to be reliable but theaccuracy and completeness thereof is not guaranteed. Data is subject to alteration due to technical advances.

II. GLASS BEADS & RETRO-REFLECTIVITY
A. Glass Beads
B. Measuring Reflectivity
Glass beads perform an important function of traffic safety because of their retroreflective properties,which permit the motorist to clearly see the pavement markings at night as well as in daytime.
The optical property of glass bead spheres by which they direct light back to the driver (auto headlight)is known as retroreflection. The intensity of the retroreflected light returned to the source of illuminationis one measure of the quality of the road marking.
Reflectivity can be checked by using an instrument called a Reflectomer. This is usually a port-able device that is engineered to measure the intensity of retro-reflected light at a given geometry(30-meter geometry is the standard) and distance typical of a car headlight. Reflectivity is
2reported in millicandelas per square meter per lux (mcd/m /lux).
30-meter geometry means that the distance from the observer to the illuminated point of interest is30 meters in length. By using mathematical models and equations, the instrument simulates thiscondition and electronically takes the measurement of the reflected light of the pavement markingline.
For more accurate readings and consistent data, we recommend you: • always read and follow the manufacture’s instructions, • calibrate equipment before using, • consult agency specifications, • choose 30 foot sections of the newly applied line and take an average of 10 readings (one every 3 feet) in each section.
For further questions on measuring reflectivity or measuring equipment, consult reflectometermanufacturer and government agency specifications.
Example of a Reflectometer: LTL 2000
Page 2
C. Wet / Night Visibility
D. Factors That Affect Retro-reflectivity
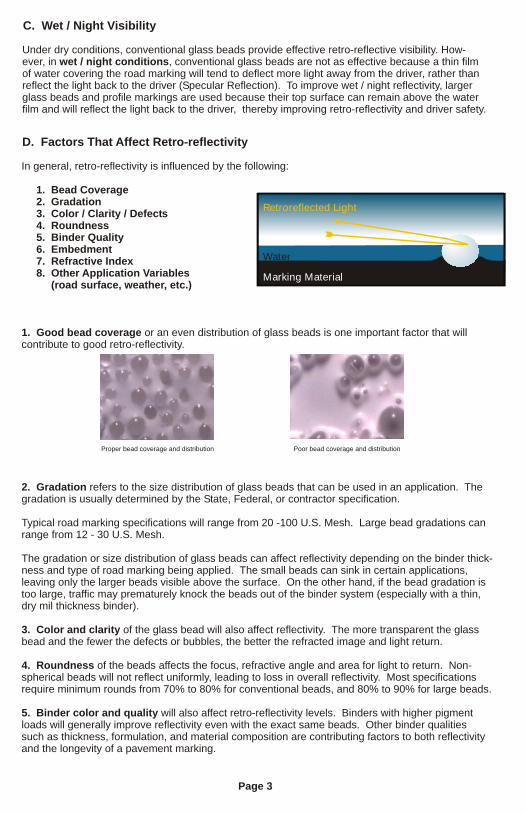
Under dry conditions, conventional glass beads provide effective retro-reflective visibility. How-ever, in wet / night conditions, conventional glass beads are not as effective because a thin filmof water covering the road marking will tend to deflect more light away from the driver, rather thanreflect the light back to the driver (Specular Reflection). To improve wet / night reflectivity, largerglass beads and profile markings are used because their top surface can remain above the waterfilm and will reflect the light back to the driver, thereby improving retro-reflectivity and driver safety.
In general, retro-reflectivity is influenced by the following:
1. Bead Coverage 2. Gradation 3. Color / Clarity / Defects 4. Roundness 5. Binder Quality 6. Embedment 7. Refractive Index 8. Other Application Variables (road surface, weather, etc.)
1. Good bead coverage or an even distribution of glass beads is one important factor that willcontribute to good retro-reflectivity.
2. Gradation refers to the size distribution of glass beads that can be used in an application. Thegradation is usually determined by the State, Federal, or contractor specification.
Typical road marking specifications will range from 20 -100 U.S. Mesh. Large bead gradations canrange from 12 - 30 U.S. Mesh.
The gradation or size distribution of glass beads can affect reflectivity depending on the binder thick-ness and type of road marking being applied. The small beads can sink in certain applications,leaving only the larger beads visible above the surface. On the other hand, if the bead gradation istoo large, traffic may prematurely knock the beads out of the binder system (especially with a thin,dry mil thickness binder).
3. Color and clarity of the glass bead will also affect reflectivity. The more transparent the glassbead and the fewer the defects or bubbles, the better the refracted image and light return.
4. Roundness of the beads affects the focus, refractive angle and area for light to return. Non-spherical beads will not reflect uniformly, leading to loss in overall reflectivity. Most specificationsrequire minimum rounds from 70% to 80% for conventional beads, and 80% to 90% for large beads.
5. Binder color and quality will also affect retro-reflectivity levels. Binders with higher pigmentloads will generally improve reflectivity even with the exact same beads. Other binder qualitiessuch as thickness, formulation, and material composition are contributing factors to both reflectivityand the longevity of a pavement marking.
Proper bead coverage and distribution Poor bead coverage and distribution
Page 3
Water
Retroreflected Light
Marking Material

6. Embedment refers to the depth the drop-on glass beads fix into the binder material. Properembedment should be in the range of 50% - 60% of the bead diameter in order to maximizeperformance.
If the embedment is too deep (> 60%), not enough of the bead will be exposed to capture thelight and return it to the driver. If embedment is too shallow (<50%), the beads will have atendency to prematurely pop out of the binder material.
Proper glass bead embedment is a function of many variables including binder viscosity, glassbead coating, size of the glass bead, solvent used, ambient temperature, binder temperature,equipment design and binder application.
a) Viscosity is a measure of the flowability of the binder material - the less viscous, the more flowable the material. In the case of thermoplastic, when more heat is applied to the binder, the more it flows. (Caution: overheating of thermoplastic is not recommended)
The viscosity directly affects the way the binder will suspend the glass beads. For example, if the thermoplastic is too hot, it will allow the beads to sink faster and leave too little of the bead exposed. If the binder is not hot enough or too viscous, the beads will stay on top of the material and not embed deeply enough.
Each type of marking material or binder has different temperature and handling characteristics so it is very important that the binder manufacturer’s recommendation are followed and closely monitored during the application in order to ensure proper bead embedment.
b) Coatings may also be added to the surface of the glass beads in order to help improve good bead embedment and adhesion. The proper coating helps promote better suspension in the binder material and improved bead adhesion.
c) Glass bead size can make a difference when it comes to good embedment. For instance, a binder system that has long drying time and/or large mil thickness may allow smaller gradation beads to sink and become buried. In such cases larger beads may be better suited.
d) Solvent composition and temperature of a binder can also make a difference in the embed- ment of glass beads. These factors play a major role in the viscosity, pot life, and cure time of a binder. The longer it takes for a material to cure or dry, the greater the chance that glass beads have in sinking into the material. Of equal importance are ambient temperatures and equip- ment design. These factors can affect the way a binder system cures and the way glass beads embed into a binder system respectively.
Good glass bead embedment Shallow (<50%) glass bead embedment
7. The Refractive Index of the glass bead will determine the degree of focus that will return retro-reflected light to its source (i.e. the headlight) and is a function of different glass chemistries. Intheory, the higher the index, the sharper the focus and the higher the retro-reflectivity, assuming allother variables remain constant. Conventional glass beads have a refractive index value of 1.5which typically meets most D.O.T. and federal requirements.
Samples (A) and (B) are two different types of waterborne paint with the exact same glass beads.Note the difference...
266 mcd
A B
485 mcd
Page 4
Deep(>50%) glass bead embedment

Special chemical coatings are often applied on the surface of glass beads in order to promoteadhesion to binder marking materials, or impart moisture resistance, or improve flotation properties.
Single applications or combinations of these coatings are possible, depending on the specifiedmaterial requirements. Some coatings are required according to State or Federal specifications.Otherwise, please consult with a representative to help find the proper coating for your applicationand binder material.
Contamination of glass beads, either moisture or foreign debris, can cause malfunction of applicationequipment and lead to considerable delays. Therefore we suggest the following tips to help preventsuch problems:
• Store material in an enclosed, dry environment. • If outdoor storage is unavoidable, make sure the beads are entirely and securely covered with a water impermeable material. • Keep pallets on dry ground above water level. • Only open packaging shortly before use. • Never leave packaging open; always cover beads after use or opening.
A successful application requires
proper preparation and adjustments.
This applies to any and all pavement
marking materials that you are using.
• Make sure the road surface is properly cleaned and dried. • Make sure that ambient temperatures are adequate and acceptable for application of pave- ment marking material. Many materials require a minimum air and surface temperature of
o 50 F and rising. • If applying over an existing line, consult with agency, engineer or manufacturer prior to installation. • When dealing with a rough or oxidized surface on asphalt or Portland cement, make sure that it is properly treated to ensure a good bond with the pavement marking material. Consult with the manufacturer of the pavement marking material and follow their recommendations. • When dealing with rough, highly textured or chip seal surfaces, be aware that thickness of material will not be uniform. For best performance consider adding additional material to the recommended thickness to obtain a more consistent line. • Highly textured and rough surfaces may also require additional drop-on glass beads.
III. GLASS BEAD COATINGS
IV. HANDLING AND STORING GLASS BEADS
V. QUALITY CONTROL & APPLICATION RECOMMENDATIONS
A. Location and Application Conditions
General Types of Coatings
AbbreviationAdhesion CoatingsMoisture Resistant CoatingsFlotation Coatings
ACMRFT
Promote chemical bonding to different marking materialsMaintain free flow of beads and prevent clumping.
Prevent sinking and promote better bead suspension
Purpose
Crew preparing for an application
Page 5

Smooth AsphaltHighly textured chip-seal surface
Most projects will specify the materials and parameters you must meet to complete thejob. If not, ask yourself the following questions to help ensure optimum results:
1. Bead Gun: Gravity or pressurized?2. Bead Loading: How much should be applied per unit area?3. Thickness of Binder Material: How many mils should be applied?4. Application Speed: What speed will the binder material permit? At what striping speed will the beads embed properly and uniformly?5. Glass Bead Gradation: Large, small, or a blend? What are the agency requirements?6. Binder and Color: Which binder material will best meet requirements (longevity, cost, road surface, etc.)?7. Single or Double Drop System: Will a single drop or double drop achieve the best results?
Make sure your equipment is functioning properly so as to allow for a smooth and time efficientapplication. The equipment needs to be approved and accepted by a project engineer or agency.
• All devices and instrument that hold and move pavement arking materials should be inm place and functioning properly. • If the binder needs specific heating, make sure the properly recommended temperatures are set. • Check extrusion dyes, spray guns, or nozzles for proper operation. • Make sure the bead tanks are properly cleaned, have no cracks or leaks, and are dry (check for condensation if left outside overnight). • Inspect the hoses that transport the beads from the tank to the bead gun (clean, no cracks, leaks, or moisture).
I • nspect the glass bead gun and make sure it is not damaged or bent. If it is a pressurized flow gun, check the valve outlet for damage or blockage. • If using a gravity flow gun while applying large beads, make sure to calibrate the bead rate
and adjust bead gun outlet valve accordingly. If not otherwise specified, follow glass bead manufacturer’s recommendations and tips.
After the equipment has been checked and the weather conditions are acceptable, a short trialapplication is recommended before the full run.
Tools and devices required: • Tar paper • Knife • Duct tape • Micrometer or wet mil gauge • Latex or heat resistant gloves • Magnifying glass • Acetone • Camera (optional) • Hammer • Draw down plates • Wire Brush • Reflectometer
B. Choosing Your Application Requirements
C. Equipment Checklist
D. Calibrating Thickness
Page 6

• Choose a panel type depending on the binder material you are working with (see table below).
• Measure the thickness of the panel using a caliper or micrometer and record.
• Tape these panels on the road surface area to be striped and make sure that they are secured.
• Apply a trial run onto the panels.
• Allow for cooling or drying and measure from the bottom of the panel to the top of the binder. a) Wear safety gloves! b) Use acetone or other organic solvent to clean micrometer.
• Subtract the measurement of the panel to get the approximate material thickness. Measure across entire line cross section to get average line thickness.
• Repeat above steps until proper thickness is achieved. Apply on road surface and measure again, if possible.
• If surface is highly textured or rough (i.e. Chip seal), calibrate thickness on aluminum plate and add additional material to recommended thickness. Inspect the line for uniformity, proper width and bead embedment.
• Make sure the bead gun and equipment are calibrated.• Shoot a 50 ft line with drop on glass beads.• Inspect the line when cured or dried for proper line width and uniformity.• Brush off loose beads. Check the embedment and distribution of the glass beads with magnifying glass.
1. Determine Proper Mil Thickness
1. Apply A Test Line With Glass Beads
Aluminum
X X
X X
X
X X
X X
X
X
X X
X X
X X
X X
Water Bourne Paint
Solvent Bourne Paint
Thermoplastic
Methyl Methacrylate
Epoxy
Polyurethane
Polyurea
Polyester
Duct Tape Tar Paper
Panel Materials That Can Be Used For Measuring The Line
E. Quality of Line
Page 7
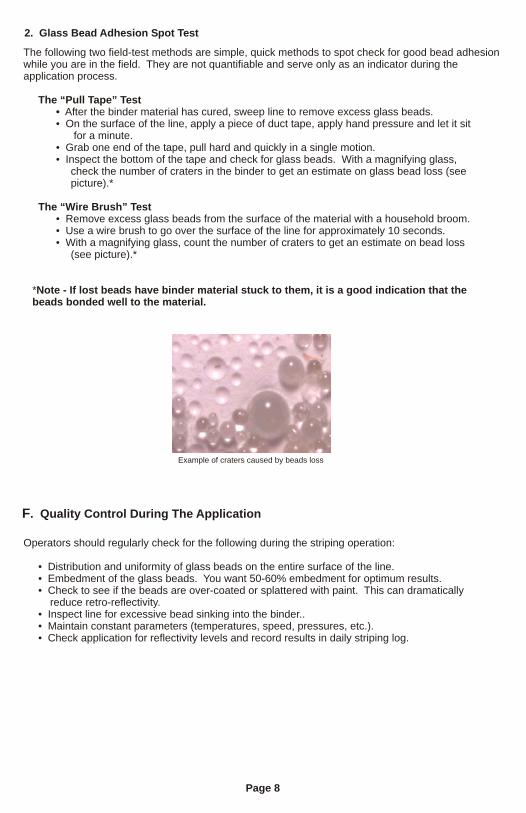
The following two field-test methods are simple, quick methods to spot check for good bead adhesionwhile you are in the field. They are not quantifiable and serve only as an indicator during theapplication process.
The “Pull Tape” Test • After the binder material has cured, sweep line to remove excess glass beads. • On the surface of the line, apply a piece of duct tape, apply hand pressure and let it sit for a minute. • Grab one end of the tape, pull hard and quickly in a single motion. • Inspect the bottom of the tape and check for glass beads. With a magnifying glass, check the number of craters in the binder to get an estimate on glass bead loss (see picture).* The “Wire Brush” Test • Remove excess glass beads from the surface of the material with a household broom. • Use a wire brush to go over the surface of the line for approximately 10 seconds. • With a magnifying glass, count the number of craters to get an estimate on bead loss (see picture).*
*Note - If lost beads have binder material stuck to them, it is a good indication that the beads bonded well to the material.
Operators should regularly check for the following during the striping operation:
• Distribution and uniformity of glass beads on the entire surface of the line. • Embedment of the glass beads. You want 50-60% embedment for optimum results. • Check to see if the beads are over-coated or splattered with paint. This can dramatically reduce retro-reflectivity. • Inspect line for excessive bead sinking into the binder.. • Maintain constant parameters (temperatures, speed, pressures, etc.). • Check application for reflectivity levels and record results in daily striping log.
2. Glass Bead Adhesion Spot Test
F. Quality Control During The Application
Example of craters caused by beads loss
Page 8

PROBLEM
Beads are clumpingprior to entering gun
Concentration of beadson one side of the line
Excessive glassbead use
Pulsating beadapplication
Reflectivity
Overflow of beadson roadway
Poor glass beadembedment
Too many beads inmiddle of line
Glass beads are sinking
Bead gun is clogged
Incorrect alignment
Clumped beads
Worn out gun orifice
Too much air pressure
Not enough tank pressure
Blockage in bead tank line
Improper glass bead embedment
Insufficient glass beads
Binder quality
Too many beads on line for the binder thickness
Bead gun shroud too wide
Bead gun too far fromline
Excessive bead pressure
Bead gun too far from line
Binder curing too fast orslowPaint or binder gun notaligned correctly
Incorrect Alignment
Bead gun control screw needs adjustment Bead gun shroud notcorrectly adjusted
Bead tank pressure to low
Bead gun too close to line
Pressure too high on bead gun
Material thickness toohigh vs bead loading
Very low binder viscosity
Repair orifice or part
Decrease the pressure
Adjust increase in pressureor check compressor
Inspect and clean line
Adjust bead gun rate
Consult Manufacturer
With a magnifying glass,make sure the embedmentis 50-60%
Reduce your bead loadingand increase your stripingspeed
Reduce the shroud width
Lower bead gun height
Reduce bead pressure
Adjust height to no lessthan 4”
Adjust application temp. of binder
Adjust alignment
Adjust alignment
Adjust control screw
Increase pressure
Adjust gun height to noless than 4”
Reduce Pressure
Correct mil thickness
Adjust viscosity
Adjust shroud to correctwidth
Clean bead gun orifice and dispenser.Adjust gun alignment
Keep glass beads awayfrom moisture.
Moisture has accumulatedand caused beads to clump Replace with dry beads.
POSSIBLE CAUSE WHAT TO DO
VI. TROUBLE SHOOTING TABLE
Page 9

Ambient Temperature - the surrounding temperature at a given place and time.
Bead Loading - the concentration or weight of glass beads on a line per unit area.
Bonding - the process by which two or more separate materials adhere or fuse together via athermal, chemical or mechanical link, i.e. Beads bonding to the binder.
Calibration - method used to standardize a process to obtain consistent and reproduciblemeasurements.
Chip Seal - highly textured road surface composed primarily of exposed gravel rocks and asphaltic binder
Coatings - special chemicals used to treat surfaces of glass beads to impart a special quality orcharacteristic (i.e. flowability, adhesion)
Embedment - portion of a material or object that lies beneath the surface of another material.
Glass Bead Gradation - system used to quantify separate sizes of glass beads based on their diameters.
Gravity Flow Gun - apparatus that dispenses glass beads by simply using gravity and no otherexternal force.
Mil Thickness - commonly used method to measure a binder material thickness: 1Mil=0.001 inch
Oxidized Surface - chemical process that results in the deterioration and physical decompositionof a surface material.
Pressurized Flow Gun- apparatus that dispenses glass beads by using air pressure as theexternal force.
Reflectometer - special instrument used to measure the amount of retro-reflected light.
Refraction - the bending of a light beam at the interface between two transparent media.
Retro-reflectivity - the amount of light that is returned from a glass bead back to the source.
Viscosity - resistance of a fluid to flow.
Wet/Night Visibility - a concept commonly used to describe the amount of brightness provided bya pavement marking under wet/night conditions.
VI. TERMS & DEFINITIONS:
KEEPING HIGHWAY SAFETY IN SIGHT
www.swarco.com
Page10
ENVIRONMENTALLY FRIENDLY
Not only are glass beads a major component of
nearly every type of reflective pavement marking
material, but they are manufactured with recycled
glass.

The Road Most TraveledFor Highway Safety Material
Swarco Reflex, Inc. P. O. Box 1558900 N. DentonMexia, TX 76667
Tele: (254) 562-9879 (877) 634-2589Fax: (254) 562-7601
Swarco Industries P. O. Box 89Columbia, TN 38402
Tele: (931) 388-5900 (800) 216-8781Fax: (931) 388-4039
Visit Our Website: www.swarco.com
ReflectiveGlass Beads
Rumble Strips
Thermoplastic MarkingCompound
PermanentMarking Tape
Temporary ConstructionZone Marking Tape