GLASGOW ART CLUB – EDUCATION PACKS · PDF fileGLASGOW ART CLUB – EDUCATION PACKS...
21
GLASGOW ART CLUB – EDUCATION PACKS Introduction The education resources for Glasgow Art Club have been created by a small group of talented teachers passionate about art; about teaching; and about making the cultural resources of Glasgow Art Club accessible to educational groups. There is a section with information on how to book an educational visit, some guidance on risks and potential hazards, to help teachers or others bringing educational groups, assess and plan their visits. Then there are the resources for each sector: early years, primary, secondary art and design students, and resources for using with National Progression Award students at level 4. The last page of the pack is a feedback form. If you could fill in a form, and hand it or email it to the Club after your visit, it would be of great help to the Club in monitoring visits, and assess their value to teachers and students. This pack was produced by Jackie Marno, Laura Bernstein, Eileen Campbell and Rhona Black, with co-ordination by Emma Griffiths, Building Learning. The pack was funded by Heritage Lottery Fund, part of a wider repair, conservation and engagement project to allow more people to access and appreciate the cultural heritage of the Glasgow Art Club. We hope you enjoy your visit. Booking your visit Glasgow Art Club has produced these resources for teachers to encourage self-led visits by education groups. The Club is busy a lot of the time, with members, diners, events and functions. Staff of Glasgow Art Club may be available when groups visit, and will do their best to assist if there is capacity. The resources have been designed for teachers to lead their own visits, and the assistance of Club staff should not be depended upon. A teacher pre-visit is essential. Visits are particularly welcome on Mondays and Tuesdays, between 11am and 12 noon, and in the afternoon between 2pm and 3pm. Please email the manager at [email protected] or call 0141 248 5210 and speak to a member of staff to arrange your visit, which will require a reasonable amount of notice, and dates offered that do not clash with other events or bookings. Please also look at the Planning Your Visit suggestions on the following page, which teachers may wish to use to create a visit risk assessment which complies with the requirements of their own establishment.
Transcript of GLASGOW ART CLUB – EDUCATION PACKS · PDF fileGLASGOW ART CLUB – EDUCATION PACKS...

GLASGOW ART CLUB – EDUCATION PACKS
Introduction
The education resources for Glasgow Art Club have been created by a small group of talented teachers passionate about art; about teaching; and about making the cultural resources of Glasgow Art Club accessible to educational groups.
There is a section with information on how to book an educational visit, some guidance on risks and potential hazards, to help teachers or others bringing educational groups, assess and plan their visits.
Then there are the resources for each sector: early years, primary, secondary art and design students, and resources for using with National Progression Award students at level 4.
The last page of the pack is a feedback form. If you could fill in a form, and hand it or email it to the Club after your visit, it would be of great help to the Club in monitoring visits, and assess their value to teachers and students.
This pack was produced by Jackie Marno, Laura Bernstein, Eileen Campbell and Rhona Black, with co-ordination by Emma Griffiths, Building Learning. The pack was funded by Heritage Lottery Fund, part of a wider repair, conservation and engagement project to allow more people to access and appreciate the cultural heritage of the Glasgow Art Club.
We hope you enjoy your visit.
Booking your visit
Glasgow Art Club has produced these resources for teachers to encourage self-led visits by education groups.
The Club is busy a lot of the time, with members, diners, events and functions. Staff of Glasgow Art Club may be available when groups visit, and will do their best to assist if there is capacity. The resources have been designed for teachers to lead their own visits, and the assistance of Club staff should not be depended upon. A teacher pre-visit is essential.
Visits are particularly welcome on Mondays and Tuesdays, between 11am and 12 noon, and in the afternoon between 2pm and 3pm.
Please email the manager at [email protected] or call 0141 248 5210 and speak to a member of staff to arrange your visit, which will require a reasonable amount of notice, and dates offered that do not clash with other events or bookings. Please also look at the Planning Your Visit suggestions on the following page, which teachers may wish to use to create a visit risk assessment which complies with the requirements of their own establishment.

Planning your visit
This document is for guidance – teachers should carry out and use their own assessment. School staff are responsible for their pupils at all times.
• For large self-led groups, staff and children should be divided into smaller groups• Each group must have an appointed leader (teacher or responsible adult). • All staff and group leaders should carry a list of the children in their group.
The recommended adult/pupil ratio is:• For early years 3, a minimum of 1 adult to every 5 children. • For primary groups, a minimum of 1 adult to 10 children.• For secondary groups, a minimum of 1 adult to 15 students.
Risks and Potential Hazards Area
Arrival at Glasgow Art Club
Hazard
Traffic on the Bath Street and busy pavements.
Trips, slips and falls on steps and at entrance.
Visitors with disabilities
Trips, slips and falls
Pupils wandering away from their group
Lost children, abductions
Damage to exhibits
Fire
Need for adult assistance
Misbehaviour, including smoking.
Unable to unlock/lock the toilet door
Action
• Group under supervision of accompanying adults.
• Children could gather next to railings outside the club, away from kerbside.
• Pause before proceeding calmly inside, reminded pupils to walk, as it is safer, and please don’t run or climb inside.
• Please discuss requirements with Manager before booking visit.
• Group under close supervision of accompanying adults and behaving appropriately (i.e., please walk, no running, climbing, or shouting).
• Group leaders should be aware of the children’s whereabouts at all times, regularly head count, and are responsible for ensuring adequate provision of responsible adults to supervise the children (see recommended adult/pupil ratio above).
• All accompanying adults to be aware the venue is a semi-public building and of the possible hazards. All accompanying adults to check their groups regularly.
• All accompanying adults to be aware that works of art are not to be touched, unless specifically identified as a handling object. No chewing gum in the Club.
• Club staff will advise on fire procedures, escape routes all clearly marked.
• Children to be supervised by school staff when using the toilets.
• No smoking anywhere in the building.
• Locks on the Ladies, and Accessible toilet doors can be opened from outside by GAC staff – but please note, not the Gents cubicles.
Toilets
Inside Glasgow Art Club

RESOURCE FOR PHOTOGRAPHY STUDENTS
NPA LEVEL 4
INTRODUCTION TO GAC PHOTOGRAPHY
The Glasgow Art Club offers students of photography an opportunity to access a building of significant historical and architectural importance while experiencing the dynamics of a working club environment for artists and lay members. The building is an excellent resource to support the Expressive Arts curriculum. The information below is a sample of how NPA Level 4 Photography may be explored within the club, focusing on the first unit only.
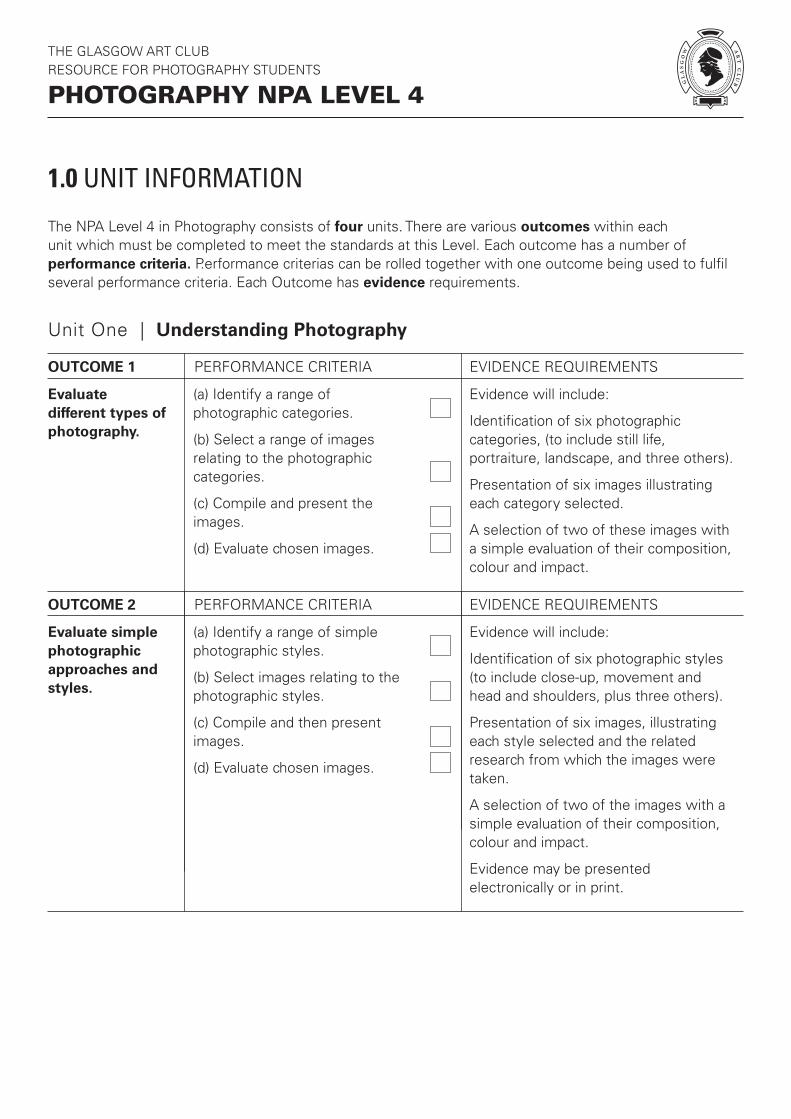
1. Photography Level 4 Unit Information The NPA Level 4 in Photography consists of four units. There are various outcomes within each unit which must be completed to meet the standards at this Level. Each outcome has a number of performance criteria. P.C’s can be rolled together with one outcome being used to fulfil several performance criteria. Each Outcome has evidence requirements.
2. Photography Unit(s) Assessment Check Overview / checklist of the units required to achieve NPA Level 4.
3. Understanding Photography Outcome 1 & 2 Student Check List Overview of what is required to complete “Understanding Photography“ unit. Areas of this may be explored and supported using the building as a resource.
4. Understanding Photography – Styles List of Styles, some of which could be interpreted using the building as a resource.
5. Understanding Photography – Common Photography Terms Supporting information that may be useful when discussing with pupils how they could approach the composition/ subject of their photographs. 6. Photographing the Visual Elements. A task that could be given to pupils as a warm up exercise, photographing areas of the building looking at shape, form texture etc.
7. Photography at Glasgow Art Club Examples of work taken by visiting students from S3 to S6.
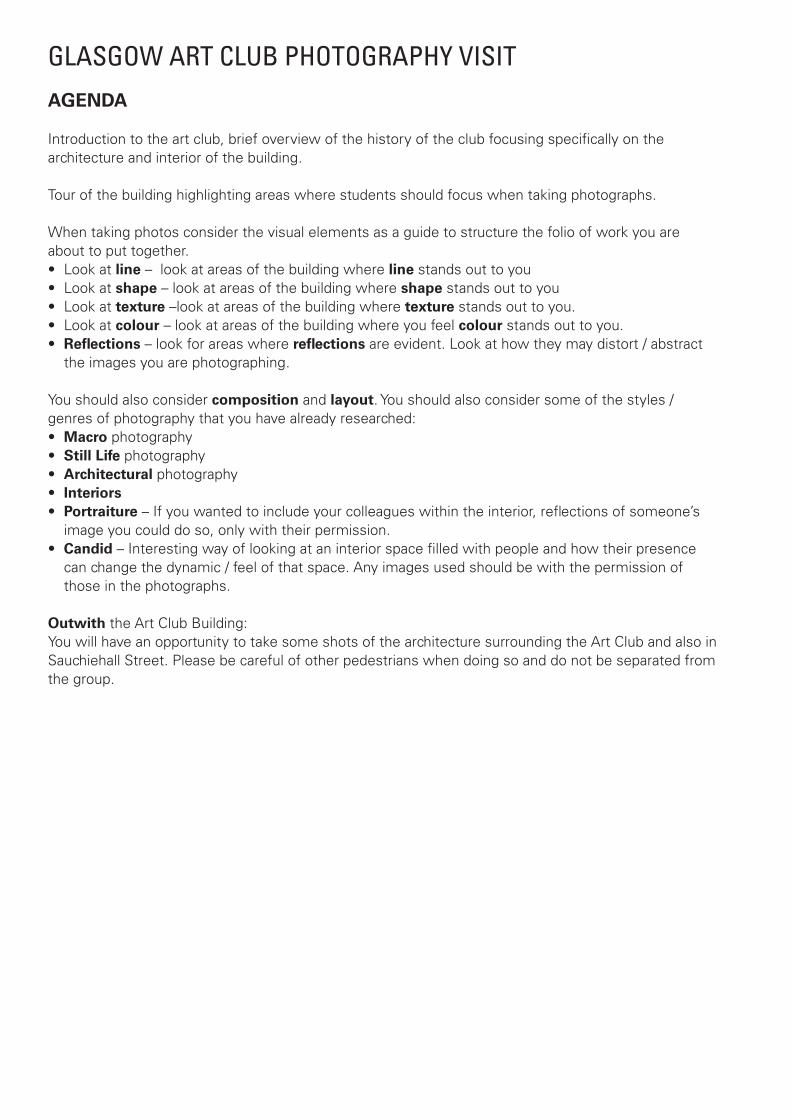
GLASGOW ART CLUB PHOTOGRAPHY VISIT
AGENDA
Introduction to the art club, brief overview of the history of the club focusing specifically on the architecture and interior of the building.
Tour of the building highlighting areas where students should focus when taking photographs.
When taking photos consider the visual elements as a guide to structure the folio of work you are about to put together.• Look at line – look at areas of the building where line stands out to you• Look at shape – look at areas of the building where shape stands out to you• Look at texture –look at areas of the building where texture stands out to you.• Look at colour – look at areas of the building where you feel colour stands out to you.• Reflections – look for areas where reflections are evident. Look at how they may distort / abstract the images you are photographing.
You should also consider composition and layout. You should also consider some of the styles / genres of photography that you have already researched:• Macro photography• Still Life photography• Architectural photography• Interiors• Portraiture – If you wanted to include your colleagues within the interior, reflections of someone’s image you could do so, only with their permission.• Candid – Interesting way of looking at an interior space filled with people and how their presence can change the dynamic / feel of that space. Any images used should be with the permission of those in the photographs.
Outwith the Art Club Building:You will have an opportunity to take some shots of the architecture surrounding the Art Club and also in Sauchiehall Street. Please be careful of other pedestrians when doing so and do not be separated from the group.
THE GLASGOW ART CLUB RESOURCE FOR PHOTOGRAPHY STUDENTS
PHOTOGRAPHY NPA LEVEL 4
The NPA Level 4 in Photography consists of four units. There are various outcomes within each unit which must be completed to meet the standards at this Level. Each outcome has a number of performance criteria. P.erformance criterias can be rolled together with one outcome being used to fulfil several performance criteria. Each Outcome has evidence requirements.
Evaluate different types of photography.
(a) Identify a range of photographic categories.
(b) Select a range of images relating to the photographic categories.
(c) Compile and present the images.
(d) Evaluate chosen images.
Evidence will include:
Identification of six photographic categories, (to include still life, portraiture, landscape, and three others).
Presentation of six images illustrating each category selected.
A selection of two of these images with a simple evaluation of their composition, colour and impact.
Unit One | Understanding Photography
OUTCOME 1 PERFORMANCE CRITERIA EVIDENCE REQUIREMENTS
Evaluate simple photographic approaches and styles.
(a) Identify a range of simple photographic styles.
(b) Select images relating to the photographic styles.
(c) Compile and then present images.
(d) Evaluate chosen images.
Evidence will include:
Identification of six photographic styles (to include close-up, movement and head and shoulders, plus three others).
Presentation of six images, illustrating each style selected and the related research from which the images were taken.
A selection of two of the images with a simple evaluation of their composition, colour and impact.
Evidence may be presented electronically or in print.
OUTCOME 2 PERFORMANCE CRITERIA EVIDENCE REQUIREMENTS
1.0 UNIT INFORMATION

Plan photography sessions based on a selection of images of people taken outdoors.
a) Choose images of people, taken outdoors.
(b) Explain why the images were selected.
(c) Describe the style and photographic approach of each chosen image.
(d) Create a plan for photographing people.
Candidates must select three diverse images of people taken outdoors. For each image, candidates must explain why the images were selected and describe the photographic approach in terms of:• The style • The mood/feel • The location • The lighting• The viewpoint • The facial expression of the subject(s) Candidates must create a practical plan for photography sessions, identifying a minimum of two ideas/concepts arising from images they have seen. This must be based on the images selected in this Outcome. The plan must include:• details about the location• travel information to the locations. • a description of the style of people photography planned.
Unit Two | Photographing People
OUTCOME 1 PERFORMANCE CRITERIA EVIDENCE REQUIREMENTS
Take a range of controlled and composed photographs of people outdoors.
(a) Select appropriate imaging equipment.
(b) Photograph people in a controlled and considered manner.
(c) Safely store all of the images taken.
Using appropriate imaging equipment, candidates must take a minimum of 30 photographs of people on location in a controlled manner, including the use of appropriate lighting conditions. Complex camera settings are not assessed and simple automatic functions of cameras can be used. Images must be stored safely using appropriate file format for retrieval and viewing.
OUTCOME 2 PERFORMANCE CRITERIA EVIDENCE REQUIREMENTS
Present selected photographs of people.
(a) Select appropriate photographs of people.
(b) Explain why the photographs were selected.
(c) Present the photographs.
Candidates must select two of the images taken in Outcome 2 for presentation and explain reasons why these images have been selected. Candidates must present prints of two images – minimum size 6” x 4“ (15.24 cm x 10.16 cm). The physical prints do not have to be produced by candidates.
OUTCOME 3 PERFORMANCE CRITERIA EVIDENCE REQUIREMENTS

Plan photography sessions based on a selection of images of outdoor places.
(a) Choose images of outdoor places.
(b) Explain why the images were selected.
(c) Describe the style and photographic approach for each chosen image.
(d) Create a plan for photography sessions of outdoor places.
Candidates must select three diverse images of places taken outdoors, with an explanation for their choices. For each image, candidates must explain why the images were selected and describe the photographic approach in terms of:• The choice of location • The framing • The viewpoint• The time of day
Candidates must show they have considered the choice of place and vantage points to photograph either using creativity in their choice, or their photographic approach. Candidates must create a practical plan identifying a minimum of two ideas/concepts arising from images they have seen. The plan must include details of possible locations, ideas for framing and a range of potential viewpoints. This must be based on the images selected in this Outcome.
Unit Three | Photographing Places
OUTCOME 1 PERFORMANCE CRITERIA EVIDENCE REQUIREMENTS
Take a range of controlled and composedphotographs of outdoor places.
(a) Select appropriate imaging equipment.
(b) Produce well composed and exposed photographs of outdoor places.
(c) Safely store all images taken.
Candidates must take a minimum of 30 photographs in a minimum of four outdoor places and must select appropriate imaging equipment. Complex camera settings are not assessed and simple automatic functions of cameras can be used. Candidates must demonstrate that they can choose appropriate lighting conditions (time of day, direction of light, weather conditions) to show a location or place to its best advantage. Images must be stored safely using easily retrievable names.
OUTCOME 2 PERFORMANCE CRITERIA EVIDENCE REQUIREMENTS
Present selected photographs of outdoor places.
(a) Select photographs of outdoor places.
(b) Explain why the photographs were selected.
(c) Present the photographs.
Candidates must select two of the images taken in Outcome 2 for presentation and explain reasons why these images have been selected.
Candidates must present prints of two images – minimum size 6” x 4“ (15.24 cm x 10.16 cm). The physical prints do not have to be produced by candidates.
OUTCOME 3 PERFORMANCE CRITERIA EVIDENCE REQUIREMENTS

Provide a simple evaluation of a range of chosen images.
(a) Identify strengths and weaknesses of chosen images.
(b) Choose one image from your selection and identify its key components.
(c) Suggest improvements to the image.
Candidates must select three existing images and identify three strengths and three weaknesses in each image.
Candidates must then choose one of the images and describe in simple terms how it could be enhanced in terms of content composition and lighting for a desired effect.
Unit Four | Working with Photographs
OUTCOME 1 PERFORMANCE CRITERIA EVIDENCE REQUIREMENTS
Make simple enhancements to an image.
(a) Choose an area of the selected image to enhance.
(b) Make a simple enhancement to the image.
(c) Explain how the enhancements were made.
Using the image selected in Outcome 1, candidates must make a minimum of one appropriate enhancement.
Candidates must also resize the image for presentation according to the presentation format they have chosen.
OUTCOME 2 PERFORMANCE CRITERIA EVIDENCE REQUIREMENTS
Store and handle images safely.
(a) Select an appropriate format to store the image.
(b) Store the image in a secure and accessible manner.
(c) Explain the importance of appropriate storage and handling.
Using an appropriate method, candidates must store the final image created in Outcome 2. They must label the image in a manner which makes it easy to retrieve. They must also give two reasons for their choice of storage and a simple explanation of the importance of handling and storing images safely.
OUTCOME 3 PERFORMANCE CRITERIA EVIDENCE REQUIREMENTS

THE GLASGOW ART CLUB RESOURCE FOR PHOTOGRAPHY STUDENTS
PHOTOGRAPHY NPA LEVEL 4
Unit One | Understanding Photography
2.0 CHECKLIST
1. Selected six different categories
2. Selected six pictures within each category
3. Select min two images − evaluate composition, colour and impact
1. Identify six photographic styles
2. Present the six images with research info
3. Select min two images − evaluate composition, colour and impact
OUTCOME 1 Evaluate different types of photography.
OUTCOME 2 Evaluate simple photographic approaches and styles.
Unit Two | Photographing People
1. Select a min three different photo images people outdoors
2. Explain the style, the mood/feel, the location, the lighting, the Viewpoint, the facial expression of the subject(s)
3. Prepare plan – practical written and visual
1. Select appropriate equipment for shoot – see plan
2. Pose photo compositions min of six photos
3. Edit and store images safely and securely
1. Select appropriate equipment for shoot – see plan
2.
OUTCOME 1 Photography sessions based on a selection of images of people taken outdoors.
OUTCOME 2 Take a range of controlled and composed photographs of people outdoors.
OUTCOME 3 Present selected photographs of people.
Notes:

Unit Three | Photographing Places
1. Select a min three different photo images outdoors - Landscape
2. Explain the choice of location, the framing, the location, the time of day / lighting, the viewpoint
3. Prepare plan – Practical written and visual
1. Select appropriate equipment for shoot – see plan
2. Pose photo compositions min of six photos
3. Edit and store images safely and securely
1. Select two images and explain why they were selected
2.
OUTCOME 1 Plan photography sessions based on a selection of images of outdoor places.
OUTCOME 2 Take a range of controlledand composed photographs of outdoor places.
OUTCOME 3 Present selected photographs of outdoor places.
Unit Four | Working with Photographs
1. Select three existing images identifying 3 strengths and three weaknesses
2. One of the images describe in simple terms how it could be enhanced in terms of content composition and lighting for a desired effect
1. From selected image above enhance (edit) and re size
2. Explain what you did to enhance image
1. Select an appropriate format to store the image – from outcome two – label clearly for access
2. Give two reasons for choice of storage
3. Explain the importance of handling and storing images safely
OUTCOME 1 Provide a simple evaluation of a range of chosen images.
OUTCOME 2 Make simple enhancements to an image.
OUTCOME 3 Store and handle images safely.
Notes:

THE GLASGOW ART CLUB RESOURCE FOR PHOTOGRAPHY STUDENTS
PHOTOGRAPHY NPA LEVEL 4
Name Class
Outcome 1: Evaluate different types of photography
3.0 UNDERSTANDING PHOTOGRAPHY CHECKLIST
Select six different photographic categories
CATEGORIES PHOTOGRAPHERS IMAGES (Minimum)
1. STILL LIFE 1. six images
2. six images
2. LANDSCAPE 1. six images
2. six images
3. PORTRAITURE 1. six images
2. six images
4. FASHION 1. six images
2. six images
5. SPORT/WILDLIFE 1. six images
2. six images
6. ARCHITECTURE 1. six images
2. six images
Select two photographs from each category above and give a brief evaluation of the:
1. Composition Discuss the composition of the image, looking at focal point, arrangement of objects/people, depth, distance, movement, where applicable. See hand out for additional information.
2. Colour How much colour is in the image? Is it low key? Is it high key? Is it limited, warm, cold, bright? See hand out for additional information.
3. Impact What impact do you think the image creates? How does it make you / the viewer feel? What kind of impression has it made? Does the image influence your/ the viewer’s feelings, thoughts or opinions on the subject matter? Has the colour and or composition contributed to the impact of the image? Ensure you include the image you are evaluating. You may use bullet points if you wish. Referring to the hand out sheets would help with a more in depth answer.

Name Class
Outcome 2: Evaluate simple photographic approaches and styles
CATEGORIES PHOTOGRAPHERS IMAGES (Minimum)
1. MACRO 1. three images
2. three images
2. HEAD AND 1. three images
2. three images
3. TIME LAPSE / 1. three images
2. three images
4. 1. three images
2. three images
5. 1. three images
2. three images
6. 1. three images
2. three images
Each style researched should have a written definition – please see hand out sheet
Select two styles from above and give a brief evaluation of:
1. Composition Discuss the composition of the image, looking at focal point, arrangement of objects/people, depth, distance, movement, where applicable. See hand out for additional information.
2. Colour How much colour is in the image? Is it low key? Is it high key? Is it limited, warm, cold, bright? See hand out for additional information.
3. Impact What impact do you think the image creates? How does it make you / the viewer feel? What kind of impression has it made? Does the image influence your/ the viewer’s feelings, thoughts or opinions on the subject matter? Has the colour and or composition contributed to the impact of the image?
Ensure you include the image you are evaluating. You may use bullet points if you wish. Referring to the hand out sheets would help with a more in depth answer.
SHOULDERS
MOTION BLUR
Select six different photographic styles, you may select the styles of photography from the list.To include close up (Macro), Movement (Time lapse/ Motion Blur) and head and shoulders (make sure the shoulders, waist, and hips are never squared off, this style of posing reflects power).

Notes:- EXAMPLE OF HOW TO ANSWER EVALUATION
CompositionThe composition is simple, as there is only one figure in a vast space. It shows perspective where you see the tunnel going into the distance. The focal point is the figure to the right. I am drawn to this because of the light of the tunnel surrounding the figure.
ColourThere is no colour as the image has been taken in black and white. It is also low key in style which creates an isolated atmosphere. It is quite dark in tone giving a feeling of danger.
ImpactThe image creates a strong impact on the viewer. The low key style is very dramatic as it creates a feeling of fear, danger and isolation of the single figure to the right of the photograph. The graffiti gives the impression of a rundown area which supports the atmosphere of fear and danger. This has influenced my opinion of the image/place where the photograph was taken. The composition has contributed to the impact of the image seen in the photographer’s use of an isolated figure in a dark tunnel along with the graffiti and derelict appearance of the area surrounding the man.

THE GLASGOW ART CLUB RESOURCE FOR PHOTOGRAPHY STUDENTS
PHOTOGRAPHY NPA LEVEL 4
4.0 UNDERSTANDING PHOTOGRAPHY - STYLES
1. Black & White Black and white photography existed for a long time before the advent of colour photography. These days photographers may choose to reproduce their images in black and white for artistic reasons, one of these being the creation of mood and atmosphere within an image.
2. High Dynamic Range (HDR) High Dynamic Range (HDR) is a process which tries to match more closely what our eyes see. Three images are taken of the same object but with three different exposures. One dark, one light and another somewhere in between. These three images are then combined into a single image. The final single image will have a much better balanced exposure.
3. Time Lapse/Motion Blur/Long Exposure Time lapse and motion blur photography can be used to capture any type of movement. Usually cameras need to be set on a tripod and the shutter speed open for a long interval of time.
4. Macro Macro is extreme close up photography. These images aim to create large close ups of something which is normally very small. Many cameras have a macro mode identified by a flower symbol. More advanced macro work can be done through the use of specific macro lenses.
5. Candid Candid photography is one of the least intrusive forms of photography and is usually captured without the subject (person) knowing.
6. Pictorialism Pictorialism is an approach to photography that emphasizes the beauty of subject matter, tonality, and composition rather than the documentation of reality. This type of photography applies many principles of fine art (drawing and painting) and is
its modern equivalent is often referred to as Fine Art Photography. Many Fine Art photographers refer to themselves as artists rather than photographers.
7. Tilt Shift Tilt–shift photography is the use of camera movements on small and medium-format cameras, and sometimes specifically refers to the use of tilt for selective focus, often for simulating a miniature scene.
8. Romanticism An artistic and intellectual movement originating in Europe in the late 1700s and characterized by a heightened interest in nature, emphasis on the individual’s expression of emotion and imagination, departure from the attitudes and forms of classicism, and rebellion against established social rules.
9. Photomontage Photomontage is the process of making a new photograph by cutting and joining two or more photographs together. The resulting composite image is often created in a way so that it appears as a seamless photographic print. Today’s technology allows us to create photo montage pieces quickly and easily by using programmes such as Photoshop.
10. Photo Collage Photo collage is the creation of a larger image using lots of smaller ones sometimes using a different angle. In this technique the photographer does not try to hide the joining edges often making the final image look disjointed.
11. Conceptualism Conceptual photography means the photographer is trying to write a story in your head with a single image. A lot of the time the message is conveyed in a very abstract way using random objects and props. Although the image may be shot to tell

one story, it can very easily be interpreted many different ways by each person who sees it.
12. Monochromatic Monochromatic images do not always have to be black and white. Colour can be used to create interesting monochrome images. Monochrome means tones of a single colour.
13. Abstraction Using unique camera angles which show only a section of an object can sometimes create stunning abstract images. These often crop out any contextual clues as to what the object is or where is may be situated. They can focus on capturing changes of tone, line, pattern, shape or texture.
14. Selective Colouring Selective colouring is a Photoshop process which can create a direct focal point by keeping one area in colour while the rest remains in black and white.
15. Photo Surrealism Photo surrealism is the creation of odd, strange, dream-like and sometimes impossible scenes and images. Today these photographs rely heavily on the use of photo manipulation software such as Photoshop. This style of photography takes much technical skill and patience making it difficult for beginners to recreate successfully.
16. High Key High key images are created by the use of lighting and are the opposite of low key. They often create a light, bright atmosphere in an image. This type of overexposed (too much light) image can applied to a variety of different genres however it is most commonly found in portraiture.
17. Low Key Low key images are created by the use of lighting. They often create a dark and moody atmosphere in an image. This type of dark image can applied to a variety of different genres however it is most commonly found in portraiture.
18. Panoramic Many cameras have panoramic modes built in which will automatically stitch images together to create these wide images. Photoshop can be used to do this when working from multiple images too but there are many free websites/apps/software which can take the pain out of putting these images together.
THE GLASGOW ART CLUB RESOURCE FOR PHOTOGRAPHY STUDENTS
PHOTOGRAPHY NPA LEVEL 4
5.0 COMMON PHOTOGRAPHY TERMS
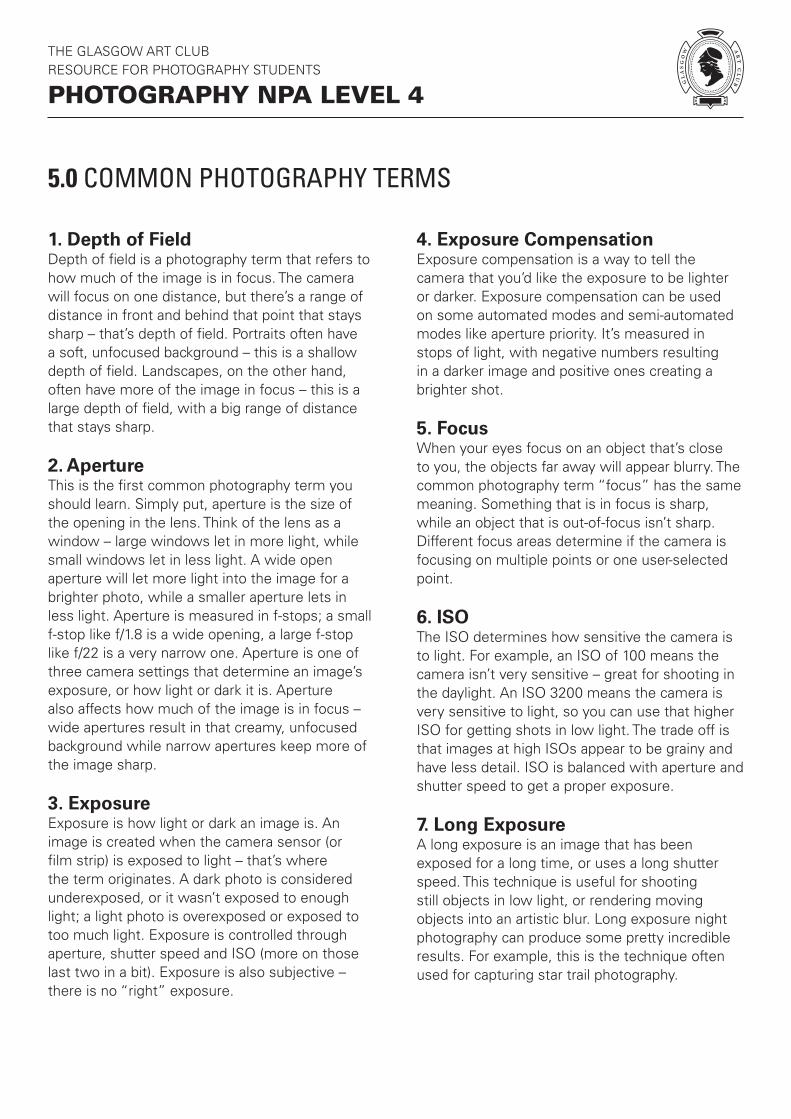
1. Depth of FieldDepth of field is a photography term that refers to how much of the image is in focus. The camera will focus on one distance, but there’s a range of distance in front and behind that point that stays sharp – that’s depth of field. Portraits often have a soft, unfocused background – this is a shallow depth of field. Landscapes, on the other hand, often have more of the image in focus – this is a large depth of field, with a big range of distance that stays sharp.
2. ApertureThis is the first common photography term you should learn. Simply put, aperture is the size of the opening in the lens. Think of the lens as a window – large windows let in more light, while small windows let in less light. A wide open aperture will let more light into the image for a brighter photo, while a smaller aperture lets in less light. Aperture is measured in f-stops; a small f-stop like f/1.8 is a wide opening, a large f-stop like f/22 is a very narrow one. Aperture is one of three camera settings that determine an image’s exposure, or how light or dark it is. Aperture also affects how much of the image is in focus – wide apertures result in that creamy, unfocused background while narrow apertures keep more of the image sharp.
3. ExposureExposure is how light or dark an image is. An image is created when the camera sensor (or film strip) is exposed to light – that’s where the term originates. A dark photo is considered underexposed, or it wasn’t exposed to enough light; a light photo is overexposed or exposed to too much light. Exposure is controlled through aperture, shutter speed and ISO (more on those last two in a bit). Exposure is also subjective – there is no “right” exposure.
4. Exposure CompensationExposure compensation is a way to tell the camera that you’d like the exposure to be lighter or darker. Exposure compensation can be used on some automated modes and semi-automated modes like aperture priority. It’s measured in stops of light, with negative numbers resulting in a darker image and positive ones creating a brighter shot.
5. FocusWhen your eyes focus on an object that’s close to you, the objects far away will appear blurry. The common photography term “focus” has the same meaning. Something that is in focus is sharp, while an object that is out-of-focus isn’t sharp. Different focus areas determine if the camera is focusing on multiple points or one user-selected point.
6. ISOThe ISO determines how sensitive the camera is to light. For example, an ISO of 100 means the camera isn’t very sensitive – great for shooting in the daylight. An ISO 3200 means the camera is very sensitive to light, so you can use that higher ISO for getting shots in low light. The trade off is that images at high ISOs appear to be grainy and have less detail. ISO is balanced with aperture and shutter speed to get a proper exposure.
7. Long ExposureA long exposure is an image that has been exposed for a long time, or uses a long shutter speed. This technique is useful for shooting still objects in low light, or rendering moving objects into an artistic blur. Long exposure night photography can produce some pretty incredible results. For example, this is the technique often used for capturing star trail photography.

8. ManualManual mode allows the photographer to set the exposure instead of having the camera do it automatically. In manual, you choose the aperture, shutter speed and ISO, and those choices affect how light or dark the image is. Semi-manual modes include aperture priority (where you only choose the aperture), shutter priority (where you only choose the shutter speed) and programed auto (where you choose a combination of aperture and shutter speed together instead of setting them individually). Manual can also refer to manual focus, or focusing yourself instead of using the autofocus.
9. MeteringUsing manual mode isn’t all guesswork – a light meter built into the camera helps guide those decisions, indicating if the camera thinks the image is over or under exposed. Metering is actually based on a middle grey, so having lighter or darker objects in the image can throw the metering off a little bit. Metering modes indicate how the meter is reading the light. Matrix metering means the camera is reading the light from the entire scene. Centre-weighted metering considers only what’s at the centre of the frame and spot metering measures the light based on where your focus point is.
10. NoiseNoise is simply little flecks in an image, also sometimes called grain. Images taken at high ISOs have a lot of noise, so it’s best to use the lowest ISO you can for the amount of light in the scene.
11. RAWRAW is a file type that gives the photographer more control over photo editing. RAW is considered a digital negative, where the default JPEG file type has already been processed a bit. RAW requires special software to open, however, while JPEG is more universal.
12. Rule Of ThirdsThis compositional rule suggests imagining the image has been divided into three parts both horizontally and vertically. Often the most interesting compositions result in placing the subject on one of the intersections of those imaginary lines, instead of in the centre of the photo.
13. Shutter SpeedThe shutter is the part of the camera that opens and closes to let light in and take a picture. The shutter speed is how long that shutter stays open, written in seconds or fractions of a second, like 1/200 s. or 1”, with the “ symbol often used to designate an entire second. The longer the shutter stays open, the more light that is let in. But, anything that moves while the shutter is open will become a blur, and if the entire camera moves while the shutter is open the whole image will be blurry – that’s why tripods are necessary for longer shutter speeds.
14. Shutter ReleaseThat’s the button you press to take the picture. 15. Time LapseA time lapse is a video created from stitching several photos together taken of the same thing at different times. Don’t confuse a time lapse with a long exposure, which is a single image with a long shutter speed.
THE GLASGOW ART CLUB RESOURCE FOR PHOTOGRAPHY STUDENTS
PHOTOGRAPHY NPA LEVEL 4
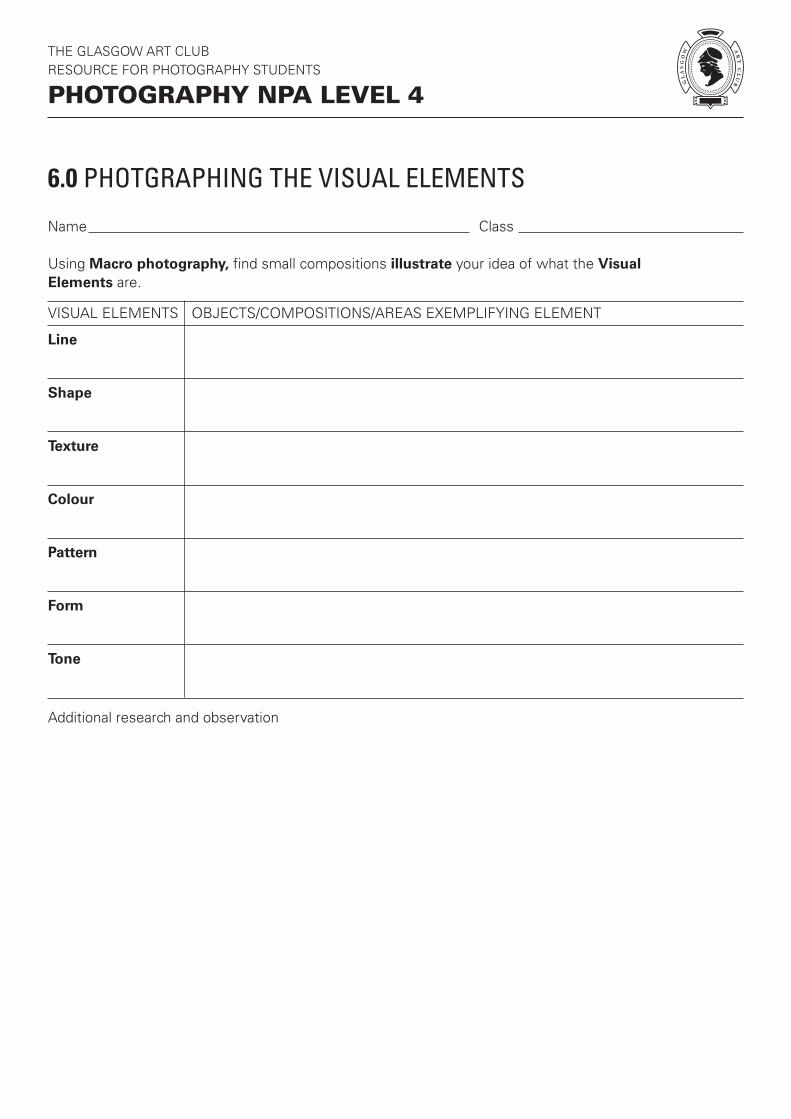
6.0 PHOTGRAPHING THE VISUAL ELEMENTS
Name Class
Using Macro photography, find small compositions illustrate your idea of what the Visual Elements are.
VISUAL ELEMENTS OBJECTS/COMPOSITIONS/AREAS EXEMPLIFYING ELEMENT
Line
Shape
Texture
Colour
Pattern
Form
Tone
Additional research and observation

THE GLASGOW ART CLUB RESOURCE FOR PHOTOGRAPHY STUDENTS
PHOTOGRAPHY NPA LEVEL 4
7.0 EXAMPLES OF BLACK AND WHITE PHOTOGRAPHY
Some images taken by pupils for different projects when visiting the Glasgow Art Club. The architecture and content of the building has much to offer the photography student.

THE GLASGOW ART CLUB RESOURCE FOR PHOTOGRAPHY STUDENTS
PHOTOGRAPHY NPA LEVEL 4
7.0 EXAMPLES OF MACRO/ABSTRACT PHOTOGRAPHY
Some images taken by pupils in different areas of the Club. Looking at abstracting the image and experimenting with the style of Macro. Pupils were using camera phones when taking these images.
THE GLASGOW ART CLUB
FEEDBACK FORM
Completing this form will help Glasgow Art Club monitor visits, and the effectiveness of our resources. Please complete and hand to a member of staff at the end of your visit or email it to [email protected]
Name of educational institution Name and contact details of group organiser
Date of visit What were the objectives of your visit? Do you feel you achieved the objective?
What aspects of your visit did you enjoy most?
Do you think that the pupils or students enjoyed their visit?
Is there anything that could have been improved?
Any other comments or suggestions?
Thank you very much for completing this form.
Glasgow Art Club really hopes that you enjoyed your visit!


![Lamina Resumen Art Jazz Club [Estíbaliz Souto]](https://static.fdocuments.in/doc/165x107/568bdc051a28ab2034b0a9bd/lamina-resumen-art-jazz-club-estibaliz-souto.jpg)


![ART JAZZ CLUB [Estibaliz Souto]](https://static.fdocuments.in/doc/165x107/568c389b1a28ab02359f7e0c/art-jazz-club-estibaliz-souto.jpg)