
GL550 Enterprise Linux Security Administration
74
Enterprise Linux Security Administration Student Workbook EVALUATION COPY Unauthorized Reproduction or Distribution Prohibited
Transcript of GL550 Enterprise Linux Security Administration

Enterprise Linux Security Administration
Student Workbook
EVALUATION COPY
Unauthorized Reproduction or Distribution Prohibited

GL550ENTERPRISELINUX SECURITYADMINISTRATIONRHEL7 SLES12
The contents of this course and all its modules and related materials, including handouts toaudience members, are copyright ©2017 Guru Labs L.C.
No part of this publication may be stored in a retrieval system, transmitted or reproduced in anyway, including, but not limited to, photocopy, photograph, magnetic, electronic or other record,without the prior written permission of Guru Labs.
This curriculum contains proprietary information which is for the exclusive use of customers of GuruLabs L.C., and is not to be shared with personnel other than those in attendance at this course.
This instructional program, including all material provided herein, is supplied without any guaranteesfrom Guru Labs L.C. Guru Labs L.C. assumes no liability for damages or legal action arising fromthe use or misuse of contents or details contained herein.
Photocopying any part of this manual without prior written consent of Guru Labs L.C. is a violationof federal law. This manual should not appear to be a photocopy. If you believe that Guru Labstraining materials are being photocopied without permission, please email [email protected] orcall 1-801-298-5227.
Guru Labs L.C. accepts no liability for any claims, demands, losses, damages, costs or expensessuffered or incurred howsoever arising from or in connection with the use of this courseware. Alltrademarks are the property of their respective owners.
Version: GL550S-R7S12-F05
EVALUATION COPY
Unauthorized Reproduction or Distribution Prohibited

EVALUATION COPY
Unauthorized Reproduction or Distribution Prohibited
ii
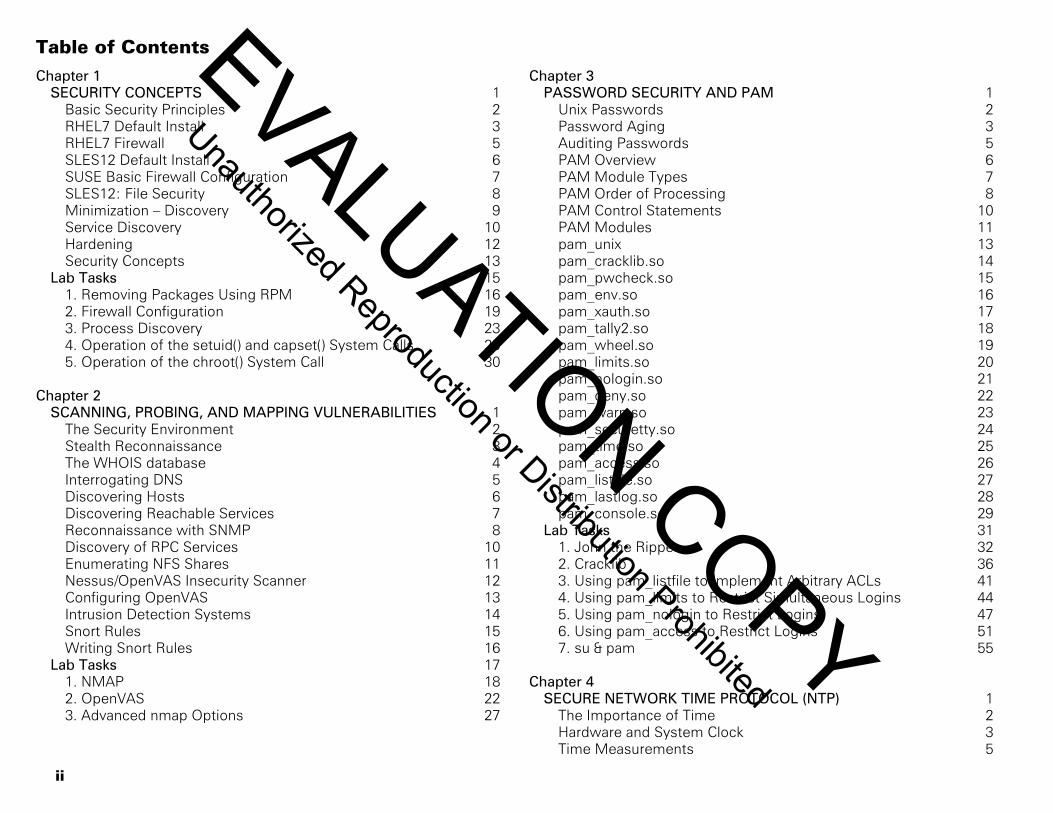
Table of ContentsChapter 1
SECURITY CONCEPTS 1Basic Security Principles 2RHEL7 Default Install 3RHEL7 Firewall 5SLES12 Default Install 6SUSE Basic Firewall Configuration 7SLES12: File Security 8Minimization – Discovery 9Service Discovery 10Hardening 12Security Concepts 13
Lab Tasks 151. Removing Packages Using RPM 162. Firewall Configuration 193. Process Discovery 234. Operation of the setuid() and capset() System Calls 255. Operation of the chroot() System Call 30
Chapter 2SCANNING, PROBING, AND MAPPING VULNERABILITIES 1
The Security Environment 2Stealth Reconnaissance 3The WHOIS database 4Interrogating DNS 5Discovering Hosts 6Discovering Reachable Services 7Reconnaissance with SNMP 8Discovery of RPC Services 10Enumerating NFS Shares 11Nessus/OpenVAS Insecurity Scanner 12Configuring OpenVAS 13Intrusion Detection Systems 14Snort Rules 15Writing Snort Rules 16
Lab Tasks 171. NMAP 182. OpenVAS 223. Advanced nmap Options 27
Chapter 3PASSWORD SECURITY AND PAM 1
Unix Passwords 2Password Aging 3Auditing Passwords 5PAM Overview 6PAM Module Types 7PAM Order of Processing 8PAM Control Statements 10PAM Modules 11pam_unix 13pam_cracklib.so 14pam_pwcheck.so 15pam_env.so 16pam_xauth.so 17pam_tally2.so 18pam_wheel.so 19pam_limits.so 20pam_nologin.so 21pam_deny.so 22pam_warn.so 23pam_securetty.so 24pam_time.so 25pam_access.so 26pam_listfile.so 27pam_lastlog.so 28pam_console.so 29
Lab Tasks 311. John the Ripper 322. Cracklib 363. Using pam_listfile to Implement Arbitrary ACLs 414. Using pam_limits to Restrict Simultaneous Logins 445. Using pam_nologin to Restrict Logins 476. Using pam_access to Restrict Logins 517. su & pam 55
Chapter 4SECURE NETWORK TIME PROTOCOL (NTP) 1
The Importance of Time 2Hardware and System Clock 3Time Measurements 5
EVALUATION COPY
Unauthorized Reproduction or Distribution Prohibited

iii
NTP Terms and Definitions 6Synchronization Methods 7NTP Evolution 8Time Server Hierarchy 9Operational Modes 10NTP Clients 11Configuring NTP Clients 13Configuring NTP Servers 15Securing NTP 16NTP Packet Integrity 18Useful NTP Commands 19
Lab Tasks 201. Configuring and Securing NTP 212. Peering NTP with Multiple Systems 25
Chapter 5KERBEROS CONCEPTS AND COMPONENTS 1
Common Security Problems 2Account Proliferation 3The Kerberos Solution 4Kerberos History 5Kerberos Implementations 6Kerberos Concepts 7Kerberos Principals 8Kerberos Safeguards 9Kerberos Components 10Authentication Process 11Identification Types 12Logging In 13Gaining Privileges 15Using Privileges 17Kerberos Components and the KDC 19Kerberized Services Review 20KDC Server Daemons 21Configuration Files 22Utilities Overview 23
Chapter 6IMPLEMENTING KERBEROS 1
Plan Topology and Implementation 2Kerberos 5 Client Software 3Kerberos 5 Server Software 4Synchronize Clocks 5
Create Master KDC 6Configuring the Master KDC 7KDC Logging 9Kerberos Realm Defaults 11Specifying [realms] 12Specifying [domain_realm] 13Allow Administrative Access 14Create KDC Databases 15Create Administrators 16Install Keys for Services 17Start Services 18Add Host Principals 19Add Common Service Principals 20Configure Slave KDCs 21Create Principals for Slaves 22Define Slaves as KDCs 23Copy Configuration to Slaves 24Install Principals on Slaves 25Synchronization of Database 26Propagate Data to Slaves 27Create Stash on Slaves 28Start Slave Daemons 29Client Configuration 30Install krb5.conf on Clients 31Client PAM Configuration 32Install Client Host Keys 34
Lab Tasks 351. Implementing Kerberos 36
Chapter 7ADMINISTERING AND USING KERBEROS 1
Administrative Tasks 2Key Tables 3Managing Keytabs 4Managing Principals 6Viewing Principals 7Adding, Deleting, and Modifying Principals 8Principal Policy 9Overall Goals for Users 10Signing In to Kerberos 11Ticket types 12Viewing Tickets 13Removing Tickets 14
EVALUATION COPY
Unauthorized Reproduction or Distribution Prohibited

iv
Passwords 15Changing Passwords 16Giving Others Access 17Using Kerberized Services 19Kerberized FTP 20Enabling Kerberized Services 21OpenSSH and Kerberos 23
Lab Tasks 241. Using Kerberized Clients 252. Forwarding Kerberos Tickets 333. OpenSSH with Kerberos 374. Wireshark and Kerberos 43
Chapter 8SECURING THE FILESYSTEM 1
Filesystem Mount Options 2NFS Properties 3NFS Export Option 4NFSv4 and GSSAPI Auth 5Implementing NFSv4 6Implementing Kerberos with NFS 8GPG – GNU Privacy Guard 10File Encryption with OpenSSL 12File Encryption With encfs 13Linux Unified Key Setup (LUKS) 14
Lab Tasks 161. Securing Filesystems 172. Securing NFS 203. Implementing NFSv4 244. File Encryption with GPG 315. File Encryption With OpenSSL 346. LUKS-on-disk format Encrypted Filesystem 37
Chapter 9AIDE 1
Host Intrusion Detection Systems 2Using RPM as a HIDS 4Introduction to AIDE 5AIDE Installation 6AIDE Policies 7AIDE Usage 8
Lab Tasks 91. File Integrity Checking with RPM 10
2. File Integrity Checking with AIDE 13
Chapter 10ACCOUNTABILITY WITH KERNEL AUDITD 1
Accountability and Auditing 2Simple Session Auditing 3Simple Process Accounting & Command History 5Kernel-Level Auditing 6Configuring the Audit Daemon 9Controlling Kernel Audit System 10Creating Audit Rules 11Searching Audit Logs 13Generating Audit Log Reports 14Audit Log Analysis 15
Lab Tasks 161. Auditing Login/Logout 172. Auditing File Access 223. Auditing Command Execution 26
Chapter 11SELINUX 1
DAC vs. MAC 2Shortcomings of Traditional Unix Security 4AppArmor 5SELinux Goals 6SELinux Evolution 7SELinux Modes 8Gathering SELinux Information 10SELinux Virtual Filesystem 11SELinux Contexts 12Managing Contexts 14The SELinux Policy 16Choosing an SELinux Policy 17Policy Layout 19Tuning and Adapting Policy 21Booleans 22Permissive Domains 24Managing File Context Database 25Managing Port Contexts 26SELinux Policy Tools 27Examining Policy 29SELinux Troubleshooting 32SELinux Troubleshooting Continued 34
EVALUATION COPY
Unauthorized Reproduction or Distribution Prohibited
v
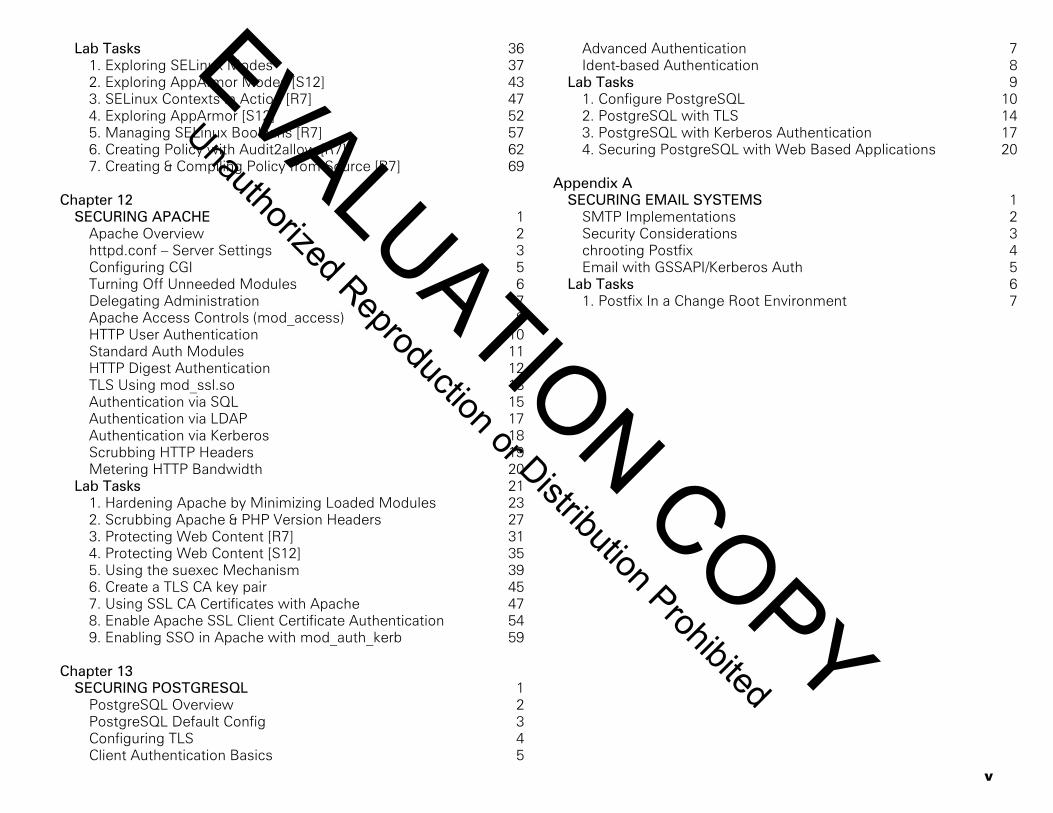
Lab Tasks 361. Exploring SELinux Modes 372. Exploring AppArmor Modes [S12] 433. SELinux Contexts in Action [R7] 474. Exploring AppArmor [S12] 525. Managing SELinux Booleans [R7] 576. Creating Policy with Audit2allow [R7] 627. Creating & Compiling Policy from Source [R7] 69
Chapter 12SECURING APACHE 1
Apache Overview 2httpd.conf – Server Settings 3Configuring CGI 5Turning Off Unneeded Modules 6Delegating Administration 7Apache Access Controls (mod_access) 8HTTP User Authentication 10Standard Auth Modules 11HTTP Digest Authentication 12TLS Using mod_ssl.so 13Authentication via SQL 15Authentication via LDAP 17Authentication via Kerberos 18Scrubbing HTTP Headers 19Metering HTTP Bandwidth 20
Lab Tasks 211. Hardening Apache by Minimizing Loaded Modules 232. Scrubbing Apache & PHP Version Headers 273. Protecting Web Content [R7] 314. Protecting Web Content [S12] 355. Using the suexec Mechanism 396. Create a TLS CA key pair 457. Using SSL CA Certificates with Apache 478. Enable Apache SSL Client Certificate Authentication 549. Enabling SSO in Apache with mod_auth_kerb 59
Chapter 13SECURING POSTGRESQL 1
PostgreSQL Overview 2PostgreSQL Default Config 3Configuring TLS 4Client Authentication Basics 5
Advanced Authentication 7Ident-based Authentication 8
Lab Tasks 91. Configure PostgreSQL 102. PostgreSQL with TLS 143. PostgreSQL with Kerberos Authentication 174. Securing PostgreSQL with Web Based Applications 20
Appendix ASECURING EMAIL SYSTEMS 1
SMTP Implementations 2Security Considerations 3chrooting Postfix 4Email with GSSAPI/Kerberos Auth 5
Lab Tasks 61. Postfix In a Change Root Environment 7
EVALUATION COPY
Unauthorized Reproduction or Distribution Prohibited

vi
Typographic Conventions
The fonts, layout, and typographic conventions of this book have beencarefully chosen to increase readability. Please take a moment tofamiliarize yourself with them.
A Warning and Solution
A common problem with computer training and reference materials isthe confusion of the numbers "zero" and "one" with the letters "oh" and"ell". To avoid this confusion, this book uses a fixed-width font that makeseach letter and number distinct.
Typefaces Used and Their Meanings
The following typeface conventions have been followed in this book:
fixed-width normal ⇒ Used to denote file names and directories. Forexample, the /etc/passwd file or /etc/sysconfig/directory. Alsoused for computer text, particularily command line output.
fixed-width italic ⇒ Indicates that a substitution is required. Forexample, the string stationX is commonly used to indicate that thestudent is expected to replace X with his or her own station number,such as station3.
fixed-width bold ⇒ Used to set apart commands. For example, thesed command. Also used to indicate input a user might type on thecommand line. For example, ssh -X station3.
fixed-width bold italic ⇒ Used when a substitution is requiredwithin a command or user input. For example, ssh -X stationX.
fixed-width underlined ⇒ Used to denote URLs. For example,http://www.gurulabs.com/.
variable-width bold ⇒ Used within labs to indicate a required studentaction that is not typed on the command line.
Occasional variations from these conventions occur to increase clarity.This is most apparent in the labs where bold text is only used to indicatecommands the student must enter or actions the student must perform.
0 OThe number
"zero".The letter
"oh".
1 lThe number
"one".The letter
"ell".
EVALUATION COPY
Unauthorized Reproduction or Distribution Prohibited

vii
Typographic Conventions
Terms and Definitions
The following format is used to introduce and define a series of terms:
deprecate ⇒ To indicate that something is considered obsolete, withthe intent of future removal.
frob ⇒ To manipulate or adjust, typically for fun, as opposed to tweak.grok ⇒ To understand. Connotes intimate and exhaustive knowledge.hork ⇒ To break, generally beyond hope of repair.hosed ⇒ A metaphor referring to a Cray that crashed after the
disconnection of coolant hoses. Upon correction, users were assuredthe system was rehosed.
mung (or munge) ⇒ Mash Until No Good: to modify a file, oftenirreversibly.
troll ⇒ To bait, or provoke, an argument, often targeted towards thenewbie. Also used to refer to a person that regularly trolls.
twiddle ⇒ To make small, often aimless, changes. Similar to frob.
When discussing a command, this same format is also used to show anddescribe a list of common or important command options. For example,the following ssh options:
-X ⇒ Enables X11 forwarding. In older versions of OpenSSH that donot include -Y, this enables trusted X11 forwarding. In newer versionsof OpenSSH, this enables a more secure, limited type of forwarding.
-Y ⇒ Enables trusted X11 forwarding. Although less secure, trustedforwarding may be required for compatibility with certain programs.
Representing Keyboard Keystrokes
When it is necessary to press a series of keys, the series of keystrokeswill be represented without a space between each key. For example, thefollowing means to press the "j" key three times: jjj
When it is necessary to press keys at the same time, the combination willbe represented with a plus between each key. For example, the followingmeans to press the "ctrl," "alt," and "backspace" keys at the same time:Ó¿Ô¿×. Uppercase letters are treated the same: Ò¿A
Line Wrapping
Occasionally content that should be on a single line, such as commandline input or URLs, must be broken across multiple lines in order to fiton the page. When this is the case, a special symbol is used to indicateto the reader what has happened. When copying the content, the linebreaks should not be included. For example, the following hypotheticalPAM configuration should only take two actual lines:
password required /lib/security/pam_cracklib.so retry=3a type= minlen=12 dcredit=2 ucredit=2 lcredit=0 ocredit=2
password required /lib/security/pam_unix.so use_authtok
Representing File Edits
File edits are represented using a consistent layout similar to the unifieddiff format. When a line should be added, it is shown in bold with aplus sign to the left. When a line should be deleted, it is shown struckout with a minus sign to the left. When a line should be modified, itis shown twice. The old version of the line is shown struck out with aminus sign to the left. The new version of the line is shown below theold version, bold and with a plus sign to the left. Unmodified lines areoften included to provide context for the edit. For example, the followingdescribes modification of an existing line and addition of a new line tothe OpenSSH server configuration file:
File: /etc/ssh/sshd_config #LoginGraceTime 2m- #PermitRootLogin yes+ PermitRootLogin no+ AllowUsers sjansen #StrictModes yes
Note that the standard file edit representation may not be used when itis important that the edit be performed using a specific editor or method.In these rare cases, the editor specific actions will be given instead.
EVALUATION COPY
Unauthorized Reproduction or Distribution Prohibited

viii
Lab Conventions
Lab Task Headers
Every lab task begins with three standard informational headers:"Objectives," "Requirements," and "Relevance". Some tasks also include a"Notices" section. Each section has a distinct purpose.
Objectives ⇒ An outline of what will be accomplished in the lab task.Requirements ⇒ A list of requirements for the task. For example,
whether it must be performed in the graphical environment, orwhether multiple computers are needed for the lab task.
Relevance ⇒ A brief example of how concepts presented in the labtask might be applied in the real world.
Notices ⇒ Special information or warnings needed to successfullycomplete the lab task. For example, unusual prerequisites or commonsources of difficulty.
Command Prompts
Though different shells, and distributions, have different promptcharacters, examples will use a $ prompt for commands to be run asa normal user (like guru or visitor), and commands with a # promptshould be run as the root user. For example:
$ whoamiguru$ su -Password: password# whoamiroot
Occasionally the prompt will contain additional information. For example,when portions of a lab task should be performed on two different stations(always of the same distribution), the prompt will be expanded to:
stationX$ whoamigurustationX$ ssh root@stationYroot@stationY’s password: passwordstationY# whoamiroot
Variable Data Substitutions
In some lab tasks, students are required to replace portions of commandswith variable data. Variable substitution are represented using italic fonts.For example, X and Y.
Substitutions are used most often in lab tasks requiring more than onecomputer. For example, if a student on station4 were working with astudent on station2, the lab task would refer to stationX and stationY
stationX$ ssh root@stationY
and each would be responsible for interpreting the X and Y as 4 and 2.
station4$ ssh root@station2
Truncated Command Examples
Command output is occasionally omitted or truncated in examples. Thereare two type of omissions: complete or partial.
Sometimes the existence of a command’s output, and not its content, isall that matters. Other times, a command’s output is too variable toreliably represent. In both cases, when a command should produceoutput, but an example of that output is not provided, the followingformat is used:
$ cat /etc/passwd. . . output omitted . . .
In general, at least a partial output example is included after commands.When example output has been trimmed to include only certain lines,the following format is used:
$ cat /etc/passwdroot:x:0:0:root:/root:/bin/bash. . . snip . . .clints:x:500:500:Clint Savage:/home/clints:/bin/zsh. . . snip . . .
EVALUATION COPY
Unauthorized Reproduction or Distribution Prohibited
ix
Lab Conventions
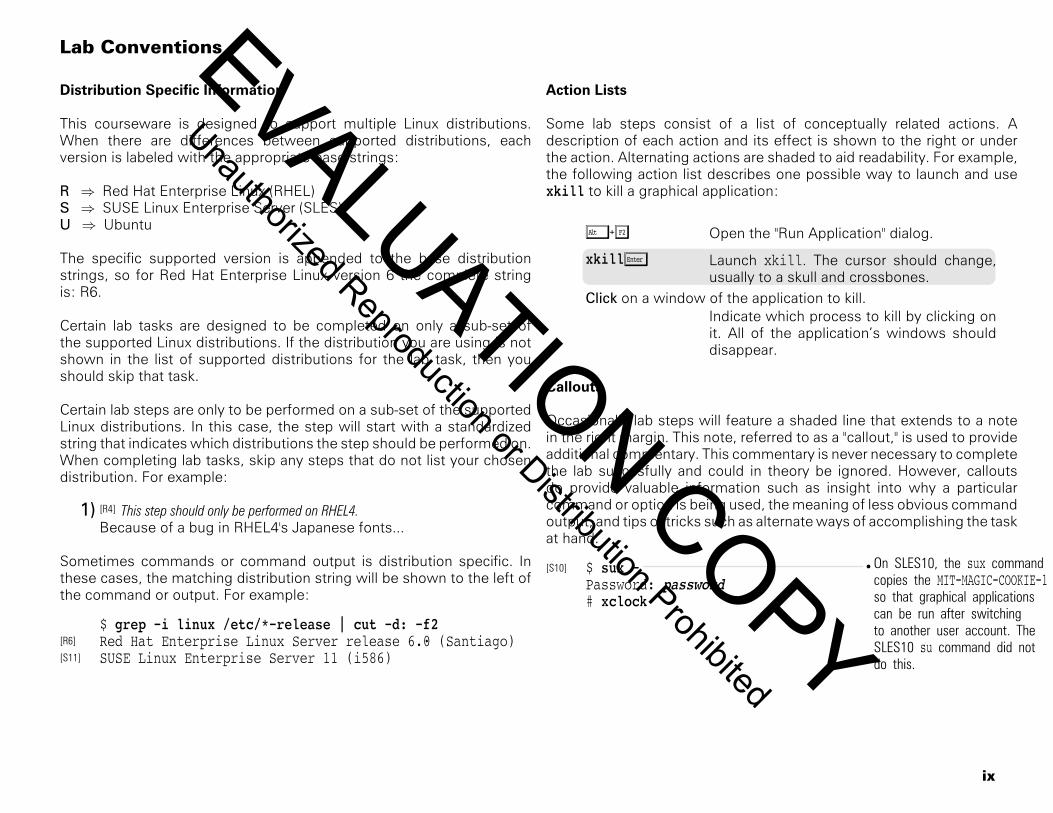
Distribution Specific Information
This courseware is designed to support multiple Linux distributions.When there are differences between supported distributions, eachversion is labeled with the appropriate base strings:
R ⇒ Red Hat Enterprise Linux (RHEL)S ⇒ SUSE Linux Enterprise Server (SLES)U ⇒ Ubuntu
The specific supported version is appended to the base distributionstrings, so for Red Hat Enterprise Linux version 6 the complete stringis: R6.
Certain lab tasks are designed to be completed on only a sub-set ofthe supported Linux distributions. If the distribution you are using is notshown in the list of supported distributions for the lab task, then youshould skip that task.
Certain lab steps are only to be performed on a sub-set of the supportedLinux distributions. In this case, the step will start with a standardizedstring that indicates which distributions the step should be performed on.When completing lab tasks, skip any steps that do not list your chosendistribution. For example:
[R4] This step should only be performed on RHEL4.1)Because of a bug in RHEL4's Japanese fonts...
Sometimes commands or command output is distribution specific. Inthese cases, the matching distribution string will be shown to the left ofthe command or output. For example:
$ grep -i linux /etc/*-release | cut -d: -f2Red Hat Enterprise Linux Server release 6.0 (Santiago)[R6]
SUSE Linux Enterprise Server 11 (i586)[S11]
Action Lists
Some lab steps consist of a list of conceptually related actions. Adescription of each action and its effect is shown to the right or underthe action. Alternating actions are shaded to aid readability. For example,the following action list describes one possible way to launch and usexkill to kill a graphical application:
Ô¿Å Open the "Run Application" dialog.
xkillÕ Launch xkill. The cursor should change,usually to a skull and crossbones.
Click on a window of the application to kill.Indicate which process to kill by clicking onit. All of the application’s windows shoulddisappear.
Callouts
Occasionally lab steps will feature a shaded line that extends to a notein the right margin. This note, referred to as a "callout," is used to provideadditional commentary. This commentary is never necessary to completethe lab succesfully and could in theory be ignored. However, calloutsdo provide valuable information such as insight into why a particularcommand or option is being used, the meaning of less obvious commandoutput, and tips or tricks such as alternate ways of accomplishing the taskat hand.
On SLES10, the sux commandcopies the MIT-MAGIC-COOKIE-1so that graphical applicationscan be run after switchingto another user account. TheSLES10 su command did notdo this.
$ sux -[S10]
Password: password# xclock
EVALUATION COPY
Unauthorized Reproduction or Distribution Prohibited

EVALUATION COPY
Unauthorized Reproduction or Distribution Prohibited
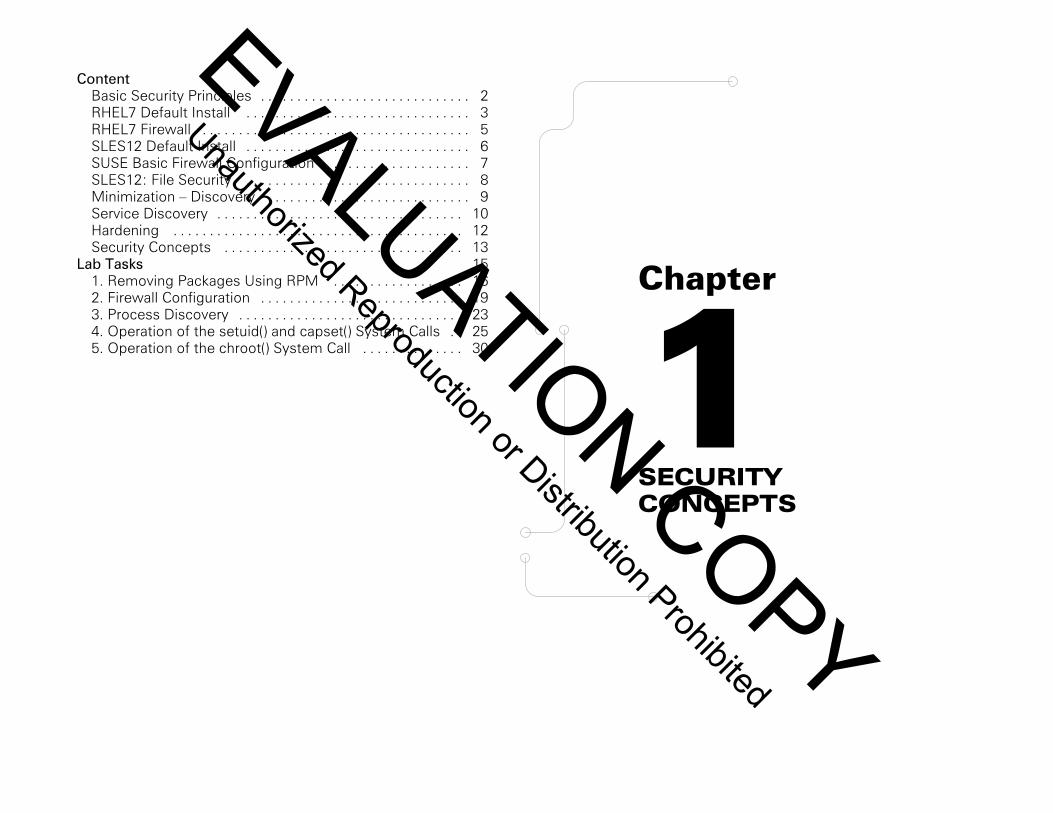
Chapter
1SECURITYCONCEPTS
ContentBasic Security Principles . . . . . . . . . . . . . . . . . . . . . . . . . . . . . 2RHEL7 Default Install . . . . . . . . . . . . . . . . . . . . . . . . . . . . . . . 3RHEL7 Firewall . . . . . . . . . . . . . . . . . . . . . . . . . . . . . . . . . . . . . 5SLES12 Default Install . . . . . . . . . . . . . . . . . . . . . . . . . . . . . . . 6SUSE Basic Firewall Configuration . . . . . . . . . . . . . . . . . . . . 7SLES12: File Security . . . . . . . . . . . . . . . . . . . . . . . . . . . . . . . 8Minimization – Discovery . . . . . . . . . . . . . . . . . . . . . . . . . . . . 9Service Discovery . . . . . . . . . . . . . . . . . . . . . . . . . . . . . . . . . . 10Hardening . . . . . . . . . . . . . . . . . . . . . . . . . . . . . . . . . . . . . . . . 12Security Concepts . . . . . . . . . . . . . . . . . . . . . . . . . . . . . . . . . 13
Lab Tasks 151. Removing Packages Using RPM . . . . . . . . . . . . . . . . . . 162. Firewall Configuration . . . . . . . . . . . . . . . . . . . . . . . . . . . . 193. Process Discovery . . . . . . . . . . . . . . . . . . . . . . . . . . . . . . . 234. Operation of the setuid() and capset() System Calls . . 255. Operation of the chroot() System Call . . . . . . . . . . . . . . 30
EVALUATION COPY
Unauthorized Reproduction or Distribution Prohibited

1-2
Basic Security Principles
Minimization – Remove unneeded componentsHardening – Lock down remaining componentsSimplify
Minimization
One of the most important principles of security is that ofminimization. In short, a service can not be attacked if it is notpresent on the system. When evaluating the security of a system,every installed component should be viewed as a potential securityrisk. Due to the complexity of modern computing systems andsoftware, the risks associated with installing a program can bedifficult, if not impossible, to predict. History has shown repeatedlythat even seemingly innocuous services can lead to back doors andholes in your system's security. When attempting to secure a system,start by determining exactly what set of services are needed on themachine, then begin the process of eliminating all unneededelements from the system.
Minimization is hampered somewhat by the fact that increases insystem performance (faster hardware) coupled with strongcompetition to add new features to the operating system andsoftware often result in a default install that has a huge number ofinstalled and running services. This problem is further exacerbated byserver and service consolidation efforts often taken by systemadministrators; ultimately yielding machines running so many thingsthat securing them becomes next to impossible. For example, RedHat Linux prior to version 8.0 would automatically configure allservices installed to start up automatically on boot. The assumptionwas that if you installed it you must want to run it. However, nowservices are not configured to start automatically on boot and youmust manually configure services.
Hardening
Once a system has been stripped down to just the absolutelynecessary components, hardening of those remaining componentscan commence. The goal of hardening is to use both general purpose(operating system functions) and application specific techniques tolimit the access provided by each remaining service. When hardeninga system, you should carefully consider exactly who should be ableto access a service and exactly what level of access they will require.Typically hardening of a service must be balanced with ease of useas the two concepts are often mutually exclusive. Because properlysecured services are typically more difficult to use, many vendorsship with fairly lax security defaults out-of-the-box. It is only recently(as security has become more of a focus) that vendors have startedto ship services with more secure default configurations.
Eschew Unnecessary Complexity→ Simplify
If several techniques exist to secure a system or service, you shouldgenerally use the simplest method that meets your requirements.Carefully consider the trade-offs in deploying complex securitymodels. While a complex model may offer benefits in configurationflexibility or performance, it will also be more prone tomisconfiguration or have unforeseen interactions that ultimately leadto service or system compromise.
EVALUATION COPY
Unauthorized Reproduction or Distribution Prohibited
1-3
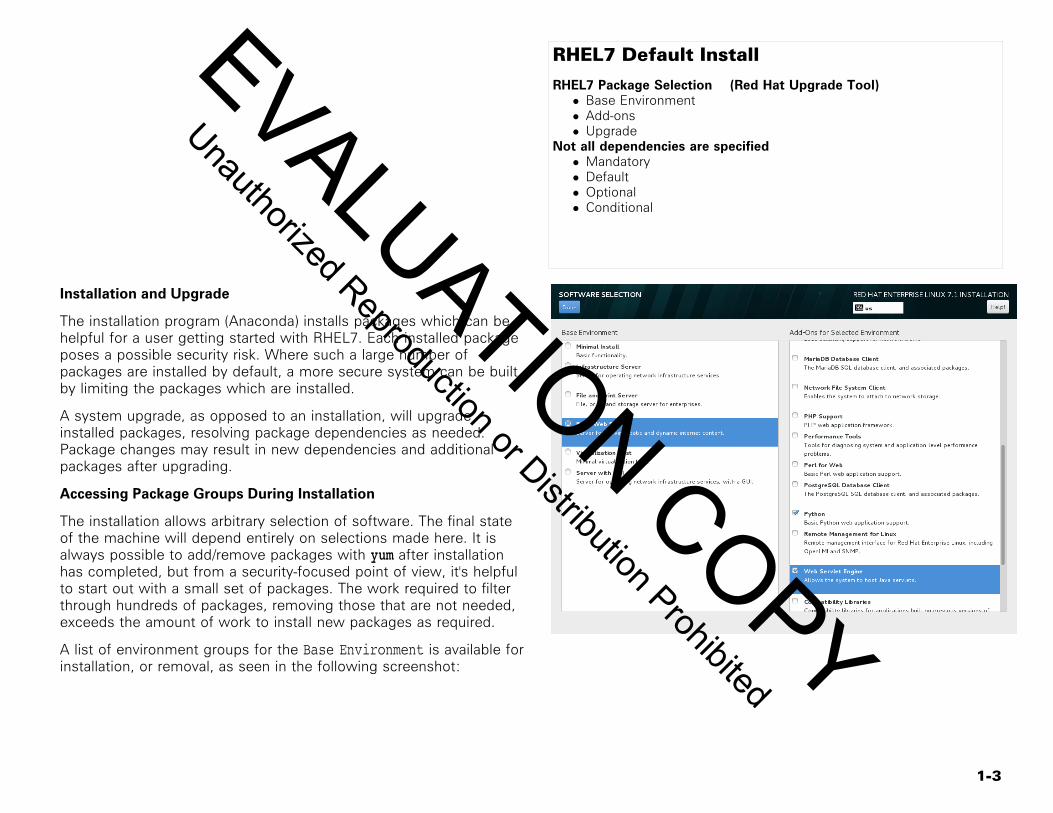
RHEL7 Default Install
RHEL7 Package Selection (Red Hat Upgrade Tool)• Base Environment• Add-ons• Upgrade
Not all dependencies are specified• Mandatory• Default• Optional• Conditional
Installation and Upgrade
The installation program (Anaconda) installs packages which can behelpful for a user getting started with RHEL7. Each installed packageposes a possible security risk. Where such a large number ofpackages are installed by default, a more secure system can be builtby limiting the packages which are installed.
A system upgrade, as opposed to an installation, will upgradeinstalled packages, resolving package dependencies as needed.Package changes may result in new dependencies and additionalpackages after upgrading.
Accessing Package Groups During Installation
The installation allows arbitrary selection of software. The final stateof the machine will depend entirely on selections made here. It isalways possible to add/remove packages with yum after installationhas completed, but from a security-focused point of view, it's helpfulto start out with a small set of packages. The work required to filterthrough hundreds of packages, removing those that are not needed,exceeds the amount of work to install new packages as required.
A list of environment groups for the Base Environment is available forinstallation, or removal, as seen in the following screenshot:
EVALUATION COPY
Unauthorized Reproduction or Distribution Prohibited
1-4
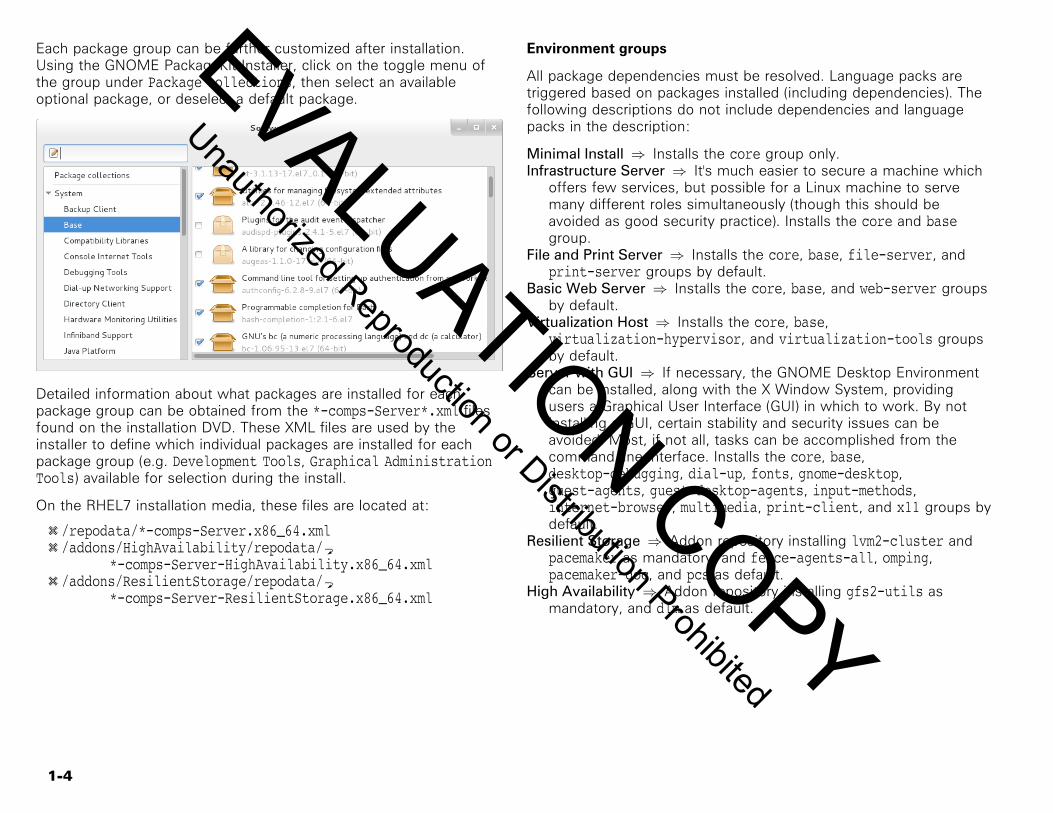
Each package group can be further customized after installation.Using the GNOME PackageKit Installer, click on the toggle menu ofthe group under Package collections, then select an availableoptional package, or deselect a default package.
Detailed information about what packages are installed for eachpackage group can be obtained from the *-comps-Server*.xml filesfound on the installation DVD. These XML files are used by theinstaller to define which individual packages are installed for eachpackage group (e.g. Development Tools, Graphical AdministrationTools) available for selection during the install.
On the RHEL7 installation media, these files are located at:
y /repodata/*-comps-Server.x86_64.xmly /addons/HighAvailability/repodata/a
*-comps-Server-HighAvailability.x86_64.xmly /addons/ResilientStorage/repodata/a
*-comps-Server-ResilientStorage.x86_64.xml
Environment groups
All package dependencies must be resolved. Language packs aretriggered based on packages installed (including dependencies). Thefollowing descriptions do not include dependencies and languagepacks in the description:
Minimal Install ⇒ Installs the core group only.Infrastructure Server ⇒ It's much easier to secure a machine which
offers few services, but possible for a Linux machine to servemany different roles simultaneously (though this should beavoided as good security practice). Installs the core and basegroup.
File and Print Server ⇒ Installs the core, base, file-server, andprint-server groups by default.
Basic Web Server ⇒ Installs the core, base, and web-server groupsby default.
Virtualization Host ⇒ Installs the core, base,virtualization-hypervisor, and virtualization-tools groupsby default.
Server with GUI ⇒ If necessary, the GNOME Desktop Environmentcan be installed, along with the X Window System, providingusers a Graphical User Interface (GUI) in which to work. By notinstalling a GUI, certain stability and security issues can beavoided. Most, if not all, tasks can be accomplished from thecommand line interface. Installs the core, base,desktop-debugging, dial-up, fonts, gnome-desktop,guest-agents, guest-desktop-agents, input-methods,internet-browser, multimedia, print-client, and x11 groups bydefault.
Resilient Storage ⇒ Addon repository installing lvm2-cluster andpacemaker as mandatory, and fence-agents-all, omping,pacemaker-doc, and pcs as default.
High Availability ⇒ Addon repository installing gfs2-utils asmandatory, and dlm as default.
EVALUATION COPY
Unauthorized Reproduction or Distribution Prohibited
1-5
RHEL7 Firewall
Default firewall:• firewall-cmd --permanent --add-service=http--zone=external
All loopback traffic acceptedAll outbound connections allowedOnly inbound SSH connections permitted
Legacy Firewall configuration• lokkit --enabled --service=ssh• /etc/sysconfig/iptables• /etc/sysconfig/iptables-config• /etc/sysconfig/ip6tables• /etc/sysconfig/ip6tables-config
Default Firewall Configuration
The default RHEL7 firewall with FirewallD provides a firewall fortrusted networks. This firewall is excellent for laptops, workstations,and home servers, but should be expanded on for production servers.The Red Hat firewall utilizes stateful packet filtering rules, allowing allestablished and related inbound traffic. The firewall is also configuredto explicitly allow inbound SSH traffic. All outbound traffic isaccepted. All other traffic is rejected.
Static Firewall Configuration
The /etc/sysconfig/iptables-config and/etc/sysconfig/ip6tables-config files control the behavior ofiptables on boot when firewalld is not being used. Configurationoptions include loading and unloading of Netfilter kernel modules andsaving of the firewall state when stopping or restarting the services.
The legacy firewall configuration is stored in two files:/etc/sysconfig/iptables and /etc/sysconfig/ip6tables. Eachtime the system boots, these files are loaded for a static firewallconfiguration. See iptables-restore(8) and ip6tables-restore(8).
libvirtd will dynamically add rules to the firewall configuration tosupport virtual machines configured with virt-manager. These rulesare removed when libvirtd is stopped.
Managing Firewall Configuration
Red Hat provides custom tools for automating the configuration offirewall settings. These tools provides Netfilter options to allow trafficto trusted services, as well as more advanced options, such as IPmasquerading and port forwarding.
firewall-config ⇒ This is the graphical configuration tool formanaging packet filtering with FirewallD.
firewall-cmd ⇒ This is the command-line configuration tool formanaging packet filtering with FirewallD.
lokkit ⇒ Part of the system-config-firewall-base package, this isa simple Python script that can configure your firewall from thecommand line. This requires that FirewallD be disabled.
Defaults to tools provided by the system-config-firewall packagesare configured in the /etc/sysconfig/system-config-firewall file.The lokkit command writes the /etc/sysconfig/iptables and/etc/sysconfig/ip6tables files.
There are also problems with using the iptables and ip6tablescommands instead of FirewallD, such as forgetting to save manualchanges (i.e. iptables-save) or saving dynamic libvirtd rules to thestatic persistent configuration. A dynamic configuration with FirewallDadds greater flexibility.
EVALUATION COPY
Unauthorized Reproduction or Distribution Prohibited
1-6
SLES12 Default Install
SLES12 Defaults• Service Location Protocol (SLP) server running and accepting
network connectionsCommon Defaults• SSH server listens for inbound connections• Firewall enabled by default• No development tools installed
SUSE Linux Enterprise Server Default Install
A default installation will enable an SSH daemon accepting networkconnections, a default firewall will be enabled, and no developmenttools, such as a compiler, will be installed.
The OpenSLP service location protocol server is installed andlistening for client connections. The SLP protocol is an industrystandard unicast and multicast protocol for clients to be able toautomatically find network resources based on resource type and atextual description rather than having to use an IP address orhostname. IP based Novell Netware networks use SLP as areplacement for SAP.
The following services are registered with SLP by default:
y SSHy VNCy NTPy Samba
Although all those services are registered with OpenSLP, only theSSH daemon is actually started by default.
EVALUATION COPY
Unauthorized Reproduction or Distribution Prohibited
1-7
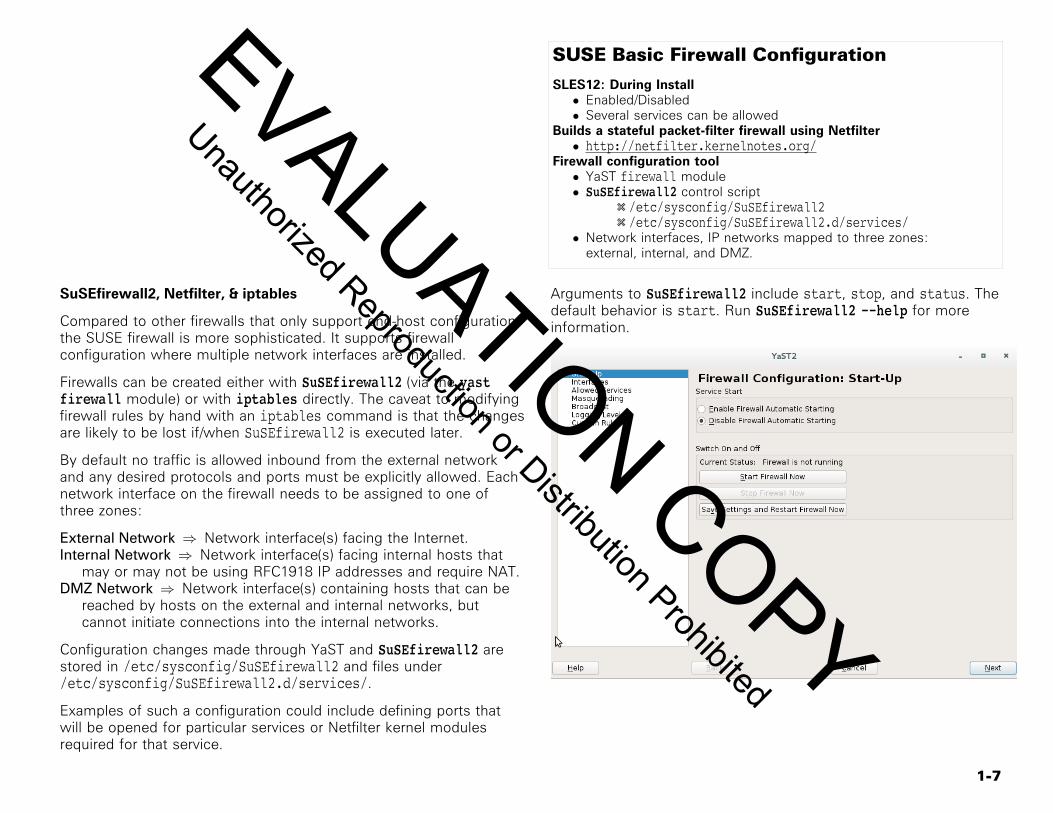
SUSE Basic Firewall Configuration
SLES12: During Install• Enabled/Disabled• Several services can be allowed
Builds a stateful packet-filter firewall using Netfilter• http://netfilter.kernelnotes.org/
Firewall configuration tool• YaST firewall module• SuSEfirewall2 control script
y /etc/sysconfig/SuSEfirewall2y /etc/sysconfig/SuSEfirewall2.d/services/
• Network interfaces, IP networks mapped to three zones:external, internal, and DMZ.
SuSEfirewall2, Netfilter, & iptables
Compared to other firewalls that only support end-host configuration,the SUSE firewall is more sophisticated. It supports firewallconfiguration where multiple network interfaces are installed.
Firewalls can be created either with SuSEfirewall2 (via the yastfirewall module) or with iptables directly. The caveat to modifyingfirewall rules by hand with an iptables command is that the changesare likely to be lost if/when SuSEfirewall2 is executed later.
By default no traffic is allowed inbound from the external networkand any desired protocols and ports must be explicitly allowed. Eachnetwork interface on the firewall needs to be assigned to one ofthree zones:
External Network ⇒ Network interface(s) facing the Internet.Internal Network ⇒ Network interface(s) facing internal hosts that
may or may not be using RFC1918 IP addresses and require NAT.DMZ Network ⇒ Network interface(s) containing hosts that can be
reached by hosts on the external and internal networks, butcannot initiate connections into the internal networks.
Configuration changes made through YaST and SuSEfirewall2 arestored in /etc/sysconfig/SuSEfirewall2 and files under/etc/sysconfig/SuSEfirewall2.d/services/.
Examples of such a configuration could include defining ports thatwill be opened for particular services or Netfilter kernel modulesrequired for that service.
Arguments to SuSEfirewall2 include start, stop, and status. Thedefault behavior is start. Run SuSEfirewall2 --help for moreinformation.
EVALUATION COPY
Unauthorized Reproduction or Distribution Prohibited
1-8
SLES12: File Security
Tightening of file and directory permissions• Four modes supported• easy, secure, paranoid, local• easy is default, secure enables trusted group, paranoid designed
for a no-user application server, local allows an admin to specifyadditional permissions
• /etc/permissions.*, /etc/permissions.d/*
Tightening File and Directory Permissions
A typical Linux installation has a few hundred thousand files on it. Thepermissions must be set so that applications function properly, whileat the same time preventing insecure permissions that allowtampering or access to confidential information. SLES12 ships withthe /usr/bin/chkstat program, which maintains the integrity of fileownership, group membership, and permissions of files.
SLES12 ships with four files that correspond to four security modes:
y /etc/permissions.easyy /etc/permissions.securey /etc/permissions.paranoidy /etc/permissions.local
Which mode to use is defined by the PERMISSION_SECURITY variablein the /etc/sysconfig/security file. Whenever SuSEconfig is run,the permissions are reapplied.
The easy mode corresponds to traditional permissions, while securerequires that users be a member of the trusted group to run certaincommands (e.g. crontab) along with a general tightening ofpermissions, while still enabling a multi-user system to function. Theparanoid mode strips all setuid and setgid bits from executables andisn't meant to function properly for a given situation withoutcustomization. It is intended for applications servers that have nousers who log in interactively. The local mode is intended as atemplate for administrators when they add custom softwarepackages, for example those installed to the /usr/local/ filesystem.
EVALUATION COPY
Unauthorized Reproduction or Distribution Prohibited
1-9
Minimization – Discovery
Discovering installed software• rpm -q• find or locate
Discovering Installed Software
The process of minimization involves identifying exactly whatsoftware is needed on a system and then ensuring that only thatnecessary software is present. Most installs make use of the basepackage groups that contain various individual packages. Often youwill find that you need some, but not all of the packages provided bya package group. When this happens, you can either skip thepackage group, choosing rather to select the individual packages, orinstall the package group and remove unneeded packages manuallypost-install.
The rpm command can also be used on a system to collectinformation about installed packages, and remove unneededpackages (though it is likely better to use yum remove). Usefulexample rpm commands include:
command example description
rpm -qa List all packages installed on the system.
rpm -qi package List detailed information about the package.
rpm -ql package List all file provided by the package.
rpm -qf file List the package name that provided a file.
rpm -qlp file.rpm List all files contained in file.rpm package.
rpm -e package Remove (erase) the listed
Software not Installed via Packages
Software installed from RPM packages is generally easy to track andmanage. When software has been installed via other means(compiled from source, etc.) it is generally more difficult to track allchanges and files provided by the software and cleanly remove them.One thing that can help this situation is using the--prefix=/pathname option when running the configure script priorto compile. Always using some common known base path(/usr/local, /opt, etc.) can help ensure that programs files aregrouped and isolated in a known location facilitating later removal.
The find and locate commands can be helpful in tracking down filesfor removal. The find command supports the -exec and -ok optionsto run an arbitrary command on files matched by the search criteria.Suppose, for instance, that you are attempting to remove installedsoftware that has all of its files owned by a specific user or groupaccount (not uncommon for daemons). The following find commandsyntax might be used:
# find /base/path -user username -exec rm {} \;
EVALUATION COPY
Unauthorized Reproduction or Distribution Prohibited
1-10
Service Discovery
systemctl list-unit-files -t servicechkconfigss/netstatlsofps
Locating Running Processes
In addition to searching the filesystem and RPM database for lists ofinstalled packages and files, A wide variety of commands exist thatcan help locate running processes:
The systemctl command can provide a list of the enabled serviceson a system using systemd. The chkconfig command is a simpleway to get a list of what services are currently configured to start onboot in the various run-levels (i.e. using a service script), especiallywith xinetd:
# systemctl list-unit-files -t service | grep enabled. . . snip . . .dbus-org.freedesktop.NetworkManager.service enabled. . . snip . . .vmtoolsd.service enabledxinetd.service enabled# chkconfig --list | grep on. . . snip . . .network 0:off 1:off 2:on 3:on 4:on 5:on 6:off
xinetd based services: chargen-dgram: off chargen-stream: off. . . snip . . . tftp: on. . . snip . . .
EVALUATION COPY
Unauthorized Reproduction or Distribution Prohibited

1-11
Check all running processes with the ps command. Possibleexamples include: ps -efw or ps auxw. During minimization, everyrunning process should be considered a potential threat andeliminated if possible. One simple rule-of-thumb: if the process list ismore than one screen of output, or contains processes whosepurpose is unknown, then continue to evaluate the list.
The ss command, and the older netstat, can be used to discoverwhat processes are listening on network ports. Any services listeningon the network should be carefully scrutinized as they represent alarger potential security vulnerability. Similar information about whatprocesses have bound network sockets can be obtained using thelsof command as shown in the following examples:
# netstat -taupeActive Internet connections (servers and established)Proto Recv-Q Send-Q Local Address Foreign Address State User Inode PID/Program nametcp 0 0 *:ssh *:* LISTEN root 8168 3579/sshdtcp 0 0 localhost:ipp *:* LISTEN root 8299 3601/cupsdtcp 0 0 localhost:smtp *:* LISTEN root 8845 3705/master. . . snip . . .# ss -taupeNetid State Recv-Q Send-Q Local Address:Port Peer Address:Porttcp LISTEN 0 128 *:ssh *:* users:(("sshd",3579,3)) ino:8168 sk:f4aa7a80tcp LISTEN 0 128 127.0.0.1:ipp *:* users:(("cupsd",3601,3)) ino:8299 sk:f441d080tcp LISTEN 0 100 127.0.0.1:smtp *:* users:(("master",3705,12)) ino:8845 sk:f441d580# lsof -iCOMMAND PID USER FD TYPE DEVICE SIZE/OFF NODE NAMEsshd 3579 root 3u IPv4 8168 0t0 TCP *:ssh (LISTEN)cupsd 3601 root 3u IPv4 8299 0t0 TCP localhost:ipp (LISTEN)cupsd 3601 root 5u IPv4 8302 0t0 UDP *:ippmaster 3705 root 12u IPv4 8845 0t0 TCP localhost:smtp (LISTEN)
EVALUATION COPY
Unauthorized Reproduction or Distribution Prohibited
1-12
Hardening
Packet filtering• Netfilter
General service wrapping• TCP wrappers• (x)inetd
PAM
Hardening of Remaining Services
Once the minimization process is complete, and all unneededservices have been removed or at least turned off, hardening of theremaining services can begin. Much of service hardening will beservice specific, but several general solutions exist that can be usedto increase the security of a wide variety of services.
Packet Filtering
The Linux kernel includes the Netfilter packet filtering system, arobust, versatile solution that, in its current incarnation, includes bothstateless and stateful packet filtering, NAT, and much more. Packetfiltering can ensure that only specific types of traffic can reachservices you designate.
General Service Wrapping
Often, if an application's built in security features are inadequate, theservice can be wrapped inside another simple process that canperform additional checks to increase security. Wrapping can alsoprovide a single unified way of configuring security for an otherwisediverse set of services. The most commonly used service wrapper iscalled TCP Wrappers and was written by Weitse Venema. TCPWrappers was frequently used by a Unix super-server (a servicedispatcher), like inetd, that would make a call to the wrapperprogram (tcpd) which would only allow the client to connect to thewrapped service if the connection met with certain defined IPaddress based checks. As an example, the following compares a
client attempting to FTP to an unprotected server and a serveremploying TCP Wrappers:
Unwrapped server:
y FTP client → listening inetd host → FTP server
TCP Wrapped server:
y FTP client → listening inetd host → tcpd → FTP server
Newer Unix super-servers, like xinetd, typically have their ownbuilt-in methods for limiting connections.
PAM
The Pluggable Authentication Modules system acts as an abstractionlayer between applications and the actual methods used to performthe authentication. On a modern Linux system, most networkservices and applications that need to perform authentication are builtto take advantage of PAM. This allows simple changes to theservice's PAM configuration file(s), modifying the methods used forauthentication, and providing a powerful tool for increasing systemsecurity.
EVALUATION COPY
Unauthorized Reproduction or Distribution Prohibited
1-13
Security Concepts
Dropping privileges• setuid()• Capabilities
libcaplibcap-ng
chroot
Minimizing Service Capabilities
One important principle of security is that of limiting the level ofaccess granted to only that which is absolutely required to performthe task. Unix systems traditionally have had something of a problemhere due to a lack of granularity with user access rights. Essentially,there is the root user (who is all powerful) and everyone else. Certainsystem tasks require that a process be running as the root user forthem to succeed. An excellent example of this is the fact that onlyprocesses running as the root user are allowed to bind to TCP andUDP ports 0-1023. Because of this, many network services are forcedto run as the root user even though they require root's elevatedprivileges only for binding to the reserved port.
The setuid() System Call
A general technique used by network services to help limit exposureis to start as the root user (allowing binding to reserved ports), andthen use the setuid() system call to change its security context andrun as some unprivileged user. After this has occurred, it isimpossible for the program to regain root privileges.
Capabilities
Linux also implements support for capabilities as originally defined inthe POSIX 1003.1e draft standard. Capabilities allow a far moregranular allocation of access to applications. The capabilitiessupported by Linux are documented and described in thecapability(7) man page. Programs written to take advantage of the
capabilities scheme can use system calls to drop certain capabilitieswhen they are no longer needed, greatly limiting the potential fordamage should the service be compromised or have a bug. Thelibcap package includes several programs for interacting with thecapability system:
capsh ⇒ shell wrapper that can examine capabilities and launchprograms with specific constraints.
getcap ⇒ lists the capabilities assigned to an executable filesetcap ⇒ set capabilities on an executable filegetpcaps ⇒ list the capabilities held by the specified running
process
Setting capabilities on an executable as root allows users to runthose programs with the individual elevated ability instead ofresorting to the program being SUID or SGID root as in the past:
$ ls -l /usr/bin/ping-rwxr-xr-x. 1 root root 44776 Aug 16 2014 /usr/bin/ping$ getcap -r /usr/bin/usr/bin/ping = cap_net_admin,cap_net_raw+ep
Notice the red color output (see the LS_COLORS variable). The setcapcommand can be used to make these kind of adjustments. Forexample, use setcap 'cap_net_bind_service=+ep' to grant aprogram the capability to bind to a privileged port (i.e. below 1024).
EVALUATION COPY
Unauthorized Reproduction or Distribution Prohibited

1-14
The capsh can be used to decode the capability string found in proc:
# grep CapEff /proc/$$/statusCapEff: 00000000a80425fb# capsh --decode=00000000a80425fb0x00000000a80425fb=cap_chown,cap_dac_override,cap_fownera
,cap_fsetid,cap_kill,cap_setgid,cap_setuid,cap_setapcap,cap_net_bind_service,cap_net_raw. . . snip . . .
The chroot Command
A final general technique used by programs to help restrict the levelof access is that of changing the program's apparent root directoryfor filesystem access. This is done via use of the chroot() systemcall, or its corresponding user-space chroot command. Running aprocess in a change rooted directory helps keep processes frommodifying files outside of its defined root.
EVALUATION COPY
Unauthorized Reproduction or Distribution Prohibited
1-15
Lab 1Estimated Time:S12: 40 minutes
R7: 40 minutesTask 1: Removing Packages Using RPM
Page: 1-16 Time: 5 minutesRequirements: b (1 station)
Task 2: Firewall ConfigurationPage: 1-19 Time: 10 minutesRequirements: bb (2 stations) c (classroom server)
Task 3: Process DiscoveryPage: 1-23 Time: 5 minutesRequirements: b (1 station)
Task 4: Operation of the setuid() and capset() System CallsPage: 1-25 Time: 10 minutesRequirements: b (1 station)
Task 5: Operation of the chroot() System CallPage: 1-30 Time: 10 minutesRequirements: b (1 station) c (classroom server)
EVALUATION COPY
Unauthorized Reproduction or Distribution Prohibited
1-16
Objectivesy Use the rpm command to discover what software packages are installed
on the system.y Identify the dependency chain to identify how to remove unneeded
packages.
Requirementsb (1 station)
RelevanceFrom a security perspective, it is important to know what is installed andneeded on a computer. Removing programs that are not needed helps toprotect against vulnerabilities.
Lab 1
Task 1Removing Packages UsingRPMEstimated Time: 5 minutes
Run the following command from a terminal to list the names of all the packages1)that are currently installed on the system:
$ rpm -qa | less. . . output omitted (press 'q' to quit when done) . . .
How many packages are currently installed on the system?2)
$ rpm -qa | wc -l. . . output omitted . . .
Suppose that you are trying to remove any unneeded software from the system.3)In exploring the filesystem you encounter the file /usr/bin/openssl. You want toevaluate whether you can safely remove this file. Start by using the rpm commandto discover what package provides the file, and what other files are included inthe package:
$ rpm -qilf /usr/bin/openssl | less. . . output omitted (press 'q' to quit when done) . . .
EVALUATION COPY
Unauthorized Reproduction or Distribution Prohibited

1-17
Based on the proceeding step you now know a little more about what the4)openssl package does. You still do not know if other applications on the systemmight use it. To see if it can safely be removed (without breaking otherapplications due to dependencies), run the following command to detect first leveldependencies:
Packages that rely on files provided by the opensslpackage.
$ rpm -q --whatrequires opensslperl-IO-Socket-SSL-1.94-3.el7.noarch[R7]
unbound-libs-1.4.20-19.el7.x86_64[R7]
dirmngr-1.1.1-1.28.x86_64[S12]
ca-certificates-1_201403302107-6.2.noarch[S12]
cryptconfig-0.3-92.14.x86_64[S12]
patterns-sles-base-12-58.8.x86_64[S12]
Removing the openssl package would break the packages listed in the preceding5)step. If you are still intent on removing the openssl package (and all the packagesthat depend on it), then start the recursive process of determining what otherpackages depend on those just discovered:
$ for i in $(rpm -q --whatrequires openssl | paste -s)> do rpm -q --whatrequires $i> doneno package requires perl-IO-Socket-SSL-1.94-3.el7.noarch[R7]
no package requires unbound-libs-1.4.20-19.el7.x86_64[R7]
no package requires dirmngr-1.1.1-1.28.x86_64[S12]
no package requires ca-certificates-1_201403302107-6.2.noarch[S12]
no package requires cryptconfig-0.3-92.14.x86_64[S12]
no package requires patterns-sles-base-12-58.8.x86_64[S12]
In this case, there are no further dependencies. If there were, it would benecessary to repeat this process.
EVALUATION COPY
Unauthorized Reproduction or Distribution Prohibited

1-18
After completing this recursive search, you might be tempted to think that you6)have a complete list of "what breaks" if the openssl package is removed. The truestory is that the openssl package actually provides more than just the opensslcommand. To get the whole list of first level dependencies for files provided bythe openssl package, run the following:
$ rpm -q --whatrequires $(rpm -q --provides openssl) | sort | uniq | more
Note that this list is not complete, either. This is because the work of recursivelydetermining what things are provided by each of the listed packages, and whatother packages might depend on them, also needs to be done.
EVALUATION COPY
Unauthorized Reproduction or Distribution Prohibited
1-19
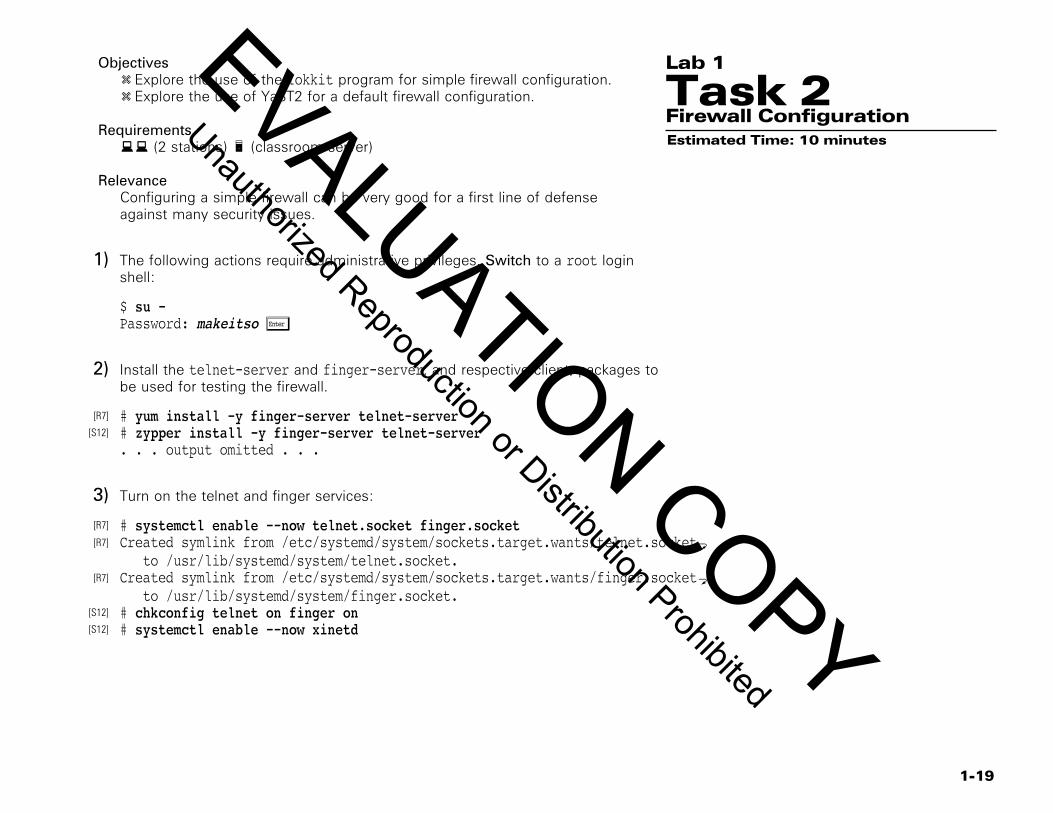
Objectivesy Explore the use of the lokkit program for simple firewall configuration.y Explore the use of YaST2 for a default firewall configuration.
Requirementsbb (2 stations) c (classroom server)
RelevanceConfiguring a simple firewall can be very good for a first line of defenseagainst many security issues.
Lab 1
Task 2Firewall ConfigurationEstimated Time: 10 minutes
The following actions require administrative privileges. Switch to a root login1)shell:
$ su -Password: makeitso Õ
Install the telnet-server and finger-server, and respective client, packages to2)be used for testing the firewall.
# yum install -y finger-server telnet-server[R7]
# zypper install -y finger-server telnet-server[S12]
. . . output omitted . . .
Turn on the telnet and finger services:3)
# systemctl enable --now telnet.socket finger.socket[R7]
Created symlink from /etc/systemd/system/sockets.target.wants/telnet.socketa[R7]
to /usr/lib/systemd/system/telnet.socket.Created symlink from /etc/systemd/system/sockets.target.wants/finger.socketa[R7]
to /usr/lib/systemd/system/finger.socket.# chkconfig telnet on finger on[S12]
# systemctl enable --now xinetd[S12]
EVALUATION COPY
Unauthorized Reproduction or Distribution Prohibited
1-20
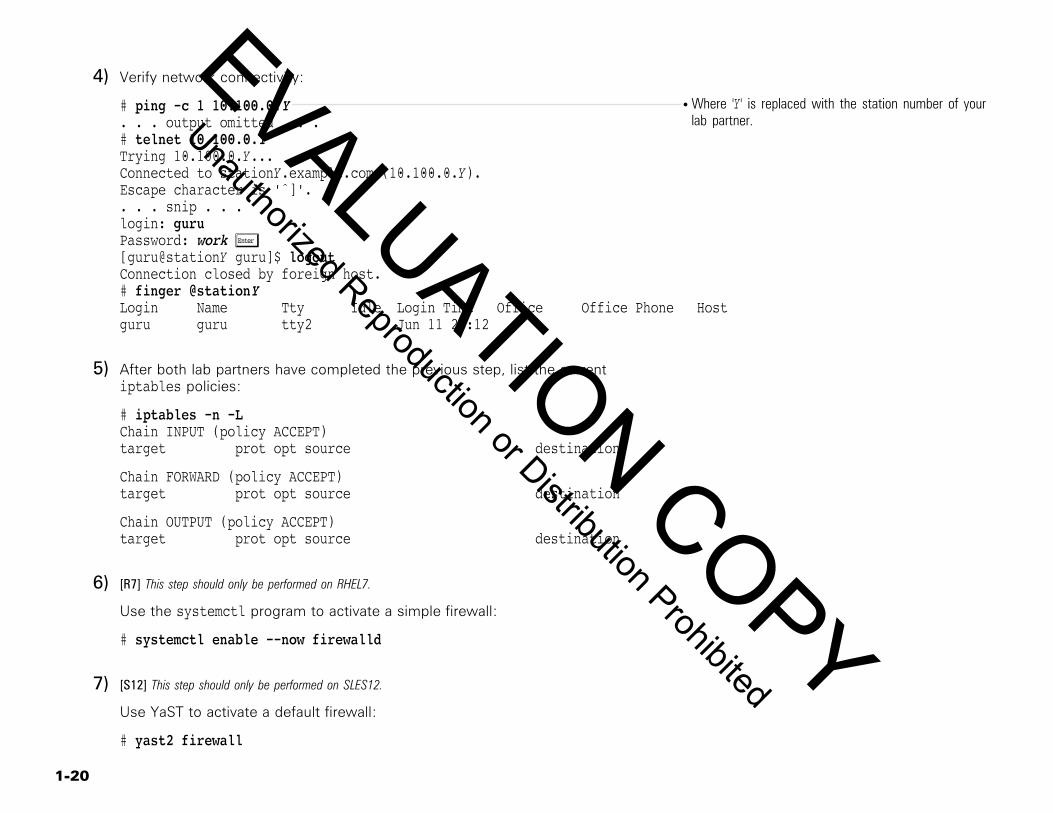
Verify network connectivity:4)Where 'Y' is replaced with the station number of yourlab partner.
# ping -c 1 10.100.0.Y. . . output omitted . . .# telnet 10.100.0.YTrying 10.100.0.Y...Connected to stationY.example.com (10.100.0.Y).Escape character is 'ˆ]'.. . . snip . . .login: guruPassword: work Õ[guru@stationY guru]$ logoutConnection closed by foreign host.# finger @stationYLogin Name Tty Idle Login Time Office Office Phone Hostguru guru tty2 Jun 11 21:12
After both lab partners have completed the previous step, list the current5)iptables policies:
# iptables -n -LChain INPUT (policy ACCEPT)target prot opt source destination
Chain FORWARD (policy ACCEPT)target prot opt source destination
Chain OUTPUT (policy ACCEPT)target prot opt source destination
[R7] This step should only be performed on RHEL7.6)Use the systemctl program to activate a simple firewall:
# systemctl enable --now firewalld
[S12] This step should only be performed on SLES12.7)Use YaST to activate a default firewall:
# yast2 firewall
EVALUATION COPY
Unauthorized Reproduction or Distribution Prohibited
1-21
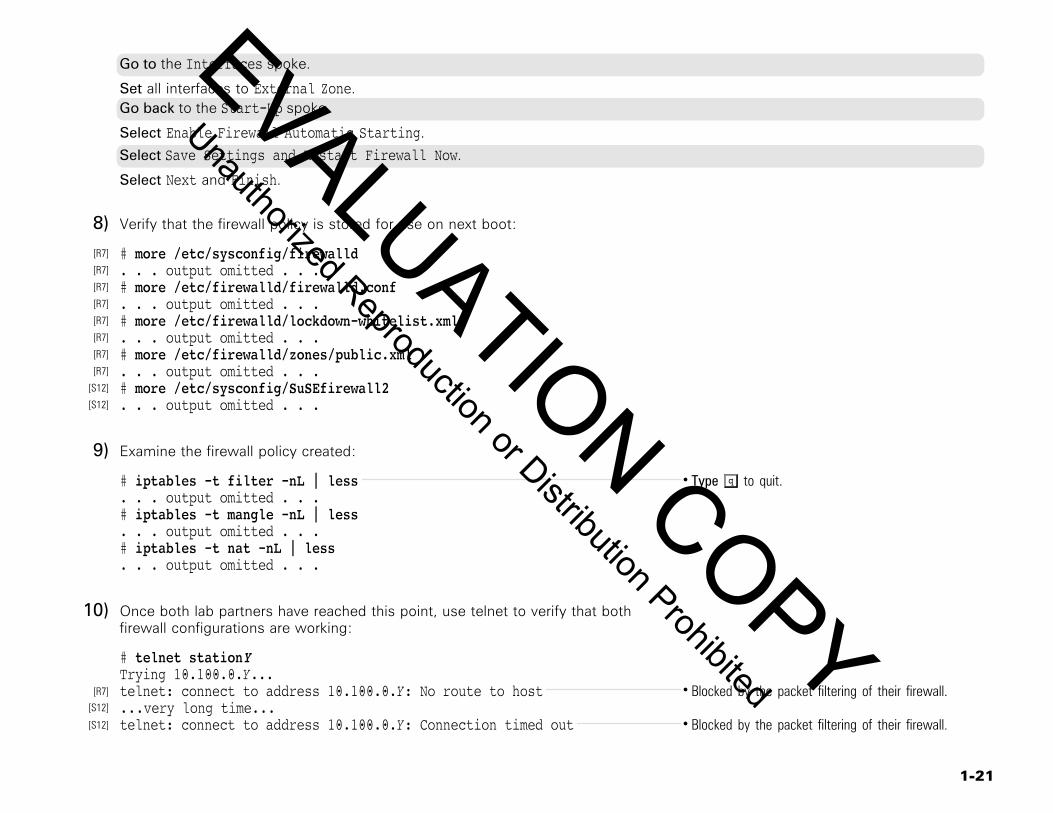
Go to the Interfaces spoke.
Set all interfaces to External Zone.Go back to the Start-Up spoke.
Select Enable Firewall Automatic Starting.
Select Save Settings and Restart Firewall Now.
Select Next and Finish.
Verify that the firewall policy is stored for use on next boot:8)
# more /etc/sysconfig/firewalld[R7]
. . . output omitted . . .[R7]
# more /etc/firewalld/firewalld.conf[R7]
. . . output omitted . . .[R7]
# more /etc/firewalld/lockdown-whitelist.xml[R7]
. . . output omitted . . .[R7]
# more /etc/firewalld/zones/public.xml[R7]
. . . output omitted . . .[R7]
# more /etc/sysconfig/SuSEfirewall2[S12]
. . . output omitted . . . [S12]
Examine the firewall policy created:9)
Type q to quit.# iptables -t filter -nL | less. . . output omitted . . .# iptables -t mangle -nL | less. . . output omitted . . .# iptables -t nat -nL | less. . . output omitted . . .
Once both lab partners have reached this point, use telnet to verify that both10)firewall configurations are working:
# telnet stationYTrying 10.100.0.Y...
Blocked by the packet filtering of their firewall.telnet: connect to address 10.100.0.Y: No route to host[R7]
...very long time...[S12]
Blocked by the packet filtering of their firewall.telnet: connect to address 10.100.0.Y: Connection timed out[S12]
EVALUATION COPY
Unauthorized Reproduction or Distribution Prohibited

1-22
Test the firewall policy by attempting to connect to the finger and ssh servers:11)
Denied by firewall and should fail.# finger @stationYfinger: connect: No route to host[R7]
...very long time...[S12]
finger: Connection timed out[S12]
Denied by firewall and should fail.# ssh stationY[S12]
...very long time...[S12]
ssh: connect to host stationY port 22: Connection timed out[S12]
Cleanup
Disable the telnet and finger services:12)
# systemctl disable --now telnet.socket finger.socket[R7]
Removed symlink /etc/systemd/system/sockets.target.wants/telnet.socket.[R7]
Removed symlink /etc/systemd/system/sockets.target.wants/finger.socket.[R7]
# chkconfig telnet off finger off[S12]
# systemctl disable --now xinetd[S12]
Stop the firewall and remove it from the boot process:13)
# systemctl disable --now firewalld[R7]
Removed symlink /etc/systemd/system/basic.target.wants/firewalld.service.[R7]
Removed symlink /etc/systemd/system/dbus-org.fedoraproject.FirewallD1.service.[R7]
# SuSEfirewall2 off[S12]
SuSEfirewall2: Firewall rules unloaded.[S12]
Administrative privileges are no longer required; exit the root shell to return to an14)unprivileged account:
# exit
EVALUATION COPY
Unauthorized Reproduction or Distribution Prohibited
1-23
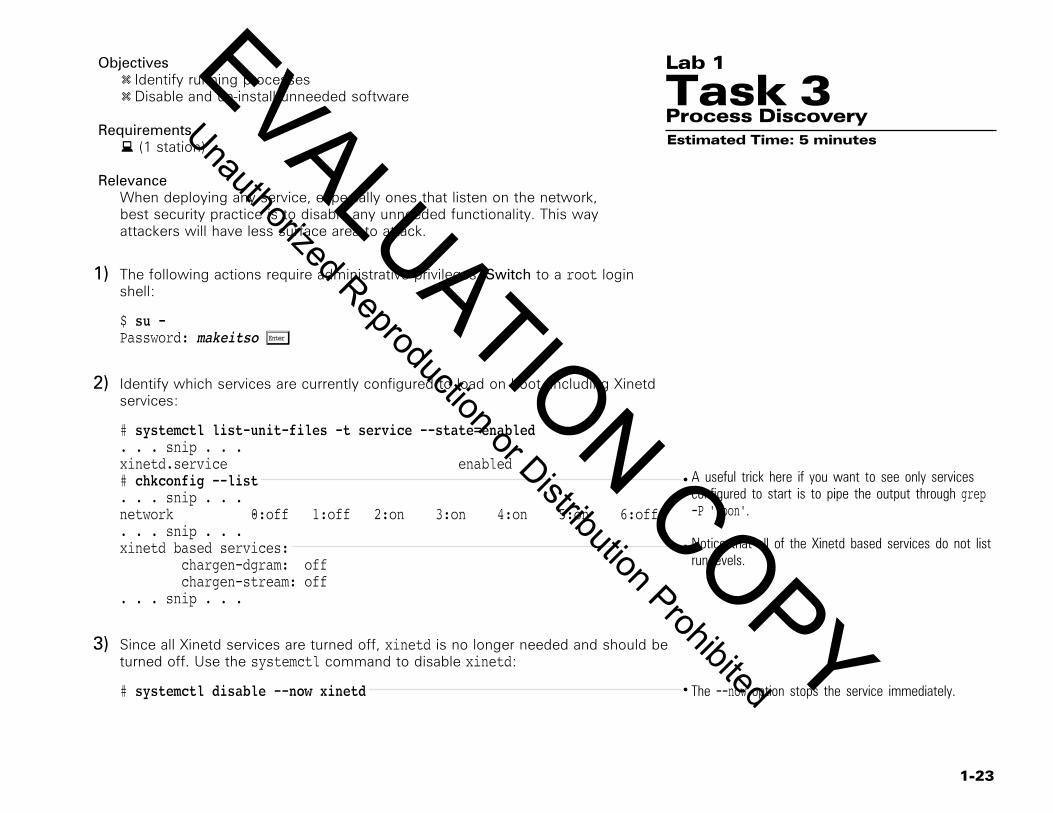
Objectivesy Identify running processesy Disable and un-install unneeded software
Requirementsb (1 station)
RelevanceWhen deploying any service, especially ones that listen on the network,best security practice is to disable any unneeded functionality. This wayattackers will have less surface area to attack.
Lab 1
Task 3Process DiscoveryEstimated Time: 5 minutes
The following actions require administrative privileges. Switch to a root login1)shell:
$ su -Password: makeitso Õ
Identify which services are currently configured to load on boot, including Xinetd2)services:
# systemctl list-unit-files -t service --state=enabled. . . snip . . .xinetd.service enabled
A useful trick here if you want to see only servicesconfigured to start is to pipe the output through grep-P '\bon'.
# chkconfig --list. . . snip . . .network 0:off 1:off 2:on 3:on 4:on 5:on 6:off. . . snip . . .
Notice that all of the Xinetd based services do not listrun-levels.
xinetd based services: chargen-dgram: off chargen-stream: off. . . snip . . .
Since all Xinetd services are turned off, xinetd is no longer needed and should be3)turned off. Use the systemctl command to disable xinetd:
The --now option stops the service immediately.# systemctl disable --now xinetd
EVALUATION COPY
Unauthorized Reproduction or Distribution Prohibited
1-24
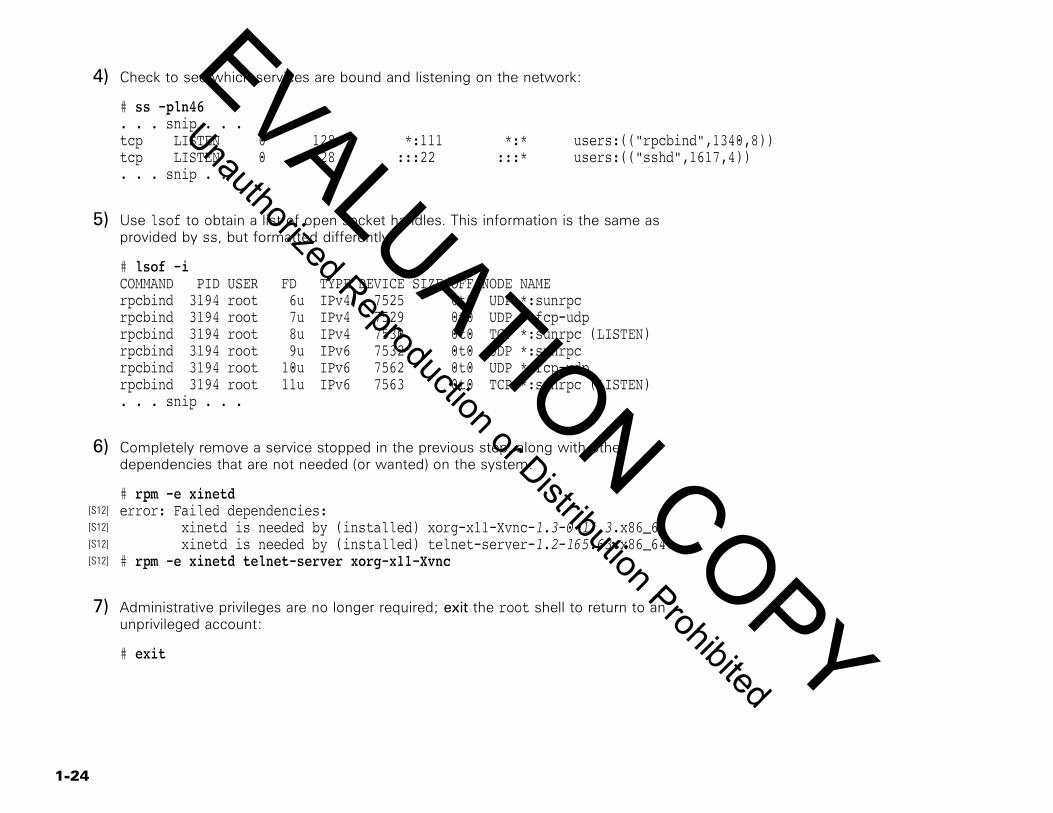
Check to see which services are bound and listening on the network:4)
# ss -pln46. . . snip . . .tcp LISTEN 0 128 *:111 *:* users:(("rpcbind",1340,8))tcp LISTEN 0 128 :::22 :::* users:(("sshd",1617,4)). . . snip . . .
Use lsof to obtain a list of open socket handles. This information is the same as5)provided by ss, but formatted differently:
# lsof -iCOMMAND PID USER FD TYPE DEVICE SIZE/OFF NODE NAMErpcbind 3194 root 6u IPv4 7525 0t0 UDP *:sunrpcrpcbind 3194 root 7u IPv4 7529 0t0 UDP *:fcp-udprpcbind 3194 root 8u IPv4 7530 0t0 TCP *:sunrpc (LISTEN)rpcbind 3194 root 9u IPv6 7532 0t0 UDP *:sunrpcrpcbind 3194 root 10u IPv6 7562 0t0 UDP *:fcp-udprpcbind 3194 root 11u IPv6 7563 0t0 TCP *:sunrpc (LISTEN). . . snip . . .
Completely remove a service stopped in the previous step, along with other6)dependencies that are not needed (or wanted) on the system:
# rpm -e xinetderror: Failed dependencies:[S12]
xinetd is needed by (installed) xorg-x11-Xvnc-1.3-0-17.3.x86_64[S12]
xinetd is needed by (installed) telnet-server-1.2-165.63.x86_64[S12]
# rpm -e xinetd telnet-server xorg-x11-Xvnc[S12]
Administrative privileges are no longer required; exit the root shell to return to an7)unprivileged account:
# exit
EVALUATION COPY
Unauthorized Reproduction or Distribution Prohibited

1-25
Objectivesy Examine a daemon's use of the setuid() and capset() system calls to
increase security.
Requirementsb (1 station)
RelevanceThe setuid() and capset() system calls can be used by developers onLinux for applications that run or start as the root user to dropunnecessary privileges. It is important to understand how these systemcalls work in order to be able understand how security techniquesinvolving these calls are implemented on Linux.
Lab 1
Task 4Operation of the setuid() andcapset() System CallsEstimated Time: 10 minutes
The following actions require administrative privileges. Switch to a root login1)shell:
$ su -Password: makeitso Õ
[R7] This step should only be performed on RHEL7.2)Stop chronyd and use ntpd for this demonstration:
# systemctl disable --now chronydrm '/etc/systemd/system/multi-user.target.wants/chronyd.service'# systemctl start ntpd
[S12] This step should only be performed on SLES12.3)Install the package libcap-progs which provides the command capsh:
# zypper install -y libcap-progs. . . output omitted . . .
Ensure ntpd is running:4)
# systemctl status ntpd ntpd.service - Network Time Service Loaded: loaded (/usr/lib/systemd/system/ntpd.service; disabled; vendor preset: disabled)
EVALUATION COPY
Unauthorized Reproduction or Distribution Prohibited
1-26
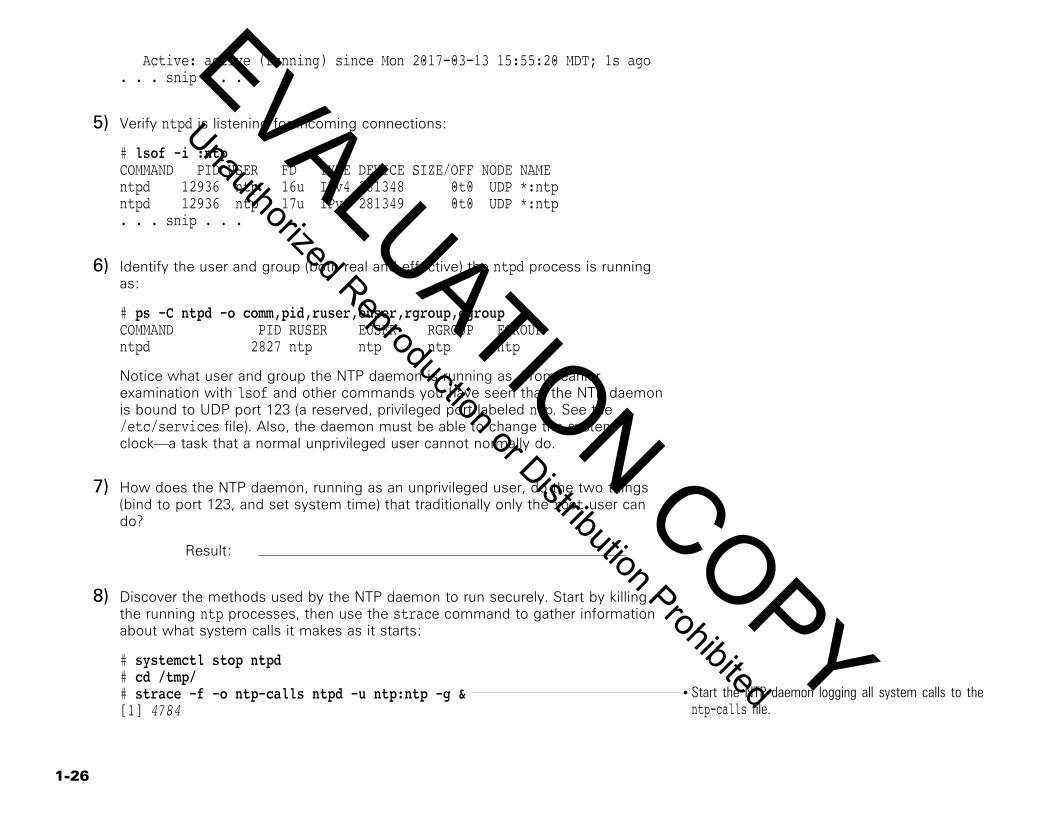
Active: active (running) since Mon 2017-03-13 15:55:20 MDT; 1s ago. . . snip . . .
Verify ntpd is listening for incoming connections:5)
# lsof -i :ntpCOMMAND PID USER FD TYPE DEVICE SIZE/OFF NODE NAMEntpd 12936 ntp 16u IPv4 281348 0t0 UDP *:ntpntpd 12936 ntp 17u IPv6 281349 0t0 UDP *:ntp. . . snip . . .
Identify the user and group (both real and effective) the ntpd process is running6)as:
# ps -C ntpd -o comm,pid,ruser,euser,rgroup,egroupCOMMAND PID RUSER EUSER RGROUP EGROUPntpd 2827 ntp ntp ntp ntp
Notice what user and group the NTP daemon is running as. From earlierexamination with lsof and other commands you have seen that the NTP daemonis bound to UDP port 123 (a reserved, privileged port labeled ntp. See the/etc/services file). Also, the daemon must be able to change the systemclock—a task that a normal unprivileged user cannot normally do.
How does the NTP daemon, running as an unprivileged user, do the two things7)(bind to port 123, and set system time) that traditionally only the root user cando?
Result:
Discover the methods used by the NTP daemon to run securely. Start by killing8)the running ntp processes, then use the strace command to gather informationabout what system calls it makes as it starts:
# systemctl stop ntpd# cd /tmp/
Start the NTP daemon logging all system calls to thentp-calls file.
# strace -f -o ntp-calls ntpd -u ntp:ntp -g &[1] 4784
EVALUATION COPY
Unauthorized Reproduction or Distribution Prohibited
1-27
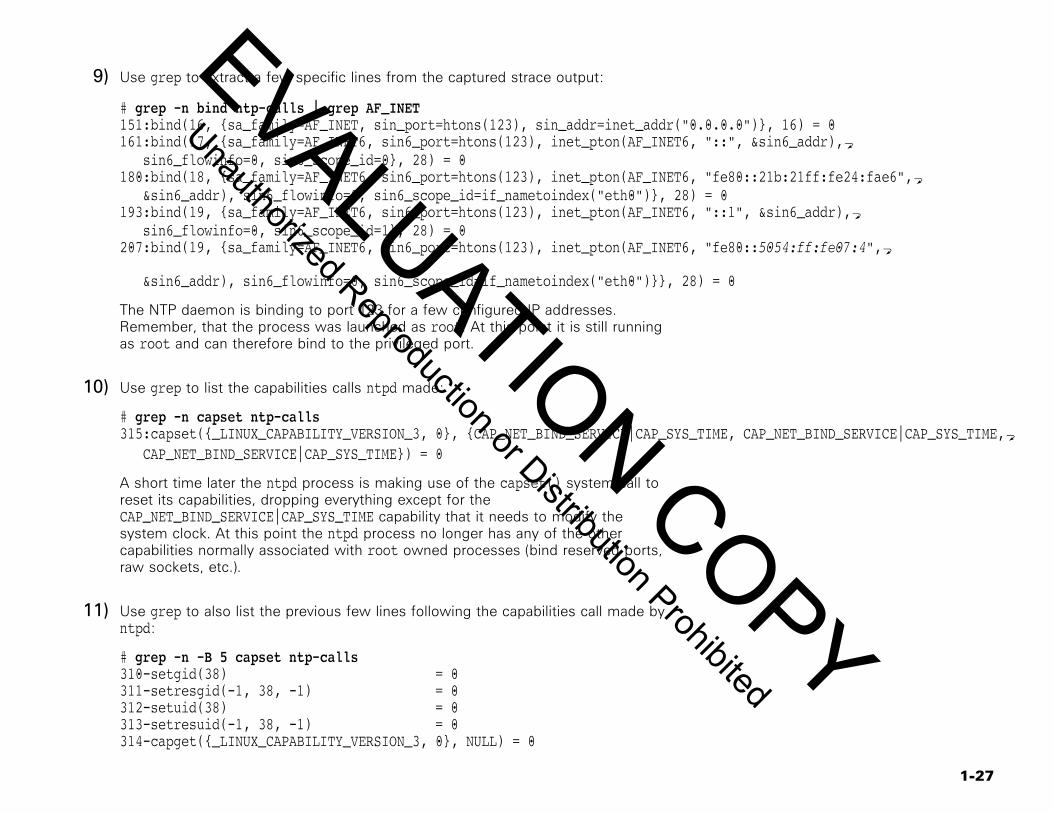
Use grep to extract a few specific lines from the captured strace output:9)
# grep -n bind ntp-calls | grep AF_INET151:bind(16, {sa_family=AF_INET, sin_port=htons(123), sin_addr=inet_addr("0.0.0.0")}, 16) = 0161:bind(17, {sa_family=AF_INET6, sin6_port=htons(123), inet_pton(AF_INET6, "::", &sin6_addr),a sin6_flowinfo=0, sin6_scope_id=0}, 28) = 0180:bind(18, {sa_family=AF_INET6, sin6_port=htons(123), inet_pton(AF_INET6, "fe80::21b:21ff:fe24:fae6",a &sin6_addr), sin6_flowinfo=0, sin6_scope_id=if_nametoindex("eth0")}, 28) = 0193:bind(19, {sa_family=AF_INET6, sin6_port=htons(123), inet_pton(AF_INET6, "::1", &sin6_addr),a sin6_flowinfo=0, sin6_scope_id=1}, 28) = 0207:bind(19, {sa_family=AF_INET6, sin6_port=htons(123), inet_pton(AF_INET6, "fe80::5054:ff:fe07:4",a
&sin6_addr), sin6_flowinfo=0, sin6_scope_id=if_nametoindex("eth0")}}, 28) = 0
The NTP daemon is binding to port 123 for a few configured IP addresses.Remember, that the process was launched as root. At this point it is still runningas root and can therefore bind to the privileged port.
Use grep to list the capabilities calls ntpd made:10)
# grep -n capset ntp-calls315:capset({_LINUX_CAPABILITY_VERSION_3, 0}, {CAP_NET_BIND_SERVICE|CAP_SYS_TIME, CAP_NET_BIND_SERVICE|CAP_SYS_TIME,a CAP_NET_BIND_SERVICE|CAP_SYS_TIME}) = 0
A short time later the ntpd process is making use of the capset() system call toreset its capabilities, dropping everything except for theCAP_NET_BIND_SERVICE|CAP_SYS_TIME capability that it needs to modify thesystem clock. At this point the ntpd process no longer has any of the othercapabilities normally associated with root owned processes (bind reserved ports,raw sockets, etc.).
Use grep to also list the previous few lines following the capabilities call made by11)ntpd:
# grep -n -B 5 capset ntp-calls310-setgid(38) = 0311-setresgid(-1, 38, -1) = 0312-setuid(38) = 0313-setresuid(-1, 38, -1) = 0314-capget({_LINUX_CAPABILITY_VERSION_3, 0}, NULL) = 0
EVALUATION COPY
Unauthorized Reproduction or Distribution Prohibited
1-28
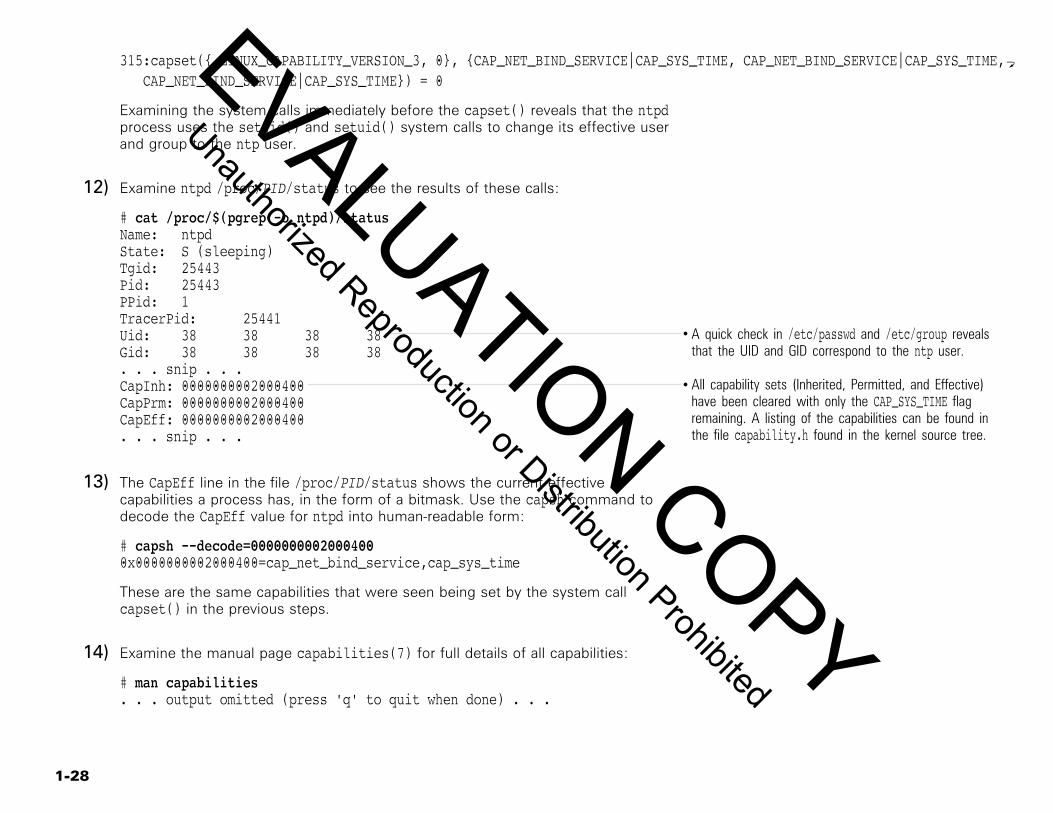
315:capset({_LINUX_CAPABILITY_VERSION_3, 0}, {CAP_NET_BIND_SERVICE|CAP_SYS_TIME, CAP_NET_BIND_SERVICE|CAP_SYS_TIME,a CAP_NET_BIND_SERVICE|CAP_SYS_TIME}) = 0
Examining the system calls immediately before the capset() reveals that the ntpdprocess uses the setgid() and setuid() system calls to change its effective userand group to the ntp user.
Examine ntpd /proc/PID/status to see the results of these calls:12)
# cat /proc/$(pgrep -o ntpd)/statusName: ntpdState: S (sleeping)Tgid: 25443Pid: 25443PPid: 1TracerPid: 25441
A quick check in /etc/passwd and /etc/group revealsthat the UID and GID correspond to the ntp user.
Uid: 38 38 38 38Gid: 38 38 38 38. . . snip . . .
All capability sets (Inherited, Permitted, and Effective)have been cleared with only the CAP_SYS_TIME flagremaining. A listing of the capabilities can be found inthe file capability.h found in the kernel source tree.
CapInh: 0000000002000400CapPrm: 0000000002000400CapEff: 0000000002000400. . . snip . . .
The CapEff line in the file /proc/PID/status shows the current effective13)capabilities a process has, in the form of a bitmask. Use the capsh command todecode the CapEff value for ntpd into human-readable form:
# capsh --decode=00000000020004000x0000000002000400=cap_net_bind_service,cap_sys_time
These are the same capabilities that were seen being set by the system callcapset() in the previous steps.
Examine the manual page capabilities(7) for full details of all capabilities:14)
# man capabilities. . . output omitted (press 'q' to quit when done) . . .
EVALUATION COPY
Unauthorized Reproduction or Distribution Prohibited

1-29
Clean up:
Kill the running strace and restart the service normally:15)
# pkill ntpd# systemctl enable --now chronyd[R7]
# systemctl start ntpd[S12]
Administrative privileges are no longer required; exit the root shell to return to an16)unprivileged account:
# exit
EVALUATION COPY
Unauthorized Reproduction or Distribution Prohibited
1-30
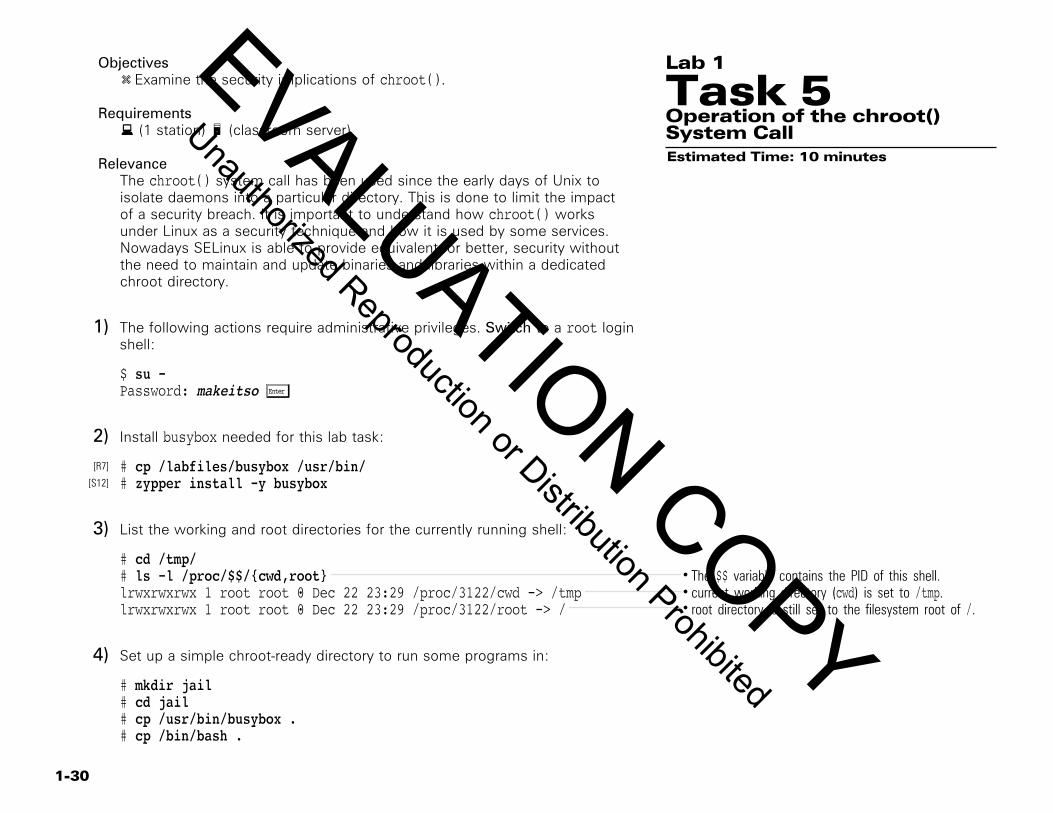
Objectivesy Examine the security implications of chroot().
Requirementsb (1 station) c (classroom server)
RelevanceThe chroot() system call has been used since the early days of Unix toisolate daemons into a particular directory. This is done to limit the impactof a security breach. It is important to understand how chroot() worksunder Linux as a security technique and how it is used by some services.Nowadays SELinux is able to provide equivalent, or better, security withoutthe need to maintain and update binaries and libraries within a dedicatedchroot directory.
Lab 1
Task 5Operation of the chroot()System CallEstimated Time: 10 minutes
The following actions require administrative privileges. Switch to a root login1)shell:
$ su -Password: makeitso Õ
Install busybox needed for this lab task:2)
# cp /labfiles/busybox /usr/bin/[R7]
# zypper install -y busybox[S12]
List the working and root directories for the currently running shell:3)
# cd /tmp/The $$ variable contains the PID of this shell.# ls -l /proc/$$/{cwd,root}current working directory (cwd) is set to /tmp.lrwxrwxrwx 1 root root 0 Dec 22 23:29 /proc/3122/cwd -> /tmproot directory is still set to the filesystem root of /.lrwxrwxrwx 1 root root 0 Dec 22 23:29 /proc/3122/root -> /
Set up a simple chroot-ready directory to run some programs in:4)
# mkdir jail# cd jail# cp /usr/bin/busybox .# cp /bin/bash .
EVALUATION COPY
Unauthorized Reproduction or Distribution Prohibited
1-31
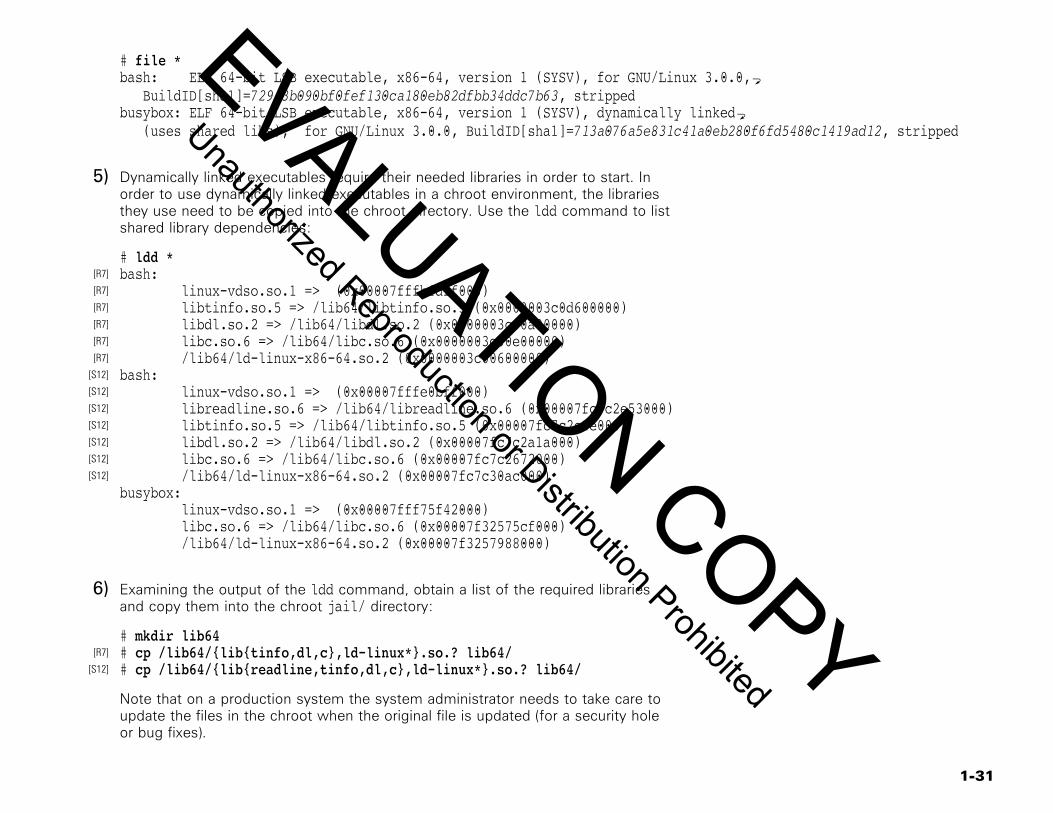
# file *bash: ELF 64-bit LSB executable, x86-64, version 1 (SYSV), for GNU/Linux 3.0.0,a BuildID[sha1]=72943b090bf0fef130ca180eb82dfbb34ddc7b63, strippedbusybox: ELF 64-bit LSB executable, x86-64, version 1 (SYSV), dynamically linkeda (uses shared libs), for GNU/Linux 3.0.0, BuildID[sha1]=713a076a5e831c41a0eb280f6fd5480c1419ad12, stripped
Dynamically linked executables require their needed libraries in order to start. In5)order to use dynamically linked executables in a chroot environment, the librariesthey use need to be copied into the chroot directory. Use the ldd command to listshared library dependencies:
# ldd *bash:[R7]
linux-vdso.so.1 => (0x00007fffbfdff000)[R7]
libtinfo.so.5 => /lib64/libtinfo.so.5 (0x0000003c0d600000)[R7]
libdl.so.2 => /lib64/libdl.so.2 (0x0000003c00a00000)[R7]
libc.so.6 => /lib64/libc.so.6 (0x0000003c00e00000)[R7]
/lib64/ld-linux-x86-64.so.2 (0x0000003c00600000)[R7]
bash:[S12]
linux-vdso.so.1 => (0x00007fffe0bff000)[S12]
libreadline.so.6 => /lib64/libreadline.so.6 (0x00007fc7c2e53000)[S12]
libtinfo.so.5 => /lib64/libtinfo.so.5 (0x00007fc7c2c1e000)[S12]
libdl.so.2 => /lib64/libdl.so.2 (0x00007fc7c2a1a000)[S12]
libc.so.6 => /lib64/libc.so.6 (0x00007fc7c2672000)[S12]
/lib64/ld-linux-x86-64.so.2 (0x00007fc7c30ac000)[S12]
busybox: linux-vdso.so.1 => (0x00007fff75f42000) libc.so.6 => /lib64/libc.so.6 (0x00007f32575cf000) /lib64/ld-linux-x86-64.so.2 (0x00007f3257988000)
Examining the output of the ldd command, obtain a list of the required libraries6)and copy them into the chroot jail/ directory:
# mkdir lib64# cp /lib64/{lib{tinfo,dl,c},ld-linux*}.so.? lib64/[R7]
# cp /lib64/{lib{readline,tinfo,dl,c},ld-linux*}.so.? lib64/[S12]
Note that on a production system the system administrator needs to take care toupdate the files in the chroot when the original file is updated (for a security holeor bug fixes).
EVALUATION COPY
Unauthorized Reproduction or Distribution Prohibited
1-32
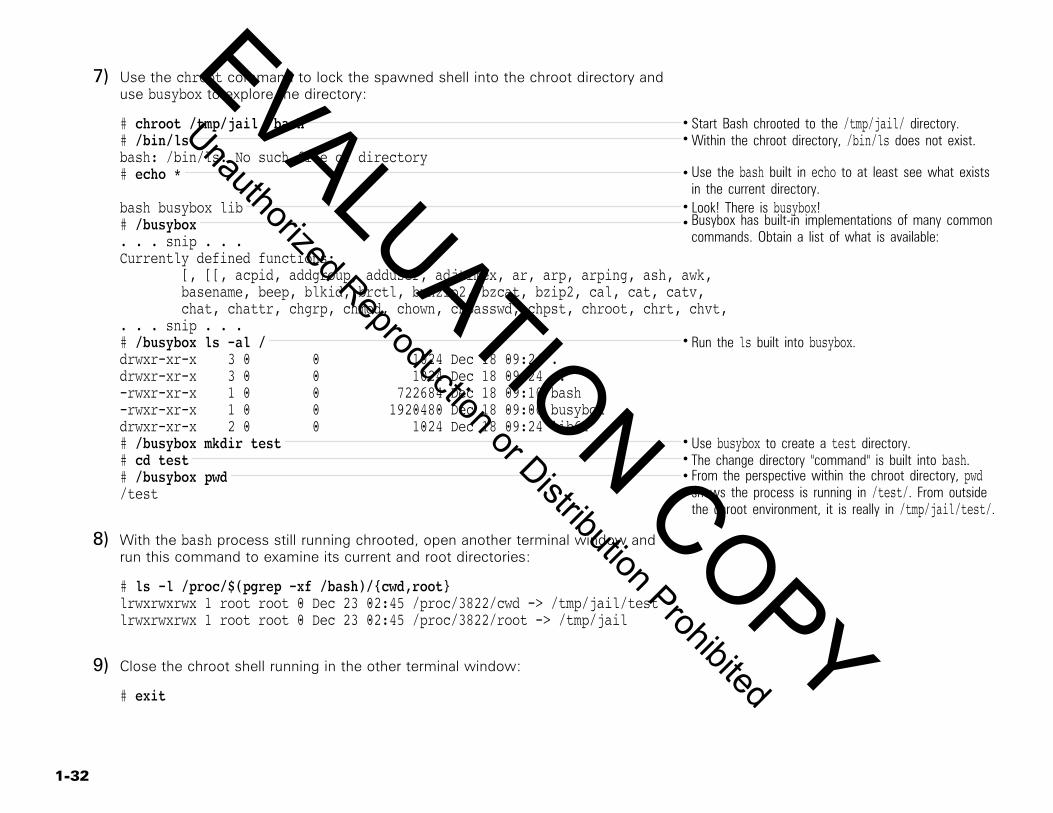
Use the chroot command to lock the spawned shell into the chroot directory and7)use busybox to explore the directory:
Start Bash chrooted to the /tmp/jail/ directory.# chroot /tmp/jail /bashWithin the chroot directory, /bin/ls does not exist.# /bin/ls
bash: /bin/ls: No such file or directoryUse the bash built in echo to at least see what existsin the current directory.
# echo *
Look! There is busybox!bash busybox libBusybox has built-in implementations of many commoncommands. Obtain a list of what is available:
# /busybox. . . snip . . .Currently defined functions: [, [[, acpid, addgroup, adduser, adjtimex, ar, arp, arping, ash, awk, basename, beep, blkid, brctl, bunzip2, bzcat, bzip2, cal, cat, catv, chat, chattr, chgrp, chmod, chown, chpasswd, chpst, chroot, chrt, chvt,. . . snip . . .
Run the ls built into busybox.# /busybox ls -al /drwxr-xr-x 3 0 0 1024 Dec 18 09:24 .drwxr-xr-x 3 0 0 1024 Dec 18 09:24 ..-rwxr-xr-x 1 0 0 722684 Dec 18 09:10 bash-rwxr-xr-x 1 0 0 1920480 Dec 18 09:00 busyboxdrwxr-xr-x 2 0 0 1024 Dec 18 09:24 lib64
Use busybox to create a test directory.# /busybox mkdir testThe change directory "command" is built into bash.# cd testFrom the perspective within the chroot directory, pwdshows the process is running in /test/. From outsidethe chroot environment, it is really in /tmp/jail/test/.
# /busybox pwd/test
With the bash process still running chrooted, open another terminal window and8)run this command to examine its current and root directories:
# ls -l /proc/$(pgrep -xf /bash)/{cwd,root}lrwxrwxrwx 1 root root 0 Dec 23 02:45 /proc/3822/cwd -> /tmp/jail/testlrwxrwxrwx 1 root root 0 Dec 23 02:45 /proc/3822/root -> /tmp/jail
Close the chroot shell running in the other terminal window:9)
# exit
EVALUATION COPY
Unauthorized Reproduction or Distribution Prohibited
1-33
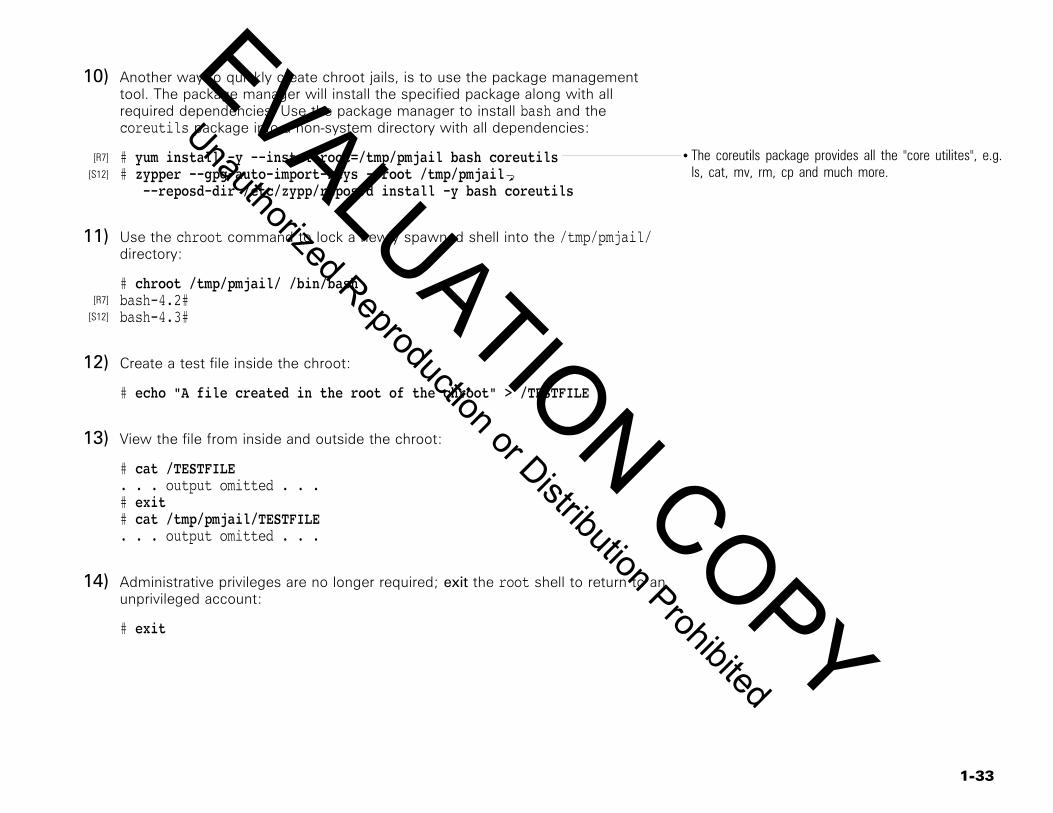
Another way to quickly create chroot jails, is to use the package management10)tool. The package manager will install the specified package along with allrequired dependencies. Use the package manager to install bash and thecoreutils package into a non-system directory with all dependencies:
The coreutils package provides all the "core utilites", e.g.ls, cat, mv, rm, cp and much more.
# yum install -y --installroot=/tmp/pmjail bash coreutils[R7]
# zypper --gpg-auto-import-keys --root /tmp/pmjaila[S12]
--reposd-dir /etc/zypp/repos.d install -y bash coreutils
Use the chroot command to lock a newly spawned shell into the /tmp/pmjail/11)directory:
# chroot /tmp/pmjail/ /bin/bashbash-4.2#[R7]
bash-4.3#[S12]
Create a test file inside the chroot:12)
# echo "A file created in the root of the chroot" > /TESTFILE
View the file from inside and outside the chroot:13)
# cat /TESTFILE. . . output omitted . . .# exit# cat /tmp/pmjail/TESTFILE. . . output omitted . . .
Administrative privileges are no longer required; exit the root shell to return to an14)unprivileged account:
# exit
EVALUATION COPY
Unauthorized Reproduction or Distribution Prohibited

EVALUATION COPY
Unauthorized Reproduction or Distribution Prohibited
Chapter
2SCANNING,PROBING, ANDMAPPINGVULNERABILITIES
ContentThe Security Environment . . . . . . . . . . . . . . . . . . . . . . . . . . . 2Stealth Reconnaissance . . . . . . . . . . . . . . . . . . . . . . . . . . . . . 3The WHOIS database . . . . . . . . . . . . . . . . . . . . . . . . . . . . . . . 4Interrogating DNS . . . . . . . . . . . . . . . . . . . . . . . . . . . . . . . . . . 5Discovering Hosts . . . . . . . . . . . . . . . . . . . . . . . . . . . . . . . . . . 6Discovering Reachable Services . . . . . . . . . . . . . . . . . . . . . . 7Reconnaissance with SNMP . . . . . . . . . . . . . . . . . . . . . . . . . 8Discovery of RPC Services . . . . . . . . . . . . . . . . . . . . . . . . . . 10Enumerating NFS Shares . . . . . . . . . . . . . . . . . . . . . . . . . . . 11Nessus/OpenVAS Insecurity Scanner . . . . . . . . . . . . . . . . 12Configuring OpenVAS . . . . . . . . . . . . . . . . . . . . . . . . . . . . . . 13Intrusion Detection Systems . . . . . . . . . . . . . . . . . . . . . . . . 14Snort Rules . . . . . . . . . . . . . . . . . . . . . . . . . . . . . . . . . . . . . . . 15Writing Snort Rules . . . . . . . . . . . . . . . . . . . . . . . . . . . . . . . . 16
Lab Tasks 171. NMAP . . . . . . . . . . . . . . . . . . . . . . . . . . . . . . . . . . . . . . . . . 182. OpenVAS . . . . . . . . . . . . . . . . . . . . . . . . . . . . . . . . . . . . . . . 223. Advanced nmap Options . . . . . . . . . . . . . . . . . . . . . . . . . 27
EVALUATION COPY
Unauthorized Reproduction or Distribution Prohibited
2-2
The Security Environment
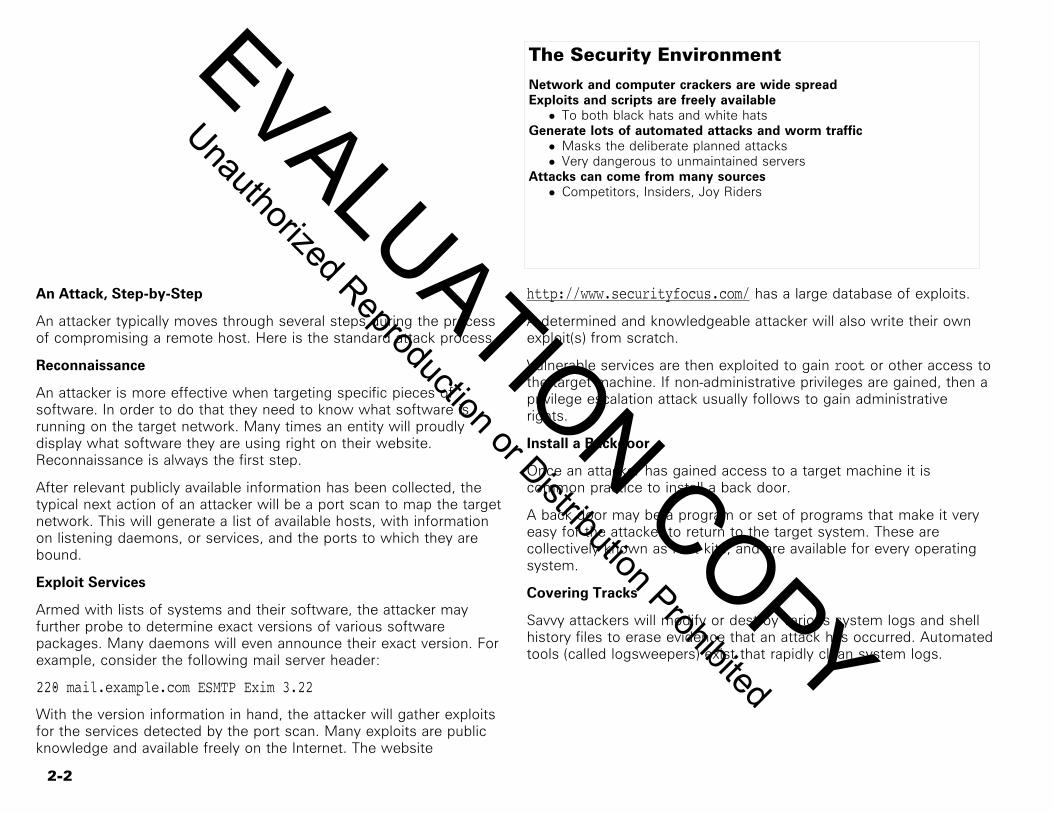
Network and computer crackers are wide spreadExploits and scripts are freely available• To both black hats and white hats
Generate lots of automated attacks and worm traffic• Masks the deliberate planned attacks• Very dangerous to unmaintained servers
Attacks can come from many sources• Competitors, Insiders, Joy Riders
An Attack, Step-by-Step
An attacker typically moves through several steps during the processof compromising a remote host. Here is the standard attack process.
Reconnaissance
An attacker is more effective when targeting specific pieces ofsoftware. In order to do that they need to know what software isrunning on the target network. Many times an entity will proudlydisplay what software they are using right on their website.Reconnaissance is always the first step.
After relevant publicly available information has been collected, thetypical next action of an attacker will be a port scan to map the targetnetwork. This will generate a list of available hosts, with informationon listening daemons, or services, and the ports to which they arebound.
Exploit Services
Armed with lists of systems and their software, the attacker mayfurther probe to determine exact versions of various softwarepackages. Many daemons will even announce their exact version. Forexample, consider the following mail server header:
220 mail.example.com ESMTP Exim 3.22
With the version information in hand, the attacker will gather exploitsfor the services detected by the port scan. Many exploits are publicknowledge and available freely on the Internet. The website
http://www.securityfocus.com/ has a large database of exploits.
A determined and knowledgeable attacker will also write their ownexploit(s) from scratch.
Vulnerable services are then exploited to gain root or other access tothe target machine. If non-administrative privileges are gained, then aprivilege escalation attack usually follows to gain administrativerights.
Install a Backdoor
Once an attacker has gained access to a target machine it iscommon practice to install a back door.
A back door may be a program or set of programs that make it veryeasy for the attacker to return to the target system. These arecollectively known as root kits, and are available for every operatingsystem.
Covering Tracks
Savvy attackers will modify or destroy various system logs and shellhistory files to erase evidence that an attack has occurred. Automatedtools (called logsweepers) exist that rapidly clean system logs.
EVALUATION COPY
Unauthorized Reproduction or Distribution Prohibited
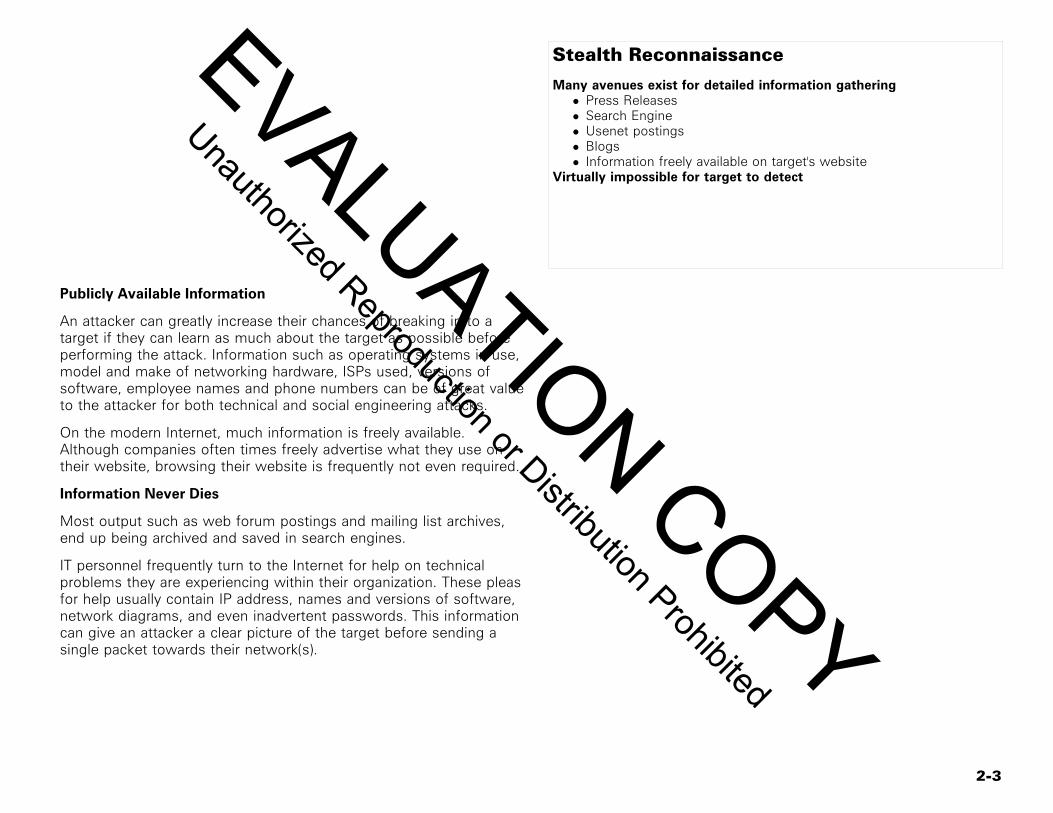
2-3
Stealth Reconnaissance
Many avenues exist for detailed information gathering• Press Releases• Search Engine• Usenet postings• Blogs• Information freely available on target's website
Virtually impossible for target to detect
Publicly Available Information
An attacker can greatly increase their chances of breaking in to atarget if they can learn as much about the target as possible beforeperforming the attack. Information such as operating systems in use,model and make of networking hardware, ISPs used, versions ofsoftware, employee names and phone numbers can be of great valueto the attacker for both technical and social engineering attacks.
On the modern Internet, much information is freely available.Although companies often times freely advertise what they use ontheir website, browsing their website is frequently not even required.
Information Never Dies
Most output such as web forum postings and mailing list archives,end up being archived and saved in search engines.
IT personnel frequently turn to the Internet for help on technicalproblems they are experiencing within their organization. These pleasfor help usually contain IP address, names and versions of software,network diagrams, and even inadvertent passwords. This informationcan give an attacker a clear picture of the target before sending asingle packet towards their network(s).
EVALUATION COPY
Unauthorized Reproduction or Distribution Prohibited
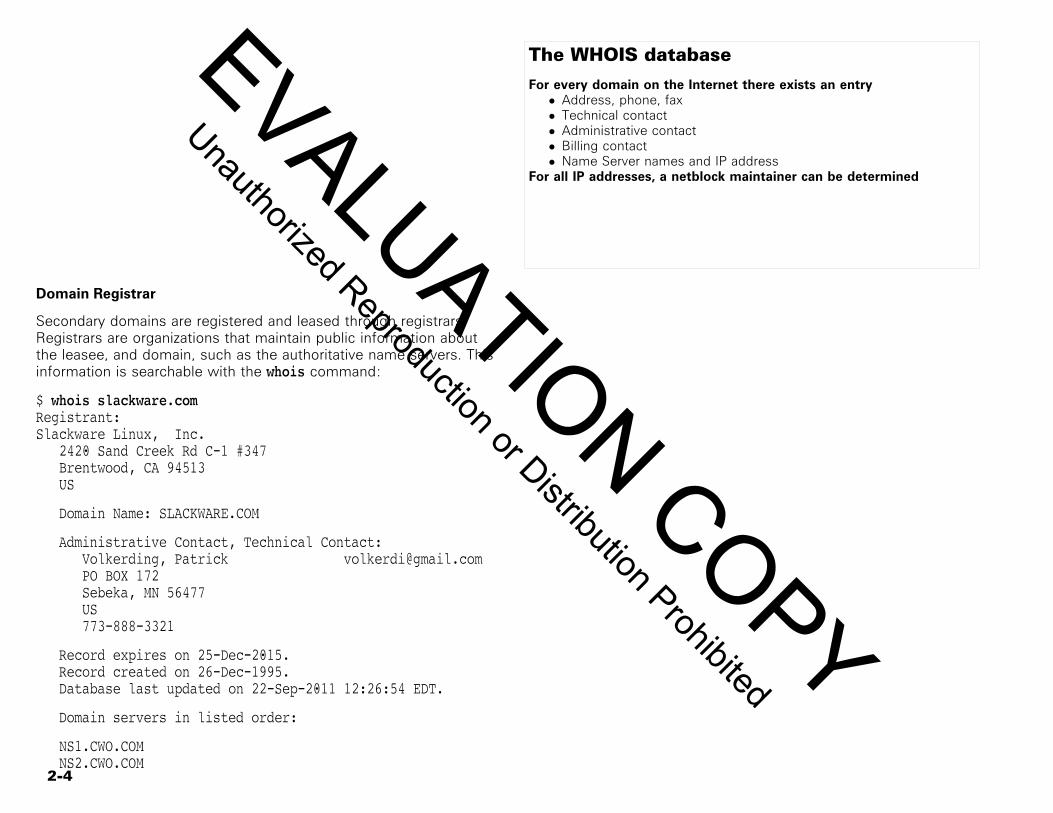
2-4
The WHOIS database
For every domain on the Internet there exists an entry• Address, phone, fax• Technical contact• Administrative contact• Billing contact• Name Server names and IP address
For all IP addresses, a netblock maintainer can be determined
Domain Registrar
Secondary domains are registered and leased through registrars.Registrars are organizations that maintain public information aboutthe leasee, and domain, such as the authoritative name servers. Thisinformation is searchable with the whois command:
$ whois slackware.comRegistrant:Slackware Linux, Inc. 2420 Sand Creek Rd C-1 #347 Brentwood, CA 94513 US
Domain Name: SLACKWARE.COM
Administrative Contact, Technical Contact: Volkerding, Patrick [email protected] PO BOX 172 Sebeka, MN 56477 US 773-888-3321
Record expires on 25-Dec-2015. Record created on 26-Dec-1995. Database last updated on 22-Sep-2011 12:26:54 EDT.
Domain servers in listed order:
NS1.CWO.COM NS2.CWO.COM
EVALUATION COPY
Unauthorized Reproduction or Distribution Prohibited
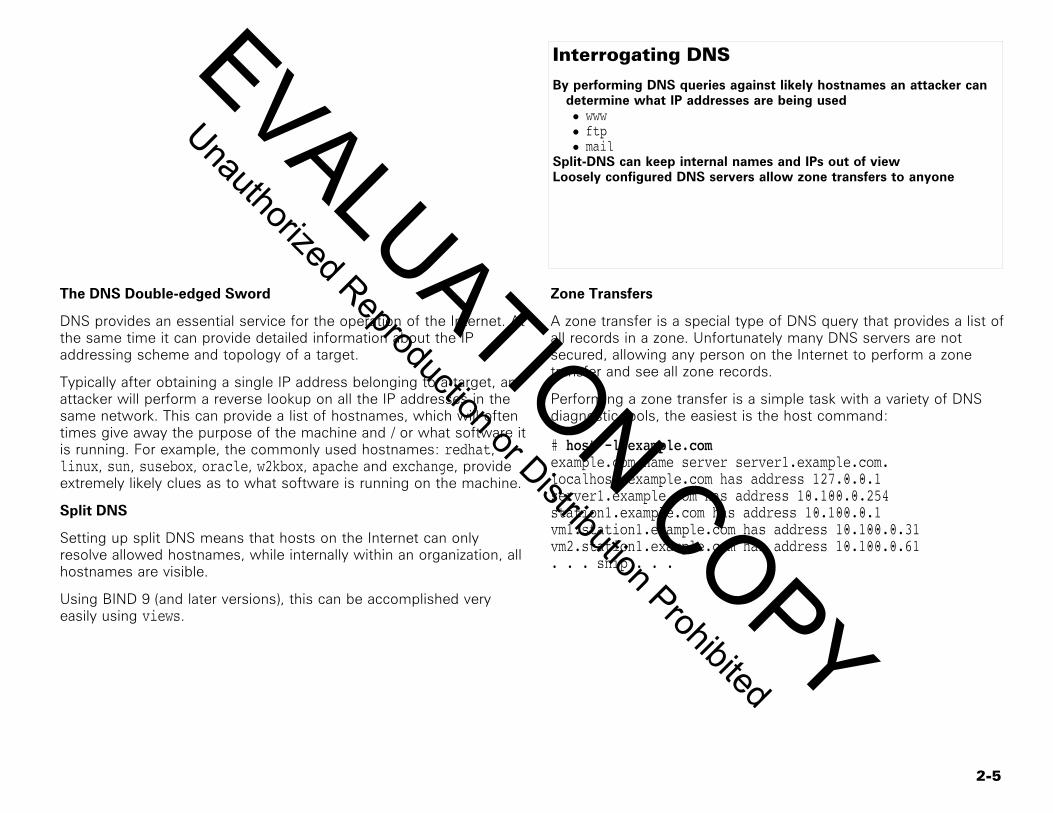
2-5
Interrogating DNS
By performing DNS queries against likely hostnames an attacker candetermine what IP addresses are being used• www• ftp• mail
Split-DNS can keep internal names and IPs out of viewLoosely configured DNS servers allow zone transfers to anyone
The DNS Double-edged Sword
DNS provides an essential service for the operation of the Internet. Atthe same time it can provide detailed information about the IPaddressing scheme and topology of a target.
Typically after obtaining a single IP address belonging to a target, anattacker will perform a reverse lookup on all the IP addresses in thesame network. This can provide a list of hostnames, which will oftentimes give away the purpose of the machine and / or what software itis running. For example, the commonly used hostnames: redhat,linux, sun, susebox, oracle, w2kbox, apache and exchange, provideextremely likely clues as to what software is running on the machine.
Split DNS
Setting up split DNS means that hosts on the Internet can onlyresolve allowed hostnames, while internally within an organization, allhostnames are visible.
Using BIND 9 (and later versions), this can be accomplished veryeasily using views.
Zone Transfers
A zone transfer is a special type of DNS query that provides a list ofall records in a zone. Unfortunately many DNS servers are notsecured, allowing any person on the Internet to perform a zonetransfer and see all zone records.
Performing a zone transfer is a simple task with a variety of DNSdiagnostic tools, the easiest is the host command:
# host -l example.comexample.com name server server1.example.com.localhost.example.com has address 127.0.0.1server1.example.com has address 10.100.0.254station1.example.com has address 10.100.0.1vm1.station1.example.com has address 10.100.0.31vm2.station1.example.com has address 10.100.0.61. . . snip . . .
EVALUATION COPY
Unauthorized Reproduction or Distribution Prohibited
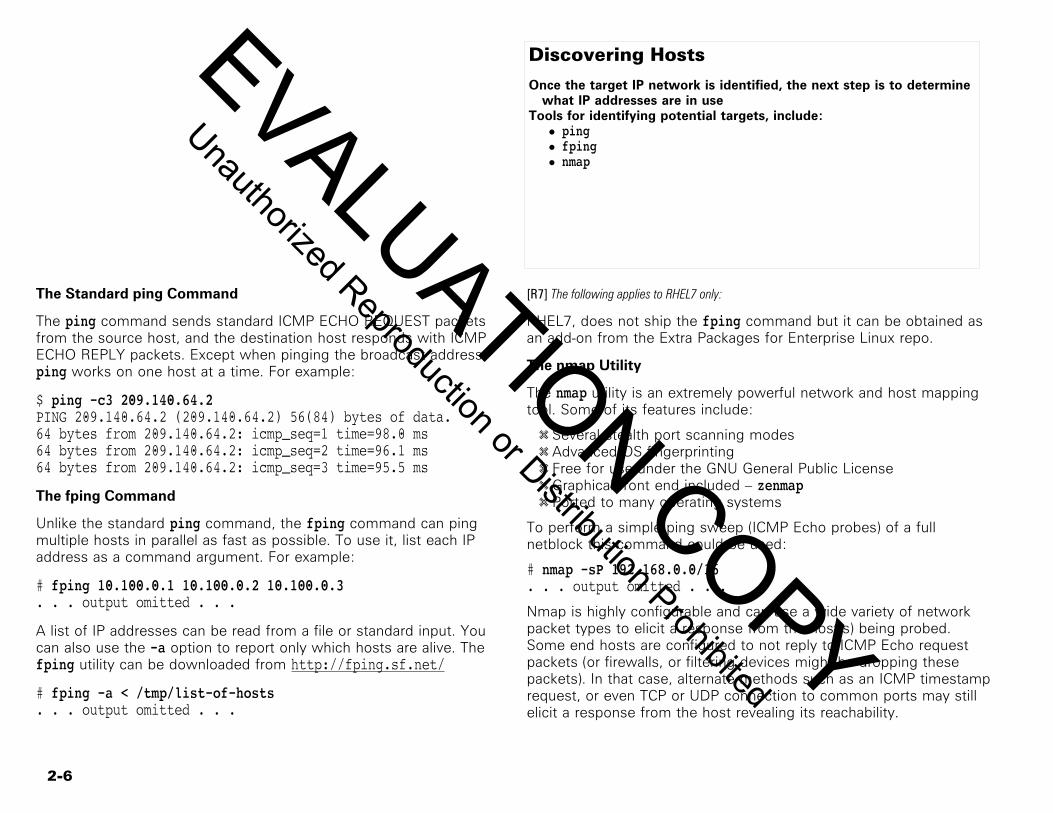
2-6
Discovering Hosts
Once the target IP network is identified, the next step is to determinewhat IP addresses are in use
Tools for identifying potential targets, include:• ping• fping• nmap
The Standard ping Command
The ping command sends standard ICMP ECHO REQUEST packetsfrom the source host, and the destination host responds with ICMPECHO REPLY packets. Except when pinging the broadcast address,ping works on one host at a time. For example:
$ ping -c3 209.140.64.2PING 209.140.64.2 (209.140.64.2) 56(84) bytes of data.64 bytes from 209.140.64.2: icmp_seq=1 time=98.0 ms64 bytes from 209.140.64.2: icmp_seq=2 time=96.1 ms64 bytes from 209.140.64.2: icmp_seq=3 time=95.5 ms
The fping Command
Unlike the standard ping command, the fping command can pingmultiple hosts in parallel as fast as possible. To use it, list each IPaddress as a command argument. For example:
# fping 10.100.0.1 10.100.0.2 10.100.0.3. . . output omitted . . .
A list of IP addresses can be read from a file or standard input. Youcan also use the -a option to report only which hosts are alive. Thefping utility can be downloaded from http://fping.sf.net/
# fping -a < /tmp/list-of-hosts. . . output omitted . . .
[R7] The following applies to RHEL7 only:
RHEL7, does not ship the fping command but it can be obtained asan add-on from the Extra Packages for Enterprise Linux repo.
The nmap Utility
The nmap utility is an extremely powerful network and host mappingtool. Some of its features include:
y Several stealth port scanning modesy Advanced OS fingerprintingy Free for use under the GNU General Public Licensey Graphical front end included – zenmapy Ported to many operating systems
To perform a simple ping sweep (ICMP Echo probes) of a fullnetblock this command could be used:
# nmap -sP 192.168.0.0/16 . . . output omitted . . .
Nmap is highly configurable and can use a wide variety of networkpacket types to elicit a response from the host(s) being probed.Some end hosts are configured to not reply to ICMP Echo requestpackets (or firewalls, or filtering devices might be dropping thesepackets). In that case, alternate methods such as an ICMP timestamprequest, or even TCP or UDP connection to common ports may stillelicit a response from the host revealing its reachability.
EVALUATION COPY
Unauthorized Reproduction or Distribution Prohibited
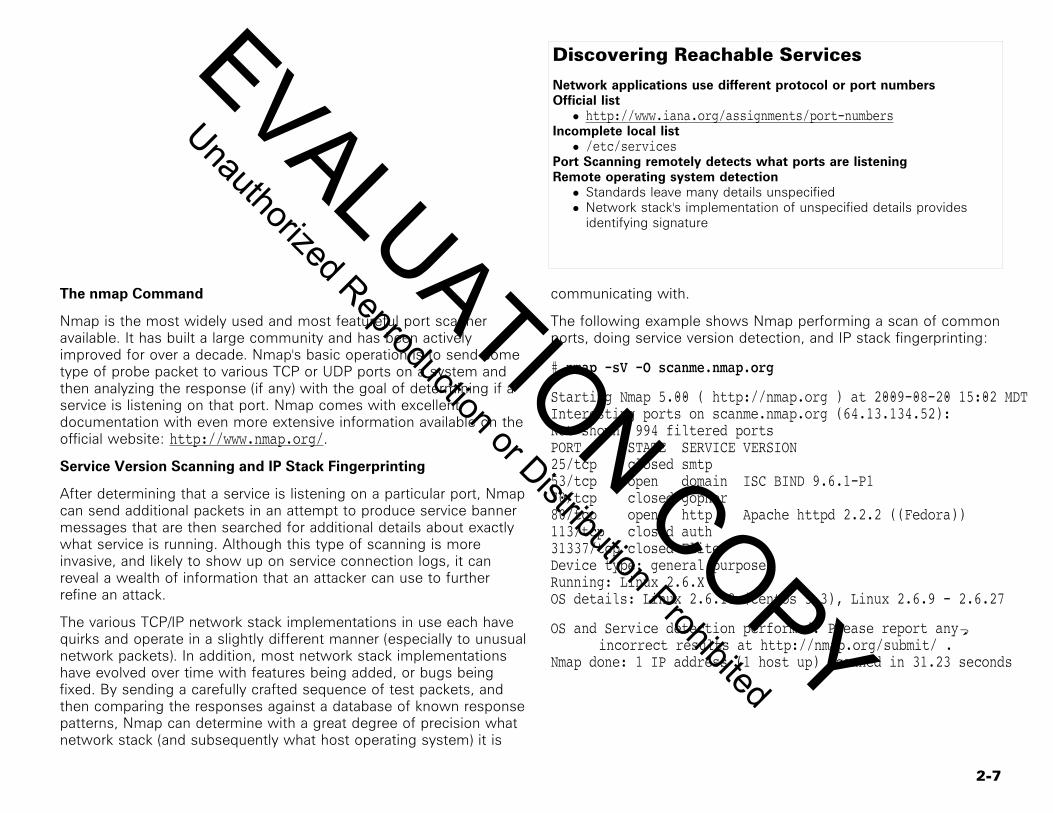
2-7
Discovering Reachable Services
Network applications use different protocol or port numbersOfficial list• http://www.iana.org/assignments/port-numbers
Incomplete local list• /etc/services
Port Scanning remotely detects what ports are listeningRemote operating system detection• Standards leave many details unspecified• Network stack's implementation of unspecified details provides
identifying signature
The nmap Command
Nmap is the most widely used and most featureful port scanneravailable. It has built a large community and has been activelyimproved for over a decade. Nmap's basic operation is to send sometype of probe packet to various TCP or UDP ports on a system andthen analyzing the response (if any) with the goal of determining if aservice is listening on that port. Nmap comes with excellentdocumentation with even more extensive information available on theofficial website: http://www.nmap.org/.
Service Version Scanning and IP Stack Fingerprinting
After determining that a service is listening on a particular port, Nmapcan send additional packets in an attempt to produce service bannermessages that are then searched for additional details about exactlywhat service is running. Although this type of scanning is moreinvasive, and likely to show up on service connection logs, it canreveal a wealth of information that an attacker can use to furtherrefine an attack.
The various TCP/IP network stack implementations in use each havequirks and operate in a slightly different manner (especially to unusualnetwork packets). In addition, most network stack implementationshave evolved over time with features being added, or bugs beingfixed. By sending a carefully crafted sequence of test packets, andthen comparing the responses against a database of known responsepatterns, Nmap can determine with a great degree of precision whatnetwork stack (and subsequently what host operating system) it is
communicating with.
The following example shows Nmap performing a scan of commonports, doing service version detection, and IP stack fingerprinting:
# nmap -sV -O scanme.nmap.org
Starting Nmap 5.00 ( http://nmap.org ) at 2009-08-20 15:02 MDTInteresting ports on scanme.nmap.org (64.13.134.52):Not shown: 994 filtered portsPORT STATE SERVICE VERSION25/tcp closed smtp53/tcp open domain ISC BIND 9.6.1-P170/tcp closed gopher80/tcp open http Apache httpd 2.2.2 ((Fedora))113/tcp closed auth31337/tcp closed EliteDevice type: general purposeRunning: Linux 2.6.XOS details: Linux 2.6.18 (Centos 5.3), Linux 2.6.9 - 2.6.27
OS and Service detection performed. Please report anyaincorrect results at http://nmap.org/submit/ .
Nmap done: 1 IP address (1 host up) scanned in 31.23 seconds
EVALUATION COPY
Unauthorized Reproduction or Distribution Prohibited
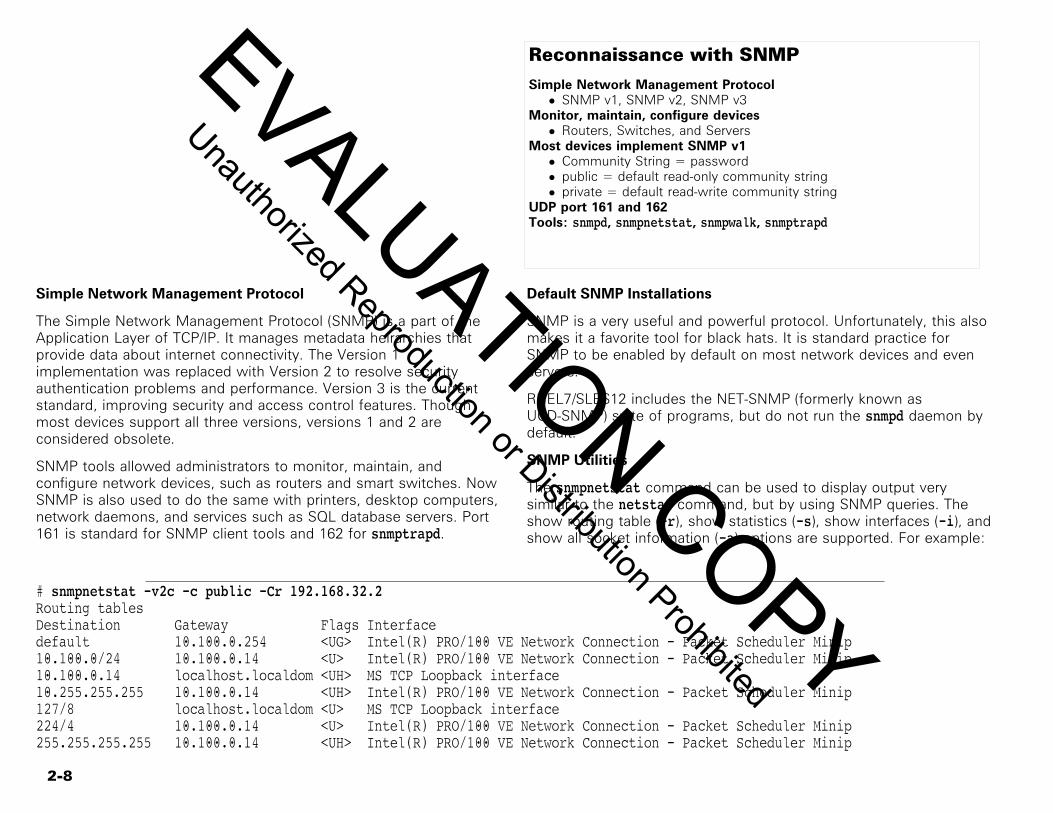
2-8
Reconnaissance with SNMP
Simple Network Management Protocol• SNMP v1, SNMP v2, SNMP v3
Monitor, maintain, configure devices• Routers, Switches, and Servers
Most devices implement SNMP v1• Community String = password• public = default read-only community string• private = default read-write community string
UDP port 161 and 162Tools: snmpd, snmpnetstat, snmpwalk, snmptrapd
Simple Network Management Protocol
The Simple Network Management Protocol (SNMP) is a part of theApplication Layer of TCP/IP. It manages metadata heirarchies thatprovide data about internet connectivity. The Version 1implementation was replaced with Version 2 to resolve securityauthentication problems and performance. Version 3 is the currentstandard, improving security and access control features. Thoughmost devices support all three versions, versions 1 and 2 areconsidered obsolete.
SNMP tools allowed administrators to monitor, maintain, andconfigure network devices, such as routers and smart switches. NowSNMP is also used to do the same with printers, desktop computers,network daemons, and services such as SQL database servers. Port161 is standard for SNMP client tools and 162 for snmptrapd.
Default SNMP Installations
SNMP is a very useful and powerful protocol. Unfortunately, this alsomakes it a favorite tool for black hats. It is standard practice forSNMP to be enabled by default on most network devices and evenservers.
RHEL7/SLES12 includes the NET-SNMP (formerly known asUCD-SNMP) suite of programs, but do not run the snmpd daemon bydefault.
SNMP Utilities
The snmpnetstat command can be used to display output verysimilar to the netstat command, but by using SNMP queries. Theshow routing table (-r), show statistics (-s), show interfaces (-i), andshow all socket information (-a) options are supported. For example:
# snmpnetstat -v2c -c public -Cr 192.168.32.2Routing tablesDestination Gateway Flags Interfacedefault 10.100.0.254 <UG> Intel(R) PRO/100 VE Network Connection - Packet Scheduler Minip10.100.0/24 10.100.0.14 <U> Intel(R) PRO/100 VE Network Connection - Packet Scheduler Minip10.100.0.14 localhost.localdom <UH> MS TCP Loopback interface10.255.255.255 10.100.0.14 <UH> Intel(R) PRO/100 VE Network Connection - Packet Scheduler Minip127/8 localhost.localdom <U> MS TCP Loopback interface224/4 10.100.0.14 <U> Intel(R) PRO/100 VE Network Connection - Packet Scheduler Minip255.255.255.255 10.100.0.14 <UH> Intel(R) PRO/100 VE Network Connection - Packet Scheduler Minip
EVALUATION COPY
Unauthorized Reproduction or Distribution Prohibited
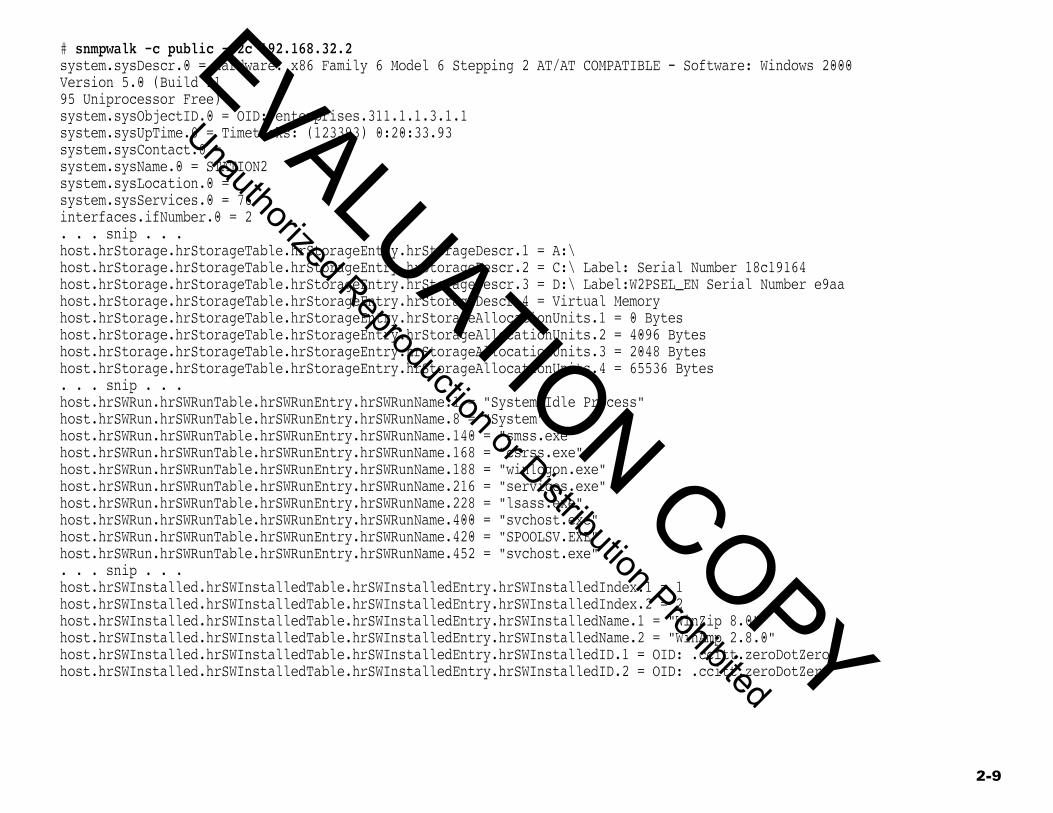
2-9
# snmpwalk -c public -v2c 192.168.32.2system.sysDescr.0 = Hardware: x86 Family 6 Model 6 Stepping 2 AT/AT COMPATIBLE - Software: Windows 2000Version 5.0 (Build 2195 Uniprocessor Free)system.sysObjectID.0 = OID: enterprises.311.1.1.3.1.1system.sysUpTime.0 = Timeticks: (123393) 0:20:33.93system.sysContact.0 =system.sysName.0 = STATION2system.sysLocation.0 =system.sysServices.0 = 76interfaces.ifNumber.0 = 2. . . snip . . .host.hrStorage.hrStorageTable.hrStorageEntry.hrStorageDescr.1 = A:\host.hrStorage.hrStorageTable.hrStorageEntry.hrStorageDescr.2 = C:\ Label: Serial Number 18c19164host.hrStorage.hrStorageTable.hrStorageEntry.hrStorageDescr.3 = D:\ Label:W2PSEL_EN Serial Number e9aahost.hrStorage.hrStorageTable.hrStorageEntry.hrStorageDescr.4 = Virtual Memoryhost.hrStorage.hrStorageTable.hrStorageEntry.hrStorageAllocationUnits.1 = 0 Byteshost.hrStorage.hrStorageTable.hrStorageEntry.hrStorageAllocationUnits.2 = 4096 Byteshost.hrStorage.hrStorageTable.hrStorageEntry.hrStorageAllocationUnits.3 = 2048 Byteshost.hrStorage.hrStorageTable.hrStorageEntry.hrStorageAllocationUnits.4 = 65536 Bytes. . . snip . . .host.hrSWRun.hrSWRunTable.hrSWRunEntry.hrSWRunName.1 = "System Idle Process"host.hrSWRun.hrSWRunTable.hrSWRunEntry.hrSWRunName.8 = "System"host.hrSWRun.hrSWRunTable.hrSWRunEntry.hrSWRunName.140 = "smss.exe"host.hrSWRun.hrSWRunTable.hrSWRunEntry.hrSWRunName.168 = "csrss.exe"host.hrSWRun.hrSWRunTable.hrSWRunEntry.hrSWRunName.188 = "winlogon.exe"host.hrSWRun.hrSWRunTable.hrSWRunEntry.hrSWRunName.216 = "services.exe"host.hrSWRun.hrSWRunTable.hrSWRunEntry.hrSWRunName.228 = "lsass.exe"host.hrSWRun.hrSWRunTable.hrSWRunEntry.hrSWRunName.400 = "svchost.exe"host.hrSWRun.hrSWRunTable.hrSWRunEntry.hrSWRunName.420 = "SPOOLSV.EXE"host.hrSWRun.hrSWRunTable.hrSWRunEntry.hrSWRunName.452 = "svchost.exe". . . snip . . .host.hrSWInstalled.hrSWInstalledTable.hrSWInstalledEntry.hrSWInstalledIndex.1 = 1host.hrSWInstalled.hrSWInstalledTable.hrSWInstalledEntry.hrSWInstalledIndex.2 = 2host.hrSWInstalled.hrSWInstalledTable.hrSWInstalledEntry.hrSWInstalledName.1 = "WinZip 8.0"host.hrSWInstalled.hrSWInstalledTable.hrSWInstalledEntry.hrSWInstalledName.2 = "WinAmp 2.8.0"host.hrSWInstalled.hrSWInstalledTable.hrSWInstalledEntry.hrSWInstalledID.1 = OID: .ccitt.zeroDotZerohost.hrSWInstalled.hrSWInstalledTable.hrSWInstalledEntry.hrSWInstalledID.2 = OID: .ccitt.zeroDotZero
EVALUATION COPY
Unauthorized Reproduction or Distribution Prohibited
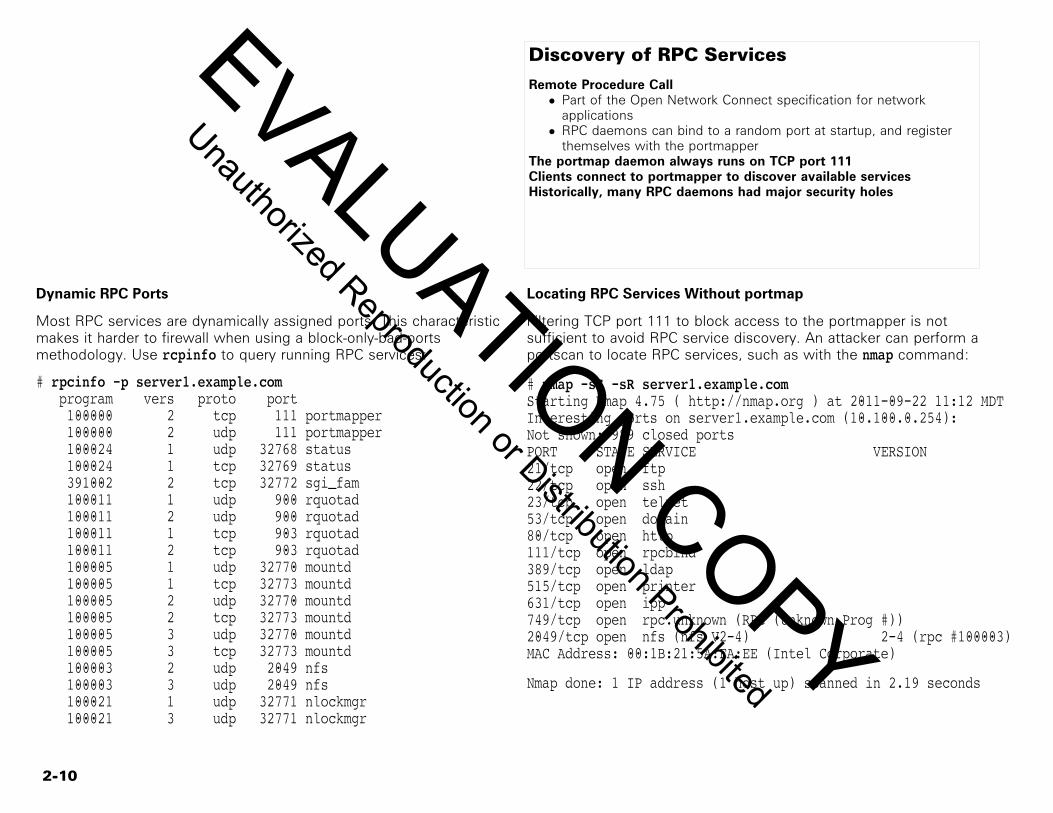
2-10
Discovery of RPC Services
Remote Procedure Call• Part of the Open Network Connect specification for network
applications• RPC daemons can bind to a random port at startup, and register
themselves with the portmapperThe portmap daemon always runs on TCP port 111Clients connect to portmapper to discover available servicesHistorically, many RPC daemons had major security holes
Dynamic RPC Ports
Most RPC services are dynamically assigned ports. This characteristicmakes it harder to firewall when using a block-only-bad-portsmethodology. Use rcpinfo to query running RPC services:
# rpcinfo -p server1.example.com program vers proto port 100000 2 tcp 111 portmapper 100000 2 udp 111 portmapper 100024 1 udp 32768 status 100024 1 tcp 32769 status 391002 2 tcp 32772 sgi_fam 100011 1 udp 900 rquotad 100011 2 udp 900 rquotad 100011 1 tcp 903 rquotad 100011 2 tcp 903 rquotad 100005 1 udp 32770 mountd 100005 1 tcp 32773 mountd 100005 2 udp 32770 mountd 100005 2 tcp 32773 mountd 100005 3 udp 32770 mountd 100005 3 tcp 32773 mountd 100003 2 udp 2049 nfs 100003 3 udp 2049 nfs 100021 1 udp 32771 nlockmgr 100021 3 udp 32771 nlockmgr
Locating RPC Services Without portmap
Filtering TCP port 111 to block access to the portmapper is notsufficient to avoid RPC service discovery. An attacker can perform aportscan to locate RPC services, such as with the nmap command:
# nmap -sS -sR server1.example.comStarting Nmap 4.75 ( http://nmap.org ) at 2011-09-22 11:12 MDTInteresting ports on server1.example.com (10.100.0.254):Not shown: 989 closed portsPORT STATE SERVICE VERSION21/tcp open ftp22/tcp open ssh23/tcp open telnet53/tcp open domain80/tcp open http111/tcp open rpcbind389/tcp open ldap515/tcp open printer631/tcp open ipp749/tcp open rpc.unknown (RPC (Unknown Prog #))2049/tcp open nfs (nfs V2-4) 2-4 (rpc #100003)MAC Address: 00:1B:21:5A:EA:EE (Intel Corporate)
Nmap done: 1 IP address (1 host up) scanned in 2.19 seconds
EVALUATION COPY
Unauthorized Reproduction or Distribution Prohibited
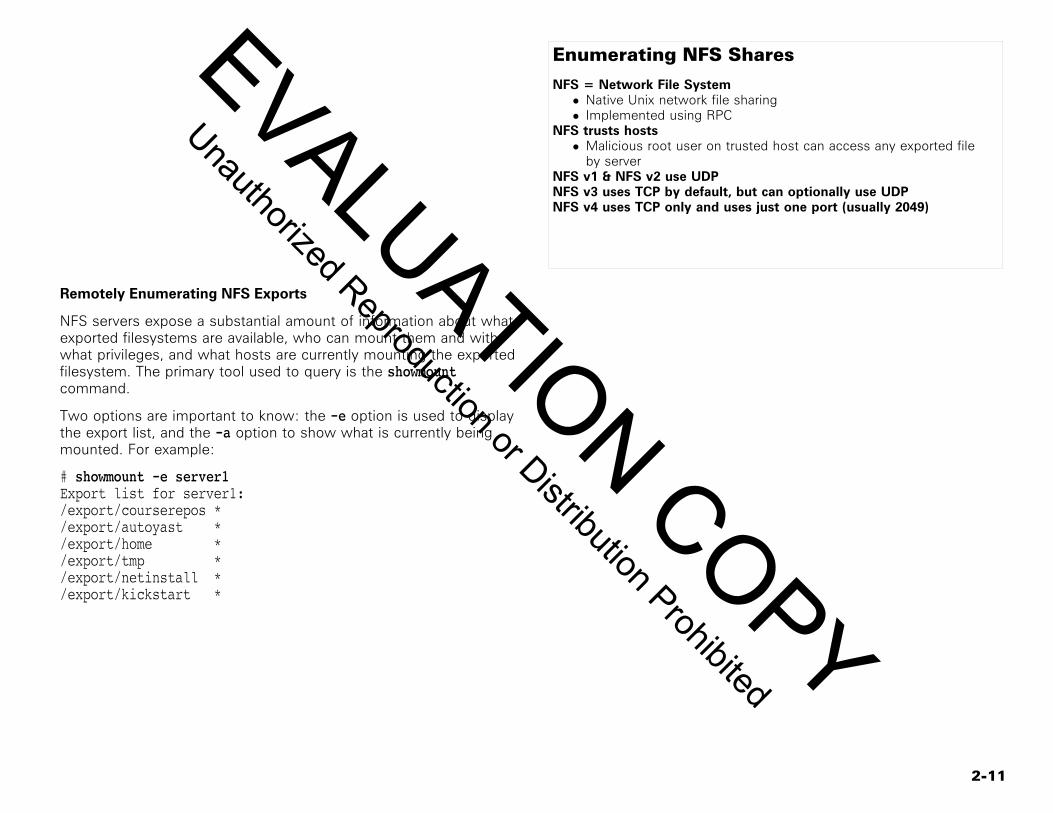
2-11
Enumerating NFS Shares
NFS = Network File System• Native Unix network file sharing• Implemented using RPC
NFS trusts hosts• Malicious root user on trusted host can access any exported file
by serverNFS v1 & NFS v2 use UDPNFS v3 uses TCP by default, but can optionally use UDPNFS v4 uses TCP only and uses just one port (usually 2049)
Remotely Enumerating NFS Exports
NFS servers expose a substantial amount of information about whatexported filesystems are available, who can mount them and withwhat privileges, and what hosts are currently mounting the exportedfilesystem. The primary tool used to query is the showmountcommand.
Two options are important to know: the -e option is used to displaythe export list, and the -a option to show what is currently beingmounted. For example:
# showmount -e server1Export list for server1:/export/courserepos */export/autoyast */export/home */export/tmp */export/netinstall */export/kickstart *
EVALUATION COPY
Unauthorized Reproduction or Distribution Prohibited
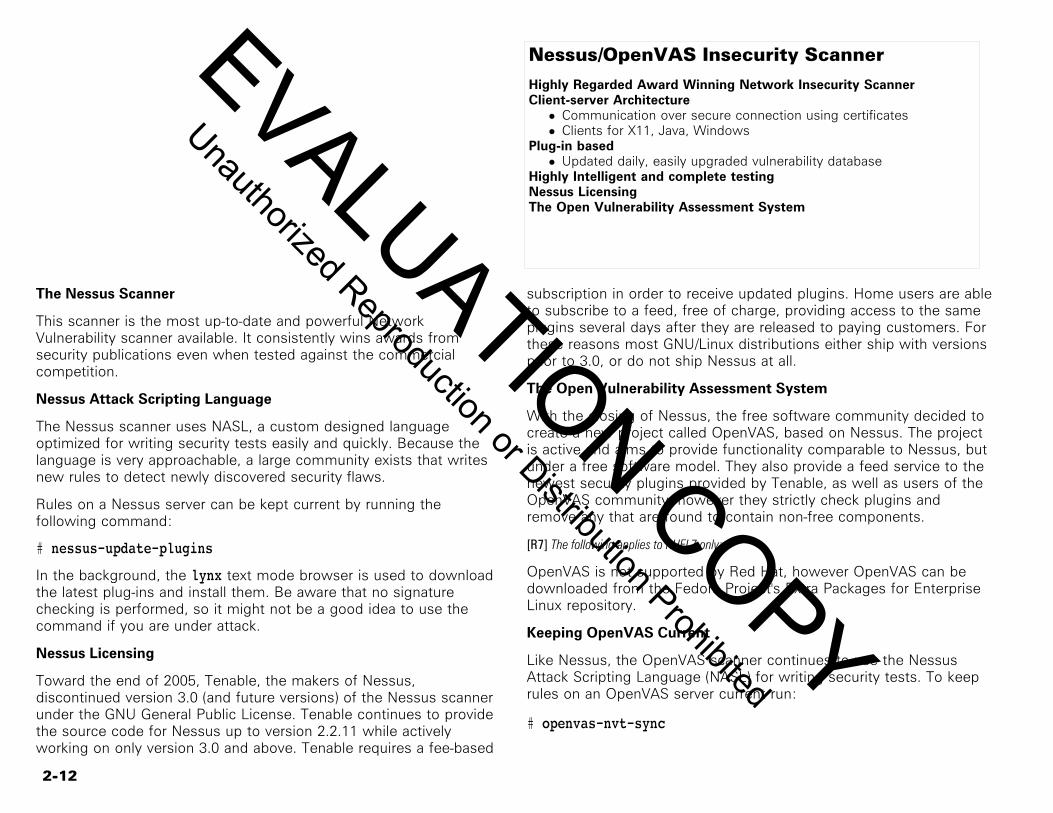
2-12
Nessus/OpenVAS Insecurity Scanner
Highly Regarded Award Winning Network Insecurity ScannerClient-server Architecture• Communication over secure connection using certificates• Clients for X11, Java, Windows
Plug-in based• Updated daily, easily upgraded vulnerability database
Highly Intelligent and complete testingNessus LicensingThe Open Vulnerability Assessment System
The Nessus Scanner
This scanner is the most up-to-date and powerful NetworkVulnerability scanner available. It consistently wins awards fromsecurity publications even when tested against the commercialcompetition.
Nessus Attack Scripting Language
The Nessus scanner uses NASL, a custom designed languageoptimized for writing security tests easily and quickly. Because thelanguage is very approachable, a large community exists that writesnew rules to detect newly discovered security flaws.
Rules on a Nessus server can be kept current by running thefollowing command:
# nessus-update-plugins
In the background, the lynx text mode browser is used to downloadthe latest plug-ins and install them. Be aware that no signaturechecking is performed, so it might not be a good idea to use thecommand if you are under attack.
Nessus Licensing
Toward the end of 2005, Tenable, the makers of Nessus,discontinued version 3.0 (and future versions) of the Nessus scannerunder the GNU General Public License. Tenable continues to providethe source code for Nessus up to version 2.2.11 while activelyworking on only version 3.0 and above. Tenable requires a fee-based
subscription in order to receive updated plugins. Home users are ableto subscribe to a feed, free of charge, providing access to the sameplugins several days after they are released to paying customers. Forthese reasons most GNU/Linux distributions either ship with versionsprior to 3.0, or do not ship Nessus at all.
The Open Vulnerability Assessment System
With the closing of Nessus, the free software community decided tocreate a new project called OpenVAS, based on Nessus. The projectis active and aims to provide functionality comparable to Nessus, butunder a free software model. They also provide a feed service to thenewest security plugins provided by Tenable, as well as users of theOpenVAS community, however they strictly check plugins andremove any that are found to contain non-free components.
[R7] The following applies to RHEL7 only:
OpenVAS is not supported by Red Hat, however OpenVAS can bedownloaded from the Fedora Project's Extra Packages for EnterpriseLinux repository.
Keeping OpenVAS Current
Like Nessus, the OpenVAS scanner continues to use the NessusAttack Scripting Language (NASL) for writing security tests. To keeprules on an OpenVAS server current run:
# openvas-nvt-sync
EVALUATION COPY
Unauthorized Reproduction or Distribution Prohibited
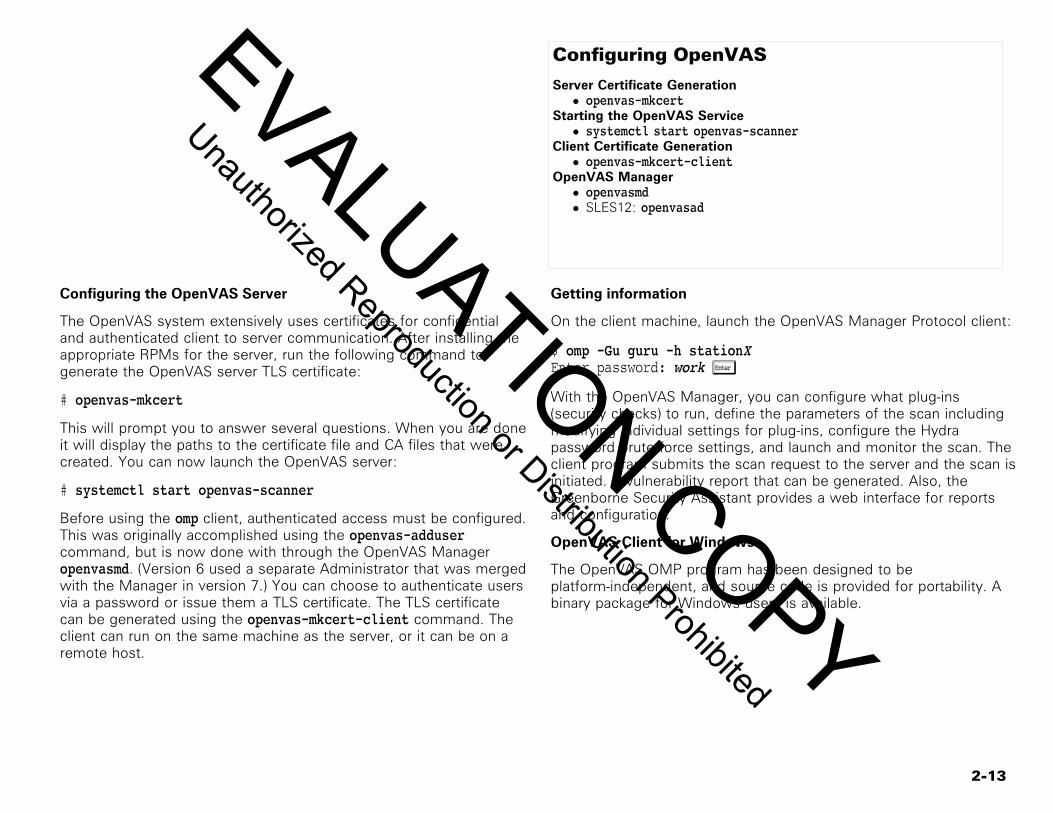
2-13
Configuring OpenVAS
Server Certificate Generation• openvas-mkcert
Starting the OpenVAS Service• systemctl start openvas-scanner
Client Certificate Generation• openvas-mkcert-client
OpenVAS Manager• openvasmd• SLES12: openvasad
Configuring the OpenVAS Server
The OpenVAS system extensively uses certificates for confidentialand authenticated client to server communication. After installing theappropriate RPMs for the server, run the following command togenerate the OpenVAS server TLS certificate:
# openvas-mkcert
This will prompt you to answer several questions. When you are doneit will display the paths to the certificate file and CA files that werecreated. You can now launch the OpenVAS server:
# systemctl start openvas-scanner
Before using the omp client, authenticated access must be configured.This was originally accomplished using the openvas-addusercommand, but is now done with through the OpenVAS Manageropenvasmd. (Version 6 used a separate Administrator that was mergedwith the Manager in version 7.) You can choose to authenticate usersvia a password or issue them a TLS certificate. The TLS certificatecan be generated using the openvas-mkcert-client command. Theclient can run on the same machine as the server, or it can be on aremote host.
Getting information
On the client machine, launch the OpenVAS Manager Protocol client:
$ omp -Gu guru -h stationXEnter password: work Õ
With the OpenVAS Manager, you can configure what plug-ins(security checks) to run, define the parameters of the scan includingmodifying individual settings for plug-ins, configure the Hydrapassword brute force settings, and launch and monitor the scan. Theclient program submits the scan request to the server and the scan isinitiated. A vulnerability report that can be generated. Also, theGreenborne Security Assistant provides a web interface for reportsand configuration.
OpenVAS Client for Windows
The OpenVAS OMP program has been designed to beplatform-independent, and source code is provided for portability. Abinary package for Windows users is available.
EVALUATION COPY
Unauthorized Reproduction or Distribution Prohibited
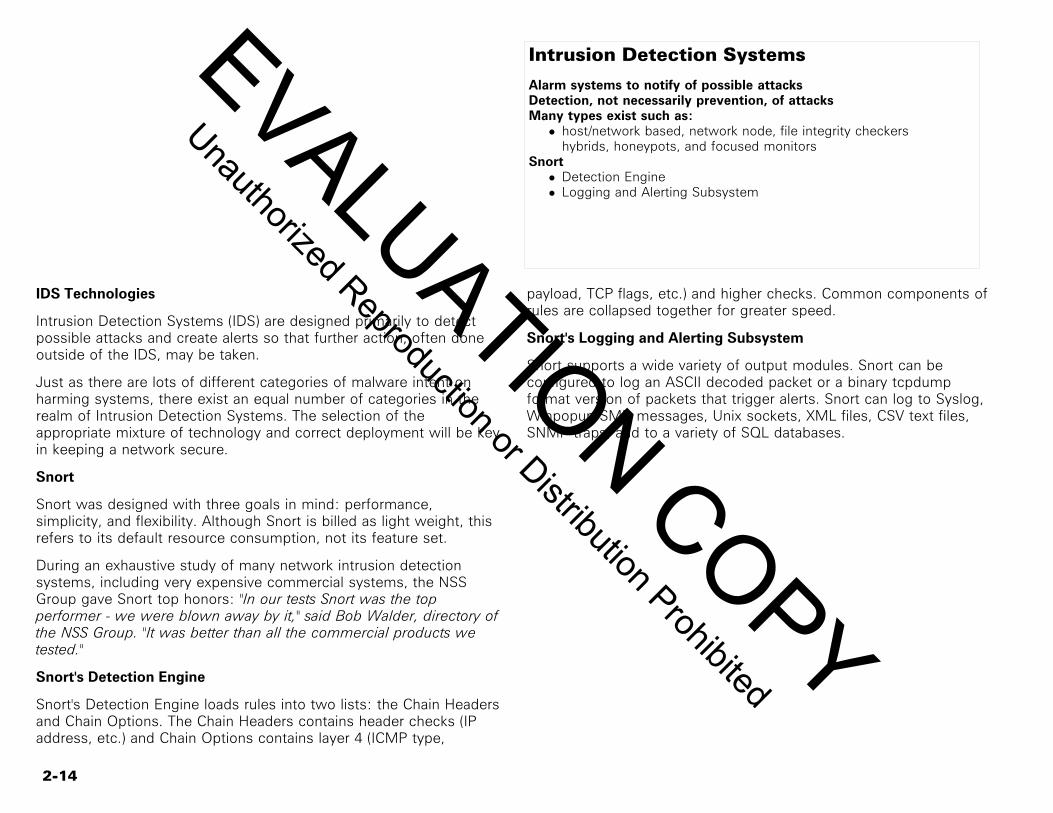
2-14
Intrusion Detection Systems
Alarm systems to notify of possible attacksDetection, not necessarily prevention, of attacksMany types exist such as:• host/network based, network node, file integrity checkers
hybrids, honeypots, and focused monitorsSnort• Detection Engine• Logging and Alerting Subsystem
IDS Technologies
Intrusion Detection Systems (IDS) are designed primarily to detectpossible attacks and create alerts so that further action, often doneoutside of the IDS, may be taken.
Just as there are lots of different categories of malware intent onharming systems, there exist an equal number of categories in therealm of Intrusion Detection Systems. The selection of theappropriate mixture of technology and correct deployment will be keyin keeping a network secure.
Snort
Snort was designed with three goals in mind: performance,simplicity, and flexibility. Although Snort is billed as light weight, thisrefers to its default resource consumption, not its feature set.
During an exhaustive study of many network intrusion detectionsystems, including very expensive commercial systems, the NSSGroup gave Snort top honors: "In our tests Snort was the topperformer - we were blown away by it," said Bob Walder, directory ofthe NSS Group. "It was better than all the commercial products wetested."
Snort's Detection Engine
Snort's Detection Engine loads rules into two lists: the Chain Headersand Chain Options. The Chain Headers contains header checks (IPaddress, etc.) and Chain Options contains layer 4 (ICMP type,
payload, TCP flags, etc.) and higher checks. Common components ofrules are collapsed together for greater speed.
Snort's Logging and Alerting Subsystem
Snort supports a wide variety of output modules. Snort can beconfigured to log an ASCII decoded packet or a binary tcpdumpformat version of packets that trigger alerts. Snort can log to Syslog,Winpopup SMB messages, Unix sockets, XML files, CSV text files,SNMP traps, and to a variety of SQL databases.
EVALUATION COPY
Unauthorized Reproduction or Distribution Prohibited

2-15
Snort Rules
Apply actions on a packet-by-packet basisRule HeaderRule OptionAvailable actions:• pass• log• alert• activate• dynamic
Snort Rules
Snort uses rules to evaluate packets and trigger an appropriateaction. A default installation of Snort includes over a thousand rules.Additional rules may be created to protect against threats that didn'texist when a particular version of Snort was released.
A Snort rule header matches a packet based upon source anddestination IP address, port, and protocol. Rule options define whatpart(s) of the packet to analyze and what alert(s) to send in responseto a matched packet.
Snort will not resolve host names to IP addresses, so IP addressesmust be entered in CIDR notation (e.g., 192.168.0.0/24 to denote theClass C net block 192.168.0.x). Snort will recognize the any keywordas matching all hosts. It also supports more advanced options, suchas negation using the negation operator, ! (so !192.168.0.0/24would denote any host not in the 192.168.0.x net block) andcomma-separated lists of machines delimited by brackets (so192.168.0.0/24,192.168.2.0/24 would denote any host in either the192.168.0.x or 192.168.2.x net blocks). Ports can be specified by portnumber, by the any keyword, or as colon-separated ranges (so6000:6999 would denote all ports between 6000 and 6999, inclusive).The negation operator ! can also be used with ports as well as IPaddresses. Snort also supports directional operators to indicatedirections of packet flow to analyze. -> and <- can be used toindicate direction, or <> can be used to indicate either direction (soany any -> 192.168.0.0/24 23 would capture all traffic fromanywhere to the telnet port on the 192.168.0.x net block, while
!192.168.0.0/24 any <> 192.168.0.0/24 23 would capture bothsides of all telnet connections to machines in the 192.168.0.x netblock).
Snort Rule Actions
When a packet has been matched, one of several actions may betaken:
pass ⇒ ignore the packetlog ⇒ log the packetalert ⇒ issue an alert in response to the packet (also log the packet
by default)activate ⇒ alert, and then turn on a dynamic ruledynamic ⇒ when turned on by an activate rule, act as a log rule
Active Rulesets
Snort has a powerful concept of dynamically changing rulesets. Thisfeature is implemented through the use of the activate and dynamicactions. Activate actions behave just like an alert, but in addition tologging an alert they also turn on a dynamic rule. Dynamic rules areactive only once turned on by an activate action, behave just like alog action while active, and are active only for a specified number ofpackets. This combination is particularly powerful when used withexploit signatures: an activate rule that detects a suspected exploitcan log an alert warning of the exploit, and then activate adynamic rule which can then log the next specified number ofpackets to capture all pertinent information regarding the exploit.
EVALUATION COPY
Unauthorized Reproduction or Distribution Prohibited
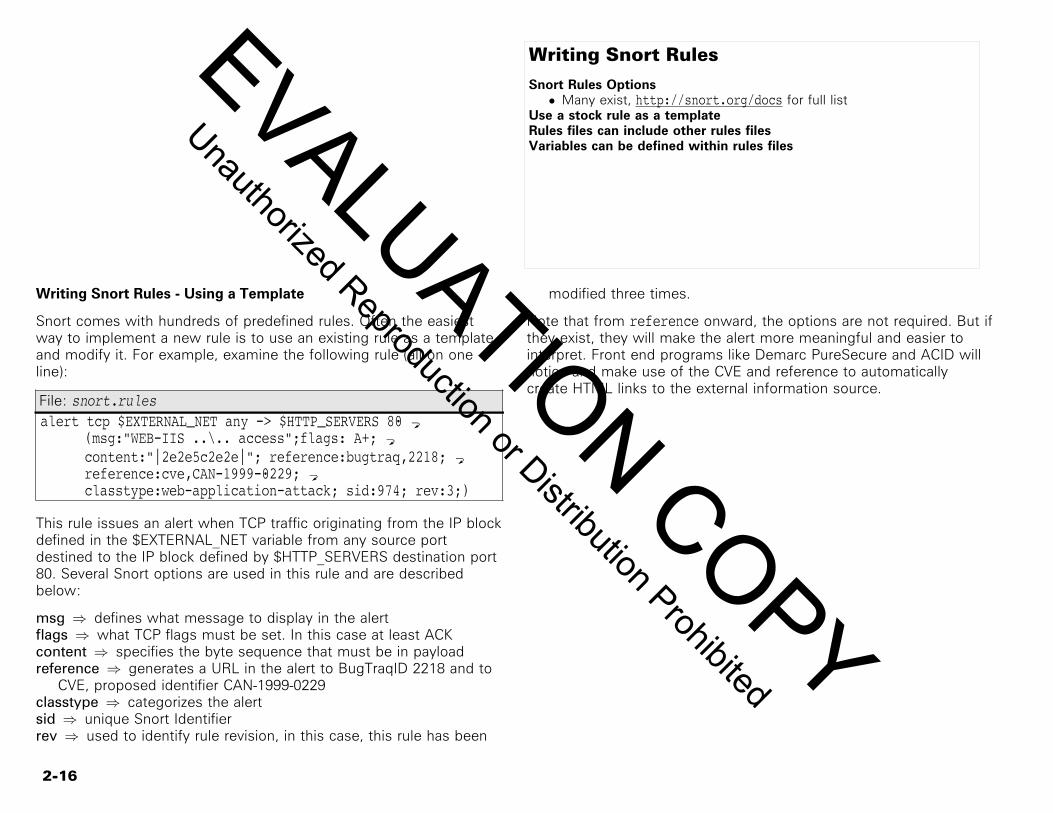
2-16
Writing Snort Rules
Snort Rules Options• Many exist, http://snort.org/docs for full list
Use a stock rule as a templateRules files can include other rules filesVariables can be defined within rules files
Writing Snort Rules - Using a Template
Snort comes with hundreds of predefined rules. Often the easiestway to implement a new rule is to use an existing rule as a templateand modify it. For example, examine the following rule (all on oneline):
File: snort.rulesalert tcp $EXTERNAL_NET any -> $HTTP_SERVERS 80 a
(msg:"WEB-IIS ..\.. access";flags: A+; acontent:"|2e2e5c2e2e|"; reference:bugtraq,2218; areference:cve,CAN-1999-0229; aclasstype:web-application-attack; sid:974; rev:3;)
This rule issues an alert when TCP traffic originating from the IP blockdefined in the $EXTERNAL_NET variable from any source portdestined to the IP block defined by $HTTP_SERVERS destination port80. Several Snort options are used in this rule and are describedbelow:
msg ⇒ defines what message to display in the alertflags ⇒ what TCP flags must be set. In this case at least ACKcontent ⇒ specifies the byte sequence that must be in payloadreference ⇒ generates a URL in the alert to BugTraqID 2218 and to
CVE, proposed identifier CAN-1999-0229classtype ⇒ categorizes the alertsid ⇒ unique Snort Identifierrev ⇒ used to identify rule revision, in this case, this rule has been
modified three times.
Note that from reference onward, the options are not required. But ifthey exist, they will make the alert more meaningful and easier tointerpret. Front end programs like Demarc PureSecure and ACID willnotice and make use of the CVE and reference to automaticallycreate HTML links to the external information source.
EVALUATION COPY
Unauthorized Reproduction or Distribution Prohibited

2-17
Lab 2Estimated Time:S12: 50 minutes
R7: 50 minutesTask 1: NMAP
Page: 2-18 Time: 30 minutesRequirements: bbb (3 stations)
Task 2: OpenVASPage: 2-22 Time: 20 minutesRequirements: b (1 station) d (graphical environment)
Task 3: Advanced nmap OptionsPage: 2-27 Time: 15 minutes (BONUS)Requirements: bb (2 stations)
EVALUATION COPY
Unauthorized Reproduction or Distribution Prohibited
2-18
Objectivesy Use nmap to discover listening services and perform remote stack
fingerprinting.
Requirementsbbb (3 stations)
Relevancenmap is a port scanner that can be used to scan for active ports on ahost/network. nmap is very versatile in that it can query for listening ports ina variety of ways. Once the open ports are discovered, they can be auditedand if needed, action can be taken with these ports.
Lab 2
Task 1NMAPEstimated Time: 30 minutes
[R7] This step should only be performed on RHEL7.1)Install nmap and a packet sniffer:
# yum install -y nmap wireshark
[S12] This step should only be performed on SLES12.2)Install nmap and a packet sniffer:
# zypper install -y nmap wireshark
Examine the various options supported by the nmap command:3)
# nmap -h. . . output omitted . . .# man nmap
Run a simple ping scan to determine what hosts are active on the network:4)
# nmap -v -sP 10.100.0.0/24Starting Nmap 6.40 ( http://nmap.org ) at 2015-06-26 09:08 MDTInitiating ARP Ping Scan at 09:08Scanning 10.100.0.0 [1 port]Completed ARP Ping Scan at 09:08, 0.21s elapsed (255 total hosts)Initiaing Parallel DNS resolution of 255 hosts. at 09:08Completed Parallel DNS resolution of 255 hosts. at 09:08
EVALUATION COPY
Unauthorized Reproduction or Distribution Prohibited
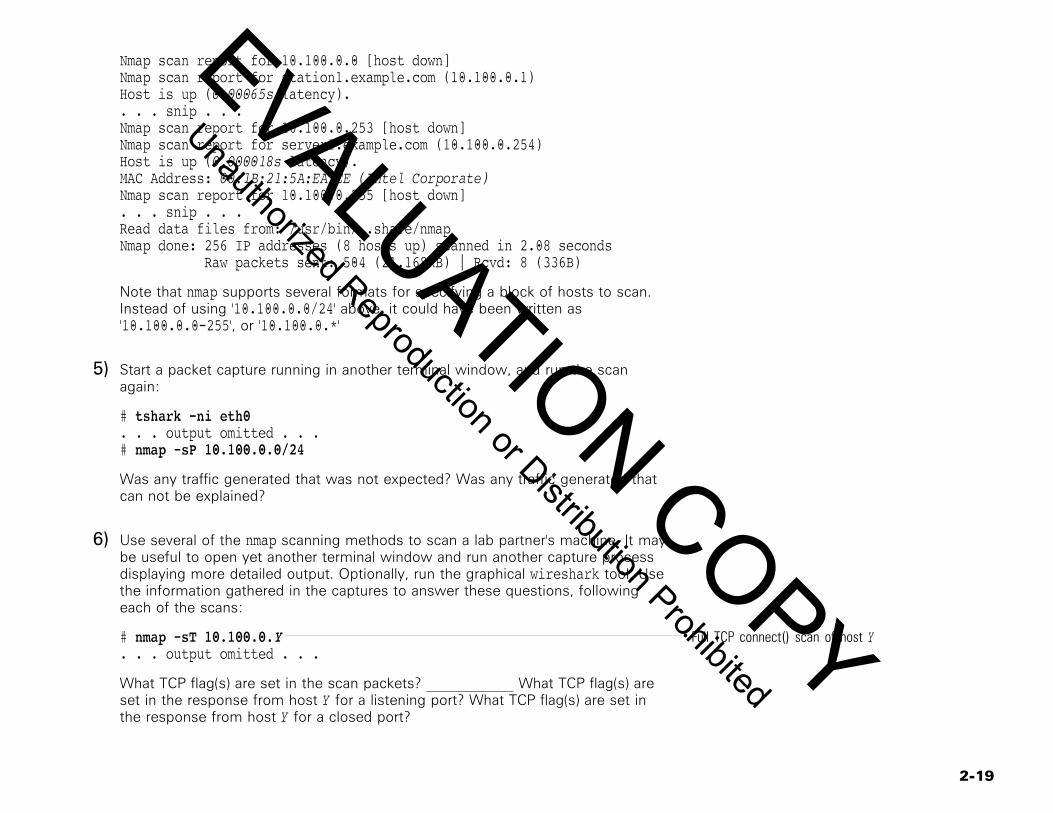
2-19
Nmap scan report for 10.100.0.0 [host down]Nmap scan report for station1.example.com (10.100.0.1)Host is up (0.00065s latency).. . . snip . . .Nmap scan report for 10.100.0.253 [host down]Nmap scan report for server1.example.com (10.100.0.254)Host is up (0.000018s latency).MAC Address: 00:1B:21:5A:EA:EE (Intel Corporate)Nmap scan report for 10.100.0.255 [host down]. . . snip . . .Read data files from: /usr/bin/..share/nmapNmap done: 256 IP addresses (8 hosts up) scanned in 2.08 seconds Raw packets sent: 504 (21.168KB) | Rcvd: 8 (336B)
Note that nmap supports several formats for specifying a block of hosts to scan.Instead of using '10.100.0.0/24' above, it could have been written as'10.100.0.0-255', or '10.100.0.*'
Start a packet capture running in another terminal window, and run the scan5)again:
# tshark -ni eth0. . . output omitted . . .# nmap -sP 10.100.0.0/24
Was any traffic generated that was not expected? Was any traffic generated thatcan not be explained?
Use several of the nmap scanning methods to scan a lab partner's machine. It may6)be useful to open yet another terminal window and run another capture processdisplaying more detailed output. Optionally, run the graphical wireshark tool. Usethe information gathered in the captures to answer these questions, followingeach of the scans:
Full TCP connect() scan of host Y# nmap -sT 10.100.0.Y. . . output omitted . . .
What TCP flag(s) are set in the scan packets? ____________ What TCP flag(s) areset in the response from host Y for a listening port? What TCP flag(s) are set inthe response from host Y for a closed port?
EVALUATION COPY
Unauthorized Reproduction or Distribution Prohibited

2-20
If sorting through the output to answer these questions is difficult, try running7)scans to single known-state ports. For example, if a telnet server is running onhost Y, try running the two following nmap commands and compare the trafficthat is generated from both:
# nmap -sT -p 22 10.100.0.Y. . . output omitted . . .# nmap -sT -p 81 10.100.0.Y. . . output omitted . . .
What source port(s) does nmap use in this scan? Do the source port(s) usedfollow any pattern? Do the destination port(s) follow a perceivable pattern?
Even basic logging tools on the end host will register the scans used so far. Many8)native OS logging tools will not log connections that do not successfully completethe TCP three way handshake. Run a stealth scan, and analyze the output:
TCP SYN stealth port scan.# nmap -sS 10.100.0.Y. . . output omitted . . .
What TCP flag(s) are set in the scan packets? How does nmap respond when itdiscovers a listening port (host Y returns SYN, ACK) during this TCP stealth scan?How does this response differ from the simple TCP connect scan?
Perform a UDP scan and analyze the results. Note that this scan can take a very9)long time to complete. Try to answer the questions as the scan is still running(stop when the answers have all been found):
UDP SYN stealth port scan.# nmap -sU 10.100.0.Y. . . output omitted . . .
What UDP source port(s) does the scan use? ____________ Does the UDP scanalways use the observed source port(s)? What type of ICMP message is beinggenerated by host Y in response to the scan? Bonus: what are the type and codevalues for this ICMP message? Certainly host Y can generate replies much fasterthan is being seen here. Read the relevant section (-sU) of the nmap man page todiscover why the scan is so slow when directed at a Linux box.
EVALUATION COPY
Unauthorized Reproduction or Distribution Prohibited

2-21
Perform a FIN scan. Not only can this elude detection on many hosts, but many10)simple router access lists / firewalls will summarily drop packets with SYN flag setbut may see these a 'harmless' and let them pass:
# nmap -sF 10.100.0.Y. . . output omitted . . .
What TCP flag(s) are set in the scan packets? What response does the scan elicitfrom host Y for a closed port? What response does the scan elicit from host Y fora listening port? Read the appropriate nmap man page to learn more details aboutthis scan and its limitations (i.e. Windows).
Several options exist that can act as modifiers to most of the scans explored11)above. Look at the effect of using decoy hosts in a scan.
Note: replace Z with some active station number:
Scan with 2 decoys.# nmap -sS -D 10.100.0.Z,192.168.0.5 10.100.0.Y. . . output omitted . . .
Examining the capture output, it is quite clear that the above causes nmap to forgescan packets so the victim host Y sees scans coming from three differentaddresses. Consider what secondary effects this will have. Host Y will respond toeach of the spoofed addresses; from host Z perspective it may seem as if host Yis scanning it!
One of the most fascinating capabilities of nmap is the built-in TCP/IP stack12)fingerprinting methods that can be used for remote OS identification. Perform anOS identification scan with full service banner parsing:
# nmap -O -sV 10.100.0.YNote the actual version of the installed software isindicated based on parsed banner and connectinformation.
21/tcp open ftp vsftpd 2.0.522/tcp open ssh OpenSSH 4.3 (protocol 2.0)111/tcp open rpcbind 2 (rpc #100000). . . snip . . .Running: Linux 2.4.X|2.5.X|2.6.XOS details: Linux 2.4.7 - 2.6.11
EVALUATION COPY
Unauthorized Reproduction or Distribution Prohibited
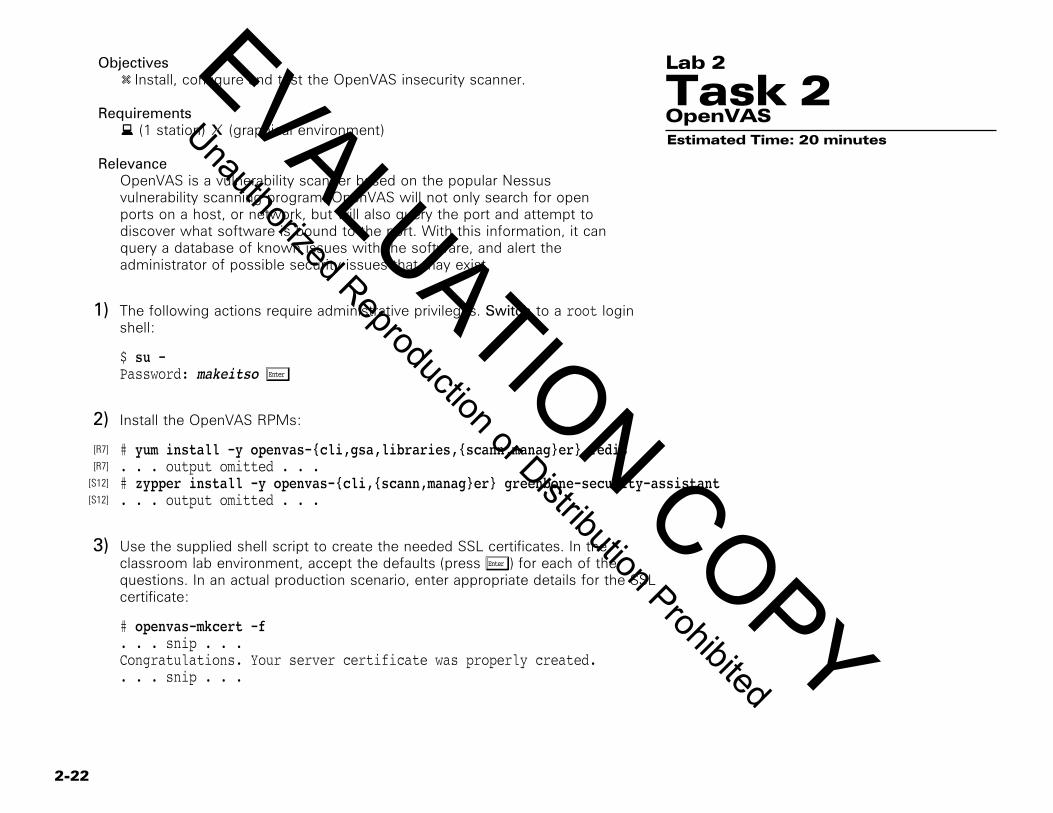
2-22
Objectivesy Install, configure and test the OpenVAS insecurity scanner.
Requirementsb (1 station) d (graphical environment)
RelevanceOpenVAS is a vulnerability scanner based on the popular Nessusvulnerability scanning program. OpenVAS will not only search for openports on a host, or network, but will also query the port and attempt todiscover what software is bound to the port. With this information, it canquery a database of known issues with the software, and alert theadministrator of possible security issues that may exist.
Lab 2
Task 2OpenVASEstimated Time: 20 minutes
The following actions require administrative privileges. Switch to a root login1)shell:
$ su -Password: makeitso Õ
Install the OpenVAS RPMs:2)
# yum install -y openvas-{cli,gsa,libraries,{scann,manag}er} redis[R7]
. . . output omitted . . .[R7]
# zypper install -y openvas-{cli,{scann,manag}er} greenbone-security-assistant[S12]
. . . output omitted . . . [S12]
Use the supplied shell script to create the needed SSL certificates. In the3)classroom lab environment, accept the defaults (press Õ) for each of thequestions. In an actual production scenario, enter appropriate details for the SSLcertificate:
# openvas-mkcert -f. . . snip . . .Congratulations. Your server certificate was properly created.. . . snip . . .
EVALUATION COPY
Unauthorized Reproduction or Distribution Prohibited
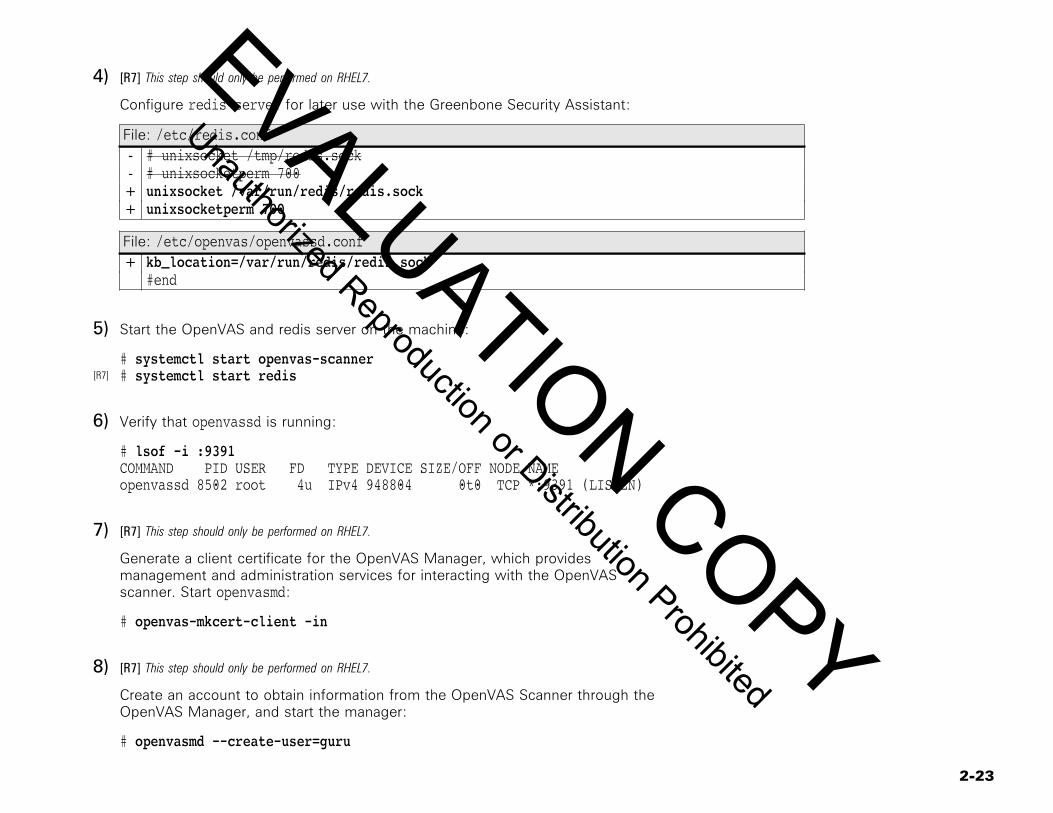
2-23
[R7] This step should only be performed on RHEL7.4)Configure redis-server for later use with the Greenbone Security Assistant:
File: /etc/redis.conf- # unixsocket /tmp/redis.sock- # unixsocketperm 700+ unixsocket /var/run/redis/redis.sock+ unixsocketperm 700
File: /etc/openvas/openvassd.conf+ kb_location=/var/run/redis/redis.sock #end
Start the OpenVAS and redis server on the machine:5)
# systemctl start openvas-scanner# systemctl start redis[R7]
Verify that openvassd is running:6)
# lsof -i :9391COMMAND PID USER FD TYPE DEVICE SIZE/OFF NODE NAMEopenvassd 8502 root 4u IPv4 948804 0t0 TCP *:9391 (LISTEN)
[R7] This step should only be performed on RHEL7.7)Generate a client certificate for the OpenVAS Manager, which providesmanagement and administration services for interacting with the OpenVASscanner. Start openvasmd:
# openvas-mkcert-client -in
[R7] This step should only be performed on RHEL7.8)Create an account to obtain information from the OpenVAS Scanner through theOpenVAS Manager, and start the manager:
# openvasmd --create-user=guru
EVALUATION COPY
Unauthorized Reproduction or Distribution Prohibited

2-24
Copy and paste this password for a future step.User created with password '2847e205-025a-41ef-bb21-07db7d0ab592'.# systemctl start openvas-manager
Verify the TLS encrypted connection that is required to communicate with the9)scanner:
# openssl s_client -connect localhost:9391. . . output omitted . . .# echo $?1# openssl s_client -connect localhost:9391a[R7]
-key /etc/pki/openvas/private/CA/clientkey.pema -cert /etc/pki/openvas/CA/clientcert.pem# openssl s_client -connect localhost:9391a[S12]
-key /var/lib/openvas/private/CA/cakey.pema -cert /var/lib/openvas/CA/cacert.pem. . . output omitted . . .Õ# echo $?0
[R7] This step should only be performed on RHEL7.10)Verify that openvasmd is running:
# lsof -i :9390COMMAND PID USER FD TYPE DEVICE SIZE/OFF NODE NAMEopenvasmd 20305 root 4u IPv6 1187724 0t0 TCP *:otp (LISTEN)
[R7] This step should only be performed on RHEL7.11)Verify that the omp client command can communicate with the OpenVAS Managerdaemon:
# omp --pingOMP ping was successful.
[R7] This step should only be performed on RHEL7.12)Verify that the omp client command can communicate with the OpenVAS Managerdaemon using the new account:
EVALUATION COPY
Unauthorized Reproduction or Distribution Prohibited
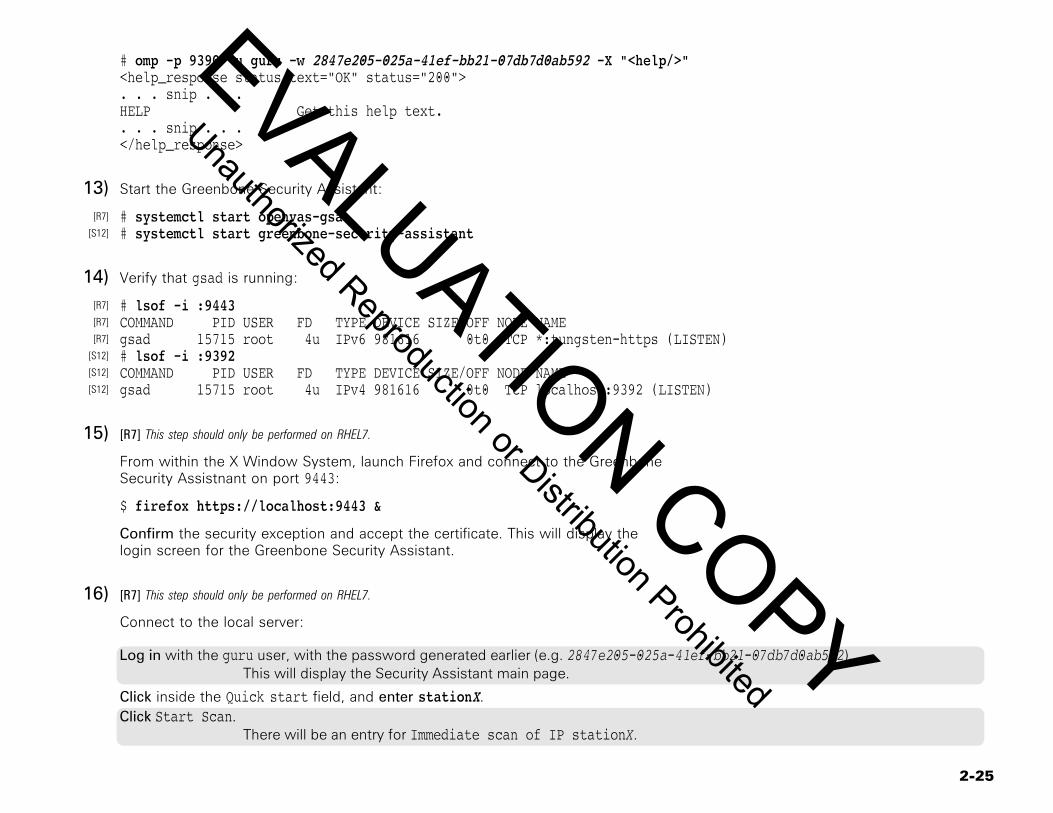
2-25
# omp -p 9390 -u guru -w 2847e205-025a-41ef-bb21-07db7d0ab592 -X "<help/>"<help_response status_text="OK" status="200">. . . snip . . .HELP Get this help text.. . . snip . . .</help_response>
Start the Greenbone Security Assistant:13)# systemctl start openvas-gsa[R7]
# systemctl start greenbone-security-assistant[S12]
Verify that gsad is running:14)# lsof -i :9443[R7]
COMMAND PID USER FD TYPE DEVICE SIZE/OFF NODE NAME[R7]
gsad 15715 root 4u IPv6 981616 0t0 TCP *:tungsten-https (LISTEN)[R7]
# lsof -i :9392[S12]
COMMAND PID USER FD TYPE DEVICE SIZE/OFF NODE NAME[S12]
gsad 15715 root 4u IPv4 981616 0t0 TCP localhost:9392 (LISTEN)[S12]
[R7] This step should only be performed on RHEL7.15)From within the X Window System, launch Firefox and connect to the GreenboneSecurity Assistnant on port 9443:
$ firefox https://localhost:9443 &
Confirm the security exception and accept the certificate. This will display thelogin screen for the Greenbone Security Assistant.
[R7] This step should only be performed on RHEL7.16)Connect to the local server:
Log in with the guru user, with the password generated earlier (e.g. 2847e205-025a-41ef-bb21-07db7d0ab592).This will display the Security Assistant main page.
Click inside the Quick start field, and enter stationX.Click Start Scan.
There will be an entry for Immediate scan of IP stationX.
EVALUATION COPY
Unauthorized Reproduction or Distribution Prohibited

2-26
[R7] This step should only be performed on RHEL7.17)After a minute or two, the scan will complete. Under Severity the result of N/Awill be displayed. No plug-ins have been downloaded, so no vulnerabilities havebeen discovered. Run the openvas-check-setup command:
# openvas-check-setup. . . snip . . . ERROR: The NVT collection is very small. FIX: Run a synchronization script like openvas-nvt-sync or greenbone-nvt-sync.. . . snip . . .
If internet access is currently available, update OpenVAS' plugins. This may take a18)few minutes.
# openvas-nvt-sync. . . output omitted . . .
Can take several minutes# openvasmd --rebuild[R7]
# systemctl restart openvas-manager[R7]
[R7] This step should only be performed on RHEL7.19)Rerun the security scan with the new plug-ins. This can be done be creating anew task, or by re-running the existing task. Explore the discovered vulnerabilities.If desired, connect to a partner's station to run a scan.
Clean up so as to not interfere with future labs:20)
# systemctl stop openvas-scanner# systemctl stop openvas-manager redis[R7]
EVALUATION COPY
Unauthorized Reproduction or Distribution Prohibited

2-27
Objectivesy Explore some of the advanced nmap options
Requirementsbb (2 stations)
Relevancenmap comes with many advanced features and different ways to help inscanning the network.
Lab 2
Task 3Advanced nmap OptionsEstimated Time: 15 minutes (BONUS)
One very interesting option is -f which can be added to most of the scans to1)perform nasty fragmentation of the scan packets to resist analysis and detectionby weak filtering devices. Try out the -f option and examine the trace produced.
The nmap man page provides more insight into many of the scan techniques and2)OS identification routines.
Try running Null and Xmas scans and looking at the capture output.3)
EVALUATION COPY
Unauthorized Reproduction or Distribution Prohibited

7400 East Orchard Rd., Suite 1450N Greenwood Village, Colorado 80121
Ph: 303-302-5280 www.itcourseware.com
9-37-00027-000-03-13-19
EVALUATION COPY
Unauthorized Reproduction or Distribution Prohibited