GISVM OPENGEO SUITE 64bit QUICKSTART &...
19
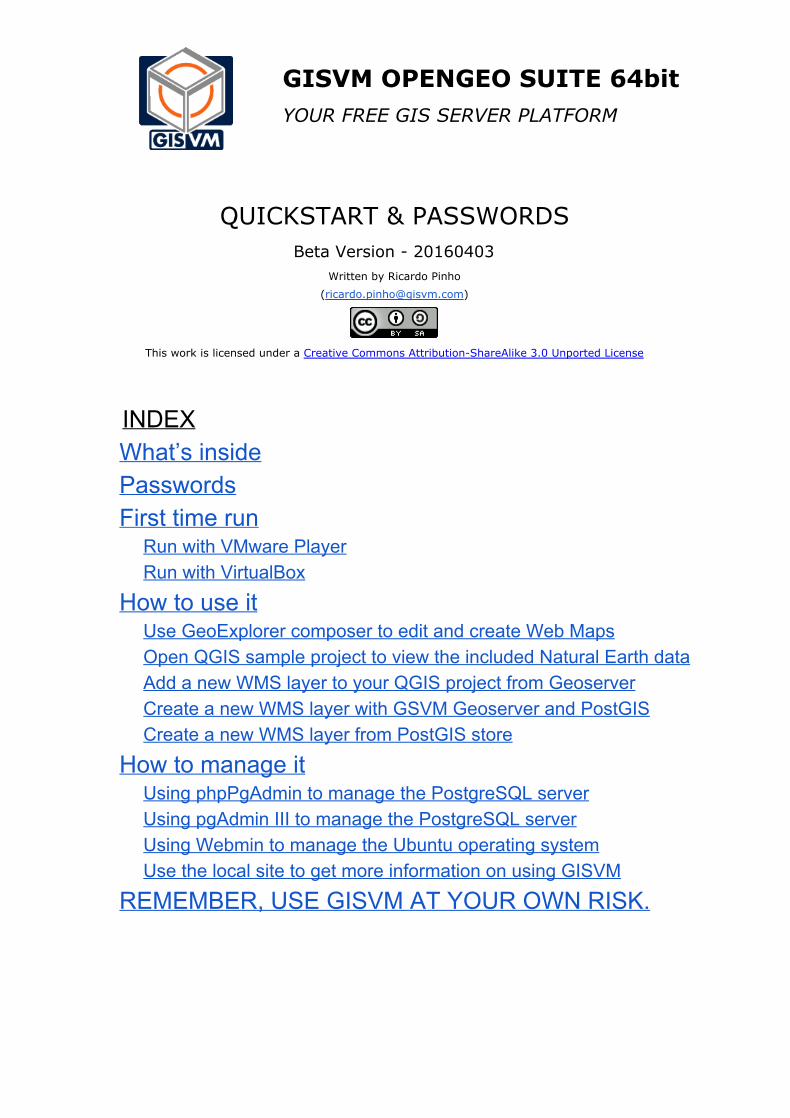
GISVM OPENGEO SUITE 64bit YOUR FREE GIS SERVER PLATFORM QUICKSTART & PASSWORDS Beta Version 20160403 Written by Ricardo Pinho ([email protected] ) This work is licensed under a Creative Commons AttributionShareAlike 3.0 Unported License INDEX What’s inside Passwords First time run Run with VMware Player Run with VirtualBox How to use it Use GeoExplorer composer to edit and create Web Maps Open QGIS sample project to view the included Natural Earth data Add a new WMS layer to your QGIS project from Geoserver Create a new WMS layer with GSVM Geoserver and PostGIS Create a new WMS layer from PostGIS store How to manage it Using phpPgAdmin to manage the PostgreSQL server Using pgAdmin III to manage the PostgreSQL server Using Webmin to manage the Ubuntu operating system Use the local site to get more information on using GISVM REMEMBER, USE GISVM AT YOUR OWN RISK.
-
Upload
hoangkhuong -
Category
Documents
-
view
228 -
download
5
Transcript of GISVM OPENGEO SUITE 64bit QUICKSTART &...
GISVM OPENGEO SUITE 64bit YOUR FREE GIS SERVER PLATFORM
QUICKSTART & PASSWORDS Beta Version 20160403
Written by Ricardo Pinho
This work is licensed under a Creative Commons AttributionShareAlike 3.0 Unported License
INDEX What’s inside Passwords First time run
Run with VMware Player Run with VirtualBox
How to use it Use GeoExplorer composer to edit and create Web Maps Open QGIS sample project to view the included Natural Earth data Add a new WMS layer to your QGIS project from Geoserver Create a new WMS layer with GSVM Geoserver and PostGIS Create a new WMS layer from PostGIS store
How to manage it Using phpPgAdmin to manage the PostgreSQL server Using pgAdmin III to manage the PostgreSQL server Using Webmin to manage the Ubuntu operating system Use the local site to get more information on using GISVM
REMEMBER, USE GISVM AT YOUR OWN RISK.
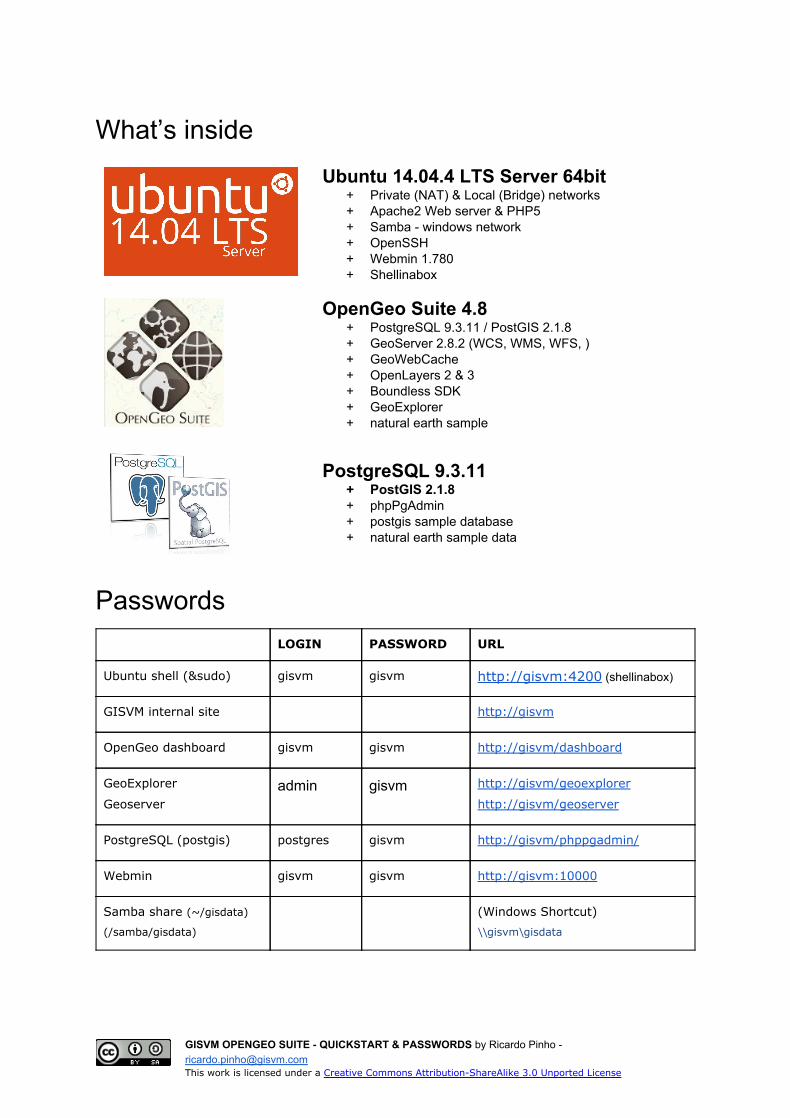
What’s inside
Ubuntu 14.04.4 LTS Server 64bit + Private (NAT) & Local (Bridge) networks + Apache2 Web server & PHP5 + Samba windows network + OpenSSH + Webmin 1.780 + Shellinabox
OpenGeo Suite 4.8 + PostgreSQL 9.3.11 / PostGIS 2.1.8 + GeoServer 2.8.2 (WCS, WMS, WFS, ) + GeoWebCache + OpenLayers 2 & 3 + Boundless SDK + GeoExplorer + natural earth sample
PostgreSQL 9.3.11 + PostGIS 2.1.8 + phpPgAdmin + postgis sample database + natural earth sample data
Passwords
LOGIN PASSWORD URL
Ubuntu shell (&sudo) gisvm gisvm http://gisvm:4200 (shellinabox)
GISVM internal site http://gisvm
OpenGeo dashboard gisvm gisvm http://gisvm/dashboard
GeoExplorer
Geoserver admin gisvm http://gisvm/geoexplorer
http://gisvm/geoserver
PostgreSQL (postgis) postgres gisvm http://gisvm/phppgadmin/
Webmin gisvm gisvm http://gisvm:10000
Samba share (~/gisdata)
(/samba/gisdata)
(Windows Shortcut)
\\gisvm\gisdata
GISVM OPENGEO SUITE QUICKSTART & PASSWORDS by Ricardo Pinho [email protected] This work is licensed under a Creative Commons AttributionShareAlike 3.0 Unported License
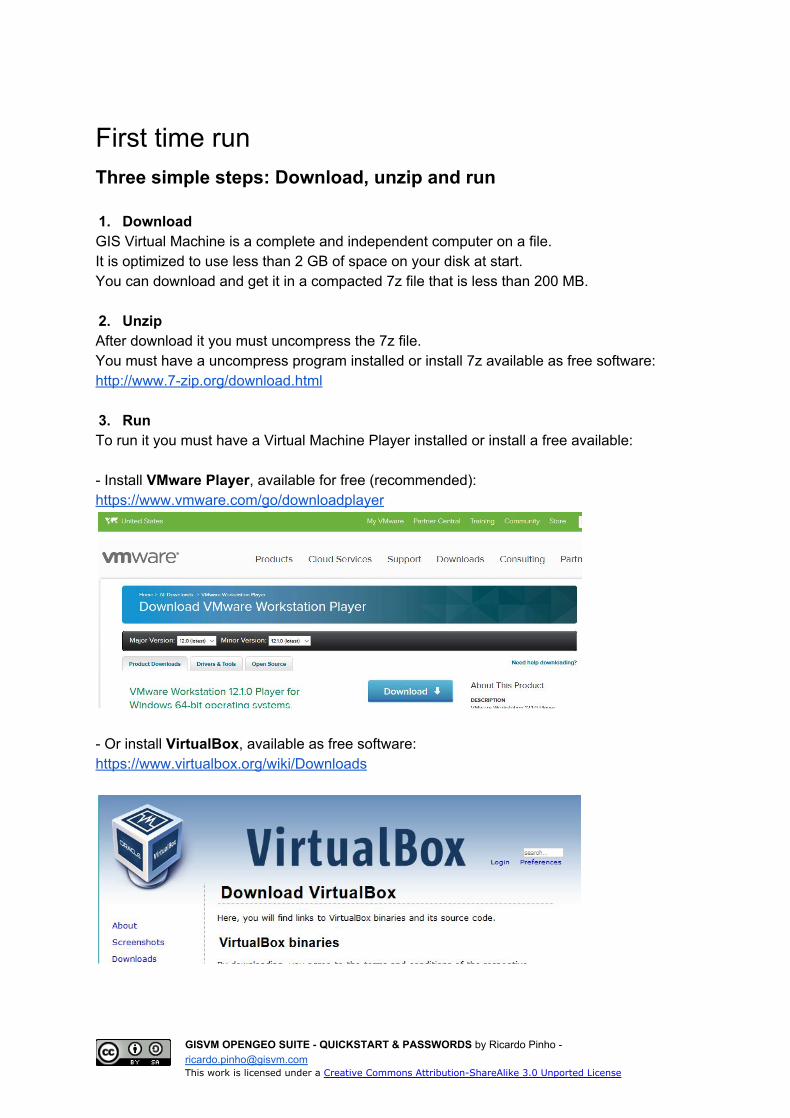
First time run Three simple steps: Download, unzip and run 1. Download GIS Virtual Machine is a complete and independent computer on a file. It is optimized to use less than 2 GB of space on your disk at start. You can download and get it in a compacted 7z file that is less than 200 MB. 2. Unzip After download it you must uncompress the 7z file. You must have a uncompress program installed or install 7z available as free software: http://www.7zip.org/download.html 3. Run To run it you must have a Virtual Machine Player installed or install a free available: Install VMware Player, available for free (recommended): https://www.vmware.com/go/downloadplayer
Or install VirtualBox, available as free software: https://www.virtualbox.org/wiki/Downloads
GISVM OPENGEO SUITE QUICKSTART & PASSWORDS by Ricardo Pinho [email protected] This work is licensed under a Creative Commons AttributionShareAlike 3.0 Unported License
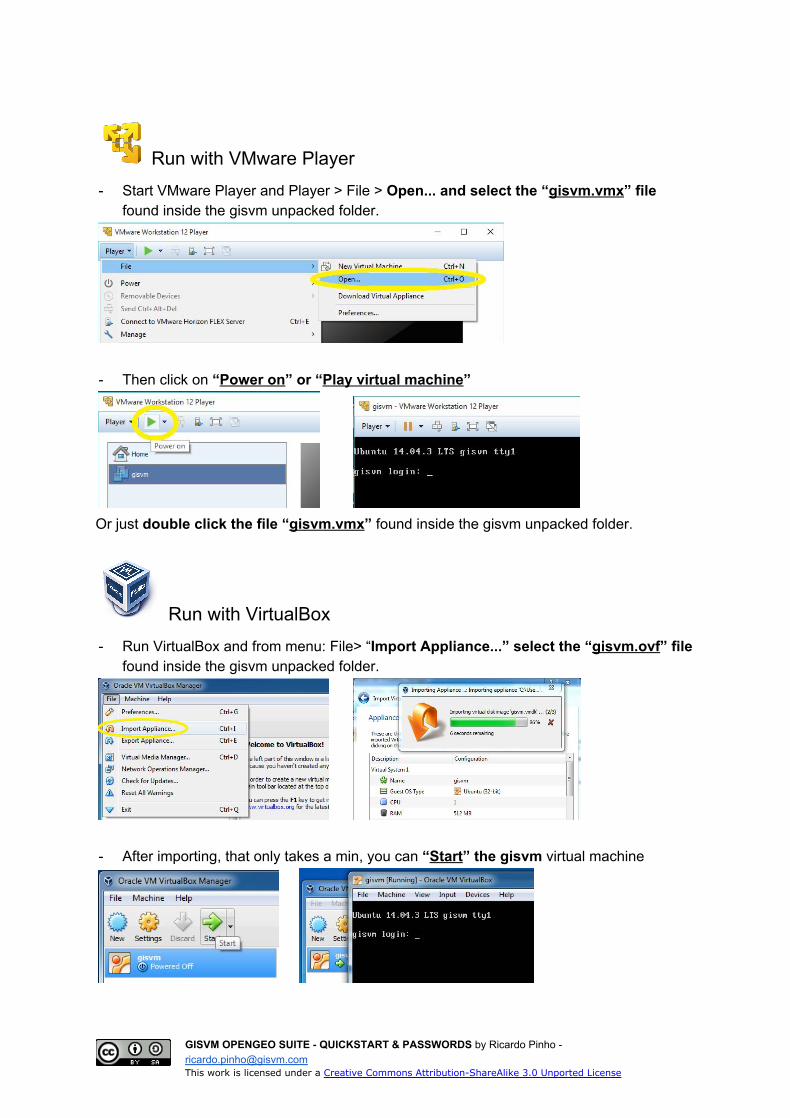
Run with VMware Player Start VMware Player and Player > File > Open... and select the “gisvm.vmx” file
found inside the gisvm unpacked folder.
Then click on “Power on” or “Play virtual machine”
Or just double click the file “gisvm.vmx” found inside the gisvm unpacked folder.
Run with VirtualBox Run VirtualBox and from menu: File> “Import Appliance...” select the “gisvm.ovf” file
found inside the gisvm unpacked folder.
After importing, that only takes a min, you can “Start” the gisvm virtual machine
GISVM OPENGEO SUITE QUICKSTART & PASSWORDS by Ricardo Pinho [email protected] This work is licensed under a Creative Commons AttributionShareAlike 3.0 Unported License
How to use it
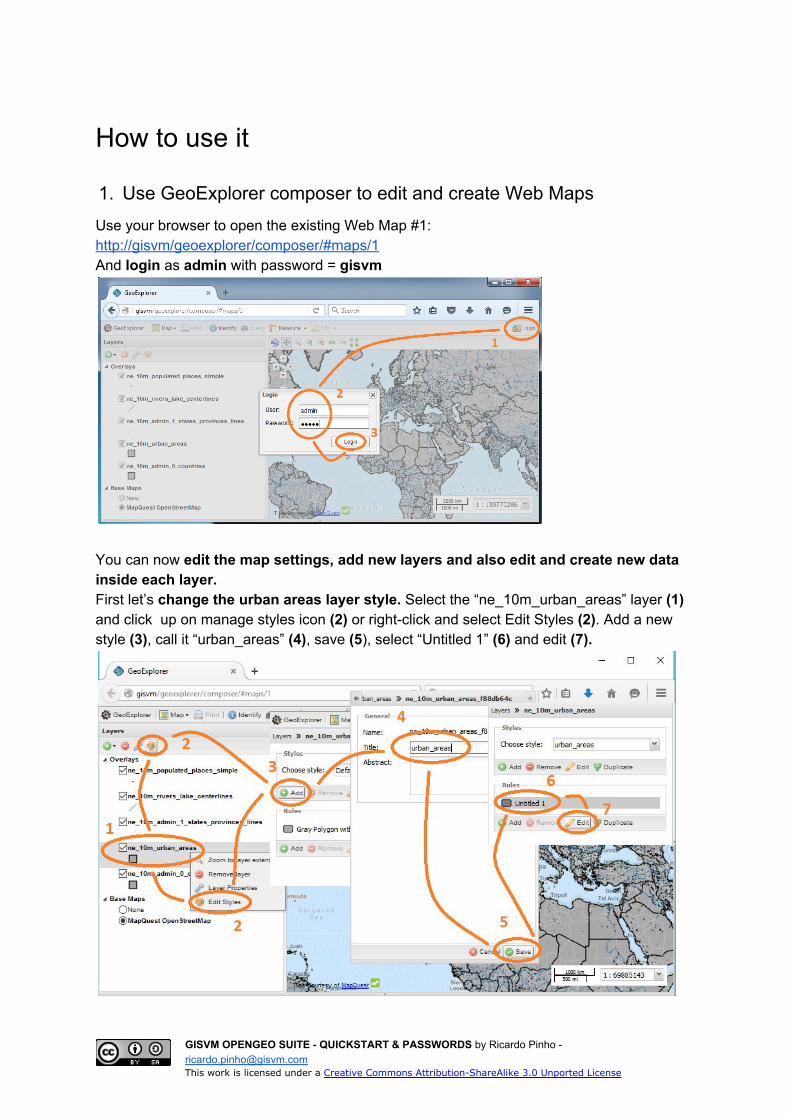
1. Use GeoExplorer composer to edit and create Web Maps Use your browser to open the existing Web Map #1: http://gisvm/geoexplorer/composer/#maps/1 And login as admin with password = gisvm
You can now edit the map settings, add new layers and also edit and create new data inside each layer. First let’s change the urban areas layer style. Select the “ne_10m_urban_areas” layer (1) and click up on manage styles icon (2) or rightclick and select Edit Styles (2). Add a new style (3), call it “urban_areas” (4), save (5), select “Untitled 1” (6) and edit (7).
GISVM OPENGEO SUITE QUICKSTART & PASSWORDS by Ricardo Pinho [email protected] This work is licensed under a Creative Commons AttributionShareAlike 3.0 Unported License
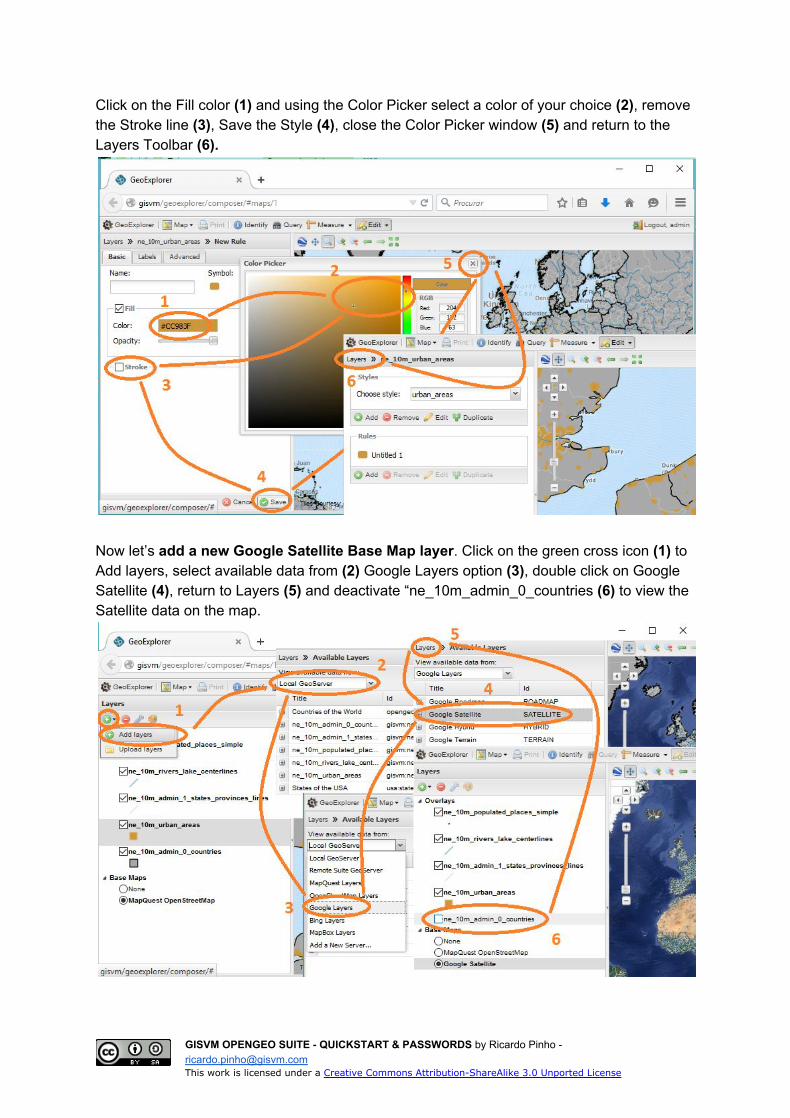
Click on the Fill color (1) and using the Color Picker select a color of your choice (2), remove the Stroke line (3), Save the Style (4), close the Color Picker window (5) and return to the Layers Toolbar (6).
Now let’s add a new Google Satellite Base Map layer. Click on the green cross icon (1) to Add layers, select available data from (2) Google Layers option (3), double click on Google Satellite (4), return to Layers (5) and deactivate “ne_10m_admin_0_countries (6) to view the Satellite data on the map.
GISVM OPENGEO SUITE QUICKSTART & PASSWORDS by Ricardo Pinho [email protected] This work is licensed under a Creative Commons AttributionShareAlike 3.0 Unported License

Let us now edit a polygon from the urban areas layer. First activate the “ne_10m_urban_areas” layer (1), click the Query menu icon (2), rightclick on a table line (3) to zoom to that feature. Now click the Edit menu icon (4) and select the Modify option, click on the feature polygon (5) and on the popup window click “Edit” icon (6)
You are now on the edit vertex mode, so you can use your mouse to mode existing vertex (1), add new vertex by selecting and dragging middle vertex (2) or remove existing vertex by placing your mouse over the vertex and pressing the Del key on your keyboard. After making your changes, just press Save green icon (3).
GISVM OPENGEO SUITE QUICKSTART & PASSWORDS by Ricardo Pinho [email protected] This work is licensed under a Creative Commons AttributionShareAlike 3.0 Unported License
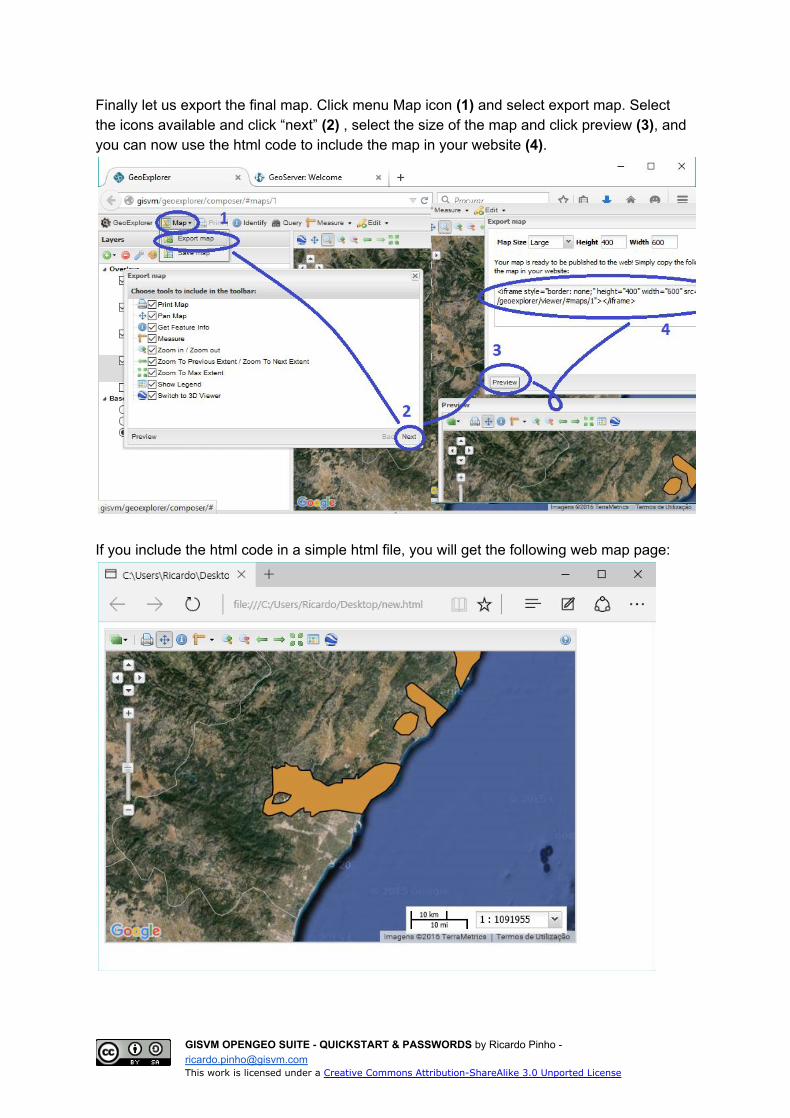
Finally let us export the final map. Click menu Map icon (1) and select export map. Select the icons available and click “next” (2) , select the size of the map and click preview (3), and you can now use the html code to include the map in your website (4).
If you include the html code in a simple html file, you will get the following web map page:
GISVM OPENGEO SUITE QUICKSTART & PASSWORDS by Ricardo Pinho [email protected] This work is licensed under a Creative Commons AttributionShareAlike 3.0 Unported License
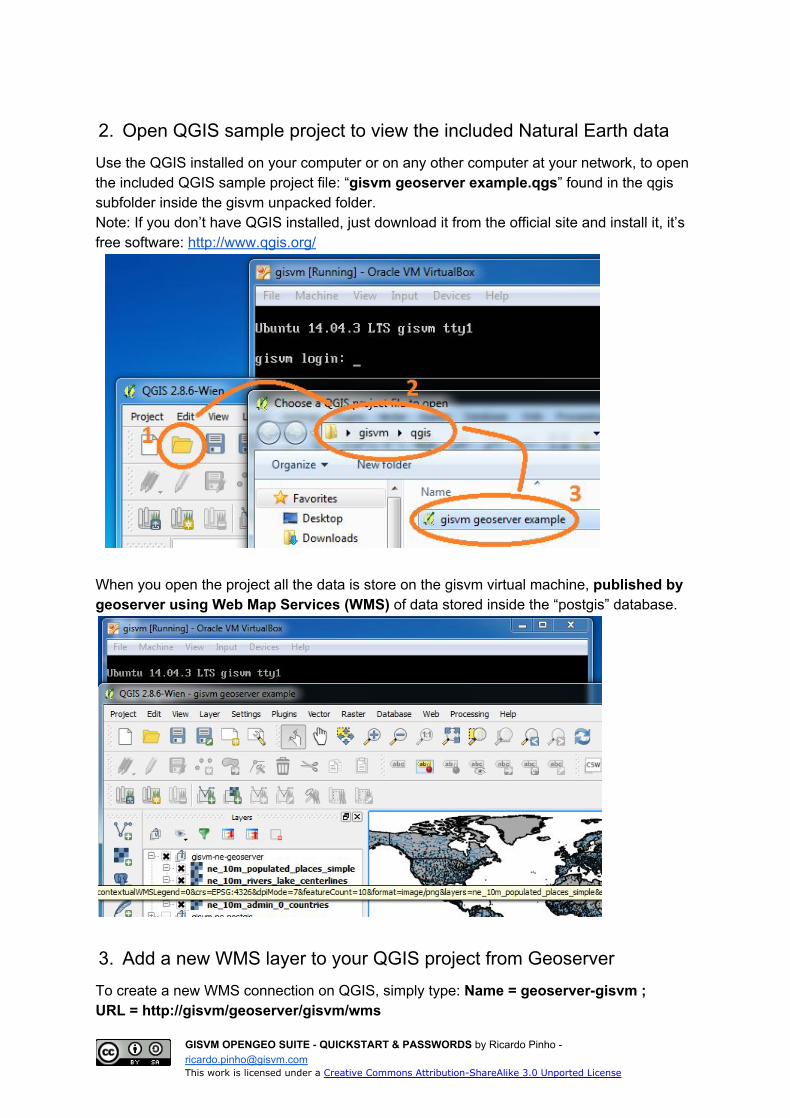
2. Open QGIS sample project to view the included Natural Earth data Use the QGIS installed on your computer or on any other computer at your network, to open the included QGIS sample project file: “gisvm geoserver example.qgs” found in the qgis subfolder inside the gisvm unpacked folder. Note: If you don’t have QGIS installed, just download it from the official site and install it, it’s free software: http://www.qgis.org/
When you open the project all the data is store on the gisvm virtual machine, published by geoserver using Web Map Services (WMS) of data stored inside the “postgis” database.
3. Add a new WMS layer to your QGIS project from Geoserver To create a new WMS connection on QGIS, simply type: Name = geoservergisvm ; URL = http://gisvm/geoserver/gisvm/wms
GISVM OPENGEO SUITE QUICKSTART & PASSWORDS by Ricardo Pinho [email protected] This work is licensed under a Creative Commons AttributionShareAlike 3.0 Unported License
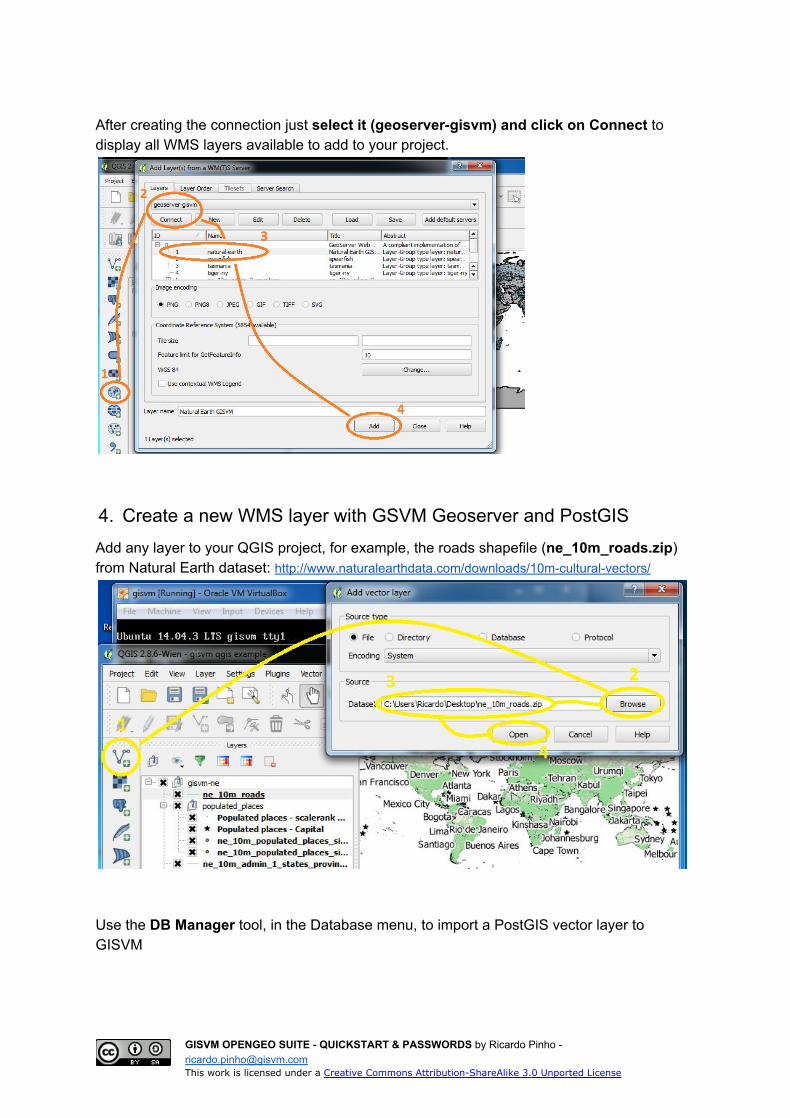
After creating the connection just select it (geoservergisvm) and click on Connect to display all WMS layers available to add to your project.
4. Create a new WMS layer with GSVM Geoserver and PostGIS Add any layer to your QGIS project, for example, the roads shapefile (ne_10m_roads.zip) from Natural Earth dataset: http://www.naturalearthdata.com/downloads/10mculturalvectors/
Use the DB Manager tool, in the Database menu, to import a PostGIS vector layer to GISVM
GISVM OPENGEO SUITE QUICKSTART & PASSWORDS by Ricardo Pinho [email protected] This work is licensed under a Creative Commons AttributionShareAlike 3.0 Unported License
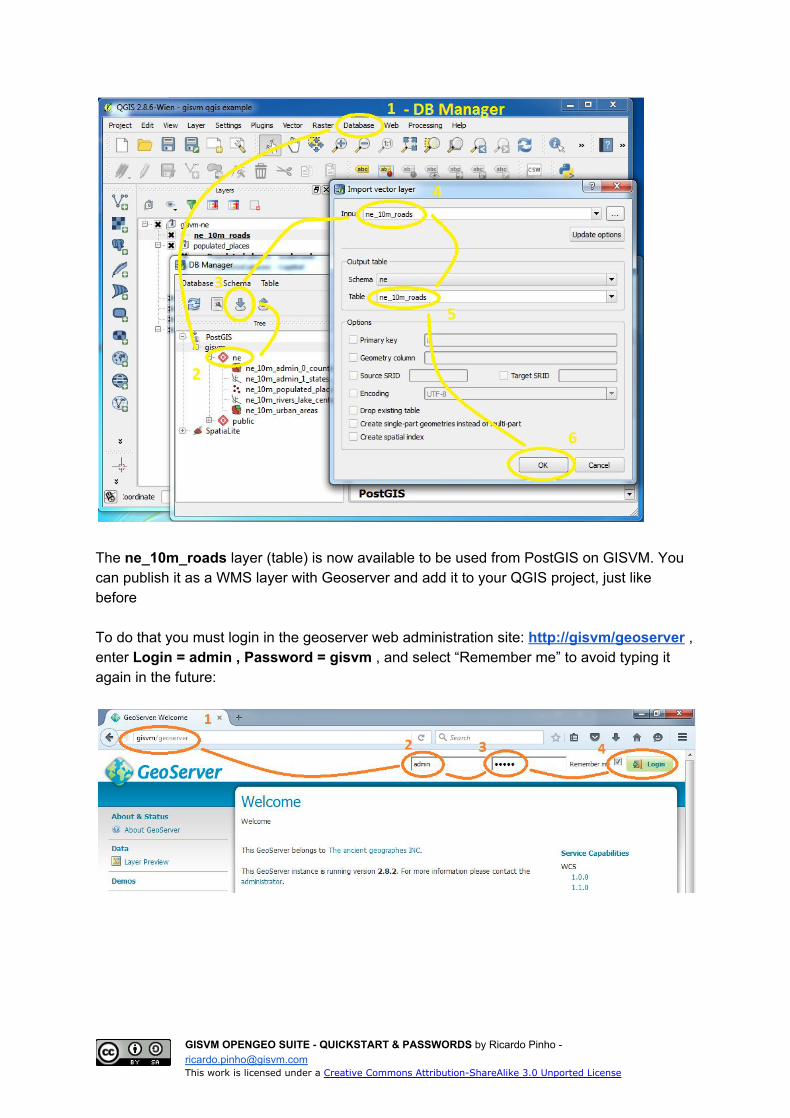
The ne_10m_roads layer (table) is now available to be used from PostGIS on GISVM. You can publish it as a WMS layer with Geoserver and add it to your QGIS project, just like before To do that you must login in the geoserver web administration site: http://gisvm/geoserver , enter Login = admin , Password = gisvm , and select “Remember me” to avoid typing it again in the future:
GISVM OPENGEO SUITE QUICKSTART & PASSWORDS by Ricardo Pinho [email protected] This work is licensed under a Creative Commons AttributionShareAlike 3.0 Unported License
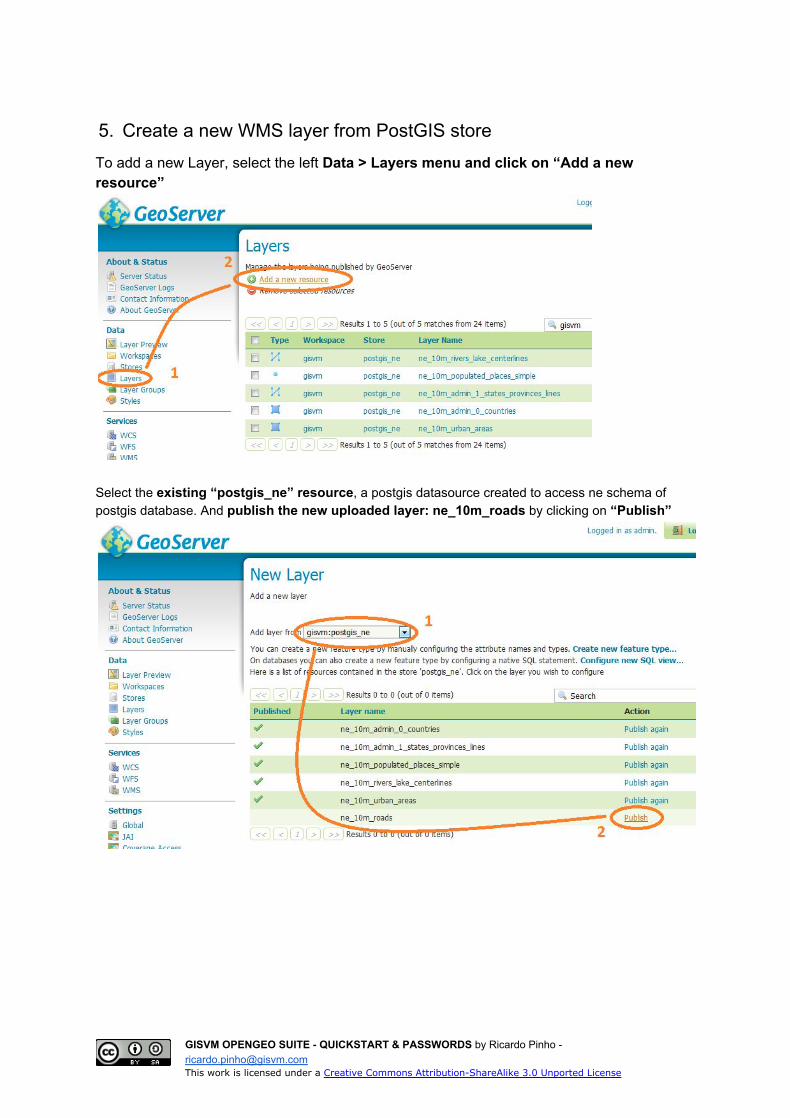
5. Create a new WMS layer from PostGIS store To add a new Layer, select the left Data > Layers menu and click on “Add a new resource”
Select the existing “postgis_ne” resource, a postgis datasource created to access ne schema of postgis database. And publish the new uploaded layer: ne_10m_roads by clicking on “Publish”
GISVM OPENGEO SUITE QUICKSTART & PASSWORDS by Ricardo Pinho [email protected] This work is licensed under a Creative Commons AttributionShareAlike 3.0 Unported License
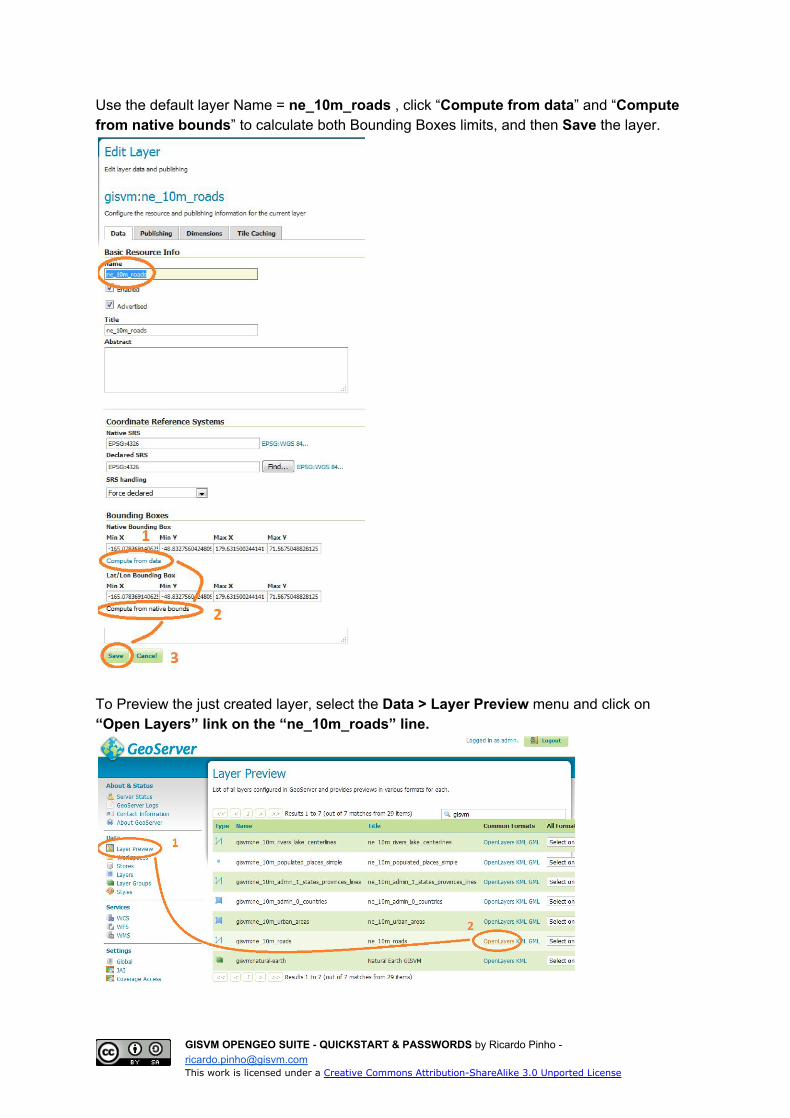
Use the default layer Name = ne_10m_roads , click “Compute from data” and “Compute from native bounds” to calculate both Bounding Boxes limits, and then Save the layer.
To Preview the just created layer, select the Data > Layer Preview menu and click on “Open Layers” link on the “ne_10m_roads” line.
GISVM OPENGEO SUITE QUICKSTART & PASSWORDS by Ricardo Pinho [email protected] This work is licensed under a Creative Commons AttributionShareAlike 3.0 Unported License
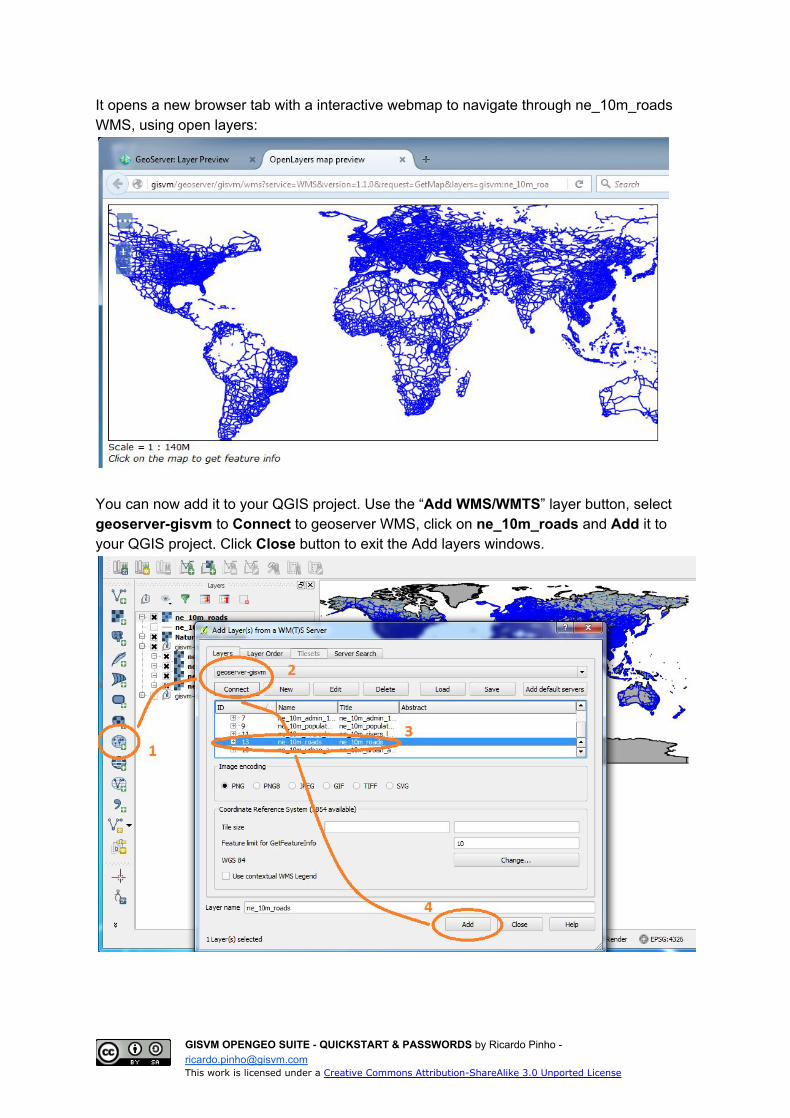
It opens a new browser tab with a interactive webmap to navigate through ne_10m_roads WMS, using open layers:
You can now add it to your QGIS project. Use the “Add WMS/WMTS” layer button, select geoservergisvm to Connect to geoserver WMS, click on ne_10m_roads and Add it to your QGIS project. Click Close button to exit the Add layers windows.
GISVM OPENGEO SUITE QUICKSTART & PASSWORDS by Ricardo Pinho [email protected] This work is licensed under a Creative Commons AttributionShareAlike 3.0 Unported License
How to manage it GISVM comes installed with two great full feature administration tools that you can use to manage it completely: phpPgAdmin and Webmin
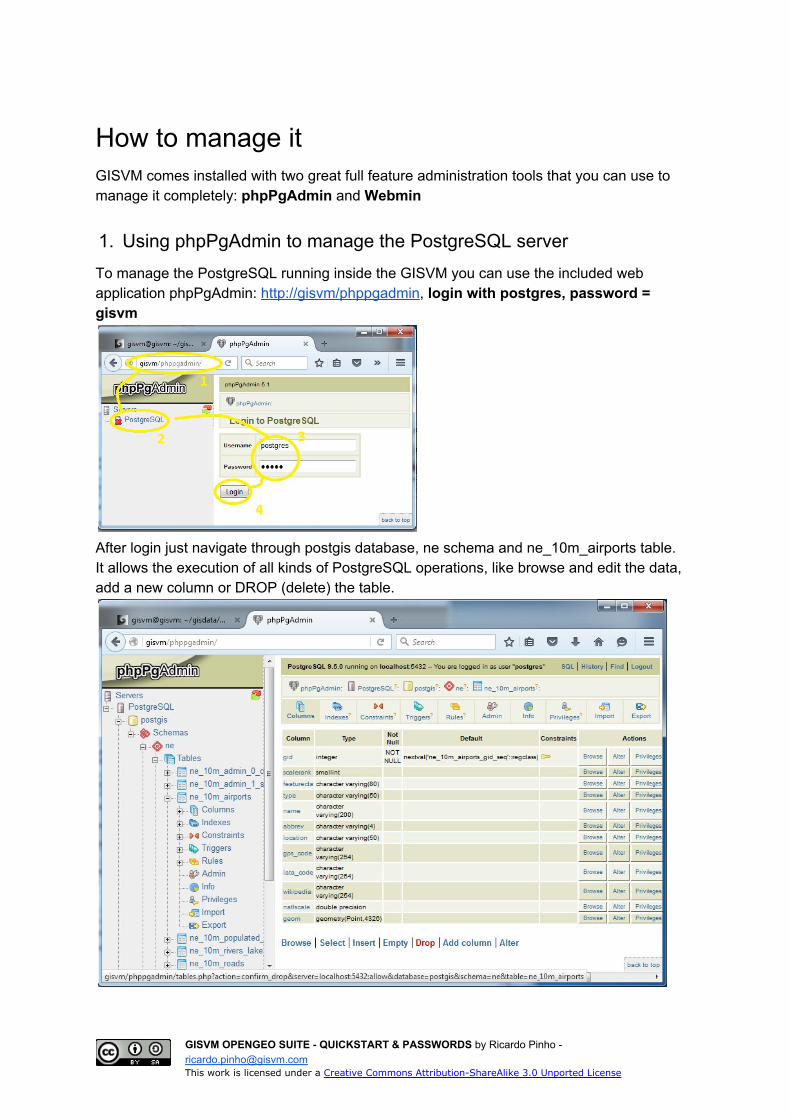
1. Using phpPgAdmin to manage the PostgreSQL server To manage the PostgreSQL running inside the GISVM you can use the included web application phpPgAdmin: http://gisvm/phppgadmin, login with postgres, password = gisvm
After login just navigate through postgis database, ne schema and ne_10m_airports table. It allows the execution of all kinds of PostgreSQL operations, like browse and edit the data, add a new column or DROP (delete) the table.
GISVM OPENGEO SUITE QUICKSTART & PASSWORDS by Ricardo Pinho [email protected] This work is licensed under a Creative Commons AttributionShareAlike 3.0 Unported License
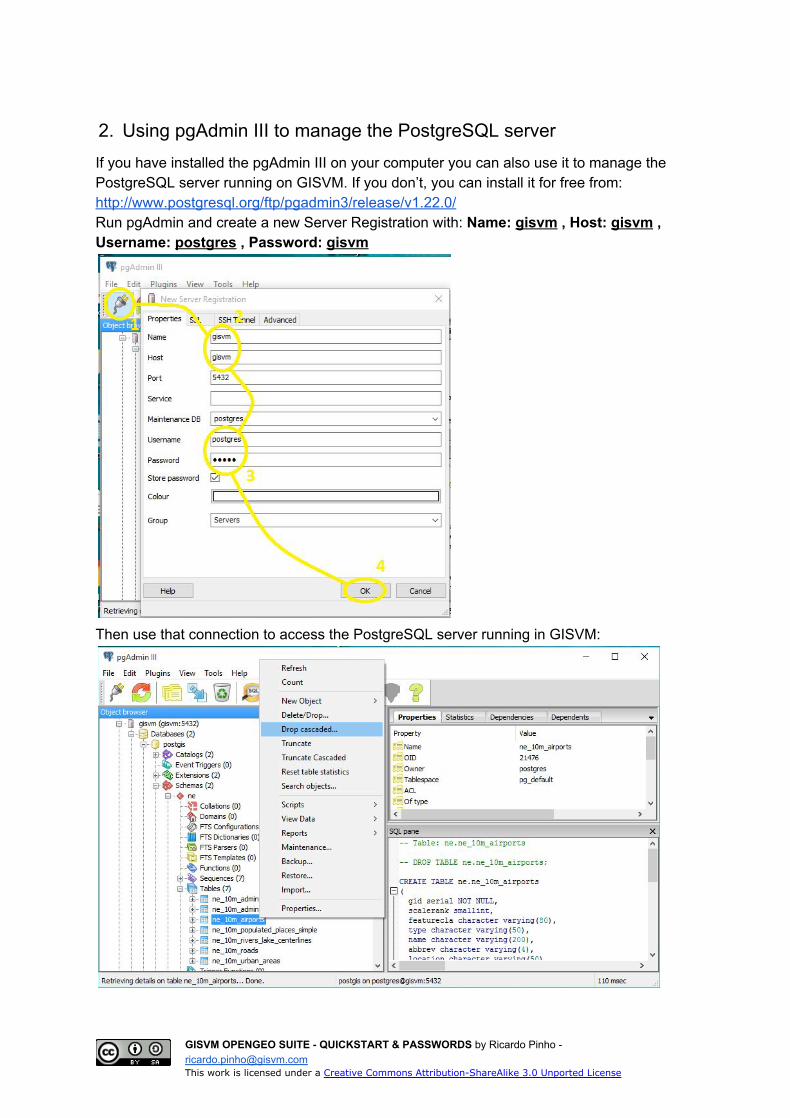
2. Using pgAdmin III to manage the PostgreSQL server If you have installed the pgAdmin III on your computer you can also use it to manage the PostgreSQL server running on GISVM. If you don’t, you can install it for free from: http://www.postgresql.org/ftp/pgadmin3/release/v1.22.0/ Run pgAdmin and create a new Server Registration with: Name: gisvm , Host: gisvm , Username: postgres , Password: gisvm
Then use that connection to access the PostgreSQL server running in GISVM:
GISVM OPENGEO SUITE QUICKSTART & PASSWORDS by Ricardo Pinho [email protected] This work is licensed under a Creative Commons AttributionShareAlike 3.0 Unported License
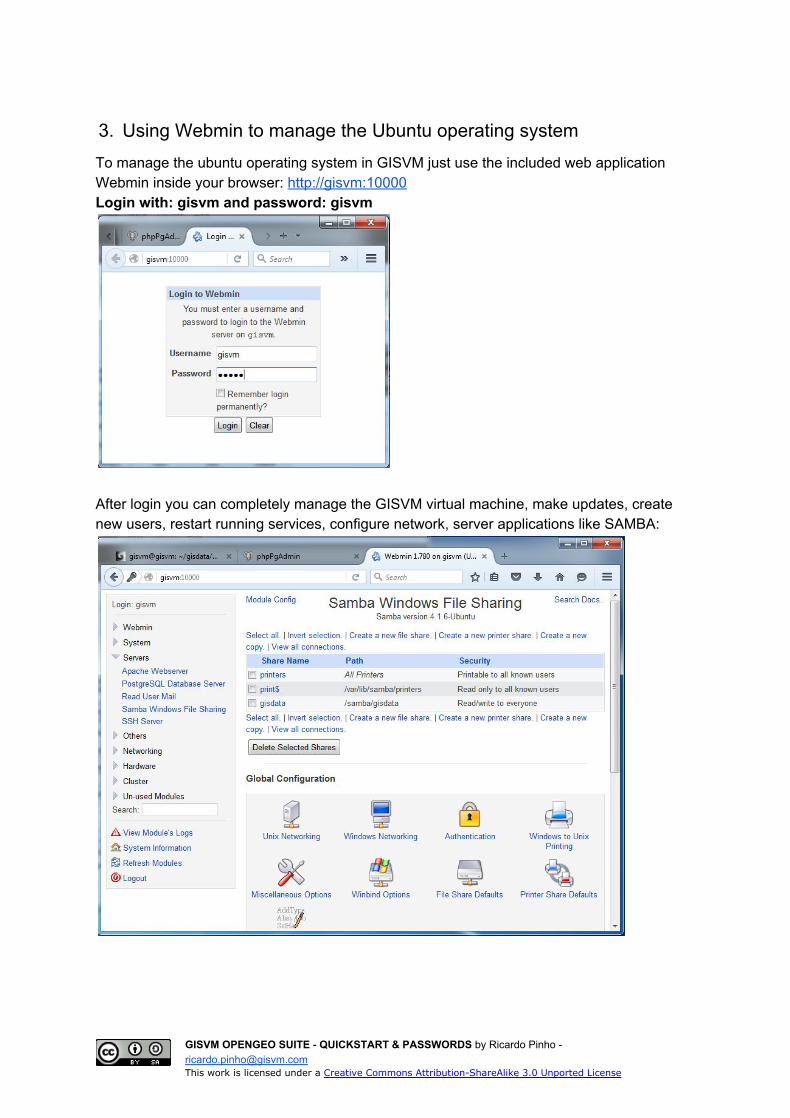
3. Using Webmin to manage the Ubuntu operating system To manage the ubuntu operating system in GISVM just use the included web application Webmin inside your browser: http://gisvm:10000 Login with: gisvm and password: gisvm
After login you can completely manage the GISVM virtual machine, make updates, create new users, restart running services, configure network, server applications like SAMBA:
GISVM OPENGEO SUITE QUICKSTART & PASSWORDS by Ricardo Pinho [email protected] This work is licensed under a Creative Commons AttributionShareAlike 3.0 Unported License
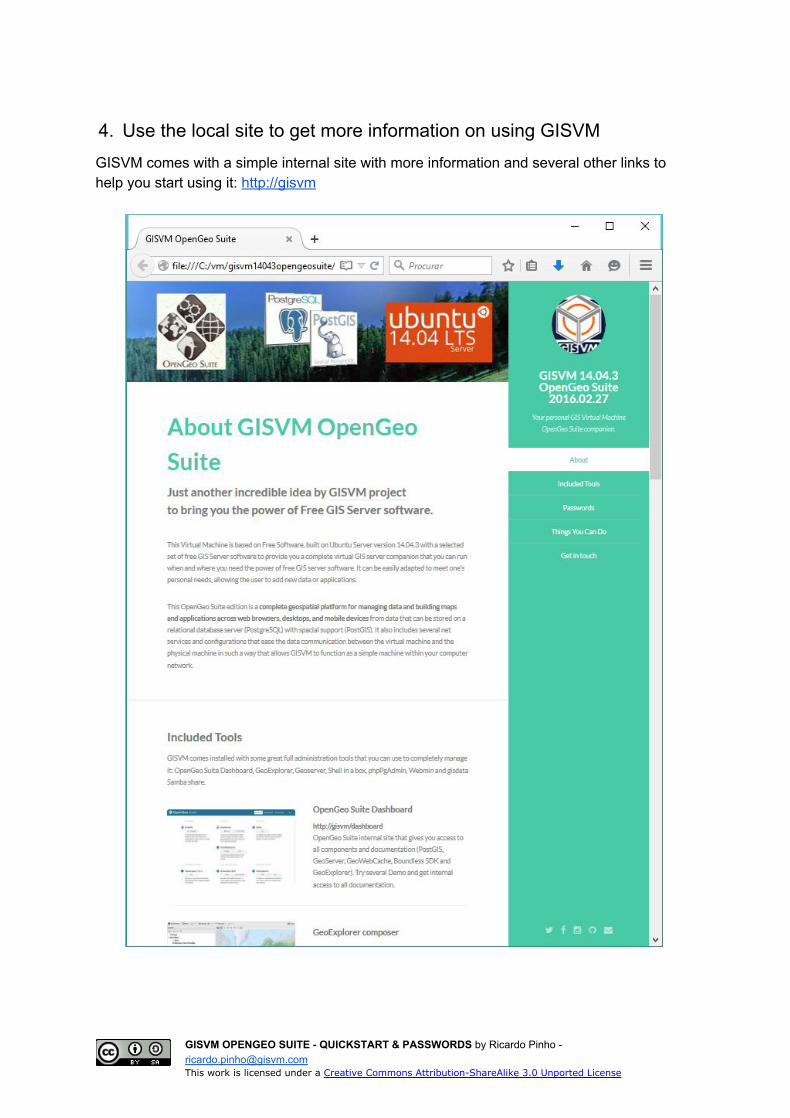
4. Use the local site to get more information on using GISVM GISVM comes with a simple internal site with more information and several other links to help you start using it: http://gisvm
GISVM OPENGEO SUITE QUICKSTART & PASSWORDS by Ricardo Pinho [email protected] This work is licensed under a Creative Commons AttributionShareAlike 3.0 Unported License
REMEMBER, USE GISVM AT YOUR OWN RISK
THERE IS NO WARRANTY FOR THE PROGRAM, TO THE EXTENT PERMITTED BY APPLICABLE LAW. THE COPYRIGHT HOLDERS AND/OR OTHER PARTIES PROVIDE THE PROGRAM “AS IS” WITHOUT WARRANTY OF ANY KIND, EITHER EXPRESSED OR IMPLIED, INCLUDING, BUT NOT LIMITED TO, THE IMPLIED WARRANTIES OF MERCHANTABILITY AND FITNESS FOR A PARTICULAR PURPOSE. THE ENTIRE RISK AS TO THE QUALITY AND PERFORMANCE OF THE PROGRAM IS WITH YOU. SHOULD THE PROGRAM PROVE DEFECTIVE, YOU ASSUME THE COST OF ALL NECESSARY SERVICING, REPAIR OR CORRECTION. THIS INFORMATION IS BEING GIVEN TO YOU GRATUITOUSLY AND THERE IS NO AGREEMENT OR UNDERSTANDING BETWEEN YOU AND THE GISVM PROJET OR ME (RICARDO PINHO) REGARDING YOUR USE OR MODIFICATION OF THIS INFORMATION BEYOND THE CREATIVE COMMONS ATTRIBUTIONSHAREALIKE 3.0 UNPORTED LICENSE (CC BYSA)
Please visit the GISVM project site regularly to get updates and help us make it better!
http://gisvm.com
Thank you for using it.
THAT’S IT, HAVE FUN !!!!!!!!!
GISVM OPENGEO SUITE QUICKSTART & PASSWORDS by Ricardo Pinho [email protected] This work is licensed under a Creative Commons AttributionShareAlike 3.0 Unported License