GIS 2.0 User Guide
124
GIS 2.0 User Guide
Transcript of GIS 2.0 User Guide
GIS 2.0 User Guide
Copyright © 2011 True Automation, Inc. All rights reserved
The software contains proprietary information of True Automation; it is provided under a license agreement containing restrictions on use and disclosure and is also protected by copyright law. Reverse engineering of the software is prohibited.
Due to continued product development this information may change without notice. The information and intellectual property contained herein is confidential between True Automation and the client and remains the exclusive property of True Automation. If you find any problems in the documentation, please report them to us in writing. True Automation does not warrant that this documentation is error-free.
No part of this publication may be reproduced, stored in a retrieval system, or transmitted in any form or by any means, electronic, mechanical, photocopying, recording or otherwise without the prior written permission of True Automation.
This document was created using Author-it™ (http://www.author-it.com), the total component content management solution. Author-it™ is a trademark of Author-it Software Corporation Ltd.
True Automation, Inc. 2600 Technology Drive
Plano, Texas 75074 972.881.1858
Web site: http://www.trueautomation.com

Page 3 9/17/2013, 1:38 PM
GIS V2.0 (9.0.38) True Automation, Inc.
Contents
GIS Module V2.0 ........................................................................................................................ 4
PDF File: GIS User Guide ....................................................................................................... 4
Before You Begin .................................................................................................................... 5
Need To Know .................................................................................................................... 5
License Setup for 8.1 .......................................................................................................... 7
License Setup for 9.0 .......................................................................................................... 8
Setting up Disclaimer and Max Records for 8.1 ................................................................... 9
Setting up Disclaimer and Max Records for 9.0 ................................................................. 11
Using GIS ............................................................................................................................. 12
Opening GIS from PACS 8.1 ............................................................................................. 12
Opening GIS from PACS 9.0 ............................................................................................. 20
Creating a New Map .......................................................................................................... 25
Setting up a Current or Prior Year layer ............................................................................. 26
Adding Labels to Map Layers ............................................................................................ 28
Creating an Alias for a Label ............................................................................................. 30
Changing Layer and Legend Properties ............................................................................ 32
Setting up Geoprocessing ................................................................................................. 34
Setting up Symbology ....................................................................................................... 41
Managing Map Layers and Creating New Group Layers ................................................... 51
Zooming In/Out ................................................................................................................. 55
Printing a Map ................................................................................................................... 58
Buttons in the GIS Toolbar ................................................................................................ 64
Context Menu from the Table of Contents ......................................................................... 84
Context Menu from the Map .............................................................................................. 90
Index ...................................................................................................................................... 123
Contents
Page 4 9/17/2013, 1:38 PM
GIS V2.0 (9.0.38) True Automation, Inc.
The GIS Module V2.0 allows you to view and maintain data for properties with the use of maps representing geographical features such as parcels, streets, and lot lines.
By using the GIS module, you can customize the maps to display properties in a way that is best fit for your needs.
Within a map, you can select a single property or multiple related properties to view or maintain data. Data maintenance options available include standard PACS features such as creating profiles and neighborhoods, mass updates, and the recalculation of properties.
PDF File: GIS User Guide
Click GIS 2.0 User Guide (TAUserGuide_GIS.pdf) to access the PDF file.
GIS Module V2.0
GIS Module V2.0
Page 5 9/17/2013, 1:38 PM
GIS V2.0 (9.0.38) True Automation, Inc.
Before You Begin
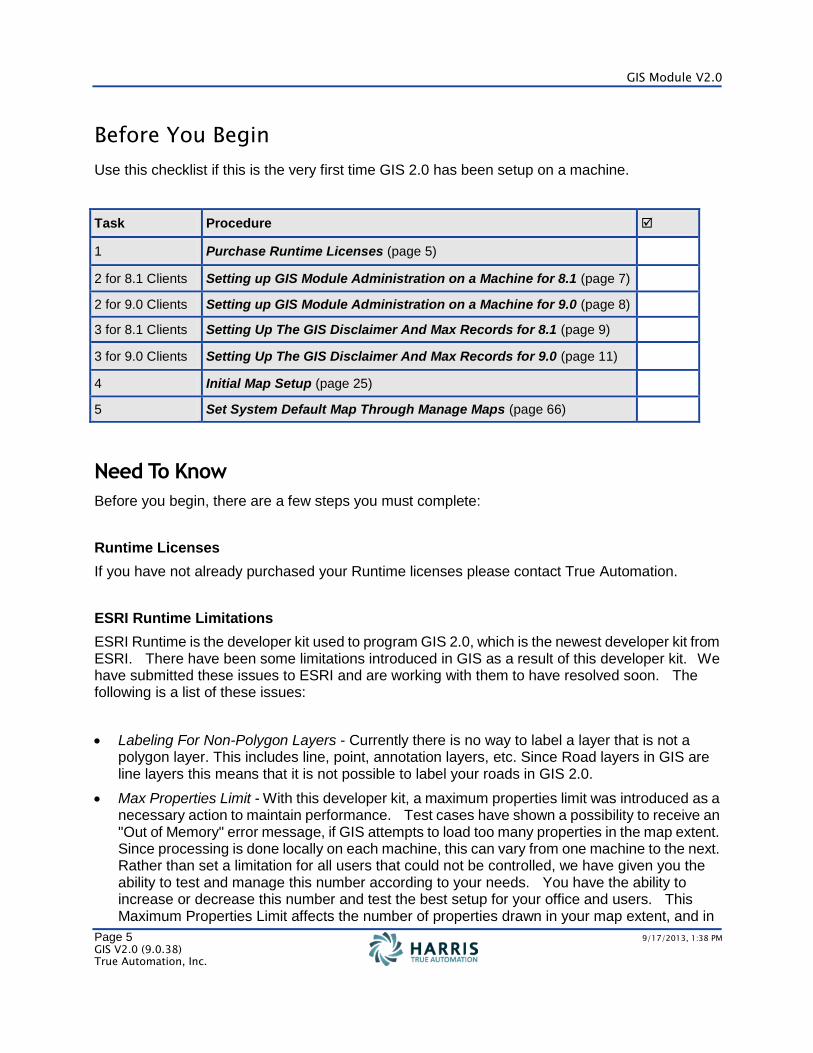
Use this checklist if this is the very first time GIS 2.0 has been setup on a machine.
Task Procedure
1 Purchase Runtime Licenses (page 5)
2 for 8.1 Clients Setting up GIS Module Administration on a Machine for 8.1 (page 7)
2 for 9.0 Clients Setting up GIS Module Administration on a Machine for 9.0 (page 8)
3 for 8.1 Clients Setting Up The GIS Disclaimer And Max Records for 8.1 (page 9)
3 for 9.0 Clients Setting Up The GIS Disclaimer And Max Records for 9.0 (page 11)
4 Initial Map Setup (page 25)
5 Set System Default Map Through Manage Maps (page 66)
Need To Know
Before you begin, there are a few steps you must complete:
Runtime Licenses
If you have not already purchased your Runtime licenses please contact True Automation.
ESRI Runtime Limitations
ESRI Runtime is the developer kit used to program GIS 2.0, which is the newest developer kit from ESRI. There have been some limitations introduced in GIS as a result of this developer kit. We have submitted these issues to ESRI and are working with them to have resolved soon. The following is a list of these issues:
Labeling For Non-Polygon Layers - Currently there is no way to label a layer that is not a polygon layer. This includes line, point, annotation layers, etc. Since Road layers in GIS are line layers this means that it is not possible to label your roads in GIS 2.0.
Max Properties Limit - With this developer kit, a maximum properties limit was introduced as a necessary action to maintain performance. Test cases have shown a possibility to receive an "Out of Memory" error message, if GIS attempts to load too many properties in the map extent. Since processing is done locally on each machine, this can vary from one machine to the next. Rather than set a limitation for all users that could not be controlled, we have given you the ability to test and manage this number according to your needs. You have the ability to increase or decrease this number and test the best setup for your office and users. This Maximum Properties Limit affects the number of properties drawn in your map extent, and in

Contents
Page 6 9/17/2013, 1:38 PM
GIS V2.0 (9.0.38) True Automation, Inc.
turn, how many properties can be hand-selected for processing. This does not affect properties selected through Advanced Search.
For more detailed instructions regarding setting up Max Properties Limit:
For 8.1 Clients, see Setting up Max Records for 8.1 (page 9)
For 9.0 Clients, see Setting up Max Records for 9.0 (page 11)
User Rights
Here are the following user rights that are associated with GIS:
GIS Appraiser Administrator – Allows the user to add and remove templates and carry out all functions of GIS Viewer.
GIS Basic User – Allows the user to have access to all global templates and enables full use of GIS Viewer, but it does not allow the user to create any templates. (This is a view-only user right for the templates). You must have this for GIS Viewer.
GIS Power User – Allows the user to have full control and use of GIS Viewer, and allows the user to view, add or remove templates.
GIS File Maintenance User – Allows the user to access the Manage GIS option under the Tools menu. This right is designed only to manage the layers and aerials images; it does not enable access to GIS Viewer or allow the user to view a full extent of your GIS or work in PACS through GIS.
GIS Module V2.0
Page 7 9/17/2013, 1:38 PM
GIS V2.0 (9.0.38) True Automation, Inc.
License Setup for 8.1
Purpose
Use the following procedure to set up your system to use the PACS GIS Module you have purchased. Each user is required to register their computer with the corresponding GIS Module license. Once the client purchases the license(s), TA will set that amount in the client's database. Then, you will be able to assign a license to a computer.
Contact True Automation Support if you need assistance.
Procedure
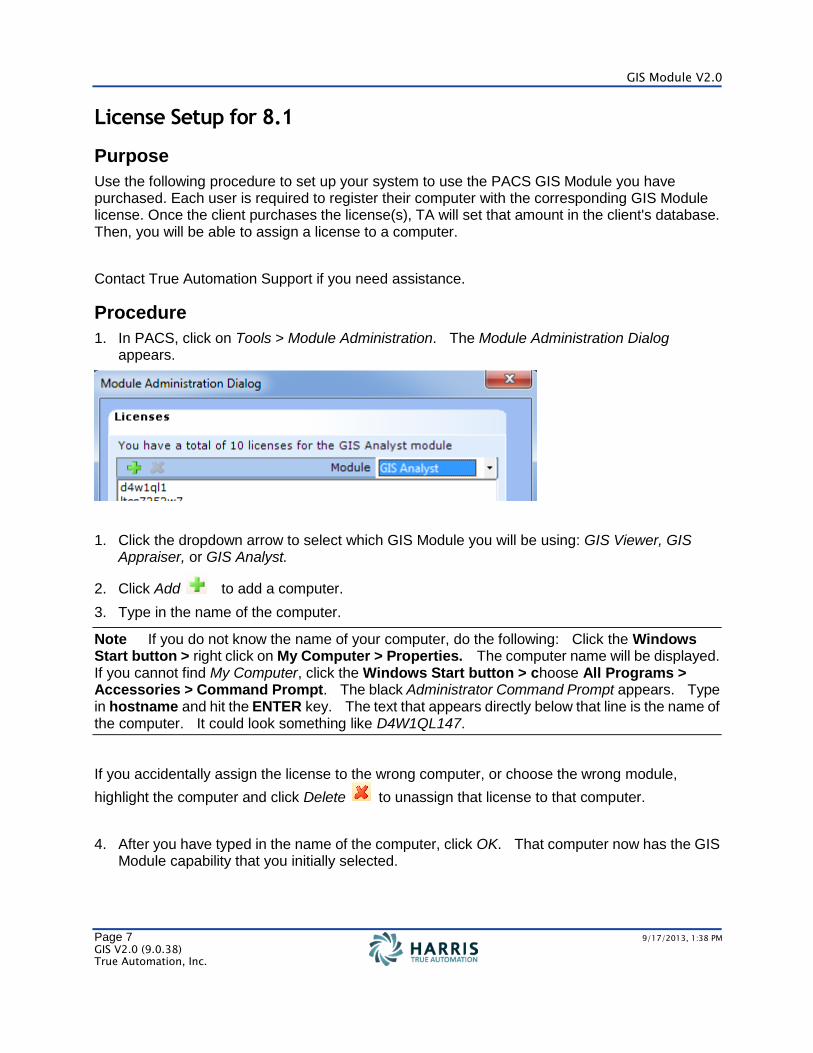
1. In PACS, click on Tools > Module Administration. The Module Administration Dialog appears.
1. Click the dropdown arrow to select which GIS Module you will be using: GIS Viewer, GIS Appraiser, or GIS Analyst.
2. Click Add to add a computer.
3. Type in the name of the computer.
Note If you do not know the name of your computer, do the following: Click the Windows Start button > right click on My Computer > Properties. The computer name will be displayed. If you cannot find My Computer, click the Windows Start button > choose All Programs > Accessories > Command Prompt. The black Administrator Command Prompt appears. Type in hostname and hit the ENTER key. The text that appears directly below that line is the name of the computer. It could look something like D4W1QL147.
If you accidentally assign the license to the wrong computer, or choose the wrong module,
highlight the computer and click Delete to unassign that license to that computer.
4. After you have typed in the name of the computer, click OK. That computer now has the GIS Module capability that you initially selected.
Contents
Page 8 9/17/2013, 1:38 PM
GIS V2.0 (9.0.38) True Automation, Inc.
License Setup for 9.0
Purpose
Use the following procedure to set up your system to use the PACS GIS Module you have purchased. Each user is required to register their computer with the corresponding GIS Module license. Once the client purchases the license(s), TA will set that amount in the client's database. Then, you will be able to assign a license to a computer.
Contact True Automation Support if you need assistance.
Procedure
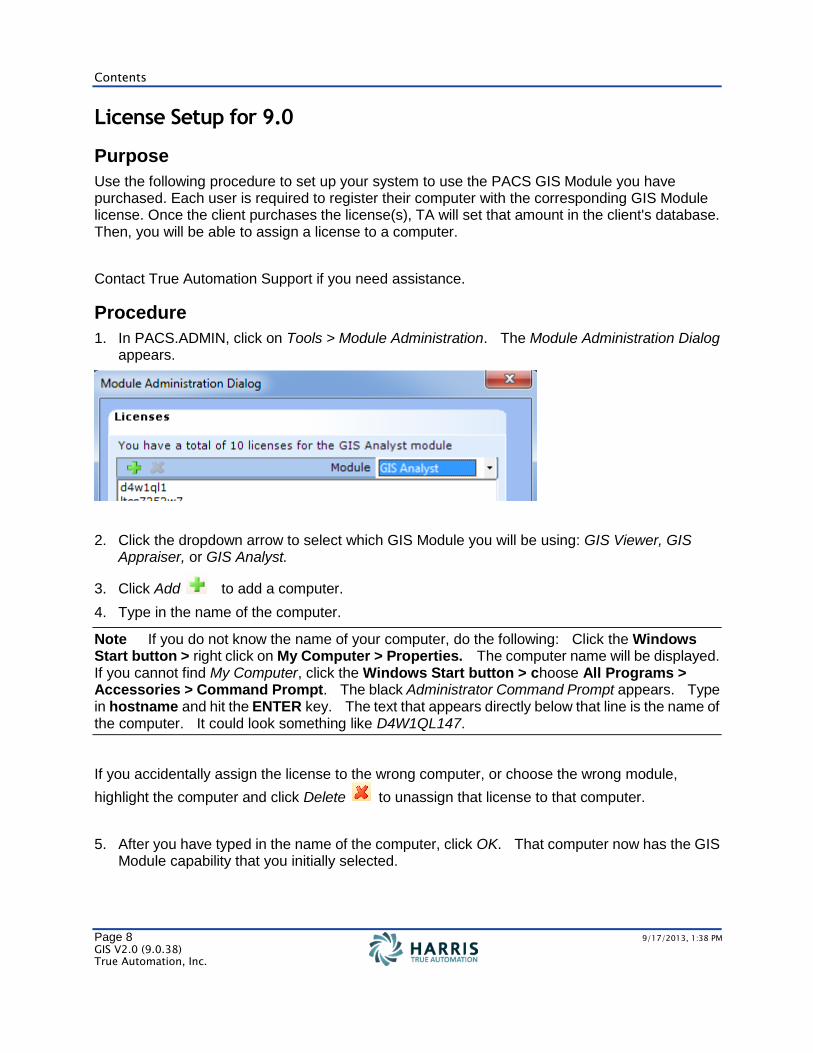
1. In PACS.ADMIN, click on Tools > Module Administration. The Module Administration Dialog appears.
2. Click the dropdown arrow to select which GIS Module you will be using: GIS Viewer, GIS Appraiser, or GIS Analyst.
3. Click Add to add a computer.
4. Type in the name of the computer.
Note If you do not know the name of your computer, do the following: Click the Windows Start button > right click on My Computer > Properties. The computer name will be displayed. If you cannot find My Computer, click the Windows Start button > choose All Programs > Accessories > Command Prompt. The black Administrator Command Prompt appears. Type in hostname and hit the ENTER key. The text that appears directly below that line is the name of the computer. It could look something like D4W1QL147.
If you accidentally assign the license to the wrong computer, or choose the wrong module,
highlight the computer and click Delete to unassign that license to that computer.
5. After you have typed in the name of the computer, click OK. That computer now has the GIS Module capability that you initially selected.
GIS Module V2.0
Page 9 9/17/2013, 1:38 PM
GIS V2.0 (9.0.38) True Automation, Inc.
Setting up Disclaimer and Max Records for 8.1
Purpose
Use the following procedure to set up your system with a disclaimer on your printed maps.
Procedure
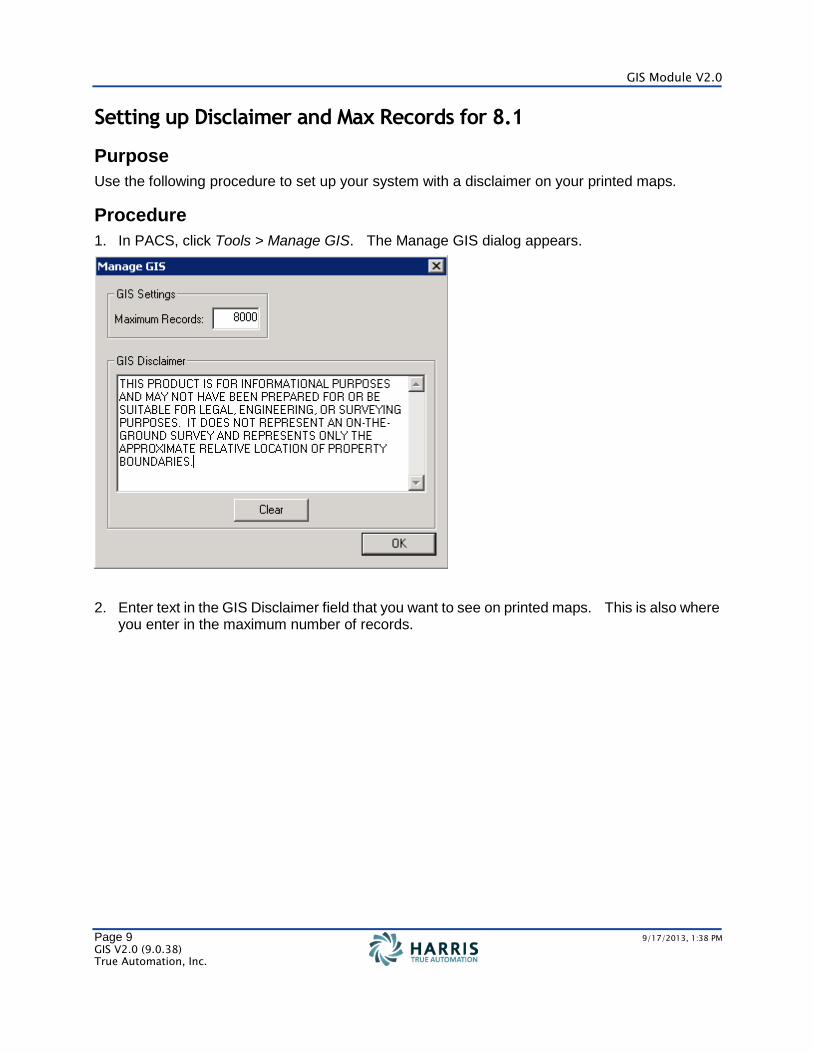
1. In PACS, click Tools > Manage GIS. The Manage GIS dialog appears.
2. Enter text in the GIS Disclaimer field that you want to see on printed maps. This is also where you enter in the maximum number of records.
Contents
Page 10 9/17/2013, 1:38 PM
GIS V2.0 (9.0.38) True Automation, Inc.
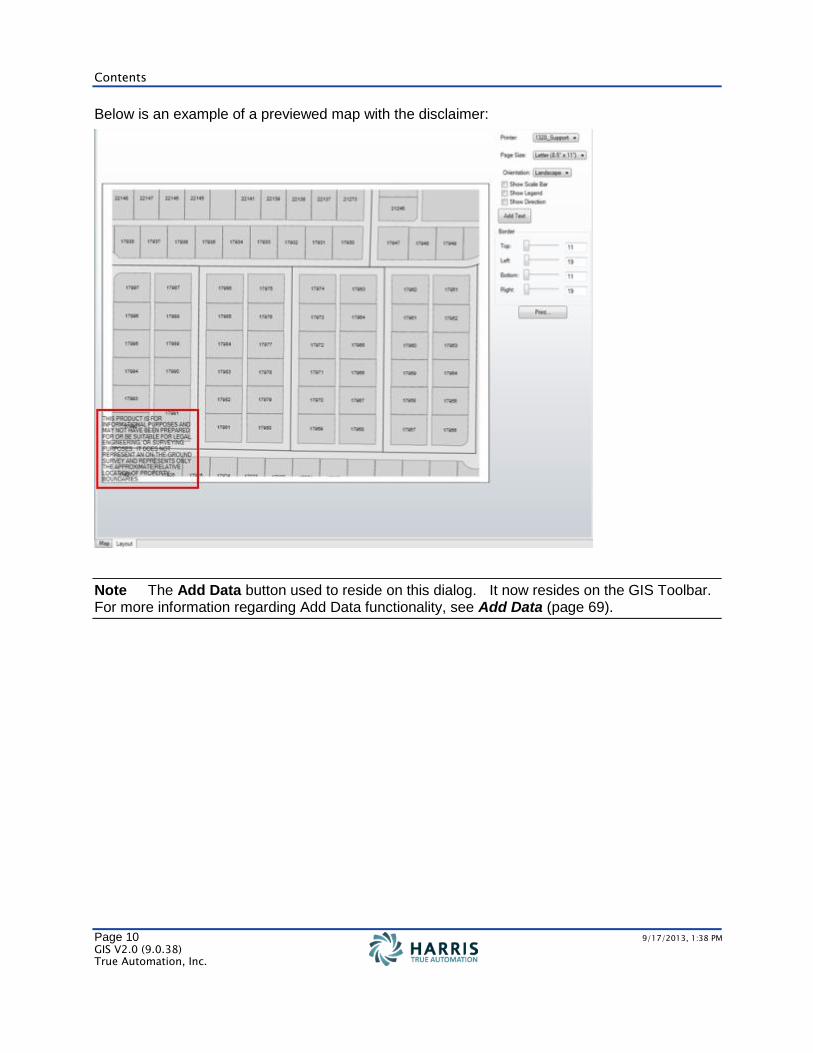
Below is an example of a previewed map with the disclaimer:
Note The Add Data button used to reside on this dialog. It now resides on the GIS Toolbar. For more information regarding Add Data functionality, see Add Data (page 69).
GIS Module V2.0
Page 11 9/17/2013, 1:38 PM
GIS V2.0 (9.0.38) True Automation, Inc.
Setting up Disclaimer and Max Records for 9.0
Purpose
Use the following procedure to set up your system with a disclaimer on your printed maps.
Procedure
1. In PACS.ADMIN, click Tools > System Configuration.
2. Scroll to GIS properties.
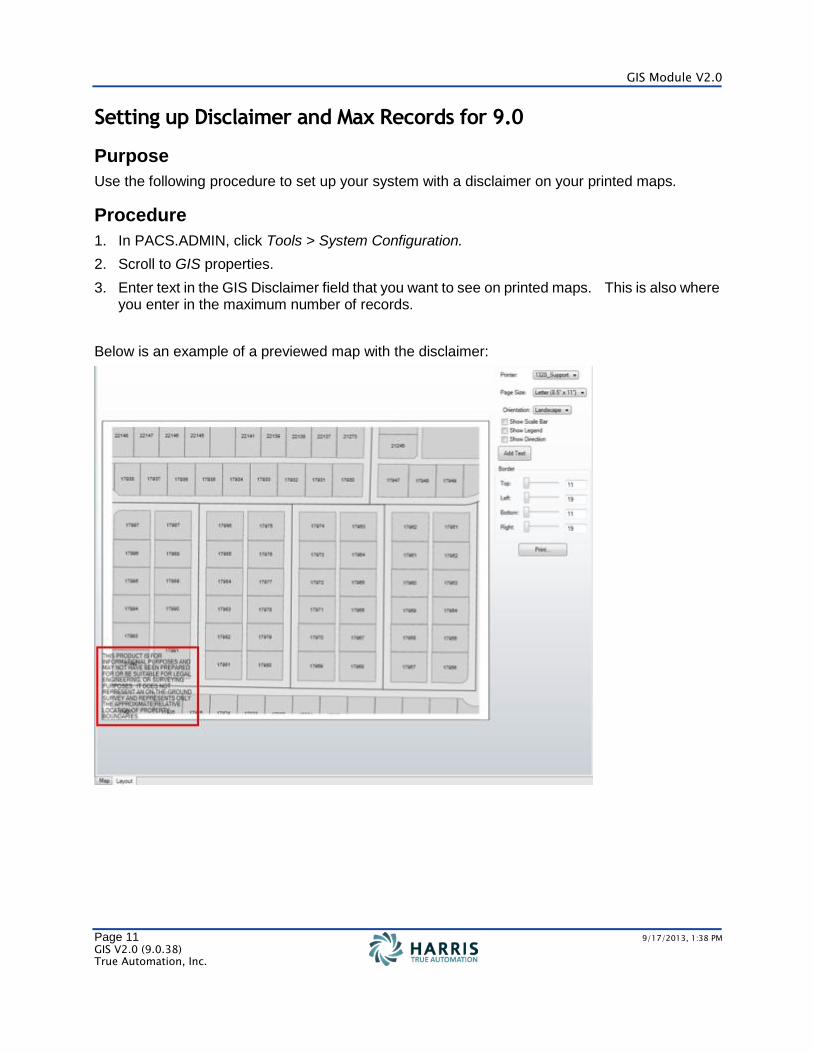
3. Enter text in the GIS Disclaimer field that you want to see on printed maps. This is also where you enter in the maximum number of records.
Below is an example of a previewed map with the disclaimer:
Contents
Page 12 9/17/2013, 1:38 PM
GIS V2.0 (9.0.38) True Automation, Inc.
Using GIS
Use the following procedures to use the functionality in GIS Viewer.
Opening GIS from PACS 8.1
Purpose
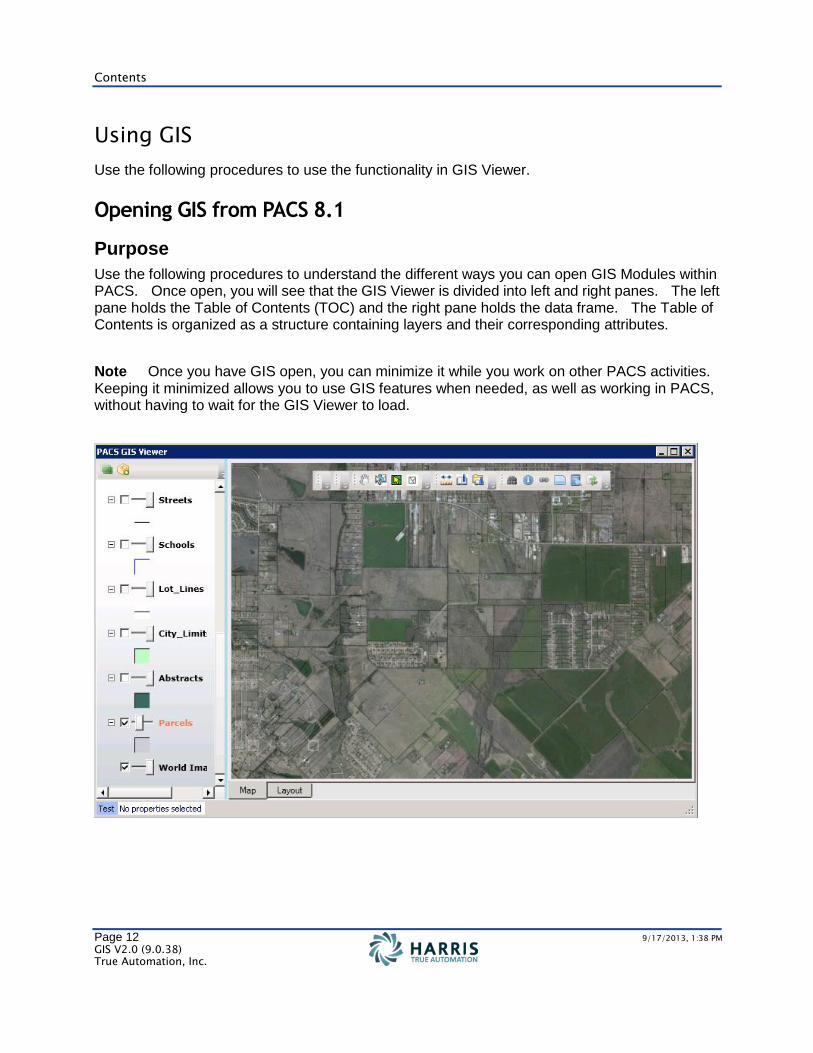
Use the following procedures to understand the different ways you can open GIS Modules within PACS. Once open, you will see that the GIS Viewer is divided into left and right panes. The left pane holds the Table of Contents (TOC) and the right pane holds the data frame. The Table of Contents is organized as a structure containing layers and their corresponding attributes.
Note Once you have GIS open, you can minimize it while you work on other PACS activities. Keeping it minimized allows you to use GIS features when needed, as well as working in PACS, without having to wait for the GIS Viewer to load.

GIS Module V2.0
Page 13 9/17/2013, 1:38 PM
GIS V2.0 (9.0.38) True Automation, Inc.
I. GIS Button in the Icon Toolbar
1. In PACS Appraisal, click on the GIS button in the Icon Toolbar.
2. The GIS Viewer opens.
II. PACS Activities
1. In PACS Appraisal, choose Activities > GIS > GIS Viewer / Appraiser.
2. The GIS Viewer opens.
III. Real Property Record
1. Open a Real Property record in PACS.
2. Click on the GIS tab.
3. The GIS Viewer opens with that property selected.
Contents
Page 14 9/17/2013, 1:38 PM
GIS V2.0 (9.0.38) True Automation, Inc.
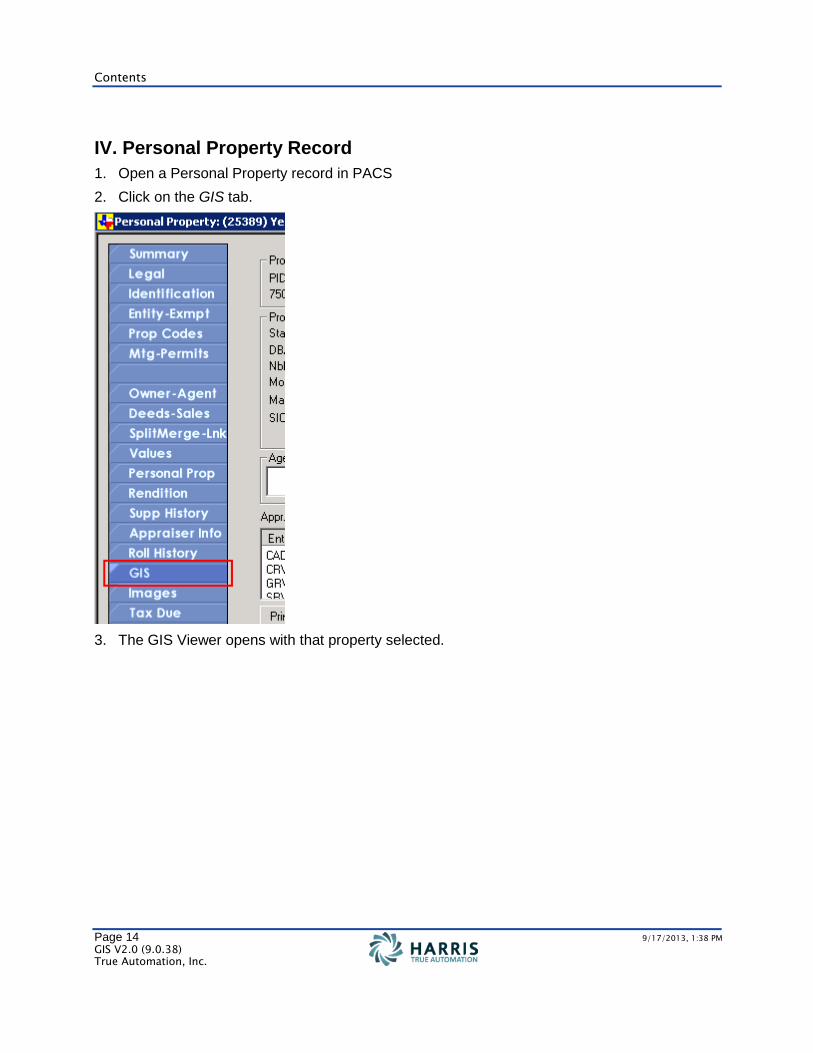
IV. Personal Property Record
1. Open a Personal Property record in PACS
2. Click on the GIS tab.
3. The GIS Viewer opens with that property selected.
GIS Module V2.0
Page 15 9/17/2013, 1:38 PM
GIS V2.0 (9.0.38) True Automation, Inc.
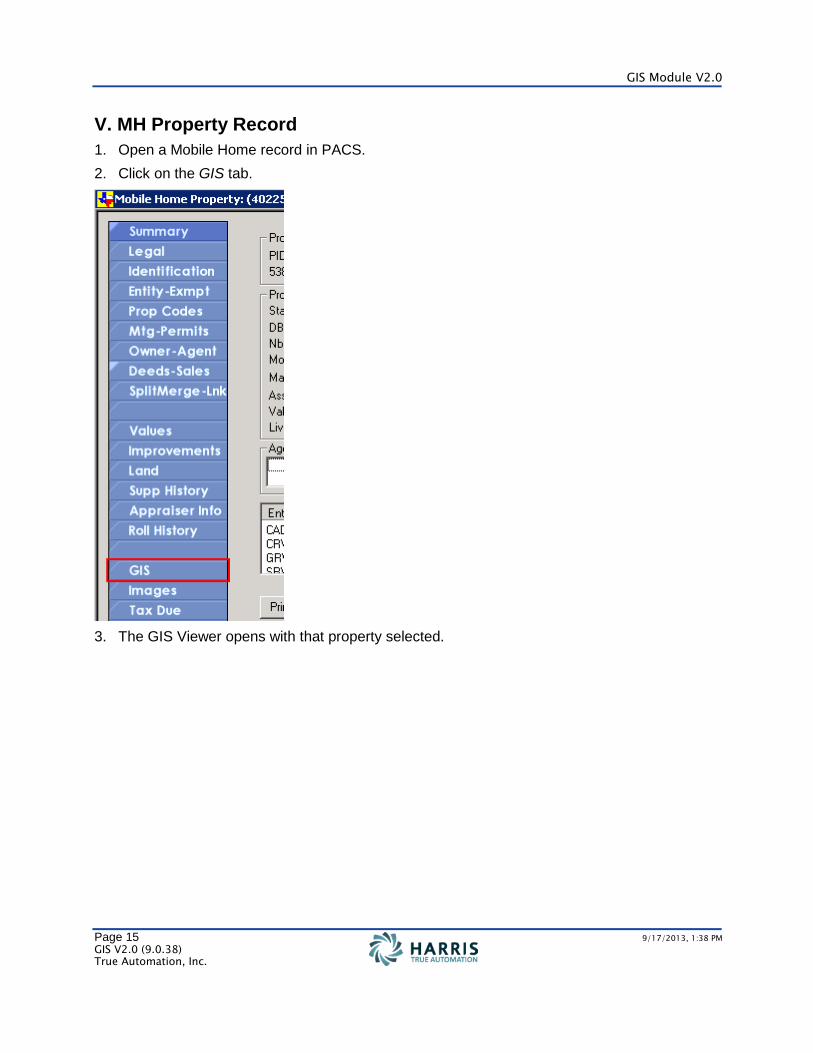
V. MH Property Record
1. Open a Mobile Home record in PACS.
2. Click on the GIS tab.
3. The GIS Viewer opens with that property selected.
Contents
Page 16 9/17/2013, 1:38 PM
GIS V2.0 (9.0.38) True Automation, Inc.
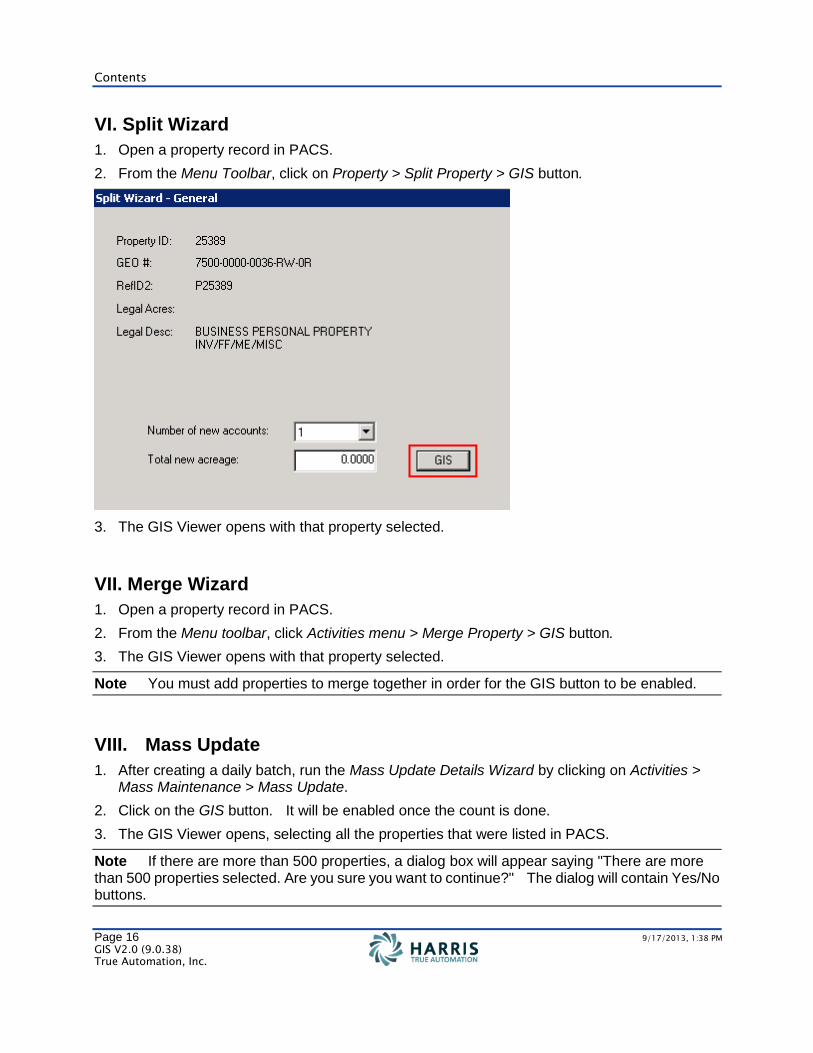
VI. Split Wizard
1. Open a property record in PACS.
2. From the Menu Toolbar, click on Property > Split Property > GIS button.
3. The GIS Viewer opens with that property selected.
VII. Merge Wizard
1. Open a property record in PACS.
2. From the Menu toolbar, click Activities menu > Merge Property > GIS button.
3. The GIS Viewer opens with that property selected.
Note You must add properties to merge together in order for the GIS button to be enabled.
VIII. Mass Update
1. After creating a daily batch, run the Mass Update Details Wizard by clicking on Activities > Mass Maintenance > Mass Update.
2. Click on the GIS button. It will be enabled once the count is done.
3. The GIS Viewer opens, selecting all the properties that were listed in PACS.
Note If there are more than 500 properties, a dialog box will appear saying "There are more than 500 properties selected. Are you sure you want to continue?" The dialog will contain Yes/No buttons.
GIS Module V2.0
Page 17 9/17/2013, 1:38 PM
GIS V2.0 (9.0.38) True Automation, Inc.
IX. Property Search Results
1. From property search results, select one or more properties.
2. Right click on the search results to open the context menu. Click on View in GIS.
3. The GIS Viewer opens, selecting all the properties that were selected from the search results.
X. Neighborhood Profile
Note This is only available in GIS Appraiser and GIS Analyst.
1. Open a property that has a Neighborhood Profile assigned to it or click on Activities > Profiling > Neighborhood Profiles. The Neighborhood Results dialog opens.
2. Double click on the Neighborhood Profile you want to open. The Neighborhood Profile dialog opens.
3. Click on the GIS button on the dialog.
4. The GIS Viewer opens, selecting the property that was listed on the Neighborhood Profile.
Note If there are more than 500 properties, a dialog box will appear saying "There are more than 500 properties selected. Are you sure you want to continue?" The dialog will contain Yes/No buttons.
Contents
Page 18 9/17/2013, 1:38 PM
GIS V2.0 (9.0.38) True Automation, Inc.
XI. Comparable Grids
1. Open the Residential Sale/Equity, Land Sales or Commercial Sales grids.
2. Click on the GIS button on the dialog.
3. The GIS Viewer opens.
XII. ARB Protest
1. From the ARB Protest Search results, select a protest.
2. Right click on the protest to open the context menu and select Commercial Presentation > GIS.
3. The GIS Viewer opens with the property selected.
XIII. Personal Property Link
1. Open a Personal Property account in PACS.
2. Click on the GIS panel. The GIS Viewer opens, automatically zooming to and selecting the linked real property account.

GIS Module V2.0
Page 19 9/17/2013, 1:38 PM
GIS V2.0 (9.0.38) True Automation, Inc.
XIV. MH Link
1. Open a Mobile Home account in PACS.
2. Click on the GIS panel. The GIS Viewer opens, automatically zooming to and selecting the linked real property account.
Contents
Page 20 9/17/2013, 1:38 PM
GIS V2.0 (9.0.38) True Automation, Inc.
Opening GIS from PACS 9.0
Purpose
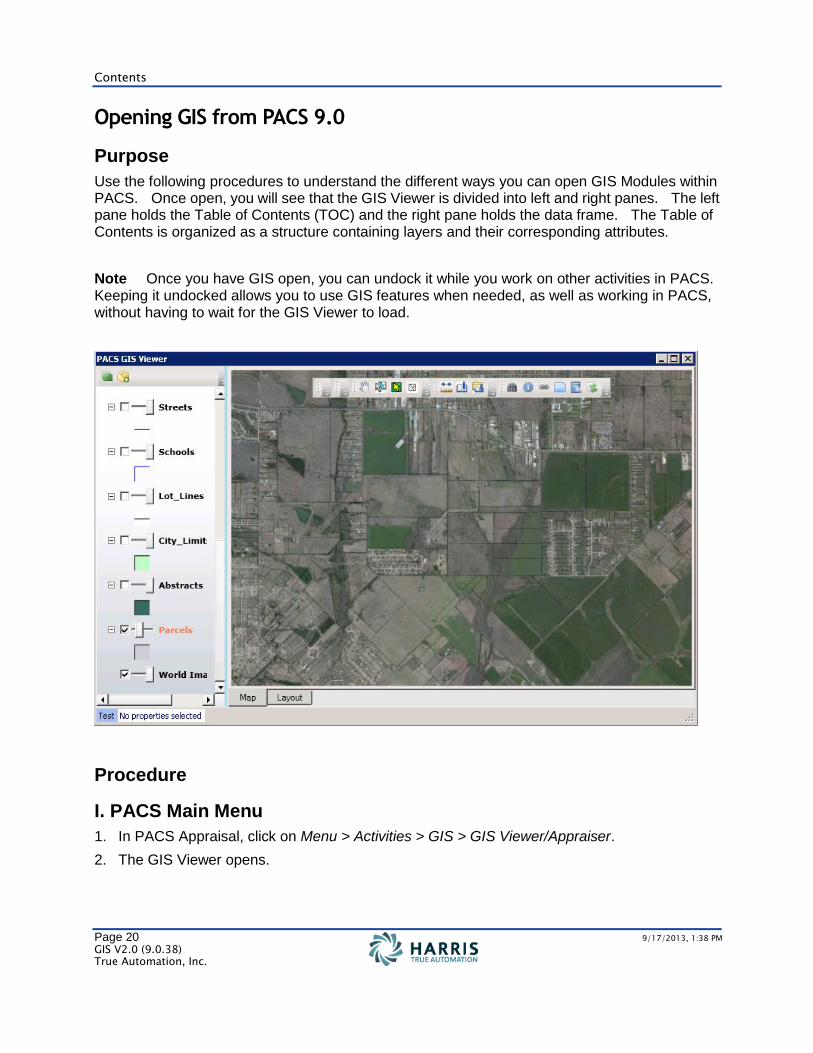
Use the following procedures to understand the different ways you can open GIS Modules within PACS. Once open, you will see that the GIS Viewer is divided into left and right panes. The left pane holds the Table of Contents (TOC) and the right pane holds the data frame. The Table of Contents is organized as a structure containing layers and their corresponding attributes.
Note Once you have GIS open, you can undock it while you work on other activities in PACS. Keeping it undocked allows you to use GIS features when needed, as well as working in PACS, without having to wait for the GIS Viewer to load.
Procedure
I. PACS Main Menu
1. In PACS Appraisal, click on Menu > Activities > GIS > GIS Viewer/Appraiser.
2. The GIS Viewer opens.
GIS Module V2.0
Page 21 9/17/2013, 1:38 PM
GIS V2.0 (9.0.38) True Automation, Inc.
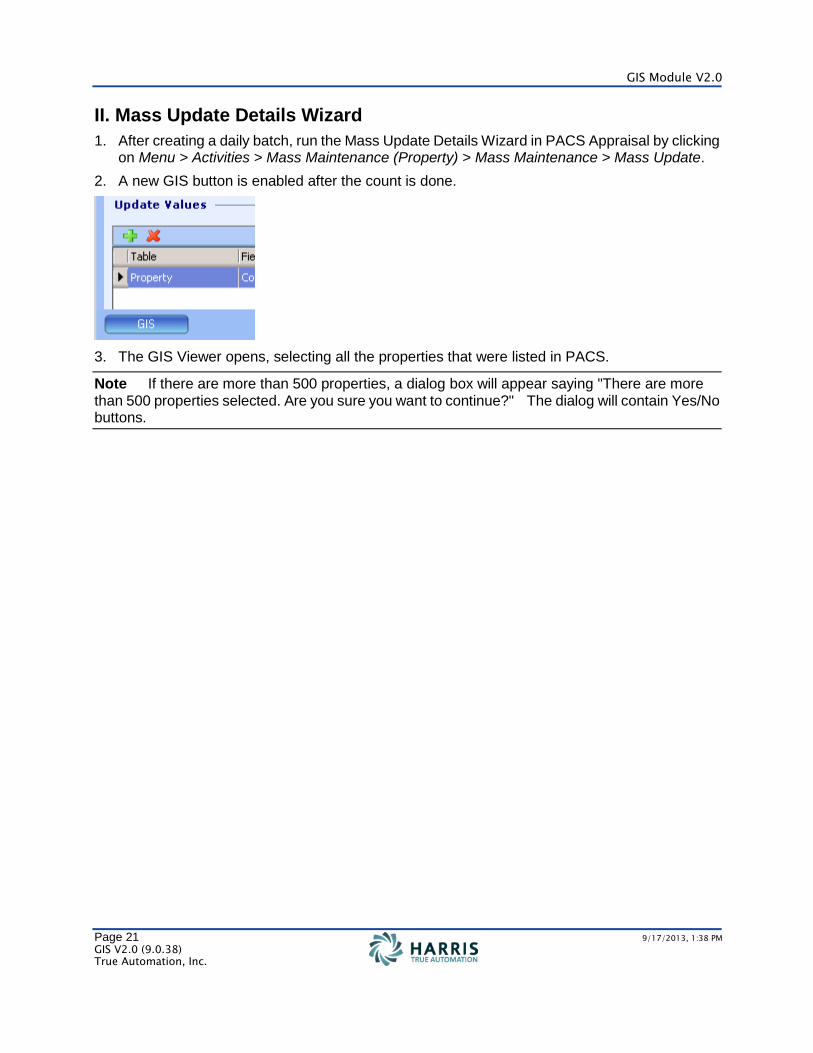
II. Mass Update Details Wizard
1. After creating a daily batch, run the Mass Update Details Wizard in PACS Appraisal by clicking on Menu > Activities > Mass Maintenance (Property) > Mass Maintenance > Mass Update.
2. A new GIS button is enabled after the count is done.
3. The GIS Viewer opens, selecting all the properties that were listed in PACS.
Note If there are more than 500 properties, a dialog box will appear saying "There are more than 500 properties selected. Are you sure you want to continue?" The dialog will contain Yes/No buttons.

Contents
Page 22 9/17/2013, 1:38 PM
GIS V2.0 (9.0.38) True Automation, Inc.
III. Property Search Results
1. In PACS Appraisal, right click on the Property Search results.
2. Select properties that you want to view in GIS Viewer.
3. Select Launch GIS for Select Properties...
4. The GIS Viewer opens, showing all the properties selected.
IV. Neighborhood Profile
Note This is only available in GIS Appraiser and GIS Analyst.
1. In PACS Appraisal, open a property.
2. Click on the Identification tab > Profile button. The Neighborhood Profile dialog opens.
GIS Module V2.0
Page 23 9/17/2013, 1:38 PM
GIS V2.0 (9.0.38) True Automation, Inc.
3. Click on the GIS button.
4. The GIS Viewer opens, selecting the property that was listed on the Neighborhood Profile.
Note If there are more than 500 properties, a dialog box will appear saying "There are more than 500 properties selected. Are you sure you want to continue?" The dialog will contain Yes/No buttons.
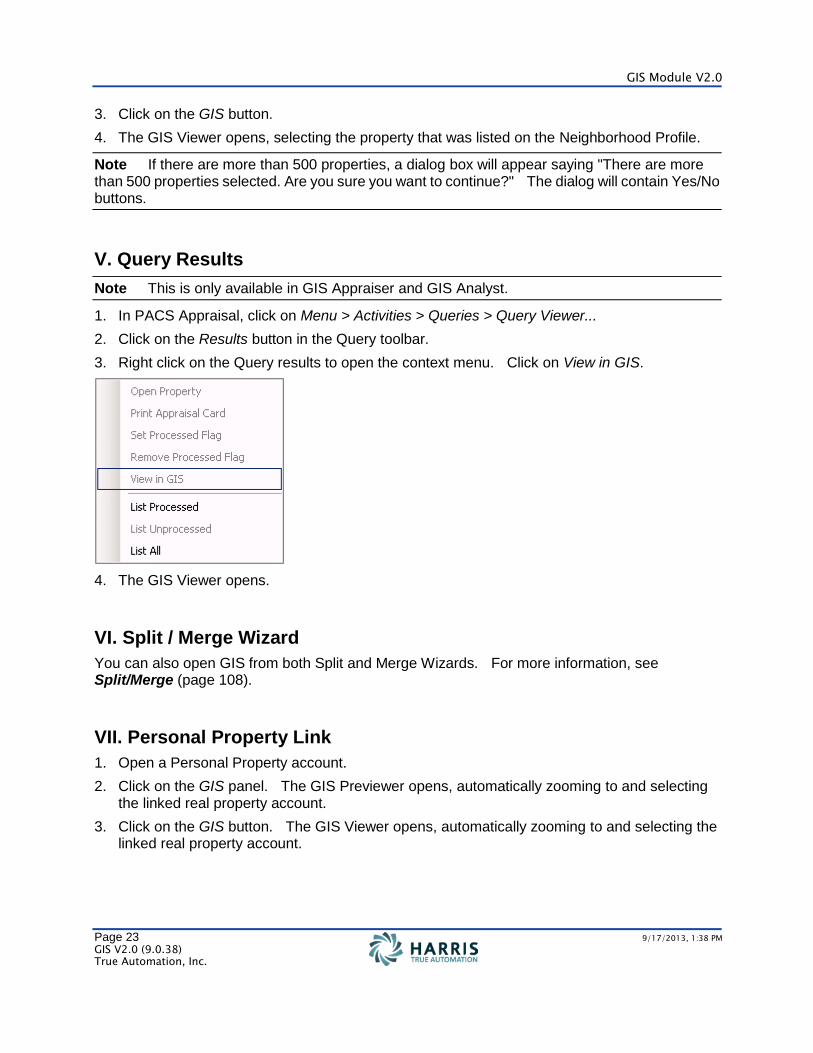
V. Query Results
Note This is only available in GIS Appraiser and GIS Analyst.
1. In PACS Appraisal, click on Menu > Activities > Queries > Query Viewer...
2. Click on the Results button in the Query toolbar.
3. Right click on the Query results to open the context menu. Click on View in GIS.
4. The GIS Viewer opens.
VI. Split / Merge Wizard
You can also open GIS from both Split and Merge Wizards. For more information, see Split/Merge (page 108).
VII. Personal Property Link
1. Open a Personal Property account.
2. Click on the GIS panel. The GIS Previewer opens, automatically zooming to and selecting the linked real property account.
3. Click on the GIS button. The GIS Viewer opens, automatically zooming to and selecting the linked real property account.

Contents
Page 24 9/17/2013, 1:38 PM
GIS V2.0 (9.0.38) True Automation, Inc.
VIII. MH Link
1. Open a Mobile Home account.
2. Click on the GIS panel. The GIS Previewer opens, automatically zooming to and selecting the linked mobile home account.
3. Click on the GIS button. The GIS Viewer opens, automatically zooming to and selecting the linked mobile home account.
GIS Module V2.0
Page 25 9/17/2013, 1:38 PM
GIS V2.0 (9.0.38) True Automation, Inc.
Creating a New Map
Purpose
Use this procedure to create your first map.
Procedure
1. From the GIS toolbar, click the Add Data button to add your basemap.
2. Click on the Basemaps tab and choose either World Imagery or World Topographic Map.
3. Click Add. Now, you can add shape files or rasters to the map.
4. Click the Add Data button from the toolbar again.
5. On the Shapefiles and/or Rasters tab, click the Browse button to locate the file you want to add as a layer. Rasters are geocoded images.
6. Select the files you want to add. You may add multiple files.
7. Click Open.
8. Click Add. The new layers will appear in the TOC.
Important When adding a shapefile to your map, you must use the UNC pathing and not a mapped network drive. Otherwise, other users will not be able to see those map layers.
Example:
Correct pathing: \\pacsserver\GIS_Data\TA_Data
Incorrect pathing: D:GIS_Data\TA_Data
Note If you already have maps created, do not use this guide. Use the New Map (page 65) guide.
Contents
Page 26 9/17/2013, 1:38 PM
GIS V2.0 (9.0.38) True Automation, Inc.
Setting up a Current or Prior Year layer
Purpose
Use this procedure to indicate prior year layers and certified year layers. Every year at certification, the GIS team will take a snapshot of the GIS data. That archive will be will be dropped into GIS. We anticipate having multiple layers in the TOC, such as Parcel Layer 2012, Parcel Layer 2011, etc. You can then open a property for 2008 for example, then open GIS viewer in the 2008 Layer. You can research any information in that year layer (or prior years).
Note To join your parcel layer to a current or certified year in PACS, the shapefile must contain the prop_id field. Otherwise, you will not see the Parcel Layer option in Layer Properties.
Procedures
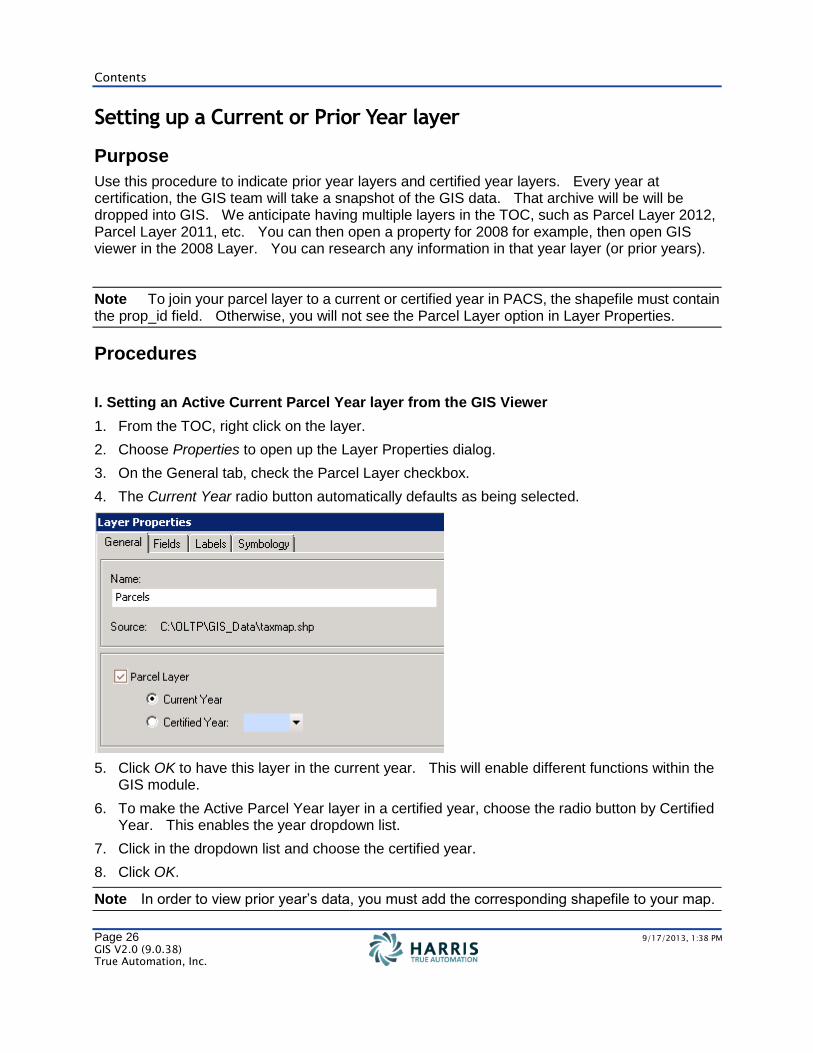
I. Setting an Active Current Parcel Year layer from the GIS Viewer
1. From the TOC, right click on the layer.
2. Choose Properties to open up the Layer Properties dialog.
3. On the General tab, check the Parcel Layer checkbox.
4. The Current Year radio button automatically defaults as being selected.
5. Click OK to have this layer in the current year. This will enable different functions within the GIS module.
6. To make the Active Parcel Year layer in a certified year, choose the radio button by Certified Year. This enables the year dropdown list.
7. Click in the dropdown list and choose the certified year.
8. Click OK.
Note In order to view prior year’s data, you must add the corresponding shapefile to your map.
GIS Module V2.0
Page 27 9/17/2013, 1:38 PM
GIS V2.0 (9.0.38) True Automation, Inc.
II. Setting an Active Certified Parcel Year layer from the Property
1. In PACS.NET, open a property.
2. Click Commands.
3. Click on the GIS option to open GIS Viewer with the certified year parcel layer turned on. The GIS command option is only available if a parcel layer exists for that certified year.
4. The map extent is set to the property from which the GIS button was clicked from.
Contents
Page 28 9/17/2013, 1:38 PM
GIS V2.0 (9.0.38) True Automation, Inc.
Adding Labels to Map Layers
Purpose
Use this procedure to change the labels that are shown on map layers, which is derived from either PACS data or information in the shapefile.
Procedure
From the Table Of Contents in the GIS Module, right click on the name of the layer you want to modify.
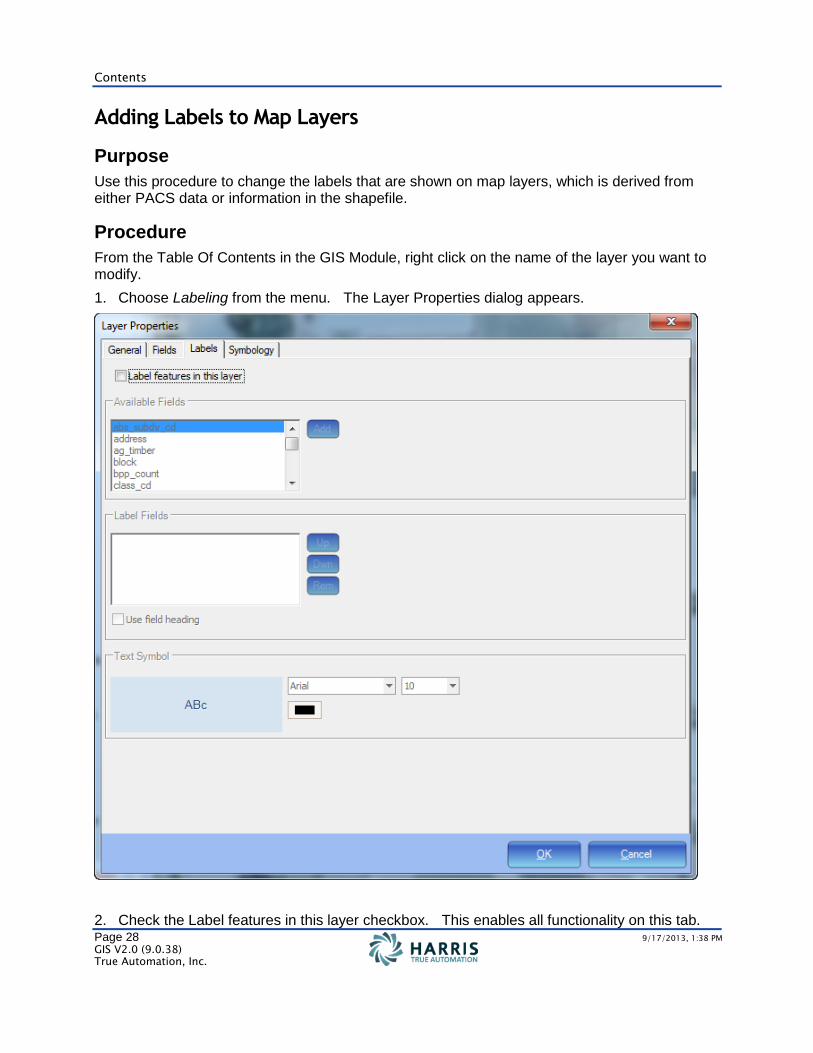
1. Choose Labeling from the menu. The Layer Properties dialog appears.
2. Check the Label features in this layer checkbox. This enables all functionality on this tab.
GIS Module V2.0
Page 29 9/17/2013, 1:38 PM
GIS V2.0 (9.0.38) True Automation, Inc.
3. From the Available Fields list, choose the field you want to appear on the map layer. You may select multiple fields by holding down the CTRL key while click on them.
4. Click Add. The selected fields now appear in the Label Fields list.
Optional features on the Layer Properties dialog:
To rearrange the order the labels that will be shown on the map layer, select the label from the Label Fields list and click the Up or Dwn button.
To remove a label from appearing on the map layer, select the label from the Label Fields list and click the Rem button to remove it.
To include the field heading (including the alias heading) on the map layer, check the Use field heading checkbox. You can create an alias name that you want to show on the map layer. For example, instead of showing the heading "prop_id" on the map layer, you can give it the alias of "PID". See Creating an Alias for a Label (page 30).
To modify the label's font, font size, or font color, click on the dropdown list beside the field and choose which one you would like to use.
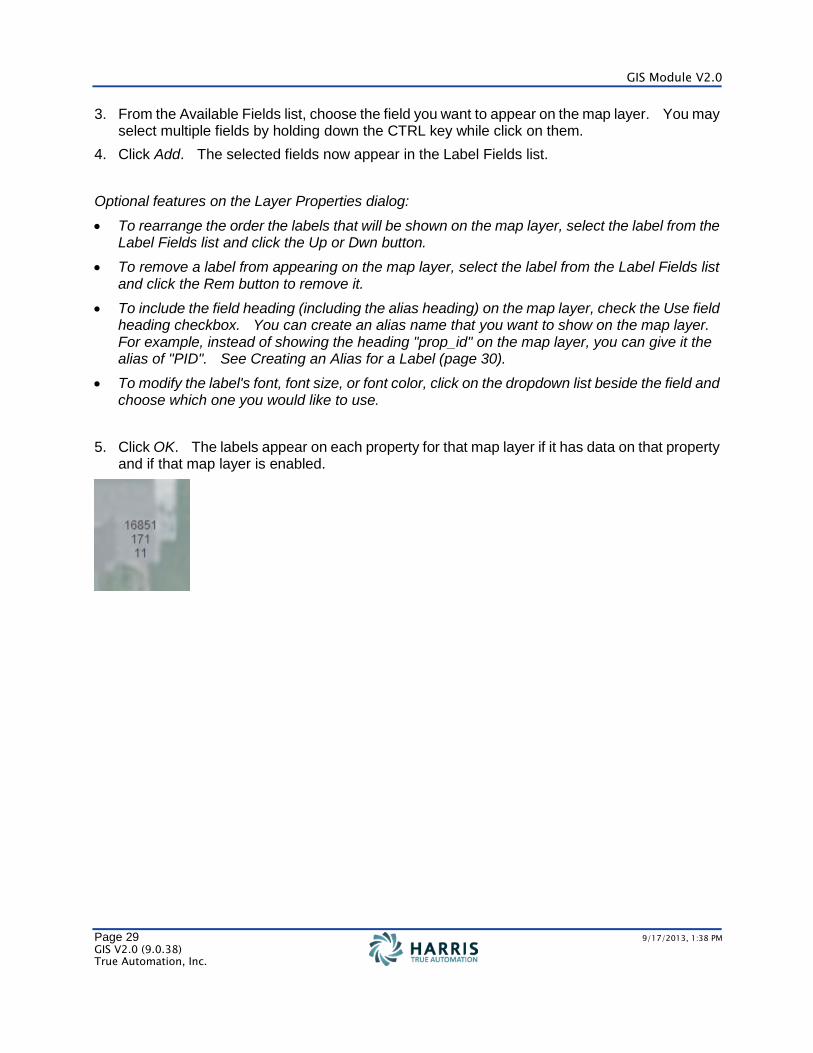
5. Click OK. The labels appear on each property for that map layer if it has data on that property and if that map layer is enabled.
Contents
Page 30 9/17/2013, 1:38 PM
GIS V2.0 (9.0.38) True Automation, Inc.
Creating an Alias for a Label
Purpose
Use this procedure to change the label heading that is shown on map layers.
Procedure
From the Table Of Contents in the GIS Module, right click on the name of the layer you want to modify.
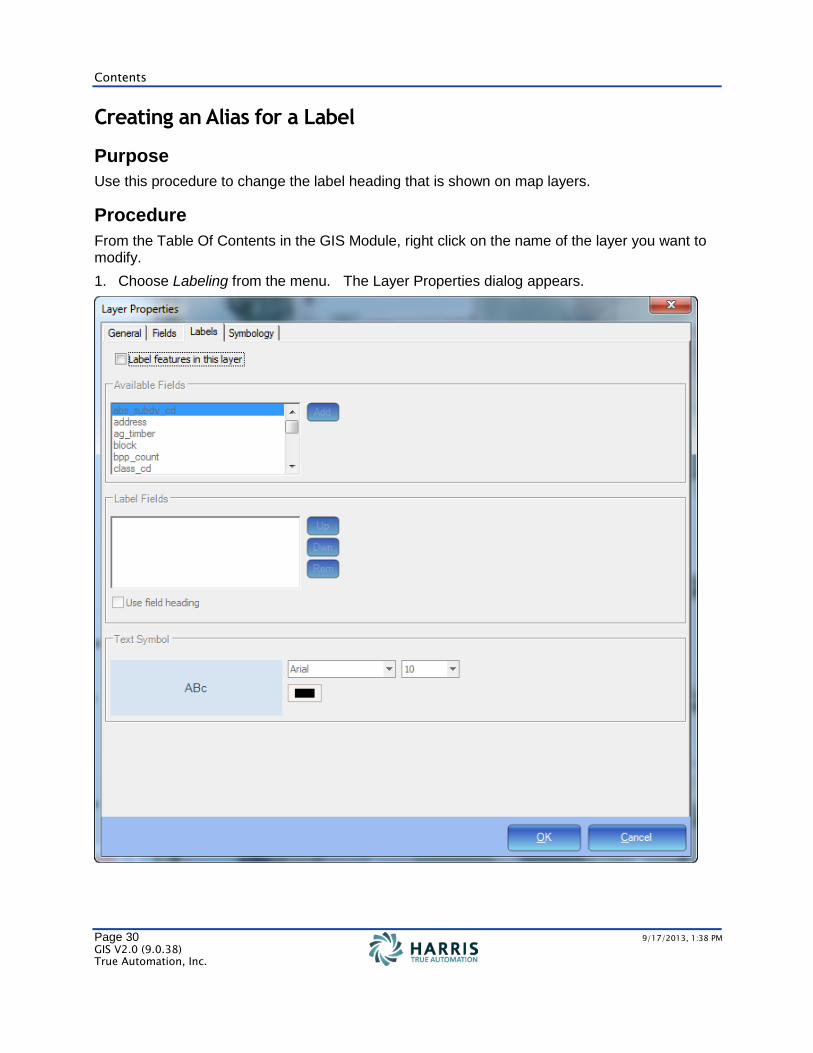
1. Choose Labeling from the menu. The Layer Properties dialog appears.
GIS Module V2.0
Page 31 9/17/2013, 1:38 PM
GIS V2.0 (9.0.38) True Automation, Inc.
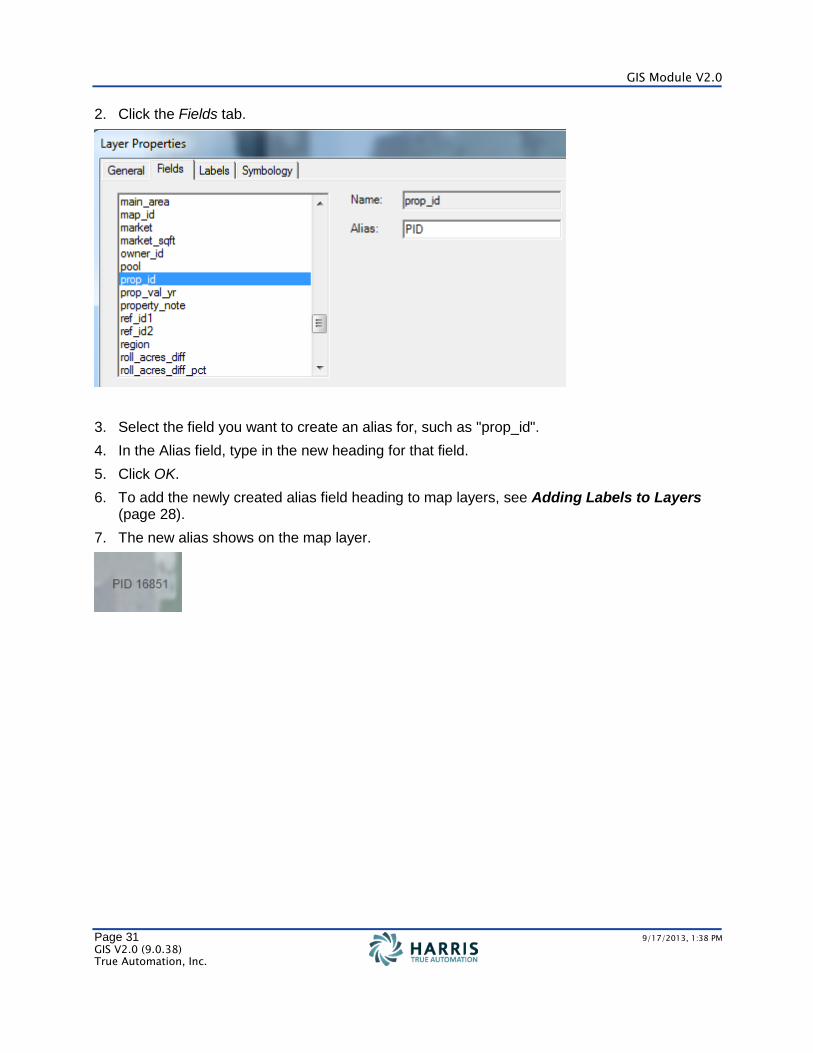
2. Click the Fields tab.
3. Select the field you want to create an alias for, such as "prop_id".
4. In the Alias field, type in the new heading for that field.
5. Click OK.
6. To add the newly created alias field heading to map layers, see Adding Labels to Layers (page 28).
7. The new alias shows on the map layer.
Contents
Page 32 9/17/2013, 1:38 PM
GIS V2.0 (9.0.38) True Automation, Inc.
Changing Layer and Legend Properties
Use the following procedures to change the symbol color, opacity, outline width, outline color and symbol label of the layers on the map. You also have the ability to do this through Simple Symbology.
Legend Properties
Purpose
Use this procedure to change the symbol color, opacity, outline width, and outline color of the layers on the map.
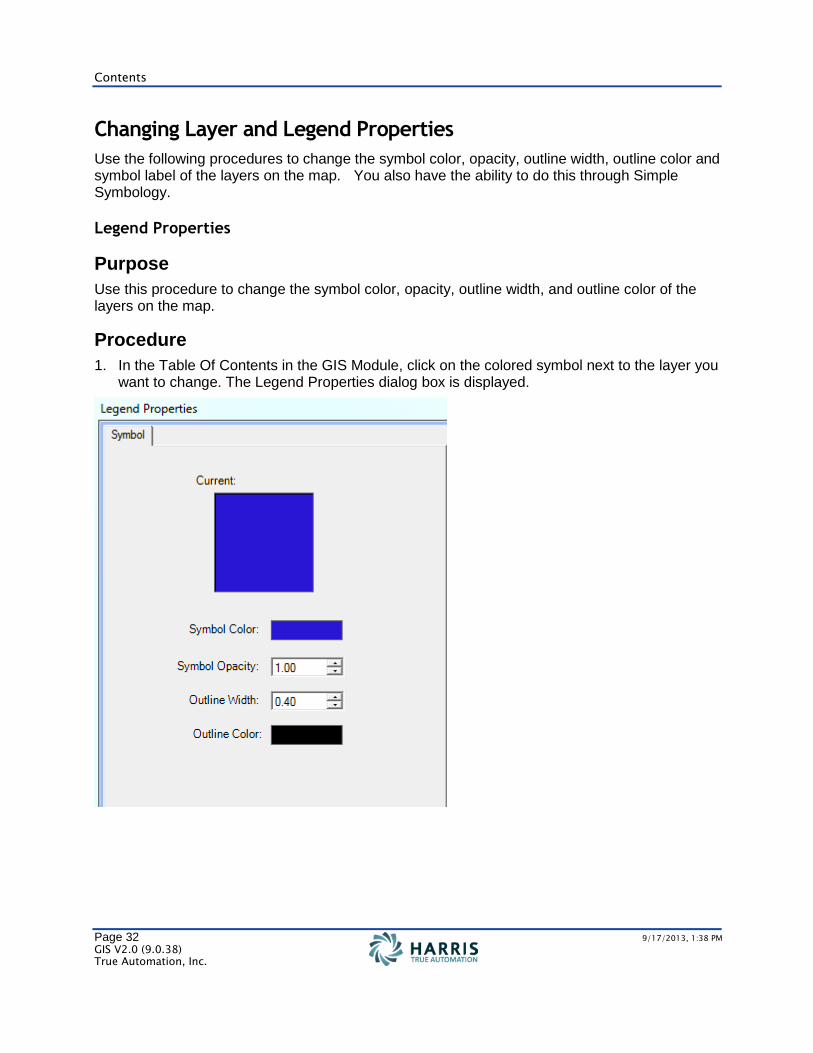
Procedure
1. In the Table Of Contents in the GIS Module, click on the colored symbol next to the layer you want to change. The Legend Properties dialog box is displayed.
GIS Module V2.0
Page 33 9/17/2013, 1:38 PM
GIS V2.0 (9.0.38) True Automation, Inc.
2. Select the following options as needed:
To change the symbol/layer color, click the color swatch next to the Symbol Color field, and select the desired color.
To make a layer transparent, change the numerical value next to Symbol Opacity. This will change the opacity of the symbol's color.
To adjust the outline width of a layer, change the numerical value of the width next to the Outline Width field. This will change the width of the outline (border around polygons).
To change the outline color of a layer, click the color swatch next to Outline Color field, and then select a new color. This will change the color of the outline (polygon border).
3. Click Done.
Renaming Map Layers and Symbols
Purpose
Use this procedure to rename map layers and map symbols. There are multiple ways to rename the map layer.
Procedures
I. Renaming the layer from the right click TOC menu
1. Right click on the name of the layer you want to change.
2. Select Rename Layer.
3. Type in the new name of the layer.
4. Click on another label's name to save the changes.
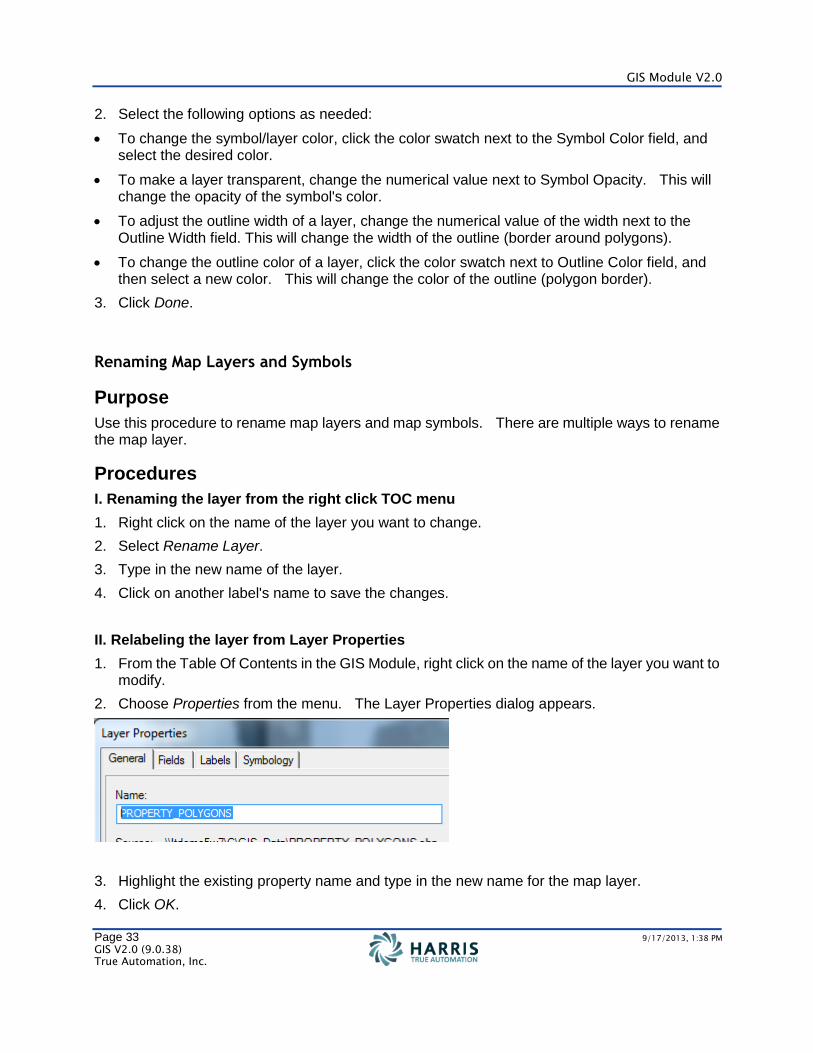
II. Relabeling the layer from Layer Properties
1. From the Table Of Contents in the GIS Module, right click on the name of the layer you want to modify.
2. Choose Properties from the menu. The Layer Properties dialog appears.
3. Highlight the existing property name and type in the new name for the map layer.
4. Click OK.

Contents
Page 34 9/17/2013, 1:38 PM
GIS V2.0 (9.0.38) True Automation, Inc.
Setting up Geoprocessing
Use the following procedures to set up Spatial Analysis, also called Geoprocessing. Spatial Analysis gives the user the following functionality:
Buffer allows the user to input a certain distance to create a buffer around input features to a specified distance.
Clip allows the user to extract input features that overlay the clip features.
Intersect allows the user to show only layer information for selected properties.
Union allows the user to combine two layers together.
Note Geoprocessing functionality is only available in GIS Analyst. For more information, contact True Automation.
Buffer
Purpose
Use this procedure to input a certain distance to create a buffer around input features to a specified distance.
Note This feature is only available in GIS Analyst. For more information, contact True Automation.
Below is a visual explanation of how this works:
GIS Module V2.0
Page 35 9/17/2013, 1:38 PM
GIS V2.0 (9.0.38) True Automation, Inc.
Procedure
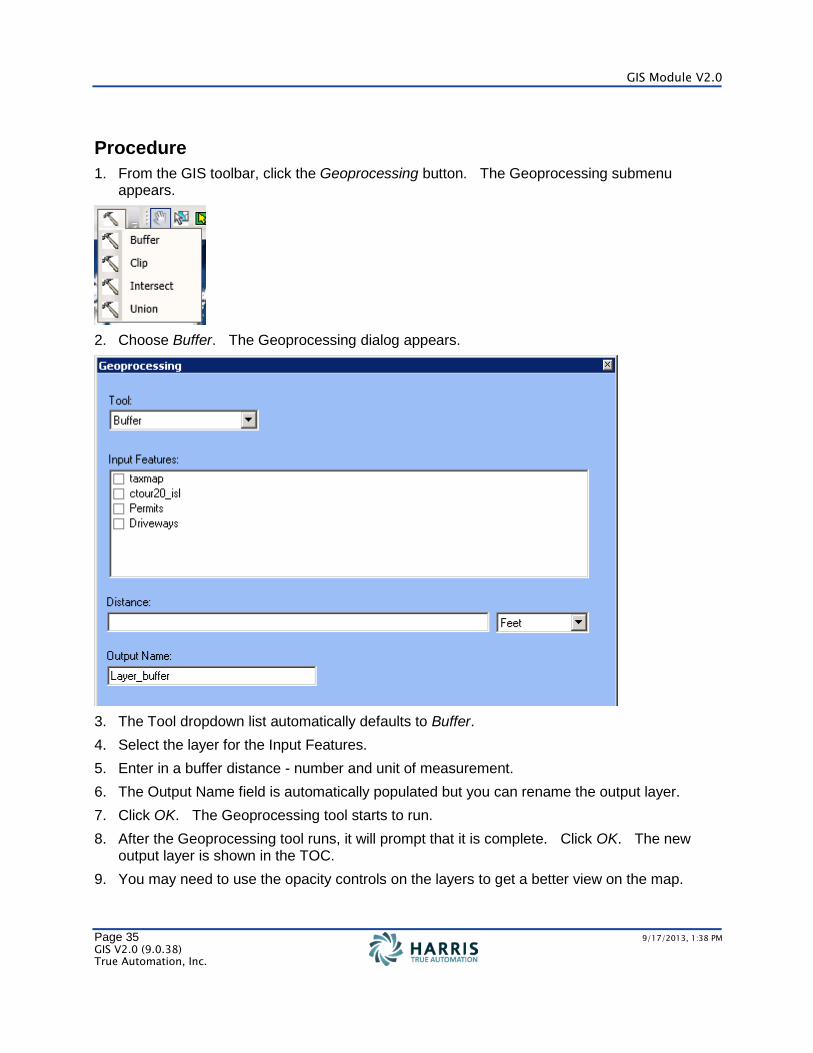
1. From the GIS toolbar, click the Geoprocessing button. The Geoprocessing submenu appears.
2. Choose Buffer. The Geoprocessing dialog appears.
3. The Tool dropdown list automatically defaults to Buffer.
4. Select the layer for the Input Features.
5. Enter in a buffer distance - number and unit of measurement.
6. The Output Name field is automatically populated but you can rename the output layer.
7. Click OK. The Geoprocessing tool starts to run.
8. After the Geoprocessing tool runs, it will prompt that it is complete. Click OK. The new output layer is shown in the TOC.
9. You may need to use the opacity controls on the layers to get a better view on the map.
Contents
Page 36 9/17/2013, 1:38 PM
GIS V2.0 (9.0.38) True Automation, Inc.
Clip
Purpose
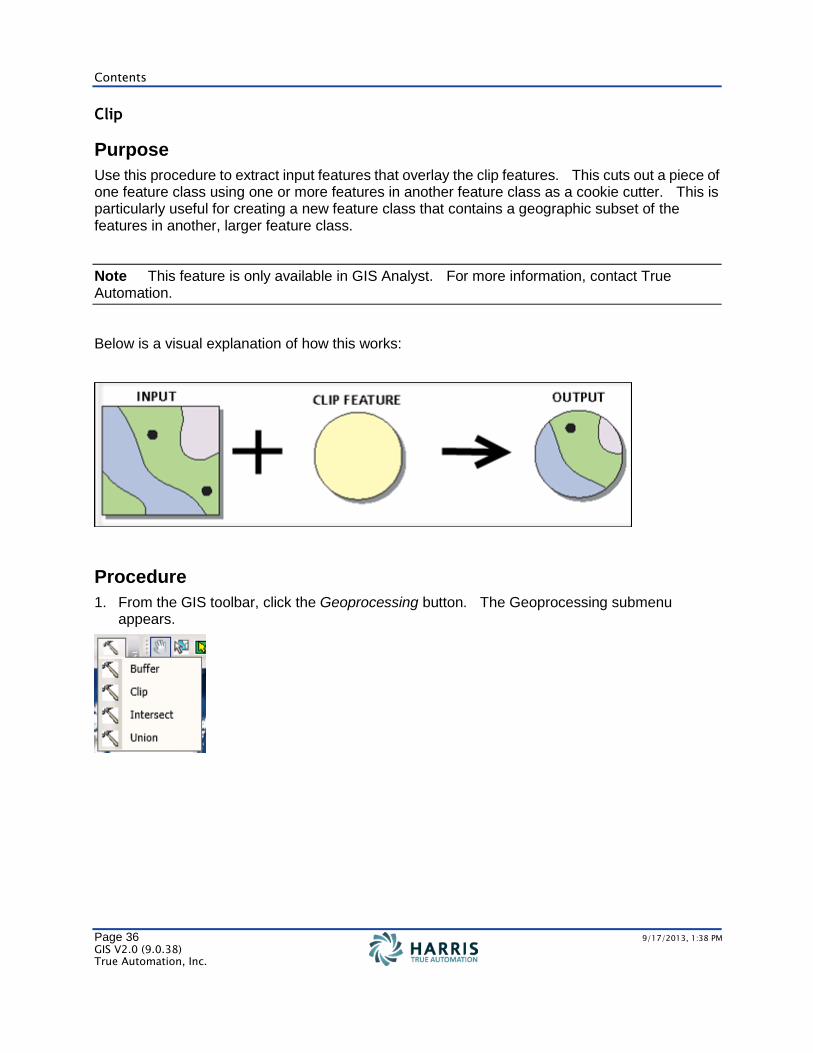
Use this procedure to extract input features that overlay the clip features. This cuts out a piece of one feature class using one or more features in another feature class as a cookie cutter. This is particularly useful for creating a new feature class that contains a geographic subset of the features in another, larger feature class.
Note This feature is only available in GIS Analyst. For more information, contact True Automation.
Below is a visual explanation of how this works:
Procedure
1. From the GIS toolbar, click the Geoprocessing button. The Geoprocessing submenu appears.
GIS Module V2.0
Page 37 9/17/2013, 1:38 PM
GIS V2.0 (9.0.38) True Automation, Inc.
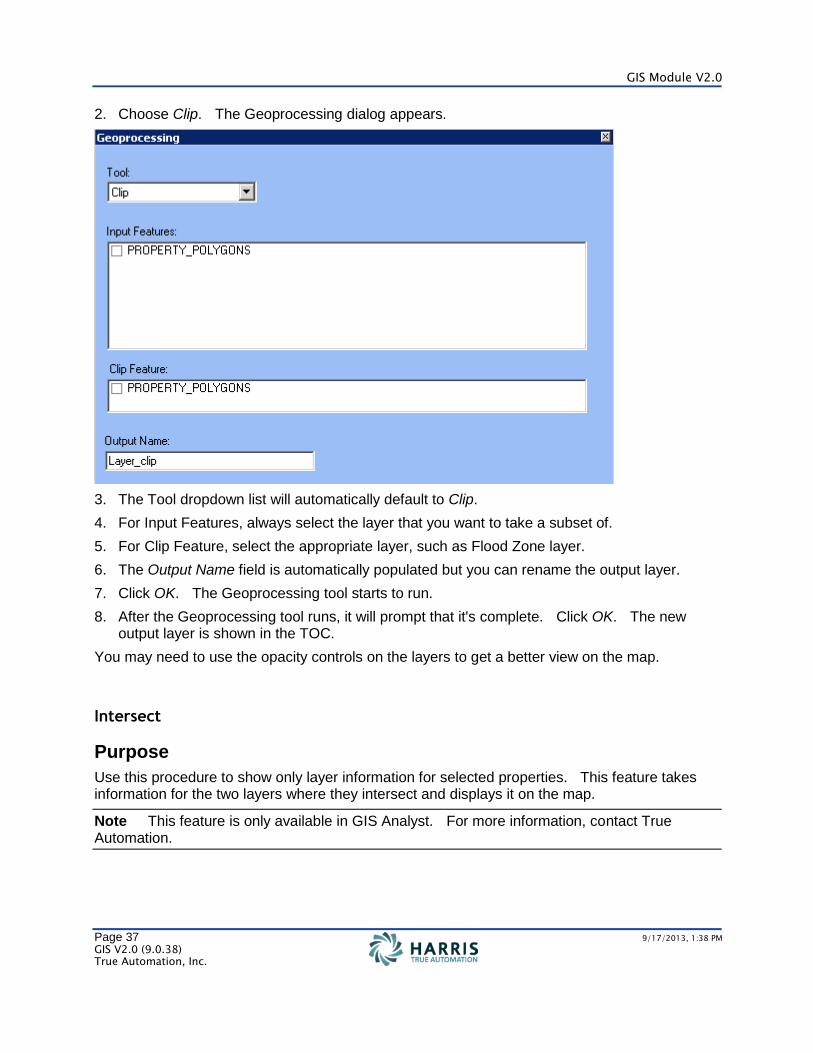
2. Choose Clip. The Geoprocessing dialog appears.
3. The Tool dropdown list will automatically default to Clip.
4. For Input Features, always select the layer that you want to take a subset of.
5. For Clip Feature, select the appropriate layer, such as Flood Zone layer.
6. The Output Name field is automatically populated but you can rename the output layer.
7. Click OK. The Geoprocessing tool starts to run.
8. After the Geoprocessing tool runs, it will prompt that it's complete. Click OK. The new output layer is shown in the TOC.
You may need to use the opacity controls on the layers to get a better view on the map.
Intersect
Purpose
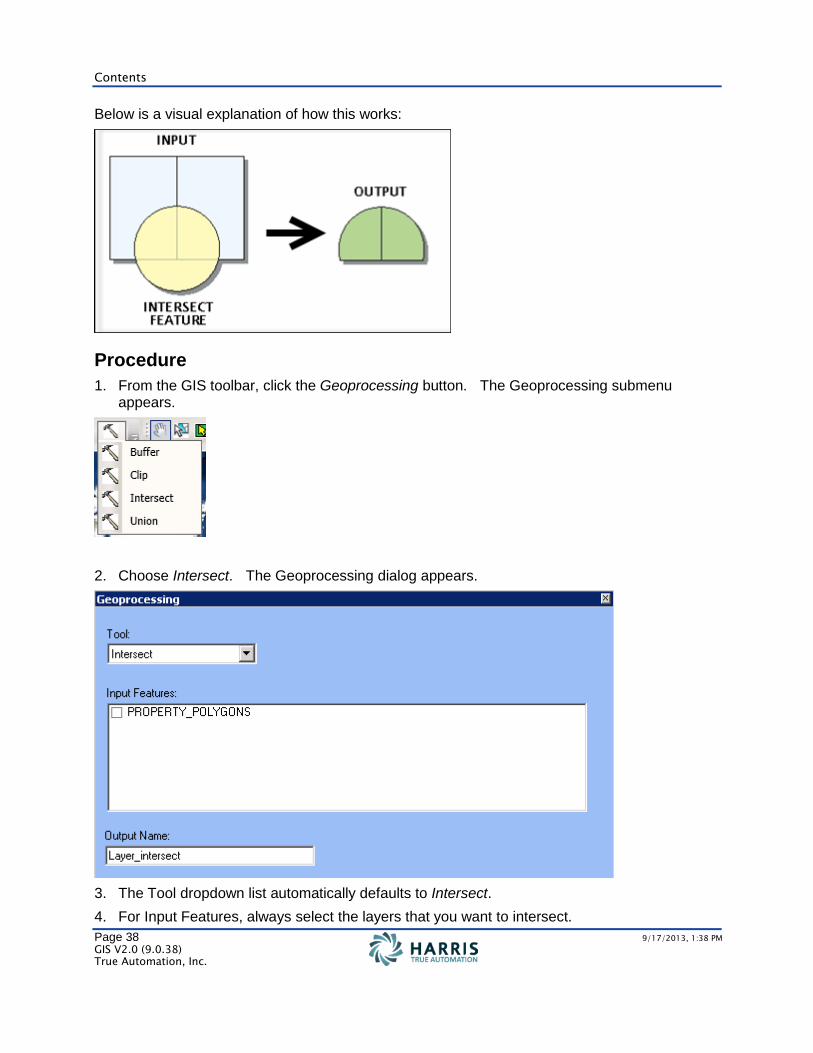
Use this procedure to show only layer information for selected properties. This feature takes information for the two layers where they intersect and displays it on the map.
Note This feature is only available in GIS Analyst. For more information, contact True Automation.
Contents
Page 38 9/17/2013, 1:38 PM
GIS V2.0 (9.0.38) True Automation, Inc.
Below is a visual explanation of how this works:
Procedure
1. From the GIS toolbar, click the Geoprocessing button. The Geoprocessing submenu appears.
2. Choose Intersect. The Geoprocessing dialog appears.
3. The Tool dropdown list automatically defaults to Intersect.
4. For Input Features, always select the layers that you want to intersect.
GIS Module V2.0
Page 39 9/17/2013, 1:38 PM
GIS V2.0 (9.0.38) True Automation, Inc.
5. The Output Name field is automatically populated but you can rename the output layer.
6. Click OK. The Geoprocessing tool starts to run.
7. After the Geoprocessing tool runs, it will prompt that it's complete. Click OK. The new output layer is shown in the TOC.
You may need to use the opacity controls on the layers to get a better view on the map.
Union
Purpose
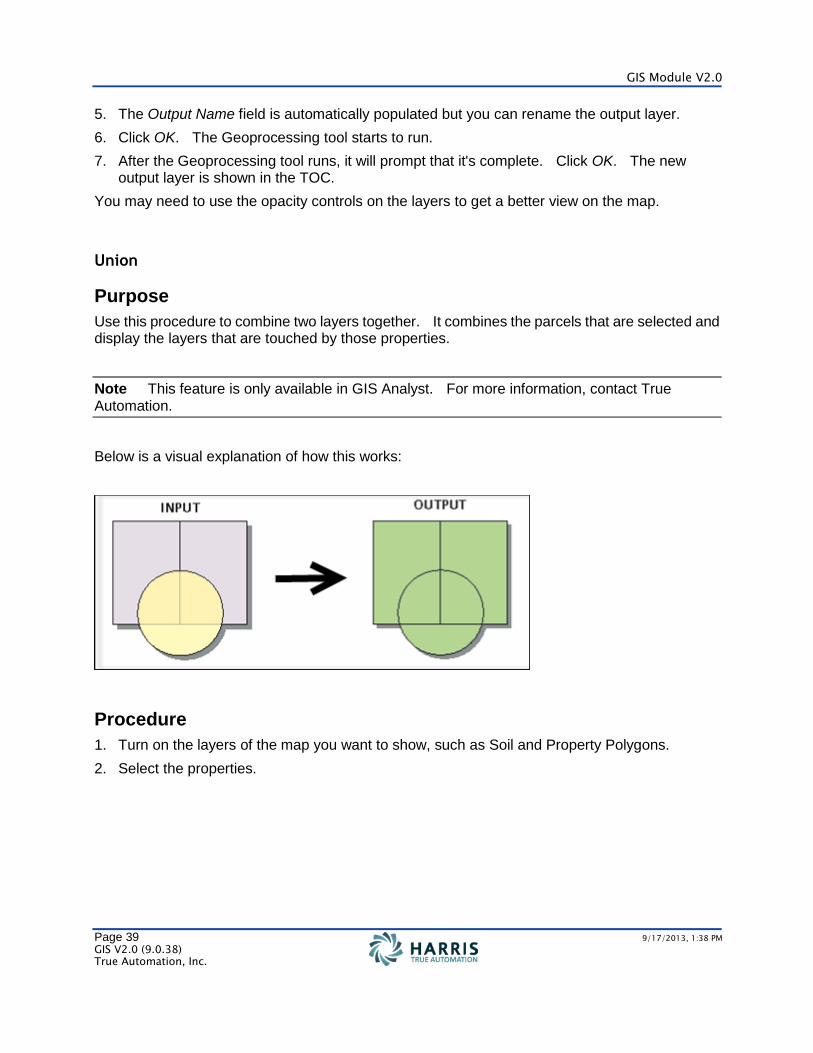
Use this procedure to combine two layers together. It combines the parcels that are selected and display the layers that are touched by those properties.
Note This feature is only available in GIS Analyst. For more information, contact True Automation.
Below is a visual explanation of how this works:
Procedure
1. Turn on the layers of the map you want to show, such as Soil and Property Polygons.
2. Select the properties.
Contents
Page 40 9/17/2013, 1:38 PM
GIS V2.0 (9.0.38) True Automation, Inc.
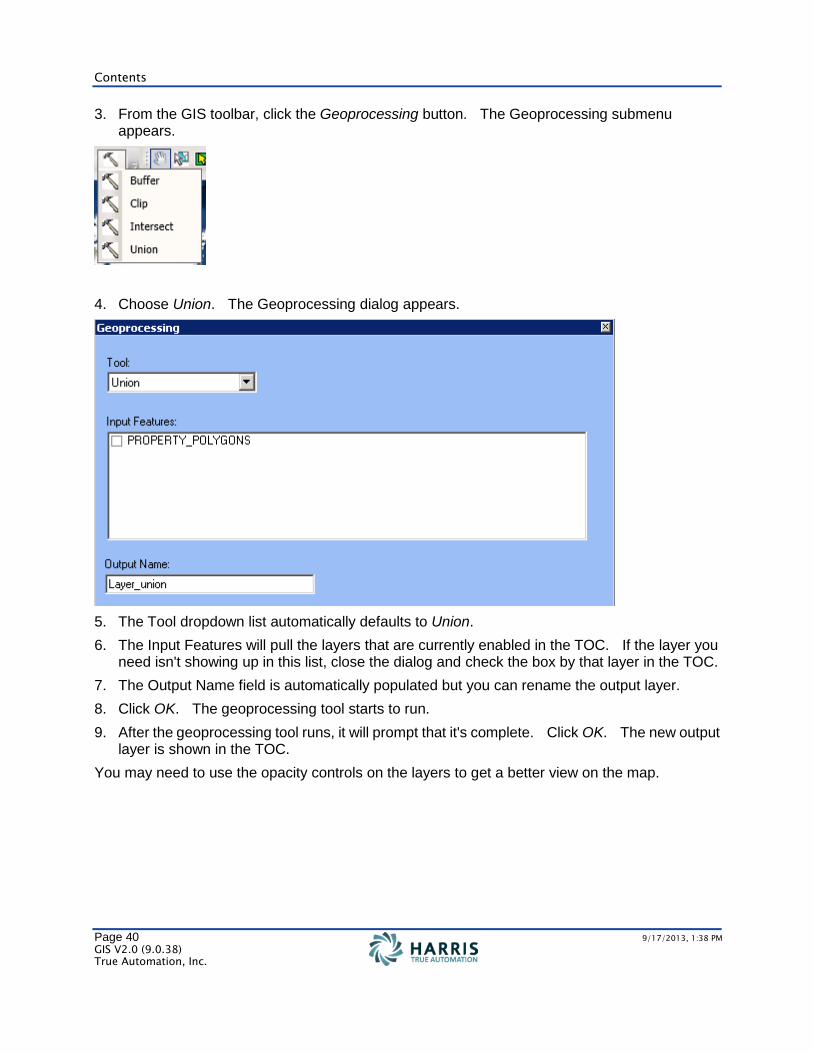
3. From the GIS toolbar, click the Geoprocessing button. The Geoprocessing submenu appears.
4. Choose Union. The Geoprocessing dialog appears.
5. The Tool dropdown list automatically defaults to Union.
6. The Input Features will pull the layers that are currently enabled in the TOC. If the layer you need isn't showing up in this list, close the dialog and check the box by that layer in the TOC.
7. The Output Name field is automatically populated but you can rename the output layer.
8. Click OK. The geoprocessing tool starts to run.
9. After the geoprocessing tool runs, it will prompt that it's complete. Click OK. The new output layer is shown in the TOC.
You may need to use the opacity controls on the layers to get a better view on the map.
GIS Module V2.0
Page 41 9/17/2013, 1:38 PM
GIS V2.0 (9.0.38) True Automation, Inc.
Setting up Symbology
Use the following procedures to manipulate Simple and Advanced Symbology.
Simple Symbology: Features
Purpose
Use this procedure to change the symbol and label properties.
Procedure
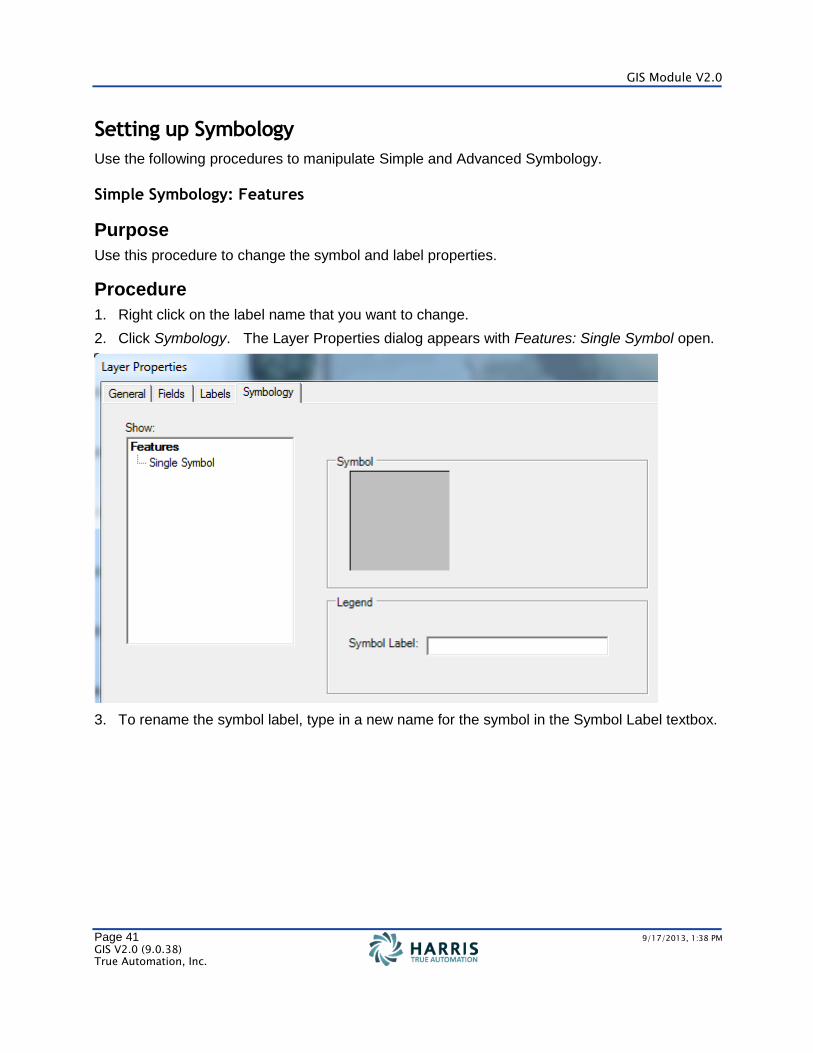
1. Right click on the label name that you want to change.
2. Click Symbology. The Layer Properties dialog appears with Features: Single Symbol open.
3. To rename the symbol label, type in a new name for the symbol in the Symbol Label textbox.
Contents
Page 42 9/17/2013, 1:38 PM
GIS V2.0 (9.0.38) True Automation, Inc.
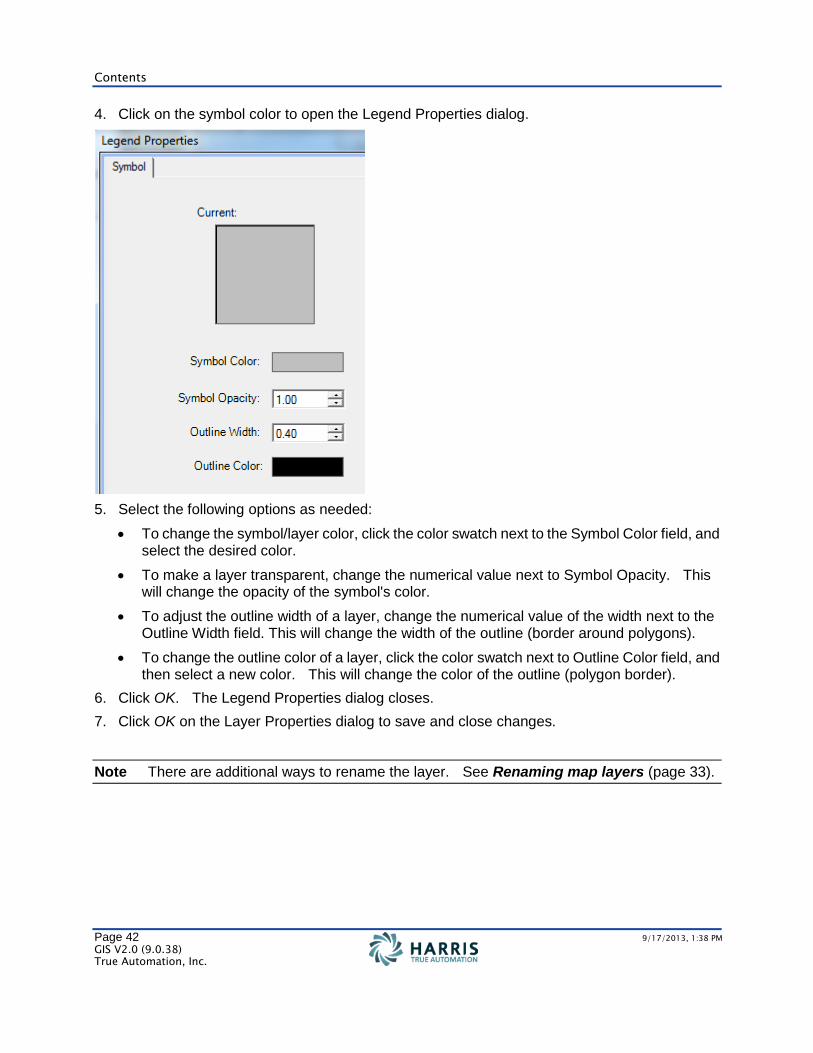
4. Click on the symbol color to open the Legend Properties dialog.
5. Select the following options as needed:
To change the symbol/layer color, click the color swatch next to the Symbol Color field, and select the desired color.
To make a layer transparent, change the numerical value next to Symbol Opacity. This will change the opacity of the symbol's color.
To adjust the outline width of a layer, change the numerical value of the width next to the Outline Width field. This will change the width of the outline (border around polygons).
To change the outline color of a layer, click the color swatch next to Outline Color field, and then select a new color. This will change the color of the outline (polygon border).
6. Click OK. The Legend Properties dialog closes.
7. Click OK on the Layer Properties dialog to save and close changes.
Note There are additional ways to rename the layer. See Renaming map layers (page 33).
GIS Module V2.0
Page 43 9/17/2013, 1:38 PM
GIS V2.0 (9.0.38) True Automation, Inc.
Advanced Symbology: Categories
Purpose
Use this procedure to set up a graphical representation of the data contained within a layer. You can symbolize for code driven fields, such as Abstract Subdivision Code, Class Code, Exemptions, etc.
Procedure
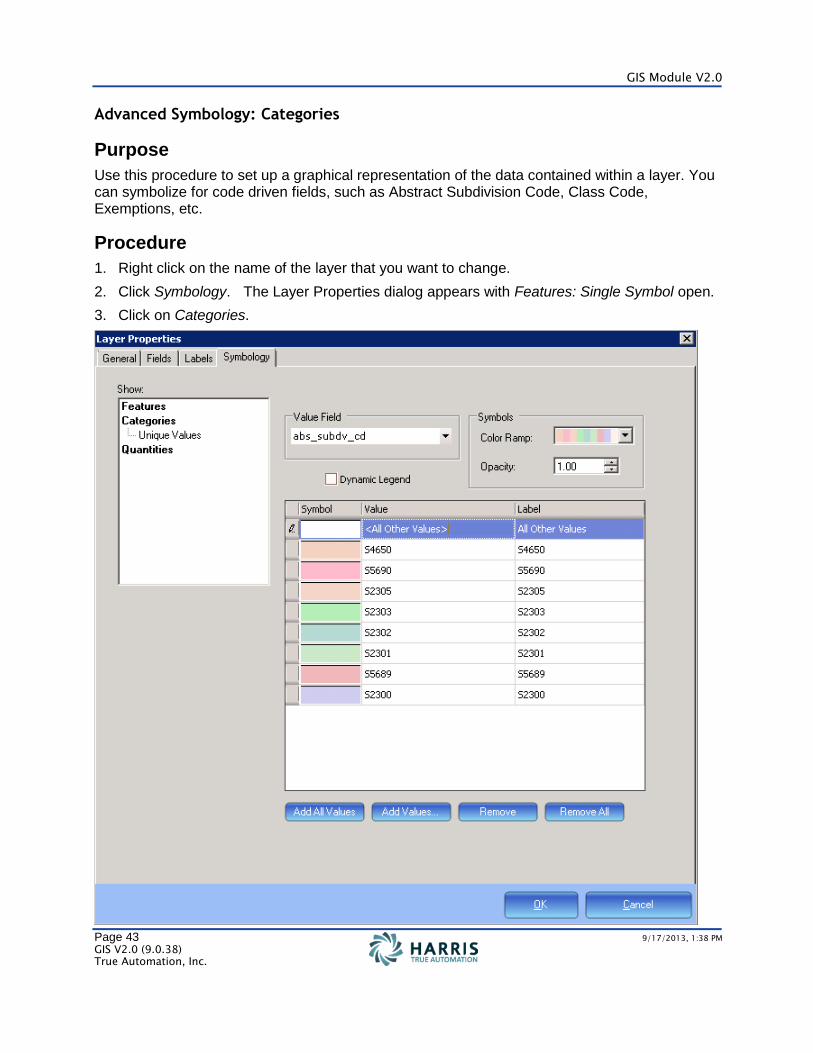
1. Right click on the name of the layer that you want to change.
2. Click Symbology. The Layer Properties dialog appears with Features: Single Symbol open.
3. Click on Categories.
Contents
Page 44 9/17/2013, 1:38 PM
GIS V2.0 (9.0.38) True Automation, Inc.
4. Select a field from the Value Field dropdown list. This allows you to select the field for which you want to apply symbology.
5. A color ramp is already selected. You make choose another color ramp by clicking in the Color Ramp dropdown list. This combo provides various color ramps that can be applied, which will ultimately determine the symbols that are generated.
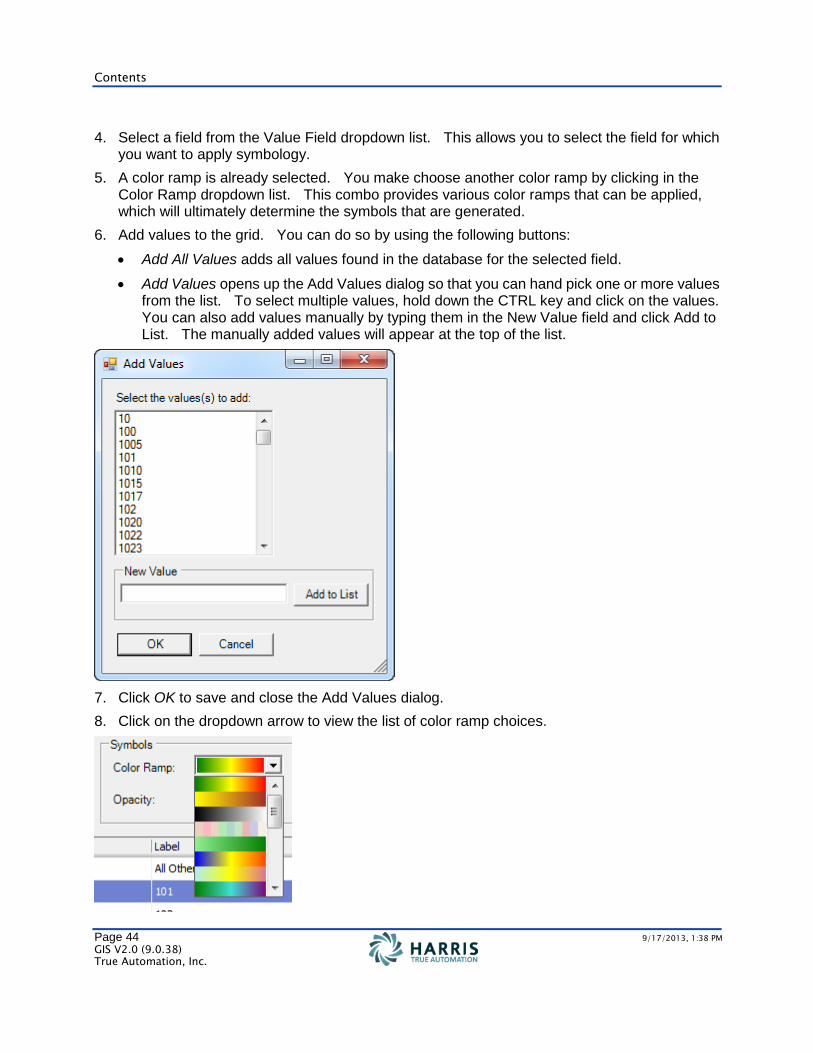
6. Add values to the grid. You can do so by using the following buttons:
Add All Values adds all values found in the database for the selected field.
Add Values opens up the Add Values dialog so that you can hand pick one or more values from the list. To select multiple values, hold down the CTRL key and click on the values. You can also add values manually by typing them in the New Value field and click Add to List. The manually added values will appear at the top of the list.
7. Click OK to save and close the Add Values dialog.
8. Click on the dropdown arrow to view the list of color ramp choices.
GIS Module V2.0
Page 45 9/17/2013, 1:38 PM
GIS V2.0 (9.0.38) True Automation, Inc.
9. Select the color ramp you want to use.
Note Changing the color ramp after the grid has been populated will result in an update of any symbols within the grid that have not been manually overridden by the user.
Optional choices on the Categories dialog:
To change the opacity of the color ramp, click the up or down arrows for that field or type in the number of the opacity, such as 0.3.
To enable dynamic legend support, check the Dynamic Legend checkbox. When checked, only symbols for properties that are currently within the Viewer will appear in the legend.
Note If more than 100 unique values are added, the Dynamic Legend checkbox is checked by default.
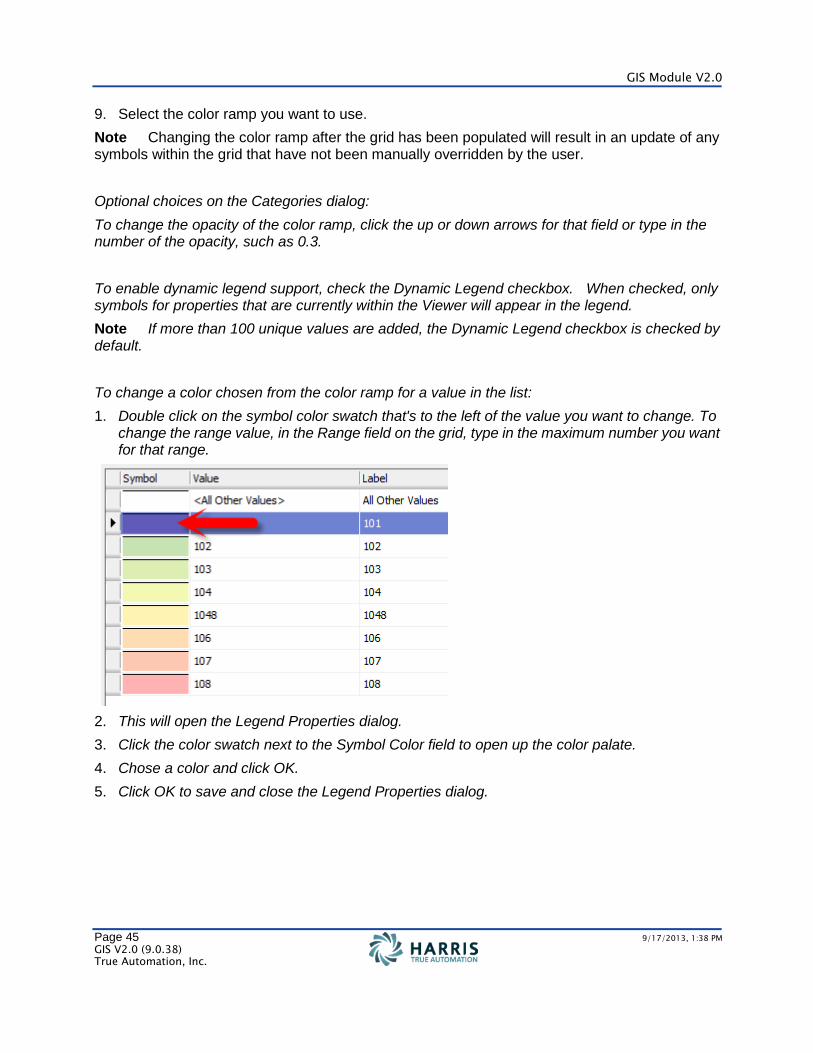
To change a color chosen from the color ramp for a value in the list:
1. Double click on the symbol color swatch that's to the left of the value you want to change. To change the range value, in the Range field on the grid, type in the maximum number you want for that range.
2. This will open the Legend Properties dialog.
3. Click the color swatch next to the Symbol Color field to open up the color palate.
4. Chose a color and click OK.
5. Click OK to save and close the Legend Properties dialog.
Contents
Page 46 9/17/2013, 1:38 PM
GIS V2.0 (9.0.38) True Automation, Inc.
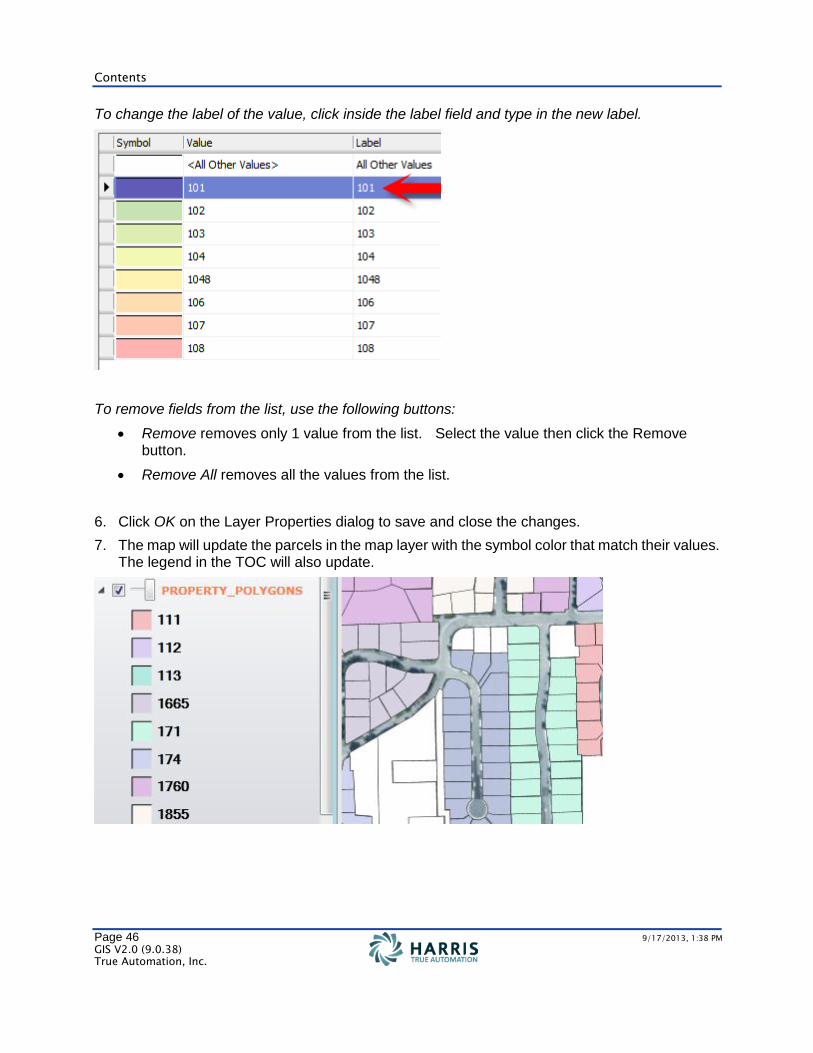
To change the label of the value, click inside the label field and type in the new label.
To remove fields from the list, use the following buttons:
Remove removes only 1 value from the list. Select the value then click the Remove button.
Remove All removes all the values from the list.
6. Click OK on the Layer Properties dialog to save and close the changes.
7. The map will update the parcels in the map layer with the symbol color that match their values. The legend in the TOC will also update.

GIS Module V2.0
Page 47 9/17/2013, 1:38 PM
GIS V2.0 (9.0.38) True Automation, Inc.
To save advanced symbology on a map layer:
1. Click the Save Map button on the toolbar.
To remove advanced symbology from a map layer:
1. Right click on the map layer and choose Symbology.
2. Click on Features.
3. Click on the Symbol color and again on it from the Legend Properties dialog that appears.
4. Select a color from the color palate.
5. Click OK > OK > OK.
6. The map layer will appear with the new symbol color.
Advanced Symbology: Quantities
Purpose
Use this procedure to symbolize for values and quantities, such as Sales Ratio. It's a way to display features sharing a common range of numeric field values with a common color symbol.
Procedure
1. Right click on the name of the layer that you want to change the symbology.
2. Click Symbology. The Layer Properties dialog appears with Features: Single Symbol open.
3. Click on Quantities.
4. Select a field from the Value field dropdown list, such as Sales Ratio or Market Value.
5. Next to Classes, select how many breaks you want for the values.
Contents
Page 48 9/17/2013, 1:38 PM
GIS V2.0 (9.0.38) True Automation, Inc.
6. A color ramp is already selected. You make choose another color ramp by clicking in the Color Ramp dropdown list. This combo provides various color ramps that can be applied, which will ultimately determine the symbols that are generated.
Optional features on the Quantities dialog:
To enter in a normalization field, select a field from the Normalization field dropdown list. This will change the breaks in values to breaks in percentages.
To change the opacity of the color ramp, click the up or down arrows for that field or type in the number of the opacity, such as 0.3.
To enable dynamic legend support, check the Dynamic Legend checkbox. When checked, only symbols for properties that are currently within the Viewer will appear in the legend.
Note If more than 100 unique values are added, the Dynamic Legend checkbox is checked by default.
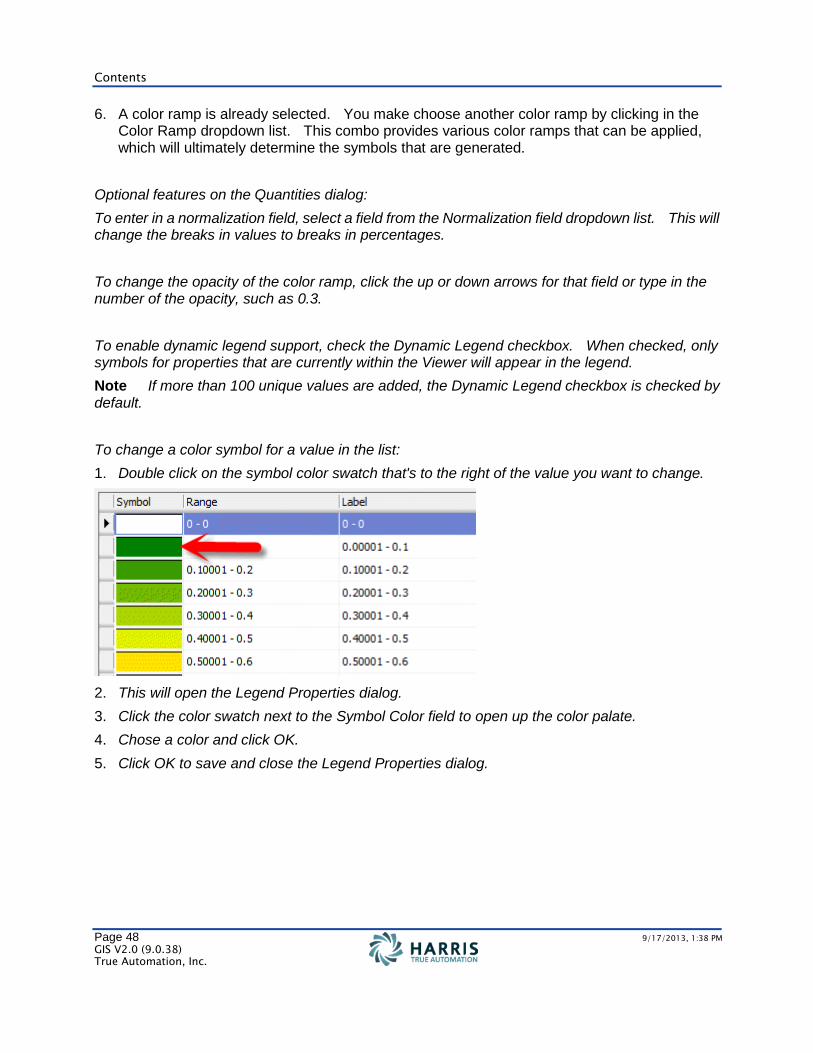
To change a color symbol for a value in the list:
1. Double click on the symbol color swatch that's to the right of the value you want to change.
2. This will open the Legend Properties dialog.
3. Click the color swatch next to the Symbol Color field to open up the color palate.
4. Chose a color and click OK.
5. Click OK to save and close the Legend Properties dialog.
GIS Module V2.0
Page 49 9/17/2013, 1:38 PM
GIS V2.0 (9.0.38) True Automation, Inc.
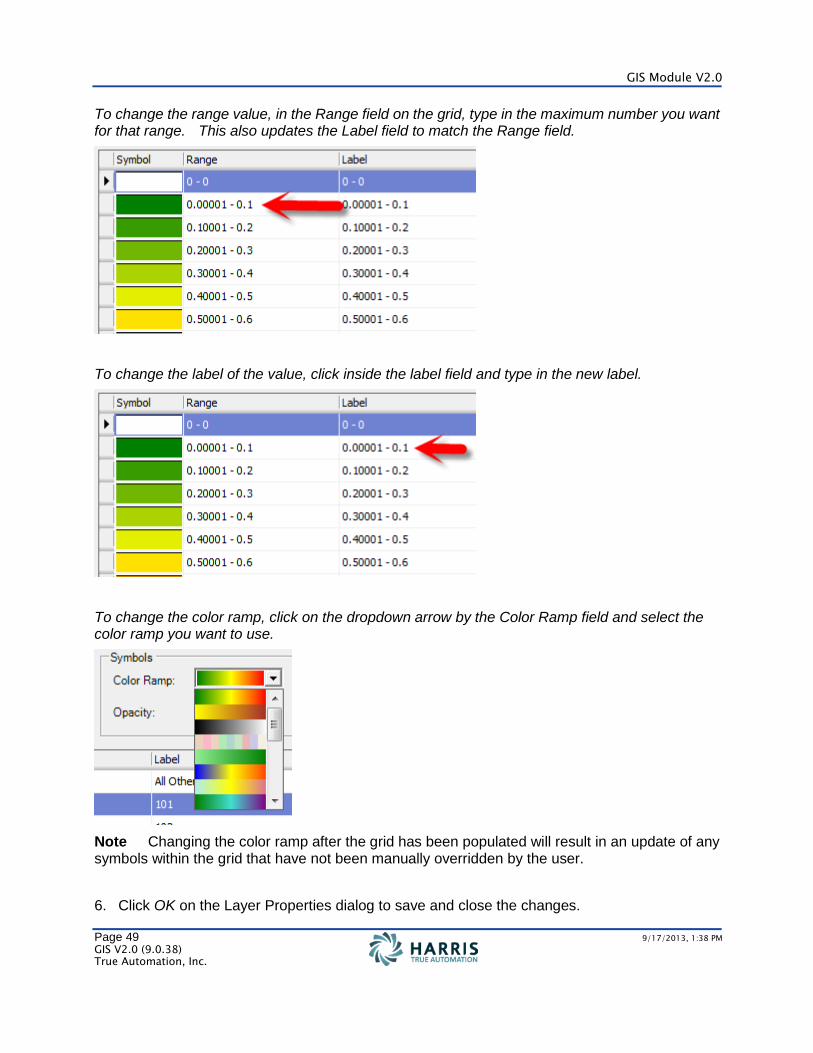
To change the range value, in the Range field on the grid, type in the maximum number you want for that range. This also updates the Label field to match the Range field.
To change the label of the value, click inside the label field and type in the new label.
To change the color ramp, click on the dropdown arrow by the Color Ramp field and select the color ramp you want to use.
Note Changing the color ramp after the grid has been populated will result in an update of any symbols within the grid that have not been manually overridden by the user.
6. Click OK on the Layer Properties dialog to save and close the changes.
Contents
Page 50 9/17/2013, 1:38 PM
GIS V2.0 (9.0.38) True Automation, Inc.
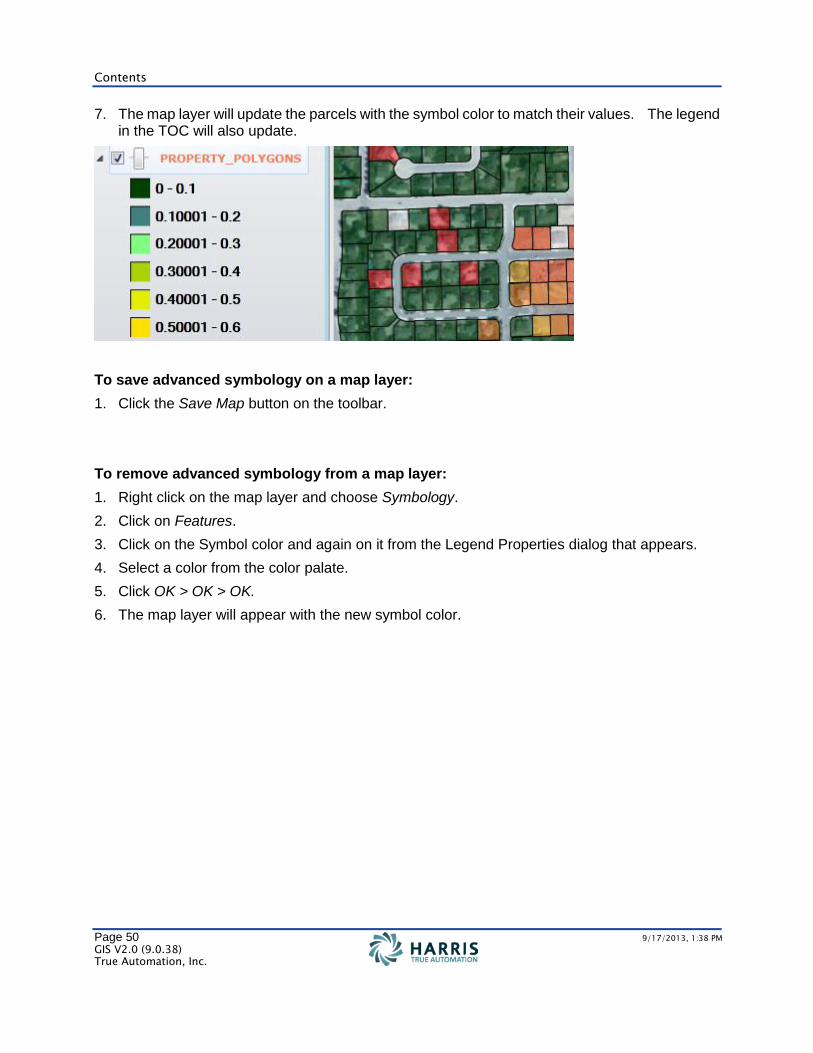
7. The map layer will update the parcels with the symbol color to match their values. The legend in the TOC will also update.
To save advanced symbology on a map layer:
1. Click the Save Map button on the toolbar.
To remove advanced symbology from a map layer:
1. Right click on the map layer and choose Symbology.
2. Click on Features.
3. Click on the Symbol color and again on it from the Legend Properties dialog that appears.
4. Select a color from the color palate.
5. Click OK > OK > OK.
6. The map layer will appear with the new symbol color.

GIS Module V2.0
Page 51 9/17/2013, 1:38 PM
GIS V2.0 (9.0.38) True Automation, Inc.
Managing Map Layers and Creating New Group Layers
Use the following procedures to Manage Layers and create a New Group Layer from the TOC Toolbar Menu.
Managing Layers
Purpose
Use this procedure to change the order of the layers. The first layer listed at the top of the table of contents generally hides the layers that follow it.
Prerequisites
Before beginning, determine the required order of the layers and whether a particular kind of layer will prevent the details of other layers below it from being visible.
For example, a flood zone layer placed on top of a lot line layer prevents lot lines from being visible.
Contents
Page 52 9/17/2013, 1:38 PM
GIS V2.0 (9.0.38) True Automation, Inc.
Procedure
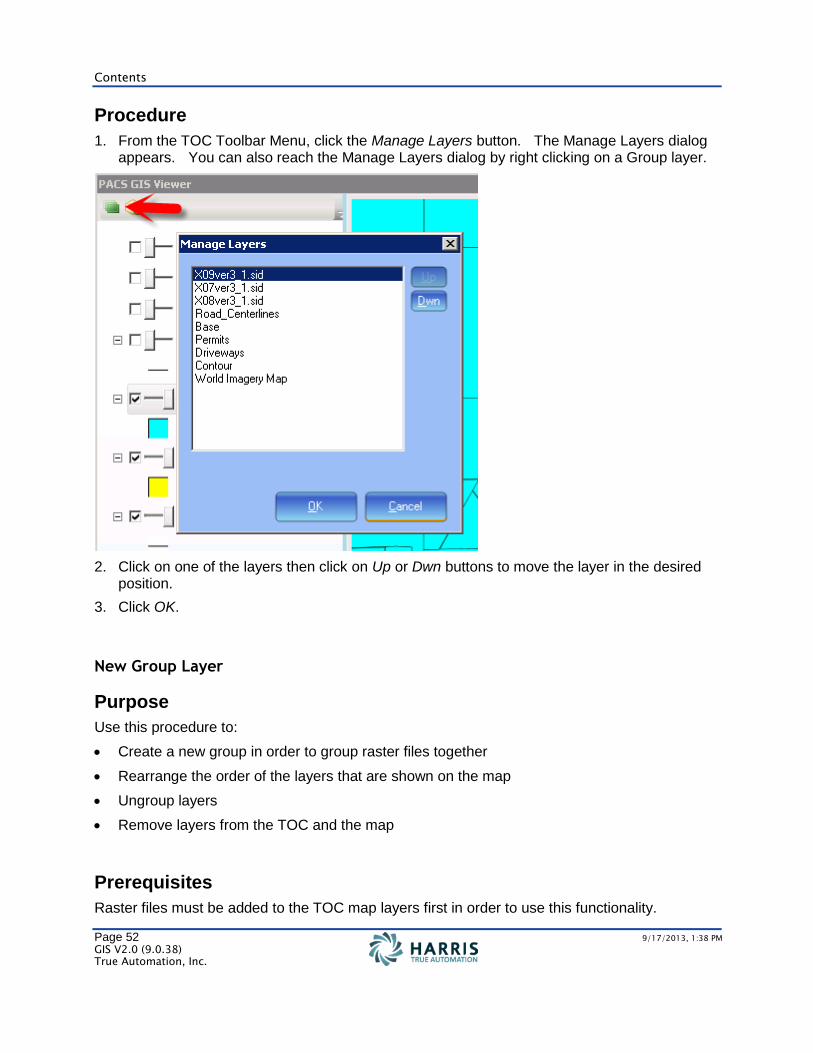
1. From the TOC Toolbar Menu, click the Manage Layers button. The Manage Layers dialog appears. You can also reach the Manage Layers dialog by right clicking on a Group layer.
2. Click on one of the layers then click on Up or Dwn buttons to move the layer in the desired position.
3. Click OK.
New Group Layer
Purpose
Use this procedure to:
Create a new group in order to group raster files together
Rearrange the order of the layers that are shown on the map
Ungroup layers
Remove layers from the TOC and the map
Prerequisites
Raster files must be added to the TOC map layers first in order to use this functionality.
GIS Module V2.0
Page 53 9/17/2013, 1:38 PM
GIS V2.0 (9.0.38) True Automation, Inc.
Procedure
I. Creating a New Group Layer for raster files
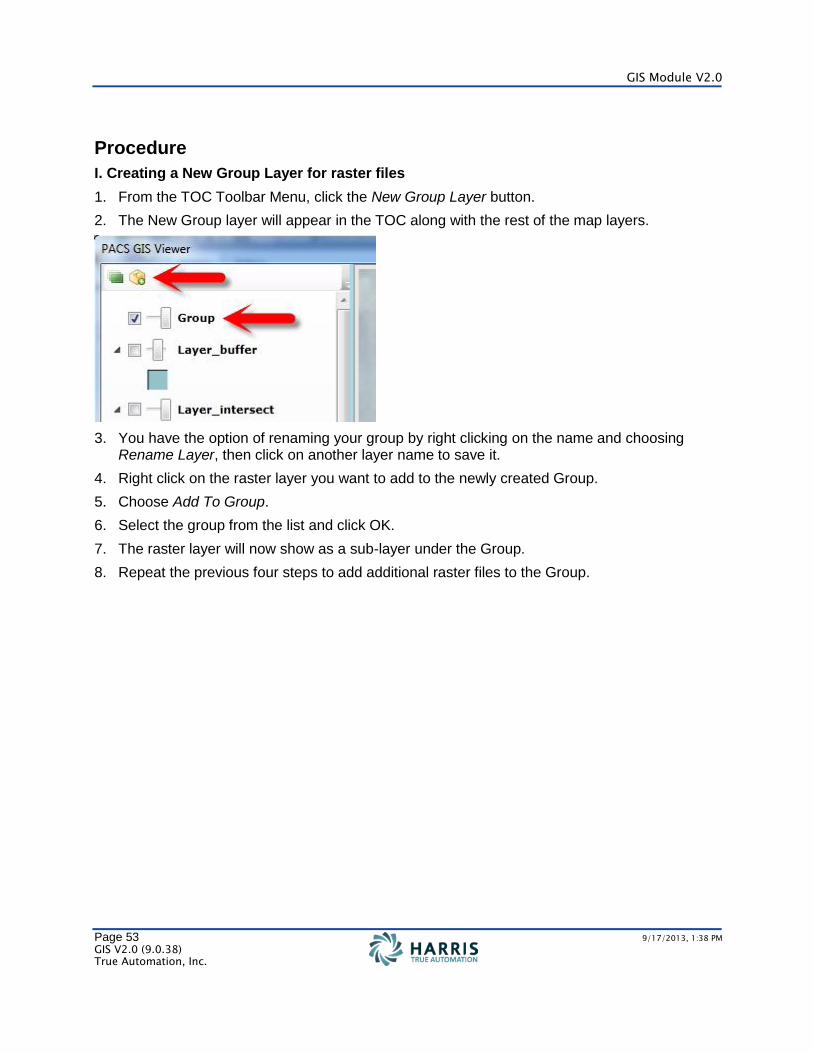
1. From the TOC Toolbar Menu, click the New Group Layer button.
2. The New Group layer will appear in the TOC along with the rest of the map layers.
3. You have the option of renaming your group by right clicking on the name and choosing Rename Layer, then click on another layer name to save it.
4. Right click on the raster layer you want to add to the newly created Group.
5. Choose Add To Group.
6. Select the group from the list and click OK.
7. The raster layer will now show as a sub-layer under the Group.
8. Repeat the previous four steps to add additional raster files to the Group.
Contents
Page 54 9/17/2013, 1:38 PM
GIS V2.0 (9.0.38) True Automation, Inc.
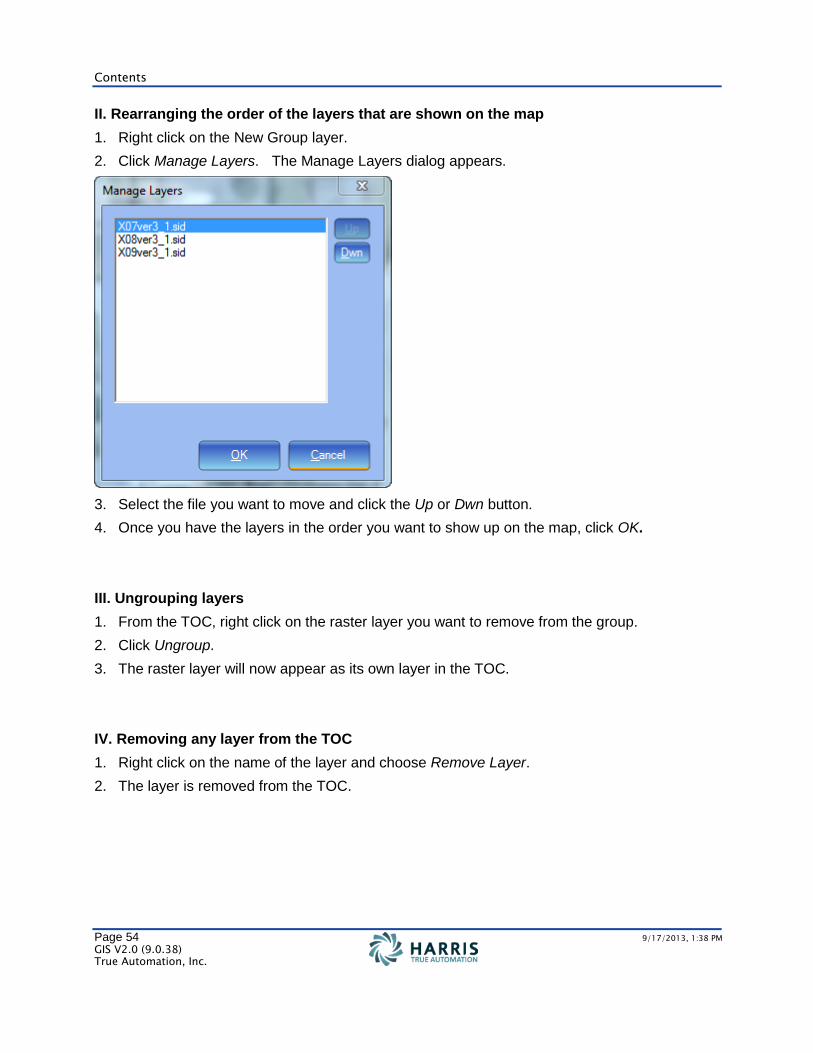
II. Rearranging the order of the layers that are shown on the map
1. Right click on the New Group layer.
2. Click Manage Layers. The Manage Layers dialog appears.
3. Select the file you want to move and click the Up or Dwn button.
4. Once you have the layers in the order you want to show up on the map, click OK.
III. Ungrouping layers
1. From the TOC, right click on the raster layer you want to remove from the group.
2. Click Ungroup.
3. The raster layer will now appear as its own layer in the TOC.
IV. Removing any layer from the TOC
1. Right click on the name of the layer and choose Remove Layer.
2. The layer is removed from the TOC.
GIS Module V2.0
Page 55 9/17/2013, 1:38 PM
GIS V2.0 (9.0.38) True Automation, Inc.
Zooming In/Out
Use the following procedures to zoom in and out of the map. There are multiple ways to do this.
Zooming in and out using the mouse/keyboard
Purpose
Use the following procedures to zoom in and out of the map using the mouse and keyboard.
Procedure
Zooming In
There are multiple ways to zoom in:
While holding the SHIFT key down on your keyboard, drag the mouse to create a box over the area you want to zoom in. Let go of everything and GIS Viewer will zoom into your selection.
Double click on the part of the map that you want to zoom in.
Using the scroll wheel on the mouse, scroll up.
You can also use the Navigation zoom in function.
Zooming Out
There are two ways to zoom out:
Using the scroll wheel on the mouse, scroll down.
You can also use the Navigation zoom out function.
Contents
Page 56 9/17/2013, 1:38 PM
GIS V2.0 (9.0.38) True Automation, Inc.
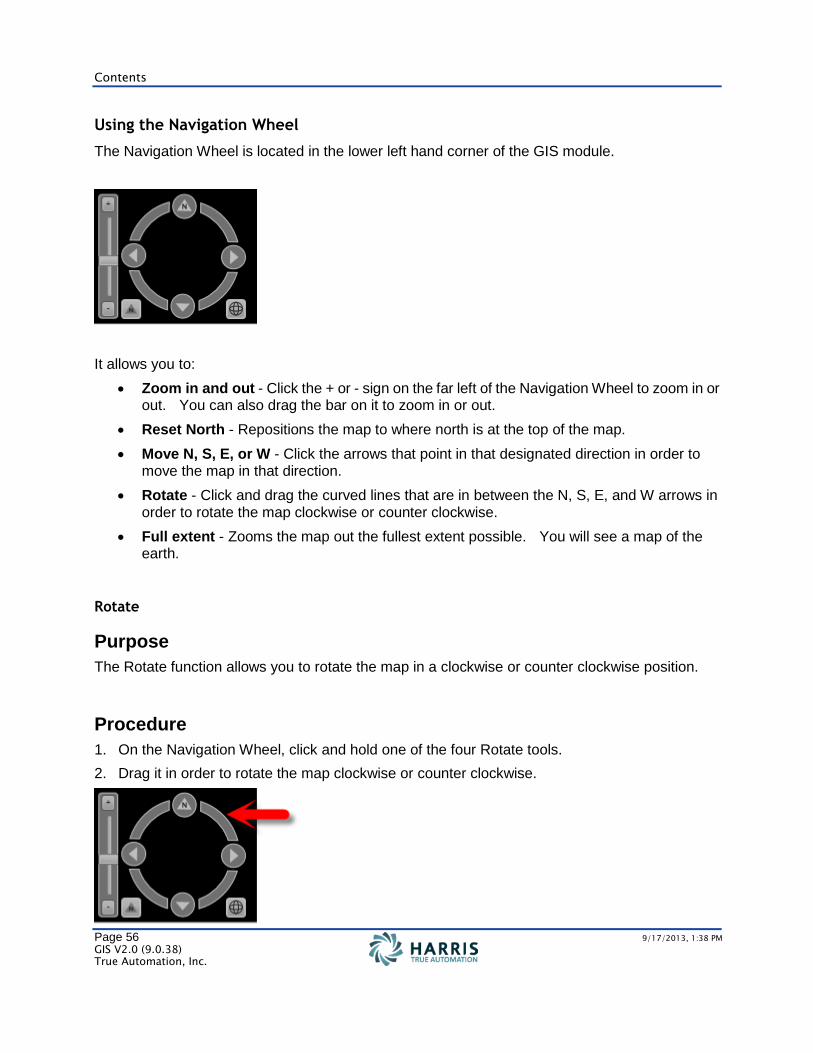
Using the Navigation Wheel
The Navigation Wheel is located in the lower left hand corner of the GIS module.
It allows you to:
Zoom in and out - Click the + or - sign on the far left of the Navigation Wheel to zoom in or out. You can also drag the bar on it to zoom in or out.
Reset North - Repositions the map to where north is at the top of the map.
Move N, S, E, or W - Click the arrows that point in that designated direction in order to move the map in that direction.
Rotate - Click and drag the curved lines that are in between the N, S, E, and W arrows in order to rotate the map clockwise or counter clockwise.
Full extent - Zooms the map out the fullest extent possible. You will see a map of the earth.
Rotate
Purpose
The Rotate function allows you to rotate the map in a clockwise or counter clockwise position.
Procedure
1. On the Navigation Wheel, click and hold one of the four Rotate tools.
2. Drag it in order to rotate the map clockwise or counter clockwise.
GIS Module V2.0
Page 57 9/17/2013, 1:38 PM
GIS V2.0 (9.0.38) True Automation, Inc.
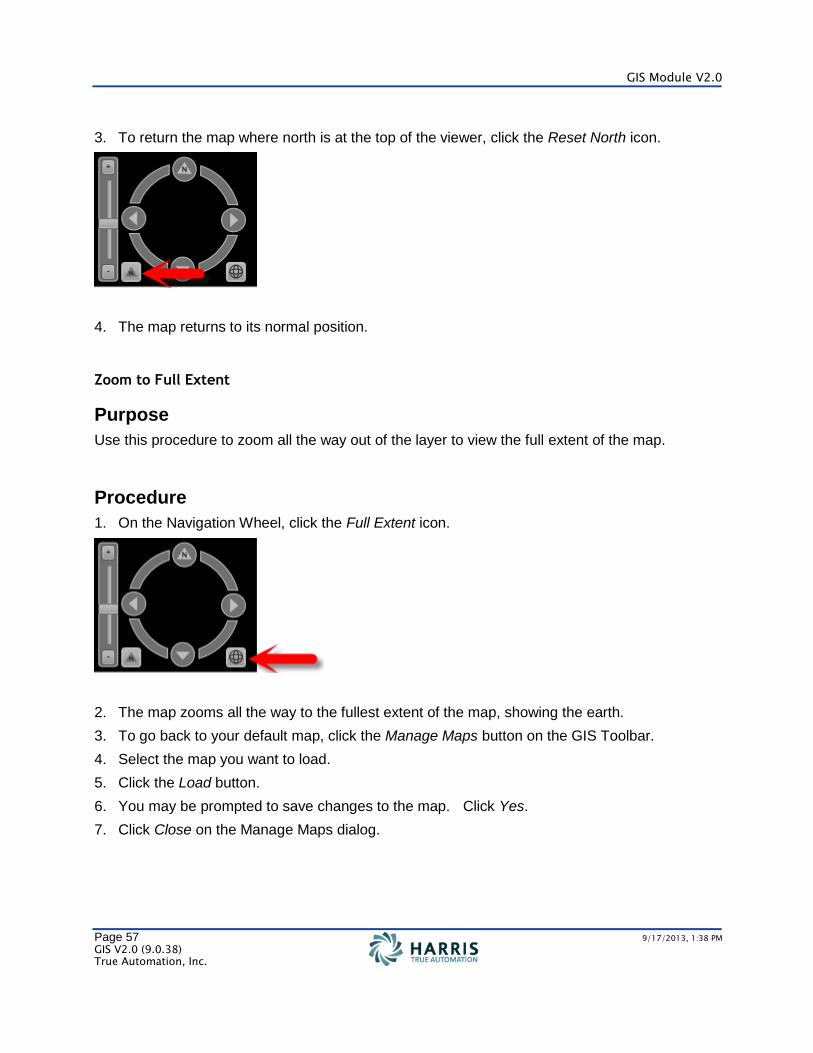
3. To return the map where north is at the top of the viewer, click the Reset North icon.
4. The map returns to its normal position.
Zoom to Full Extent
Purpose
Use this procedure to zoom all the way out of the layer to view the full extent of the map.
Procedure
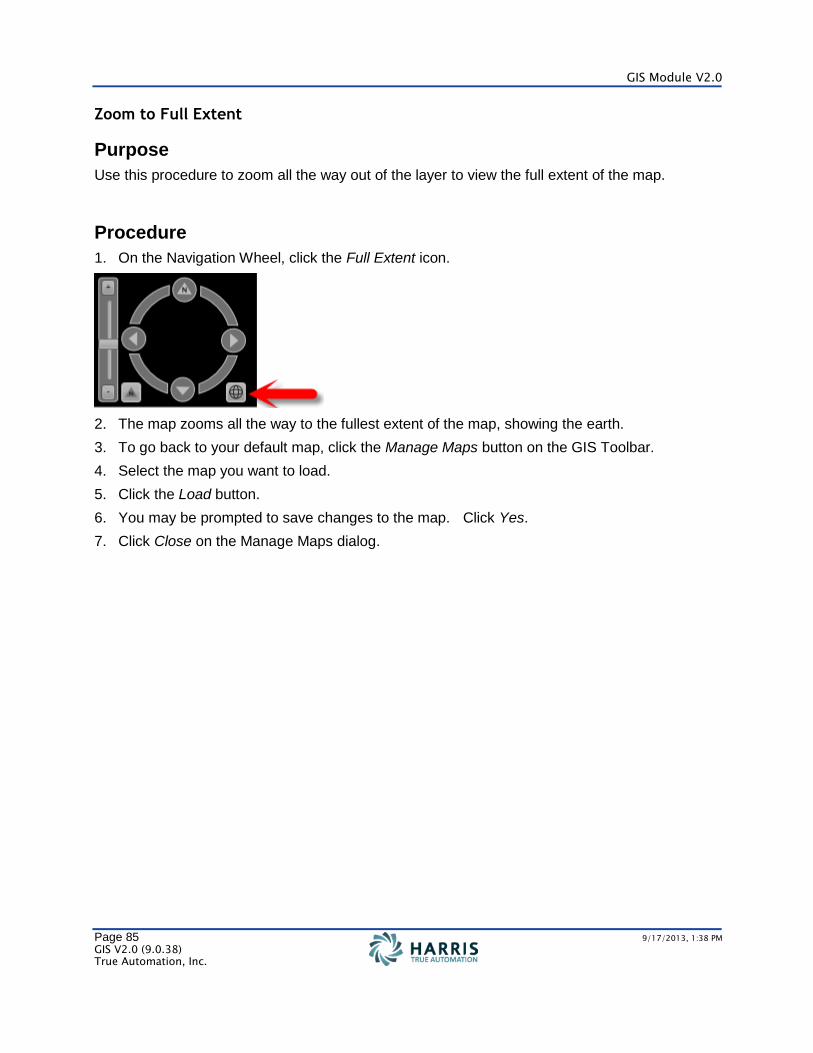
1. On the Navigation Wheel, click the Full Extent icon.
2. The map zooms all the way to the fullest extent of the map, showing the earth.
3. To go back to your default map, click the Manage Maps button on the GIS Toolbar.
4. Select the map you want to load.
5. Click the Load button.
6. You may be prompted to save changes to the map. Click Yes.
7. Click Close on the Manage Maps dialog.
Contents
Page 58 9/17/2013, 1:38 PM
GIS V2.0 (9.0.38) True Automation, Inc.
Printing a Map
Use the following procedures to print a map from the Layout tab in the GIS Viewer.
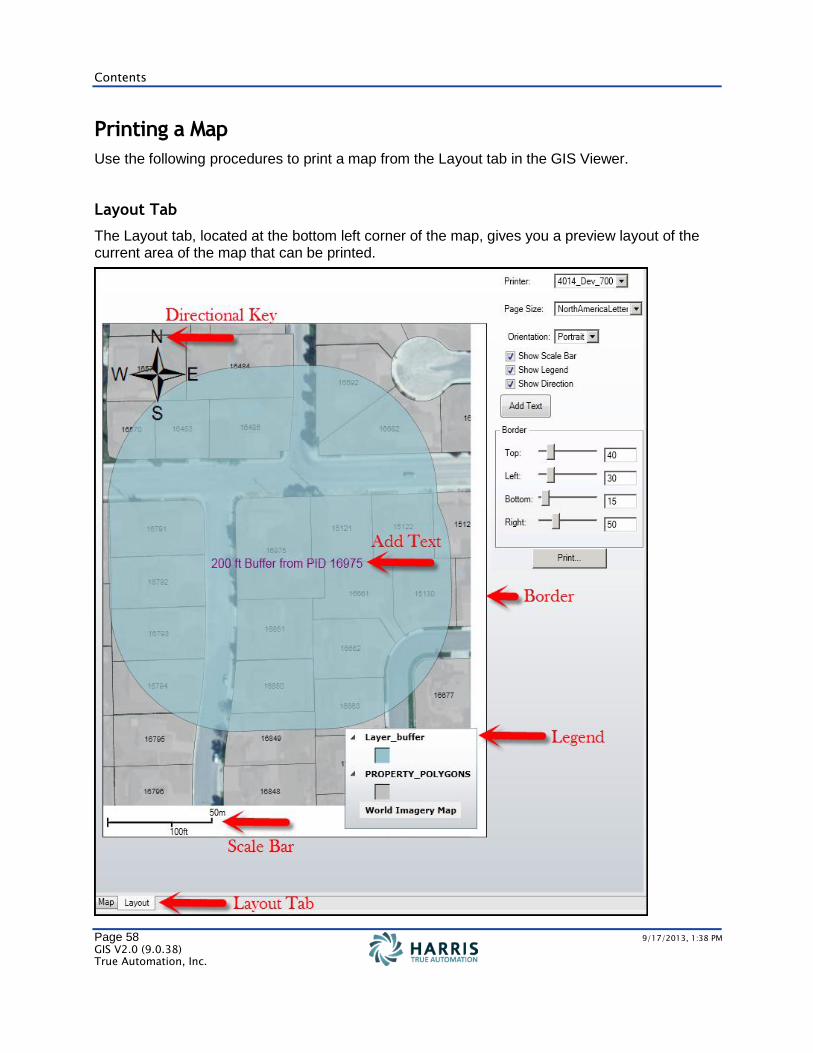
Layout Tab
The Layout tab, located at the bottom left corner of the map, gives you a preview layout of the current area of the map that can be printed.
GIS Module V2.0
Page 59 9/17/2013, 1:38 PM
GIS V2.0 (9.0.38) True Automation, Inc.
The following lists all the features that are available from the Layout tab:
Printer not only allows the user to print to a printer, but now the user can print to a plotter.
Page Size designates the page size from a list of available page sizes that appear in the dropdown list.
Orientation designates the page orientation: portrait or landscape.
Show Scale Bar shows the Scale Bar on the map. You can reposition it anywhere you'd like.
Show Legend shows the Legend on the map. You can reposition it anywhere you'd like.
Show Direction shows the directional key on the map. You can reposition it anywhere you'd like.
Add Text adds text to the map. (Note This feature is only available in GIS Appraiser and GIS Analyst).
Border sets borders on one or more sides of the map.
Print prints the map via the Print button.
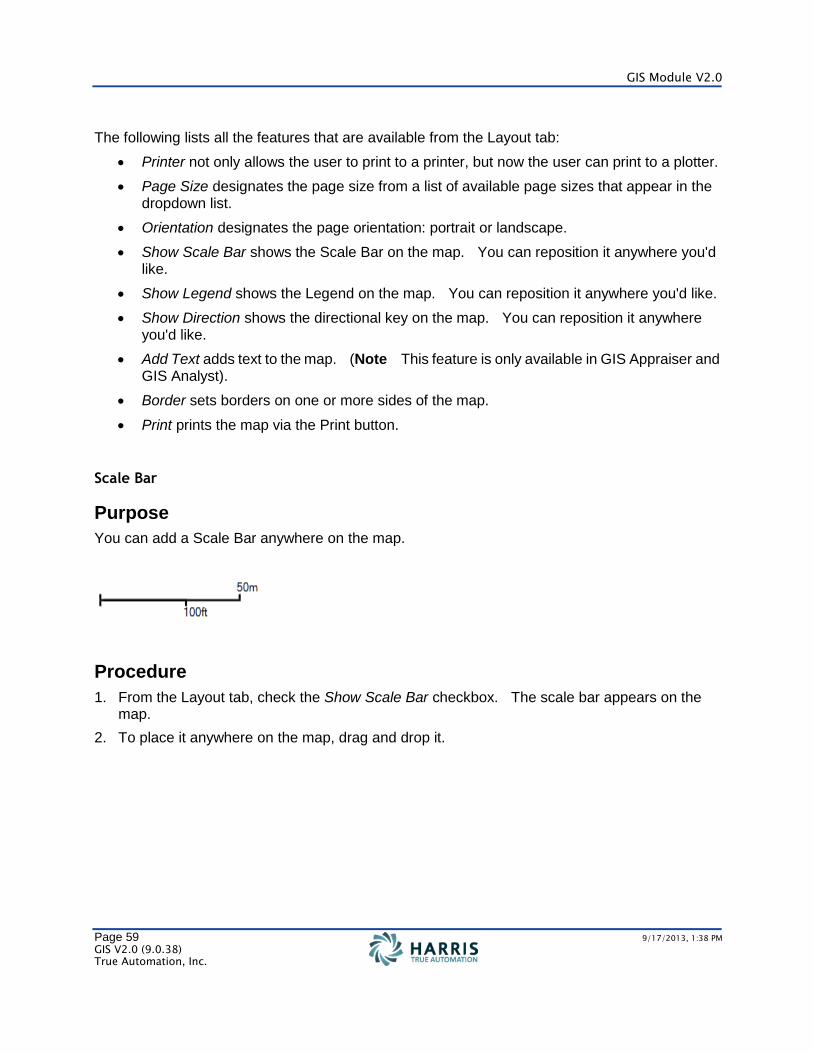
Scale Bar
Purpose
You can add a Scale Bar anywhere on the map.
Procedure
1. From the Layout tab, check the Show Scale Bar checkbox. The scale bar appears on the map.
2. To place it anywhere on the map, drag and drop it.
Contents
Page 60 9/17/2013, 1:38 PM
GIS V2.0 (9.0.38) True Automation, Inc.
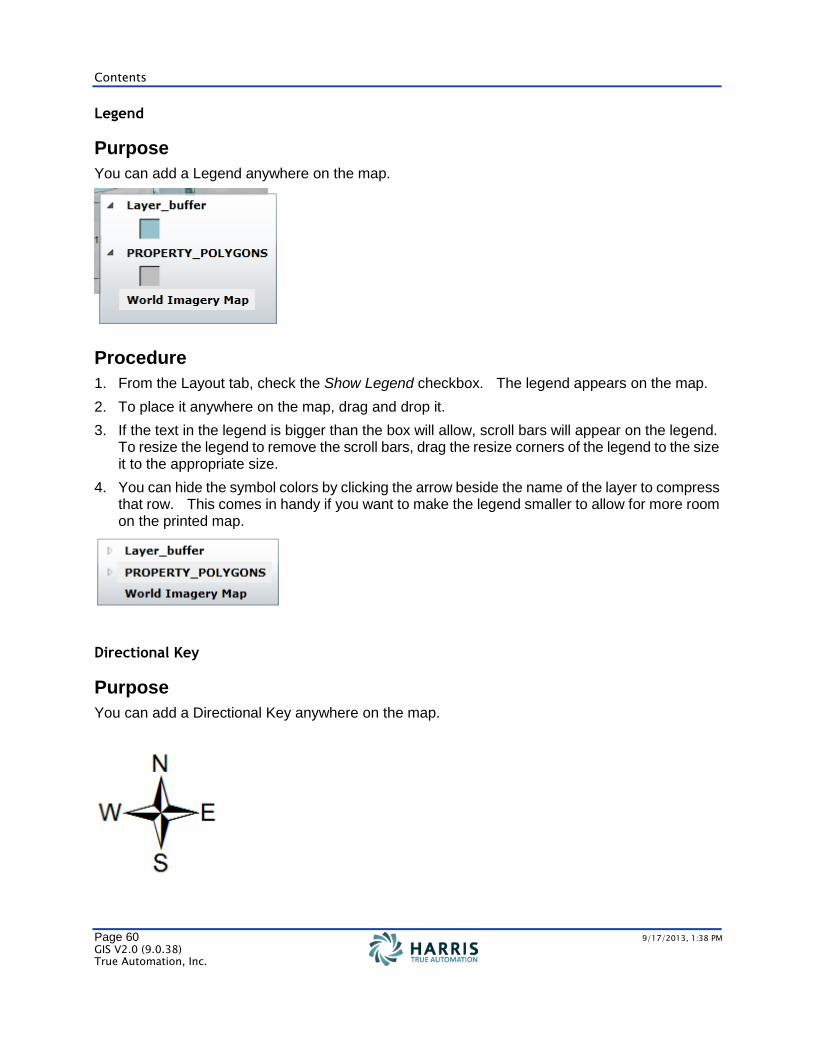
Legend
Purpose
You can add a Legend anywhere on the map.
Procedure
1. From the Layout tab, check the Show Legend checkbox. The legend appears on the map.
2. To place it anywhere on the map, drag and drop it.
3. If the text in the legend is bigger than the box will allow, scroll bars will appear on the legend. To resize the legend to remove the scroll bars, drag the resize corners of the legend to the size it to the appropriate size.
4. You can hide the symbol colors by clicking the arrow beside the name of the layer to compress that row. This comes in handy if you want to make the legend smaller to allow for more room on the printed map.
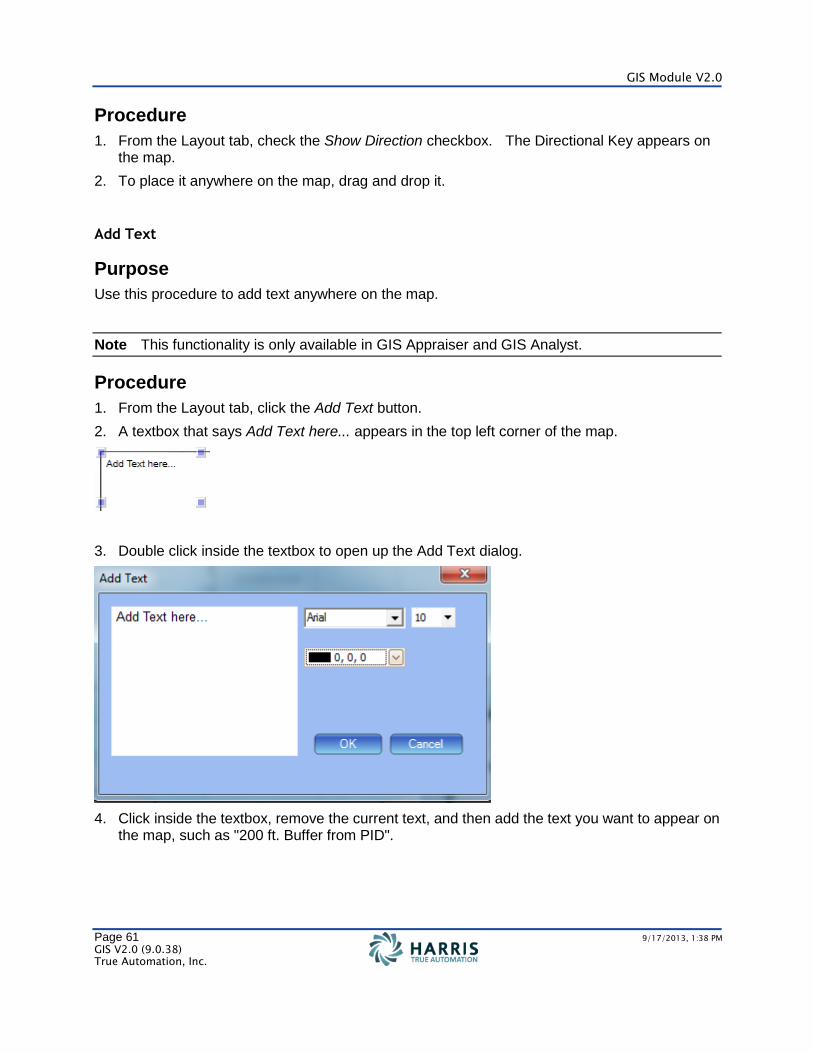
Directional Key
Purpose
You can add a Directional Key anywhere on the map.
GIS Module V2.0
Page 61 9/17/2013, 1:38 PM
GIS V2.0 (9.0.38) True Automation, Inc.
Procedure
1. From the Layout tab, check the Show Direction checkbox. The Directional Key appears on the map.
2. To place it anywhere on the map, drag and drop it.
Add Text
Purpose
Use this procedure to add text anywhere on the map.
Note This functionality is only available in GIS Appraiser and GIS Analyst.
Procedure
1. From the Layout tab, click the Add Text button.
2. A textbox that says Add Text here... appears in the top left corner of the map.
3. Double click inside the textbox to open up the Add Text dialog.
4. Click inside the textbox, remove the current text, and then add the text you want to appear on the map, such as "200 ft. Buffer from PID".
Contents
Page 62 9/17/2013, 1:38 PM
GIS V2.0 (9.0.38) True Automation, Inc.
The following options are available:
Change the font.
Change the font size.
Change the font color. There are currently three different swatches of colors to choose from: Custom, Web, and System.
5. Click OK.
6. To place it anywhere on the map, drag and drop it.
Border
Purpose
You can add a border for all four sides around the map. You can create a border for one, two, three or all sides. This provides a way to frame the map on the printout, leaving space for additional text or just to have a cleaner look. Each border can be pulled out to approximately 50% of the available view.
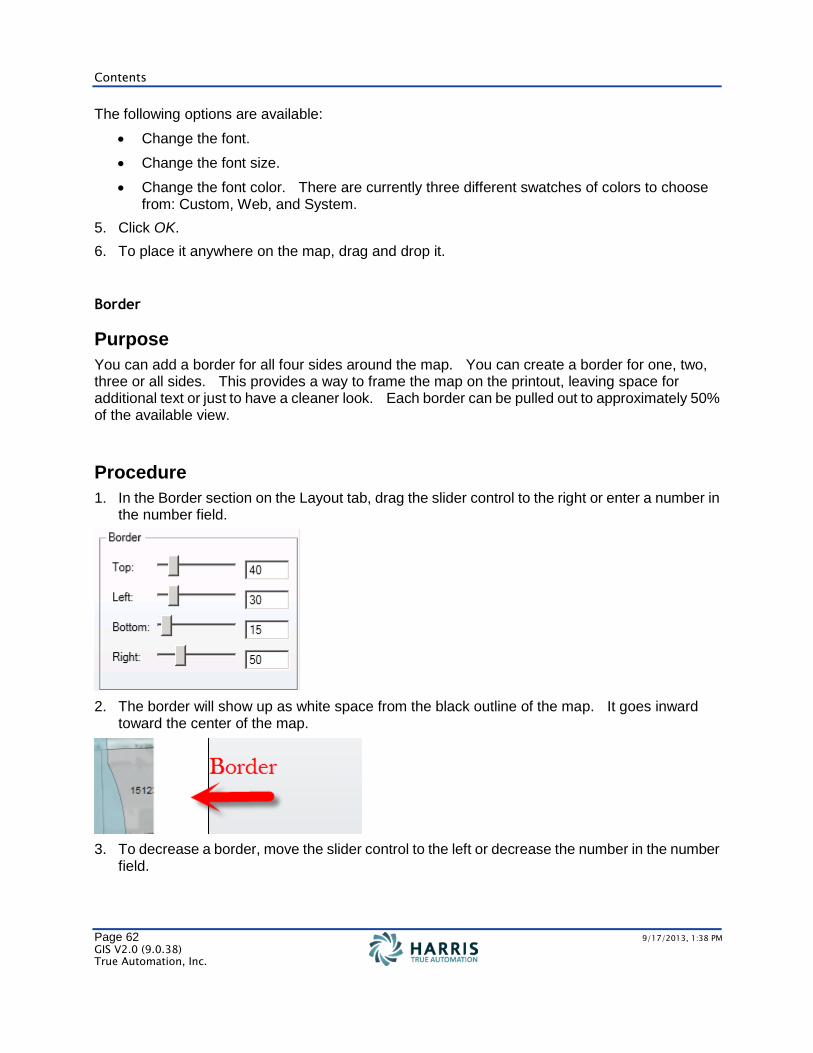
Procedure
1. In the Border section on the Layout tab, drag the slider control to the right or enter a number in the number field.
2. The border will show up as white space from the black outline of the map. It goes inward toward the center of the map.
3. To decrease a border, move the slider control to the left or decrease the number in the number field.
GIS Module V2.0
Page 63 9/17/2013, 1:38 PM
GIS V2.0 (9.0.38) True Automation, Inc.
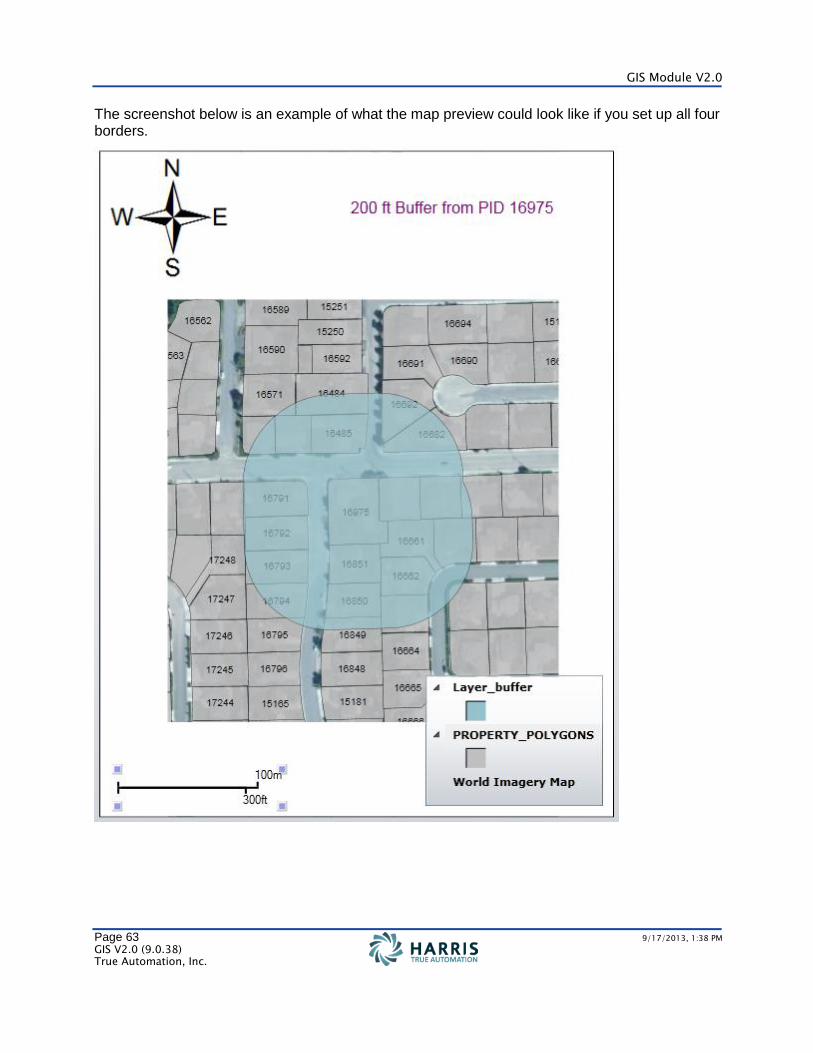
The screenshot below is an example of what the map preview could look like if you set up all four borders.
Contents
Page 64 9/17/2013, 1:38 PM
GIS V2.0 (9.0.38) True Automation, Inc.
Buttons in the GIS Toolbar
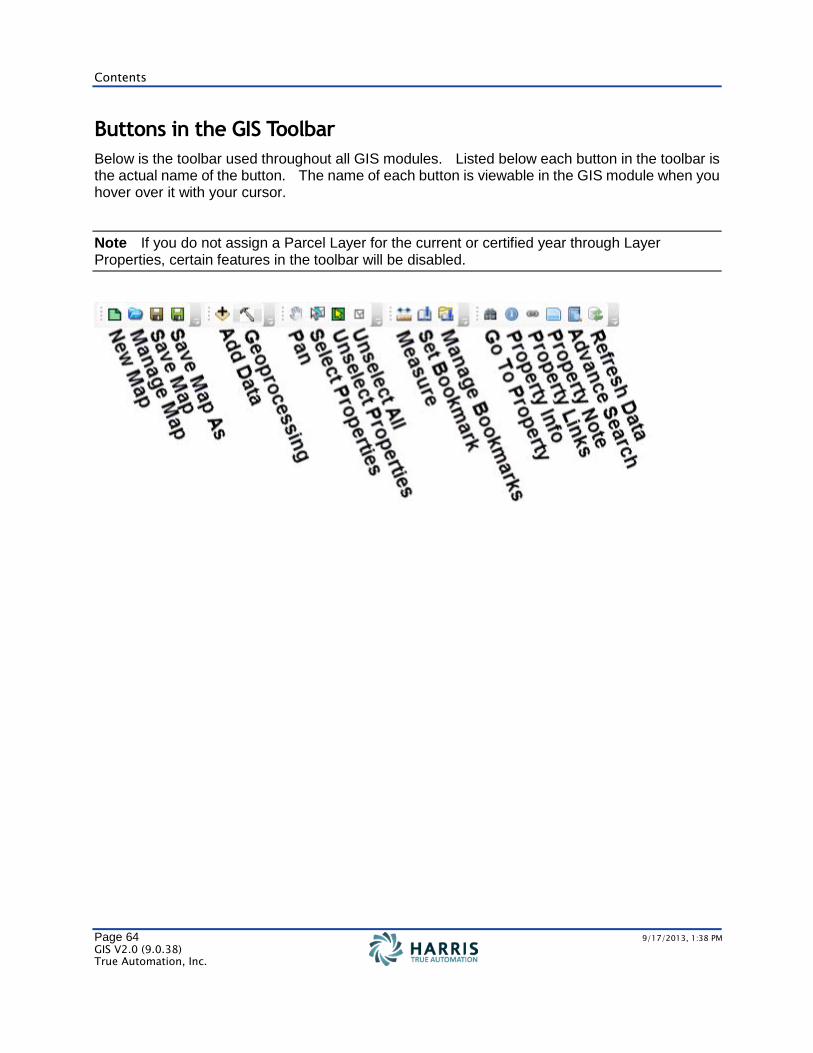
Below is the toolbar used throughout all GIS modules. Listed below each button in the toolbar is the actual name of the button. The name of each button is viewable in the GIS module when you hover over it with your cursor.
Note If you do not assign a Parcel Layer for the current or certified year through Layer Properties, certain features in the toolbar will be disabled.
GIS Module V2.0
Page 65 9/17/2013, 1:38 PM
GIS V2.0 (9.0.38) True Automation, Inc.
New Map
Purpose
The New Map button removes all layers and brings the map to its initial state, allowing you to create an entirely new map.
Procedure
1. From the GIS toolbar, click the New Map button.
2. GIS Viewer will appear blank.
3. Click the Add Data button from the GIS toolbar to add basemaps, shapefiles, rasters, map packages and to connect to a file geodatabase or SDE.
4. You must add your basemap first. Only one basemap can be added per map. You may choose either the World Imagery or World Topographic map. To do so, click on the Basemaps tab in order to choose a World Imagery or World Topographic map.
5. Click Add. Now, you can add shape files or rasters to the map.
6. Click the Add Data button from the toolbar again.
7. On the Shapefiles or Rasters tab, click the Browse button to locate the file you want to add as a layer. Rasters are geocoded images.
8. Click Add.
9. The new layers will appear in the TOC.
Important When adding a shapefile to your map, you must use the UNC pathing and not a mapped network drive. Otherwise, other users will not be able to see those map layers.
Example:
Correct pathing: \\pacsserver\GIS_Data\TA_Data
Incorrect pathing: D:GIS_Data\TA_Data
Contents
Page 66 9/17/2013, 1:38 PM
GIS V2.0 (9.0.38) True Automation, Inc.
Manage Map
Purpose
The Manage Map button allows the user to open and save multiple map definition files. In essence, you can set a map as your own personal default map or set a map as the System Default Map.
Procedure
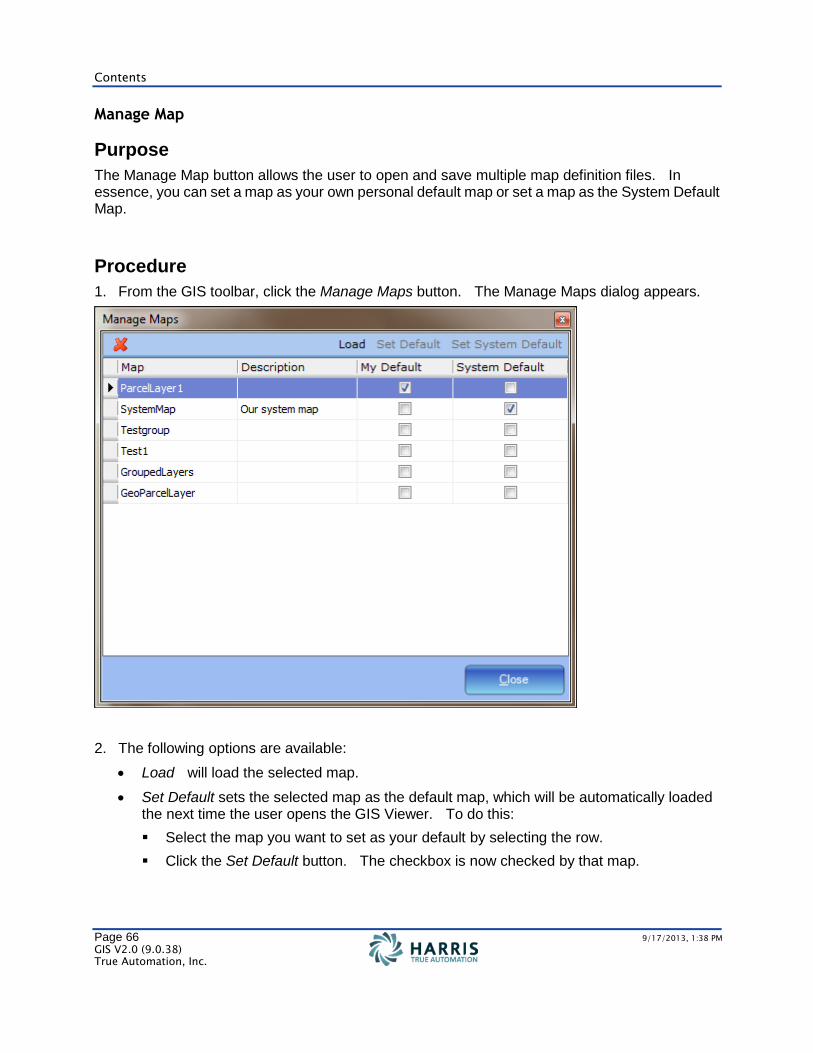
1. From the GIS toolbar, click the Manage Maps button. The Manage Maps dialog appears.
2. The following options are available:
Load will load the selected map.
Set Default sets the selected map as the default map, which will be automatically loaded the next time the user opens the GIS Viewer. To do this:
Select the map you want to set as your default by selecting the row.
Click the Set Default button. The checkbox is now checked by that map.
GIS Module V2.0
Page 67 9/17/2013, 1:38 PM
GIS V2.0 (9.0.38) True Automation, Inc.
Set System Default sets the selected map as the system default map. It will be loaded automatically the next time any user opens the GIS Viewer, if that user does not have a default map set.
Remove deletes the selected map. Users will only be able to delete their own maps.
Note Only users with GIS Appraiser or GIS Analyst, along with having the appropriate GIS Manager user rights, will be able to set the System Default map and delete any map. Also, only maps that are initially set up as public can be set as the System Default. For more information regarding setting up the map as public, see Save Map As (page 68).
Save Map
Purpose
Use this procedure to save any changes made to the map.
Procedure
1. From the GIS toolbar, click the Save Map button.
2. The map is now saved.
Contents
Page 68 9/17/2013, 1:38 PM
GIS V2.0 (9.0.38) True Automation, Inc.
Save Map As
Purpose
Use this procedure to save the map if it's a new map.
Procedure
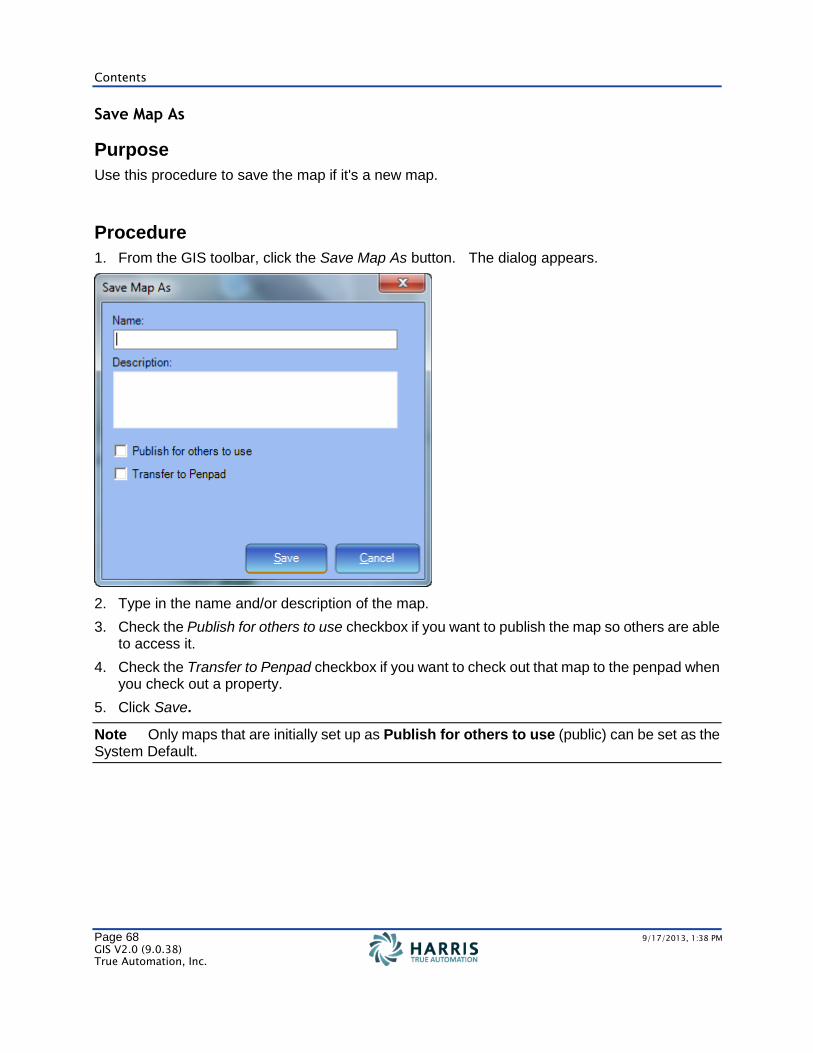
1. From the GIS toolbar, click the Save Map As button. The dialog appears.
2. Type in the name and/or description of the map.
3. Check the Publish for others to use checkbox if you want to publish the map so others are able to access it.
4. Check the Transfer to Penpad checkbox if you want to check out that map to the penpad when you check out a property.
5. Click Save.
Note Only maps that are initially set up as Publish for others to use (public) can be set as the System Default.
GIS Module V2.0
Page 69 9/17/2013, 1:38 PM
GIS V2.0 (9.0.38) True Automation, Inc.
Add Data
Purpose
The Add Data button allows you to add several types of data to the map, such as Shape files, Geodatabases, SDEs, etc.
Procedure
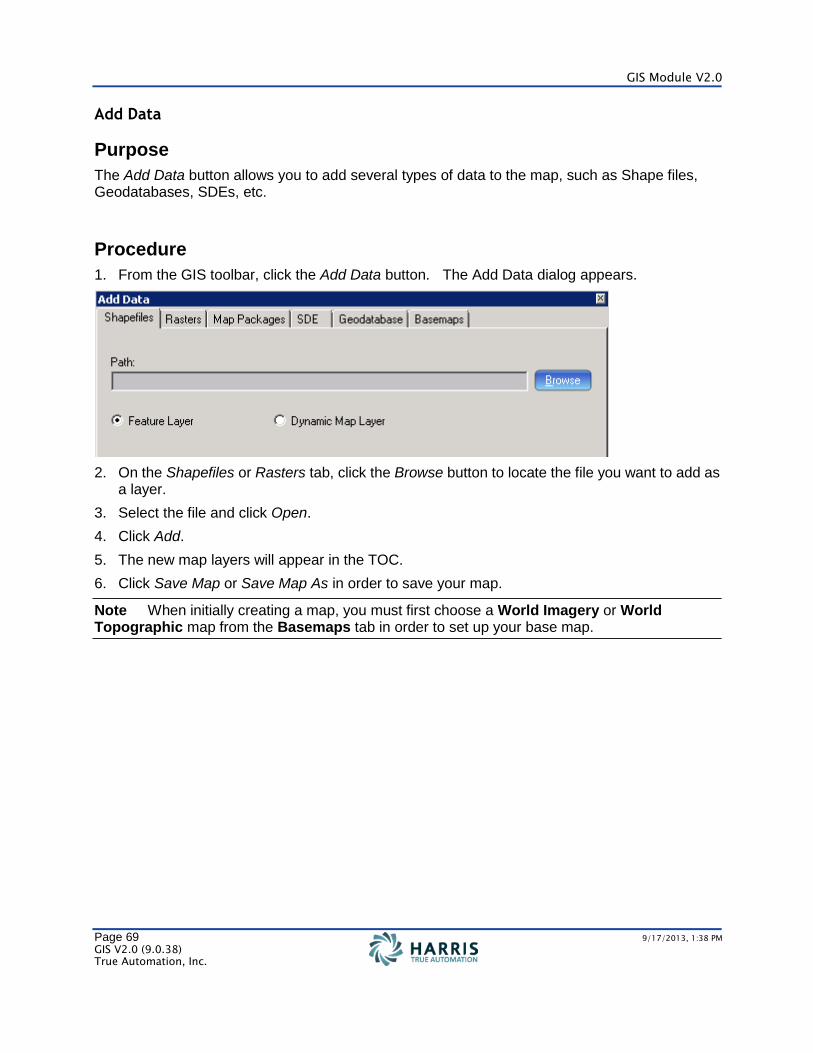
1. From the GIS toolbar, click the Add Data button. The Add Data dialog appears.
2. On the Shapefiles or Rasters tab, click the Browse button to locate the file you want to add as a layer.
3. Select the file and click Open.
4. Click Add.
5. The new map layers will appear in the TOC.
6. Click Save Map or Save Map As in order to save your map.
Note When initially creating a map, you must first choose a World Imagery or World Topographic map from the Basemaps tab in order to set up your base map.
Contents
Page 70 9/17/2013, 1:38 PM
GIS V2.0 (9.0.38) True Automation, Inc.
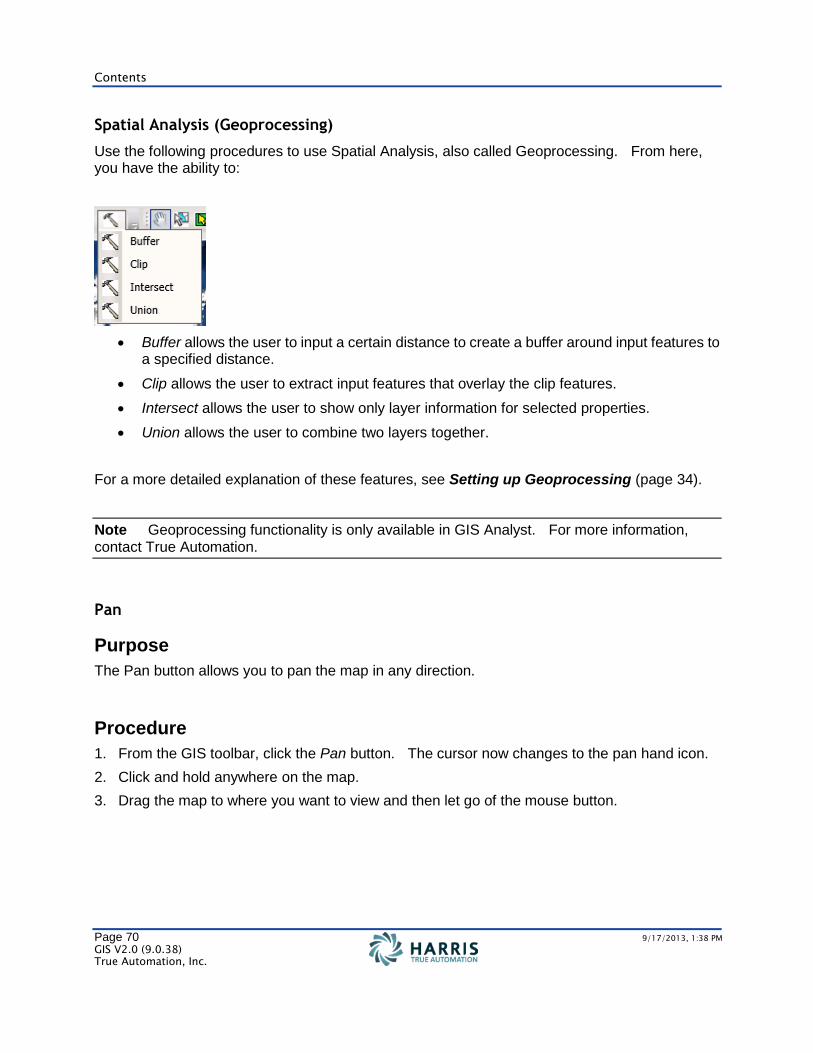
Spatial Analysis (Geoprocessing)
Use the following procedures to use Spatial Analysis, also called Geoprocessing. From here, you have the ability to:
Buffer allows the user to input a certain distance to create a buffer around input features to a specified distance.
Clip allows the user to extract input features that overlay the clip features.
Intersect allows the user to show only layer information for selected properties.
Union allows the user to combine two layers together.
For a more detailed explanation of these features, see Setting up Geoprocessing (page 34).
Note Geoprocessing functionality is only available in GIS Analyst. For more information, contact True Automation.
Pan
Purpose
The Pan button allows you to pan the map in any direction.
Procedure
1. From the GIS toolbar, click the Pan button. The cursor now changes to the pan hand icon.
2. Click and hold anywhere on the map.
3. Drag the map to where you want to view and then let go of the mouse button.
GIS Module V2.0
Page 71 9/17/2013, 1:38 PM
GIS V2.0 (9.0.38) True Automation, Inc.
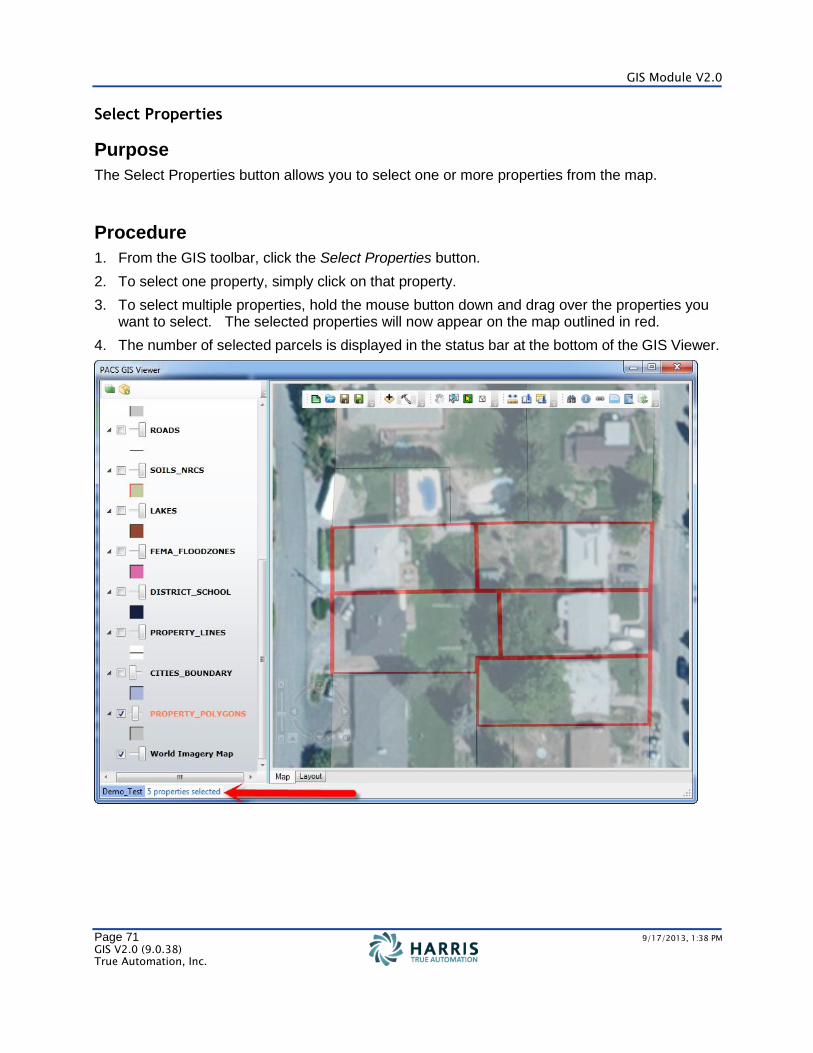
Select Properties
Purpose
The Select Properties button allows you to select one or more properties from the map.
Procedure
1. From the GIS toolbar, click the Select Properties button.
2. To select one property, simply click on that property.
3. To select multiple properties, hold the mouse button down and drag over the properties you want to select. The selected properties will now appear on the map outlined in red.
4. The number of selected parcels is displayed in the status bar at the bottom of the GIS Viewer.
Contents
Page 72 9/17/2013, 1:38 PM
GIS V2.0 (9.0.38) True Automation, Inc.
Unselect Properties
Purpose
The Unselect Properties button allows you to unselect properties from the map. You may unselect one or multiple properties using this button.
Procedure
1. Properties must be selected in order to unselect them.
2. From the GIS toolbar, click the Unselect Properties button.
3. Click on the property that you want to unselect.
4. You may unselect multiple properties by simply clicking on them.
5. The property will no longer be selected; it will no longer be outlined in red.
Unselect All
Purpose
The Unselect All button allows you to unselect all properties that are currently selected.
Procedure
1. Properties must be selected in order to unselect them.
2. From the GIS toolbar, click the Unselect All button.
3. All properties that were selected are no longer selected; they will no longer be outlined in red.
GIS Module V2.0
Page 73 9/17/2013, 1:38 PM
GIS V2.0 (9.0.38) True Automation, Inc.
Measure
Purpose
The Measure button allows you to measure distances and areas.
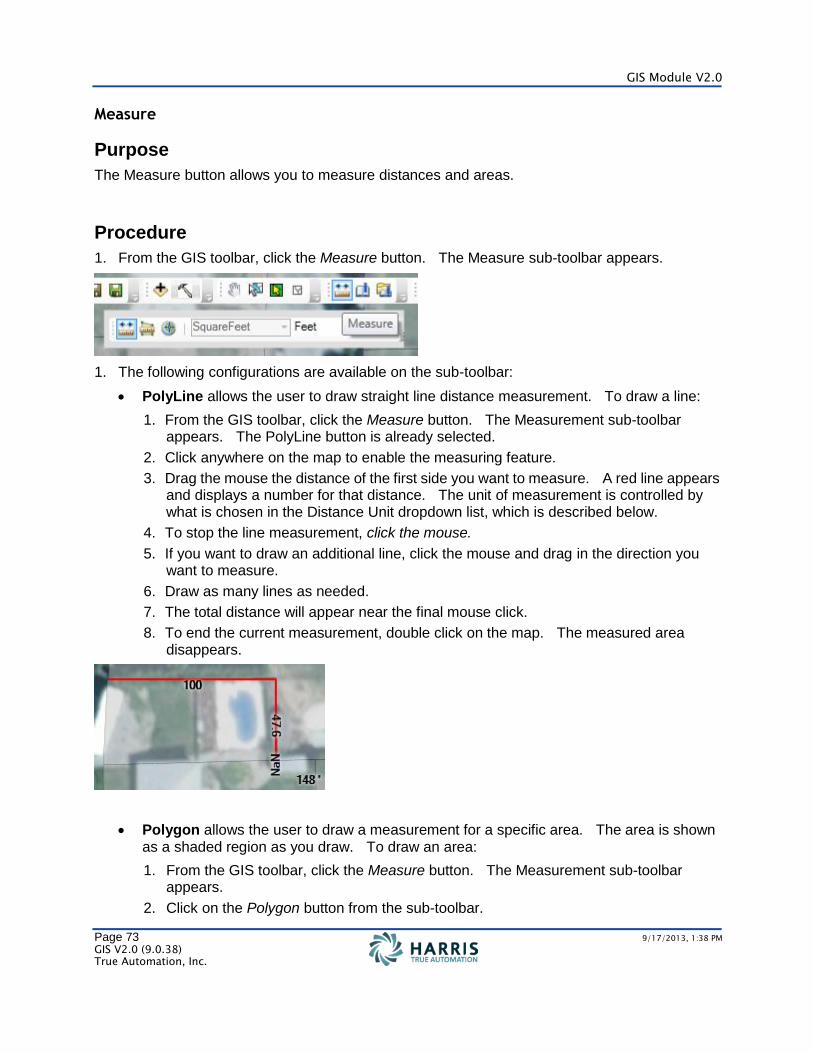
Procedure
1. From the GIS toolbar, click the Measure button. The Measure sub-toolbar appears.
1. The following configurations are available on the sub-toolbar:
PolyLine allows the user to draw straight line distance measurement. To draw a line:
1. From the GIS toolbar, click the Measure button. The Measurement sub-toolbar appears. The PolyLine button is already selected.
2. Click anywhere on the map to enable the measuring feature.
3. Drag the mouse the distance of the first side you want to measure. A red line appears and displays a number for that distance. The unit of measurement is controlled by what is chosen in the Distance Unit dropdown list, which is described below.
4. To stop the line measurement, click the mouse.
5. If you want to draw an additional line, click the mouse and drag in the direction you want to measure.
6. Draw as many lines as needed.
7. The total distance will appear near the final mouse click.
8. To end the current measurement, double click on the map. The measured area disappears.
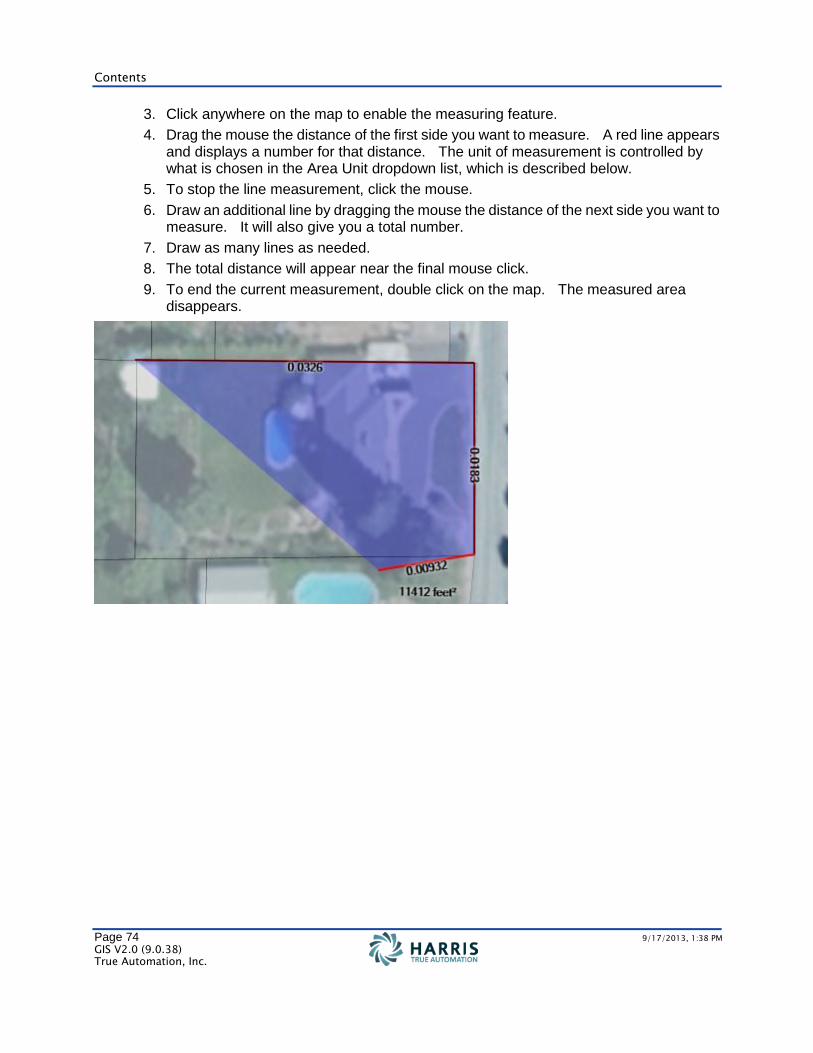
Polygon allows the user to draw a measurement for a specific area. The area is shown as a shaded region as you draw. To draw an area:
1. From the GIS toolbar, click the Measure button. The Measurement sub-toolbar appears.
2. Click on the Polygon button from the sub-toolbar.
Contents
Page 74 9/17/2013, 1:38 PM
GIS V2.0 (9.0.38) True Automation, Inc.
3. Click anywhere on the map to enable the measuring feature.
4. Drag the mouse the distance of the first side you want to measure. A red line appears and displays a number for that distance. The unit of measurement is controlled by what is chosen in the Area Unit dropdown list, which is described below.
5. To stop the line measurement, click the mouse.
6. Draw an additional line by dragging the mouse the distance of the next side you want to measure. It will also give you a total number.
7. Draw as many lines as needed.
8. The total distance will appear near the final mouse click.
9. To end the current measurement, double click on the map. The measured area disappears.
GIS Module V2.0
Page 75 9/17/2013, 1:38 PM
GIS V2.0 (9.0.38) True Automation, Inc.
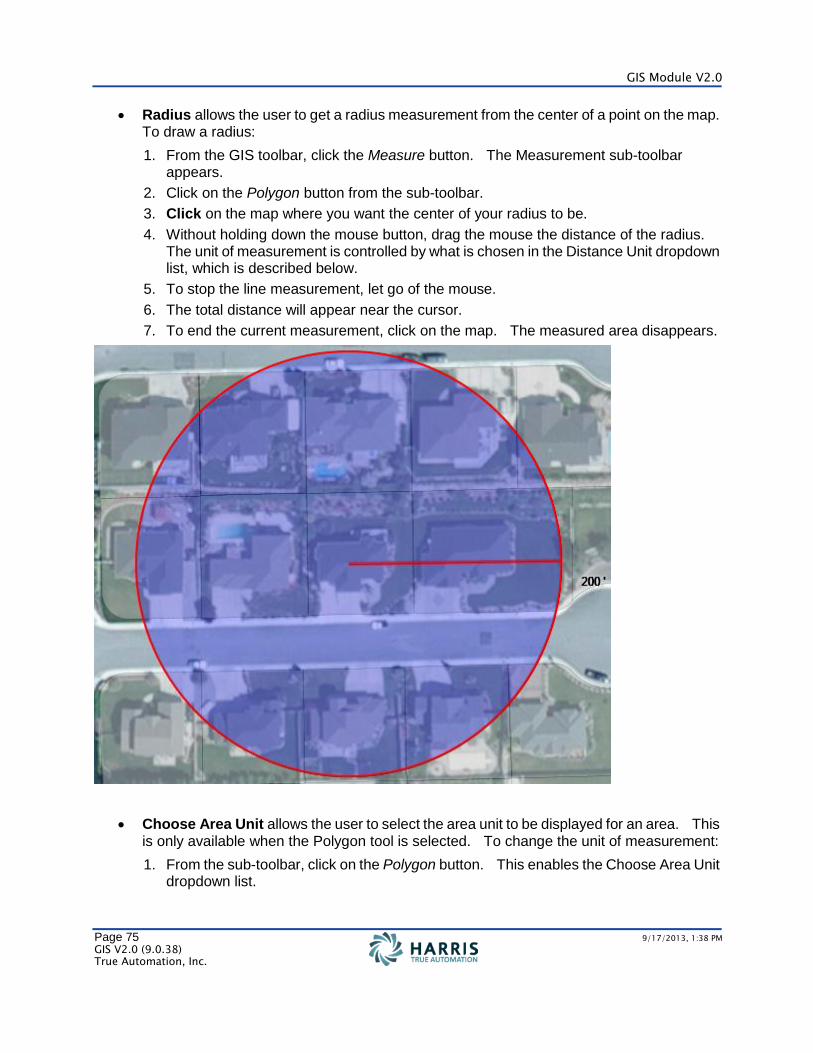
Radius allows the user to get a radius measurement from the center of a point on the map. To draw a radius:
1. From the GIS toolbar, click the Measure button. The Measurement sub-toolbar appears.
2. Click on the Polygon button from the sub-toolbar.
3. Click on the map where you want the center of your radius to be.
4. Without holding down the mouse button, drag the mouse the distance of the radius. The unit of measurement is controlled by what is chosen in the Distance Unit dropdown list, which is described below.
5. To stop the line measurement, let go of the mouse.
6. The total distance will appear near the cursor.
7. To end the current measurement, click on the map. The measured area disappears.
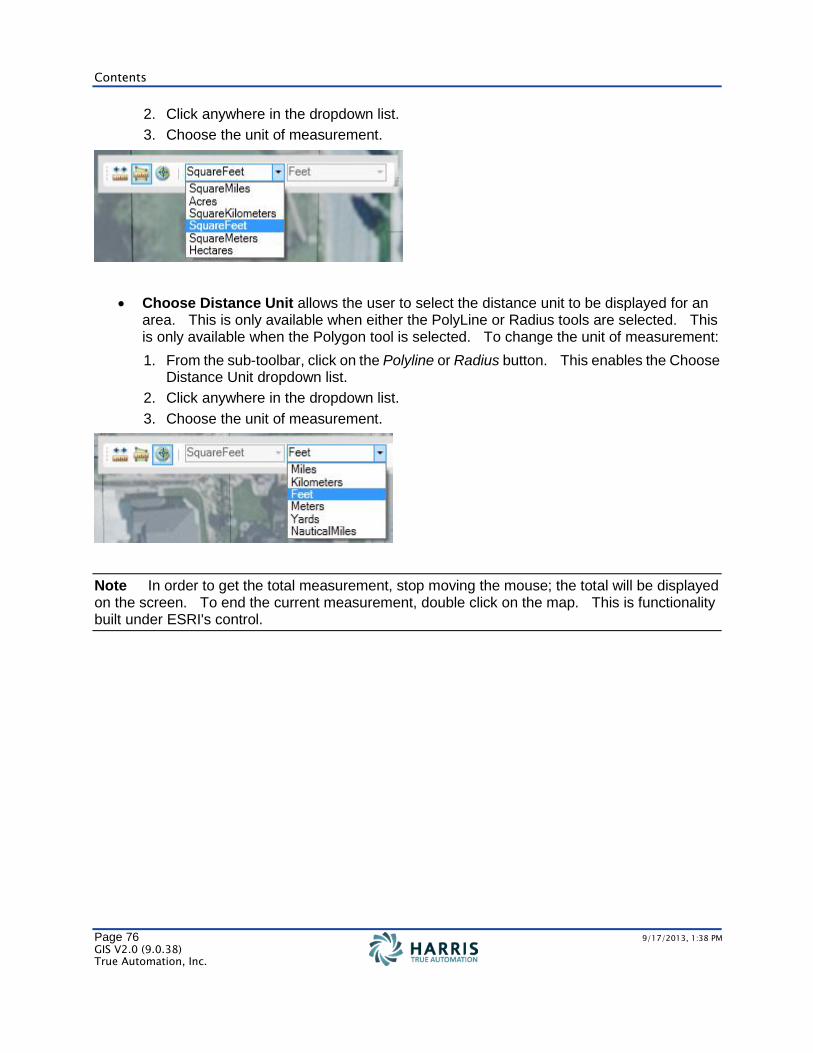
Choose Area Unit allows the user to select the area unit to be displayed for an area. This is only available when the Polygon tool is selected. To change the unit of measurement:
1. From the sub-toolbar, click on the Polygon button. This enables the Choose Area Unit dropdown list.
Contents
Page 76 9/17/2013, 1:38 PM
GIS V2.0 (9.0.38) True Automation, Inc.
2. Click anywhere in the dropdown list.
3. Choose the unit of measurement.
Choose Distance Unit allows the user to select the distance unit to be displayed for an area. This is only available when either the PolyLine or Radius tools are selected. This is only available when the Polygon tool is selected. To change the unit of measurement:
1. From the sub-toolbar, click on the Polyline or Radius button. This enables the Choose Distance Unit dropdown list.
2. Click anywhere in the dropdown list.
3. Choose the unit of measurement.
Note In order to get the total measurement, stop moving the mouse; the total will be displayed on the screen. To end the current measurement, double click on the map. This is functionality built under ESRI's control.
GIS Module V2.0
Page 77 9/17/2013, 1:38 PM
GIS V2.0 (9.0.38) True Automation, Inc.
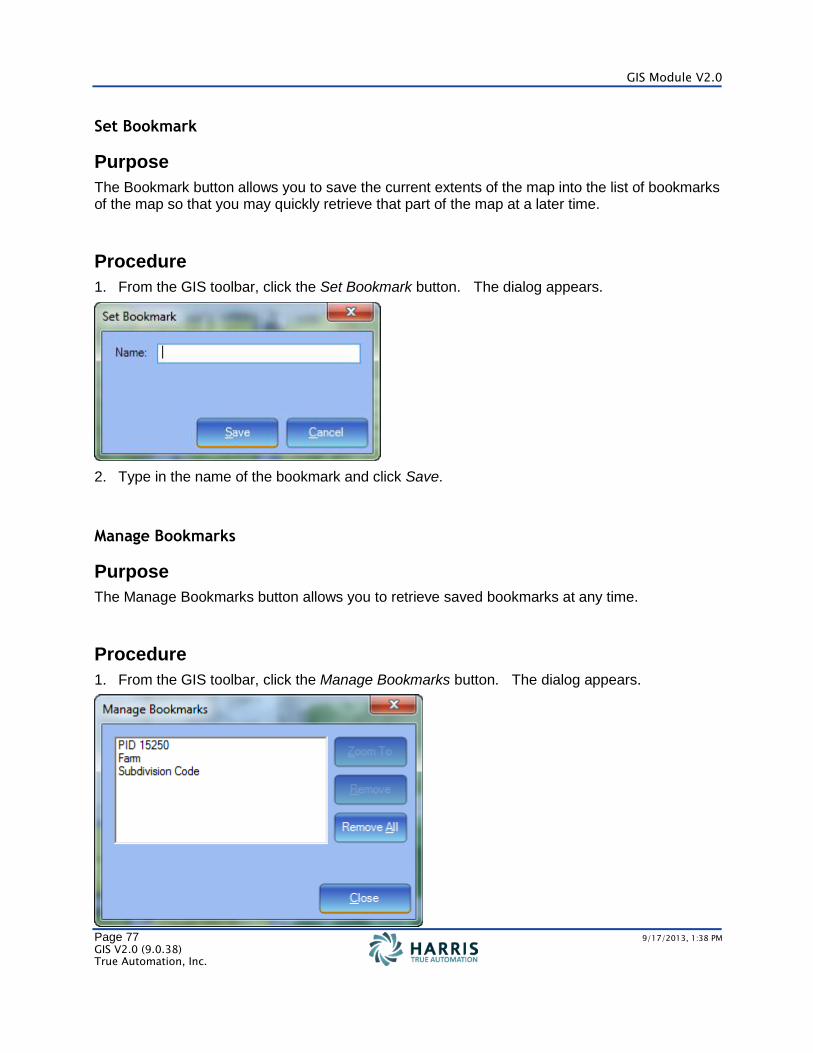
Set Bookmark
Purpose
The Bookmark button allows you to save the current extents of the map into the list of bookmarks of the map so that you may quickly retrieve that part of the map at a later time.
Procedure
1. From the GIS toolbar, click the Set Bookmark button. The dialog appears.
2. Type in the name of the bookmark and click Save.
Manage Bookmarks
Purpose
The Manage Bookmarks button allows you to retrieve saved bookmarks at any time.
Procedure
1. From the GIS toolbar, click the Manage Bookmarks button. The dialog appears.
Contents
Page 78 9/17/2013, 1:38 PM
GIS V2.0 (9.0.38) True Automation, Inc.
2. Select the bookmark you want to retrieve and click Zoom To. You also have options to Remove a selected bookmark or Remove All bookmarks. Options are disabled if no bookmark is selected.
3. Click Close.
Go To Property
Purpose
The Go To Property button allows you to quickly find a property and will select it for you.
Procedure
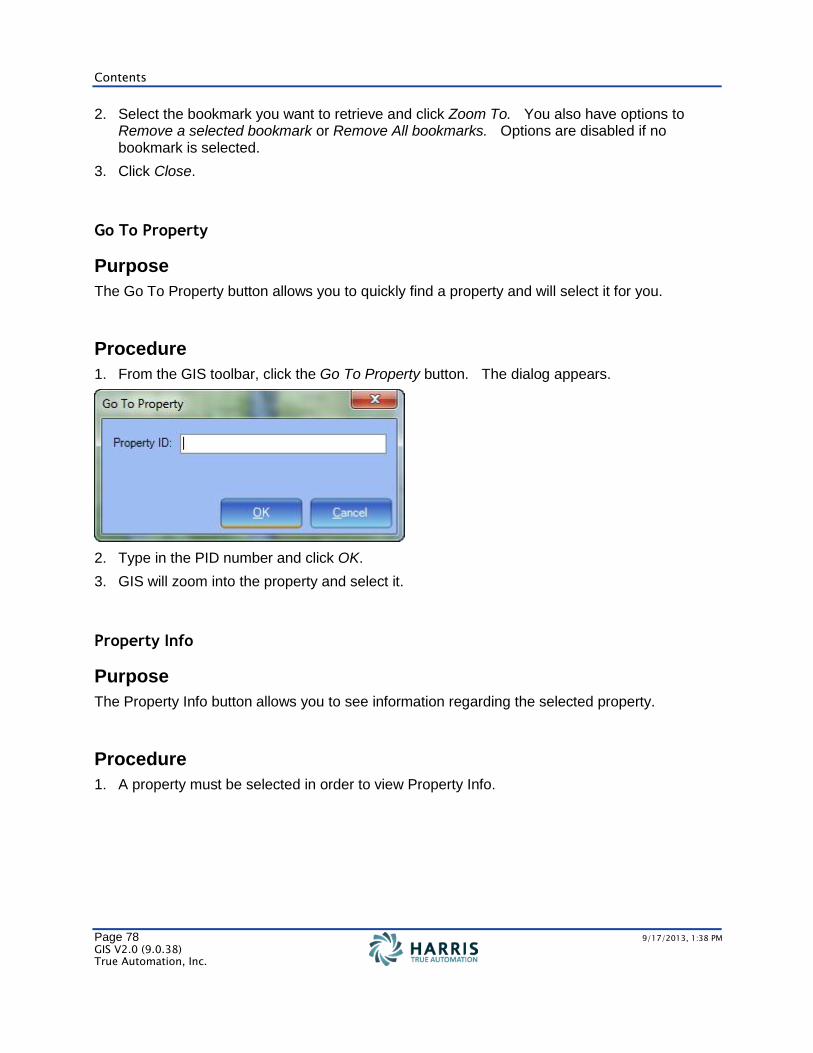
1. From the GIS toolbar, click the Go To Property button. The dialog appears.
2. Type in the PID number and click OK.
3. GIS will zoom into the property and select it.
Property Info
Purpose
The Property Info button allows you to see information regarding the selected property.
Procedure
1. A property must be selected in order to view Property Info.
GIS Module V2.0
Page 79 9/17/2013, 1:38 PM
GIS V2.0 (9.0.38) True Automation, Inc.
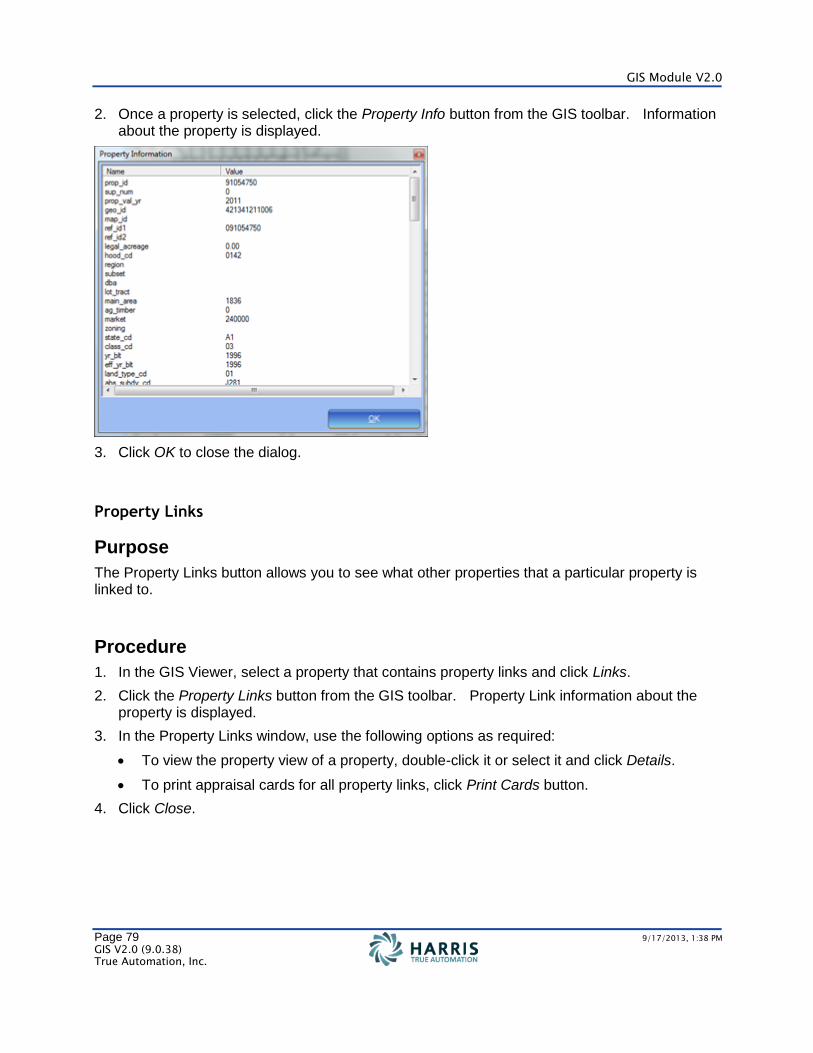
2. Once a property is selected, click the Property Info button from the GIS toolbar. Information about the property is displayed.
3. Click OK to close the dialog.
Property Links
Purpose
The Property Links button allows you to see what other properties that a particular property is linked to.
Procedure
1. In the GIS Viewer, select a property that contains property links and click Links.
2. Click the Property Links button from the GIS toolbar. Property Link information about the property is displayed.
3. In the Property Links window, use the following options as required:
To view the property view of a property, double-click it or select it and click Details.
To print appraisal cards for all property links, click Print Cards button.
4. Click Close.
Contents
Page 80 9/17/2013, 1:38 PM
GIS V2.0 (9.0.38) True Automation, Inc.
Property Note
Purpose
The Property Note button allows you to enter in a note that can appear on a specific property, such as "Contested property part of another case". You may also use this field as a way of communicating with TA's GIS Department in order to make a correction on GIS data.
Note Anything entered in the Property Note can be queried and/or labeled on the property.
Procedure
1. From the GIS toolbar, click the Select Properties button.
2. Click on a property from the map to select it.
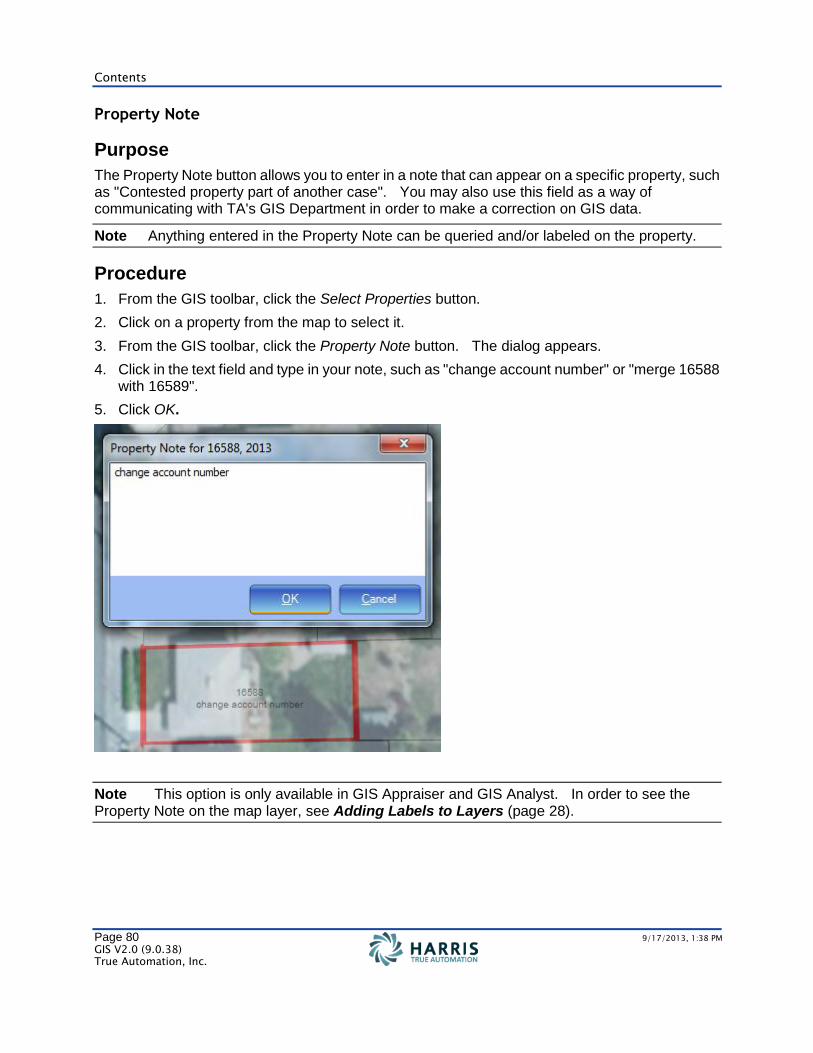
3. From the GIS toolbar, click the Property Note button. The dialog appears.
4. Click in the text field and type in your note, such as "change account number" or "merge 16588 with 16589".
5. Click OK.
Note This option is only available in GIS Appraiser and GIS Analyst. In order to see the Property Note on the map layer, see Adding Labels to Layers (page 28).
GIS Module V2.0
Page 81 9/17/2013, 1:38 PM
GIS V2.0 (9.0.38) True Automation, Inc.
Advance Search
Purpose
The Advanced Search button allows you to retrieve a specific set of data from the system.
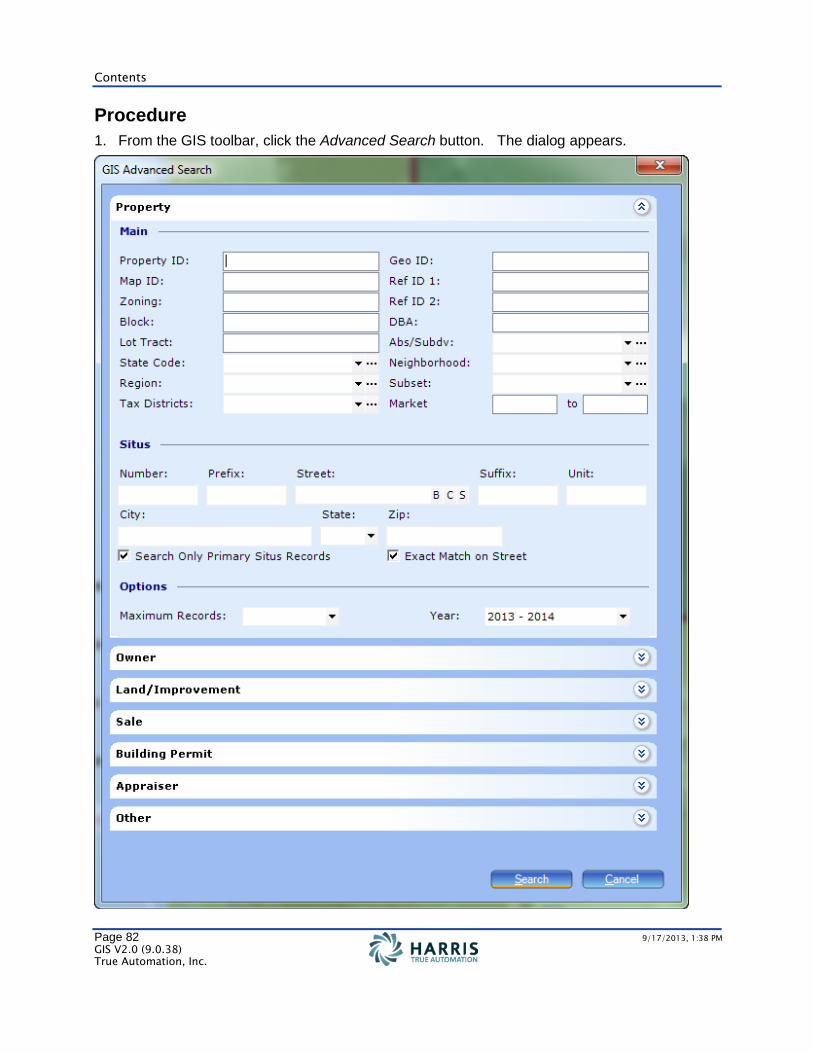
You can specify the following kinds of data from the Advanced Search option:
Property data, such as a block, a neighborhood, situs information, and geo or reference ID.
Owner data, such as an address and exemptions.
Land data, such as price, acreage, square footage, and ag or timber use.
Improvement data, such as the class code and year built.
Sale data, such as the sale date, sale price, and sales ratio.
Building Permit data, such as permit number, permit type, and status.
Appraiser data, such as last appraiser, last inspection date, and next inspection date.
Other data, such as UGA, tax area, and effective acres group.
Contents
Page 82 9/17/2013, 1:38 PM
GIS V2.0 (9.0.38) True Automation, Inc.
Procedure
1. From the GIS toolbar, click the Advanced Search button. The dialog appears.
GIS Module V2.0
Page 83 9/17/2013, 1:38 PM
GIS V2.0 (9.0.38) True Automation, Inc.
2. In order to see the options on each panel, either single click on the panel to do a quick-expand or double click on the panel to fully expand.
3. Enter in a limited amount of search criteria first (such as the abstract subdivision and sales date), reviewing the search results, and then entering more criteria as required to refine the search. For example, if your initial search results listing include vacant lots, you could change the state code to get a listing of sales that does not include vacant lots.
4. Click Search.
Results
The system highlights the properties in the data frame that match the selection criteria you entered.
Refresh Data
Purpose
The Refresh Data button allows you to refresh the map.
Procedure
1. From the GIS Viewer toolbar, click the Refresh Data button.
2. The map will refresh with the most up-to-date information.
Contents
Page 84 9/17/2013, 1:38 PM
GIS V2.0 (9.0.38) True Automation, Inc.
Context Menu from the Table of Contents
Use the following procedures to:
Note The following features are in regards to raster files.
Manage Layers
Add To Group
Ungroup
See New Group Layer (page 52) for more information.
Remove Layer
Purpose
The Remove Layer option allows you to remove a map layer from the GIS Viewer.
Procedures
1. Right click on the name of the layer you want to remove.
2. Click Remove.
3. The layer is now removed from the GIS module.
Rename Layer
Purpose
Use this procedure to rename map layers.
Procedures
1. Right click on the name of the layer you want to change.
2. Select Rename Layer.
3. Type in the new name of the layer.
4. Click on another label's name to save the changes.
Important ESRI does not allow relabeling Road map layers.
GIS Module V2.0
Page 85 9/17/2013, 1:38 PM
GIS V2.0 (9.0.38) True Automation, Inc.
Zoom to Full Extent
Purpose
Use this procedure to zoom all the way out of the layer to view the full extent of the map.
Procedure
1. On the Navigation Wheel, click the Full Extent icon.
2. The map zooms all the way to the fullest extent of the map, showing the earth.
3. To go back to your default map, click the Manage Maps button on the GIS Toolbar.
4. Select the map you want to load.
5. Click the Load button.
6. You may be prompted to save changes to the map. Click Yes.
7. Click Close on the Manage Maps dialog.
Contents
Page 86 9/17/2013, 1:38 PM
GIS V2.0 (9.0.38) True Automation, Inc.
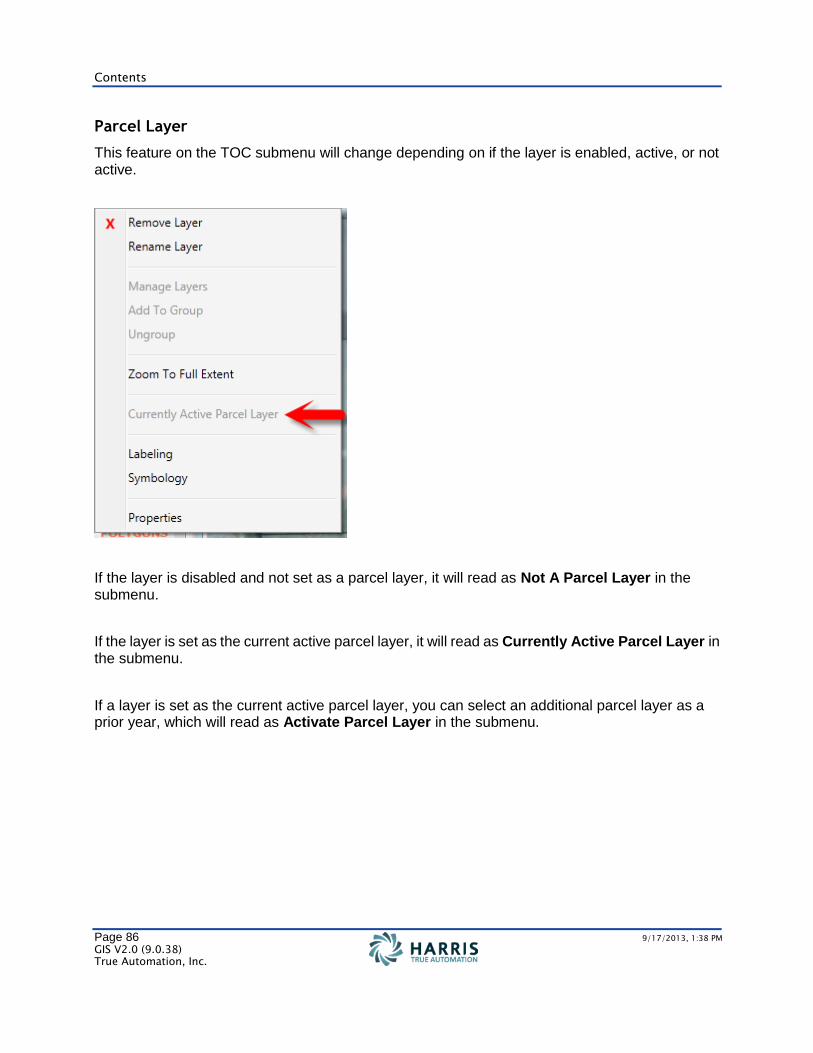
Parcel Layer
This feature on the TOC submenu will change depending on if the layer is enabled, active, or not active.
If the layer is disabled and not set as a parcel layer, it will read as Not A Parcel Layer in the submenu.
If the layer is set as the current active parcel layer, it will read as Currently Active Parcel Layer in the submenu.
If a layer is set as the current active parcel layer, you can select an additional parcel layer as a prior year, which will read as Activate Parcel Layer in the submenu.

GIS Module V2.0
Page 87 9/17/2013, 1:38 PM
GIS V2.0 (9.0.38) True Automation, Inc.
Labeling
Purpose
Use this procedure to change the labels that are shown on map layers, which is derived from either PACS data or information in the shapefile. For more information, see Adding Labels to Layers (page 28).
Contents
Page 88 9/17/2013, 1:38 PM
GIS V2.0 (9.0.38) True Automation, Inc.
Symbology
Simple Symbology allows the user to manipulate simple symbology, such as:
Changing the symbol/layer color.
Making a map layer transparent.
Adjusting the outline width of a layer.
Changing the outline color of a layer.
For more information, see Simple Symbology: Features (page 41).
Advanced Symbology allows the user to manipulate advanced symbology, such as:
Showing symbology for categories is a graphical representation of the data contained within a layer. You can symbolize for code driven fields, such as Abstract Subdivision Code, Class Code, Exemptions, etc. For more information, see Advanced Symbology: Categories (page 43).
Showing symbology for quantities, symbolizes for values and quantities, such as Sales Ratio. It's a way to display features sharing a common range of numeric field values with a common color symbol. For more information, see Advanced Symbology: Quantities (page 47).
Note Advanced Symbology is only available in GIS Analyst.

GIS Module V2.0
Page 89 9/17/2013, 1:38 PM
GIS V2.0 (9.0.38) True Automation, Inc.
Properties
Layer Properties contain the following tabs:
From Layer Properties, you have the ability to:
Set up an active parcel layer for the current or certified year. For more information, see Setting up a Current or Prior Year Layer (page 26).
Show fields and labels on map layers. For more information, see Adding Labels to Map Layers (page 28).
Modify the font, font size, and font color of labels on the map layers. For more information, see Optional features on the Layer Properties dialog in the Adding Labels to Map Layers (page 28) topic.
Create simple and complex symbology for features, categories, and quantities on the map layers. For more information, see Setting up Symbology (page 41).
Rename map layers. For more information, see Renaming Map Layers and Symbols. (page 33)
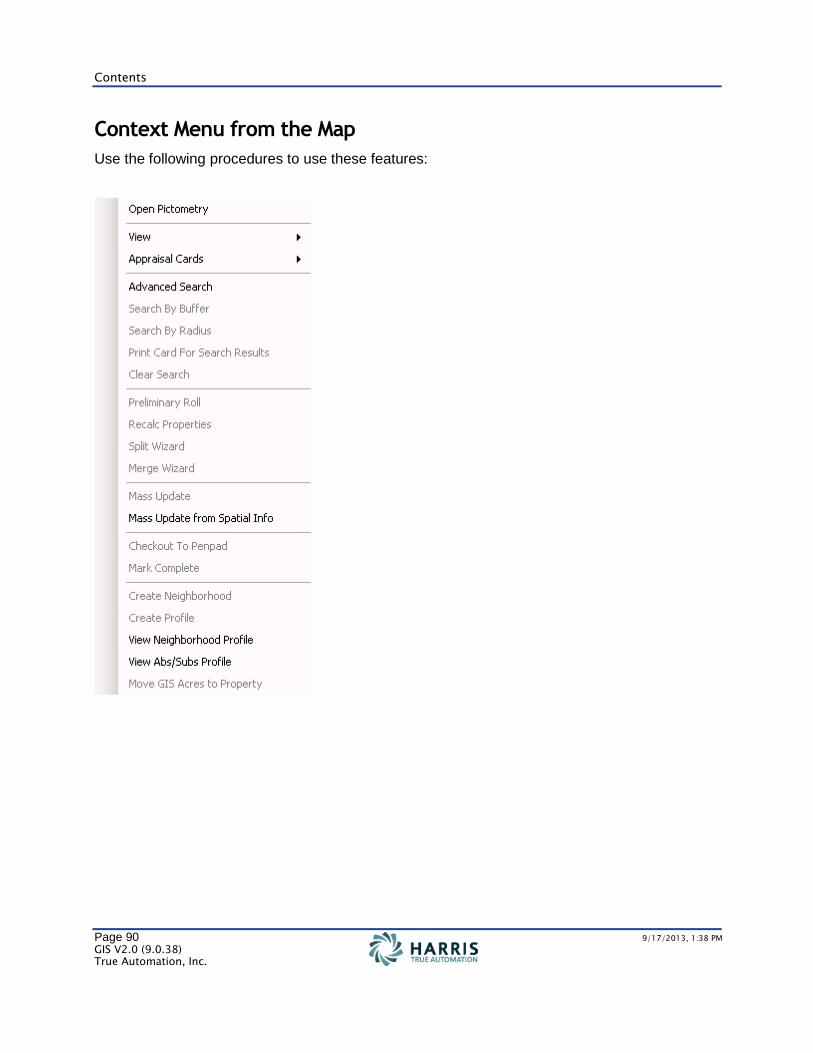
Contents
Page 90 9/17/2013, 1:38 PM
GIS V2.0 (9.0.38) True Automation, Inc.
Context Menu from the Map
Use the following procedures to use these features:
GIS Module V2.0
Page 91 9/17/2013, 1:38 PM
GIS V2.0 (9.0.38) True Automation, Inc.
The following functions are available when you right click directly on a parcel from the map without a parcel being selected:
Open Pictometry
View details for Property, Land, Improvements and Images
Preview or Print Appraisal Cards
Mass Maintenance from Spatial Info: Mass Update, Mass Update Land Miscellaneous Codes, and Mass Update Tax Area/Special Assessment Agencies
View Neighborhood Profile
View Abs/Subs Profile
The following functions are available from the submenu once you have selected one property:
Open Pictometry
Advance Search
Search by Buffer
Search By Radius
Print Card For Search Results
Clear Search
Preliminary Roll
Recalc Properties
Split Wizard
Mass Maintenance: Mass Update, Mass Update Land Miscellaneous Codes, and Mass Update Tax Area/Special Assessment Agencies
Mass Maintenance from Spatial Info: Mass Update, Mass Update Land Miscellaneous Codes, and Mass Update Tax Area/Special Assessment Agencies
Checkout To Penpad
Create Neighborhood
Create Profile
Move GIS Acres to Property
Contents
Page 92 9/17/2013, 1:38 PM
GIS V2.0 (9.0.38) True Automation, Inc.
The following functions are available from the submenu once you have selected multiple properties:
Open Pictometry
Advance Search
Print Card For Search Results
Clear Search
Preliminary Roll
Recalc Properties
Merge Wizard
Mass Maintenance: Mass Update, Mass Update Land Miscellaneous Codes, and Mass Update Tax Area/Special Assessment Agencies
Mass Maintenance from Spatial Info: Mass Update, Mass Update Land Miscellaneous Codes, and Mass Update Tax Area/Special Assessment Agencies
Checkout To Penpad
Create Neighborhood
Create Profile
GIS Module V2.0
Page 93 9/17/2013, 1:38 PM
GIS V2.0 (9.0.38) True Automation, Inc.
Pictometry
Purpose
Use the procedures below to enable the use of Pictometry in PACS.
After completing the procedures, the Show Pictometry icon is enabled.
Important When entering information as specified in the procedures, case sensitivity may matter. Enter the information exactly as it is shown.
Prerequisites
You have a license for the computer that Pictometry will be installed on.
You have configured Pictometry in Electronic Field Study (EFS).
You have checked the database configuration in PACS.
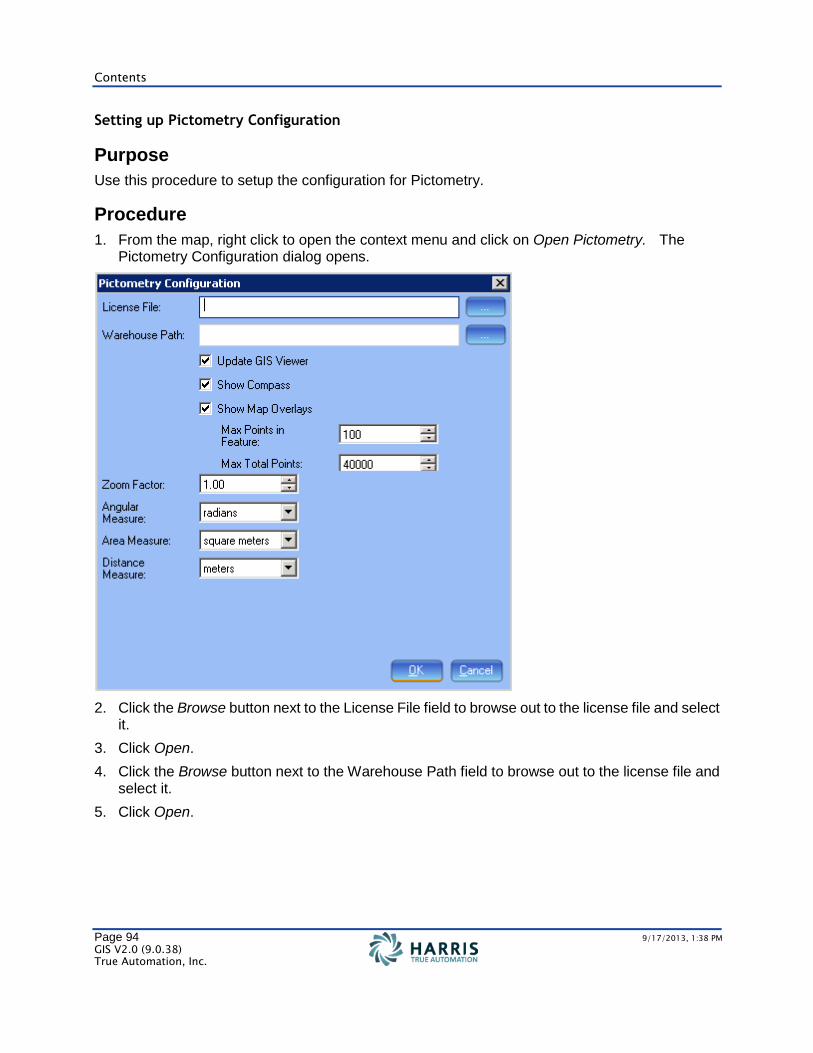
Contents
Page 94 9/17/2013, 1:38 PM
GIS V2.0 (9.0.38) True Automation, Inc.
Setting up Pictometry Configuration
Purpose
Use this procedure to setup the configuration for Pictometry.
Procedure
1. From the map, right click to open the context menu and click on Open Pictometry. The Pictometry Configuration dialog opens.
2. Click the Browse button next to the License File field to browse out to the license file and select it.
3. Click Open.
4. Click the Browse button next to the Warehouse Path field to browse out to the license file and select it.
5. Click Open.
GIS Module V2.0
Page 95 9/17/2013, 1:38 PM
GIS V2.0 (9.0.38) True Automation, Inc.
The following fields are optional:
Update GIS Viewer updates the GIS Viewer’s extent when the Pictometry Viewer extent is changed through things such as panning, etc.
Show Compass shows a compass in the Pictometry Viewer.
Show Map Overlays shows the layer borders from GIS Viewer in the Pictometry viewer.
Max Points in Feature sets the maximum number of points that a GIS property can have to be overlaid in the Pictometry Viewer.
Max Total Points sets the maximum number of points in total that will be overlaid from the GIS layers. Setting this to higher numbers will take longer to draw the overlays, but will only be slow the first time it loads.
Zoom Factor sets the default zoom factor that will be set when loading the viewer and when clicking OK.
Angular Measure sets the units used for angular measurements (Bearing).
Area Measure sets the units used for area measurements.
Distance Measure sets the units used for distance measurements.
6. Click OK.
Creating the Image Type
1. In PACS Appraisal, choose Tools > Document Imaging Maintenance > Image Types.
2. Click New.
3. Enter the following data:
Field Data
Type P
Description Image
Picture Type JPG
4. Click OK.
Creating the Record Type
1. In PACS Appraisal, choose Tools > Document Imaging Maintenance > Record Types.
The Record Types dialog box is displayed.
2. Click New.
3. Enter the following data:
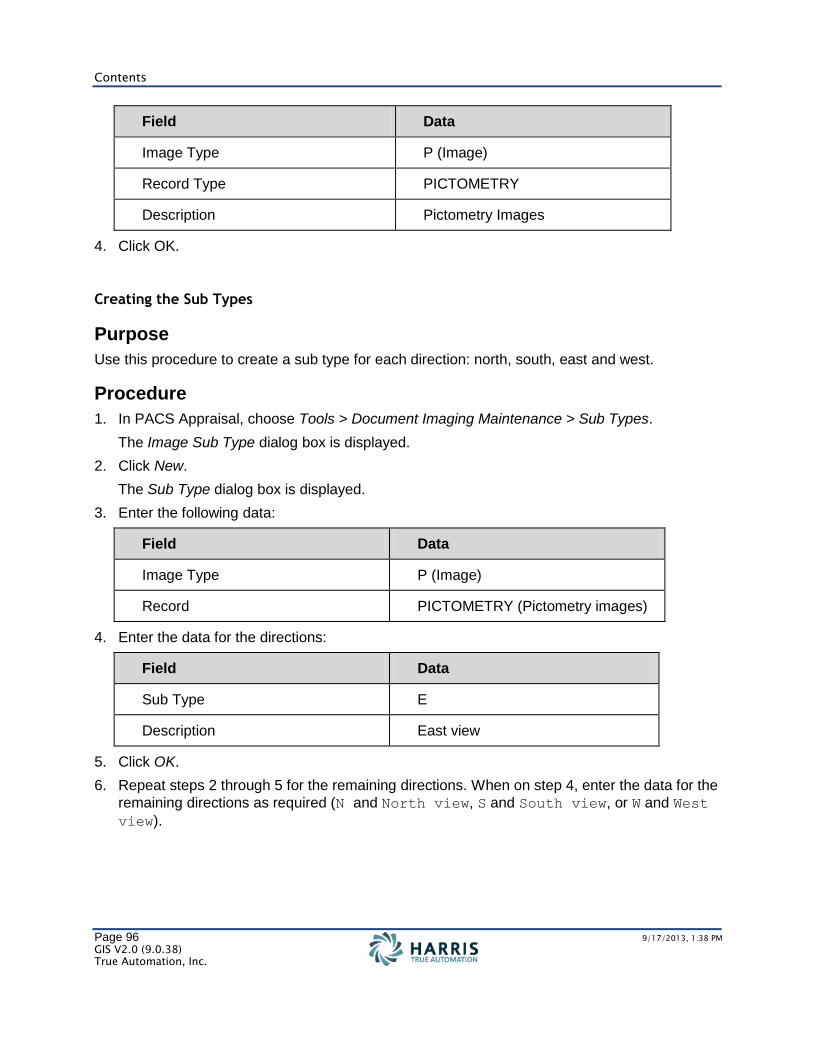
Contents
Page 96 9/17/2013, 1:38 PM
GIS V2.0 (9.0.38) True Automation, Inc.
Field Data
Image Type P (Image)
Record Type PICTOMETRY
Description Pictometry Images
4. Click OK.
Creating the Sub Types
Purpose
Use this procedure to create a sub type for each direction: north, south, east and west.
Procedure
1. In PACS Appraisal, choose Tools > Document Imaging Maintenance > Sub Types.
The Image Sub Type dialog box is displayed.
2. Click New.
The Sub Type dialog box is displayed.
3. Enter the following data:
Field Data
Image Type P (Image)
Record PICTOMETRY (Pictometry images)
4. Enter the data for the directions:
Field Data
Sub Type E
Description East view
5. Click OK.
6. Repeat steps 2 through 5 for the remaining directions. When on step 4, enter the data for the
remaining directions as required (N and North view, S and South view, or W and West
view).
GIS Module V2.0
Page 97 9/17/2013, 1:38 PM
GIS V2.0 (9.0.38) True Automation, Inc.
Maximizing the Pictometry Window
Purpose
Use this procedure to maximize the Pictometry® window when in use.
Procedure
1. In PACS Appraisal, choose Tools > Document Imaging Maintenance > Pictometry > Settings.
The Pictometry User Settings dialog box is displayed.
2. Select Open Maximized, and then click OK.
Testing Pictometry in PACS
Purpose
Use this procedure to check your set up of Pictometry® in PACS.
Procedure
1. In the GIS Viewer/Appraiser, select the GIS Images check box
2. Select any county parcels.
3. Click the Show Pictometry icon.
The cursor displays an A at the upper right of the arrow.
4. Click the property you need to view in Pictometry.
The Electronic Field Study window is displayed.

Contents
Page 98 9/17/2013, 1:38 PM
GIS V2.0 (9.0.38) True Automation, Inc.
Attaching Pictometry Images to Property Records
Purpose
Use the procedures described in this topic to extract images directly from Pictometry® and attach the images to property records.
Prerequisites
The user right Edit Pictometry System Settings has been assigned to your user ID. This user right allows you to extract images. For more information about assigning user rights, see the User Rights User Guide.
Electronic Field Study (EFS) has been installed on your PC.
There is enough space on the server. We recommend at least 100 gigabytes of available space.
Procedure
Caution If you extract images for multiple properties, the extraction could be lengthy. We recommend that you carry out the following procedures after normal business hours.
To Specify the Directory to Which Images are Extracted
1. Choose Tools > System Settings > Pictometry.
The Pictometry System Settings dialog box is displayed.
2. Complete the following fields as required and verify read/write access to the extract path. Then click OK.
Workspace Path –The path where the workspace is kept on the server.
Master Workspace Filename –The filename of the workspace.
Image Extract Path –The path to which the images will be extracted.
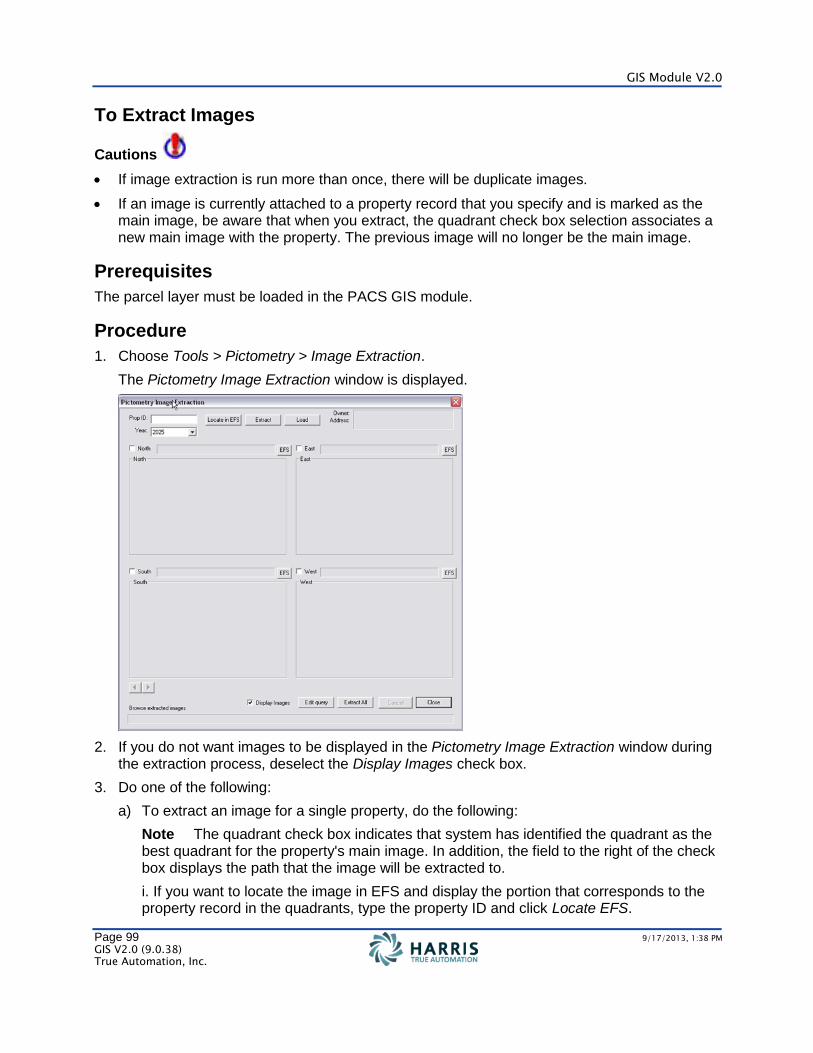
GIS Module V2.0
Page 99 9/17/2013, 1:38 PM
GIS V2.0 (9.0.38) True Automation, Inc.
To Extract Images
Cautions
If image extraction is run more than once, there will be duplicate images.
If an image is currently attached to a property record that you specify and is marked as the main image, be aware that when you extract, the quadrant check box selection associates a new main image with the property. The previous image will no longer be the main image.
Prerequisites
The parcel layer must be loaded in the PACS GIS module.
Procedure
1. Choose Tools > Pictometry > Image Extraction.
The Pictometry Image Extraction window is displayed.
2. If you do not want images to be displayed in the Pictometry Image Extraction window during the extraction process, deselect the Display Images check box.
3. Do one of the following:
a) To extract an image for a single property, do the following:
Note The quadrant check box indicates that system has identified the quadrant as the best quadrant for the property's main image. In addition, the field to the right of the check box displays the path that the image will be extracted to.
i. If you want to locate the image in EFS and display the portion that corresponds to the property record in the quadrants, type the property ID and click Locate EFS.

Contents
Page 100 9/17/2013, 1:38 PM
GIS V2.0 (9.0.38) True Automation, Inc.
ii. Click Extract to extract the image for the property.
b) To extract images for multiple properties at the same time, do the following:
i. Click Edit query. Enter the query in the dialog box that is displayed and then click OK.
ii. Click Extract All to extract the images.
iii. To scroll through the extracted images, use the previous and next buttons. Adjust the quadrant check boxes and paths as necessary. (For information about the quadrant check box, see the note under Step 3a above.)
4. If you want to view the entire image in EFS (not just the portion of the image applicable for the property records), click EFS.
Result
The images extracted correspond to the parcel layer you used in GIS and cannot be shifted.
Note If you are extracting images for multiple properties, the extraction could be lengthy. As stated above, we recommend that you extract images for multiple properties after normal business hours.
View Property, Land, Improvements, or Images
Purpose
Use this procedure to open the Property, Land, Improvements, or Image details in PACS from GIS.
Procedure
I. To view Property Details in PACS from GIS:
1. From the map, find the property that you want to view Property Details.
2. Without selecting the property, right click on the parcel to open the Data Frame Submenu.
3. Click View > Property.
4. PACS opens the property with the Summary panel being displayed.
II. To view Land Details in PACS from GIS:
1. From the map, find the property that you want to view Land Details.
2. Without selecting the property, right click on the parcel to open the Data Frame Submenu.
3. Click View > Land.
4. PACS opens the property with the Land panel being displayed.
Note This option is only available from GIS Appraiser and GIS Analyst.
GIS Module V2.0
Page 101 9/17/2013, 1:38 PM
GIS V2.0 (9.0.38) True Automation, Inc.
III. To view Improvement Details in PACS from GIS:
1. From the map, find the property that you want to view Improvement Details.
2. Without selecting the property, right click on the parcel to open the Data Frame Submenu.
3. Click View > Improvements.
4. PACS opens the property with the Improvements panel being displayed.
Note This option is only available from GIS Appraiser and GIS Analyst.
IV. To view Images in PACS from GIS:
1. From the map, find the property that you want to view Images.
2. Without selecting the property, right click on the parcel to open the Data Frame Submenu.
3. Click View > Images.
4. PACS opens the Image Viewer. If there is an image available, the main image for that property is displayed.
Appraisal Cards
Purpose
Use this procedure to preview or print Appraisal Cards for a property from GIS.
Procedure
1. From the map, find the property that you want to view Property Details.
2. Without selecting the property, right click on the parcel to open the Data Frame Submenu.
3. Click Appraisal Cards > Preview or Print. If you click Preview, PACS provides a preview of the appraisal card. If you click Print, PACS prints the appraisal card for the property.
Click here for more information on advanced printing options of Appraisal Cards.
Contents
Page 102 9/17/2013, 1:38 PM
GIS V2.0 (9.0.38) True Automation, Inc.
Advance Search
Purpose
Use this procedure to retrieve a specific set of data from the system.
You can specify the following kinds of data as shown in the screenshot below:
Property data, such as a block, a neighborhood, situs information, and geo or reference ID.
Owner data, such as an address and exemptions.
Land data, such as price, acreage, square footage, and ag or timber use.
Improvement data, such as the class code and year built.
Sale data, such as the sale date, sale price, and sales ratio.
Building Permit data, such as permit number, permit type, and status.
Appraiser data, such as last appraiser, last inspection date, and next inspection date.
Other data, such as UGA, tax area, and effective acres group.
Procedure
For the steps to this procedure, see Advance Search (page 81).
Search by Buffer
Purpose
Use this procedure to search a buffer distance from a property, with the selected property being the center of the buffer.
Procedure
1. In GIS Viewer, select the property you want to set as the center of the buffer.
2. Right click on it and select Search by Buffer. The Search Distance dialog appears.
3. Enter in the number and select the unit of measurement.
4. Click OK.
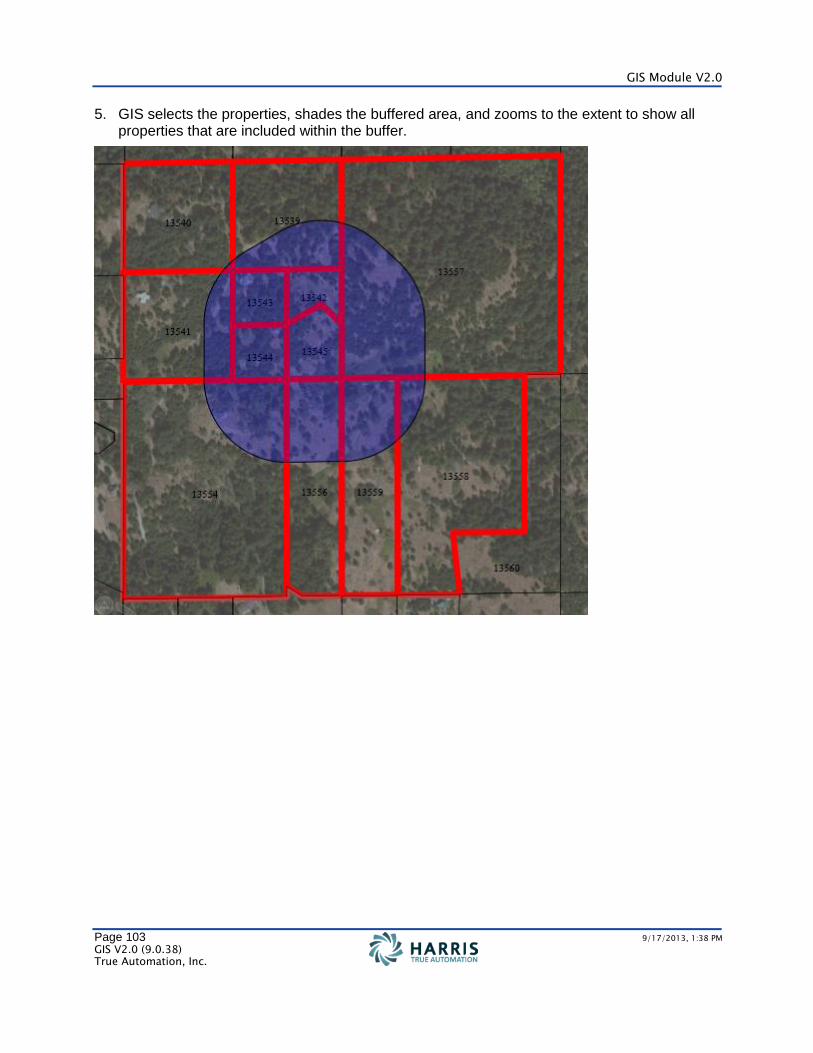
GIS Module V2.0
Page 103 9/17/2013, 1:38 PM
GIS V2.0 (9.0.38) True Automation, Inc.
5. GIS selects the properties, shades the buffered area, and zooms to the extent to show all properties that are included within the buffer.
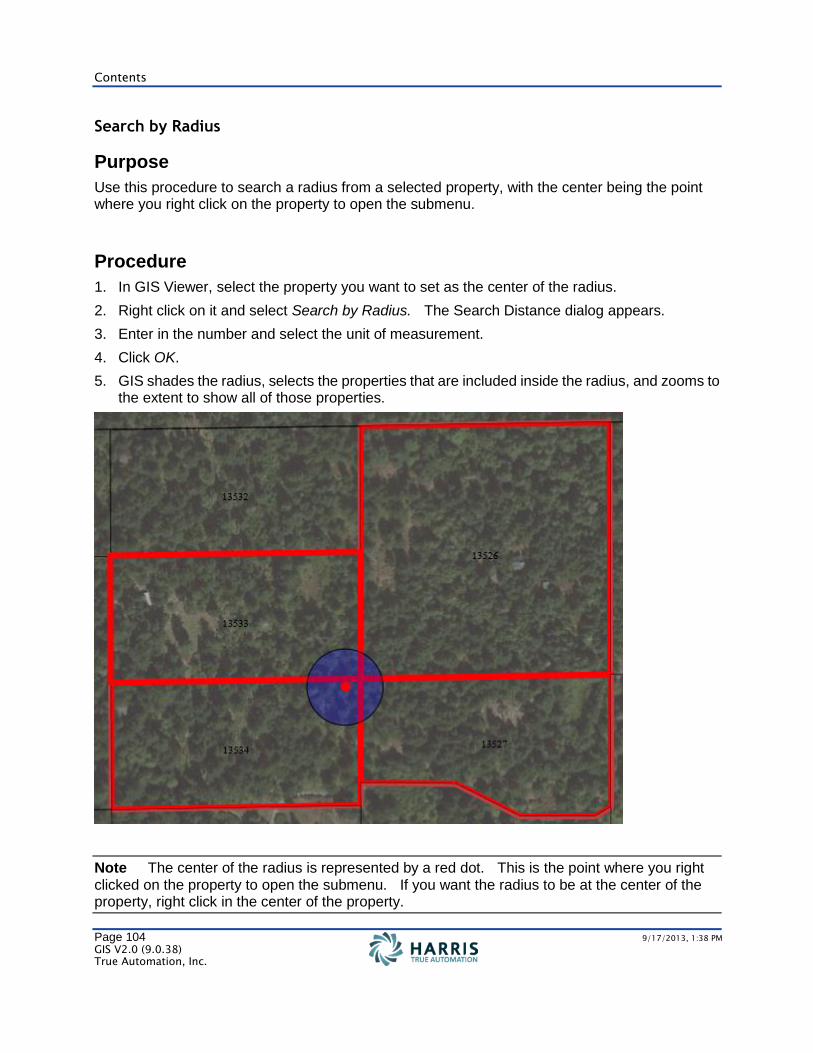
Contents
Page 104 9/17/2013, 1:38 PM
GIS V2.0 (9.0.38) True Automation, Inc.
Search by Radius
Purpose
Use this procedure to search a radius from a selected property, with the center being the point where you right click on the property to open the submenu.
Procedure
1. In GIS Viewer, select the property you want to set as the center of the radius.
2. Right click on it and select Search by Radius. The Search Distance dialog appears.
3. Enter in the number and select the unit of measurement.
4. Click OK.
5. GIS shades the radius, selects the properties that are included inside the radius, and zooms to the extent to show all of those properties.
Note The center of the radius is represented by a red dot. This is the point where you right clicked on the property to open the submenu. If you want the radius to be at the center of the property, right click in the center of the property.
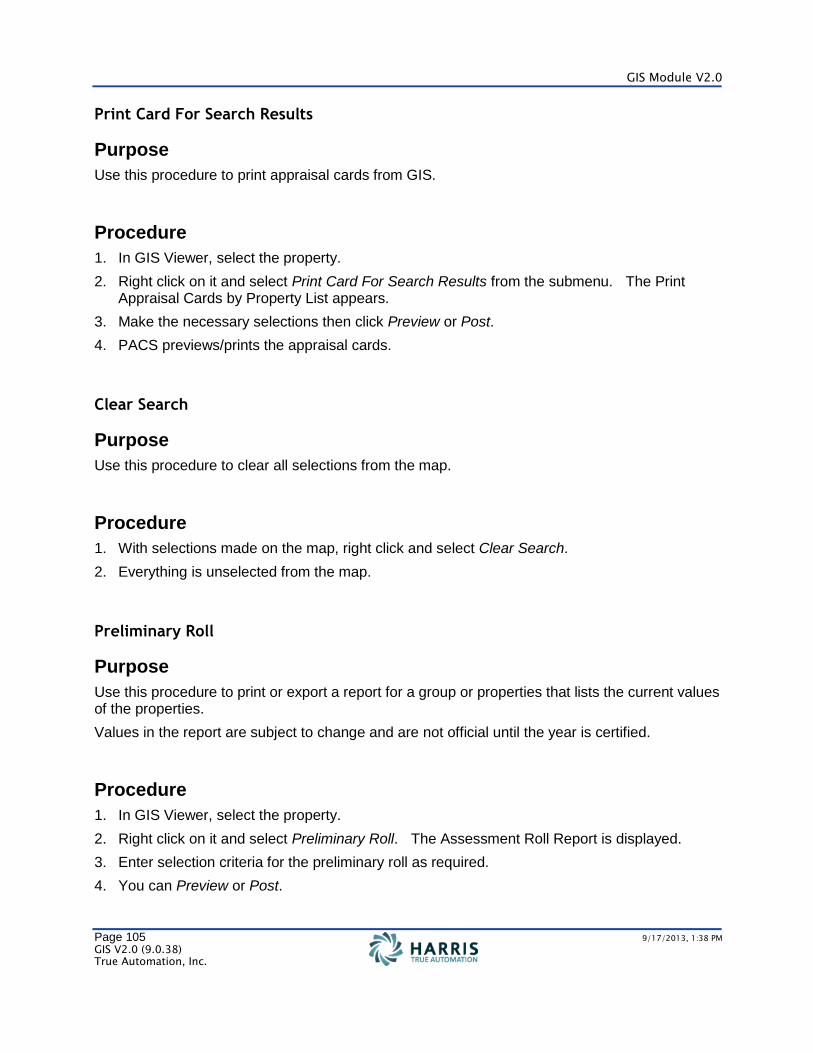
GIS Module V2.0
Page 105 9/17/2013, 1:38 PM
GIS V2.0 (9.0.38) True Automation, Inc.
Print Card For Search Results
Purpose
Use this procedure to print appraisal cards from GIS.
Procedure
1. In GIS Viewer, select the property.
2. Right click on it and select Print Card For Search Results from the submenu. The Print Appraisal Cards by Property List appears.
3. Make the necessary selections then click Preview or Post.
4. PACS previews/prints the appraisal cards.
Clear Search
Purpose
Use this procedure to clear all selections from the map.
Procedure
1. With selections made on the map, right click and select Clear Search.
2. Everything is unselected from the map.
Preliminary Roll
Purpose
Use this procedure to print or export a report for a group or properties that lists the current values of the properties.
Values in the report are subject to change and are not official until the year is certified.
Procedure
1. In GIS Viewer, select the property.
2. Right click on it and select Preliminary Roll. The Assessment Roll Report is displayed.
3. Enter selection criteria for the preliminary roll as required.
4. You can Preview or Post.
Contents
Page 106 9/17/2013, 1:38 PM
GIS V2.0 (9.0.38) True Automation, Inc.
Recalculate Properties
Purpose
Use this procedure to recalculate properties selected in GIS. This will open up the Mass Recalculation dialog and auto-populate it with the selected properties.
Procedure
1. In GIS Viewer, select the property.
2. Right click on it and choose Recalc Properties. The Recalculate Property dialog is displayed.
3. Select one of the following options:
All Properties carries out recalculation for all properties in the database.
Select Properties allows you to use selection criteria to carry out recalculation on a group of properties.
Query carries out recalculation on properties retrieved by a query.
Note When recalculating properties in GIS Appraiser, the default selection is Query and includes the default GIS query in the query frame. We recommend that you use this default query because it recalculates the properties that you selected in GIS.
4. To determine how many properties the system will carry out the recalculation for, click Count. The number of properties to be recalculated is displayed.
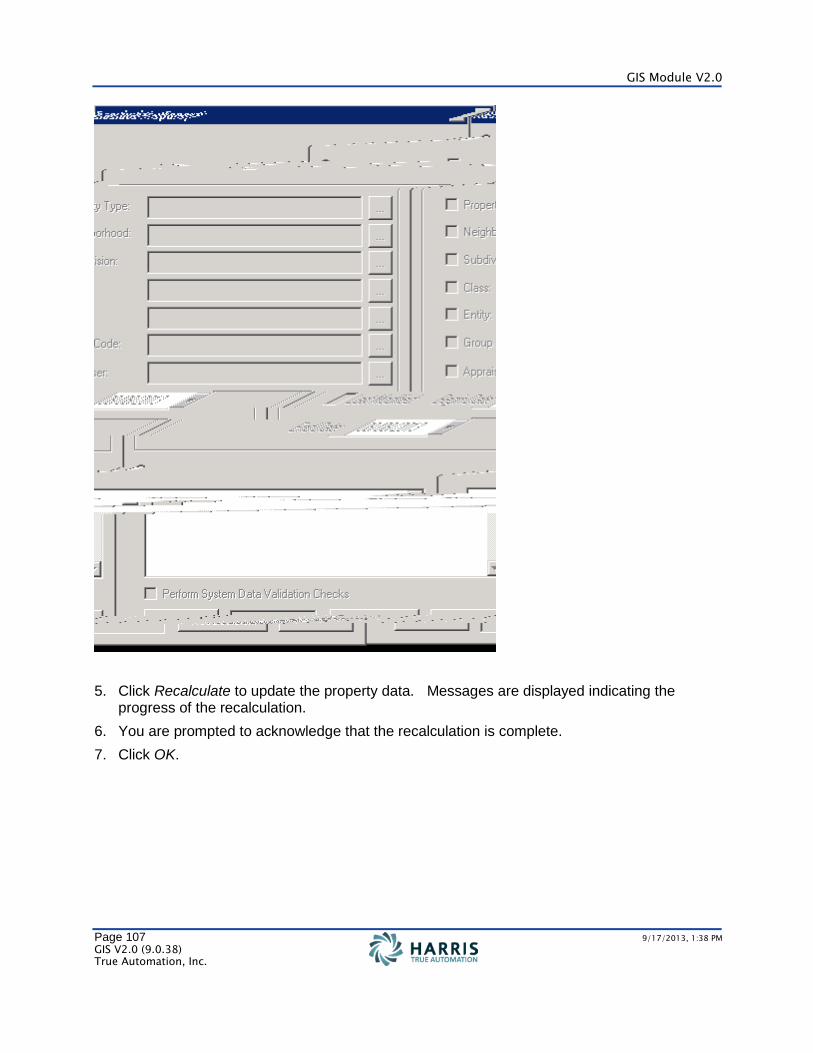
GIS Module V2.0
Page 107 9/17/2013, 1:38 PM
GIS V2.0 (9.0.38) True Automation, Inc.
5. Click Recalculate to update the property data. Messages are displayed indicating the progress of the recalculation.
6. You are prompted to acknowledge that the recalculation is complete.
7. Click OK.
Contents
Page 108 9/17/2013, 1:38 PM
GIS V2.0 (9.0.38) True Automation, Inc.
Split Wizard
Purpose
Use this procedure to view split properties in PACS from GIS. There are a couple of ways to do this.
Note This functionality is only available in GIS Appraiser and GIS Analyst.
Procedure
I. Split Wizard from a property
1. In PACS Appraisal, open a property.
2. Click Commands > Split Property.
3. Click on the GIS button.
4. The GIS Viewer opens with the extent set to the property selected for the split.
II. Split Wizard from GIS
1. In GIS Viewer, select the property you want to split.
2. Right click on it to open the context menu and select Split Wizard.
3. The Split Setup Dialog opens.
GIS Module V2.0
Page 109 9/17/2013, 1:38 PM
GIS V2.0 (9.0.38) True Automation, Inc.
Merge Wizard
Purpose
Use this procedure to view merged properties in PACS from GIS. There are a couple of ways to do this.
Note This functionality is only available in GIS Appraiser and GIS Analyst.
Procedure
I. Merge Wizard from a property
1. In PACS Appraisal, open a property.
2. Click Commands > Merge Property.
3. Click on the GIS button. The GIS Viewer opens, zoomed in to the properties selected for the merge.
II. Merge Wizard from GIS
1. In GIS Viewer, select the properties you want to merge.
2. Right click on them to open then context menu and select Merge Wizard.
3. The Merge Setup Dialog opens.
Contents
Page 110 9/17/2013, 1:38 PM
GIS V2.0 (9.0.38) True Automation, Inc.
Mass Maintenance
Use the following procedures to:
Mass Update
Mass Update Land Miscellaneous Codes
Mass Update Tax Area/Special Assessment Agencies
Note Mass Update Land Miscellaneous Codes and Mass Update Tax Area/Special Assessment Agencies options are only available in PACS 9.0.
Mass Update
Purpose
Use this procedure to update multiple properties selected in the data frame.
Caution It is not possible to rerun a mass update.
Prerequisites
You must create a daily batch before doing a mass update.
Procedure
1. From GIS, select the property you want.
2. Right click on the map to open the context menu.
3. Hover over Mass Maintenance and select Mass Update.
4. A Mass Update prompt may appear to remind you that a Daily Batch must first be created. If it has already been created, click OK. Otherwise, click Cancel and create a daily batch.
5. The Mass Update Details dialog appears, automatically defaulting to the Property ID's type. Note that the Property IDs are automatically populated in the Property ID(s) paragraph. This came from the properties that were selected from the map.
6. Follow the standard operating procedures for mass updating on the Mass Update Details dialog.
7. Click Count. The # Items column will show the same number of PIDs that are entered in the Property ID(s) paragraph.
Caution Verify that the # Items column matches the amount of properties that were in the update. You must ensure that the count is within an expected reasonable estimate, taking into consideration that the count is not the number of properties, but the number of items to be
GIS Module V2.0
Page 111 9/17/2013, 1:38 PM
GIS V2.0 (9.0.38) True Automation, Inc.
updated. Therefore, if a property has multiple improvements and all of them are updated, the count will reflect each individual improvement.
8. Click Update. The Mass Maintenance Processing dialog will appear as processing. It will then disappear when it's completed.
9. The GIS Viewer will reappear with the property or properties selected that were updated.
10. To verify the changes were updated:
From the GIS Viewer, click the Unselect All icon from the GIS Toolbar.
Right click on one of the properties that were just updated.
Hover over View and select Property. This will open up the Summary panel on the property in PACS.
Mass Update Land Miscellaneous Codes in 9.0
Purpose
Use this procedure to open up the Mass Update Land Miscellaneous Code Details dialog and auto-populate it with the selected properties.
Note This functionality is only available in PACS 9.0.
Caution It is not possible to rerun a mass update.
Prerequisites
You must create a daily batch before doing a mass update.
Procedure
1. From GIS Viewer, select one or more properties.
2. Right click on the map to open the context menu.
3. Hover over Mass Maintenance and select Mass Update Land Miscellaneous Codes. The Mass Update Land Miscellaneous Codes dialog opens.
4. The Mass Update Land Miscellaneous Code Details dialog appears, automatically defaulting to the Property ID's Type. It automatically populates the Property IDs, from the properties selected on the map, into the Property ID(s) paragraph.
5. Follow the standard operating procedures for mass updating on the Mass Update Land Miscellaneous Code Details dialog.
Contents
Page 112 9/17/2013, 1:38 PM
GIS V2.0 (9.0.38) True Automation, Inc.
6. Click Count. The # of Items column will show the same number of PIDs that are entered in the Property ID(s) paragraph.
Caution Verify that the # Items column matches the amount of properties that were in the update. You must ensure that the count is within an expected reasonable estimate, taking into consideration that the count is not the number of properties, but the number of items to be updated. Therefore, if a property has multiple improvements and all of them are updated, the count will reflect each individual improvement.
7. Click Update. The Mass Maintenance Processing dialog may appear as it's processing. Click OK if prompted.
8. The GIS Viewer will reappear with the property or properties selected that were updated.
9. To verify the changes were updated:
From the GIS Viewer, click the Unselect All icon from the GIS Toolbar.
Right click on one of the properties that were just updated.
Hover over View and select Land. This will open up the Land panel on the property in PACS.
Mass Update Tax Area/Special Assessment Agencies in 9.0
Purpose
Use this procedure to open up the Mass Update Tax Area/Special Assessment Details dialog and auto-populate it with the selected properties.
Note This functionality is only available in PACS 9.0.
Caution It is not possible to rerun a mass update.
Prerequisites
You must create a daily batch before doing a mass update.
Procedure
1. From GIS Viewer, select one or more properties.
2. Right click on the map to open the context menu.
3. Hover over Mass Maintenance and select Mass Update Tax Area / Special Assessment Details. The Mass Update Tax Area / Special Assessment Details dialog opens.
GIS Module V2.0
Page 113 9/17/2013, 1:38 PM
GIS V2.0 (9.0.38) True Automation, Inc.
4. The Mass Update Tax Area / Special Assessment Details dialog appears, automatically defaulting to the Property ID's Type. It automatically populates the Property IDs, from the properties selected on the map, into the Property ID(s) paragraph.
5. Follow the standard operating procedures for mass updating on the Mass Update Tax Area / Special Assessment Details dialog.
6. Click Count. The # of Items column will show the same number of PIDs that are entered in the Property ID(s) paragraph.
Caution Verify that the # Items column matches the amount of properties that were in the update. You must ensure that the count is within an expected reasonable estimate, taking into consideration that the count is not the number of properties, but the number of items to be updated. Therefore, if a property has multiple improvements and all of them are updated, the count will reflect each individual improvement.
7. Click Update. The Mass Maintenance Processing dialog may appear as it's processing. Click OK if prompted.
8. The GIS Viewer will reappear with the property or properties selected that were updated.
9. To verify the changes were updated:
From the GIS Viewer, click the Unselect All icon from the GIS Toolbar.
Right click on one of the properties that were just updated.
Hover over View and select Property. This will open up the Summary panel on the property in PACS.
Click on the Tax Area & Exemptions panel to view that the changes were made.

Contents
Page 114 9/17/2013, 1:38 PM
GIS V2.0 (9.0.38) True Automation, Inc.
Mass Maintenance from Spatial Info
Use the following procedures to:
Mass Update
Mass Update Land Miscellaneous Codes
Mass Update Tax Area/Special Assessment Agencies
Note Mass Update Land Miscellaneous Codes and Mass Update Tax Area/Special Assessment Agencies options are only available in PACS 9.0.
Mass Update
Purpose
Use this procedure to open up the take a layer of data and manipulate it spatially (across the region of that layer) or take two layers to create a third layer and Mass Update.
Caution It is not possible to rerun a mass update.
Prerequisites
You must create a daily batch before doing a mass update.
Procedure
1. From GIS Viewer, select one or more properties.
2. Right click on the map to open the context menu.
3. Hover over Mass Maintenance and select Mass Update. The Mass Maintenance from Spatial Info dialog opens.
4. From the Tool dropdown list, select which Geoprocessing tool you want to use. The following options are available:
Buffer - The user can input a certain distance to create a buffer around input features to a specified distance.
Clip - The user can extract input features that overlay the clip features.
Intersect - The user can show only layer information for selected properties. This functionality extracts information where two layers intersect.
Union - The user can combine two layers together. It combines the parcels and attributes that are selected and display the layers that are touched by those properties.
5. Select the Input Features.
6. Type in the Distance unit.
7. Select the unit of measurement from the Distance drop down list.
GIS Module V2.0
Page 115 9/17/2013, 1:38 PM
GIS V2.0 (9.0.38) True Automation, Inc.
8. You can rename the new layer from the Output Name field.
9. Click OK. The Running geoprocessing tool dialog opens and shows it processing.
10. A Mass Update prompt may appear to remind you that a Daily Batch must first be created. If it has already been created, click OK. Otherwise, click Cancel and create a daily batch.
11. The Mass Update Details dialog appears, automatically defaulting to the Property ID's type. Note that the Property IDs are automatically populated in the Property ID(s) paragraph. This came from the properties that were selected from the map.
12. Follow the standard operating procedures for mass updating on the Mass Update Details dialog.
13. Click Count. The # Items column will show the same number of PIDs that are entered in the Property ID(s) paragraph.
Caution Verify that the # Items column matches the amount of properties that were in the update. You must ensure that the count is within an expected reasonable estimate, taking into consideration that the count is not the number of properties, but the number of items to be updated. Therefore, if a property has multiple improvements and all of them are updated, the count will reflect each individual improvement.
14. Click Update. The Mass Maintenance Processing dialog will appear as processing. It will then disappear when it's completed.
15. Click OK on the Geoprocessing tool dialog when it says Geoprocessing complete Done. The GIS Viewer will reappear with the Geoprocessing tool activated for the property or properties that were selected.
Note To remove the new layer created, either right click on the name and choose Remove Layer to permanently eliminate the layer from the map, or uncheck the box beside the layer to hide that layer on the map.
Mass Update Land Miscellaneous Codes in 9.0
Purpose
Use this procedure to open up the take a layer of data and manipulate it spatially (across the region of that layer) or take two layers to create a third layer and Mass Update Land Miscellaneous Code Details.
Note This functionality is only available in PACS 9.0.
Caution It is not possible to rerun a mass update.
Contents
Page 116 9/17/2013, 1:38 PM
GIS V2.0 (9.0.38) True Automation, Inc.
Prerequisites
You must create a daily batch before doing a mass update.
Procedure
1. From GIS Viewer, select one or more properties.
2. Right click on the map to open the context menu.
3. Hover over Mass Maintenance and select Mass Update Land Miscellaneous Code Details. The Mass Maintenance from Spatial Info dialog opens.
4. From the Tool dropdown list, select which Geoprocessing tool you want to use. The following options are available:
Buffer - The user can input a certain distance to create a buffer around input features to a specified distance.
Clip - The user can extract input features that overlay the clip features.
Intersect - The user can show only layer information for selected properties. This functionality extracts information where two layers intersect.
Union - The user can combine two layers together. It combines the parcels and attributes that are selected and display the layers that are touched by those properties.
5. Select the Input Features.
6. Type in the Distance unit.
7. Select the unit of measurement from the Distance drop down list.
8. You can rename the new layer from the Output Name field.
9. Click OK. The Running geoprocessing tool dialog opens and shows it processing.
10. A Mass Update prompt may appear to remind you that a Daily Batch must first be created. If it has already been created, click OK. Otherwise, click Cancel and create a daily batch.
11. The Mass Update Land Miscellaneous Code Details dialog appears, automatically defaulting to the Property ID's Type. This will automatically populate the Property IDs, from the properties selected on the map, into the Property ID(s) paragraph.
12. Follow the standard operating procedures for mass updating on the Mass Update Land Miscellaneous Code Details dialog.
13. Click Count. The # Items column will show the same number of PIDs that are entered in the Property ID(s) paragraph.
Caution Verify that the # Items column matches the amount of properties that were in the update. You must ensure that the count is within an expected reasonable estimate, taking into consideration that the count is not the number of properties, but the number of items to be updated. Therefore, if a property has multiple improvements and all of them are updated, the count will reflect each individual improvement.
GIS Module V2.0
Page 117 9/17/2013, 1:38 PM
GIS V2.0 (9.0.38) True Automation, Inc.
14. Click Update. The Mass Maintenance Processing dialog will appear as processing. It will then disappear when it's completed.
15. Click OK on the Geoprocessing tool dialog when it says Geoprocessing complete Done. The GIS Viewer will reappear with the Geoprocessing tool activated for the property or properties that were selected.
Note To remove this new layer, either right click on the name and choose Remove Layer to permanently eliminate the layer from the map, or uncheck the box beside the layer to hide that layer on the map.
Contents
Page 118 9/17/2013, 1:38 PM
GIS V2.0 (9.0.38) True Automation, Inc.
Mass Update Tax Area / Special Assessment Agencies in 9.0
Purpose
Use this procedure to open up the take a layer of data and manipulate it spatially (across the region of that layer) or take two layers to create a third layer and Mass Update Tax Area / Special Assessment Agencies.
Note This functionality is only available in PACS 9.0.
Caution It is not possible to rerun a mass update.
Prerequisites
You must create a daily batch before doing a mass update.
Procedure
1. From GIS Viewer, select one or more properties.
2. Right click on the map to open the context menu.
3. Hover over Mass Maintenance and select Mass Update Tax Area / Special Assessment Agencies. The Mass Maintenance from Spatial Info dialog opens.
4. From the Tool dropdown list, select which Geoprocessing tool you want to use. The following options are available:
Buffer - The user can input a certain distance to create a buffer around input features to a specified distance.
Clip - The user can extract input features that overlay the clip features.
Intersect - The user can show only layer information for selected properties. This functionality extracts information where two layers intersect.
Union - The user can combine two layers together. It combines the parcels and attributes that are selected and display the layers that are touched by those properties.
5. Select the Input Features.
6. Type in the Distance unit.
7. Select the unit of measurement from the Distance drop down list.
8. You can rename the new layer from the Output Name field.
9. Click OK. The Running geoprocessing tool dialog opens and shows it processing.
10. A Mass Update prompt may appear to remind you that a Daily Batch must first be created. If it has already been created, click OK. Otherwise, click Cancel and create a daily batch.
11. The Mass Update Tax Areas/Special Assessment Details dialog appears, automatically defaulting to the Property ID's Type. This will automatically populate the Property IDs, from the properties selected on the map, into the Property ID(s) paragraph.

GIS Module V2.0
Page 119 9/17/2013, 1:38 PM
GIS V2.0 (9.0.38) True Automation, Inc.
12. Follow the standard operating procedures for mass updating on the Mass Update Land Tax Areas/Special Assessment Details dialog.
13. Click Count. The # of Properties to be Updated field will update to the same number of PIDs that are entered in the Property ID(s) paragraph.
Caution Verify that the # Items column matches the amount of properties that were in the update. You must ensure that the count is within an expected reasonable estimate, taking into consideration that the count is not the number of properties, but the number of items to be updated. Therefore, if a property has multiple improvements and all of them are updated, the count will reflect each individual improvement.
14. Click Update. The Mass Maintenance Processing dialog will appear as processing. It will then disappear when it's completed.
15. Click OK on the Geoprocessing tool dialog when it says Geoprocessing complete Done. The GIS Viewer will reappear with the Geoprocessing tool activated for the property or properties that were selected.
Note To remove this new layer, either right click on the name and choose Remove Layer to permanently eliminate the layer from the map, or uncheck the box beside the layer to hide that layer on the map.
Checkout To Penpad
Purpose
Use this procedure to check out properties from the GIS Viewer/Appraiser window to Penpad.
Prerequisites
You have connected your Penpad mobile computer to your office network and logged on to Penpad.
Procedure
1. In the GIS Viewer/Appraiser window, select a property or properties.
2. Right click to open the context menu and choose Checkout to Penpad. A status message is displayed.
3. You are prompted to acknowledge that the check out operation completed successfully. Click OK.
See Also
For information about Penpad features, see Penpad System Overview.
Contents
Page 120 9/17/2013, 1:38 PM
GIS V2.0 (9.0.38) True Automation, Inc.
Mark Complete
This option allows you to mark properties complete by right clicking on the property in GIS.
Create Neighborhood
Purpose
Use this procedure to assign properties to a neighborhood code through the Create Neighborhood Wizard.
Prerequisites
The neighborhood code that you will use has been set up. To set up the neighborhood code, choose Tools > Code File Maintenance > General > Neighborhood Codes.
Procedure
1. In the GIS Viewer/Appraiser, use the Select Properties icon to select the properties to include in the neighborhood.
2. Right-click on a selected property and choose Create Neighborhood.
The Profile Wizard is displayed with the default GIS query for the selected properties.
3. If necessary, choose the following options:
Verify Query –Confirms the syntax of the query.
Verify # of Props –Determines the number of properties to be retrieved by the query.
Load Query –Loads a previously saved query into the Profile Wizard.
Save Query –Saves a manually entered query for future use.
4. Click Next.
The Profile Wizard –Select Sales Options dialog box is displayed.
5. Choose the following options as required for the sales options:
Sale Types –Enables the selection of one or more sale types established by the CAD which are required for the property records to be included in the neighborhood.
Sale Date –Enables the selection of a date range that the property records to be included in the neighborhood must have been sold within.
Sale Ratio Type
Comment
6. As required, select the inclusion of parent, child, and/or deleted properties.
7. Click Next.
The Profile Wizard dialog box is displayed.
8. In the Neighborhood drop-down list, select the neighborhood to add the properties to.
9. If you need to make adjustments to reach a certain percentage of market value, click Change Imprv/Land %.
GIS Module V2.0
Page 121 9/17/2013, 1:38 PM
GIS V2.0 (9.0.38) True Automation, Inc.
10. Click Next.
Another version of the Profile Wizard dialog box is displayed.
11. Click Apply/Recalculate to apply the neighborhood and/or subdivision codes and recalculate the property.
A message is displayed indicating the system is updating the properties.
After processing, the number of properties, and start and end times of the processing are displayed.
12. Click Next.
Another version of the Profile Wizard dialog box is displayed.
13. Click Rebuild Profile to build the profile based on the selected criteria.
A message is displayed indicating that the system is building the profile.
Another version of the Profile Wizard dialog box is displayed with the newly created profiles.
14. Click Next.
Another version of the Profile Wizard is displayed.
15. Choose one of the following options to accept, change or delete the profile:
Yes, I am happy with the data –Accepts the new profile.
No, I would like to change the Land/Imprv % and regenerate –Returns to the dialog box in which you can enter the new percentage.
No, I would like to change the Land/Imprv % to the suggested percentage –Allows you to enter the new land/improvement percentage to be used.
No, delete the generated profile –Deletes the profile.
16. Click Finish.
Create Profile
This feature opens the Profile Wizard to create profile types for neighborhood, abstract/subdivision, region, subset, or query.
View Neighborhood Profile
This feature displays the neighborhood profile for the property selected.
View Abs/Subs Profile
This feature displays the subdivision profile for selected properties if a subdivision has been set up.
Contents
Page 122 9/17/2013, 1:38 PM
GIS V2.0 (9.0.38) True Automation, Inc.
Move GIS Acres to Property
Purpose
Use this procedure to enter the acreage amount calculated in GIS into the PACS property legal description.
Procedure
1. From a map, select a property in the current year.
2. Right click on the property to open the context menu.
3. Select Move GIS Acres to Property. This will update the property legal acreage with the GIS acreage.
Page 123 9/17/2013, 1:38 PM
GIS V2.0 (9.0.38) True Automation, Inc.
9/6/2013 11:35
True Automation, Inc. 2600 Technology Dr., Suite 900 Plano, TX 75074
Phone: 972.881.1858 Fax: 972.633.0533
A
Add Data • 10, 69 Add Text • 61 Adding Labels to Map Layers • 28, 31, 80,
87, 89 Advance Search • 81, 102 Advanced Symbology
Categories • 43, 88 Quantities • 47, 88
Appraisal Cards • 101 Attaching Pictometry Images to Property
Records • 98
B
Before You Begin • 5 Border • 62 Buffer • 34 Buttons in the GIS Toolbar • 64
C
Changing Layer and Legend Properties • 32 Checkout To Penpad • 119 Clear Search • 105 Clip • 36 Context Menu from the Map • 90 Context Menu from the Table of Contents •
84 Create Neighborhood • 120 Create Profile • 121 Creating a New Map • 5, 25 Creating an Alias for a Label • 29, 30 Creating the Image Type • 95 Creating the Record Type • 95 Creating the Sub Types • 96
D
Directional Key • 60
G
GIS Module V2.0 • 4 Go To Property • 78
I
Intersect • 37
L
Labeling • 87 Layout Tab • 58 Legend • 60 Legend Properties • 32 License Setup for 8.1 • 5, 7 License Setup for 9.0 • 5, 8
M
Manage Bookmarks • 77 Manage Map • 5, 66 Managing Layers • 51 Managing Map Layers and Creating New
Group Layers • 51 Mark Complete • 120 Mass Maintenance • 110 Mass Maintenance from Spatial Info • 114 Mass Update • 110, 114 Mass Update Land Miscellaneous Codes in
9.0 • 111, 115 Mass Update Tax Area / Special Assessment
Agencies in 9.0 • 118 Mass Update Tax Area/Special Assessment
Agencies in 9.0 • 112 Maximizing the Pictometry Window • 97 Measure • 73 Merge Wizard • 109 Move GIS Acres to Property • 122
N
Need To Know • 5 New Group Layer • 52, 84 New Map • 25, 65
O
Opening GIS from PACS 8.1 • 12 Opening GIS from PACS 9.0 • 20
Index
Index
Page 124 9/17/2013, 1:38 PM
GIS V2.0 (9.0.38) True Automation, Inc.
P
Pan • 70 Parcel Layer • 86 PDF File
GIS User Guide • 4 Pictometry • 93 Preliminary Roll • 105 Print Card For Search Results • 105 Printing a Map • 58 Properties • 89 Property Info • 78 Property Links • 79 Property Note • 80
R
Recalculate Properties • 106 Refresh Data • 83 Remove Layer • 84 Rename Layer • 84 Renaming Map Layers and Symbols • 33, 42,
89 Rotate • 56
S
Save Map • 67 Save Map As • 67, 68 Scale Bar • 59 Search by Buffer • 102 Search by Radius • 104 Select Properties • 71 Set Bookmark • 77 Setting up a Current or Prior Year layer • 26,
89 Setting up Disclaimer and Max Records for
8.1 • 5, 6, 9 Setting up Disclaimer and Max Records for
9.0 • 5, 6, 11 Setting up Geoprocessing • 34, 70 Setting up Pictometry Configuration • 94 Setting up Symbology • 41, 89 Simple Symbology
Features • 41, 88 Spatial Analysis (Geoprocessing) • 70 Split Wizard • 23, 108 Symbology • 88
T
Testing Pictometry in PACS • 97
U
Union • 39 Unselect All • 72 Unselect Properties • 72 Using GIS • 12 Using the Navigation Wheel • 56
V
View Abs/Subs Profile • 121 View Neighborhood Profile • 121 View Property, Land, Improvements, or
Images • 100
Z
Zoom to Full Extent • 57, 85 Zooming in and out using the
mouse/keyboard • 55 Zooming In/Out • 55