Getting to Know the D1 - cdn-10.nikon-cdn.comcdn-10.nikon-cdn.com/pdf/manuals/dslr/D1rm.pdf ·...
144
ii Getting to Know the D1 Parts of the D1 Focus mode selector dial (pg. 33) Lens release button (pg. 6) DC in, video out connector cover (pg. 102) 10-pin remote terminal (pg. 116) Sync terminal for external flash (pg. 95) Self-timer lamp (pg. 63) Mode dial lock release (pg. 26) Eyelet for camera strap Auto bracketing button (pg. 53–55) Flash sync mode button (pg. 96) Mode dial (pg. 26) AF area mode button (pg. 34–35) Accessory shoe (pg. 95) Depth-of-field preview button (pg. 64) Sub-command dial Power switch (pg. 4) Eyelet for camera strap Shutter-release button (pg. 20–21) Exposure mode button (pg. 43–48)/ Format button (pg. 13) Exposure compensation button (pg. 51–52) Top control panel (pg. v) Focal plane indicator (pg. 64) Metering selector lock button (pg. 41–42) Metering selector (pg. 41–42) Diopter adjustment knob (pg. 63) Getting to Know the D1: Parts of the D1
Transcript of Getting to Know the D1 - cdn-10.nikon-cdn.comcdn-10.nikon-cdn.com/pdf/manuals/dslr/D1rm.pdf ·...

ii
Getting to Know the D1
Parts of the D1
Focus modeselector dial (pg. 33)
Lens releasebutton (pg. 6)
DC in, video outconnector cover (pg. 102)
10-pin remoteterminal (pg. 116)
Sync terminal forexternal flash (pg. 95)
Self-timerlamp (pg. 63)
Mode dial lockrelease (pg. 26)
Eyelet forcamera strap
Auto bracketingbutton (pg. 53–55)
Flash syncmode button (pg. 96)
Mode dial (pg. 26)
AF area modebutton (pg. 34–35)
Accessory shoe (pg. 95)
Depth-of-field previewbutton (pg. 64)
Sub-commanddial
Power switch(pg. 4)
Eyelet forcamera strap
Shutter-releasebutton (pg. 20–21)
Exposure mode button(pg. 43–48)/ Format
button (pg. 13)
Exposurecompensation
button (pg. 51–52)
Top controlpanel (pg. v)
Focal planeindicator (pg. 64)
Metering selectorlock button (pg. 41–42)
Metering selector(pg. 41–42)
Diopter adjustmentknob (pg. 63)
Getting to Know the D1: Parts of the D1

iii
Eyepiece shutter lever (pg. 62)
AE/AF lock button (pg. 37, 41)
Viewfinder eyepiece
AF start (pg. 33)/Cancel button (pg. 78)
Main command dial
Focus area selector(pg. 36; playback pg. 79)
Focus areaselector lock
(pg. 36)
IEEE 1394connector cover
(pg. 103)
Rear control panel (pg. v)
Delete button (pg. 81)/Format button (pg. 13)
Monitor button (pg. 59)
LCD monitor (pg. vii)
Custom setting button (pg. 66)/Execute button (pg. 78)
Command lock/Menu button (pg. 43, 46)
Battery pack latch (pg. 4)
Image quality button (pg. 29)/Select all button (pg. 78)
Sensitivity button (pg. 30)/Multiple select button (pg. 78)
White balance button (pg. 31)/Thumbnail button (pg. 78)
Getting to Know the D1: Parts of the D1

iv
Shutter-release button(vertical shooting)
(pg. 4)
Shutter-release buttonlock (vertical shooting)
(pg. 4)
Cover for CompactFlashcard slot (pg. 12)
Memory cardaccess lamp (pg. 12)
Card slot coverrelease button(under cover) (pg. 12)
Main command dial(vertical shooting)
AF start (AF ON) button(vertical shooting)
(pg. 33)
Tripod socket
Accessories
Body capBF-1A
Cover forLCD monitor
Video cableEG-D1
Camera strapAN-D1
Getting to Know the D1: Parts of the D1

v
Flexible programindicator (pg. 18)
Exposuremode (pg. 43–47)
Bracketingindicator (pg. 53)
Exposurecompensation indicator (pg. 51)
Clock battery indicator (pg. 8–9)
Shutter speed (pg. 43–44)/Exposurecompensation (pg. 51)/Date and time (pg. 8)
Year/month indicator (pg. 8–9)
Aperture display (pg. 45)/Playback(pg. 78–80)/PC mode indicator (pg. 104)
Number ofexposuresremaining
(pg. 22)
Current framenumber (pg. 22)
Day indicator (pg. 8–9)
Electronic analog exposure display(pg. 48)/Exposure compensation (pg. 54–55)
Flash sync mode (pg. 96) CompactFlash memorycard indicator (pg. 22)
Battery indicator (pg. 5)
Focus area display (pg. 36)
Shutter-speed lock (pg. 44)
Aperture lock(pg. 46)
Top Control Panel
Rear Control Panel
CompactFlash cardstatus display
White-balancemode (pg. 31–32)Image quality display (pg. 28–29)
Sensitivity/Number of exposures remaining/File type/Custom settings number
Black-and-white mode (pg. 28–29) Monitor indicator
Sensitivity indicator (pg. 30)Custom settings indicator (pg. 65)
Getting to Know the D1: Parts of the D1

vi
12mm (0.47˝) reference circle for center-weighted metering (pg. 41)
Focus brackets(focus area)(pg. 36)Spot-metering targets(pg. 42)
Aperture lock (pg. 45) Exposure mode (pg. 43–48)
Shutter-speed lock (pg. 44)Exposure compensation
indicator (pg. 18)
Focus indicator (pg. 20) Flash-ready light (pg. 95)
Meteringsystem (pg. 41)
Auto-exposurelock (pg. 49)
Frame counter (pg.22)/Exposures remaining
in buffer (pg. 22)/Exposure compensation
value (pg. 51)
Electronic analogexposure display (pg. 48)/
Exposure compensation (pg. 54–55)
Shutter speed (pg. 44)
Aperture (pg. 45)
Viewfinder Display
Getting to Know the D1: Parts of the D1

vii
LCD Monitor
Note
Getting to Know the D1: Parts of the D1
1 Frame number
The LCD monitor and control panels may darken or turn black at high temperatures. Thedisplays will return to normal when the temperature drops. At low temperatures, theresponse time of the LCD control panels may drop, but response time will return to normalwhen the temperature rises.
1 0 0 - 6
1
1 Folder name2 Filename3 Frame number4 Date of recording
5 Time of recording6 Protected file7 Image quality
1 0 0 N C _ D 1 / D S C _ 0 0 0 6 . J P G 6 / 1 82 0 0 0 / 0 1 / 2 6 0 1 : 1 1 : 2 0 N O R M A L
1
4 5 6 7
2 3
viii
Caring for the Camera and Battery
Do not dropThe camera and lens may malfunction ifsubjected to strong shocks or vibration.
Keep dryThis product is not waterproof, and maymalfunction if immersed in water or exposedto high levels of humidity. Rusting of theinternal mechanism can cause irreparabledamage.
Avoid sudden changes in temperatureSudden changes in temperature, such asoccur when entering or leaving a heatedbuilding on a cold day, can causecondensation inside the device. To preventcondensation, place the device in its carryingcase or a plastic bag before exposing it tosudden changes in temperature.
Keep away from strong magnetic fieldsDo not use or store this device in the vicinityof equipment that produces strongelectromagnetic radiation or magneticfields. Strong static charges or the magneticfields produced by equipment such as radiotransmitters could interfere with the colorLCD monitor, damage data stored on theflash memory card, or affect the product’sinternal circuitry.
Do not touch shutter curtainThe shutter curtain is made of extremely thinmaterial and is easily damaged. Under nocircumstances should you exert pressure onthe curtain, poke it with cleaning tools orother implements, or subject it to strong aircurrents from a blower. Any of these actionscould scratch, deform, or tear the curtain.
Cleaning• When cleaning the camera body, use a
blower to remove dust and lint, then wipegently with a soft, dry cloth. After usingyour camera at the beach or seaside, wipeoff any sand or salt using a cloth lightlydampened with pure water and then dryyour camera thoroughly. In rare instances,
static electricity produced by a brush orcloth may cause the LCD displays to lightup or darken. This does not indicate amalfunction, and the display will shortlyreturn to normal.
• When cleaning the lens and mirror,remember that these elements are easilydamaged. Dust and lint should be gentlyremoved with a blower. When using anaerosol blower, keep the can vertical (tiltingthe can could result in liquid being sprayedon the mirror). If you do get a fingerprint orother stain on the lens, apply a smallamount of lens cleaner to a soft cloth andwipe the lens carefully.
• See “Technical Notes: Cleaning the CCD”for information on cleaning the CCD.
Storage• To prevent mold or mildew, store the
equipment in a dry, well-ventilated area.Do not store it with naptha or camphormoth balls, close to equipment thatproduces strong magnetic fields, or in areassubject to high temperatures, for examplenear a kerosene heater or in a car on a hotday.
• When leaving the product unattended for along period of time, remove the battery toprevent leakage and store the camera in aplastic bag containing desiccant. Do nothowever store the camera case in a plasticbag, as this may cause the material todeteriorate. Note also that desiccant losesits ability to absorb moisture after a periodof time, and should be replaced at regularintervals.
• To prevent mold or mildew, take the cameraout at least once a month to turn it on andrelease the shutter a few times.
• Store the battery in a cool, dry place.
Caring for the Camera and Battery

ix
Color LCD monitor• The monitor may contain a few pixels that
are always lit or that do not light. This is acharacteristic common to all TFT LCDmonitors and does not indicate amalfunction. Images recorded with thecamera will not be affected.
• Images in the monitor may be difficult tosee in a bright light.
• The monitor is lit by a fluorescent backlight.Should the monitor begin to dim or flicker,contact your Nikon service representative.
• Do not apply pressure to the LCD monitor,as this could cause damage or malfunction.Dust or lint adhering to the monitor can beremoved with a blower brush. Stains canbe removed by rubbing the surface lightlywith a soft cloth or chamois leather.
• Should the monitor break, care should betaken to avoid injury due to broken glassand to prevent the liquid crystal from themonitor touching the skin or entering theeyes or mouth.
• Replace the monitor cover whentransporting the camera or leaving itunattended.
Turn camera off before removingbattery or unplugging AC adapterDo not unplug the product or remove thebattery while the camera is on, or whileimages are being recorded or deleted frommemory. Forcibly cutting power to the productin these circumstances could result in loss ofdata or in damage to internal circuitry ormemory. To prevent an accidentalinterruption of power, avoid carrying theproduct with you while the AC adapter isconnected.
Observe proper precautions whenhandling batteriesBatteries may leak or explode if improperlyhandled. Observe the following precautionswhen handling batteries for use in this prod-uct:• Be sure the product is off before inserting
or removing the battery. If you are usingthe AC adapter, be sure it is unplugged.
• Foreign matter on the battery terminals—for example, sweat or oil—may prevent acontact from being formed. Beforeinstalling the battery, clean it thoroughlywith a soft, dry cloth.
• When the product is used continuously onbattery power for an extended period, thebattery may become hot. Due cautionshould be observed when removing thebattery.
• Use only batteries approved for use in thisequipment.
• Do not expose the battery to flame or toexcessive heat or moisture. Do not short-circuit or disassemble the battery.
Spare batteries• Keep a spare battery fully charged when
taking photographs on importantoccasions. Depending on your location,you may find it difficult to purchasereplacement batteries on short notice.
• On cold days, the capacity of the batterytends to decrease. Be sure the battery isfully charged before taking photographsoutside in cold weather. Keep a sparebattery in a warm place and exchange thetwo as necessary. Once warmed, a coldbattery may recover some of its charge.
Caring for the Camera and Battery

x Notice for Customers in the U.S.A. and Canada
Notice for customers in the U.S.A.Federal Communications Commission (FCC) Radio FrequencyInterference StatementThis equipment has been tested and found to comply with the limits for a ClassB digital device, pursuant to Part 15 of the FCC Rules. These limits aredesigned to provide reasonable protection against harmful interference in aresidential installation. This equipment generates, uses, and can radiate radiofrequency energy and, if not installed and used in accordance with theinstructions, may cause harmful interference to radio communications. How-ever, there is no guarantee that interference will not occur in a particularinstallation. If this equipment does cause harmful interference to radio ortelevision reception, which can be determined by turning the equipment off andon, the user is encouraged to try to correct the interference by one or more ofthe following measures:• Reorient or relocate the receiving antenna.• Increase the separation between the equipment and receiver.• Connect the equipment into an outlet on a circuit different from that to which
the receiver is connected.• Consult the dealer or an experienced radio/television technician for help.
CAUTIONSModificationsThe FCC requires the user to be notified that any changes or modificationsmade to this device that are not expressly approved by Nikon Corporation mayvoid the user's authority to operate the equipment.
Interface CablesUse the interface cables sold or provided by Nikon for your equipment. Usingother interface cables may exceed the limits of Class B Part 15 of the FCCrules.
D1
FOR HOME OR OFFICE USE
Tested To ComplyWith FCC Standards
Notice for customers in CanadaCAUTIONThis class B digital apparatus meets all requirements of the CanadianInterference Causing Equipment Regulations.
ATTENTIONCet appareil numérique de la classe B respecte toutes les exigences duRèglement sur le matériel brouilleur du Canada.

xi
Notices• Reproduction, in whole or in part, of any of the manuals provided with your Nikon product
requires prior permission from Nikon.• The information contained in this manual is subject to change without notice.• While Nikon makes every effort to produce perfect manuals, we appreciate any opportunity
for improvement. Should you find any mistakes, we would be grateful if you were to kindlylet us know. The address of Nikon’s representative in your area is provided separately.
• Nikon does not accept liability for damages resulting from the use of this product.
Notice Concerning Prohibition of Copying or ReproductionNote that simply being in possession of material that has been digitally copied or reproducedby means of a scanner, digital camera, or other device may be punishable by law.
• Items prohibited by law from being copied or reproducedDo not copy or reproduce paper money, coins, securities, government bonds, or localgovernment bonds, even if such copies or reproductions are stamped “Sample”.
The copying or reproduction of paper money, coins, or securities which are circulated in aforeign country is prohibited.
Unless the prior permission of the government has been obtained, the copying orreproduction of unused postage stamps or post cards issued by the government isprohibited.
The copying or reproduction of stamps issued by a government or of certified documentsstipulated by law is prohibited.
• Cautions on certain copies and reproductionsThe government has issued cautions on copies or reproductions of securities issued byprivate companies (shares, bills, checks, gift certificates, etc.), commuter passes, orcoupon tickets, except when a minimum of necessary copies are to be provided forbusiness use by a company. Also, do not copy or reproduce passports issued by thegovernment, licenses issued by public agencies and private groups, ID cards, and tickets,such as passes and meal coupons.
• Comply with copyright noticesThe copying or reproduction of copyrighted creative works such as books, music, paintings,woodcut prints, maps, drawings, movies, and photographs is prohibited except when it isdone for personal use at home or for similar restricted and non-commercial use.
Trademark InformationApple and Macintosh are registered trademarks of Apple Computer, Inc.
Microsoft and Windows are registered trademarks of Microsoft Corporation.
CompactFlash is a trademark of SanDisk Corporation.
All other trade names mentioned in this manual or the other documentation provided withyour Nikon product are trademarks or registered trademarks of their respective holders.
Notices
xii
Contents
Getting to Know the D1............................................................................... ii
Caring for the Camera and Battery ....................................................... viii
About This Manual ....................................................................................... 1
First Steps...................................................................................................... 31 Insert the Battery .................................................................................. 42 Attach the Lens .................................................................................... 63 Set the Time and Date ......................................................................... 84 Choose a Language for the Menus ................................................. 105 Insert the Memory Card .................................................................... 126 Take a Photograph............................................................................. 14
6.1 Set the advance mode to S (single frame) ........................... 146.2 Set image quality to NORM (normal) ..................................... 146.3 Set sensitivity to ISO 200 equivalent ........................................ 156.4 Set white balance to A (auto) ................................................ 156.5 Set the focus mode to S (single servo AF) .............................. 166.6 Set the AF area mode to single area AF ............................... 166.7 Select the center focus area .................................................. 176.8 Select matrix metering ............................................................. 176.9 Set the exposure mode to programmed auto ..................... 186.10 Ready the camera ................................................................... 196.11 Half-press the shutter release button...................................... 206.12 Check the indicators in the viewfinder .................................. 206.13 Take a photograph................................................................... 21
7 Play the Photograph Back ................................................................ 23
Camera Settings ........................................................................................ 25The Mode Dial ............................................................................................ 26Image Quality ............................................................................................ 28Sensitivity (ISO Equivalency) ..................................................................... 30White Balance............................................................................................ 31Autofocus ................................................................................................... 33AF Area Mode ............................................................................................ 34Focus Area.................................................................................................. 36Focus Lock .................................................................................................. 37Getting Good Results with Autofocus ..................................................... 39Manual Focus ............................................................................................. 40Metering ..................................................................................................... 41Exposure Mode .......................................................................................... 43Auto-Exposure Lock ................................................................................... 49
Contents

xiii
Exposure Compensation .......................................................................... 51Auto Bracketing ......................................................................................... 53Capture Preview Mode ............................................................................ 56Record-and-Review .................................................................................. 58Playing Photographs Back........................................................................ 60Self Timer Mode.......................................................................................... 62Diopter Adjustment ................................................................................... 63LCD Illuminator ........................................................................................... 63Depth-of-Field Preview .............................................................................. 64Focal Plane Position ................................................................................... 64
Custom Settings ......................................................................................... 65Changing Custom Settings ....................................................................... 66Custom Settings Options ........................................................................... 67
Quick Guide to Custom Settings Options ........................................ 74Two-Button Reset........................................................................................ 76
Playback .................................................................................................... 77Playing Photographs Back........................................................................ 78The Playback Menu ................................................................................... 82
Flash Photography .................................................................................... 93Through-the-Lens Flash Photography ...................................................... 94Flash Sync Modes ...................................................................................... 96Compatible Speedlights ........................................................................... 98Using a Speedlight ................................................................................... 100
Connections ............................................................................................ 101Connecting to a Television or VCR ........................................................ 102Connecting to a Computer ................................................................... 103Reading Photographs from Memory Cards ......................................... 105
Technical Notes ....................................................................................... 107Replacing the Focusing Screen ............................................................. 108Compatible Lenses .................................................................................. 109Cleaning the CCD ................................................................................... 112Optional Accessories .............................................................................. 114Troubleshooting ........................................................................................ 118Specifications ........................................................................................... 123Exposure Program (Programmed Auto) ................................................ 127
Index ........................................................................................................ 128
Contents

xiv

1
ABOUT THIS MANUAL
Thank you for your purchase of a Nikon D1 digital camera. This chapterdescribes the basic layout of this manual.

2
This manual is divided into seven main chapters:
First StepsOutlines the steps you will take when using your camera for the first time, frominstalling the batteries to taking photographs at basic settings.
Camera SettingsDetails the advanced settings of your camera.
Custom SettingsDescribes the options available in the camera’s custom settings menu.
PlaybackDetails how to play back and delete images recorded with your camera.
Flash PhotographyLists the flash options available for the D1.
ConnectionsDescribes how to connect your camera to a computer or television.
Technical NotesLists the accessories available for your camera, describes how to care for thecamera’s CCD, and provides troubleshooting tips.
Tip
About This Manual
When taking photographs on important occasions, take a few trial shots to confirm thatthe camera is functioning properly. Whenever you are in doubt about how aphotograph will turn out, you can take a trial shot and play it back in the camera’s LCDmonitor.

3
FIRST STEPS
This chapter covers the steps you will take when using your camera for the firsttime, from inserting the battery to taking your first photograph. It describes themost commonly used settings for D-Type autofocus (AF) Nikkor lenses, asshown below.
Operating mode
Image quality
White balance
Sensitivity
Lens D-Type AF Nikkor lens
Metering
Exposure mode
Focus area
Focus mode
ISO 200 equivalent
Normal
Auto
Single-frame shooting (S)
Center
3D color matrix metering
Programmed auto (P)
Single-servo autofocus(AF-S)
AF area mode Single area AF

4
1 Insert the Battery
Insert the battery and check the battery indicator.
1.1 Charge the batteryThe D1 uses rechargeable EN-4 Ni-MH battery packs (availableseparately). Be sure the battery is fully charged before inserting it in thecamera.
Batteries can be charged in about 90 minutesusing the MH-16 Quick Charger (available sepa-rately). See the documentation provided withthe MH-16 for details. More information aboutbatteries can be found in “Technical Notes:Optional Accessories.”
1.2 Insert the battery in the camera
Tip
Be sure the camera is off before inserting or removing the battery pack(A). Turn the battery pack latch to the open position (B) and insert thebattery in the camera (C).
A B C
First Steps: Insert the Battery
The EN-4 rechargeable battery pack can also be recharged using the MH-15 QuickCharger for the F100 film camera or the EH-3 Quick Charger for the E3/E3s digitalcameras.

5
1.3 Turn the battery pack latch to the locked position
Tip
1.4 Check the battery indicator
Turn the camera on (A) and confirm the battery level in the control panelon top of the camera (B).
Battery fully chargedLow batteryReady a fully-charged spare battery. (The display in the viewfinderturns off to save power when no operations are being performed.)Battery exhaustedNo photographs can be taken until the battery has been replaced.
All indicators in the viewfinder and rear control panel, and all indicatorsin the top control panel other than the exposure mode, battery indicator,and exposure counter, disappear six seconds after the camera isturned on (automatic meter switch-off).
A B
First Steps: Insert the Battery
Reactivating the displayLightly press (half-press) the shutter-release button to reactivate the display in thecontrol panel and viewfinder. Indicators will be displayed for six seconds after youremove your finger from the button. Note that when using the shutter-release buttonfor vertical shooting, you will need to set the shutter-release button lock release forvertical shooting to the unlocked position.
The length of time before automatic meter switch-off can be changed using customsettings (see “Custom Settings,” item 15).
6
2 Attach the Lens
After making sure that the camera is off, mount the lens and set theaperture to its minimum setting (largest f-number).
2.1 Attach the lens to the camera body
Tip
A B
Turn the camera off (A). Align the mounting mark on the lens with themounting mark on the camera body, then, being careful not to touch thelens-release button, turn the lens counter-clockwise until it locks intoplace (B).
If no lens is attached, or if a non-CPU lens is attached (see “TechnicalNotes: Compatible Lenses”), F-- will appear in the top control panel andviewfinder when the camera is turned on (if the exposure mode is setto programmed auto or shutter-priority auto, the exposure modeindicator will also blink).
2.2 Set aperture to its minimum setting
Set the lens to minimum aperture (maximum f-number).
If the lens is not set to the minimum aperture, a blinking FEE indicatorwill appear in the viewfinder and in the control panel on top of thecamera when the camera is turned on. The shutter can not be releasedwhile this indicator is displayed.
First Steps: Attach the Lens
To get the most from your camera, use a D-Type AF Nikkor lens (see “Technical Notes:Compatible Lenses” for more information).

7
Note
2.3 Lock the aperture ring
Detaching the lensBefore detaching the lens, turn the cam-era off. Then turn the lens clockwisewhile holding down the lens-release but-ton.
If you do not intend to set aperture manually using the lens aperturering, lock the lens aperture (the aperture ring can not be used unlesschanges have been made to default settings as described in “CustomSettings,” item 22).
22
ft m
28
70
50
3528
8510
5
22
When no lens is attached…If the camera’s lens mount is not cov-ered, dust may find its way onto themirror or viewfinder screen. This can beprevented by attaching the BF-1A bodycap to the camera when no lens is inplace (note that the BF-1 body cap cannot be used with the D1).
First Steps: Attach the Lens
When attaching or detaching the lens or body cap, be careful that dirt or other foreignmatter does not enter the camera body. The presence of foreign matter inside thecamera could affect your photographs. When changing lenses or replacing the bodycap, hold the camera with the base down or tilted so that the lens mount faces theground. Be sure to replace the body cap when no lens is in place.

8
Note
A B
First Steps: Set the Time and Date
3 Set the Time and Date
The D1 records the time and date for each photograph taken. Beforeusing your camera, set the internal clock-calendar to the current timeand date.
3.1 Check the time and date in the control panel
After turning the camera on, press the auto-bracketing button (BKT)and exposure compensation button ( ) simultaneously. The yearindicator will be displayed in the control panel on top of the camera (B).Press the exposure-compensation button ( ) once to display themonth and day, a second time to display the hour and minute. Pressingthe button a third time will clear the time and date from the display).
The clock-calendar is powered by an independent battery with a life of about ten years.When no charge remains, the clock-battery replacement indicator will appear in thecontrol panel on top of the camera. Take the camera to a Nikon-authorized servicecenter, where the clock battery can be replaced for a fee.

9
A B
First Steps: Set the Time and Date
3.2 Set the time and date
To set the time and date, turn the camera on and hold the auto-bracketing button down for more than two seconds while pressing theexposure compensation button (A). The year indicator in the controlpanel on top of the camera will flash (B). Set the year using the maincommand dial. Pressing the exposure-compensation button will causethe month, day, hour, and minute to be displayed in turn; the itemcurrently displayed can be set using the main command dial. Press theexposure compensation button when the minute is displayed to clearthe time and date from the display, putting any changes into effect (thedisplay disappears automatically, cancelling changes to settings, if nooperations are performed for three minutes).
Note
The time/date display is cleared from the control panel when the shutter-release buttonis pressed half way. Changes to the time and date will not be saved.

10
4 Choose a Language for the Menus
Camera menus and messages can be displayed in English, German,French, or Japanese. To select the language used:
4.1 Display the playback menu
PLAY BACKDELETESLIDE SHOWPROTECTHIDE IMAGEPRINT SETSET UP
SET
A B
Holding the mode dial lock-release down, turn the mode dial to PLAY(playback mode). Turn the camera on and press the button (A) todisplay the playback menu (B).
4.2 Choose SET UP from the playback menu
PLAY BACKDELETESLIDE SHOWPROTECTHIDE IMAGEPRINT SETSET UP
SET
Unlock the focus-area selector and press ▼ until SET UP is highlighted.Press the focus-area selector to the right to display the SET UP menu.
SET UPFOLDERSD1
20SEN
OPTIONSAUTO OFFLANGUAGEVIDEO OUTPUTCARDFORMAT
SET
First Steps: Choose a Language for the Menus

11
4.3 Choose a language from the LANGUAGE menu
SET UPFOLDERSD1
EN
OPTIONSAUTO OFFLANGUAGEVIDEO OUTPUTCARDFORMAT
SET
20S
LANGUAGE
DEUTSCHENGLISHFRANÇAIS日本語�
SET
DEFJ
Using the focus-area selector, highlight LANGUAGE and press theselector to the right to display the LANGUAGE menu. Highlight thedesired language and press the focus-area selector to the right (orpress the button) to put your choice into effect.
First Steps: Choose a Language for the Menus

12
5 Insert the Memory Card
The D1 digital camera uses compact flash-memory cards to recordphotographs and other information. Before taking photographs, youwill need to insert a memory card in the camera’s card slot.
5.1 Open the card slot
After making sure the camera is off, open the door covering the card-slot cover release button (1) and press the card-slot cover releasebutton (2) to open the card slot (3).
5.2 Insert the memory card, fold the eject button over,and close the coverA B
Insert the memory card in the slot (A), being sure that the card terminalsare fully inserted in the connector at the back of the slot. The cardshould be inserted facing the ▲CARD label next to the card slot.
✔Important: Do not attempt to insert the card upside down orbackwards. Do not use force when inserting the card. Eitheraction could damage your camera.
Fold the eject button over and close the cover (B). If the button is not foldedover when the cover is closed, closing the door may partially eject the card,causing errors in recording photographs or during playback.
First Steps: Insert the Memory Card
Note
The following CompactFlash memory cards have been tested and approved for usein the D1:• Nikon EC-CF CompactFlash memory cards• SanDisk Corporation SDCFB-4/8/15/30/40/48/64/96 CompactFlash memory cardsOperation is not guaranteed with other cards. IBM microdrive cards are not supported.

13
Removing memory cards
When removing memory cards, turn the camera off and open thecard-slot cover. After confirming that the access lamp is off, standthe eject button up and press it down to eject the card. Do not attemptto remove the card while the access lamp is on. Doing so could resultin loss of data or in damage to the camera or the card.
✔Important: The compact flash card may become hot while inuse. Observe due caution when removing memory cardsfrom the camera.
Formatting memory cardsMemory cards must be formatted before they can be used to recordphotographs. When formatting memory cards, first make sure thecamera is on, then hold the buttons down simultaneously fortwo seconds. A blinking FOR indicator will appear in the top controlpanel. To format the memory card, press the two buttons again.
✔Note: Formatting memory cards permanently erases anydata they may contain. Before formatting the card, be sureto make copies of data you would like to keep.
When the card is formatted, the frame-number display in the controlpanel on top of the camera will show 1, and the number of exposuresremaining will appear in both control panels (when a hundred ormore exposures remain, the control panels will show FL).
First Steps: Insert the Memory Card
14
6 Take a Photograph
This section describes how to take a photograph using the mostcommonly-used settings.
6.1 Set the advance mode to S (single frame)
Hold the mode dial lock-release down and turn the mode dial to S(single frame). See “Camera Settings: The Mode Dial” for moreinformation.
6.2 Set image quality to NORM (normal)A C
After turning the camera on, hold the button down (A) and turn themain command dial (B). The image-quality display in the rear controlpanel (C) will cycle through the image-quality settings as shown below.Stop when the display shows NORM (normal).
B
HI FINE NORM BASIC
See “Camera Settings: Image Quality” for more information.
First Steps: Take a Photograph
15
6.3 Set sensitivity to ISO 200 equivalentA CB
Hold the button down (A) and turn the main command dial (B). Thesensitivity display in the rear control panel will cycle through thesensitivity settings as shown below. Stop when the display shows 200(ISO 200 equivalent).
See “Camera Settings: Sensitivity” for more information.
6.4 Set white balance to A (auto)
200 400 800 1600
A CB
Hold the button down (A) and turn the main command dial (B). Thewhite-balance display in the rear control panel will cycle through thewhite-balance settings as shown below. Stop when the display showsA (auto white balance).
A PRE
See “Camera Settings: White Balance” for more information.
First Steps: Take a Photograph
16
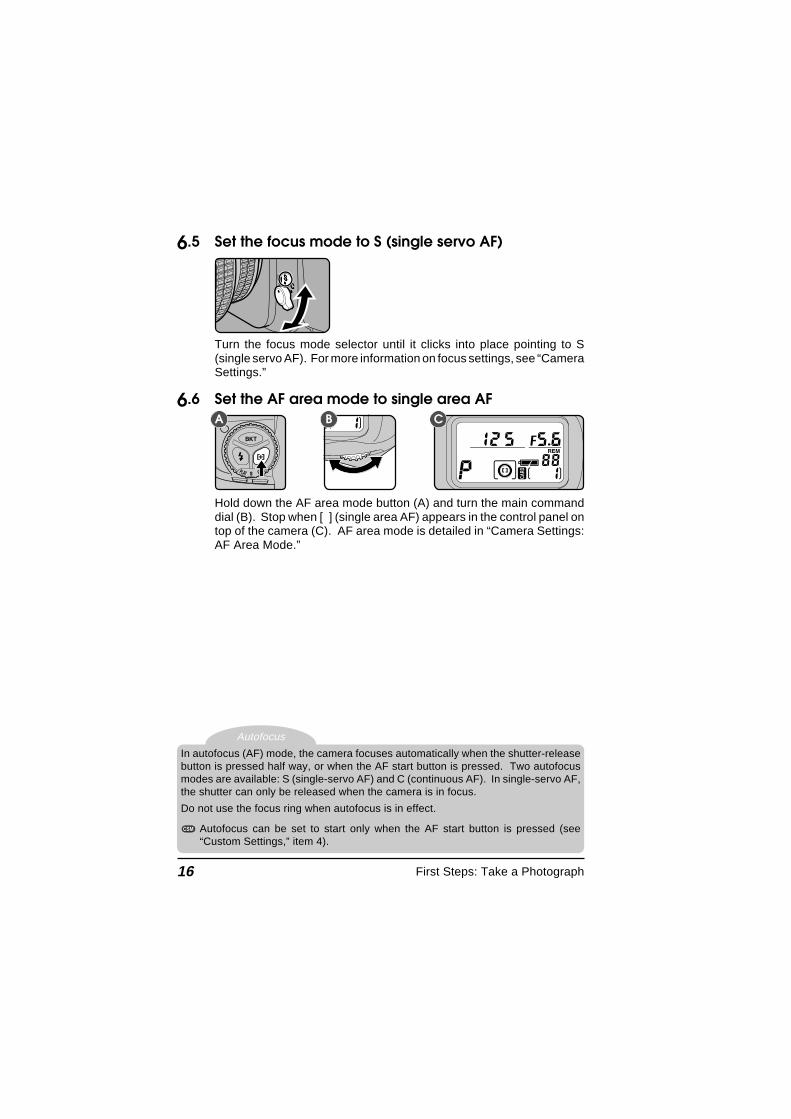
6.5 Set the focus mode to S (single servo AF)
Autofocus
Turn the focus mode selector until it clicks into place pointing to S(single servo AF). For more information on focus settings, see “CameraSettings.”
6.6 Set the AF area mode to single area AF
Hold down the AF area mode button (A) and turn the main commanddial (B). Stop when [ ] (single area AF) appears in the control panel ontop of the camera (C). AF area mode is detailed in “Camera Settings:AF Area Mode.”
First Steps: Take a Photograph
A B C
In autofocus (AF) mode, the camera focuses automatically when the shutter-releasebutton is pressed half way, or when the AF start button is pressed. Two autofocusmodes are available: S (single-servo AF) and C (continuous AF). In single-servo AF,the shutter can only be released when the camera is in focus.
Do not use the focus ring when autofocus is in effect.
Autofocus can be set to start only when the AF start button is pressed (see“Custom Settings,” item 4).

17
6.7 Select the center focus area
Metering
A B C
Unlock the focus area selector (A) and push the focus-area selector up,down, left, and right until the focus area display in the control panel ontop of the camera shows center focus (B).
The focus area can only be selected while the focus area display isshown in the control panel. To activate the focus area display, half-press the shutter-release button.
After selecting the focus area, lock the focus area selector (C).
More information on focus area can be found in “Camera Settings:Focus Area.”
6.8 Select matrix meteringA B
Hold down the metering selector lock release and turn the meteringselector to (matrix metering). The matrix metering indicator willappear in the viewfinder (B).
First Steps: Take a Photograph
The D1 offers three metering modes: matrix, center-weighted, and spot (see “CameraSettings: Metering” for details). In matrix mode 3D color metering is used, which setsexposure based on a variety of data from all areas of the frame provided by a CCDsensor with 1005 (67 vertical × 15 horizontal) metering pixels. This system is particularlyeffective with brightly-colored (white or yellow) or dark-colored (black or dark green)subjects that occupy a substantial portion of the frame, producing photographs closerto what is seen by the naked eye. 3D color metering can however only be used withD-Type lenses. When another type of lens is in place, the system used is color matrixmetering, which does not take distance information from the lens into account.

18
6.9 Set the exposure mode to programmed auto
Exposure mode
Hold the MODE button down and turn the main command dial until theexposure-mode indicator in control panel on top of the camera showsP (programmed auto). When the shutter-release button is half-pressed,aperture and shutter-speed will be shown in the control panel.
Flexible programWhen the exposure mode is set toprogrammed auto, the main com-mand dial can be rotated to selectnew combinations of aperture andshutter speed. This makes it possibleto approximate the effects of aper-
ture-priority auto or shutter-priority auto in programmed mode. Whileflexible program is in effect, an asterisk will appear next to the exposuremode indicator (P) in the top control panel. Flexible program can becancelled by: rotating the command dial until the asterisk disappears,changing the exposure mode, turning the power off, or performing atwo-button reset (see “Custom Settings: Two-Button Reset”).
First Steps: Take a Photograph
The D1 offers a choice of four exposure modes: programmed auto, shutter-priorityauto, aperture-priority auto, and manual. In programmed auto, the camera automat-ically adjusts exposure to produce the best results, as shown in “Technical Notes:Exposure Program (Programmed Auto).” Use this mode in combination with flexibleprogram, exposure compensation (see “Camera Settings: Exposure Compensation”),or auto bracketing (see “Camera Settings: Auto Bracketing”) for programmed photog-raphy that is at once sophisticated and simple. Other exposure modes can be selectedaccording to your subject and shooting conditions, allowing you to adjust depth of field,or blur or freeze moving objects. See “Camera Settings: Exposure Mode” for details.
When a non-CPU lens is in use, the exposure mode will automatically be set to A(aperture-priority auto; see “Camera Settings: Exposure Mode”). The exposure-modeindicator in the control panel on top of the camera will show a flashing P, the exposure-mode indicator in the viewfinder, A. The aperture display in the control panel andviewfinder will show F--. Aperture must be set manually using the aperture ring on thelens.

19
6.10 Ready the camera
Camera shake and shutter speedTo prevent blurring caused by camera shake, the shutter speedshould be faster than the inverse of the focal length of the lens, inseconds (for example, if the lens has a focal length of 50mm, shutterspeed should be faster than 1/50 sec.). Use of a tripod is recom-mended when shooting at lower shutter speeds.
A B
Hold the camera as shown above, with your elbow propped lightlyagainst your body for support. Hold the hand-grip with your right handand cradle the camera or lens with your left. The shutter-release buttonfor portrait photographs can be used when the camera is in verticalshooting mode (B).
The recommended stance for taking photographs is with one foot a halfpace in front of the other and your upper body in a stable position.
First Steps: Take a Photograph

20
6.11 Half-press the shutter release button
Note
B
Center the focus brackets on your subject (A) and lightly press theshutter-release button half way (B). The camera will adjust focusautomatically, and the results of the autofocus operation will appear inthe viewfinder.
The subject is in focus.The camera is focused on an area between the camera and thesubject.The camera is focused on an area behind the subject.The camera is unable to focus using autofocus. See “CameraSettings: Autofocus” for instructions.
To focus on a subject that will not be in the center of the finalcomposition, change the focus area (see “Camera Settings: FocusArea”) or use focus lock (see “Camera Settings: Focus Lock”).
6.12 Check the indicators in the viewfinderWith the shutter-button held half way, check the indicators in theviewfinder. By default, aperture and shutter speed are displayed in thesmallest possible increments (see “Custom Settings,” item 2, forinformation on changing the size of the increments used for displayingaperture, shutter speed, and exposure compensation).
If the subject is too bright or too dark, one of the following indicators willappear in the viewfinder or the control panel on top of the camera.HI Subject is too bright. Use a Neutral Density (ND) filter.Lo Subject is too dark. Use a flash.
First Steps: Take a Photograph
A
The viewfinder shows approximately 96% of the image actually exposed on the CCD.The area that appears in the final photograph will be slightly larger than the sceneviewed through the viewfinder.

21
6.13 Take a photograph
Notes
B
With the shutter-release button held halfway down, check the focusindicator in the viewfinder one final time (A) to confirm that the ●indicator is showing and the camera is in focus (if your subject hasmoved since the photograph was composed, autofocus will automati-cally track the subject so that it stays in focus). Then carefully press theshutter-release button the rest of the way to take a photograph (B).
By default, the photograph will automatically be recorded on thecompact flash-memory card when the shutter-release button is pressedall the way down. You can, however, set the camera to “capture-preview mode” to preview the photograph in the viewfinder before it isrecorded on the memory card. See “Camera Settings: Capture PreviewMode.”
First Steps: Take a Photograph
A
If the subject in the viewfinder appears to be out of focus even when the in-focusindicator (● ) appears in the viewfinder, adjust viewfinder diopter as described in“Camera Settings: Diopter Adjustment.”
Avoid taking photographs with the camera focused on the sun or another strong lightsource, as excessive light may cause deterioration in the camera’s charge-coupleddevice (CCD). It may also produce a white blur effect in the final photograph.
The D1 is equipped with a combined electronic (CCD) and mechanical shutter. Thisshutter operates differently from the mechanical shutters found in film cameras, withthe result that the interval between the sound made by the shutter and that made bythe mirror will not decrease past a certain point, even at high shutter speeds.

22
When the exposure remaining count reaches 0
When there is not enough memory available on the compact flash-memory card to store further photographs at current settings, theexposure remaining count will show zero and the Cd (card) indicatorin the viewfinder and the CARD indicators in the control panels willflash. In this case you will need to delete photographs (see“Playback”) or insert another memory card (see “Insert the MemoryCard” in this chapter) before more photographs can be taken.
First Steps: Take a Photograph
Note
The frame number shown in the control panel on top of the camera corresponds to thenumber of photographs in the current folder. When a new folder is created, the currentframe number will return to 1. New folders are created when:• the number of photographs in the current folder reaches the maximum of 999• a file number of 999 is reached in sequential numbering mode (see "Custom
Settings," item 29)• you create a new folder using the NEW option in the FOLDERS menu (see
"Playback: The Playback Menu"

23
Tip
A B C
First Steps: Play the Photograph Back
7 Play the Photograph Back
Photographs taken with the D1 can be played back on the camera’sLCD monitor. If desired, photographs can also be deleted.
7.1 Turn the monitor on
Press the button to turn the monitor on (A). The most recentlytaken photograph will be displayed (B).
Other photographs in memory, if any, can be viewed by pressing thefocus area selector (C). Press ▲ to view photographs taken before thephoto currently displayed, or ▼ to view photographs taken after thecurrent photograph. Pressing ▲ when you reach the oldest photographwill display the most recent photograph in memory; when the mostrecent photo is displayed, press ▼ to view the oldest photograph inmemory. If the card contains no photographs, the message “CARDCONTAINS NO PHOTOGRAPHS” will be displayed.
For more information on playback, see “Playback.”
In playback mode, the monitor will turn off automatically to save power if no operationsare performed for a specified period of time. The length of time before the monitor turnsoff can be set using custom settings (see “Custom Settings,” item 18) or the auto-off menu(see “Playback”).
After the monitor has turned off, the display can be restored by pressing the buttonbefore automatic meter switch-off (see “Custom Settings,” item 15). Pressing the button after this time will display the most recent photograph in memory.

24
A B
C
First Steps: Play the Photograph Back
7.2 Delete a photograph
To delete the photograph currently displayed in the LCD monitor, pressthe button (A). A confirmation dialog will be displayed (B).
Press the button again (C) to delete the photograph and return tosingle image playback, where the next photograph in memory will bedisplayed. To return to playback without deleting the photograph, pressany of the buttons on the rear of the camera except the and buttons. Press the button or lightly press the shutter-releasebutton to end playback without deleting the photograph.
For more information on deleting photographs, see “Playback.”
ERASING IMAGESYES ☞ DEL
25
CAMERA SETTINGS
This chapter details most of the camera settings you will use when takingphotographs. Information on custom settings, playback, and flash photogra-phy are provided in separate chapters.

26
The Mode Dial
The mode dial is used to set the camera operating mode. The D1 can beoperated in single-frame or continuous shooting modes, self-timer mode,playback mode, and PC mode.
To set the operating mode, hold the mode dial lockbutton down and turn the mode dial to the desiredsetting.
Note
The following operating modes are available:S Single-frame shooting: One photograph is taken each time the
shutter-release button is pressed. The next photograph can not betaken until the current photograph has been recorded to the flashmemory card and the card access lamp has gone out.
C Continuous shooting: Photographs are taken at a maximum rate of4.5 frames per second while the shutter-release button is held down.Photographs are stored in a temporary memory buffer, which canhold a maximum of twenty-one photographs. When this limit isreached, the camera will be unable to record more photographs untilat least one of the images in the buffer has been transferred to thememory card.
Camera Settings: The Mode Dial
The frame advance rate quoted above for continuous shooting mode is the averageobtained at a temperature of 20°C (68°F) using continuous servo AF, manualexposure mode, a shutter speed faster than 1/250 sec., and an aperture other than themaximum aperture.
Should the D1’s battery become exhausted while photographing in continuousshooting mode, the camera will stop shooting, save images held in the temporarymemory buffer to the memory card and turn off.
The advance rate for continuous shooting can be changed using custom settings(see “Custom Settings,” item 25). You can also set the size of the memory bufferto any value between one and twenty-one frames (“Custom Settings,” item 26).

27
While photos are being transferredfrom the buffer to the memory card,you will only be able to take as manyphotographs as have already beentransferred from the buffer to the card.When the shutter-release button ispressed half way, the number of con-secutive photographs that can betaken before the buffer fills up is displayed in the viewfinder and thecontrol panel on top of the camera (see above).Self timer: This mode is ideal for photographs in which the photog-rapher wishes to appear (see “Self Timer Mode” in this chapter).
PLAY Playback mode: In this mode, photographs can be played back onthe LCD monitor (see “Playback”).
PC PC mode: This mode is used when the camera is connected to acomputer (see “Connections”).
✔ Important: When taking photographs in continuous shooting mode, donot turn the camera off until all photographs in the buffer have beentransferred to the memory card. Doing so could result in loss of data.Similarly, do not remove the memory card or battery from the cameraor disconnect the AC Adapter while images are being transferred fromthe buffer to the card. Doing so could result in loss of data or in damageto the camera or the card. Be sure the camera is off and the accesslamp has gone out before removing the memory card.
The time duration for writing to the CompactFlash card will varydepending on the card speed and content of your images. Thefollowing chart shows typical writing time in each recording mode, butthe actual time may vary slightly.
Image Quality One image shot 21 continuous image shotsBASIC 2 seconds 25 secondsNORMAL 2.5 seconds 45 secondsFINE 5 seconds 95 secondsHI (RGB) 30 seconds 10 minutes 30 secondsHI (YCbCr) 20 seconds 7 minutesHI (RAW) 15 seconds 2 minutes 30 seconds*
*Except for RAW files, the bit depth is 8 bit. RAW, uncompressed files are recorded at a bitdepth of 12, and saved in 16-bit format. Therefore, the time shown is for 10 images, as the filespace required is about twice that of other file types.
Camera Settings: The Mode Dial

28
Image Quality
The image quality setting controls the image type (color or black-and-white),file type (RGB TIFF, YCbCr TIFF, RAW data, or JPEG), and compression ratio.
RAW, YCbCr
A B
To choose the compression ratio, turn the main command dial while holdingdown the button (A). Image quality settings are displayed in the rearcontrol panel (B) in the order shown below.
HI FINE NORM BASIC
HI High image quality, no compression: Images are not compressedwhen saved. Images can be stored as TIFF files (RGB and YCbCr)or RAW data.
FINE Fine image quality, low compression: Images are JPEG-com-pressed at a compression ratio of 1:4.
NORM Normal image quality, medium compression: Images are JPEG-compressed at a compression ratio of 1:8.
BASIC Basic image quality, high compression: Images are JPEG-com-pressed at a compression ratio of 1:16.
Camera Settings: Image Quality
RAW data formatRaw 12-bit data from the CCD are saved directly to the memory card. This file typecan only be read using Nikon Capture software available separately from Nikon.The RAW data format is only available when “RAW data format available” isselected using Custom Setting 28 (see “Custom Settings”).
YCbCr formatModels color data using measures of luminance (Y) and chrominance (Cb, Cr). Thisfile type can be read using Nikon View DX or Nikon Capture software.

29
HI YCbCr TIFF ➠ YCbCr TIFF (B&W) ➠ RGB TIFF➠ RGB TIFF (B&W) ➠ RAW ➠ YCbCr TIFF
FINE FINE ➠ FINE (B&W) ➠ FINENORM NORM ➠ NORM (B&W) ➠ NORMBASIC BASIC ➠ BASIC (B&W) ➠ BASIC
When black-and-white is chosen, the rear control panel shows B/W. RAW andTIFF formats are displayed in the rear control panel as shown below.
RAW YCbCr TIFF RGB TIFF
The approximate number of images that can be saved on 96 and 64 MB Nikonmemory cards in each format are shown below.
Format and file size Approx. number Approx. numberof frames of frames
(96 MB card) (64 MB card)
HI (RAW, approx. 4 MB) 23 15
HI (YCbCr TIFF, approx. 5.2 MB) 18 12
HI (RGB TIFF, approx. 7.8 MB) 12 8
FINE (approx. 1.3 MB) 66 44
NORM (approx. 650 KB) 132 88
BASIC (approx. 320 KB) 265 177
To choose between black-and-white and colorphotography, or to select the file type used atan image quality of HI, hold down the button and turn the sub-command dial tocycle through the settings as shown below.
Note
Camera Settings: Image Quality
File size for black-and-white and color images is identical.
30
Notes
Sensitivity (ISO Equivalency)
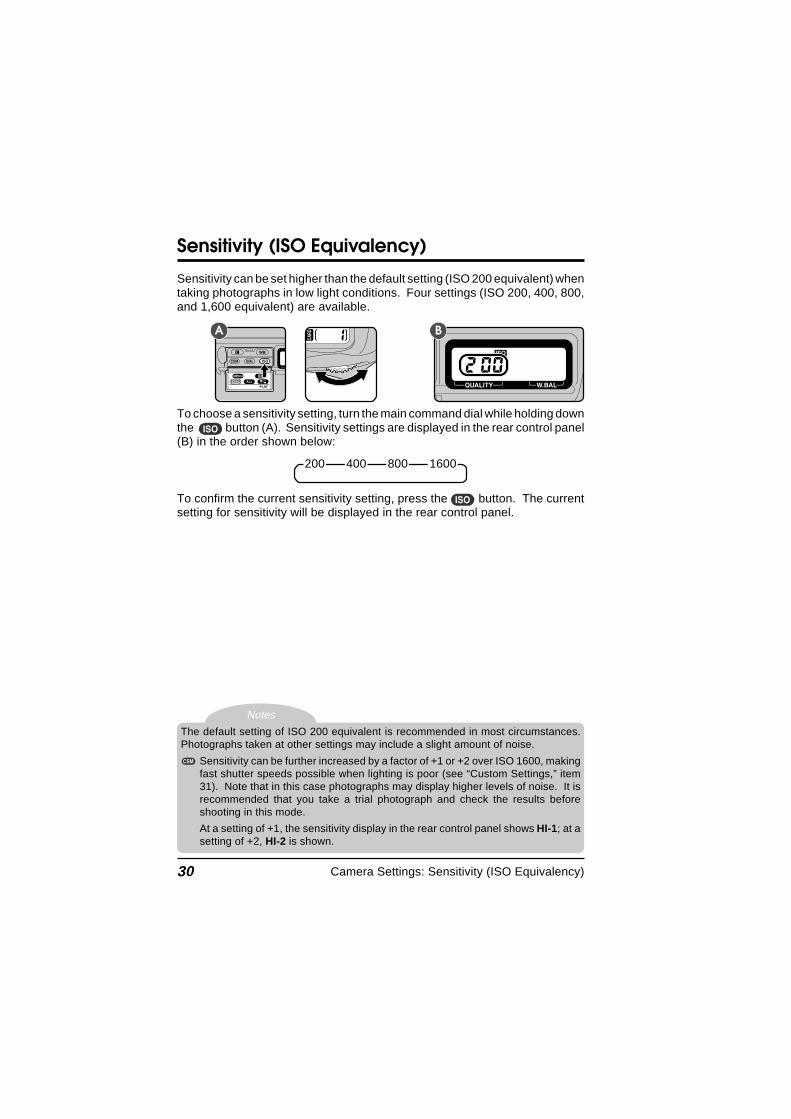
Sensitivity can be set higher than the default setting (ISO 200 equivalent) whentaking photographs in low light conditions. Four settings (ISO 200, 400, 800,and 1,600 equivalent) are available.
A B
To choose a sensitivity setting, turn the main command dial while holding downthe button (A). Sensitivity settings are displayed in the rear control panel(B) in the order shown below:
200 400 800 1600
To confirm the current sensitivity setting, press the button. The currentsetting for sensitivity will be displayed in the rear control panel.
Camera Settings: Sensitivity (ISO Equivalency)
The default setting of ISO 200 equivalent is recommended in most circumstances.Photographs taken at other settings may include a slight amount of noise.
Sensitivity can be further increased by a factor of +1 or +2 over ISO 1600, makingfast shutter speeds possible when lighting is poor (see “Custom Settings,” item31). Note that in this case photographs may display higher levels of noise. It isrecommended that you take a trial photograph and check the results beforeshooting in this mode.
At a setting of +1, the sensitivity display in the rear control panel shows HI-1; at asetting of +2, HI-2 is shown.

31
White Balance
The human eye is able to adapt to changes in lighting, and consequently tohumans a white object will still look white whether viewed in sunlight or underovercast skies, or indoors under incandescent or fluorescent lighting. A digitalcamera, in contrast, must adjust colors according to the lighting in order thatcolors that appear white when viewed directly appear white in the finalphotograph. This adjustment is called “white balance.”
Tip
A B
To set white balance, turn the main command dial while holding down the button (A). White balance settings are displayed in the rear control panel (B)as follows:
A Auto white balance: The 1005-pixel CCD adjusts white balanceautomatically for light sources with color temperatures betweenapproximately 4200K and approximately 7000K.Incandescent: Use this setting when taking photographs indoors underincandescent light. Color temperature is fixed at approximately 3000K.Fluorescent: Use this setting when taking photographs indoors underfluorescent light. Color temperature is fixed at approximately 4200K.Direct sunlight: Use this setting when taking photographs in directsunlight. Color temperature is fixed at approximately 5200K (daylight).Flash: Use this setting with Nikon Speedlights. Color temperature isfixed at approximately 5400K.Overcast: Use this setting when taking photographs under overcastskies. Color temperature is fixed at approximately 6000K (daylight).Shade: Use this setting when taking photographs in the shade in sunnyweather. Color temperature is fixed at approximately 7000K (daylight).
PRE Preset white balance: White balance can be set using a white objectas a reference point.
Camera Settings: White Balance
A PRE
While auto white balance is suited to most lighting conditions, other settings can beused when you want to fix white balance to a value suited to a particular light source.

32
The D1 uses through-the-lens (TTL) metering to set white balance in auto andpreset modes. This allows white balance to be set accurately when the subjectis lit differently from the camera.
Using preset white balancePreset white balance is useful when taking photographs under colored lighting.To set white balance:
1 Light a white object with the same lighting that will be used in the final photograph.
2 Select a white balance of PREas described on the previouspage, then hold the but-ton down for 2 seconds. ThePRE indicator in the rear con-trol panel will flash.
3 Using manual focus (see “Manual Focus,” below) and auto exposure(exposure mode P, S, or A), focus the camera on the white object and pressthe shutter-release button. Note that the desired results may not beobtained if the image is extremely over- or under-exposed.
Manual white-balance adjustmentFine adjustments can be made manually to fixed white balance settings.
Note
A B
To adjust white balance, select a white balance other than PRE. Then, holding downthe button, turn the sub-command dial to raise or lower the white balance settingby ±3 in increments of 1 (A). Raising white balance adjustment makes your imagesappear bluer; lowering the adjustment makes images appear more yellow or red. Atsettings other than 0, a indicator will appear in the rear control panel (B).
Camera Settings: White Balance
Color temperatureThe perceived color of a light source varies with the viewer and other conditions. Colortemperature is an objective measure of the color of a light source, defined withreference to the temperature to which an object would have to be heated to radiate lightin the same wavelengths. While light sources with a color temperature in theneighborhood of 5,000–5,500°K appear to be white, light sources with a lower colortemperature, such as incandescent light bulbs, appear to be slightly yellow or red.Light sources with a higher color temperature seem to be tinged with blue.

33
Tip
Autofocus
When the focus-mode selector (A) is set to S (single servo AF) or C (continuousservo AF), the camera focuses automatically when the shutter-release buttonis half-pressed (B), or the button is held down (see below).
A B
S Single servo AF (focus priority): When the subject is at rest, thecamera focuses when the shutter-release button is pressed half way.Focus remains locked as long as the shutter-release button is held inthis position (focus lock). If the subject was moving when the shutter-release button was pressed half way, the camera will focus continu-ously as long as the subject continues to move and the shutter-release button is kept lightly pressed (focus tracking). Focus will lockwhen the subject comes to a halt. The shutter can only be releasedwhen the in-focus indicator (● ) appears in the viewfinder (focuspriority).
C Continuous servo AF (release priority): The camera focuses con-tinuously as long as the shutter-release button is held half way down,and focus will automatically track moving subjects (focus tracking).The shutter can be released even when the in-focus indicator (● ) isnot displayed in the viewfinder (release priority).
The “AF start” buttonsA B
An alternative means of activating the autofocus operation is to press the button (A) or, when the shutter-release button lock for vertical shooting isdisabled, the AF-ON button (B). Both buttons perform the same function aspressing the shutter-release button half way.
Camera Settings: Autofocus
You can set the camera to perform an autofocus operation only when the button or AF-ON button is pressed. See “Custom Settings,” item 4.

34
Tip
AF Area Mode
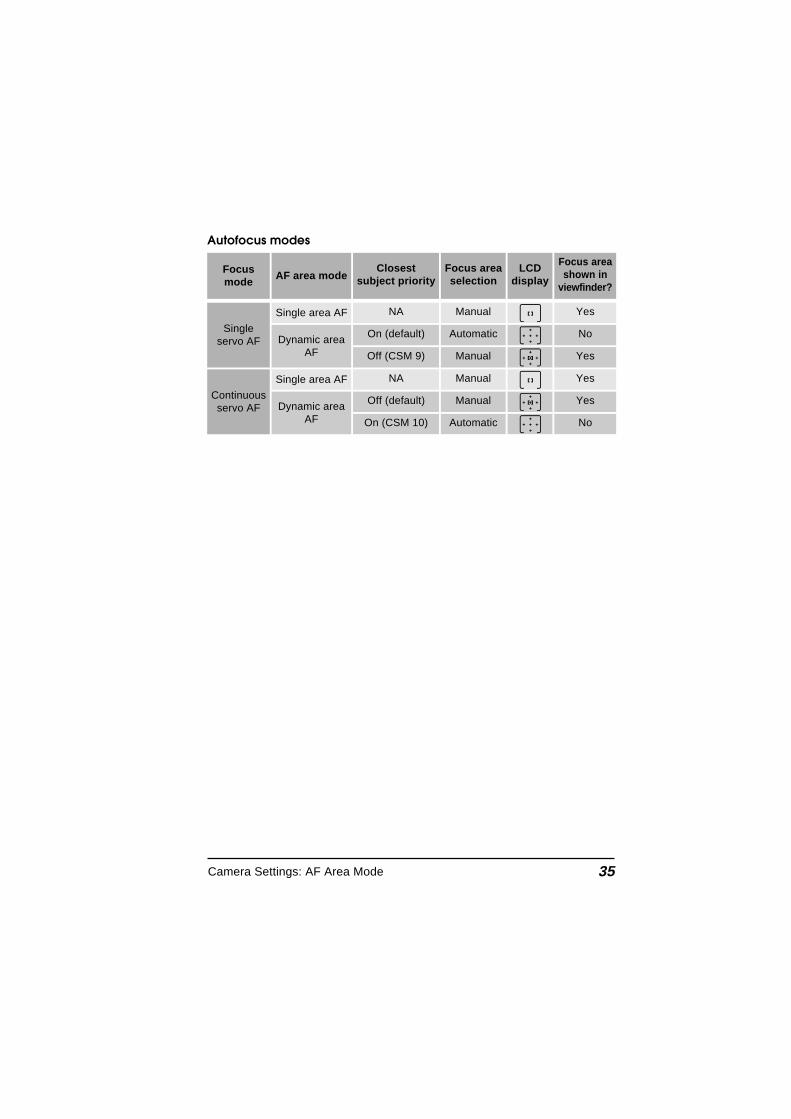
Autofocus can be set to focus only on the selected focus area (single area AF)or to shift focus from one area to the next depending on the movement of thesubject (dynamic AF). By default, when dynamic AF is used in combinationwith continuous servo AF, the camera first focuses on the subject in theselected focus area and then shifts the focus area to keep this subject in focus.In single servo AF, the camera first focuses on the object closest to the cameraand then shifts the focus area to track the subject as it moves (closest subjectpriority). The defaults for dynamic AF can be changed using custom settings.
A B
To select between single area and dynamic AF, turn the main command dialwhile holding down the [+] button (A). The AF area mode is displayed in thecontrol panel on top of the camera (B).
Single area AF: The camera focuses on the subject in the areaselected for autofocus (see “Autofocus Area,” above). This mode isuseful when focusing on subjects that are relatively stationary.Dynamic AF: The camera first focuses on the subject in the areaselected for autofocus. If the subject moves to another focus area,the camera will automatically shift the focus area to follow it (the focusarea shown in the viewfinder will not, however, change). This makesit possible to focus on subjects that are moving irregularly.Dynamic AF with closest subject priority: The camera first fo-cuses on the closest object to the photographer that falls in one of thefive focus areas, and then tracks this subject as it moves to otherfocus areas. No focus area indicators are shown in the viewfinder orin the control panel on top of the camera. This mode does not workwell with telephoto lenses or poorly-lit subjects; use single area AFinstead.
Camera Settings: AF Area Mode
By default, closest subject priority is used when single servo AF is combined withdynamic AF, and is not used when continuous servo AF is in effect. CustomSetting 9 can be used to turn closest subject priority off when single servo AF isin effect. Similarly, Custom Setting 10 can be used to turn closest subject priorityon when continuous servo AF is used. See “Custom Settings,” items 9 and 10.
35Camera Settings: AF Area Mode
Manual
Automatic
Manual
Singleservo AF Dynamic area
AF
Single area AF NA
On (default)
Off (CSM 9)
Yes
No
Yes
Manual
Manual
Automatic
Continuousservo AF Dynamic area
AF
Single area AF NA
Off (default)
On (CSM 10)
Yes
Yes
No
Focusmode
AF area modeClosest
subject priorityFocus areaselection
LCDdisplay
Focus areashown in
viewfinder?
Autofocus modes

36
Tip
A CB
Camera Settings: Focus Area
Focus Area
The D1 has five focus areas which together cover a wide area of the frame. Bychoosing the focus area according to your composition and the position of yoursubject, you can focus on an off-center subject without using focus lock.
To select a focus area, unlock the focus-area selector by rotating the lockrelease to the unlocked position (A). You can move the focus area left or right,up or down by pressing the focus-area selector in the corresponding direction.
The selected focus area appears in the control panel on top of the camera (B)and is shown in red in the viewfinder (C). The focus area can be locked byrotating the focus-area selector lock release to the locked position.
Note: The focus area can not be selected manually when closest subjectpriority is in effect. The focus area indicator is not displayed in the viewfinderor in the control panel on top of the camera when closest subject priority is ineffect (see “AF Area Mode”).
Focus area can still be selected when another type of finder screen is inserted in thecamera.
By default, if the top focus area is selected, the focus area will not change whenthe top of the focus-area selector is pressed. Similarly, pressing the selector to theright when the right area is selected has no effect. This setting can be changedso that pressing the top of the selector when the top area is selected activates thebottom area, pressing the selector to the right when the right area is selectedactivates the left area, etc. This allows you to shift focus from the right to left side,top to bottom, without changing the position of your finger on the focus-areaselector. See “Custom Settings,” item 6.

37
Tip
Focus Lock
Focus lock can be used to focus on a subject not in any of the five focus areas,or on other occasions when you would otherwise be unable to focus on thesubject using autofocus.
The procedure for using focus lock differs depending on whether you are using-single or continuous servo AF. Follow the steps below.
1 Position the subject in the focus area (A) and press the shutter-releasebutton half way (B).
A B
2a In single servo AF, confirm that the in-focus indicator (● ) appears in theviewfinder. Focus will remain locked at the current setting as long as theshutter-release button is held half way down. To lock exposure as well asfocus, press the button. Focus and exposure will remain locked as longas the button is held down, even if you remove your finger from theshutter-release button.
Camera Settings: Focus Lock
The button can be set to lock only focus, rather than both focus and exposure.See “Custom Settings,” item 21.
38
Tip
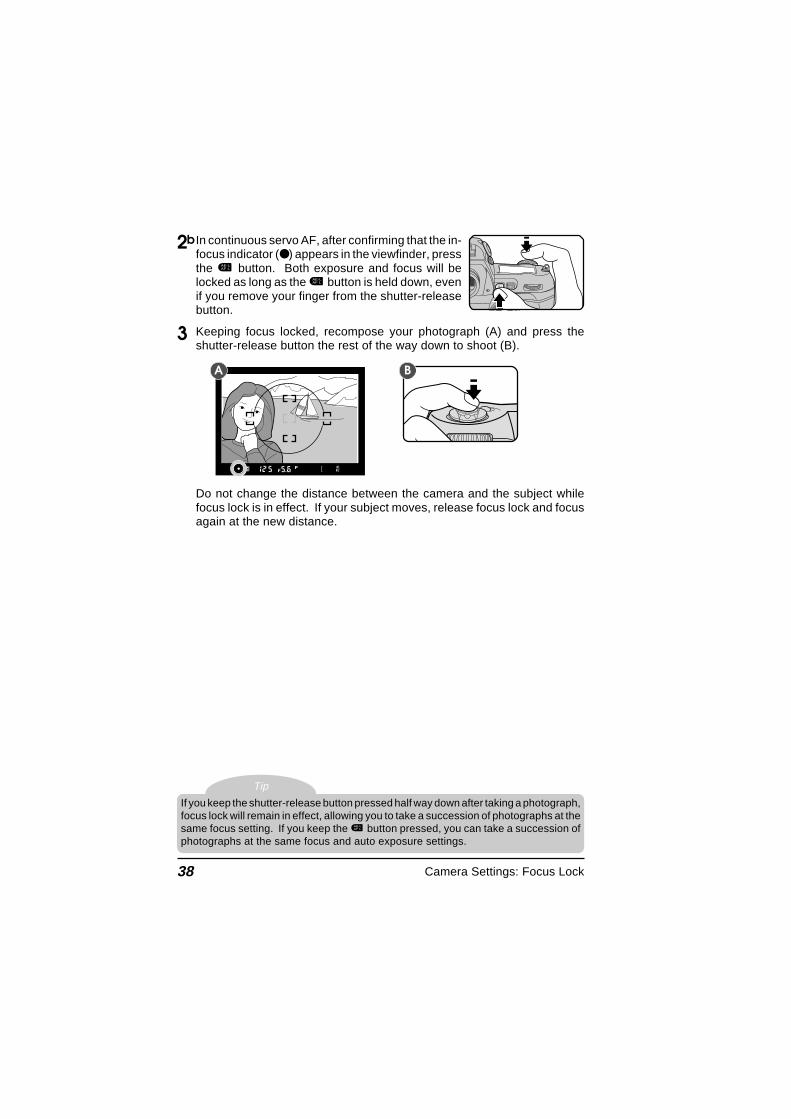
2b In continuous servo AF, after confirming that the in-focus indicator (● ) appears in the viewfinder, pressthe button. Both exposure and focus will belocked as long as the button is held down, evenif you remove your finger from the shutter-releasebutton.
3 Keeping focus locked, recompose your photograph (A) and press theshutter-release button the rest of the way down to shoot (B).
Do not change the distance between the camera and the subject whilefocus lock is in effect. If your subject moves, release focus lock and focusagain at the new distance.
A B
Camera Settings: Focus Lock
If you keep the shutter-release button pressed half way down after taking a photograph,focus lock will remain in effect, allowing you to take a succession of photographs at thesame focus setting. If you keep the button pressed, you can take a succession ofphotographs at the same focus and auto exposure settings.

39
Getting Good Results with Autofocus
Autofocus performs best when:
• The subject is well lit. To use autofocus with very dark subjects, use theAF-assist illuminator built into the Nikon SB-28DX Speedlight (availableseparately) and select the center focus area.
• There is contrast between the subject and the background. For example,autofocus may not perform well on subjects that are the same color as thebackground.
• The objects in the focus brackets are all at the same distance from thecamera. For example, autofocus may not perform well when you arephotographing an object inside a cage, as the bars of the cage will be closerto the camera than the object in the cage, and both the bars and the objectin the cage will be in the focus brackets.
• The subject is not dominated by regular geometrical patterns. Forexample, the camera may have difficulty focusing on a row of windows ina skyscraper.
• The subject is evenly lit.
If the in-focus indicator (● ) does not appear in the viewfinder when the shutter-release button is pressed half way, focus manually or use focus lock to focuson another subject at the same distance, then recompose your photograph(see “Focus Lock”).
Camera Settings: Getting Good Results with Autofocus

40
Note
Manual Focus
Manual focus can be used in situations in which autofocus will not produce theexpected results, or when the lens attached to the camera is not an AF Nikkorlens.
B
To use manual focus, set the focus mode selector to M (A). Adjust focus usingthe lens focusing ring (B) until the image displayed on the clear matte field inthe viewfinder is in focus.
Using the electronic range finderA B
Set the focus mode selector to M and half-press the shutter-release button.Before the focus indicator in the viewfinder disappears, rotate the lens focusingring (A) until the in-focus indicator (● ) is displayed.
If the indicator appears in the viewfinder, the camera is focused on a pointbetween the camera and the subject. The indicator appears when thecamera is focused on a point behind the subject. Note that a photograph canbe taken even when the in-focus indicator is not displayed in the viewfinder.
A
Camera Settings: Manual Focus
The D1’s built-in electronic range finder is compatible with most Nikkor lenses(including AF Nikkor lenses when used with manual focus) with a maximum apertureof f/5.6 or faster, and can be used when focusing on subjects in any of the five focusareas (see “Focus Area,” above).
41
Metering
The D1 offers a choice of three metering methods, which can be chosenaccording to how your subject is lit:
Color matrix metering/3D color matrix metering: The D1 uses a3D color matrix metering system. In this system, metering isperformed by a CCD sensor with 1,005 (67 vertical × 15 horizontal)metering pixels, which sets exposure using a selection of data fromall areas of the frame. This system is particularly effective withbrightly-colored (white or yellow) or dark-colored (black or darkgreen) subjects that occupy a substantial portion of the frame,producing photographs closer to what is seen by the naked eye. 3Dcolor metering can however only be used with D-type lenses. Whenanother type of lens is in place, color matrix metering is used. Unlike3D matrix metering, this system does not make use of range informa-tion from the lens.
Spot or center-weighted metering is recommended when you useAE-lock (see “AE Lock”) or exposure compensation (see “ExposureCompensation”).
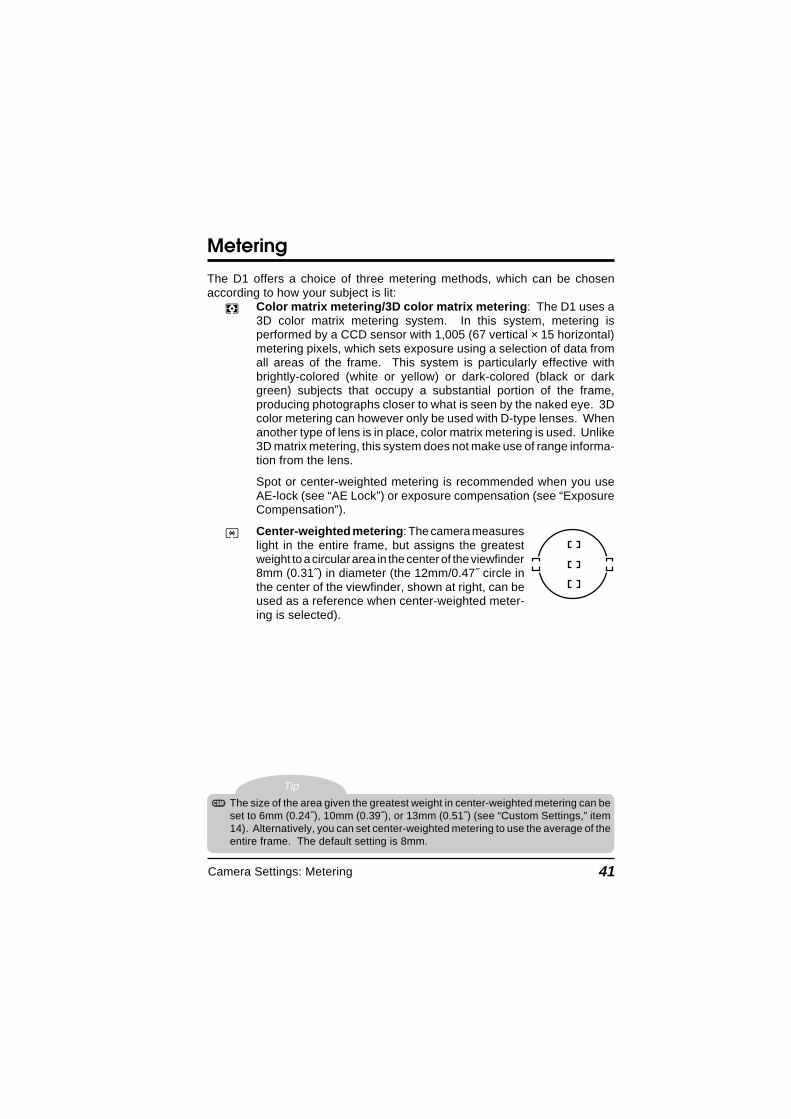
Center-weighted metering: The camera measureslight in the entire frame, but assigns the greatestweight to a circular area in the center of the viewfinder8mm (0.31˝) in diameter (the 12mm/0.47˝ circle inthe center of the viewfinder, shown at right, can beused as a reference when center-weighted meter-ing is selected).
Tip
Camera Settings: Metering
The size of the area given the greatest weight in center-weighted metering can beset to 6mm (0.24˝), 10mm (0.39˝), or 13mm (0.51˝) (see “Custom Settings,” item14). Alternatively, you can set center-weighted metering to use the average of theentire frame. The default setting is 8mm.
42
Spot metering: The camera measures light only in a circle 4mm(0.15˝) in diameter and centered on the current focus area. The areametered occupies approximately two percent of the entire frame.This method can be used with back-lit subjects or on other occasionswhen the background is much darker or much brighter than yoursubject.
As a rule, spot metering measures light in the current focus area,ensuring that your subject is properly exposed. When closest-subject priority is used with dynamic AF area selection, or when anon-CPU lens is attached, light will be measured in the center focusarea only.
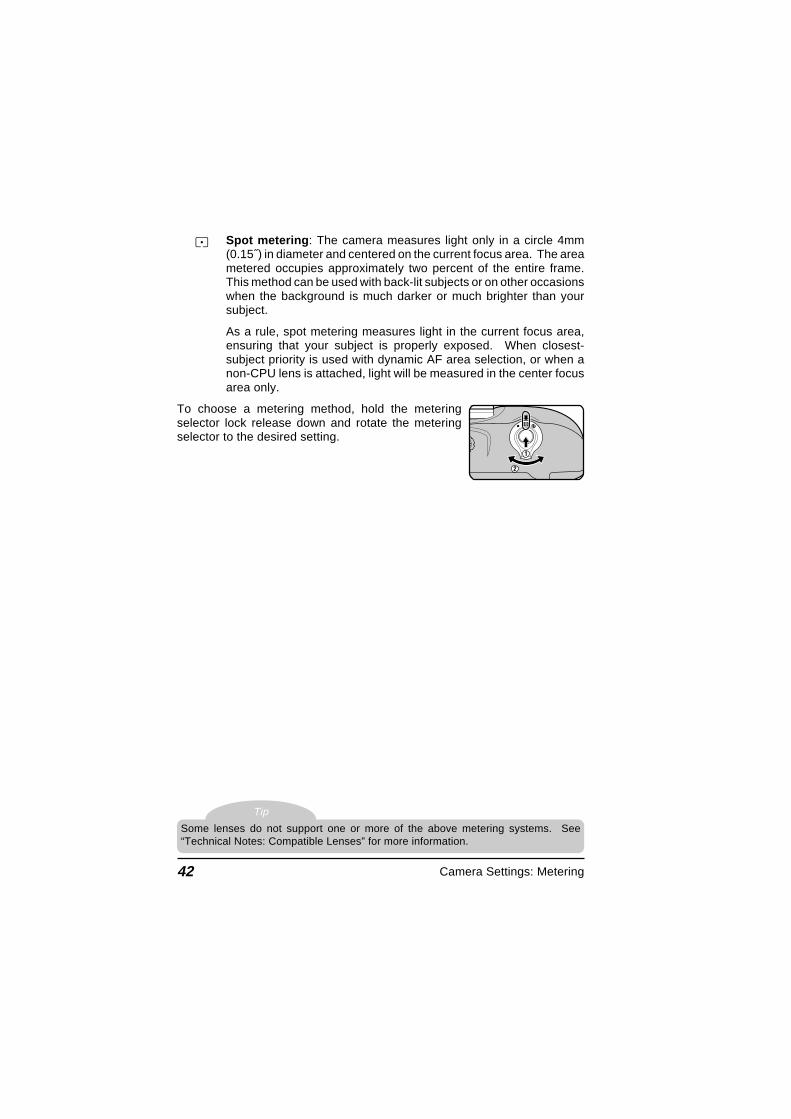
To choose a metering method, hold the meteringselector lock release down and rotate the meteringselector to the desired setting.
Tip
Camera Settings: Metering
Some lenses do not support one or more of the above metering systems. See“Technical Notes: Compatible Lenses” for more information.
43
Note
Exposure Mode
The D1 offers a choice of four exposure modes: programmed auto, shutter-priority auto, aperture-priority auto, and manual. This section discussesshutter-priority auto, aperture-priority auto, and manual exposure modes. Formore information on programmed auto, see “First Steps.”
— Shutter-priority autoIn shutter-priority auto, you set the shutter speed;the camera automatically adjusts the apertureto produce the best exposure. Shutter speedcan be set to a value between 30 and 1/16,000
seconds. High shutter speeds can be used tofreeze motion, low shutter speeds to blur mov-ing objects.
To use shutter-priority auto:
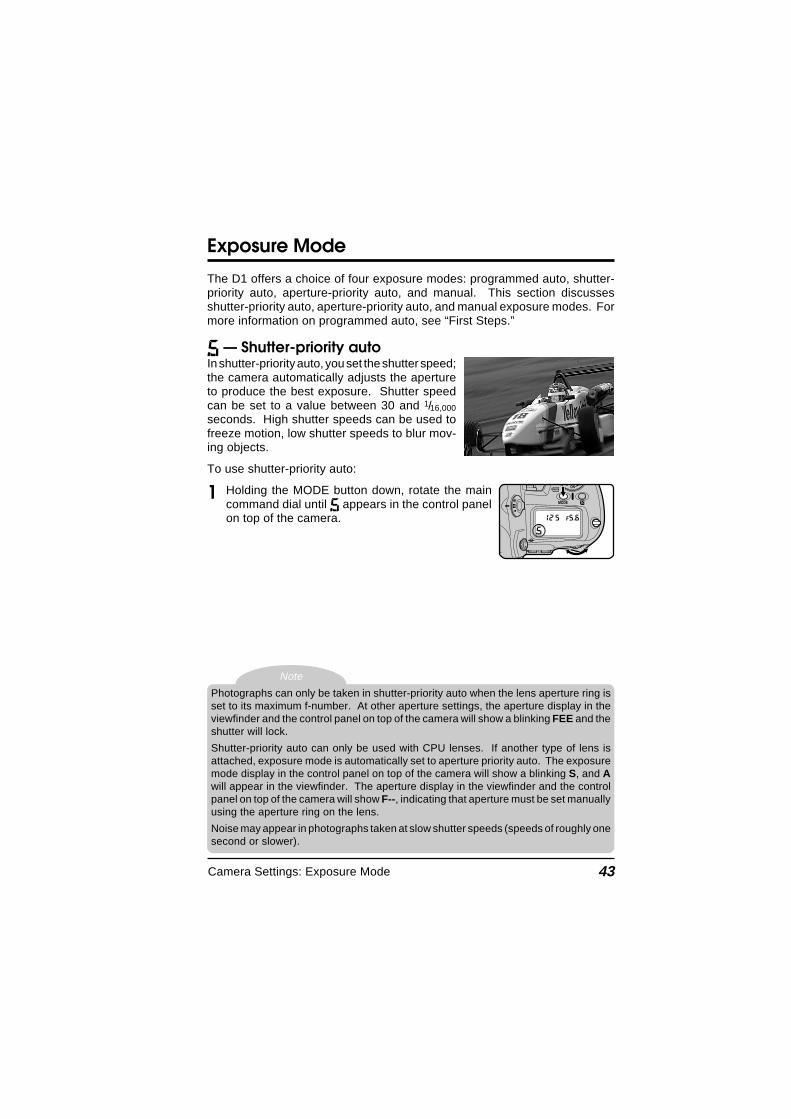
1 Holding the MODE button down, rotate the maincommand dial until appears in the control panelon top of the camera.
Camera Settings: Exposure Mode
Photographs can only be taken in shutter-priority auto when the lens aperture ring isset to its maximum f-number. At other aperture settings, the aperture display in theviewfinder and the control panel on top of the camera will show a blinking FEE and theshutter will lock.
Shutter-priority auto can only be used with CPU lenses. If another type of lens isattached, exposure mode is automatically set to aperture priority auto. The exposuremode display in the control panel on top of the camera will show a blinking S, and Awill appear in the viewfinder. The aperture display in the viewfinder and the controlpanel on top of the camera will show F--, indicating that aperture must be set manuallyusing the aperture ring on the lens.
Noise may appear in photographs taken at slow shutter speeds (speeds of roughly onesecond or slower).

44
Tips
2 Rotate the main command dial to choose a shutterspeed.
Shutter-speed lockIf desired, you can lock shutter speed to the selected setting so that it does notchange accidentally when you use the main command dial for other purposes.If you hold the button down while turning the main command dial to selectthe shutter speed (A), shutter speed will be locked when you release the button, and lock indicators will appear in the viewfinder and the control panelon top of the camera (B). To release the lock, hold the button down andturn the main command dial.
A B
Camera Settings: Exposure Mode
The steps used in adjusting shutter speed and aperture can be changed usingCustom Setting 2. See “Custom Settings.”
You can choose the sub-command dial as the control for selecting shutter speedand aperture. See “Custom Settings,” item 12.
If the subject will be over- or under-exposed at the selected shutter speed, a warningwill appear in the viewfinder and in the control panel on top of the camera when theshutter-release button is pressed half way.HI The photograph will be overexposed. Select a higher shutter speed. If the warning
persists, use a Neutral Density (ND) filterLo The photograph will be underexposed. Select a lower shutter speed or use a flash.
The electronic analog exposure display will show the amount the photograph will beunder- or over-exposed.

45
— Aperture-priority autoIn aperture-priority auto, you set the apertureand the camera automatically adjusts the shut-ter speed to produce the best exposure. Smallapertures (high f-numbers) can be used to in-crease the depth of field, bringing backgroundand foreground into focus. Large apertures (lowf-numbers) can be used to blur the background.Larger apertures can also be used to increasethe range of the flash.
To use aperture-priority auto:
1 Holding the MODE button down, rotate the maincommand dial until appears in the control panelon top of the camera.
Note
2 Rotate the sub-command dial to choose an aper-ture between the minimum and maximum settingspossible for the lens.
Camera Settings: Exposure Mode
With CPU lenses, the lens aperture ring must be set to its maximum f-number whenaperture-priority auto is used. At other settings, the aperture display in the viewfinderand the control panel on top of the camera will show a blinking FEE and the shutter willlock.
When a non-CPU lens is used, aperture can be adjusted using the lens aperture ring.The aperture display in the viewfinder and the control panel on top of the camera willshow F-- to indicate that aperture must be set manually using the aperture ring.
Custom Setting 22 can be used to allow aperture to be set with the aperture ringon CPU lenses. See “Custom Settings,” item 22.

46
Tips
Aperture lockIf desired, you can lock aperture to the selected setting so that it does notchange accidentally when you use the sub-command dial for other purposes.If you hold the button down while turning the sub-command dial to selectthe aperture (A), aperture will be locked when you release the button, andlock indicators will appear in the viewfinder and the control panel on top of thecamera (B). To release the lock, hold the button down and turn the sub-command dial.
A B
Camera Settings: Exposure Mode
The steps used in adjusting shutter speed and aperture can be changed usingCustom Setting 2. See “Custom Settings.”
You can choose the sub-command dial as the control for selecting shutter speedand aperture. See “Custom Settings,” item 12.
If the subject will be over- or under-exposed at the selected aperture, a warning willappear in the viewfinder and in the control panel on top of the camera when the shutter-release button is pressed half way.HI The photograph will be overexposed. Select a higher f-number (smaller aperture).
If the warning persists, use a Neutral Density (ND) filter.Lo The photograph will be underexposed. Select a lower f-number (larger aperture)
or use a flash.The electronic analog exposure display will show the amount the photograph will beunder- or over-exposed.

47
— ManualIn manual exposure mode, you control bothaperture and shutter speed. Shutter speed canbe set for a long time exposure (bulb) or to fixedvalues between 30 and 1/16,000 seconds. Aper-ture can be set to any value between the mini-mum and maximum values for the lens. Usingthe electronic analog exposure display in theviewfinder or the control panel on top of thecamera, you can adjust exposure to suit yourobjective and shooting conditions.
To use manual exposure:
1 Holding the MODE button down, rotate the maincommand dial until appears in the control panelon top of the camera.
Tips
2 Rotate the main command dial to choose a shutterspeed (A). Aperture is set by rotating the sub-command dial (B).
A
B
Camera Settings: Exposure Mode
At a shutter-speed setting of bulb, the shutter will remain open as long as the shutter-release button is held down (long time exposure). Note however that if the shutter isopen for more than one second at any setting, noise may appear in the finalphotograph.
Aperture and shutter speed can be locked using the button, as described in“Shutter-priority auto” and “Aperture-priority auto.”
The steps used in adjusting shutter speed and aperture can be changed usingCustom Setting 2. See “Custom Settings.”
You can reverse the roles of the main- and sub-command dials for selectingshutter speed and aperture. See “Custom Settings,” item 12.

48
3 Check exposure in the electronic analog exposure display in the viewfinderor the control panel on top of the camera, and readjust settings to achievethe desired result.
Reading the electronic analog exposure displayThe electronic analog exposure display shows the amount the image willbe over- or under-exposed if a photograph is taken at current settings. Thedisplay varies depending on whether exposure compensation is displayedin increments of 1/3,
1/2, or 1 EV (the illustrations below show the electronicanalog exposure display in the control panel on top of the camera).
1/3 EV Increments 1/2 or 1 EV Increments
+2 +1 0 –1 –2
➔ Underexposed
➔
Overexposed +3 +2 +1 –1 –3–20
➔ Underexposed
➔
Overexposed
Some examples of how to read the display are given below.
1/3 EV Increments 1/2 or 1 EV Increments
Optimal exposure Optimal exposure
Underexposed by 2/3 EV Underexposed by 1 EV
Overexposed by Overexposed bymore than 2 EV more than 3 EV
If the limits of the camera’s metering system are exceeded, the electronicanalog exposure display will flash.
Note
Camera Settings: Exposure Mode
When using an AF Micro-Nikkor lensWhen setting aperture by means of the sub-command dial, you need not take theexposure ratio into account if you are using an external exposure meter. Compensationthat takes the exposure ratio into account is only necessary if you are using the lensaperture ring.

49
Auto-Exposure Lock
When spot or center-weighted metering is used in combination with pro-grammed auto, shutter-priority auto, or aperture-priority auto, the cameradetermines exposure automatically with reference to lighting conditions in alimited area of the frame. Auto-exposure lock is used when you want autoexposure to be based on a subject that will not be in the focus area in the finalcomposition.
To use auto-exposure lock:
1 With the metering selector lock release held down,rotate the metering selector to select center-weighted or spot metering.
Notes
2 After positioning the subject in the focus area, press the shutter-releasebutton half way and confirm that the in-focus indicator (● ) appears in theviewfinder (A). With the shutter-release button held half way down, pressand hold the button (B).
Exposure is calculated based on lighting conditions in the current focusarea (spot metering) or in an 8mm circle in the center of the viewfinder(center-weighted metering).
A B
Camera Settings: Auto-Exposure Lock
Matrix metering is not recommended for use with auto-exposure lock, as it is unlikelyto produce the desired results.
Note that if autofocus (single servo AF or continuous servo AF) is in effect, focus willlock when the button is pressed. Check to see that the in-focus indicator (● ) isdisplayed in the viewfinder. If desired, camera settings can be changed so that onlyauto-exposure is locked when the button is pressed (see “Custom Settings,” item21).
If spot metering is used in combination with closest-subject priority (see “AF AreaMode”), exposure will be based on lighting conditions in the center focus area.

50
3 With the button held down, recompose your photograph (A) and shoot(B).
Tips
While the button is held down, you can adjust shutter speed (whenshutter-priority auto is selected as the exposure mode), aperture (aperture-priority auto), or flexible program (programmed auto). The aperture (inshutter-priority auto), shutter speed (aperture priority auto), or flexibleprogram are automatically adjusted to produce the exposure set usingauto-exposure lock. The adjusted values for shutter speed and apertureare displayed in the viewfinder and the control panel on top of the camera.
Metering can not be changed while exposure lock is in effect. Any changesto metering will take effect only after the button is released.
A B
Camera Settings: Auto-Exposure Lock
Camera settings can be changed so that auto-exposure locks when the shutter-release button is pressed half way. See “Custom Settings,” item 7.
The size of the area given the greatest weight in center-weighted metering can beset to 6mm (0.24˝), 10mm (0.39˝), or 13mm (0.51˝) (see “Custom Settings,” item14). Alternatively, you can set center-weighted metering to use the average of theentire frame. The default setting is 8mm.
Camera settings can be changed so that auto-exposure lock remains in effect afteryou release the button. In this case, normal auto-exposure will be restored thenext time the button is pressed. See “Custom Settings,” item 21.
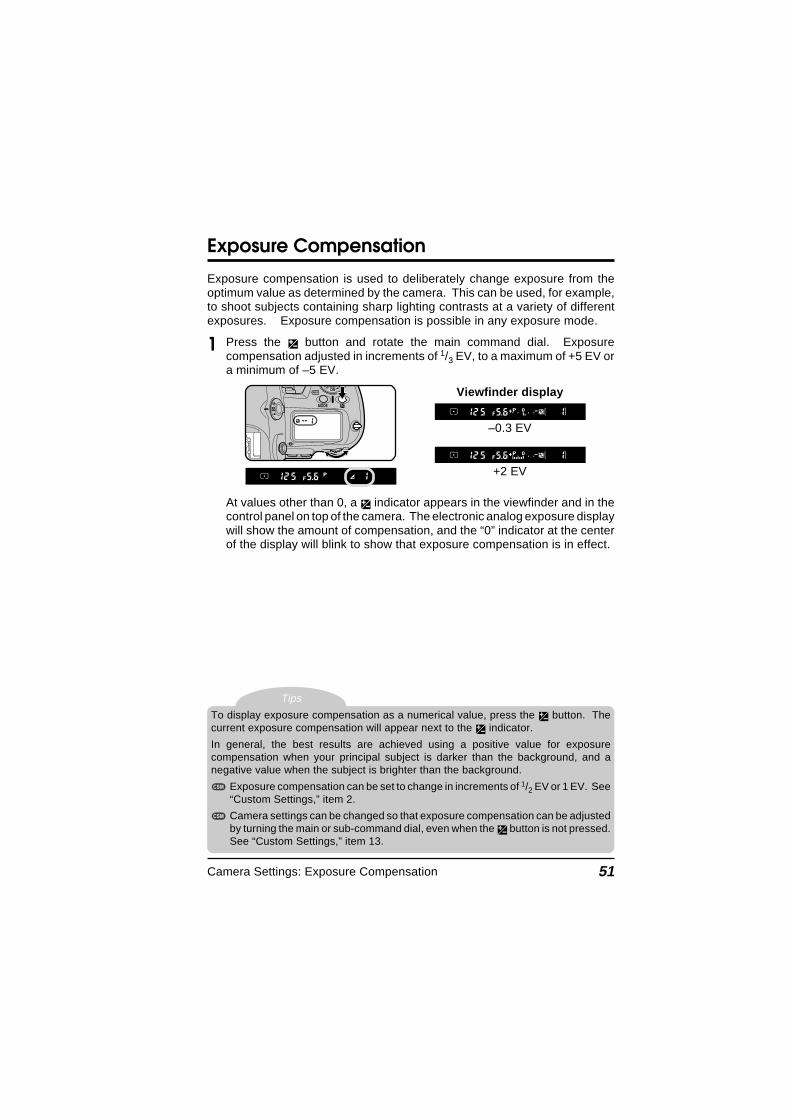
51
Exposure Compensation
Exposure compensation is used to deliberately change exposure from theoptimum value as determined by the camera. This can be used, for example,to shoot subjects containing sharp lighting contrasts at a variety of differentexposures. Exposure compensation is possible in any exposure mode.
1 Press the button and rotate the main command dial. Exposurecompensation adjusted in increments of 1/3 EV, to a maximum of +5 EV ora minimum of –5 EV.
Tips
Viewfinder display
–0.3 EV
+2 EV
At values other than 0, a indicator appears in the viewfinder and in thecontrol panel on top of the camera. The electronic analog exposure displaywill show the amount of compensation, and the “0” indicator at the centerof the display will blink to show that exposure compensation is in effect.
Camera Settings: Exposure Compensation
To display exposure compensation as a numerical value, press the button. Thecurrent exposure compensation will appear next to the indicator.
In general, the best results are achieved using a positive value for exposurecompensation when your principal subject is darker than the background, and anegative value when the subject is brighter than the background.
Exposure compensation can be set to change in increments of 1/2 EV or 1 EV. See“Custom Settings,” item 2.
Camera settings can be changed so that exposure compensation can be adjustedby turning the main or sub-command dial, even when the button is not pressed.See “Custom Settings,” item 13.
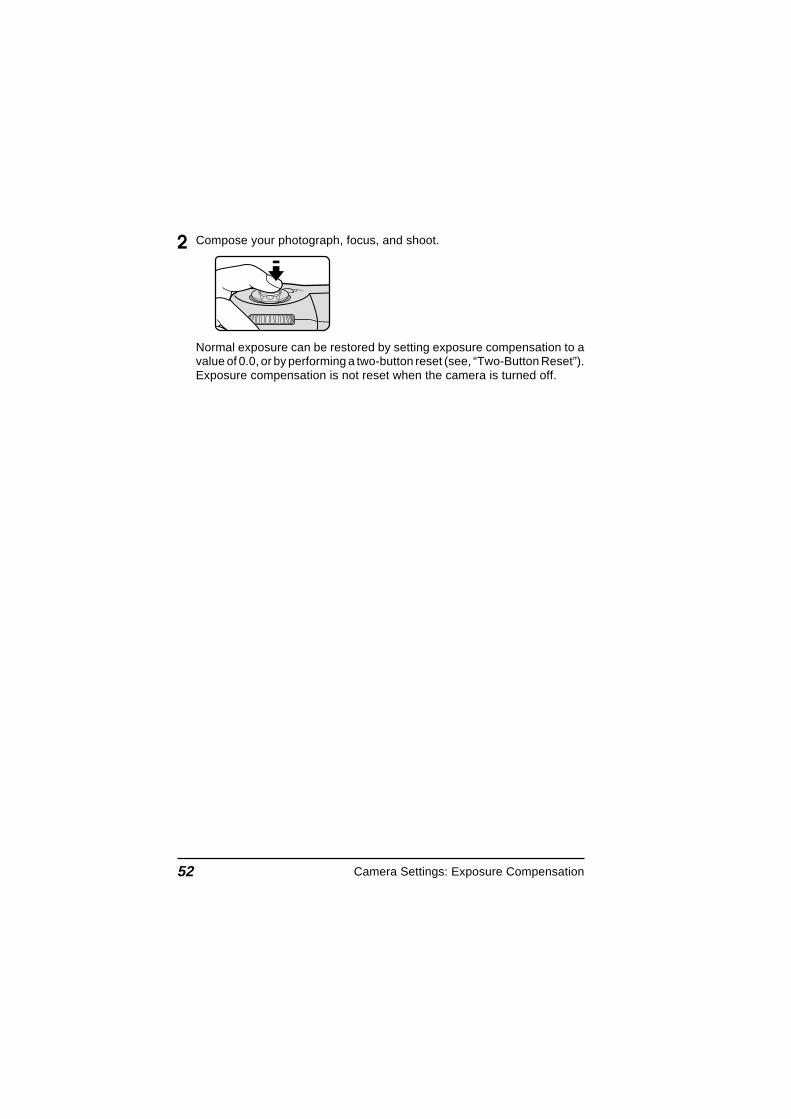
52
2 Compose your photograph, focus, and shoot.
Normal exposure can be restored by setting exposure compensation to avalue of 0.0, or by performing a two-button reset (see, “Two-Button Reset”).Exposure compensation is not reset when the camera is turned off.
Camera Settings: Exposure Compensation

53
Auto Bracketing
Bracketing is used to take a series of photographs of the same subject usinga variety of exposure values that “bracket” optimum value as determined by thecamera (or, in manual mode, by the photographer). This can be used to takemultiple shots of the same subject at different exposure settings withoutstopping to adjust exposure compensation manually. Up to three photographscan be taken at exposure settings varying from +2 to –2 EV (these values areadded to the value chosen for exposure compensation using the exposurecompensation function described on the previous pages). Bracketing can beused in any exposure mode.
1 Holding down the BKT button (A), rotate the main command dial until BKTappears in the control panel on top of the camera (B). The indicator inthe viewfinder and in the control panel on top of the camera will blink.
Note
A B
A B
2 Holding the BKT button down (A), rotate the sub-command dial to choosea bracketing program (B). The bracketing programs available depend onCustom Setting 2 (see overleaf).
Camera Settings: Auto Bracketing
Changes to exposure are effected by changing the shutter speed (manual andaperture-priority auto exposure modes), the aperture (shutter-priority auto), or bothshutter speed and aperture (programmed auto).
Flash and auto-exposure bracketingIf a Speedlight is attached when bracketing is in effect, both flash level (TTL level asdetermined for the main subject) and auto-exposure will be changed for eachexposure regardless of the exposure mode. Camera settings can be changed so thatonly one of flash-exposure bracketing or auto-exposure bracketing will be performed.See “Custom Settings,” item 11.

54
When Custom Setting 2 is set to 1/3 increments (default):
SettingControl Panel Number of Shots/
Exposure Display Bracketing (EVs)
–2F1.0 2 (±0, –1.0)
–2F0.7 2 (±0, –0.7)
–2F0.3 2 (±0, –0.3)
+2F1.0 2 (±0, +1.0)
+2F0.7 2 (±0, +0.7)
+2F0.3 2 (±0, +0.3)
–3F1.0 3 (–1.0, –2.0, ±0)
–3F0.7 3 (–0.7, –1.3, ±0)
–3F0.3 3 (–0.3, –0.7, ±0)
+3F1.0 3 (+1.0, ±0, +2.0)
+3F0.7 3 (+0.7, ±0, +1.3)
+3F0.3 3 (+0.3, ±0, +0.7)
3F1.0 3 (±0, –1.0, +1.0)
3F0.7 3 (±0, –0.7, +0.7)
3F0.3 3 (±0, –0.3, +0.3)
When Custom Setting 2 is set to increments of 1/2:
SettingControl Panel Number of Shots/
Exposure Display Bracketing (EVs)
–2F1.0 2 (±0, –1.0)
–2F0.5 2 (±0, –0.5)
+2F1.0 2 (±0, +1.0)
+2F0.5 2 (±0, +0.5)
–3F1.0 3 (–1.0, –2.0, ±0)
–3F0.5 3 (–0.5, –1.0, ±0)
+3F1.0 3 (+1.0, ±0, +2.0)
+3F0.5 3 (+0.5, ±0, +1.0)
3F1.0 3 (±0, –1.0, +1.0)
3F0.5 3 (±0, –0.5, +0.5)
Camera Settings: Auto Bracketing

55
When Custom Setting 2 is set to increments of 1:
SettingControl Panel Number of Shots/
Exposure Display Bracketing (EVs)
–2F1.0 2 (±0, –1.0)
+2F1.0 2 (±0, +1.0)
–3F1.0 3 (–1.0, –2.0, ±0)
+3F1.0 3 (+1.0, ±0, +2.0)
3F1.0 3 (±0, –1.0, +1.0)
3 To take the first photograph in the series, compose a photograph, focus,and shoot. If the camera is set to continuous shooting mode (operatingmode C), the camera will take the specified number of shots while theshutter-release button is held down and then stop automatically. In single-frame shooting or when the self timer is on (see “Self Timer Mode”),photographs are taken one at a time each time the shutter-release buttonis fully pressed. Bracketing can be cancelled before all the photographs inthe series have been taken by holding down the BKT button and rotatingthe main command dial until BKT is no longer displayed in the controlpanel. The bracketing program currently selected will be recalled the nexttime bracketing is used.
Tips
Camera Settings: Auto Bracketing
The shutter-speed and aperture values displayed during shooting reflect the exposurecompensation value for the current photograph.
Bracketing can be combined with exposure compensation (see “ExposureCompensation”). This can be used to achieve exposure compensations of more than+2.0 or less than –2.0 during bracketing.
If the camera is turned off before you have taken all the photographs in the sequence,you can continue from where you left off when the camera is turned back on. If thememory card fills up before you have completed the sequence, you can continue fromwhere you left off after deleting images or inserting a new memory card.
By default, the camera shoots photographs with a negative compensation valuebefore shooting those with a positive compensation value. This can be changedusing Custom Setting 3 (see “Custom Settings”).
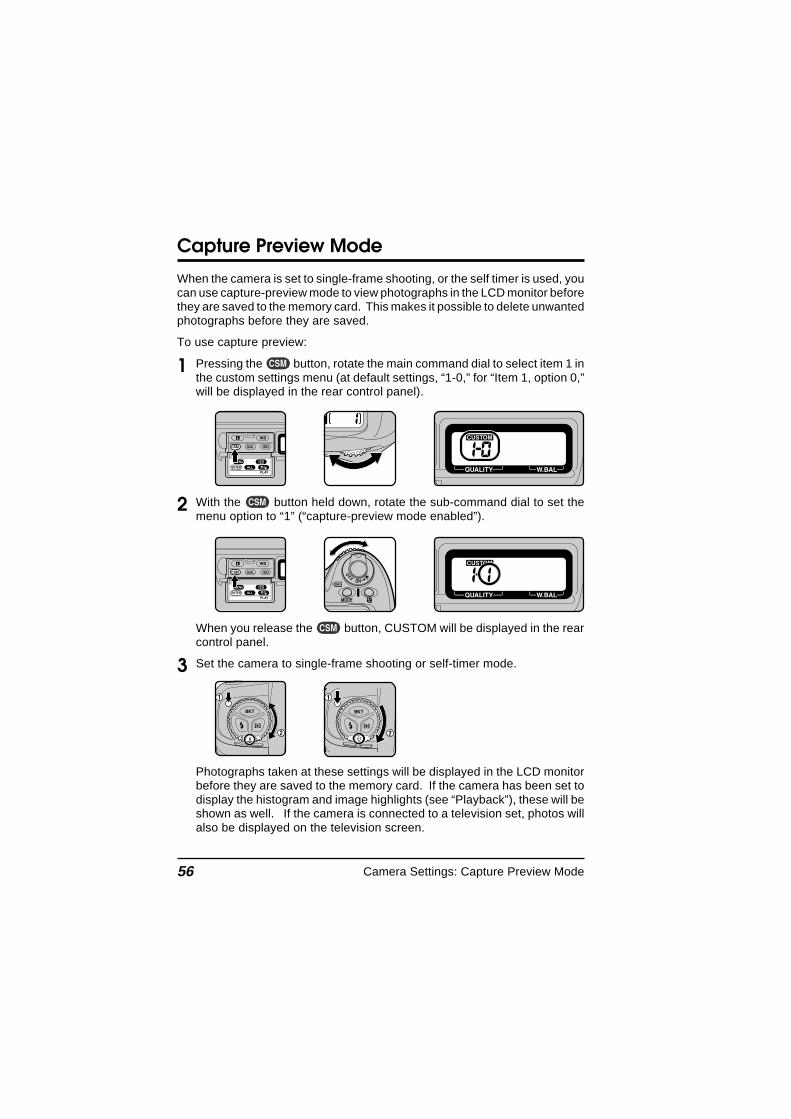
56
Capture Preview Mode
When the camera is set to single-frame shooting, or the self timer is used, youcan use capture-preview mode to view photographs in the LCD monitor beforethey are saved to the memory card. This makes it possible to delete unwantedphotographs before they are saved.
To use capture preview:
1 Pressing the button, rotate the main command dial to select item 1 inthe custom settings menu (at default settings, “1-0,” for “Item 1, option 0,”will be displayed in the rear control panel).
2 With the button held down, rotate the sub-command dial to set themenu option to “1” (“capture-preview mode enabled”).
When you release the button, CUSTOM will be displayed in the rearcontrol panel.
3 Set the camera to single-frame shooting or self-timer mode.
Photographs taken at these settings will be displayed in the LCD monitorbefore they are saved to the memory card. If the camera has been set todisplay the histogram and image highlights (see “Playback”), these will beshown as well. If the camera is connected to a television set, photos willalso be displayed on the television screen.
Camera Settings: Capture Preview Mode
57
If no other operation is performed, the monitor will stay on for the length of timespecified in Custom Setting 18 or the playback menu “Auto Off” option (if thistime is shorter than the time required to record the photograph, the monitor willremain on for five seconds after the image has been recorded to the card). Themonitor will then turn off automatically to save power.
The operations that can be performed while the photograph is on display areas follows:
To record the photographPress the button. The monitor will turn off and the photograph will berecorded to the memory card.
To delete the photograph before it is recorded to the memory cardHalf-press the shutter-release button, or press the or button. Thephotograph will be deleted without being recorded to the memory card andthe monitor will turn off.
To turn the monitor on or offPress the button to turn the monitor on or off. When the monitor isturned off, a monitor indicator will appear in the rear control panel,indicating that the photograph has yet to be deleted or recorded to thememory card. The photograph will be displayed again when the monitoris turned on.
Notes
Camera Settings: Capture Preview Mode
Capture preview is only available in single-frame shooting or self-timer modes.Photographs are not displayed when the camera is set to continuous shooting or PCmode.
If, after the monitor has been turned off, another photograph is taken while the monitorindicator is displayed in the rear control panel, the current photograph will be deletedand the photograph just taken will appear in the monitor.

58
Record-and-Review
When the camera is set to single-frame shooting, or the self timer is used, youcan choose to have photographs displayed automatically in the monitorimmediately after they have been saved to the memory card. This allows youto delete unwanted photographs immediately after they have been taken.
To use record-and-review:
1 Pressing the button, rotate the main-command dial to select item 1 inthe custom settings menu (at default settings, “1-0,” for “Item 1, option 0,”will be displayed in the rear control panel).
2 With the button held down, rotate the sub-command dial to set themenu option to “2” (“record-and-review mode enabled”).
When you release the button, CUSTOM will be displayed in the rearcontrol panel.
3 Set the camera to single-frame shooting or self-timer mode.
Photographs taken at these settings will be displayed in the LCD monitor.If the camera has been set to display the histogram and image highlights(see “Playback”), these will be shown as well. If the camera is connectedto a television set, photos will also be displayed on the television screen.
Camera Settings: Record-and-Review

59
If no other operation is performed, the monitor will stay on for the length of timespecified in Custom Setting 18 or the playback menu “Auto Off” option (if thistime is shorter than the time required to record the photograph, the monitor willremain on for five seconds after the image has been recorded to the card). Themonitor will then turn off automatically to save power.
The operations that can be performed while the photograph is on display areas follows:
To delete the photographPress the button. A confirmation dialog will be displayed; if you press
again, the photograph will be deleted and the monitor will turn off.
To end the displayAfter the camera has finished recording or deleting the photograph and thememory card access lamp has gone out, press any button other than theauto-bracketing button, the flash-sync mode button, or the AF-area modebutton. The photograph will disappear from the display and the monitor willturn off.
To turn the monitor on or offPress the button to turn the monitor on or off. When the monitor isturned off, a monitor indicator will appear in the rear control panel,indicating that the photograph is still on display. The photograph willappear again when the monitor is turned on.
Notes
Camera Settings: Record-and-Review
Record-and-review is only available in single-frame shooting or self-timer modes.Photographs are not displayed when the camera is set to continuous shooting or PCmode.
If, after the monitor has been turned off, another photograph is taken while the monitorindicator is displayed in the rear control panel, the current photograph will be clearedfrom the display and the photograph just taken will appear in the monitor. The currentphotograph is not deleted when cleared from the display.

60
Playing Photographs Back
Photographs already stored on the memory card can be played back withoutsetting the camera to playback (PLAY) mode. This playback feature can beused in single-frame shooting, continuous shooting, and self-timer modes.
To play photographs back:
1 Press the shutter-release button half way to wakethe camera up.
Notes
2 Press the monitor button.
The most recent photograph in memory will bedisplayed. If the camera has been set to display thehistogram and image highlights (see “Playback”),these will be shown as well. If the camera isconnected to a television set, photos will also bedisplayed on the television screen (the camera’sLCD monitor must be on for photographs to bedisplayed).
Camera Settings: Playing Photographs Back
If no photographs have been stored in the memory card, the message “CARDCONTAINS NO IMAGES” will be displayed.
The focus area selector can not be used to select the focus area while playback is inprogress.
Photographs can not be played back in PC mode.
61
The operations that can be performed while playing photographs back are asfollows:
To end playbackPress the button or half-press the shutter-release button. Thephotograph currently on display will disappear and the monitor will turn off.
To stop the monitor from turning off automaticallyIf no other operation is performed, the monitor will stay on for the length oftime specified in Custom Setting 18 or the playback menu “Auto Off” option.The monitor will then turn off automatically to save power.
After the monitor has turned off, the display can be restored by pressing the button before automatic meter switch-off (see “Custom Settings,” item
15).
To delete the photograph currently displayedPress the button. A confirmation dialog will be displayed; press again to delete the photograph. To return to single-image playback withoutdeleting the photograph, press any of the buttons on the rear of the cameraexcept the and buttons.
To view other photographs in memoryPress the focus area selector up (▲) or down (▼).
To view information on the current photographPress the focus area selector to the left ( ) or right ( ) to hide or displayinformation on the current photograph.
Camera Settings: Playing Photographs Back
Notes
The left and right edges of photographs are not shown when the photographs aredisplayed in the LCD monitor using the capture preview, record-and-review, orplayback feature described above.

62
Self Timer Mode
The D1’s built-in self timer is ideal for photographs in which photographerswish to appear themselves. The camera should be placed on a stable, levelsurface (a tripod is recommended).
To use the self timer:
1 Holding down the mode dial lock release, rotate themode dial to select .
Tips
2 Compose the picture and focus.
With single-servo AF, check that the in-focus indicator (● ) appears in theviewfinder. Photographs can not be taken when the camera is not focused.
3 In exposure modes other than manual (M), you should close the viewfindereyepiece shutter (A) to prevent light entering via the eyepiece fromaffecting the results of the auto-exposure operation. You can then pressthe shutter-release button all the way down to start the self timer (B).
A B
After the shutter-release button is pressed, the self-timer lamp on front ofthe camera (C) will blink for eight seconds. Two seconds after the lampstops blinking, the shutter will release automatically and a photograph willbe taken.
To turn the self timer off before a photo is taken, set the mode dial to a modeother than .
C
Camera Settings: Self Timer Mode
Do not stand in front of the lens when adjusting camera settings in single-servo orcontinuous-servo autofocus modes.
If a shutter speed of bulb (long time exposure) is chosen in self-timer mode, shutterspeed will be set to approximately 1/10 sec.
The timer can be set to delays of 2, 5, or 20 seconds using Custom Setting 16 (see“Custom Settings”).

63
Diopter Adjustment
The viewfinder is equipped with diopter adjustment to accommodate individualdifferences in vision.
Pull the diopter knob out and rotate it until the focusbrackets in the viewfinder are in sharp focus. Dioptercan be adjusted between –3 DP and +1 DP. Correctivelenses (available separately) allow diopter to be ad-justed between –5 DP and + 3 DP.
Tip
✔Important: Be careful not to accidently put your finger in your eye whenoperating the diopter dial.
LCD Illuminator
The rear control panel and the control panel on top of the camera are equippedwith an illuminator so that you can view camera settings in the dark.
To turn the illuminator on, rotate the power switch to. The illuminator will remain on while the switch is
held in this position. After the switch is released, theilluminator will remain on while exposure indicators aredisplayed, or until the shutter is released.
Camera Settings: Diopter Adjustment/LCD Illuminator
The illuminator can be set to turn on when any button is pressed. See “CustomSettings,” item 17.

64
Depth-of-Field Preview
To check the depth of field for the aperture setting in the current exposuremode, hold down the depth-of-field preview button.
The lens will be stopped down to the aperture selectedby the camera in programmed-auto or shutter-priorityauto exposure modes, or to the value selected by theuser in aperture-priority auto or manual modes. Theview through the viewfinder will give you an approxi-mate idea of the depth of field that can be obtained atthe current aperture.
Focal Plane Position
The position of the focal plane inside the camera is indicated by a mark on thecamera body.
The distance between the camera and the subjectshould be measured from this mark whenever distanceis measured manually. The distance between the lensmounting flange and the focal plane is 46.5 mm (1.83˝).
Camera Settings: Depth-of-Field Preview/Focal Plane Position

65
CUSTOM SETTINGS
Custom settings are available for a variety of camera functions. Settings canbe changed singly or in combination according to your preferences and thetask at hand.

66
Tip
Changing Custom Settings
To make changes to custom settings:
1 Select the desired item by rotating the main command dial while holdingdown the button. The rear control panel will show the item numberand the option currently selected for that item (e.g., “1-0” for “Item 1, option0”).
The D1 offers a total of 32 items (0–31), each with its own menu of options.
2 Select an option for the chosen item by rotating the sub-command dial.
After you release the button, CUSTOM will appear in the rear controlpanel.
Custom Settings: Changing Custom Settings
To return custom settings to their default values, perform a two-button reset as describedin “Two-Button Reset” at the end of this chapter. Only settings in the current custom set(see “Custom Settings Options,” item 0) will be reset.
67
Custom Settings Options
0. Custom SettingsThe camera can store up to two sets of custom settings (Set A and Set B).Using Custom Setting 0, you can recall either of these sets. Any changesto settings apply to the current set.Option: A Custom Set A (default)
b Custom Set B
1. Image StatusThe camera offers a choice of capture modes for single-frame shooting andself-timer modes: “capture preview” (photographs are displayed in themonitor before being saved to the memory card) and “record-and-review”(photographs are displayed in the monitor after being saved to the memorycard). Either mode allows you to delete unwanted photographs immedi-ately after shooting.Option: 0 Photograph is not displayed (default)
1 Capture-Preview Mode2 Record-and-Review Mode
2. EV Steps for Exposure ControlThis setting controls the size of the increments for adjusting shutter-speed,aperture, exposure compensation, and auto exposure bracketing.Option: 3 1/3 increments (default)
2 1/2 increments1 Increments of 1
3. Bracketing OrderIn auto bracketing, photographs are taken in the order given in “CameraSettings: Auto Bracketing” when the default option (0) is in effect. Selectingoption 1 causes bracketing to proceed from negative to positive compen-sation values.Option: 0 Default (see “Camera Settings: Auto Bracketing”)
1 Negative-to-positive bracketing
4. Autofocus ActivationBy default, autofocus is performed when the shutter-release button ispressed half way. It can also be set to start only when the button ispressed.Option: 0 Autofocus is performed when the shutter-release button is
pressed half way (default)1 Autofocus is only performed when the button is pressed
Custom Settings: Custom Settings Options

68
5. Anti-Vibration Mode (Delay Exposure until Mirror Shock Has Subsided)By default, the image is captured at the same time the shutter is released.To minimize mirror shock, you can set the camera to capture the imageafter the shutter is released.Option: 0 No delay (default)
1 Release delay in effect
6. Focus Area SelectionAt default settings, the focus area display is bounded by the four outer focusareas. Thus, for example, pressing the focus selector toward the top whenthe top focus area is already selected will have no effect. This can bechanged so that the focus area “wraps around” from top to bottom and rightto left. In this case, pressing the focus selector toward the top when the topfocus area is highlighted selects the bottom focus area, and vice-versa.Similarly, pressing the selector to the right when the right area is high-lighted selects the left focus area.Option: 0 Default (focus area does not wrap around)
1 Wrap-around in effect
7. AE LockBy default, auto-exposure only locks when the button is pressed. Thiscan be changed so that auto-exposure locks when the shutter-releasebutton is pressed half way.Option: 0 Auto exposure locks only when the button is pressed
(default)1 Auto-exposure locks when the shutter-release button is pressed
half way
8. Mirror UpThis setting can be used to leave the mirror in the up position so that theCCD can be cleaned. See “Technical Notes: Cleaning the CCD.”Option: 0 Mirror down during cleaning (default)
1 Mirror up during cleaning
9. Dynamic AF Mode in Single-Servo AFThis item can be used to activate or deactivate closest subject priority whendynamic AF is used with single-servo autofocus.Option: 0 Closest subject priority enabled (default)
1 Closest subject priority disabled
Custom Settings: Custom Settings Options

69
10. Dynamic AF Mode in Continuous-Servo AFThis item can be used to activate or deactivate closest subject priority whendynamic AF is used with continuous-servo autofocus.Option: 0 Closest subject priority disabled (default)
1 Closest subject priority enabled
11. Auto Exposure/Flash Exposure BracketingBy default, when a Speedlight is used with auto bracketing (see “CameraSettings: Auto Bracketing), flash exposure bracketing and auto-exposurebracketing will be performed simultaneously. Using this item, you canchange camera settings so that only flash exposure bracketing or onlyauto-exposure bracketing is performed.Option: AS Flash exposure bracketing and auto-exposure bracketing
performed together (default)AE Only auto-exposure bracketing is performedSb Only flash exposure bracketing is performed
12. Command Dial FunctionsBy default, the main command dial is used to change shutter speed inshutter-priority and manual exposure modes, the sub-command dial tochange aperture in aperture priority and manual exposure modes. Thisrelationship can be reversed using this item.Option: 0 Main command dial controls shutter speed, sub-command
dial controls aperture (default)1 Sub-command dial controls shutter speed, main command
dial controls aperture
13. Exposure Compensation SettingsThis item allows exposure compensation to be set without pressing the button.Option: 0 Exposure compensation is set by pressing the button and
turning the main command dial (default)1 Exposure compensation can be set by turning the sub-com-
mand dial (programmed auto or shutter-priority auto) or maincommand dial (aperture-priority auto or manual). If the rolesof the main command and sub-command dials are switchedusing Custom Setting 12, exposure compensation will beassigned to the sub-command dial in programmed auto,aperture-priority auto, and manual modes, and to the maincommand dial in shutter-priority auto.
Custom Settings: Custom Settings Options

70
14. Center-Weighted Metering AreaBy default, center-weighted metering assigns the greatest weight to a circlein the center of the viewfinder 8 mm (0.32˝) in diameter. The diameter ofthe area assigned the greatest weight can be changed to 6 mm (0.24˝), 10mm (0.39˝), or 13 mm (0.51˝), or exposure can be based on the averagelighting for the entire frame.Option: 6 Greatest weight assigned to a 6 mm circle
8 Greatest weight assigned to an 8 mm circle (default)10 Greatest weight assigned to a 10 mm circle13 Greatest weight assigned to a 13 mm circleA Exposure based average for entire frame
15. Time Delay for Auto Meter-Switch-OffBy default, exposure indicators are displayed in the control panel on top ofthe camera for six seconds after the camera is turned on. This can bechanged to four, eight, or sixteen seconds.Option: 4 Four-second delay
6 Six-second delay (default)8 Eight-second delay
16 Sixteen-second delay
16. Self-Timer DurationWhen photographs are taken using the self-timer, the default delaybetween the time the shutter-release button is pressed all the way downand the time the shutter is released is ten seconds. The timer can also beset to delays of two, five, or twenty seconds.Option: 2 Two-second delay
5 Five-second delay10 Ten-second delay (default)20 Twenty-second delay
17. LCD IlluminationBy default, the LCD illuminator comes on when the power switch is turnedto . Using this item, the illuminator can be set to come on when anybutton is pressed.Option: 0 LCD illuminator comes on when power switch is turned to
(default)1 LCD illuminator comes on when any button is pressed
18. LCD Monitor Auto Power OffThe time the LCD monitor will remain on if no operations are performedduring playback can be set using this item.Option: 0 Twenty seconds (default)
1 One minute2 Five minutes3 Ten minutes
Custom Settings: Custom Settings Options

71
19. Aperture SettingOn certain lenses, aperture varies with focal length or lens-to-film distance. Forexample, some Zoom-Nikkor lenses’ maximum aperture varies with focallength, while some Micro-Nikkor lenses’ maximum aperture varies with lens-to-film distance. By default, the aperture set using the sub-command dial inaperture-priority or manual exposure modes is preserved as either focal lengthor lens-to-film distance changes. Using this item, the camera can be set tomaintain aperture a constant number of steps from the maximum aperture forthe current focal length or lens-to-film distance. Suppose an aperture of f/8 isselected with an AF Zoom-Nikkor 70-210 mm f/4-5.6D lens zoomed out to 70mm. When the lens is zoomed to this position, f/8 is two steps from themaximum aperture of f/4. At default settings, the aperture will remain aconstant f/8 even when the lens is zoomed out to 210 mm. If the camera is setto maintain aperture a constant number of steps from the maximum aperturefor the current focal length, however, the aperture at 210 mm will be f/11, twosteps from f/5.6, the maximum aperture for this focal length.Option: 0 Aperture does not change with focal length or lens-to-film dis-
tance (default)1 Aperture is maintained at a value a constant number of steps from
the maximum aperture for the current focal length or lens-to-filmdistance
20. Shutter Release Indication via Self-Timer LampThe self-timer lamp on the front of the camera can be set to light immediatelybefore the shutter is released, even when the self timer is not used.Option: 0 Self-timer lamp does not light when shutter is released (default)
1 Self-timer lamp lights immediately before shutter is released
21. ButtonBy default, both auto exposure and autofocus are locked when the buttonis pressed and remain locked when it is held down. Using this item, you canchange settings so that auto exposure remains locked when the button isreleased, or so that only one of auto exposure or autofocus is locked while thebutton is held down.Option: 0 Both auto exposure and autofocus are locked while the
button is pressed (default)1 Only auto exposure is locked while the button is pressed2 Only autofocus is locked while the button is pressed3 Auto exposure is locked when the button is pressed, and
remains locked until the button is pressed a second time
22. Aperture SelectionBy default, aperture can only be set using the sub-command dial in aperture-priority auto and manual exposure modes. Using this item, you can changesettings so that aperture can only be adjusted using the lens aperture ring.Option: 0 Aperture can only be adjusted using sub-command dial (default)
1 Aperture can only be adjusted with lens aperture ring
Custom Settings: Custom Settings Options

72
23. SharpeningThe D1 can be set to increase or decrease the sharpness of edges inphotographs recorded using the camera.Option: 0 Normal (default)
1 Low2 High3 None
24. Tone CompensationThis setting controls the image compensation performed by the camerawhen a photograph is taken. Compensation is performed by means ofcurves which define the relationship between the tone distribution in theoriginal image and the compensated result. By default, the D1 automati-cally adjusts tonal range and distribution for optimal results when matrixmetering is used. At settings other than RAW (when data from the CCD arerecorded directly to the memory card without adjustment), you can choosefrom auto, normal, low-contrast, and high-contrast settings. You can alsouse custom curves created and downloaded to the camera using NikonCapture software for the D1 (available separately). The default customcurve is linear.Option: 0 Auto (default)—camera adjusts curves to produce optimal
contrast (matrix metering only; when another metering methodis used, this option is equivalent to option 1, i.e. normal tonecompensation)
1 Normal—this curve is suitable for scenes with a normaldistribution of shadows, mid-tones, and highlights
2 Low-contrast—use this curve to prevent highlights in brightly-lit scenes from being “washed out”
3 High-contrast—use this curve to bring out hazy backgrounddetails
4 User-defined custom curve
25. Shooting Speed in Continuous Shooting ModeThis item can be used to adjust the frame advance rate in continuousshooting mode.Option: Ch Approx. 4.5 frames per second (default)
3 Approx. 3 fps2 Approx. 2 fps1 Approx. 1 fpsCL Each photograph is written to the memory card before the
following photograph is taken. Photographs are not stored inthe temporary memory buffer.
Custom Settings: Custom Settings Options

73
26. Maximum Number of Consecutive Shots in Continuous Shooting ModeThis item determines the number of photographs that can be stored in thetemporary memory buffer in continuous shooting mode (see “CameraSettings: The Mode Dial”).Option: 21 Twenty-one standard photographs, ten photographs in RAW
format (default)1–20 Specified number of photographs, from one to twenty (one to
nine in RAW format)
27. LCD Monitor Display ModeBy default, only image data are displayed when photographs are playedback. Using this item, you can also show the histogram and/or highlights(see “Playback” for more information on histograms and highlights).Option: 0 Image only (default)
1 Image and histogram2 Image and highlights3 Image, histogram, and highlights
28. Save RAW ImagesThe RAW data format is only available at an image quality of HI when thisitem is set to 1.Option: 0 RAW data format not available (default)
1 RAW data format available
29. Auto File Numbering ModeThe D1 stores photographs in numbered files and folders. Because no twophotographs or folders on any given memory card will have the samenumber at the same time, there is no possibility of confusion so long as youcontinue to use a single memory card without formatting it. If you formatthe card or use a new card, however, a number previously assigned maybe used again. If you then copy a folder or photograph to a computer, anearlier folder or photograph with the same number may be overwritten.This can be prevented using option 1. With this option, when a new cardis inserted, numbering will continue from the highest number available onthe previous card. Choose option 0 to restore normal filename assignment.Option: 0 Normal filename assignment (default)
1 Sequential filename assignment
30. Shooting Mode in PC ModeThe normal frame-advance mode when the camera is connected to acomputer is single frame shooting, but the continuous shooting can bechosen using this item.Option: S Single frame shooting (default)
C Continuous shooting
Custom Settings: Custom Settings Options

74
31. Sensitivity UpBy default, sensitivity can be set to a values equivalent to ISO 200, 400,800, or 1,600. Sensitivity up can be used to increase sensitivity by a factorof +1 or +2 over ISO 1600. These settings can be used to achieve highshutter speeds at night-time sporting events, or to achieve optimal expo-sure when taking photographs of poorly-lit subjects. Note, however, thathigh sensitivity settings increase the amount of noise that appears in thefinal photograph. It is recommended that you take a trial photograph tocheck the results when shooting at high sensitivity settings.Option: 0 Sensitivity can be set to values equivalent to 200, 400, 800, or
1,600 (default)1 Sensitivity set to +1 (sensitivity display in rear control panel
shows HI-1)2 Sensitivity set to +2 (sensitivity display in rear control panel
shows HI-2)
Quick Guide to Custom Settings OptionsCopy the following table and keep it with your camera for reference.
Custom Settings: Custom Settings Options
6: Focus areaselection
7: AE lock
11: Auto exposure/flash exposurebracketing
12: Command dialfunctions
13: Exposurecompensationsettings
Custom Setting Option Meaning Custom Setting Option Meaning
0: Custom settingsA Custom Set A
b Custom Set B
1: Image status
0 Disabled
1Capture Preview
Mode
2Record-and-Review
Mode
2: EV steps forexposurecontrol
3 1/3
1 1
2 1/2
3: Bracketingorder 1 Negative-to-positive
0 Default
4: Autofocusactivation
0
1
Shutter-releasebutton activates AF
AF activated by button only
5: Anti-vibrationmode
0 Disabled
1 Enabled
1 Wrap-around
0 Default
0 Only buttonlocks AE
1
AE locks whenshutter-release
button pressed halfway
8: Mirror up0 Mirror down
1 Mirror up
9: Dynamic AFmode (single-servo AF)
0Closest subjectpriority enabled
1Closest subjectpriority disabled
10: Dynamic AFmode (continu-ous-servo AF)
0Closest subjectpriority disabled
1Closest subjectpriority enabled
ASFlash and auto
exposure
AE Auto exposure only
Sb Flash exposure only
0 Default
1Roles of main andsub command dials
reversed
0 Default
1
Exposure compen-sation set by turning
main or sub com-mand dial

75
17: LCD illumina-tion
18: LCD monitorauto power off
19: Aperture settingduring zooming
20: Shutter-releaseindication viaself-timer lamp
21: button
22: Apertureselection
23: Sharpening
25: Shooting speedin continuousshooting mode
14: Center-weight-ed meteringarea
6, 8, 10,13, A
Diameter of meter-ing area in mm (“A”is average for entire
frame)
Custom Setting Option Meaning Custom Setting Option Meaning
15: Time delay forauto meter-switch-off
4, 6, 8,16
Delay in seconds
16: Self-timerduration
2, 5, 10,20
Duration in seconds
LCD illuminateswhen power switch
set to 0
LCD illuminateswhen any button is
pressed1
20 seconds0
1 minute1
5 minutes2
10 minutes3
1 Variable
0 Fixed
0 Disabled
1 Enabled
0 Locks AE and AF
1 AE lock only
2 AF lock only
3Press once to lockAE. Press again to
release.
0 Sub-command dial
1 Lens aperture ring
0 Normal
1 Low
2 High
3 None
24: Tone compen-sation
0 Auto
1 Normal
2 Contrast–
3 Contrast+
4 Custom
Ch 4.5 fps
3 3 fps
2 2 fps
1 1 fps
CL Rapid single frame
26: Maximumnumber ofconsecutiveshots in contin-uous shootingmode
27: LCD monitordisplay mode
28: Save RAWimages
0RAW format not
available
1RAW format avail-
able
1Image and histo-
gram
3Image, histogram,
and highlights
2 Image and highlights
0 Image only
2121 (10 shots in RAW
format)
1–201–20 (1–9 shots in
RAW format)
29: Auto filenumberingmode 1
Sequential number-ing
0 Default
30: Shooting modein PC mode
Custom Settings: Custom Settings Options
C Continuous shooting
SSingle-frame
shooting
31: Sensitivity up
0 Disabled
1 +1.0
2 +2.0

76
Two-Button Reset
Two-button reset restores camera and custom settings to their default values.
To reset camera settings, hold the and buttons down together for more than two seconds.
The following camera settings will be reset to their default values:
Setting Default
Image quality Normal (color)
Sensitivity ISO 200 equivalent
White balanceA (auto white balance; manual whitebalance adustment set to 0)
AF area mode Single area AF
Focus area Center
Exposure mode Programmed auto
Flexible program None
Shutter-speed lock Off
Aperture lock Off
Auto-exposure lock Off
Exposure compensation ±0
Auto bracketing Off
Flash synchro mode Front-curtain sync
To reset custom settings for the current custom set (A or B) to their defaultvalues, hold the and buttons down together for more than twoseconds. The CUSTOM indicator in the rear control panel will start to blink.Release both buttons while the indicator is blinking and then press the buttonsagain. Both camera settings and custom settings for the current custom setwill be restored to their default values.
Custom Settings: Two-Button Reset

77
PLAYBACK
This chapter describes the D1’s playback options, including viewing photo-graphs and photograph information, deleting photographs, and the playbackmenu.

78
Playing Photographs Back
Playback ControlsThe buttons next to the rear control panel and the button have twofunctions, one for changing camera settings and another in playback mode.
Button Name in playback mode Function in playback modeMenu Display/hide playback menuThumbnail Display thumbnailsExecute Select menu itemSelect All Select all thumbnailsMultiple Select Select multiple images
CancelCancel operation and return toprevious menu
Single-Frame PlaybackPhotographs stored in the memory card can be played back one at a time onthe LCD monitor.
1 Holding down the mode dial lock release, turn the mode dial to PLAY(playback mode). Playback indicators will appear in the control panel ontop of the camera (B).
An hourglass icon will be displayed while thecamera reads the most recent photograph inmemory. The image is displayed together withthe folder number and frame number (seeright).
Tip
Playback: Playing Photographs Back
The button controls the LCD monitor. Press the button to turn the monitor onand off. If the camera is connected to a television, the television will continue to displayimages even when the monitor is off.
A B
79
Pressing the focus area selector up or down displays the other photo-graphs in memory one at a time. To scroll quickly to a particular framenumber without viewing intervening photos, hold the selector down formore than two seconds. Photographs will be reduced to thumbnails in thecenter of the LCD monitor for rapid display, with the frame numberappearing at the bottom of each photograph. The camera will scroll quicklythrough photographs while the focus area selector is held down. Releasethe selector when the desired frame is reached.
To display or hide information for the current photograph, including date ofrecording and camera settings at the time the photograph was made, pressthe selector to the right or left. The display changes as shown below.
2 After rotating the focus area selector lock to the unlockedposition, use the focus area selector to view otherphotographs or photo information.
Photograph information includes: the model of camera used, the camerafirmware version, metering, shutter speed, aperture, exposure compensa-tion, sensitivity, image type (color or black-and-white), white balance,white-balance adjustment, tone curve, edge enhancement, and focallength. The information actually displayed depends on the lens used.
Tips
Frame numberFrame number Filename
Date and time of recording(File type)
Photo informationPage 1
Image only
Playback: Playing Photographs Back
Photo informationPage 2 ▲ ▲▲ ▲
▲ ▲▲ ▲▲ ▲
The first and last photographs in memory are linked. Pressing the focus-area selectortowards the top when the last photo in memory is selected takes you to the first photo;pressing the selector towards the bottom when the first photo is selected takes you tothe last photo.
The brightness of the LCD monitor can be adjusted using the sub-command dial.

80
Thumbnail PlaybackThe D1 can display the photographs stored in the flash memory card asthumbnail images. In this mode, up to nine images can be displayed at a time.
1 Holding down the mode dial lock release, turn the mode dial (A) to PLAY(playback mode) and press the button (B) to display a menu of up tonine preview images (C).
The currently selected thumbnail will be highlighted.
2 If there are more than nine photos in memory, use the main command dialto page through the previews, nine at a time (A). Use the focus areaselector to highlight the photo you want to view (B), then press the button or the button to view it at full size (C).
Tip
Playback: Playing Photographs Back
When images are displayed in playback mode, the monitor will turn off automaticallyif no operations are performed for the length of time specified in Custom Setting 18 orthe playback menu “Auto Off” setting (see “The Playback Menu,” below). The displaycan be restored by pressing the shutter-release button lightly within the time specifiedin Custom Setting 15 (default is six seconds).
A B C
A B C

81
Deleting ImagesTo delete the image currently displayed, or to deletethe image currently selected in the thumbnail display,press the button. Note that once deleted,photos cannot be recovered; be sure to make copiesof any photographs you wish to keep, prior to dele-tion.
Notes
This dialog appearswhen the button ispressed. Press the button again to deletethe selected photo-graph. To return to play-back without deletingthe photograph, pressany of the buttons onthe rear of the cameraexcept the and buttons.
Playback: Playing Photographs Back
ERASING IMAGES
YES ☞ DEL
If there are no photographs in the current folder, the message, "card contains no imagedata" will be displayed. Although you will not be able to play photographs back, youcan still use the options available in the SET UP submenu of the playback menu (see"The Playback Menu," below). To view or delete images in other folders, select "D1NC_D1" or "DCF_ALL" using the FOLDERS item in the SET UP submenu.
The D1 can not display photographs taken with other digital cameras full screen. It candisplay thumbnail previews of photographs taken with cameras that conform to theDesign Rule for Camera File Systems (DCF).
The left and right edges of photographs are not shown when the photographs areplayed back in the LCD monitor.

82
The Playback Menu
The playback menu offers options for deleting multiple images, creating slideshows, protecting photographs from deletion, and hiding photographs duringplayback. It also includes options for setting up photos for printing at printservices or on printers that support the Digital Print Order Format (DPOF).
To use the playback menu:
1 Holding down the mode dial lock release, turn themode dial to PLAY (playback mode).
2 Press the button (A) to display the playback menu (B).
3 Menu items can be highlighted by pressing the top of the focus areaselector to move up through the list, or the bottom of the selector to movedown through the list.
PLAY BACKDELETESLIDE SHOWPROTECTHIDE IMAGEPRINT SETSET UP
SET
PLAY BACKDELETESLIDE SHOWPROTECTHIDE IMAGEPRINT SETSET UP
SET
Playback: The Playback Menu
A B

83
4 To select the currently highlighted item, press the button or press thefocus area selector to the right.
A submenu of options for the currently selected item will be displayed. Toreturn to the playback menu without making any changes to settings, pressthe focus area selector to the left or press the button.
5 To make changes to settings, highlight the desired option (A) and press the button (B) or press the focus-area selector to the right.
SLIDE SHOW
START
FRAME INTVL
SET
Playback: The Playback Menu
A B

84
DeleteThe DELETE submenu contains the following op-tions:
SELECTED: Delete multiple selected pho-tographs
ALL: Delete all photographs in thecurrent folder
PRINT SET: Delete print-order files createdusing the PRINT option
SELECTEDWhen this option is selected, a thumbnail menu showing the images in thecurrent folder will be displayed. Choose the photographs to be deletedfrom the thumbnail menu and press the button. A confirmation dialogwill be displayed; select YES to permanently delete the selected photo-graphs. Select NO or press the button to cancel the operation and returnto the thumbnail menu.
ALLWhen this option is selected, a confirmation dialog will be displayed.Selecting YES in this dialog permanently deletes all photographs in thecurrent folder with the exception of those protected with the PROTECToption or hidden using HIDE IMAGE. Select NO or press the button tocancel the operation and return to the DELETE submenu.
PRINT SETWhen this item is highlighted, pressing the focus-area selector to the rightor pressing the button deletes the current print order file created usingthe PRINT SETUP option.
DELETE
SELECTEDALLPRINT SET
SET
Playback: The Playback Menu
Tip
Selecting photographs from a thumbnail menuTo select multiple photos from a thumbnail menu, highlight images with the focus areaselector and press the button, or press to select all images. Selected imagesare marked with an icon; to deselect an image, highlight it and press the button.To complete the operation, highlight the last of the images to be selected and pressthe button. To exit from the thumbnail menu, press the or button.

85
SlideshowThe SLIDE SHOW submenu contains the followingoptions:
START: Start a slide showFRAME INTVL: Select the time each image will
be displayed
Playback: The Playback Menu
SLIDE SHOW
START
FRAME INTVL
SET
FRAME INTVL
2 S 3 S 5 S10 S
SET
�
Notes
STARTWhen this option is selected, the camera will display the photographs inmemory one at a time in the order they were taken (photographs hiddenusing the HIDE IMAGE option will not be displayed).
To pause the slide show, press the button; a pause screen will bedisplayed. Selecting RESTART in the pause screen will restart theslideshow. Press the button to end the slideshow and return to theplayback menu.
When the slideshow finishes, a pause screen will be displayed. To exit theslideshow and return to playback mode, press the button.
FRAME INTVLThis option is available in the SLIDE SHOWsubmenu and the slideshow pause screen. Se-lecting this option brings up a menu of intervalsettings. The interval controls the time betweenphotographs in the slide show (the default inter-val is two seconds). When an interval setting isselected, the slideshow will begin or continuefrom where it was interrupted. Press the button to end the slideshow and return to the playback menu.
When a slideshow is in progress, the camera will power off automatically if nooperation is performed for ten minutes.
The actual interval between images varies with the size of the images that must bedisplayed.
86
ProtectThe PROTECT option in the playback menu allowsyou to change the protected status of selected im-ages. Images can be chosen from a thumbnail menu,where protected images are marked with a icon.Protected images can not be deleted (although theyare erased when the memory card is formatted), andhave read-only status when viewed on a computer.
Hide ImageThe HIDE IMAGE option in the playback menu allowsyou to change the hidden status of selected images.Images to be hidden or revealed can be chosen froma thumbnail menu, where hidden images are markedwith and icons. Hidden images can not bedeleted (although they are erased when the memorycard is formatted), and are not displayed duringplayback or slide shows. They are treated as hidden,read-only files when viewed on a computer.
PROTECT
SET
HIDE IMAGE
SET
Playback: The Playback Menu
Tip
Selecting photographs from a thumbnail menuTo select multiple photos from a thumbnail menu, highlight images with the focus areaselector and press the button, or press to select all images. Selected imagesare marked with an icon; to deselect an image, highlight it and press the button.To complete the operation, highlight the last of the images to be selected and pressthe button. To exit from the thumbnail menu, press the or button.

87
Print SetupThe PRINT SET option in the playback menu allowsimages to be selected for printing using a printer orprint service that supports the Digital Print OrderFormat, or DPOF. Data concerning the images andother information to be printed are saved in printorder files on the flash memory card. The requestedimages and information can then be printed when thecard is inserted in a DPOF-compatible device.
When PRINT SET is selected, a thumbnail menu will appear, where you canselect images that will be printed, or remove images that have already beenselected. Images selected for printing are marked by a icon. After you haveselected the images to be printed, the menu of print options shown above willbe displayed.
The options available are as follows:DONE: Select this item to confirm the print order and exit the
print setup menu.COPIES: The number of copies of the selected images that will be
printed can be set by highlighting this item and pressingthe button. The number of copies to be printed canbe selected from the COPIESmenu (shown at right) using thefocus area selector. Press the
button to save changesand return to the PRINT SETmenu, or press the button tocancel the operation and exitfrom the COPIES menu.
DATE: If this item is checked, the date of recording will be printedon the photographs. The item can be checked or un-checked by highlighting it and pressing the button.
Playback: The Playback Menu
PRINT SET
DONE
DATECOPIES
SET
COPIES
1 COPIES
SET

88
SetupThe SET UP menu contains the following options:
FOLDERS: Create new folders for record-ing photographs or select fold-ers for playback.
OPTIONS: Select whether to display a his-togram and/or highlights whenimages are displayed in singleimage playback, capture pre-view, and record-and-review.
AUTO OFF: Set the length of time before the monitor turns offautomatically in playback mode.
LANGUAGE: Choose a language for the menus and messages dis-played by the camera.
VIDEO OUTPUT: Select the video format used when the camera is con-nected to a television set or VCR.
CARDFORMAT: Format memory cards for use in the D1.
These options are described in detail on the pages that follow.
Playback: The Playback Menu
SET UPFOLDERSD1
20SEN
OPTIONSAUTO OFFLANGUAGEVIDEO OUTPUTCARDFORMAT
SET

89
FoldersThe FOLDERS submenu contains the following options:
NEW: Create a new folderD1 NC_D1: Select for playback all folders
created by the D1 (default)DCF ALL: Select all folders conforming to
the Design Rule for Camera FileSystems (DCF) for playback.
nnn NC_D1: Select only the current folderfor playback (the number of the current folder is shownto the left of this menu item).
NEWCreate a folder with the folder name NC_D1 anda new folder number. Selecting NEW displays thedialog shown at right, where you can select a foldernumber by pressing the focus-area selector up ordown. Press the selector to the right or press the
button to create a new folder using the speci-fied number; press the selector to the left or pressthe button to exit without creating a new folder.Photographs taken after a new folder is created will be stored in the new folder.
D1 NC_D1Images in all folders created by the D1 will be displayed during playback.Images in folders created by other cameras are not displayed.
DCF ALLWhen this option is selected, images in all folders that conform to theDesign Rule for Camera File Systems can be viewed in playback mode.
nnn NC_D1 (nnn is the number of the current folder)Only images in the current folder will be displayed during playback. Thefolder number of the current folder is shown to the left of the menu item.
Playback: The Playback Menu
FOLDERSNEW
NC_D1ALLNC_D1
SET
D1DCF100
NEW
100 NC_D1
SET
Notes
Creating a new folder automatically resets the frame number display in the controlpanel on top of the camera to 1.
When creating new folders with the NEW command, the D1 only uses the last foldercreated to store all subsequent photographs. Thus, if you use the NEW option tocreate in succession the three folders “101 NC_D1,” “102 NC_D1,” and “103 NC_D1,”the D1 will store images in the folder “103 NC_D1.”
Remember that the current folder option “nnn NC_D1” will display only the images inthe last folder created. To view or delete images in folders other than the current folder,select “D1 NC_D1” or “DCF ALL” from the FOLDERS menu.

90
OptionsThe OPTIONS submenu contains the following items:
HISTOGRAM: When this item is checked, ahistogram is displayed whenimages are played back.
HIGHLIGHT: When this item is checked, high-lights are indicated by a blink-ing display when images areplayed back.
To check or deselect items in the OPTIONS menu, highlight the item usingthe focus area selector and press the button.
HISTOGRAMWhen this item is checked, a histogram is shownwith images displayed in single-frame playback,capture preview, or record-and-review. The his-togram shows the distribution of shadows, mid-tones, and highlights in the image. The horizontalaxis corresponds to brightness, starting with blackat the left end of the scale and shading through towhite at the right end. The vertical axis shows thenumber of pixels of a given brightness in the image.
When the histogram is displayed, the playback screen also shows theimage, reduced to occupy one-quarter of the monitor, together with photoinformation. In single-image playback, press the focus-area selector to theright or left to view more information on the current photograph (additionalinformation is not available in capture-preview or record-and-review modes).In capture-preview mode, the scale of the histogram’s horizontal axis isreduced by one half.
Playback: The Playback Menu
OPTIONS
HIGHLIGHT
SET
HISTOGRAM
Note
Choosing a new setting in the OPTIONS submenu automatically changes the optionselected for Custom Setting 27 in the current custom set (see “Custom Settings”).

91
HIGHLIGHTWhen this item is checked, the brightest portionsof the image (image highlights) blink on and off. Incapture-preview and record-and-review modes,the image and highlights are displayed sepa-rately, with both the image and the highlightdisplay reduced to occupy one-quarter of themonitor. Additional photo information is not dis-played when the focus selector is pressed to theleft or right.
Playback: The Playback Menu
AUTO OFF
20 S1 M5 M10 M
SET
LANGUAGE
DEUTSCHENGLISHFRANÇAIS日本語�
SET
DEFJ
Notes
LanguageThe LANGUAGE submenu can be used to select thelanguage for the playback menu from German(Deutsch), English, French (Français), and Japa-nese. Highlight the desired language using the focusarea selector and press the button to put yourchoice into effect.
Choosing a new setting in the AUTO OFF submenu automatically changes the optionselected for Custom Setting 18 in the current custom set (see “Custom Settings”).
When the camera is connected to the AC adapter (available separately), the monitorwill turn off automatically if no operations are performed for ten minutes. If the camerais connected to a television set, images will continue to be displayed on the televisionfor ten minutes after the LCD monitor has turned off.
Both histogram and highlights can be displayed simultaneously.
Auto OffThe AUTO OFF submenu is used to set the length oftime the camera will remain on in playback mode if nooperations are performed. Highlight your choiceusing the focus-area selector, then press the button to put your choice into effect.
92
VIDEO OUTPUT
NTSCPAL
SET
Video OutputThe VIDEO OUTPUT submenu contains the follow-ing items:
NTSC: Select NTSC when connectingthe camera to a television orVCR that complies with theNTSC standard
PAL: Select PAL when connectingthe camera to a television orVCR that complies with the PAL standard
Card formatThe CARDFORMAT option in the setup menu can beused to format memory cards for use in the D1. Thecard format menu is shown at right.
To format the memory card, highlight FORMAT usingthe focus area selector and press the button.Note that formatting permanently deletes all files onthe card, including those that are protected or hidden.Be sure to back up any photographs you would like to keep.
To exit from the format menu without formatting the memory card, press the button or highlight NO and press the button.
Tip
CARDFORMAT
NOFORMATSET
WARNING! ALLIMAGES WILLBE DELETED
Memory cards can also be formatted by simultaneously pressing the FORMATbuttons. See “First Steps: Insert the Memory Card.”
Playback: The Playback Menu

93
FLASH PHOTOGRAPHY
The D1 can be used with the SB-28DX (available separately) for sophisticatedflash photographs using the D1’s unique 3D multi-sensor balanced fill-flashcontrol.

94
Through-the-Lens Flash Photography
When the SB-28DX Speedlight (available separately) is attached to the D1 andset to TTL (through-the-lens) mode, it automatically selects a flash modedesigned for the D1 (TTL mode is only available when the SB-28DX isattached). The following settings are available:
3D multi-sensor balanced fill-flash for D1Multi-sensor balanced fill-flash for D1
This mode is available when a CPU lens is attached. Matrix metering isused to balance flash output with ambient lighting for the main subject andbackground. When the shutter-release button is pressed, the SB-28DXemits a series of nearly invisible preflashes (monitor preflashes) that arereflected from objects in all areas of the frame and picked up by thecamera’s five-segment TTL multi sensor. This information is analyzed incombination with such data as the camera’s sensitivity (ISO equivalency)setting, aperture, focal length, and exposure compensation value. Basedon this information, the flash output level is automatically compensated tobalance flash output with ambient light. When a D-Type lens is attached,distance information is added to the calculation for still more precise flashcontrol (3D multi-sensor balanced fill-flash).
Center-weighted fill-flash for D1This mode is used with non-CPU lenses. When a non-CPU lens isattached, the camera automatically chooses center-weighted metering,and consequently flash output is roughly balanced with ambient lighting forthe main subject and background. If the frame includes a highly reflectiveobject, or if the background is non-reflective, the camera may be unable toadjust exposure correctly. In such cases, standard TTL flash control canbe used. Standard TTL flash is automatically selected when spot meteringis used.
Standard TTL flash for D1Standard TTL flash control is available with all lens types. Standard TTLflash control does not take the brightness of the background into account,but adjusts flash output so that the main subject is correctly exposed. Thismakes it suitable for photographs in which the main subject is emphasizedat the expense of other details, or when you are using exposure compen-sation with flash photography. This mode is automatically selected whenspot metering is used.
Flash Photography: Through-the-Lens Flash Photography

95
Note
Accessory shoeThe SB-28DX, SB-28, SB-27, SB-26, SB-25,SB-24, SB-23, SB-22s, and SB-29 Speedlightscan be attached directly to the accessory shoewithout a sync cable. The shoe is equipped witha safety lock that keeps the Speedlight affixed tothe camera when Speedlights provided with alocking pin (the SB-28DX, SB-28, SB-27, SB-26, SB-25, SB-22s, and SB-29) are attached.
Sync terminalA sync cable can be attached to the camera’ssync terminal.
Flash Photography: Through-the-Lens Flash Photography
Flash-ready indicatorWhen the SB-28DX, SB-28, SB-27, SB-26, SB-25, SB-24, SB-23, SB-22s, andSB-29 Speedlights are connected, the flash-ready indicator lights up when theflash is fully charged and ready for use. If the flash-ready indicator blinks forabout three seconds after a photograph is taken with a flash set to TTL orexternal automatic mode, the photograph may be underexposed. Check thephotograph in the LCD monitor. If it is underexposed, adjust the focusdistance, aperture, or flash range and try again.
Do not attach a flash to the sync terminal when performing rear-curtain sync flashphotography with a Speedlight attached to the accessory shoe.

96
Flash Sync Modes
Five sync modes are available:Front-curtain sync: This mode is recommended in most situations.When using the SB-26, SB-25, or SB-24, set the sync mode selectoron the Speedlight to NORMAL.Slow sync:A lower shutter speed is used in programmed auto andaperture-priority auto exposure modes to bring out backgrounddetails.Rear-curtain sync: Use this mode to suggest motion by creating astream of light that appears to follow moving objects. When thismode is combined with programmed auto or aperture-priority auto,shutter speed is slowed to achieve the same effect as slow sync.When using the SB-26, SB-25, or SB-24, set the Speedlight’s syncmode selector to REAR.Red-eye reduction: In this mode, a red-eye reduction pre-flashlights for approximately one second before the main flash, causingthe pupils in your subjects’ eyes to contract and reducing the “red-eye” effect a flash can sometimes cause.Red-eye reduction with slow sync: This mode combines red-eyereduction with slow sync (available only with SB-28DX, SB-28, SB-27, and SB-26). Set the exposure mode to programmed auto oraperture-priority auto.
Notes
Flash Photography: Flash Sync Modes
To prevent blurring caused by camera shake, use of a tripod is recommended with slowsync or red-eye reduction with slow sync.
Rear-curtain sync can not be used with a studio flash system.
When red-eye reduction is used, there is a one-second delay between your fullypressing the shutter-release button and the shutter being released. Be careful not tomove the camera or to let your subject move during this time. Red-eye reduction worksbest when your subject is well within the range of the flash and is fully turned to facethe camera.

97
To set the flash sync mode, hold down the flash mode button while turning themain command dial.
The camera will cycle through the available flash modes in the order shownbelow.
Programmed auto oraperture priority auto
Shutter-priority auto ormanual exposure
Flash Photography: Flash Sync Modes
98
Compatible Speedlights
The D1 can be used with the Speedlights listed below.
1 Can only be used when the SB-28DX is attached. When other Speedlights areattached and set to TTL, the shutter-release button will lock and no photographs canbe taken.
2 When spot metering is used, this setting is treated as “standard TTL flash control”(see above).
3 The balanced fill-flash mode used depends on the lens. When a D-Type Nikkor lens(IX-Nikkor excepted) is attached, 3D multi-sensor balanced fill-flash is used. Whena CPU lens (F3AF excepted) of a type other than type D is attached, multi-sensorbalanced fill-flash is used. If a non-CPU lens is attached, center-weighted fill-flashis used.
4 The SB-28DX offers two auto modes: non-TTL Auto Flash (A) and Auto Aperture(AA). AA is used when a lens with a CPU (IX-Nikkor and F3AF excepted) isattached, A when another type of lens is attached.
Flash Photography: Compatible Speedlights
✔ ✔✔ 4 ✔ ✔✔✔ 3 ✔SB-28DX(cordless)
Speedlight
TTL1 A M REAR
Flash mode
FP high-speedsync
Rear-curtainsync
Non-TTLauto
ManualRepeating
flashStandard
TTL2Balancedfill-flash
Red-eyereduction
✔ ✔✔ ✔ ✔—— ✔SB-28(cordless)
— ✔✔ 5 ✔ ——— ✔SB-27(cordless)
✔ ✔✔ ✔ ✔—— ✔SB-266
(cordless)
✔ ✔✔ ✔ ✔—— —SB-25(cordless)
— ✔✔ ✔ ✔—— —SB-24(cordless)
— ✔— ✔ ✔—— —
SB-23,SB-21B7,SB-29(cordless)
— ✔✔ ✔ ——— —
SB-22S,SB-22,SB-20,SB-16B,SB-15(cordless)
— ✔✔ ✔ ——— —SB-118,SB-14

99
5 When using an SB-27 with the D1, set the SB-27 to the Forced A mode.6 The SB-26 can be set to slave mode for wireless slave flash photography. When
the wireless slave selector is set to D, shutter speed will be set to a value under 1/250sec.
7 Autofocus can only be used with the SB-21B or SB-29 when a AF-Micro lens (60mm,105mm, 200mm) is attached.
8 When using the SB-11 or SB-14 in A or M mode, connect the SC-13 using the SU-2.While the SB-11 and SB-14 can be connected using the SC-11 or SC-15, the flash-ready indicator will not appear in the viewfinder display and shutter speed will notbe adjusted automatically.
✔ Important: Use Nikon Speedlights only. Using another make of flashcould damage the internal circuitry of the camera or flash. Before usinga Nikon Speedlight other than listed above, contact a Nikon-authorizedservice representative for more information.
Notes
Flash Photography: Compatible Speedlights
Refer to your Speedlight manual for detailed instructions. In the table of differentcamera types given in the SB-28DX manual, the D1 is classified as type A.
The shutter will synchronize with the flash when set to speeds of 1/500 sec. or slower.When using the Medical Nikkor 120mm f/4 lens, set the shutter speed to 1/125 sec. orslower.
If the flash-ready indicator blinks for about three seconds after a photograph is takenwith the SB-28DX set to TTL, the photograph may be underexposed. Check thephotograph in the LCD monitor. If it is underexposed, adjust the focus distance,aperture, or flash range and try again. This underexposure warning may not appearwhen a Speedlight other than the SB-28DX is used with a shutter speed of 1/500 sec.If you find that images are underexposed even though no warning appeared in theviewfinder display, try setting the shutter speed to 1/250 sec.
Sensitivity settings available for TTL flash photography are ISO 200, 400, 800, and1600 equivalent. If sensitivity up (see “Custom Settings,” item 31) is used, the flashmay not produce appropriate lighting, depending on the aperture or distance to thesubject.
In the case of Speedlights equipped with an AF-Assist Illuminator, the illuminator willonly light when the center focus area is used.
When the exposure mode is set to programmed auto, the maximum aperture varieswith sensitivity, as shown below:
Sensitivity (ISO equivalent) 200 400 800 1600Maximum aperture 4.8 5.6 6.7 8
For each increase in sensitivity, aperture is stopped down by half a step. If the lenshas a smaller maximum aperture than that given above, the maximum aperture will bethe maximum aperture for the lens.
When flash exposure compensation is used, appears in the viewfinder display, butthe amount of compensation is not displayed.

100
Using a Speedlight
This section describes the steps involved in using a SB-28DX Speedlight for3D multi-sensor balanced fill-flash photography.
1 After attaching the Speedlight, choose any metering method other thanspot.
2 Choose an exposure mode and confirm shutter speed and aperture.
3 Choose a flash sync mode as described above under “Flash Sync Modes.”
4 Turn the Speedlight power switch to ON orSTBY, and set the Speedlight mode to
.
will appear in the Speedlight dis-play.
5 Compose a picture, lightly press the shutter-release button, and check focus and flashcharge in the viewfinder display.
6 After checking the flash range in theSpeedlight display, press the shutter-releasebutton all the way down to take a picture.
Notes
Flash Photography: Using a Speedlight
In shutter-priority auto and manual exposure modes, shutter speed can be set to avalue between 1/500 sec. and thirty seconds. If speed faster than 1/500 sec. is chosen,the camera will automatically lower shutter speed to 1/500 sec.
When using slow sync or slow sync with red-eye reduction, set the exposure mode toprogrammed auto or aperture-priority auto.
If the flash-ready indicator blinks for about three seconds after a photograph is takenwith a flash set to TTL or external automatic mode, the photograph may be underex-posed. Check the photograph in the LCD monitor. If it is underexposed, adjust thefocus distance, aperture, or flash range and try again.
Read all instructions in the Speedlight manual thoroughly.

101
CONNECTIONS
This chapter describes how to connect the D1 to a computer, television set, orVCR.

102
Connecting to a Television or VCR
Using the EG-D1 video cable, you can connect the D1 to a television or videocassette recorder (VCR) to view images on the television screen or recordthem on tape. Follow these steps to play photographs back on a television set:
1 Open the cover protecting the camera’s VIDEO OUT and DC IN connectorsas shown below.
2 Connect the cable to the camera by inserting theblack plug into the video-out jack as shown at right.
Notes
Connections: Connecting to a Television or VCR
Video-out connector
DC-in connector
3 Connect the yellow plug to the VIDEO IN jack onthe television or VCR.
4 Tune the television to the video channel. The television will displaywhatever image is shown in the camera’s LCD monitor.
The VIDEO OUTPUT item in the playback menu offers a choice of NTSC or PALstandards for video output. Select a standard that matches the one used in yourtelevision set. See “Playback: The Playback Menu.”
While the camera is connected to a television set, all controls function normally andphotographs can still be taken.
Video output is linked to the monitor button only when the mode dial is set to PLAY(playback). In other modes, the television will continue to display images even whenthe LCD monitor is off.
When the camera is powered by the EH-4 AC adapter (available separately), themonitor will turn off if no operations are performed for ten minutes. Images willcontinue to be displayed on the television for another ten minutes.

103
Connecting to a Computer
The D1 can be connected directly to a computer via its IEEE 1394 interface,when images can be transferred to the computer using Nikon View DX or NikonCapture software (available separately). Using Nikon Capture, you can controlyour camera from your computer for advanced studio photography.
1 After checking that the camera is off, open thecover protecting the camera’s IEEE 1394 connectorand connect a six-pin, IEEE 1394 cable (availableseparately) to the camera.
Connections: Connecting to a Computer
2 Check that the other end of the cable is connectedto your computer’s IEEE 1394 connector. Forinformation on connecting IEEE 1394 peripheralsto your computer, refer to the documentationprovided with your computer, or with your IEEE1394 card or expansion board.
104
3 Turn the camera on. Then, holding down the mode dial lock release, turnthe mode dial to PC (PC mode).
If the camera is properly connected and Nikon Capture is running on yourcomputer, the letters “PC” will be displayed in the control panel on top ofthe camera (“PC” is not displayed when Nikon View DX is running). Referto your software manual for information concerning the operations that canbe performed while the camera is connected to a computer.
If the camera is not connected to a computer, or if it is connected whenneither Nikon View DX nor Nikon Capture is installed, the camera willfunction as it would in single-frame shooting or continuous shootingmodes. The only differences are that the frame advance mode (single orcontinuous) is set using Custom Setting item 30, and that photographs arenot displayed on the monitor in capture-preview mode, record-and-reviewmode, or in single-image playback.
4 Before disconnecting the IEEE 1394 cable from the camera, turn thecamera off. Do not turn the camera off or disconnect the camera when datatransfer is in progress.
Connections: Connecting to a Computer
Notes
Do not use the camera with the computer while battery power is low or the batteriesare exhausted. If the battery indicator changes to low or starts to flash while thecamera and computer are connected, wait for data transfer to terminate, thendisconnect the camera and replace the batteries or connect the EH-4 AC adapter (soldseparately).
It is recommended that the camera be powered by the EH-4 AC adapter (availableseparately) when you are using the Nikon digital camera D1 with Nikon View DX.When using an EN-4 battery pack, be aware that leaving the camera connected whenthe battery is exhausted may shorten battery life. Should the battery becomeexhausted, insert a fully charged spare battery without delay or disconnect the camerafrom the computer. The amount of charge remaining is shown by the battery indicatorin the control panel on top of the camera.
Only photographs that conform to the Design Rule for Camera File Systems (DCF) canbe transferred from the camera to the computer in PC mode while Nikon Capture isrunning on the computer.
105
Reading Photographs from Memory Cards
Photographs stored on the memory card can be viewed on a computer byremoving the memory card from the camera and reading it using a CompactFlash(CF) card reader or PC card adapter.
To read the memory cards, you will need:• a PC or Macintosh computer, and• either a CF card reader or, if your computer is equipped with a PCMCIA
Type II or Type III card slot, an EC-AD1 PC-card adapter (availableseparately from Nikon).
Using a CF Card ReaderThe steps involved in connecting a CF card reader and inserting memory cardsmay be found in the documentation provided with your card reader. Once thecard has been inserted, it will function as a disk, as described in Step 3 of“Using a PCMCIA Card Slot,” below.
Connections: Reading Photographs from Memory Cards

106
Tips
Using a PCMCIA Card Slot
1 To read CompactFlash cards using a PCMCIA Type II or Type III card slot,insert the card into a PC card adapter as shown below.
2 Insert the adapter into the PC card slot asinstructed in the documentation providedwith your computer or PC card drive.
Com
pact
Flas
h C
ard T
M
TM
EC
-AD
1
PC
Car
d A
dapt
erP
C C
ard
Ada
pter
CompactFlash Card TM
EC-64CF
MB
CompactFlash Card TM
EC-AD1
ADAPTER
3 The card will now function as a disk. Photographs may be found within thefolder DCIM in the card’s root directory, stored in the folder namednnnNC_D1, where “nnn” is the number shown at the top right corner of thephotograph when it is played back on the camera. Photos recorded at animage quality setting of FINE, NORMAL, or BASIC can be viewed in anyapplication that supports the JPEG format. To read photographs recordedat a setting of HI RGB-TIFF, you will need an application that can read TIFFfiles. RAW and YCbCr TIFF files can only be viewed using Nikon View DXor Nikon Capture (available separately).
Connections: Reading Photographs from Memory Cards
You can use Nikon View DX to browse photographs on a memory card in the samefashion as when the camera is connected to your computer directly. See the NikonView DX reference manual for details.
The D1 can read and play back only those images that conform to the Design Rule forCamera File Systems (DCF). It may not be able to read JPEG or TIFF files createdby a computer or by another make of camera. It may also not be able to read camerafiles that have been renamed or moved to a different folder using a computer.

107
TECHNICAL NOTES
This chapter contains information on optional accessories, camera care,troubleshooting, and camera specifications.

108
Replacing the Focusing Screen
The D1 is supplied with a type B BriteView focusing screen.
To change focusing screens:
1 After turning the camera off, remove the lens from the camera body (A) and,using the tweezers supplied with the focusing screen, pull the focusingscreen latch towards you (B). The screen holder will spring open.
2 Grasp the screen tab with the tweezers and remove the screen (A).Holding the tab on the replacement screen in the tweezers, set thereplacement screen in the holder (B).
3 Using the tweezers, push the front edge of the holder upward until it clicksinto place.
Notes
Technical Notes: Replacing the Focusing Screen
22
ft m
28
70
50
3528
8510
5
22
Do not touch the camera mirror or the surface of the focusing screens.
Use only screens designated for use in the D1 or the Nikon F100 film camera.
A B
A B

109
Note
Compatible Lenses
CPU lenses are recommended for use in the D1. D-Type lenses areparticularly recommended, as you will have access to the complete range ofcamera functions only when a D-Type lens is attached. The following lensescan be used with the D1.
Technical Notes: Compatible Lenses
Lens
CP
U L
ense
sN
on
-CP
U L
ense
s
✔ ✔ ✔ ✔ ✔ 1✔✔ (3DColor)
✔✔D-Type AF Nikkor,AF-S, AF-I Nikkor
Exposure meteringmode
Manualwith
electronicrangefinder
P S A SpotCenter-weighted
MatrixMAuto-focus
Focusing Exposure mode
✔ 5 — — ✔ ✔✔—✔—Auto extension rings(PK 11A, 12, 13, PN-11)
✔ 6 — — ✔ ✔✔—✔—AI-type Nikkor
✔ 6 — — — ———✔—AI-modified Nikkor
— — — ✔ ✔✔—✔—Reflex-Nikkor7
✔ 2 — — ✔ 8 ✔ 8✔ 8—✔ 9—
✔ 5 — — ✔ ✔ 10✔ 10—✔—AI-type Teleconverter
✔ 5 — — ✔ 12 ✔✔—✔ 12—Bellows FocusingAttachment PB-611
PC-Nikkor7
✔ 2 — — — ✔ 1, 3✔ 3✔ 3 (3DColor)
✔ 3—PC Micro Nikkor85mm F2.8D
✔ 5 ✔ ✔ ✔ ✔ 1✔✔ (3DColor)
✔✔ 5AF-I Teleconverter4
✔ ✔ ✔ ✔ ✔ 1✔✔
(Color)✔✔
Non D-type AF Nikkor(except lenses for F3AF)
✔ 6 ✔ ✔ ✔ ✔✔✔
(Color)✔—AI-P Nikkor
When using a lens without a built-in CPU:Choose center-weighted or spot metering, and an exposure mode of aperture-priorityauto or manual. When an exposure mode of programmed auto or shutter-priority autois selected, the camera will automatically be set to aperture-priority auto with center-weighted metering, and the exposure-mode indicator (P or S) in the control panel ontop of the camera will blink (the viewfinder display will show A). Regardless of theexposure mode, aperture can only be set using the lens aperture ring; turning the sub-command dial has no effect. F-- will appear in the aperture indicators in the viewfinderand the control panel on top of the camera.
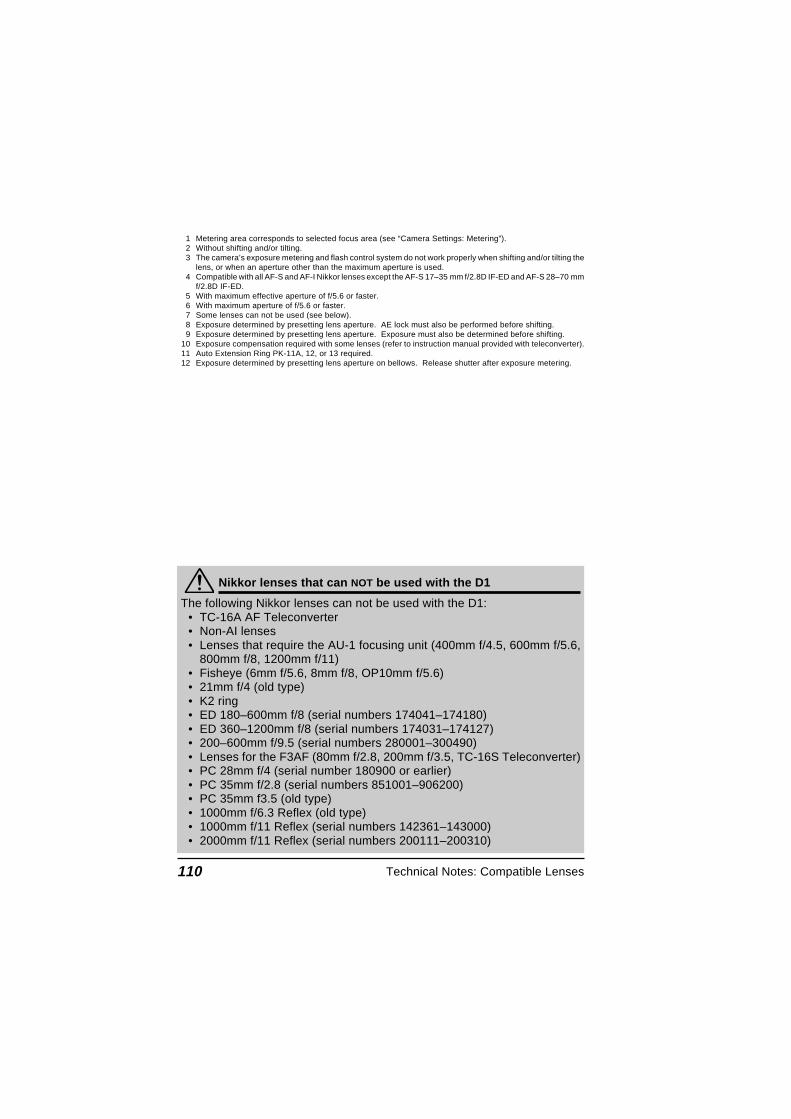
110
Nikkor lenses that can NOT be used with the D1
The following Nikkor lenses can not be used with the D1:• TC-16A AF Teleconverter• Non-AI lenses• Lenses that require the AU-1 focusing unit (400mm f/4.5, 600mm f/5.6,
800mm f/8, 1200mm f/11)• Fisheye (6mm f/5.6, 8mm f/8, OP10mm f/5.6)• 21mm f/4 (old type)• K2 ring• ED 180–600mm f/8 (serial numbers 174041–174180)• ED 360–1200mm f/8 (serial numbers 174031–174127)• 200–600mm f/9.5 (serial numbers 280001–300490)• Lenses for the F3AF (80mm f/2.8, 200mm f/3.5, TC-16S Teleconverter)• PC 28mm f/4 (serial number 180900 or earlier)• PC 35mm f/2.8 (serial numbers 851001–906200)• PC 35mm f3.5 (old type)• 1000mm f/6.3 Reflex (old type)• 1000mm f/11 Reflex (serial numbers 142361–143000)• 2000mm f/11 Reflex (serial numbers 200111–200310)
1 Metering area corresponds to selected focus area (see “Camera Settings: Metering”).2 Without shifting and/or tilting.3 The camera’s exposure metering and flash control system do not work properly when shifting and/or tilting the
lens, or when an aperture other than the maximum aperture is used.4 Compatible with all AF-S and AF-I Nikkor lenses except the AF-S 17–35 mm f/2.8D IF-ED and AF-S 28–70 mm
f/2.8D IF-ED.5 With maximum effective aperture of f/5.6 or faster.6 With maximum aperture of f/5.6 or faster.7 Some lenses can not be used (see below).8 Exposure determined by presetting lens aperture. AE lock must also be performed before shifting.9 Exposure determined by presetting lens aperture. Exposure must also be determined before shifting.
10 Exposure compensation required with some lenses (refer to instruction manual provided with teleconverter).11 Auto Extension Ring PK-11A, 12, or 13 required.12 Exposure determined by presetting lens aperture on bellows. Release shutter after exposure metering.
Technical Notes: Compatible Lenses
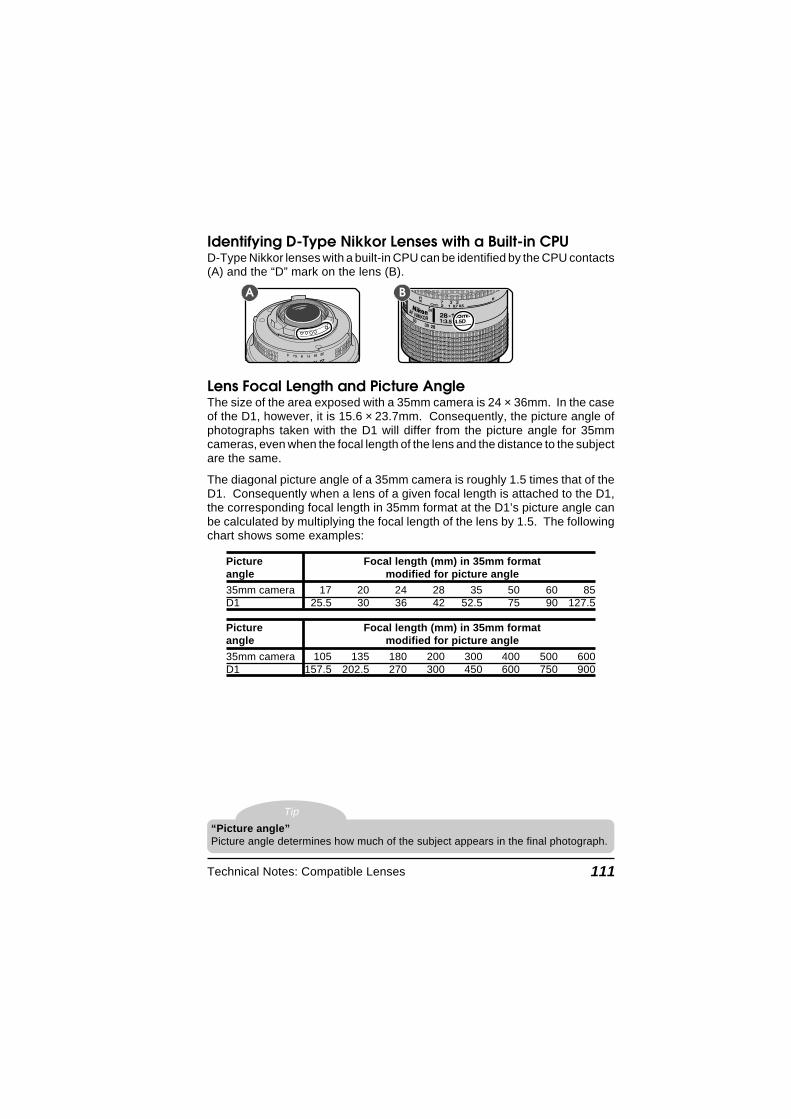
111
Identifying D-Type Nikkor Lenses with a Built-in CPUD-Type Nikkor lenses with a built-in CPU can be identified by the CPU contacts(A) and the “D” mark on the lens (B).
Lens Focal Length and Picture AngleThe size of the area exposed with a 35mm camera is 24 × 36mm. In the caseof the D1, however, it is 15.6 × 23.7mm. Consequently, the picture angle ofphotographs taken with the D1 will differ from the picture angle for 35mmcameras, even when the focal length of the lens and the distance to the subjectare the same.
The diagonal picture angle of a 35mm camera is roughly 1.5 times that of theD1. Consequently when a lens of a given focal length is attached to the D1,the corresponding focal length in 35mm format at the D1’s picture angle canbe calculated by multiplying the focal length of the lens by 1.5. The followingchart shows some examples:
Picture Focal length (mm) in 35mm formatangle modified for picture angle
35mm camera 17 20 24 28 35 50 60 85D1 25.5 30 36 42 52.5 75 90 127.5
Picture Focal length (mm) in 35mm formatangle modified for picture angle
35mm camera 105 135 180 200 300 400 500 600D1 157.5 202.5 270 300 450 600 750 900
Tip
Technical Notes: Compatible Lenses
“Picture angle”Picture angle determines how much of the subject appears in the final photograph.
A B

112
Cleaning the CCD
The charged-coupled device (CCD) that serves as the D1’s picture element isfitted with a low-pass filter to prevent moiré. While this filter prevents dirt fromgetting onto the CCD, any dirt or dust that finds its way onto the filter may,depending on shooting conditions, appear in photographs taken with thecamera. In this case you will need to clean the filter.
The low-pass filter is extremely delicate and is easily damaged. It is recom-mended that you have it cleaned by Nikon-authorized service personnel.
How to tell when the filter needs cleaning (I)
1 Set the exposure mode to programmed auto (P) or aperture-priority auto(A) and choose the smallest aperture setting (largest f-number).
2 Take a picture of an evenly-colored, white object, such as a clean, white-colored wall. Load the photograph onto a computer and examine it on thecomputer monitor. If the photograph contains dark specks or lines, you willneed to have the filter cleaned at a Nikon-authorized service center orclean it yourself as described below.
How to tell when the filter needs cleaning (II)
1 The EH-4 AC adapter (available separately) is required for this method.Turn the camera off and connect the AC adapter.
2 Remove the lens and turn the camera on.
3 Keeping the button held down, turn the main command dial to selectCustom Setting 8, then turn the sub-command dial to select option 1. Themirror will be raised to the up position and the shutter curtain will open.
Technical Notes: Cleaning the CCD
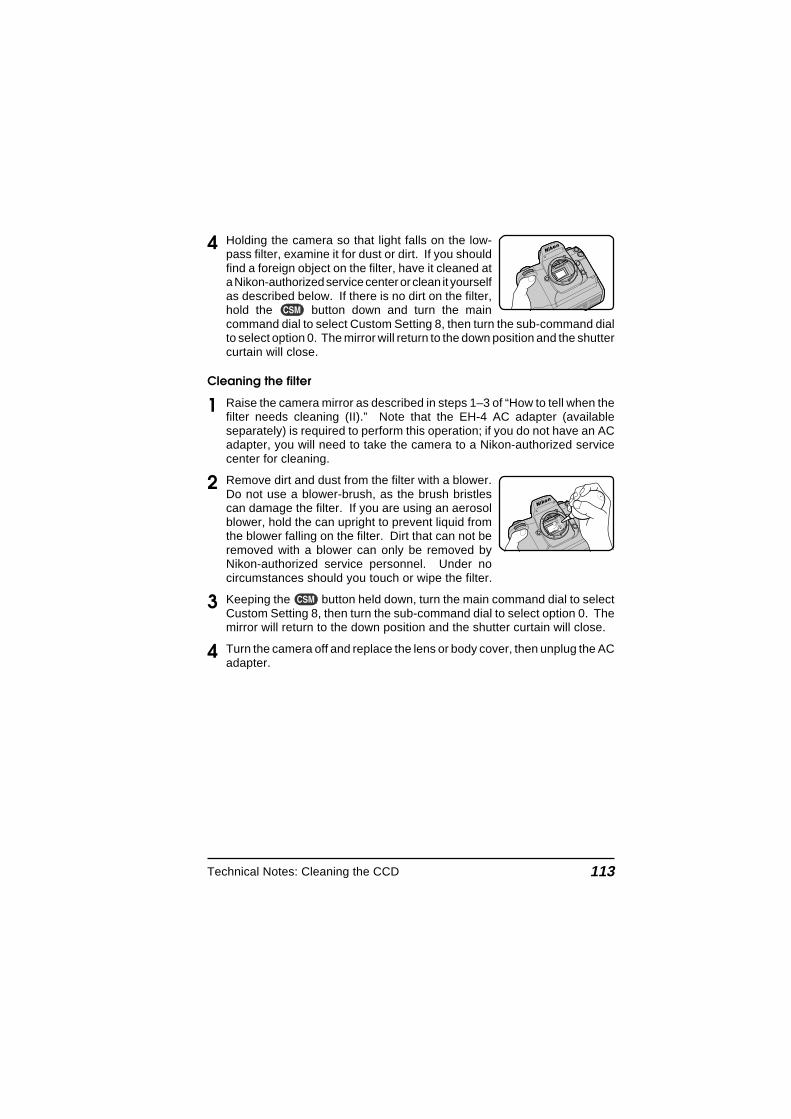
113
4 Holding the camera so that light falls on the low-pass filter, examine it for dust or dirt. If you shouldfind a foreign object on the filter, have it cleaned ata Nikon-authorized service center or clean it yourselfas described below. If there is no dirt on the filter,hold the button down and turn the maincommand dial to select Custom Setting 8, then turn the sub-command dialto select option 0. The mirror will return to the down position and the shuttercurtain will close.
Cleaning the filter
1 Raise the camera mirror as described in steps 1–3 of “How to tell when thefilter needs cleaning (II).” Note that the EH-4 AC adapter (availableseparately) is required to perform this operation; if you do not have an ACadapter, you will need to take the camera to a Nikon-authorized servicecenter for cleaning.
2 Remove dirt and dust from the filter with a blower.Do not use a blower-brush, as the brush bristlescan damage the filter. If you are using an aerosolblower, hold the can upright to prevent liquid fromthe blower falling on the filter. Dirt that can not beremoved with a blower can only be removed byNikon-authorized service personnel. Under nocircumstances should you touch or wipe the filter.
3 Keeping the button held down, turn the main command dial to selectCustom Setting 8, then turn the sub-command dial to select option 0. Themirror will return to the down position and the shutter curtain will close.
4 Turn the camera off and replace the lens or body cover, then unplug the ACadapter.
Technical Notes: Cleaning the CCD

114
Optional Accessories
At the time of writing, the following accessories were available for the D1:
EN-4 Rechargeable Battery PackThe EN-4 is a rechargeable nickel-metal hydride (Ni-MH) battery packdesigned exclusively for use in the D1.
MH-16 Quick-ChargerThe MH-16 can be used to recharge EN-4 battery packs.
EH-4 AC AdapterThe EH-4 can be used with AC power sources of 100–120V or 220–240Vand 50–60 Hz. Separate power cables are available for use in NorthAmerica, the United Kingdom, Europe, Australia, and Japan.
Optional LensesA variety of AF Nikkor lenses, including wideangle, telephoto, zoom, micro,defocus image control (DC) or regular lenses, with focal lengths of 16–600mm, are available for the D1.
EC-CF CompactFlash Memory Cards64MB and 96MB EC-CF CompactFlash memory cards are available for theD1. In addition, the CompactFlash memory cards listed below have beentested and approved for use in the COOLPIX 950 digital camera. Opera-tion is not guaranteed with other CompactFlash memory cards.
• SanDisk SDCFB-4, SDCFB-8, SDCFB-15, SDCFB-30, SDCFB-40,SDCFB-48, SDCFB-64, and SDCFB-96 CompactFlash memory cards
Contact the manufacturer for more information on the above memorycards.
Technical Notes: Optional Accessories

115
EC-AD1 PC Card AdapterUsing the PC card adapter, CompactFlash memory cards can be read bycomputers equipped with PCMCIA card slots configured for ATA memorycards.
DK-14 Antifog Finder EyepieceThis viewfinder eyepiece prevents fogging in humid or cold conditions.
DK-2 Rubber Eye CupPrevents eye fatigue by making it easier to see the image in the viewfinder.
Eyepiece Correction LensesTo accommodate individual differences in vision, five types of viewfinderlenses are available with diopters of –3, –2, 0, +1, and +2.
DR-4 Right-Angle Viewing Attachment/DK-7 Eyepiece AdapterThe DR-4 attaches at a right angle to the viewfinder eyepiece, allowing youto view the image in the viewfinder from above. The DK-7 is used whenattaching the DR-3 Right-Angle Viewing Attachment or the DG-2 EyepieceMagnifier to the D1.
FiltersNikon filters can be divided into three types: screw-in, drop-in and rear-interchange. With the exception of the R60, exposure compensation neednot be adjusted when a Nikon filter is attached (in the case of the R60, setexposure compensation to +1). Filters manufactured by other makers mayinterfere with autofocus or electronic rangefinding.
The D1 can not be used with Polar polarizing filters. Use the C-PL circularpolarizing filter instead.
If you are using a filter to protect the lens, it is recommended that you usean NC or L37C filter.
When shooting with a filter attached, moiré may be observed whenshooting a subject against a bright light, or when a strong light source is inthe frame. In these conditions, it is recommended that you remove the filterbefore shooting.
Technical Notes: Optional Accessories

116
Nikon SB-28DX SpeedlightThis Speedlight has a guide number of 36 (manual mode, 35mm zoom-head position, ISO 100 m, 20°C [68°F]) and is powered by four alkalinebatteries. Other power sources (available separately) that can be used withthe SB-28DX include newer models of the SD-6, -7, SK-6, and the SK-6Aand SD-8A. Note, however, that older models of the SD-6, -7, SK-6, andthe SD-8 are not compatible with the SB-28DX. The SC-16A power cordsupplied with newer models of the SD-6, -7 units is available for separatepurchase, and can be used to connect older models to the SB-28DX. TheSD-6, -7 and SK-6 are not available in Europe. The SK-6A is available onlyin Europe.
Accessories for the Remote TerminalThe D1 is equipped with a ten-pin remote termi-nal for remote-control photography, automaticphotography, and connection to other devices.The terminal is provided with a cap, which pro-tects the contacts when the terminal is not is use.The following accessories can be connected:
MC-20 Remote Cord (80cm/2.6´): Remote shutter release; can be usedto reduce camera shake. It is equipped with time-exposure and timerfeatures, emitting a beep once a second while the shutter is open.
MC-21 Extension Cord (3m/9.8´): Can be connected to the MC-20, MC-22, MC-25, or MC-30.
MC-22 Remote Cord (1m/3.3´): Remote shutter release with blue, yellow,and black terminals for connection to a remote shutter-triggering device,making it possible to control the camera via sound or electronic signals.
MC-25 Adapter Cord (20cm/0.7´): Ten-pin to two-pin adapter cord forconnection to the MW-2 Radio Control Set, the MT-2 Intervalometer, theML-2 Modulite Control Set, and other devices with two-pin terminals.
MC-30 Remote Cord (80cm/2.6´): Remote shutter release; can be usedto reduce camera shake. Can be used to lock the shutter-release buttonduring a time exposure.
ML-2 Modulite Remote Control Set: Allows infrared remote control witha range of up to 100m (328´). Remote control over greater distances canbe achieved with multiple units. Requires MC-25 Adapter Cord.
ML-3 Modulite Remote Control Set: Allows infrared remote control witha range of up to 8m (26.2´).
Technical Notes: Optional Accessories
22
70
50
8510
5
22

117
SoftwareTwo software packages are available for the D1: Nikon View DX, whichallows you to browse the contents of the camera’s memory when thecamera is connected to the computer via its IEEE 1394 interface, and NikonCapture, which offers remote control and image enhancement features.Both packages are available in Windows and Macintosh versions; systemrequirements are given below.
Nikon View DXfor Windows for Macintosh
OS Microsoft Windows 95, Mac OS 8.6 or laterWindows 98,Windows NT 4.0 or later
CPU Pentium II, Celeron or higher Power PC G3 or higherMemory 16MB minimum 16MB minimum
(over 32MB recommended) (over 32MB recommended)Video VGA (640 × 480 pixels) with VGA (640 × 480 pixels) with
16-bit color or higher 16-bit color or higherIEEE1394 Adaptec AHA-8920/8945, Built-in IEEE 1394 interface or
HotConnect V1.1 or later Adaptec AHA-8945Other CD-ROM drive CD-ROM drive
40 MB or more free hard-disk 40 MB or more free hard-diskspace when Nikon View DX is space when Nikon View DX isrunning (100 MB or more running (100 MB or morerecommended) recommended)
Nikon Capturefor Windows for Macintosh
OS Microsoft Windows 95, Mac OS 8.6 or laterWindows 98,Windows NT 4.0 or later
CPU Pentium II, Celeron or higher Power PC G3 or higherMemory 64MB minimum 32MB minimum
(over 128MB recommended) (over 64MB recommended)Video VGA (640 × 480 pixels) with VGA (640 × 480 pixels) with
16-bit color or higher 16-bit color or higherIEEE1394 Adaptec AHA-8920/8945, Built-in IEEE 1394 interface or
HotConnect V1.1 or later Adaptec AHA-8945Other CD-ROM drive CD-ROM drive
40 MB or more free hard-disk 40 MB or more free hard-diskspace when Nikon Capture is space when Nikon Capture isrunning (200 MB or more running (200 MB or morerecommended) recommended)
Technical Notes: Optional Accessories
118
Troubleshooting
Should any of the following indicators appear in the viewfinder or control panel displays,check the list below before consulting your retailer or Nikon representative.
Technical Notes: Troubleshooting
Seealso
Indication
Controlpanel
ViewfinderProblem Solution
Set ring to smallestaperture (largest f-num-ber).
FEE(blinking)
FEE(blinking)
Lens aperture ring is notset to smallest aperture. pg. 6
†Ready spare, fullycharged battery.
Low battery. pg. 5
†† Replace battery.Battery exhausted. pg. 5
Use Nikkor lens (IXNikkor excepted) withbuilt-in CPU, or setcamera exposure modeto A or M and adjustaperture with lens aper-ture ring.
F-- F--
Lens not attached, orattached lens not Nikkorlens with built-in CPU. pg. 6
pg.109
Focus manually.(blinking)
Camera can not focus.pg. 20pg. 40
† Indicators in viewfinder turn off when no button is pressed.†† Indicators in viewfinder and rear control panel turn off.

119
Seealso
Indication
Controlpanel
ViewfinderProblem Solution
Switch to manual expo-sure mode or use an-other shutter speed.
bulb(blinking)
bulb(blinking)
Shutter speed set tobulb (long time expo-sure) in shutter-priority
pg. 43pg. 47
Attach Nikkor lens withbuilt-in CPU or selectmanual or aperture-priority auto.
P or S(blinking)
A(blinking)
Programmed auto orshutter-priority autoselected with no lens inplace or with lens otherthan CPU Nikkor inplace.
pg. 6pp. 45–48
Check photo in LCDmonitor. If underex-posed, adjust shutter-speed, aperture, or flashrange and try again.
(blinking)
If flash-ready lampblinks for three secondsafter flash, photo may beunderexposed.
pg.100
Shutter speed automati-cally set to 1/500 sec.Shutter
speed(blinking)
500(blinking)
Shutter speed fasterthan lens sync speed(shutter-priority auto ormanual exposuremodes)
pg.100
Technical Notes: Troubleshooting
Exposure mode:P use ND filterS increase shutter
speed; if indicationpersists, use ND filter
A use smaller aperture(higher f-number); ifindication persists,use ND filter
HI HI
Subject too bright; photowill be overexposed.
pg. 20pp. 43–46
Exposure mode:P use flashS lower shutter speed; if
indication persists,use flash
A use larger aperture(lower f-number); ifindication persists,use flash
Lo Lo
Subject too dark; photowill be underexposed.
pg. 20pg. 97pg. 43
pg. 45
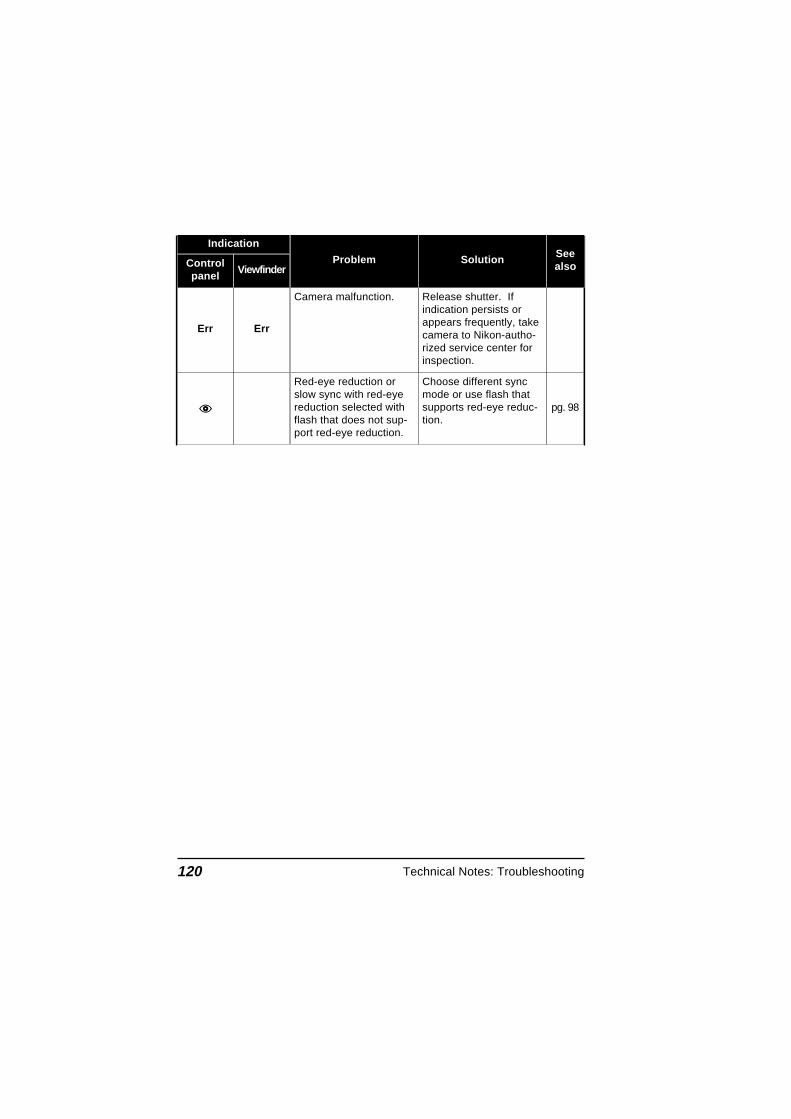
120
Release shutter. Ifindication persists orappears frequently, takecamera to Nikon-autho-rized service center forinspection.
Err Err
Camera malfunction.
Red-eye reduction orslow sync with red-eyereduction selected withflash that does not sup-port red-eye reduction.
pg. 98
Choose different syncmode or use flash thatsupports red-eye reduc-tion.
Technical Notes: Troubleshooting
Seealso
Indication
Controlpanel
ViewfinderProblem Solution

121
This error occurs in playback mode when thecurrent folder contains no images. Select adifferent folder from the FOLDERS menu. Youwill not be able to play back photos until at leastone photo has been recorded on the card,although the camera will function normally inother respects.
The camera can not access the memory card,all available file numbers have been used, orthe card is not correctly formatted. Replace thecard with a Nikon-authorized memory card.
The camera can not detect a flash-memorycard. Turn the mode dial to OFF and confirmthat the flash-memory card has been correctlyinserted in the camera as described in “FirstSteps: Insert the Memory Card.”
Error MessagesWhen there is a problem with the flash-memory card or with the camera’sinternal programming and circuitry, an error message will appear superim-posed on the image in the LCD monitor. Below is a list of error messages thatmay be displayed by the D1 and the steps that should be taken to deal withthem.
NO CARDPRESENT
The card has not been formatted for use in theD1. Format the card as instructed in “FirstSteps: Insert the Memory Card,” or replace thecard with a correctly formatted CompactFlashmemory card.
THIS CARDCAN NOT BE USED
CARD IS NOTFORMATTED
Technical Notes: Troubleshooting
CARD CONTAINSNO IMAGES
Card is full. No further photographs can betaken until images have been deleted from thecard as described in “Playback.”
LCD Monitor Controlpanel Action
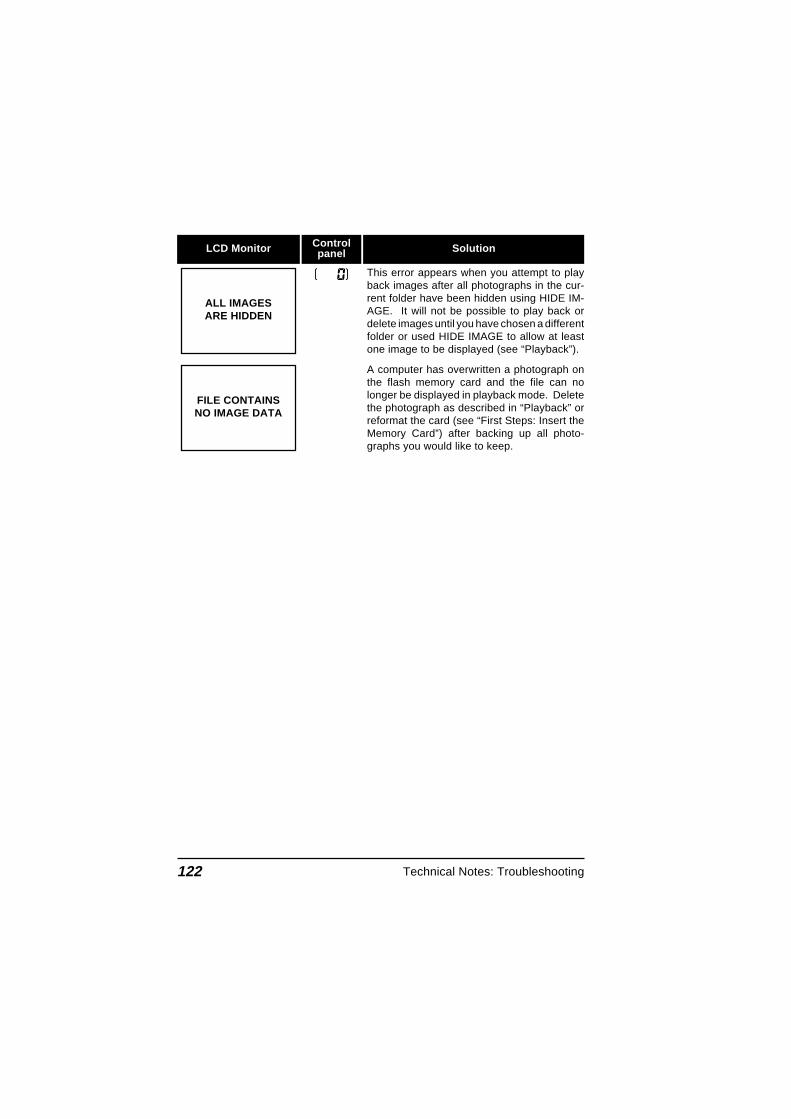
122
This error appears when you attempt to playback images after all photographs in the cur-rent folder have been hidden using HIDE IM-AGE. It will not be possible to play back ordelete images until you have chosen a differentfolder or used HIDE IMAGE to allow at leastone image to be displayed (see “Playback”).
A computer has overwritten a photograph onthe flash memory card and the file can nolonger be displayed in playback mode. Deletethe photograph as described in “Playback” orreformat the card (see “First Steps: Insert theMemory Card”) after backing up all photo-graphs you would like to keep.
FILE CONTAINSNO IMAGE DATA
Technical Notes: Troubleshooting
LCD Monitor Controlpanel Solution
ALL IMAGESARE HIDDEN
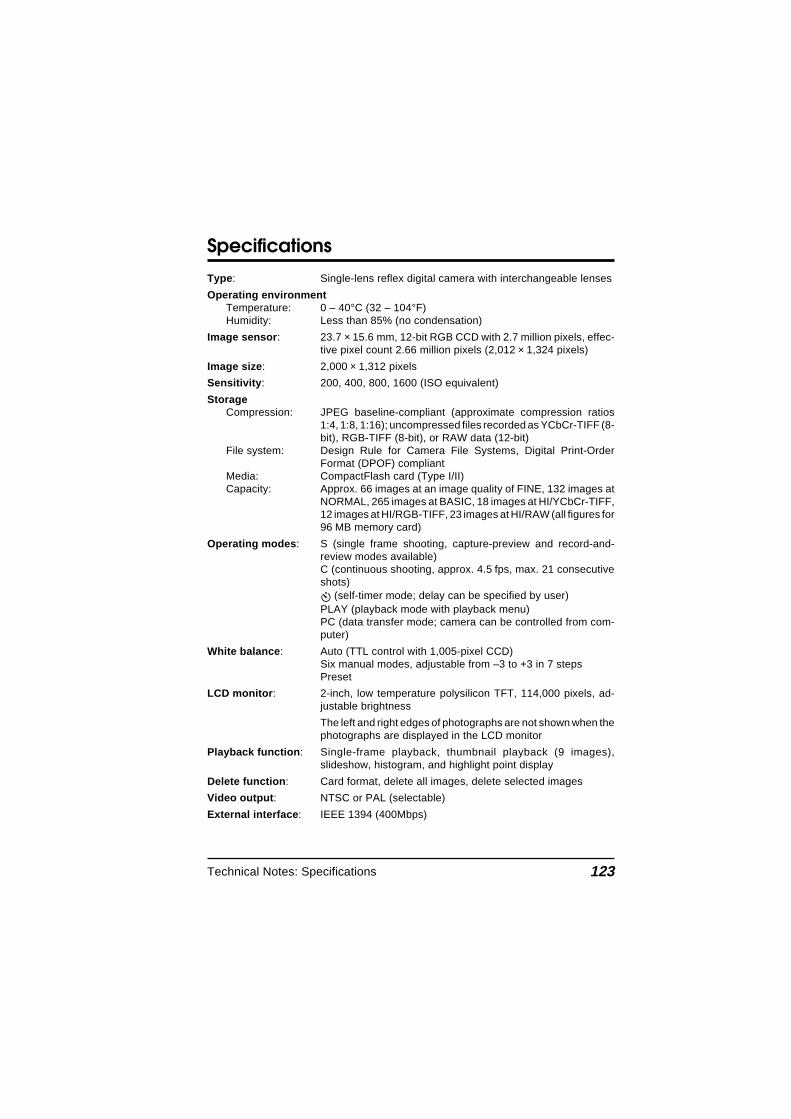
123
Specifications
Type: Single-lens reflex digital camera with interchangeable lenses
Operating environmentTemperature: 0 – 40°C (32 – 104°F)Humidity: Less than 85% (no condensation)
Image sensor: 23.7 × 15.6 mm, 12-bit RGB CCD with 2.7 million pixels, effec-tive pixel count 2.66 million pixels (2,012 × 1,324 pixels)
Image size: 2,000 × 1,312 pixels
Sensitivity: 200, 400, 800, 1600 (ISO equivalent)
StorageCompression: JPEG baseline-compliant (approximate compression ratios
1:4, 1:8, 1:16); uncompressed files recorded as YCbCr-TIFF (8-bit), RGB-TIFF (8-bit), or RAW data (12-bit)
File system: Design Rule for Camera File Systems, Digital Print-OrderFormat (DPOF) compliant
Media: CompactFlash card (Type I/II)Capacity: Approx. 66 images at an image quality of FINE, 132 images at
NORMAL, 265 images at BASIC, 18 images at HI/YCbCr-TIFF,12 images at HI/RGB-TIFF, 23 images at HI/RAW (all figures for96 MB memory card)
Operating modes: S (single frame shooting, capture-preview and record-and-review modes available)C (continuous shooting, approx. 4.5 fps, max. 21 consecutiveshots)
(self-timer mode; delay can be specified by user)PLAY (playback mode with playback menu)PC (data transfer mode; camera can be controlled from com-puter)
White balance: Auto (TTL control with 1,005-pixel CCD)Six manual modes, adjustable from –3 to +3 in 7 stepsPreset
LCD monitor: 2-inch, low temperature polysilicon TFT, 114,000 pixels, ad-justable brightness
The left and right edges of photographs are not shown when thephotographs are displayed in the LCD monitor
Playback function: Single-frame playback, thumbnail playback (9 images),slideshow, histogram, and highlight point display
Delete function: Card format, delete all images, delete selected images
Video output: NTSC or PAL (selectable)
External interface: IEEE 1394 (400Mbps)
Technical Notes: Specifications

124
Exposure modes: P (programmed auto with flexible program)S (shutter-priority auto)A (aperture-priority auto)M (manual)
Image size: 24 × 36 mm
Lens mount: Nikon F mount (with AF coupling and AF contacts)
Lenses: Type-D AF Nikkor lenses (excluding IX Nikkor)—all functionssupportedOther type-D Nikkor lenses—all functions except autofocussupportedOther AF Nikkor lenses (excluding F3AF)—all functions ex-cept 3D color matrix metering and 3D multi-sensor balanced fill-flash for D1 supportedAI-P Nikkor lenses—all functions except 3D color matrixmetering, 3D multi-sensor balanced fill-flash for D1, andautofocus supportedOther lenses can be used in aperture-priority or manual modewith center-weighted or spot metering; electronic rangefindercan be used with lenses with a maximum aperture of f/5.6 orfaster.
Picture angle: 35mm format equivalent to 1.5 times focal length of lens.
ViewfinderType: Optical fixed eye-level pentaprism with diopter adjustment of –3
to +1 DP, equipped with eyepiece shutterEyepoint: 22 mm (at –1.0 DP)Focusing screen: Type B BriteView clear matte screen Mark IIIFrame coverage: Approx. 96% of lensMagnification: 0.8 × with 50 mm lens set to infinity and –1.0 DPInformation: Focus indicators, shutter speed, aperture, exposure mode,
metering, shutter-speed lock, aperture lock, AE lock, electronicanalog display, frame counter, ready light, five sets of focusbrackets (areas)
Reflex mirror: Quick-return
Lens aperture: Instant return with depth-of-field preview
Autofocus: TTL phase detection by means of Nikon Multi-CAM1300autofocus module; detection range –1 to 19 EV (ISO 100 atroom temperature)
Lens servo: Single-servo AF (S), Continuous-servo AF (C), manual (M);focus tracking automatically activated according to subjectstatus in single-servo and continuous-servo AF
Focus area: Focus area can be selected from five focus areas
AF-area mode: Single-area AF, Dynamic AF (supports closest subject priority)
Focus lock: Focus can be locked using the AE/AF lock button or, in single-servo AF, by pressing the shutter-release button half way
Technical Notes: Specifications
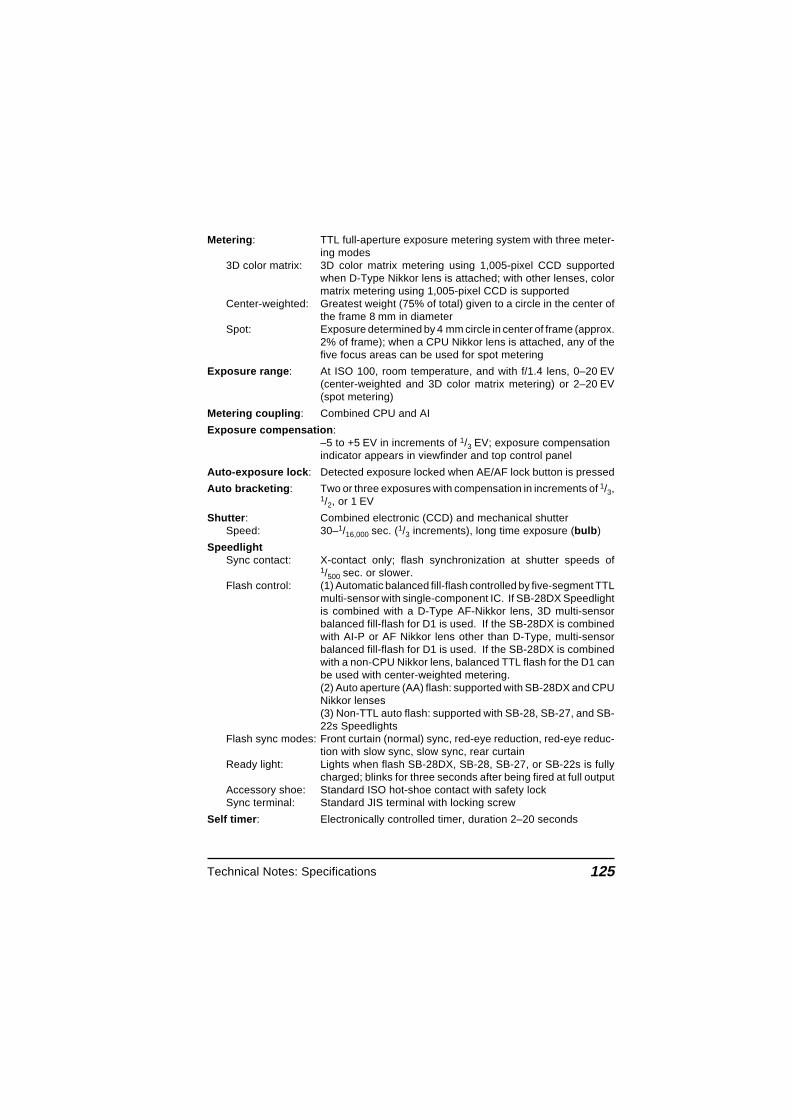
125
Metering: TTL full-aperture exposure metering system with three meter-ing modes
3D color matrix: 3D color matrix metering using 1,005-pixel CCD supportedwhen D-Type Nikkor lens is attached; with other lenses, colormatrix metering using 1,005-pixel CCD is supported
Center-weighted: Greatest weight (75% of total) given to a circle in the center ofthe frame 8 mm in diameter
Spot: Exposure determined by 4 mm circle in center of frame (approx.2% of frame); when a CPU Nikkor lens is attached, any of thefive focus areas can be used for spot metering
Exposure range: At ISO 100, room temperature, and with f/1.4 lens, 0–20 EV(center-weighted and 3D color matrix metering) or 2–20 EV(spot metering)
Metering coupling: Combined CPU and AI
Exposure compensation:–5 to +5 EV in increments of 1/3 EV; exposure compensationindicator appears in viewfinder and top control panel
Auto-exposure lock: Detected exposure locked when AE/AF lock button is pressed
Auto bracketing: Two or three exposures with compensation in increments of 1/3,1/2, or 1 EV
Shutter: Combined electronic (CCD) and mechanical shutterSpeed: 30–1/16,000 sec. (1/3 increments), long time exposure (bulb)
SpeedlightSync contact: X-contact only; flash synchronization at shutter speeds of
1/500 sec. or slower.Flash control: (1) Automatic balanced fill-flash controlled by five-segment TTL
multi-sensor with single-component IC. If SB-28DX Speedlightis combined with a D-Type AF-Nikkor lens, 3D multi-sensorbalanced fill-flash for D1 is used. If the SB-28DX is combinedwith AI-P or AF Nikkor lens other than D-Type, multi-sensorbalanced fill-flash for D1 is used. If the SB-28DX is combinedwith a non-CPU Nikkor lens, balanced TTL flash for the D1 canbe used with center-weighted metering.(2) Auto aperture (AA) flash: supported with SB-28DX and CPUNikkor lenses(3) Non-TTL auto flash: supported with SB-28, SB-27, and SB-22s Speedlights
Flash sync modes: Front curtain (normal) sync, red-eye reduction, red-eye reduc-tion with slow sync, slow sync, rear curtain
Ready light: Lights when flash SB-28DX, SB-28, SB-27, or SB-22s is fullycharged; blinks for three seconds after being fired at full output
Accessory shoe: Standard ISO hot-shoe contact with safety lockSync terminal: Standard JIS terminal with locking screw
Self timer: Electronically controlled timer, duration 2–20 seconds
Technical Notes: Specifications

126
Depth-of-field preview: Lens aperture can be stopped down by pressing depth-of-fieldpreview button
Top control panel: Display includes shutter-speed lock indicator, shutter speed,exposure compensation, date, aperture lock indicator, aper-ture, operating mode, clock-battery indicator, exposure com-pensation indicator, auto bracketing indicator, exposure indica-tor, exposure mode, flexible program indicator, flash syncmode, AF area mode, focus area, battery indicator, framecount, number of exposures remaining, card indicator
Rear control panel: Display includes custom-settings indicator, B&W indicator,sensitivity, custom setting, file type, number of exposuresremaining, image quality, sensitivity indicator, monitor indica-tor, white-balance mode, card indicator
Remote control: Remote control via 10-pin remote terminal or IEEE 1394 inter-face (400 Mbps)
Power source: EN-4 Ni-MH Battery Pack, 7.2 V DC (can be recharged withoptional MH-16 or MH-15 Quick Chargers); EH-4 AC adapter(sold separately), 100–240 V AC
Power switch: Includes LCD illuminator switch
Exposure meters: Turn off automatically if no operation performed for six seconds;can be re-activated by lightly pressing the shutter-releasebutton or by pressing the AF-ON button.
Battery indicators: (battery fully charged), (low battery), (batteryexhausted); if no indicators appear, batteries are completelyexhausted or improperly installed
Tripod socket: 1/4 in. (JIS standard)
Custom settings: 32 settings from 0–31 available (see “Custom Settings”)
Two-button reset: Settings restored to defaults by pressing CSM and ISO buttonssimultaneously (some settings not restored)
Dimensions: Approx. 157 (W) × 153 (H) × 86 (D) mm (6.2 × 6.1 × 3.4 in.)
Weight: Approx. 1.1 kg (2.5 lbs.) without batteries
Accessories: EG-D1 video cable, BF-1A body cap, monitor cover, AN-D1camera strap
Options: EN-4 Ni-MH Battery Pack, MH-16 Quick Charger, EH-4 ACAdapter, CompactFlash memory cards, EC-AD1 PC cardadapter, SB-28DX Speedlight, SC-D1 IEEE 1394 cable, DK-14Antifog Finder Eyepiece, Nikon View DX browser software,Nikon Capture control software (standard accessories maydiffer depending on country or region of sale)
Note
Technical Notes: Specifications
The LCD illuminator will gradually get darker over time. This is normal; if desired, theilluminator can be replaced for a fee by a Nikon-authorized technician.
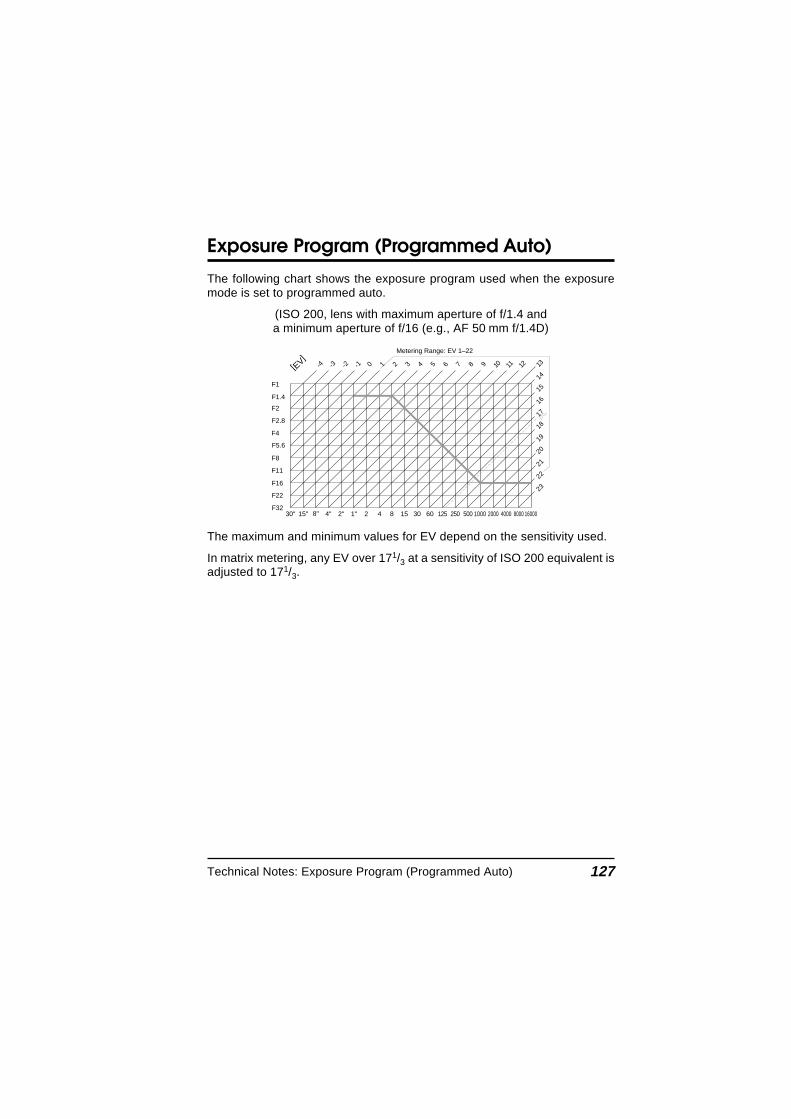
127
Exposure Program (Programmed Auto)
The following chart shows the exposure program used when the exposuremode is set to programmed auto.
(ISO 200, lens with maximum aperture of f/1.4 anda minimum aperture of f/16 (e.g., AF 50 mm f/1.4D)
-4 -3 12 13-2 -1 0 1 2 3 4 5 6 7 8 9 10 11
F1.4
F1
F2
F2.8
F4
F5.6
F8
F11
F16
F22
F3230" 15" 8" 4" 2" 1" 2 4 8 15 30 60 125 250 500 1000 2000 4000 8000 16000
22
21
20
19
18
17
16
1514
[EV]
23
171 /3
Metering Range: EV 1–22
The maximum and minimum values for EV depend on the sensitivity used.
In matrix metering, any EV over 171/3 at a sensitivity of ISO 200 equivalent isadjusted to 171/3.
Technical Notes: Exposure Program (Programmed Auto)
128
Index
Symbols3D color matrix metering. See
Metering3D multi-sensor balanced fill-flash
for the D1. See Flash photogra-phy
AA (Aperture-priority auto exposure
mode). See Exposure modeA (Auto white balance). See White
balanceAC adapter ................................. 114Accessories, optional ......... 114–117Accessory shoe ........................... 95AF area mode ........................ 34–35
dynamic AF .............................. 34single area AF .................... 16, 34
AF lock. See Focus lockAnti-vibration mode ...................... 68Aperture ................................. 45–47
lock ..................................... 46, 76maximum ............................ 45, 47minimum ......................... 6, 45–46
Aperture-priority auto exposuremode. See Exposure mode
Auto bracketing .......... 53–56, 67, 76Auto exposure lock .... 49–50, 68, 76Autofocus ............. 16, 33–35, 37–39Autofocus assist illuminator ... 39, 99Auto meter switch-off ............. 20, 70AUTO OFF ................................... 91
BBASIC. See Image qualityBattery ........................... ix, 4–5, 114
battery indicator .......................... 5installing ................................. 4–5
Body cap ........................................ 7Bulb. See Long time exposure
CC (continuous servo autofocus).
See AutofocusC (continuous shooting mode). See
Continuous shooting modeCapture preview mode .... 56–57, 67CARDFORMAT ........................... 92Card slot ................................ 12–13Center-weighted fill-flash for the D1.
See Flash photographyCenter-weighted metering. See
MeteringClock calendar ........................... 8–9Closest subject priority .... 34, 68, 69Color temperature. See White
balanceContinuous servo AF. See Focus
modeContinuous shooting mode .... 26, 72Custom settings ..................... 65–76
custom sets A, B ...................... 67resetting to default values ........ 76
DData transfer. See PC modeDate and time. See Clock calendarDCF. See Design Rule for Camera
File SystemsDELETE ....................................... 84Deleting photographs ...... 24, 82, 84Depth of field ................................ 45Depth-of-field preview.................. 64Design Rule for Camera File
Systems .......................... 104, 106Digital Print Order Format ........... 82Distance information ........ 17, 41, 94Diopter adjustment. See Viewfinder
diopterDPOF. See Digital Print Order
Format
Index

129
EEH-4 AC adapter. See AC adapterElectronic analog exposure
display ............................. v, vi, 48Electronic rangefinder .......... 40, 109EN-4 NiMH battery pack. See
BatteryExposure compensation .. 51, 69, 76Exposure mode.............. 18, 42, 109
aperture priority auto ........ 45, 100manual .............................. 43, 100programmed auto ..... 18, 127, 100shutter-priority auto .......... 44, 100
FFINE. See Image qualityFlash bracketing .................... 53, 67Flash photography ............... 93–100
flash sync mode ............... 96, 100front-curtain sync ...................... 96rear-curtain sync ...................... 96red-eye reduction ..................... 96red-eye reduction with
slow sync .............................. 96slow sync .................................. 96
Flash ready light .................. 95, 100Flexible program .................... 18, 76Focus area ........................ vi, 20, 36Focus lock ........................ 33, 37, 71Focus mode ................... 16, 33, 109
continuous servo AF .... 26, 72, 73manual ........................ 39, 40, 109single servo AF............. 16, 33, 68
Focus tracking ............................. 33FOLDERS .................................... 89
HHI. See Image qualityHIDE IMAGE ................................ 86HIGHLIGHT ........................... 90–91HISTOGRAM ............................... 90
IImage quality ................... 14, 28–29INTERVAL ................................... 85ISO equivalency. See Sensitivity
LLANGUAGE ..................... 10–11, 91LCD illuminator ...................... 63, 70Lens ................................... 109–111
cleaning .................................... viiicompatibility .................... 109–110CPU Nikkor ................. 94, 98, 109D-Type AF Nikkor ..... 94, 107, 109mounting ................................. 6–7non-CPU ........... 6, 43–45, 98, 109removing ..................................... 7
Long time exposure ..................... 47
Index

130
MManual exposure mode. See
Exposure modeManual focus. See Focus modeMatrix metering. See MeteringMemory card .................. 12–13, 114
formatting ........................... 13, 92Metering ................... 17, 41–42, 109
3D color matrix ........... 17, 41, 109and flash modes ....................... 94center-weighted .......... 41, 94, 109matrix .......................... 17, 41, 109spot ............................. 42, 94, 109
MH-16 quick charger ............. 4, 114Mirror ............................................ viii
mirror up ................... 68, 112–113Mode dial ............................... 14, 26Monitor pre-flash .......................... 94Multi-sensor balanced fill-flash for
the D1. See Flash photography
NNTSC. See VIDEO OUTPUTNORMAL. See Image quality
PPAL. See VIDEO OUTPUTPC mode ........................ 26, 73, 103Picture angle .............................. 111Playback .............. 23, 26, 60, 78–80Playback menu ...................... 82–87PLAY BACK OPTIONS ............... 90PRE. See White balancePre-flash ...................................... 96PRINT SET ............................ 84, 87Programmed auto exposure mode.
See Exposure modePROTECT .................................... 86
RRAW data............................... 28, 67Rear-curtain sync. See Flash
photographyRecord-and-review ................ 58, 73Red-eye reduction. See Flash
photographyRed-eye reduction with slow sync.
See Flash photographyRGB. See Image qualityRGB-TIFF .................................... 29
SS (Shutter-priority auto exposure
mode). See Exposure modeS (Single-frame shooting). See
Single-frame shooting modeS (Single-servo AF). See Focus
mode, single-servo AFSelf-timer ......................... 27, 62, 70Sensitivity ............................... 14, 30
sensitivity up ....................... 74, 99SET UP .................................. 88–92Shutter speed
lock ........................................... 44synchronized ............................ 98
Shutter-priority auto exposuremode. See Exposure mode
Single-frame shootingmode ....................... 14, 26, 68, 69
Single-image playback .... 23, 78–79Single-servo AF. See AutofocusSLIDE SHOW .............................. 85Slow sync. See Flash photographySpeedlight .............. 94, 98–100, 116
See also Flash photographySpot metering. See meteringStandard TTL flash for the D1. See
Flash photographySync terminal ............................... 95
Index

131
TThumbnail mode .......................... 80Time exposure. See Long time
exposureTone compensation ..................... 72Two-button reset .......................... 76
VVIDEO OUTPUT .......................... 92Viewfinder diopter ........................ 63
WWhite balance .................. 15, 31–32
YYCbCr. See Image qualityYCbCr-TIFF ................................. 29
Index