
Getting started with your · Getting Started with Silhouette ... from the box and remove the three...
24
Getting started with your
-
Upload
nguyenkhanh -
Category
Documents
-
view
215 -
download
2
Transcript of Getting started with your · Getting Started with Silhouette ... from the box and remove the three...

Getting started with your

Getting Started with Silhouette CAMEO®
Connecting your Silhouette CAMEO®
Silhouette CAMEO®desktop cutting tool
A/C adapter and power cable
USB cable
1
remove foam
1
12” cutting mat
Check Included Items
The Silhouette CAMEO® comes with the items shown in the following list. Check that all the items have been included before starting. If you are missing any items listed below, please contact [email protected].
Take the Silhouette CAMEO® from the box and remove the three strips of packing tape and foam support as indicated by the following diagrams. These strips of tape and foam are used to hold the moving parts of the Silhouette in place during shipment.
crosscut blade
remove tape
AutoBladeBluetooth®
removal tool

Getting Started with Silhouette CAMEO®
2
3
2
Install the Silhouette Studio‰ Software
Installation1. Navigate to silhouetteamerica.com.2. Click the blue “Update Software” button at the top of the screen. 3. Under “Silhouette Studio” click the download link. Ensure you choose the correct one depending on your operating system (Windows or MAC).
FOR WINDOWS: Proceed through the installation process by following the on-screen prompts. If the installation window does not automatically appear, browse to the download in My Computer and double-click the setup.exe program to run it. If a “New Hardware Found” dialog box appears, follow the recommended instructions to accept your system’s installation of the Silhouette driver.
FOR MAC: Drag and drop the Silhouette Studio® application icon into the applications folder to install Silhouette Studio®.
Connect the Silhouette CAMEO®
Once the Silhouette Studio® software is installed, connect the Silhouette CAMEO® to the power supply. Then connect the Silhouette to your computer with the included USB cable as shown in the diagram.
Turn the machine on by pressing the power button. Follow the touchscreen prompts to select your language and perform initial setup. If your PC displays a “New Hardware Found” dialog box, follow the recommended instructions to accept your system’s installation of the Silhouette driver.
power
Bluetooth®
The Silhouette CAMEO® is Bluetooth® compatible and allows wireless communication. The “Silhouette CAMEO® Bluetooth® Edition” includes a pre-installed Bluetooth® adapter. For all other Cameo editions, Bluetooth® is enabled, but you will need to install a Bluetooth® adapter. The Bluetooth® resides in the bottom of the machine in a compartment accessible by a basic screwdriver.
To connect your Bluetooth® enabled CAMEO 3, ensure that Bluetooth® is activated. You should see a Bluetooth® symbol in the upper-left corner of your CAMEO screen. If no symbol is present, activate Bluetooth® in the “BLUETOOTH” menu found within the CAMEO 3 machine settings( ).
Select “Add Bluetooth Cutter…” from the Silhouette menu found along the top of your Silhouette Studio® software. A dialog box will appear displaying Bluetooth® devices. Select the CAMEO 3 from the list of devices and the software will begin syncing. After a few seconds, the status of the CAMEO will display as ‘Ready’ in the SEND TO SILHOUETTE panel and the setup is complete.
Bluetooth® is off (or no Bluetooth® adapter present)
Bluetooth® is active but not connected
Bluetooth® is active and connected
No
Symbol( )
Getting Started with Silhouette CAMEO®
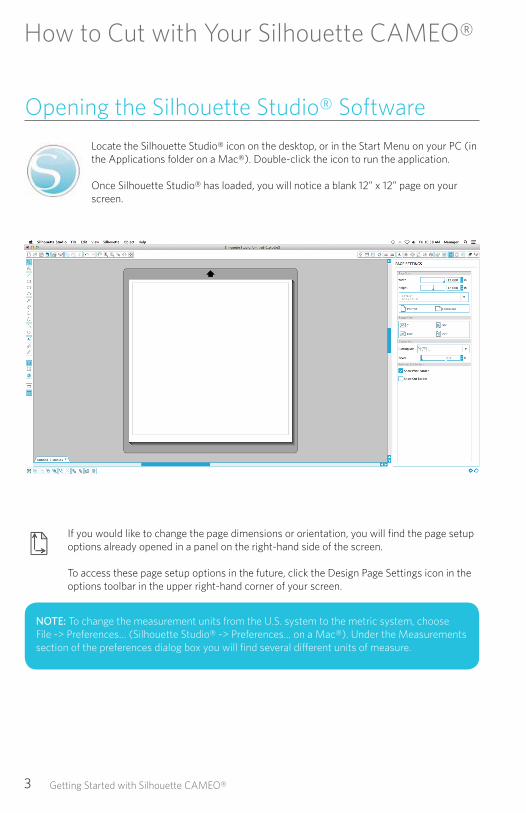
NOTE: To change the measurement units from the U.S. system to the metric system, choose File -> Preferences… (Silhouette Studio® -> Preferences… on a Mac®). Under the Measurements section of the preferences dialog box you will find several different units of measure.
3
How to Cut with Your Silhouette CAMEO®
Opening the Silhouette Studio® Software
Locate the Silhouette Studio® icon on the desktop, or in the Start Menu on your PC (in the Applications folder on a Mac®). Double-click the icon to run the application.
Once Silhouette Studio® has loaded, you will notice a blank 12” x 12” page on your screen.
If you would like to change the page dimensions or orientation, you will find the page setup options already opened in a panel on the right-hand side of the screen.
To access these page setup options in the future, click the Design Page Settings icon in the options toolbar in the upper right-hand corner of your screen.

Getting Started with Silhouette CAMEO®
Sele
ct T
ool
New
Dra
win
g
Ope
n
Save
Save
to S
D C
ard
Prin
t
Cop
yPast
e CutUnd
oZ
oom
InZ
oom
to S
elec
ted
Are
aFi
ll C
olor
Fill
Gra
dien
tFi
ll Pa
tter
nLi
ne C
olor
Line
Sty
leM
oveRo
tate Sc
ale
Repl
icat
eM
odify
Off
set
Page
Set
tings
Regi
stra
tion
Mar
ksG
rid S
ettin
gs
Cut
Set
tings
Des
ign
Page
Sett
ings
Pan
el
Silh
ouet
te S
tudi
o®C
olor
Pre
fere
nce
Pref
eren
ces
Text
Alig
nD
rag
Zoo
m
Fit t
o W
indo
wZ
oom
Out
Redo
Send
to S
ilhou
ette
PixS
can
Pan
Effe
cts
Aut
o Tr
ace Se
nd to
Silh
ouet
tePo
int E
dit T
ool
Line
Too
lRe
ctan
gle
Tool
Roun
ded
Rect
angl
eEl
lipse
Too
lPo
lygo
n To
olC
urve
d Sh
ape
Tool
Free
hand
Too
l
Text
Too
lEr
aser
Too
lK
nife
Too
lD
raw
ing
Are
a
Libr
ary
Onl
ine
Stor
e
Gro
up
Ung
roup Se
lect
All
Des
elec
t All
Dup
licat
eDel
ete Br
ing
to F
ront
Send
to B
ack
Wel
dOff
set
Show
Lib
rary
Show
Lib
rary
and
D
raw
ing
Are
a
Sele
ct b
y C
olor
Smoo
th F
reeh
and
Tool
Arc
Too
lPo
lygo
nToo
l
Embo
ssSt
ippl
e
4

Getting Started with Silhouette CAMEO®
Drawing Text
To cut letters or words using any font on your computer, choose the text tool from the toolbar on the left-hand side of the screen. With the text tool selected, click anywhere on the page and begin typing.
After clicking on the page with the text tool, a blinking cursor will appear. Begin typing any letters, words, or phrases you choose.
While you are typing or editing text, the text options panel will appear on the right-hand side of the screen. In this panel you can change the font, text size, weight, justification, character spacing and line spacing. Use the mouse to highlight your text before making adjustments to the font, size, weight, etc.
To finish typing your text, click anywhere off the page. This will end the text editing mode and deselect the text. If you need to make a change to the text, double-click the text on the page using the Select Tool (found on the left-hand toolbar).
To move your text around the page, click and drag it to a new location.
To resize your text, select the text and then click and drag one of the corner control handles.
To rotate your text, select the text, then click and drag the green circle displayed above the object.
5

Getting Started with Silhouette CAMEO®
Drawing Simple Shapes
Silhouette Studio® has built-in functions to draw simple shapes such as circles, squares, rectangles, lines, polygons, and freehand line art. Each of these tools can be found in the toolbar on the left-hand side of the Silhouette Studio® window.
Lines To draw a line, choose the Line Tool on the left-hand toolbar. Either click and drag with the mouse to draw a line, or click once to start the line and click a second time to end.
Hold SHIFT while creating a line to make a perfectly vertical, horizontal, or 45° line.
Rectangles/Squares To draw a rectangle, choose the Rectangle Tool from the left-hand toolbar. Either click and drag with the mouse to draw a rectangle, or click once to set one corner and click a second time to set the opposite corner.
Hold SHIFT while creating a rectangle to make a perfect square.Hold ALT (OPTION on Mac®) to draw the rectangle from the center instead of one corner.Hold SHIFT + ALT (SHIFT + OPTION on Mac®) to draw a perfect square centered on your original click.
6

Getting Started with Silhouette CAMEO®
Cutting Your Design
Preparing the Cutting Mat
Remove the non-stick liner from the cutting mat.
Position your paper or other media on the cutting mat according to the diagram shown in Silhouette Studio®.
If you don’t see an image of the cutting mat under your document on the screen, click the Page Setup button in the options toolbar in the upper right-hand corner of the window.
Position your image on the screen where you want it to cut on the mat. Be sure to keep your design within the red margins on your page.
7

Getting Started with Silhouette CAMEO®
Preparing the Silhouette to Cut
Turn the Silhouette CAMEO® on by pressing the power button and waiting for the machine to start up.
To feed the cutting mat into the Silhouette, lift the lid, align the left edge of the mat with the blue alignment mark on the left side of the machine, press the mat against the white rollers, and press the “Load cut mat” button on the LOAD screen.
8
Loading a material that has its own backing and does not require a cutting mat (such as vinyl), requires a similar process as above but you should select “Load media” instead.
If using a lined material without a cutting mat, you can use the crosscutter on the back of the machine to trim your project after it’s done cutting. Simply place the crosscut blade into the track and slide it across your material in the direction indicated on the crosscut blade. The crosscut blade can be found in the storage compartment.
Adjusting the Rollers for Smaller MediaBy adjusting the rollers on the main roller shaft, the Silhouette CAMEO® can cut the following media sizes: A4, letter, 12”, and 13”.
Locate the release lever on the right side and turn it clockwise.
Grasp the roller body and roller head and twist into the unlocked position.
Slide the roller to the desired position and twist to lock in place.
white rollerscrosscut blade
ROLLER HEAD
ROLLER BODY
INDICATOR UNLOCK
LOCK
Getting Started with Silhouette CAMEO®
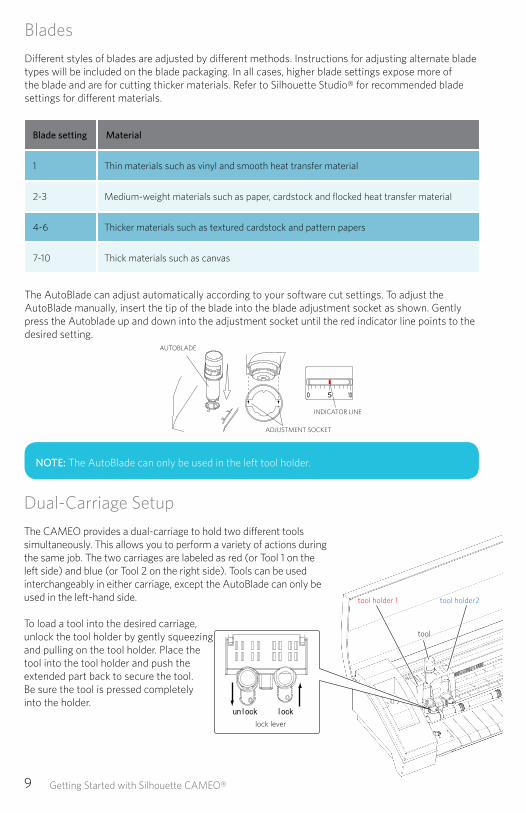
Blades
Different styles of blades are adjusted by different methods. Instructions for adjusting alternate blade types will be included on the blade packaging. In all cases, higher blade settings expose more of the blade and are for cutting thicker materials. Refer to Silhouette Studio® for recommended blade settings for different materials.
9
The AutoBlade can adjust automatically according to your software cut settings. To adjust the AutoBlade manually, insert the tip of the blade into the blade adjustment socket as shown. Gently press the Autoblade up and down into the adjustment socket until the red indicator line points to the desired setting.
Blade setting
1
4-6
7-10
2-3
Material
Thin materials such as vinyl and smooth heat transfer material
Thicker materials such as textured cardstock and pattern papers
Thick materials such as canvas
Medium-weight materials such as paper, cardstock and flocked heat transfer material
NOTE: The AutoBlade can only be used in the left tool holder.
lock lever
tool
tool holder 1 tool holder2
Dual-Carriage Setup
The CAMEO provides a dual-carriage to hold two different tools simultaneously. This allows you to perform a variety of actions during the same job. The two carriages are labeled as red (or Tool 1 on the left side) and blue (or Tool 2 on the right side). Tools can be used interchangeably in either carriage, except the AutoBlade can only be used in the left-hand side.
To load a tool into the desired carriage, unlock the tool holder by gently squeezingand pulling on the tool holder. Place the tool into the tool holder and push the extended part back to secure the tool. Be sure the tool is pressed completely into the holder.
INDICATOR LINE
ADJUSTMENT SOCKET
AUTOBLADE
unlock lock

Getting Started with Silhouette CAMEO®
Cutting
Click the Cut Settings button on the toolbar at the top of the screen. The Cut Settings panel will appear on the right side of the screen.
If using multiple tools, you can assign which lines will be performed by each tool. This can be done in one of two ways.
If using the default “Standard” Cut Mode, you can select your image on your workspace and then click on the Tool you want to assign the image to.
If using the “Advanced” Cut Mode, you can assign which tool will be used according to the image’s line color or fill color by clicking on the desired Tool.
You can adjust the cut order (if applicable) under the Cut Conditions menu
Within the Cut Settings panel, you will notice a list of common media types including various weights of paper, vinyl, and other materials. Choose the appropriate media type from the list. If the media you are cutting (or a similar media) does not appear in the list, you can choose “Custom” from the list and manually adjust the speed and thickness for the Silhouette. Generally, thicker materials require a higher thickness and intricate designs require a slower cutting speed.
Once you have chosen the appropriate cut settings, click the Send to Silhouette button at the bottom of the right panel.
Once the Silhouette is done cutting, press the “Unload” button.
Carefully peel away your cutout design. Peel the leftover paper/media off the cutting mat.
Use a Silhouette scraper tool to scrape excess paper pieces from the mat.
10
Select Media Type
Send to Silhouette
Cut Order

Getting Started with Silhouette CAMEO®
My Library
Browsing Designs
Click the My Library button to view the Silhouette designs you have on your computer. Silhouette Studio® includes 100 free designs to help you get started. Connect your CAMEO to your computer and power it on to get your 100 free designs.
Click the Show All Designs shortcut in the left panel of My Library to view all 100 designs included with your software.
Click the icon next to the My Library folder to expand the folder and view its contents. This folder initially contains the 100 free designs included.
Use the View as Icons button and View as List button to change the view of your designs in the right panel. In List View, you can sort by name, design type, artist name, and date downloaded.
11

Getting Started with Silhouette CAMEO®
Organizing Designs
You can organize your designs within My Library for your convenience by creating new folders for your designs. With the My Library folder highlighted, click the New Folder button in the toolbar at the top of the My Library window, then type a name for your new folder.
Select the My Library folder again to reveal the 100 designs you already have.
Drag any design from the right panel into your newly created folder in the folders panel on the left. The numbers in parentheses next to each folder indicate how many shapes are included in each folder.
12
Silhouette Cloud
Silhouette Cloud works hand in hand with Silhouette Studio® to keep all of your designs synced on multiple devices. You can sync up to five devices with your Cloud account. If you aren’t using multiple devices, Silhouette Cloud is useful in backing up your designs and preventing the need for recoveries.
In Silhouette Cloud, there is unlimited storage available for Silhouette Design Store downloads. There is 1GB available for custom content. Club Silhouette Members receive 5GB of storage for custom content.
To sync your files, drag them into the cloud icon in your Library folder. The software will prompt you to sign into the Cloud with your Silhouette account. Once you sign in, your Cloud will start syncing your designs.
Your Cloud Library will remain its own folder in your Library. You have the option to save things under you Local User folder or into your Cloud Library, which is titled with your Silhouette Account email. Files saved in your Local User folder will only be available from that device.

Getting Started with Silhouette CAMEO®
Searching Designs
At the top of the My Library window you will find a search box. Click in the text box and type a keyword to search your library of images. Search results will display in the right panel of My Library.
If you would like to view the keywords and description for a shape used for searching, right click (Control Click on Mac®) and choose Show Properties. At the bottom of My Library details about the highlighted shape will appear. Shapes downloaded from the Silhouette Design Store will contain several keywords and a description or instructions.
Using Designs in My Library
Using the folders in My Library, navigate to a design that you’d like to cut. Double-click the design to place it on your page in the software.
This will automatically close My Library which can be easily re-opened by clicking the My Library button on the left toolbar again. To close My Library without pasting a design, click the Close button in the upper right-hand corner of the My Library area.
13
search box

Getting Started with Silhouette CAMEO®
Downloading New Shapes
Connecting to the Silhouette Design Store
The Silhouette Design Store contains thousands of designs to cut with your Silhouette ranging from simple cutouts to intricate patterns and designs. Most shapes are only 99¢. Generally, a free shape is posted every week as well.
To access the Silhouette Design Store, click the Design Store button in the toolbar on the left side of the window.
The free design of the week will be displayed on the home page that appears.
14

Getting Started with Silhouette CAMEO®
Browsing for new designs
The Silhouette Design Store works like any other web page and can be navigated by clicking on various links to browse new releases, popular designs, etc. The home page contains popular and new designs that you may be interested in.
For now, try downloading a free design by clicking this week’s free design button on the home page or searching the Free Design tab.
Click on the design in the search results to view details about the design.Click the Add to Cart button to add this free design to your shopping cart.
Locate the shopping cart icon in the upper right-hand corner of the window and click it to view your shopping cart. Your shopping cart total should be $0.00.
Click the Checkout button to proceed. At this time the system will ask you to sign in before downloading. Creating a new account only takes a few seconds. Click the Sign up Free link on the login page to create a new account.
15

Getting Started with Silhouette CAMEO® 16
Creating an account
Several different account types exist. Once you’re more familiar with the Silhouette Design Store, you may wish to purchase a subscription and download dozens of designs each month.
In order to create a free account and buy designs one at a time, choose the “Sign up FREE” option.
You will be asked for your name, email and password in order to create an account. Type your information and click the Sign Up button.
Getting Started with Silhouette CAMEO®
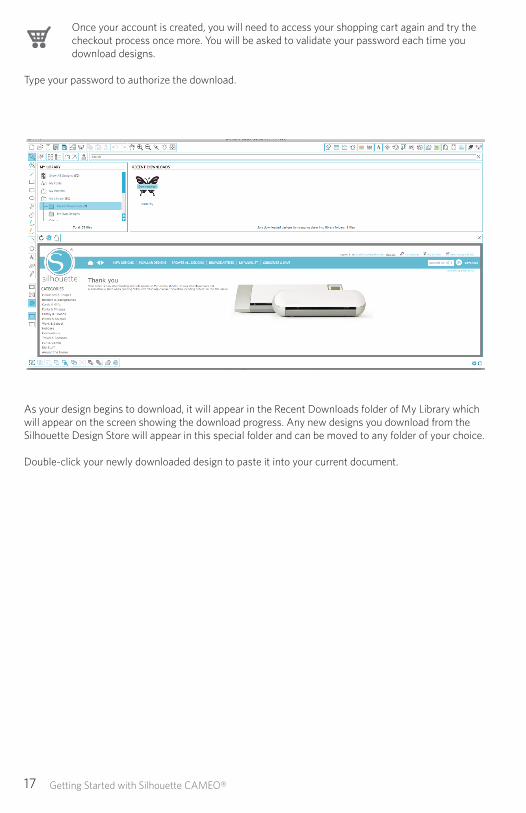
Once your account is created, you will need to access your shopping cart again and try the checkout process once more. You will be asked to validate your password each time you download designs.
Type your password to authorize the download.
As your design begins to download, it will appear in the Recent Downloads folder of My Library which will appear on the screen showing the download progress. Any new designs you download from the Silhouette Design Store will appear in this special folder and can be moved to any folder of your choice.
Double-click your newly downloaded design to paste it into your current document.
17
Getting Started with Silhouette CAMEO®
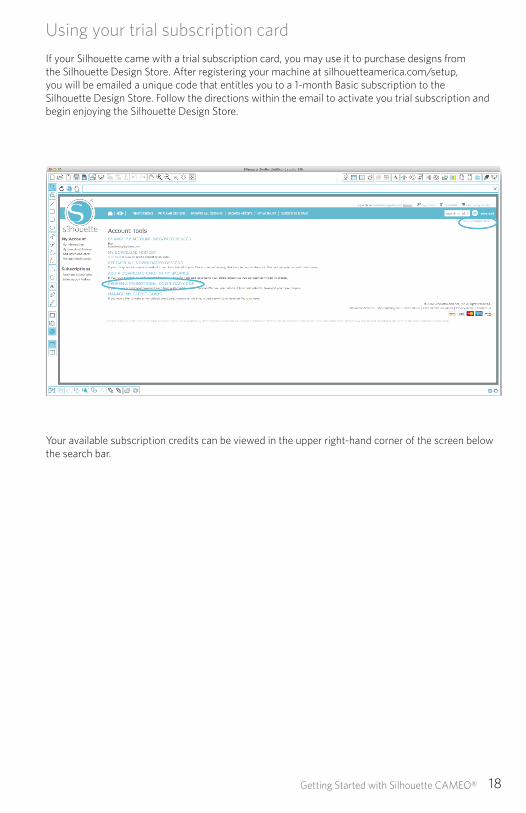
Using your trial subscription card
If your Silhouette came with a trial subscription card, you may use it to purchase designs from the Silhouette Design Store. After registering your machine at silhouetteamerica.com/setup, you will be emailed a unique code that entitles you to a 1-month Basic subscription to the Silhouette Design Store. Follow the directions within the email to activate you trial subscription and begin enjoying the Silhouette Design Store.
Your available subscription credits can be viewed in the upper right-hand corner of the screen below the search bar.
18

Getting Started with Silhouette CAMEO®
Using Your USB Device with the Silhouette CAMEO®
Saving to Your USB Device
Open or create a shape in the Silhouette Studio® software.
Resize your design to the size you want it to cut and position it as desired.
Insert a USB memory device into your computer.
Go to the File > Save As option (or CTRL + SHIFT + S) and save your design to the USB memory device.
Remove the USB memory device from your computer.
19

Getting Started with Silhouette CAMEO® 20
Using a USB Device in your Silhouette CAMEO®
With the Silhouette CAMEO® powered on, insert your USB memory device into the slot on the side of the machine. Load your material into the Silhouette.
With the USB memory device inserted and your cutting mat/media loaded, a USB menu will appear on your screen. Press the USB button in the bottom left-hand corner.
From here, browse the files on your device and choose the your desired image. At the top there will be an image of your file to help you choose the one you are looking for.
“Change Settings1” and “Change Settings2” will give you access to adjust your Cut Settings for each tool holder. Your Cut Settings were saved when you saved your file in Silhouette Studio®, but you can adjust them if needed. You can also choose to perform a test cut here.
When you are ready, press the Send button. Your job will cut according to your specifications.

21
21
Silhouette CAMEO® Safety PrecautionsKeep the Silhouette CAMEO® out of reach of children.Review and keep this document for future reference.The Silhouette CAMEO® is an electronic cutting tool and requires careful use and handling. To avoid personal injury or damage to the machine, please read the following safety precautions.
Conventions used in this guide Description of safety symbols
In order to use the Silhouette CAMEO® safely and correctly, as well as to prevent human injury and property damage, careful attention must be given to each of the safety precautions in this document. Failure to comply with these precautions may void the warranty of the product and any personal or property damage liability.
The symbol indicates information that requires careful attention (which includes warnings).
The symbol indicates an action that is strictly prohibited.
The symbol, whether next to an image or included in text, indicates an action that must be performed.
Safety Precautions WARNING
Do not touch moving parts while the Silhouette is cutting.
Keep hands and other objects away from moving parts when the machine is plugged in.
Do not connect the Silhouette to a non-rated power supply.Use of a different supply voltage may result in electrical shock or a fire hazard due to current leakage.
Do not disassemble, repair, or remodel the Silhouette.Tampering with the Silhouette hardware can cause electrical shock or fire due to current leakage. If your Silhouette needs repair, please contact Silhouette Customer Service.
Do not use the Silhouette in a location where it may be exposed to water, humidity, or dust.
If the Silhouette begins to smoke, gets too hot, emits a strange odor, or otherwise functions abnormally, do not continue using it. Unplug the AC adapter from the electrical socket.Use of the Silhouette CAMEO® when overheated may result in a fire hazard or electrical shock.Do not try to repair the Silhouette yourself.
Do not allow dust or metals near the power plug.A dirty power plug may result in electrical shock or a fire hazard due to current leakage.

22
22
Do not use or store the Silhouette CAMEO® in a location exposed to direct sunlight or a direct draft of an air conditioner or heater.Excessive heat, dust and/or humidity can cause the machine to malfunction.
Do not use the Silhouette CAMEO® in a location subject to excessive vibration or electrical noise.
For any questions or concerns contact Silhouette Customer Service at [email protected]
Do not pull on the power cable to unplug the Silhouette.
If a foreign object/substance enters the Silhouette during operation, cancel the current project by turning the machine off.Do not attempt to remove the foreign object or continue cutting.
Do not attempt to lubricate the Silhouette CAMEO®.The Silhouette does not require lubricant or any liquid agent to operate normally.
Do not use any liquid cleaning agents or any other liquids on the interior of the Silhouette CAMEO® or around the Silhouette control panel.Liquids will ruin the functionality of the machine.
Be sure to leave enough space around the Silhouette CAMEO® during operation so the machine, media, and cutting mat do not touch surrounding objects.
Keep the Silhouette CAMEO® at least 3 feet away from any light or heat sources.
Always use the correct blade setting for the material you are cutting.
Using too deep of a setting can cause the cutting mat to wear out and can adversely affect cutting performance.
When manually moving the cutting carriage, use caution and move slowly so as not to damage the Silhouette hardware.
The Silhouette blade is sharp.Handle the blade housing with care and do not touch the blade itself.
Do not use the AC adapter or power cord if it is damaged.Use of a damaged power cord or AC adapter may result in electrical shock or fire. Replace damaged power cords and AC adapters.
Only use the AC adapter included in the Silhouette CAMEO® box.Use of other AC adapters may cause malfunctions or result in electrical shock or fire. Be sure to connect the AC adapter to the CAMEO before plugging it into the wall.

Where to Find More Information
Complete User’s ManualView the complete, illustrated User’s Manual within Silhouette Studio® by clicking Help -> User’s Manual.
WebsiteVisit the tutorials section of www.silhouetteamerica.com for help with specific features and step-by-step instructions on how to cut different media types with the Silhouette CAMEO®.
BlogVisit the official Silhouette blog at blog.silhouetteamerica.com for ideas of new projects you can create. Many blog posts contain step-by-step instructions for advanced uses of Silhouette products and software.
NewsletterSign up for the Silhouette newsletter at www.silhouetteamerica.com to receive product updates and special offers via email.
Customer ServiceIf you have any further questions, feel free to contact customer service:
Silhouette America, [email protected](800) 859-8243 (US only)(801) 983-8937
SILH-CAM2-GUIDEwww.silhouetteamerica.com