Getting Started with the CLI and APIs using Cisco Metacloud
21
© 2015 Cisco and/or its affiliates. All rights reserved. This document is Cisco Public. Page 1 of 21 Tutorial Getting Started with the CLI and APIs using Cisco Metacloud In this tutorial we will describe how to get started with the OpenStack APIs using the command line, the REST interface, and some simple Python code examples. We will walk through the steps of each of these with actual examples as well as pointers to the Web for additional information. This document is targeted at people that are new to OpenStack and want to get going with the CLI, REST, and maybe some coding in Python. OpenStack APIs OpenStack has a standard set of REST APIs that are exposed and used to run and manage the cloud platform. They are controlled by versions, so you should always make sure you are using the right version of the API standard when talking to a particular OpenStack cloud. The APIs are the only way for you to talk to OpenStack from the outside world--even the default dashboard Horizon has to use the REST APIs to perform functions in the cloud, so they are really the only way to communicate with an OpenStack environment. There are many other open source projects that can talk to the OpenStack APIs and the list is growing every day. Ansible, Chef, Puppet, and SaltStack as well as many higher-level XaaS systems, including Cloud Foundry, OpenShift, Appenda, RightScale, Scalr, Clickr, and many others have interfaces to OpenStack. The OpenStack project provides a standard set of Client utilities for each project (i.e. Nova, Cinder, Keystone) that can be installed on your local system to control your OpenStack instance. These utilities are Python-based, so Python is also a requirement to run the CLI tool suite. A unified CLI tool starting above V2.20.0 is replacing these single CLI tools.
Transcript of Getting Started with the CLI and APIs using Cisco Metacloud

© 2015 Cisco and/or its affiliates. All rights reserved. This document is Cisco Public. Page 1 of 21
Tutorial
Getting Started with the CLI and APIs using Cisco Metacloud
In this tutorial we will describe how to get started with the OpenStack APIs using the command line, the REST interface, and some simple Python code examples. We will walk through the steps of each of these with actual examples as well as pointers to the Web for additional information. This document is targeted at people that are new to OpenStack and want to get going with the CLI, REST, and maybe some coding in Python.
OpenStack APIs OpenStack has a standard set of REST APIs that are exposed and used to run and manage the cloud platform. They are controlled by versions, so you should always make sure you are using the right version of the API standard when talking to a particular OpenStack cloud. The APIs are the only way for you to talk to OpenStack from the outside world--even the default dashboard Horizon has to use the REST APIs to perform functions in the cloud, so they are really the only way to communicate with an OpenStack environment.
There are many other open source projects that can talk to the OpenStack APIs and the list is growing every day. Ansible, Chef, Puppet, and SaltStack as well as many higher-level XaaS systems, including Cloud Foundry, OpenShift, Appenda, RightScale, Scalr, Clickr, and many others have interfaces to OpenStack.
The OpenStack project provides a standard set of Client utilities for each project (i.e. Nova, Cinder, Keystone) that can be installed on your local system to control your OpenStack instance. These utilities are Python-based, so Python is also a requirement to run the CLI tool suite. A unified CLI tool starting above V2.20.0 is replacing these single CLI tools.

© 2015 Cisco and/or its affiliates. All rights reserved. This document is Cisco Public. Page 2 of 21
The API can also be written via CURL commands either in a script, at the CLI, or via programmatic control, so we will walk through a few examples of how this works by logging into OpenStack and issuing a few API commands via CURL directly. We can then run the CLI with the debug option turned on and watch how those tools create their CURL commands to do their work.
Lastly, there have been several language bindings built in the open source community including Java, Ruby, GO, C, C++, Python, node.js as well as the Python API that the CLI tools use to do their work. We will look at a few simple Python scripts using the bindings to illustrate how to talk to an OpenStack-based cloud platform.
OpenStack CLI tools – Getting Started on the Command Line Before using the command line to communicate with your OpenStack environment you will need to download and install the CLI tools for your particular OS. Below are the instructions that explain how to install the prerequisite software and the Python package for each OpenStack client.
http://docs.openstack.org/user-guide/common/cli_install_openstack_command_line_clients.html
https://support.metacloud.com/entries/100998896-Installing-Command-line-clients
https://support.metacloud.com/entries/100996126-Available-OpenStack-Services-Clients
After you have the core CLI utilities installed you next need to get the login script from the OpenStack instance you are talking to, (or you can build one from scratch). To get the login CLI script from the OpenStack instance you first need to login, then you will need to navigate to the Access and Security Tab on the left navigation menu.

© 2015 Cisco and/or its affiliates. All rights reserved. This document is Cisco Public. Page 3 of 21
Next, navigate to the API tab on the top of the panel and notice the two buttons at the top for RC file downloads. One is for the OpenStack CLI and the other is to use the EC2 CLI tools.
Select the DOWNLOAD OPENSTACK RC file, which will download the RC file to your local computer. Next you need to run that file to authenticate into the tenant you downloaded the RC file from. Below is an example of what the script file looks like:
#!/bin/bash
# With the addition of Keystone, to use an OpenStack cloud you should
# Authenticate against keystone, which returns a **Token** and **Service
# Catalog**. The catalog contains the endpoint for all services the
# User/tenant has access to - including nova, glance, keystone, swift.
#
# *NOTE*: Using the 2.0 *auth api* does not mean that compute api is 2.0. We
# will use the 1.1 *compute api*
export OS_AUTH_URL=http://api-trial1.client.metacloud.net:5000/v2.0
# With the addition of Keystone we have standardized on the term **tenant**
# as the entity that owns the resources.
export OS_TENANT_ID=5a2f2a6b6b7641bf97bc7303fcb9f047
export OS_TENANT_NAME="Heat Demo"
# In addition to the owning entity (tenant), openstack stores the entity
# performing the action as the **user**.

© 2015 Cisco and/or its affiliates. All rights reserved. This document is Cisco Public. Page 4 of 21
export OS_USERNAME="biharper"
# With Keystone you pass the keystone password.
echo "Please enter your OpenStack Password: "
read -sr OS_PASSWORD_INPUT
export OS_PASSWORD=$OS_PASSWORD_INPUT
Next we need to run the bash shell script, so run it using the following command:
$ source Web-Production-rc.sh
Please Enter your OpenStack password: ***********
Once you have authenticated you can begin using the CLI tools. Please note, if you enter your password incorrectly, this simple script will not give you an error, you will get an error on the first CLI you attempt.
Below we will start with probably the largest command, the “nova” command and show some simple examples.
First, let’s look at a simple example which will look at running VMs using the nova list command within a tenant. The second example is showing how to boot up a VM using the nova boot command.
Below we are booting a VM.
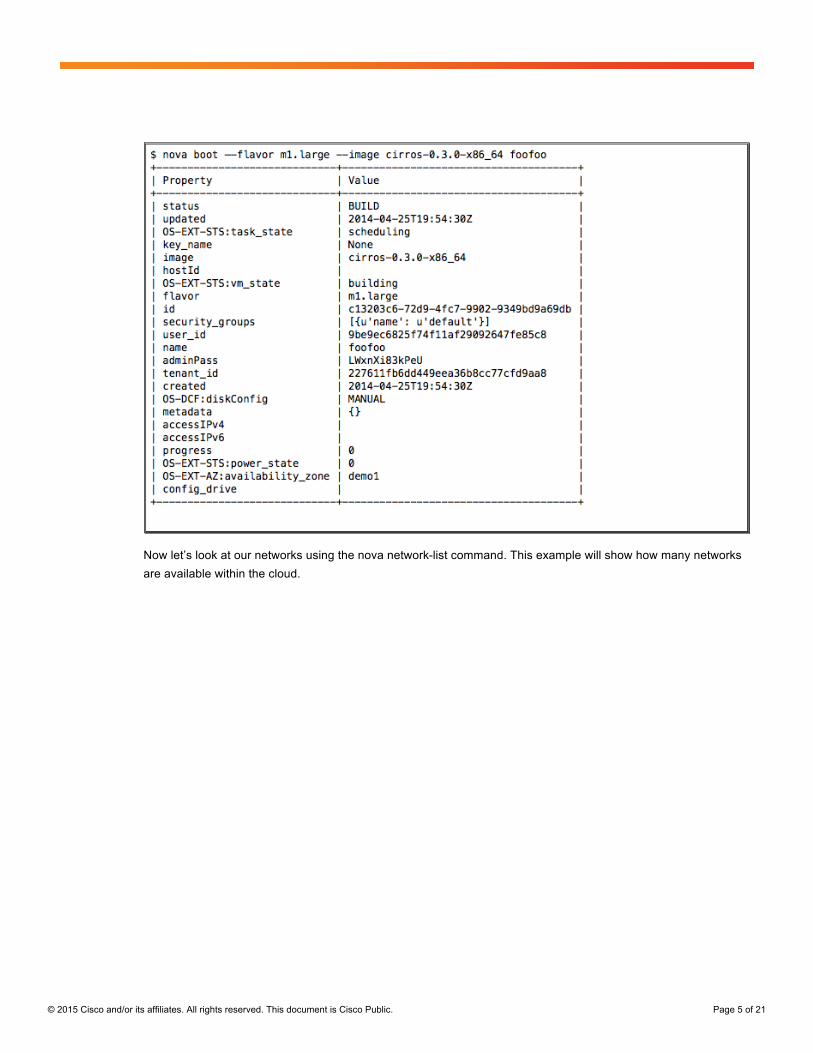
© 2015 Cisco and/or its affiliates. All rights reserved. This document is Cisco Public. Page 5 of 21
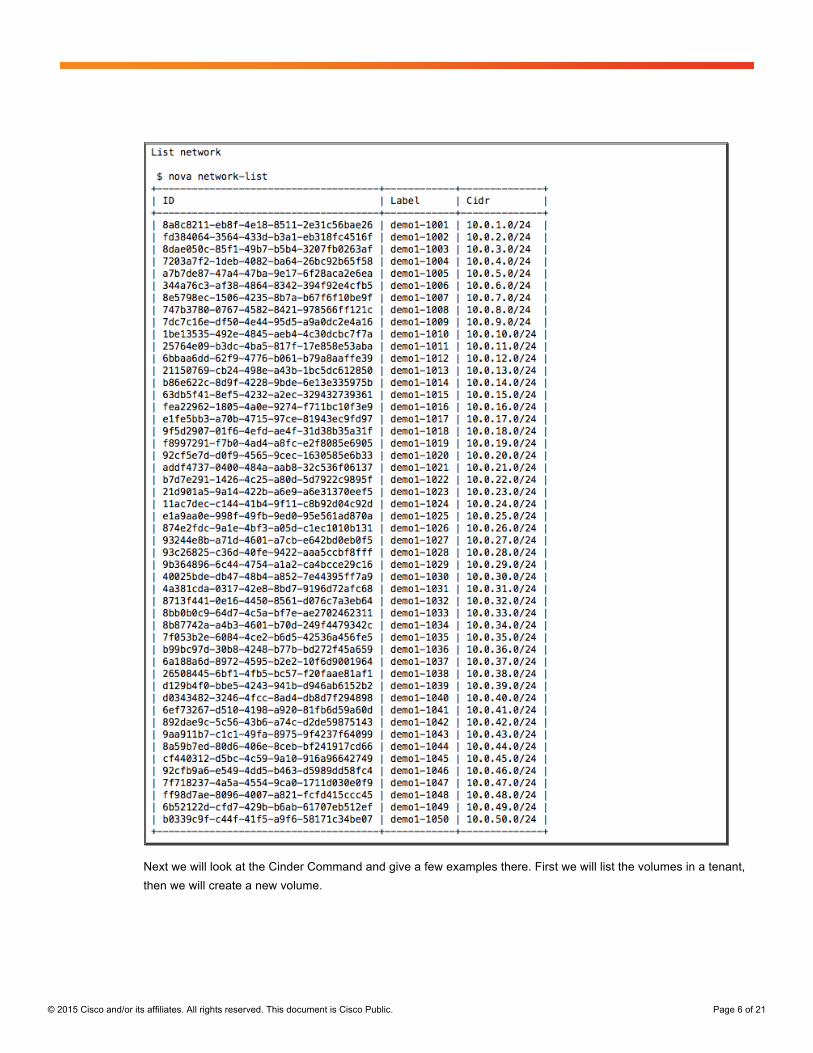
Now let’s look at our networks using the nova network-list command. This example will show how many networks are available within the cloud.
© 2015 Cisco and/or its affiliates. All rights reserved. This document is Cisco Public. Page 6 of 21
Next we will look at the Cinder Command and give a few examples there. First we will list the volumes in a tenant, then we will create a new volume.

© 2015 Cisco and/or its affiliates. All rights reserved. This document is Cisco Public. Page 7 of 21
Next we will tackle a more complex example and attach a volume to an instance, then mount the volume from within that instance so we can use it.
A cloud volume is backed by a persistent storage device such as an NFS device, Ceph pool, or another mechanism to provide OpenStack with persistent storage within its framework. Cloud volumes can be attached and detached from instances. When they are first attached they are raw devices with no file system. The device will be /dev/vdb (virtual device B) but until you put a file system on it and mount it to a mount point, you won't be able to see it.
The assumption is that you have a running instance (bea1d407-2163-4e5a-99f1-d83aa96435d1) and you want to attach a 2G cloud volume to it and then mount it to the system. In this example we will use the Cinder command line to create a volume of 2G, then attach that volume to a running Linux instance, then create a file system and mount it to the system.

© 2015 Cisco and/or its affiliates. All rights reserved. This document is Cisco Public. Page 8 of 21
First, we will need to ssh into our instance and see what we have for devices and mount points.
$ ssh –i your-private-key.pem <user_name>@<ip_address or host>
Once in the instance, check the mount points.
$ sudo df -k
Since nothing is listed must put a Linux file system into the cloud Volume using the mkfs command.
$ sudo mkfs -t ext3 /dev/vdb
Once the volume is formatted, we can create a mount point to mount the volume.
$ sudo mkdir /VolumeB
Mount it and verify you can see the new volume.
$ sudo mount -t ext3 /dev/vdb /VolumeB
You can test it by putting some data there or making a directory and touching a file name on the virtual drive.
$ cd /VolumeB
$ touch test-data.dat
Now we can look at some Glance commands for the image store and walk through some examples. The best use case for the Glance CLI is uploading EC2 Container GuestOS images, which are 3 files with UUID that get pointed to by the base AMI. Below we will walk through some examples.
First, let’s use the CLI to list the images stored in Glance. This is an Admin View using an Admin project and login.

© 2015 Cisco and/or its affiliates. All rights reserved. This document is Cisco Public. Page 9 of 21
Next, let’s look at the details of a particular image using the image-show option.
Finally, let’s add a GuestOS image to Glance using the CLI by uploading an EC2 AMI/ARI/AKI image. You must do it in three steps, and tie the AKI and ARI to the AMI by the UUID. Below are the steps and an example.

© 2015 Cisco and/or its affiliates. All rights reserved. This document is Cisco Public. Page 10 of 21
Please note the ID of each of the above as the third upload needs to point back to these to pieces for the AMI to be complete.
OpenStack REST Interface – Getting Started with CURL The OpenStack APIs, as stated earlier, are RESTful APIs and utilize REST as the method of communication. Under the covers, REST is an HTTP interface that is interacted upon using CURL commands. The process remains the same to get access into OpenStack: First you authenticate to a tenant with your username and password. Once you do that you get a token, which you can then use to perform other operations. We will demonstrate this using CURL with the examples below.
The first example will authenticate to a URL endpoint with a username and password, and then extract a token that is used for other actions.
© 2015 Cisco and/or its affiliates. All rights reserved. This document is Cisco Public. Page 11 of 21
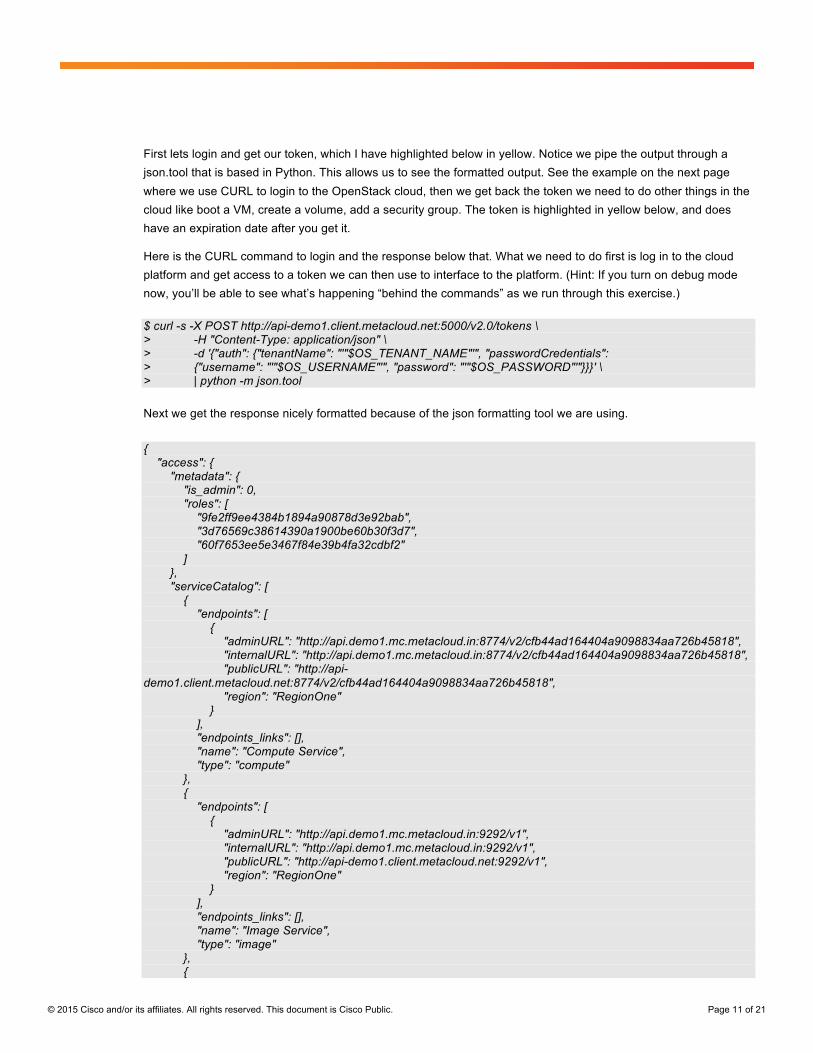
First lets login and get our token, which I have highlighted below in yellow. Notice we pipe the output through a json.tool that is based in Python. This allows us to see the formatted output. See the example on the next page where we use CURL to login to the OpenStack cloud, then we get back the token we need to do other things in the cloud like boot a VM, create a volume, add a security group. The token is highlighted in yellow below, and does have an expiration date after you get it.
Here is the CURL command to login and the response below that. What we need to do first is log in to the cloud platform and get access to a token we can then use to interface to the platform. (Hint: If you turn on debug mode now, you’ll be able to see what’s happening “behind the commands” as we run through this exercise.) $ curl -s -X POST http://api-demo1.client.metacloud.net:5000/v2.0/tokens \ > -H "Content-Type: application/json" \ > -d '{"auth": {"tenantName": "'"$OS_TENANT_NAME"'", "passwordCredentials": > {"username": "'"$OS_USERNAME"'", "password": "'"$OS_PASSWORD"'"}}}' \ > | python -m json.tool Next we get the response nicely formatted because of the json formatting tool we are using.
{ "access": { "metadata": { "is_admin": 0, "roles": [ "9fe2ff9ee4384b1894a90878d3e92bab", "3d76569c38614390a1900be60b30f3d7", "60f7653ee5e3467f84e39b4fa32cdbf2" ] }, "serviceCatalog": [ { "endpoints": [ { "adminURL": "http://api.demo1.mc.metacloud.in:8774/v2/cfb44ad164404a9098834aa726b45818", "internalURL": "http://api.demo1.mc.metacloud.in:8774/v2/cfb44ad164404a9098834aa726b45818", "publicURL": "http://api-demo1.client.metacloud.net:8774/v2/cfb44ad164404a9098834aa726b45818", "region": "RegionOne" } ], "endpoints_links": [], "name": "Compute Service", "type": "compute" }, { "endpoints": [ { "adminURL": "http://api.demo1.mc.metacloud.in:9292/v1", "internalURL": "http://api.demo1.mc.metacloud.in:9292/v1", "publicURL": "http://api-demo1.client.metacloud.net:9292/v1", "region": "RegionOne" } ], "endpoints_links": [], "name": "Image Service", "type": "image" }, {

© 2015 Cisco and/or its affiliates. All rights reserved. This document is Cisco Public. Page 12 of 21
"endpoints": [ { "adminURL": "http://api.demo1.mc.metacloud.in:8000/v1", "internalURL": "http://api.demo1.mc.metacloud.in:8000/v1", "publicURL": "http://api-demo1.client.metacloud.net:8000/v1", "region": "RegionOne" } ], "endpoints_links": [], "name": "CloudFormation Service", "type": "cloudformation" }, { "endpoints": [ { "adminURL": "http://api.demo1.mc.metacloud.in:8776/v1/cfb44ad164404a9098834aa726b45818", "internalURL": "http://api.demo1.mc.metacloud.in:8776/v1/cfb44ad164404a9098834aa726b45818", "publicURL": "http://api-demo1.client.metacloud.net:8776/v1/cfb44ad164404a9098834aa726b45818", "region": "RegionOne" } ], "endpoints_links": [], "name": "Volume Service", "type": "volume" }, { "endpoints": [ { "adminURL": "http://api.demo1.mc.metacloud.in:8773/services/Admin", "internalURL": "http://api.demo1.mc.metacloud.in:8773/services/Cloud", "publicURL": "http://api-demo1.client.metacloud.net:8773/services/Cloud", "region": "RegionOne" } ], "endpoints_links": [], "name": "EC2 Service", "type": "ec2" }, { "endpoints": [ { "adminURL": "http://api.demo1.mc.metacloud.in:8004/v1/cfb44ad164404a9098834aa726b45818", "internalURL": "http://api.demo1.mc.metacloud.in:8004/v1/cfb44ad164404a9098834aa726b45818", "publicURL": "http://api-demo1.client.metacloud.net:8004/v1/cfb44ad164404a9098834aa726b45818", "region": "RegionOne" } ], "endpoints_links": [], "name": "Orchestration Service", "type": "orchestration" }, { "endpoints": [ { "adminURL": "http://api-demo1.client.metacloud.net:35357/v2.0", "internalURL": "http://api.demo1.mc.metacloud.in:5000/v2.0", "publicURL": "http://api-demo1.client.metacloud.net:5000/v2.0", "region": "RegionOne" }

© 2015 Cisco and/or its affiliates. All rights reserved. This document is Cisco Public. Page 13 of 21
], "endpoints_links": [], "name": "Identity Service", "type": "identity" } ], "token": { "expires": "2015-05-18T23:02:39Z", "id": "58a4be5be9c74adaa9b456f756b8d6dc", "issued_at": "2015-05-17T23:02:39.797404", "tenant": { "description": "Demo Admin", "enabled": true, "id": "cfb44ad164404a9098834aa726b45818", "name": "Demo Admin" } }, "user": { "id": "9be9ec6825f74f11af29092647fe85c8", "name": "demoadmin", "roles": [ { "name": "_identity_internal_role_" }, { "name": "admin" }, { "name": "ROLE_PORTAL_ADMIN" } ], "roles_links": [], "username": "demoadmin" } } } Now that we have the token, let’s ask OpenStack to list out all of the tenants and again pipe it through Python json formatting tool. Below is the example. Notice the token and the API call.
$ curl -H "X-Auth-Token: 58a4be5be9c74adaa9b456f756b8d6dc " http://api-demo1.client.metacloud.net:35357/v2.0/tenants | python -json.tool { "tenants": [ { "description": "IT Developer Operations", "enabled": true, "id": "227611fb6dd449eea36b8cc77cfd9aa8", "name": "IT-DevOps", "self_service_managers": [ "ecf9a4633c8847219135944878d8a1a6", "5f6b584669054fc6b83edc518a9236a6", "9e680ae8f0ff48298132e1dc71fab3ad" ], "self_service_token": "041703c74b654d35a82e774d000e550e" }, { "description": "Corp Production Web Farm", "enabled": true,
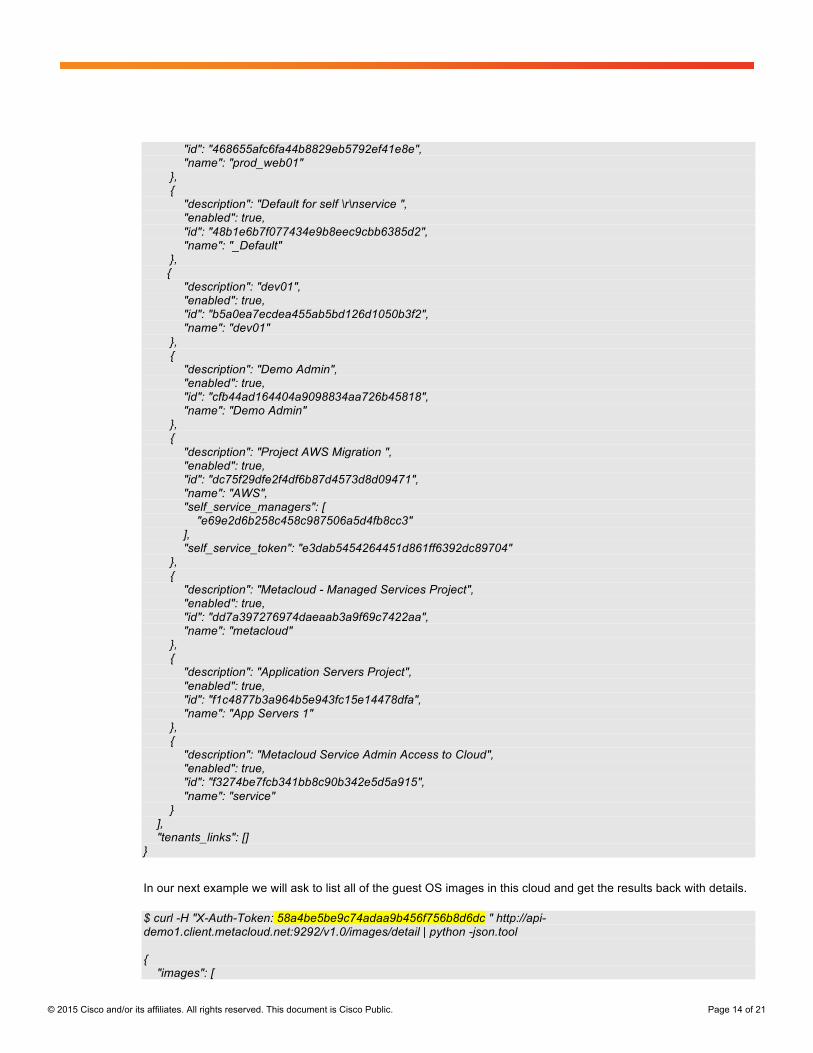
© 2015 Cisco and/or its affiliates. All rights reserved. This document is Cisco Public. Page 14 of 21
"id": "468655afc6fa44b8829eb5792ef41e8e", "name": "prod_web01" }, { "description": "Default for self \r\nservice ", "enabled": true, "id": "48b1e6b7f077434e9b8eec9cbb6385d2", "name": "_Default" }, { "description": "dev01", "enabled": true, "id": "b5a0ea7ecdea455ab5bd126d1050b3f2", "name": "dev01" }, { "description": "Demo Admin", "enabled": true, "id": "cfb44ad164404a9098834aa726b45818", "name": "Demo Admin" }, { "description": "Project AWS Migration ", "enabled": true, "id": "dc75f29dfe2f4df6b87d4573d8d09471", "name": "AWS", "self_service_managers": [ "e69e2d6b258c458c987506a5d4fb8cc3" ], "self_service_token": "e3dab5454264451d861ff6392dc89704" }, { "description": "Metacloud - Managed Services Project", "enabled": true, "id": "dd7a397276974daeaab3a9f69c7422aa", "name": "metacloud" }, { "description": "Application Servers Project", "enabled": true, "id": "f1c4877b3a964b5e943fc15e14478dfa", "name": "App Servers 1" }, { "description": "Metacloud Service Admin Access to Cloud", "enabled": true, "id": "f3274be7fcb341bb8c90b342e5d5a915", "name": "service" } ], "tenants_links": [] } In our next example we will ask to list all of the guest OS images in this cloud and get the results back with details.
$ curl -H "X-Auth-Token: 58a4be5be9c74adaa9b456f756b8d6dc " http://api-demo1.client.metacloud.net:9292/v1.0/images/detail | python -json.tool { "images": [

© 2015 Cisco and/or its affiliates. All rights reserved. This document is Cisco Public. Page 15 of 21
{ "checksum": "0589beddbcd5e94d136042fe0850266c", "container_format": "bare", "created_at": "2014-05-03T21:41:59", "deleted": false, "deleted_at": null, "disk_format": "raw", "id": "77f25830-2b1d-489a-886f-f0947dd123f9", "is_public": true, "min_disk": 0, "min_ram": 0, "name": "MySQL-13.0", "owner": "cfb44ad164404a9098834aa726b45818", "properties": {}, "protected": true, "size": 4294967296, "status": "active", "updated_at": "2014-05-04T18:04:46" }, { "checksum": "b67bd9b50f0ebd07e69038abf929d0ae", "container_format": "bare", "created_at": "2014-05-03T17:41:59", "deleted": false, "deleted_at": null, "disk_format": "raw", "id": "60da3f65-c27d-4e00-864a-3bc7a16ceea1", "is_public": true, "min_disk": 0, "min_ram": 0, "name": "nginx-13.0c", "owner": "cfb44ad164404a9098834aa726b45818", "properties": {}, "protected": false, "size": 4294967296, "status": "active", "updated_at": "2014-05-03T20:35:22" }, { "checksum": "570e8f46d891d5f4476f806f223a54ab", "container_format": "ami", "created_at": "2014-04-28T21:14:16", "deleted": false, "deleted_at": null, "disk_format": "ami", "id": "8ed8cd89-80d7-4653-8862-32e880e02b2d", "is_public": true, "min_disk": 0, "min_ram": 0, "name": "ubuntu.13-04.x86-64.20140425", "owner": "dd7a397276974daeaab3a9f69c7422aa", "properties": { "kernel_id": "7a02c501-3820-4856-b0c1-1412665a6572", "ramdisk_id": "0a3bace5-200e-416d-a4d7-62e0fdb25fa6" }, "protected": false, "size": 2147483648, "status": "active", "updated_at": "2014-04-28T21:14:51" }, {

© 2015 Cisco and/or its affiliates. All rights reserved. This document is Cisco Public. Page 16 of 21
"checksum": "89465e5e9b3b22a46b3c9554a004aca7", "container_format": "ari", "created_at": "2014-04-28T21:14:15", "deleted": false, "deleted_at": null, "disk_format": "ari", "id": "0a3bace5-200e-416d-a4d7-62e0fdb25fa6", "is_public": true, "min_disk": 0, "min_ram": 0, "name": "ubuntu.13-04.x86-64.20140425-ramdisk", "owner": "dd7a397276974daeaab3a9f69c7422aa", "properties": {}, "protected": false, "size": 4766343, "status": "active", "updated_at": "2014-04-28T21:14:15" }, { "checksum": "deacc3c3a21beb4913c43a00bb6d5e01", "container_format": "aki", "created_at": "2014-04-28T21:14:14", "deleted": false, "deleted_at": null, "disk_format": "aki", "id": "7a02c501-3820-4856-b0c1-1412665a6572", "is_public": true, "min_disk": 0, "min_ram": 0, "name": "ubuntu.13-04.x86-64.20140425-kernel", "owner": "dd7a397276974daeaab3a9f69c7422aa", "properties": {}, "protected": false, "size": 5355920, "status": "active", "updated_at": "2014-04-28T21:14:14" }, { "checksum": "a161b9c3853891241d874a06e4df303d", "container_format": "bare", "created_at": "2014-03-22T01:14:56", "deleted": false, "deleted_at": null, "disk_format": "raw", "id": "7d33035b-5c2f-4827-a07b-06c2042ebf02", "is_public": false, "min_disk": 0, "min_ram": 0, "name": "CoreOS", "owner": "cfb44ad164404a9098834aa726b45818", "properties": {}, "protected": false, "size": 318703104, "status": "active", "updated_at": "2014-03-22T01:15:05" }, { "checksum": "d972013792949d0d3ba628fbe8685bce", "container_format": "bare", "created_at": "2014-03-22T01:03:43", "deleted": false,

© 2015 Cisco and/or its affiliates. All rights reserved. This document is Cisco Public. Page 17 of 21
"deleted_at": null, "disk_format": "raw", "id": "60625017-bb88-49ea-9dbc-f5d5fe554e9d", "is_public": false, "min_disk": 0, "min_ram": 0, "name": "CirrosOS.0.3.1-Raw", "owner": "cfb44ad164404a9098834aa726b45818", "properties": {}, "protected": false, "size": 13147648, "status": "active", "updated_at": "2014-03-22T01:03:44" }, { "checksum": "9ff360edd3b3f1fc035205f63a58ec3e", "container_format": "bare", "created_at": "2014-03-06T17:16:32", "deleted": false, "deleted_at": null, "disk_format": "qcow2", "id": "850a036d-2e9f-42c8-ba79-ef7c647c8df0", "is_public": true, "min_disk": 0, "min_ram": 0, "name": "fedora-19-x86_64", "owner": "227611fb6dd449eea36b8cc77cfd9aa8", "properties": {}, "protected": false, "size": 237371392, "status": "active", "updated_at": "2014-03-06T17:17:25" }, ] }
To sum it up, the REST API provides flexibility as well as information and is the way all of the software is written to OpenStack, in a restful way using either JSON or XML. As you can see you must then use tools to parse out the information needed which can sometimes be more complex than using a language binding. Next we will explore the Python OpenStack language binding.
OpenStack Language Bindings – Getting Started with Python Using the OpenStack Python APIs is basically using the same methods and objects that the OpenStack CLIs use, which hide the REST layer from the application developer. So what this implies is there is then a different set of libraries you must import in order to talk to each one of the OpenStack components. Over the last year there has been an effort to document the APIs better and provide working examples of how to use them. You can view the current status of this project by following the link below. You can also look at the source code for these libraries and utilities to figure out which methods are available as well as what objects you can reference.
http://python-openstacksdk.readthedocs.org/en/latest/
The best way to understand the Python API is to start with a few examples. Let’s look at writing some code that will log in into the cloud, get a token, and then list all the running VM instances.

© 2015 Cisco and/or its affiliates. All rights reserved. This document is Cisco Public. Page 18 of 21
Next lets run the script and look at the output.
The next example will list the images in Glance. The code is similar to the last example but we have done some things to make the output from this code easier to read.
$ python listservers-nova.py --------------------------Instance List Command:-------------------------- Web-server10 Jenkins Ansible Tower WordPress ubuntu1404-jtg-1 Windows2012-VM Ubuntu14.04-DevStack Ubuntu14.04-CLI -----------------------------End List Command:---------------------------- $
#!/usr/bin python # # listservers-nova.py # # Example Python Openstack code written by Bill Harper@Metacloud 8.2.2014 # # This example will list the instances running a particular tenant # We will force authentication in this example to make it easy # # Example to List Servers will use the nova APIs or Methods that the CLI tools use # # First, let’s import the library so we can use it, note we are using v1_1. If it were a different # version, the calls could be and would be different. Please refer to those docs for examples. # from novaclient.v1_1 import client # # Next we will setup our login details # USER = 'demoadmin' PASS = 'MetacloudSE1' TENANT = 'Demo Admin' AUTH_URL = 'http://api-demo1.client.metacloud.net:5000/v2.0' # # Next we will assign self to the api login API call # self = client.Client(username=USER, api_key=PASS, project_id=TENANT, auth_url=AUTH_URL) # # Now lets setup a simple loop to list the running instances out on the screen and # Put a text wrapper around the listing of the running OpenStack Instances print "--------------------------Instance List Command:--------------------------" for servers in self.servers.list(): print(servers.name) print "-----------------------------End List Command:----------------------------"

© 2015 Cisco and/or its affiliates. All rights reserved. This document is Cisco Public. Page 19 of 21
To run the above example, create a text file with its contents and then execute the code against Python as follows.
Below is the output from this simple script that shows the listing of the images in the AZ we have authenticated to.
#!/usr/bin/env python # # Example Python OpenStack code written by Bill Harper # # # Import the Novaclient OpenStack libraries and refer to them as client from novaclient.v1_1 import client # Import Pretty Print and call it pprint from pprint import pprint # ############################################################## # force in authentication by hardcoding it to these Vars below # USER = 'demoadmin' PASS = “**********” TENANT = 'Demo Admin' AUTH_URL = 'http://api-demo1.client.metacloud.net:5000/v2.0' ntoken = client.Client(username=USER, api_key=PASS, project_id=TENANT, auth_url=AUTH_URL) os.system('clear') print "*"*98 print " Image List Command:" print "*"*98 # pprint (nt.images.list()) image_list = (ntoken.images.list(detailed=True)) #print ("Processing Guest Images to list ... %s Images found" % (len(image_list))) print "{0:50} {1:40} {2:6}".format("Guest OS Name", "Image ID ","Status") print "*"*98 for image in image_list: print "{0:50} {1:40} {2:6}".format(image.name, image.id, image.status) print "*"*98 print (" Image Summary -----> %s Guest Images Processed on this listing " % (len(image_list))) print "*"*98
$ python image-list.py

© 2015 Cisco and/or its affiliates. All rights reserved. This document is Cisco Public. Page 20 of 21
Conclusion As one can see by exploring the APIs within OpenStack, they are very powerful as well as complete. You can interface to them many different ways including the Horizon Dashboard, the CLI clients, the Python API methods as well as many other tools including Chef, Puppet, Ansible, Salt Stack, OpenShift, Cloud Foundry, RightScale, Clickr, Apprenda, Scalr and many more. As the community grows so does the tool chain that supports OpenStack.
References The most direct reference is the OpenStack site itself and a few selected blogs. The OpenStack site is always growing and producing more documentation.
● http://docs.openstack.org/user-guide/common/cli_install_openstack_command_line_clients.html
● http://docs.openstack.org/developer/python-glanceclient/
● http://docs.openstack.org/api/quick-start/content/
************************************************************************************************** Image List Command: ************************************************************************************************** Guest OS Name Image ID Status ************************************************************************************************** Jenkins 6b8aa825-1168-4294-8aa4-9811604d9bb0 ACTIVE MySQL-20150506213033 761a7ffc-8c4d-4f89-b16e-ac5a259f9fff ACTIVE CentOS7-x86-64-1503-Raw bd0e5a6c-2da2-41f4-93da-8e569005e977 ACTIVE copc.centos.6-4.x86-64.20150428 5a2a2ab4-8f45-4caa-8bf1-ada680a77bb3 ACTIVE CentOS-6.4-x86-64-RAW 5d45616c-9a81-4dbb-b541-e5354abc1d63 ACTIVE ubuntu1404-20150427233033 8ffc4d76-649f-42d9-8880-e1ca63157dfc ACTIVE CentOS.6.4.x86-64-GITYUMFIX 2a568e36-43ff-4a99-9fc5-8a8e2ed4d82d ACTIVE ubuntu1404-jtg 2a3d2e0a-8444-44a3-8601-07a7c68aab92 ACTIVE DBserver f88afd0a-4762-47e0-b8f4-350dcfa0b28e ACTIVE mc-vlb-3.6-x86_64-20140929 f645ec75-9761-454c-938c-cce2f616c0a2 ACTIVE mc-vlb.initrd.img-3.2.0-69-virtual 6b3070cf-7978-4661-9d81-88e840a15868 ACTIVE mc-vlb.vmlinuz-3.2.0-69-virtual 9a55585f-28aa-4a59-a36c-2b5acffa9166 ACTIVE Ubuntu14.04-CLI-GOLD-SNAPSHOT 82559259-4a8d-47d2-8938-42108465d91e ACTIVE lb01-web.0319 f53224b5-8989-4136-9fdf-2d4268e71c7c ACTIVE Windows2012-Server-R2-QCOW2 0e468d99-4e6d-443c-8ce8-1bc7b1199403 ACTIVE Windows-Server2012-R2.QCOW2 e3a9cab6-e5bd-4452-854e-356e18d9b61a ACTIVE CoreOS 557.2.0 66088018-8869-4d6c-bc22-088c9a9ac629 ACTIVE Ovservium fb67cc95-b26a-4168-b5a0-030c271522db ACTIVE Picwik 8d72e29e-d01d-4b9a-9557-6ae3804072db ACTIVE Postgress 538036f4-1033-4d86-9c76-b4316285b26c ACTIVE MySQL ebabf1f6-32d2-4127-8e08-de5877075ee7 ACTIVE Tomcat-Apache d47d9acb-c380-414b-8003-47c3327ab2b7 ACTIVE CCMT 3efcc314-4e1a-43e4-b9d6-b76644da8f94 ACTIVE Ubuntu14.04-OpenStack-CLI-Tools 417d337a-9567-4617-84da-dc71702a70f4 ACTIVE Ubuntu Server 14.04 4f259645-5e9b-46fd-9ff0-90509a95867d ACTIVE LAMP-13.0.Stack a695f8d9-c32e-402c-9ee1-bc6bef141b90 ACTIVE traffic1 bcb772d6-5598-4fc5-8f0f-43881a72751e ACTIVE traffic3 d6653ec5-f9da-4067-96ef-4add965b19a0 ACTIVE awweb-backup 80591c53-8c85-46fc-a9c8-51e16ac99d1d ACTIVE traffic1_img 2657b7b3-6599-4d8a-ab9a-e8f4d5bffa1c ACTIVE prod_web_ 9cecd336-d767-401b-b55a-c41d415bde38 ACTIVE resolv-conf-removed-snap1 d046aeb2-8435-49ce-ada0-ecdab2548430 ACTIVE ubuntu-13.04-resolvconfremoved 7bfbb2ed-3f71-49de-a4f7-17deecca4df5 ACTIVE ubuntu.13-04.x86-64.20140425 448a8619-ab65-4a9e-bf17-48a154ff7746 ACTIVE ubuntu.13-04.x86-64.20140425-ramdisk b0f6d4be-cd52-499f-802f-b73dfb219125 ACTIVE ubuntu.13-04.x86-64.20140425-kernel 678bd193-0818-45ca-bf2f-dd7bd943b2b5 ACTIVE ubuntu.12-10.x86-64.20131009 40a400ec-1879-483c-9924-b5d27f1cda76 ACTIVE ubuntu.12-10.x86-64.20131009-ramdisk ca9ae3c5-1581-4d65-8da1-d6dd2d89436a ACTIVE ubuntu.12-10.x86-64.20131009-kernel 64f81e67-ee2c-42e2-a446-89183855a67c ACTIVE ubuntu.12-04.x86-64.20130725 403203af-579e-45c8-81ac-555d36a82646 ACTIVE ubuntu.12-04.x86-64.20130725-ramdisk a6982b9d-4d41-4a92-bf1d-79b1f8b9c35b ACTIVE ubuntu.12-04.x86-64.20130725-kernel fe7426cd-26b5-42a0-86eb-568a04896db9 ACTIVE scientific.6-3.x86-64.20130402 0055abb0-802f-48e7-8826-dcabe1099fe7 ACTIVE scientific.initramfs-2.6.32-358.2.1.el6.x86_64 b7e7e470-873e-4bd9-a5cd-55e82573854a ACTIVE scientific.vmlinuz-2.6.32-358.2.1.el6.x86_64 f0323af8-65bb-4f87-a68e-89f2021d9e32 ACTIVE scientific.5-9.x86-64.20130402 0fbada39-4955-4673-ac29-f940efa5c1e8 ACTIVE scientific.initrd-2.6.18-348.3.1.el5 f5a35b64-f960-441c-a613-b24ba637745d ACTIVE scientific.vmlinuz-2.6.18-348.3.1.el5 79ffb632-442c-44ef-9cab-23839ed7bbc3 ACTIVE centos.6-4.x86-64.20120402 a276313e-085e-4931-87cf-952720596150 ACTIVE centos.initramfs-2.6.32-358.2.1.el6.x86_64 bd39b718-e5ff-491c-8b00-6ac0ad86c4e6 ACTIVE centos.vmlinuz-2.6.32-358.2.1.el6.x86_64 57feda2f-1ed0-4b50-b3aa-9424f43a8640 ACTIVE ************************************************************************************************** Image Summary -----> 51 Guest Images Processed on this listing **************************************************************************************************

© 2015 Cisco and/or its affiliates. All rights reserved. This document is Cisco Public. Page 21 of 21
● http://docs.openstack.org/api/quick-start/content/index.html#authenticate
● http://developer.openstack.org/api-ref.html
● https://wiki.openstack.org/wiki/OpenStackRESTAPI
● http://docs.openstack.org/developer/python-novaclient/ref/v1_1/images.html
Examples Below is a link to the author’s GitHub account so you can see or download the working examples in this tutorial.
https://github.com/wsh17/OpenStack-Python-Coding-Examples
For More Information Read more about Cisco Metacloud on our Community page, or contact your local account representative.
Printed in USA CXX-XXXXXX-XX 10/11