Getting Started with Stratus - University of Minnesota Started with...Working with Volumes Working...
88
Getting Started with Stratus Evan Bollig 05/01/2017
Transcript of Getting Started with Stratus - University of Minnesota Started with...Working with Volumes Working...

Getting Started with StratusEvan Bollig05/01/2017

Overview
● What is Stratus?● Accessing Stratus● Booting Virtual Machines (VMs)● Connecting to VMs● Working with Volumes● Working with Storage Tiers● Installing Software

What is Stratus?

Stratus is a subscription-based Research Compute Cloud with support for Protected Data
Backed by HPE hardware and open-source software, OpenStack (Newton) and Ceph (Kraken)
Three types of cloud storage:
● Block device Volumes● S3-compatible Protected Object Cache● S3-compatible Persistent Object Storage
The Infrastructure-as-a-Service is hosted on-premise at the Minnesota Supercomputing Institute
Stratus
http://360cloudservices.com/cloud-computing-definition/

Why Cloud Computing?
Cloud computing supports non-traditional HPC workflows:
● Clinically certified pipelines -- version locked software stacks for reproducibility
● Software distributed as images and containers -- developer controlled environments
● Protected data -- ephemeral storage, network isolation, per-user ACLs
● Long running jobs (> 1 mo.) -- persist through maintenance windows
http://360cloudservices.com/cloud-computing-definition/

Stratus or Mesabi?
Stratus does not compete with HPC
Stratus has a self-service, on-demand model. You get what you want, when you want it.
The caveat: you are responsible for management and security of your own VMs.
Whenever possible, use Mesabi!
http://360cloudservices.com/cloud-computing-definition/

Managing Expectations
Before you get started, let’s clarify one more time: Stratus is not a managed HPC environment
● No software modules. Install your own.● No job scheduler. Run jobs as scripts or install
your own.● No global Tier I Storage (i.e., Panasas) with
group directories. Transfer data manually.● No automatic backups of VMs, storage, or data. ● Hardware is oversubscribed to emphasize
flexibility and capacity over performance● Sane defaults for VM and port security are
already applied. If you change settings, you are opting out of our protections at your own risk! http://360cloudservices.com/cloud-computing-definition/

Accessing Stratus

Login
Login with any web browser: https://stratus.msi.umn.edu
Choose “UMN OIT - Shibboleth (with Duo)”

Login
Enter your UMN ID and Password when prompted.

Duo
Two-factor Authentication must be enabled for your account
If this is your first time using Duo, follow the setup prompts in the left window.
Refer to OIT for configuration help: https://it.umn.edu/self-help-guide/duo-setup-use-two-factor-authentication-0

You’re In!
Congratulations, you are authenticated!
If you have one or more Stratus allocations, you will see a list of all of your projects.
To become a Stratus subscriber, or to get help with other login issues, contact [email protected]

The Horizon Interface
The OpenStack web interface is called “Horizon”
Horizon provides visibility and control over all Virtual Machines (VMs) and Volumes within each Project
The simple Web UI is backed by an advanced Web Service API
Click around and kick the tires a bit! Horizon only shows you features that you can control

Switching Projects
To switch projects, use the omnipresent pull-down

Project Quotas
Each project has a set of Limits visible from the Project > Compute > Overview tab
The base subscription* to Stratus includes:
● 16 vCPUs● 50 GB RAM● 2 TB of Volume Storage
Exhausted quotas prevent creation of new VMs and Volumes
(*) à la carte pricing is available for larger allocations

Instances
The Project > Compute > Instances tab shows active VMs
You can Launch or Delete instances, as well as modify settings for individual instances
All active and manageable VMs are listed in the table
WARNING! A deleted VM is gone for good. Be careful what you delete

Volumes
The Project > Compute > Volumes tab shows active data volumes
Volumes store data, and/or active file systems within VMs
You can Create or Delete volumes, as well as modify settings like volume size and attachments
All active and manageable VMs are listed in the table
WARNING! A deleted volume is gone for good

Images
The Project > Compute > Images tab shows available images for new VMs
MSI provides a number of “blessed” images. These images come with some pre-configured rules and software for data security
Images can be Launched as VMs or converted into Volumes. Volumes created from images can also be launched as VMs

Security Groups
The Project > Compute > Access & Security tab shows security settings (e.g., security groups and key pairs), plus API access information
Security Groups control network traffic to VMs, and work like a firewall
By default Security Groups reject all incoming traffic to VMs. Additional Security Groups can be added with rules to open ports (e.g., ssh to TCP port 22)

SSH keypairs are essential for accessing VMs
Create a new key pair to generate and download a new private key, or Import a key pair to upload an existing public key
Every VM will boot with one key pair associated with the default user. To login to the VM you will need the matching private key
Key Pairs

API Access with OpenStack RC v3
Stratus is backed by many web service APIs that can be controlled directly
Click Download OpenStack RC File v3 to get your OpenStack RC file for the current project
When sourced in BASH, the OpenStack RC file activates the OpenStack Command Line Interface (CLI)

Setup CLI
The OpenStack CLI can only connect to Stratus from the bastion host, stratus-bastion.msi.umn.edu
To use the CLI:
a) Transfer your OpenStack RC file to stratus-bastion.msi.umn.edu
b) Source the file on stratus-bastion to authenticate the OpenStack CLI. Use your UMN Password
You will be prompted to authenticate with Duo by the bastion host

You’re Ready!
Both Horizon and the OpenStack CLI are ready to roll
Let’s get started by booting VMs and moving some data!
Booting Virtual Machines (VMs)

Create a Key Pair (One Time Only)
Use the bastion to import a new keypair:
1) Create the new key pair:ssh-keygen -t rsa -b 4096 -f ~/.ssh/id_rsa
2) Use the OpenStack CLI:openstack keypair create \--public-key ~/.ssh/id_rsa.pub mykey
3) Check the keypair with:openstack keypair listor go to:https://stratus.msi.umn.edu/dashboard/project/access_and_security/
The key pair will be used to boot VMs. Stratus will hold onto the public key, and inject it into VMs, while you hold onto the private key.

A New Instance via Horizon
The easiest way to boot a VM is through Horizon (https://stratus.msi.umn.edu)
Go to Project > Compute > Instances and click Launch Instance

Horizon provides a Wizard to help you launch VMs.
Look for stars (*); those are required fields and can only be set before instance creation!
To begin, we name the VM
Note that we have the option of booting more than one VM at once by specifying Count
A New Instance via Horizon

Next we specify the image to boot from. Choose an image, or a volume/snapshot.
Enable Create New Volume; this backs the VM with a volume. If you accidentally delete the VM, the volume will persist (unless you agree to Delete Volume on Instance Delete).
Specify your Volume Size (GB) based on the capacity needed for the operating system and software on your VM.
A New Instance via Horizon

A New Instance via Horizon
Next, choose a Flavor that fits your needs for RAM and vCPUs.
Total Disk does not matter as the VM storage comes from the backing Volume.
Horizon nicely shows you current capacities and the impact on your quota

A New Instance via Horizon
Next, specify optional settings like additional Security Groups.
Don’t worry: you can modify optional settings on running VMs, but setting them now will save you time.

A New Instance via Horizon
Finally, click Launch Instance
Stratus will start the boot process and show you details of its current state
Inspect the VM by clicking on the Instance Name.

A New Instance via Horizon
Your instance is ready to go once Status is Active, and Power State is Running

Connecting to VMs

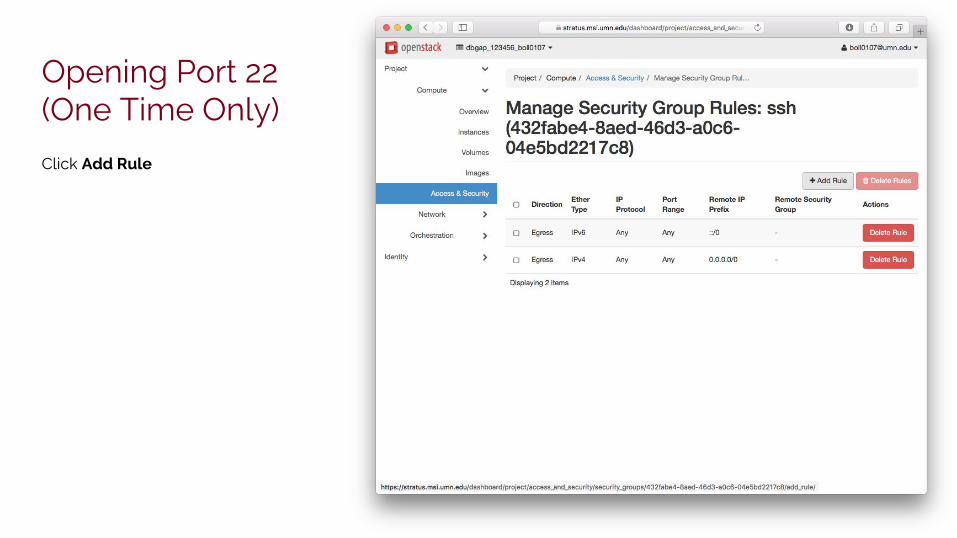
Opening Port 22 (One Time Only)
Before you SSH to a VM, you must open port 22 within the Security Groups
Go to Project > Compute > Access & Security and Create Security Group

Opening Port 22 (One Time Only)
Name the Security Group ssh

Opening Port 22 (One Time Only)
Next click Manage Rules on the ssh Security Group
Opening Port 22 (One Time Only)
Click Add Rule

Opening Port 22 (One Time Only)
Pull down the Rule and choose SSH
The default CIDR allows connections from anywhere. Adjust as necessary for your use-case.
Opening Port 22 (One Time Only)
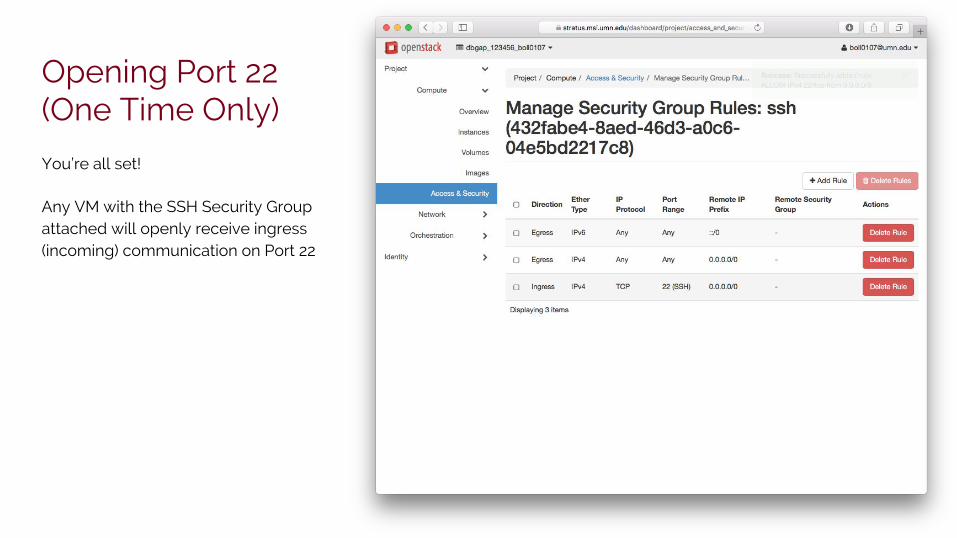
You’re all set!
Any VM with the SSH Security Group attached will openly receive ingress (incoming) communication on Port 22

Edit a VM’s Security Groups
To attach the security group, go to Project > Compute > Instances and pull down the instance menu to Edit Security Groups
Remember to add the security groups when booting instances, and save time!

Edit a VM’s Security Groups
Apply the new ssh Security Group and click Save
The port will be open almost immediately (no reboot required).

Choosing the Right Cloud User
All cloud images have a default user* for SSH access:
● On Centos the user is centos● On Ubuntu the user is ubuntu
See this guide for further details: https://docs.openstack.org/image-guide/obtain-images.html
(*) In the future, some MSI-blessed images will have LDAP enabled for SSH access via your UMNID

SSH to VMs
Stratus VMs can only be reached via the bastion host, stratus-bastion.msi.umn.edu
Remember:
a) VMs are addressed with an IP, not a hostname
b) You must specify the Cloud User when you run ssh
c) Always double check that the server shows the ssh Security Group as attached

Working with Volumes
Why Volumes?
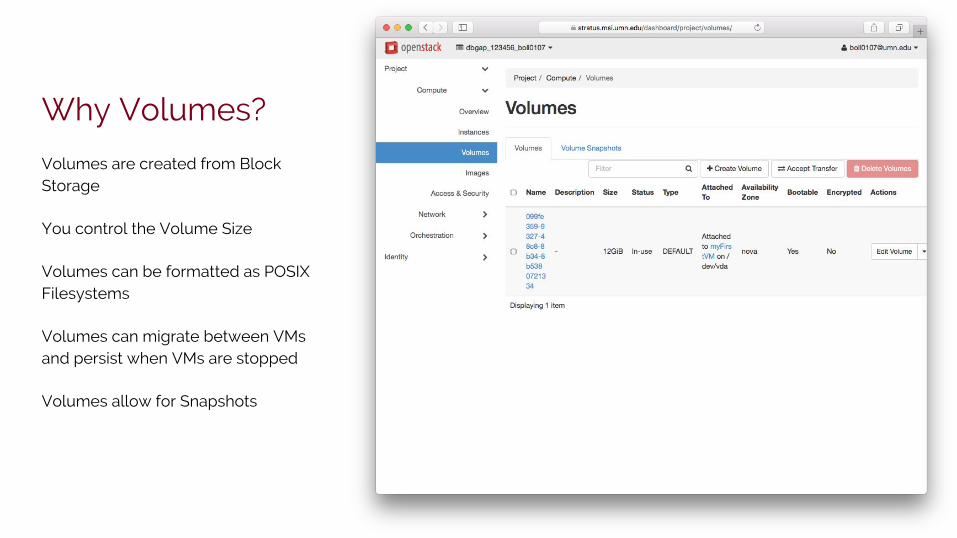
Volumes are created from Block Storage
You control the Volume Size
Volumes can be formatted as POSIX Filesystems
Volumes can migrate between VMs and persist when VMs are stopped
Volumes allow for Snapshots

Volume Quotas
All volumes count against the Volume Storage quota
Snapshots are also included

Creating a new Volume
Go to Project > Compute > Volumes and Create Volume
VMs already have volumes attached and in-use for their root filesystem

Creating a new Volume
Name your volume and specify the desired size (in GB)
The size can be grown later
The Volume Quota appears on the right

Creating a new Volume
Success! The volume is created and available.
Now you need to attach and format it

Attaching a new Volume
Pull down the Volume Menu and select Manage Attachments

Attaching a new Volume
Choose an instance to attach to
The Device Name is auto-populated, but you can specify an override

Attaching a new Volume
The volume is attached!
Remember where it is attached to inside the VM (/dev/vdb)
Now you need to format and mount the volume

Format and Mount a Volume
SSH to your VM and check if the volume is present (/dev/vdb) with ls
Use mkfs.ext4 (or another mkfs.* command) to format the POSIX filesystem on the volume:
sudo mkfs.ext4 /dev/vdb
Remember to use sudo for these commands!

Format and Mount a Volume
The filesystem is ready, but still needs to be mounted.
Create a mountpoint with mkdir -p, then mount the filesystem to the mountpoint:
sudo mkdir -p /mnt/workspace sudo mount /dev/vdb /mnt/workspace
Check the status with df -h
Notice that filesystems lose some capacity due to formatting. We’ll teach you how to adjust the volume size later

Format and Mount a Volume
You’re almost ready to use the new workspace!
Final detail: the mounted filesystem is read-only for regular users. If you want to avoid sudo on every command, open the permissions with chmod:
chmod 777 /mnt/workspace

Detaching Volumes
To safely detach a volume, umount the mount point first:
sudo umount /mnt/workspace
Confirm it is gone with df -h or ls

Detaching Volumes
Now you can detach the volume within Horizon
Go to Project > Compute > Volumes and pull down the Volume Menu to Manage Attachments

Detaching Volumes
Click on Detach Volume

Detaching Volumes
The volume is detached, but not deleted. All data is safe.
The volume can be reattached to the previous VM or attached to another VM (e.g., another piece of the workflow)

Volume Snapshots
Snapshots can be made of any attached or detached volumes
Snapshots are static backups of a volume
To snapshot a volume, go to Project > Compute > Volumes and choose Create Snapshot from the Volume Menu

Volume Snapshots
Snapshots can be made of any attached or detached volumes
Snapshots are static backups of a volume
To snapshot a volume, go to Project > Compute > Volumes and choose Create Snapshot from the Volume Menu

Volume Snapshots
Label your snapshots intuitively
(*) Bug in Horizon: Horizon fails to update the quota for volume snapshots. This will be fixed in the near future.

Volume Snapshots
If your snapshot exceeds the quota, you will not be able to save it

Volume Snapshots
You can also snapshot running VMs to lock your software stack
Simply create a snapshot of the root volume

Volume Snapshots
Remember to label and describe the snapshot clearly
If the volume is attached and in-use, you can force the snapshot without detaching the volume

Volume Snapshots
The snapshot might take a while to create

Volume Snapshots
Viola! The snapshot is ready for use

Restoring Snapshots
Snapshots are versatile
Create Volume will restore the snapshot to a new, attachable volume
Launch as Instance restores to a new volume, attached to a new VM instance*. This requires the filesystem inside to be a bootable operating system.
(*) Snapshots are your personal VM images

Quota Management
Storage quotas are always the easiest to fill
Remember to delete unused volumes and snapshots to free quota
Boot VMs with small volumes (~10GB) and move large workspace volumes between VMs
Email [email protected] if you would like to purchase a larger quota (1 TB/yr increments)

Working with Storage Tiers

Storage Tiers
Data can migrate between the following Tiers on Stratus:
1. Active Analysis● Volume Storage
2. Secure Archive● dbGaP Cache (s3cache)● Persistent Secure Storage (s3secure)
3. Sanitized Data (i.e., non-protected and non-governed) ● Tier II (tier2)● Archive Tape Storage*
(*) Availability TBD

Where can I use dbGaP Data?
You can run analysis on dbGaP data at MSI, but you must have an active Data Access Plan with the NIH
dbGaP was previously stored in /panfs/single_copy. It now data goes onto Stratus (s3cache and s3secure)
http://360cloudservices.com/cloud-computing-definition/

S3 Cache (a.k.a. dbGaP Cache)
Intended for short-term caching of bulk protected data (e.g., NIH dbGaP data). Consider this a scratch space.
No source data; copies only!
Capacity is limited to 400 TB total, shared by all dbGaP users (fairshare). Don’t be a jerk!
Bucket ACLs are restricted to individual projects; do not open permissions
If cache capacity is reached, objects are deleted following a First-In-First-Out rule regardless of 60-day lifecycle

S3 Secure
Requires purchase (1 TB/yr increments)
Dedicated object storage for protected data
For data that cannot be made public
No public sharing options
Stream data directly in/out of VMs with mc and s3cmd

Tier II Storage
Public sharing options
Only for unprotected data! No dbGaP clones or other data covered by policy
Same archive storage that is available to the rest of MSI
Move data between S3 Cache, S3 Secure, and Tier II using the mc or s3cmd commands on a VM
Stage data from Tier I (Panasas) into Tier II before pulling into VMs

Encryption
You are responsible for self-encrypting data at rest (i.e., within S3 Secure and S3 Cache).
Use gpg with the S3cmd
Use the encryption option with Minio Client*
(*) Currently, Minio Client has limited support for encryption. This will improve in the near future.

Moving Data Between Tiers
Stream data in/out of VMs with Minio Client (mc) or the S3 Command (s3cmd)
Stage data from Tier I (Panasas) into Tier II, then pull data into VMs
Pull data from NIH using gdc-client (pre-installed on VMs). Move data from VM to s3cache with mc
Focus on staging read-write data on volumes, read-only/write-only data in object storage (s3cache and s3secure), and unprotected data in Tier II.
Setup Minio
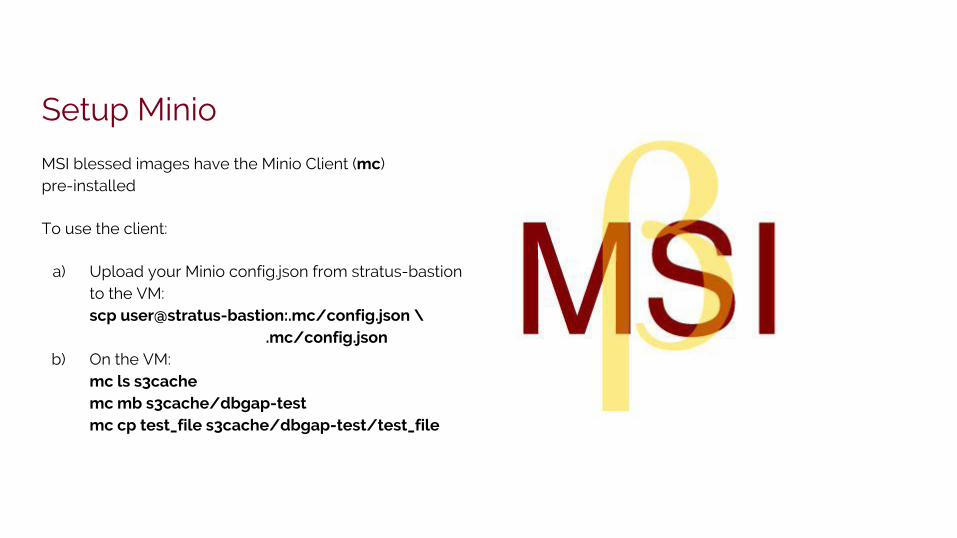
MSI blessed images have the Minio Client (mc) pre-installed
To use the client:
a) Upload your Minio config.json from stratus-bastion to the VM:scp user@stratus-bastion:.mc/config.json \ .mc/config.json
b) On the VM: mc ls s3cachemc mb s3cache/dbgap-testmc cp test_file s3cache/dbgap-test/test_file

Put a directory: mc cp -r ./dbgap-test \ s3cache/dbgap-test
Copy a single file: mc cp s3cache/dbgap-test/test_file \ ./dbgap-test-file.txt mc cp ./dbgap-test-file.txt \ s3secure/dbgap-test/dbgap-test-file.txt
Stream data from one storage platform to another: mc mirror s3secure/dbgap-test \ tier2/dbgap-test
Moving Data Around

Installing Software

SUDO Privileges
Since VMs are self-service, users are in full control of what software gets installed
Use sudo to escalate privileges to run commands as root

Software from a Package Manager
Most operating systems come with a package manager
Remember to run with sudo!
On Centos use yum:
sudo yum install <package>
On Ubuntu use apt-get:
sudo apt-get install <package>

Refer to your application documentation for preferred installation methods
Some packages are in platform agnostic repositories like CRAN (https://cran.r-project.org/) or PyPi (https://pypi.python.org/pypi)
Some scientific applications are only available from source
Remember: Stratus VMs are self-serve. MSI Staff cannot install software for you.
Alternate Installations

Docker
Docker is installed by default on all MSI-blessed images
Download and run Docker Container Images from DockerHub (https://hub.docker.com/)
Try it out:
docker run -it centos /bin/bash
Or
docker run -it biocontainers/samtools \ samtools --version

Ports 443 and 8443
To help protect users:
a) Stratus only allows direct access to VM Ports 443 and 8443*.
b) Any service/application running on these ports must have SSL enabled.
All other ports are accessible from stratus-bastion.msi.umn.edu.
(*) Security Groups do not open 443 or 8443 by default--follow the guide for Port 22 to open these ports

dbGaP Software
gdc-client is pre-installed on MSI blessed images
Use gdc-client to stage data on a VM/volume and then push it into the dbGaP Cache with the minio client (mc)

TODO: Booting from the CLI
Creating a volume
Attaching an instance to the volume