Getting Started with Parent Portal · Getting Started with Parent Portal ... The Parent Portal...
50
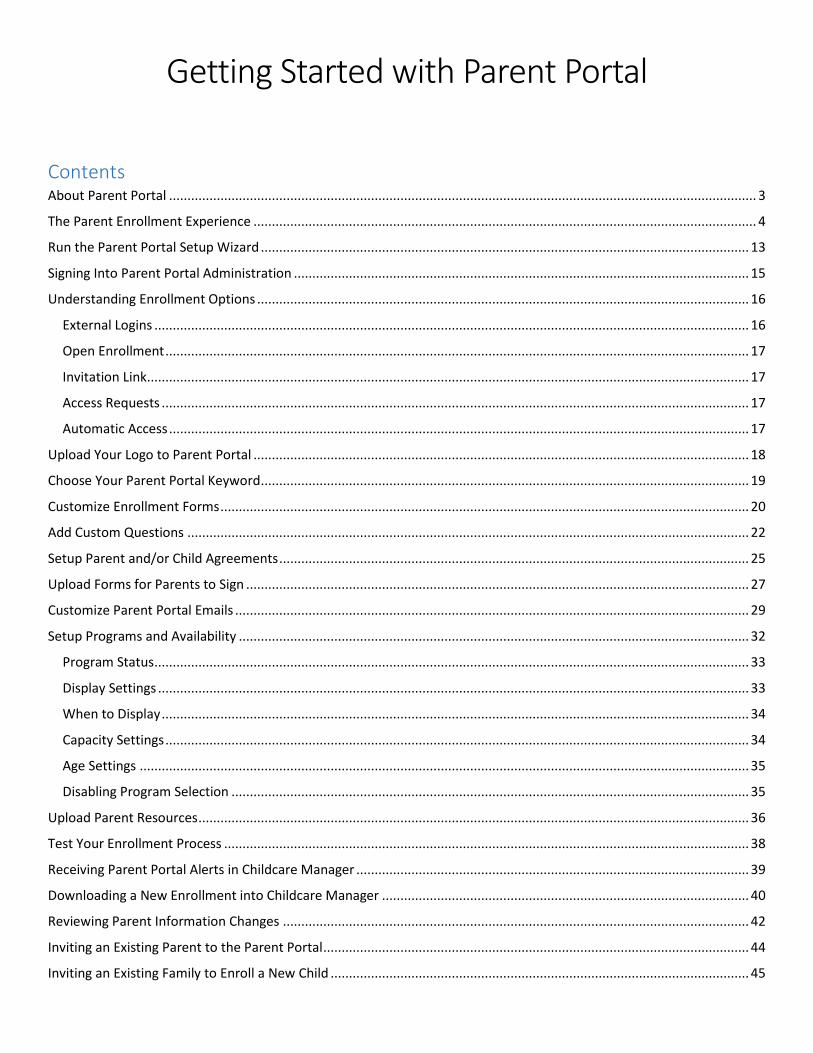
Getting Started with Parent Portal Contents About Parent Portal ................................................................................................................................................................ 3 The Parent Enrollment Experience ......................................................................................................................................... 4 Run the Parent Portal Setup Wizard ..................................................................................................................................... 13 Signing Into Parent Portal Administration ............................................................................................................................ 15 Understanding Enrollment Options ...................................................................................................................................... 16 External Logins .................................................................................................................................................................. 16 Open Enrollment ............................................................................................................................................................... 17 Invitation Link.................................................................................................................................................................... 17 Access Requests ................................................................................................................................................................ 17 Automatic Access .............................................................................................................................................................. 17 Upload Your Logo to Parent Portal ....................................................................................................................................... 18 Choose Your Parent Portal Keyword..................................................................................................................................... 19 Customize Enrollment Forms ................................................................................................................................................ 20 Add Custom Questions ......................................................................................................................................................... 22 Setup Parent and/or Child Agreements ................................................................................................................................ 25 Upload Forms for Parents to Sign ......................................................................................................................................... 27 Customize Parent Portal Emails ............................................................................................................................................ 29 Setup Programs and Availability ........................................................................................................................................... 32 Program Status.................................................................................................................................................................. 33 Display Settings ................................................................................................................................................................. 33 When to Display ................................................................................................................................................................ 34 Capacity Settings ............................................................................................................................................................... 34 Age Settings ...................................................................................................................................................................... 35 Disabling Program Selection ............................................................................................................................................. 35 Upload Parent Resources ...................................................................................................................................................... 36 Test Your Enrollment Process ............................................................................................................................................... 38 Receiving Parent Portal Alerts in Childcare Manager ........................................................................................................... 39 Downloading a New Enrollment into Childcare Manager .................................................................................................... 40 Reviewing Parent Information Changes ............................................................................................................................... 42 Inviting an Existing Parent to the Parent Portal .................................................................................................................... 44 Inviting an Existing Family to Enroll a New Child .................................................................................................................. 45
Transcript of Getting Started with Parent Portal · Getting Started with Parent Portal ... The Parent Portal...
Getting Started with Parent Portal
Contents About Parent Portal ................................................................................................................................................................ 3
The Parent Enrollment Experience ......................................................................................................................................... 4
Run the Parent Portal Setup Wizard ..................................................................................................................................... 13
Signing Into Parent Portal Administration ............................................................................................................................ 15
Understanding Enrollment Options ...................................................................................................................................... 16
External Logins .................................................................................................................................................................. 16
Open Enrollment ............................................................................................................................................................... 17
Invitation Link .................................................................................................................................................................... 17
Access Requests ................................................................................................................................................................ 17
Automatic Access .............................................................................................................................................................. 17
Upload Your Logo to Parent Portal ....................................................................................................................................... 18
Choose Your Parent Portal Keyword ..................................................................................................................................... 19
Customize Enrollment Forms ................................................................................................................................................ 20
Add Custom Questions ......................................................................................................................................................... 22
Setup Parent and/or Child Agreements ................................................................................................................................ 25
Upload Forms for Parents to Sign ......................................................................................................................................... 27
Customize Parent Portal Emails ............................................................................................................................................ 29
Setup Programs and Availability ........................................................................................................................................... 32
Program Status .................................................................................................................................................................. 33
Display Settings ................................................................................................................................................................. 33
When to Display ................................................................................................................................................................ 34
Capacity Settings ............................................................................................................................................................... 34
Age Settings ...................................................................................................................................................................... 35
Disabling Program Selection ............................................................................................................................................. 35
Upload Parent Resources ...................................................................................................................................................... 36
Test Your Enrollment Process ............................................................................................................................................... 38
Receiving Parent Portal Alerts in Childcare Manager ........................................................................................................... 39
Downloading a New Enrollment into Childcare Manager .................................................................................................... 40
Reviewing Parent Information Changes ............................................................................................................................... 42
Inviting an Existing Parent to the Parent Portal .................................................................................................................... 44
Inviting an Existing Family to Enroll a New Child .................................................................................................................. 45

Sending a Parent Portal Invitation to a Lead ........................................................................................................................ 47
Disable a Parent’s Account from Childcare Manager ........................................................................................................... 49
Opting a Family out of Parent Portal .................................................................................................................................... 50

About Parent Portal
Parent Portal allows new parents enrolling in your center to fill out their information online. This reduces errors and
eliminates paper. Parent Portal also allows you to enroll parents on a first come first serve basis based on your capacity
for certain programs. In addition, Parent Portal allows current parents to make information changes online and to
download resources that you make available to them.
This guide will get you started with customizing the Parent Portal enrollment experience.

The Parent Enrollment Experience
This section will briefly familiarize you with the parent experience while enrolling so that the customization options
presented in this guide make more sense. You should test the enrollment process yourself after reviewing this guide and
customizing your parent portal.
This is the parent portal home page. It is the screen that parents will see when they first visit your parent portal.

The parent is asked to create an account before proceeding to any function within the parent portal. They may do so by
entering their email address and creating a password. If you have the option enabled, they may also use an external
service to identify themselves to the parent portal.
After registering, parents are asked to confirm their email address by clicking a link in an email sent to them. This step
happens whether or not they choose to register with an external account.

After the parent confirms their email, they are taken to the requested page. In this case, we clicked the “Enroll Your
Child Now” button before registering, so the Enrollment screen appears. The parent is asked to fill in information that
mirrors the fields presented in Childcare Manager. The above screenshot is an example. The particular fields that are
displayed and the number of steps is customizable.
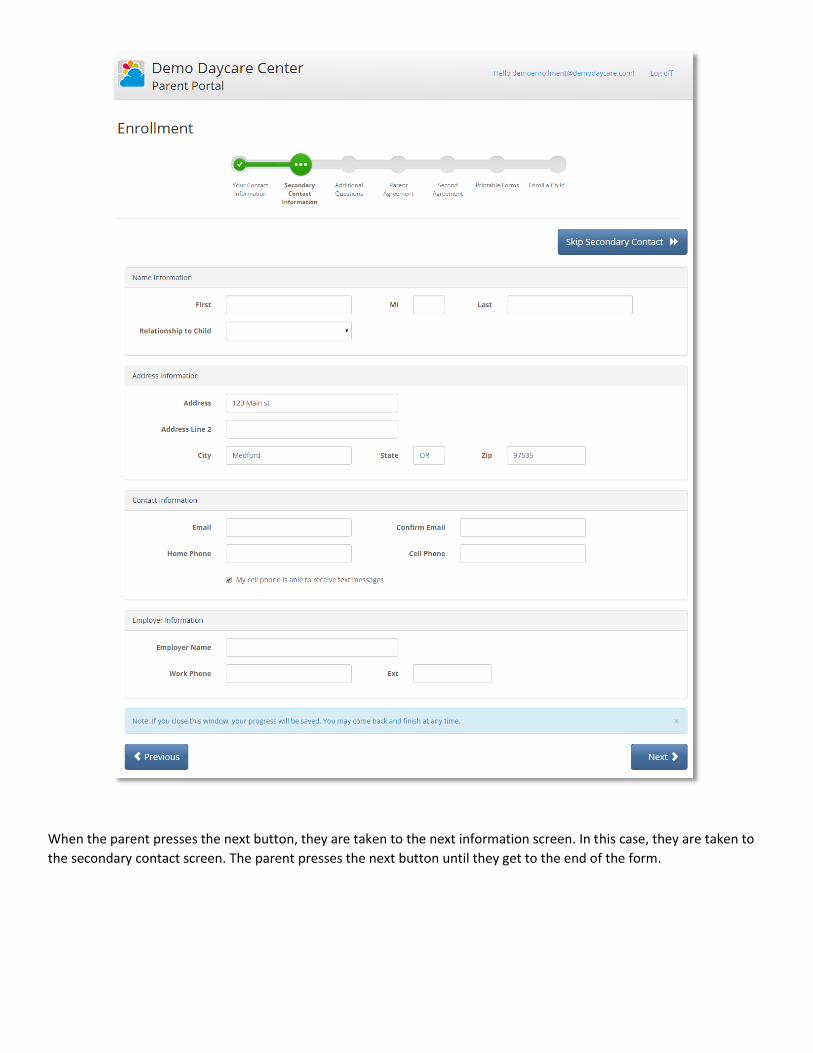
When the parent presses the next button, they are taken to the next information screen. In this case, they are taken to
the secondary contact screen. The parent presses the next button until they get to the end of the form.

When the parent reaches the end of the parent information forms, they are asked to continue to enrollment dashboard
to enroll a child.
At the enrollment dashboard, the parent is prompted to begin enrolling a child. They may do so by clicking the “Enroll
New Child” button, or by clicking the link in the hint displayed at the top of the page.

The child enrollment process is similar to the parent enrollment process. The parent continues until they reach the end
of the form.

When the parent reaches the optional allergy page, the “Next” button is greyed out. The parent must either click the
button labeled “My Child Has No Known Allergies” or they must add an allergy. If they add an allergy, the “Next” button
will become enabled. This approach ensures that each parent directly answers this important question.

When the parent reaches the end of the child enrollment form, they are asked to continue to the enrollment dashboard.

At this point all required enrollment processes are complete. The parent may submit this enrollment and it will become
available in Childcare Manager. If the parent chooses, they may enroll a second child or provide additional contacts
before submitting their enrollment. After the enrollment is submitted, no changes can be made until the enrollment is
accepted in Childcare Manager.

Run the Parent Portal Setup Wizard
Before signing into the Parent Portal Administration area, you must run the Parent Portal Setup Wizard in Childcare
Manager. The setup wizard will synchronize your family and child statuses, your allergy type, your relation types, and do
the initial synchronization of active families.
The Parent Portal Setup Wizard can be found in the CCM Online sub menu under the Options menu.
The setup wizard will first check your account status to make sure it is setup properly. The first interactive wizard screen
will require you to categorize your family statuses. Each status should be active, waiting, or other. The active group
includes families which have children who are actively enrolled in your center. The waiting group is for families who are
currently waiting for an available opening. The other group should include all other statuses of families that are not
enrolled in your center. The other group should include prospective statuses and statuses that represent families who
no longer have children enrolled in your center.

This pictures shows example statuses assigned to categories
After you have finished assigned family statuses to categories, click next. The next screen should look very similar. This
screen is your child statuses instead of your family statuses. You should repeat the same procedure that was done with
the family statuses, then click next.
After you finish categorizing your statuses, continue through the wizard until it is complete, then click finish.

Signing Into Parent Portal Administration
After completing the Parent Portal Setup Wizard, you may sign into Parent Portal Administration. Parent Portal
Administration will allow you to customize the look and function of your parent portal. You should first sign into
Childcare Manager Online by visiting
https://www.childcaremanageronline.com/Account/SignIn.aspx
After signing in, select the Parent Portal Tab, then click the “Login Now” link next to the school you would like to
customize.

Understanding Enrollment Options
It is important that you decide how several key features of Parent Portal will be configured.
To configure your enrollment settings:
1. Login to Parent Portal Administration (described in the previous step)
2. Click the “Parent Enrollment” tab
3. Click the “Parent Enrollment Settings” tab
4. Review the descriptions below to decide if you would like to use each feature
5. If you make any changes, be sure to click the “Save Settings” button at the bottom
External Logins If this options is enabled, parents will be able to use their existing login with several other providers (such as Google and
Microsoft) to identify themselves to the Parent Portal. External logins allow the parent to avoid creating an account and

having to remember another password. If a parent enrolls using an external login, they can still create a local account
later by using the “forgot password” function.
Open Enrollment If this option is checked, parents will have the ability to visit your parent portal and enroll without being invited. If this
option is not checked, parents can only enroll using one of the invitation options described later in this document.
Invitation Link This option controls whether the invitation function is advertised on the home page of your parent portal. When you
invite a parent to enroll in the parent portal, they will receive an email that has both a code and a link. If this option is
enabled, they can go to your parent portal, click the invitation entry link, then copy and paste the code. Alternatively,
they can simply click the link in the email. If you uncheck this option, they will only be able to use the link in the email.
You should only uncheck this option if you don’t want to advertise the availability of enrollment invitations.
Access Requests If this option is enabled, existing parents will be able to visit your parent portal and submit an access request. An access
request is an information form that a parent fills out to gain access to their parent portal account. Once the parent
submits an access request, a notification will appear in Childcare Manager. You may then compare the information
submitted with the information you have in Childcare Manager. You should always contact the parent before granting
access.
Automatic Access When a new registrant enters an email address, they are asked to confirm that address by clicking a link in an email sent
to that address. If this option is checked, existing parents will automatically be given access to their account if they enter
and confirm an email address that matches the email address you have on file for them in Childcare Manager. They must
be the only family that has that email address in Childcare Manager.

Upload Your Logo to Parent Portal
After logging into Parent Portal Administration, it is a good to start with uploading your logo. If you do not have your
logo available, you may move onto to other steps. If you do not upload your logo, your parent portal will display the
default logo shown above.
To upload your logo:
1. Choose the “Look and Feel” tab
2. Choose the “Logo” sub tab
3. Click the “Choose File” button
4. Locate a suitable logo file on your computer. Square logos look best. Be sure to take note of the logo guidelines
displayed on the logo screen.
5. After choosing the file, press the “Upload” button.
6. Your logo should now be shown in the Current Logo box.

Choose Your Parent Portal Keyword
Choosing your Parent Portal Keyword allows you to customize the URL which parents use to access your parent portal.
The location of your parent portal will be www.ccmparent.com/keyword. For example, if you chose the keyword
“MyCenter” your parent portal may be accessed from www.ccmparent.com/MyCenter.
Important: Make sure you choose your keyword carefully. It may only be done once.
To choose a keyword:
1. Click the “Look and Feel” tab
2. Click the “Keyword” sub tab
3. Type your desired keyword in the keyword box
4. Click the “Set Keyword” button
Note: Although choosing a keyword makes your parent portal easier to locate, the best way to help parents reach your
parent portal is to include a link on your center’s webpage.
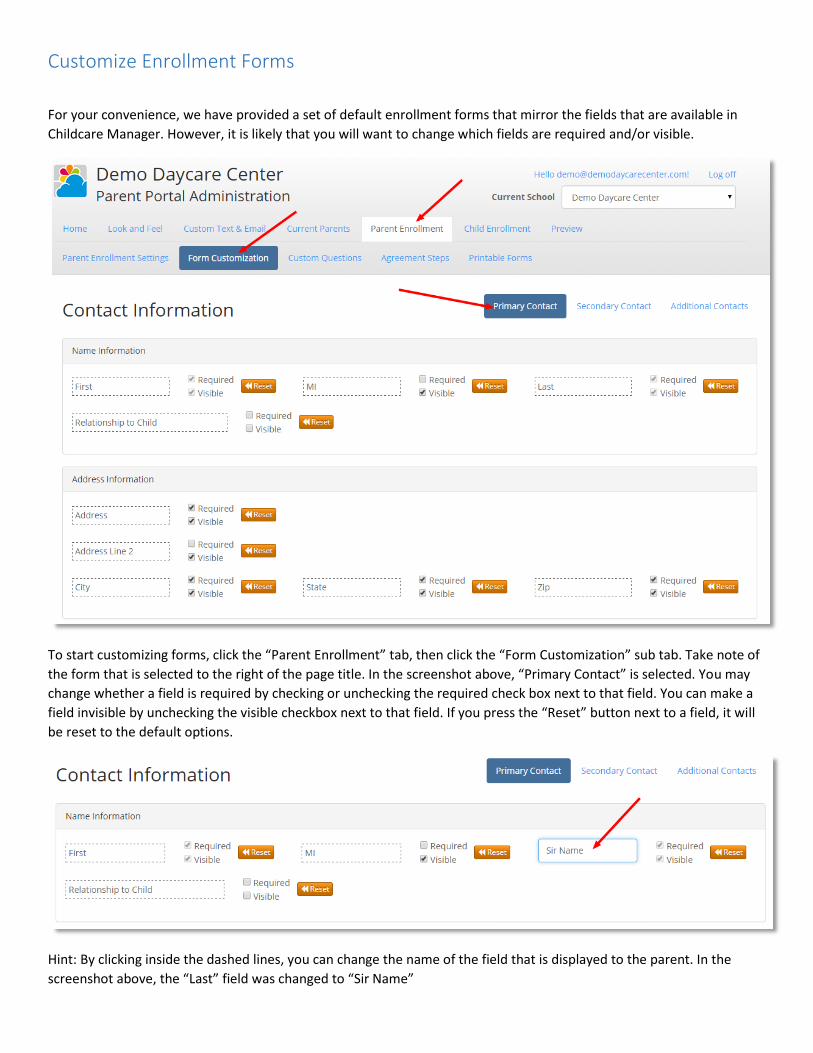
Customize Enrollment Forms
For your convenience, we have provided a set of default enrollment forms that mirror the fields that are available in
Childcare Manager. However, it is likely that you will want to change which fields are required and/or visible.
To start customizing forms, click the “Parent Enrollment” tab, then click the “Form Customization” sub tab. Take note of
the form that is selected to the right of the page title. In the screenshot above, “Primary Contact” is selected. You may
change whether a field is required by checking or unchecking the required check box next to that field. You can make a
field invisible by unchecking the visible checkbox next to that field. If you press the “Reset” button next to a field, it will
be reset to the default options.
Hint: By clicking inside the dashed lines, you can change the name of the field that is displayed to the parent. In the
screenshot above, the “Last” field was changed to “Sir Name”

Important: When you are done making changes to a form, make sure to scroll to the bottom of
the page and click “Save Changes”
Once you are done customizing parent enrollment forms, you can move on to customizing child enrollment forms. These
forms are different, but the customization process is exactly the same.
All of the options and settings found under the Parent Enrollment tab control the part of enrollment where information
is collected about the family such as parent contact information. This information is only collected once per family
enrollment.
All of the options and settings found under the Child Enrollment tab control the part of enrollment where information is
collected about each child that will be enrolling. This information is collected separately for each child that is enrolling.

Add Custom Questions
You may want to request additional information that is not included on the standard parent portal forms. You can
request this information using the “Custom Questions” section that is found under both the Parent Enrollment and Child
Enrollment sections.
To Add a New Custom Question:
1. Click the “Parent Enrollment” tab or the “Child Enrollment” tab
2. Click “Custom Questions” sub tab
3. Click the “New Custom Question” button
As an example, we will create a custom question that allows the parent to answer with a drop down list.

1. Enter the title of the question in the box labeled “Question Text”
2. Enter help text, this will appear underneath the questions and should provide guidance about answering the
question
3. Select “Custom Drop Down List” from the “Answer Type” drop down
4. Click “Add List” to create a new list which will specify the options available in the drop down. This will pop a new
window.

5. Enter a name that you will call your list. In our example
we entered “Color Drop Down”. This name is only for your
reference.
6. Enter the first item that should appear in the list into
the box labeled “New List Item”. In the example screenshot,
we entered “Blue”
7. Click the add button to add the item you just typed into
the list
8. Repeat the previous two steps for each item that you
would like to appear in the list
9. Click save changes when all items have been added
10. The name of the new lists should appear in the “Please
Select a Custom List” field.
11. Select whether the question should be required or not. If you mark the question as required. The parent must
answer the question before moving forward with the enrollment. If the question is not required, it may be
skipped.
12. Click the “Save Changes” button
13. This question will now be included as part of your enrollment process

Setup Parent and/or Child Agreements
The agreement function allows you to include text that the parent read. The parent must type their name to agree
before proceeding. You can include an unlimited number of agreements as part of the parent enrollment process or as
part of the enrollment for each child.
To add a new agreement step:
1. Click the “Parent Enrollment” tab or the “Child Enrollment” tab
2. Click the “Agreement Steps” sub tab
3. Click the “New Agreement Step” button
4. You should now be at the Add an Agreement Step screen
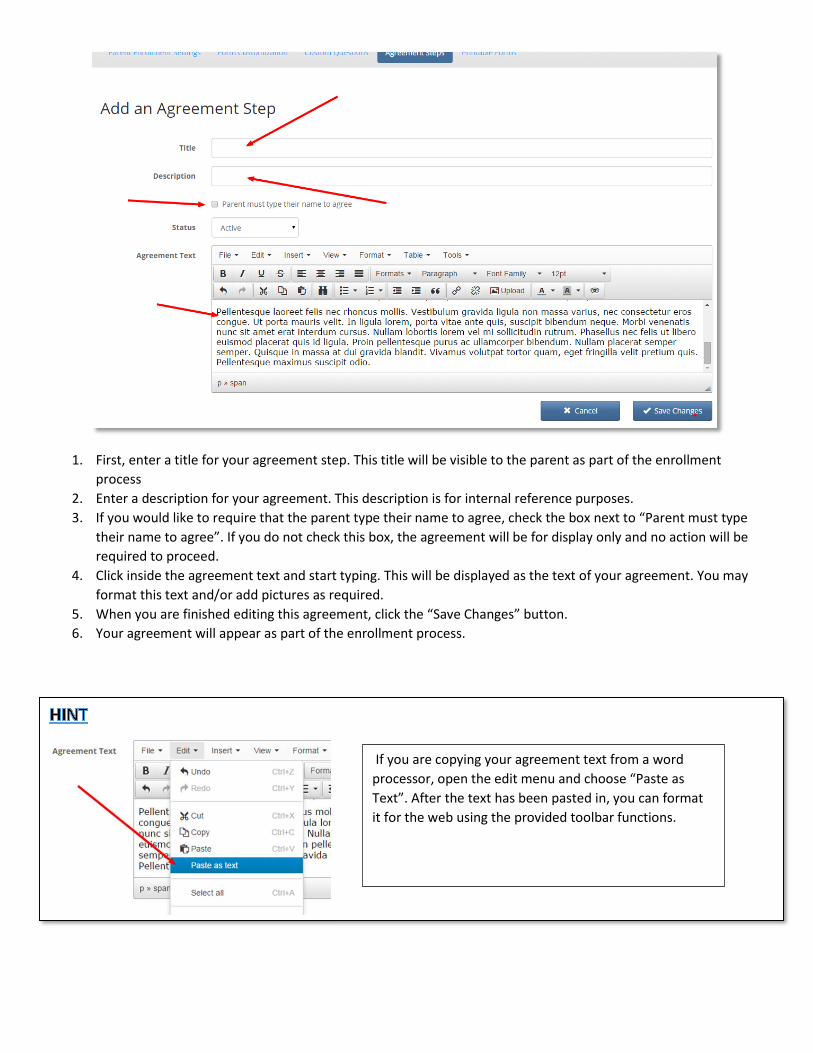
1. First, enter a title for your agreement step. This title will be visible to the parent as part of the enrollment
process
2. Enter a description for your agreement. This description is for internal reference purposes.
3. If you would like to require that the parent type their name to agree, check the box next to “Parent must type
their name to agree”. If you do not check this box, the agreement will be for display only and no action will be
required to proceed.
4. Click inside the agreement text and start typing. This will be displayed as the text of your agreement. You may
format this text and/or add pictures as required.
5. When you are finished editing this agreement, click the “Save Changes” button.
6. Your agreement will appear as part of the enrollment process.
If you are copying your agreement text from a word
processor, open the edit menu and choose “Paste as
Text”. After the text has been pasted in, you can format
it for the web using the provided toolbar functions.

Upload Forms for Parents to Sign
The printable forms function allows you to upload forms that parent can print out and sign. If you have forms that must
be physically signed or filled out, this feature allows you to provide those forms to parents before they come to your
center for the first time.
To upload a form:
1. Choose the “Parent Enrollment” tab or the “Child Enrollment” tab
2. Click the “Printable Forms” sub tab
3. Click the “New Form” button
4. You should now be at the Add Printable Form screen
1. Click the “Choose File” button
2. Select the PDF file from your computer that you would like to upload
3. After selecting the file, click the “Upload” button
4. Wait for the file to finish uploading, do not click “Upload” a second time
5. You should now see a new screen that allows you to edit the title and description of the form

1. Fill out the Title of the form, this will be visible to parents
2. Fill out the description of the form, this will be visible to parents
3. Check the box if the parent needs to sign this form. If you check this box, there will be a message indicating that
the form needs to be signed when it is presented for download.
4. When you are finished, click the “Save” button.

Customize Parent Portal Emails
The parent portal sends various email when certain events occur. Examples include, enrollment acceptance and site
registration. You may change the content of these emails.
To customize an email:
1. Click the “Custom Text & Email” tab
2. Click the “Custom Emails” sub tab
3. Locate the email you would like to edit
4. Press the “Edit” button next to that email
5. You should now be at the Edit Custom Email screen

Here, you can edit the content of the email. Alternatively, you can disable the email by choosing “Disabled” from the
“Status” drop down menu, then clicking “Save Changes” at the bottom of the page. Some emails, such as the Reset
Password email, may not be disabled.
Some emails require special merge fields. For example, the reset password email must include a reset password link
somewhere in the body of the email. If you receive an error message stating that a merge field is required, complete the
following steps:
1. Place the cursor where the merge field should go
2. Press the “Merge” button on the toolbar
3. The Insert Merge Field window will appear
4. Click the “Insert” button next to the field you would like to insert

When you have finished editing your custom email, make sure to press the “Save Changes” button at the bottom of the
page.
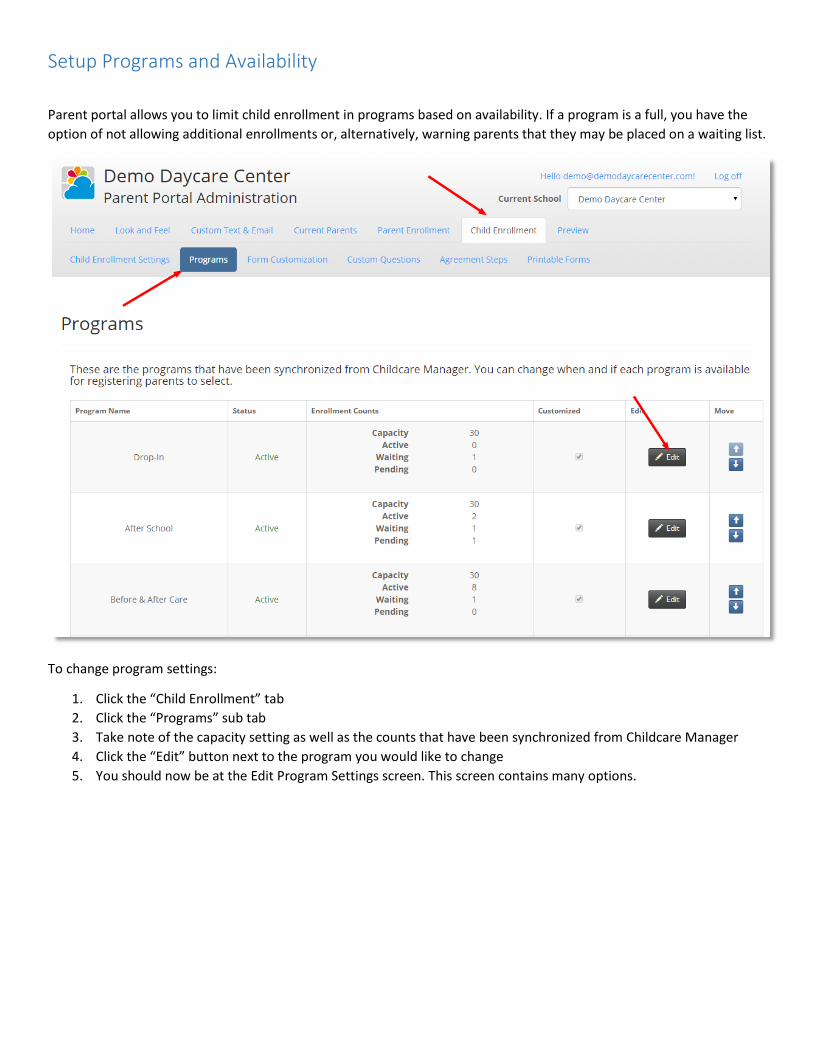
Setup Programs and Availability
Parent portal allows you to limit child enrollment in programs based on availability. If a program is a full, you have the
option of not allowing additional enrollments or, alternatively, warning parents that they may be placed on a waiting list.
To change program settings:
1. Click the “Child Enrollment” tab
2. Click the “Programs” sub tab
3. Take note of the capacity setting as well as the counts that have been synchronized from Childcare Manager
4. Click the “Edit” button next to the program you would like to change
5. You should now be at the Edit Program Settings screen. This screen contains many options.

Program Status
Set the status to disabled if the program is no longer used or should only be used in Childcare Manager. This will prevent
the program from being shown as an option to the enrolling parent. Alternatively, click the “Always Display” check box if
the program should always be shown. The always display option will override all other settings and ensure that the
program is always displayed.
Display Settings
The program name displayed to parents defaults to the name of the program in Childcare Manager. You can customize
the display name here. You should also add a brief description about the program so enrolling parents feel confident
that they are selecting the correct one. You can also add important eligibility and cost information in the description
area.

When to Display
The enrollment start and stop dates control when a program is available for potential parents to select. The program will
only be shown when between these dates. If you prefer not to use this option, leave either or both fields blank.
Capacity Settings
The program capacity settings control what happens when programs are full. By default, program capacity mirrors what
is entered in Childcare Manager but you may override that setting by entering a different number here. The capacity
mode setting determines what happens If the number of children enrolled and waiting for a program is equal to or
greater than the program capacity.

Age Settings
If you check the “Use Age Restriction” box and fill out the age settings box, the program will only be displayed to parents
enrolling children whose age, on the program start date, is between the ages you specify. If you do not specify a
program start date, the child’s age and eligibility will be calculated at the time of enrollment.
If any of your active programs use the age restriction feature, the parent will be prompted to enter a birth date for the
child at the very beginning of the child enrollment process.
Important: After setting up your program, make sure to scroll to the bottom of the
page and click the “Save Changes” button.
Disabling Program Selection
You may decide to allow parents to enroll, then select the best program for them manually in Childcare Manager. You
may disable parent program selection entirely. To disable online program selection:
1. Click the “Child Enrollment” tab
2. Click the “Child Enrollment Settings” sub tab
3. Uncheck the “Program Choice” box
4. Click the “Save Settings” button at the bottom of the screen.

Upload Parent Resources
The parent resources screen allows you to upload files for download by your enrolled parent. Here, you can make
documents, such as a parent handbook, available to parents.
To upload a new document for parents:
1. Click the “Current Parents” tab
2. Click the “Parent Resources” sub tab
3. Click the “New Parent Resource” button
4. You should now be at the Add Parent Resource screen
1. Click the “Choose File” button
2. Select the file from your computer that you would like to upload
3. After selecting the file, click the “Upload” button

4. Wait for the file to finish uploading, do not click “Upload” a second time
5. You should now see a new screen that allows you to edit the title and description of the form
The title and description of the resource will be displayed to parents.
The start and end dates allow you to control when the resource is available to your enrolled parents. If you prefer not to
use this option, leave one or both of these fields blank.
The parent filter allows you to control which parents the resource is available to. For example, if you upload a document
called “After School Parent Handbook” and, it should only be available to parents with children in the “After School”
program, click the “Child Program” check box, then click the “After School” check box. Use this feature to make sure that
each parent sees only the documents that are relevant to them.

Test Your Enrollment Process
Now that you have setup the basics of your enrollment process, you may test it to make sure it conforms to your
expectations. You may enroll as a parent by visiting the location described in the Keyword Selection section of this
document. If you choose this option, make sure to sign out of Parent Portal Administration first.
Another way to test your enrollment process is to use the built in test account. You can reach the test account by click
the “Preview” tab.
You can see what your Parent Portal looks like from the prospective of the parent by clicking one of the Preview Links.
The test the enrollment process, click the enrollment form link.

Receiving Parent Portal Alerts in Childcare Manager
After running the Parent Portal Setup Wizard a new Parent Portal tab should appear under the family center. When a
new notification is received, such as a new enrollment, a badge with a red number will appear on this tab. Click the tab
to receive your notification.
Childcare Manager checks for new notifications approximately every ten minutes. If you would like to check for
notifications immediately, click the Parent Portal tab, then click the “Check for New Notifications” link.

Downloading a New Enrollment into Childcare Manager
Once you have received your enrollment notification and visited the Parent Portal tab, click “Review Enrollment”
This will open the Review Parent Portal Enrollment dialog

Before accepting the enrollment, you must do the following:
1. Click the View/Edit Family Data Card button and fill in any additional required fields.
2. Click the View/Edit Contact button for each contact, review the information and fill in any additional required
fields
3. Click the View/Edit Child button for each child, review the information and fill in any additional required
4. Custom questions and allergy notes from the Parent Portal are downloaded into Childcare Manager as notes.
You should review these notes before accepting the enrollment.
5. When you are done reviewing the enrollment, click “Accept Enrollment”
6. A new family with the listed contacts and children will automatically be added to Childcare Manager

Reviewing Parent Information Changes
When a parent logs in and changes their personal information, this information is not automatically updated in Childcare
Manager. You must review and accept or deny these changes. These changes are synchronized with Childcare Manager
the same way that new enrollments are. You will receive a parent portal notification in the Family Center.
If the changes look fine, you may click “Accept All Changes” right from the notification screen. If you would like fine
grained control of each change, click the “Review Changes” link instead.
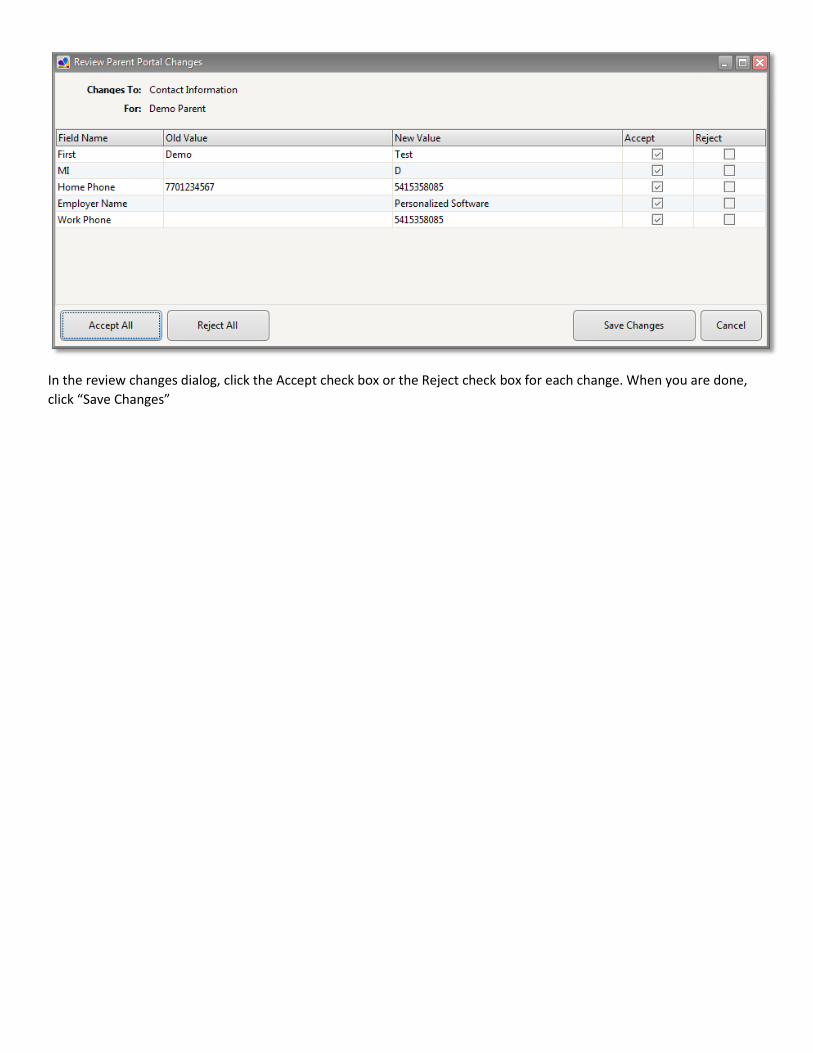
In the review changes dialog, click the Accept check box or the Reject check box for each change. When you are done,
click “Save Changes”

Inviting an Existing Parent to the Parent Portal
You may send invitations to your existing parent’s so that they can manager their contact information and access parent
resources.
To invite an existing family to Parent Portal:
1. Go to the Family Center
2. Click the Parent Portal tab
3. Ensure that the family is not already enrolled in Parent Portal, note that, in the screenshot above, the enrollment
status is “Not Enrolled”
4. Click the “Invite Family” button on the toolbar

Inviting an Existing Family to Enroll a New Child
There may be times when an existing family has a child enrolled at your center, then that families wants to enroll a new
child. In these situations, you should use the Send Invitation for New Child function. The family does not need to have a
Parent Portal account for this feature to work.
To invite a new child:
1. Go to the Family Center
2. Click the Parent Portal tab
3. Select the family to invite
4. Right click the family name
5. Select “Send PP Invitation For New Child” from the popup menu
6. The Invite new child dialog should now appear

7. Enter the number of new children to invite. This number is only
relevant if you choose not to use open enrollment.
8. If you are using program selection, click the “Restrict Program
Choices” check box
9. Check each box next to each program that the parents should
be able to choose for their child or children
10. Click the “Send Invitation” button

Sending a Parent Portal Invitation to a Lead
After a lead indicates that they would like to enroll in your center, you may streamline this process by sending them a
Parent Portal invitation link.
To invite a lead to Parent Portal:
1. Go to Lead Center
2. Highlight the Lead you would like to invite
3. Click the “Send Enrollment Invitation” button
4. You should now see the invite lead dialog

5. Enter the number of new children to invite. This number is only
relevant if you choose not to use open enrollment.
6. If you are using program selection, click the “Restrict Program
Choices” check box
7. Check each box next to each program that the parent’s should
be able to choose from for their child or children
8. Click the “Send Invitation” button

Disable a Parent’s Account from Childcare Manager
If you would like to disable a parent’s access to parent portal:
1. Go to Family Center
2. Click the Parent Portal tab
3. Select the family in the list. In the screenshot above, “Bailey, Laura” is selected. Note that the Parent Portal
Account Status is “Active”.
4. Click the Disable Account button highlighted in the screenshot above
5. The selected family will no longer be able to log into Parent Portal

Opting a Family out of Parent Portal
Parent Portal does not synchronize social security numbers. Even so, some families may occasionally object to having
any information synchronize with the cloud. For these families, Childcare Manager has an opt-out feature. When you
opt a family out of parent portal, there information will no longer synchronize. In addition, any information currently on
the parent portal will be deleted.
To opt a family out of parent portal:
1. Go to Family Center
2. Click the Parent Portal tab
3. Select the family in the list. In the screenshot above, “Henderson” is selected
4. Click the “Opt Out Family” button highlighted in the screenshot above
5. The selected family will no longer be able to log into Parent Portal, any information will be deleted from Parent
Portal, and their information will not be synchronized again.