
Getting Started with .NET, .NET CF, Visual · PDF fileThe class library, the other main...
54
Getting Started with .NET, .NET CF, Visual Studio .NET Overview of the .NET Framework ................................................................................. 1 Microsoft and Sun's Confrontation ............................................................................................ 5 Getting Started with Visual Studio .NET and the Microsoft .NET Compact Framework ........................................................................................................................... 19 Getting Started with XML Web Services in Visual Basic.NET and Visual C# .................................................................................................................................................. 44 Overview of the .NET Framework [http://msdn.microsoft.com/library/default.asp?url=/library/en- us/cpguide/html/cpovrintroductiontonetframeworksdk.asp] The .NET Framework is an integral Windows component that supports building and running the next generation of applications and XML Web services. The .NET Framework is designed to fulfill the following objectives: • To provide a consistent object-oriented programming environment whether object code is stored and executed locally, executed locally but Internet-distributed, or executed remotely. • To provide a code-execution environment that minimizes software deployment and versioning conflicts. • To provide a code-execution environment that guarantees safe execution of code, including code created by an unknown or semi-trusted third party. • To provide a code-execution environment that eliminates the performance problems of scripted or interpreted environments. • To make the developer experience consistent across widely varying types of applications, such as Windows-based applications and Web-based applications. • To build all communication on industry standards to ensure that code based on the .NET Framework can integrate with any other code. The .NET Framework has two main components: the common language runtime and the .NET Framework class library. The common language runtime is the foundation of the .NET Framework. You can think of the runtime as an agent that manages code at execution time, providing core services such as memory management, thread management, and remoting, while also enforcing strict type safety and other forms of code accuracy that ensure security and robustness. In fact, the concept of code management is a fundamental principle of the runtime. Code that targets the runtime is known as managed code, while code that does not target the runtime is known as unmanaged code. The class library, the other main component of the .NET Framework, is a comprehensive, object-oriented collection of reusable types that you can use to develop applications ranging from traditional command-line or graphical user interface (GUI) applications to applications based on the latest innovations provided by ASP.NET, such as Web Forms and XML Web services. The .NET Framework can be hosted by unmanaged components that load the common language runtime into their processes and initiate the execution of managed code, thereby creating a software environment that can exploit both managed and unmanaged features. The .NET Framework not only provides several runtime hosts, but also supports the development of third-party runtime hosts. For example, ASP.NET hosts the runtime to provide a scalable, server-side environment for managed code. ASP.NET works directly with the runtime to enable Web Forms applications and XML Web services, both of which are discussed later in this topic.
Transcript of Getting Started with .NET, .NET CF, Visual · PDF fileThe class library, the other main...

Getting Started with .NET, .NET CF, Visual Studio .NET Overview of the .NET Framework ................................................................................. 1 Microsoft and Sun's Confrontation ............................................................................................ 5 Getting Started with Visual Studio .NET and the Microsoft .NET Compact Framework ........................................................................................................................... 19 Getting Started with XML Web Services in Visual Basic.NET and Visual C#.................................................................................................................................................. 44
Overview of the .NET Framework [http://msdn.microsoft.com/library/default.asp?url=/library/en-us/cpguide/html/cpovrintroductiontonetframeworksdk.asp]
The .NET Framework is an integral Windows component that supports building and running the next generation of applications and XML Web services. The .NET Framework is designed to fulfill the following objectives:
• To provide a consistent object-oriented programming environment whether object code is stored and
executed locally, executed locally but Internet-distributed, or executed remotely.
• To provide a code-execution environment that minimizes software deployment and versioning
conflicts.
• To provide a code-execution environment that guarantees safe execution of code, including code
created by an unknown or semi-trusted third party.
• To provide a code-execution environment that eliminates the performance problems of scripted or
interpreted environments.
• To make the developer experience consistent across widely varying types of applications, such as
Windows-based applications and Web-based applications.
• To build all communication on industry standards to ensure that code based on the .NET Framework
can integrate with any other code.
The .NET Framework has two main components: the common language runtime and the .NET Framework class library. The common language runtime is the foundation of the .NET Framework. You can think of the runtime as an agent that manages code at execution time, providing core services such as memory management, thread management, and remoting, while also enforcing strict type safety and other forms of code accuracy that ensure security and robustness. In fact, the concept of code management is a fundamental principle of the runtime. Code that targets the runtime is known as managed code, while code that does not target the runtime is known as unmanaged code. The class library, the other main component of the .NET Framework, is a comprehensive, object-oriented collection of reusable types that you can use to develop applications ranging from traditional command-line or graphical user interface (GUI) applications to applications based on the latest innovations provided by ASP.NET, such as Web Forms and XML Web services.
The .NET Framework can be hosted by unmanaged components that load the common language runtime into their processes and initiate the execution of managed code, thereby creating a software environment that can exploit both managed and unmanaged features. The .NET Framework not only provides several runtime hosts, but also supports the development of third-party runtime hosts.
For example, ASP.NET hosts the runtime to provide a scalable, server-side environment for managed code. ASP.NET works directly with the runtime to enable Web Forms applications and XML Web services, both of which are discussed later in this topic.
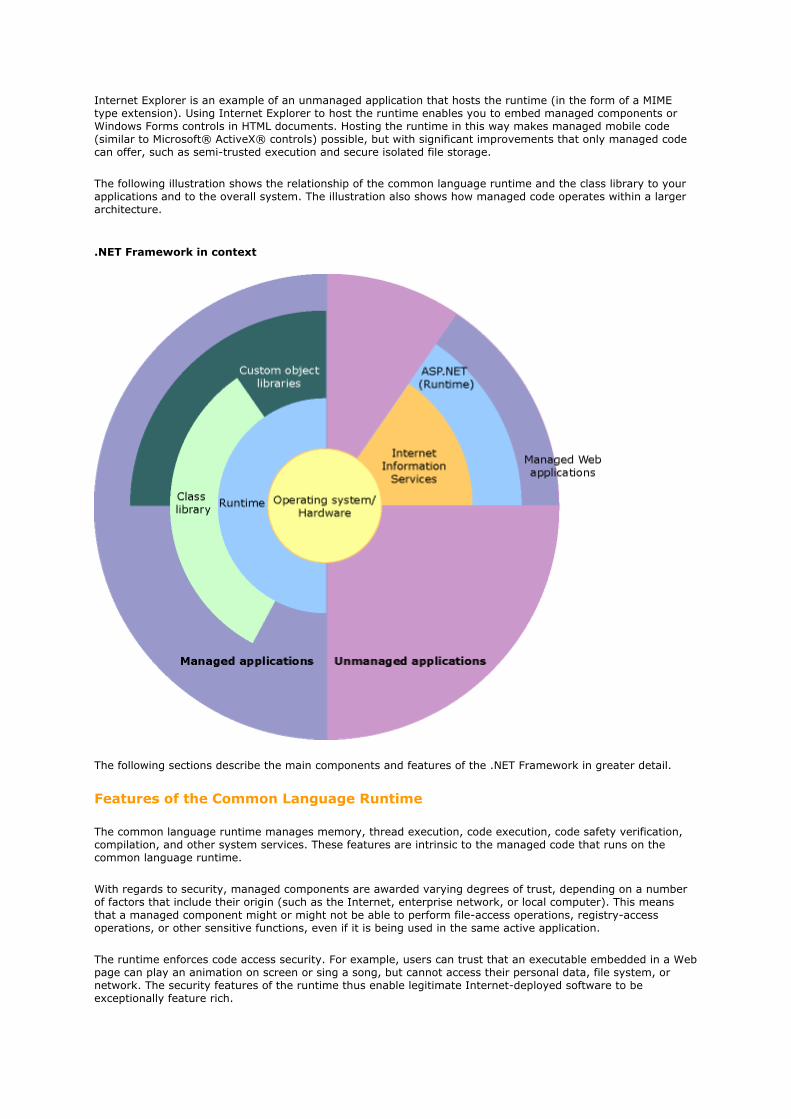
Internet Explorer is an example of an unmanaged application that hosts the runtime (in the form of a MIME type extension). Using Internet Explorer to host the runtime enables you to embed managed components or Windows Forms controls in HTML documents. Hosting the runtime in this way makes managed mobile code (similar to Microsoft® ActiveX® controls) possible, but with significant improvements that only managed code can offer, such as semi-trusted execution and secure isolated file storage.
The following illustration shows the relationship of the common language runtime and the class library to your applications and to the overall system. The illustration also shows how managed code operates within a larger architecture.
.NET Framework in context
The following sections describe the main components and features of the .NET Framework in greater detail.
Features of the Common Language Runtime
The common language runtime manages memory, thread execution, code execution, code safety verification, compilation, and other system services. These features are intrinsic to the managed code that runs on the common language runtime.
With regards to security, managed components are awarded varying degrees of trust, depending on a number of factors that include their origin (such as the Internet, enterprise network, or local computer). This means that a managed component might or might not be able to perform file-access operations, registry-access operations, or other sensitive functions, even if it is being used in the same active application.
The runtime enforces code access security. For example, users can trust that an executable embedded in a Web page can play an animation on screen or sing a song, but cannot access their personal data, file system, or network. The security features of the runtime thus enable legitimate Internet-deployed software to be exceptionally feature rich.
The runtime also enforces code robustness by implementing a strict type- and code-verification infrastructure called the common type system (CTS). The CTS ensures that all managed code is self-describing. The various Microsoft and third-party language compilers generate managed code that conforms to the CTS. This means that managed code can consume other managed types and instances, while strictly enforcing type fidelity and type safety.
In addition, the managed environment of the runtime eliminates many common software issues. For example, the runtime automatically handles object layout and manages references to objects, releasing them when they are no longer being used. This automatic memory management resolves the two most common application errors, memory leaks and invalid memory references.
The runtime also accelerates developer productivity. For example, programmers can write applications in their development language of choice, yet take full advantage of the runtime, the class library, and components written in other languages by other developers. Any compiler vendor who chooses to target the runtime can do so. Language compilers that target the .NET Framework make the features of the .NET Framework available to existing code written in that language, greatly easing the migration process for existing applications.
While the runtime is designed for the software of the future, it also supports software of today and yesterday. Interoperability between managed and unmanaged code enables developers to continue to use necessary COM components and DLLs.
The runtime is designed to enhance performance. Although the common language runtime provides many standard runtime services, managed code is never interpreted. A feature called just-in-time (JIT) compiling enables all managed code to run in the native machine language of the system on which it is executing. Meanwhile, the memory manager removes the possibilities of fragmented memory and increases memory locality-of-reference to further increase performance.
Finally, the runtime can be hosted by high-performance, server-side applications, such as Microsoft® SQL Server™ and Internet Information Services (IIS). This infrastructure enables you to use managed code to write your business logic, while still enjoying the superior performance of the industry's best enterprise servers that support runtime hosting.
.NET Framework Class Library
The .NET Framework class library is a collection of reusable types that tightly integrate with the common language runtime. The class library is object oriented, providing types from which your own managed code can derive functionality. This not only makes the .NET Framework types easy to use, but also reduces the time associated with learning new features of the .NET Framework. In addition, third-party components can integrate seamlessly with classes in the .NET Framework.
For example, the .NET Framework collection classes implement a set of interfaces that you can use to develop your own collection classes. Your collection classes will blend seamlessly with the classes in the .NET Framework.
As you would expect from an object-oriented class library, the .NET Framework types enable you to accomplish a range of common programming tasks, including tasks such as string management, data collection, database connectivity, and file access. In addition to these common tasks, the class library includes types that support a variety of specialized development scenarios. For example, you can use the .NET Framework to develop the following types of applications and services:
• Console applications.
• Scripted or hosted applications.
• Windows GUI applications (Windows Forms).
• ASP.NET applications.
• XML Web services.
• Windows services.
For example, the Windows Forms classes are a comprehensive set of reusable types that vastly simplify Windows GUI development. If you write an ASP.NET Web Form application, you can use the Web Forms classes.

Client Application Development
Client applications are the closest to a traditional style of application in Windows-based programming. These are the types of applications that display windows or forms on the desktop, enabling a user to perform a task. Client applications include applications such as word processors and spreadsheets, as well as custom business applications such as data-entry tools, reporting tools, and so on. Client applications usually employ windows, menus, buttons, and other GUI elements, and they likely access local resources such as the file system and peripherals such as printers.
Another kind of client application is the traditional ActiveX control (now replaced by the managed Windows Forms control) deployed over the Internet as a Web page. This application is much like other client applications: it is executed natively, has access to local resources, and includes graphical elements.
In the past, developers created such applications using C/C++ in conjunction with the Microsoft Foundation Classes (MFC) or with a rapid application development (RAD) environment such as Microsoft® Visual Basic®. The .NET Framework incorporates aspects of these existing products into a single, consistent development environment that drastically simplifies the development of client applications.
The Windows Forms classes contained in the .NET Framework are designed to be used for GUI development. You can easily create command windows, buttons, menus, toolbars, and other screen elements with the flexibility necessary to accommodate shifting business needs.
For example, the .NET Framework provides simple properties to adjust visual attributes associated with forms. In some cases the underlying operating system does not support changing these attributes directly, and in these cases the .NET Framework automatically recreates the forms. This is one of many ways in which the .NET Framework integrates the developer interface, making coding simpler and more consistent.
Unlike ActiveX controls, Windows Forms controls have semi-trusted access to a user's computer. This means that binary or natively executing code can access some of the resources on the user's system (such as GUI elements and limited file access) without being able to access or compromise other resources. Because of code access security, many applications that once needed to be installed on a user's system can now be safely deployed through the Web. Your applications can implement the features of a local application while being deployed like a Web page.
Server Application Development
Server-side applications in the managed world are implemented through runtime hosts. Unmanaged applications host the common language runtime, which allows your custom managed code to control the behavior of the server. This model provides you with all the features of the common language runtime and class library while gaining the performance and scalability of the host server.
The following illustration shows a basic network schema with managed code running in different server environments. Servers such as IIS and SQL Server can perform standard operations while your application logic executes through the managed code.
Server-side managed code
ASP.NET is the hosting environment that enables developers to use the .NET Framework to target Web-based applications. However, ASP.NET is more than just a runtime host; it is a complete architecture for developing Web sites and Internet-distributed objects using managed code. Both Web Forms and XML Web services use IIS and ASP.NET as the publishing mechanism for applications, and both have a collection of supporting classes in the .NET Framework.
XML Web services, an important evolution in Web-based technology, are distributed, server-side application components similar to common Web sites. However, unlike Web-based applications, XML Web services components have no UI and are not targeted for browsers such as Internet Explorer and Netscape Navigator. Instead, XML Web services consist of reusable software components designed to be consumed by other applications, such as traditional client applications, Web-based applications, or even other XML Web services. As a result, XML Web services technology is rapidly moving application development and deployment into the highly distributed environment of the Internet.
If you have used earlier versions of ASP technology, you will immediately notice the improvements that ASP.NET and Web Forms offers. For example, you can develop Web Forms pages in any language that supports the .NET Framework. In addition, your code no longer needs to share the same file with your HTTP text (although it can continue to do so if you prefer). Web Forms pages execute in native machine language because, like any other managed application, they take full advantage of the runtime. In contrast, unmanaged ASP pages are always scripted and interpreted. ASP.NET pages are faster, more functional, and easier to develop than unmanaged ASP pages because they interact with the runtime like any managed application.
The .NET Framework also provides a collection of classes and tools to aid in development and consumption of XML Web services applications. XML Web services are built on standards such as SOAP (a remote procedure-call protocol), XML (an extensible data format), and WSDL ( the Web Services Description Language). The .NET Framework is built on these standards to promote interoperability with non-Microsoft solutions.
For example, the Web Services Description Language tool included with the .NET Framework SDK can query an XML Web service published on the Web, parse its WSDL description, and produce C# or Visual Basic source code that your application can use to become a client of the XML Web service. The source code can create classes derived from classes in the class library that handle all the underlying communication using SOAP and XML parsing. Although you can use the class library to consume XML Web services directly, the Web Services Description Language tool and the other tools contained in the SDK facilitate your development efforts with the .NET Framework.
If you develop and publish your own XML Web service, the .NET Framework provides a set of classes that conform to all the underlying communication standards, such as SOAP, WSDL, and XML. Using those classes enables you to focus on the logic of your service, without concerning yourself with the communications infrastructure required by distributed software development.
Finally, like Web Forms pages in the managed environment, your XML Web service will run with the speed of native machine language using the scalable communication of IIS.
Microsoft and Sun's Confrontation
By Kashif Manzoor [http://www.codeproject.com/dotnet/dotnet.asp]
It's new - it's powerful - it solves lots of problems - and it is threatening to a vast community of Java worshippers, and best (or worst) of all it's from Microsoft. You guessed it right; I am talking about .NET.
Around 1995, Java was generating the same vigor as is generated by .NET today. May be I am being a bit unfair; actually Sun's Java was a much bigger event than .NET. My intention is not to belittle .NET's arrival; but what's true is true! Sun's Java introduced a revolutionary approach of software development. Previously you had developers specializing in either Visual C++, or VB or Tcl/Tk (for UNIX based platforms). Finding an individual who is conversant in various competing languages was next to impossible. With Sun's Java - all that the programmers needed to know was a single language - namely Java; thus Java provided the programmer's with a unique tool that solved their ages long problem of platform independence.
Sun furthered their service to the Computer Industry by tackling the issue of web development with applets, JSP (Java Serve Pages) and Servlets. Then came Sun's EJBs (Enterprise Java Beans). EJB brought an end to the painful era of distributed application development. All this time when Sun was winning our admiration; Microsoft was trying their level best to match up to Sun's tools. Although many of the technologies that J2EE
use, were introduced by Microsoft (e.g. OLE/COM was present before EJB, ASP was developed before JSP etc.), but Sun's J2EE better many of these technologies and popularized them with their Java platform independence approach (with .NET Microsoft has done the same - namely - improved not only upon their existing technologies but on J2EE as well).
But Sun was uncatchable. Sun's unique approach of "distributing it free" helped them in gaining popularity amongst developers. Sun addressed industry's needs by developing or by enhancing tools like JSP, Servlets, EJB, JMS, JNDI, JNI etc. Sun stuffed these excellent tools under one umbrella - the Java2 Enterprise Edition (J2EE). Microsoft's equivalent to J2EE was Microsoft's Windows DNA programming model. DNA's popularity was marred by Microsoft's proprietary approach; while J2EE are a set of specifications, DNA is a Microsoft's propritery implementation. With the world depending more and more on the Internet - and Sun's tools becoming the foremost media for the web applications, Microsoft seemed to be loosing the battle. But Microsoft has a wonderful history of starting late but catching up quickly (Windows vs. Macintosh, Internet Explorer vs. Netscape ). So Microsoft put their best men at work and started calling the project as Next Generation Windows Services (NGWS). The outcome of the project is what we now know as .NET. .NET has borrowed most of it's ideas from Sun's J2EE; but this time Microsoft has really outdone themselves. .NET strengthen many of the features of J2EE, and it also makes up for most of Microsoft's mistakes.
A few months back when the hype of .Net (and C#) started, I rejected the hype since I am more of a Java and Visual C++ lover. When it comes to Web development or distributed application development I prefer Sun's Java, Servlets, JSP and EJBs. And when it comes to Windows application, Microsoft's Visual C++ is the tool of my choice. So my immediate reaction was - "Hmmm, yet another of Microsoft's gimmick; I won't fall for this at all !!!". But then I started reading about it and the more I read, the more I liked. It was as if for the first time in Microsoft's history they have actually listened to our cries. With .Net Microsoft isn't telling us how to do our job, but it is the outcome of a thorough consideration of developer's feedback.
Programming in Visual C++ has always made be feel proud of myself. Those of you who have used Visual C++ to develop OLE, COM, COM+, ActiveX applications would know what I mean. Every time I make an ActiveX client/serve or an ActiveX control, I get up from my computer fully satisfied and content. But making a Java Bean never gives me that satisfaction - simply because it's so damn easy !!!. With .NET Microsoft has made lots of things even easier not only in comparison to their previous technologies but even in comparison to Java.
When I started reading about .NET, I almost always came across biased or one sided views. So rather than being swayed by Microsoft or Sun's claims I decided to make my own opinion - and that is the prime reason of writing this article.
The rest of this article delves deeply in .NET. The article concludes with the future predictions made by the IT pundits.
• .NET - a framework • Major Components of .NET • What is "Common Language Specification" (CLS) • What is "Common Language Runtime" (CLR) • What is "Microsoft Intermediate Language" ("MSIL" or simply "IL") • What is "Common Type System" (CTS) • .NET Framework Base Classes • What are Web Services, Web Forms, Windows Forms • Various .NET Languages - VB.Net, ASP. NET, C#, J#, VC.NET • What has future in store for us ?
.NET - a framework
The most important question is What is .NET ?, and the simplest answer is : it is a Framework in which Windows applications may be developed and run. I agree that this answer does not tell much. In order to understand .NET we must go back in time and follow the development of Windows and the advent of Windows programming.
Let's see how a traditional windows application works.
Windows provide the programmers with various functions - called API. Starting from the very first time Windows enter the commercial market to the latest version of WindowsXP, APIs are the basic tool to let the Windows know what you want it to do. If you want to create a Dialog Box you must call a specific API provided to you by Windows. Making a button requires another API call. And the list goes on. As new GUIs appear on the seen, new APIs are introduced in Windows. But using these native APIs was a very challenging task. Making a simple Window that prints "Hello World" could take more than hundred lines. Compare this to 5 lines of "Hello World" program in DOS. Due to this difficulty, Windows programming was considered something better left to the experts. Microsoft and other commercial organization's realized this and started marketing Visual Tools that made the programmer's life easy. Using Visual C++, Visual Basic, Borland's C++ and other such IDEs, it became simpler to make Windows programs.
Various vendors develop their own "Wrapper classes" that wrapped the Windows APIs in an Object-Oriented way. The Microsoft Foundation Classes (MFC) that are used in Visual C++, is an example of Wrapper classes. The MFC equivalent of Visual Basic is VBRun; and for Visual J++ it is WFC. These Wrapper Classes, along with the Visual GUI tools made it very convenient to make windows programs.
Microsoft realized that applications need a solid way to talk to each other. And this resulted in the introduction of Object Linking and Embedding (OLE). OLE was an extremely useful concept, but it had two major flaws : It was notoriously difficult to program, and it was very limited in its scope - i.e. it only did a few things like drag and drop, clipboard sharing, OLE client, OLE server etc. Microsoft addressed (or at least tried to address) both these problems. They upgraded OLE to COM. COM was much more capable than OLE, and it introduced new concept like ActiveX controls which directly competed with Java Applets. As for the difficulty of programming OLE/COM; Microsoft expanded the MFC and VBRun to take care of most of the dirty job. Although making an ActiveX application still was slightly tricky in Visual C++, but developing an ActiveX application in Visual Basic was extremely easy; and hence Visual Basic became the foremost ActiveX development media.
The Internet revolution posed new problems and challenges. C/C++ which was the tool of champions was not suited/ready for Web Development. Microsoft tried expanding MFC, and included several network oriented classes - like CSocket, CASyncSocket, and several HTTP based classes. Using these classes a programmer could very develop a distributed application - although not without considerable effort. But these applications were always customized and targeted to the specific task. The developers had to take care of the gory network communication details themselves. By now object-oriented analysis and development had started becoming ubiquitous. Although technologies like Remote Procedure Call (RPC) was a great help to the programmers; but it was limited in its scope. With programmers following the Object-Oriented development RPC was not much help at all; since RPC did not allow passing objects as parameters. This major issue was addressed by introduction of industry's agreed upon standards like CORBA, IIOP, RMI, DCOM etc. All these standards used customized protocol to transmit an object over the network, and they required a tight coupling between the server and the client - i.e. the client needed to be fully aware of how to talk to the server. Due to this tight client-server coupling all these protocols needed considerable deployment efforts in order for
distributed applications to function properly. Sun did come up with another layer on top of RMI - the famous Enterprise Java Beans (EJB). The EJB container provided lot of services for free - all that a programmer had to do was to extend (inherit) from an appropriate EJB base class and there you have it - a fully functional distributed application. EJB made programmer's life extremely easy; but it did not eradicate the client-server coupling issue.
While all this was happening - Microsoft was still not facing the writing on the wall - MICROSOFT NEEDED SOMETHING RADICALLY NEW TO MATCH UP TO THE CHANGING TIMES AND CHANGING DEMANDS. Microsoft soon realized that upgrading their existing technologies would not work - what they needed was a complete change in their philosophy. OLE was upgraded to COM - and it was welcomed by all. COM was then upgraded to COM+. Microsoft addressed the distributed programming issue with the introduction of DCOM. Although COM/COM+/DCOM were all good technologies but these technologies required significant learning curve. Sun on the other hand was making things easier and hence a majority of developers were turning towards Java based technologies for distributed enterprise applications.
Microsoft - after the cold treatment faced by DNA - got their gurus together and asked them to reflect back on DNA and to come up with a future vision. This group came up with so many new and great ideas which made Microsoft realized that no amount of up gradation or extension in MFC/VBRun/WFC, COM/COM+/DCOM, ASP, APIs etc. would even come closer to realizing this new vision. So they made a radical but correct decision - and this was the decision of coming up with something big, something new, and something that lets Microsoft make up for their lapses - this was called the .NET Framework.
The remaining portion of this article discusses a few of the main features and components of .NET framework. After having introduced .NET in brief I'll conclude this article by answering the million dollar question - "What is .NET ?"
This article assumes that the reader has a solid programming experience. IT also assumes some experience of JAVA. Although experience of RMI, EJB, ActiveX, VC, VB is not required but having an introductory knowledge of these tools would help appreciate .NET better.
go to top
Major Components of .NET
The diagram given below describes various components of .NET Framework[3]

Now we explain these components briefly...
The .NET framework can only be exploited by languages that are compliant with .NET. Most of Microsoft languages have been made to fully comply with .NET.
.NET also introduces Web Forms, Web Services and Windows Forms. The reason why they have been shown separately and not as a part of a particular language is that these technologies can be used by any .NET compliant language. For example Windows Forms is used by VC, VB.NET, C# all as a mode of providing GUI.
The next component of .NET is the .NET Framework Base Classes. These are the common class libraries (much like Java packages) that can be used by any .NET compliant language. These classes provide the programmers with a high degree of functionality that they can use in their programs. For example their are classes to handle reading, writing and manipulating XML documents, enhanced ADOs etc.
The bottom most layer is the CLR - the common runtime language. The CLR is discussed in detail in [7].
go to top
What is "Common Language Specification" (CLS)
One of the obvious themes of .NET is unification and interoperability between various programming languages. In order to achieve this; certain rules must be laid and all the languages must follow these rules. In other words we can not have languages running around creating their own extensions and their own fancy new data types. CLS is the collection of the rules and constraints that every language (that seeks to achieve .NET compatibility) must follow. Microsoft have defined three level of CLS compatibility/compliance. The goals and objectives of each compliance level has been set aside. Given below are the three compliance levels with their brief description:
COMPLIANT PRODUCER
The component developed in this type of language can be used by any other language.
CONSUMER
The language in this category can use classes produced in any other language. In simple words this means that the language can instantiate classes developed in other language. This is similar to how COM components can be instantiated by your ASP code.
EXTENDER
Languages in this category can not just use the classes as in CONSUMER category; but can also extend classes using inheritance.
Languages that come with Microsoft Visual Studio namely Visual C++, Visual Basic and C#; all satisfy the above three categories. Vendors can select any of the above categories as the targeted compliance level(s) for their languages.
go to top
What is "Common Language Runtime" (CLR)
CLR is .NET equivalent of Java Virtual Machine (JVM). It is the runtime that converts a MSIL code into the host machine language code, which is then executed appropriately. [7] gives a detailed description of CLR.
go to top
What is "Microsoft Intermediate Language" (MSIL)
A .NET programming language (C#, VB.NET, J# etc.) does not compile into executable code; instead it compiles into an intermediate code called Microsoft Intermediate Language (MSIL). As a programmer one need not worry about the syntax of MSIL - since our source code in automatically converted to MSIL. Complete specifications of MSIL can be found at http://msdn.microsoft.com/net/ecma/part_3_IL_inst_set.pdf . The MSIL code is then send to the CLR (Common Language Runtime) that converts the code to machine language which is then run on the host machine[7]. MSIL is similar to Java Byte code. A Java program is compiled into Java Byte code (the .class file) by a Java compiler, the class file is then sent to JVM which interprets it and runs it on the host machine.
go to top
What is "Common Type System" (CTS)
All this time we have been talking about language interoperability, and .NET Class Framework. None of this is possible without all the language sharing the same data types. What this means is that an int should mean the same in VB, VC++, C# and all other .NET compliant languages. Same goes for all the other data types. This is achieved through introduction of Common Type System (CTS). CTS, much like Java, defines every data type as a Class. Every .NET compliant language must stick to this definition. Since CTS defines every data type as a class; this means that only Object-Oriented (or Object-Based) languages can achieve .NET compliance. Given below is a list of CTS supported data types:
Data Type Description
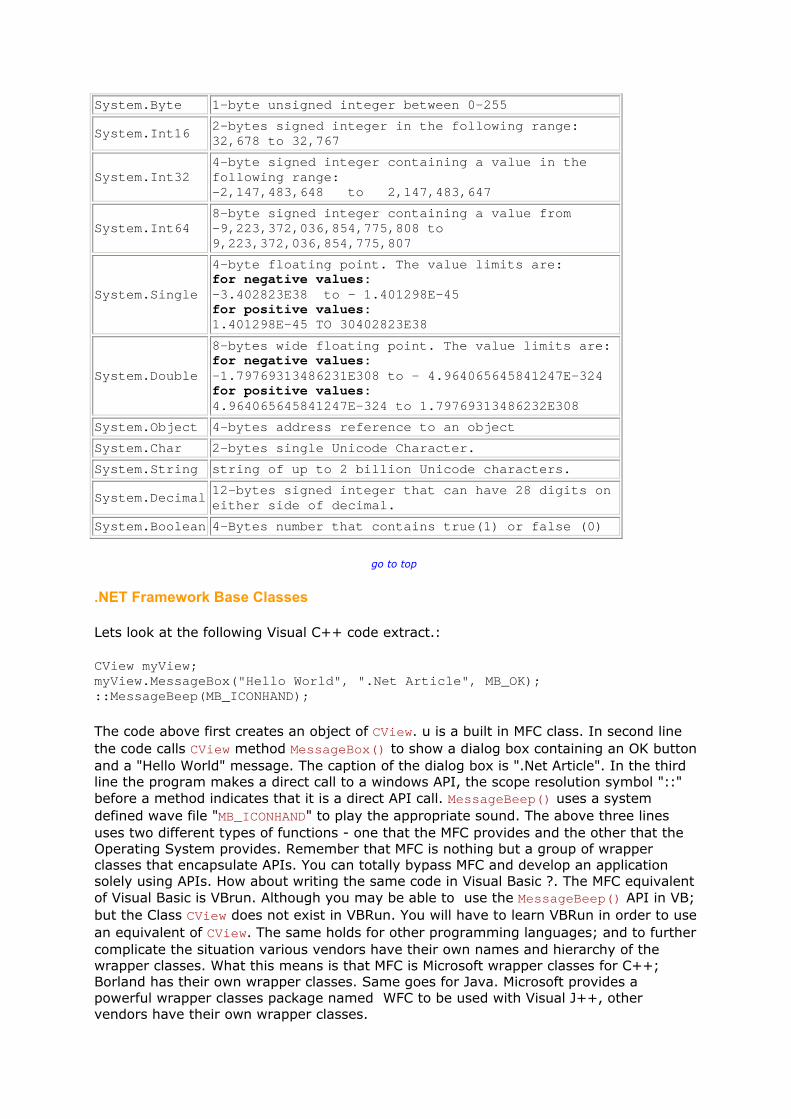
System.Byte 1-byte unsigned integer between 0-255
System.Int16 2-bytes signed integer in the following range: 32,678 to 32,767
System.Int32 4-byte signed integer containing a value in the following range: -2,147,483,648 to 2,147,483,647
System.Int64 8-byte signed integer containing a value from -9,223,372,036,854,775,808 to 9,223,372,036,854,775,807
System.Single
4-byte floating point. The value limits are: for negative values: -3.402823E38 to - 1.401298E-45 for positive values: 1.401298E-45 TO 30402823E38
System.Double
8-bytes wide floating point. The value limits are: for negative values: -1.79769313486231E308 to - 4.964065645841247E-324 for positive values: 4.964065645841247E-324 to 1.79769313486232E308
System.Object 4-bytes address reference to an object
System.Char 2-bytes single Unicode Character.
System.String string of up to 2 billion Unicode characters.
System.Decimal 12-bytes signed integer that can have 28 digits on either side of decimal.
System.Boolean 4-Bytes number that contains true(1) or false (0)
go to top
.NET Framework Base Classes
Lets look at the following Visual C++ code extract.:
CView myView; myView.MessageBox("Hello World", ".Net Article", MB_OK); ::MessageBeep(MB_ICONHAND);
The code above first creates an object of CView. u is a built in MFC class. In second line the code calls CView method MessageBox() to show a dialog box containing an OK button and a "Hello World" message. The caption of the dialog box is ".Net Article". In the third line the program makes a direct call to a windows API, the scope resolution symbol "::" before a method indicates that it is a direct API call. MessageBeep() uses a system defined wave file "MB_ICONHAND" to play the appropriate sound. The above three lines uses two different types of functions - one that the MFC provides and the other that the Operating System provides. Remember that MFC is nothing but a group of wrapper classes that encapsulate APIs. You can totally bypass MFC and develop an application solely using APIs. How about writing the same code in Visual Basic ?. The MFC equivalent of Visual Basic is VBrun. Although you may be able to use the MessageBeep() API in VB; but the Class CView does not exist in VBRun. You will have to learn VBRun in order to use an equivalent of CView. The same holds for other programming languages; and to further complicate the situation various vendors have their own names and hierarchy of the wrapper classes. What this means is that MFC is Microsoft wrapper classes for C++; Borland has their own wrapper classes. Same goes for Java. Microsoft provides a powerful wrapper classes package named WFC to be used with Visual J++, other vendors have their own wrapper classes.
In addition to this, if your application uses a COM component then you code would look radically different in different languages - this is because different languages have different implementation of COM, and have different data types. Given below is an extract of a COM component code (this has been taken out from SMTP.Server application). The code below returns a String. But in the world of COM, there is no string data type; instead the equivalent is "BSTR". The MFC implementation of string is the class CString (very similar to String class in Java). CString provides a function AllocSysString() that does the necessary conversion to BSTR.
BSTR CServer::GetCcTo() { return m_strCcTo.AllocSysString(); }
Now if a COM component was to be developed in VB. The above code would need to go through serious changes. Based on the above discussion we come to the following conclusion :
Every Windows application language has their own implementation and interfaces for the following:
1. COM Components, 2. Operating System Specific APIs (e.g. Win32API, Win16 API, Windows CE APIs) 3. Wrapper Classes (e.g. MFC, VBRun, WFC)
The above mentioned differences create unnecessary work for a programmer; and hamper interoperability between various languages.
Many Visual C++ programmers are reluctant to learn Visual Basic despite the fact that VB is much easier than VC. Although VC applications are faster, and this may be the reason why programmers may prefer VC, but in case of a simple COM component the increased productivity in VB more than make up for a slight penalty in speed. Personally I prefer to stick to VC, mainly because of the fact that I will have to learn VBRun, VB specific data types, and VB specific COM implementation. It would be great if VB and VC had common data types, and if MFC was also present in VB. This would reduce my learning curve to almost none, and would encourage thousands of programmers like me to embrace VB.
There is another problem with existing COM implementation. While a COM component can be used in many languages irrespective of how they were developed. These components can not be extended/inherited from. I have always fancied the very idea if being able to inherit/extend from a COM component. Unfortunately it is not (at least up till now) possible unless you have an access to the source code of the component. So the need of the hour is :
• A Common wrapper class implementation • A Common Data Type system • Ability to inherit/extend from COM Components.
And the solution to all this is - .NET Class Framework. Those of you who are familiar with MFC/VBRun/WFC can look at this framework as a group of wrapper classes that are shared across VC, VB, and any other .NET compliant language (a language that follows the Common Language Specifications "CLS" - set forth by Microsoft). So now we all have to learn only one Class Framework and can use it whether we are working in VB or in VC or in any other CLS compliant language. An important terminology related to .NET Framework is Namespace. Since you would frequently come across this term in any .NET article; its good if we formally define it. Namespace is a logical grouping of related

interfaces, structures and classes. Java programmers are familiar with the package concept. The namespace is very similar to the package concept. A Namespace may contain further namespaces. This would result in a tree like hierarchical structure. .Net Class Framework is nothing but a hierarchical structure of namespaces. In .NET Class Framework "System" is the starting namespace. A few other namespaces within System are System.Security, System.Data, System.Console, System.WinForms etc.
If you want to program a .NET application you will have to learn .NET Class Framework; just as a Java programmer learns the basic package hierarchy (e.g. java.util, java.lang, javax.servlet etc.).
go to top
Web Services
Web services is an extension of ActiveX. Those of you who have used ASP and JSP both, know the apparent shortcomings of ASP. JSP has been enriched with the concepts of Beans and Tags. ASP equivalent for Beans and Tags was ActiveX Controls and ActiveX automation servers. Let me take a minute to explain this point a bit further. Web Services is NOT a Microsoft proprietary standard. It is a W3Consortium standard, and has been developed by Microsoft, IBM and many other big names of the industry.
Functions are of two types. The ASP built-in functions, and the programmer defined/implemented functions . In order to use the built-in functions you just need to pass the appropriate parameters and make a simple call to these functions. The functions are implemented by the ASP itself. The string manipulation functions, Number conversion functions are an example of built in functions.
The programmer defined functions are the functions that are defined and implemented by the programmer. A programmer can either write these functions in the same asp file or can write them in another file. If the function code resides in the same asp file then the programmer can directly call that function. In case the function resides in another file , say "func.asp"; then the programmer needs to include that file by writing a statement like <!-- #include file="func.asp" -->; and now the programmer can use the function. The programmers can also make ActiveX automation servers, and call various function of these ActiveX servers. But one limitation is very obvious -- no matter which type of function you use, the function MUST physically reside on the same machine. For example your ActiveX automation server must be implemented either as a .dll or as an .exe and then must also be registered in Windows Registry before an asp code can call its functions. (you may download SMTP.Server - an ActiveX component developed by the author - to get a better idea of how to use an ActiveX component from you ASP/VC/VB code.) In a world where the Internet has become not only a necessity but also a way of life - it is obvious that this limitation is a strong one. Microsoft's answer to this problem is "Web Services". The idea goes something like this :
1. The Web service provider develops a useful function(s), and publish/advertise it. The Web Service provider uses Web Service Description Language (WSDL) standard to describe the interface of the function(s). This is much like the Type Libraries (TLB) and Object Description Language files (ODL) that needs to be generated with the ActiveX automation servers.
2. The programmer/client who needs the function does a lookup by using a process called - Web Service Discovery or SOAP Discovery (also called DISCO for Web Service DISCOvery)
3. The Actual communication between the client program and the web service takes place through a protocol called Simple Object Access Protocol (SOAP) - SOAP is an XML based light weight protocol used for communication in a decentralized distributed environment.

As is evident from the above discussion that at the heart of all the communication is XML. Both SOAP, WSDL leverage on XML.
We have all either used or at least heard of network communication protocols like RPC (Remote Procedure Call); RMI (Remote Method Invocation), CORBA, DCOM, IIOP. All these technologies have the same purpose - to enable calling a function/Object on a remote machine. So how is Web Service (or SOAP) any different than these existing technologies ? . The main difference is that SOAP uses HTTP/HTTPS protocol; unlike all the other technologies that uses specialized protocols for distributed communication. Microsoft, with this simplified approach has tried to bring sanity and unification to the world of distributed programming. Distributed applications are heavily dependent on JNDI lookups, RMI, CORBA, IIOP, Serializability and other intricacies. With Web Service and .NET development tools ; Microsoft have provided us with a much simpler way of developing distributed applications. So what is the catch ?. The obvious catch is that this is an ASP.NET specific technology (at least for now); but with time SOAP, WSDL, DISCO will most certainly gain wider acceptance.
According to Microsoft's tests an application developed ASP.NET using ADO.NET and Web Services, is many times more efficient than an equivalent application developed in JAVA, JSP, Servlets and EJBs. [1]
Note that .NET has no direct equivalent of EJBs. So considering Web Services as an equivalent to EJB will be in correct. However some of the functionality of an EJB can be provided by Web Services.
With .NET, Microsoft has followed one guiding principle - make it as simple as possible. And Web Services is no exception to this ideology. See the example below and judge for yourself as to how easy it is to develop a Web Service. And compare this with how "EASY ?" it was to develop an ActiveX automation server; or how "easy ?" it is to develop an EJB.
Web Service Example
Open any text editor and type in the following Visual Basic code, and save the file under ".asmx" extension.
Imports System Imports System.Web.Services Imports Microsoft.VisualBasic Public Class HelloWorld : Inherits WebService Public Function <WebMethod()> GreetTheUser(strUserName as String) as String Select Case strUserName Case "Kashif Manzoor" return "Hello Author" Case "Amna Kashif" return "Hello Ms. Amna Kashif" Case "Ahmed Luqman" return "Hello little Ahmed" Case Else return "Hello Stranger" End Select End Function End Class
The first three lines import needed Classes. Import is similar to the import used in Java or the #include in C/C++. The rest of the code is self explanatory. Notice that the Class extends/inherits from the built in Web Service class; this is mandatory. Also notice that the Function is declared with the key word <WebMethod()> this indicates that this function can be invoked from the web across the Internet. You may add other private functions in your class but those functions will not be accessible to outside word.

So that's it !!! you have successfully made your first Web Service. Although the service simply takes in a name and returns a greeting; but it is enough to give you a flavor of Web Services. This Web Service can now be accessed from your ASP.NET code. This article does not intend to explain either ASP.NET or Web Services in details , the interested reader should consult ASP.NET manual or visit MSDN site for more details.
Deploy your ".asmx" file on Web Service aware Application Server like IIS. And open up a Web Service aware browser like IE. Type in the appropriate URL for the file. If the file is in the default web application folder then the URL would be "http://localhost/HelloWorld.asmx". What do you think would happen ?. You will see a well formatted web page, giving you the details of the GreetTheUser() method. And at the bottom of the page you will be given an edit box, where you can enter the "strUserName" and then press a button beside the edit box. Once you do that, you will receive the greeting string as an XML document. This is a new and a wonderful feature.
Lets not be unfair with Sun's technologies here. Making an EJB (at least a stateless and stateful EJB) is no more difficult than the above example. What makes EJBs tricky is the deployment, the JNDI lookups, the Stubs and the application servers that support EJBs. With Microsoft's "click and ready to go" approach and easy to use utilities that come with Visual Studio.NET, deploying any of .NET application is extremely easy.
In conclusion Web Services is an evolutionary idea as opposed to being a revolutionary idea, its just an other distributed development tool - which happens to be extremely simple to use. Incorporation of Web Services in ASP.NET, has taken ASP to a new level of respectability. Web Services has already started gaining popularity and is also incorporated in the Java platform. Visit http://java.sun.com to get the latest on Web Services support in Java platform.
go to top
Web Forms
Just as the Win Forms provide a unified way of developing GUI for desktop application, the Web Forms provide similar tool for web applications. Web Forms has been introduced in .NET as a part of ASP.NET. Web Forms are a forms engine, that provide a browser-based user interface.
To appreciate Web Forms you may consider how GUI is rendered in current Web applications. The GUI is rendered by using HTML tags. (e.g. <input type=text name=editbox1 maxlength=10 size=10 >, will draw an edit box on the web page) Web Forms can also have the intelligence to use HTML, DHTML,WML etc. to draw the controls on the web page based on the browser's capabilities. Web Forms can also incorporate the logic behind these controls. Its like hooking up the code to a GUI control. Just like in your VB application, you can associate a code with a button on the web page, this code will be run on the server when the button is pressed. This is in contrast to the scripts that run on the clients when a button is pressed. This approach is different to the Java approach. In Java a programmer can simulate this functionality through JavaScript and Servlets. But with Web forms this is done transparently. A Java programmer may consider as if each HTML control has its dedicated "Servlet" running in the background. Every time the control receives any event of interest (e.g. button pressed, selection changed etc.) this specific "Servlet" is called. This results in much cleaner code and an excellent logic separation between presentation and business logic layers.
Web Forms consist of two parts - a template, which contains HTML-based layout information for all the GUI elements and a Component which contains all the logic to be hooked to the controls or GUI elements. This provides a neat presentation layer and application logic layer separation.
The GUI will be rendered on the client side, while the code that has been hooked to the GUI elements will run on the server side (very much like a button being pressed on a JSP and a Servlet being called in response. But with Win Forms this has been made extremely easy). The incorporation of Web Forms in ASP.NET is an attempt to take ASP to a new level where it can seriously challenge JSP.
Another good feature of Web Forms is that it can be built to have enough intelligence to support a vast variety of browsers. The same ASP page would render itself using DHTML, if the browser is IE 5.5. but if the browser is Netscape the web page will be rendered using HTML tags; if the page is being accessed through a WAP device the same page will render itself using WML tags.
One of the obvious disadvantage of ASP over Java was that there was that an ASP code was a maintenance nightmare. While a Java programmer can use Java Beans, Tags and also Servlets to achieve presentation and business layer separation - no such mechanism was present to a ASP programmer. With ASP.NET Microsoft has provided such presentation-business layer separation - by introducing the concept of Web Forms:
1. ASP.NET Web Forms provide an easy and powerful way to build dynamic Web UI. 2. ASP.NET Web Forms pages can target any browser client (there are no script
library or cookie requirements). 3. ASP.NET Web Forms pages provide syntax compatibility with existing ASP pages. 4. ASP.NET server controls provide an easy way to encapsulate common
functionality. 5. ASP.NET ships with 45 built-in server controls. Developers can also use controls
built by third parties. 6. ASP.NET templates provide an easy way to customize the look and feel of list
server controls. 7. ASP.NET validation controls provide an easy way to do declarative client or server
data validation.
For those of you (like me) who turned to Java for web development mainly due to spaghetti code of ASP- ASP.NET is worth exploring. Since it introduces some exciting new ways to write clean code (Personally I find Web Forms an exciting new concept - that does not have a direct equivalence in Java platform)
go to top
Windows Forms
Windows forms (also called Win Forms) are used to create GUI for Windows desktop applications. The idea of Win Form has been borrowed from Windows Foundation Classes (WFC) which were used for Visual J++. Win Form provide an integrated and unified way of developing GUI. It has a rich variety of Windows controls and user interface support.
Numerous classes and functions were used by programmers to handle GUI. MFC in VC++, direct API in C++ and VB Forms Engine in VB are just a few examples of different ways of handling GUI.
Simply put - Win Form is just another group of wrapper classes that deal specifically with GUI. Win Form classes encapsulate the Windows Graphical APIs. Now the programmers would not need to use the Windows Graphical APIs directly; and since Win Form has been made a part of .NET Class Framework; all the programming languages would use the same Win Form classes. This would rid the programmers of the need to learn different GUI classes/tools. Win Forms in the part of the namespace System.Winforms.
With Win Forms we can make a single user interface, and use it in VC++, VB, C#. Using Visual Studio.NET simply design the GUI, by dragging the controls on a form (something that all VC++ and VB programmers are well familiar with). Now you can use the same form either in VB, VC++ or in C#. And this is all made possible because Visual Studio.NET uses the System.Winforms namespace to draw the GUI. And any language that has the appropriate CLS compliance can use this form directly.
go to top
Various .NET Languages - VB.Net, ASP.NET, C#, J#, VC.NET
Sun intended to present JVM - as a single language virtual Machine. Meaning that only a Java program can be converted to a byte code (.class file) and then presented to JVM, which interprets the programs and runs it on the host machine. Although In concept, any language can be compiled to Java Byte code and then fed to JVM; but Sun did not encourage such approaches. Despite Sun's lack of initiative in this regard many researchers and companies have developed languages following this approach. Sun's vision of Java being "One language fits all" has both its advocates and its critics[5]
With CLR, Microsoft has adopted a much liberal policy. Microsoft has themselves evolved/developed/modified many of their programming language to be compliant with .NET CLR.
Although Visual C++ (VC++) , has undergone changes to incorporate .NET; yet VC++ also maintain its status as being a platform dependent programming. Many new MFC classes have been added; a programmer can choose between using MFC and compiling the program into a platform specific executable file; or using .NET framework classes and compile into platform independent MISL file. A programmer can also specify (via directives) when ever he uses "un-safe" (the code that by passes CLR - e.g. the use of pointers) code.
ASP, is another language that has been improved markedly. Most programmers know that ASP did not measure upto JSP; Microsoft has tried to turned the tables by introducing ASP.NET. ASP.NET makes extensive use of Web-Services. Web-Services is an open standard and JSP can use Web-services (Sun's official web site gives a detail on Web services and how that are being incorporated in Java platform). There are many other features that have been introduced in ASP.NET, to make it an ideal distributed programming tool and to measure up against JSP. ASP code within <% %> tag, is compiled into .NET Framework (similar to JSP code being compiled into a servlet). This approach is different than how the <% %> was handled in ASP ASP.NET has been enhanced by Microsoft.
Out of ALL .NET languages, Visual Basic.NET (VB.NET) is one language that has probably undergone the most changes. Now VB.NET may be considered a complete Object-Oriented Language (as opposed to its previous "Half Object Based and Half Object Oriented" status).
Microsoft has also developed a brand new programming language C# (C Sharp). This language makes full use of .NET. It is a pure object oriented language. A Java programmer may find most aspects of this language to be identical to Java. If you are a new comer to Microsoft Technologies - this language is the easiest way to get on the .NET band wagon. While VC++, and VB enthusiast would stick to VC.NET and VB.NET; they would probably increase their productivity by switching to C#. C# is developed to make full use of all the intricacies of .NET. The learning curve of C# for a Java programmer is minimal. Microsoft has also come up with a The Microsoft Java Language Conversion Assistant - which is a tool that automatically converts existing Java-language
source code into C# for developers who want to move their existing applications to the Microsoft .NET Framework.
Microsoft has also developed J# (Java Sharp). C# may be similar to Java, but it is not entirely identical. It is for this reason that Microsoft has developed J# - the syntax of J# is identical to Visual J++. Microsoft's growing legal battle with Sun over Visual J++ - forced Microsoft to discontinue Visual J++. So J# is Microsoft's indirect continuation of Visual J++. It has been reported that porting a medium sized Visual J++ project, entirely to J# takes only a few days of effort.
Microsoft encourages third party vendors to make use of Visual Studio.Net (launched on Feb 13, 2002). Third party vendors can write compilers for different languages - that compile the language to MSIL (Microsoft Intermediate Language). These vendors need not develop their own development environment. They can easily use Visual Studio.NET as an IDE for their .NET compliant language. A vendor has already produced COBOL.NET that integrates with Visual Studio.NET and compiles into MSIL[3]. Theoretically it would then be possible to come up with Java compiler that compiles into MSIL instead of Java Byte code; and uses CLR instead of JVM. However Microsoft has not pursued this due to possible legal action by Sun.
go to top
What has future in store for us ?
Although the Beta of Visual Studio.Net has been around for over two years; it was officially launched on Feb 13, 2002. The future of .NET is very promising. With .NET Microsoft has diverged from their age-old philosophy of "proprietorship". Microsoft has always been coming up with good tools - which unfortunately have used proprietary technologies. One reason of unpopularity of DNA, COM, DCOM was that they were all based on proprietary Microsoft binary format. Microsoft has learned from its mistakes; .NET has a foundation of ASCII based XML. Microsoft submitted C#, and CLI for standardization to ECMA which on December 13, 2001, ratified the C# and Common Language Infrastructure (CLI) specifications into international standards. The ECMA standards will be known as ECMA-334 (C#) and ECMA-335 (the CLI). There is also a technical report on the CLI which will be known as ECMA TR84. In addition, ECMA approved the fast-track motion of these specifications to ISO. This is a huge step toward the Microsoft .NET Framework being widely accepted by the industry.
As of now, CLR is only available on Windows platform. .NET can only challenge Java, when the CLR becomes available for other platforms. Corel is working on a "Port Project" - that aims to port .NET framework to LINUX. Another company by the name of XIMIAN is also working on a similar project named - "Mono". With third party projects like these - we would soon have .NET versions for various non-Windows platforms.
In future we would probably see J2EE and .NET chasing each other with no single technology ever being able to replace the other. Historically Microsoft platform is considered inappropriate for enterprise solutions - whereas it is considered perfect tool for standalone applications. Java platform on the other hand, has always been considered suitable for Enterprise applications, and has been considered slow and at times inefficient for standalone applications. With the healthy competition between Java and .NET we would probably see much better application platforms. As a programmer - we stand to loose nothing. Whether .NET gains more acceptance than J2EE or vice versa - the programming aspects remain the same. Whether you program in C# or, Java or J# - the syntax (essentially) remain the same - and with the similarity between the .NET and Java framework classes it would take an average programmer only a month or so to switch from one to another.
It is the author's opinion that .NET should be treated as a valuable addition to a programmer's toolbox. In .NET we have another tool at our disposal, how we use it, and when we use it is subject to our discretion.
Getting Started with Visual Studio .NET and the Microsoft .NET Compact Framework [http://msdn.microsoft.com/library/default.asp?url=/library/en-us/cptutorials/html/introduction_to_development_tutorial.asp]
Larry Roof larryroof.com
March 2002
Applies to: Microsoft® .NET Compact Framework 1.0 Microsoft® Visual Studio .NET 2003 Microsoft® Windows® CE .NET
Summary: Learn about developing robust smart client device applications with the .NET Compact Framework 1.0 and Visual Studio .NET 2003. (34 printed pages)
Contents
Introduction Common Language Runtime .NET Compact Framework Class Library Ala Carte Features Features Missing from the .NET Compact Framework Developing with Visual Studio .NET 2003 Additions to the IDE Supported Languages Online Documentation Creating a .NET Compact Framework Application Starting a Visual Basic .NET Project Starting a Visual C# .NET Project The Smart Device Application Wizard Pocket PC Project Types Windows CE Project Types Setting Project Properties Creating the Interface Adding Code Testing Your Application Testing in the Emulator Testing on a Device Debugging Your Application Deploying Your Application What is required? Creating a CAB File CAB File Output Creating a Desktop Setup Summary Where to go for Additional Information
Introduction
Microsoft developed the .NET Compact Framework with one intention in mind: to build applications. I am talking about applications that display, gather, process and forward information, those applications that give users a reason to carry a device. While they typically will have an interface, they do not require one. The data that they are working with might be local, might be remote, or some combination of both.
The .NET Compact Framework simplifies application development on smart devices. Currently this includes the Pocket PC, Pocket PC 2002, Pocket PC Phone Edition and other devices running Windows CE.NET 4.1 or later.
You will need Visual Studio .NET 2003 to build applications that target the .NET Compact Framework. You can build applications using either Visual C# .NET, Visual Basic .NET, or both.
The .NET Compact Framework has two main components: the common language runtime and the .NET Compact Framework class library.
The runtime is the foundation of the .NET Compact Framework. It is responsible for managing code at execution time, providing core services such as memory management and thread management while enforcing code safety and accuracy. Code that targets the runtime is known as managed code; code that does not target the runtime, as is the case with eMbedded Visual C++, is known as unmanaged, or native code.
The .NET Compact Framework class library is a collection of reusable classes that you can use to quickly and easily develop applications. This framework was designed with porting in mind, whether to Microsoft or third-party platforms. What does this mean to you? Simply that the coding techniques and the applications you create today to run on a Pocket PC could run on other platforms, such as a cell phone or another vendor's PDA, if a version of the .NET Compact Framework was created for that platform.
Common Language Runtime
The common language runtime provides a code-execution environment that manages code targeting the .NET Compact Framework. Code management can take the form of memory management, thread management, security management, code verification and compilation and other system services.
The runtime is designed to enhance performance. It uses just-in-time (JIT) compiling, which enables managed code to run in the native machine language of the platform on which your application is running. This allows you to create applications that can target a variety of platforms and not have to worry about recompiling or generating executables that target each specific platform.
Even though your mobile application is written in Visual Basic .NET or C# .NET, and as such is managed code, you are still able to incorporate functions and subroutines stored externally in dynamic link libraries (DLLs), including the Windows CE APIs. The .NET Compact Framework provides the data types and support for structures to allow you to easily incorporate functions from the Windows CE APIs into your application.
.NET Compact Framework Class Library
The .NET Compact Framework class library is a collection of reusable classes that tightly integrate with the common language runtime. Your applications leverage these libraries to derive functionality.
As you would expect from an object-oriented class library, the .NET Compact Framework types enable you to accomplish a range of common programming tasks, including tasks such as interface design, leveraging XML, database access, thread management and file I/O.
Following is a list of common functionality available through the .NET Compact Framework.
Form-related Classes
The .NET Compact Framework implements a subset of the System.Windows.Forms and System.Drawing classes, which allows you to construct a rich Windows CE-based user interface for your device application. The Form Designer in Visual Studio.NET manages much of the interaction with these classes for you.
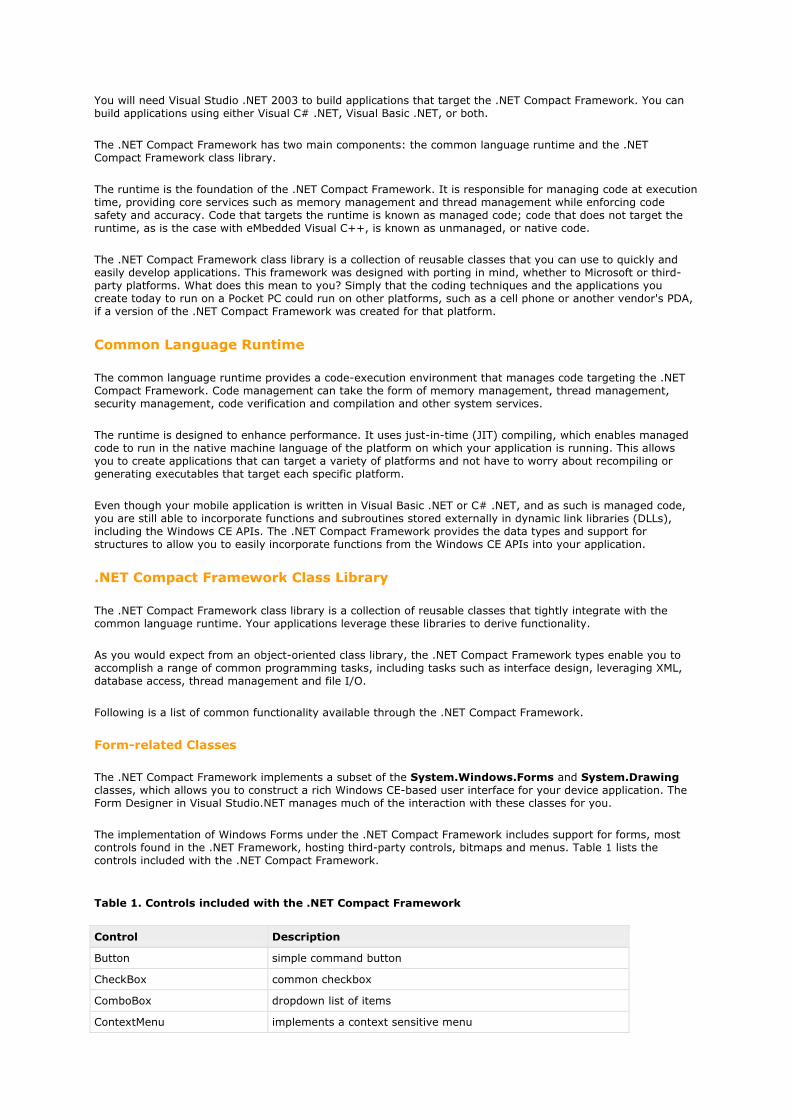
The implementation of Windows Forms under the .NET Compact Framework includes support for forms, most controls found in the .NET Framework, hosting third-party controls, bitmaps and menus. Table 1 lists the controls included with the .NET Compact Framework.
Table 1. Controls included with the .NET Compact Framework
Control Description
Button simple command button
CheckBox common checkbox
ComboBox dropdown list of items
ContextMenu implements a context sensitive menu
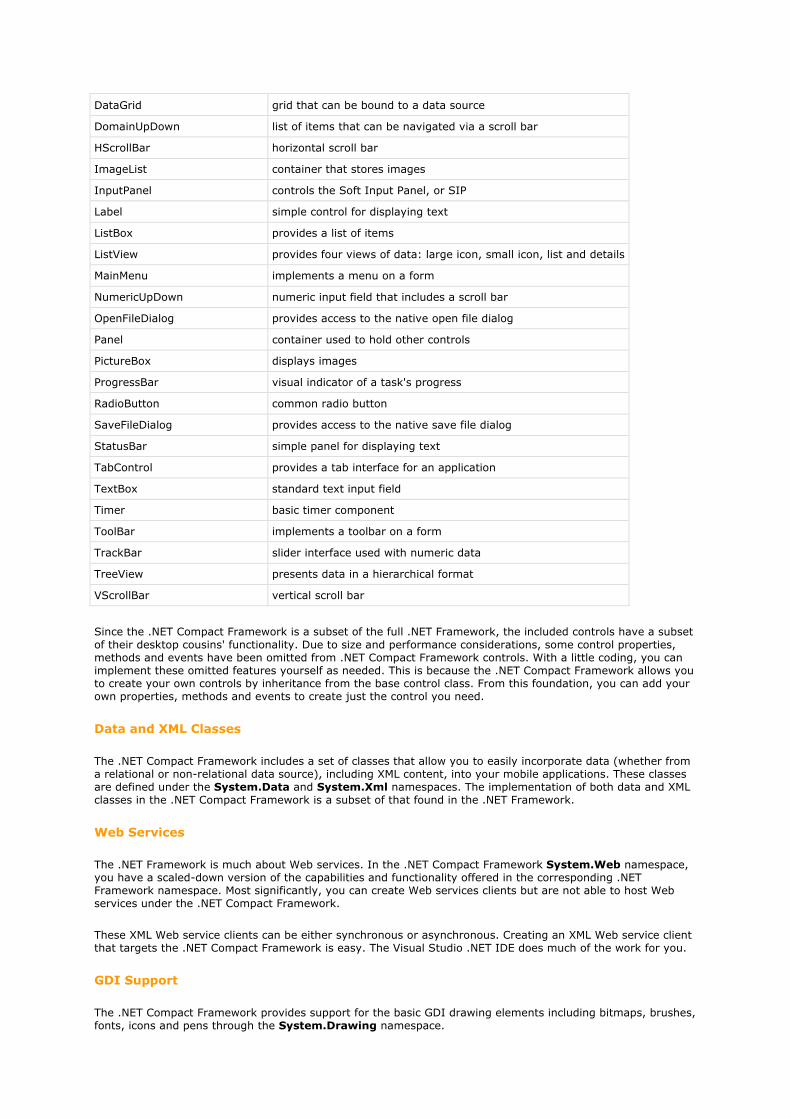
DataGrid grid that can be bound to a data source
DomainUpDown list of items that can be navigated via a scroll bar
HScrollBar horizontal scroll bar
ImageList container that stores images
InputPanel controls the Soft Input Panel, or SIP
Label simple control for displaying text
ListBox provides a list of items
ListView provides four views of data: large icon, small icon, list and details
MainMenu implements a menu on a form
NumericUpDown numeric input field that includes a scroll bar
OpenFileDialog provides access to the native open file dialog
Panel container used to hold other controls
PictureBox displays images
ProgressBar visual indicator of a task's progress
RadioButton common radio button
SaveFileDialog provides access to the native save file dialog
StatusBar simple panel for displaying text
TabControl provides a tab interface for an application
TextBox standard text input field
Timer basic timer component
ToolBar implements a toolbar on a form
TrackBar slider interface used with numeric data
TreeView presents data in a hierarchical format
VScrollBar vertical scroll bar
Since the .NET Compact Framework is a subset of the full .NET Framework, the included controls have a subset of their desktop cousins' functionality. Due to size and performance considerations, some control properties, methods and events have been omitted from .NET Compact Framework controls. With a little coding, you can implement these omitted features yourself as needed. This is because the .NET Compact Framework allows you to create your own controls by inheritance from the base control class. From this foundation, you can add your own properties, methods and events to create just the control you need.
Data and XML Classes
The .NET Compact Framework includes a set of classes that allow you to easily incorporate data (whether from a relational or non-relational data source), including XML content, into your mobile applications. These classes are defined under the System.Data and System.Xml namespaces. The implementation of both data and XML classes in the .NET Compact Framework is a subset of that found in the .NET Framework.
Web Services
The .NET Framework is much about Web services. In the .NET Compact Framework System.Web namespace, you have a scaled-down version of the capabilities and functionality offered in the corresponding .NET Framework namespace. Most significantly, you can create Web services clients but are not able to host Web services under the .NET Compact Framework.
These XML Web service clients can be either synchronous or asynchronous. Creating an XML Web service client that targets the .NET Compact Framework is easy. The Visual Studio .NET IDE does much of the work for you.
GDI Support
The .NET Compact Framework provides support for the basic GDI drawing elements including bitmaps, brushes, fonts, icons and pens through the System.Drawing namespace.
Base Classes
The .NET Compact Framework provides a robust set of base classes that expose a wide-range of functionality for use by developers. This underlying infrastructure enables you to write rich .NET applications including being able to create multi-threaded applications (System.Threading), leveraging networking resources (System.Net), and working with files (System.IO).
IrDA Support
Windows CE devices, such as the Pocket PC and Pocket PC 2002, include infrared (IR) communication capabilities. In support of this, the .NET Compact Framework includes classes that allow you to leverage IR communication from within your application. These classes are part of the System.Net.IrDA namespace. You can use IR to communicate with Pocket PCs, printers and other IR-enabled devices.
Bluetooth Support
The .NET Compact Framework does not natively provide support for Bluetooth. You can access most third-party Pocket PC implementations of Bluetooth via either serial port communications or through a provider's API.
Visual Basic Support
Visual Basic .NET makes liberal use of helper functions that are located in a Visual Basic Helper library. The .NET Compact Framework includes a subset of these functions as well. These functions are considered by Visual Basic developers to be a core part of the language, which is the reason for their inclusion.
If you are a Visual Basic or eMbedded Visual Basic developer converting over to the .NET Compact Framework, this means that many of the Visual Basic language functions you are used to working with will be available to you in Visual Basic .NET.
Ala Carte Features
To conserve resources on the target device, Microsoft divided the .NET Compact Framework into logical components. By delivering components as separate DLLs—or assemblies as they are referred to within the .NET Compact Framework—Microsoft gives you the option of picking and choosing the features you need, and only those features that your target device has the space to hold.
An example of this is the System.SR assembly, which contains error message strings. Including this assembly with your application allows access to detailed descriptions of any errors encountered, which is certainly helpful during a debugging session, but infrequently needed in an application once it is released to production. Excluding this assembly does not affect the performance or functionality of your application; it simply means you will not have access to detailed error messages.
Another example of the .NET Compact Framework ala carte approach is SQL Server CE components, delivered in a set of DLLs totaling slightly over 1MB in size. Unless you explicitly add a reference to the System.Data.SqlServerCe assemblies, these DLLs will not be included with your application.
Features Missing from the .NET Compact Framework
Some serious trimming had to be made to the .NET Framework so that it could fit into the operating constraints of Windows CE. The most notable .NET Framework features that did not make it into the .NET Compact Framework are the subject of this section.
Method Overloads
Overloading a method provides alternative ways to call that method. It also increases the size of the Framework. Because of this, the .NET Compact Framework trimmed the overloads from almost all methods.
What this means to you is two-fold. First, there is a good chance that a particular method overload you used with a desktop application will not be available when developing .NET Compact Framework-based applications. Second, when you read the documentation, pay close attention to whether or not a method is supported by the .NET Compact Framework.
Missing Controls
A number of .NET Framework controls did not make their way into the .NET Compact Framework. The absence of most of these controls is insignificant to mobile developers. Since printing has such a limited role in mobile applications, removing the whole family of print-related controls is not an issue. That takes care of the CrystalReportViewer, PageSetupDialog, PrintDialog, PrintDocument, PrintPreviewControl and PrintPreviewDialog controls. You can replace many of the missing dialogs with your own dialogs or by accessing system dialogs directly using the Windows CE API.
Third-party controls are already becoming available to fill in for the controls that were left out of the .NET Compact Framework. For a list of third-party .NET Compact Framework controls see the references at the end of this article.
XML Functionality
As much as the .NET Compact Framework offers in the way of XML, an equal amount of functionality was trimmed. The key missing XML-related component is the System.Xml.XPath namespace. The XPath namespace made XML parsing far easier than the methods offered under the .NET Compact Framework. In its absence, you can use a combination of recursive and iterative searches against the Document Object Model (DOM).
The .NET Compact Framework is missing another key XML component, Extensible Stylesheet Language Transformation, or XSLT. With XSLT, you can convert an XML document into different formats.
On an XML-related note, the .NET Compact Framework does not currently provide support for developing device-based XML Web services.
Database Support
The .NET Compact Framework offers a robust set of data-related tools. Local database support is provided for SQL Server CE. On the server side, the .NET Compact Framework provides support for SQL Server.
Note that there is a third party who provides a .NET Compact Framework component for working with Pocket Access databases. For more information, see the references at the end of this article.
Binary Serialization
Due to size and performance considerations both the BinaryFormatter and SoapFormatter classes have been omitted from the .NET Compact Framework.
Access to the Windows Registry
The .NET Framework has the Microsoft.Win32.Registry namespace, which makes it easy to work with the Windows registry from an application. Obviously, this namespace was not included in the .NET Compact Framework, because it relates to Win32, not Windows CE. You may access the Windows CE registry by invoking the relevant Windows APIs.
Leveraging COM Components
Incorporating COM objects into a .NET Compact Framework-based application is a two-step process. First, you must write an unmanaged—that is to say eMbedded Visual C++—DLL wrapper that exposes the COM object. Depending upon the complexity of the COM object, this may be anything from simple to extremely complicated. Second, you must use PInvoke to access your DLL wrapper. Luckily, the development community has already begun work on accessing the more commonly used COM components, several of which are included in the references at the end of this article.
Security
The .NET Compact Framework does not secure access to unmanaged code. Any application can call any system or non-system API.
There is currently no role-based security with the .NET Compact Framework. The principal object has no understanding of known identity or known role.
XML Web Services
The most notable exclusion from the .NET Compact Framework XML Web service capabilities is the ability to use cookies. Cookies are widely used to maintain state on the server between calls from a client. While the use of cookies in Web services is not as prevalent as their use on Web sites, they are still in use.
The .NET Compact Framework offers limited cryptographic abilities with respect to Web services.
Printing
The .NET Compact Framework provides no support for printing. There is no easy way to interact with either network printers or external printers via IR.
The workaround for accessing network printers is to build a server-based application, which accepts and prints jobs submitted by your mobile application.
You can send output through the IR port directly to IR-enabled printers. You use the System.Net.IrDA namespace to access the IR port of your device
GDI+
Windows CE does not natively support GDI+, so GDI+ related functionality was removed from .NET Compact Framework.
Remoting
The first release of the .NET Compact Framework does not support remoting.
Developing with Visual Studio .NET 2003
Visual Studio .NET 2003 provides a robust development environment for creating applications that target the .NET Compact Framework. Included with Visual Studio .NET is a set of pre-built device profiles. A device profile contains information necessary to build applications that target specific devices. With Visual Studio .NET, there are profiles that enable you to create applications for the Pocket PC, Pocket PC 2002, and Windows CE .NET 4.1 and later. These profiles allow you to create applications that include Windows Forms and ADO.NET, and offer the ability to consume Web services.
Profiles may be device-specific, such as targeting the Pocket PC, less-specific platforms that target the Windows CE platform in general, or generic profiles that target any platform to which the .NET Compact Framework has been ported.
Visual Studio .NET supports device kits (formerly known as SDKs). As were earlier versions of the embedded tools, device kits are separate from Visual Studio .NET and may be installed and updated independently.
Additions to the IDE
In addition to all of the features found natively in Visual Studio .NET, there are the following device-specific features:
• Templates—predefined configurations for common project types. Templates are provided for both
Pocket PC and Windows CE devices.
• Device-specific controls—controls specifically designed for use with the Pocket PC and Windows CE.
The interface, resource consumption and functionality have been tailored for these environments.
• Device emulators—testing environments that simulate specific devices. Emulators run on the
developer's PC, allowing for testing without the presence of a device.
• Automatic deployment of applications—allows you to easily test to either an emulator or a device,
providing developers with a seamless testing environment.
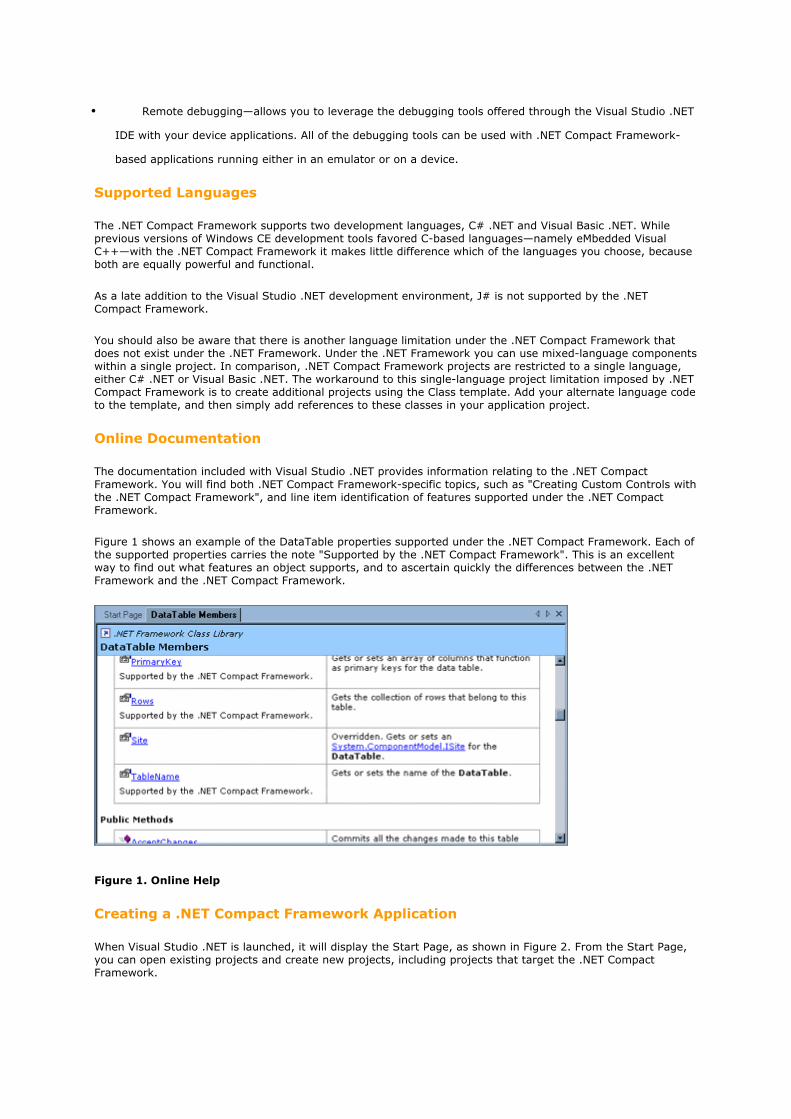
• Remote debugging—allows you to leverage the debugging tools offered through the Visual Studio .NET
IDE with your device applications. All of the debugging tools can be used with .NET Compact Framework-
based applications running either in an emulator or on a device.
Supported Languages
The .NET Compact Framework supports two development languages, C# .NET and Visual Basic .NET. While previous versions of Windows CE development tools favored C-based languages—namely eMbedded Visual C++—with the .NET Compact Framework it makes little difference which of the languages you choose, because both are equally powerful and functional.
As a late addition to the Visual Studio .NET development environment, J# is not supported by the .NET Compact Framework.
You should also be aware that there is another language limitation under the .NET Compact Framework that does not exist under the .NET Framework. Under the .NET Framework you can use mixed-language components within a single project. In comparison, .NET Compact Framework projects are restricted to a single language, either C# .NET or Visual Basic .NET. The workaround to this single-language project limitation imposed by .NET Compact Framework is to create additional projects using the Class template. Add your alternate language code to the template, and then simply add references to these classes in your application project.
Online Documentation
The documentation included with Visual Studio .NET provides information relating to the .NET Compact Framework. You will find both .NET Compact Framework-specific topics, such as "Creating Custom Controls with the .NET Compact Framework", and line item identification of features supported under the .NET Compact Framework.
Figure 1 shows an example of the DataTable properties supported under the .NET Compact Framework. Each of the supported properties carries the note "Supported by the .NET Compact Framework". This is an excellent way to find out what features an object supports, and to ascertain quickly the differences between the .NET Framework and the .NET Compact Framework.
Figure 1. Online Help
Creating a .NET Compact Framework Application
When Visual Studio .NET is launched, it will display the Start Page, as shown in Figure 2. From the Start Page, you can open existing projects and create new projects, including projects that target the .NET Compact Framework.
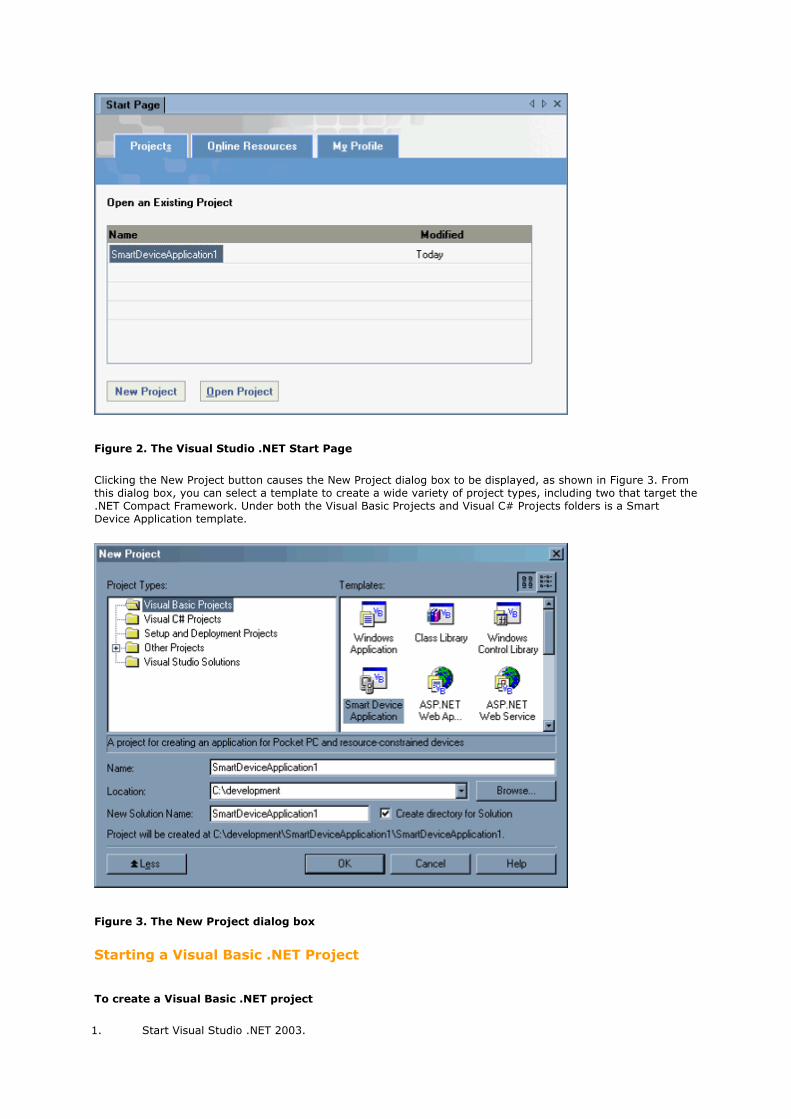
Figure 2. The Visual Studio .NET Start Page
Clicking the New Project button causes the New Project dialog box to be displayed, as shown in Figure 3. From this dialog box, you can select a template to create a wide variety of project types, including two that target the .NET Compact Framework. Under both the Visual Basic Projects and Visual C# Projects folders is a Smart Device Application template.
Figure 3. The New Project dialog box
Starting a Visual Basic .NET Project
To create a Visual Basic .NET project
1. Start Visual Studio .NET 2003.
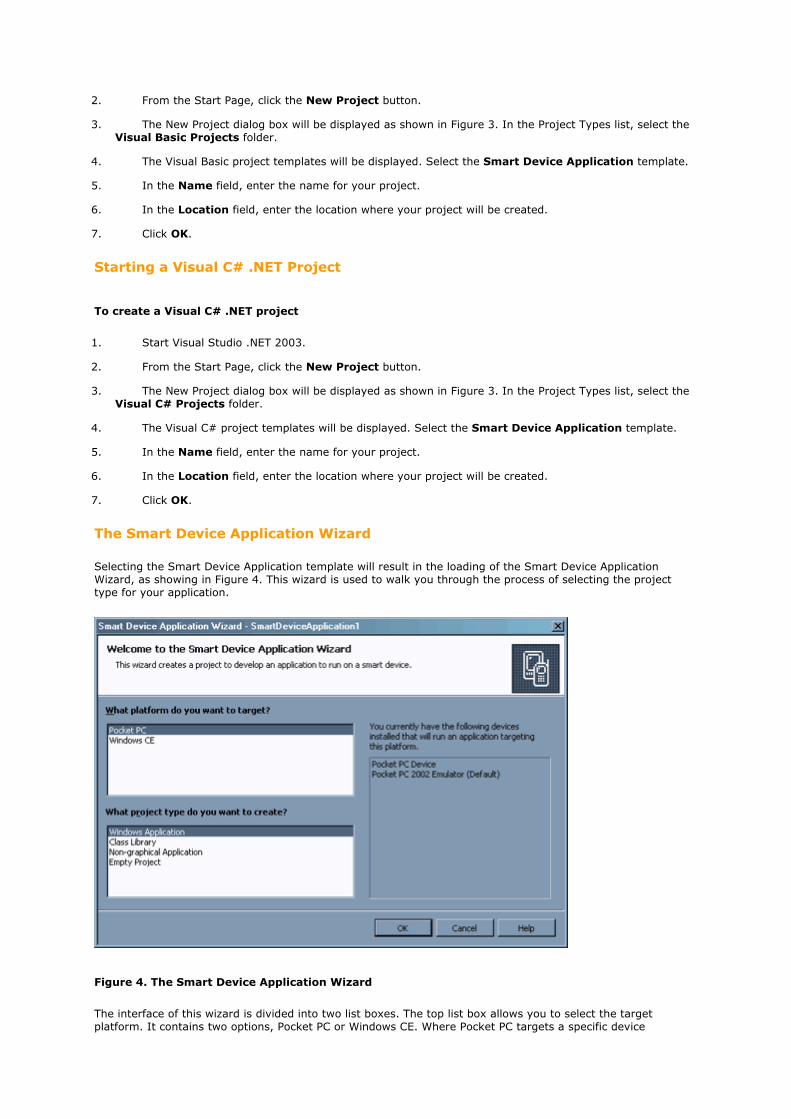
2. From the Start Page, click the New Project button.
3. The New Project dialog box will be displayed as shown in Figure 3. In the Project Types list, select the Visual Basic Projects folder.
4. The Visual Basic project templates will be displayed. Select the Smart Device Application template.
5. In the Name field, enter the name for your project.
6. In the Location field, enter the location where your project will be created.
7. Click OK.
Starting a Visual C# .NET Project
To create a Visual C# .NET project
1. Start Visual Studio .NET 2003.
2. From the Start Page, click the New Project button.
3. The New Project dialog box will be displayed as shown in Figure 3. In the Project Types list, select the Visual C# Projects folder.
4. The Visual C# project templates will be displayed. Select the Smart Device Application template.
5. In the Name field, enter the name for your project.
6. In the Location field, enter the location where your project will be created.
7. Click OK.
The Smart Device Application Wizard
Selecting the Smart Device Application template will result in the loading of the Smart Device Application Wizard, as showing in Figure 4. This wizard is used to walk you through the process of selecting the project type for your application.
Figure 4. The Smart Device Application Wizard
The interface of this wizard is divided into two list boxes. The top list box allows you to select the target platform. It contains two options, Pocket PC or Windows CE. Where Pocket PC targets a specific device

platform, the Windows CE template is used to create a more general-purpose application that could run on a variety of devices that are running that operating system.
The lower list box displays the project types that are available for the target device (Pocket PC or Windows CE) you selected.
Pocket PC Project Types
Four project types target the Pocket PC and Pocket PC 2002 platforms, as shown in Figure 5. These are Windows Application, Class Library, Non-graphical Application and Empty Project. A description of each of these project types is provided in Table 2.
Figure 5. Pocket PC project types
These project types can be used to create applications that target Pocket PC devices running SH3, MIPS or ARM processors and Pocket PC 2002 devices with ARM or XScale processors.
Table 2. Pocket PC project types
Project Type Description
Windows Application A Windows Forms-based project including Pocket PC specific controls. This is the most commonly used template because it generates Windows-based applications.
Class Library Class libraries allow you to package related components in a single file. They can be used to develop other applications or as a base for inheritance for other components. This project type is best suited for creating modules of code that will be reused with multiple applications.
Non-graphical Application Used to create executables that will not have a user interface. Best used for background and maintenance applications that do not require user interaction.
Empty Project Defines a project with no predefined components, allowing you to custom-build everything from the ground up.
Note The Pocket PC device does not come with console support. As a workaround you can load console.dll yourself, which is available with Platform Builder.
Windows CE Project Types
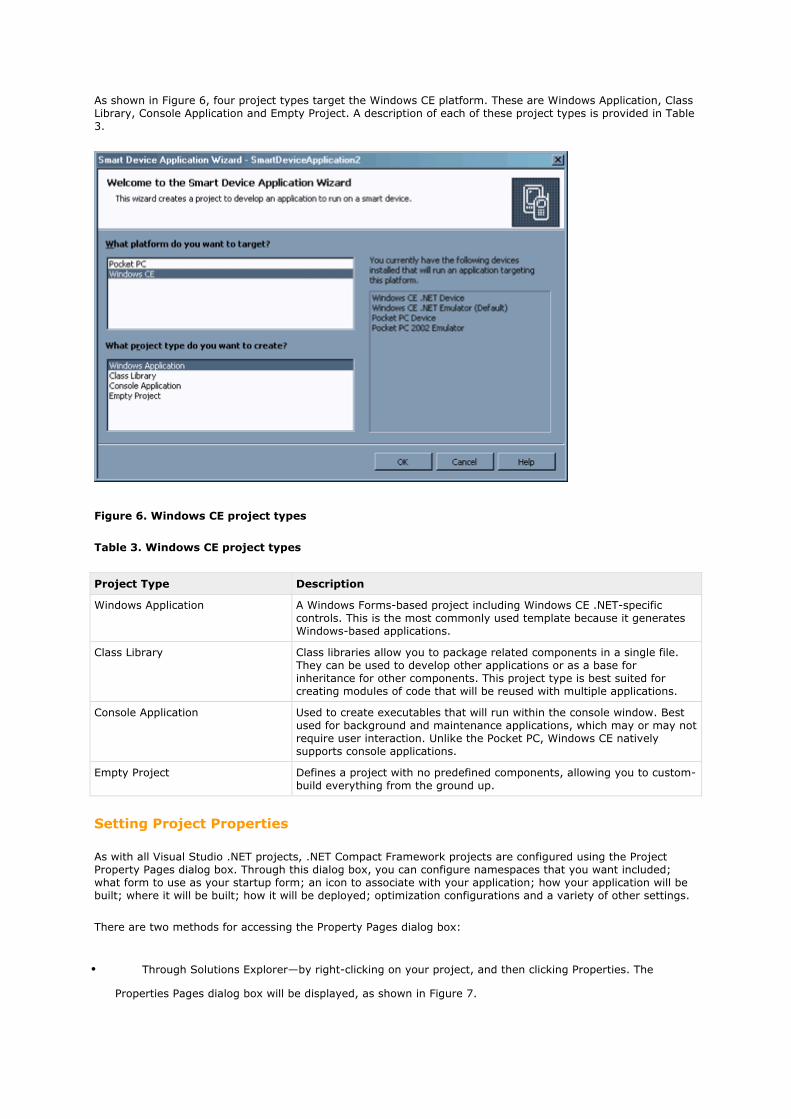
As shown in Figure 6, four project types target the Windows CE platform. These are Windows Application, Class Library, Console Application and Empty Project. A description of each of these project types is provided in Table 3.
Figure 6. Windows CE project types
Table 3. Windows CE project types
Project Type Description
Windows Application A Windows Forms-based project including Windows CE .NET-specific controls. This is the most commonly used template because it generates Windows-based applications.
Class Library Class libraries allow you to package related components in a single file. They can be used to develop other applications or as a base for inheritance for other components. This project type is best suited for creating modules of code that will be reused with multiple applications.
Console Application Used to create executables that will run within the console window. Best used for background and maintenance applications, which may or may not require user interaction. Unlike the Pocket PC, Windows CE natively supports console applications.
Empty Project Defines a project with no predefined components, allowing you to custom-build everything from the ground up.
Setting Project Properties
As with all Visual Studio .NET projects, .NET Compact Framework projects are configured using the Project Property Pages dialog box. Through this dialog box, you can configure namespaces that you want included; what form to use as your startup form; an icon to associate with your application; how your application will be built; where it will be built; how it will be deployed; optimization configurations and a variety of other settings.
There are two methods for accessing the Property Pages dialog box:
• Through Solutions Explorer—by right-clicking on your project, and then clicking Properties. The
Properties Pages dialog box will be displayed, as shown in Figure 7.

• Through the Project menu—first select your project in the Solutions Explorer window. Then, from the
Project menu, click Properties. The Property Pages dialog box will be displayed.
Figure 7. The Property Pages dialog box
Creating the Interface
If you are already an experienced Visual Studio .NET developer, you will require little orientation to begin creating user interfaces for applications that target the .NET Compact Framework. For those who are new to the Visual Studio .NET IDE, new projects based on the Windows Application template will automatically display a default form as shown in Figure 8.
In this example, the project type is a Windows Application that will target the Pocket PC. The template for this type of application includes a form that is sized correctly for the Pocket PC platform. A menu control, shown below the form, is included with the form because most Pocket PC applications include menus.

Figure 8. Default Pocket PC form
Controls that are Included
The .NET Compact Framework includes a subset of the controls that can be used to construct a desktop Windows application. For the most part, you will find that these controls offer a subset of equivalent controls found under the .NET Framework. This difference has to do with resource limitations imposed by the target platforms.
The controls provided through .NET Compact Framework are shown in Table 4.
Table 4. Controls included with the .NET Compact Framework
Button CheckBox ComboBox ContextMenu DomainUpDown
HScrollBar ImageList InputPanel Label ListBox
ListView MainMenu NumericUpDown OpenFileDialog Panel
PictureBox ProgressBar RadioButton SaveFileDialog StatusBar
TabControl TextBox Timer Toolbar TrackBar
TreeView VScrollBar DataGrid
Note There are also a number of third-party controls available. Refer to the reference section at the end of this document for more details.
Building Custom Controls
One of the coolest features about the .NET Compact Framework is how it enables you to code around limitations. Take controls, for example. All of the controls delivered with the .NET Compact Framework are limited in comparison to their full-Framework counterparts. They are missing properties, methods and events. Through the .NET Compact Framework, you can modify the functionality of the standard controls to fit just your need.

You can divide custom controls into three categories: user, inherited and owner-drawn. User controls are the simplest to create, but unfortunately are not supported under the .NET Compact Framework. Inherited controls start with a .NET Compact Framework control. They then add, remove or modify the properties, methods and events of that base control as desired. As complexity of a control goes, inherited controls tend to fall between user and owner-drawn controls. Owner-drawn controls offer the most flexibility in the way of their interface. They also require the greatest amount of work.
While the process of creating custom controls for the .NET Compact Framework is outside of the scope of this article, you will find that most of the techniques and approaches used with the .NET Framework carry over to .NET Compact Framework.
The following links provide additional details on creating custom controls for use with the .NET Compact Framework:
Creating Custom Controls for the .NET Compact Framework
Developing Custom Controls in C# with Smart Device Extensions
Design-time Functionality for Custom Controls in Compact Framework and SDE
Creating Custom Controls with the .NET Compact Framework
Constructing a Menu
Look at any commercially successful Pocket PC application, and you will find a menu bar. Almost without exception, to build a highly effective Pocket PC application with a fair set of functionality requires the use of a menu bar.
The use of menu bars is so common that the default Pocket PC Windows Application template automatically attaches a menu bar to the initial form it creates. With Visual Studio .NET and the .NET Compact Framework, building menus is easy and straightforward. You simply build a menu hierarchy with a graphical tool provided through the Forms Designer.
While constructing menus with the design-time tool is the easiest approach, it's not the only approach. Menus can also be constructed with code. While slightly more complicated, there are situations where you will want to create your menus on the fly while your application is running.
It is the MainMenu control that physically implements a menu bar on a form. The Menu Designer offers a graphical interface to configuring a MainMenu control. You use the Menu Designer to construct the menus and menu items that will compose your overall menu bar.
To activate the Menu Designer
1. From within the Visual Studio .NET IDE, open the form to which you will be adding the menu. If your form does not already contain a MainMenu control, add one at this time.
2. Click the MainMenu icon in the icon tray. The menu bar on your form will become activated.
3. Click the menu bar on the form. This activates the menu designer. The space for the first menu will be highlighted as shown in Figure 9.

Figure 9. An empty menu in the Menu Designer
4. Enter the name of your first (left-most) menu in the highlighted area. In the example shown in Figure 10, the menu New is defined.
5. At this point, you could either add additional menus or define the items that will appear on the New menu. To add additional menus, simply enter the name of the next menu in the Type Here box immediately to the right of the first menu defined. In Figure 10, this would be just to the right of New. For our example, we'll add an Edit menu.
Figure 10. Adding the New menu
6. To define a menu item for the Edit menu, click the Type Here box immediately above Edit and type the name of the menu item. Figure 11 demonstrates adding the menu item Cut to the Edit menu.

7. Continue this process of creating menus and their items until you complete your menu.
Figure 11. Adding items to the Edit menu
Coding a menu item
If you are building a menu, you need to respond to the user tapping, or clicking, a menu item. Each menu item has a Click event procedure that executes when the user taps on the item. Listing 1 shows an example of such a procedure.
Listing 1. A click event procedure for a menu item
[Visual Basic]
Private Sub mnuEditCut_Click(ByVal sender As System.Object, _
ByVal e As System.EventArgs) Handles mnuEditCut.Click
MessageBox.Show("cut...")
End Sub
[Visual C#]
private void mnuEditCut_Click(object sender, System.EventArgs e)
{
MessageBox.Show("cut...");
}
Constructing a Toolbar

Desktop developers should note that toolbars as they exist in the Pocket PC environment are different from those deployed with a standard desktop application. Most notably, Pocket PC toolbars appear at the bottom of an interface, rather than the top. In addition, they are always limited to a small number of buttons, a restriction enforced by the minimal screen real estate offered on the Pocket PC. Both of these traits can be seen in Figure 12.
Figure 12. An example toolbar
Toolbars serve two important roles in an application. First, they add some spice. Pocket PC applications in general, because of the limited size, tend to be plain in appearance. Toolbars, and the buttons they contain, can give your application's interface visual 'punch'.
Second, toolbars simplify user interaction. Commonly used functions and features can be placed on a toolbar instead of nesting them in a menu. The advantage of this is that accessing a toolbar button requires only a single tap. In comparison, a menu item requires at least two taps, and possibly a third if the item is part of a submenu.
This process of constructing a toolbar is divided into three steps:
1. Add and configure an ImageList control. The ImageList control provides the images that will ultimately be displayed on the buttons of your menu.
2. Add and configure a ToolBar control. The ToolBar control defines the buttons that will compose the physical toolbar as it is displayed to the end user.
3. Write an event procedure to respond to button taps. The ToolBar control uses a single event procedure to respond to taps on any of its buttons.
Coding a toolbar
With toolbars, you are only concerned about a single event, the event that fires when the user taps on a button. That event is the ButtonClick event. The event procedure for the ButtonClick event is shared between all of the buttons.
The only issue when working with this event procedure is determining which button was tapped. This can be easily accomplished by referencing the event arguments passed to the procedure. By referencing e.Button.ImageIndex, you can determine the image that was associated with the button that was tapped. This index is the one you originally assigned to the images as you stored them within the ImageList control. Listing 2 provides a demonstration of handling the button taps.
Listing 2. Handing toolbar button taps
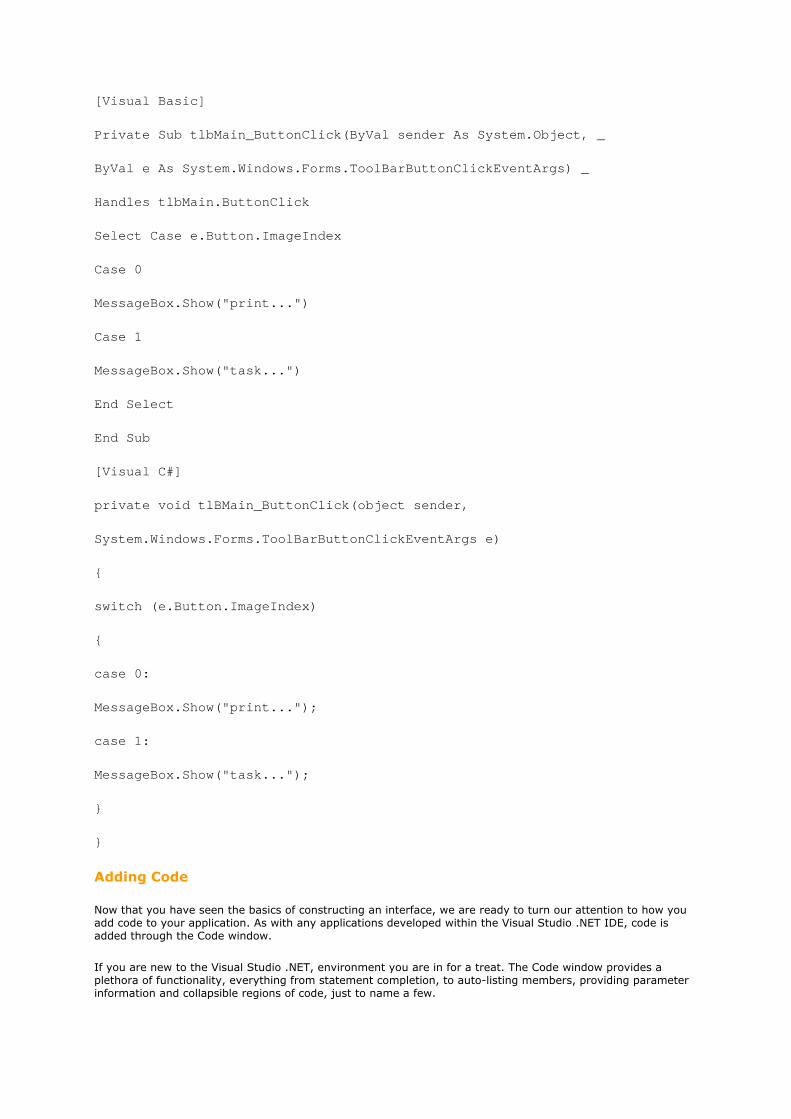
[Visual Basic]
Private Sub tlbMain_ButtonClick(ByVal sender As System.Object, _
ByVal e As System.Windows.Forms.ToolBarButtonClickEventArgs) _
Handles tlbMain.ButtonClick
Select Case e.Button.ImageIndex
Case 0
MessageBox.Show("print...")
Case 1
MessageBox.Show("task...")
End Select
End Sub
[Visual C#]
private void tlBMain_ButtonClick(object sender,
System.Windows.Forms.ToolBarButtonClickEventArgs e)
{
switch (e.Button.ImageIndex)
{
case 0:
MessageBox.Show("print...");
case 1:
MessageBox.Show("task...");
}
}
Adding Code
Now that you have seen the basics of constructing an interface, we are ready to turn our attention to how you add code to your application. As with any applications developed within the Visual Studio .NET IDE, code is added through the Code window.
If you are new to the Visual Studio .NET, environment you are in for a treat. The Code window provides a plethora of functionality, everything from statement completion, to auto-listing members, providing parameter information and collapsible regions of code, just to name a few.

The easiest way to navigate through your code is by using the two combo boxes located at the top of the window. The combo box at the top left of the Code window allows you to select a class within a module. The combo box at the top right of the window allows you to select a method from within that class.
Testing Your Application
With the user interface completed and the code written, it is time to turn our attention to testing your application. Visual Studio .NET offers two methods for testing applications that target the .NET Compact Framework: through an emulator and on a device. With either the emulator or a device, Visual Studio .NET handles deploying both your application and all of the components your application requires, including the .NET Compact Framework and SQL Server CE.
All this is handled when you test a .NET Compact Framework application from within Visual Studio .NET 2003. A check of the target platform is made to confirm that the .NET Compact Framework is installed. If Visual Studio .NET determines that the .NET Compact Framework is missing, it will automatically copy and install the .NET Compact Framework before attempting to run your application. This installation process will occur the first time you test to a device or the emulator and if you hard reset either the device or emulator.
A similar process is used if your application uses SQL Server CE. Visual Studio .NET will check the target platform to confirm that the SQL Server CE components are installed. If Visual Studio .NET does not find them, it will automatically copy and install the required SQL Server CE components before running your application.
After it has been determined that all of the components required by your application are present, your application will be copied to the target platform, placed in the directory you specified in your project configurations and finally launched.
Running a Test
There are several ways to run a test of your application:
• From the Visual Studio .NET toolbar, click the Start button.
• From the Debug menu, select Start or Start without Debugging.
• Press the F5 key (start with debugging) or Ctrl+F5 (start without debugging).
Testing in the Emulator
The emulator provides an environment within your desktop PC that mimics the functionality and operation of the device platform you are targeting with your application. The emulator is useful in situations where you do not have a device or when your device is not available.
Be forewarned: Testing in the emulator has its shortcomings. First and foremost is that the emulator runs on a desktop PC, which has far more processing resources than the target device. This can give you a false sense of how well your application performs. In addition, input for the emulator is provided through a keyboard and a mouse rather than the stylus the end user will use. If you are not consciously aware of this difference, you can create an application that is easy to use in the emulator and painful to use on the device. Finally, the emulator offers a "close" representation of a device, not an exact match. There are subtle differences in all emulators.
Emulator Requirements
The emulators provided with Visual Studio .NET will not operate unless the development PC on which it is running has a network connection. If your PC does not have a network connection, you can still use the emulator by installing the Microsoft Loopback Network Adapter. This adapter simulates a network connection and effectively fools the emulator into running.
Installing a loopback adapter under Windows 2000
Under Windows 2000, the process for installing the Microsoft Loopback Network Adapter is as follows:
1. In the Control Panel, click Add/Remove Hardware.
2. On the Welcome page of the Add/Remove Hardware Wizard, click Next.
3. Click Add/Troubleshoot a device, and then click Next. The process will pause while your system is scanned for plug-and-play devices.
4. On the Choose a Hardware Device page, click Add a new device, and then click Next.
5. On the Find New Hardware page, click No, I want to select the hardware from a list, and then click Next.
6. On the Hardware Type page, click Network adapters, and then click Next. There will be a brief delay while a list of network adapters is generated.
7. On the Select Network Adapter page, first click Microsoft in the Manufacturers list box, and then Microsoft Loopback Adapter from the Network Adapter list box. Click the Next button.
8. On the Start Hardware Installation page, click Next. The loopback adapter installs.
Configuring a loopback adapter under Windows 2000
Like any network adapter, installing a loopback adapter is only half of the process. You also need to configure your new adapter. Perform the following steps to configure the loopback adapter:
1. On the Start menu, click Settings, point to Network and Dial-up Connections, and then click Local Area Connection. The Local Area Connection Status dialog displays.
2. Click Properties. The Local Area Connection Properties window displays.
Note Check to make sure that you are working with the right connection. The Connection Using field of this dialog should read "Microsoft Loopback Adapter".
3. Select Internet Protocol (TCP/IP), and then click Properties. The Internet Protocol window displays.
4. Configure the IP address properties.
5. Click OK to close the Internet Protocol window.
6. Click OK to close the Local Area Connection Properties window.
7. Click Close to close the Local Area Connection Status window.
Moving Files to the Emulator
Earlier versions of Windows CE / Pocket PC emulators offered two distinct approaches to creating the emulator environment. The first generation of emulators used a closed environment, which was inaccessible from standard Windows-based file management tools found on the development PC. Any files that you needed on the emulator had to either be created within the emulator or copied to the emulator using specialized utilities that were included with the eMbedded Visual Tools.
Second-generation emulators provided a more open environment, one that was accessible using common tools, such as File Explorer. The emulator directory structure existed in a subdirectory on the development PC. Copying files to and from the emulator was a simple drag-and-drop operation.
The emulator included with Visual Studio .NET returns us to the closed emulator environment. To complicate matters, unlike earlier versions of the eMbedded Visual Tools, Visual Studio .NET does not include an emulator file management tool. This absence requires some creative work-around on your part.
There are three common ways to provide files within the emulator environment. One way is to create the files through applications that run on the emulator. I don't believe that this approach requires any additional discussion here. You can use standard .NET programming techniques to create text, XML or database files.
The other two approaches, adding files to your project and copying files from a share, require some additional explanation.
Adding files to project
The easiest method to move files to the emulator is to include them as part of your project. One advantage to using this approach is that in the event that you perform a hard reset on the emulator, you simply need to rebuild your project to resume testing.
The process for using this approach is:
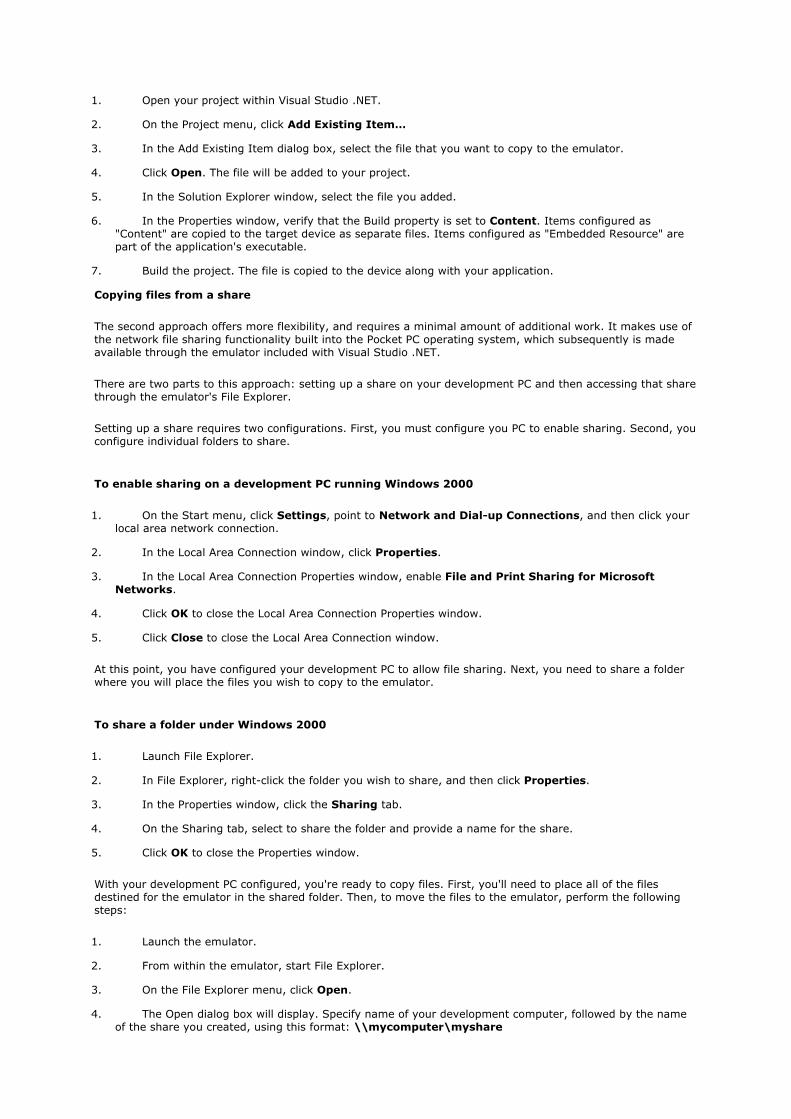
1. Open your project within Visual Studio .NET.
2. On the Project menu, click Add Existing Item…
3. In the Add Existing Item dialog box, select the file that you want to copy to the emulator.
4. Click Open. The file will be added to your project.
5. In the Solution Explorer window, select the file you added.
6. In the Properties window, verify that the Build property is set to Content. Items configured as "Content" are copied to the target device as separate files. Items configured as "Embedded Resource" are part of the application's executable.
7. Build the project. The file is copied to the device along with your application.
Copying files from a share
The second approach offers more flexibility, and requires a minimal amount of additional work. It makes use of the network file sharing functionality built into the Pocket PC operating system, which subsequently is made available through the emulator included with Visual Studio .NET.
There are two parts to this approach: setting up a share on your development PC and then accessing that share through the emulator's File Explorer.
Setting up a share requires two configurations. First, you must configure you PC to enable sharing. Second, you configure individual folders to share.
To enable sharing on a development PC running Windows 2000
1. On the Start menu, click Settings, point to Network and Dial-up Connections, and then click your local area network connection.
2. In the Local Area Connection window, click Properties.
3. In the Local Area Connection Properties window, enable File and Print Sharing for Microsoft Networks.
4. Click OK to close the Local Area Connection Properties window.
5. Click Close to close the Local Area Connection window.
At this point, you have configured your development PC to allow file sharing. Next, you need to share a folder where you will place the files you wish to copy to the emulator.
To share a folder under Windows 2000
1. Launch File Explorer.
2. In File Explorer, right-click the folder you wish to share, and then click Properties.
3. In the Properties window, click the Sharing tab.
4. On the Sharing tab, select to share the folder and provide a name for the share.
5. Click OK to close the Properties window.
With your development PC configured, you're ready to copy files. First, you'll need to place all of the files destined for the emulator in the shared folder. Then, to move the files to the emulator, perform the following steps:
1. Launch the emulator.
2. From within the emulator, start File Explorer.
3. On the File Explorer menu, click Open.
4. The Open dialog box will display. Specify name of your development computer, followed by the name of the share you created, using this format: \\mycomputer\myshare
5. Tap OK.
Depending on the security settings on your development PC, you may be prompted for a username and password before being allowed to access the share.
At this point, you're ready to copy files to and from the share on your development PC and the emulator.
Note These same approaches for copying files work equally well when using a device, but there is one known issue. Pocket PC devices by default have the device name "Pocket PC". Unless you change this name, you will not be able to access a share.
Testing on a Device
Testing on a device allows you get a first-hand experience with how your applications perform. With Visual Studio .NET you can test on devices connected to your development PC via USB, serial or Ethernet.
Note Use Ethernet to connect your device to your development PC. This is by far the quickest and easiest method for testing and debugging.
Deploying to a Device
You can select to deploy to a device using any of the following ways:
• On the Visual Studio .NET toolbar, select Pocket PC Device from the Deployment Device combo box.
• Under the Device page of the Project Properties dialog, select Pocket PC Device from the Deployment
Device combo box.
• From the Property window, set the Deployment Device property of your project to Pocket PC Device.
Debugging Your Application
The debugging environment provided through the Visual Studio .NET IDE is robust. It allows you to pause your application, see its inner workings, modify code, examine values and step through your application in a systematic manner.
The core of the debugging functionality can be found on the Debug menu in the Visual Studio .NET IDE. From this menu, you can start and stop a debugging session, set breakpoints, and navigate about your application while in debug mode.
Note Breakpoints identify a line of code within your application where you want to pause or interrupt the execution of your application when encountered.
Visual Studio .NET enables you to remotely debug applications that are running on a device or in an emulator from the comfort of your development PC. You can use the Command window to enter statements, query and set variables, execute lines of code and other similar tasks.
Note For the optimal debugging environment, use Ethernet to connect your device to your PC.
Deploying Your Application
Creating setups for a .NET Compact Framework application is similar to the approach used for other Windows applications. Application setups are delivered using cabinet files, more commonly referred to as "CAB" files, after their .cab file extension. CAB files serve two purposes: 1) they compress and store files so that they may be easily distributed; 2) they make sure that all of the files and settings required by an application are correctly handled.
What is required?
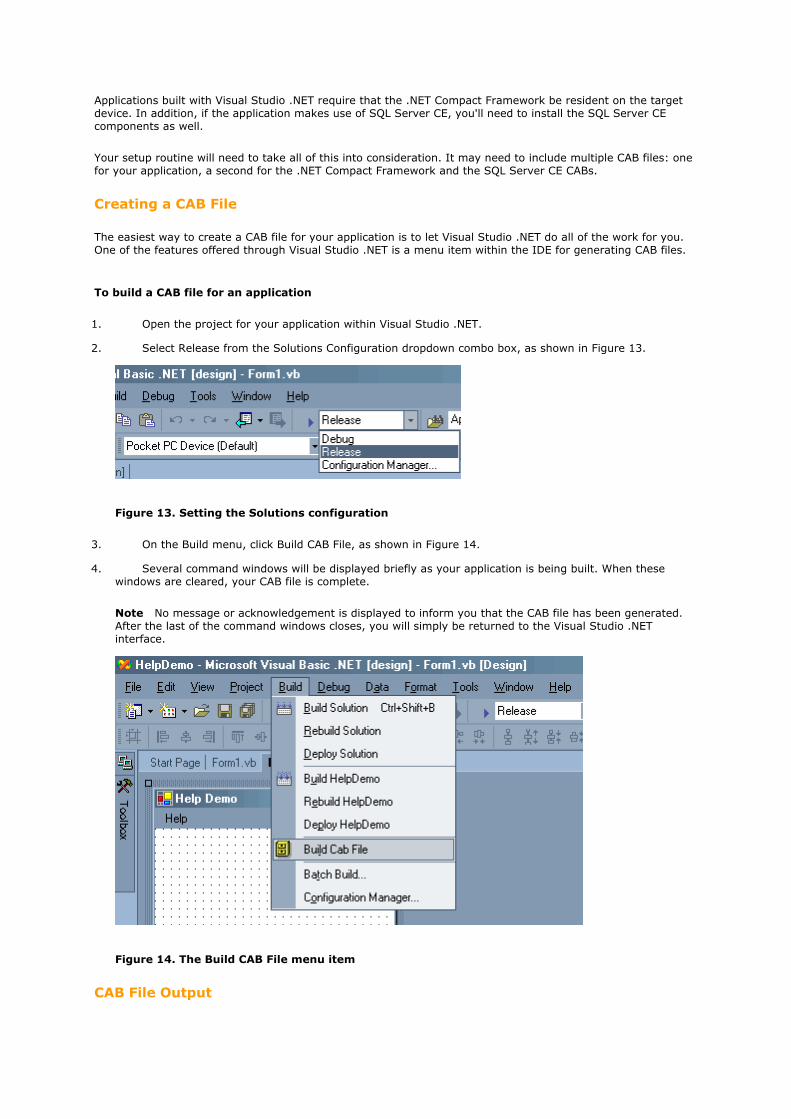
Applications built with Visual Studio .NET require that the .NET Compact Framework be resident on the target device. In addition, if the application makes use of SQL Server CE, you'll need to install the SQL Server CE components as well.
Your setup routine will need to take all of this into consideration. It may need to include multiple CAB files: one for your application, a second for the .NET Compact Framework and the SQL Server CE CABs.
Creating a CAB File
The easiest way to create a CAB file for your application is to let Visual Studio .NET do all of the work for you. One of the features offered through Visual Studio .NET is a menu item within the IDE for generating CAB files.
To build a CAB file for an application
1. Open the project for your application within Visual Studio .NET.
2. Select Release from the Solutions Configuration dropdown combo box, as shown in Figure 13.
Figure 13. Setting the Solutions configuration
3. On the Build menu, click Build CAB File, as shown in Figure 14.
4. Several command windows will be displayed briefly as your application is being built. When these windows are cleared, your CAB file is complete.
Note No message or acknowledgement is displayed to inform you that the CAB file has been generated. After the last of the command windows closes, you will simply be returned to the Visual Studio .NET interface.
Figure 14. The Build CAB File menu item
CAB File Output
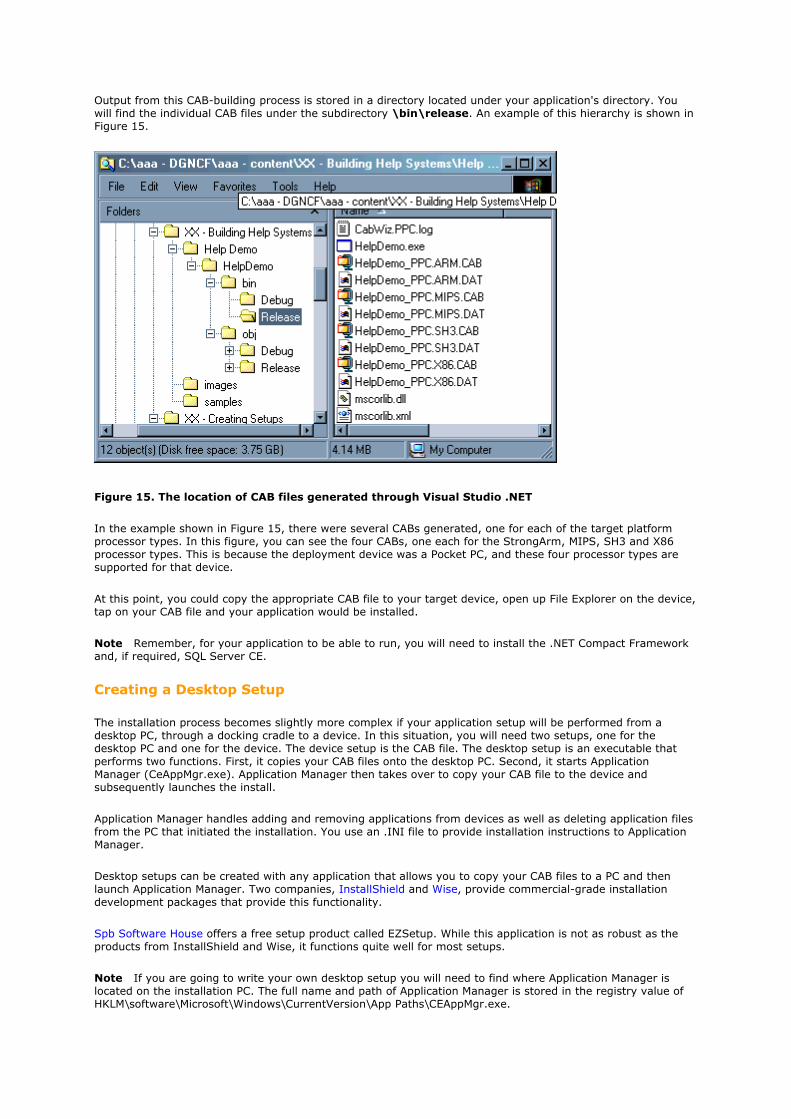
Output from this CAB-building process is stored in a directory located under your application's directory. You will find the individual CAB files under the subdirectory \bin\release. An example of this hierarchy is shown in Figure 15.
Figure 15. The location of CAB files generated through Visual Studio .NET
In the example shown in Figure 15, there were several CABs generated, one for each of the target platform processor types. In this figure, you can see the four CABs, one each for the StrongArm, MIPS, SH3 and X86 processor types. This is because the deployment device was a Pocket PC, and these four processor types are supported for that device.
At this point, you could copy the appropriate CAB file to your target device, open up File Explorer on the device, tap on your CAB file and your application would be installed.
Note Remember, for your application to be able to run, you will need to install the .NET Compact Framework and, if required, SQL Server CE.
Creating a Desktop Setup
The installation process becomes slightly more complex if your application setup will be performed from a desktop PC, through a docking cradle to a device. In this situation, you will need two setups, one for the desktop PC and one for the device. The device setup is the CAB file. The desktop setup is an executable that performs two functions. First, it copies your CAB files onto the desktop PC. Second, it starts Application Manager (CeAppMgr.exe). Application Manager then takes over to copy your CAB file to the device and subsequently launches the install.
Application Manager handles adding and removing applications from devices as well as deleting application files from the PC that initiated the installation. You use an .INI file to provide installation instructions to Application Manager.
Desktop setups can be created with any application that allows you to copy your CAB files to a PC and then launch Application Manager. Two companies, InstallShield and Wise, provide commercial-grade installation development packages that provide this functionality.
Spb Software House offers a free setup product called EZSetup. While this application is not as robust as the products from InstallShield and Wise, it functions quite well for most setups.
Note If you are going to write your own desktop setup you will need to find where Application Manager is located on the installation PC. The full name and path of Application Manager is stored in the registry value of HKLM\software\Microsoft\Windows\CurrentVersion\App Paths\CEAppMgr.exe.
Summary
The .NET Compact Framework presents developers with a powerful tool for creating robust mobile applications. It enables you to leverage you existing .NET skills in the construction of applications that target Pocket PC and Windows CE .NET devices.
The .NET Compact Framework is a subset of the .NET Framework. While similar in appearance and functionality to the .NET Framework, learning how to program under the .NET Compact Framework will take time and effort. You will need to master the limitations imposed by Windows CE devices and the demands associated with creating mobile applications.
Where to go for Additional Information
Articles
Getting started
Taking Control with C#: an overview on getting started with the .NET Compact Framework and Visual C#
Accessing the Enterprise with Ease: an overview on using the .NET Compact Framework and SQL Server to create mobile applications that access enterprise data
Making the Move from C++ to C#: provides a comparison of developing an application using eMbedded Visual C++ against the .NET Compact Framework with Visual C#
Smart Device Extensions, SQLCE and Me: an introduction to developing applications with the .NET Compact Framework and SQL Server CE
Getting Started with Smart Device Extensions: a first look at working with the .NET Compact Framework
Some Very Smart Software: a quick overview of leveraging Web services from a .NET Compact Framework application
Creating custom controls
Creating Custom Controls for the .NET Compact Framework
Developing Custom Controls in C# with Smart Device Extensions
Design-time Functionality for Custom Controls in Compact Framework and SDE
Creating Custom Controls with the .NET Compact Framework
Newsgroups
microsoft.public.dotnet.framework.compactframework—information on developing applications with the .NET Compact Framework
microsoft.public.pocketpc—general information relating to the Pocket PC
microsoft.public.pocketpc.developer—information for Pocket PC developers
microsoft.public.sqlserver.ce—information on working with Microsoft SQL Server CE
microsoft.public.webservices—information on developing Web services
Web Sites
Developer programs
Microsoft's Mobile Solution Partner Program is a worldwide initiative designed to help you develop cutting-edge solutions using Microsoft Mobile Software, and successfully bring them to market.
Microsoft Mobile Software is all about enabling great solutions and services to deliver information any time, any place and on any device.
Join the Microsoft mobile revolution and extend your applications, connect to new markets and innovate exciting new ways for people to live and work.
Microsoft's Mobile2Market Program is a comprehensive program for the certification and delivery of mobile applications designed for Pocket PC and Smartphone. Designed to connect independent software vendors to mobile operators and retailers, Mobile2Market strengthens and develops the marketplace for mobile applications by creating new revenue opportunities for mobile applications, reducing your time-to-market, and providing your customers with a seamless user experience.
Training and jump-starting programs
larryroof.com offers training and project consulting in designing and developing mobile applications. Services offered include 5-day training courses in the .NET Compact Framework and SQL Server CE, customized training programs and combinations of training and project consulting to aid you in quickly implementing effective mobile solutions.
Information sites
gotdotnet.com is the home site for the .NET Framework, and includes a section on the .NET Compact Framework.
innovativedss.com includes sample code and developer forums.
devbuzz.com is a developer site that focuses on eMbedded Visual Basic and the .NET Compact Framework; it includes articles, sample code and forums.
Third-party controls and components
DateTimePicker—While this control is provided by the .NET Framework, it is absent from .NET Compact Framework. Available from IntelliProg.
HTMLViewer—Supports displaying HTML content. Available from IntelliProg.
RichInk—Allows user to enter and edit text while providing advanced formatting features and support for Rich Text Format and Rich Ink. Available from IntelliProg.
Pocket Outlook—This library allows applications written to the .NET Compact Framework to easily access and manipulate Pocket Outlook data. For more information, see inthehand.com.
Pocket Access—This library enables you to incorporate data stored in Pocket Access databases into your .NET Compact Framework applications. For more information, see inthehand.com.
Getting Started with XML Web Services in Visual Basic.NET and Visual C# [http://msdn.microsoft.com/webservices/default.aspx?pull=/library/en-us/dv_vstechart/html/vbtchGettingStartedWithXMLWebServicesInVisualStudioNET.asp]
Rob Caron Visual Studio Team Microsoft Corporation
October 2002
Summary: Microsoft® Visual Studio® .NET and XML Web services provide a simple, flexible, standards-based model that allows developers to assemble applications regardless of the platform, programming language, or
object model. This article will help you get started creating and accessing XML Web services with Visual Basic .NET and Visual C#. (15 printed pages)
Contents
Introduction Working With XML Web Services Creating XML Web Services with Visual Studio Deploying XML Web Services with Visual Studio Accessing XML Web Services with Visual Studio Conclusion
Introduction
An XML Web service is a programmable unit of software that can be accessed over the Internet and used remotely. An XML Web service can be used internally by a single application or exposed externally over the Internet for use by multiple applications. An XML Web service is accessible through a standard interface, allowing heterogeneous systems to work together as a single web of computation.
XML Web services depend heavily upon the broad acceptance of XML, HTTP, and other protocols that support interoperability. XML Web services use these standardized protocols to exchange data between systems that might otherwise be completely incompatible — for example, systems with different operating systems or component models. Developers can create applications that weave together XML Web services from a variety of sources in much the same way that they traditionally use components in a distributed application.
One of the core characteristics of an XML Web service is the high degree of abstraction between the implementation and consumption of a service. This abstraction allows XML Web services to be exposed and consumed without regard to their implementation. In other words, the only information that the Web service provider and client need to have in common is the inputs, outputs, and location of the Web service. Details such as programming language, hardware, operating system, or other implementation details are not necessary.
XML Web services are enabling a new era of distributed application development. XML Web services deliver interoperability on an entirely new level that is independent of platform, allowing different systems to seamlessly integrate their functionality. As the next revolutionary advancement of the Internet, XML Web services will become the fundamental structure that links together all computing devices. For more information, see Programming the Web with XML Web Services.
Working With XML Web Services
The ASP.NET page framework also serves as a framework for XML Web services in managed code. As such, XML Web services can access the many features of the .NET Framework, such as authentication, caching, and state management. Developers are then free to focus on creating or accessing XML Web services without needing to write infrastructure code.
In the ASP.NET application model, Web pages intended for the browser use the .aspx file extension. To differentiate XML Web services from regular ASP.NET pages, XML Web services use the .asmx extension.
XML Web services consist of an XML Web service entry point and the code that implements the XML Web service functionality. In ASP.NET, the .asmx file serves as the addressable entry point for the XML Web service. It references code in precompiled assemblies, a code-behind file, or code contained in the .asmx file itself.
There are two fundamental roles when working with XML Web services:
• Creating an XML Web service — When you create an XML Web service, you are creating an application that exposes functionality to XML Web service clients.
• Accessing an XML Web service — When you access an XML Web service, your client application locates, references, and uses the functionality contained within that XML Web service.
XML Web services can be either stand-alone applications or subcomponents of a larger Web application. The minimum requirement is that the client must be able to send messages to the XML Web service. For more information, see XML Web Services in Managed Code.
Creating XML Web Services with Visual Studio

To create XML Web services in managed code using Visual Studio, you need access to a Web server configured for developing ASP.NET applications. There are several types of Web projects; when you want to work with XML Web services using managed code in Visual Studio .NET, you use the ASP.NET Web Service project template. After you create an XML Web service project in Visual Studio, you see the Component Designer. The Component Designer is the design surface for your XML Web service. You can use the Design view to add components to your XML Web service, and the Code view to view and edit the code associated with your XML Web service.
When you create an ASP.NET Web Service project in Visual Studio, it constructs a Web application project structure on the Web server and a Visual Studio solution file on your local computer. The solution file (.sln) contains the configuration and build settings and keeps a list of files associated with the project. In addition, Visual Studio automatically creates the necessary files and references to support an XML Web service. When completed, the Visual Studio integrated development environment (IDE) displays the .asmx file in Design view.
By default, Visual Studio uses code-behind files, such as Service1.asmx.vb or Service1.asmx.cs, when you create an XML Web service with the ASP.NET Web Service project template. The code-behind file contains the code that implements the functionality of the XML Web service. By default, this code-behind file is hidden in Solution Explorer. When viewing the Code view of the .asmx file, you are actually seeing the contents of this code-behind file. The .asmx file itself contains a processing directive, WebService, which indicates where to find the implementation of the XML Web service. When you build an XML Web service in managed code, ASP.NET automatically provides the infrastructure and handles the processing of XML Web service requests and responses, including the parsing and creation of SOAP messages. The compiled output is a .dll file that is placed in the project's bin folder. For more information, see Creating XML Web Services in Managed Code.
WebService Processing Directive
The WebService processing directive provides necessary information to the ASP.NET environment, such as which class implements the XML Web service functionality. An example of the WebService processing directive in an .asmx file follows:
' Visual Basic <%@ WebService Language="vb" Codebehind="Service1.asmx.vb" Class="WebService1.Service1" %> // C# <%@ WebService Language="c#" Codebehind="Service1.asmx.cs" Class="WebService1.Service1" %> Note To view the contents of the .asmx file, in Solution Explorer, right-click the .asmx file and click Open With on the shortcut menu. In the Open With dialog box, select Source Code (Text) Editor, and then click Open.
The Language attribute indicates the programming language used to develop the XML Web service. You can create XML Web services in any .NET-compatible language, such as Visual Basic .NET or Visual C#. The code-behind file associated with the .asmx page is indicated using the Codebehind attribute. The Class attribute indicates which class in the code-behind file implements the functionality of the XML Web service. For more information, see Code Model for XML Web Services in Managed Code.
System.Web.Services.WebService Class
The System.Web.Services.WebService class, which defines the optional base class for XML Web services, provides direct access to common ASP.NET objects, such as those for application and session state. By default, XML Web services created in managed code using Visual Studio inherit from this class. The XML Web service can inherit from this class to gain access to ASP.NET's intrinsic objects, such as Request and Session.
If the XML Web service does not inherit from the System.Web.Services.WebService class, it can still access the ASP.NET intrinsic objects from System.Web.HttpContext.Current. The class implementing the XML Web service must be public and must have a public default constructor (a constructor without parameters). This makes it possible for ASP.NET to create an instance of the XML Web service class to process incoming XML Web service requests. For more information, see Inheriting from the WebService Class.
WebService Attribute
Each XML Web service requires a unique namespace, which makes it possible for client applications to differentiate among XML Web services that might use the same method name. The default namespace for XML Web services created in Visual Studio .NET is "http://tempuri.org/". Although the namespace resembles a typical URL, you should not assume that it is viewable in a Web browser, it is merely a unique identifier.
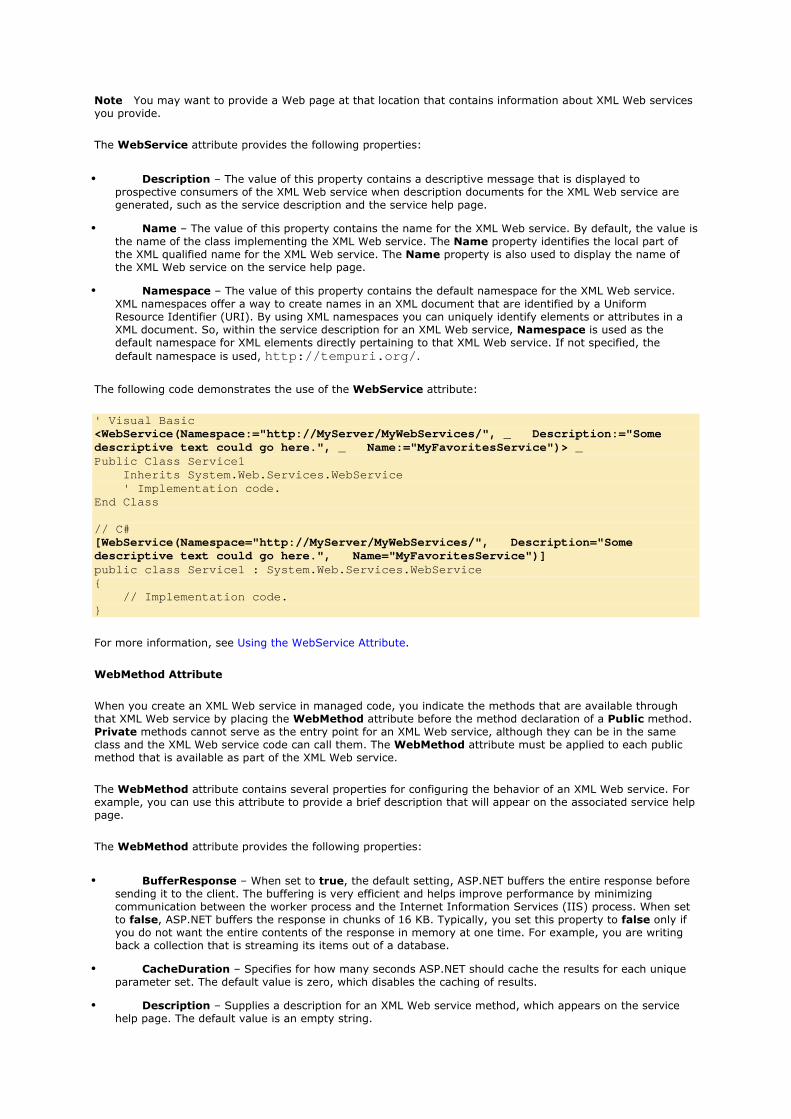
Note You may want to provide a Web page at that location that contains information about XML Web services you provide.
The WebService attribute provides the following properties:
• Description – The value of this property contains a descriptive message that is displayed to prospective consumers of the XML Web service when description documents for the XML Web service are generated, such as the service description and the service help page.
• Name – The value of this property contains the name for the XML Web service. By default, the value is the name of the class implementing the XML Web service. The Name property identifies the local part of the XML qualified name for the XML Web service. The Name property is also used to display the name of the XML Web service on the service help page.
• Namespace – The value of this property contains the default namespace for the XML Web service. XML namespaces offer a way to create names in an XML document that are identified by a Uniform Resource Identifier (URI). By using XML namespaces you can uniquely identify elements or attributes in a XML document. So, within the service description for an XML Web service, Namespace is used as the default namespace for XML elements directly pertaining to that XML Web service. If not specified, the default namespace is used, http://tempuri.org/.
The following code demonstrates the use of the WebService attribute:
' Visual Basic <WebService(Namespace:="http://MyServer/MyWebServices/", _ Description:="Some descriptive text could go here.", _ Name:="MyFavoritesService")> _ Public Class Service1 Inherits System.Web.Services.WebService ' Implementation code. End Class // C# [WebService(Namespace="http://MyServer/MyWebServices/", Description="Some descriptive text could go here.", Name="MyFavoritesService")] public class Service1 : System.Web.Services.WebService { // Implementation code. }
For more information, see Using the WebService Attribute.
WebMethod Attribute
When you create an XML Web service in managed code, you indicate the methods that are available through that XML Web service by placing the WebMethod attribute before the method declaration of a Public method. Private methods cannot serve as the entry point for an XML Web service, although they can be in the same class and the XML Web service code can call them. The WebMethod attribute must be applied to each public method that is available as part of the XML Web service.
The WebMethod attribute contains several properties for configuring the behavior of an XML Web service. For example, you can use this attribute to provide a brief description that will appear on the associated service help page.
The WebMethod attribute provides the following properties:
• BufferResponse – When set to true, the default setting, ASP.NET buffers the entire response before sending it to the client. The buffering is very efficient and helps improve performance by minimizing communication between the worker process and the Internet Information Services (IIS) process. When set to false, ASP.NET buffers the response in chunks of 16 KB. Typically, you set this property to false only if you do not want the entire contents of the response in memory at one time. For example, you are writing back a collection that is streaming its items out of a database.
• CacheDuration – Specifies for how many seconds ASP.NET should cache the results for each unique parameter set. The default value is zero, which disables the caching of results.
• Description – Supplies a description for an XML Web service method, which appears on the service help page. The default value is an empty string.

• EnableSession – When set to false, the default setting, ASP.NET cannot access the session state for an XML Web service method. When set to true, the XML Web service can access the session state collection directly from HttpContext.Current.Session or with the WebService.Session property if it inherits from the WebService base class.
• MessageName – Enables the XML Web service to uniquely identify overloaded methods using an alias. Unless otherwise specified, the default value is the method name. When specifying a value for MessageName, the resulting SOAP messages will reflect this name instead of the actual method name.
• TransactionOption – Specifies whether the XML Web service method can participate as the root object of a transaction. Even though you can set the TransactionOption property to any of the values of the TransactionOption enumeration, an XML Web service method only has two possible behaviors; it does not participate in a transaction (Disabled, NotSupported, Supported), or it creates a new transaction (Required, RequiresNew). Unless otherwise specified, the default value is TransactionOption.Disabled. To use this property, you need to add a reference to System.EnterpriseServices.dll. This namespace contains methods and properties that expose the distributed transaction model found in COM+ services. The System.EnterpriseServices.ContextUtil class lets you vote on the transaction using the SetAbort or SetComplete methods.
The following code demonstrates the use of the WebMethod attribute:
' Visual Basic Public Class Service1 Inherits System.Web.Services.WebService <WebMethod(BufferResponse:=False, _ CacheDuration:=60, _ Description:="Some descriptive text", MessageName:="RetrieveData")> _ Public Function GetBigChunkOfData() As DataSet ' Implementation code. End Function End Class // C# public class Service1 : System.Web.Services.WebService { [WebMethod(BufferResponse=false, CacheDuration=60, Description="Some descriptive text", MessageName="RetrieveData")] public DataSet GetBigChunkOfData() { // Implementation code. } }
For more information, see Using the WebMethod Attribute.
Deploying XML Web Services with Visual Studio
When using Visual Studio .NET to create XML Web services in managed code, you use a standard deployment model: You compile your project and then you deploy the resulting files to a production server. The project .dll file contains the compiled code from the XML Web services code-behind class file (.asmx.vb or .asmx.cs) along with all other class files included in your project, but not the .asmx file itself. You then deploy this single project .dll file to the production server without any source code. When the XML Web service receives a request, the project .dll file is loaded and executed.
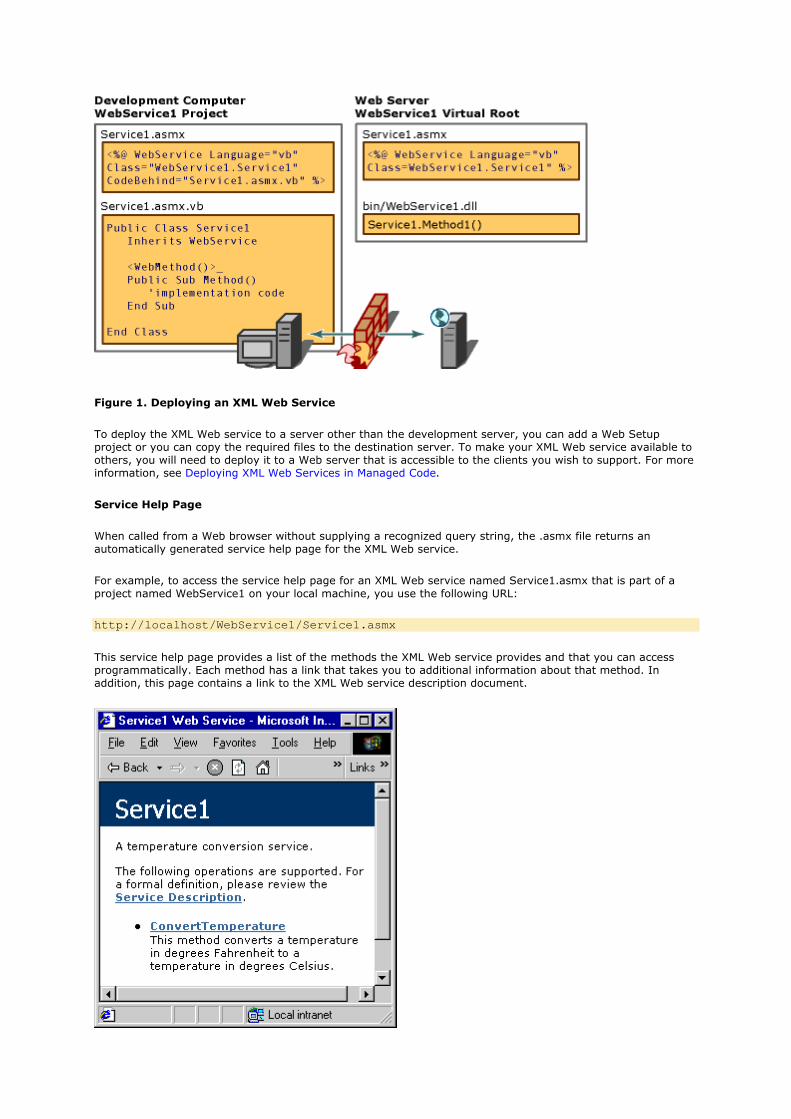
Figure 1. Deploying an XML Web Service
To deploy the XML Web service to a server other than the development server, you can add a Web Setup project or you can copy the required files to the destination server. To make your XML Web service available to others, you will need to deploy it to a Web server that is accessible to the clients you wish to support. For more information, see Deploying XML Web Services in Managed Code.
Service Help Page
When called from a Web browser without supplying a recognized query string, the .asmx file returns an automatically generated service help page for the XML Web service.
For example, to access the service help page for an XML Web service named Service1.asmx that is part of a project named WebService1 on your local machine, you use the following URL:
http://localhost/WebService1/Service1.asmx
This service help page provides a list of the methods the XML Web service provides and that you can access programmatically. Each method has a link that takes you to additional information about that method. In addition, this page contains a link to the XML Web service description document.
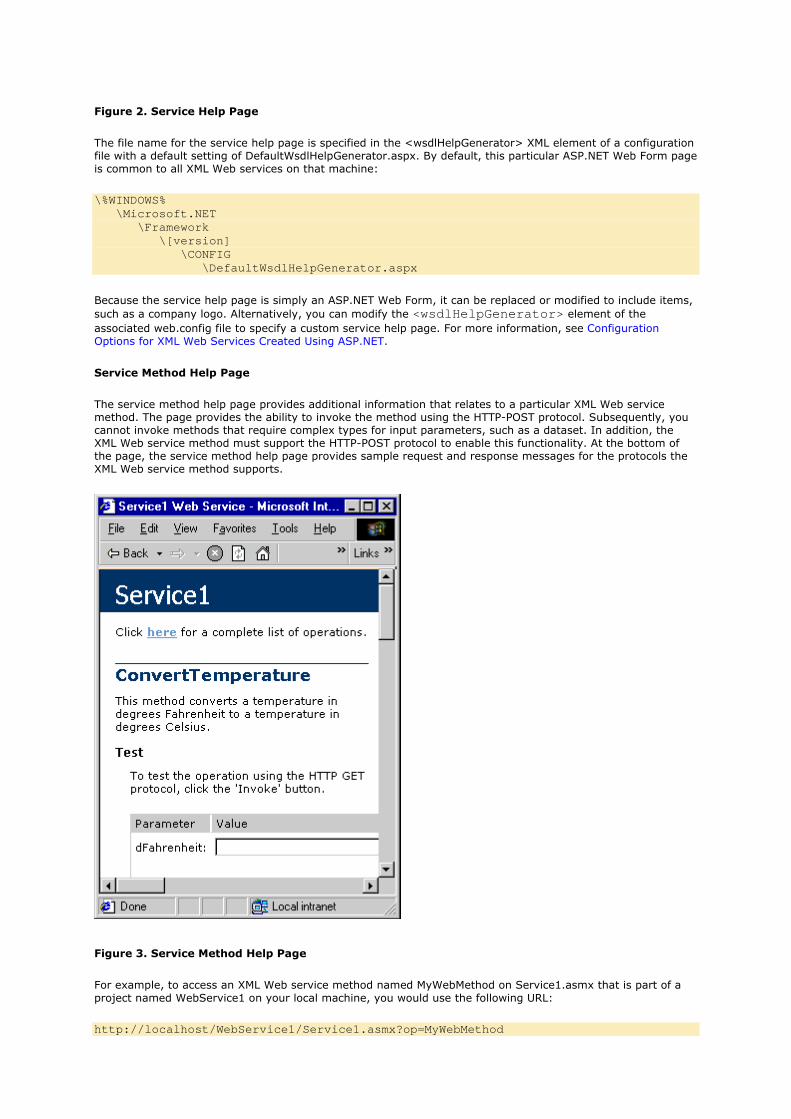
Figure 2. Service Help Page
The file name for the service help page is specified in the <wsdlHelpGenerator> XML element of a configuration file with a default setting of DefaultWsdlHelpGenerator.aspx. By default, this particular ASP.NET Web Form page is common to all XML Web services on that machine:
\%WINDOWS% \Microsoft.NET \Framework \[version] \CONFIG \DefaultWsdlHelpGenerator.aspx
Because the service help page is simply an ASP.NET Web Form, it can be replaced or modified to include items, such as a company logo. Alternatively, you can modify the <wsdlHelpGenerator> element of the associated web.config file to specify a custom service help page. For more information, see Configuration Options for XML Web Services Created Using ASP.NET.
Service Method Help Page
The service method help page provides additional information that relates to a particular XML Web service method. The page provides the ability to invoke the method using the HTTP-POST protocol. Subsequently, you cannot invoke methods that require complex types for input parameters, such as a dataset. In addition, the XML Web service method must support the HTTP-POST protocol to enable this functionality. At the bottom of the page, the service method help page provides sample request and response messages for the protocols the XML Web service method supports.
Figure 3. Service Method Help Page
For example, to access an XML Web service method named MyWebMethod on Service1.asmx that is part of a project named WebService1 on your local machine, you would use the following URL:
http://localhost/WebService1/Service1.asmx?op=MyWebMethod
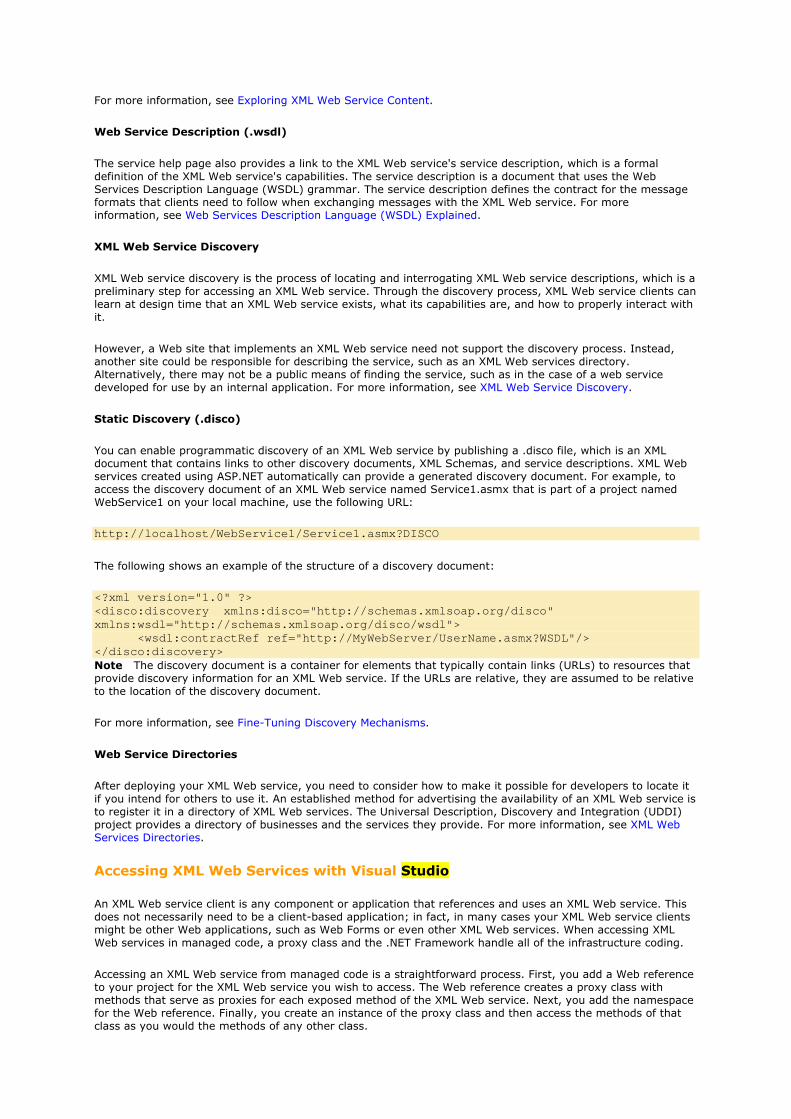
For more information, see Exploring XML Web Service Content.
Web Service Description (.wsdl)
The service help page also provides a link to the XML Web service's service description, which is a formal definition of the XML Web service's capabilities. The service description is a document that uses the Web Services Description Language (WSDL) grammar. The service description defines the contract for the message formats that clients need to follow when exchanging messages with the XML Web service. For more information, see Web Services Description Language (WSDL) Explained.
XML Web Service Discovery
XML Web service discovery is the process of locating and interrogating XML Web service descriptions, which is a preliminary step for accessing an XML Web service. Through the discovery process, XML Web service clients can learn at design time that an XML Web service exists, what its capabilities are, and how to properly interact with it.
However, a Web site that implements an XML Web service need not support the discovery process. Instead, another site could be responsible for describing the service, such as an XML Web services directory. Alternatively, there may not be a public means of finding the service, such as in the case of a web service developed for use by an internal application. For more information, see XML Web Service Discovery.
Static Discovery (.disco)
You can enable programmatic discovery of an XML Web service by publishing a .disco file, which is an XML document that contains links to other discovery documents, XML Schemas, and service descriptions. XML Web services created using ASP.NET automatically can provide a generated discovery document. For example, to access the discovery document of an XML Web service named Service1.asmx that is part of a project named WebService1 on your local machine, use the following URL:
http://localhost/WebService1/Service1.asmx?DISCO
The following shows an example of the structure of a discovery document:
<?xml version="1.0" ?> <disco:discovery xmlns:disco="http://schemas.xmlsoap.org/disco" xmlns:wsdl="http://schemas.xmlsoap.org/disco/wsdl"> <wsdl:contractRef ref="http://MyWebServer/UserName.asmx?WSDL"/> </disco:discovery> Note The discovery document is a container for elements that typically contain links (URLs) to resources that provide discovery information for an XML Web service. If the URLs are relative, they are assumed to be relative to the location of the discovery document.
For more information, see Fine-Tuning Discovery Mechanisms.
Web Service Directories
After deploying your XML Web service, you need to consider how to make it possible for developers to locate it if you intend for others to use it. An established method for advertising the availability of an XML Web service is to register it in a directory of XML Web services. The Universal Description, Discovery and Integration (UDDI) project provides a directory of businesses and the services they provide. For more information, see XML Web Services Directories.
Accessing XML Web Services with Visual Studio
An XML Web service client is any component or application that references and uses an XML Web service. This does not necessarily need to be a client-based application; in fact, in many cases your XML Web service clients might be other Web applications, such as Web Forms or even other XML Web services. When accessing XML Web services in managed code, a proxy class and the .NET Framework handle all of the infrastructure coding.
Accessing an XML Web service from managed code is a straightforward process. First, you add a Web reference to your project for the XML Web service you wish to access. The Web reference creates a proxy class with methods that serve as proxies for each exposed method of the XML Web service. Next, you add the namespace for the Web reference. Finally, you create an instance of the proxy class and then access the methods of that class as you would the methods of any other class.
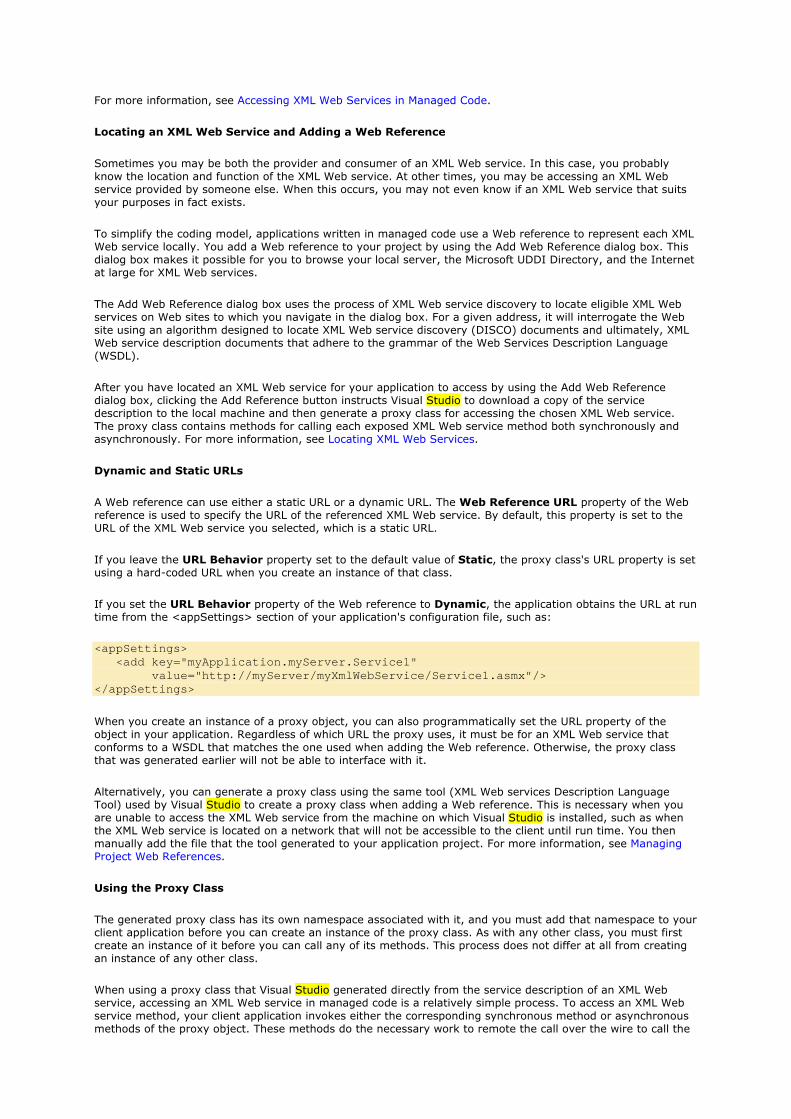
For more information, see Accessing XML Web Services in Managed Code.
Locating an XML Web Service and Adding a Web Reference
Sometimes you may be both the provider and consumer of an XML Web service. In this case, you probably know the location and function of the XML Web service. At other times, you may be accessing an XML Web service provided by someone else. When this occurs, you may not even know if an XML Web service that suits your purposes in fact exists.
To simplify the coding model, applications written in managed code use a Web reference to represent each XML Web service locally. You add a Web reference to your project by using the Add Web Reference dialog box. This dialog box makes it possible for you to browse your local server, the Microsoft UDDI Directory, and the Internet at large for XML Web services.
The Add Web Reference dialog box uses the process of XML Web service discovery to locate eligible XML Web services on Web sites to which you navigate in the dialog box. For a given address, it will interrogate the Web site using an algorithm designed to locate XML Web service discovery (DISCO) documents and ultimately, XML Web service description documents that adhere to the grammar of the Web Services Description Language (WSDL).
After you have located an XML Web service for your application to access by using the Add Web Reference dialog box, clicking the Add Reference button instructs Visual Studio to download a copy of the service description to the local machine and then generate a proxy class for accessing the chosen XML Web service. The proxy class contains methods for calling each exposed XML Web service method both synchronously and asynchronously. For more information, see Locating XML Web Services.
Dynamic and Static URLs
A Web reference can use either a static URL or a dynamic URL. The Web Reference URL property of the Web reference is used to specify the URL of the referenced XML Web service. By default, this property is set to the URL of the XML Web service you selected, which is a static URL.
If you leave the URL Behavior property set to the default value of Static, the proxy class's URL property is set using a hard-coded URL when you create an instance of that class.
If you set the URL Behavior property of the Web reference to Dynamic, the application obtains the URL at run time from the <appSettings> section of your application's configuration file, such as:
<appSettings> <add key="myApplication.myServer.Service1" value="http://myServer/myXmlWebService/Service1.asmx"/> </appSettings>
When you create an instance of a proxy object, you can also programmatically set the URL property of the object in your application. Regardless of which URL the proxy uses, it must be for an XML Web service that conforms to a WSDL that matches the one used when adding the Web reference. Otherwise, the proxy class that was generated earlier will not be able to interface with it.
Alternatively, you can generate a proxy class using the same tool (XML Web services Description Language Tool) used by Visual Studio to create a proxy class when adding a Web reference. This is necessary when you are unable to access the XML Web service from the machine on which Visual Studio is installed, such as when the XML Web service is located on a network that will not be accessible to the client until run time. You then manually add the file that the tool generated to your application project. For more information, see Managing Project Web References.
Using the Proxy Class
The generated proxy class has its own namespace associated with it, and you must add that namespace to your client application before you can create an instance of the proxy class. As with any other class, you must first create an instance of it before you can call any of its methods. This process does not differ at all from creating an instance of any other class.
When using a proxy class that Visual Studio generated directly from the service description of an XML Web service, accessing an XML Web service in managed code is a relatively simple process. To access an XML Web service method, your client application invokes either the corresponding synchronous method or asynchronous methods of the proxy object. These methods do the necessary work to remote the call over the wire to call the
desired XML Web service method. By default, the proxy class uses SOAP to access the XML Web service method, as SOAP supports the richest set of data types of the three supported protocols (HTTP-GET, HTTP-POST, and HTTP-SOAP).
The proxy class generated by the Add Web Reference process derives from the System.Web.Service.Protocols.SoapHttpClientProtocol class, which contains several properties that you can use to control the behavior of how this class accesses an XML Web service.
In addition to others, the SoapHttpClientProtocol class provides the following properties:
• ClientCertificates – This property allows a client to pass one or more client certificates, also known as Authenticode X.509 v.3 certificates, when calling an XML Web service method.
• CookieContainer – If an XML Web service method uses session state, then a cookie is passed back in the response headers to the XML Web service client that uniquely identifies the session for that XML Web service client. For the XML Web service client to receive that cookie, a new instance of CookieContainer must be created and assigned to the CookieContainer property before calling the XML Web service method. This ensures that the cookie is properly included in subsequent requests.
• Credentials – When using the Credentials property, an XML Web service client must instantiate a class implementing ICredentials, such as NetworkCredential, and then set the client credentials specific to the authentication mechanism. The NetworkCredential class can be used to set authentication credentials using the basic, digest, NTLM and Kerberos authentication mechanisms.
• PreAuthenticate – When PreAuthenticate is true, the WWW-authenticate header is sent with the first request if the authentication mechanism supports doing so. When PreAuthenticate is false, the default value, a request is made to the XML Web service method without initially attempting to authenticate the user. If you know the Web service requires authentication, you can save one roundtrip by setting this property to true.
• Proxy – Use this property if a client needs to use different proxy settings than those found in the system settings. You can use the WebProxy class to set the proxy settings, because it implements IWebProxy. Or, default proxy setting can be set in a configuration file.
• Timeout – The time out, in milliseconds, for synchronous calls to the XML Web service. The default is 100000 milliseconds. Setting the Timeout property to Timeout.Infinite indicates that the request does not time out; however, the Web server can still cause the request to time out on the server side.
• Url – The default value for this property is determined by the location attribute found in the service description from which the proxy class was generated.
For more information, see SoapHttpClientProtocol Class.
Calling XML Web Service Methods
After adding a Web reference to an XML Web service, you can invoke the exposed methods of that XML Web service and access the results just as you would any other method of a component.
In the example code below, the client application (Application1) is accessing an XML Web service for which it has a Web reference (Converter) that contains a proxy class (Service1), which has a method (ConvertTemperature) for calling the XML Web service. The two lines of code in bold represent the code that is necessary to access the XML Web service.
' Visual Basic Imports System Module Module1 Sub Main() Dim cService As New Converter.Service1() Dim dFahrenheit As Double Dim dCelsius As Double Console.Write("Temperature in degrees Fahrenheit: ") dFahrenheit = Convert.ToDouble(Console.ReadLine()) dCelsius = cService.ConvertTemperature(dFahrenheit) Console.Write("Temperature in degrees Celsius: ") Console.WriteLine(dCelsius.ToString()) End Sub End Module // C#
using System; namespace Application1 { class Class1 { static void Main() { Converter.Service1 cService = new Converter.Service1(); Console.WriteLine("Temperature in degrees Fahrenheit: "); double dFahrenheit = Convert.ToDouble(Console.ReadLine()); double dCelsius = cService.ConvertTemperature(dFahrenheit); Console.Write("Temperature in degrees Celsius: "); Console.WriteLine(dCelsius.ToString()); } } }
For more information, see Accessing an XML Web Service in Managed Code.
Conclusion
XML Web services provide the ability to exchange messages in a loosely coupled environment using standard protocols such as HTTP, XML, SOAP, and WSDL. The messages can be structured and typed, or loosely defined. Because standard protocols serve as the basis for XML Web services, your XML Web service applications can communicate with a broad variety of implementations, platforms, and devices.
You create XML Web services using the ASP.NET page framework, which enables these XML Web services to access the many features of the .NET Framework. Because ASP.NET and the .NET Framework are the basis for XML Web services in managed code, developers can focus on creating or accessing XML Web services without needing to write infrastructure code.
Accessing an XML Web service in managed code is a relatively simple process when you use a proxy class that Visual Studio generated directly from the service description of the XML Web service. The proxy class does the work to transform the method call into a request message and the response message back into a method return value.
For step-by-step walkthroughs on how to create and access XML Web services in Visual Studio .NET, see Creating and Accessing XML Web Services Walkthroughs and Support WebCast: Microsoft .NET: Introduction to Web Services (http://support.microsoft.com/default.aspx?scid=http://support.microsoft.com/servicedesks/webcasts/wc012902/wcblurb012902.asp).