Getting Started with Monero By Kevin Lee 1) 2) Download...
6
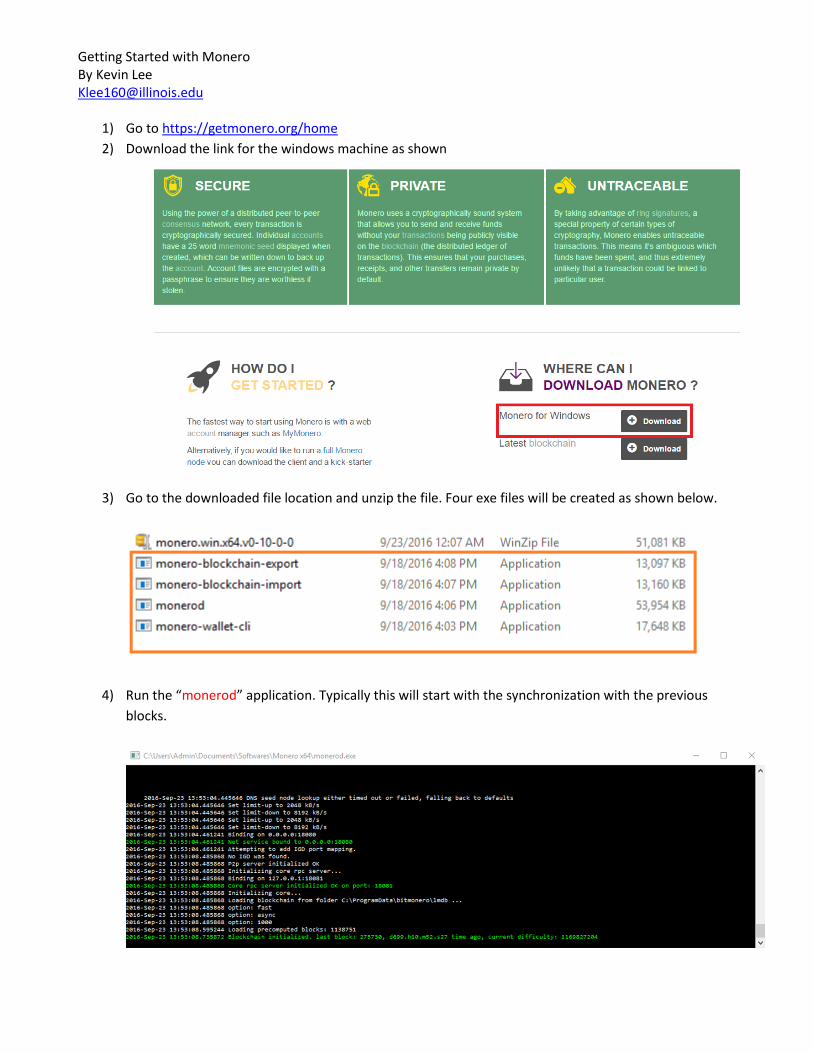
Getting Started with Monero By Kevin Lee [email protected] 1) Go to https://getmonero.org/home 2) Download the link for the windows machine as shown 3) Go to the downloaded file location and unzip the file. Four exe files will be created as shown below. 4) Run the “monerod” application. Typically this will start with the synchronization with the previous blocks.
Transcript of Getting Started with Monero By Kevin Lee 1) 2) Download...
Getting Started with Monero By Kevin Lee [email protected]
1) Go to https://getmonero.org/home
2) Download the link for the windows machine as shown
3) Go to the downloaded file location and unzip the file. Four exe files will be created as shown below.
4) Run the “monerod” application. Typically this will start with the synchronization with the previous
blocks.

Getting Started with Monero By Kevin Lee [email protected]
We need to wait until this synchronization gets finished successfully. Don’t worry about any error
messages, It may take 4 or 5 hours to sync successfully. You will see a message like this
5) Go the folder and now launch the “monero-wallet-cli” application
At first it will ask to enter the wallet name: If you have one before enter the wallet name and the
password. If you are creating a wallet for the first time, Just enter some wallet name and confirm
the password of your wish, twice as shown below. Then select the language option.

Getting Started with Monero By Kevin Lee [email protected]
Now the wallet will be created with the key and a signature message of the wallet as shown below.
6) We can start mining now, with the “start_mining [optional]” command in the wallet prompt
window as show below.

Getting Started with Monero By Kevin Lee [email protected]
Once we start the mining we will be able to see some logs in monerod window. If you want to
check the hash rate, enter “show_hr” in monerod window. To close the hash rate type “hide_hr”
command.
7) To stop mining, go to monerod window and enter “stop_mining” command as show below.

Getting Started with Monero By Kevin Lee [email protected]
8) Once we are done with this one then close the “monero-wallet-cli” window with the “exit”
command. Also close the “monerod” with by entering “Ctrl+c” or “exit”. Now the logs will get
recorded for both the windows.
9) To check the Wallet logs that were generated during these transactions check the “monero-wallet-
cli.log” in the same folder, and for the Monerod logs go to the path
“C:\ProgramData\bitmonero\bitmonero.log” file.
You will be able to see the logs that were recorded for each of the steps. Please note that the
“monero-wallet-cli.log” will record the most recent activities you have in the Wallet. Nevertheless,
the bitmonero.log will grow by appending the new activities to the previous log.
10) The synchronized blockchain is stored at: C:\programdata\bitmonero\lmdb\data.mdb It will occupy about 8GB memory.
11) It is highly recommended that you synchronize the blockchain from scratch. Syncing from scratch is fast and will leave you with a fully verified blockchain. Once it is synchronized, it will automatically re-synchronize new transactions when you run Monerod again.
12) Alternatively, if you want to download the raw blockchain, you can go to
https://getmonero.org/home

Getting Started with Monero By Kevin Lee [email protected]
Once downloaded, you can import it with:
blockchain_import --input-file /path/to/your/download.raw.
13) If you want to convert your old blockchain, you can use blockchain_export to create a
blockchain.raw, followed by blockchain_import to import it into the new LMDB format.
14) For Further readings on how to transfer the Balance check the video link.
https://www.youtube.com/watch?v=dzTWD4b3tEw


![Monero Bulletproofs Security Audit · 2021. 4. 17. · Monero Bulletproofs + Security Audit 1 Executive Summary The Monero Research Lab announced [11] the implementation of Bulletproofs](https://static.fdocuments.in/doc/165x107/61311db21ecc5158694487c8/monero-bulletproofs-security-audit-2021-4-17-monero-bulletproofs-security.jpg)


![A Monero data model and API specification · 2021. 2. 5. · MoneroBlock hex: string miner_tx: MoneroTx txs: MoneroTx[] tx_hashes: string[] MoneroBlockHeader hash: string height:](https://static.fdocuments.in/doc/165x107/6122128879796402e43830e5/a-monero-data-model-and-api-speciication-2021-2-5-moneroblock-hex-string.jpg)