Getting Started with Licensing in Tally.ERP 9 · Tally.ERP 9 brings a simple and more user-fri...
37
Getting Started with Licensing in Tally.ERP 9
Transcript of Getting Started with Licensing in Tally.ERP 9 · Tally.ERP 9 brings a simple and more user-fri...

Getting Started with Licensing in Tally.ERP 9

The information contained in this document represents the current view of Tally Solutions Pvt. Ltd., (‘Tally’ in short) on the topics discussed as of the date of publication. Because Tally must respond to changing market conditions, it should not be interpreted to be a commitment on the part of Tally, and Tally cannot guarantee the accuracy of any information presented after the date of publication.
This document is for informational purposes only. TALLY MAKES NO WARRANTIES, EXPRESS OR IMPLIED, IN THIS DOCUMENT.
Complying with all applicable copyright laws is the responsibility of the user. Without limiting the rights under copyright, no part of this document may be reproduced, stored in, or introduced into a retrieval system, or transmitted in any form, by any means (electronic, mechanical, photocopying, recording, or otherwise), or for any purpose, without the express written permission of Tally Solutions Pvt. Ltd.
Tally may have patents, patent applications, trademarks, copyrights, or other intellectual property rights covering subject matter in this document. Except as expressly provided in any written licence agreement from Tally, the furnishing of this document does not give you any licence to these patents, trademarks, copyrights, or other intellectual property.
© 2009 Tally Solutions Pvt. Ltd. All rights reserved.
Tally, Tally 9, Tally9, Tally.ERP, Tally.ERP 9, Shoper, Shoper 9, Shoper POS, Shoper HO, Shoper 9 POS, Shoper 9 HO, TallyDeveloper, Tally Developer, Tally.Developer 9, Tally.NET, Tally Development Environment, Tally Extender, Tally Integrator, Tally Integrated Network, Tally Service Partner, TallyAcademy & Power of Simplicity are either registered trademarks or trademarks of Tally Solutions Pvt. Ltd. in India and/or other countries. All other trademarks are properties of their respective owners.
Version: Getting Started with Licensing in Tally.ERP 9/1.0/March 2009

Contents
Contents
Lesson 1: Introduction1.1 Features of Licensing ........................................................................................................................ 1
Lesson 2: Activating Tally.ERP 9 for Single Site2.1 Activating Tally.ERP 9 ..................................................................................................................... 2
Step 1: Activate Tally.ERP 9 ...............................................................................................................................2Step 2: Procedure to Unlock License File ...........................................................................................................5
Lesson 3: Activating Tally.ERP 9 for Multi-Site3.1 Introduction ....................................................................................................................................... 8
Step1: Activate Tally.ERP 9 ................................................................................................................................8Step 2: Procedure to Unlock the License File ...................................................................................................11
Lesson 4: Configuring Tally.ERP 94.1 Data Configurations ........................................................................................................................ 144.2 TDL Configuration ......................................................................................................................... 15
Local TDLs ........................................................................................................................................................16Account TDLs ....................................................................................................................................................18Remote TDLs .....................................................................................................................................................19
4.3 Advanced Configuration ................................................................................................................. 194.4 Configure Existing License ............................................................................................................ 20
Lesson 5: Updating License5.1 Steps for License Updation ............................................................................................................. 22
Lesson 6: Surrendering Tally.ERP 96.1 Surrender Tally.ERP 9 License ...................................................................................................... 23
Lesson 7: Reactivating Tally.ERP 97.1 Internet Connectivity is Available .................................................................................................. 267.2 Internet Connectivity is Not Available ........................................................................................... 26
Lesson 8: Uninstalling Tally.ERP 98.1 Uninstalling Tally.ERP 9 ................................................................................................................ 278.2 Uninstalling License Server ............................................................................................................ 28
i

Contents
Lesson 9: Reset Tally.ERP 9 License9.1 Reset Tally.ERP 9 License ............................................................................................................. 30
Lesson 10: Licensing Resolution10.1 Licensing Resolution .................................................................................................................... 31
ii

Lesson 1: Introduction
Tally.ERP 9 brings a simple and more user-friendly Licensing mechanism, which addresses many of the licensing activities for any user from a single screen. Besides, allowing activation of Single User (Silver) and Multi User (Gold) license, it also extends this feature for multi-site Licensing.
1.1 Features of Licensing Simple and easy to useAllows different licensing activities from a single windowProvides flexibility to configure settings based on Single / Multi-user / locationBrings in the concept of Account for better management & administration of LicensesMinimal information required at the time of activation / reactivationProvides wider scope of activities ensuring transparencyAllows personalised key for activation/ reactivation thereby better security.
The new licensing process provides the user with the flexibility and compatibility to manage multiple license running at different locations/ sites centrally in a secured environment.
Site LicensingA new concept known as Site Licensing is introduced from Tally.ERP 9. A site refers to a location comprising of a single Tally.ERP 9 License or multiple Tally.ERP 9 licenses linked to it. The site licensing may be broadly classified into two viz., Single Site and Multi-Site
Single Site: means a single instance of Tally.ERP 9 (Silver or Gold) is active at a time on a single machine under a given account.Multi Site: means more than one instance of Tally.ERP 9 (Silver or Gold) license are active on different machines (may be at different locations) under a single account com-prising of the same or different serial numbers.
1
Lesson 2: Activating Tally.ERP 9 for Single Site
2.1 Activating Tally.ERP 9In Tally.ERP 9, licensing functions on the concept of sites. A site is a single instance of Tally.ERP 9 installed and activated. The License Activation is shown in two simple steps:
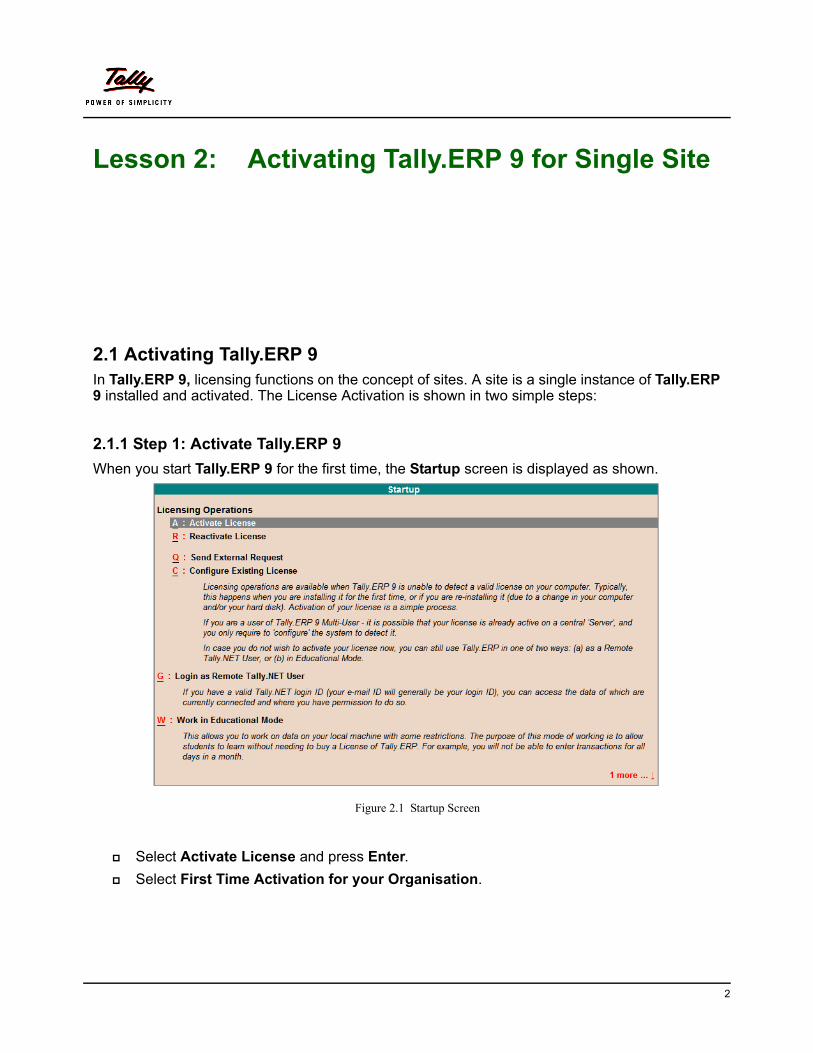
2.1.1 Step 1: Activate Tally.ERP 9When you start Tally.ERP 9 for the first time, the Startup screen is displayed as shown.
Figure 2.1 Startup Screen
Select Activate License and press Enter.Select First Time Activation for your Organisation.
2

Creating Tally.NET Auditors’
Figure 2.2 First Time activation of the License.
Press Enter.The Activate License screen is displayed. In the Serial Number field enter the Serial Number printed on the Installation Guide. In the Activation Key field enter the Activation Key printed on the Installation Guide. Enter a your E-mail address in the E-mail ID of Administrator field. An account is cre-ated using the e-mail address provided, the serial number is linked to the account. The Unlock Key, Account Information and Account Password will be mailed separately to the email-id provided. Enter the email address in Repeat (E-mail ID of Administrator).
Figure 2.3 Activation Form
Press Enter.Tally.ERP 9 searches for Internet Connectivity on your computer.
Note: In case an active internet connection is not available on the license server opt for Offline Activation (read section Internet Connectivity is not Available).
3

Creating Tally.NET Auditors’
Internet Connectivity is Available Tally.ERP 9 displays the message Congratulations! Your Activation Request has been Processed. An encrypted file is now on your machine. Press Enter to continue.Proceed to section Step 2: Procedure to Unlock License File.
Internet Connectivity is Not AvailableTally.ERP 9 displays the message Could not connect to the Internet, Do you want to activate the License Offline.
Figure 2.4 Offline Activation Message
Press Y or click Yes to proceed with offline activation. Tally.ERP 9 displays a message Your Offline Activation Request file has been Created Successfully. A license request file named tally_req.lic is generated and stored in the default Tally.ERP 9 folder. Copy the tally_req.lic and transfer it to another computer with an internet connection and Tally.ERP 9 installed. Start Tally.ERP 9.Go to Gateway of Tally > F12: Configure > Licensing > Send External Request.
4

Creating Tally.NET Auditors’
Figure 2.5 Startup
Tally.ERP 9 displays a message Offline Response File Generated Successfully.Copy tally_lck.lic file to a pendrive/CD and paste this file to the Tally.ERP 9 folder of the
computer where Tally.ERP 9 is to be activated. Start Tally.ERP 9.Proceed to section Step 2: Procedure to Unlock License File.
2.1.2 Step 2: Procedure to Unlock License FileAccess your email and retrieve the unlock key before proceeding to unlock the license file.
The license Startup screen is displayed. Select Unlock License.
5

Creating Tally.NET Auditors’
Figure 2.6 Startup
The Unlock License screen is displayed. Type the unlock key retrieved in Unlock Key field and press Enter.
Figure 2.7 Unlock License
On successfully unlocking the license, Tally.ERP 9 displays a message as shown.
Figure 2.8 License Successfully Activated
6

Creating Tally.NET Auditors’
Note: The procedure to activate Tally.ERP 9 Silver/Gold/Auditors’ Edition is the same for a Single Site.
In case of Tally.ERP 9 Gold or Auditors’ Edition a request to activate the license can be made from the server or client machine
On startup Tally.ERP 9, the Edition and number of Users information are displayed under Version, similarly the License Serial Number and Account ID appear under License block of the Information panel as shown.
Figure 2.9 Tally.ERP 9 License Details for Single User
Similarly, you can also activate Tally.ERP 9 Gold or Tally.ERP 9 Auditors’ Edition Single Site License.
7
Lesson 3: Activating Tally.ERP 9 for Multi-Site
3.1 IntroductionA Multi-Site has more than one Tally.ERP 9 Silver or Gold licenses active on different machines or locations under a single account comprising of same or different serial numbers.
On purchase of Tally.ERP 9 Multi Site License, the associated Tally Partner creates an Account ID using your E-Mail ID, the Multi Site License Serial Numbers are associated to the account created. You need to provide the Account ID and Password to access the account information, or reactivate Tally.ERP 9 license rather than providing the Serial Number and Activation Keywhich is difficult to remember. The Multi Site Activation is shown in two simple steps
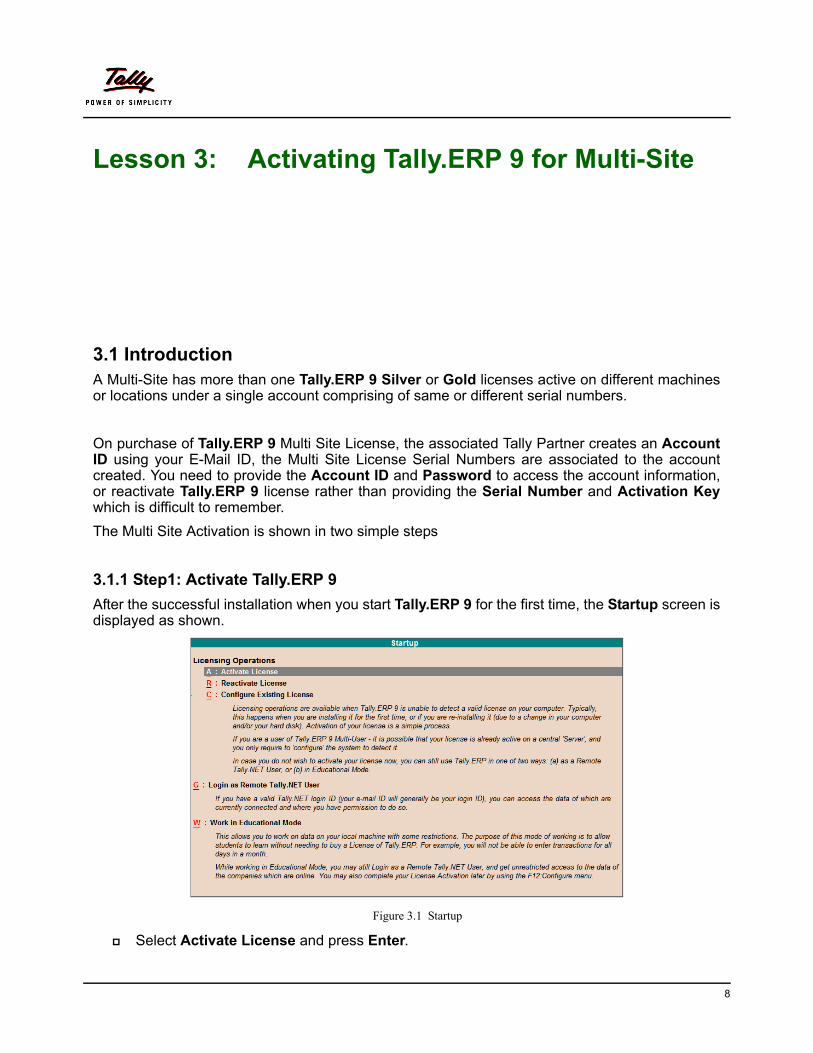
3.1.1 Step1: Activate Tally.ERP 9 After the successful installation when you start Tally.ERP 9 for the first time, the Startup screen is displayed as shown.
Figure 3.1 Startup
Select Activate License and press Enter.
8

Creating Tally.NET Auditors’
Figure 3.2 Activate License
Select Activation of an Additional Site for your Organisation and press Enter.The Activate Site License form appears. In the Serial Number field enter the Serial Number printed on the Installation Guide. In the Activation Key field enter the Activation Key printed on the Installation Guide. Enter the Account ID in the Account ID field Enter the Site Name in Site ID field. An account can have one or more active sites. Enter your E-mail ID in E-mail ID of Site Administrator field. The Unlock key, Password and account information is mailed to the E-Mail ID provided. Re-enter the E-mail address in the Repeat (E-mail ID of Site Administrator) field.
Figure 3.3 Multi Site Activation Form
Press Enter. Tally.ERP 9 searches for Internet Connectivity on your computer.
9
Creating Tally.NET Auditors’
Internet Connectivity is Available Tally.ERP 9 displays a message Congratulations! Your activation Request has been processed. An encrypted file is now on your machine. Press Enter to continue.Proceed to section Step 2: Procedure to Unlock License File.
Internet Connectivity is Not AvailableTally.ERP 9 displays a message Could not connect to the Internet, Do you want to activate the License Offline.
Figure 3.4 Offline Activation Message
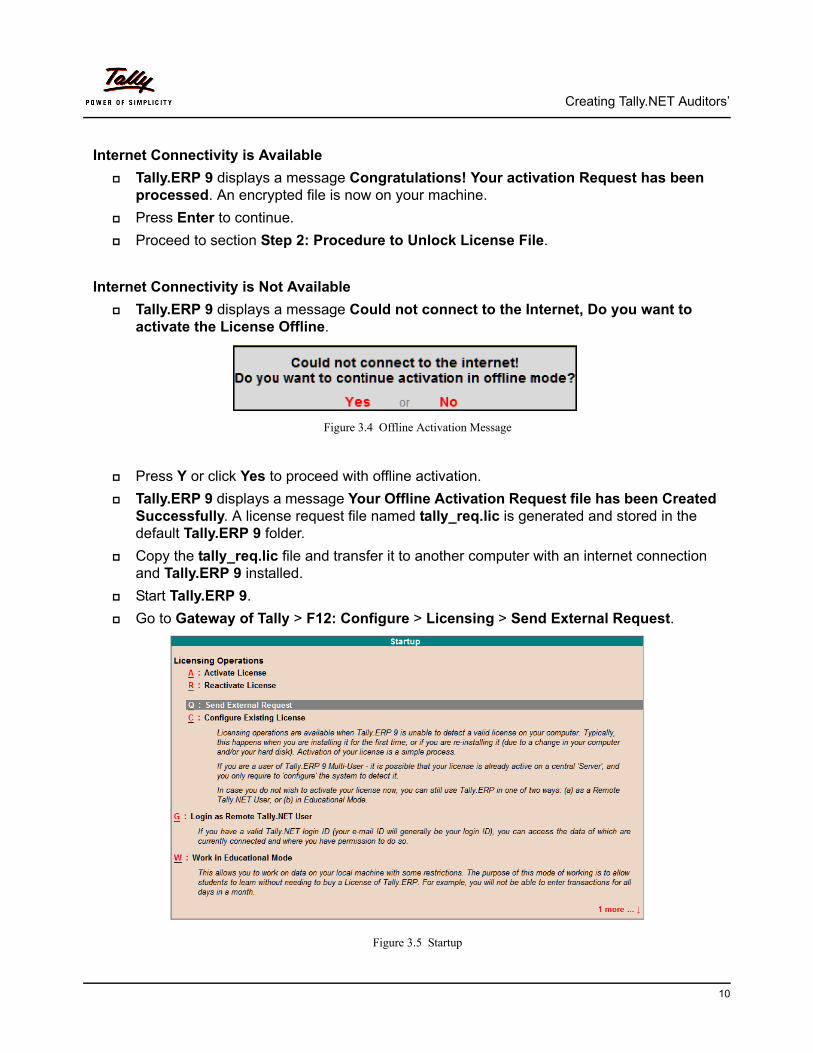
Press Y or click Yes to proceed with offline activation. Tally.ERP 9 displays a message Your Offline Activation Request file has been Created Successfully. A license request file named tally_req.lic is generated and stored in the default Tally.ERP 9 folder. Copy the tally_req.lic file and transfer it to another computer with an internet connection and Tally.ERP 9 installed. Start Tally.ERP 9.Go to Gateway of Tally > F12: Configure > Licensing > Send External Request.
Figure 3.5 Startup
10

Creating Tally.NET Auditors’
Tally.ERP 9 displays a message Offline Response File Generated Successfully.Copy tally_lck.lic file and transfer this file to the default Tally.ERP 9 folder of the computer where Tally.ERP 9 is activated. Start Tally.ERP 9.Proceed to the section Step 2: Procedure to Unlock License File.
3.1.2 Step 2: Procedure to Unlock the License FileThe license Startup screen is displayed. Select Unlock License.
Figure 3.6 Startup
The Unlock License screen appears. Enter the Unlock Key emailed in the Unlock Key field and press Enter.
Figure 3.7 Unlock License
11

Creating Tally.NET Auditors’
On successfully unlocking the license file, a message is displayed as shown.
Figure 3.8 License Activates Successfully
On starting Tally.ERP 9, the Edition and User information is displayed under Version block, the License Serial Number, Site ID and Account ID are displayed under the License block of the information panel.
Figure 3.9 License Details
Similarly, you can also activate Tally.ERP 9 Gold or Tally.ERP 9 Auditors’ Edition for Multi Site Licenses.
12

Lesson 4: Configuring Tally.ERP 9
The user can locally configure the Tally.ini using the configuration options available. You can add or modify parameters to the Tally.ini file without actually opening the file. To configure Tally.ERP 9Go to Gateway of Tally or Company Info menu
Press F12:Configure The Configuration menu appears as shown
Figure 4.1 Configuration Menu
Here we will be discussing the four categories of the Configuration menuData ConfigurationTDL ConfigurationAdvanced ConfigurationConfigure Existing License
13

Configuring Tally.ERP 9
4.1 Data Configurations
In case you do not want Tally.ERP 9 to load companies on startup, set Load Companies on Startup to No.
Tally.ERP 9 allows the user to add or modify the path where the Language, Data and Configuration files reside. To change the required configurations, execute the following steps. Go to Gateway of Tally or Company Info menu
Press F12:ConfigureSelect Data Configuration
The Data Configuration screen is displayed.By default C:\Tally.ERP9\Lang appears in Location of Language Files field. Specify the required path, if the language files reside in another folder.By default C:\Tally.ERP9 appears in Location of Tally Configuration Files field. Specify the required path, if the configuration file resides in another folder.By default C:\Tally.ERP9\Data appears in Location of Data Files field. Specify the required path, if you want to change the data folder.By default Load Companies on Startup is enabled, Select the required companies from the List of Companies.
14

Configuring Tally.ERP 9
Figure 4.2 Configure Licensing
Select End of List.Accept to save the data configurations.Tally.ERP 9 displays a message Do you want to restart Tally.ERP 9 for the changes to have effect?Press Y or click Yes to effect changes and restart Tally.ERP 9.
4.2 TDL ConfigurationThe TDL Configuration screen shows the details about the TDLs that are active and their origin. In Tally.ERP 9 with the availability of remote access the application can get TDLs from the following locations:
Remote serverThe owner account and Locally available TDLs
The TDLs are categorized as Local TDLs, Account TDLs and Remote TDLs.Press F12: Configure Select TDL Configuration.
15

Configuring Tally.ERP 9
The TDL Configuration screen appears as shown:
Figure 4.3 TDL Configuration
4.2.1 Local TDLs
Displays the TDLs that are available and their Status as Active, Not Allowed and Error. Select the button F4: Local TDLs, it displays the following screen:
Figure 4.4 TDL Configuration
Multiple TDL files can be specified in this TDL configuration screen as shown:
16
Configuring Tally.ERP 9
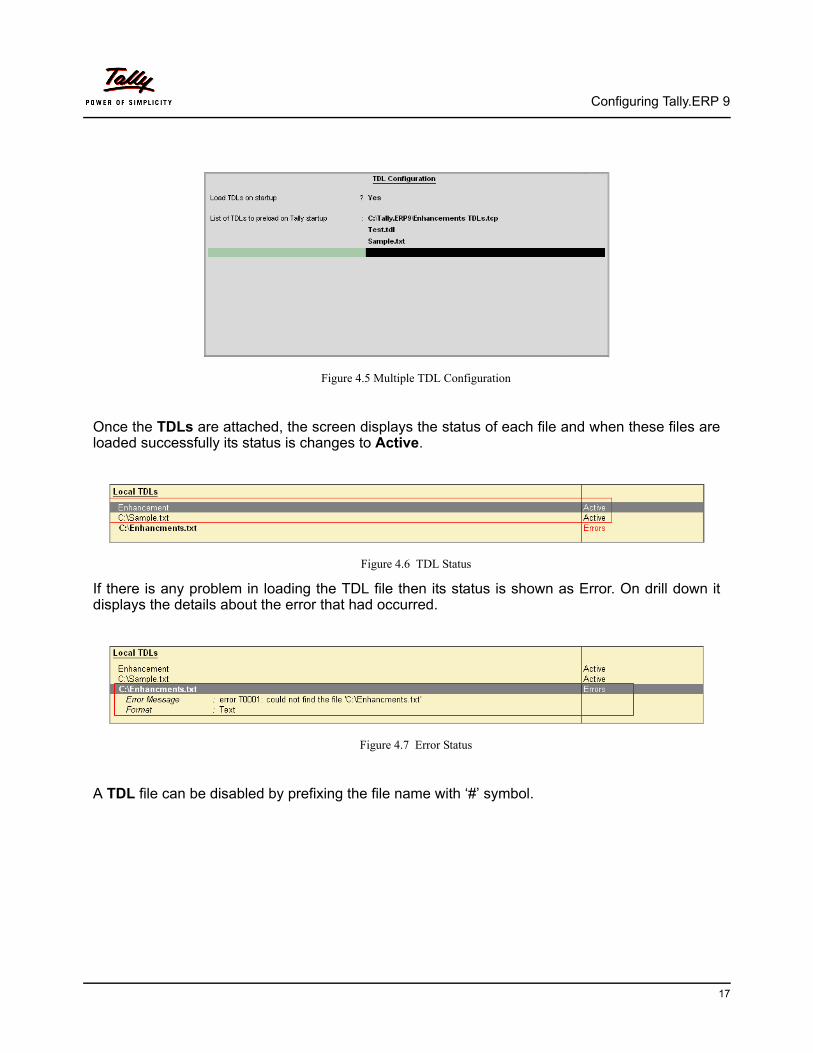
Figure 4.5 Multiple TDL Configuration
Once the TDLs are attached, the screen displays the status of each file and when these files are loaded successfully its status is changes to Active.
Figure 4.6 TDL Status
If there is any problem in loading the TDL file then its status is shown as Error. On drill down it displays the details about the error that had occurred.
Figure 4.7 Error Status
A TDL file can be disabled by prefixing the file name with ‘#’ symbol.
17

Configuring Tally.ERP 9
Figure 4.8 TDL Configuration
The status of the disabled file is then shown as Not Allowed.
Figure 4.9 Local TDLs
4.2.2 Account TDLs
Refer TDL Configuration in Control Centre
The list of TDLs are received from the account are displayed under the section Account TDLs. The following screen shows that no TDLs are received from the account:
Figure 4.10 Account TDLs
18

Configuring Tally.ERP 9
4.2.3 Remote TDLsWhen a user selects the option to Login as Remote User, then the TDLs that are attached on the remote server are also available for the client. TDLs received from the remote server are listed under the heading Remote TDLs as shown:
Figure 4.11 Remote TDLs
The List of all the active TDLs on the remote server are displayed.
4.3 Advanced ConfigurationThe user can add or modify the required parameters required for synchronisation and ODBC. To change the required configurations follow the steps shown:
Go to Gateway of Tally or Company Info menu Press F12:ConfigureSelect Advanced Configuration
The Client/Server Configuration screen is displayed.In Tally is acting as field select the required type from the list of Client /Server.Enter the required port number in the Port field.Ignore Client’s modified Voucher Type Masters should be set to No, so that modifications made on the Client to Voucher Type Masters are updated on the Server.Ignore Server modified Voucher type Master should be set to No, so that modifications made on the Server to Voucher Type Masters are updated on the Client.Enable Sync Logging should be set to Yes, to generate a Log file which contains synchronized vouchers and is saved in the Tally folder.By default Use HTTP Proxy Server is set to No. In case you are using a proxy server set this option to Yes.Enter the required address in the URL field.To authenticate before connecting, set Authentication Required to Yes.Provide the required username and password in the User Name and Password fields respectively.
19

Configuring Tally.ERP 9
Figure 4.12 Client/Server Configuration
Accept to save the configurations.Tally.ERP 9 displays a message Do you want to restart Tally.ERP 9 for the changes to have effect?Press Y or click Yes to effect changes and restart Tally.ERP 9.
4.4 Configure Existing LicenseYou can configure the existing license by providing the License Server Name and Port Number. By default, Tally.ERP 9 uses 9090 port for communication between the license servers and clients, in case you opt for a different port number, please contact the system or network administrator. To configure the existing license, execute the following steps.Go to Gateway of Tally or Company Info menu
Press F12:Configure.Select Licensing > Configure Existing License.The Configure Existing License screen appears.Provide the required License Server Name or IP Address in the Tally License Server Field.
20

Configuring Tally.ERP 9
By default, Tally.ERP 9 License Services uses port 9999 to operate. Provide the required port number, in case you want Tally.ERP 9 license services to use another port for communication.
Figure 4.13 Configure Existing License
Accept to save the License Configurations.Tally.ERP 9 displays a message Do you want to restart Tally.ERP 9 for the changes to have effect?Press Y or click Yes to effect changes and restart Tally.ERP 9.
The remaining options of the Licensing menu, such as, Update License, Sur-render License and Reset License are discussed as separate lessons in this book.
21

Lesson 5: Updating License
The procedure to update a Tally.ERP 9 license for Single Site and Multi Site is similar. You require to update the license information, when the TDL/General configuration assigned to the account has to be applied to the respective site or when you renew/subscribe for Tally.NET.
5.1 Steps for License UpdationFrom the Gateway of Tally or Company Info menu
Press F12: Configure. Select Licensing > Update License.The Login as Remote Tally.NET User screen appears.Enter your E-Mail ID in Your E-Mail ID field.Enter your Tally.NET Password in Your Tally.NET Password.
Figure 5.1 Login as Remote User
Accept to update the licenseTally.ERP 9 displays the message License Updated Successfully!The Version block of the Information Panel displays the date on which the License was updated.
22

Lesson 6: Surrendering Tally.ERP 9
6.1 Surrender Tally.ERP 9 LicenseYou can surrender the activated Tally.ERP 9 when:
Hard Disk has to be formattedReinstalling the Operating System Adding new Hardware or DriversReactivating the license on another computer or site.
To surrender, the user has to execute the following steps:Go to Gateway of Tally or Company Info menu
Press F12:Configure. Select Licensing > Surrender.
Figure 6.1 Surrender License
23

Tally.ERP 9 displays a message You are about to Surrender Your License. Continue? Press Y or click Yes to proceed with surrendering the license. The Login As Remote Tally.NET User screen is displayed.Provide your E-Mail ID in Your E-Mail ID field.Provide your Tally.NET Password in Your Tally.NET Password.
Figure 6.2 Login to Surrender
Press EnterTally.ERP 9 displays a message as shown:
Figure 6.3 License Surrendered
24

Lesson 7: Reactivating Tally.ERP 9
A new option that has been introduced in licensing is Reactivate. This option is used for subsequent activation of Tally.ERP 9. The process to Reactivate single site or multi site is similar.
After surrendering the Tally.ERP 9 Single Site or Multi-Site license, when you start Tally.ERP 9, it looks for a valid license file in the default folder. In case, the license file is not available, the user has to Reactivate Tally.ERP 9.
The process to Reactivate Tally.ERP 9 is as follows: Start Tally.ERP 9.The Startup screen is displayed.Select Reactivate License and press Enter.The Reactivate License screen appears.Select If you have only one license for your organisation to reactivate a single site license or select If you wish to reactivate a site to reactivate a multi site license.Depending on your requirement the Reactivate License / Reactivate Site License form appears.Enter the required details to reactivate the license as shown.
Figure 7.1 Site Reactivation Form
Press Enter
25

Reactivating Tally.ERP 9
Tally.ERP 9 searches for an internet connectivity on your computer.
7.1 Internet Connectivity is AvailableThe Tally_lck.lic is generated and stored in the default Tally.ERP9 Directory.The Unlock Key is emailed to the E-Mail ID provided.
7.2 Internet Connectivity is Not AvailableTally.ERP 9 displays the message Could not connect to Internet, Do you want to gen-erate the License file offline.Press Y or click on Yes.Tally.ERP 9 displays a message Your Offline Activation Request file has been Created Successfully. The license request file named Tally_req.lic is generated and stored in the default Tally.ERP 9 folder. Copy the Tally_req.lic file and transfer it to another computer with an internet connection and Tally.ERP 9 installed. Start Tally.ERP 9.Go to Gateway of Tally > F12: Configure > Licensing > Send External RequestCopy Tally.Lic and transfer it to the computer where Tally.ERP 9 is to be activatedStart Tally.ERP 9.The Startup screen is displayed. Select Unlock License. Enter the Unlock Key emailed and press Enter.
On successfully unlocking the license key, Tally.ERP 9 displays a successful license activation message.
The Account ID, Site ID and E-mail ID of Site Administrator must be the same as provided in the activation form.
26

Lesson 8: Uninstalling Tally.ERP 9
8.1 Uninstalling Tally.ERP 9
You can uninstall Tally.ERP 9 or the License Server or both, to uninstall, execute the following steps:
Click Uninstall from Start > Programs > Tally.ERP 9.
Figure 8.1 Uninstall Wizard
By default, Tally.ERP 9 is selected. Click on Uninstall to uninstall Tally.ERP 9.
Note: You need to have administrator rights or login as administrator to uninstall Tally.ERP 9When some of the Tally.ERP 9 files are open, a message Couldn’t Delete Some of the files. Exiting Uninstalla-tion…’ is displayed. Click OK. to uninstall, close the file/s and start the uninstall procedure again.
27

Uninstalling Tally.ERP 9
Figure 8.2 Uninstallation Successful - Finish
Click Finish to complete uninstalling.
Uninstalling removes all files created except for Data Folder which remains intact.In Tally.ERP 9 folder a Backup folder containing a Restore_Date_Time folder is created. The Restore_date_time folder contains stat.900 and Lang folder which has the dct files.
8.2 Uninstalling License Server
Click Uninstall from Start > Programs > Tally.ERP 9.
28

Uninstalling Tally.ERP 9
Figure 8.3 Uninstall Wizard
By default, License Server is selected. Click on Uninstall to uninstall the License Server. Click Finish to complete the uninstallation of Tally License Server.
Figure 8.4 Uninstall License Server.
Note: In a situation where the Tally.ERP 9 and the License Server are installed on the same computer, you can uninstall both the Tally.ERP 9 and the License Server by selecting both the options.
29

Lesson 9: Reset Tally.ERP 9 License
9.1 Reset Tally.ERP 9 License
This option enables you to remove all licensing data from the computers. This will bring the user’s computer to a state, where Tally.ERP 9 activation was not done earlier.
To reset Tally.ERP 9 License, execute the following steps:
Go to Gateway of Tally or Company Info menuPress F12:ConfigureSelect Licensing > Reset Licensing
Figure 9.1 Reset License
Tally.ERP 9 displays the message You are about to Reset Your License. Continue? Press Y or click Yes to proceed with surrendering the license. Tally.ERP 9 displays a message License Reset Successfully.
30

Lesson 10: Licensing Resolution
10.1 Licensing Resolution
When you try to activate the second or subsequent licenses using the option First time activation for your organisation and providing the same Account ID, the User Resolution screen appears:
Figure 10.1 User Resolution
In the User Resolution screen, select the required option to activate the license:
31

Chapter Title
10.1.1 Option 1: If you want to add this Serial Number to the same Account:
Select this option in case you want the serial number provided to be included in the existing account. The Supporting Activation Form appears displaying the Account ID
Figure 10.2 Supporting Activation Form
Enter the required Site Name in the Site Name field to proceed with the activation of Tally.ERP 9 LicenseThe License Serial Number provided is activated as new site under the existing Account.
10.1.2 Option 2: If you want to provide a new account id and want to retain the existing account id as the administrator of the account:
Select this option when you want to retain the existing Account ID for the purpose of Account Administration and the License Serial Number provided to be activated under the new Account ID.
32

Chapter Title
The Supporting Activation Form appears as shown:
Figure 10.3 Supporting Activation Form
Provide the required Account ID in the Account ID field, a new account will be created and the License Serial Number provided in the Activation Form will be included in the new Account ID.
10.1.3 Option 3: Esc, If you have accidentally entered, the wrong e-mail address, and re-enter the information to proceed:
Select this option when you have provided the wrong e-mail id. You will return to the Activate License form
The remaining steps to unlock the license file are discussed under the heading Unlock License under licensing.
33