Getting Started With Blackboard Learn 9 - UT Arlington · Getting Started With Blackboard Learn 9.1...
38
© 2010 Blackboard Inc. - 1 - Getting Started Getting Started With Blackboard Learn 9.1
-
Upload
nguyendung -
Category
Documents
-
view
218 -
download
0
Transcript of Getting Started With Blackboard Learn 9 - UT Arlington · Getting Started With Blackboard Learn 9.1...
© 2010 Blackboard Inc. - 1 - Getting Started
Getting Started With
Blackboard Learn 9.1
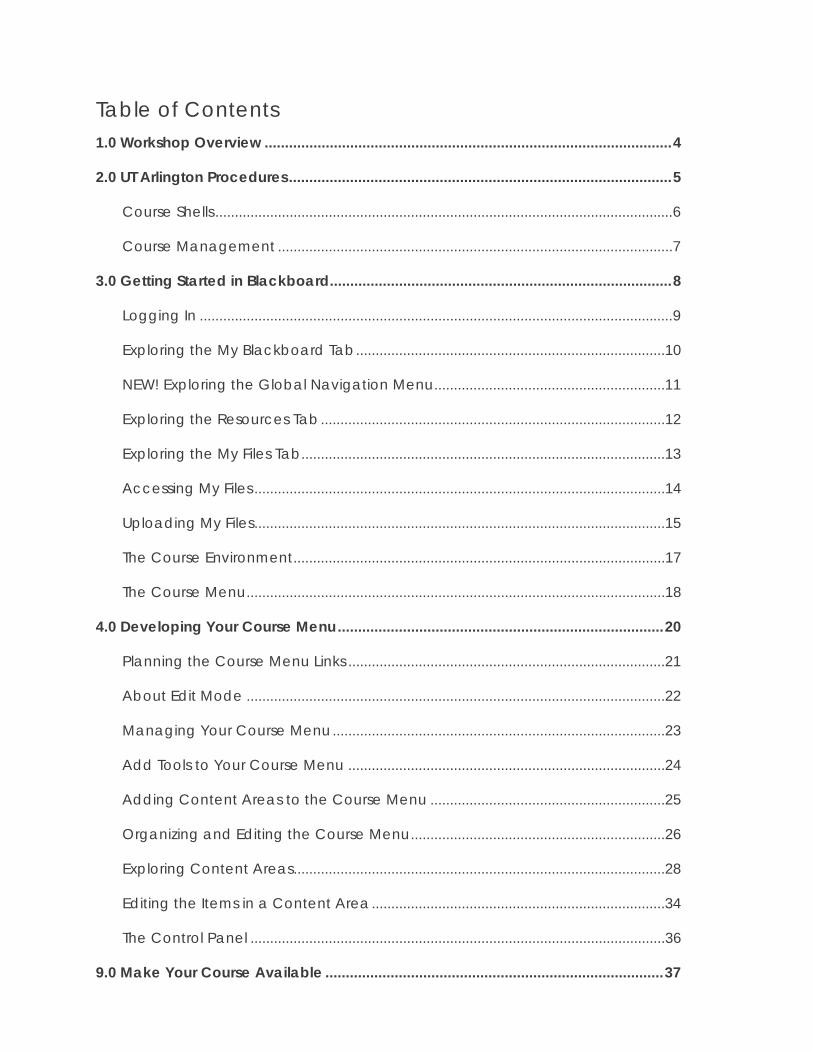
Table of Contents 1.0 Workshop Overview .................................................................................................... 4
2.0 UT Arlington Procedures .............................................................................................. 5
Course Shells ..................................................................................................................... 6
Course Management ..................................................................................................... 7
3.0 Getting Started in Blackboard .................................................................................... 8
Logging In ......................................................................................................................... 9
Exploring the My Blackboard Tab ...............................................................................10
NEW! Exploring the Global Navigation Menu ...........................................................11
Exploring the Resources Tab ........................................................................................12
Exploring the My Files Tab .............................................................................................13
Accessing My Files .........................................................................................................14
Uploading My Files .........................................................................................................15
The Course Environment ...............................................................................................17
The Course Menu ...........................................................................................................18
4.0 Developing Your Course Menu ................................................................................ 20
Planning the Course Menu Links .................................................................................21
About Edit Mode ...........................................................................................................22
Managing Your Course Menu .....................................................................................23
Add Tools to Your Course Menu .................................................................................24
Adding Content Areas to the Course Menu ............................................................25
Organizing and Editing the Course Menu .................................................................26
Exploring Content Areas ...............................................................................................28
Editing the Items in a Content Area ...........................................................................34
The Control Panel ..........................................................................................................36
9.0 Make Your Course Available ................................................................................... 37

© 2010 Blackboard Inc. - 3 - Getting Started
10.0 Workshop Wrap Up .................................................................................................. 38

© 2010 Blackboard Inc. - 4 - Getting Started
1.0 Workshop Overview
In this section, we will look at the key concepts covered in this hands-on manual. You will be introduced to the teaching and learning features of Blackboard Learn™.
We will begin by briefly covering the UT Arlington procedures for course management in Blackboard. From the instructor perspective, you will then follow a scenario-based approach representing the tasks you will complete to set up your course. You will begin by logging into Blackboard and exploring the Blackboard environment. You will then navigate through the Course Environment including the Course Menu, which is the students’ access point to tools and content. Next, you will learn how to customize your course style and course menu. Finally, you will learn to upload course materials such as your syllabus, lecture slides, etc.
2.0 UT Arlington Procedures
Learning Outcomes
After completing this section, you will be able to:
Explain the procedures for obtaining a course shell
Explain the process for requesting a Course Merge
Explain the procedure for making a course available
© 2010 Blackboard Inc. - 6 - Getting Started
Course Shells
Blackboard course shells for all UT Arlington credit courses will be automatically created for all sections that are officially listed in the MyMav Schedule of Classes one semester prior to being offered. In addition, instructor assignments and student uploads will be automated based on faculty assignments and student enrollments listed in the MyMav Schedule of Classes.
Please communicate to your appropriate departmental administrator that faculty and TA access to Blackboard course sections is dependent upon section listings and faculty/TA assignments made by the department in MyMav. For new employees, HR assignments in DEFINE and NetID requests to OIT must be in place before MyMav assignments will take effect. Course access is dependent upon execution of the following:
1. Departmental section listings to Registrar
2. Departmental assignment of instructor of record in MyMav (*after sections created by Registrar)
3. Departmental assignment of employee in DEFINE (new employees only, then return to 2 above)
4. Departmental request of NETID through OIT (new employees only)
When can faculty assignments be made? After your course section is listed in MyMav, your department administrator needs to follow steps 1 - 2 above (3 - 4 for new employees) for your official section to appear when you log in to Blackboard. Please allow 24 hours after your assignment is made in MyMav.
Important information for teaching assistants: if you have both a faculty NetID and a student NetID, you may need to update your primary account through OIT. Only one NetID will be passed into Blackboard. Usually this will be the student NetID. If you woud like to use your faculty NetID in Blackboard, please contact the Help Desk ([email protected]) and request to designate your faculty NetID as the primary account in CEDAR.
Drop/Adds
Drops and adds will be reflected in your Blackboard course sections based upon transactions that take place in MyMav up to Census date. Students no longer on the MyMav course roster will disappear from your Blackboard course.

© 2010 Blackboard Inc. - 7 - Getting Started
Course Management
All course sections will have an automatically-created, empty course shell. This is your "official course shell." The course shell will be available during the semester prior to when it is being taught (e.g. Fall course shells are created on census date of preceding summer) provided you have been assigned to that section in MyMav, *as mentioned above. Because every course section will automatically have a course shell, you may wish to combine sections. Additionally, it will now be your responsibility to make your course available to students.
Combining Multiple Sections and Cross-listed Courses
If you wish to combine multiple sections into one section for easy access to all students, please request a Section Merge. List all sections you are teaching. Sections will be merged into the first section listed in MyMav. For example, if you are teaching BIOL 1333-001, 002, and 003, the 002 and 003 sections will be merged into the 001 section.
If you are teaching a cross-listed course, you will need to merge the sections. Cross-listed courses will not be automatically merged.
Please email [email protected] for all course merge requests.
Student Access to Courses
It is the primary responsibility of the instructor of records to make a course available to students through the availability setting in Blackboard. Your students are enrolled in the course automatically through MyMav once they have registered and paid, but will not see their course until the course has been made available. The earliest students will gain access to courses is two weeks prior to the first class day. You will need to set the course to “Available” when you are ready for students to access.
We will discuss the process of making a course available at the end of this document.

© 2010 Blackboard Inc. - 8 - Getting Started
3.0 Getting Started in Blackboard
In this section, you will explore Blackboard as an instructor.
Learning Outcomes
After completing this section, you will be able to:
Log in to Blackboard Learn
Explain the information available on the My Blackboard tab, the Resources tab and the My Files tab
Access content and tools from the Course Menu and Tools link
Describe what a Content Area is and navigate content
Explain the difference between Content Pages and Tool Links
Use breadcrumbs to navigate the course
© 2010 Blackboard Inc. - 9 - Getting Started
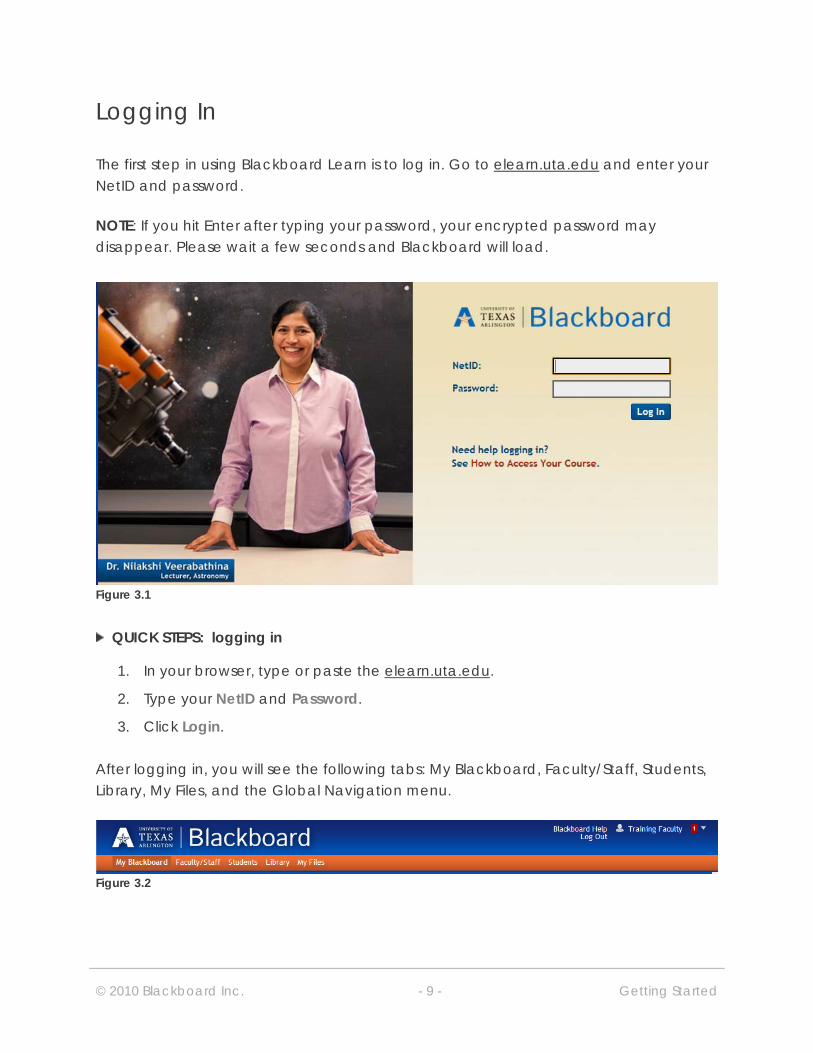
Logging In
The first step in using Blackboard Learn is to log in. Go to elearn.uta.edu and enter your NetID and password.
NOTE: If you hit Enter after typing your password, your encrypted password may disappear. Please wait a few seconds and Blackboard will load.
Figure 3.1
QUICK STEPS: logging in
1. In your browser, type or paste the elearn.uta.edu.
2. Type your NetID and Password.
3. Click Login.
After logging in, you will see the following tabs: My Blackboard, Faculty/Staff, Students, Library, My Files, and the Global Navigation menu.
Figure 3.2

Exploring the My Blackboard Tab
First, we will explore the contents of the My Blackboard tab. It contains the Course List module which lists all the courses in which you have access.
Figure 3.3
The My Blackboard tab contains Modules which collect information from all the courses you are enrolled in, giving you a total picture of news and activity for your courses. The following modules can be found on the My Blackboard tab:
Course List – displays all the courses that you have been assigned to in MyMav My Organizations – displays all the organizations that you have been enrolled in System Notifications – displays system-wide upgrades and outages Announcements – displays notifications specifically for faculty and staff All Announcements – displays announcements for your assigned courses Blackboard IM– displays a link to allow you to download BB IM My Calendar – displays calendar dates for courses that you have created Alerts – displays due dates as well as early warning system and alerts Needs Attention – displays items that need grading such as Assignments or Tests

© 2010 Blackboard Inc. - 11 - Getting Started
NEW! Exploring the Global Navigation Menu
The Global Navigation Menu provides one-click access to the new My Blackboard tools, such as new discussion posts, announcements, recently added content, and more. Students will also have quick access to new grades within the Global Navigation Menu.
© 2010 Blackboard Inc. - 12 - Getting Started
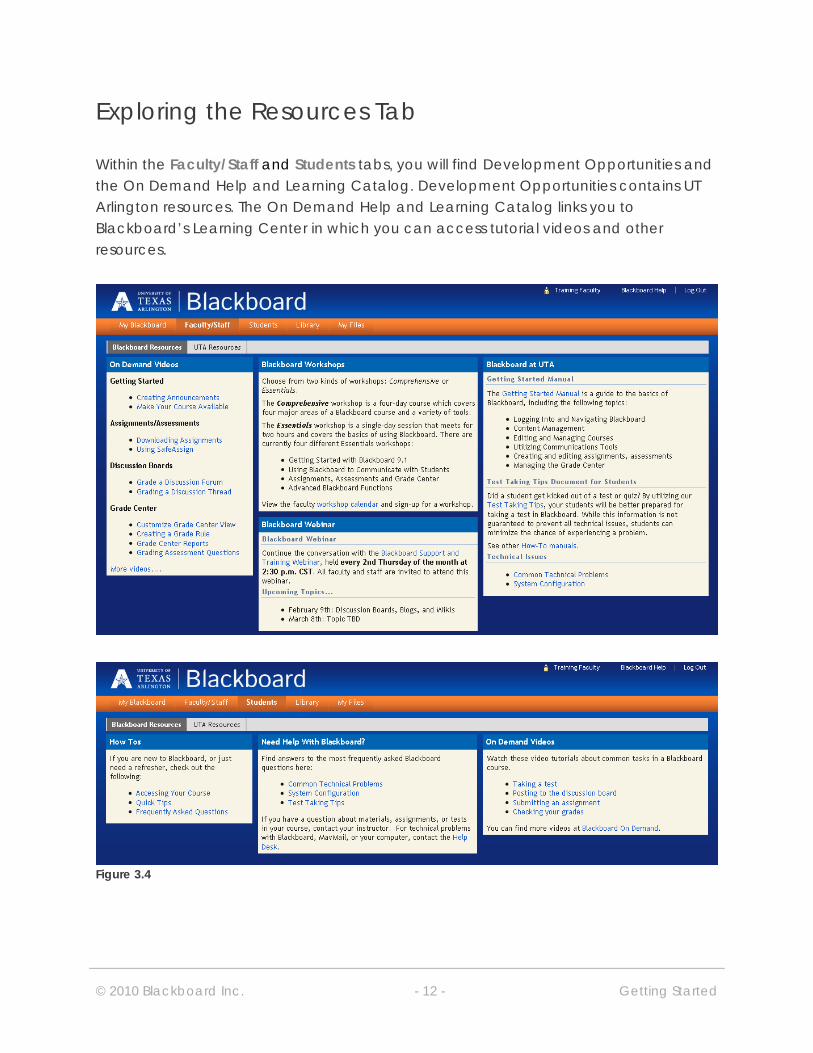
Exploring the Resources Tab
Within the Faculty/Staff and Students tabs, you will find Development Opportunities and the On Demand Help and Learning Catalog. Development Opportunities contains UT Arlington resources. The On Demand Help and Learning Catalog links you to Blackboard’s Learning Center in which you can access tutorial videos and other resources.
Figure 3.4

© 2010 Blackboard Inc. - 13 - Getting Started
Exploring the My Files Tab
The My Files tab houses all of your uploaded content. There are three types of content within Blackboard.
1. My Files: Content uploaded to My Files can be accessible from all your courses and can be uploaded to specific areas of your courses. Unlike course content, My Files will not be archived. It will stay with you for the life of your Blackboard use.
2. Course Files: Contains content that you upload within a specific course. Note: When your course is archived, corresponding Course Files will be archived as well.
3. Organizational Files: Contains content that you upload within a specific organization.
4. Institutional Files: Contains items specific to a particular department similar to a departmental common drive or shared drive.
Figure 3.5
© 2010 Blackboard Inc. - 14 - Getting Started
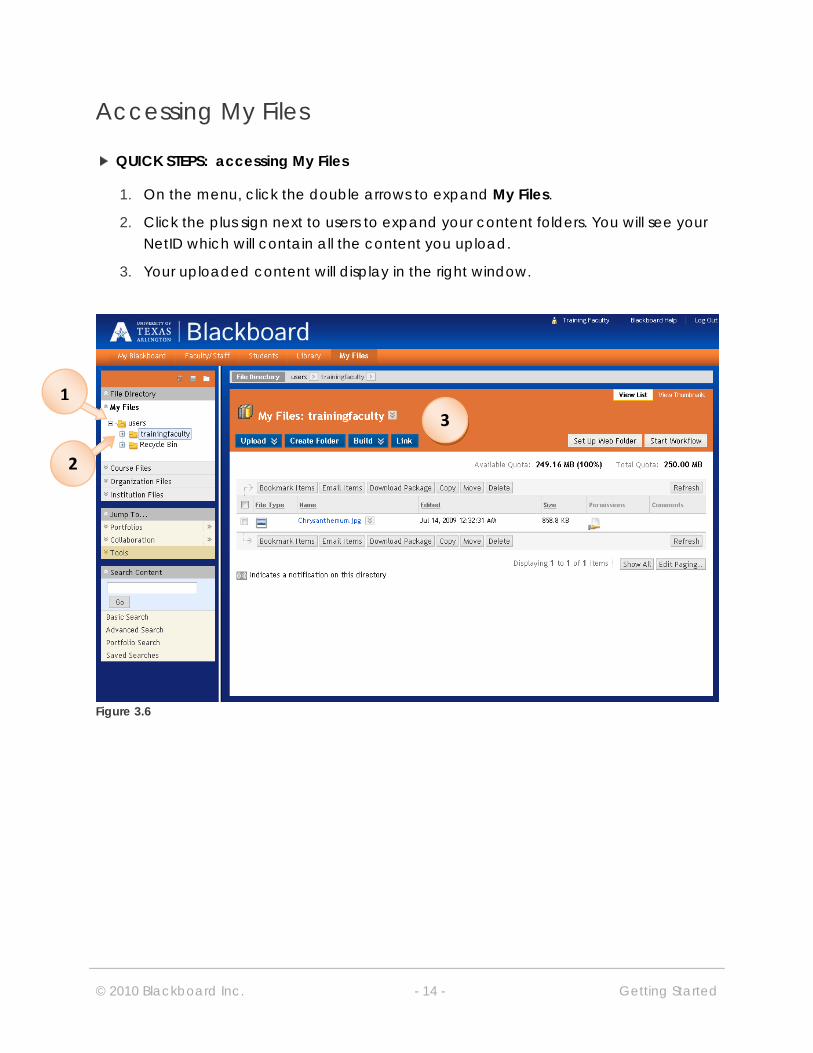
Accessing My Files
QUICK STEPS: accessing My Files
1. On the menu, click the double arrows to expand My Files.
2. Click the plus sign next to users to expand your content folders. You will see your NetID which will contain all the content you upload.
3. Your uploaded content will display in the right window.
Figure 3.6
3
1
2

© 2010 Blackboard Inc. - 15 - Getting Started
Uploading My Files
QUICK STEPS: uploading to My Files
1. On the Upload tab, point the double arrows. On the drop-down menu, click Upload Files.
2. The first time you launch MyFiles you may be asked to run Java. It is always recommended that you do so. If you see this message, click Run.
1
2
© 2010 Blackboard Inc. - 16 - Getting Started
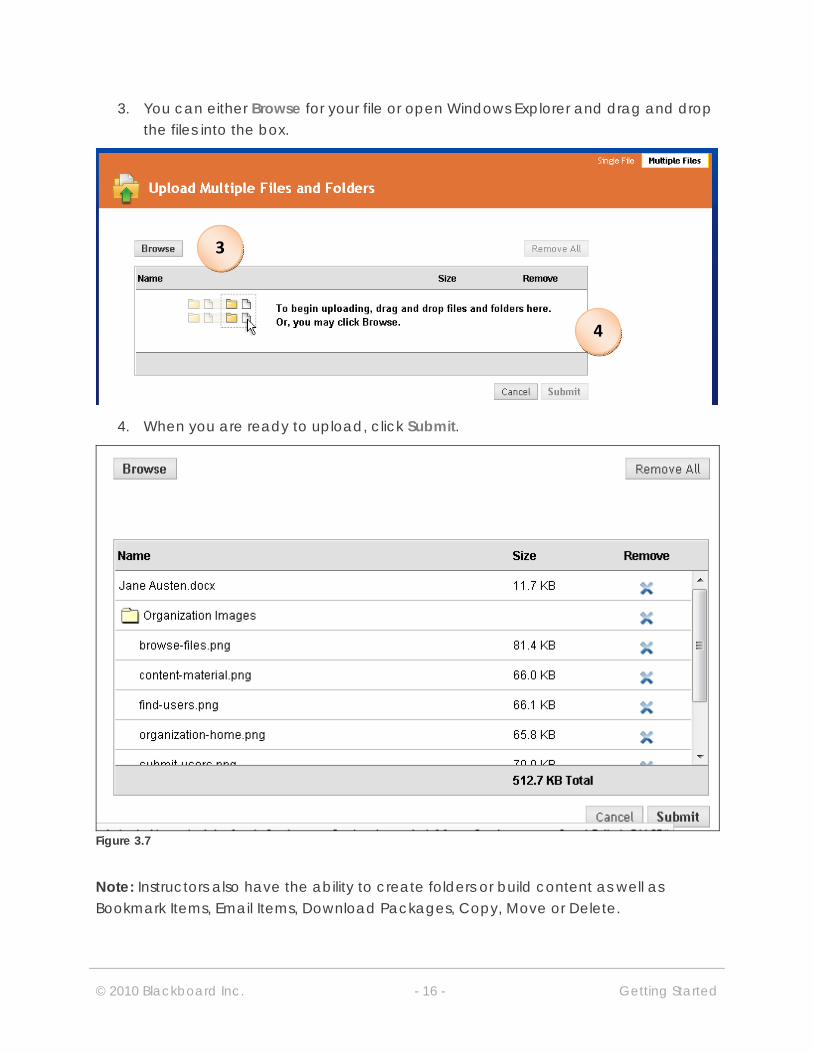
3. You can either Browse for your file or open Windows Explorer and drag and drop the files into the box.
4. When you are ready to upload, click Submit.
Figure 3.7
Note: Instructors also have the ability to create folders or build content as well as Bookmark Items, Email Items, Download Packages, Copy, Move or Delete.
3
4

© 2010 Blackboard Inc. - 17 - Getting Started
The Course Environment
You access a course by clicking its title under Courses in the My Blackboard tab.
Figure 3.8
Courses will vary in design depending on the instructor, but there are some common features.
Figure 3.9
Take Note
A. Page header – identical to the page header you saw upon logging in, including the My Blackboard, Faculty/Staff, Student, Library and My Files tabs.
B. Course Menu – the access point for all course content. Instructors add and delete links here.
C. Content frame – displays the tool or Content Area that is selected in the Course Menu. By default, when you enter a course, the Announcements page appears. Instructors are able to change the first page that is seen which is called the course entry point or landing point.
B C
A

- 18 - Getting Started
The Course Menu
Figure 3.10
Take Note
Access all course content from the Course Menu. Although your course menu will default with the above items, it can contain links to the following:
A. Content Areas – top level containers that organize and store course content, such as lecture notes, assignments, and tests. In the preceding image, the Course Materials Content Area may contain items such as course handouts.
B. Individual tools – links to tools students will need often, such as the Discussion Boards, UTA Email and Blogs.
C. External links – Web sites used for an assignment.
D. Course links – direct links to content also available in a Content Area that you do not want students to miss.
NOTE: Students will not see hidden links nor empty content area links within the Course Menu. A hidden link title appears with a square with a diagonal line through it (see ClassRev Recordings above). The empty squares indicate there is no content within the link (see Syllabus above).

Student Experience: The Course Menu
© 2010 Blackboard Inc. - 19 - Getting Started
Breadcrumbs
As you view the items and links presented in a Content Area, use the breadcrumbs to navigate to previous pages. In the following example, click the title of the course in the breadcrumbs to return to the course entry point, which is set by the instructor. In this course, it is Announcements.
Figure 3.12
Course-to-Course Navigation
Use the course-to-course navigation tool to quickly jump from one course to another in which you are enrolled. In the top section of the drop-down menu, you will find courses in which you recently visited. In the bottom section of the drop-down menu, you will find the remaining courses in which you are enrolled.
Figure 3.12
© 2010 Blackboard Inc. - 20 - Getting Started
4.0 Developing Your Course Menu
In this section, you will explore the process of planning, adding, and organizing links on the Course Menu. You will gain hands-on experience creating a Course Menu suitable for your course. Finally, you will develop and edit a Content Area and edit your Course Menu.
Learning Outcomes
After completing this section, you will be able to:
Explain the difference between the instructor and student views of the course
Explain the steps for developing a Course Menu
Add links to tools and Content Areas on the Course Menu
Create a Content Area and add items and tools to it
Edit and order links on the Course Menu

Creating Your Course Menu: Planning the Course Menu Links
© 2010 Blackboard Inc. - 21 - Getting Started
Planning the Course Menu Links
Before adding links to the Course Menu, take a step back and look at your course material, learning objectives, and activities.
A good initial strategy is to keep the Course Menu as simple as possible.
The following table suggests possible starting points for determining what to add to the Course Menu.
If you want to provide Add
One-click access to regularly used tools, such as the Discussion Board, Blogs, or Calendar
Tool Link to the specific tool
Lecture notes or other reading material One or more Content Areas to organize the material
A link to a regularly used Web site External Link
An important file, such as a checklist, map, or image to which students need regular and easy access
Blank Page
Note the difference between a Tool and a Content Area. A tool allows you to complete a specific function whereas a Content Area is a single page that can house content, tools links, course links, etc.

Creating Your Course Menu: About Edit Mode
© 2010 Blackboard Inc. - 22 - Getting Started
About Edit Mode
As the Course Menu is created, you will work in Edit Mode. Edit Mode allows you to view all the instructor functions.
NOTE: In this workshop, the phrase “in Edit Mode” refers to Edit Mode being ON, showing all the instructor’s functions.
Figure 4.1
Take Note
A. Click Edit Mode to change from ON to OFF. When Edit Mode is ON, all instructor functions are available. When Edit Mode is OFF, you see what students see.
B. When Edit Mode is ON, you will be able to add, delete, and edit items your course as indicated by the chevron, menu buttons. When Edit Mode is OFF, you will not be able to make any change. This is a good indicator of what a student will see in your course at that given time.
A B
A B
Creating Your Course Menu: Managing Your Course Menu
© 2010 Blackboard Inc. - 23 - Getting Started
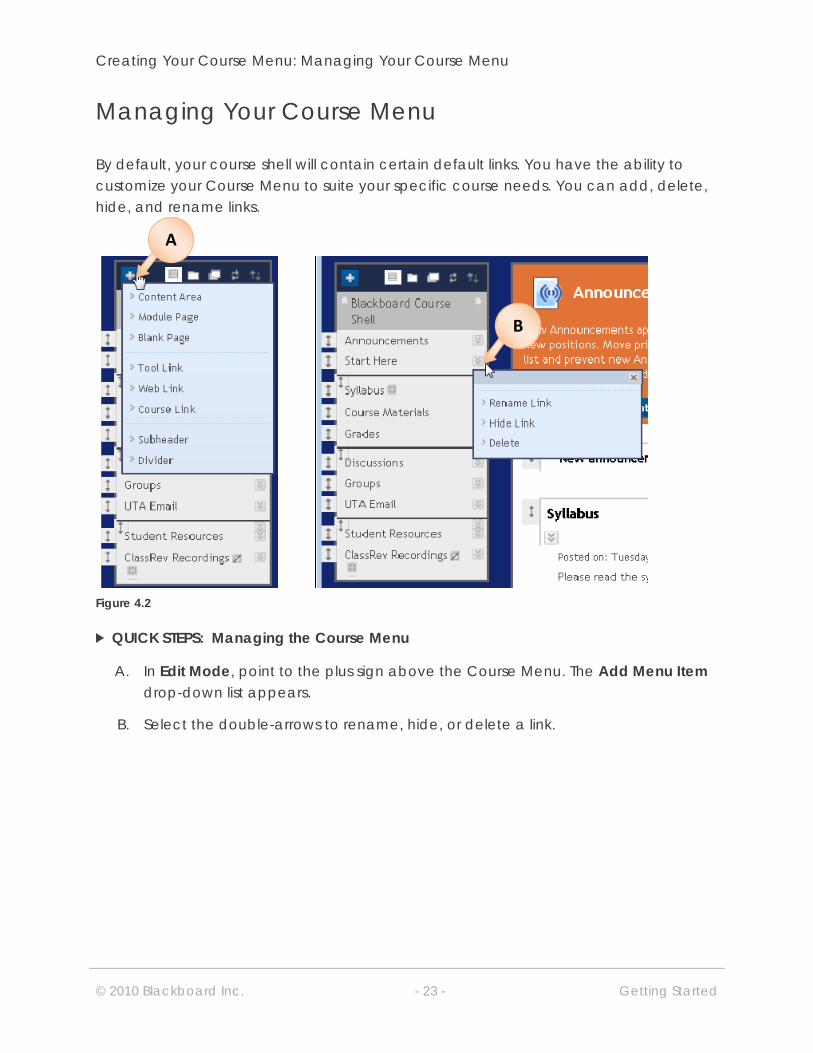
Managing Your Course Menu
By default, your course shell will contain certain default links. You have the ability to customize your Course Menu to suite your specific course needs. You can add, delete, hide, and rename links.
Figure 4.2
QUICK STEPS: Managing the Course Menu
A. In Edit Mode, point to the plus sign above the Course Menu. The Add Menu Item drop-down list appears.
B. Select the double-arrows to rename, hide, or delete a link.
A
B

© 2010 Blackboard Inc. - 24 - Getting Started
Add Tools to Your Course Menu
Links to frequently used tools can be added to the Course Menu. Consider the course content and the needs of the students when adding tools.
Figure 4.3
QUICK STEPS: adding tools to the Course Menu
1. In Edit Mode, point to the plus sign above the Course Menu. The Add Menu Item drop-down list appears.
2. Select Create Tool Link.
3. Type a Name for the link.
4. From the Type drop-down list, select the tool to add.
5. Select the Available to Users check box.
6. Click Submit.
2
1
3
4
5 6
- 25 - Getting Started
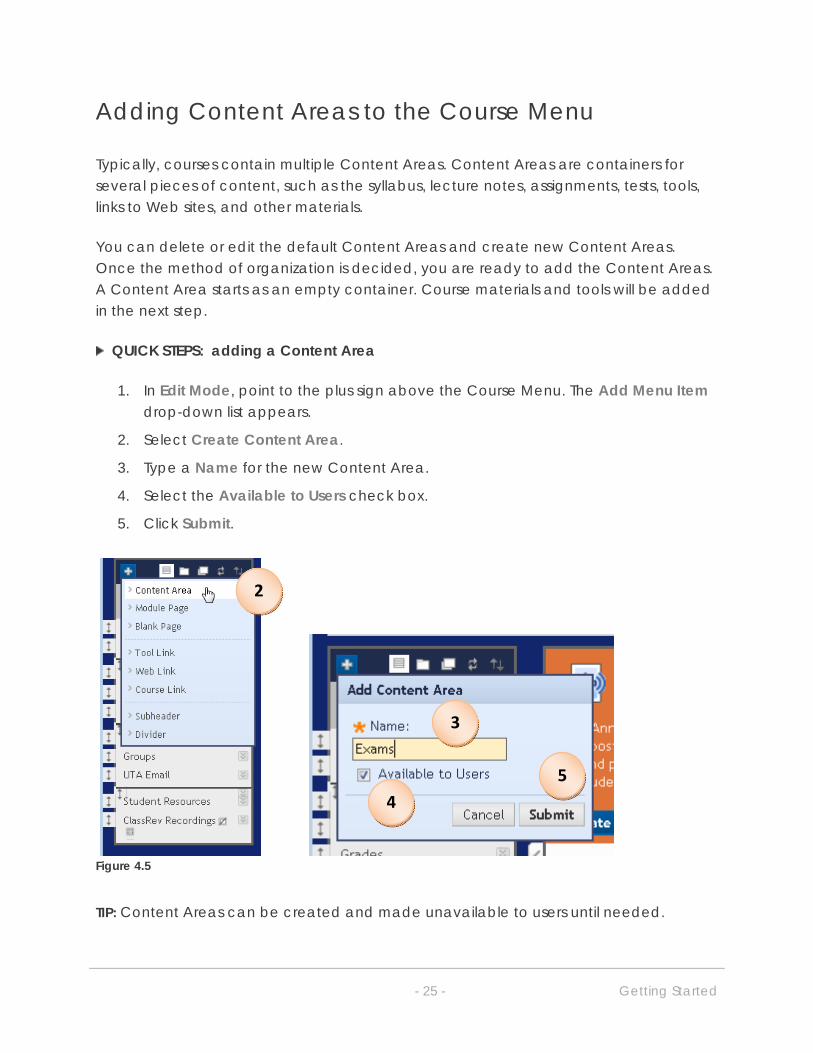
Adding Content Areas to the Course Menu
Typically, courses contain multiple Content Areas. Content Areas are containers for several pieces of content, such as the syllabus, lecture notes, assignments, tests, tools, links to Web sites, and other materials.
You can delete or edit the default Content Areas and create new Content Areas. Once the method of organization is decided, you are ready to add the Content Areas. A Content Area starts as an empty container. Course materials and tools will be added in the next step.
QUICK STEPS: adding a Content Area
1. In Edit Mode, point to the plus sign above the Course Menu. The Add Menu Item drop-down list appears.
2. Select Create Content Area.
3. Type a Name for the new Content Area.
4. Select the Available to Users check box.
5. Click Submit.
Figure 4.5
TIP: Content Areas can be created and made unavailable to users until needed.
2
3
4
5
© 2010 Blackboard Inc. - 26 - Getting Started
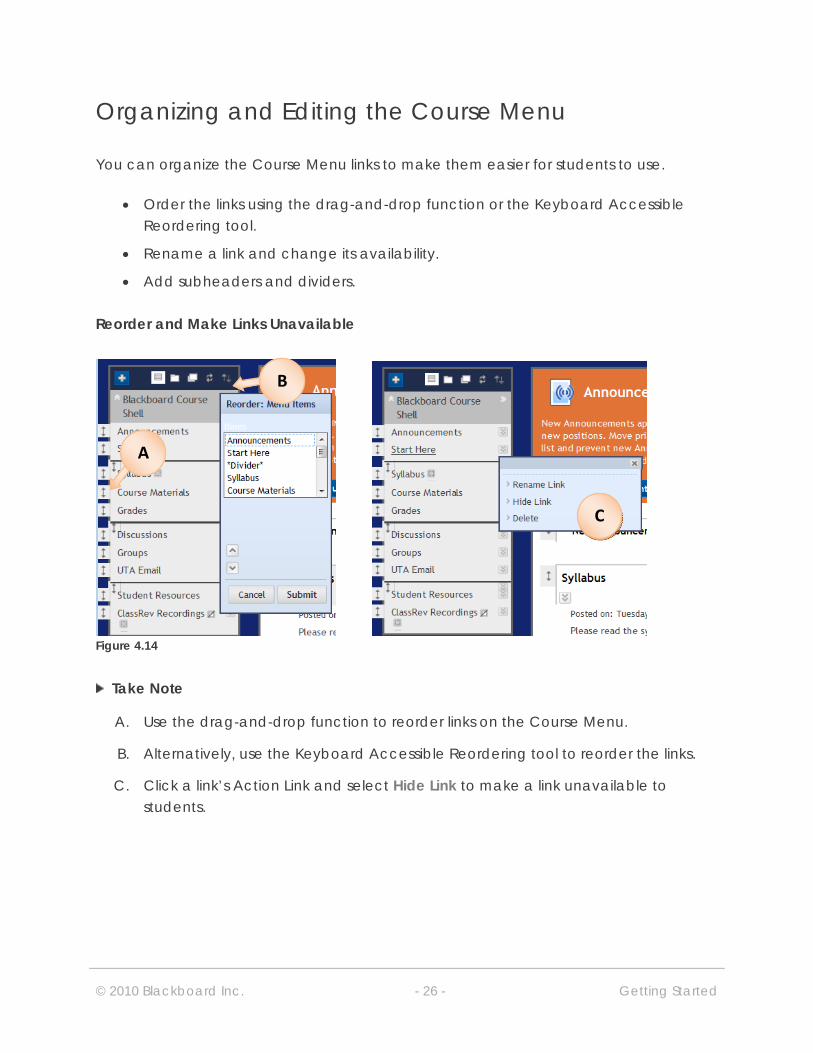
Organizing and Editing the Course Menu
You can organize the Course Menu links to make them easier for students to use.
Order the links using the drag-and-drop function or the Keyboard Accessible Reordering tool.
Rename a link and change its availability.
Add subheaders and dividers.
Reorder and Make Links Unavailable
Figure 4.14
Take Note
A. Use the drag-and-drop function to reorder links on the Course Menu.
B. Alternatively, use the Keyboard Accessible Reordering tool to reorder the links.
C. Click a link’s Action Link and select Hide Link to make a link unavailable to students.
A
C
B

Creating Your Course Menu: Organizing and Editing the Course Menu
© 2010 Blackboard Inc. - 27 - Getting Started
Rename Links
QUICK STEPS: renaming a link
1. In Edit Mode, click the item’s Action Link to access the contextual menu.
2. Select Rename Link.
3. Type a new name.
4. Click the green check mark to Save or the red X to Cancel. The new name appears on the Course Menu.
4 3
2
1
Creating Your Course Menu: Exploring Content Areas
© 2010 Blackboard Inc. - 28 - Getting Started
Exploring Content Areas
You have added Content Areas to the Course Menu. The next step is to add course materials and tools. The following list includes some of the items that can be added to Content Areas:
Items or Files, which can contain text, audio, movies, files, and images
Individual tool links, Course Links, and URLs
Individual audio, image, and video links
Folders, Learning Modules, and Lesson Plans
Assignments, tests, and surveys
Mashups
Blank Pages
Textbook information
NOTE: A Mashup can be defined as combining elements from two or more sources. When you view a YouTube™ video in a Blackboard Learn course as part of the course content, you are experiencing a Mashup. Mashups can also include Flickr® photos and SlideShare presentations.

Creating Your Course Menu: Exploring Content Areas
© 2010 Blackboard Inc. - 29 - Getting Started
Figure 4.6
On the Action Bar, use the Build Content, Create Assessment, Add Interactive Tool, and Assign Textbook options to add materials to Content Areas.
The following table summarizes some of the materials that can be added using each option on the Action Bar in a Content Area.
Content Area additions Click
Item, file, or folder
Audio, Image, Video, URL
Learning Module, Lesson Plan, Syllabus, Course Link
Content Folder, Module Page, Blank Page
Mashups
Build Content
Test
Survey
Assignment
Self and Peer Assessment
SafeAssignment
Create Assessment
Discussion Board
Blogs
Journals
Wikis
Groups
Collaborate Sessions
Add Interactive Tool
Textbook information for your course Assign Textbook
Creating Your Course Menu: Exploring Content Areas
© 2010 Blackboard Inc. - 30 - Getting Started
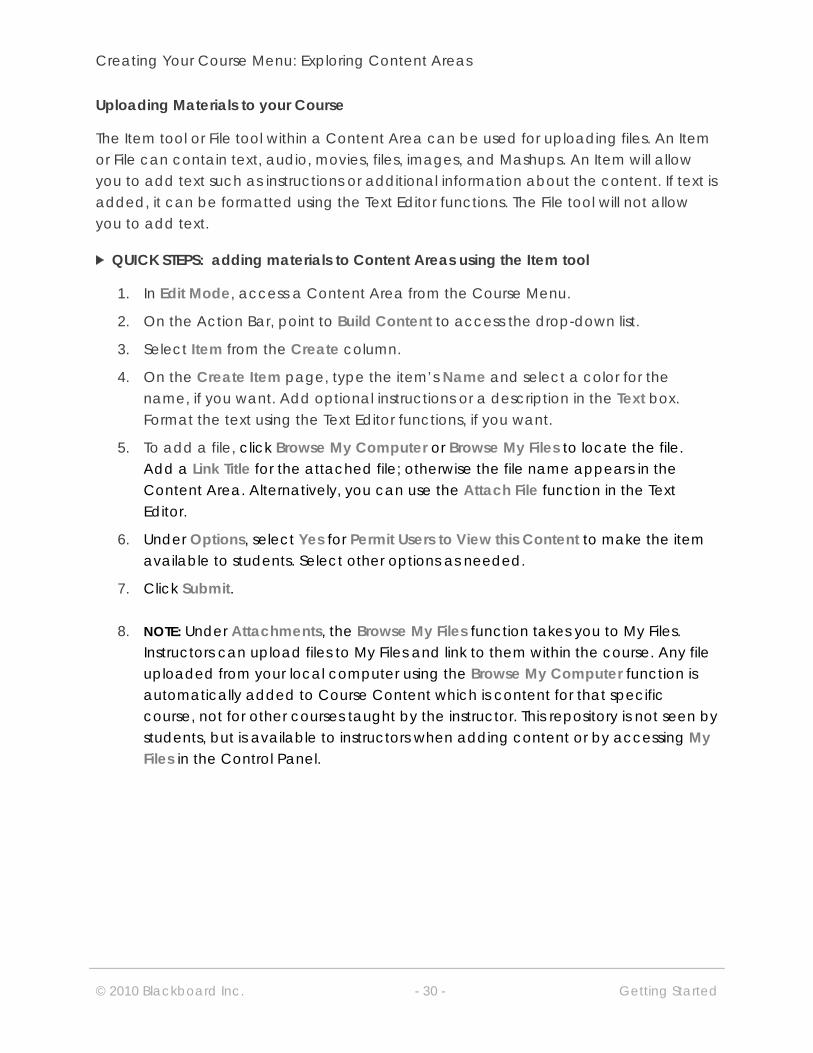
Uploading Materials to your Course
The Item tool or File tool within a Content Area can be used for uploading files. An Item or File can contain text, audio, movies, files, images, and Mashups. An Item will allow you to add text such as instructions or additional information about the content. If text is added, it can be formatted using the Text Editor functions. The File tool will not allow you to add text.
QUICK STEPS: adding materials to Content Areas using the Item tool
1. In Edit Mode, access a Content Area from the Course Menu.
2. On the Action Bar, point to Build Content to access the drop-down list.
3. Select Item from the Create column.
4. On the Create Item page, type the item’s Name and select a color for the name, if you want. Add optional instructions or a description in the Text box. Format the text using the Text Editor functions, if you want.
5. To add a file, click Browse My Computer or Browse My Files to locate the file. Add a Link Title for the attached file; otherwise the file name appears in the Content Area. Alternatively, you can use the Attach File function in the Text Editor.
6. Under Options, select Yes for Permit Users to View this Content to make the item available to students. Select other options as needed.
7. Click Submit.
8. NOTE: Under Attachments, the Browse My Files function takes you to My Files. Instructors can upload files to My Files and link to them within the course. Any file uploaded from your local computer using the Browse My Computer function is automatically added to Course Content which is content for that specific course, not for other courses taught by the instructor. This repository is not seen by students, but is available to instructors when adding content or by accessing My Files in the Control Panel.

Creating Your Course Menu: Exploring Content Areas
© 2010 Blackboard Inc. - 31 - Getting Started
Figure 4.7
NOTE: In the Build Content drop-down list, additional content types are listed. Notice that Files, Audio, Image, Video, URL, and Mashups are listed, but can also be added using the Text Editor functions when adding a content item. The student view may be different depending on the method used, so experiment to determine which method meets your needs.
3
7
4
5
6
2
Creating Your Course Menu: Exploring Content Areas
© 2010 Blackboard Inc. - 32 - Getting Started
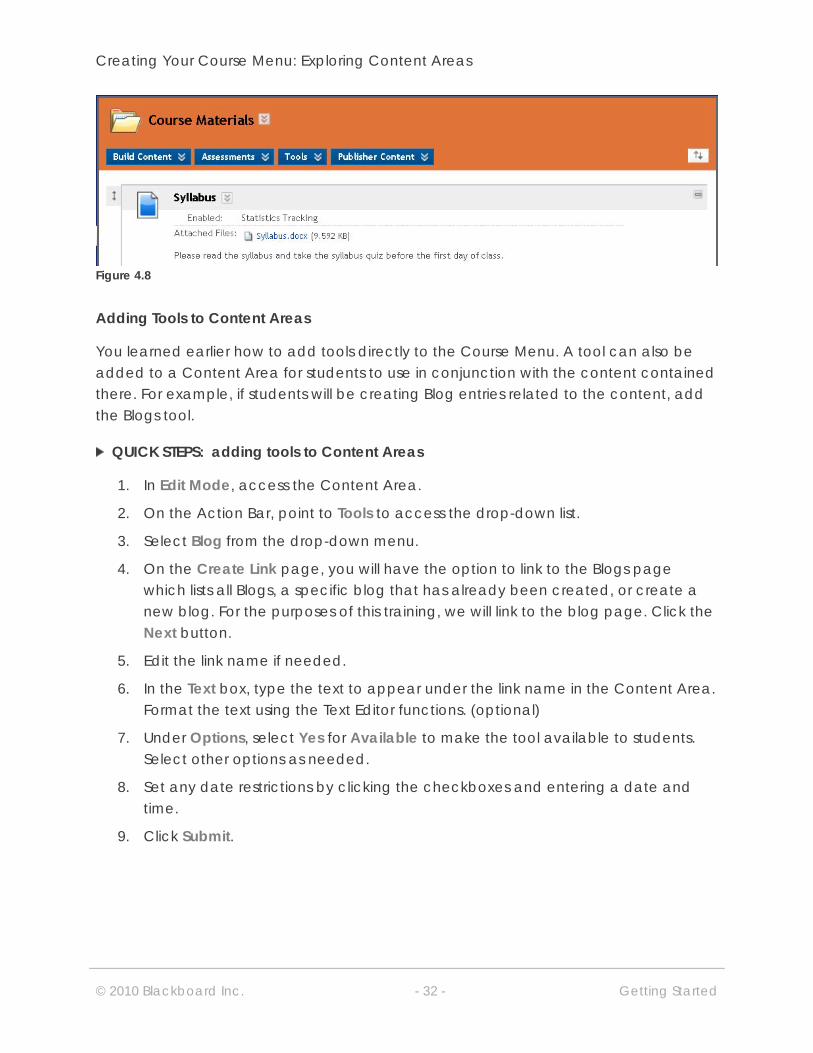
Figure 4.8
Adding Tools to Content Areas
You learned earlier how to add tools directly to the Course Menu. A tool can also be added to a Content Area for students to use in conjunction with the content contained there. For example, if students will be creating Blog entries related to the content, add the Blogs tool.
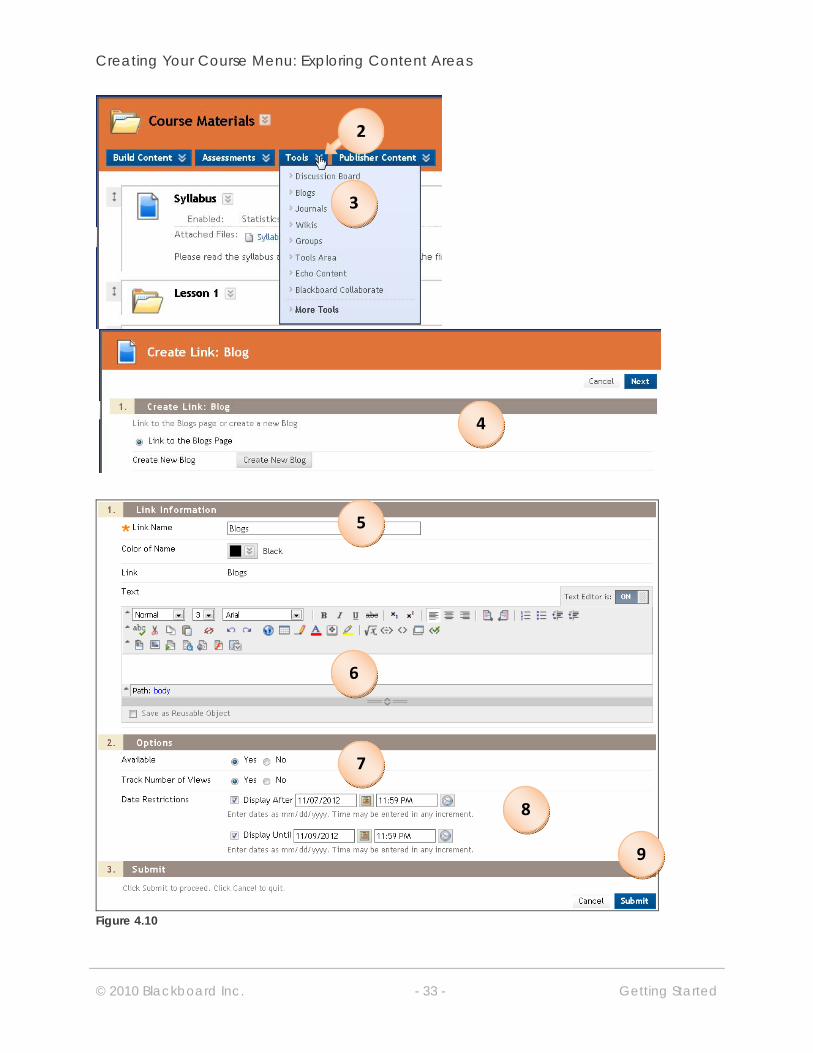
QUICK STEPS: adding tools to Content Areas
1. In Edit Mode, access the Content Area.
2. On the Action Bar, point to Tools to access the drop-down list.
3. Select Blog from the drop-down menu.
4. On the Create Link page, you will have the option to link to the Blogs page which lists all Blogs, a specific blog that has already been created, or create a new blog. For the purposes of this training, we will link to the blog page. Click the Next button.
5. Edit the link name if needed.
6. In the Text box, type the text to appear under the link name in the Content Area. Format the text using the Text Editor functions. (optional)
7. Under Options, select Yes for Available to make the tool available to students. Select other options as needed.
8. Set any date restrictions by clicking the checkboxes and entering a date and time.
9. Click Submit.
Creating Your Course Menu: Exploring Content Areas
© 2010 Blackboard Inc. - 33 - Getting Started
Figure 4.10
4
2
3
5
6
7
9
8
© 2010 Blackboard Inc. - 34 - Getting Started
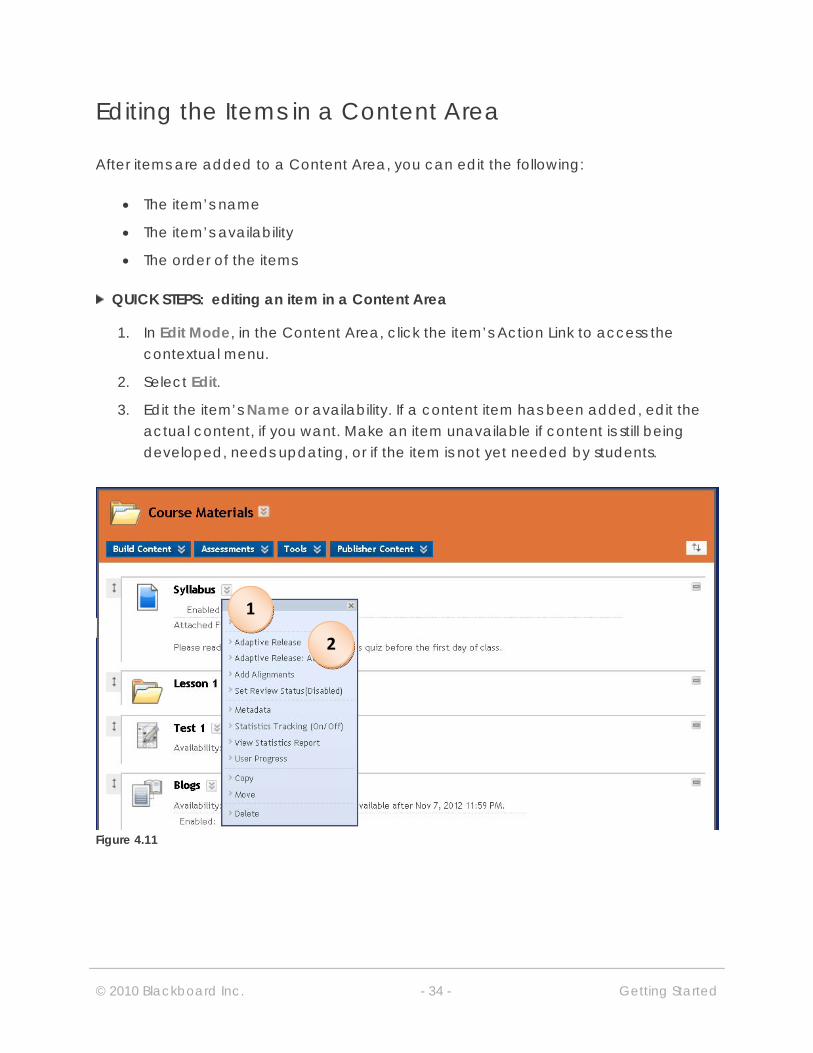
Editing the Items in a Content Area
After items are added to a Content Area, you can edit the following:
The item’s name
The item’s availability
The order of the items
QUICK STEPS: editing an item in a Content Area
1. In Edit Mode, in the Content Area, click the item’s Action Link to access the contextual menu.
2. Select Edit.
3. Edit the item’s Name or availability. If a content item has been added, edit the actual content, if you want. Make an item unavailable if content is still being developed, needs updating, or if the item is not yet needed by students.
Figure 4.11
1
2

© 2010 Blackboard Inc. - 35 - Getting Started
Change the Order of Items
Add content items to a Content Area in any order and reorder using the drag-and-drop function. Each item has a move icon—a double-tipped arrow or handle.
QUICK STEPS: changing the order of items in a Content Area
1. In Edit Mode, hover your pointer over the arrows next to the item until you see the quad arrow. The item is highlighted.
2. Drag the item into the new location in the Content Area. The item is surrounded by dashes as it is being moved into its new spot.
3. Release the item to place it in its new location.
Figure 4.12
3
1

© 2010 Blackboard Inc. - 36 - Getting Started
The Control Panel
The Control Panel is the central access point for course management functions and is not visible to students. The Control Panel is located under the Course Menu. You will access the Grade Center using the options on the Control Panel.
Figure 8.1
Take Note
A. Expand each of the items on the Control Panel by clicking the double arrows pointing downward. The menu appears directly below the subheading. Select the option.
B. Alternatively, expand an item into the content frame by clicking the double arrows pointing right. Select an option such as Grade Center.
B A
© 2010 Blackboard Inc. - 37 - Getting Started
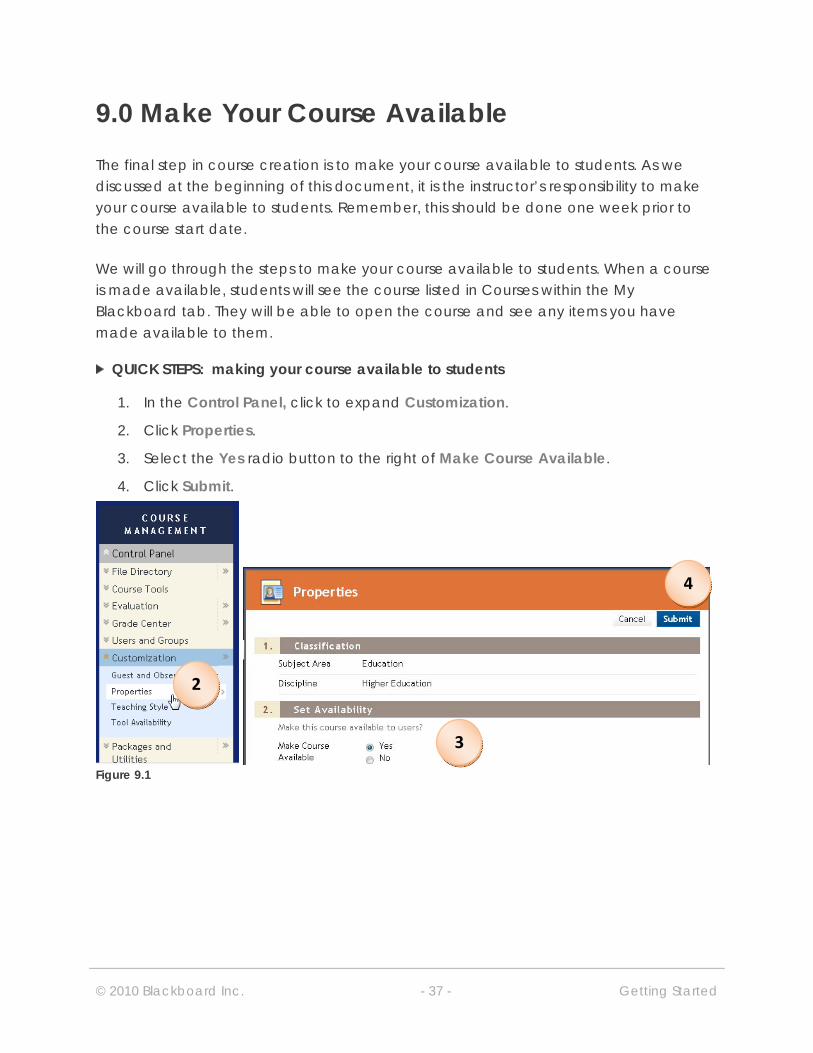
9.0 Make Your Course Available
The final step in course creation is to make your course available to students. As we discussed at the beginning of this document, it is the instructor’s responsibility to make your course available to students. Remember, this should be done one week prior to the course start date.
We will go through the steps to make your course available to students. When a course is made available, students will see the course listed in Courses within the My Blackboard tab. They will be able to open the course and see any items you have made available to them.
QUICK STEPS: making your course available to students
1. In the Control Panel, click to expand Customization.
2. Click Properties.
3. Select the Yes radio button to the right of Make Course Available.
4. Click Submit.
Figure 9.1
2
3
4

© 2010 Blackboard Inc. - 38 - Getting Started
10.0 Workshop Wrap Up
The Workshop Wrap Up provides the opportunity to reflect on what has been learned by focusing your attention on the key concepts presented in the workshop.
In this workshop, you learned how to do the following:
Log in to Blackboard Learn and explain the information available on the My Blackboard tab, Resources tab, and My Files
Add content to My Files
Navigate the Course Environment
Add and access content and tools from the Course Menu and Tools link
Explain the steps for planning, creating, customizing, and editing the Course Menu
Create Content Areas and add course materials and tools
Make your Course available to students