
Getting started PiiGAB QuickLoop -...
15
www.piigab.com PiiGAB Processinformation i Göteborg AB • Anders Carlssons gata 7 • S-417 55 Göteborg • Sweden Tel: +46(0)31 559977 • Fax: +46(0)31 227071 • email: [email protected] Getting started PiiGAB QuickLoop
-
Upload
vuongquynh -
Category
Documents
-
view
224 -
download
0
Transcript of Getting started PiiGAB QuickLoop -...
www.piigab.com
PiiGAB Processinformation i Göteborg AB • Anders Carlssons gata 7 • S-417 55 Göteborg • Sweden Tel: +46(0)31 559977 • Fax: +46(0)31 227071 • email: [email protected]
Getting started PiiGAB QuickLoop

Getting started PiiGAB QuickLoop Rev 1.00.00
© PiiGAB Processinformation i Göteborg AB Page: 2
Contents
1. DOCUMENT INFORMATION ............................................................................................ 3
1.1 VERSIONS ..................................................................................................................... 3
2. REQUIREMENTS............................................................................................................... 3
2.1 OPTIONAL REQUIREMENTS ............................................................................................. 3
3. INSTALLATION, LICENSE AND TEST ............................................................................ 4
3.1 INSTALL......................................................................................................................... 4 3.2 LICENSE ........................................................................................................................ 4 3.3 TEST QUICKOPC .......................................................................................................... 4
4. CONFIGURE A SOLUTION IN PIIGAB QUICKLOOP...................................................... 5
5. CONFIGURE A PROJECT TO EXPORT OPC-TAGS ...................................................... 6
5.1 CREATE A PROJECT IN THE SOLUTION ............................................................................. 6 5.2 CREATING PROJECTS FOR THE SITE ................................................................................ 6
5.2.1 How often should the site be sampled? ............................................................... 6 5.2.2 How should the OPC-tags be exported? ............................................................. 6
6. BROWSE TAGS IN OPC-SERVERS ................................................................................ 7
6.1 BROWSE THE OPC SERVERS NODE ................................................................................ 8 6.2 USE THE PIIGAB M-BUS OPC SERVER (.CSV) NODE (OPTIONAL) .................................... 9
7. BIND OPC-TAGS TO THE PROJECT ............................................................................ 10
8. SET SAMPLE PERIOD OF THE PROJECT’S OPC-TAGS ............................................ 11
8.1 FORMAT OF THE SAMPLE PERIOD .................................................................................. 11 8.2 OTHER SAMPLING PERIOD SETTINGS ............................................................................. 11
9. TEST THE EXPORT OF OPC-TAGS WITH THE CONSOLE EXPORT ......................... 12
10. CONFIGURE OTHER EXPORT TYPES ...................................................................... 13
10.1 TEXT EXPORT .......................................................................................................... 13 10.2 SQL-EXPORT .......................................................................................................... 13 10.3 ODBC-EXPORT ....................................................................................................... 13 10.4 XML-EXPORT .......................................................................................................... 13 10.5 FTP-EXPORT ........................................................................................................... 13
11. CONFIGURE A PROJECT AS A WINDOWS SERVICE ............................................. 14
12. APPENDIX .................................................................................................................... 15
12.1 CONTACTS .............................................................................................................. 15
Getting started PiiGAB QuickLoop Rev 1.00.00
© PiiGAB Processinformation i Göteborg AB Page: 3
1. Document Information This document will describe how to configure the PiiGAB QuickLoop to read OPC-tags in any OPC-server. OPC-servers from PiiGAB and OPCLabs will be used in examples. If you see something that is not correct in this document, that misleads you or if you are missing something please contact us so we can improve this document continuously. See contact information at the end of the document.
1.1 Versions
Version Modified by Details
1.00.00 Stefan Eriksson Initial version
2. Requirements
Object Detail
An OPC-server To read OPC-tags from
QuickLoop V2.7.0.1 or higher
2.1 Optional requirements
Object Detail
PiiGAB M-Bus Explorer PiiGAB’s M-Bus OPC-server
KitServer OPC Labs’ OPC-server

Getting started PiiGAB QuickLoop Rev 1.00.00
© PiiGAB Processinformation i Göteborg AB Page: 4
3. Installation, license and test PiiGAB will send you a ZIP-file containing the entire QuickLoop package. QuickLoop uses the QuickOPC libraries from OPC Labs and is mandatory to run QuickLoop. There is also an OPC Core Component package which is recommended to install.
3.1 Install 1. Unzip the QuickLoop package sent from PiiGAB. 2. Unzip the QuickLoop Pre-components.zip. 3. Unzip the appropriate OPC Core Components Redistributable 105.1.zip package.
Either the x86 or the x64 based on the OS architecture your computer uses. 4. Install the QuickOPC package. Select only .NET install. You can ignore COM-install. 5. Install QuickLoop.exe.
3.2 License You will also receive a license for QuickOPC. This license is mandatory to run QuickOPC and QuickLoop. The license is a .bin file which you will receive from PiiGAB.
1. Receive the license .bin-file from PiiGAB. 2. Start QuickOPC’s License Manager at: Start->All programs->PiiGAB->QuickOPC. 3. Press the Install license… button. 4. Browse to the .bin-file.
The license will be installed.
3.3 Test QuickOPC To make sure everything works, please run this simple test.
1. Start QuickOPC’s test OPC-client at: Start->All programs->PiiGAB->QuickOPC->Demo Applications (.NET)->Demo Applicartion (OPC-DA).
2. Press the Read item button. 3. Check the Value, Timestamp and Quality fields. It should look something like this:
Note: Make sure Quality is “Good” like the picture.

Getting started PiiGAB QuickLoop Rev 1.00.00
© PiiGAB Processinformation i Göteborg AB Page: 5
.
4. Configure a solution in PiiGAB QuickLoop In PiiGAB QuickLoop you can have several projects which can read the OPC-servers separately and export the data from the OPC-servers. All projects are located in a Solution. You start configure QuickLoop by creating a Solution.
1. Start PiiGAB QuickLoop. 2. Press the File-menu, select New and select New Solution…
3. Browse to the location of the folder where you want to store the solution file. 4. Save the solution.
Getting started PiiGAB QuickLoop Rev 1.00.00
© PiiGAB Processinformation i Göteborg AB Page: 6
5. Configure a project to export OPC-tags To export the OPC-tags from the OPC-servers you have to bind the OPC-tags to a QuickLoop project in the solution. In the project you also specify how often the OPC-tags should be read and how they should be exported.
5.1 Create a project in the solution
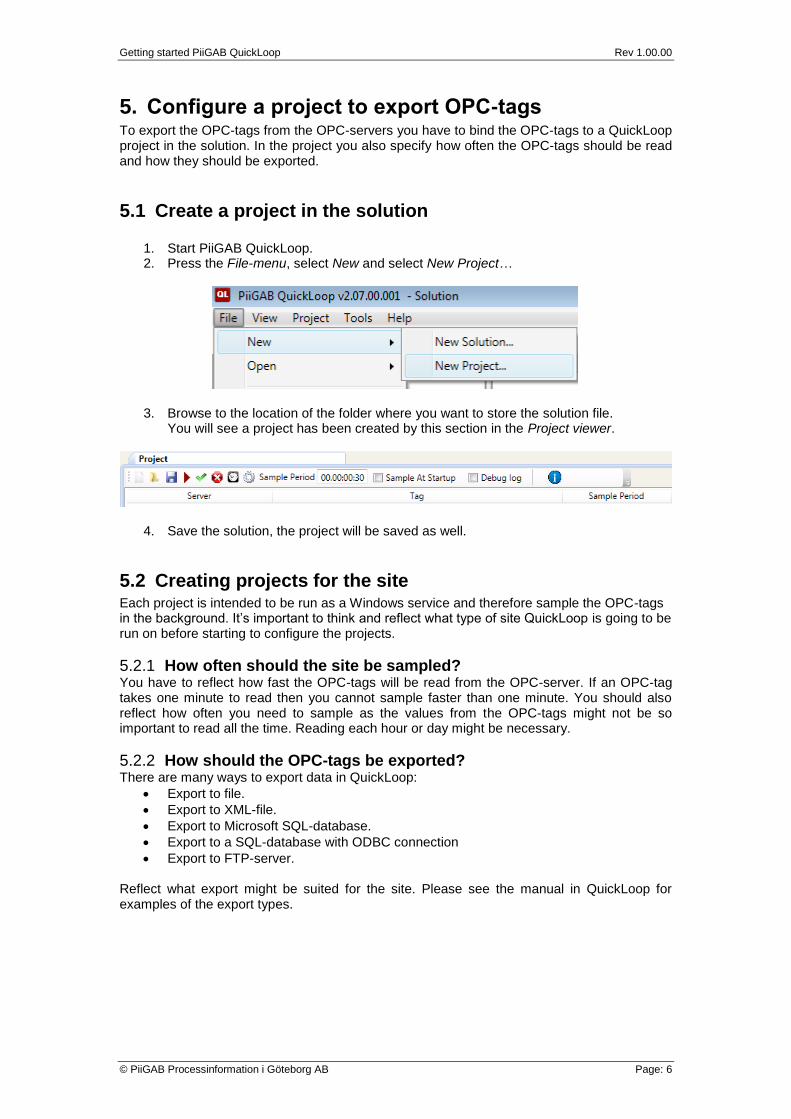
1. Start PiiGAB QuickLoop. 2. Press the File-menu, select New and select New Project…
3. Browse to the location of the folder where you want to store the solution file. You will see a project has been created by this section in the Project viewer.
4. Save the solution, the project will be saved as well.
5.2 Creating projects for the site Each project is intended to be run as a Windows service and therefore sample the OPC-tags in the background. It’s important to think and reflect what type of site QuickLoop is going to be run on before starting to configure the projects.
5.2.1 How often should the site be sampled? You have to reflect how fast the OPC-tags will be read from the OPC-server. If an OPC-tag takes one minute to read then you cannot sample faster than one minute. You should also reflect how often you need to sample as the values from the OPC-tags might not be so important to read all the time. Reading each hour or day might be necessary.
5.2.2 How should the OPC-tags be exported? There are many ways to export data in QuickLoop:
Export to file.
Export to XML-file.
Export to Microsoft SQL-database.
Export to a SQL-database with ODBC connection
Export to FTP-server. Reflect what export might be suited for the site. Please see the manual in QuickLoop for examples of the export types.

Getting started PiiGAB QuickLoop Rev 1.00.00
© PiiGAB Processinformation i Göteborg AB Page: 7
6. Browse tags in OPC-servers QuickLoop’s built-in OPC-tag browser allows you to browse the OPC-tags that are configured for each OPC-server. On the left side of QuickLoop you have the Server browser. Here can you browse OPC-servers.
At the root level there are two nodes to browse in.
Node Description
PiiGAB M-Bus OPC Server (.csv) Browse the CSV-file of PiiGAB M-Bus Explorer
OPC Servers Browse all OPC-servers
Getting started PiiGAB QuickLoop Rev 1.00.00
© PiiGAB Processinformation i Göteborg AB Page: 8
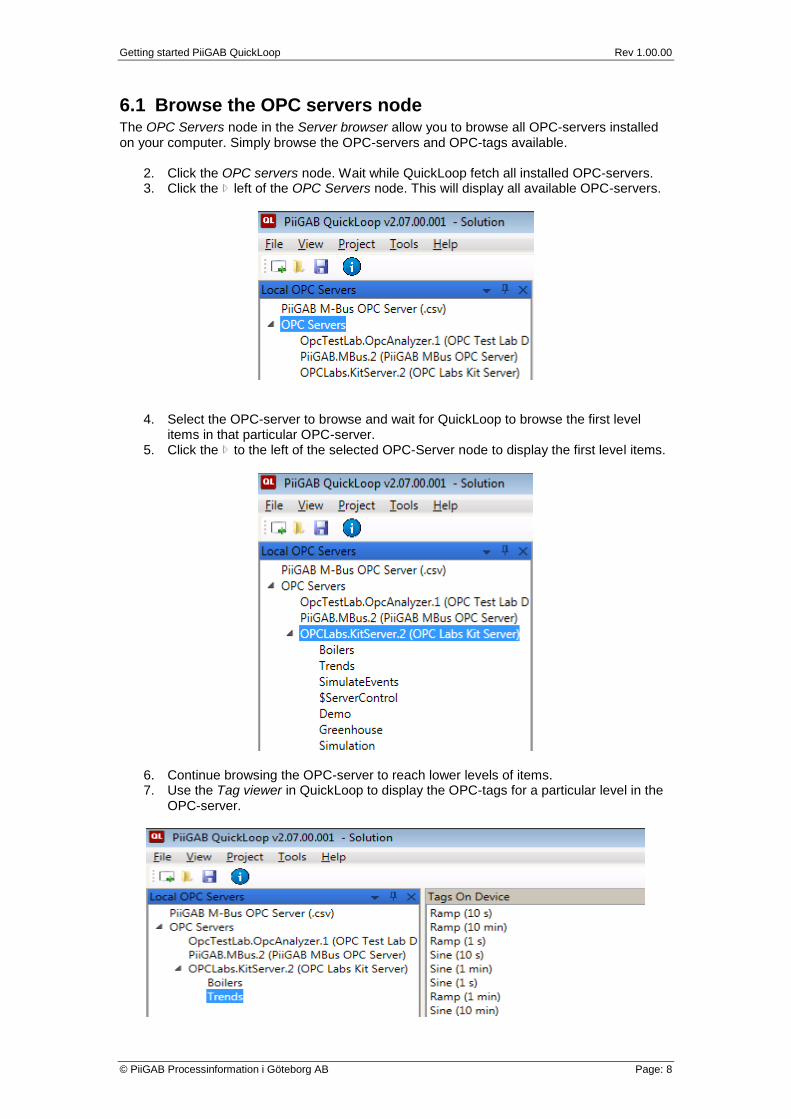
6.1 Browse the OPC servers node The OPC Servers node in the Server browser allow you to browse all OPC-servers installed on your computer. Simply browse the OPC-servers and OPC-tags available.
2. Click the OPC servers node. Wait while QuickLoop fetch all installed OPC-servers. 3. Click the left of the OPC Servers node. This will display all available OPC-servers.
4. Select the OPC-server to browse and wait for QuickLoop to browse the first level items in that particular OPC-server.
5. Click the to the left of the selected OPC-Server node to display the first level items.
6. Continue browsing the OPC-server to reach lower levels of items. 7. Use the Tag viewer in QuickLoop to display the OPC-tags for a particular level in the
OPC-server.
Getting started PiiGAB QuickLoop Rev 1.00.00
© PiiGAB Processinformation i Göteborg AB Page: 9
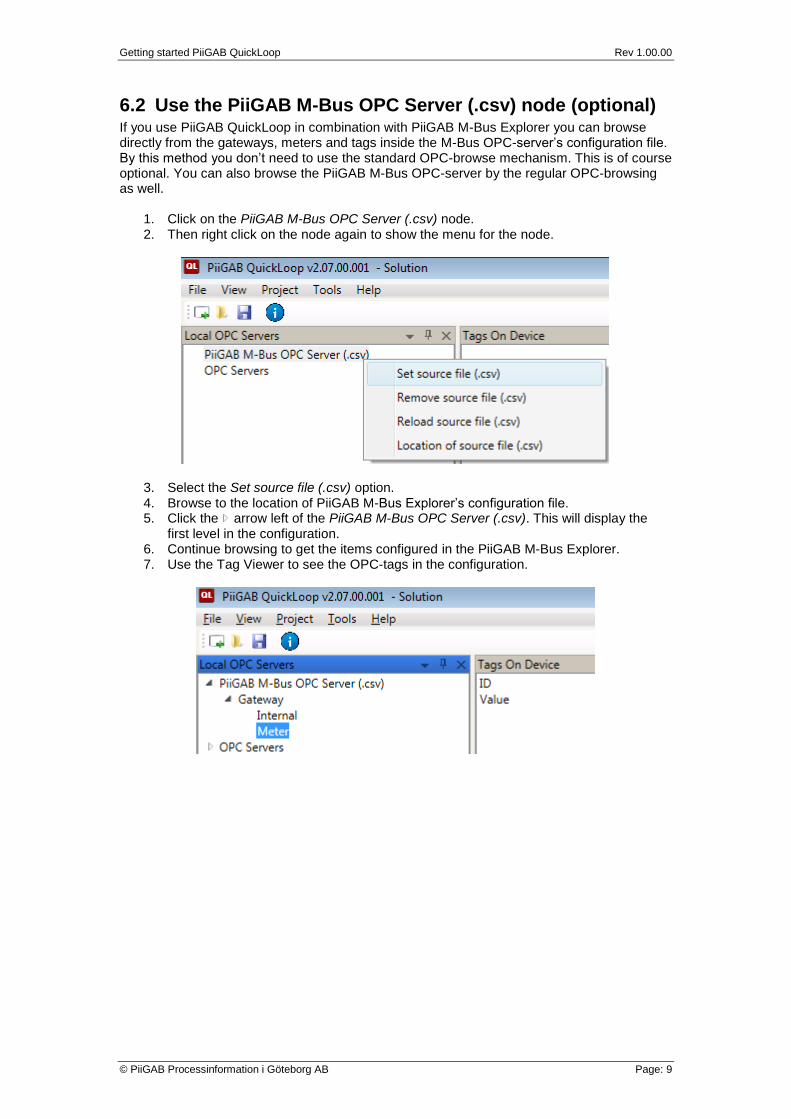
6.2 Use the PiiGAB M-Bus OPC Server (.csv) node (optional) If you use PiiGAB QuickLoop in combination with PiiGAB M-Bus Explorer you can browse directly from the gateways, meters and tags inside the M-Bus OPC-server’s configuration file. By this method you don’t need to use the standard OPC-browse mechanism. This is of course optional. You can also browse the PiiGAB M-Bus OPC-server by the regular OPC-browsing as well.
1. Click on the PiiGAB M-Bus OPC Server (.csv) node. 2. Then right click on the node again to show the menu for the node.
3. Select the Set source file (.csv) option. 4. Browse to the location of PiiGAB M-Bus Explorer’s configuration file. 5. Click the arrow left of the PiiGAB M-Bus OPC Server (.csv). This will display the
first level in the configuration. 6. Continue browsing to get the items configured in the PiiGAB M-Bus Explorer. 7. Use the Tag Viewer to see the OPC-tags in the configuration.

Getting started PiiGAB QuickLoop Rev 1.00.00
© PiiGAB Processinformation i Göteborg AB Page: 10
7. Bind OPC-tags to the project To bind OPC-tags to a project you have to drag-and-drop the OPC-tag from the Tag Viewer. Remember to browse the OPC-servers to get the OPC-tags in the Tag Viewer before you can bind them to a project. An OPC-tag bound to a particular project is not locked for only that project, it can be used in other projects as well.
1. Browse in the Server browser after the OPC-tags to bind in the project. 2. Select the OPC-tag from the Tag Viewer.
3. Select the OPC-tag in the Tag Viewer and hold the left mouse button down. 4. Drag the OPC-tag to the project’s OPC-tag list. 5. Release the left mouse button in the project’s OPC-tag list.
6. Repeat step 3 to step 5 or step 1 to step 5 to include more OPC-tags in the project. You can also select several OPC-tags in the Tag Viewer and drag them to the project’s tag list as well.
7. Save the solution, the project will be saved as well.
Getting started PiiGAB QuickLoop Rev 1.00.00
© PiiGAB Processinformation i Göteborg AB Page: 11
8. Set sample period of the project’s OPC-tags The default sample period of each OPC-tag in the project is 00.00:00:30 (sample every 30 seconds). It’s easy to change the sample period of the OPC-tags. You can also have different sample periods on the OPC-tags in the project.
1. Select the OPC-tag or multi OPC-tags in the project. You can also click the green
check mark button to select all OPC-tags in the project. 2. Place the mouse curser in the Sample Period field
.
3. Edit the sample period as suited. 4. Press the ENTER-key on your keyboard to apply the sampled period on the selected
OPC-tags.
8.1 Format of the sample period The format of the sampled period is: DD.HH.MM.SS = Days.Hours:Minutes:Seconds. The input of the sample period must be in this format. There are some limitations in the format. For instance you cannot specify a sample period of 24 hours (00.24:00:00), instead you have to specify one day (01.00:00:00) to achieve the same effect. This goes as well with 60 minutes which should be specified as 1 hour instead (00.01:00:00).
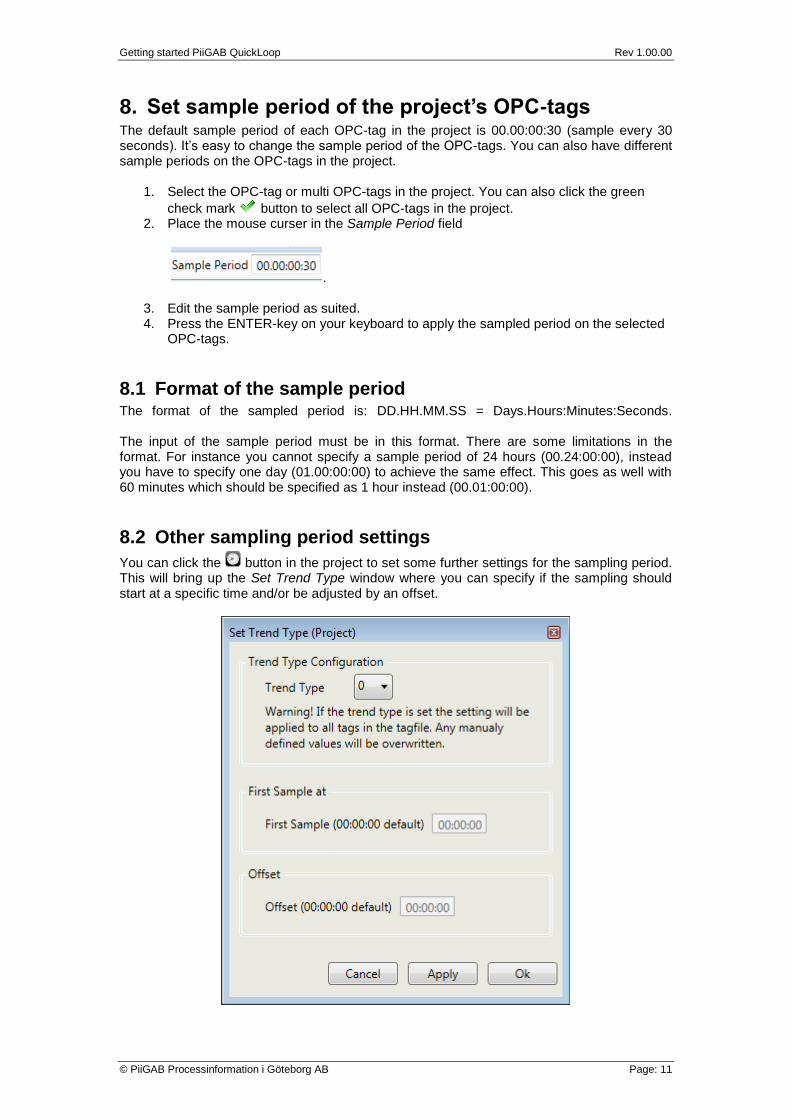
8.2 Other sampling period settings
You can click the button in the project to set some further settings for the sampling period. This will bring up the Set Trend Type window where you can specify if the sampling should start at a specific time and/or be adjusted by an offset.
Getting started PiiGAB QuickLoop Rev 1.00.00
© PiiGAB Processinformation i Göteborg AB Page: 12
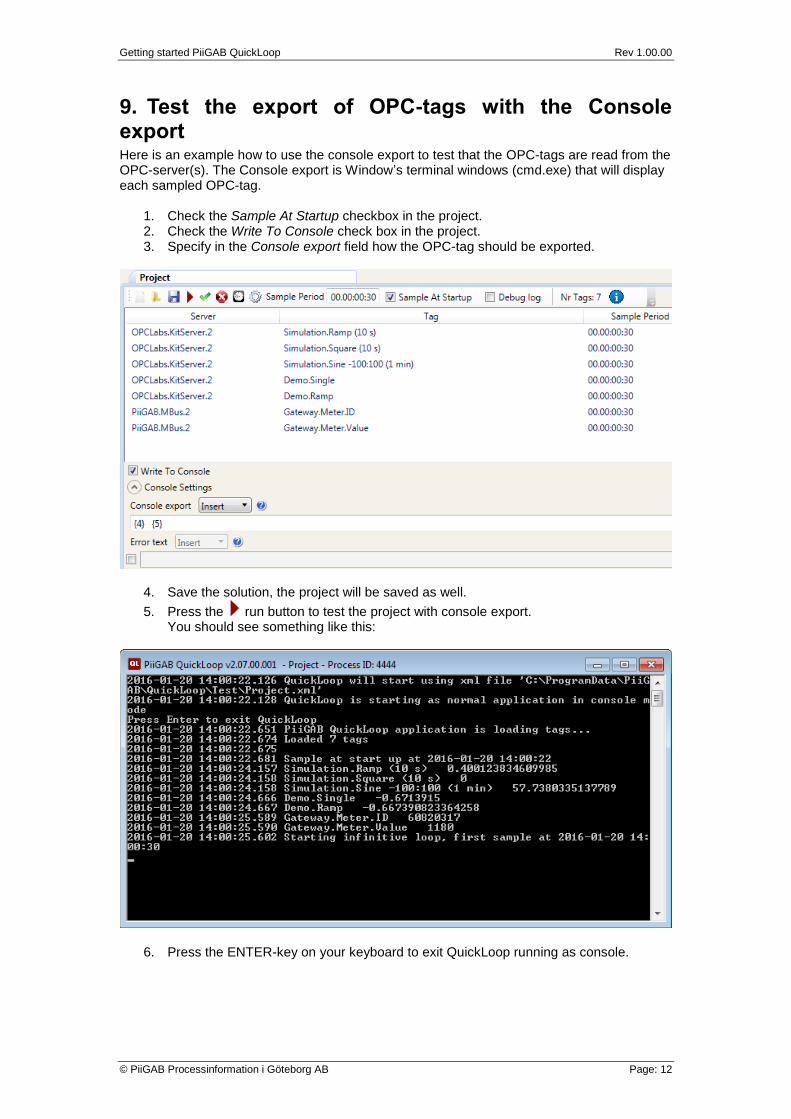
9. Test the export of OPC-tags with the Console export Here is an example how to use the console export to test that the OPC-tags are read from the OPC-server(s). The Console export is Window’s terminal windows (cmd.exe) that will display each sampled OPC-tag.
1. Check the Sample At Startup checkbox in the project. 2. Check the Write To Console check box in the project. 3. Specify in the Console export field how the OPC-tag should be exported.
4. Save the solution, the project will be saved as well.
5. Press the run button to test the project with console export. You should see something like this:
6. Press the ENTER-key on your keyboard to exit QuickLoop running as console.

Getting started PiiGAB QuickLoop Rev 1.00.00
© PiiGAB Processinformation i Göteborg AB Page: 13
10. Configure other export types There are several ways to export the OPC-tags when they are read from the OPC-server(s). The manual inside QuickLoop has these export types explained, please see the manual. Here is a short summary of each export type:
10.1 Text export Export to a text file. Select to either store all samplings in one file or have a new for each sampling.
10.2 SQL-export Export specifically to Microsoft SQL-server. Specify the connection string and the insert statement.
10.3 ODBC-export Export to any SQL-server with a ODBC connection. Specify the connection and the insert statement.
10.4 XML-export Export to an XML-file. Each sampling will produce a new XML-file.
10.5 FTP-export Export any files from a folder to an FTP-server.

Getting started PiiGAB QuickLoop Rev 1.00.00
© PiiGAB Processinformation i Göteborg AB Page: 14
11. Configure a project as a Windows service When all configurations of the projects are completed and hopefully tested you can install each project as Windows services. By running the project as a Windows service, all sampling of the OPC-tags will be carried out in the background. The sampling process cannot be so easily turned off by accident or willingly by someone else. Also Windows operating system will automatically restart the service if the computer goes down from a power failure, shutdown or restart. Here is how to install and start the project as a Windows service.
1. Press the Project-menu, select Run as service…
2. Select the project in the drop-down-list. 3. Press the Install button to install the project as Windows service.
The project will be installed as a Windows service and be displayed in the list. 4. Select the project from the list.
5. Press the Run button to start the project.
Getting started PiiGAB QuickLoop Rev 1.00.00
© PiiGAB Processinformation i Göteborg AB Page: 15
12. Appendix
12.1 Contacts
PiiGAB Processinformation Anders Carlssons gata 7
417 55 Göteborg Sweden
Phone + 46 31 55 99 77 www.piigab.com
Distributors Please contact our distributors in respective countries:
Germany Relay GmbH Stettiner Str. 38 33106 Paderborn Germany Phone +49 5251 17670 www.relay.de
Norway Autic Systems AS Stoltenbergs gate 48 3110 Tønsberg Norway Phone +47 33 30 09 50 www.autic.no
Czech Republic Papouch store s.r.o. Strasnicka 3165/1b 102 00 PRAGUE 10 Czech Republic Phone +420 267 314 267-8 www.papouch.com


![s-708ver.3.0 Pit ON/OFF B @ 26. START START 30 ON ...s-708ver.3.0 Pit ON/OFF B @ 26. START START 30 ON @ START TART START 9 OFF razz] Pit START START s TART START ØNG 5 : 03-451 1-8855](https://static.fdocuments.in/doc/165x107/60c018a42bb96e24557afa05/s-708ver30-pit-onoff-b-26-start-start-30-on-s-708ver30-pit-onoff-b.jpg)


