GETTING STARTED - Touchboards.com Interactive … Control Panel 9 ... This Getting Started Guide...
24
G ETTING S TARTED for Windows and the Mac The InterWrite LCD Tablet
Transcript of GETTING STARTED - Touchboards.com Interactive … Control Panel 9 ... This Getting Started Guide...

1
GETTING STARTED
for Windows and the Mac
The InterWrite LCD Tablet
redy_juan
New Stamp

2
We at GTCO CalComp are proud of our InterWriteTM family of prod-ucts. We strive to continue to bring you the best the technology hasto offer. We urge you to visit our Web site, where we will post thelatest information regarding any updates and changes we have madethat would impact the instructions in this Getting Started document.
www.gtcocalcomp.com
Support/InterWrite/Documentation LibrarySupport/InterWrite/Software Downloads
Navigate to:

3
Table of ContentsiPanel Overview 4What’s in the Box? 5System Requirements 5iPanel Executive Pen Assembly 6iPanel Installation 7
Kick Stand 7Connecting the iPanel 7
iPanel Control Panel 9Install the InterWrite Software on Windows 10Install the InterWrite Software on the Mac 11The iPanel/InterWrite Connection 12iPanel Properties 13
Calibrate the Screen 13Setting Pen Pressure in Windows 13
Getting Started with InterWrite 14Begin an InterWrite Session 14Pen Selection in Windows 15Pen Selection on the Mac 16Pen Selection during a Presentation 16Image Files 17Distributing Image Files 18
Limited Warranty for the iPanel 19Regulatory Statements 20Appendix A: Specifications 22Appendix B: OnScreen Display Menu 23Appendix C: Display Timing 23

4
iPanel Overview
INTERWRITE iPANELTM
The InterWrite iPanel is an LCD tablet. The electronic iPanel Execu-tive Pen is used to control the cursor and to write and draw directlyon the iPanel screen. When used in conjunction with a videoprojector, the iPanel screen’s image can be projected on a white-board or projection surface, where the interaction with the desktopcan be seen by everyone in the room. This addition to the InterWritefamily of products, which includes InterWrite Whiteboards andInterWrite Pads, expands the interactive opportunities of theInterWrite system for the Classroom or Boardroom.
This Getting Started Guide describes how to assemble the pen, installand connect the iPanel, install the InterWrite software, and calibratethe iPanel. It ends with a brief overview of the InterWrite software.
Interactive Mode is the operational mode of the InterWrite softwarethat allows you to take advantage of the full power and robustfeatures of the InterWrite system. The iPanel is an input device to thecomputer, much the same as the InterWrite whiteboards and pads.The difference is that what the whiteboards and pads do remotely,the iPanel does directly. It allows you to annotate captured screenimages and a variety of page types in Annotation Mode, and to runapplications and browse the Web in Mouse Mode, while everythingyou’re doing can be seen on a projection surface, thanks to theattached video projector. And, anyone at the whiteboard, or with anInterWrite Pad can interact with the presentation and participateactively in the collaborative experience.
5
What’s in the Box?
iPanel
Accessory Box containing:
VGA Cable
AC Adapter
Power Cable
USB Cable
2 iPanel Executive Pens
2 AAA Batteries
InterWrite CD
iPanel Getting Started Guide
If any item is missing or damaged, please contact your dealerimmediately. A plastic covering is taped to the iPanel screen toprotect it during shipping. We recommend you leave the protectiveplastic in place until you have completed your iPanel installation. It iseasily removed by pulling on the tape tabs.
System Requirements
Operating System: Windows 98, 2000, Me, XP; Mac OS X
Pentium 200MHz (or equivalent) processor, orhigher
32MB of RAM (64MB recommended)
Video card with 4 MB of RAM for minimum 24-bit(True Color) display
4X speed CD ROM, or higher
An available USB port

6
iPanel Executive Pen Assembly
1 Unscrew the pen. Insert the provided AAA battery into the upper halfof the pen barrel. Ensure that the positive pole (the + end with theprotruding button) is inserted so it is pointing toward the bottom halfof the pen.
2 Screw the two pen halves back together.
Notice that each Executive Pen comes with two replacement tips. Simplypull out the used tip and snap a replacement tip into place in the end ofthe pen barrel.
Store the pen in the Pen Holder behind the top lip of the iPanel.
The Executive Pen is an electronic pen, powered by a single AAA battery,that sends positional signals to the iPanel’s electromagnetic digitizer tocontrol cursor movement. The rocker button on the pen body providesadditional mouse-like cursor control. The lower end of the rocker button,the end closest to the pen tip, acts as a double-click when you press it. Theupper end of the rocker button provides right-click capability.
Plus end of battery points this way
Rocker Button
Pen Tip
Double-Click
Right-Click
7
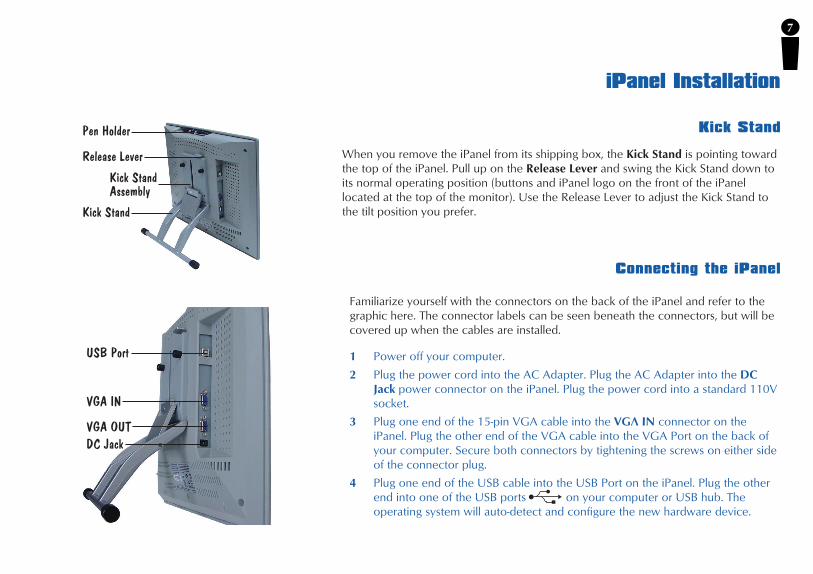
When you remove the iPanel from its shipping box, the Kick Stand is pointing towardthe top of the iPanel. Pull up on the Release Lever and swing the Kick Stand down toits normal operating position (buttons and iPanel logo on the front of the iPanellocated at the top of the monitor). Use the Release Lever to adjust the Kick Stand tothe tilt position you prefer.
Familiarize yourself with the connectors on the back of the iPanel and refer to thegraphic here. The connector labels can be seen beneath the connectors, but will becovered up when the cables are installed.
iPanel Installation
Kick Stand
Connecting the iPanel
1 Power off your computer.
2 Plug the power cord into the AC Adapter. Plug the AC Adapter into the DCJack power connector on the iPanel. Plug the power cord into a standard 110Vsocket.
3 Plug one end of the 15-pin VGA cable into the VGA IN connector on theiPanel. Plug the other end of the VGA cable into the VGA Port on the back ofyour computer. Secure both connectors by tightening the screws on either sideof the connector plug.
4 Plug one end of the USB cable into the USB Port on the iPanel. Plug the otherend into one of the USB ports on your computer or USB hub. Theoperating system will auto-detect and configure the new hardware device.
DC Jack
VGA IN
USB Port
VGA OUT
Kick Stand
Release Lever
Kick StandAssembly
Pen Holder
8
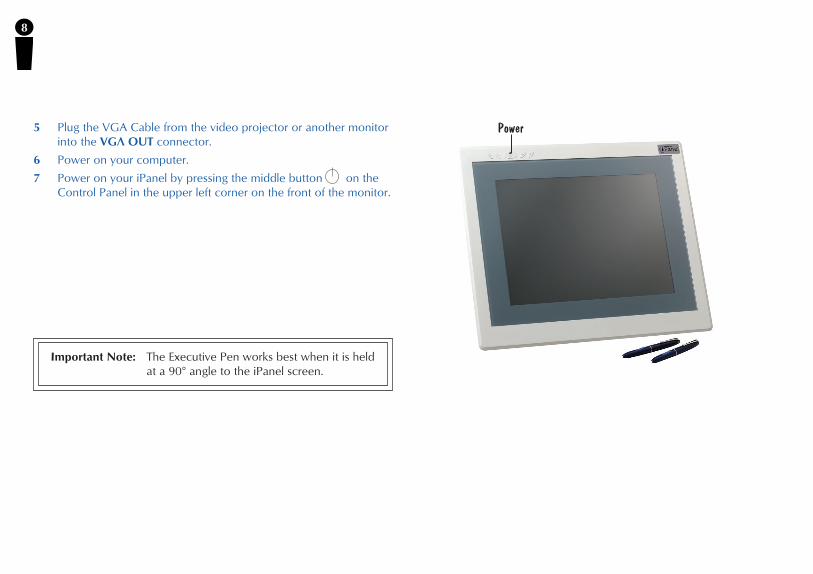
Power5 Plug the VGA Cable from the video projector or another monitorinto the VGA OUT connector.
6 Power on your computer.
7 Power on your iPanel by pressing the middle button on theControl Panel in the upper left corner on the front of the monitor.
Important Note: The Executive Pen works best when it is heldat a 90° angle to the iPanel screen.
9
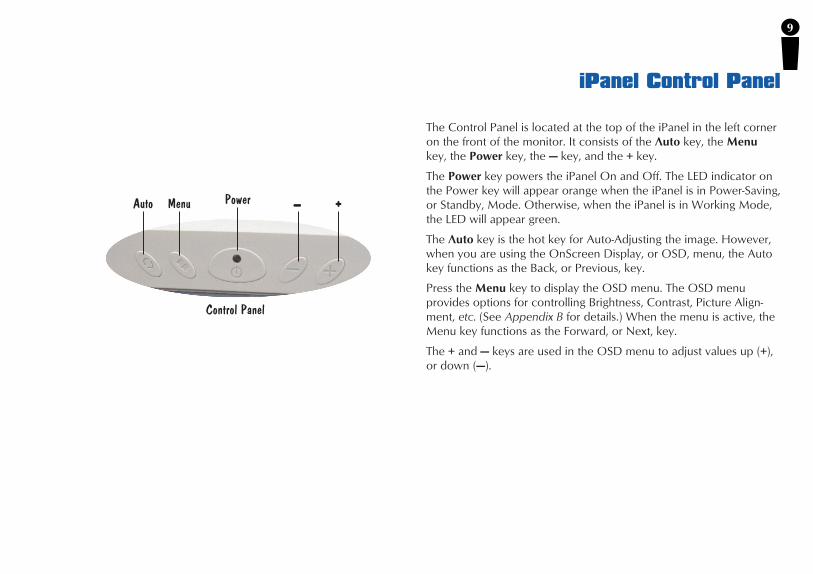
The Control Panel is located at the top of the iPanel in the left corneron the front of the monitor. It consists of the Auto key, the Menukey, the Power key, the — key, and the + key.
The Power key powers the iPanel On and Off. The LED indicator onthe Power key will appear orange when the iPanel is in Power-Saving,or Standby, Mode. Otherwise, when the iPanel is in Working Mode,the LED will appear green.
The Auto key is the hot key for Auto-Adjusting the image. However,when you are using the OnScreen Display, or OSD, menu, the Autokey functions as the Back, or Previous, key.
Press the Menu key to display the OSD menu. The OSD menuprovides options for controlling Brightness, Contrast, Picture Align-ment, etc. (See Appendix B for details.) When the menu is active, theMenu key functions as the Forward, or Next, key.
The + and — keys are used in the OSD menu to adjust values up (+),or down (—).
iPanel Control Panel
PowerAuto Menu ————— +++++
Control Panel

10
Install the InterWrite Software on Windows
1 Log in as Administrator. Insert the InterWrite software CD into theCD drive on your PC. The installer will autoload. If it doesn’t, clickon the Start button on the Windows Task Bar and select Run fromthe menu. Type X:\setup.exe (X represents the CD drive letter).
3 Follow the onscreen instructions for the software installation. Youwill know the InterWrite software has installed successfully by theappearance of the InterWrite icon in the System Tray on theWindows Task Bar. If the icon does not appear, restart yourcomputer.
The InterWrite software must be installed on Windows by a user withAdministrator privileges. iPanel is compatible with Windows 98, Me,2000, and XP.
2 Select the Install InterWrite Software menu option.
Tip: Click the InterWrite icon in the System Tray of the WindowsTask Bar to display Device Manager’s option menu. Select theCheck for Updates option. If a new version is available,download it now. You should periodically check for updates.
The appearance of the InterWrite icon on the Task Bar indicates thatthe InterWrite Device Manager is now running on your PC. You willclick on the InterWrite icon to display the options on the DeviceManager menu.
InterWrite icon
11
Install the InterWrite Software on the Mac
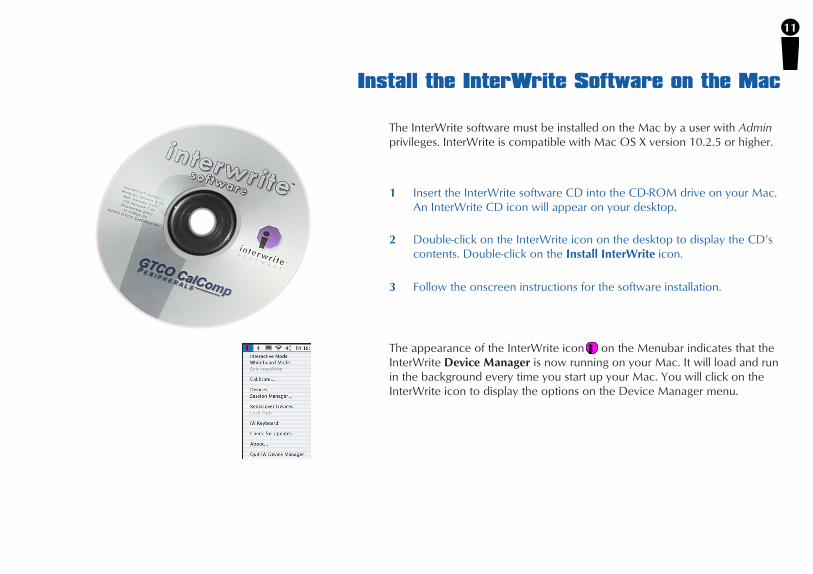
The InterWrite software must be installed on the Mac by a user with Adminprivileges. InterWrite is compatible with Mac OS X version 10.2.5 or higher.
1 Insert the InterWrite software CD into the CD-ROM drive on your Mac.An InterWrite CD icon will appear on your desktop.
2 Double-click on the InterWrite icon on the desktop to display the CD’scontents. Double-click on the Install InterWrite icon.
3 Follow the onscreen instructions for the software installation.
The appearance of the InterWrite icon on the Menubar indicates that theInterWrite Device Manager is now running on your Mac. It will load and runin the background every time you start up your Mac. You will click on theInterWrite icon to display the options on the Device Manager menu.

12
The iPanel/InterWrite Connection
Device Manager is a component of the InterWrite software you justinstalled. Its function is to manage the InterWrite hardware devices andtheir connections to the computer and the InterWrite software. When anInterWrite hardware device, such as the iPanel is properly connected, itwill show up in the Devices list, selected from the Device Manager menu.To access the menu, click on the InterWrite icon (in the System Tray onthe Windows Task Bar, or on the Mac Menubar).
If the iPanel is not working correctly, check the following:
If the LED in the Power button is neither orange nor green, the iPanelis not powered On. Press the Power button on the iPanel ControlPanel. If the LED does not light up, check your power connections atthe DC Jack on the back of the iPanel, the AC Adapter and the wallplug or power strip.
If there is power, but no picture, check the VGA cable connections atthe back of the iPanel (VGA IN) and on the computer.
If the iPanel does not show up in Device Manager’s Devices list, verifythat the USB cable is properly connected to the USB port on the backof the iPanel and to a USB port, or USB hub, on your computer.Unplug the USB cable from the USB port, wait five seconds, and plugit back in. If you have more than one USB port on your computer, tryplugging the USB cable into a different port.
13
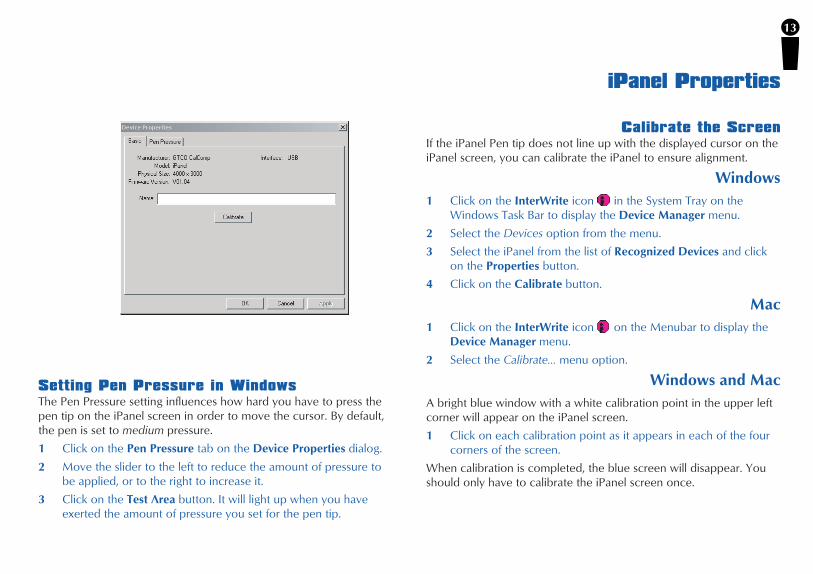
iPanel Properties
Setting Pen Pressure in WindowsThe Pen Pressure setting influences how hard you have to press thepen tip on the iPanel screen in order to move the cursor. By default,the pen is set to medium pressure.
1 Click on the Pen Pressure tab on the Device Properties dialog.
2 Move the slider to the left to reduce the amount of pressure tobe applied, or to the right to increase it.
3 Click on the Test Area button. It will light up when you haveexerted the amount of pressure you set for the pen tip.
Calibrate the ScreenIf the iPanel Pen tip does not line up with the displayed cursor on theiPanel screen, you can calibrate the iPanel to ensure alignment.
Windows
1 Click on the InterWrite icon in the System Tray on theWindows Task Bar to display the Device Manager menu.
2 Select the Devices option from the menu.
3 Select the iPanel from the list of Recognized Devices and clickon the Properties button.
4 Click on the Calibrate button.
Mac
1 Click on the InterWrite icon on the Menubar to display theDevice Manager menu.
2 Select the Calibrate... menu option.
Windows and Mac
A bright blue window with a white calibration point in the upper leftcorner will appear on the iPanel screen.
1 Click on each calibration point as it appears in each of the fourcorners of the screen.
When calibration is completed, the blue screen will disappear. Youshould only have to calibrate the iPanel screen once.
14
Getting Started with InterWrite
The InterWrite system is at the heart of a successful interactivecollaboration, whether it is in a classroom of fourth graders studyingworld geography, or in a boardroom of corporate types brainstorminga new product launch. All the tools you will need to stimulate inspira-tion, connection and participation can be found in the InterWritesoftware. Here’s a quick look at the InterWrite basics to get youstarted.
The InterWrite software is run in one of two operational modes,Interactive Mode or Whiteboard Mode. Whiteboard Mode, selectedonly when using a whiteboard with InterWrite, allows you to capturenotes, drawings, calculations—whatever you write on the whiteboardwith an electronic Marker Pen—for distribution. Whiteboard Moderequires a computer, an electronic whiteboard, and one or moreelectronic Marker Pens. When you select Whiteboard Mode, a blank
white screen representing the whiteboard surface appears on yourcomputer monitor. As you write on the whiteboard with one of theuncapped electronic Marker Pens, whatever you write appears on thecomputer screen in the color of the Marker Pen. Whenever youchange pens, the new pen color is displayed on the computer screen.Interactive Mode, the more feature-rich and robust of the twooperational modes, allows you to run applications (Mouse Mode) byusing the electronic Executive Pen on the iPanel screen to move thecursor. In Annotation Mode you use the Executive Pen to annotatecaptured images with InterWrite’s wide array of annotation tools. Theannotation tools consist of freehand tools, text tools and drawing tools.Of the freehand tools, the Pen is the most frequently used tool. Thefollowing pages describe how to select and configure the Pen tool.
Begin an InterWrite Session
Start InterWrite by using the electronic Executive Pen to click on theInterWrite icon in the System Tray on the Windows Task Bar, or on theMac Menubar. Select Interactive Mode from the Device Manager menu.
15
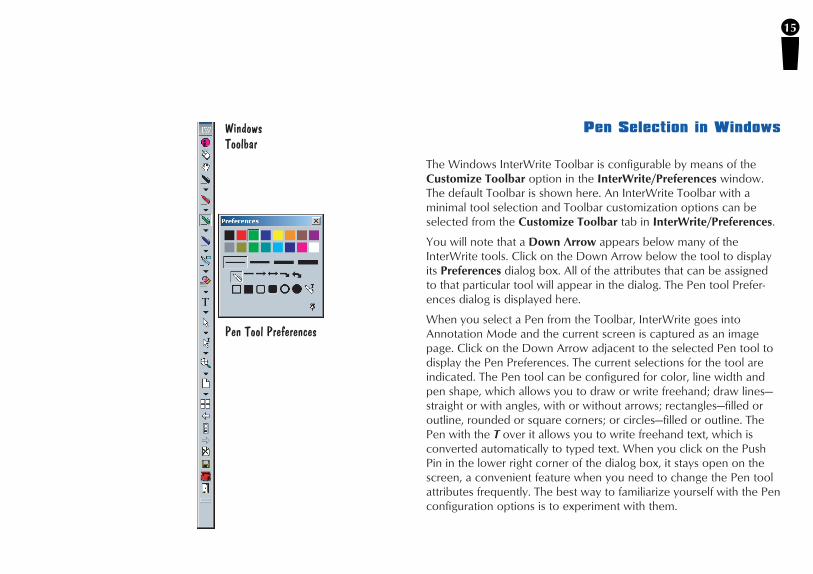
The Windows InterWrite Toolbar is configurable by means of theCustomize Toolbar option in the InterWrite/Preferences window.The default Toolbar is shown here. An InterWrite Toolbar with aminimal tool selection and Toolbar customization options can beselected from the Customize Toolbar tab in InterWrite/Preferences.
You will note that a Down Arrow appears below many of theInterWrite tools. Click on the Down Arrow below the tool to displayits Preferences dialog box. All of the attributes that can be assignedto that particular tool will appear in the dialog. The Pen tool Prefer-ences dialog is displayed here.
When you select a Pen from the Toolbar, InterWrite goes intoAnnotation Mode and the current screen is captured as an imagepage. Click on the Down Arrow adjacent to the selected Pen tool todisplay the Pen Preferences. The current selections for the tool areindicated. The Pen tool can be configured for color, line width andpen shape, which allows you to draw or write freehand; draw lines—straight or with angles, with or without arrows; rectangles—filled oroutline, rounded or square corners; or circles—filled or outline. ThePen with the T over it allows you to write freehand text, which isconverted automatically to typed text. When you click on the PushPin in the lower right corner of the dialog box, it stays open on thescreen, a convenient feature when you need to change the Pen toolattributes frequently. The best way to familiarize yourself with the Penconfiguration options is to experiment with them.
Pen Selection in WindowsWindowsToolbar
Pen Tool Preferences

16
The Pen tool selection and configuration processes varyslightly on the Mac and the PC, but their use in conjunc-tion with the iPanel is identical. Some users prefer toassign a different color and line width to each of the fourPen tools. As they present their material, they can easilyswitch from one Pen to the other to use the differentassigned effects. Other users prefer to keep one Penselected and change its color and line width on the fly, asthe presentation warrants. As you become more familiarwith the InterWrite annotation tools, you will find themethod that best suits your presentation style.
Pen Selection on the Mac
On the Mac, when you open InterWrite in InteractiveMode, it automatically starts up in Annotation Modeand a blank page is displayed. Four different Pen toolscan be configured on the Toolbar, as can the line andrectangle Pen Shapes. Each of these annotation toolscan be configured for color and line width by makingselections from the Width and Color menus on theMenubar. The current selections for each annotationtool are displayed on the icons. The best way tofamiliarize yourself with the Pen configuration options isto experiment with them.
Pen Selection during a Presentation
Mac MenubarMacToolbar

17
Image Files
Annotated screens are captured as images in a .GWB file. Each image repre-sents a page in the presentation image file. As soon as InterWrite goes intoAnnotation Mode (in Windows—when an annotation tool is selected; on theMac—when Interactive Mode is started up), an untitled image file is created.Unless you give the file a name, it is automatically saved using today’s date.(Multiple files created today have 01, 02, 03, etc., appended to the date name.)
An existing presentation image file can be opened, its pages can be sorted,annotations can be added to the existing pages, and new pages can be addedto the file. Your presentation will determine how each image file evolves. Forexample, you can prepare a presentation file of blank maps ahead of time for ageography lesson. Or, you can capture and annotate each of the monthlyearnings spreadsheets as you review the past fiscal year during a budgetmeeting. Or, you can run a PowerPoint Slide Show during a presentation andannotations can be added to each slide and saved.
Keep in mind that the page will not be added to the presentation image fileuntil either an annotation tool is used on the page, or the page is saved—byclicking on the Save tool on the Toolbar. The process is the same, whether youpre-build an image file for a presentation, or build the image file during thepresentation. Click the Mouse Mode tool and, using the Executive Pen as themouse, display the image you want to capture. Select an annotation tool, a Pen,for example, and the image is captured. Either annotate the image, or click onthe Save tool. Add a blank, gridded, or background image page, or click theMouse Mode tool and select the next image for capture to continue.
MacToolbar Mouse Mode
Pens
Highlighter
Eraser
Mac Save
Create
Page Sorter
Windows Save
WindowsToolbar
New Page

18
Distributing Image Files
The InterWrite presentation image files you create can be printedfor local distribution, or emailed to anyone anywhere.
Review the presentation file in the InterWrite Page Sorter. Pagescan be sorted and deleted in the Page Sorter. When the file hasbeen arranged to your satisfaction, you can use the Page Sorter’sprint option to print it, you can export it to one of several fileformats, or, in Windows, you can email it directly from the PageSorter.
The native file format of saved presentation image files has the.GWB extension and can be viewed in Windows with the GWBReader. This is an application that is part of the InterWritesoftware suite and is installed when the InterWrite software isinstalled. The Windows GWB Reader is also available for down-load at www.gtcocalcomp.com in Support/InterWrite/SoftwareDownloads, and can be distributed freely with your presentationfiles. You can also save and email your presentation image fileson both Windows and the Mac in a PDF format, which can beread by Adobe’s Acrobat Reader.
Now, everyone can stay in the information loop, whether theywere able to attend the presentation or not.

19
Limited Warranty for the iPanel
GTCO CalComp Corporation warrants these products to be free from defects in material andworkmanship under the following terms. Complete and return the enclosed warranty registration card toensure that your products are covered by this warranty.
Coverage
Parts and labor are warranted for one (1) year from the date of the first consumer purchase for theiPanel, electronic pen, AC Adapter, and cables. This warranty applies to the original consumerpurchaser only. This warranty does not apply to any product purchased outside the United States orCanada. For warranty information outside the United States or Canada, contact your local dealer ordistributor.Warranty is valid only if original consumer’s purchase or lease date is less than or equal to six monthsfrom the original GTCO CalComp sale date. This information will be captured by the system serialnumber and confirmed by the reseller’s purchase order.
Conditions
Except as specified below, this warranty covers all defects in material or workmanship in the products.The following are not covered by the warranty:
1. Any product on which the serial number has been defaced, modified, or removed (ifapplicable).
2. Damage, deterioration, or malfunction resulting from:a. Accident, misuse, abuse, neglect, fire, water, lightening, or other acts of nature,
unauthorized product modification for any purpose, or failure to follow instructionssupplied with the product.
b. Repair, or attempted repair, by anyone not authorized by GTCO CalComp.c. Any damage in shipment of the product (claims must be presented to the carrier).d. Any other cause which does not relate to a manufacturing defect.
3. Any product not sold or leased to a consumer within six months of GTCO CalComp’s originalsale date.
4. Consumable parts, e.g., batteries and pen tips.GTCO CalComp will pay all labor and material expenses for covered items, but will not pay for thefollowing:
1. Removal or installation charges.2. Costs for initial technical adjustments (set up), including adjustments of user controls.3. Certain shipping charges. (Payment of shipping charges is discussed in the next section of this
warranty.)4. Packaging costs. (Customers should keep their boxes.)
Warranty Service Procedures
1. To obtain service on your GTCO CalComp product, call the Service & Support Department at(410) 312-9221 (EST), or (480) 443-2214 (MST) to obtain a Return Material AuthorizationNumber (RMA#) and shipping instructions.
2. Ship the product to GTCO CalComp with the RMA# marked clearly on the outside of the box.GTCO CalComp reserves the right to refuse the shipment, if not properly marked.
3. Although the consumer must pay any shipping charges to ship the product to GTCOCalComp for warranty service, GTCO CalComp will pay the return shipping charges forground shipment. Other shipping options are available at an additional fee.
4. Whenever warranty service is required, the original dated sales invoice (or a copy) must bepresented as proof of warranty coverage, and should be included in shipment of the product.In addition, please include your name, address, telephone number, fax number, email address,and a description of the problem.
5. If GTCO CalComp determines that the unit is not defective within the terms of the warranty,the consumer shall pay the cost of all freight charges, as well as any repair charges.
Technical Support
Web-based Technical Support is available free of charge at: www.gtcocalcomp.com, where current driverreleases, as well as comprehensive technical support, troubleshooting, Technical Bulletins and FAQs canbe found.Telephone Technical Support is available free of charge to the original consumer for a period of 90 daysfrom the date of purchase of the product. Please contact our Service & Support Department at (410)312-9221 (EST), or (480) 443-2214 (MST). You can also fax your request to (410) 290-9065 (EST), or(480) 948-5508 (MST). Our toll-free numbers in the U.S. are: 800-344-4723 for our East Coast customersand 800-856-0732 for our West Coast customers.
Disclaimer of Unstated Warranties
The warranty printed above is the only warranty applicable to this purchase. ALL OTHER WARRANTIES,EXPRESSED OR IMPLIED, INCLUDING, BUT NOT LIMITED TO, THE IMPLIED WARRANTIES OFMERCHANTABILITY AND FITNESS FOR A PARTICULAR PURPOSE ARE DISCLAIMED. Assuming thewarranty above stated is otherwise applicable, it is expressly understood and agreed that GTCOCalComp’s sole liability, whether in contract, tort, under any warranty, in negligence, or otherwise, shallbe for the repair or replacement of the defective parts, and under no circumstances shall GTCOCalComp be liable for special, indirect, or consequential damages. The price stated and paid for theequipment is a consideration in limiting GTCO CalComp’s liability.
Notice
Some states and provinces do not allow the exclusion or limitation of incidental or consequentialdamages, so the above exclusion may not apply to you. This warranty gives you specific legal rights, andyou may have other rights, which vary from state to state, or province to province.To obtain service on your GTCO CalComp product, call our Service & Support Department at (410) 312-9221 (EST), or (480) 443-2214 (MST), fax us at (410) 290-9065 (EST), or (480) 948-5508 (MST). We canalso be contacted through our Web site at www.gtcocalcomp.com.
Important! All products returned to GTCO CalComp for service must have prior approval in the form ofa Return Merchandise Number (RMA#), which can be obtained by calling the Service & SupportDepartment.

20
Declaration of conformity according to ISO/IEC Guide 22and EN 45014
Manufacturer’s Name: Lightsonic Optoelectronics Inc.for GTCO CalComp, Inc.
Manufacturer’s Address: 5F No. 38, Ke-Yih Rd., ChunanMiaoli, Taiwan Zip: 350
Declares, that the product
Product Name: 15" Tablet LCD Monitor
Brand Name: InterWrite IPanel 15E
Model Numbers: LPM150B100
Product Options: All
Conforms to the following product specifications:
Safety: EN60950:2000
EMC:EMI: EN55022:1988-Class BEN55024:1998EN61000-3-2:1995+A1:1998+A2:1998 ClassAEN61000-3-3:1995EN61000-4-2:1995EN61000-4-3:1995EN61000-4-4:1995EN61000-4-5:1995EN61000-4-6:1996EN61000-4-8:1993EN61000-4-11:1994
European Contact
GTCO CalCompWorld Trade CenterA-1300 Vienna — AirportAustriaTel: + 43 1 7007 36450Fax: + 43 1 7007 36458
European Union Emission Directive
This product is in conformity with the protection requirements of EUCouncil Directive 89/366/ECC on the approximation of the laws ofthe Member States relating to electromagnetic compatibility.
This product has been tested and found to comply with the limits forClass B Information Technology Equipment according to CISPR 22/European Standard EN55022. The limits for Class B equipment werederived for typical industrial environments to provide reasonableprotection against interference with licensed communication devices.
Regulatory Statements

21
USA
Radio Fequency Emissions Notices
This equipment has been tested and found to comply with the limitsfor a Class B digital device, pursuant to part 15 of the FCC Rules.These limits are designed to provide reasonable protection againstharmful interference in a residential installation. This equipmentgenerates, uses and can radiate radio frequency energy and, if notinstalled and used in accordance with the instructions, may causeharmful interference to radio communications. However, there is noguarantee that interference will not occur in a particular installation.If this equipment does cause harmful interference to radio ortelevision reception, which can be determined by turning theequipment off and on, the user is encouraged to try to correct theinterference by one or more of the following measures:
Reorient or relocate the receiving antenna.
Increase the separation between the equipment and receiver.
Connect the equipment into an outlet on a circuit different fromthat to which the receiver is connected.
Reorient or coil cables.
If necessary, consult the dealer or an experienced radio/television technician for additional suggestions.
Any cables the user adds to the device must be shielded to be incompliance with the FCC standards. Any unauthorized modificationto this device could result in the revocation of the end user’sauthority to operate this device.
Electronic Pen
This device complies with Part 15 of FCC rules. Operation is subjectto the following two conditions: (1) This device may not causeharmful interference, and (2) This device must accept any interfer-ence received, including interference that may cause undesiredoperation.
Canada
Industry Canada Class B emission compliance statement. This ClassB digital apparatus complies with Canadian ICES-003.
Avis de conformite’ a’ la re’glementation d’Industrie Canada. Cetappareil nume’rique de classe B est conforme a’ la norme NMB-003du Canada.
22
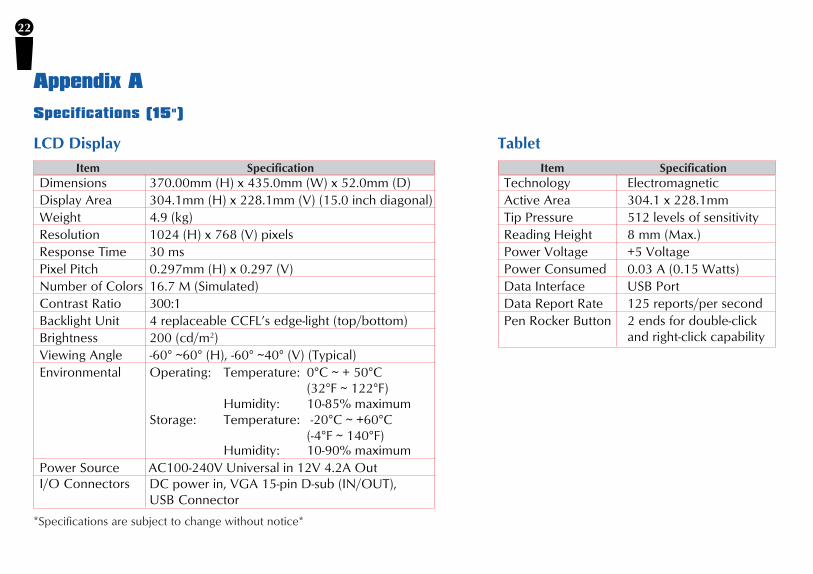
Appendix A
Specifications (15")
LCD Display
*Specifications are subject to change without notice*
Tablet
DimensionsDisplay Area
ResolutionResponse TimePixel PitchNumber of ColorsContrast RatioBacklight UnitBrightnessViewing AngleEnvironmental
370.00mm (H) x 435.0mm (W) x 52.0mm (D)
4.9 (kg)304.1mm (H) x 228.1mm (V) (15.0 inch diagonal)
1024 (H) x 768 (V) pixels30 ms0.297mm (H) x 0.297 (V)16.7 M (Simulated)300:14 replaceable CCFL’s edge-light (top/bottom)200 (cd/m2)-60° ~60° (H), -60° ~40° (V) (Typical)
Humidity: 10-90% maximum
Storage: Temperature: -20°C ~ +60°C(-4°F ~ 140°F)
Humidity: 10-85% maximum
Operating: Temperature: 0°C ~ + 50°C(32°F ~ 122°F)
Power SourceI/O Connectors DC power in, VGA 15-pin D-sub (IN/OUT),
USB Connector
Item Specification
AC100-240V Universal in 12V 4.2A Out
2 ends for double-clickand right-click capability
TechnologyActive AreaTip PressureReading HeightPower VoltagePower ConsumedData InterfaceData Report RatePen Rocker Button
Electromagnetic
512 levels of sensitivity304.1 x 228.1mm
8 mm (Max.)+5 Voltage0.03 A (0.15 Watts)USB Port125 reports/per second
Item Specification
Weight

23
Appendix C
Display Timing
Appendix B
OnScreen Display Menu
Mode Resolution
1024 x 768 (Mac)
640 x 350640 x 400640 x 480640 x 480 (Mac)640 x 480640 x 480800 x 600800 x 600800 x 600800 x 600832 x 624 (Mac)1024 x 7681024 x 7681024 x 768
123456789101112131415
H-Freq.(KHz)V-Freq.(Hz)Refresh Freq.
31.4731.4731.473537.8637.535.1537.8748.0746.8749.7148.3656.4760.0260.24
707060677275566072757460707575
Adjust the screen brightness
Adjust the screen contrast
Adjust the horizontal size of the display
Adjust the color setup
Adjust the Red color gain
Adjust the Green color gain
Adjust the Blue color gain
Green Gain
H-Position
V-Position
S-Scaling
Color Temperature
Auto Adjustment
Red Gain
Contrast
Blue Gain
Brightness
OSD H-Position
OSD Time
Sharpness
Recall
Phase
Language
OSD V-Position
Exit
Choose English, Traditional Chinese, orSimplified Chinese for the OSD Menu
Press the + or — key to exit the OSD menu
Position the display along the horizontal axisof the screenPosition the display along the vertical axis ofthe screen
Auto-adjust the display position, timing andphase of the screen
Adjust the phase control. Phase adjustment maybe required to optimize the display quality.
Adjust the vertical position of the OSD menuon the screen
Set the amount of time that must elapsebefore the OSD closes
Adjust the sharpness control
Press the + or — key to default to factory settings
Adjust the horizontal position of the OSDmenu on the screen
Tea Time Set an alarm to remind yourself to take a break

24
Copyright© 2003 GTCO CalComp Inc.InterWrite is a trademark of GTCO CalComp Inc.
Bluetooth is a trademark of, and is owned by, Bluetooth SIG, Inc., U.S.A.,and is licensed to GTCO CalComp Inc.
All other products and company names are the trademarks or registeredtrademarks of their respective owners.
The information contained in this document is subject to change without notice. GTCO CalComp assumes noresponsibility for technical, or editorial errors, or omissions that may appear in this document, or for the use of thismaterial. Nor does GTCO CalComp make any commitment to update the information contained in this document.This document contains proprietary information which is protected by copyright. All rights reserved. No part of thisdocument can be photocopied or reproduced in any form without the prior, written consent of GTCO CalComp Inc.
www.gtcocalcomp.com
37-00797-01 Rev. A
Corporate Headquarters
7125 Riverwood Drive
Columbia, Maryland 21046
Tel: 410.381.6688
Fax: 410.290.9065
Toll Free: 800.344.4723
Western Office
14555 North 82nd Street
Scottsdale, Arizona 85260
Tel: 480.948.6540
Fax: 480.948.5508
Toll Free: 800.856.0732
European Headquarters
GTCO CalComp Ges.m.b.H.
World Trade Center, Suite 165
A-1300 Vienna, Austria
Tel: + 43 1 7007 36450
Fax: + 43 1 7007 36458