Getting Started Guide 2009-06-12 - ODM | Online ... Start-Page 3 RA56-cATM-BLY90 Release 1.0 Chapter...
39
Quick Start-Page 1 RA56-cATM-BLY90 Release 1.0 RA56-cATM-BLY90 GETTING STARTED GUIDE FACTORY DEFAULTS: Ethernet Ports Port 1 = 192.168.1.254 Port 2 = DHCP LOGIN User Name = admin Password = admin Table of Contents Chapter 1 Prep Work for module installation ........................................................... 2 Chapter 2 Configure module ................................................................................ 3 Connect to the module................................................................................................................................................. 3 Steps for appliance configuration ................................................................................................................................ 4 Chapter 3 Build OPC90 Database ........................................................................... 5 Option#1 : OPC90 Manual Method .............................................................................................................................. 5 Option#2 : Using the OPC90 File Import Feature ......................................................................................................... 9 Chapter 4 Configure CLX TAGS for transfer............................................................. 16 Chapter 5 Configure the CTAG MASTER.................................................................. 17 Chapter 6 Using the CtagMaster CSV Import Utility ................................................... 27 Chapter 7 Using the cATM-BLY90 XFER Utility ......................................................... 28 Start the Utility ........................................................................................................................................................... 28 Setup Option............................................................................................................................................................... 28 Using the Backup Utility ............................................................................................................................................. 29 Restoring a Backup Configuration to the cATM‐BLY90 Appliance ............................................................................. 31 Utility option for Upgrade and Help ........................................................................................................................... 31 Chapter 8 Changing the Network Settings of the cATM-BLY90 ..................................... 32 Chapter 9 Troubleshooting Hints.......................................................................... 35 OPC90Server Troubleshooting ................................................................................................................................... 35 cTAG Master Troubleshooting.................................................................................................................................... 37 Chapter 10 Datasheet ....................................................................................... 38
Transcript of Getting Started Guide 2009-06-12 - ODM | Online ... Start-Page 3 RA56-cATM-BLY90 Release 1.0 Chapter...
Quick Start-Page 1
RA56-cATM-BLY90 Release 1.0
RA56-cATM-BLY90 GETTING STARTED GUIDE
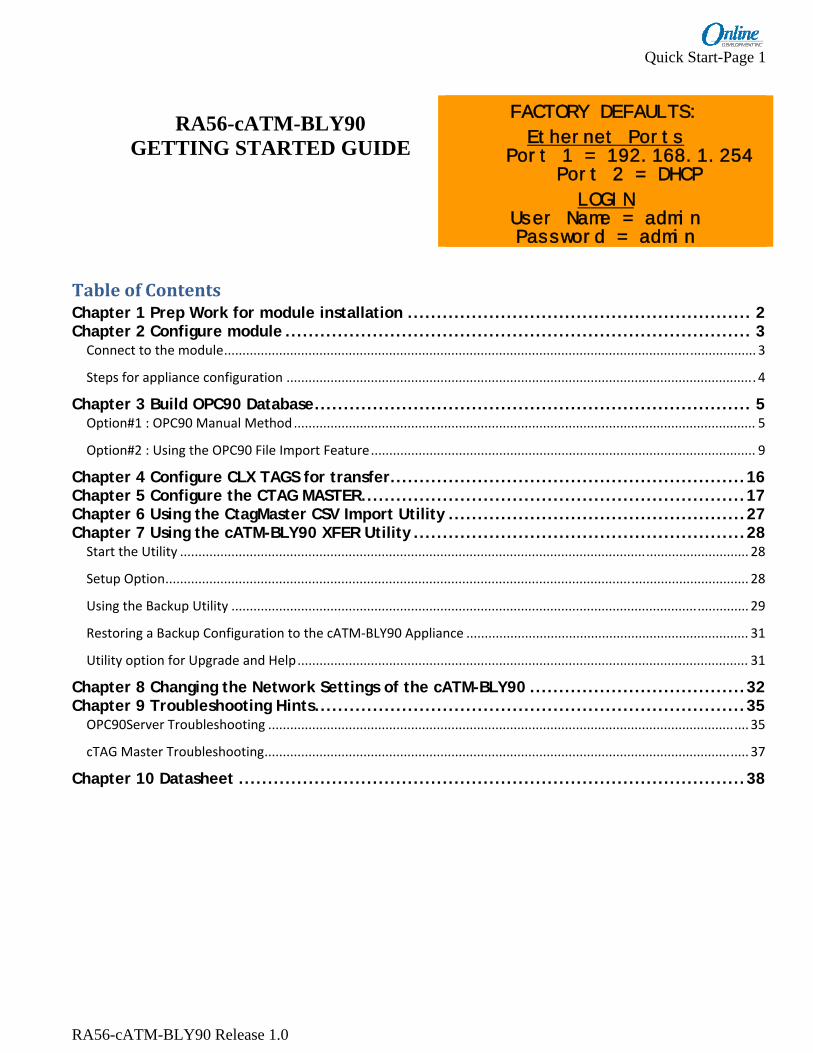
FACTORY DEFAULTS:
Ethernet Ports Port 1 = 192.168.1.254
Port 2 = DHCP
LOGIN User Name = admin Password = admin
Table of Contents Chapter 1 Prep Work for module installation ........................................................... 2 Chapter 2 Configure module ................................................................................ 3 Connect to the module ................................................................................................................................................. 3
Steps for appliance configuration ................................................................................................................................ 4
Chapter 3 Build OPC90 Database ........................................................................... 5 Option#1 : OPC90 Manual Method .............................................................................................................................. 5
Option#2 : Using the OPC90 File Import Feature ......................................................................................................... 9
Chapter 4 Configure CLX TAGS for transfer ............................................................. 16 Chapter 5 Configure the CTAG MASTER .................................................................. 17 Chapter 6 Using the CtagMaster CSV Import Utility ................................................... 27 Chapter 7 Using the cATM-BLY90 XFER Utility ......................................................... 28 Start the Utility ........................................................................................................................................................... 28
Setup Option ............................................................................................................................................................... 28
Using the Backup Utility ............................................................................................................................................. 29
Restoring a Backup Configuration to the cATM‐BLY90 Appliance ............................................................................. 31
Utility option for Upgrade and Help ........................................................................................................................... 31
Chapter 8 Changing the Network Settings of the cATM-BLY90 ..................................... 32 Chapter 9 Troubleshooting Hints .......................................................................... 35 OPC90Server Troubleshooting ................................................................................................................................... 35
cTAG Master Troubleshooting .................................................................................................................................... 37
Chapter 10 Datasheet ....................................................................................... 38
Quick Start-Page 2
RA56-cATM-BLY90 Release 1.0
Chapter 1 Prep Work for module installation
• Obtain network configuration for each cATM unit
• Setup your PC to communicate with the default IP address provided on the cATM from the factory
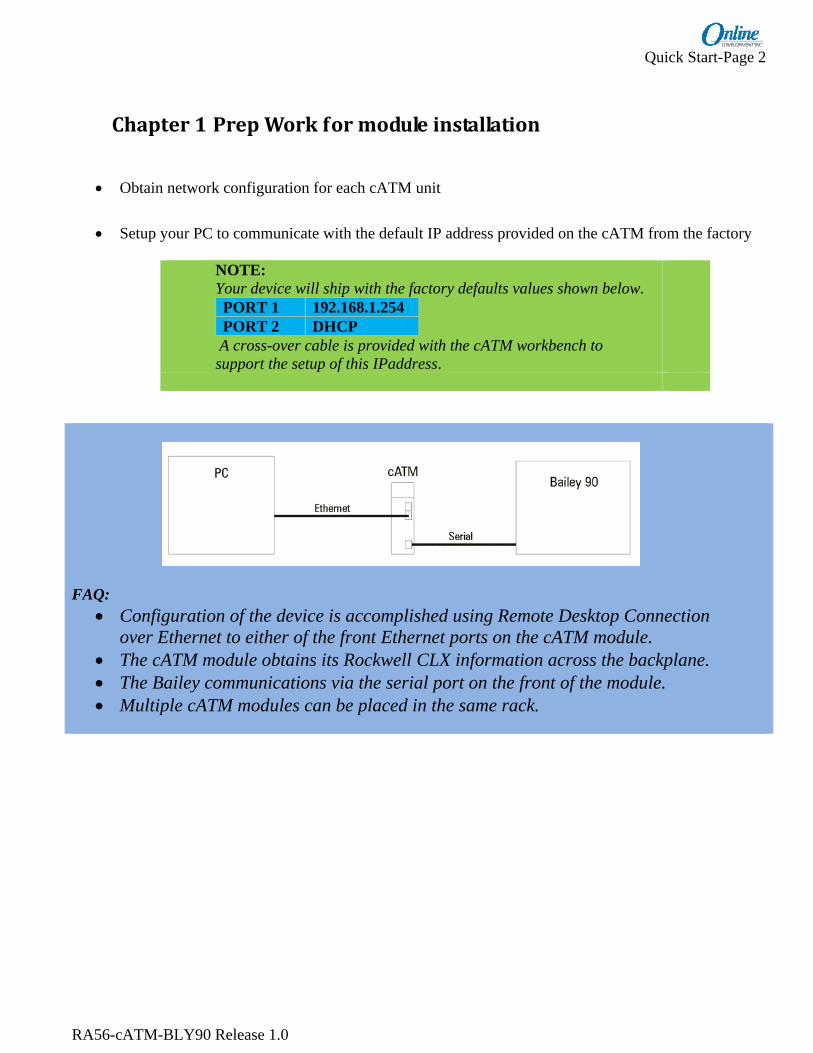
NOTE: Your device will ship with the factory defaults values shown below. PORT 1 192.168.1.254 PORT 2 DHCP
A cross-over cable is provided with the cATM workbench to support the setup of this IPaddress.
FAQ:
• Configuration of the device is accomplished using Remote Desktop Connection over Ethernet to either of the front Ethernet ports on the cATM module.
• The cATM module obtains its Rockwell CLX information across the backplane. • The Bailey communications via the serial port on the front of the module. • Multiple cATM modules can be placed in the same rack.
Quick Start-Page 3
RA56-cATM-BLY90 Release 1.0
Chapter 2 Configure module
Connect to the module
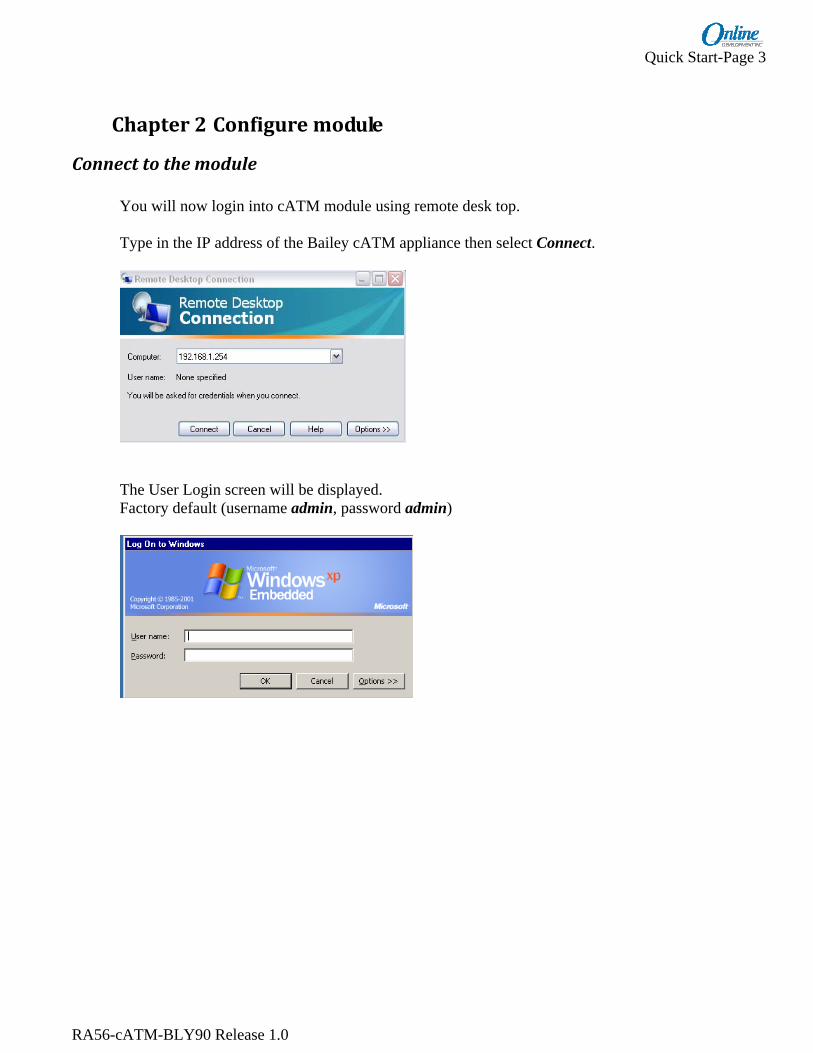
You will now login into cATM module using remote desk top.
Type in the IP address of the Bailey cATM appliance then select Connect.
The User Login screen will be displayed. Factory default (username admin, password admin)

Quick Start-Page 4
RA56-cATM-BLY90 Release 1.0
You will now be connected to the RA56-cATM-BLY90 desktop.
NOTE: Later in ADMINISTRATION CONFIGURATION section of this manual, you will change Network configuration of your cATM
Steps for appliance configuration For each cATM module, repeat the following the instructions in the following sections in this order
BUILD OPC90 DATABASE BUILD CLX TAG LIST cTagMaster TAG MAPPING DATABASE
NOTE: To perform configuration Backup/Restore or Import/Export CSV files you will be using the cATM-BLY90 XFER Utility. The use of this utility is described in section ( ) of this document. The XFER utility requires the use of a standard USB flash removable drive.

Quick Start-Page 5
RA56-cATM-BLY90 Release 1.0
Chapter 3 Build OPC90 Database Refer to the OPC90 Server User documentation and Help files for additional information. There are two ways to build the OPC90 Database: 1. Manual: The first is to use the OPC90 interface to manually add individual blocks that correspond with
the data to be exchanged from the ABB Bailey DCS. 2. Import: The second method is to use the OPC90 file import feature. This feature is very useful for
importing large quantities of block definitions that would be impractical to do using the OPC90 user interface. This is the method that will be demonstrated in this example.
Option#1 : OPC90 Manual Method
Start the OPC90Server by double clicking the OPC90Server icon from the desktop.
Until configured, the OPC90 Server screen will be blank. From the ADD menu, select NEW DEVICE
Quick Start-Page 6
RA56-cATM-BLY90 Release 1.0
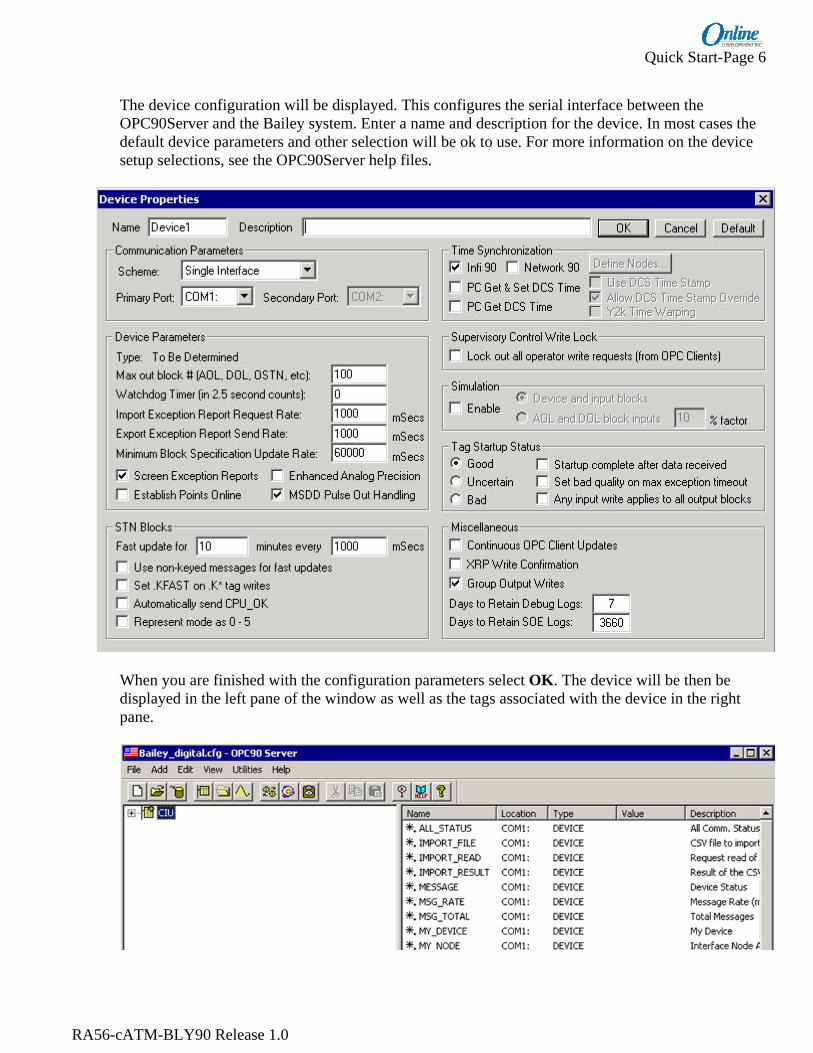
The device configuration will be displayed. This configures the serial interface between the OPC90Server and the Bailey system. Enter a name and description for the device. In most cases the default device parameters and other selection will be ok to use. For more information on the device setup selections, see the OPC90Server help files.
When you are finished with the configuration parameters select OK. The device will be then be displayed in the left pane of the window as well as the tags associated with the device in the right pane.

Quick Start-Page 7
RA56-cATM-BLY90 Release 1.0
Next, add a new Group. A “Group” is an organized collection of blocks, which we will get to in the next step. Groups can be a name of an area in a plant or maybe types of blocks. Groups are intended for organization of the database but are not required. Groups become part of the OPC tag name when used. To add a new Group, highlight the Device then select Add New Group from the ADD menu and give it a name.
Select OK to continue. The newly created Group will be displayed under the Device.

Quick Start-Page 8
RA56-cATM-BLY90 Release 1.0
Next, add a new Block under the Group that was just created. A block actually defines a tag name, tag type and address within the ABB Bailey DCS. Block names must be unique with respect to all other blocks within the current tree level. A block name can be any combination of characters except periods. It’s best to stick with alpha-numeric names for compatibility with most OPC client software. The block name is part of the OPC tag name. The block address (ABB Bailey ring, node, module and block number) must be unique with respect to all other blocks (except POLL and SPEC blocks) in the database. From the ADD menu, select Add New Block. Give the block a name, a description that helps to identify the Block, and select the Block Type. The block type DIL used in this example refers to Digital Input Loop. The DIL OPC90 block is used to retrieve the exception reported output from Bailey Digital Output / Loop Blocks (function code 45). It can also be used to retrieve digital inputs defined within Bailey Logic Master Modules Group I/O definitions.

Quick Start-Page 9
RA56-cATM-BLY90 Release 1.0
Select OK to continue. The newly created block will be displayed under the group. Tags created that are associated with this block will be displayed in the right window pane. This block is now linked from the OPC90 Server to the Bailey DCS system.
Option#2 : Using the OPC90 File Import Feature
NOTE: In order to import a CSV file an OPC90 CSV file must be located in the OPC90 CSV directory. Bailey database conversion tools are available from Rockwell Automation. These tools can be installed on a commercial PC to convert ABB Bailey console tag database files into CSV files for use by the cATM-BLY90 appliance and RSLogix 5000 software. cATM-BLY90 includes and on-board utility to import the resulting CSV configuration files for defining the mapping between Bailey block and ControlLogix tag structures. A Sample CSV file of a Bailey configuration is provided which will be used in this example. Start the OPC90Server by double clicking the OPC90Server icon from the desktop.

Quick Start-Page 10
RA56-cATM-BLY90 Release 1.0
Until configured, the OPC90 Server screen will be blank.
From the File menu select Import CSV File
The default directory will be CSV. Select the CSV file named SamplePoints to import then select Open. Depending on the size of the CSV file it may take a few minutes to complete the import process.

Quick Start-Page 11
RA56-cATM-BLY90 Release 1.0
If you are importing a CSV file from the USB drive, click the UP button (highlighted in yellow below) until the Removable Disk (D:) is shown then select the CSV file that you want to import from the USB drive.
When the import process has completed, you will see all the ABB Bailey Blocks and their associated tags under the device name CIU and Group name.

Quick Start-Page 12
RA56-cATM-BLY90 Release 1.0
Right click on the device, CIU, and select Properties to configure options. The device configuration will be displayed. This configures the serial interface between the OPC90Server and the Bailey system. Enter a name and description for the device. In most cases the default device parameters and other selections will be ok to use. For more information on the device setup selections, see the OPC90Server help files.

Quick Start-Page 13
RA56-cATM-BLY90 Release 1.0
When you are finished with the configuration parameters select OK.

Quick Start-Page 14
RA56-cATM-BLY90 Release 1.0
When you expand the CIU-A Device you will see several Groups defined with their associated blocks.

Quick Start-Page 15
RA56-cATM-BLY90 Release 1.0
Adding a New Block You can add blocks to a group if desired. A block actually defines a tag name, tag type and address within the ABB Bailey DCS. Block names must be unique with respect to all other blocks within the current tree level. A block name can be any combination of characters except periods. It’s best to stick with alpha-numeric names for compatibility with most OPC client software. The block name is part of the OPC tag name. The block address (ABB Bailey ring, node, module and block number) must be unique with respect to all other blocks (except POLL and SPEC blocks) in the database. We’re going to add a new block under the Group named Import. Highlight the Group name Import and select the ADD menu. Then select Add New Block. Give the block the name 100DS11o1, Select the Bloc Type as DIL.
Select OK to continue. The newly created block will be displayed under the group Import. Tags created that are associated with this block will be displayed in the right window pane. This block is now linked from the OPC90 Server to the Bailey DCS system.

Quick Start-Page 16
RA56-cATM-BLY90 Release 1.0
When you are finished with the OPC90 configuration, select Save As from the File menu and give the configuration a name. For this example we have renamed the configuration Test.cfg.
Chapter 4 Configure CLX TAGS for transfer
When you have configured a block of tags within the OPC90 Server, you must also configure tags within the Control Logix where these tags can be transferred to or from. Here a UDT (User Defined Type) has been configured within the CLX controller. From the screen shot below, you will see a user defined structure that looks like the DIL block configured in the OPC90Server. Refer to Rockwell Automation user documentation for information on creating tags.
NOTE: You can also use the RSLogix 5000 CSV File Import Utiliy to import a CSV file that was created by the Rockwell Automation ABB Bailey database conversion utility mentioned earlier.

Quick Start-Page 17
RA56-cATM-BLY90 Release 1.0
Chapter 5 Configure the CTAG MASTER Refer to the cTagMaster User documentation and Help files for additional information.
Start the CTAG Master Configuration tool by double clicking on the cTagMaster Configurator icon.
You can also access the cTAG Master configuration tool by clicking on the Control Panel icon.
Click on the Configure button to start the configuration tool.
The cTAG Master control panel shows the status of the communication between the CLX processor and the OP90 Server. Communication may be stopped or started from here as well by as by clicking on the green GO button or red STOP button. NOTE: The cTAG Master Service must be stopped before you can continue with the configuration. The service may be stopped by clicking the Stop button.
Quick Start-Page 18
RA56-cATM-BLY90 Release 1.0
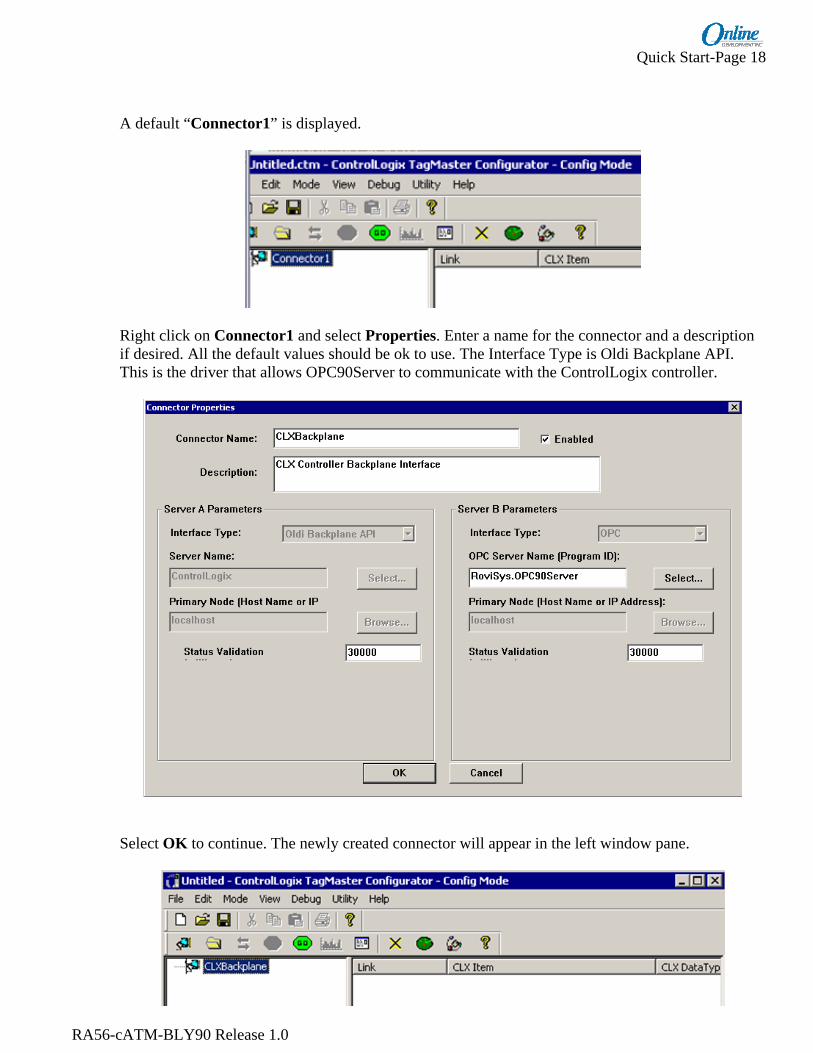
A default “Connector1” is displayed.
Right click on Connector1 and select Properties. Enter a name for the connector and a description if desired. All the default values should be ok to use. The Interface Type is Oldi Backplane API. This is the driver that allows OPC90Server to communicate with the ControlLogix controller.
Select OK to continue. The newly created connector will appear in the left window pane.

Quick Start-Page 19
RA56-cATM-BLY90 Release 1.0
Next, add a Group. From the Edit menu, select Add New Group. Enter a name for the group. You can also enter a description for the group if desired, but it is not required. You can use the default values for the other selections unless you have a reason to change them. Note the Data Flow Direction tab. This defines the direction for this tag group.
Specifies that data is read from the tags within the ControlLogix server ‘A’ of this group and written or sent to their mappings in OPC Server ‘B’ of this group. Specifies bi-direction data transfer or that data flows in both directions and is read and written from the tags within the ControlLogix server ‘A’ and written or read from their mappings in OPC Server ‘B’. The Data Flow / Data Master defined within the Tag Map definition defines which server originates the value first upon startup of runtime mode. After startup, when a value changes on either side it is sent to the other side. Specifies that data is read from the OPC items within OPC server ‘B’ of this group and then written or sent to their mappings of ControlLogix Server ‘A’ of this group. Data is not polled from Server A unless it is being viewed in monitor mode. Click OK to continue. The group DIL_READONLY_1 is now displayed under the connector CLXBackplane.
Quick Start-Page 20
RA56-cATM-BLY90 Release 1.0
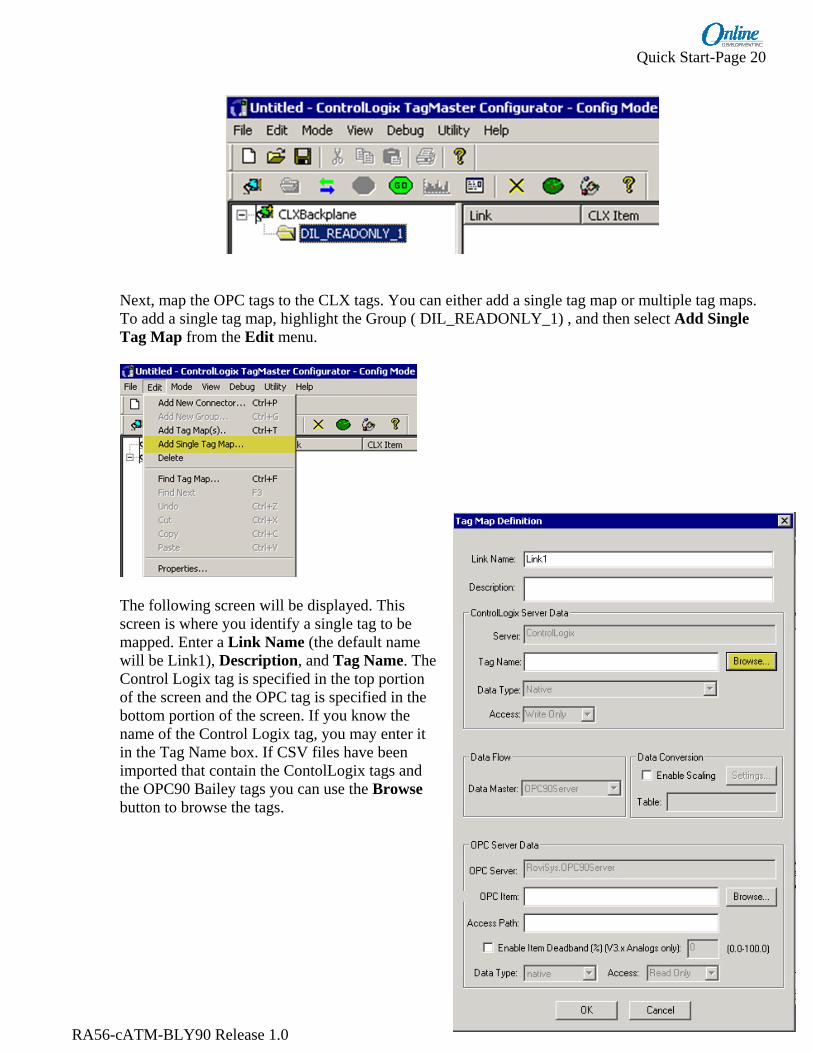
Next, map the OPC tags to the CLX tags. You can either add a single tag map or multiple tag maps. To add a single tag map, highlight the Group ( DIL_READONLY_1) , and then select Add Single Tag Map from the Edit menu.
The following screen will be displayed. This screen is where you identify a single tag to be mapped. Enter a Link Name (the default name will be Link1), Description, and Tag Name. The Control Logix tag is specified in the top portion of the screen and the OPC tag is specified in the bottom portion of the screen. If you know the name of the Control Logix tag, you may enter it in the Tag Name box. If CSV files have been imported that contain the ContolLogix tags and the OPC90 Bailey tags you can use the Browse button to browse the tags.

Quick Start-Page 21
RA56-cATM-BLY90 Release 1.0
Click on the Browse tab to browse ControlLogix tags.
Expand the Online directory to few tags. Once you have selected the ControlLogix tag, click OK.

Quick Start-Page 22
RA56-cATM-BLY90 Release 1.0
The selected tag will appear in the upper portion of the window.
From the lower portion of the window select Browse OPC90 Tags. Using the same steps, select the OPC90 tag.

Quick Start-Page 23
RA56-cATM-BLY90 Release 1.0
The linked tags will be displayed in the Tag Map Definition.
Select OK and the linked tag will be displayed as follows.
If you want to map multiple tags, select Add Tag Map(s). To use this feature you must first have imported CSV files for the ControlLogix tags and the OPC90 tags.

Quick Start-Page 24
RA56-cATM-BLY90 Release 1.0
From this screen, you can browse both the CLX tags and the OPC90 tags. You can easily map the tags by selecting a tag from one column and drag and drop to a tag in the other column that you want to map it to and then select the MAP tab. You can also just highlight a tag from each column to be mapped and then click the MAP tab.

Quick Start-Page 25
RA56-cATM-BLY90 Release 1.0
Once you have selected the tags to be mapped, the linked tags will be displayed in the right window pane which shows the CLX tag name, data type, direction, the OPC tag name, data type, etc.
When you have completed the cTAG Master configuration you must save the configuration. Click File then Save AS and give it file name. The config file will be stored with a (*.ctm) extension.

Quick Start-Page 26
RA56-cATM-BLY90 Release 1.0
Restart the cTAG Master Service by clicking on the green GO button.
To view Server Status, select Utility and Server Status.
This screen gives you status of the Backplane API as well as the OPC90 Server.

Quick Start-Page 27
RA56-cATM-BLY90 Release 1.0
Chapter 6 Using the CtagMaster CSV Import Utility You can use the CSV file import utility to import a CSV file that has been created using the Rockwell Automation file conversion utility. From the File menu select Import CSV File
Select the appropriate file and select Open

Quick Start-Page 28
RA56-cATM-BLY90 Release 1.0
Chapter 7 Using the cATMBLY90 XFER Utility
The Xfer utility is used to obtain important files associated with the operation of the cATM-BLY90 appliance. Xfer is a simple utility consisting of five buttons; Setup, Backup, Restore, Upgrade and Help.
Start the Utility Double click on the cATM-BLY90 xfer icon to run the utility. The following screen will be displayed.
Setup Option NOTE: This utility requires a formatted USB drive to be inserted into one of the two available USB ports on the cATM-BLY90 appliance. Setup defines the USBdrive, programs and file types to be included in Xfers’s backup and restore operations. A selection to just deal with newer files or always do the operations with all files can also be specified. Remember that Setup needs to be ran whenever a new USB drive is utilized that hasn’t been used by Xfer before. The first time the USB flash drive is used you must run Setup to initialize the USB drive. The following screen will be displayed. This allows you to configure the options that you want to be able to backup. Once you have selected the options, click OK.

Quick Start-Page 29
RA56-cATM-BLY90 Release 1.0
When Setup has finished, Setup updated will be displayed.
Using the Backup Utility Click on Backup to request xfer to perform its backup operation. The file types for the selected programs as defined in setup will be backed up to the USB flash drive. These files are stored under the Xfer directory created on the USB flash drive by Setup. They are organized under that directory by program name and sub-directories by file type. Once you have finished creating and testing your application you can use the Backup feature of the Xfer utility to save it. Click the Backup button to start the process. Based on the options selected during Setup, the selected files will be copied to the appropriate directories on the USB flash drive.
When the backup has finished, Backup completed will be displayed.

Quick Start-Page 30
RA56-cATM-BLY90 Release 1.0
Note: Saving the Backup to an External PC Remove the USB flash drive from the cATM-BLY90 appliance and install it into a PC where you want to save the configuration file. All of the backup files will be contained within the Xfer directory on the USB flash drive. Simply copy the Xfer directory from the USB flash to a directory of your choice on the PC.
Quick Start-Page 31
RA56-cATM-BLY90 Release 1.0
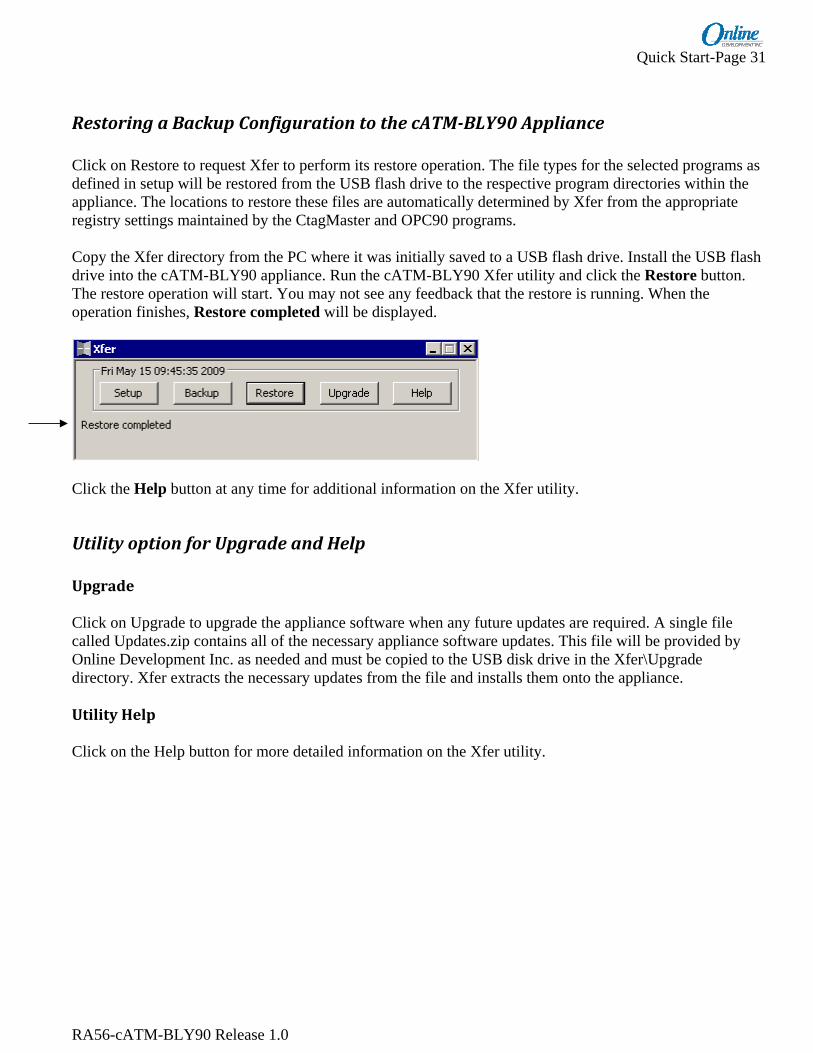
Restoring a Backup Configuration to the cATMBLY90 Appliance Click on Restore to request Xfer to perform its restore operation. The file types for the selected programs as defined in setup will be restored from the USB flash drive to the respective program directories within the appliance. The locations to restore these files are automatically determined by Xfer from the appropriate registry settings maintained by the CtagMaster and OPC90 programs. Copy the Xfer directory from the PC where it was initially saved to a USB flash drive. Install the USB flash drive into the cATM-BLY90 appliance. Run the cATM-BLY90 Xfer utility and click the Restore button. The restore operation will start. You may not see any feedback that the restore is running. When the operation finishes, Restore completed will be displayed.
Click the Help button at any time for additional information on the Xfer utility.
Utility option for Upgrade and Help Upgrade Click on Upgrade to upgrade the appliance software when any future updates are required. A single file called Updates.zip contains all of the necessary appliance software updates. This file will be provided by Online Development Inc. as needed and must be copied to the USB disk drive in the Xfer\Upgrade directory. Xfer extracts the necessary updates from the file and installs them onto the appliance.
Utility Help Click on the Help button for more detailed information on the Xfer utility.
Quick Start-Page 32
RA56-cATM-BLY90 Release 1.0
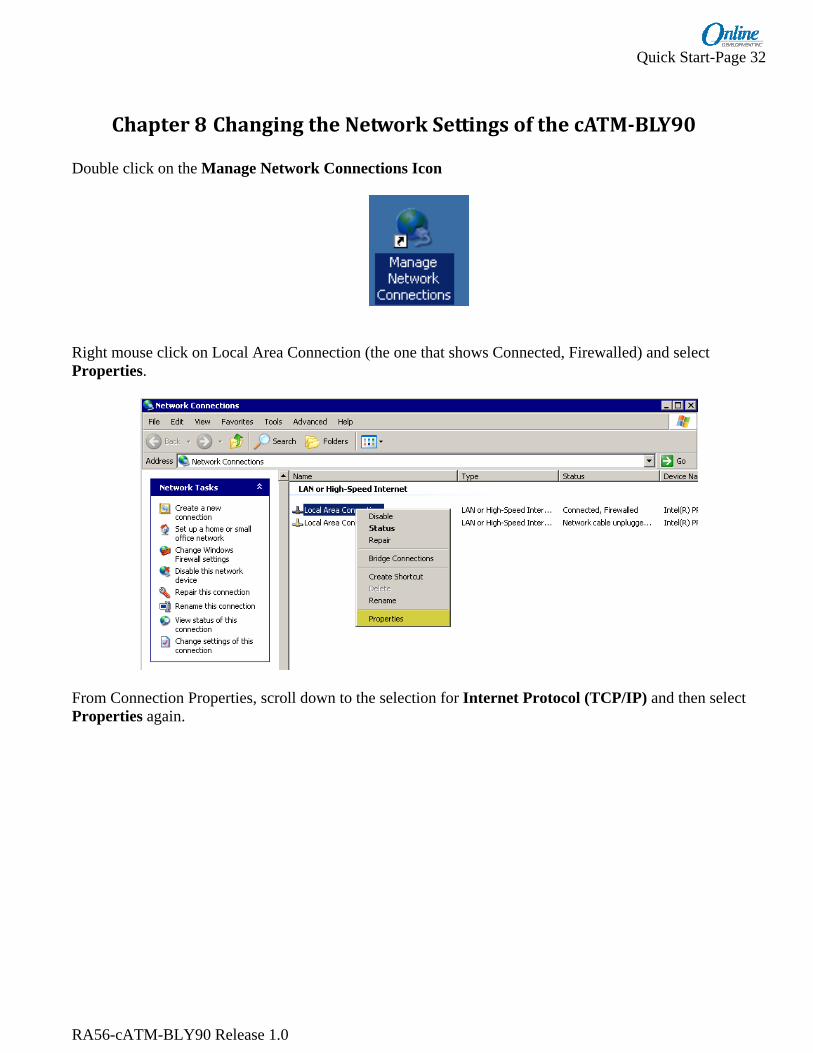
Chapter 8 Changing the Network Settings of the cATMBLY90 Double click on the Manage Network Connections Icon
Right mouse click on Local Area Connection (the one that shows Connected, Firewalled) and select Properties.
From Connection Properties, scroll down to the selection for Internet Protocol (TCP/IP) and then select Properties again.

Quick Start-Page 33
RA56-cATM-BLY90 Release 1.0
Edit the IP Address field to the desired IP Address then select OK. NOTE: The IP Address change will take effect immediately after selecting OK and the Remote Desktop connection to the appliance will be lost. Close the Remote Desktop and reconnect using the new IP Address. Remember to set your PC back to the appropriate network settings!

Quick Start-Page 34
RA56-cATM-BLY90 Release 1.0

Troubleshooting-Page 35
RA56-cATM-BLY90 Release 1.0
Chapter 9 Troubleshooting Hints
OPC90Server Troubleshooting
This section is provided to help the user identify and correct problems that may arise as a result of incorrectly setting up the OPC90 Server interface. It is provided as a general guide to allow the user to decipher normal and abnormal operation. If this does not help, OPC90 Server can be enabled to post additional error messages to OPC90 Server log files using the DEVICE block DEBUG_LOG attributes. To change these attributes right mouse click on the Device block and select or deselect Show Receive, Show Send, Show Errors and/or Show Events. Note these flags can be changed in runtime. Remember to save the configuration if these flags are to be saved. Use these DEBUG_LOG attributes to track down tough problems and discover hard to find configuration errors. Afterwards remember to disable all of its options (except Errors), since leaving them enabled can consume large amounts of disk file space.
After installing the OPC90 Server for the first time and thereafter when it is then started up in Monitor mode or when an OPC Client connects to it, the OPC90 Server DEVICE block will automatically begin talking with the Bailey interface. The startup pattern will vary based on the type of Bailey interface being utilized. The first thing you should notice is the Bailey interface serial processing card LEDs begin to sequence. Shortly thereafter you may hear the loop interface termination unit relays click on and off several times as the driver is identifying the Bailey interface type. Just prior to downloading the OPC90 Server block database to the Bailey interface, it will be restarted, and the loop interface termination unit relays will click off isolating it from the communication loop. Next you should observe the Bailey interface serial processing card LEDs sequence at a steady rate as the OPC90 Server block database is being downloaded. Upon completing the database download, the Bailey interface will be commanded on-line, at which time the loop interface termination unit relays will click on and the loop interface card LEDs begin to count loop messages. Thereafter, the Bailey interface serial processing card LEDs will sequence steadily based on the exception report poll interval setup by in the DEVICE block and individual OPC90 Server POLL blocks (when utilized). All Bailey interfaces have a series of four or eight red LEDs on the hardware module that processes serial communication and manages its database. Don't confuse this card with the module that handles the interface with the Bailey communication loop which also has a series of LEDs. An indication that communication with the BAILEY interface is occurring can be determined by looking at the serial processing card LEDs. (Hereafter, these LEDs will be referenced as Bailey interface LEDs.) The Bailey interface LEDs count commands and replies occurring between the OPC90 Server Application Station computer and Bailey interface.

Troubleshooting-Page 36
RA56-cATM-BLY90 Release 1.0
Troubleshooting-Page 37
RA56-cATM-BLY90 Release 1.0
cTAG Master Troubleshooting
Quick Setup and Troubleshooting Reference This section details how a user can quickly setup cTagMaster and diagnose common setup problems. The following checklist should be consulted if startup issues arise: Configure the desired blocks first within the OPC90 Server and then save the configuration. You will also need to setup DCOM for the OPC90 Server to run as Interactive user so only 1 copy runs at a time. (If 2 copies of the OPC90Server are running then the second copy will fail since both will require access to the same COM port) 1. Configure your cTagMaster configuration. Add a Connector, one or more groups, add the desired tag
maps for each group. 2. Place cTagMaster in runtime mode from cTMC.
Upon startup, if cTagMaster displays the message ‘Access Denied’ then verify that the user has privilege to run the program, especially when running as a service. This may require setting up the service to be setup to run under the Administrator account.
Using the Server Status dialog, in runtime if the Total Reads=0, then it is possible that the Advise subscriptions are not working correctly. If the problem cannot be corrected with one of above steps, then the Connector and OPC Server (in the worst case scenario) may need to be setup for ‘Polling’. As stated above, the advise connections will require security on the cTagMaster node to be setup such that the user account which runs the OPC Server on the remote node will have ‘permission’ to send back data to the cTagMaster node and thus to cTagMaster. This is not the same as the security setup to the Server in step #6. Since cTagMaster is not an OPC Server, it cannot be setup with DCOM to enable such permission.
As a quick reference, here are some reasons that cTagMaster may fail to connect to the OPC Server or get data:
a. The OPC Server database has not been setup correctly.
b. The cTagMaster Group’s ‘Active Group’ checkbox was unchecked (disabled)
meaning no data will be received or sent for that group.

Datasheet-Page 38
RA56-cATM-BLY90 Release 1.0
Chapter 10 Datasheet

Datasheet-Page 39
RA56-cATM-BLY90 Release 1.0