
Getting Started - Simsol · Getting Started. After successfully installing the Simsol Software, you...
28
1
Transcript of Getting Started - Simsol · Getting Started. After successfully installing the Simsol Software, you...

1
2
Getting Started
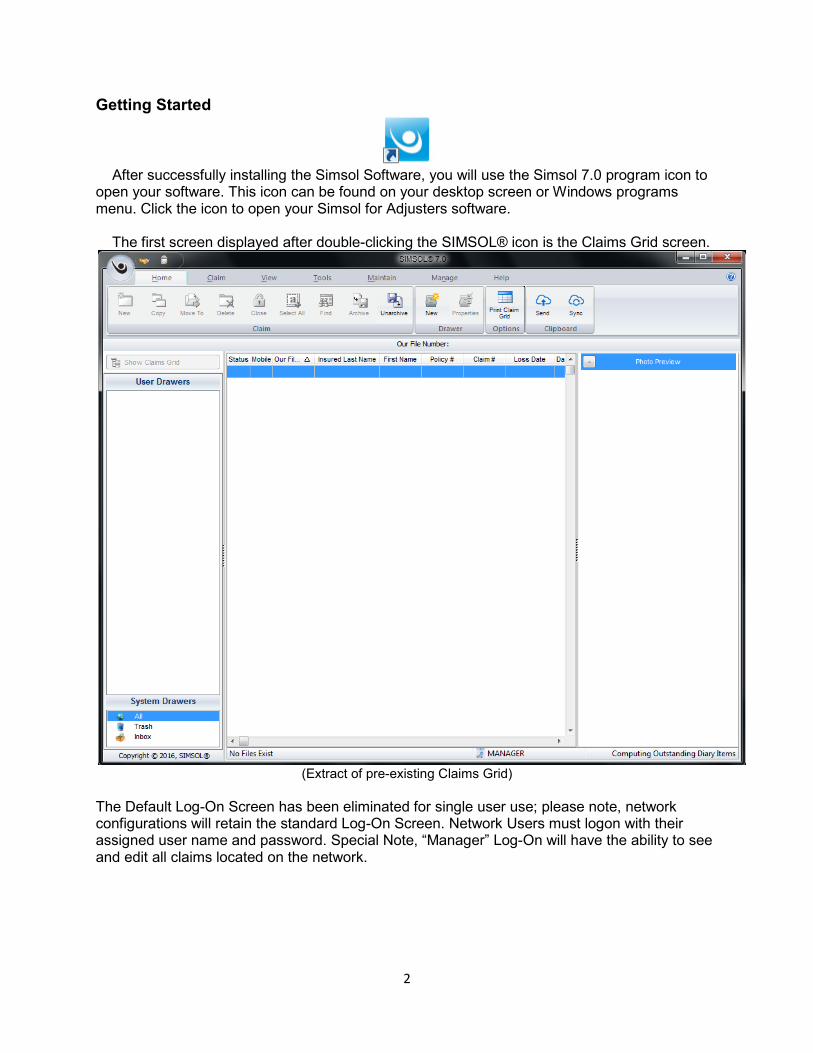
After successfully installing the Simsol Software, you will use the Simsol 7.0 program icon to open your software. This icon can be found on your desktop screen or Windows programs menu. Click the icon to open your Simsol for Adjusters software. The first screen displayed after double-clicking the SIMSOL® icon is the Claims Grid screen.
(Extract of pre-existing Claims Grid)
The Default Log-On Screen has been eliminated for single user use; please note, network configurations will retain the standard Log-On Screen. Network Users must logon with their assigned user name and password. Special Note, “Manager” Log-On will have the ability to see and edit all claims located on the network.

3
(Network Users Only)
Now that you have logged into your Simsol for Adjusters software, you will be viewing the main screen of the program also known as “the claim grid”. As you start to create and compile more claims, they will be displayed on this screen for easy access.

4
The Main Screen After logging in, the main screen “claims grid” of the program is displayed.
5
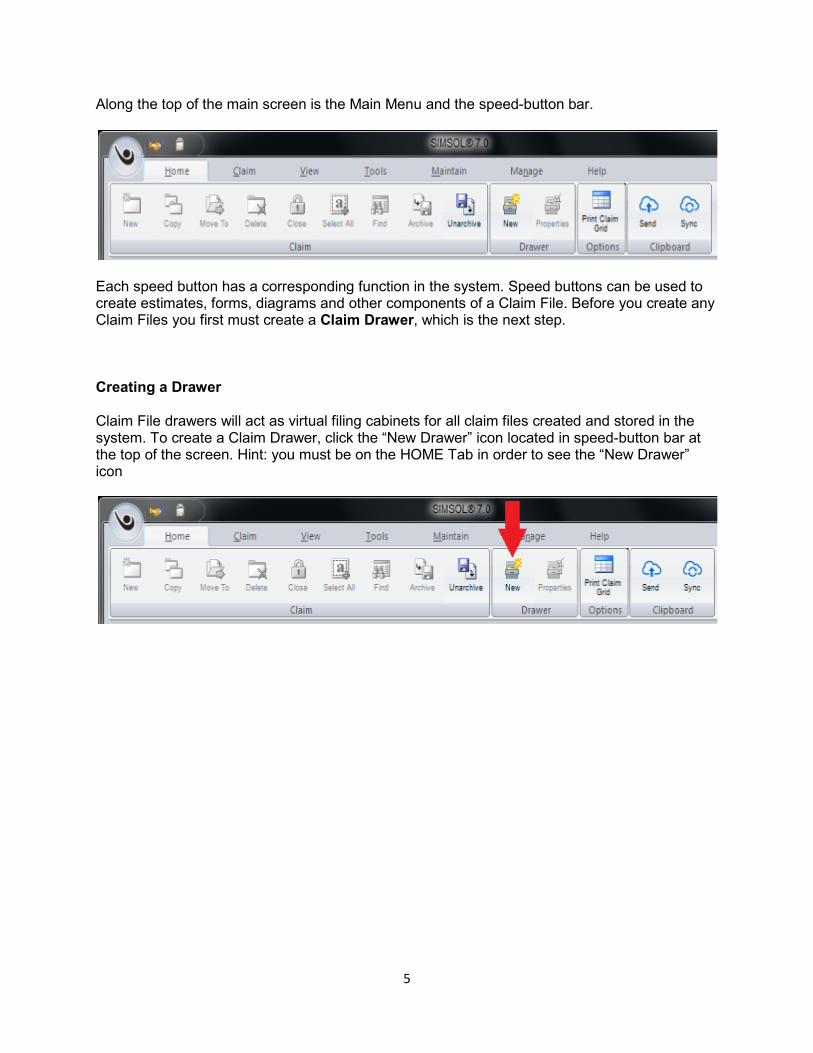
Along the top of the main screen is the Main Menu and the speed-button bar.
Each speed button has a corresponding function in the system. Speed buttons can be used to create estimates, forms, diagrams and other components of a Claim File. Before you create any Claim Files you first must create a Claim Drawer, which is the next step. Creating a Drawer Claim File drawers will act as virtual filing cabinets for all claim files created and stored in the system. To create a Claim Drawer, click the “New Drawer” icon located in speed-button bar at the top of the screen. Hint: you must be on the HOME Tab in order to see the “New Drawer” icon
6
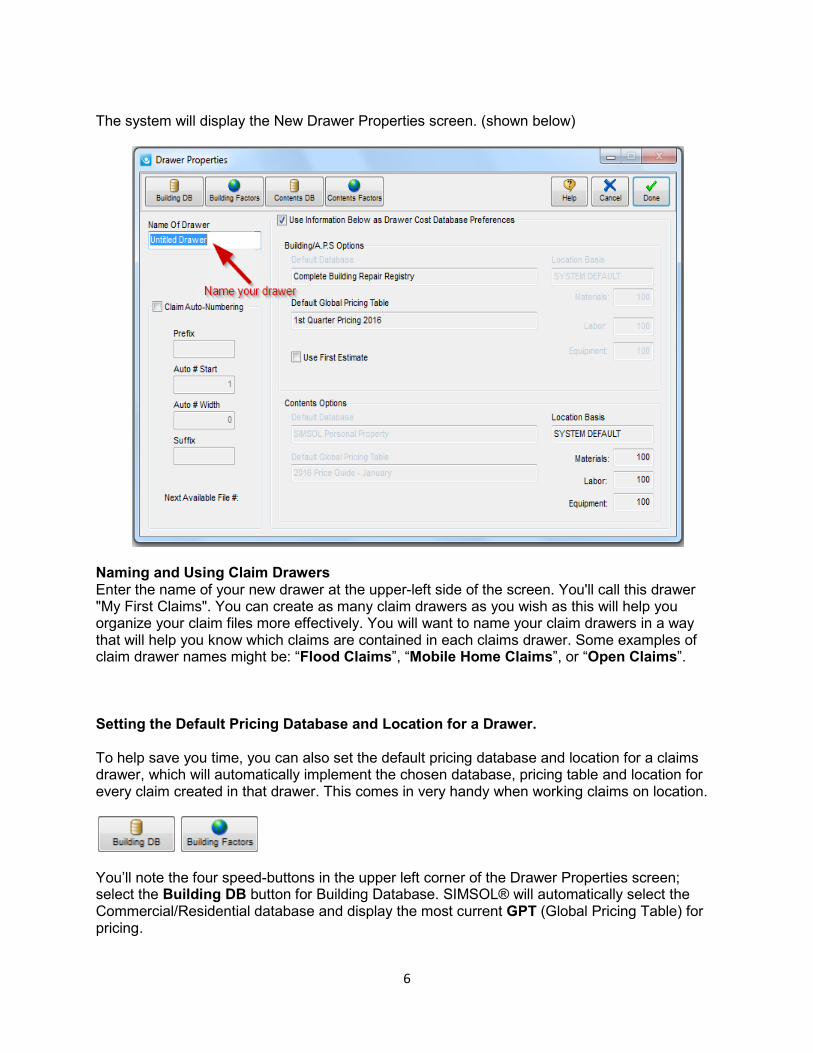
The system will display the New Drawer Properties screen. (shown below)
Naming and Using Claim Drawers Enter the name of your new drawer at the upper-left side of the screen. You'll call this drawer "My First Claims". You can create as many claim drawers as you wish as this will help you organize your claim files more effectively. You will want to name your claim drawers in a way that will help you know which claims are contained in each claims drawer. Some examples of claim drawer names might be: “Flood Claims”, “Mobile Home Claims”, or “Open Claims”. Setting the Default Pricing Database and Location for a Drawer. To help save you time, you can also set the default pricing database and location for a claims drawer, which will automatically implement the chosen database, pricing table and location for every claim created in that drawer. This comes in very handy when working claims on location.
You’ll note the four speed-buttons in the upper left corner of the Drawer Properties screen; select the Building DB button for Building Database. SIMSOL® will automatically select the Commercial/Residential database and display the most current GPT (Global Pricing Table) for pricing.

7
Click Done and SIMSOL® automatically selects the next button Building Factors for Building Location Factors.
Click Done and then Yes in the next window. Repeat this with the Contents DB (Contents database) and Contents LF (Contents Location Factors).
Now click Done to save the new information. The Claim Drawer name will appear in the User Drawers Section as seen in the Claims Grid (shown above). You can create as many Claims Drawers as necessary to better organize your Claim Files. Now that you have successfully created a claim drawer, you are ready to create a new claim! Creating a Claim
To Create a New Claim File, click the New Claim speed-button located in the top left corner of the screen, HINT: you must be on the HOME tab in order to see the New Claim icon.

8
Claim Setup Wizard The New Claim Set-up Wizard is displayed after clicking the New Claim speed-button. The first screen displayed offers us some choices for the type of claim you're about to write.
(Excerpt of Claim Setup Wizard)
Let's create a New Homeowners' Claim File. After you select the Claim File type, you are prompted for a file name. You'll call this Claim HO-12345.
Now click OK to begin entering information into the New Claim Wizard.

9
Using the Wizard The first screen of the Homeowner's Claim Wizard contains the Loss Information for all of the important parties involved with the claim. Fill out as much information as possible on this screen because much of the information found here is used elsewhere in the claim.
(Claims Setup Wizard Screen 1)
The first wizard screen contains some fields that access the information stored in the contact manager. You may enter information in these fields by simply typing in the information or, if the person or entity is in your system's contact manager, you may click on the drop down arrow button to display a list of available contacts. Simply click on the contact's listing to enter the information into the claim. Use the Tab key to cycle through the fields and fill out the rest of the information. HINT: Do not use Enter key to fill out field boxes. When all information is filled out you click Next or Enter key to advance to the second screen of the Homeowner's Claim Wizard.

10
Policy Information The second screen of the Wizard contains fields for the Policy Information. Enter a date for the “Policy Start” and press the Tab key. The system automatically fills out a date one year after for the Policy End date. You may also fill out the type of policy, deductible and coverage limits for the policy. Be sure to fill out the amount for each coverage. This is how the SIMSOL® wizard automatically creates the individual estimates.
(Claims Setup Wizard Screen 2)
After you have entered all relevant policy information, click Next or press the Enter key to advance to the third screen in the Homeowner’s Claim Wizard.

11
Estimate Information Screen
(Claims Setup Wizard Screen 3)
The third screen contains the factors for the claim. This is where the Databases, Global Pricing Tables, and Location Factors are displayed. *Note that the system has automatically selected the Database and Global Pricing Table that was set in the Drawer Properties when you created the drawer. Use the drop down buttons or the speed-buttons to change the Database, GPT or Location Factors. *Note that the Location Factors have been automatically selected based on the first three digits of the loss location zip code. From the Estimate Information screen you may also enter or select a pre-defined DEPRECIATION TABLE. Since you have not set up any depreciation tables in the system, you are done with this screen. Click Next to advance to the final screen of the New Claim Set-up Wizard.
12
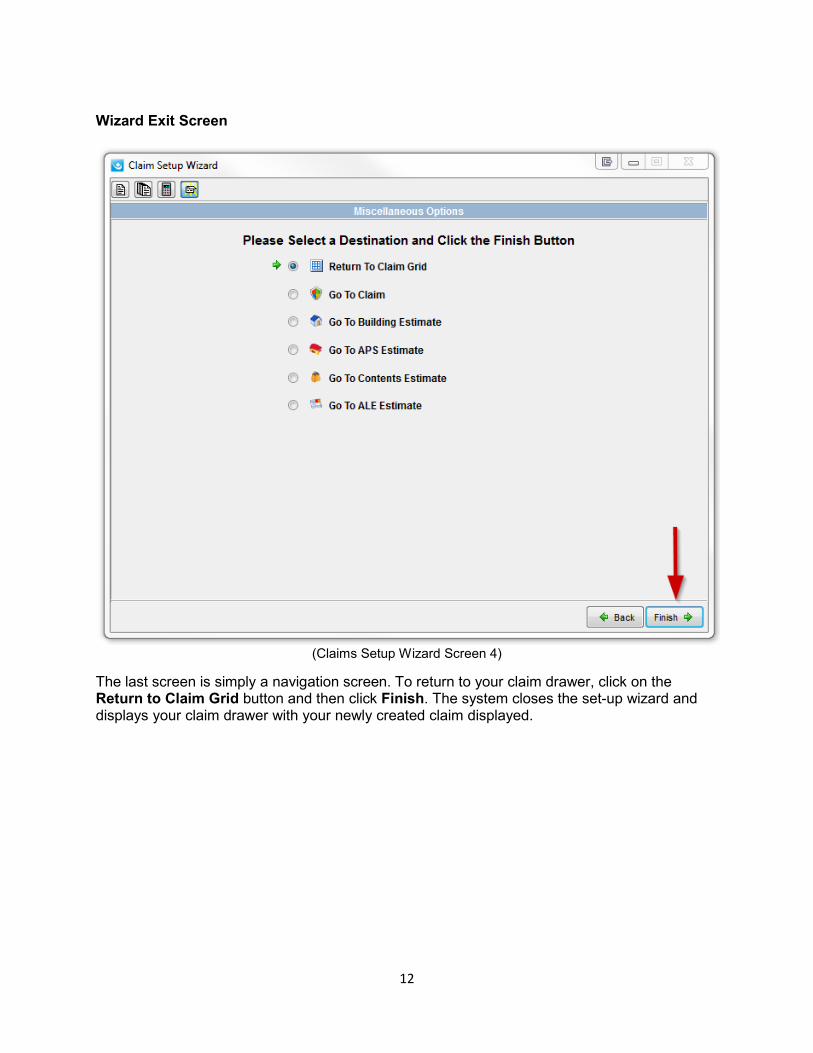
Wizard Exit Screen
(Claims Setup Wizard Screen 4)
The last screen is simply a navigation screen. To return to your claim drawer, click on the Return to Claim Grid button and then click Finish. The system closes the set-up wizard and displays your claim drawer with your newly created claim displayed.

13
Opening your Claim Congratulations, you have just created your first Simsol claim file! Now you are ready to dive in to your claim and start building your estimates, writing reports, drawing diagrams, inserting digital pictures and much more. To get started, you can either double click the claim we’ve just created in the claims grid or click the “Show Highlighted Claim File” button found on the left side of the main screen.
(Claims Grid)
The Claim Enclosure Tree You are now inside the HO-12345 file that you have created. You will notice the many different components to your claim listed on the left side of the screen. This panel is called the Claim Enclosure Tree. The Claim Enclosure Tree has 13 components. Each component will expand vertically to display digital workspaces or documents that you have completed within each component.

14
(Loss Information Screen)
The 13 major components of the Claim Enclosure Tree are: • Claim Data • Forms • Building Estimate • Sketches\Diagrams • A.P.S. Estimate (Appurtenant Private
Structure) • Digital Photos
• Contents Estimate • Scanned Documents (versions prior to 5.2) • A.L.E. Estimate (Additional Living Expenses) • Attached Documents • SQFT Valuation (Square Foot Valuation) • Notebooks • Reports
15
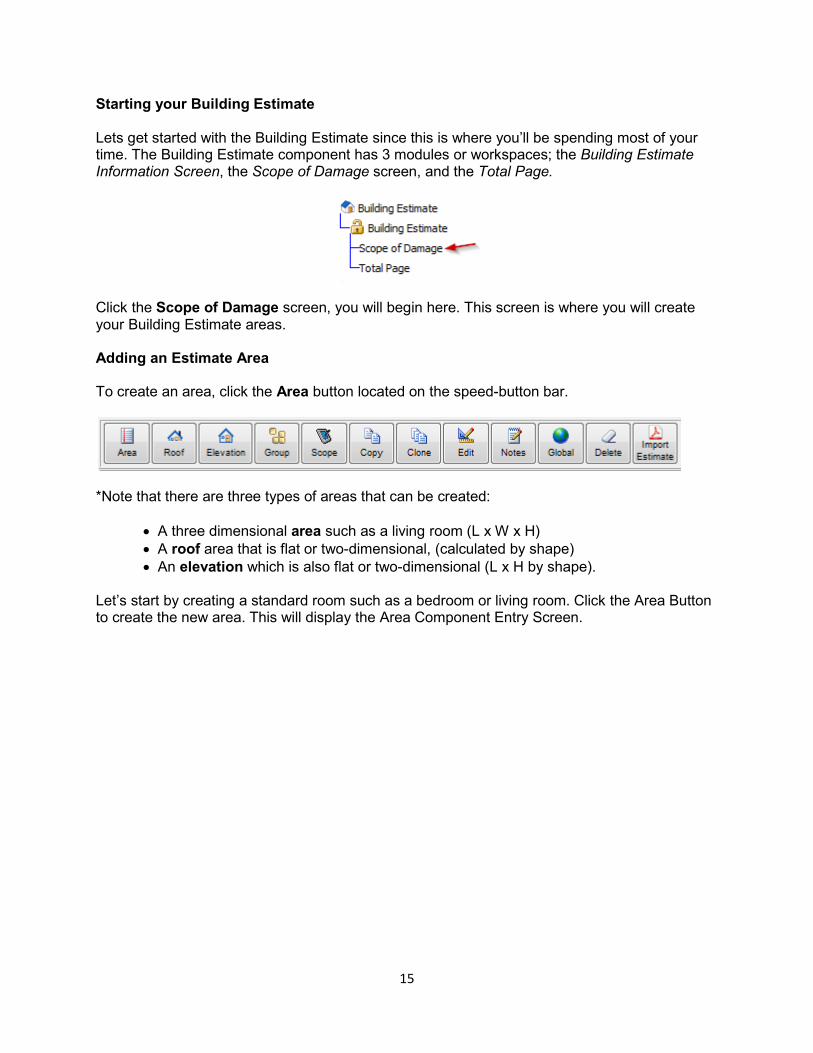
Starting your Building Estimate Lets get started with the Building Estimate since this is where you’ll be spending most of your time. The Building Estimate component has 3 modules or workspaces; the Building Estimate Information Screen, the Scope of Damage screen, and the Total Page.
Click the Scope of Damage screen, you will begin here. This screen is where you will create your Building Estimate areas. Adding an Estimate Area To create an area, click the Area button located on the speed-button bar.
*Note that there are three types of areas that can be created:
• A three dimensional area such as a living room (L x W x H) • A roof area that is flat or two-dimensional, (calculated by shape) • An elevation which is also flat or two-dimensional (L x H by shape).
Let’s start by creating a standard room such as a bedroom or living room. Click the Area Button to create the new area. This will display the Area Component Entry Screen.

16
Area Component Entry
(Area Component Screen)
You may either type in the name of the area or you may select the name from the dropdown list. *Note that SIMSOL® automatically fills in the name of the area as you type. Once you've named the area, press TAB to begin filling out the Main Dimensions of the Area. Dimensions may be entered by typing in a whole number for a dimension with no "inches". If both feet and inches are required type the number of feet, press the space bar once, then type the number of inches. *For instance, for a measurement of 18 feet 3 inches type 18 (SPACE) 3. Press the TAB key after the dimensions are entered to confirm the entry and move to the next entry field. As you can see, the system has automatically entered the feet and inches symbols to your measurements. To enter an offset, closet, or other area component, click the corresponding speed-button at the top of the screen. Dimensions are entered for components the same way as in the Main Area. We're done with this area now. Click Done to save the area and it's offset component.

17
You will now be returned to the Scope of Damage screen and your newly created area will be displayed. Once your area has been created, you can continue creating areas until you have completed all the rooms that will need repair items. Areas can also be copied or cloned (clone is two areas or more) by using the “Copy” and “Clone” speed buttons found at in the speed bar. Deleting an area can be done by either “right clicking” on the area you wish to delete and selecting the delete option, or by highlighting the desired area with a single click and then selecting the “Delete” speed-button found on the speed-button bar. The “Group” button allows you to combine multiple areas into a single group for better organization. This is a very handy tool when writing an estimate on multi-family properties, town homes, or apartment complexes. If you decide that you need to change the dimensions of a room or area that you have already created, highlight the desired area by single clicking the room and then select the “Edit” button in the speed button menu. This will display the “area component entry” screen once again which allows you to alter or edit dimensions, closets, offsets, doors, etc.
18
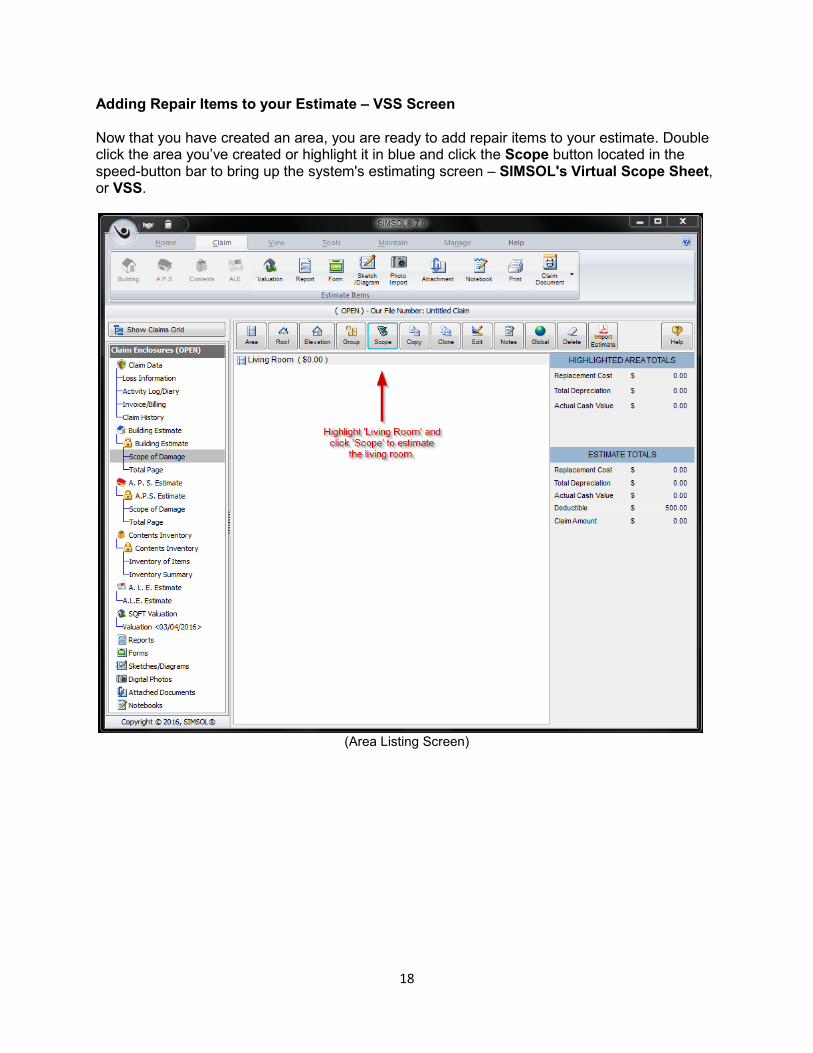
Adding Repair Items to your Estimate – VSS Screen Now that you have created an area, you are ready to add repair items to your estimate. Double click the area you’ve created or highlight it in blue and click the Scope button located in the speed-button bar to bring up the system's estimating screen – SIMSOL's Virtual Scope Sheet, or VSS.
(Area Listing Screen)

19
The Virtual Scope Sheet (VSS) The VSS screen is comprised of six primary sections. The speed-button bar is located along the top of the screen, the Category Listing section is located on the left of the VSS, and the Repair Item Database and Scopes are located in the center section of the screen. Along the bottom of the VSS is the Mini-Override Screen, which displays estimate repair items and their details as repair items are added to your estimate. The Mini-Override Screen allows you to quickly make changes to basic information for each repair item.
(VSS - Screen)
Two other important sections of the VSS are located on the right side of the screen. These sections can display different bits of estimate information based on the preferences of the user. The top drop down list contains options for viewing additional information for the repair item currently highlighted in the center section of the VSS. Your options include More Detail(items on the subsequent database level for the currently highlighted repair item), a listing of the available Scopes for the repair item, Claim Data for the current file, Spec Information (specifications) for the available scopes for the repair item and the SIMSOL® Graphics Search screen.

20
For your first estimate, make sure this is set to the “Scopes” option.
The bottom-right drop-down contains options for the type of estimate totals to be displayed on the VSS. Users have an option to display either Area Totals which displays only the totals for the current area, Estimate Totals which displays totals for the entire estimate or Estimate Trade Totals which displays Trade breakdown totals for the entire estimate. Entering Estimate Repair Items
(VSS - Screen)

21
Entering estimate repair items in the VSS is done by first selecting the appropriate category from the Categories Listing. The Repair items and scope numbers for the corresponding category are then displayed in the center of the screen. Let's find the repair item "Vinyl-Clad Wall Drywall". You first click the category listing on the left "Drywall Items". The system then displays all wall related repair items contained in the database. To select a wall-related repair item, simply click the appropriate repair item description and then click the corresponding scope number. Let's select Vinyl-Clad Wall Drywall and scope number 3 for REMOVE AND REPLACE. Clicking the number 3 turns the scope BLUE and adds the single repair item "Remove and Replace Vinyl-Clad Wall Drywall" into your estimate. You may select multiple scopes for a single repair item. For example, clicking on the “Mouldings & Trim” category displays the “Base Moulding” repair item. Let's say the estimate calls for the removal, replacement and painting of the “Base Moulding”. That's a total of 3 scopes for the “Base Moulding repair” item. First select “Base Moulding”, and then click on scopes “1” for remove, “2” for replace and “7” for paint.
Deleting an item is just as simple. Click on the repair item name and the BLUE scope for the corresponding item. The scope returns to the original color and the item is removed from the estimate. In our example, let's return to the “Wall Gypsum Drywall” item and delete scope 3. As you can see, clicking on the now BLUE scope 3, turns it back to its original color and removes the "Vinyl-Clad Wall Drywall" item from the Mini-Override section of the VSS. Clicking on the scope numbers acts just like a toggle switch, each click either enters an item that is not currently in the estimate, or deletes an item that has already been selected.

22
Changing Item Costs Sometimes a repair item's cost is not exactly what you want it to be, and needs to be changed. To change a unit cost on the fly, double-click the Unit Cost Field in the Mini-Override window located at the bottom of the screen. The Unit Cost is then highlighted; enter the new Unit Cost and press tab to accept the amount. The new amount is displayed in RED, indicating the override.
(VSS – Mini Override Screen)
Changing Item Quantities Most item quantities are calculated automatically by the system based on the dimensions entered in the Scope of Damage / Area Listing Screen. Sometimes these quantities must be changed. To change a quantity, double-click the Quantity Field in the Mini-Override window located at the bottom of the screen. The Item's Quantity is highlighted; enter the new Quantity and press TAB to accept the new quantity. The new quantity is displayed in RED, indicating the quantity has been changed. The quantity can also be changed by selecting a specific amount in the Area % and Height fields using the drop down button, or by typing an amount in the fields. When you are finished entering scopes click on the Done button at the right end of the speed-button row at the top of the VSS.
23
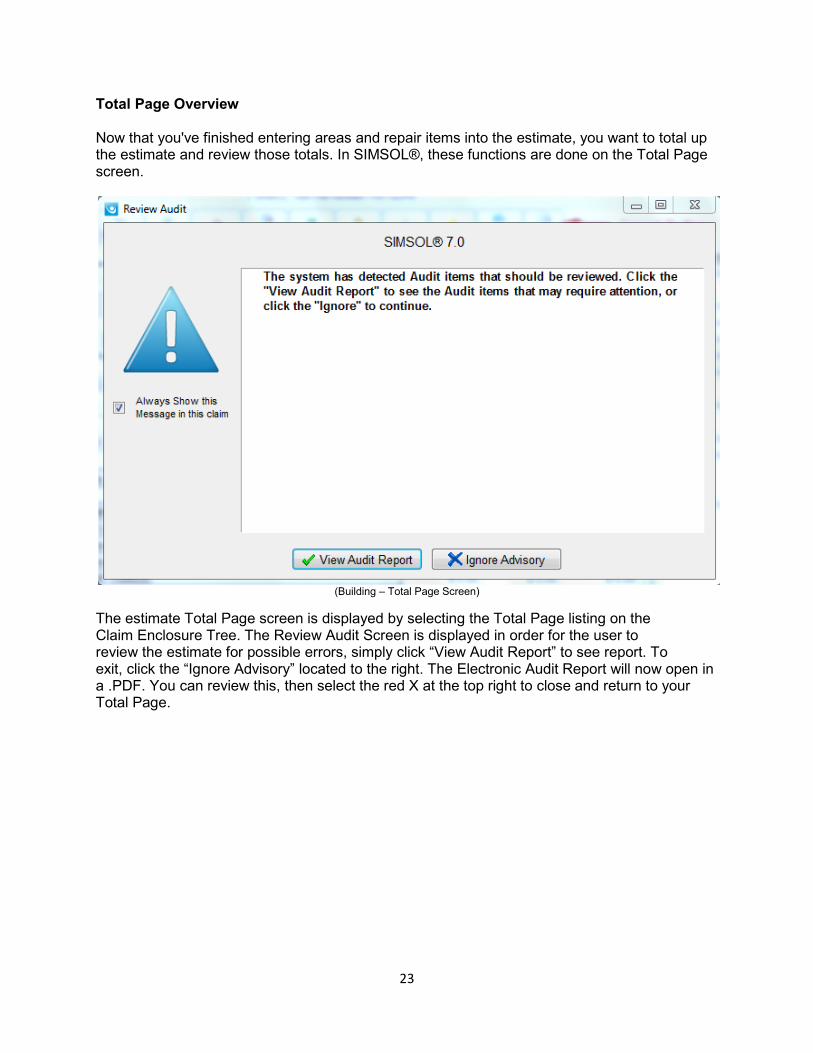
Total Page Overview Now that you've finished entering areas and repair items into the estimate, you want to total up the estimate and review those totals. In SIMSOL®, these functions are done on the Total Page screen.
(Building – Total Page Screen)
The estimate Total Page screen is displayed by selecting the Total Page listing on the Claim Enclosure Tree. The Review Audit Screen is displayed in order for the user to review the estimate for possible errors, simply click “View Audit Report” to see report. To exit, click the “Ignore Advisory” located to the right. The Electronic Audit Report will now open in a .PDF. You can review this, then select the red X at the top right to close and return to your Total Page.
24
(Building – Total Page)
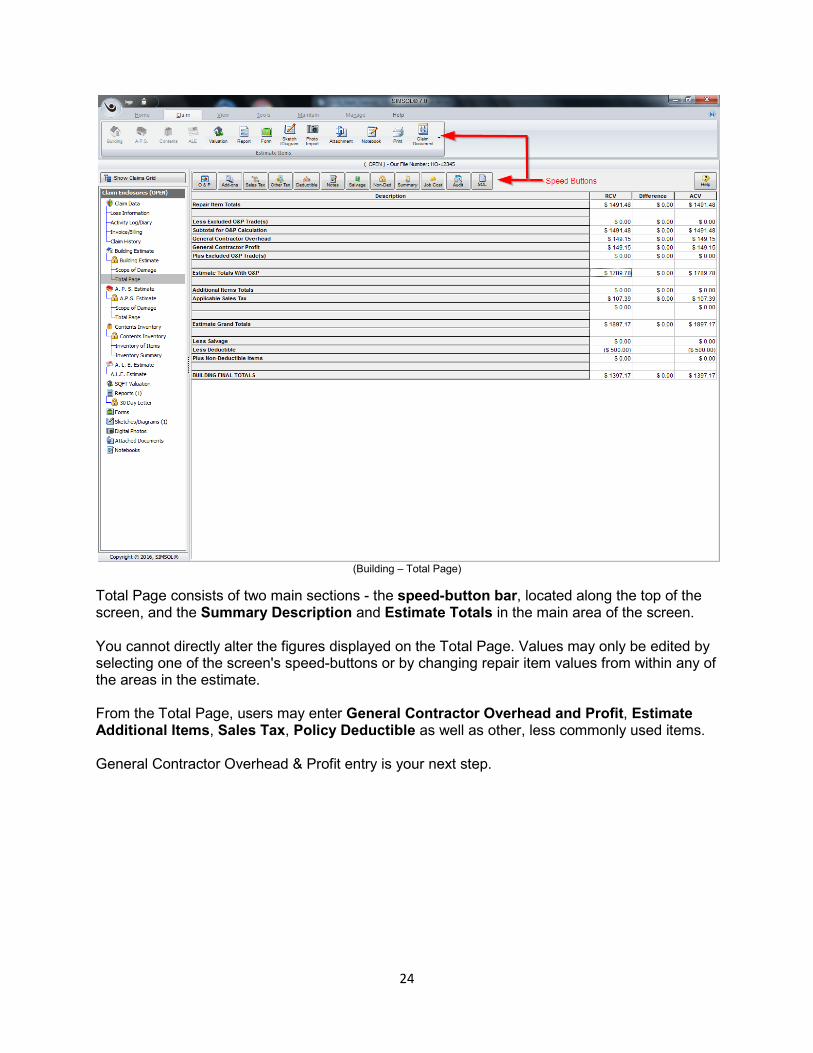
Total Page consists of two main sections - the speed-button bar, located along the top of the screen, and the Summary Description and Estimate Totals in the main area of the screen. You cannot directly alter the figures displayed on the Total Page. Values may only be edited by selecting one of the screen's speed-buttons or by changing repair item values from within any of the areas in the estimate. From the Total Page, users may enter General Contractor Overhead and Profit, Estimate Additional Items, Sales Tax, Policy Deductible as well as other, less commonly used items. General Contractor Overhead & Profit entry is your next step.

25
Entering Contractor O&P
To enter Contractor Overhead and Profit from the Total Page, begin by clicking on the O&P speed button. The system displays the Overhead and Profit Work Screen.

26
Now select the checkbox next to Variable Overhead and Profit and enter the amount as a whole percent for our Overhead and Profit. In our example you are entering 10% for Overhead and another 10% for Profit. If you want to subtotal the estimate before the 10% profit is calculated, place a bullet in the "Percentage of RCV & ACV". The system calculates the Overhead and Profit Totals and displays them on the Total Page. You are also able to remove trades from the calculation of Overhead and Profit. Let’s say that in our estimate you know that the insured is going to do the painting himself. You want to remove the estimate’s subtotal for all painting before you do the calculation of Overhead and Profit. To remove an item’s trade or subtrade figures from the calculation of Overhead and Profit, you first find the Trade name and double-click on the Trade name to display the sub-trades. You then select the sub-trade name and click the Right Arrow button to send it to the list of “Trades Excluded from O&P.” The item is still in the estimate, but now you’re not paying Overhead and Profit on it. When you’ve got the appropriate amounts entered and any trades excluded, click ‘Done’ to add the amounts to the estimate. Entering Sales Tax Now you’re going to add Sales Tax to your Estimate. This is done from the Total Page by first selecting the “Sales Tax” speed button and displaying the Sales Tax Calculator.

27
In our example, you only want to apply sales tax to the Material costs within the estimate, so you will uncheck every option but the Material Totals. Let’s use a sales tax percentage of 6%. You click on the field asking us for a Sales Tax rate and type in 6. You then click ‘Done’ to add the sales tax amount to our estimate. Printing an Estimate Click the “Print” speed button located at the very top of the screen under the Home Tab.
After clicking the print speed button, the system displays the Global Print Screen. The Global Print Screen gives you the option of printing one item or multiple items at one time. Simply select the item to print from the Available Print Items list and send it to the Selected Print Items list by clicking on the right arrow in the center. Multiple items can be selected and sent to be printed using the right arrow. After an item is selected and sent to the Selected Print Items list, choose the Print Options for each selected print item by checking the appropriate boxes in the right panel. For the Building Estimate, General Options are located near the top of the Print Options screen, followed by the Estimate Cover Page options, Estimate Body printing options, Total Page, and Appendices. Print routines can be saved as a template for use later or in other claims. Use the New button in the Print Group Templates pane in the lower left.

28
When all items for the print have been selected and options chosen for each, click the Print speed button located in the top left corner. The system displays the Report Setup window allowing you to print or preview the estimate; or you can send it to a PDF file (Adobe Acrobat® format) for e-mailing.
(Report Setup Screen)
To generate a PDF document, select the PDF option, then click the “Save As” button to the immediate right of the PDF option. Designate where you would like to store this PDF file, enter a file name, and click “Save”. This will return you to the Report Setup screen, where you will click “OK” to create the PDF file. Need More Help? You've gone over the basic steps on how to write and print a Building Estimate using the SIMSOL® for ADJUSTERS software. The APS (Appurtenant Private Structure) and Contents Inventory Estimators are very similar to the Building Estimator and are, therefore, not discussed in this Getting Started Tutorial. We have also not discussed other program modules found in SIMSOL® for ADJUSTERS such as the diagramming or digital photo module. Please contact your SIMSOL® Tech Support for any questions you may have. Check the SIMSOL® web site (www.simsol.com) for training workshop schedules and locations or call our Director of Training to schedule group workshops in your area.


![Skaffold - storage.googleapis.com · [getting-started getting-started] Hello world! [getting-started getting-started] Hello world! [getting-started getting-started] Hello world! 5.](https://static.fdocuments.in/doc/165x107/5ec939f2a76a033f091c5ac7/skaffold-getting-started-getting-started-hello-world-getting-started-getting-started.jpg)


