
Getting Started GateManager PREMIUM Domain...
27
Getting Started GateManager PREMIUM Domain Administration This document helps you get started with Secomea’s hosted GateManager in relation to the GateManager 5 Domain Administration. This guide assumes that you have worked with the GateManager FREE BASIC start package and have ordered the GateManager PREMIUM up- grade (Secomea part number 26473), and subsequently had your GateManager administrator account upgraded with Domain Administration features. This document does not explain all the features and possibilities of the GateManager Domain Administrator, but only the more commonly used fea- tures for administering SiteManagers and LinkManagers. Version: 2.2, March 2015
-
Upload
nguyentram -
Category
Documents
-
view
240 -
download
4
Transcript of Getting Started GateManager PREMIUM Domain...
Getting Started GateManager PREMIUM Domain Administration
This document helps you get started with Secomea’s hosted GateManager in relation to the GateManager 5 Domain Administration.
This guide assumes that you have worked with the GateManager FREE BASIC start package and have ordered the GateManager PREMIUM up-grade (Secomea part number 26473), and subsequently had your GateManager administrator account upgraded with Domain Administration features.
This document does not explain all the features and possibilities of the GateManager Domain Administrator, but only the more commonly used fea-tures for administering SiteManagers and LinkManagers.
Version: 2.2, March 2015

Getting Started, GateManager PREMIUM Domain Administration Page 2 of 27
Table of Contents
1. GateManager Administrator GUI FAQ 3
2. First time login to the GateManager WEB GUI 4
3. SiteManager configuration backup 6
4. Accessing the Web GUI of a SiteManager 7
5. Accessing the Web GUI of a LinkManager 9
6. Organize equipment in domains and provide LinkManager access to specific equipment 10
6.1. Create new domains and move device agents to them 10
6.2. Create a domain to hold LinkManager accounts 12
6.3. Grant domain access to LinkManagers using “Joined Domains” 15
7. Understanding Audit logs 17
8. Working with Alerts 18
8.1. Generally about Alerts 18
8.2. Example of a FAILED Alert (aka. Disconnect Alert) 19
8.3. Example of a CONNECTED Alert for selected appliances 19
9. Working with Actions 21
9.1. Upgrade firmware on multiple appliances: 21
10. Combining Alerts and Actions 23
11. Working with the Replace Appliance function 25
Appendix A, Supplementary publications 26
Notices 27

Getting Started, GateManager5 PREMIUM Domain Administration Page 3 of 27
1. GateManager Administrator GUI FAQ Q: Can any browser be used for accessing the GateManager administrator GUI?
A: Almost. The GateManager administrator GUI is using advanced Java script, which should be supported by most web browsers. We recommend Google Chrome, Mozilla Firefox, Apple Safari (for Apple OS). Microsoft Internet Explor-er is not recommended due to slow and flawed processing of Java script. How-ever, IE 9-11 should work, while IE8 will not. _______________
Q: Can I use my tablet or smart phone?
A: Yes. For Apple iPad and iPhone you may need to change your Administrator account to use user name and password only, since it may not be possible to store the x509 certificate onto the device. For newer Android based devices such as Samsung, you can store the certificate on the device. Note that drag’n’drop by default is disabled when GateManager detects a browser on an Android or iOS platform in order to prevent unintended reorganizing of contents. This can, however, be enabled under the My Account menu and is stored in a local cookie locally on the PC. _______________
Q: Can I load the x509 certificate into my browser, so I do not have to browse for it each time I login?
A: Yes. GateManager 5 uses a cookie to remember which file was used for the last login. _______________
Q: Can GateManager administrators at the same level change or delete each other’s accounts?
A: Yes. We have chosen to allow this by design, in order to let administrators help each other in case a password is forgotten. If you need to have an overall administrator, you can decide to create a sub-domain structure in which you create additional administrator accounts, and then have the initial administrator account in the “root-domain”. _______________
Q: I already have a GateManager FREE BASIC account. Do I need a new login, for my PREMIUM account?
A: No, we will typically just upgrade your account profile on the server. Next time you login you will notice that you have all the GateManager Domain admin-istrator features applicable to the GateManager PREMIUM account. _______________

Getting Started, GateManager PREMIUM Domain Administration Page 4 of 27
2. First time login to the GateManager WEB GUI 1. When the administrator account was initially created for you, an email was
automatically sent to you. It would look like this:
If the account was defined to use two factor security with x509 certificate, the email will include the certificate as attachment. Save the certificate on your PC in e.g. the “My Documents” folder.
The email will include a link to the GateManager’s DNS name and/or IP address. Click the link to connect to the GateManager. Bookmark the link in your browser.
The email is sent with the GateManager server as sender, while the name in the greetings section indicates the GateManager administrator ac-count that created your account. If you have not been notified about the password associated with your account, you will need to contact this per-son.

Getting Started, GateManager PREMIUM Domain Administration Page 5 of 27
2. Follow the link in the email to open the GateManager login screen, and browse for the certificate you just saved.
Note: The GateManager administrator portal requires minimum MS In-ternet Explorer 9, Apple Safari, Firefox or Google Chrome.
3. In your very first login, you will see an empty tree. You should consider changing your password under My Account. Note that this will make the GateManager server issue a new email with a new certificate. Your existing certificate will subsequently be invalidated.

Getting Started, GateManager PREMIUM Domain Administration Page 6 of 27
4. All items are as default displayed in the tree view.
In order to hide items in the tree view, you can click on the icons above the tree. When an icon has a blue background it means the item is activated and the associated objects will be shown in the tree.
The icon mouse-over message will indicate the function of an item.
The settings of the icons will be saved in a cookie on your PC and your tree-view will be restored when you login again.
This will allow you to customize your favorite view according to the functions you use most often.
3. SiteManager configuration backup With GateManager 5 you do not need to setup configuration backup.
When a change is made to the SiteManager configuration, the GateManager server will automatically make a new backup of the configuration.
You can view the configuration by placing the cursor on a SiteManager and se-lect the Backup tab:
The GateManager will always store the 3 most recent configurations and over-write the oldest. If you wish to maintain a particular configuration, you can select the Lock function, which will prevent the configuration from being overwritten.
A useful feature is that you can use the scale symbol to compare differences between two configuration backups.

Getting Started, GateManager PREMIUM Domain Administration Page 7 of 27
4. Accessing the Web GUI of a SiteManager 1. A SiteManager that has not been managed via the GateManager adminis-
trator GUI before will be marked with a red exclamation mark (!). Before you can connect to the SiteManager’s web GUI you need to attach it to the GateManager.
You can either right-click the SiteManager and select Attach, or select At-tach here in the Appliance tab.
2. First time you select the SiteManager GUI button for a given device, you will be met with a browser message saying that the certificate of the website is insecure (wording will depend on the browser)
This is because the SiteManager certificate and the temporary IP address to reach it, is not known by a public certificate authentication service. You can, however, safely accept.

Getting Started, GateManager PREMIUM Domain Administration Page 8 of 27
3. This will bring you to the configuration interface of the SiteManager.
Hint. Refer to the Secomea GateManager BASIC Guide for an introduction to con-figuring SiteManager network settings and setting up Device Agents.
The guide can be downloaded from this location: http://info.secomea.com/basic

Getting Started, GateManager PREMIUM Domain Administration Page 9 of 27
5. Accessing the Web GUI of a LinkManager 1. When a LinkManager is connected to the GateManager server, you will see
a number of things:
Firstly a License will be pulled from the LinkManager license pool. The "progress bar" of the certificate icon will show with red, how many licenses are left. If all licenses of the pool is used no other LinkManager will be able to connect until the currently connected LinkManager disconnects.
The account icon of the connected LinkManager will get a light-green background, which makes it easier to identify users that are logged in.
Simultaneously an "LinkManager appliance" icon will appear with a lap-top symbol with a green checkmark. In square bracket the Windows com-puter name is shown. Hint: Right-clicking and disabling and enabling the appliance will free the license in case the user has forgotten to logout and is unintentionally blocking the license.
If the LinkManager user has logged in and also has connected to a de-vice via a SiteManager agent, a green lightning symbol will appear over the SiteManager icon.
2. If you select the laptop icon, you will see the “LinkManager GUI” button.
3. If you click it, it will warn you about the usual certificate issue, which you can safely ignore and continue to the administrator interface of the LinkManager. You will not be able to remote control the user console.
Getting Started, GateManager PREMIUM Domain Administration Page 10 of 27
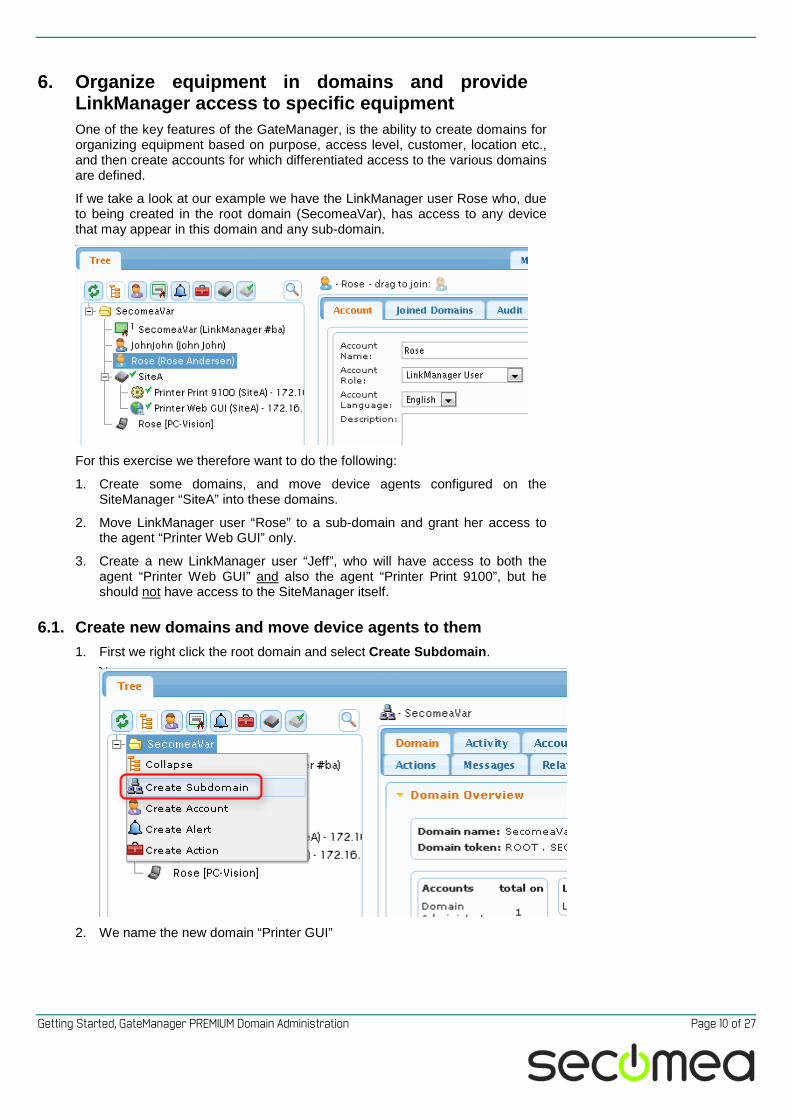
6. Organize equipment in domains and provide LinkManager access to specific equipment One of the key features of the GateManager, is the ability to create domains for organizing equipment based on purpose, access level, customer, location etc., and then create accounts for which differentiated access to the various domains are defined.
If we take a look at our example we have the LinkManager user Rose who, due to being created in the root domain (SecomeaVar), has access to any device that may appear in this domain and any sub-domain.
For this exercise we therefore want to do the following:
1. Create some domains, and move device agents configured on the SiteManager “SiteA” into these domains.
2. Move LinkManager user “Rose” to a sub-domain and grant her access to the agent “Printer Web GUI” only.
3. Create a new LinkManager user “Jeff”, who will have access to both the agent “Printer Web GUI” and also the agent “Printer Print 9100”, but he should not have access to the SiteManager itself.
6.1. Create new domains and move device agents to them 1. First we right click the root domain and select Create Subdomain.
2. We name the new domain “Printer GUI”

Getting Started, GateManager PREMIUM Domain Administration Page 11 of 27
3. We use the same procedure to create the domain “Printing Access”
4. We select the agent “Printer Web GUI” and while holding down the left
mouse button, we drag the agent to the domain “Printer GUI”.

Getting Started, GateManager PREMIUM Domain Administration Page 12 of 27
5. We do the same for moving the agent “Printer Print 9100” to the domain “Printing Access”
Notice that the SiteManager itself stays in the root domain.
6.2. Create a domain to hold LinkManager accounts 6. We right click the root domain and select Create Subdomain, and we cre-
ate a domain called “LinkManagers”
7. Now we select the account Rose, and while holding down the left mouse
button, we drag the account into the new domain.

Getting Started, GateManager PREMIUM Domain Administration Page 13 of 27
8. We now need to ensure that a LinkManager license is available in the do-main “LinkManagers”. In our case we only have one “license pool” called “SecomeaVar”, and which contains only one license.
We can choose to simply drag the license into the LinkManagers domain. This, however, means that other LinkManager accounts that potentially could be created in the root domain SecomeaVar will not be able to use the license.
Therefore we leave the license in the root domain, and instead we “join” the license to the LinkManagers domain.
We select the license, and we drag the icon on the right, into the domain for which the license should be available:
Now the license can be used for LinkManager accounts in both the root domain, and the domain “LinkManagers”.
9. We now want to create our LinkManager account “Jeff”.
We select the domain LinkManagers, right-click and select Create Ac-count.
Getting Started, GateManager PREMIUM Domain Administration Page 14 of 27
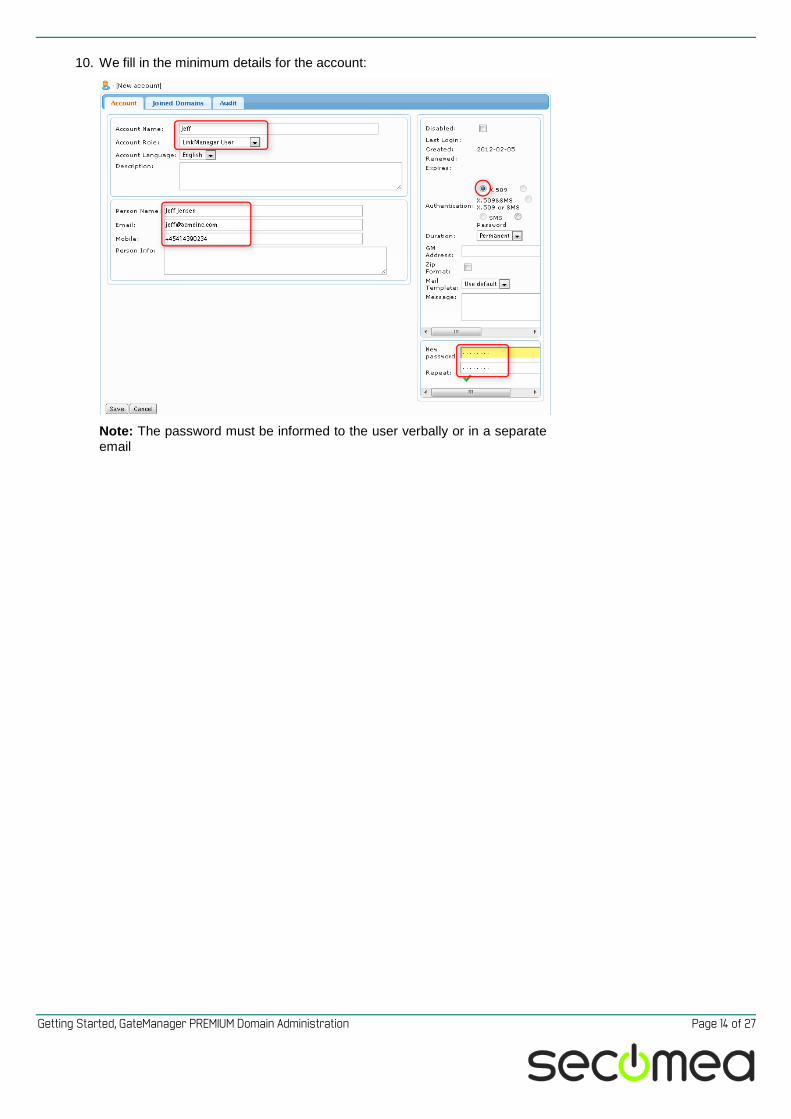
10. We fill in the minimum details for the account:
Note: The password must be informed to the user verbally or in a separate email

Getting Started, GateManager PREMIUM Domain Administration Page 15 of 27
6.3. Grant domain access to LinkManagers using “Joined Do-mains” 11. We select the account icon for Rose on the right and we drag it into the do-
main that the account should have access to.
12. We now select account “Jeff”, and do the same for his account. But for Jeff
we join him to both the “Printer GUI” and the “Printing Access” domain.

Getting Started, GateManager PREMIUM Domain Administration Page 16 of 27
The end result is that when Rose logs in with her LinkManager, she will be able to access the Printer GUI domain only and connect to the “Web GUI” agent only:
And when Jeff logs in, he has access to both domains and subsequently both agents:
Getting Started, GateManager PREMIUM Domain Administration Page 17 of 27
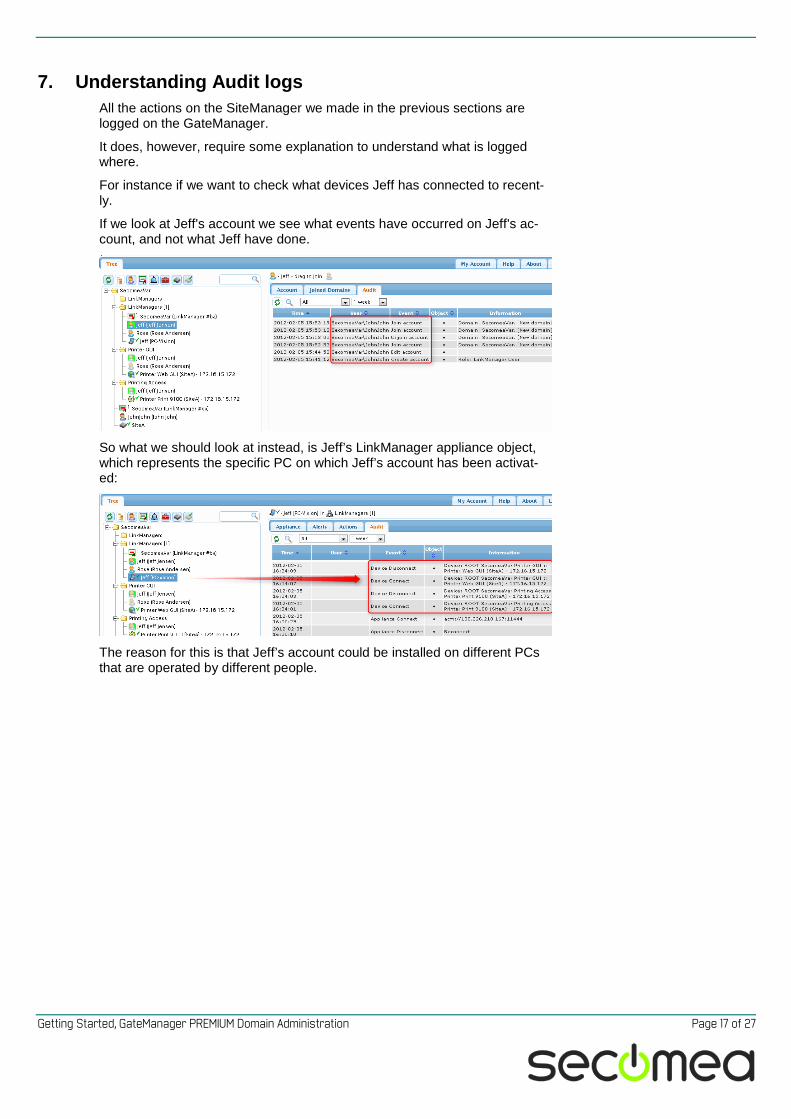
7. Understanding Audit logs All the actions on the SiteManager we made in the previous sections are logged on the GateManager.
It does, however, require some explanation to understand what is logged where.
For instance if we want to check what devices Jeff has connected to recent-ly.
If we look at Jeff's account we see what events have occurred on Jeff's ac-count, and not what Jeff have done.
So what we should look at instead, is Jeff’s LinkManager appliance object, which represents the specific PC on which Jeff’s account has been activat-ed:
The reason for this is that Jeff’s account could be installed on different PCs that are operated by different people.

Getting Started, GateManager PREMIUM Domain Administration Page 18 of 27
8. Working with Alerts
8.1. Generally about Alerts Alerts can be used to submit an alert to a specific email address (or by SMS to a mobile number if this feature is enabled on the GateManager.
Alert processing depends on the GateManager connection to the Secomea Appliances (SiteManager or TrustGate) being available or not.
Alerts that are associated with equipment connected to the Appliance (via an Input port on a SiteManager, or equipment connected by Ethernet, USB or Serial), will be delivered instantly via the Appliance' GateManager con-nection, and result in the alert email being sent immediately (or based on the defined delay for the trigger)
Alerts that are associated with the Appliance itself, such as an "Appliance Disconnect" alert, will only be triggered based on the following criteria:
1. If the next expected heartbeat does not arrive (default up to 10 minutes), or..
2. If the Appliance has sent an off-line heartbeat, and has not recon-nected within 2 minutes (offline heartbeats are generated based on a controlled reboot/reconnect activated from the local Appliance Web menu or an applied GateManager reboot action, or as a result of a automatic reboot in conjunction with a firmware upgrade).
If a SiteManager is disconnected, and have Disconnect alerts associated with devices controlled by the Appliance (such as a SiteManager agents), the alerts for these devices will be triggered based on the above two criteria also. Note that the devices may in fact be connected locally at the remote site, but since the GateManager cannot determine the cause for the general disconnect, it has no other choice than to trigger the device alerts also.
Alerts are created by Right clicking the domain where the alert should be created.

Getting Started, GateManager PREMIUM Domain Administration Page 19 of 27
8.2. Example of a FAILED Alert (aka. Disconnect Alert) Common names like "FAILED" or "Connected" are reserved words on the hosted serve, so you will have to extend the naming like in this case "FAILED(Company)" – this will also clearly identify the alert when it is mailed to you.
8.3. Example of a CONNECTED Alert for selected appliances This example illustrates creation of an Alert that is triggered when certain appliances connect.
Create the Alert definition as follows:

Getting Started, GateManager PREMIUM Domain Administration Page 20 of 27
Now click the Selected TAB and checkmark the appliances that should have this alert associated.
NOTE: Combining the “Apply to” and “Trigger on” option should cover most of the needs for an Alert.
Getting Started, GateManager PREMIUM Domain Administration Page 21 of 27
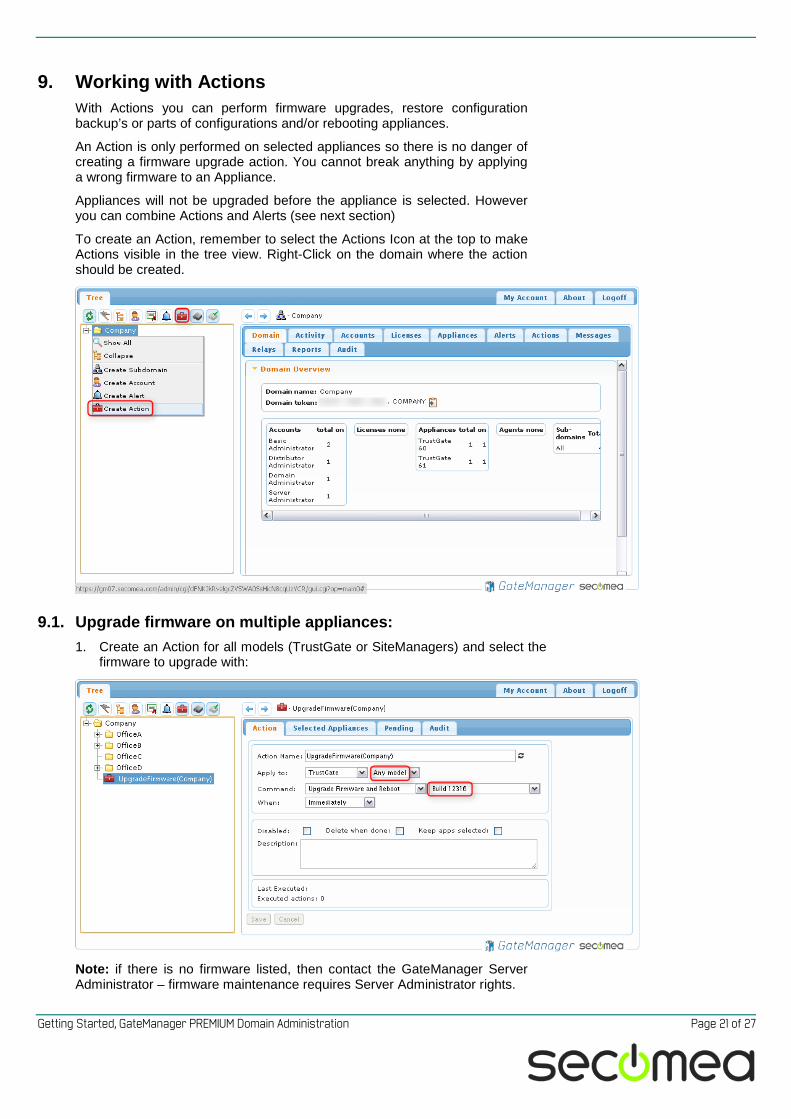
9. Working with Actions With Actions you can perform firmware upgrades, restore configuration backup’s or parts of configurations and/or rebooting appliances.
An Action is only performed on selected appliances so there is no danger of creating a firmware upgrade action. You cannot break anything by applying a wrong firmware to an Appliance.
Appliances will not be upgraded before the appliance is selected. However you can combine Actions and Alerts (see next section)
To create an Action, remember to select the Actions Icon at the top to make Actions visible in the tree view. Right-Click on the domain where the action should be created.
9.1. Upgrade firmware on multiple appliances: 1. Create an Action for all models (TrustGate or SiteManagers) and select the
firmware to upgrade with:
Note: if there is no firmware listed, then contact the GateManager Server Administrator – firmware maintenance requires Server Administrator rights.

Getting Started, GateManager PREMIUM Domain Administration Page 22 of 27
2. Now click the Selected Appliances tab and select the appliances you want to upgrade
3. Press the Save Changes icon to execute the action.
Appliances that are currently not connected will automatically be upgraded the next time they come online.

Getting Started, GateManager PREMIUM Domain Administration Page 23 of 27
10. Combining Alerts and Actions It is possible to create an Alert that triggers and Action.
Example: the next time a SiteManager or TrustGate Appliance connects to the GateManager it should get a new GateManager address, automatically reboot and subsequently connect to another GateManager. This is useful when migrating from one GateManager to another.
Example: When a new SiteManager or TrustGate appliance appears in a domain it should be configured with a special configuration profile (e.g. a set of Forwarding Firewall rules on a TrustGate, or special Agent definitions on a SiteManager).
Note: that you cannot append a single Firewall rule or a single Agent to the existing table. A configuration profile will always overwrite the entire section (E.g. the Forwarding Firewall table or the Agent list)
The following example will apply a new Forwarding Firewall table the next time a new TrustGate appliance appears in a specific domain.
1. Create a connect alert in the domain OfficeC. Settings are:
Apply to: All, TrustGate, Any models
Trigger on: Appliances New.

Getting Started, GateManager PREMIUM Domain Administration Page 24 of 27
2. Create an Action that contains the add-on configuration part. Settings are:
Apply to: TrustGate, All models
Command: Upload Configuration and Reboot
3. Combine the Action to the Alert by dragging the Action from the Domain-
Tree to the Send to: field of the Alert:
4. Select the Connect(OfficeC) alert in the Domain-Tree. With the mouse drag
the Add-on-ForwardingFirewall(OfficeC) action to the Send To: field in the Right side window.
Next time a TrustGate of any model show up in the OfficeC domain for the first time it will be applied the Configuration profile from the Add-on-ForwardingFirewall(OfficeC) action.

Getting Started, GateManager PREMIUM Domain Administration Page 25 of 27
11. Working with the Replace Appliance function If you have a SiteManager or TrustGate appliance that needs to be replaced for any reason, you just use the Replace function in GateManager 5.
The Replace function will restore the configuration from the old appliance to the new one.
All settings will be restored including VPN tunnels, Agent, passwords and certificates. The old and the new appliance do not have to be the same mod-el. E.g. a TrustGate 260 can replace a TrustGate 60, and a SiteManager 3239 can replace a SiteManager 2134.
The Replace button will only show on failed units (marked with a red cross):
Select the failed appliance in the Tree-view and press the Replace button. A Wizard will guide you through the replacement procedure.

Getting Started, GateManager PREMIUM Domain Administration Page 26 of 27
Appendix A, Supplementary publications
This document is kept updated at this location:
http://info.secomea.com/premium
This document assumes you had performed the steps of the GateManager FREE BASIC guide and is therefore a natural extension to the guide found here:
http://info.secomea.com/basic

Getting Started, GateManager PREMIUM Domain Administration Page 27 of 27
Notices
Publication and copyright © Copyright Secomea A/S 2012-2015. All rights reserved. You may download and print a copy for your own use. As a high-level administrator, you may use whatever you like from contents of this document to create your own instruc-tions for deploying our products. Otherwise, no part of this document may be copied or reproduced in any way, without the written consent of Secomea A/S. We would appreciate getting a copy of the material you produce in order to make our own material better and – if you give us permission – to inspire other users.
Trademarks SiteManager™, LinkManager™ and GateManager™ are trademarks of Secomea A/S. Other trademarks are the property of their respective owners.
Disclaimer Secomea A/S reserves the right to make changes to this publication and to the products described herein without notice. The publication of this document does not represent a commitment on the part of Secomea A/S. Considerable effort has been made to ensure that this publication is free of inaccuracies and omis-sions but we cannot guarantee that there are none.
The following paragraph does not apply to any country or state where such pro-visions are inconsistent with local law:
SECOMEA A/S PROVIDES THIS PUBLICATION "AS IS" WITHOUT WARRANTY OF ANY KIND, EITHER EXPRESS OR IMPLIED, INCLUDING, BUT NOT LIMITED TO, THE IMPLIED WARRANTIES OF MERCHANTABILITY OR FITNESS FOR A PARTICULAR PURPOSE
SECOMEA A/S SHALL NOT BE LIABLE FOR ANY DIRECT, INDIRECT, INCIDENTAL, CONSEQUENTIAL, OR OTHER DAMAGE ALLEGED IN CONNECTION WITH THE FURNISHING OR USE OF THIS INFORMATION.
Secomea A/S Denmark CVR No. DK 31 36 60 38 E-mail: [email protected] www.secomea.com


![Untitled-1 [kachhiproperties.com]...PLOT 10 12 13 14 15 16 17 18 19 20 21 22 23 24 25 26 27 28 29 30 TYPE OF PLOT SQ. FT. PREMIUM PREMIUM PREMIUM PREMIUM PREMIUM PREMIUM PREMIUM PREMIUM](https://static.fdocuments.in/doc/165x107/60d9385783220366c70105ab/untitled-1-plot-10-12-13-14-15-16-17-18-19-20-21-22-23-24-25-26-27-28-29.jpg)