Getting Started - Baiduimages.china-pub.com/ebook4945001-4950000/4949992/ch01.pdfapproach describes...
32
1 Chapter Contents The Java Technology Phenomenon 1 The “Hello World!” Application 5 A Closer Look at the “Hello World!” Application 23 Common Problems (and Their Solutions) 27 Questions and Exercises: Getting Started 31 This chapter provides everything you’ll need to know about getting started with the Java programming language. The first section provides an overview of Java technology as a whole. It discusses both the Java programming language and platform, providing a broad overview of what this technology can do and how it will make your life easier. The second section provides information on the “Hello World!” application. This hands-on approach describes what to download, what to install, and what to type when creating a simple “Hello World!” application. It provides separate instructions for the NetBeans inte- grated development environment (NetBeans IDE), Microsoft Windows, Solaris, Linux, and OS X users. The third section discusses the “Hello World!” application, describing each section of code in detail. It covers source code comments, the HelloWorldApp class definition block, and the main method. The fourth section presents common problems and solutions. This is the place to go if you have trouble compiling or running the programs in this chapter. The chapter ends with questions and exercises to test your understanding. The Java Technology Phenomenon Talk about Java technology seems to be everywhere, but what exactly is it? This sec- tion explains how Java technology is both a programming language and a platform and provides an overview of what this technology can do for you. 1 Getting Started
Transcript of Getting Started - Baiduimages.china-pub.com/ebook4945001-4950000/4949992/ch01.pdfapproach describes...

1
Chapter ContentsThe Java Technology Phenomenon 1The “Hello World!” Application 5A Closer Look at the “Hello World!” Application 23Common Problems (and Their Solutions) 27Questions and Exercises: Getting Started 31
This chapter provides everything you’ll need to know about getting started with the Java programming language. The fi rst section provides an overview of Java technology as a whole. It discusses both the Java programming language and platform, providing a broad overview of what this technology can do and how it will make your life easier. The second section provides information on the “Hello World!” application. This hands- on approach describes what to download, what to install, and what to type when creating a simple “Hello World!” application. It provides separate instructions for the NetBeans inte-grated development environment (NetBeans IDE), Microsoft Windows, Solaris, Linux, and OS X users. The third section discusses the “Hello World!” application, describing each section of code in detail. It covers source code comments, the HelloWorldApp class defi nition block, and the main method. The fourth section presents common problems and solutions. This is the place to go if you have trouble compiling or running the programs in this chapter. The chapter ends with questions and exercises to test your understanding.
The Java Technology Phenomenon
Talk about Java technology seems to be everywhere, but what exactly is it? This sec-tion explains how Java technology is both a programming language and a platform and provides an overview of what this technology can do for you.
1Getting Started
psn-gallardo.indb 1psn-gallardo.indb 1 11/12/14 12:03 PM11/12/14 12:03 PM

2 Chapter 1 ■ Getting Started
1 The Java Programming Language
The Java programming language is a high- level language that can be characterized by the following buzzwords:
■ Simple■ Object oriented■ Distributed■ Multithreaded■ Dynamic■ Architecture neutral■ Portable■ High performance■ Robust■ Secure
Each of the preceding buzzwords is explained in The Java Language Environment, a white paper written by James Gosling and Henry McGilton.1
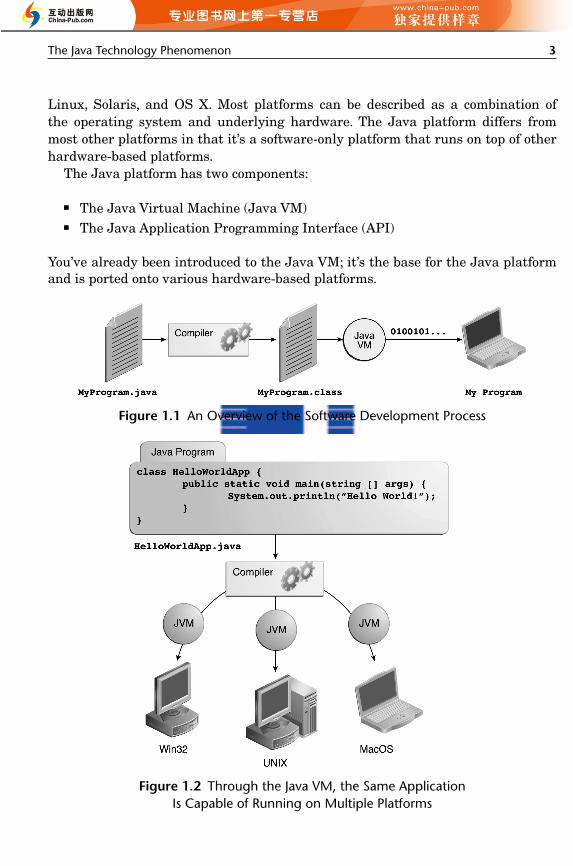
In the Java programming language, all source code is fi rst written in plain text fi les ending with the .java extension. Those source fi les are then compiled into .class fi les by the javac compiler. A .class fi le does not contain code that is native to your processor; it instead contains bytecodes— the machine language of the Java Virtual Machine (Java VM).2 The java launcher tool then runs your applica-tion with an instance of the Java VM.
Because the Java VM is available on many different operating systems, the same .class fi les are capable of running on Microsoft Windows, Solaris, Linux, or OS X. Some virtual machines, such as the Java HotSpot Virtual Machine, perform addi-tional steps at runtime to give your application a performance boost.3 This includes various tasks such as fi nding performance bottlenecks and recompiling (to native code) frequently used sections of code.
The Java Platform
A platform is the hardware or software environment in which a program runs. We’ve already mentioned some of the most popular platforms like Microsoft Windows,
1. http://www.oracle.com/technetwork/java/langenv-140151.html
2. The terms Java Virtual Machine and Java VM indicate a virtual machine for the Java platform.
3. http://www.oracle.com/technetwork/java/javase/tech/index-jsp-136373.html
psn-gallardo.indb 2psn-gallardo.indb 2 11/12/14 12:03 PM11/12/14 12:03 PM
The Java Technology Phenomenon 3
1Linux, Solaris, and OS X. Most platforms can be described as a combination of the operating system and underlying hardware. The Java platform differs from most other platforms in that it’s a software- only platform that runs on top of other hardware- based platforms.
The Java platform has two components:
■ The Java Virtual Machine (Java VM)■ The Java Application Programming Interface (API)
You’ve already been introduced to the Java VM; it’s the base for the Java platform and is ported onto various hardware- based platforms.
Figure 1.1 An Overview of the Software Development Process
Figure 1.2 Through the Java VM, the Same Application Is Capable of Running on Multiple Platforms
psn-gallardo.indb 3psn-gallardo.indb 3 11/12/14 12:03 PM11/12/14 12:03 PM

4 Chapter 1 ■ Getting Started
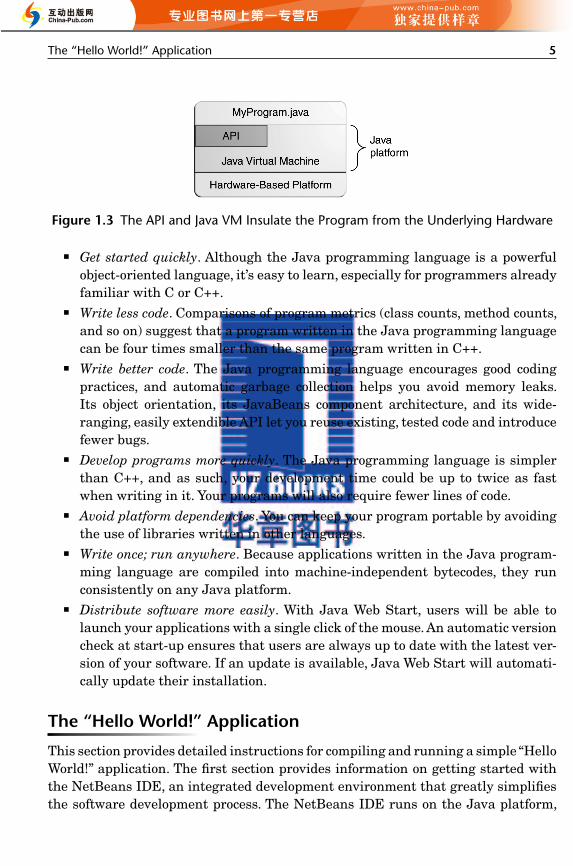
1 The API is a large collection of ready- made software components that provide many useful capabilities. It is grouped into libraries of related classes and inter-faces; these libraries are known as packages. The next section highlights some of the functionality provided by the API.
As a platform- independent environment, the Java platform can be a bit slower than native code. However, advances in compiler and virtual machine technologies are bringing performance close to that of native code without threatening portability.
What Can Java Technology Do?
The general- purpose, high- level Java programming language is a powerful software plat-form. Every full implementation of the Java platform gives you the following features:
■ Development tools. The development tools provide everything you’ll need for compiling, running, monitoring, debugging, and documenting your applica-tions. As a new developer, the main tools you’ll be using are the javac com-piler, the java launcher, and the javadoc documentation tool.
■ Application Programming Interface (API). The API provides the core function-ality of the Java programming language. It offers a wide array of useful classes ready for use in your own applications. It spans everything from basic objects, to networking and security, to XML generation and database access, and more. The core API is very large; to get an overview of what it contains, consult the Java Platform Standard Edition 8 Documentation.4
■ Deployment technologies. The Java SE Development Kit (JDK) software pro-vides standard mechanisms such as the Java Web Start software and Java Plug- In software for deploying your applications to end users.
■ User interface toolkits. The JavaFX, Swing, and Java 2D toolkits make it pos-sible to create sophisticated graphical user interfaces (GUIs).
■ Integration libraries. Integration libraries such as the Java Interactive Data Lan-guage (IDL) API, Java Database Connectivity (JDBC) API, Java Naming and Directory Interface (JNDI) API, Java Remote Method Invocation (RMI), and Java Remote Method Invocation over Internet Inter- ORB Protocol (Java RMI- IIOP) Technology enable database access and manipulation of remote objects.
How Will Java Technology Change My Life?
We can’t promise you fame, fortune, or even a job if you learn the Java programming language. Still, it is likely to make your programs better and requires less effort than other languages. We believe that Java technology will help you do the following:
4. 8/docs/index.html
psn-gallardo.indb 4psn-gallardo.indb 4 11/12/14 12:03 PM11/12/14 12:03 PM
The “Hello World!” Application 5
1
■ Get started quickly. Although the Java programming language is a powerful object- oriented language, it’s easy to learn, especially for programmers already familiar with C or C++.
■ Write less code. Comparisons of program metrics (class counts, method counts, and so on) suggest that a program written in the Java programming language can be four times smaller than the same program written in C++.
■ Write better code. The Java programming language encourages good coding practices, and automatic garbage collection helps you avoid memory leaks. Its object orientation, its JavaBeans component architecture, and its wide- ranging, easily extendible API let you reuse existing, tested code and introduce fewer bugs.
■ Develop programs more quickly. The Java programming language is simpler than C++, and as such, your development time could be up to twice as fast when writing in it. Your programs will also require fewer lines of code.
■ Avoid platform dependencies. You can keep your program portable by avoiding the use of libraries written in other languages.
■ Write once; run anywhere. Because applications written in the Java program-ming language are compiled into machine- independent bytecodes, they run consistently on any Java platform.
■ Distribute software more easily. With Java Web Start, users will be able to launch your applications with a single click of the mouse. An automatic version check at start- up ensures that users are always up to date with the latest ver-sion of your software. If an update is available, Java Web Start will automati-cally update their installation.
The “Hello World!” Application
This section provides detailed instructions for compiling and running a simple “Hello World!” application. The fi rst section provides information on getting started with the NetBeans IDE, an integrated development environment that greatly simplifi es the software development process. The NetBeans IDE runs on the Java platform,
Figure 1.3 The API and Java VM Insulate the Program from the Underlying Hardware
psn-gallardo.indb 5psn-gallardo.indb 5 11/12/14 12:03 PM11/12/14 12:03 PM

6 Chapter 1 ■ Getting Started
1 which means that you can use it with any operating system for which there is a JDK available. These operating systems include Microsoft Windows, Solaris, Linux, and OS X. We recommend using the NetBeans IDE instead of the command line whenever pos-sible. The remaining sections provide platform- specifi c instructions for getting started without an integrated development environment. These instructions are provided for users of Windows, Solaris, and Linux, respectively. (For more information about which operating system versions are supported, see Oracle JDK 8 and JRE 8 Certifi ed System Confi gurations.5) If you run into problems, be sure to consult the common problems sec-tion; it provides solutions for many issues encountered by new users.
“Hello World!” for the NetBeans IDE
It’s time to write your fi rst application! These detailed instructions are for users of the NetBeans IDE. The NetBeans IDE runs on the Java platform, which means that you can use it with any operating system for which there is a JDK available. These operating systems include Microsoft Windows, Solaris, Linux, and OS X.
A Checklist
To write your fi rst program, you’ll need the following:
1. The Java SE Development Kit. Consult the Java SE Downloads Index.6
2. The NetBeans IDE. To obtain this for all platforms, consult the NetBeans IDE Downloads Index.7
Creating Your First Application
Your fi rst application, HelloWorldApp, will simply display the greeting “Hello World!” To create this program, do the following:
1. Create an IDE project. When you create an IDE project, you create an envi-ronment in which to build and run your applications. Using IDE projects eliminates confi guration issues normally associated with developing on the command line. You can build or run your application by choosing a single menu item within the IDE.
2. Add code to the generated source fi le. A source fi le contains code, written in the Java programming language, that you and other programmers can understand.
5. http://www.oracle.com/technetwork/java/javase/certconfig-2095354.html
6. http://www.oracle.com/technetwork/java/javase/downloads/index.html
7. http://netbeans.org/downloads/index.html
psn-gallardo.indb 6psn-gallardo.indb 6 11/12/14 12:03 PM11/12/14 12:03 PM
The “Hello World!” Application 7
1As part of creating an IDE project, a skeleton source fi le will be automatically gen-erated. You will then modify the source fi le to add the “Hello World!” message.
3. Compile the source fi le into a .class fi le. The IDE invokes the Java program-ming language compiler (javac), which takes your source fi le and translates its text into instructions that the Java VM can understand. The instructions contained within this fi le are known as bytecodes.
4. Run the program. The IDE invokes the Java application launcher tool (java), which uses the Java VM to run your application.
Create an IDE Project
To create an IDE project, do the following:
1. Launch the NetBeans IDE.■ On Microsoft Windows systems, you can use the NetBeans IDE item in the
Start menu.■ On Solaris and Linux systems, you execute the IDE launcher script by navi-
gating to the IDE’s bin directory and typing ./netbeans.■ On OS X systems, click the NetBeans IDE application icon.
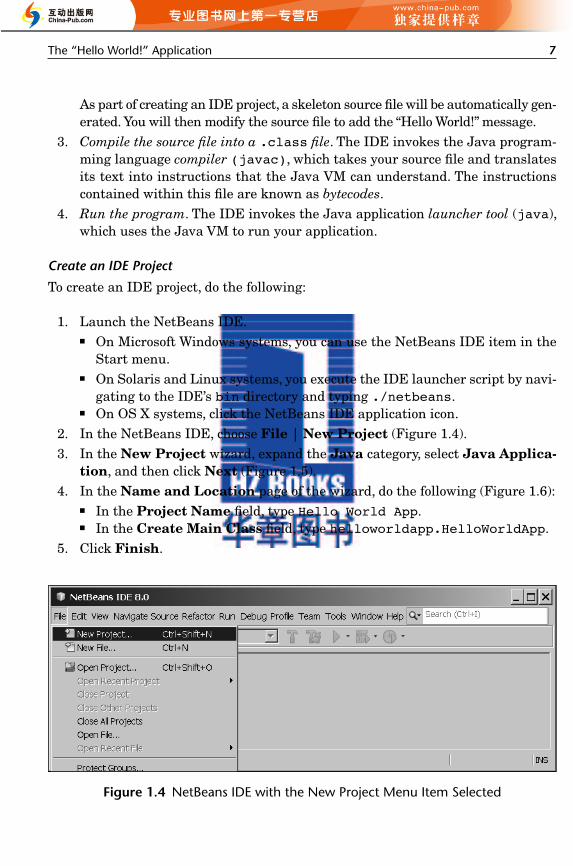
2. In the NetBeans IDE, choose File | New Project (Figure 1.4).3. In the New Project wizard, expand the Java category, select Java Applica-
tion, and then click Next (Figure 1.5).4. In the Name and Location page of the wizard, do the following (Figure 1.6):
■ In the Project Name fi eld, type Hello World App.■ In the Create Main Class fi eld, type helloworldapp.HelloWorldApp.
5. Click Finish.
Figure 1.4 NetBeans IDE with the New Project Menu Item Selected
psn-gallardo.indb 7psn-gallardo.indb 7 11/12/14 12:03 PM11/12/14 12:03 PM

8 Chapter 1 ■ Getting Started
1
Figure 1.5 NetBeans IDE, New Project Wizard, Choose Project Page
Figure 1.6 NetBeans IDE, New Project Wizard, Name and Location Page
psn-gallardo.indb 8psn-gallardo.indb 8 11/12/14 12:03 PM11/12/14 12:03 PM
The “Hello World!” Application 9
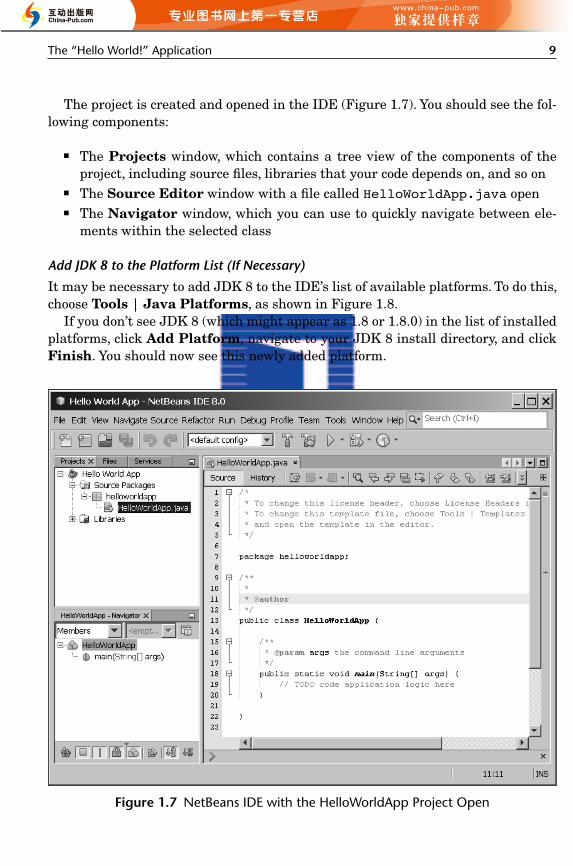
1The project is created and opened in the IDE (Figure 1.7). You should see the fol-lowing components:
■ The Projects window, which contains a tree view of the components of the project, including source fi les, libraries that your code depends on, and so on
■ The Source Editor window with a fi le called HelloWorldApp.java open■ The Navigator window, which you can use to quickly navigate between ele-
ments within the selected class
Add JDK 8 to the Platform List (If Necessary)
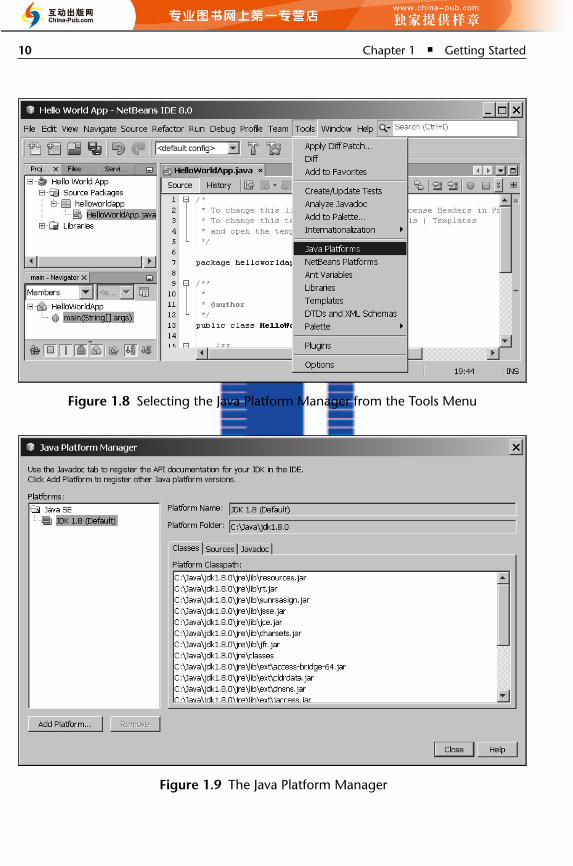
It may be necessary to add JDK 8 to the IDE’s list of available platforms. To do this, choose Tools | Java Platforms, as shown in Figure 1.8.
If you don’t see JDK 8 (which might appear as 1.8 or 1.8.0) in the list of installed platforms, click Add Platform, navigate to your JDK 8 install directory, and click Finish. You should now see this newly added platform.
Figure 1.7 NetBeans IDE with the HelloWorldApp Project Open
psn-gallardo.indb 9psn-gallardo.indb 9 11/12/14 12:03 PM11/12/14 12:03 PM
10 Chapter 1 ■ Getting Started
1
Figure 1.8 Selecting the Java Platform Manager from the Tools Menu
Figure 1.9 The Java Platform Manager
psn-gallardo.indb 10psn-gallardo.indb 10 11/12/14 12:03 PM11/12/14 12:03 PM

The “Hello World!” Application 11
1
To set this JDK as the default for all projects, you can run the IDE with the - - jdkhome switch on the command line or by entering the path to the JDK in the netbeans_j2sdkhome property of your INSTALLATION_DIRECTORY/etc/netbeans.conf fi le.
To specify this JDK for the current project only, select Hello World App in the Projects pane, choose File | Project Properties (Hello World App), click Libraries, then select JDK 1.8 in the Java Platform pull- down menu. You should see a screen similar to Figure 1.10. The IDE is now confi gured for JDK 8.
Add Code to the Generated Source File
When you created this project, you left the Create Main Class check box selected in the New Project wizard. The IDE has therefore created a skeleton class for you. You can add the “Hello World!” message to the skeleton code by replacing
Figure 1.10 The Libraries Category in the Hello World App Project Properties
psn-gallardo.indb 11psn-gallardo.indb 11 11/12/14 12:03 PM11/12/14 12:03 PM

12 Chapter 1 ■ Getting Started
1// TODO code application logic here
with
System.out.println("Hello World!"); // Display the string.
Optionally, you can replace these four lines of generated code
/** * * @author */
with these lines
/** * The HelloWorldApp class implements an application that * simply prints "Hello World!" to standard output. */
These four lines are a code comment and do not affect how the program runs. Later sections of this chapter explain the use and format of code comments.
NoteType all code, commands, and fi le names exactly as shown. Both the compiler (javac) and launcher (java) are case sensitive, so you must capitalize consistently. For example, HelloWorldApp is not the same as helloworldapp.
Save your changes by choosing File | Save. The fi le should look something like the following:
/* * To change this template, choose Tools | Templates * and open the template in the editor. */package helloworldapp;/** * The HelloWorldApp class implements an application that * simply prints "Hello World!" to standard output. */public class HelloWorldApp { /** * @param args the command line arguments */ public static void main(String[] args) { System.out.println("Hello World!"); // Display the string.
psn-gallardo.indb 12psn-gallardo.indb 12 11/12/14 12:04 PM11/12/14 12:04 PM

The “Hello World!” Application 13
1 } }
Compile the Source File into a .class File
To compile your source fi le, choose Run | Build Project (Hello World App) from the IDE’s main menu. The Output window opens and displays output similar to what you see in Figure 1.11.
If the build output concludes with the statement BUILD SUCCESSFUL, congratu-lations! You have successfully compiled your program!
If the build output concludes with the statement BUILD FAILED, you probably have a syntax error in your code. Errors are reported in the Output window as hyperlinked text. You double click such a hyperlink to navigate to the source of an error. You can then fi x the error and once again choose Run | Build Project.
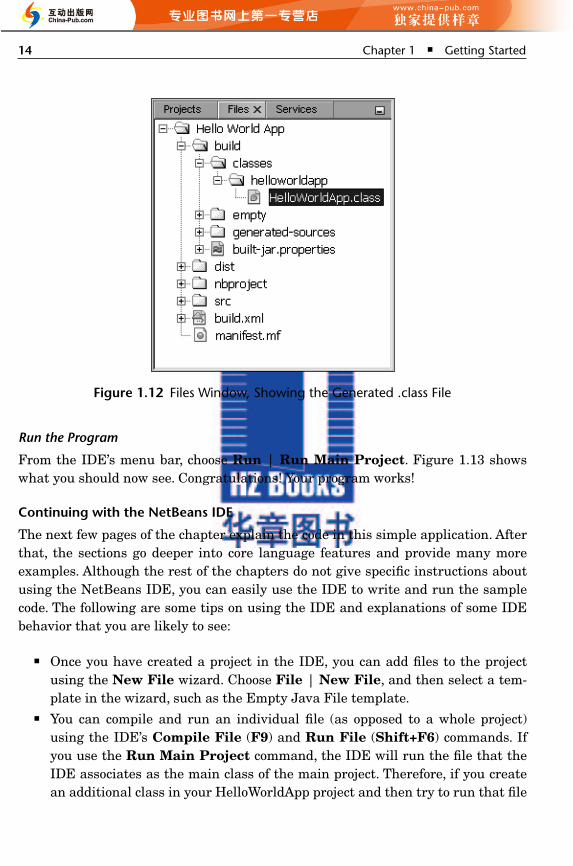
When you build the project, the bytecode fi le HelloWorldApp.class is generated. You can see where the new fi le is generated by opening the Files window and expand-ing the Hello World App/build/classes/helloworldapp node, as shown in Fig-ure 1.12. Now that you have built the project, you can run your program.
Figure 1.11 Output Window, Showing Results of Building the HelloWorld Project
psn-gallardo.indb 13psn-gallardo.indb 13 11/12/14 12:04 PM11/12/14 12:04 PM
14 Chapter 1 ■ Getting Started
1
Run the Program
From the IDE’s menu bar, choose Run | Run Main Project. Figure 1.13 shows what you should now see. Congratulations! Your program works!
Continuing with the NetBeans IDE
The next few pages of the chapter explain the code in this simple application. After that, the sections go deeper into core language features and provide many more examples. Although the rest of the chapters do not give specifi c instructions about using the NetBeans IDE, you can easily use the IDE to write and run the sample code. The following are some tips on using the IDE and explanations of some IDE behavior that you are likely to see:
■ Once you have created a project in the IDE, you can add fi les to the project using the New File wizard. Choose File | New File, and then select a tem-plate in the wizard, such as the Empty Java File template.
■ You can compile and run an individual fi le (as opposed to a whole project) using the IDE’s Compile File (F9) and Run File (Shift+F6) commands. If you use the Run Main Project command, the IDE will run the fi le that the IDE associates as the main class of the main project. Therefore, if you create an additional class in your HelloWorldApp project and then try to run that fi le
Figure 1.12 Files Window, Showing the Generated .class File
psn-gallardo.indb 14psn-gallardo.indb 14 11/12/14 12:04 PM11/12/14 12:04 PM

The “Hello World!” Application 15
1
with the Run Main Project command, the IDE will run the HelloWorldApp fi le instead.
■ You might want to create separate IDE projects for sample applications that include more than one source fi le.
■ As you are typing in the IDE, a code completion box might periodically appear. You can either ignore the code completion box and keep typing or select one of the suggested expressions. If you would prefer not to have the code com-pletion box automatically appear, you can turn off the feature. Choose Tools | Options | Editor, click the Code Completion tab, and clear the Auto Popup Completion Window check box.
■ If you want to rename the node for a source fi le in the Projects window, choose Refactor from IDE’s main menu. The IDE prompts you with the Rename dialog box to lead you through the options of renaming the class and updating code that refers to that class. Make the changes and click Refactor to apply the changes. This sequence of clicks might seem unnecessary if you have just a single class in your project, but it is very useful when your changes affect other parts of your code in larger projects.
■ For a more thorough guide to the features of the NetBeans IDE, see the Net-Beans Documentation page.8
“Hello World!” for Microsoft Windows
The following instructions are for users of Windows. (For more information about which operating system versions are supported, see Oracle JDK 8 and JRE 8 Certi-fi ed System Confi gurations.9)
8. https://netbeans.org/kb/
9. http://www.oracle.com/technetwork/java/javase/certconfig-2095354.html
Figure 1.13 The Program Prints “Hello World!” to the Output Window (along with Other Output from the Build Script)
psn-gallardo.indb 15psn-gallardo.indb 15 11/12/14 12:04 PM11/12/14 12:04 PM
16 Chapter 1 ■ Getting Started
1 A Checklist
To write your fi rst program, you’ll need the following:
1. The Java SE Development Kit 8 (JDK 8). You can download the Windows version now.10 (Make sure you download the JDK, not the JRE.) Consult the installation instructions.11
2. A text editor. In this example, we’ll use Notepad, a simple editor included with Windows platforms. You can easily adapt these instructions if you use a differ-ent text editor.
These two items are all you’ll need to write your fi rst application.
Creating Your First Application
Your fi rst application, HelloWorldApp, will simply display the greeting “Hello world!” To create this program, do the following:
1. Create a source fi le. A source fi le contains code, written in the Java program-ming language, that you and other programmers can understand. You can use any text editor to create and edit source fi les.
2. Compile the source fi le into a .class fi le. The Java programming language com-piler (javac) takes your source fi le and translates its text into instructions that the Java VM can understand. The instructions contained within this fi le are known as bytecodes.
3. Run the program. The Java application launcher tool (java) uses the Java VM to run your application.
Create a Source File
To create a source fi le, you have two options: You can save the fi le HelloWorldApp.java12 on your computer and avoid a lot of typing, or you can use the following (lon-ger) instructions.
First, start your editor. You can launch the Notepad editor from the Start menu by selecting Programs | Accessories | Notepad. In a new document, type in the following code:
/** * The HelloWorldApp class implements an application that * simply prints "Hello World!" to standard output.
10. http://www.oracle.com/technetwork/java/javase/downloads/index.html
11. 8/docs/technotes/guides/install/install_overview.html
12. tutorial/getStarted/application/examples/HelloWorldApp.java
psn-gallardo.indb 16psn-gallardo.indb 16 11/12/14 12:04 PM11/12/14 12:04 PM

The “Hello World!” Application 17
1 */class HelloWorldApp { public static void main(String[] args) { System.out.println("Hello World!"); // Display the string. }}
Figure 1.14 The Save As Dialog Just before You Click Save
NoteType all code, commands, and fi le names exactly as shown. Both the compiler (javac) and launcher (java) are case sensitive, so you must capitalize consistently. For example, HelloWorldApp is not the same as helloworldapp.
Save the code in a fi le with the name HelloWorldApp.java. To do this in Note-pad, fi rst choose the File | Save As menu item. Then, in the Save As dialog box, do the following:
1. Using the Save In combo box, specify the folder (directory) where you’ll save your fi le. In this example, the directory is myapplication on the C drive.
2. In the File Name text fi eld, type "HelloWorldApp.java", including the quotation marks.
3. From the Save As Type combo box, choose Text Documents (*.txt).4. In the Encoding combo box, leave the encoding as ANSI.
When you’re fi nished, the dialog box should look like Figure 1.14. Now click Save and exit Notepad.
Compile the Source File into a .class File
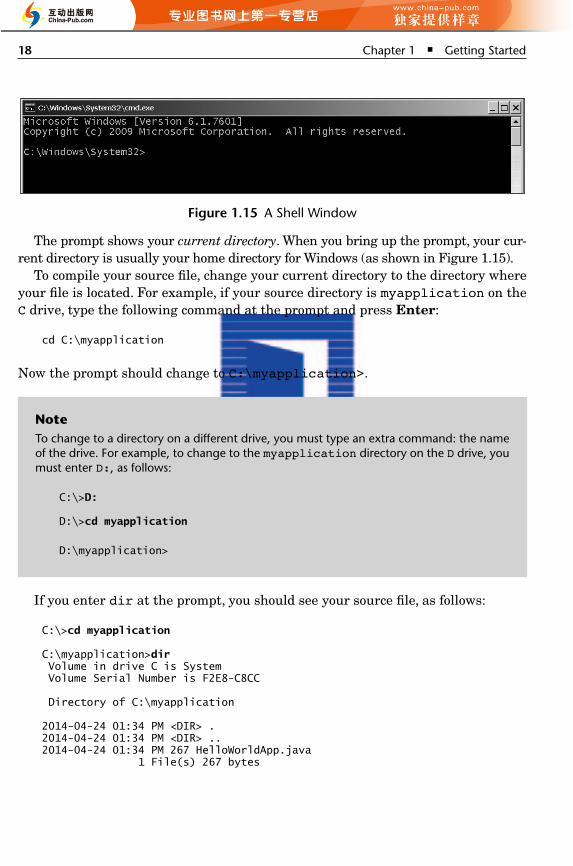
To compile your source fi le into a .class fi le, bring up a shell, or “command,” win-dow. You can do this from the Start menu by choosing Run and then entering cmd. The shell window should look similar to Figure 1.15.
psn-gallardo.indb 17psn-gallardo.indb 17 11/12/14 12:04 PM11/12/14 12:04 PM
18 Chapter 1 ■ Getting Started
1
The prompt shows your current directory. When you bring up the prompt, your cur-rent directory is usually your home directory for Windows (as shown in Figure 1.15).
To compile your source fi le, change your current directory to the directory where your fi le is located. For example, if your source directory is myapplication on the C drive, type the following command at the prompt and press Enter:
cd C:\myapplication
Now the prompt should change to C:\myapplication>.
Figure 1.15 A Shell Window
NoteTo change to a directory on a different drive, you must type an extra command: the name of the drive. For example, to change to the myapplication directory on the D drive, you must enter D:, as follows:
C:\>D: D:\>cd myapplication
D:\myapplication>
If you enter dir at the prompt, you should see your source fi le, as follows:
C:\>cd myapplication C:\myapplication>dir Volume in drive C is System Volume Serial Number is F2E8- C8CC Directory of C:\myapplication 2014- 04- 24 01:34 PM <DIR> .2014- 04- 24 01:34 PM <DIR> ..2014- 04- 24 01:34 PM 267 HelloWorldApp.java 1 File(s) 267 bytes
psn-gallardo.indb 18psn-gallardo.indb 18 11/12/14 12:04 PM11/12/14 12:04 PM

The “Hello World!” Application 19
1 2 Dir(s) 93,297,991,680 bytes free C:\myapplication>
Now you are ready to compile. At the prompt, type the following command and press Enter:
javac HelloWorldApp.java
The compiler has generated a bytecode fi le, HelloWorldApp.class. At the prompt, type dir to see the new fi le that was generated as follows:
C:\myapplication>javac HelloWorldApp.java C:\myapplication>dir Volume in drive C is System Volume Serial Number is F2E8- C8CC Directory of C:\myapplication 2014- 04- 24 02:07 PM <DIR> .2014- 04- 24 02:07 PM <DIR> ..2014- 04- 24 02:07 PM 432 HelloWorldApp.class2014- 04- 24 01:34 PM 267 HelloWorldApp.java 2 File(s) 699 bytes 2 Dir(s) 93,298,032,640 bytes free C:\myapplication>
Now that you have a .class fi le, you can run your program.
Run the Program
In the same directory, enter the following command at the prompt:
java - cp . HelloWorldApp
You should see the following on your screen:
C:\myapplication>java - cp . HelloWorldAppHello World! C:\myapplication>
Congratulations! Your program works! If you encounter problems with the instruc-tions in this section, consult “Common Problems (and Their Solutions)” at the end of this chapter.
psn-gallardo.indb 19psn-gallardo.indb 19 11/12/14 12:04 PM11/12/14 12:04 PM

20 Chapter 1 ■ Getting Started
1 “Hello World!” for Solaris and Linux
The following instructions are for users of Solaris and Linux.
A Checklist
To write your fi rst program, you’ll need the following:
1. The Java SE Development Kit 8 (JDK 8). You can download the Solaris or Linux version now.13 (Make sure you download the JDK, not the JRE.) Consult the installation instructions.14
2. A text editor. In this example, we’ll use Pico, an editor typically available for Solaris and Linux. You can easily adapt these instructions if you use a differ-ent text editor, such as vi or emacs.
These two items are all you’ll need to write your fi rst application.
Creating Your First Application
Your fi rst application, HelloWorldApp, will simply display the greeting “Hello world!” To create this program, do the following:
1. Create a source fi le. A source fi le contains code, written in the Java program-ming language, that you and other programmers can understand. You can use any text editor to create and edit source fi les.
2. Compile the source fi le into a .class fi le. The Java programming language com-piler (javac) takes your source fi le and translates its text into instructions that the Java VM can understand. The instructions contained within this .class fi le are known as bytecodes.
3. Run the program. The Java application launcher tool (java) uses the Java VM to run your application.
Create a Source File
To create a source fi le, you have two options: You can save the fi le HelloWorldApp.java15 on your computer and avoid a lot of typing, or you can use the following (lon-ger) instructions.
13. http://www.oracle.com/technetwork/java/javase/downloads/index.html
14. 8/docs/technotes/guides/install/install_overview.html
15. tutorial/getStarted/application/examples/HelloWorldApp.java
psn-gallardo.indb 20psn-gallardo.indb 20 11/12/14 12:04 PM11/12/14 12:04 PM

The “Hello World!” Application 21
1
First, open a shell, or “terminal,” window. When you fi rst bring up the prompt, your current directory will usually be your home directory. You can change your cur-rent directory to your home directory at any time by typing cd at the prompt and then pressing Enter.
The source fi les you create should be kept in a separate directory. You can cre-ate a directory by using the command mkdir. For example, to create the directory examples/java in the /tmp directory, use the following commands:
cd /tmpmkdir examplescd examplesmkdir java
To change your current directory to this new directory, you then enter
cd /tmp/examples/java
Now you can start creating your source fi le.Start the Pico editor by typing pico at the prompt and pressing Enter. If the
system responds with the message pico: command not found, then Pico is most likely unavailable. Consult your system administrator for more information, or use another editor.
When you start Pico, it’ll display a new, blank buffer. This is the area in which you will type your code. Type the following code into the new buffer:
/** * The HelloWorldApp class implements an application that * simply prints "Hello World!" to standard output. */class HelloWorldApp { public static void main(String[] args) { System.out.println("Hello World!"); // Display the string. }}
Figure 1.16 A New Terminal Window
psn-gallardo.indb 21psn-gallardo.indb 21 11/12/14 12:04 PM11/12/14 12:04 PM

22 Chapter 1 ■ Getting Started
1
Save the code in a fi le with the name HelloWorldApp.java. In the Pico editor, you do this by typing Ctrl+O and then, at the bottom where you see the prompt File Name to write:, entering the directory in which you wish to create the fi le, followed by HelloWorldApp.java. For example, if you wish to save Hello-WorldApp.java in the directory /tmp/examples/java, then you type /tmp/examples/java/HelloWorldApp.java and press Enter. You can type Ctrl+X to exit Pico.
Compile the Source File into a .class File
Bring up another shell window. To compile your source fi le, change your current directory to the directory where your fi le is located. For example, if your source directory is /tmp/examples/java, type the following command at the prompt and press Enter:
cd /tmp/examples/java
If you enter pwd at the prompt, you should see the current directory, which in this example has been changed to /tmp/examples/java. If you enter ls at the prompt, you should see your fi le.
Now are ready to compile the source fi le. At the prompt, type the following com-mand and press Enter:
javac HelloWorldApp.java
The compiler has generated a bytecode fi le, HelloWorldApp.class. At the prompt, type ls to see the new fi le that was generated, as shown in Figure 1.18. Now that you have a .class fi le, you can run your program.
Run the Program
In the same directory, enter at the prompt:
java HelloWorldApp
NoteType all code, commands, and fi le names exactly as shown. Both the compiler (javac) and launcher (java) are case sensitive, so you must capitalize consistently. For example, HelloWorldApp is not the same as helloworldapp.
psn-gallardo.indb 22psn-gallardo.indb 22 11/12/14 12:04 PM11/12/14 12:04 PM

A Closer Look at the “Hello World!” Application 23
1
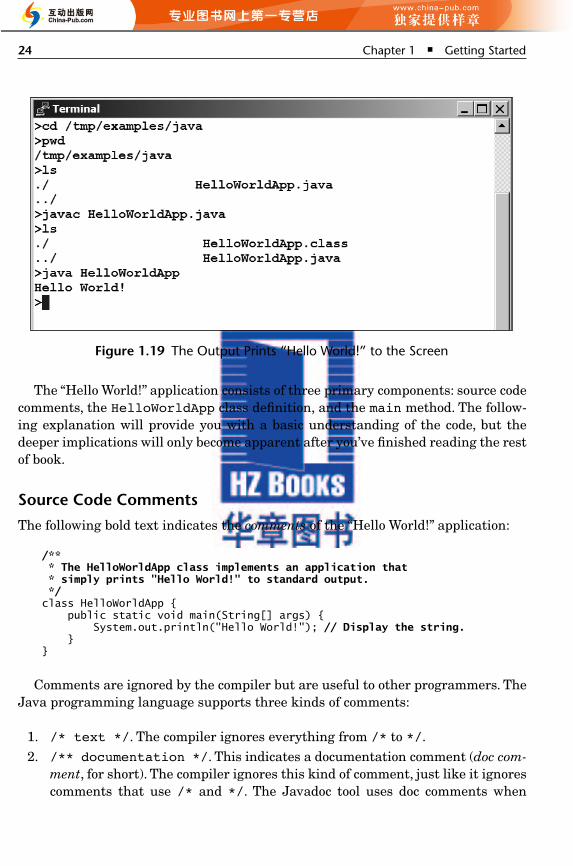
Figure 1.19 shows what you should now see. Congratulations! Your program works! If you encounter problems with the instructions in this section, consult “Common Problems (and Their Solutions)” at the end of the chapter.
A Closer Look at the “Hello World!” Application
Now that you’ve seen the “Hello World!” application (and perhaps even compiled and run it), you might be wondering how it works. Here again is its code:
class HelloWorldApp { public static void main(String[] args) { System.out.println("Hello World!"); // Display the string. }}
Figure 1.17 Results of the ls Command, Showing the .java Source File
Figure 1.18 Results of the ls Command, Showing the Generated .class File
psn-gallardo.indb 23psn-gallardo.indb 23 11/12/14 12:04 PM11/12/14 12:04 PM
24 Chapter 1 ■ Getting Started
1
The “Hello World!” application consists of three primary components: source code comments, the HelloWorldApp class defi nition, and the main method. The follow-ing explanation will provide you with a basic understanding of the code, but the deeper implications will only become apparent after you’ve fi nished reading the rest of book.
Source Code Comments
The following bold text indicates the comments of the “Hello World!” application:
/** * The HelloWorldApp class implements an application that * simply prints "Hello World!" to standard output. */class HelloWorldApp { public static void main(String[] args) { System.out.println("Hello World!"); // Display the string. }}
Comments are ignored by the compiler but are useful to other programmers. The Java programming language supports three kinds of comments:
1. /* text */. The compiler ignores everything from /* to */.2. /** documentation */. This indicates a documentation comment (doc com-
ment, for short). The compiler ignores this kind of comment, just like it ignores comments that use /* and */. The Javadoc tool uses doc comments when
Figure 1.19 The Output Prints “Hello World!” to the Screen
psn-gallardo.indb 24psn-gallardo.indb 24 11/12/14 12:04 PM11/12/14 12:04 PM

A Closer Look at the “Hello World!” Application 25
1preparing automatically generated documentation. For more information on javadoc, see the Javadoc tool documentation.16
3. // text. The compiler ignores everything from // to the end of the line.
The HelloWorldApp Class Defi nition
The following bold text begins the class defi nition block for the “Hello World!” application:
/** * The HelloWorldApp class implements an application that * simply displays "Hello World!" to the standard output. */class HelloWorldApp { public static void main(String[] args) { System.out.println("Hello World!"); // Display the string. }}
As shown above, the most basic form of a class defi nition is as follows:
class name { ...}
The keyword class begins the class defi nition for a class named name, and the code for each class appears between the opening and closing curly braces marked in bold above. Chapter 2 provides an overview of classes in general, and Chapter 4 discusses classes in detail. For now, it is enough to know that every application begins with a class defi nition.
The main Method
The following bold text begins the defi nition of the main method:
/** * The HelloWorldApp class implements an application that * simply displays "Hello World!" to the standard output. */class HelloWorldApp { public static void main(String[] args) { System.out.println("Hello World!"); //Display the string. }}
16. 8/docs/technotes/guides/javadoc/index.html
psn-gallardo.indb 25psn-gallardo.indb 25 11/12/14 12:04 PM11/12/14 12:04 PM

26 Chapter 1 ■ Getting Started
1 In the Java programming language, every application must contain a main method whose signature is as follows:
public static void main(String[] args)
The modifi ers public and static can be written in either order (public static or static public), but the convention is to use public static as shown above. You can name the argument anything you want, but most program-mers choose args or argv.
The main method is similar to the main function in C and C++; it’s the entry point for your application and will subsequently invoke all the other methods required by your program. The main method accepts a single argument: an array of elements of type String.
public static void main(String[] args)
This array is the mechanism through which the runtime system passes information to your application. For example,
java MyApp arg1 arg2
Each string in the array is called a command- line argument. Command- line argu-ments let users affect the operation of the application without recompiling it. For example, a sorting program might allow the user to specify that the data be sorted in descending order with this command- line argument:
- descending
The “Hello World!” application ignores its command- line arguments, but you should be aware of the fact that such arguments do exist.
Finally, the line
System.out.println("Hello World!");
uses the System class from the core library to print the “Hello World!” message to standard output. Portions of this library (also known as the Application Program-ming Interface, or API) will be discussed in later chapters.
psn-gallardo.indb 26psn-gallardo.indb 26 11/12/14 12:04 PM11/12/14 12:04 PM

Common Problems (and Their Solutions) 27
1Common Problems (and Their Solutions)
Compiler Problems
Common Error Messages on Microsoft Windows Systems
'javac' is not recognized as an internal or external command, operable program or batch fileIf you receive this error, Windows cannot fi nd the compiler (javac). Here’s one way to tell Windows where to fi nd javac. Suppose you installed the JDK in C:\jdk1.8.0. At the prompt, you would type the following command and press Enter:
C:\jdk1.8.0\bin\javac HelloWorldApp.java
If you choose this option, you’ll have to precede your javac and java commands with C:\jdk1.8.0\bin\ each time you compile or run a program. To avoid this extra typing, consult the section on updating the PATH variable in the JDK 8 instal-lation instructions.17
Class names, 'HelloWorldApp', are only accepted if annotation processing is explicitly requested
If you receive this error, you forgot to include the .java suffi x when compiling the program. Remember, the command is javac HelloWorldApp.java, not javac HelloWorldApp.
Common Error Messages on Solaris and Linux
javac: Command not foundIf you receive this error, the operating system cannot fi nd the compiler, javac. Here’s one way to tell Solaris and Linux where to fi nd javac. Suppose you installed the JDK in /usr/local/jdk1.8.0. At the prompt, you would type the following command and press Enter:
/usr/local/jdk1.8.0/javac HelloWorldApp.java
17. 8/docs/webnotes/install/windows/jdk-installation-windows.html#path
NoteIf you choose this option, each time you compile or run a program, you’ll have to precede your javac and java commands with /usr/local/jdk1.8.0/. To avoid this extra typing, you could add this information to your PATH variable. The steps for doing so will vary depending on which shell you are currently running.
psn-gallardo.indb 27psn-gallardo.indb 27 11/12/14 12:04 PM11/12/14 12:04 PM

28 Chapter 1 ■ Getting Started
1 Class names, 'HelloWorldApp', are only accepted if annotation
processing is explicitly requested
If you receive this error, you forgot to include the .java suffi x when compiling the program. Remember, the command is javac HelloWorldApp.java, not javac HelloWorldApp.
Syntax Errors (All Platforms)
If you mistype part of a program, the compiler may issue a syntax error. The mes-sage usually displays the type of the error, the line number where the error was detected, the code on that line, and the position of the error within the code. Here’s an error caused by omitting a semicolon (;) at the end of a statement:
testing.java:14: ';' expected.System.out.println("Input has " + count + " chars.") ^1 error
Sometimes the compiler can’t guess your intent and prints a confusing error mes-sage or multiple error messages if the error cascades over several lines. For exam-ple, the following code snippet omits a semicolon (;) from the bold line:
while (System.in.read() != - 1) count++System.out.println("Input has " + count + " chars.");
When processing this code, the compiler issues two error messages:
testing.java:13: Invalid type expression. count++ ^testing.java:14: Invalid declaration. System.out.println("Input has " + count + " chars."); ^2 errors
The compiler issues two error messages because, after it processes count++, the compiler’s state indicates that it’s in the middle of an expression. Without the semi-colon, the compiler has no way of knowing that the statement is complete. If you see any compiler errors, then your program did not successfully compile, and the compiler did not create a .class fi le. Carefully verify the program, fi x any errors that you detect, and try again.
psn-gallardo.indb 28psn-gallardo.indb 28 11/12/14 12:04 PM11/12/14 12:04 PM

Common Problems (and Their Solutions) 29
1Semantic Errors
In addition to verifying that your program is syntactically correct, the compiler checks for other basic correctness. For example, the compiler warns you each time you use a variable that has not been initialized:
testing.java:13: Variable count may not have been initialized. count++; ^testing.java:14: Variable count may not have been initialized. System.out.println("Input has " + count + " chars."); ^2 errors
Again, your program did not successfully compile, and the compiler did not create a .class fi le. Fix the error and try again.
Runtime Problems
Error Messages on Microsoft Windows Systems
Exception in thread "main" java.lang.NoClassDefFoundError: HelloWorldAppIf you receive this error, java cannot fi nd your bytecode fi le, HelloWorldApp.class. One of the places java tries to fi nd your .class fi le is your current directory. So if your .class fi le is in C:\java, you should change your current directory to that. To change your directory, type the following command at the prompt and press Enter:
cd c:\java
The prompt should change to C:\java>. If you enter dir at the prompt, you should see your .java and .class fi les. Now enter java HelloWorldApp again.
If you still have problems, you might have to change your CLASSPATH variable. To see if this is necessary, try clobbering the class path with the following command:
set CLASSPATH=
Now enter java HelloWorldApp again. If the program works now, you’ll have to change your CLASSPATH variable. To set this variable, consult the section on updat-ing the PATH variable in the JDK 8 installation instructions.18 The CLASSPATH vari-able is set in the same manner.
18. 8/docs/technotes/guides/install/windows_jdk_install.html#BABGDJFH
psn-gallardo.indb 29psn-gallardo.indb 29 11/12/14 12:04 PM11/12/14 12:04 PM

30 Chapter 1 ■ Getting Started
1 Could not find or load main class HelloWorldApp.class
A common mistake made by beginner programmers is to try to run the java launcher on the .class fi le that was created by the compiler. For example, you’ll get this error if you try to run your program with java HelloWorldApp.class instead of java HelloWorldApp. Remember, the argument is the name of the class that you want to use, not the fi le name.
Exception in thread "main" java.lang.NoSuchMethodError: main
The Java VM requires that the class you execute with it has a main method at which to begin the execution of your application. The section “A Closer Look at the ‘Hello World!’ Application” discusses the main method in detail.
Error Messages on Solaris and Linux
Exception in thread "main" java.lang.NoClassDefFoundError:
HelloWorldApp
If you receive this error, java cannot fi nd your bytecode fi le, HelloWorldApp.class. One of the places java tries to fi nd your bytecode fi le is your current direc-tory. So, for example, if your bytecode fi le is in /home/jdoe/java, you should change your current directory to that. To change your directory, type the following command at the prompt and press Enter:
cd /home/jdoe/java
If you enter pwd at the prompt, you should see /home/jdoe/java. If you enter ls at the prompt, you should see your .java and .class fi les. Now enter java HelloWorldApp again.
If you still have problems, you might have to change your CLASSPATH environ-ment variable. To see if this is necessary, try clobbering the class path with the fol-lowing command:
unset CLASSPATH
Now enter java HelloWorldApp again. If the program works now, you’ll have to change your CLASSPATH variable in the same manner as the PATH variable above.
Exception in thread "main" java.lang.NoClassDefFoundError:
HelloWorldApp/class
A common mistake made by beginner programmers is to try to run the java launcher on the .class fi le that was created by the compiler. For example, you’ll get this error if you try to run your program with java HelloWorldApp.class
psn-gallardo.indb 30psn-gallardo.indb 30 11/12/14 12:04 PM11/12/14 12:04 PM

Questions and Exercises: Getting Started 31
1instead of java HelloWorldApp. Remember, the argument is the name of the class that you want to use, not the fi le name.
Exception in thread "main" java.lang.NoSuchMethodError: main
The Java VM requires that the class you execute with it has a main method at which to begin execution of your application. The section “A Closer Look at the ‘Hello World!’ Application” discusses the main method in detail.
Applet or Java Web Start Application Is Blocked
If you are running an application through a browser and get security warnings that say the application is blocked, check the following items:
■ Verify that the attributes in the JAR fi le manifest are set correctly for the envi-ronment in which the application is running. The Permissions attribute is required. In a NetBeans project, you can open the manifest fi le from the Files tab of the NetBeans IDE by expanding the project folder and double clicking manifest.mf.
■ Verify that the application is signed by a valid certifi cate and that the certifi -cate is located in the Signer Certifi cate Authority (CA) keystore.
■ If you are running a local applet, set up a web server to use for testing. You can also add your application to the exception site list, which is managed in the Security tab of the Java Control Panel.
Questions and Exercises: Getting Started
Questions
1. When you compile a program written in the Java programming language, the compiler converts the human- readable source fi le into platform- independent code that a Java VM can understand. What is this platform- independent code called?
2. Which of the following is not a valid comment?
a. /** comment */
b. /* comment */
c. /* comment
d. // comment
3. What is the fi rst thing you should check if you see the following error at runtime?
psn-gallardo.indb 31psn-gallardo.indb 31 11/12/14 12:04 PM11/12/14 12:04 PM
32 Chapter 1 ■ Getting Started
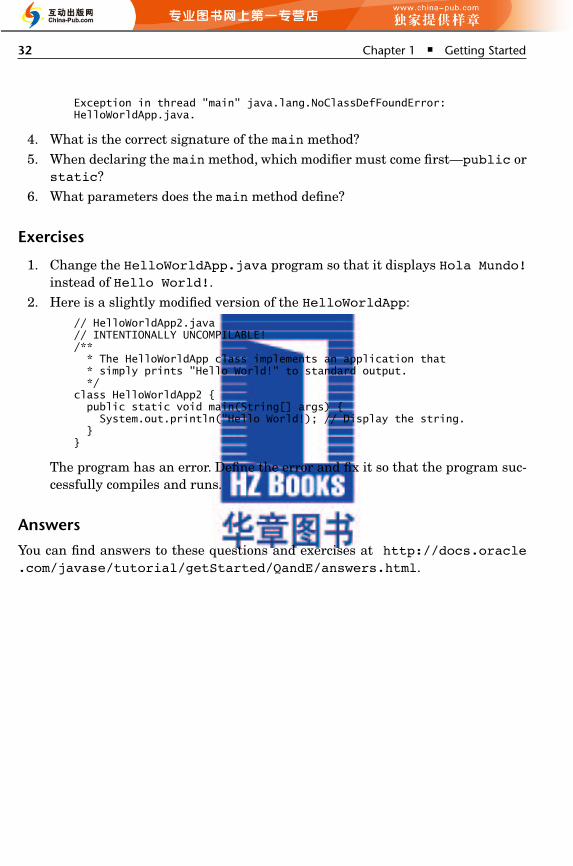
1Exception in thread "main" java.lang.NoClassDefFoundError:HelloWorldApp.java.
4. What is the correct signature of the main method?5. When declaring the main method, which modifi er must come fi rst— public or
static?6. What parameters does the main method defi ne?
Exercises
1. Change the HelloWorldApp.java program so that it displays Hola Mundo! instead of Hello World!.
2. Here is a slightly modifi ed version of the HelloWorldApp:// HelloWorldApp2.java// INTENTIONALLY UNCOMPILABLE!/** * The HelloWorldApp class implements an application that * simply prints "Hello World!" to standard output. */class HelloWorldApp2 { public static void main(String[] args) { System.out.println("Hello World!); // Display the string. }}
The program has an error. Defi ne the error and fi x it so that the program suc-cessfully compiles and runs.
Answers
You can fi nd answers to these questions and exercises at http://docs.oracle.com/javase/tutorial/getStarted/QandE/answers.html.
psn-gallardo.indb 32psn-gallardo.indb 32 11/12/14 12:04 PM11/12/14 12:04 PM