Get To Know Guide,H3 - General Motors · Manual Transmission Operating Tips . . . . . . . . .15...
20
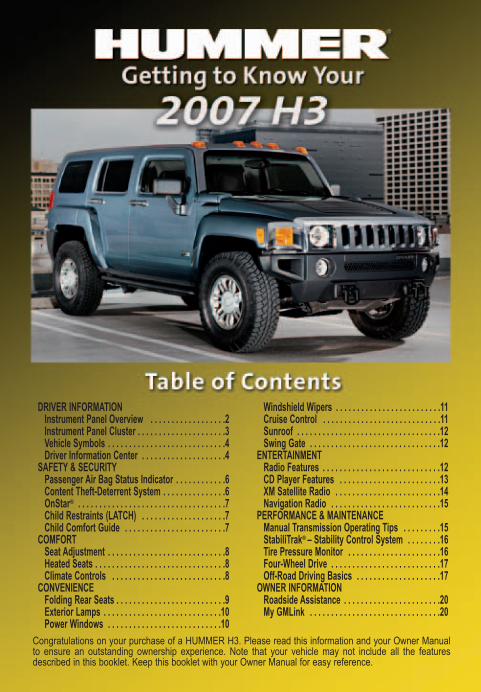
Congratulations on your purchase of a HUMMER H3. Please read this information and your Owner Manual to ensure an outstanding ownership experience. Note that your vehicle may not include all the features described in this booklet. Keep this booklet with your Owner Manual for easy reference. DRIVER INFORMATION Instrument Panel Overview . . . . . . . . . . . . . . . . . .2 Instrument Panel Cluster . . . . . . . . . . . . . . . . . . . . .3 Vehicle Symbols . . . . . . . . . . . . . . . . . . . . . . . . . . . .4 Driver Information Center . . . . . . . . . . . . . . . . . . . .4 SAFETY & SECURITY Passenger Air Bag Status Indicator . . . . . . . . . . . .6 Content Theft-Deterrent System . . . . . . . . . . . . . . .6 OnStar ® . . . . . . . . . . . . . . . . . . . . . . . . . . . . . . . . . . .7 Child Restraints (LATCH) . . . . . . . . . . . . . . . . . . . .7 Child Comfort Guide . . . . . . . . . . . . . . . . . . . . . . . .7 COMFORT Seat Adjustment . . . . . . . . . . . . . . . . . . . . . . . . . . . .8 Heated Seats . . . . . . . . . . . . . . . . . . . . . . . . . . . . . . .8 Climate Controls . . . . . . . . . . . . . . . . . . . . . . . . . . .8 CONVENIENCE Folding Rear Seats . . . . . . . . . . . . . . . . . . . . . . . . . .9 Exterior Lamps . . . . . . . . . . . . . . . . . . . . . . . . . . . .10 Power Windows . . . . . . . . . . . . . . . . . . . . . . . . . . .10 Windshield Wipers . . . . . . . . . . . . . . . . . . . . . . . . .11 Cruise Control . . . . . . . . . . . . . . . . . . . . . . . . . . . .11 Sunroof . . . . . . . . . . . . . . . . . . . . . . . . . . . . . . . . . .12 Swing Gate . . . . . . . . . . . . . . . . . . . . . . . . . . . . . . .12 ENTERTAINMENT Radio Features . . . . . . . . . . . . . . . . . . . . . . . . . . . .12 CD Player Features . . . . . . . . . . . . . . . . . . . . . . . .13 XM Satellite Radio . . . . . . . . . . . . . . . . . . . . . . . . .14 Navigation Radio . . . . . . . . . . . . . . . . . . . . . . . . . .15 PERFORMANCE & MAINTENANCE Manual Transmission Operating Tips . . . . . . . . .15 StabiliTrak ® – Stability Control System . . . . . . . .16 Tire Pressure Monitor . . . . . . . . . . . . . . . . . . . . . .16 Four-Wheel Drive . . . . . . . . . . . . . . . . . . . . . . . . . .17 Off-Road Driving Basics . . . . . . . . . . . . . . . . . . . .17 OWNER INFORMATION Roadside Assistance . . . . . . . . . . . . . . . . . . . . . . .20 My GMLink . . . . . . . . . . . . . . . . . . . . . . . . . . . . . . .20
-
Upload
nguyendien -
Category
Documents
-
view
213 -
download
0
Transcript of Get To Know Guide,H3 - General Motors · Manual Transmission Operating Tips . . . . . . . . .15...
Congratulations on your purchase of a HUMMER H3. Please read this information and your Owner Manualto ensure an outstanding ownership experience. Note that your vehicle may not include all the featuresdescribed in this booklet. Keep this booklet with your Owner Manual for easy reference.
DRIVER INFORMATION Instrument Panel Overview . . . . . . . . . . . . . . . . . .2Instrument Panel Cluster . . . . . . . . . . . . . . . . . . . . .3Vehicle Symbols . . . . . . . . . . . . . . . . . . . . . . . . . . . .4Driver Information Center . . . . . . . . . . . . . . . . . . . .4
SAFETY & SECURITYPassenger Air Bag Status Indicator . . . . . . . . . . . .6Content Theft-Deterrent System . . . . . . . . . . . . . . .6OnStar® . . . . . . . . . . . . . . . . . . . . . . . . . . . . . . . . . . .7Child Restraints (LATCH) . . . . . . . . . . . . . . . . . . . .7Child Comfort Guide . . . . . . . . . . . . . . . . . . . . . . . .7
COMFORTSeat Adjustment . . . . . . . . . . . . . . . . . . . . . . . . . . . .8Heated Seats . . . . . . . . . . . . . . . . . . . . . . . . . . . . . . .8Climate Controls . . . . . . . . . . . . . . . . . . . . . . . . . . .8
CONVENIENCEFolding Rear Seats . . . . . . . . . . . . . . . . . . . . . . . . . .9Exterior Lamps . . . . . . . . . . . . . . . . . . . . . . . . . . . .10Power Windows . . . . . . . . . . . . . . . . . . . . . . . . . . .10
Windshield Wipers . . . . . . . . . . . . . . . . . . . . . . . . .11Cruise Control . . . . . . . . . . . . . . . . . . . . . . . . . . . .11Sunroof . . . . . . . . . . . . . . . . . . . . . . . . . . . . . . . . . .12Swing Gate . . . . . . . . . . . . . . . . . . . . . . . . . . . . . . .12
ENTERTAINMENTRadio Features . . . . . . . . . . . . . . . . . . . . . . . . . . . .12CD Player Features . . . . . . . . . . . . . . . . . . . . . . . .13XM Satellite Radio . . . . . . . . . . . . . . . . . . . . . . . . .14Navigation Radio . . . . . . . . . . . . . . . . . . . . . . . . . .15
PERFORMANCE & MAINTENANCEManual Transmission Operating Tips . . . . . . . . .15StabiliTrak® – Stability Control System . . . . . . . .16Tire Pressure Monitor . . . . . . . . . . . . . . . . . . . . . .16Four-Wheel Drive . . . . . . . . . . . . . . . . . . . . . . . . . .17Off-Road Driving Basics . . . . . . . . . . . . . . . . . . . .17
OWNER INFORMATIONRoadside Assistance . . . . . . . . . . . . . . . . . . . . . . .20My GMLink . . . . . . . . . . . . . . . . . . . . . . . . . . . . . . .20
H3 2007 A.qxd 5/17/06 9:04 AM Page 1

A C A F A
G I J K M N O
AB D
L
DRIVER INFORMATIONG
etting to Know YourH
32
Instrument Panel Overview
See Section 3 of your Owner Manual.
A. Air OutletsB. Turn Signal/Multifunction LeverC. HornD. Instrument Panel ClusterE. Hazard Warning Flashers Button
F. Four-Wheel Drive SwitchesG. Exterior Lamps ControlH. Parking Brake ReleaseI. Audio SystemJ. Climate Controls
K. Rear Washer/Wiper ControlL. Off-Road Lamps Buttons (if equipped)M. Gearshift Lever N. Accessory Power OutletsO. Glove Box
EC
H
H3 2007 A.qxd 5/17/06 9:04 AM Page 2

Your vehicle’s instrument panel isequipped with this cluster or onevery similar to it. The instrumentpanel cluster includes these key features:
A. Tachometer B. Fuel GaugeC. Driver Information Center
Display/OdometerD. Engine Coolant Temperature
Gauge E. Speedometer
3
See Section 3 of your Owner Manual.
Instrument Panel Cluster
Note: The instrument panel clusteris designed to let you know aboutmany important aspects of yourvehicle’s operation. It is importantto read your Owner Manual andbecome familiar with the informa-tion being relayed to you by thelights, gauges, DIC messages andindicators, as well as what actioncan be taken to ensure safety andto prevent damage.
B C D EA
H3 2007 A.qxd 5/17/06 9:04 AM Page 3

Getting to Know Your H34
Vehicle Symbols
Following are examples of symbols youmay find on your vehicle. It is importantto become familiar with them, as theyalert you to various vehicle operatingconditions.
Air Bag Readiness Light
Air Conditioning (A/C)
Antilock Brake System Warning Light
Brake System Warning Light
Cruise Control Set
Dome Lamps Override Button
Headlamps
Instrument Panel Brightness Control
Malfunction Indicator Lamp (Check Engine Light)
Off
Off/On
On
Parking Lamps
Rear Window Defogger
Safety Belt Reminder Light
Security Light
Traction Control System Light
Driver Information Center
Your vehicle’s Driver Information Center(DIC), located in the instrument panelcluster, can display trip information, personalization features, and vehiclewarnings and messages. It can beviewed in three languages. The odometer is automatically displayedwhen the engine is started. Scroll through DIC ModesPress and release the reset stem locat-ed next to the DIC display on the instru-ment panel cluster.Trip OdometerPress and release the reset stem untilTRIP is displayed. The trip odometerdisplays the current distance traveledsince the last reset. Reset the trip odometer: Press andhold the reset stem for approximatelyfour seconds.Engine Oil Life SystemThe system calculates the percentage ofengine oil life remaining before an oiland oil filter change is needed. (Thisservice should be performed within 600miles of the CHANGE OIL messagebeing displayed.) Reset the engine oil life system:1. With the engine off, turn the key
to On.
H3 2007 A.qxd 5/17/06 9:04 AM Page 4

5
2. Press and release the reset stemuntil OIL LIFE is displayed.
3. Once the alternating OIL LIFE andRESET messages appear, press andhold the reset stem until severalbeeps sound.
4. Turn the key to Off.
Program the Automatic Door LocksTo program the door locks to operate inone of three modes:1. With the engine off, turn the key to
Lock. Do not remove the key.2. Press and hold the power door lock
button for approximately three sec-onds until the DIC displays the cur-rent door lock mode.
3. To view each next available mode,press, hold for approximately twoseconds, and then release the resetstem.
4. Once the preferred mode is dis-played, briefly press the reset stem toset your choice. The DIC display willthen clear.
Program the Remote Keyless EntryFeedbackTo program the Remote Keyless Entry(RKE) feedback to one of four modes:1. With the engine off, turn the key to
Lock. Do not remove the key.
Note: The Oil Life System must bereset after each oil change to helpensure the proper maintenance of yourvehicle. The Oil Life System does notreplace the need to follow the mainte-nance schedule in the Owner Manual.For service information, see Section 5of your Owner Manual.
2. Press and hold both the lock andunlock buttons on the RKE transmit-ter until the DIC displays the currentRKE feedback mode.
3. To view each next available mode,press, hold for approximately twoseconds, and then release the resetstem.
4. Once the preferred mode is dis-played, briefly press the reset stem toset your choice. The DIC display willthen clear.
Selecting a LanguageTo select the DIC language:1. With the engine off, turn the key
to On.2. Close all doors.3. Press and release the reset stem
until LANGUAGE is displayed.4. To view each available language,
press and hold the reset stem for two seconds.
5. Once the desired language is dis-played, briefly press the reset stem to set your choice.
Warnings and MessagesWarnings and messages are displayedon the DIC to notify the driver that thestatus of the vehicle has changed andthat some action may be needed by thedriver.Each message must be acknowledged.To acknowledge and clear a messagefrom the DIC, press and release thereset stem.With the OnStar system, if your CheckEngine light or any other warning message appears, you can press theblue OnStar button and speak to anOnStar Advisor. In many vehicles,
H3 2007 A.qxd 5/17/06 9:04 AM Page 5
Getting to Know Your H36
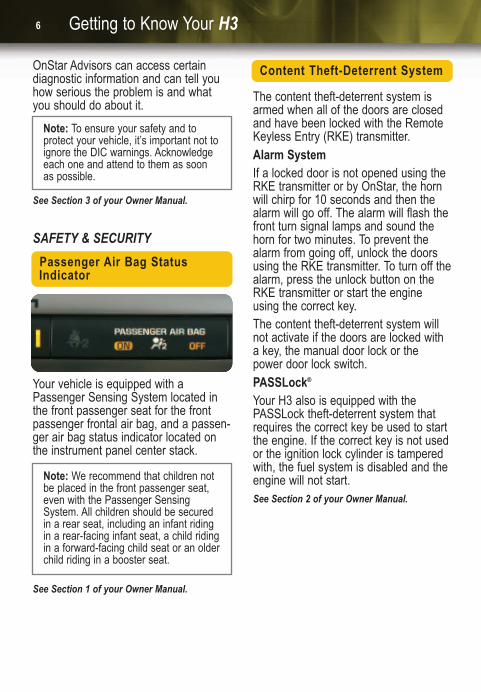
Content Theft-Deterrent System
The content theft-deterrent system isarmed when all of the doors are closedand have been locked with the RemoteKeyless Entry (RKE) transmitter.Alarm SystemIf a locked door is not opened using theRKE transmitter or by OnStar, the hornwill chirp for 10 seconds and then thealarm will go off. The alarm will flash thefront turn signal lamps and sound thehorn for two minutes. To prevent thealarm from going off, unlock the doorsusing the RKE transmitter. To turn off thealarm, press the unlock button on theRKE transmitter or start the engineusing the correct key.The content theft-deterrent system willnot activate if the doors are locked witha key, the manual door lock or thepower door lock switch.PASSLock®
Your H3 also is equipped with the PASSLock theft-deterrent system thatrequires the correct key be used to startthe engine. If the correct key is not usedor the ignition lock cylinder is tamperedwith, the fuel system is disabled and theengine will not start.See Section 2 of your Owner Manual.
SAFETY & SECURITY
Passenger Air Bag StatusIndicator
Your vehicle is equipped with aPassenger Sensing System located inthe front passenger seat for the frontpassenger frontal air bag, and a passen-ger air bag status indicator located onthe instrument panel center stack.
See Section 1 of your Owner Manual.
Note: We recommend that children notbe placed in the front passenger seat,even with the Passenger SensingSystem. All children should be securedin a rear seat, including an infant ridingin a rear-facing infant seat, a child ridingin a forward-facing child seat or an olderchild riding in a booster seat.
OnStar Advisors can access certaindiagnostic information and can tell youhow serious the problem is and whatyou should do about it.
See Section 3 of your Owner Manual.
Note: To ensure your safety and to protect your vehicle, it’s important not toignore the DIC warnings. Acknowledgeeach one and attend to them as soonas possible.
H3 2007 A.qxd 5/17/06 9:04 AM Page 6

7
OnStar®
The OnStar system provides in-vehiclesafety, security and phone services,available 24 hours a day, 7 days aweek. These services are easilyaccessed through the three OnStar buttons in your vehicle. For more information about OnStar features, refer to the OnStar Owner’sGuide and enclosed audio CD located inyour glove box.See Section 2 of your Owner Manual.
Child Restraints (LATCH)
Your vehicle is equipped with LATCHanchors, and has top tethers for usewith a LATCH compatible child restraint.If your child restraint is not compatiblewith the LATCH system, you may stilluse it by installing the child restraint withthe seat belt system.Choose a child seat that is appropriatefor the child’s age and size (weight andheight).See Section 1 of your Owner Manual.
Child Comfort Guide
Rear shoulder belt comfort guides mayprovide added safety belt comfort forsmaller adults and for older children whohave outgrown booster seats. Wheninstalled on a shoulder belt, the comfortguide better positions the belt away fromthe neck and head. One comfort guideis provided for each outboard rear seatposition.Installing a Comfort Guide:1. Remove the guide from its storage
clip on the trim panel.2. Place the guide over the belt and
insert the two edges of the belt intothe slots of the guide. Be sure thatthe belt is not twisted and that it liesflat. The elastic cord must be underthe belt and the guide on top.
3. Buckle, position and release the safety belt as described in Section 1of your Owner Manual. Make sure the belt crosses the passenger’sshoulder.
See Section 1 of your Owner Manual.
H3 2007 A.qxd 5/17/06 9:04 AM Page 7

Getting to Know Your H38
COMFORT
Seat Adjustment
Manual SeatsAdjust the position of the seat: Lift thebar located under the front of the seatand slide the seat to the desired posi-tion. Release the bar. Power SeatsThe power seat control (A) is located onthe outboard side of the seat.
Move the seat forward or rearward:Move the entire seat control forward orrearward.Raise or lower the front or rear of theseat: Lift or depress the front edge orrear edge of the seat control.Raise or lower the seat: Lift or depressthe entire seat control.Manual/Power LumbarManual lumbar support: The controlknob is located on the outboard side ofthe seat. Turn the knob counterclock-wise to increase support and clockwiseto decrease support.Power lumbar support: The controlswitch (B) is located on the outboardside of the seat. Press and hold the frontof the switch to increase support and therear of the switch to decrease support.See Section 1 of your Owner Manual.
Heated Seats
The seat cushion and the lower back ofthe driver’s and front passenger’s seatscan be heated. The controls are locatedon the outboard sides of the front seats. High Setting: Press the upper part ofthe switch.Low Setting: Press the lower part of theswitch.Off: Put the switch in the center position.
See Section 1 of your Owner Manual.
Note: The ignition must be turned to Onin order for the heated seats to operate.Also, the passenger’s safety belt mustbe buckled for the passenger’s heatedseat to operate.
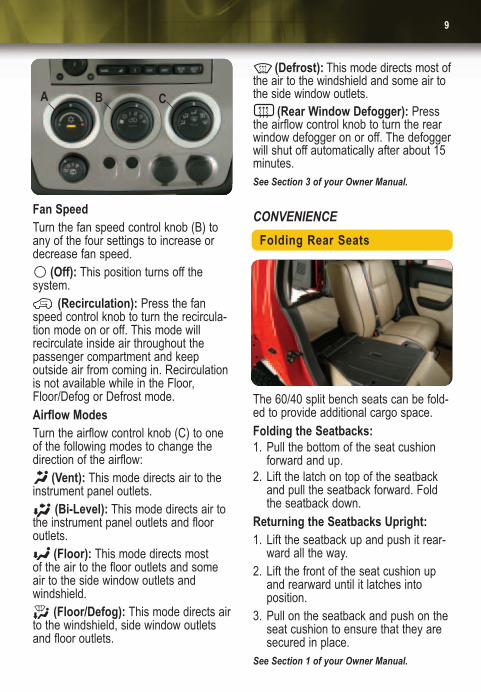
Climate Controls
Temperature ControlTurn the temperature control knob (A) to raise or lower the temperature setting.
(Air Conditioning): Press the temperature control knob to turn the air conditioning system on or off. Theindicator light will flash three times and the air conditioning system will notfunction if the fan is turned off.
AB
H3 2007 A.qxd 5/17/06 9:04 AM Page 8
9
Fan SpeedTurn the fan speed control knob (B) toany of the four settings to increase ordecrease fan speed.
(Off): This position turns off the system.
(Recirculation): Press the fanspeed control knob to turn the recircula-tion mode on or off. This mode will recirculate inside air throughout the passenger compartment and keep outside air from coming in. Recirculationis not available while in the Floor,Floor/Defog or Defrost mode.Airflow ModesTurn the airflow control knob (C) to oneof the following modes to change thedirection of the airflow:
(Vent): This mode directs air to theinstrument panel outlets.
(Bi-Level): This mode directs air tothe instrument panel outlets and flooroutlets.
(Floor): This mode directs most of the air to the floor outlets and some air to the side window outlets and windshield.
(Floor/Defog): This mode directs airto the windshield, side window outletsand floor outlets.
(Defrost): This mode directs most ofthe air to the windshield and some air tothe side window outlets.
(Rear Window Defogger): Pressthe airflow control knob to turn the rearwindow defogger on or off. The defoggerwill shut off automatically after about 15minutes.See Section 3 of your Owner Manual.
CONVENIENCE
Folding Rear Seats
The 60/40 split bench seats can be fold-ed to provide additional cargo space. Folding the Seatbacks:1. Pull the bottom of the seat cushion
forward and up.2. Lift the latch on top of the seatback
and pull the seatback forward. Foldthe seatback down.
Returning the Seatbacks Upright:1. Lift the seatback up and push it rear-
ward all the way.2. Lift the front of the seat cushion up
and rearward until it latches into position.
3. Pull on the seatback and push on theseat cushion to ensure that they aresecured in place.
See Section 1 of your Owner Manual.
A B C
H3 2007 A.qxd 5/17/06 9:04 AM Page 9

Getting to Know Your H310
Light SensorThe automatic headlamps use a lightsensor, located on top of the instrumentpanel, to determine light conditions. Toensure proper system operation, avoidplacing any objects on or near the sen-sor or covering the sensor.See Section 3 of your Owner Manual.
Exterior Lamps
Your H3 is equipped with an AutomaticHeadlamp System, which turns on theheadlamps and other exterior lamps atdusk or when necessary. The exteriorlamps also can be operated manually.Exterior Lamp Control SwitchThe exterior lamp control switch, used tomanually operate the exterior lamps, islocated on the left side of the instrumentpanel. The switch can be rotated to eachof the following four positions:
(Off): When operating in the AUTOposition, a momentary turn of the lampcontrol switch to the position will turnoff the Daytime Running Lamps, auto-matic headlamps and all exterior lights. AUTO (Automatic Lamp Control):Automatically turns on Daytime RunningLamps in the daytime, and headlamps,parking lamps, taillamps and instrumentpanel lights at night. In a dark environ-ment, the lamps will turn on when thevehicle is shifted out of Park.
(Parking Lamps): Manually turnson parking lamps, taillamps and instru-ment panel lights only.
(Headlamps): Manually turns onheadlamps, parking lamps, taillampsand instrument panel lights.
Power Windows
The power window switches are locatedon the armrest of each door. To lower apower window, push down on the powerwindow switch. To raise a power win-dow, pull up on the switch.Express-Down WindowThe driver’s window has an express-down feature that automatically lowersthe window completely without holdingthe switch. Press down on the switchpast the first position to activate theexpress-down mode.Window LockoutThe window lockout button is locatedforward of the power window switches.Depress the button to disable the pas-sengers’ power window switches.See Section 2 of your Owner Manual.
H3 2007 A.qxd 5/17/06 9:04 AM Page 10

The windshield wiper controls are on themultifunction lever, located on the leftside of the steering column. Turn theband with the wiper symbol to adjust thefunction of the wipers.
(Mist): Move the band down to thisposition to turn the wipers on for a singlewipe. Hold the band at this position foradditional wipes.
(Off): This position turns off the windshield wipers.
(Delay): This position adjusts thedelay time between wipes. Rotate theband on the lever to increase ordecrease the delay; the wipers activatemore often as the band is rotatedupward.
(Low): This position turns thewipers on Low.
(High): This position turns thewipers on High.
(Washer Fluid): To spray washerfluid on the windshield, push the paddleat the top of the multifunction lever.See Section 3 of your Owner Manual.
11
Windshield Wipers
The cruise control switch is on the multi-function lever, located on the left side ofthe steering column.
(Off): This position turns off thecruise control system.
(On): This position turns on the cruisecontrol system.+ (Resume): This position enables thevehicle to resume a set speed, or toincrease the set speed, if the system isengaged.
– (Set): Press the button on the endof the multifunction lever to set a speed,or to decrease the set speed, if the sys-tem is engaged. The cruise symbol onthe instrument panel will illuminate whenthe cruise control is engaged.See Section 3 of your Owner Manual.
Cruise Control
H3 2007 A.qxd 5/17/06 9:04 AM Page 11

Getting to Know Your H312
Sunroof
The control switch for the sunroof islocated on the headliner between thesun visors. It will operate only while theignition is on or Retained AccessoryPower is active.Vent Position: Open the sunshademanually. Press the rear part of theswitch until the desired position isreached. The glass panel will tilt up.Open Position: Press the rear part ofthe switch and hold for one second. Theglass panel will express-open automati-cally. If closed, the sunshade will openwith the glass panel.Closed Position: Press the front part ofthe switch once, hold for one secondand then release it. The glass panel willexpress-close automatically. Close thesunshade manually.See Section 2 of your Owner Manual.
Swing Gate
To lock or unlock the swing gate, usethe power door lock switch or theRemote Keyless Entry transmitter.To open the swing gate, pull the doorhandle and open the swing gate slightly.The swing gate will continue openingautomatically. See Section 2 of your Owner Manual.
ENTERTAINMENT
Radio Features
Setting the TimeTo set the time using the Hour (H) andMinute (M) buttons located on the lower-left corner of the radio:1. Press and hold the H button until the
correct hour appears on the display.2. Press and hold the M button until the
correct minute appears on the display.
Radio Controls While most of the features on your radiowill look familiar, following are some thatmay be new:
(Power/Volume): Press the top knobto turn your audio system on or off. Turnthe knob to increase or decrease thevolume.
(Tune): Turn the bottom knob toselect radio stations.
(Audio Controls) (if equipped):Press the smaller knob to select audiosettings for fade, balance, bass and tre-ble. While the setting is displayed, turnthe knob to increase or decrease thesetting.
Note: The time can be set with the ignition on or off.
H3 2007 A.qxd 5/17/06 9:04 AM Page 12

13
: Press the right or left arrow togo to the next or previous station andstay there. To scan radio stations, press and holdeither arrow for two seconds until SCNappears on the radio display. To scanpreset stations, press and hold eitherarrow for four seconds until PSCappears on the display. Press eitherarrow again to stop scanning.BAND: Press this button to switch toFM1, FM2, AM, or XM1 and XM2 (ifequipped).
(CD): Press this button to play a CDwhile listening to the radio.
(Information): If the current station orCD has a text message, INFO willappear on the display. Press this buttonto see the message, which may includethe artist, song title, etc.1–6 (Preset Scan) (if equipped): Pressthis button to scan preset radio stations.Press again to stop scanning.CAT (Category): If equipped with XMRadio, press this button to activate XMprogram type select mode.DISP (Display): Press this button toview the available radio displays.AUTO EQ (Automatic Equalization):Press this button to select customizedequalization settings.AUTO VOL (Automatic Volume): Usethis button to set the volume level toautomatically adjust with vehicle speed.Presetting Radio StationsTo preset radio stations using the sixnumbered pushbuttons:1. Press BAND to select FM1, FM2, AM,
XM1 or XM2.2. Tune in a desired station.
3. Press AUTO EQ to select the equalization.
4. Press and hold one of the six num-bered buttons until you hear a beep.
Repeat the steps for each button. Up to30 radio stations can be preset, includ-ing six FM1, six FM2, six AM, six XM1and six XM2.See Section 3 of your Owner Manual.
CD Player Features
(Track Seek): Press the rightor left arrow to go to the start of the previous or next CD track. Press againto continue moving through the CD.
(Reverse): Press and hold thisbutton to reverse quickly within a track.
(Fast Forward): Press and holdthis button to forward quickly within atrack.
(Repeat) (if equipped): Press this button to hear a track again. Pressagain to turn off repeat play.
(Random): Press this button to hearthe tracks in random order. Press againto turn off random play.
(Previous Folder) (if equipped):Press this button to go to the previousMP3 disc playlist or folder. Press againto continue moving through the MP3playlists or folders.
(Next Folder) (if equipped): Pressthis button to go to the next MP3 discplaylist or folder. Press again to continuemoving through the MP3 playlists orfolders.
(Eject): Press this button to eject a CD. (Eject operates with the ignition orradio off.)
H3 2007 A.qxd 5/17/06 9:04 AM Page 13

Getting to Know Your H314
BAND: Press this button while a CD isplaying to listen to the radio. AUTO EQ (Automatic Equalization):Press this button to select the desiredequalization setting while playing a CD.Multiple-Disc CD Changer (if equipped)
Loading CDs1. Turn on the ignition.2. Press the LOAD button once to load
one disc. Press and hold the buttonto load multiple discs.
3. The unit will beep and INSERT CD #will be displayed.
4. Insert a CD partway into the slot,label side up; the player will pull inthe CD.
5. LOADING CD # will be displayed.6. Follow the display prompts to load
additional CDs.The last CD loaded will automaticallybegin to play. Press a radio preset button to play a specific CD.
(Song List) (if equipped): Press thisbutton to enable the song list play mode,which enables the user to program theplay of up to 20 CD tracks. S-LIST willbe displayed. Press again to disable thesong list play mode.
XM Satellite Radio (if equipped)
Two subscription service bands areavailable: XM1 and XM2. To accessthem on equipped radios, press theBAND button until XM1 or XM2 appearson the display. An extra-cost subscrip-tion to XM Satellite Radio service bringsyou the quality of digital audio and textreception from coast to coast. Availableonly in the continental U.S. and Canada,XM offers more than 160 channels ofmusic, news, sports, talk and children’sprogramming. For more information, visit XM on the Internet at www.XMradio.com or call 1-800-852-XMXM (9696).See Section 3 of your Owner Manual.
(Eject): To eject one disc, pressthe button once. To eject multiple discs,press and hold the button.
See Section 3 of your Owner Manual.
Note: CDs with any affixed labels mayjam in the CD player. Label a CD using apermanent marker. If more than one CDis inserted into the slot at one time, or ifscratched or damaged CDs are played,the CD player could be damaged. Whenusing the CD player, use only CDs ingood condition without labels; load oneCD at a time; and keep the CD playerand the loading slot free of foreign mate-rials, liquids or debris.
H3 2007 A.qxd 5/17/06 9:04 AM Page 14

15
Navigation Radio (if equipped)Your vehicle’s Navigation Radio Systemprovides you with detailed maps of allmajor highways and roads throughoutthe United States. After you enter a des-tination, the system provides turn-by-turn instructions for reaching your desti-nation. In addition, the system can helpyou locate banks, airports, restaurants,post offices, ATMs and more. It also fea-tures radio and CD functions.See your Navigation EntertainmentSystem Quick Reference Guide for moreinformation.See your Navigation Owner Manual Supplement.
PERFORMANCE & MAINTENANCE
Manual Transmission OperatingTips (if equipped)
Reverse GearWhen shifting into Reverse with amanual transmission, you must bringyour vehicle to a complete stop. If thevehicle is still rolling when trying toengage Reverse, the transmission willbe damaged.The manual transmission has a lockoutfeature that prevents shifting from 5thgear to Reverse. If the shift lever ismoved toward the 5th gear positionbefore attempting to shift into Reverse,the lockout mechanism engages. Returnto the Neutral position to unlatch thelockout mechanism.If you find it difficult to shift into Reverse,return the shift lever to Neutral andrelease the clutch pedal; then depressthe clutch pedal again and shift intoReverse.Clutch PedalYou must fully depress the clutch pedalto start your vehicle. The clutch pedalalso should be fully depressed whenshifting gears. Do not drive with your foot resting on theclutch pedal. This may cause prematurewear.See Section 2 of your Owner Manual.
H3 2007 A.qxd 5/17/06 9:04 AM Page 15

Getting to Know Your H316
The Tire Pressure Monitor alerts youwhen a significant reduction in pressureoccurs in one or more of your vehicle’stires by illuminating the (low tirepressure) warning light on the instru-ment panel. The low tire pressure warning light will remain on until youcorrect the tire pressure.A CHECK TIRE PRESSURE messagemay also appear on the DIC. Correcting the Tire PressureWhen the low tire pressure warning lightilluminates, you must fill the tire to theproper tire inflation pressure. The Tireand Loading Information label on the driver’s door shows the correct inflationpressure for the tires when they’re cold.“Cold” means your vehicle has been sit-ting for at least three hours or driven nomore than one mile.You can temporarily remove the DICmessage by acknowledging it with yourDIC controls. However, at the next vehi-cle startup, the DIC message will reap-pear if the tire pressure has not beencorrected.You may notice during cooler conditionsthat the low tire pressure warning lightwill appear when the vehicle is first started and then turn off as you start todrive the vehicle. This could be an earlyindicator that your tire pressures are getting low and need to be inflated tothe proper pressure.
See Section 5 of your Owner Manual.
Tire Pressure MonitorStabiliTrak® – Stability ControlSystem
StabiliTrak is an advanced computer-controlled vehicle stability enhancementsystem that assists with directional control of the vehicle during suddenmaneuvers or low traction situations inpoor weather. It is normal to hear thesystem working, and the system willautomatically disengage cruise controlwhen activated. StabiliTrak comes onautomatically when the vehicle is startedand does not require any driver input. You should always leave StabiliTrak onto assist with directional control of yourvehicle. However, if you need to turn offStabiliTrak, press and hold the buttonon the instrument panel for five seconds.STAB SYS OFF will be displayed on theDIC. StabiliTrak also is disabled whenthe vehicle is shifted into 4LO.See Section 4 of your Owner Manual.
Note: The Tire Pressure Monitor canalert you about low tire pressure, but itdoesn’t replace normal monthly tiremaintenance.
H3 2007 A.qxd 5/17/06 9:04 AM Page 16

17
Four-Wheel Drive
Transfer Case Buttons Your vehicle’s transfer case buttonsallow you to shift into and out of the vari-ous four-wheel drive modes.
The switches, located above the centerconsole, include:4s (Four-Wheel High): Used for driving in most street and highway situations.4s (Four-Wheel High Lock): Usedwhen extra traction is needed in mostoff-road situations.4t (Four-Wheel Low Lock): Used inextreme off-road conditions.When shifting between Four-Wheel Highand Four-Wheel High Lock, you must betraveling less than 45 mph. To shift,press the desired button. The indicatorlight will flash while shifting. The light willcontinue to flash if your speed is above45 mph, indicating the shift has notoccurred. The light will remain lit whenthe shift is complete. Neutral is usedonly when towing the vehicle.
Locking Rear AxleThe locking rear axle can provide addi-tional rear wheel traction when driving inoff-road conditions such as climbing overlarge rocks or up steep grades. This feature can be engaged only when thetransfer case is in the 4LO Lock mode by pressing the button above thecenter console. The vehicle should bestopped when locking the rear axle. Thelocking rear axle will be disengagedwhen traveling above 20 mph.See Section 4 of your Owner Manual.
Off-Road Driving Basics
Off-road driving can be great fun, but itdoes have its hazards. The greatesthazard can be the terrain itself. Off-roaddriving involves some new skills, so it’svery important to read this guide as wellas your Owner Manual.Loading Your Vehicle for Off-RoadDrivingThere are some important things toremember about loading your vehicle:• The heaviest items should be on the
load floor and forward of the rearaxle. Put heavier items as forward aspossible, but do not place them in thefront seat area.
Note: Shifting the transfer case toNeutral can cause the vehicle to rolleven if the transmission is in Park. Besure to set the parking brake beforeplacing the transfer case in Neutral.
H3 2007 A.qxd 5/17/06 9:04 AM Page 17
Getting to Know Your H318
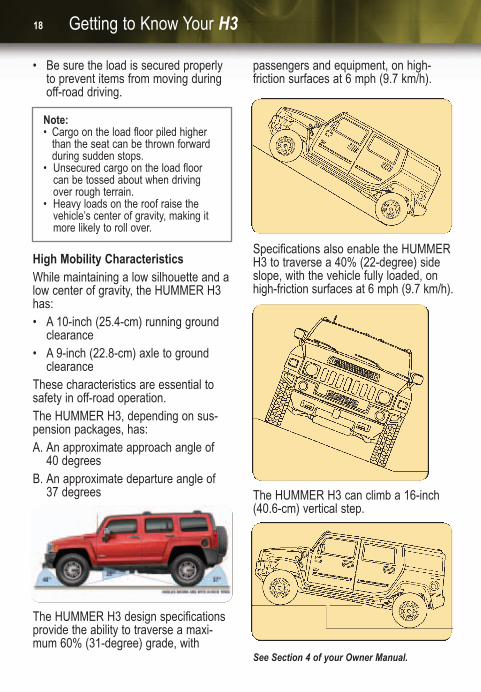
High Mobility CharacteristicsWhile maintaining a low silhouette and alow center of gravity, the HUMMER H3has:• A 10-inch (25.4-cm) running ground
clearance• A 9-inch (22.8-cm) axle to ground
clearanceThese characteristics are essential tosafety in off-road operation.The HUMMER H3, depending on sus-pension packages, has:A. An approximate approach angle of
40 degreesB. An approximate departure angle of
37 degrees
The HUMMER H3 design specificationsprovide the ability to traverse a maxi-mum 60% (31-degree) grade, with
Note:• Cargo on the load floor piled higher
than the seat can be thrown forward during sudden stops.
• Unsecured cargo on the load floor can be tossed about when driving over rough terrain.
• Heavy loads on the roof raise the vehicle’s center of gravity, making it more likely to roll over.
The HUMMER H3 can climb a 16-inch(40.6-cm) vertical step.
Specifications also enable the HUMMERH3 to traverse a 40% (22-degree) sideslope, with the vehicle fully loaded, onhigh-friction surfaces at 6 mph (9.7 km/h).
• Be sure the load is secured properlyto prevent items from moving duringoff-road driving.
passengers and equipment, on high-friction surfaces at 6 mph (9.7 km/h).
See Section 4 of your Owner Manual.
H3 2007 A.qxd 5/17/06 9:04 AM Page 18

19
Notes
H3 2007 A.qxd 5/17/06 9:04 AM Page 19
Getting to Know Your H320
Roadside Assistance
My GMLink
1-866-HUMMER6 (486-6376), or press the OnStar button.TTY Users: 1-888-889-2438HUMMER’s Roadside Assistance is available 24 hours a day, 7 days a week,365 days a year.Roadside Assistance provides ownerswith over-the-phone roadside repairs,location of the nearest HUMMER dealerand the following special services:• Fuel delivery• Lockout service• Tow to nearest dealership
for warranty service• Flat tire assistance• Jump startsThe Roadside Assistance services listedare available for a period of 4 years/50,000 miles. All services must be prearranged by HUMMER RoadsideAssistance.When you call, your Roadside Assistancerepresentative will ask for the followinginformation:
The HUMMER Owner Center at MyGMLink is a complimentary service forHUMMER owners, a one-stop resourceto enhance your HUMMER ownershipexperience. Exclusive member benefitsinclude online service reminders, vehiclemaintenance tips, online owner manual,special privileges and more. Sign uptoday at www.mygmlink.com.
• Vehicle Identification Number (VIN)• Name and home address• Telephone number and location from
which you are calling• Location, license plate number and
color of your HUMMER• Mileage of vehicle and description of
problemRoadside Assistance and OnStar When you press the OnStar button,the vehicle will send your current GPS location to an OnStar Advisor who willspeak to you, assess your problem, contact Roadside Assistance and relayyour exact location so that you will getthe help you need.
OWNER INFORMATION
15862069 A
Certain restrictions, precautions and safety procedures apply to your vehicle. Please read your OwnerManual for complete instructions. All information contained herein is based on information available atthe time of printing and is subject to change without notice. Copyright 2006 by GM Corp. All rights reserved.
!15862069=A!
H3 2007 A.qxd 5/17/06 9:04 AM Page 20