Genesis Poi: DotStar LED Persistence-of-Vision · our new DotStar LED strips are THE thing for...
51
Genesis Poi: DotStar LED Persistence-of-Vision Created by Phillip Burgess Last updated on 2019-06-10 04:11:09 PM UTC
Transcript of Genesis Poi: DotStar LED Persistence-of-Vision · our new DotStar LED strips are THE thing for...

Genesis Poi: DotStar LED Persistence-of-VisionCreated by Phillip Burgess
Last updated on 2019-06-10 04:11:09 PM UTC

Overview
Persistence of vision (POV) is the illusion of a solid image where there is none. It’s a task for which LEDs andmicrocontrollers are a natural fit. Many of our kits and guides have visited this topic before.
Poi is a performance art of spinning tethered weights. Some of the most dramatic performances use fire poi! Wesought to create something with that level of wow, but safer and usable indoors or out. And so these “Genesis” POV-poi were born…high tech, all-season, water- and playa-resistant poi that you can build and customize yourself!
I’ve wanted to make this as a DIY project since roughly forever ago, but only recently did all the pieces fall into place:
© Adafruit Industries https://learn.adafruit.com/genesis-poi-dotstar-led-persistence-of-vision-poi Page 3 of 52

our new DotStar LED strips are THE thing for persistence-of-vision effects, the Adafruit Trinket microcontroller is tinyand affordable, 3D printing is more accessible than ever…the “aha!” moment was buying some plastic tubes as a small-parts storage idea and recognizing them as the missing piece.
Here be Dragons…
I hate to sound patronizing, but just need to warn: don’t be fooled by its whimsical nature or small size, this project isdeceptively challenging! A slew of tools and skills are involved, requiring top-notch soldering and fitting things in avery confined space. Heck, I designed the thing and still several times had to back up and retrace some veryfrustrating and time-consuming steps.
Read through the entire guide before deciding if you’re ready to tackle this one. If you proceed, allow lots of time andgrant yourself permission to make mistakes. Take breaks and approach it fresh. I’ll try to steer you around the worstrage-face moments, but you may still hit a couple.
Also: remember when the Nintendo Wii first came out and people were busting their televisions? There's potentialhere for similar mayhem. The plastic capsules are hard and can break things or injure people. If you’re new to poispinning, make a practice set first using something soft. Get to know the bounds of your personal “space bubble” andhow to spin safely.
Parts and Tools
Poi are usually spun in pairs, so you’ll need at least two of some of these items.
Parts from Adafruit:
5V Trinket microcontroller (https://adafru.it/dyV)(NOT Pro Trinket — it won’t fit!).Lithium Polymer 150 mAh battery (https://adafru.it/dYY).LiPoly Backpack (https://adafru.it/e0w) (though page describes this as a Pro Trinket add-on, we’ll adapt for thesmaller Trinket board).Tiny slide switch (https://adafru.it/drN).Small tactile button (https://adafru.it/dSl) (one pack contains 20 buttons).144 LED/meter DotStar strip, either black (http://adafru.it/2328) or white (http://adafru.it/2329), 1/2 meter is
© Adafruit Industries https://learn.adafruit.com/genesis-poi-dotstar-led-persistence-of-vision-poi Page 4 of 52

�
enough for two poi.
Parts NOT from Adafruit:
Soda bottle preforms — sometimes called “baby soda bottles” or “classroom test tubes” — these incrediblydurable little capsules are 2-liter soda bottles before the blow-molding stage. Look for 130mm inside depth. Youcan find these on Amazon or eBay. If you can’t find ones that fit, no problem — small plastic soda or water bottlessometimes work.Leash and swivels. You can use paracord and #8 nickel ball bearing fishing swivels…a well-stockedtackle shop might have the swivels…or you can order a really luxurious pair of ready-to-go leashes andswivels (https://adafru.it/frN) for about ten bucks ($20 with stainless steel swivels (https://adafru.it/frO)) fromFlowtoys.com (https://adafru.it/frP)!
Tools & Miscellaneous:
3D printer (see “3D Printing” page for size limitations & workarounds).Soldering iron and related paraphernalia.Small stranded wire…a combination of 26 gauge (https://adafru.it/egK) and 30gauge (https://adafru.it/ekF) silicone-cover wire is ideal. Use the thicker gauge for power, thinner for signals.Small bits of heat-shrink tubing (https://adafru.it/diK).Adhesives: E-6000 craft glue and 5 minute epoxy.Files and sandpaper for cleaning up the 3D print.A computer running the Arduino IDE software (https://adafru.it/f1P), ideally version 1.6.4 or later. Support for theTrinket microcontroller can be enabled through the Boards Manager (Tools→Board→Boards Manager…).A computer running Python for graphics conversion, or we provide a few images to get you started.
I have a couple of 3.3V Trinkets on-hand, can I use those instead?
Yes you can, only difference is that the startup battery level display won’t work. Comment out that code and use thespace for additional graphics.
© Adafruit Industries https://learn.adafruit.com/genesis-poi-dotstar-led-persistence-of-vision-poi Page 5 of 52

� How long will they run? How long to recharge?
The poi can run continuously for about one hour (or multiple shorter sessions totaling one hour). USB recharge takesabout 90 minutes for a fully-depleted battery.
© Adafruit Industries https://learn.adafruit.com/genesis-poi-dotstar-led-persistence-of-vision-poi Page 6 of 52

© Adafruit Industries https://learn.adafruit.com/genesis-poi-dotstar-led-persistence-of-vision-poi Page 7 of 52

3D Printing, etc.
I recommend starting with the 3D parts before you even order any electronics. The fit of these parts is exceedinglyfussy and error-prone, and if you reach an impasse here you can shelve the project with minimum investment andheartache.
You’ll begin by tracking down a series of tubes:
These are 2-liter soda bottles in their larval form…before the blow-molding stage, but with the threads intact. Sodabottle preforms are watertight and near indestructible, making them popular with geocachers and schools needingkid-safe labware.
I found mine on eBay, but they also turn up on Amazon (search for “soda bottle preform” or “baby soda bottle”). Thesize and shape seems to be fairly standardized, but if they specifically mention “130 mm interior depth,” so much thebetter. Some places sell these one-off for just a few bucks apiece, or you can save by buying a set (using the sparesfor small parts storage…or getting started in geocaching).
I’ve started a thread in the Adafruit Forums (https://adafru.it/aO2) to help in tracking down capsules that are known towork. Check the discussion, or add a note if you’ve found a winner.
© Adafruit Industries https://learn.adafruit.com/genesis-poi-dotstar-led-persistence-of-vision-poi Page 8 of 52

Trouble finding preforms that fit the 3D parts? Not to
worry! Some small soda or water bottles
occasionally work. Look for one with the traditional
coarse soda thread…many varieties of bottled water use
a finer thread that won’t work for this project.
Clip or sand off any plastic “sprue” protruding from the
end of the preforms. These are sharp and will hurt if
caught in motion!
3D Printing
While waiting for your soda preforms to arrive, you can get a head start on the 3D printed parts. As mentioned, theseare fussy and it may take a few tries to get right.
https://adafru.it/fA4
https://adafru.it/fA4
© Adafruit Industries https://learn.adafruit.com/genesis-poi-dotstar-led-persistence-of-vision-poi Page 9 of 52

There are two pieces: a special bottle cap (with lanyard hole) and an insert that precisely fits inside the soda preform…we’ll be attaching electronics to this later. Print two of each — poi are usually spun in pairs — four parts total, but printjust one part at a time. The prints come out cleaner (fewer strings), and it’s less frustrating restarting a small print jobthan having a whole complex bed-full-of-parts print job fail.
Both parts are designed to print without support.
Print the cap with 3 shells (rather than 2) for added
durability. You may need to use a large brim for better
bed adhesion, since it stands narrow-end-down.
© Adafruit Industries https://learn.adafruit.com/genesis-poi-dotstar-led-persistence-of-vision-poi Page 10 of 52

The insert is about 130 mm tall and may not fit some
smaller printers when standing upright. Printing
sideways is fine but requires support material and
additional cleaning up. For really small printers, angling
it corner-to-corner can work (do you know the math
puzzle about the long spear in the shipping box?)
After printing, clean up the parts with files and/or sandpaper. Be especially careful to remove any stabby protrusions inthis slot in the insert:
A lithium-polymer battery will slide in there later. Puncturing LiPoly batteries is one way they can catch fire, hence theextra attention to removing plastic nubs here.
Test Fit
When your soda preforms arrive, check that the printed insert fits inside and the cap screws on securely. The insertshould slide in and out easily. If there’s friction, smooth any protruding bits with sandpaper. When everything looks
© Adafruit Industries https://learn.adafruit.com/genesis-poi-dotstar-led-persistence-of-vision-poi Page 11 of 52

good, rinse off any remaining plastic dust and set aside until completely dry before adding electronics.
If sanding isn’t sufficient to make the insert fit your preforms, you can try tweaking the design in Autodesk 123D (.123dxmodel is included in the ZIP file).
Go Forward! Move Ahead!
So now, if everything successfully printed and fits together to your liking, you can proceed to order all the electronicparts.
Additionally, you’ll need a pair of handles and leashes for your poi. Originally I’d used paracord and hunted downsome #8 nickel ball bearing fishing swivels (eBay), but you’ll find it easier and get better results ordering a ready-made“flowleash” pair from Flowtoys.com (https://adafru.it/frP)…they’re super comfortable, and the basic pair is only$10 (https://adafru.it/frN), or $20 for a pro version (https://adafru.it/frO) with stainless steel swivels. Their web siteshows how to adjust the leashes and has lots of great poi spinning information (and if this whole 3D printing thingdoesn’t work out for you, there’s some fine, if technologically simpler, LED poi available there).
© Adafruit Industries https://learn.adafruit.com/genesis-poi-dotstar-led-persistence-of-vision-poi Page 12 of 52

Prep Work
Though the circuit isn’t complex, it needs to fit into a very tiny space. You’ll need sharp tools in good shape, wire inmultiple gauges (26 ga for power, 30 ga for signals), stinky adhesives and — most of all — patience and perseverance.
Also, heads up: this requires really solid soldering. Poi get dropped, they collide and they smack into things. Theplastic soda capsule that’s so useful against moisture and playa dust does nothing to reduce physical shock. Coldsolder joints — where solder beads up on the surface, not flowing smoothly between parts — will not withstand shock.Connections will break (often invisibly) and your poi will misbehave or stop working entirely, and you’ll be sad. TheAdafruit Guide to Excellent Soldering (https://adafru.it/CfQ) demonstrates some good solder joints vs. duds.
Okay! No more doom & gloom, let’s get on with this thing!
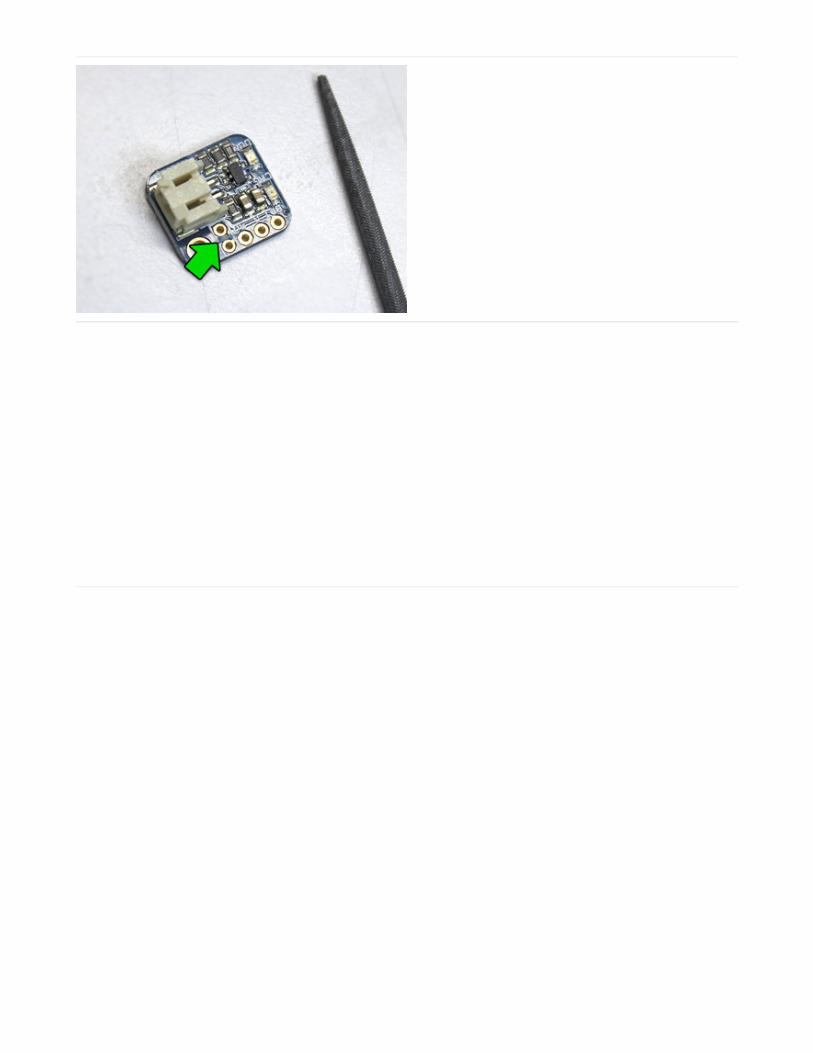
The circuit consists of two 16-pixel DotStar strips, the Trinket microcontroller, LiPoly battery and packpack, and a singlebutton and switch. Charging and programming are through the USB port.
Before doing any soldering or other work, do this: using
a small dab of E6000 glue or 5 minute epoxy, reinforce
the wires coming off the LiPoly battery. We’ll make a
sharp bend there later and don’t want the wires
breaking off.
Peel the tape up a little and get the glue underneath,
where the wires connect to the board. Don’t let the
metal E6000 tube contact the terminals! Set aside to dry
completely.
If you don’t already have the DotStar library for Arduino installed, skip ahead to the “Code” page for a moment and set
© Adafruit Industries https://learn.adafruit.com/genesis-poi-dotstar-led-persistence-of-vision-poi Page 13 of 52

that up, then return here. Go ahead and download the poi software as long as you’re there.
If you peer closely at the LED strip you’ll see the + and – connections are labeled, and arrows show the direction ofdata from “in” to “out” … but these 144 LED/m DotStar strips are packed so tightly, there’s no space for “data in” or“clock in” labels!
Manufacturers make production changes from time to time…so rather than give you a specific pinout, it’s best if youdecipher it and make a note for yourself to refer to later…
Use jumper wires and a spare Arduino if you have one,
else you can solder temporary connections to the
Trinket board.
+ and – connect to 5V and GND on the Arduino (or
USB+ and GND on Trinket).
Load up the the strandtest example sketch included with the DotStar library.
Change the 'NUMPIXELS' value to 64 (enough LEDs for two poi). Just below this, you’ll see 'DATAPIN' and 'CLOCKPIN'.If using a Trinket, change these to 1 and 2. Then connect wires from the two defined pins to the two free connectionson the strip. Press the upload button to transfer the code to the Arduino board.
If the strip lights up, fantastic! Now you know the positions of the clock & data pins relative to + and –. Write it down!
It’s normal for just the first section of the strip to cycle colors, not the whole thing, and you’ll see one white pixel at theend of the lit section.
If the strip does not light up, either switch the two wires, or switch the two numbers in the code (and upload again). If itstill doesn’t light up, try connecting at the opposite end of the strip (you might also need to try the clock/data swapagain at this end).
If no combination seems to work, start a new thread in the Adafruit Forums (https://adafru.it/cer) for help. Please try toprovide at least one photo that clearly shows your connections between the strip and Arduino, and any other relevantinformation you can provide (computer operating system, version of Arduino IDE, etc.).
When it works and you have your notes, disconnect all the wires.
Now open the 'poi' sketch (if you didn’t download this before, skip ahead to the “Code” page for the link). SelectTools→Board→Adafruit Trinket 16 MHz, plug a USB cable into one of your Trinket boards and then press the Uploadbutton. Repeat with the second board. This pre-loading step will make it easier to test the electronics later beforeeverything’s sealed up.
© Adafruit Industries https://learn.adafruit.com/genesis-poi-dotstar-led-persistence-of-vision-poi Page 14 of 52

Using snips or a hobby knife, cut and peel the rubber
coating off the DotStar strip. The ends of the strip are
sealed with a rubbery glue that peels away with
enough scraping and swearing.
The wires can be desoldered from the strip and the
ends cleaned up with a Q-tip dipped in rubbing alcohol.
Or if it’s easier, you can just sacrifice one LED and clip it
(and the wires) off the end (there’s a few more LEDs than
we need for the poi).
For each poi you’re making, cut two 16-pixel segments
from the strip. These tightly-packed strips have only one
set of solder pads between LEDs…you’ll want to make
cuts so the pads remain on the INPUT end of each
segment…pads aren’t needed on the output end.
Double…no, triple check that you are cutting sixteen (16)
LEDs and leaving pads on the INPUT end!
Trim the corners away to help it fit the end of the tube.
This might not be 100% necessary, but it’s one of those
nice touches like a sandwich cut diagonally.
© Adafruit Industries https://learn.adafruit.com/genesis-poi-dotstar-led-persistence-of-vision-poi Page 15 of 52
Use a hobby knife or a file to scratch away the trace
between these two solder pads on the LiPoly backpack.
Parts suppliers change from time to time. If your power
switches have these really long legs, clip them down to
about half their length (~1/8" or 3mm is good).
© Adafruit Industries https://learn.adafruit.com/genesis-poi-dotstar-led-persistence-of-vision-poi Page 16 of 52

Test fit the switch and pushbutton in the cutaways at the
bottom of the 3D printed insert. Use a file to clear away
any support material or cruft that interferes with their
positioning. Both of these parts should be slightly
recessed, their tips sitting flush with the bottom face —
not protruding — test by pressing down against your
work surface.
The button might be a little wobbly. That’s okay, we’ll
glue the snot out of it later.
Before we do any soldering, let’s lay out all the pieces to familiarize ourselves with the plan…see where every piecefits and do any last-minute cleanup of the 3D printed parts.
© Adafruit Industries https://learn.adafruit.com/genesis-poi-dotstar-led-persistence-of-vision-poi Page 17 of 52

The flat areas on the insert are where the LED strips will go, with the input pads toward the tip.There’s a slot at the tip where the Trinket board will nestle.Another slot mid-way holds the LiPoly backpack. The edge of this board needs to sit juuuust flush with the edgeof the insert…if it protrudes, there’s probably still some plastic cruft still to be scraped away in the slot. Thebattery connector should point “down,” toward the base.The battery slots into the base, with the wires pointed “out.” Be sure there’s no stabby plastic residue in theslot…file it smooth if necessary.Switch and button were already test-fit, you know where those go.
Prep work done! Flick on your soldering iron for the next phase…
© Adafruit Industries https://learn.adafruit.com/genesis-poi-dotstar-led-persistence-of-vision-poi Page 18 of 52

Soldering
Here’s the schematic again, for reference:
When building two or more poi, you’ll probably find it faster and easier to do each step on all the poi, assembly-linestyle, rather than building each one start-to-finish.
Power Switch
Cut two 3-inch (75 mm) — or slightly longer — pieces of
26 gauge silicone-insulated stranded wire and strip
about 1/8" insulation from one end (to match the pins on
the switch). Give the bare ends a twist and “tin” the
wires with a tiny bit of molten solder.
DO NOT connect the battery to anything until instructed to do so. Soldering on a live circuit can bedangerous.�
© Adafruit Industries https://learn.adafruit.com/genesis-poi-dotstar-led-persistence-of-vision-poi Page 19 of 52

Tin two pins of the power switch — the center pin and
either of the two outside pins. Then solder the wires to
these pins.
It’s vital thoughout this project that the solder flow smoothly between components. Cold solder joints — where thesolder is beaded on the surface — do not withstand physical shock.
Fresh solder flux (which is built into the core of the solder) is essential. You’ll have one or two tries to make theconnection…any more than that and the solder starts to get sticky and misbehave. When this happens, you can mopup the bad solder with your iron and a solder sucker (http://adafru.it/148) or copper desolderingwick (http://adafru.it/149), then begin again with virgin, flux-rich solder.
Add small bits of heat-shrink tubing over the switch
connections and carefully shrink with a lighter or heat
gun.
Heat-shrink tubing is not just to prevent electrical shorts,
it also provides the solder joints some strain relief
against shock and vibration.
© Adafruit Industries https://learn.adafruit.com/genesis-poi-dotstar-led-persistence-of-vision-poi Page 20 of 52

Strip a similar amount of insulation from the other end of
the wires, twist and tin the ends. Feed these top-to-
bottom through the two power switch holes and solder.
There’s no specific polarity — either wire can go to
either hole.
When the soldering looks good, trim away any excess
wire so the bottom of this board is relatively smooth.
Test fit the placement of the switch and LiPoly
backpack. You’ll see there’s a little channel for the wires
to run through, and a notch that holds the edge of the
board.
If there’s a few millimeters of slack, that’s fine. If there’s
a whole lot of slack, you’ll need to desolder the wires
from the backpack, trim them down a little, and re-
solder.
If the wires came up too short, not to worry. Use a hobby
knife to cut away the heat-shrink tubing, de-solder the
connections from both ends, then cut a new pair of
wires a little longer and repeat these steps.
This is what I mean by “fussy.”
Mode Select Button
The steps are very similar to the power switch above…
© Adafruit Industries https://learn.adafruit.com/genesis-poi-dotstar-led-persistence-of-vision-poi Page 21 of 52

�
Cut two pieces of 30 gauge silicone-insulated stranded
wire about the same length as the insert. We’ll cut these
to an exact length later.
Trim a little insulation from one end of the wires, twist
and tin.
Tin the pins of the pushbutton switch and solder the
wires here. Again, you’re looking for smooth, reliable
connections.
Heat-shrink the pins once the connections are
satisfactory.
Set this piece aside, we’ll come back to it in a bit.
Why are two different gauges of wire being used?
© Adafruit Industries https://learn.adafruit.com/genesis-poi-dotstar-led-persistence-of-vision-poi Page 22 of 52

Heavier-gauge wire has less resistance and can carry more current…but space is so limited here we can’t fit the 26gauge wire throughout. So the battery and power-hungry LEDs will get 26 gauge, while the microcontroller andsignal wires (which don’t require a lot of current) use the slimmer 30 gauge.
© Adafruit Industries https://learn.adafruit.com/genesis-poi-dotstar-led-persistence-of-vision-poi Page 23 of 52

Charging Wire
Easy one!
Cut a single piece of 26 gauge wire a little over 2 inches
(50 mm) long…or, with the parts laid out atop the insert,
you’re aiming to reach from the “5V” pin on the LiPoly
backpack to the “USB+” pin on the Trinket.
Strip, twist and tin both ends of the wire and solder
those connections, then trim the wires flush.
This wire should be long enough to position the Trinket
in this slot, with the USB port protruding just a couple
millimeters. As with the power switch wires before, you
may need to re-do this to get the length just right.
Battery Distrubution
© Adafruit Industries https://learn.adafruit.com/genesis-poi-dotstar-led-persistence-of-vision-poi Page 24 of 52

The weird part!
We’ll now cut a total of eight wires…just a little bit longer
than the charging wire…and strip about 1/4" of insulation
from one end. Six wires should be 26 gauge, the other
two are 30 gauge.
Color-coding the wires for +V and ground isn’t required,
but sure does help keep track of things. This makes for
two groups each with three 26 gauge wires and one 30
gauge.
Pair up wires side-by-side and twist the ends together.
Two of these pairs will be 26 gauge wire, the others two
will combine one 26 and one 30 gauge wire.
© Adafruit Industries https://learn.adafruit.com/genesis-poi-dotstar-led-persistence-of-vision-poi Page 25 of 52

Now twist pairs together end-to-end. Solder the
connections and add just enough heat-shrink tubing to
safely cover that area.
You’ll now have two little “bow tie” things with three
thicker wires and one thin wire.
© Adafruit Industries https://learn.adafruit.com/genesis-poi-dotstar-led-persistence-of-vision-poi Page 26 of 52

Goal now is to route these wires and trim them to exact
lengths. I found it helpful to tape everything down for
this step.
On the end with two thick wires: route one + and one –
wire around either side of the USB connector. These
wires will not be trimmed yet.
On the end with the thick-and-thin wires: the thick wires
go to the LiPoly backpack — black needs to reach to G,
red to BAT, while the thin wires must reach the Trinket’s
Gnd and BAT+ pins. Allow a few extra millimeters on
each to strip, twist and tin, but do not solder any of
these connections just yet.
Well okay, the red wires are pretty straightforward —
thick wire to LiPoly backpack BAT, thin wire to Trinket
BAT+. Leave the other two thick wires alone for now,
straddling the USB connector.
Mode Select Button
…and more power stuff.
© Adafruit Industries https://learn.adafruit.com/genesis-poi-dotstar-led-persistence-of-vision-poi Page 27 of 52

install the mode button into the notch at the base of the
insert. Like the power switch, there’s a channel for the
wires to run through.
Position the other components at their approximate
installed distances, then clip the mode button wires to
reach the following points (with a few extra millimeters
of slack):
G on LiPoly backpack.
Pin 3 on Trinket.
Strip, twist and tin the ends of these wires.
© Adafruit Industries https://learn.adafruit.com/genesis-poi-dotstar-led-persistence-of-vision-poi Page 28 of 52

Now insert and solder TWO wires through the G pin on
the LiPoly backpack: the shorter wire from the mode
button, and the thicker (26 ga) ground wire.
Try to keep the wires orderly on these last few steps…use tweezers to “comb” the wires apart as needed so they’re nottwisted around each other.
© Adafruit Industries https://learn.adafruit.com/genesis-poi-dotstar-led-persistence-of-vision-poi Page 29 of 52
Solder the mode button’s longer wire to Trinket pin 3.
The narrower (30 ga) ground wire then solders to the
Trinket’s Gnd pin.
Clock and Data Lines
© Adafruit Industries https://learn.adafruit.com/genesis-poi-dotstar-led-persistence-of-vision-poi Page 30 of 52

Cut four 30 gauge wires, similar length to all the power
wires you previously made. If color-coding, two are for
LED data, two for clock.
Strip about 1/4" of insulation from one end of each wire,
then pair them up and twist and tin the ends.
Solder one pair to Trinket pin 1 (data) and the other
to pin 2 (clock).
Double-check that you’re getting the correct holes, else
the poi won’t work. Pin 0 is not used.
That’s all the soldering on the Trinket and backpack! There’s still more to do elsewhere though…
© Adafruit Industries https://learn.adafruit.com/genesis-poi-dotstar-led-persistence-of-vision-poi Page 31 of 52

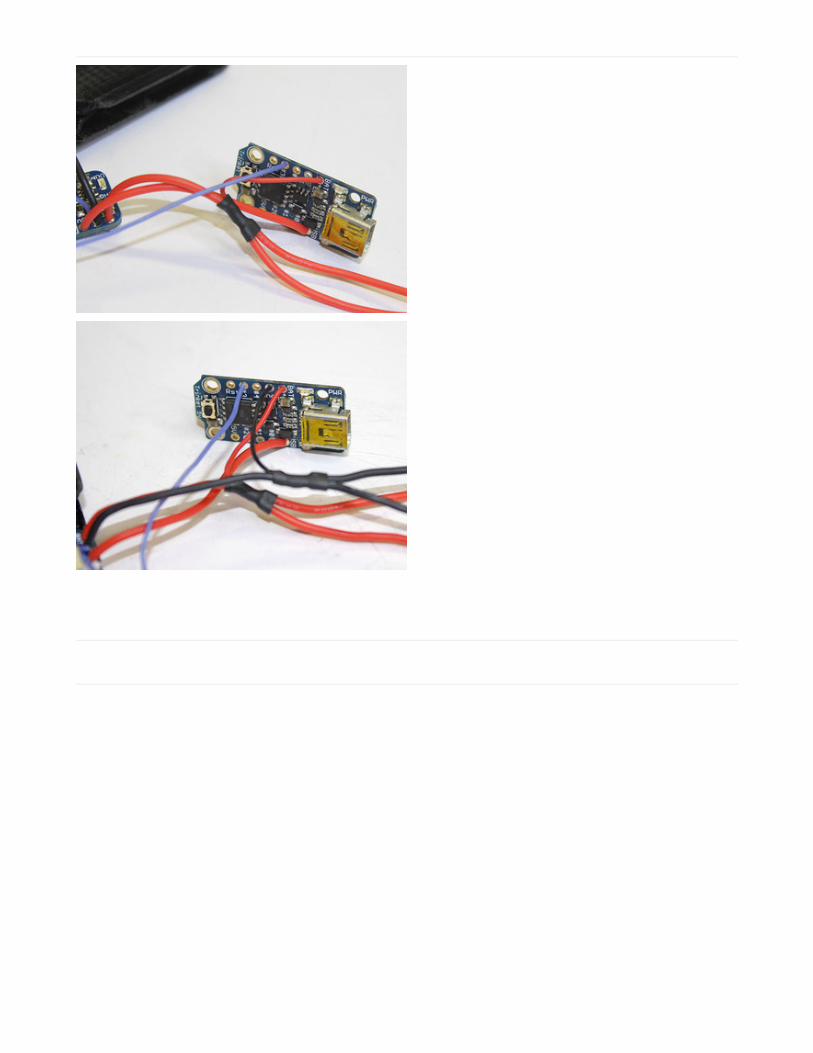
Glue and More Soldering
Carefully trim flush any protruding wires from the
underside of the Trinket and LiPoly backpack boards.
Inspect the connections carefully for any signs of shorts
or cold solder joints. Soon these boards will be tucked
away and very difficult if not impossible to repair.
© Adafruit Industries https://learn.adafruit.com/genesis-poi-dotstar-led-persistence-of-vision-poi Page 32 of 52

“Tweezer comb” the wires to straddle the USB port.
Take your time so they’re not tangled. There should be
four wires on either side: one each of power, ground,
data and clock. Tape each group down as you work so
they don’t run wild.
Carefully slot the Trinket into the printed insert,
removing the tape as you go.
Once the Trinket’s in position (the USB port should
protrude just a couple millimeters), tape the wires
together in a bundle.
© Adafruit Industries https://learn.adafruit.com/genesis-poi-dotstar-led-persistence-of-vision-poi Page 33 of 52

Tip the LiPoly backpack up and squeeze a dollop of
either E6000 glue or 5-minute epoxy on its underside.
Slide the backpack into place (the edge should be flush
with the insert) and clamp in place with a clip,
clothespin, some tape, whatever you have handy.
Do the same for the Trinket, then slide into place and
clamp.
The edge of the board should protrude from the insert
just the tiniest bit — a millimeter at most.
Glue the power switch and mode button in place. This
step really calls for epoxy, not E6000.
Make sure the tips of these controls are flush with the
base, not protruding.
Don’t glop them up too much! The sides of the switch
have openings where glue could get in and interfere
with its operation.
Intermission
E6000 requires hours to reach full strength. This is an excellent time to take a break or stop for the day. Put the piecesin the garage or out on a balcony while the glue dries…the fumes aren’t healthy to breathe. Turn off the soldering iron,wash your hands because you’ve been handling all this stuff, then go to bed, go for a bike ride or have a Pop-Tart®.
© Adafruit Industries https://learn.adafruit.com/genesis-poi-dotstar-led-persistence-of-vision-poi Page 34 of 52

We’ll continue below. In the meantime, here’s another picture of Erin “Firepixie” (https://adafru.it/CfR) spinning POV-poito keep you motivated:
Almost there!
Solder LED Strips
© Adafruit Industries https://learn.adafruit.com/genesis-poi-dotstar-led-persistence-of-vision-poi Page 35 of 52

Using pliers, add a little bend to the tips of the LED
strips (where the solder pads are) to help them fit in the
tube. Then position them over the poi insert and hold in
place temporarily with tape or rubber bands.
Those notes you took earlier about the LED strip pinout?
Here’s where you’ll need them…
© Adafruit Industries https://learn.adafruit.com/genesis-poi-dotstar-led-persistence-of-vision-poi Page 36 of 52

Tin each pad on the strip with a tiny bit of solder.
“Tweezer-comb” the clock and data wires on one
side over the corresponding pads on the LED strips, trim
length to fit (a few mm slack is OK), then strip just a tiny
bit of insulation and tin the tips of the wires. Using
tweezers to hold the wires, solder them to the LED
strips. Make sure the solder joints are smooth and shiny,
not “cold” joints.
Next, repeat the procedure with the power and ground
wires. Notice how on each side we’re connecting half
the wires for each strip; this is normal.
Turn the poi insert over and repeat these steps for the
four wires on the other side. Clock, data, power and
ground.
Dry Run
The moment of truth!
You should have already loaded the poi sketch onto the Trinket microcontroller(s). If not, skip ahead to the “Code”page for a moment, fetch that software and program the boards.
© Adafruit Industries https://learn.adafruit.com/genesis-poi-dotstar-led-persistence-of-vision-poi Page 37 of 52

Remove the tape from the LED strips.
Pivot one LED strip out slightly (if any solder connections
break, that’s a cold joint, fix it), then carefully plug the
LiPoly battery into the backpack.
DO NOT use a metal tool for this! It’s too easy to short
across the battery connections. Use a toothpick or other
non-conductive implement to push the plug into the
socket.
Flick the power switch (if it’s not already on — look for
the green power light on the Trinket board). After a few
seconds, the LEDs should start doing things!
Troubleshooting
If the LEDs don’t come on, here’s some things to check…
Green power LED on the Trinket doesn’t light with the power switch in either position: disconnect the batteryimmediately! It may be an electrical short between + and ground. Connect a USB cable between your computer and
© Adafruit Industries https://learn.adafruit.com/genesis-poi-dotstar-led-persistence-of-vision-poi Page 38 of 52

Trinket. If the light comes on then, it’s probably not a short, just a spent battery. Re-connect it and allow some time tocharge.
Green LED is on, but the LED strips do nothing: connect a USB cable and make sure the poi sketch is loaded on theTrinket board. If there’s still no response, probably a wiring mistake…either the clock and data wires are reversed, orthey’re connected to the wrong pins on the Trinket (should be pin 1 for data, pin 2 for clock).
Only one LED strip is active: wires are probably in the wrong order on the unlit strip.
Power switch won’t budge: glue has seeped inside. Use more force to try to break it free. If it’s completely wedged,there’s no choice but to break it down and solder in a new switch.
Power is always on, switch does nothing: on the LiPoly backpack board, the copper trace between the power switchconnections has not been cut.
Once any issues resolved and the LEDs are doing things as expected, switch it off for the final assembly steps…
© Adafruit Industries https://learn.adafruit.com/genesis-poi-dotstar-led-persistence-of-vision-poi Page 39 of 52

Final Assembly
Carefully fold the battery wires back across the battery
(this is why we reinforced those connections in an early
step).
Slide the battery into the slot at the base of the insert,
tucking the wires into the channel shared with the mode
select button.
Add a couple zigzag bends at the other end (near the
LiPoly backpack) to take up any slack and tuck them in.
© Adafruit Industries https://learn.adafruit.com/genesis-poi-dotstar-led-persistence-of-vision-poi Page 40 of 52

Spread a thin layer of E6000 glue or some epoxy on the
backs of the LED strips, then clamp them in place with
anything that holds them flat…sticks and rubber bands,
for example.
Allow some time again for the glue to dry. Watch some cat videos on YouTube or some poi lessons on Flowtoys’ website (https://adafru.it/fA2).
© Adafruit Industries https://learn.adafruit.com/genesis-poi-dotstar-led-persistence-of-vision-poi Page 41 of 52

Once the glue is completely dry, using a toothpick or
other nonconductive tool to carefully pack all the wires
inside.
Slide the insert into the soda preform. If there’s
substantial friction, stop and look around for protruding
wires or excess glue residue which can be scraped
away.
Fire it up, confirm everything still works. Screw on the
cap and make sure it doesn’t accidentally trigger the
mode button or power switch.
Kind of resembles the Genesis device from Star Trek II,
doesn’t it? Hence the name. :)
© Adafruit Industries https://learn.adafruit.com/genesis-poi-dotstar-led-persistence-of-vision-poi Page 42 of 52

For the poi to look their very best for photography, a few
status LEDs should be covered up. (Otherwise there’s
stray light streaks in the image.)
I thought black nail polish might work for this, but it’s
actually not that great…took about three coats to fully
obscure the status LEDs. Common acrylic hobby paint is
probably a better choice.
© Adafruit Industries https://learn.adafruit.com/genesis-poi-dotstar-led-persistence-of-vision-poi Page 43 of 52

As a final step, dabs of epoxy were added to hold wires
down in place…silicone wire is very “grippy” and drags
against the tube when slid in or out. Some extra glue
was added near the base of the Trinket board to help
secure it, and the wire-to-LED-strip connections at the
tip were reinforced.
Be very careful to keep epoxy from seeping into the
USB port! If that happens, the poi can never be plugged
in for charging or reprogramming.
While waiting for glue to dry, attach leashes to the caps.
If using the snazzy Flowtoys leashes, their web site has
directions for adjusting length and tying them.
If you like, screw on the empty plastic soda preforms
and practice with those for now. It’s a good opportunity
to dial in the leash length just right.
© Adafruit Industries https://learn.adafruit.com/genesis-poi-dotstar-led-persistence-of-vision-poi Page 44 of 52

Once all the various glues are completely dry, plug the
poi in to charge.
The green status LED indicates the battery is full.
Charging may take up to 90 minutes.
The LED strips may flicker red during charging. This is
normal!
Use It!
Slide the insert into a soda preform, flick the power switch, select an image with the mode button, screw the cap shutand have at it!
When first switched on, the LEDs will briefly display the (approximate) battery level before the POV effect starts.
Holding down the mode button for longer than 1 second will enable an auto-cycle mode, which will show a differentimage every 15 seconds.
© Adafruit Industries https://learn.adafruit.com/genesis-poi-dotstar-led-persistence-of-vision-poi Page 45 of 52

© Adafruit Industries https://learn.adafruit.com/genesis-poi-dotstar-led-persistence-of-vision-poi Page 46 of 52

�
Code
If this is your first time using Trinket, follow the Adafruit Arduino IDE Setup (https://adafru.it/jDQ) for guidance; a coupleextra steps are required compared to typical Arduino Uno programming — the IntroducingTrinket (https://adafru.it/dpf) guide may help. Try out the “blink” sketch and confirm you can upload code to the board(on the Trinket board, the LED is on pin 1 instead of 13). If you’re not already running the Arduino IDE version 1.6.4 orlater (https://adafru.it/f1P), this is a really good time to upgrade. It greatly simplifies installing libraries and support foralternate boards such as Trinket.
Software for the poi project can be fetched from GitHub (https://adafru.it/E-O):
https://adafru.it/E-O
https://adafru.it/E-O
The “poi” folder contains the Arduino sketch for this project and has two files - poi.ino (https://adafru.it/E-P) andgraphics.h (https://adafru.it/E-Q). Place both these files into your Arduino sketch names poi. T
he “convert” folder is a utility for processing images — we’ll cover that on the next page.
This project also requires the Adafruit DotStar library for Arduino. Use the Library Manager to install this(Sketch→Include Library→Manage Libraries…), or if you’re using an older version of the Arduino IDE, it can bedownloaded and installed manually (https://adafru.it/dNR):
https://adafru.it/eio
https://adafru.it/eio
There are two files in the “poi” folder, which will open as two tabs in the Arduino sketch. The second file/tab —graphics.h — contains the bitmaps and color palettes for the different modes. We’ll explain how to add different oneson the next page.
The code and example images are filling the Trinket’s program space right up to the brim. Occasionally updates to theArduino IDE software result in programs that are just a little bigger than they used to be. If that happens, it will benecessary to remove one or more images from graphics.h to free up some space.
Digging through the poi code itself, you might spot references to some additional features. These aren’t used in thepoi project because both program memory and physical space in the plastic capsule are at their limits…but in thefuture, this same code might be used in other projects where space is less of a concern.
I can compile the code but it won’t upload to the Trinket board!
You might have a “charge only” USB cable. Definitely need the normal “charge+data” type for this. Switch it out for adifferent cable and try again.
© Adafruit Industries https://learn.adafruit.com/genesis-poi-dotstar-led-persistence-of-vision-poi Page 47 of 52

© Adafruit Industries https://learn.adafruit.com/genesis-poi-dotstar-led-persistence-of-vision-poi Page 48 of 52

Preparing Images
The poi can display small GIF images with up to 16 colors (though two-color images — bitmaps — are much smaller andyou can store more of them). Images are 16 pixels tall, and a maximum of 255 pixels wide (but can be as narrow as 1pixel).
There’s not a whole lot of space on the Trinket. After the code stakes its claim, there’s little more than 1,700 bytes freefor images. A 16-color GIF requires 48 bytes plus an additional 8 bytes per column. A 2-color (bitmap) GIF requires 6bytes plus an additional 2 bytes/column. There’s enough space for a few carefully-crafted “pixel art” type images.
A tiny 16-pixel-high Welsh flag. I’m not even Welsh, but
totally a sucker for anything with a cool dragon on it.
Rawr.
https://adafru.it/E-R
https://adafru.it/E-R
The process for converting images for the poi is a little gritty right now, requiring a command-line tool written inPython. It also requires the Python Imaging Library (PIL).
Probably the least-bothersome way to do this right now is on a Raspberry Pi computer, where most of the tools arealready built-in, though this requires some familiarity with the Linux operating system.
I'd like to make a more user-friendly tool for this in the future. But for the time being these steps remain a bit technical.
Installing and using Python varies from system to system. On the Raspberry Pi, Python is already installed by default,though PIL must be added manually:
Things will be entirely different on Windows or Mac or even on other Linux distributions. Unfortunately setting upPython is way beyond the scope of this guide, so you might Google ’round for tutorials elsewhere. If this gets too dryand technical, don’t fret…I suspect that given time other users will post some good poi-ready images to the AdafruitForums (https://adafru.it/cer).
So, let’s suppose we have this little Welsh dragon GIF image, 16 pixels tall by 26 pixels wide:
sudo apt-get install python-imaging
© Adafruit Industries https://learn.adafruit.com/genesis-poi-dotstar-led-persistence-of-vision-poi Page 49 of 52

The top of the image will correspond to the tip of the poi. The flag of Wales traditionally has the dragon facing left, butit’s flipped here because the poi will “paint” the image left-to-right…and if you were swinging an actual physical flagthrough actual physical air, the dragon always faces the direction of motion (the example images also include a UnitedStates flag, and that one’s flipped for the same reason…you’ll see this with flags on the starboard side of an airplanetoo…part of international flag protocol).
ANYWAY, to convert this using the Python script, you’d type:
Or you can convert a whole list of images:
The “> graphics.h” redirects the output of the convert.py script to the plain-text file graphics.h, which can then beincorporated into an Arduino sketch.
Inside the file you’ll see one or more sections like this:
python convert.py wales.gif > graphics.h
python convert.py *.gif > graphics.h
// usa.gif -----------------------------------------------------------------
const uint8_t PROGMEM palette04[][3] = { { 56, 56, 56 }, { 56, 0, 0 }, { 0, 0, 0 }, { 0, 3, 56 } };
const uint8_t PROGMEM pixels04[] = { 0X22, 0X22, 0X22, 0X22, 0X22, 0X22, 0X22, 0X22, 0X22, 0X22, 0X22, 0X22, 0X22, 0X22, 0X22, 0X22, 0X10, 0X10, 0X10, 0X10, 0X10, 0X10, 0X12, 0X22, 0X10, 0X10, 0X10, 0X10, 0X10, 0X10, 0X12, 0X22, 0X10, 0X10, 0X10, 0X10, 0X10, 0X10, 0X12, 0X22, 0X10, 0X10, 0X10, 0X10, 0X10, 0X10, 0X12, 0X22, 0X10, 0X10, 0X10, 0X10, 0X10, 0X10, 0X12, 0X22, 0X10, 0X10, 0X10, 0X10, 0X10, 0X10, 0X12, 0X22, 0X10, 0X10, 0X10, 0X10, 0X10, 0X10, 0X12, 0X22, 0X10, 0X10, 0X10, 0X10, 0X10, 0X10, 0X12, 0X22, 0X10, 0X10, 0X10, 0X10, 0X10, 0X10, 0X12, 0X22, 0X10, 0X10, 0X10, 0X10, 0X10, 0X10, 0X12, 0X22, 0X10, 0X10, 0X10, 0X10, 0X10, 0X10, 0X12, 0X22, 0X10, 0X10, 0X10, 0X10, 0X10, 0X10, 0X12, 0X22, 0X10, 0X10, 0X10, 0X10, 0X10, 0X10, 0X12, 0X22, 0X33, 0X33, 0X33, 0X30, 0X10, 0X10, 0X12, 0X22, 0X30, 0X30, 0X30, 0X30, 0X10, 0X10, 0X12, 0X22, 0X33, 0X03, 0X03, 0X30, 0X10, 0X10, 0X12, 0X22, 0X30, 0X30, 0X30, 0X30, 0X10, 0X10, 0X12, 0X22, 0X33, 0X03, 0X03, 0X30, 0X10, 0X10, 0X12, 0X22, 0X30, 0X30, 0X30, 0X30, 0X10, 0X10, 0X12, 0X22, 0X33, 0X03, 0X03, 0X30, 0X10, 0X10, 0X12, 0X22, 0X30, 0X30, 0X30, 0X30, 0X10, 0X10, 0X12, 0X22, 0X33, 0X33, 0X33, 0X30, 0X10, 0X10, 0X12, 0X22 };
© Adafruit Industries https://learn.adafruit.com/genesis-poi-dotstar-led-persistence-of-vision-poi Page 50 of 52

Above is the data for an American flag…a four-entry color palette (white, red, black, blue) followed by the pixel data(packed two pixels per byte).
Then, near the bottom of the file, you’ll see a block like this:
This table holds references to all of the images in the file, along with their widths in pixels (height is always 16) andformat (bitmap or up to 16 colors).
If you need to free up some program space in a hurry, you can just comment out or delete a line in this table…thecompiler is smart enough to not include the corresponding image data in the final program.
const image PROGMEM images[] = { { PALETTE1 , 100, (const uint8_t *)palette00, pixels00 }, { PALETTE4 , 48, (const uint8_t *)palette01, pixels01 }, { PALETTE4 , 54, (const uint8_t *)palette02, pixels02 }, { PALETTE4 , 1, (const uint8_t *)palette03, pixels03 }, { PALETTE4 , 24, (const uint8_t *)palette04, pixels04 }, { PALETTE4 , 9, (const uint8_t *)palette05, pixels05 }, { PALETTE4 , 26, (const uint8_t *)palette06, pixels06 }};
© Adafruit Industries https://learn.adafruit.com/genesis-poi-dotstar-led-persistence-of-vision-poi Page 51 of 52

© Adafruit Industries Last Updated: 2019-06-10 04:11:09 PM UTC Page 52 of 52