General Ledger End User Training Manual
47
Table of Contents SECTION 1 GENERAL LEDGER MASTER RECORDS PROCESSING ..................................................... 3 1.1 CREATE/CHANGE/DISPLAY GL A/C MASTER RECORDS ......................................................................... 3 1.2 DISPLAY CHANGES GL ACCOUNT MASTER DATA. ............................................................................... 17 SECTION 2 GENERAL LEDGER BUSINESS TRANSACTIONS................................................................ 25 2.1 PARK DOCUMENT (SINGLE SCREEN TRANSACTION) ............................................................................. 25 2.2 POST/DELETE PARK DOCUMENT........................................................................................................... 31 2.3 DISPLAY PARKED DOCUMENT .............................................................................................................. 33 2.4 POST GL ACCOUNT DOCUMENT ........................................................................................................... 36 SECTION 3 GENERAL LEDGER REPORTS ................................................................................................ 43 3.1 STANDARD SAP REPORTS...................................................................................................................... 43
-
Upload
sudheer1112 -
Category
Documents
-
view
56 -
download
5
description
SAP General Ledger End User Training Manual
Transcript of General Ledger End User Training Manual

Table of Contents
SECTION 1 GENERAL LEDGER MASTER RECORDS PROCESSING ..................................................... 3
1.1 CREATE/CHANGE/DISPLAY GL A/C MASTER RECORDS ......................................................................... 3 1.2 DISPLAY CHANGES GL ACCOUNT MASTER DATA. ............................................................................... 17
SECTION 2 GENERAL LEDGER BUSINESS TRANSACTIONS................................................................ 25
2.1 PARK DOCUMENT (SINGLE SCREEN TRANSACTION) ............................................................................. 25 2.2 POST/DELETE PARK DOCUMENT........................................................................................................... 31 2.3 DISPLAY PARKED DOCUMENT .............................................................................................................. 33 2.4 POST GL ACCOUNT DOCUMENT ........................................................................................................... 36
SECTION 3 GENERAL LEDGER REPORTS ................................................................................................ 43
3.1 STANDARD SAP REPORTS...................................................................................................................... 43

Note
This training document does not cover all knowledge areas of SAP ERP System. It has been
specifically prepared keeping in view the Business Processes of FBR, therefore, it should be treated
as a supplement and/or guide to your daily work and nothing further.
This training document will only provide explanation of the key and mandatory data fields and not
of all the fields appearing on the screen. However, users may use online help facility provided by
SAP ERP System by placing the cursor on the field that requires explanation and pressing FI
button.
Legend for R/O/C
R = Required field
O = Optional field
C = Check box

SECTION 1 GENERAL LEDGER MASTER RECORDS PROCESSING
1.1 Create/Change/Display GL A/C Master Records
Enter Transaction Code FS00 in Command Field or navigate through tree menu.
Via Transaction Code FS00
Menu Accounting>Financial Accounting>General Ledger>Master Records >G/L Accounts>individually processing>Centrally
Press enter or to run the transaction.
Edit G/L Account Centrally Screen
On screen “Edit G/L Accounting Centrally”, require some setting which are given below.
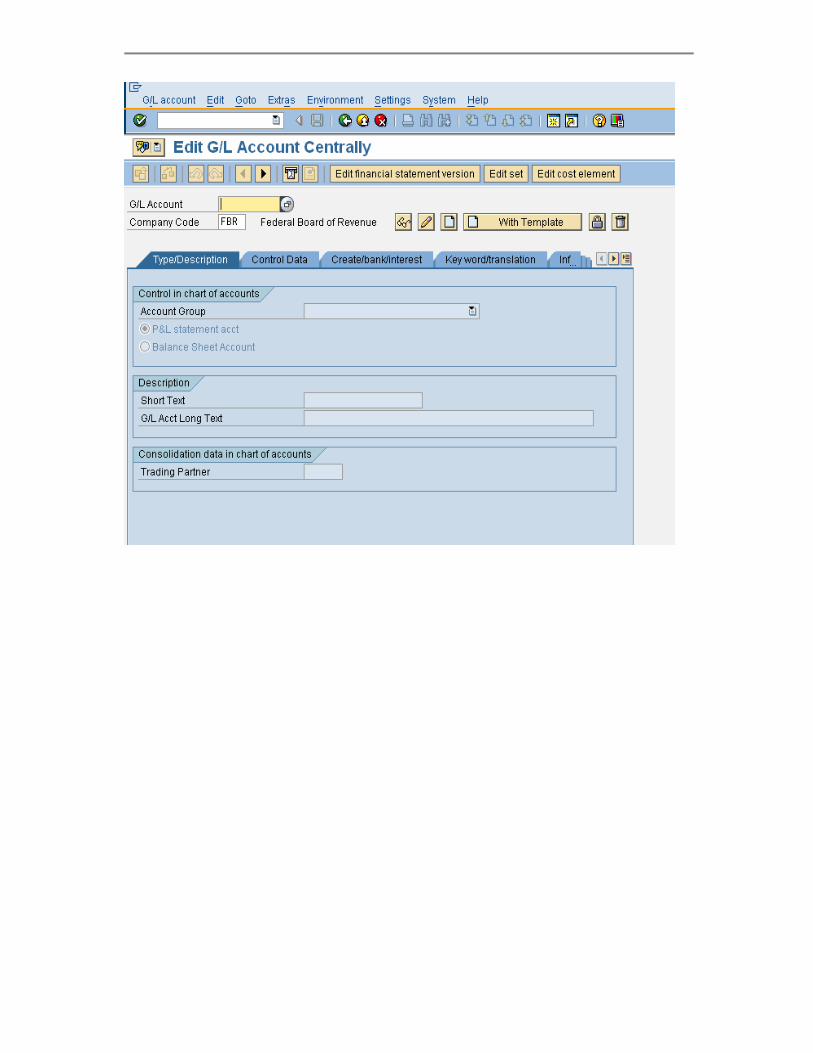

Hierarchy display From menu click settings and then click Hierarchy display as shown below:
Navigation tree window A navigation tree selection window prompt is in front, select radio button of “Display
accounts in navigation tree” button and click to continue.

Information window
An information window will prompt stating “the new settings will take effect once the
transaction is restarted click to continue.
Click back button from top to main screen. Repeat the step mention in 1.2 i.e. T-Code FS00.

Now screen will open with Hierarchy display as shown below:
View Hierarchy Display screen
Creating Balance Sheet Item G/L Account Select appropriate account group to create G/L Account in it for an example ‘Expenses’ as shown below:
Hierarchy Display Part

Create G/L Account
Click on the button create a screen “create G/L account” will prompt

Create G/L Account screen
Enter manually G/L Account properly and click to continue.

From right side screen menu a blank screen for entries will open select Account Group as Shown below:
Type/Description Tab Select account group from drill down list, for example select “Expenses”.
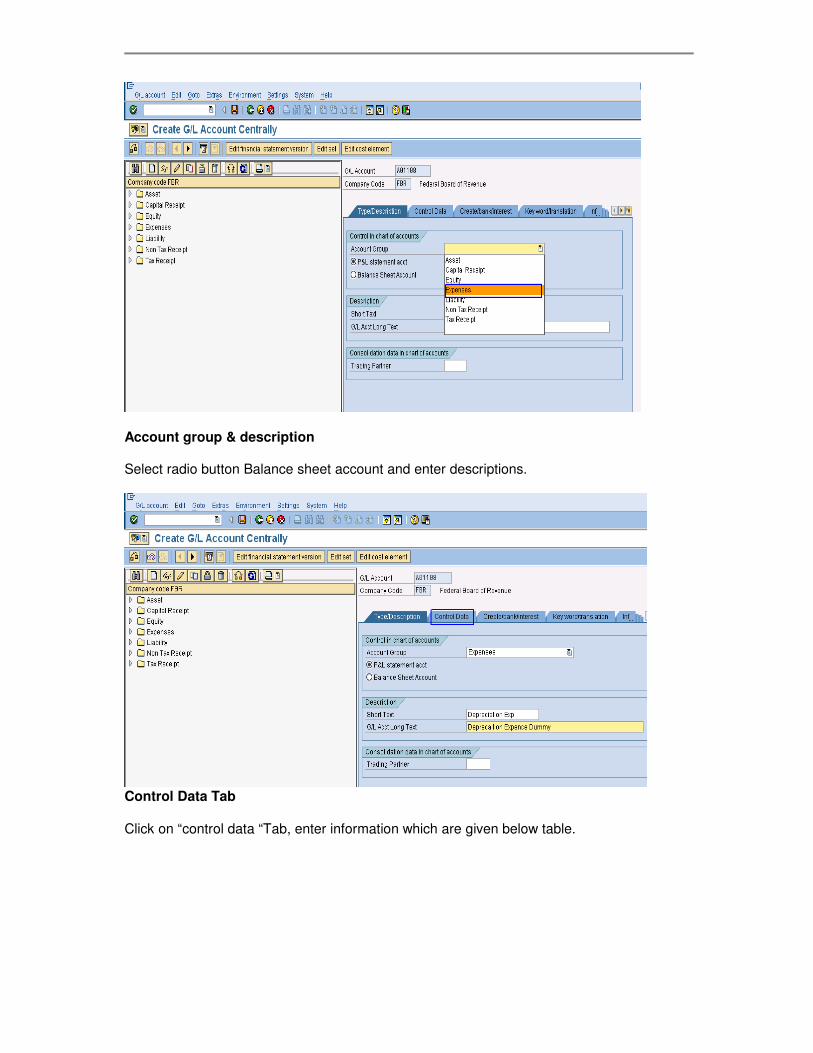
Account group & description Select radio button Balance sheet account and enter descriptions.
Control Data Tab
Click on “control data “Tab, enter information which are given below table.
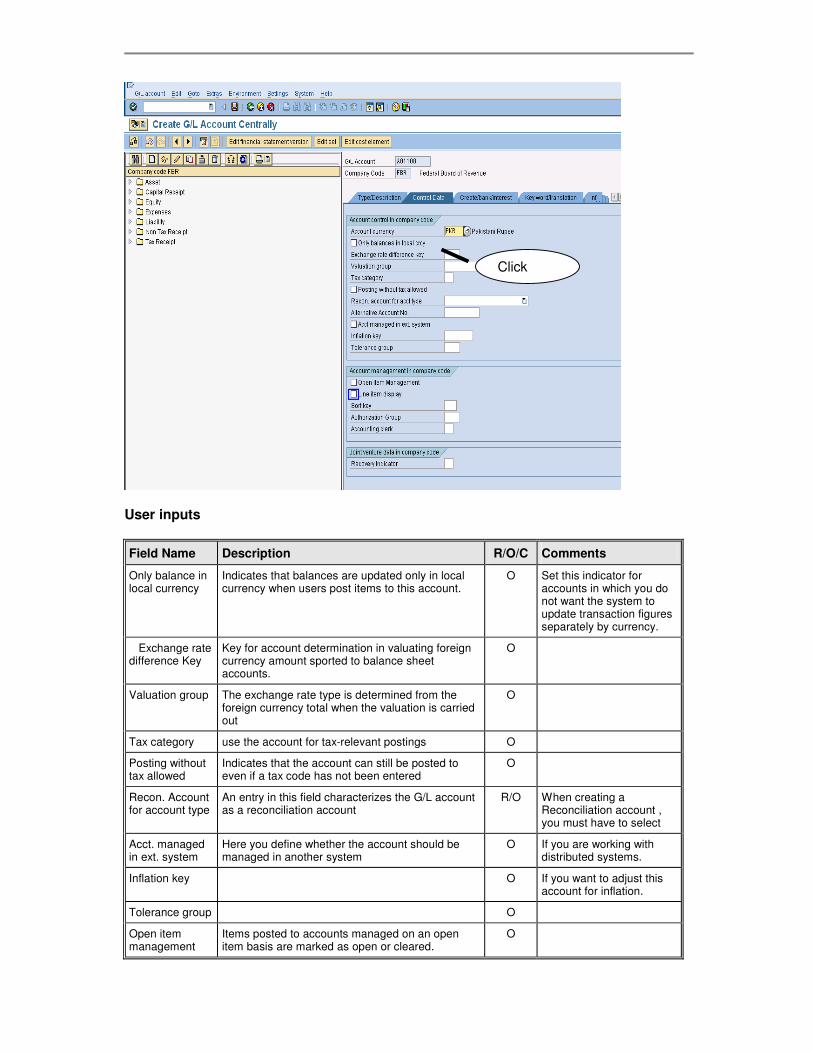
User inputs
Field Name Description R/O/C Comments
Only balance in local currency
Indicates that balances are updated only in local currency when users post items to this account.
O Set this indicator for accounts in which you do not want the system to update transaction figures separately by currency.
Exchange rate difference Key
Key for account determination in valuating foreign currency amount sported to balance sheet accounts.
O
Valuation group The exchange rate type is determined from the foreign currency total when the valuation is carried out
O
Tax category use the account for tax-relevant postings O
Posting without tax allowed
Indicates that the account can still be posted to even if a tax code has not been entered
O
Recon. Account for account type
An entry in this field characterizes the G/L account as a reconciliation account
R/O When creating a Reconciliation account , you must have to select
Acct. managed in ext. system
Here you define whether the account should be managed in another system
O If you are working with distributed systems.
Inflation key O If you want to adjust this account for inflation.
Tolerance group O
Open item management
Items posted to accounts managed on an open item basis are marked as open or cleared.
O
Click here

Line item display
O Set if you want to see the line items in the entry view
Sort key it sorts the items according to the content of the Allocation field
O
Authorization group
allows extended authorization protection for particular objects
O
Accounting clerk Identification code for the accounting clerk. O
Recovery indicator
If there is a Joint venture. O
Account Currency = PKR
Tax category choose * for All tax types allowed.
Tax Category Selection
Enter * in Tax Category field, it will show possible entries screen.
Select posting without tax allowed

Choose Recon .account type from drill down menu Choose vendor as shown in screen.
Create/Bank/Interest Tab
Click on Create/bank/interest tab and enter the following in formations which are given below.

User Input
Field Name Description R/O/C Comments
Field status group
Determines the screen layout for R
Post automatically only
Indicates that this account can only be posted to by the system using account determination tables
O
Supplement auto. Postings
Indicates that line item which is generated automatically by the system for this account can be supplemented manually.
Recon. Account ready for input
Indicator which determines that the reconciliation account is ready for input when posting a document.
O
Planning level used to control displays in Cash Management O
Relevant to cash flow
Determines that the GL Account is a cash flow account.
O
Commitment item
For assigning budget. O
House bank To determine bank data O
Account id O
Interest indicator
Procedure of interest to be calculated O
Interest calc. Frequency of monthly interest calculation O
Click here

frequency
Key date of last int. calc
Date for calculation of interest O
Date of last interest run
O
Field status group selection Enter field status group and commitment item.
Save Master Data.
Click on to save master data. A message on the bottom of the screen will appear shown below:
And newly created account appears in hierarchy.

End of transaction
1.2 Display Changes GL Account Master Data.
Required User Input (FS04) Enter Transaction Code FS04 in Command Field or navigate through tree menu.
Via Transaction Code FS04
Menu Accounting>Financial Accounting>General Ledger>Master Records >G/L Accounts>Display Changes>Centrally
New GL account

Press enter or to run the transaction.
Central G/L Account Changes: Initial Screen Click on central G/L Account changes initial screen and enter the following information which is given below.

User Inputs
Field Name Description R/O/C Comments
Account number
GL account number to see changes R
Company code Insert FBR R
Period of change
From Change date
displays changes which were made as from the input date
O
Time Displays changes which were made as from the input time.
O
Changed by Displays changes which were made as from user. O
Enter the Account number and company code.

Press “Enter” to continue
G/L Account Changes: Changed Fields Screen
Display All Changes Click on push button “All Changes” to see all changes made to the GL account.

G/L Account Changes: Overview Screen
Click to see details.
Details
By click a details window will prompt.
Click here or press F6
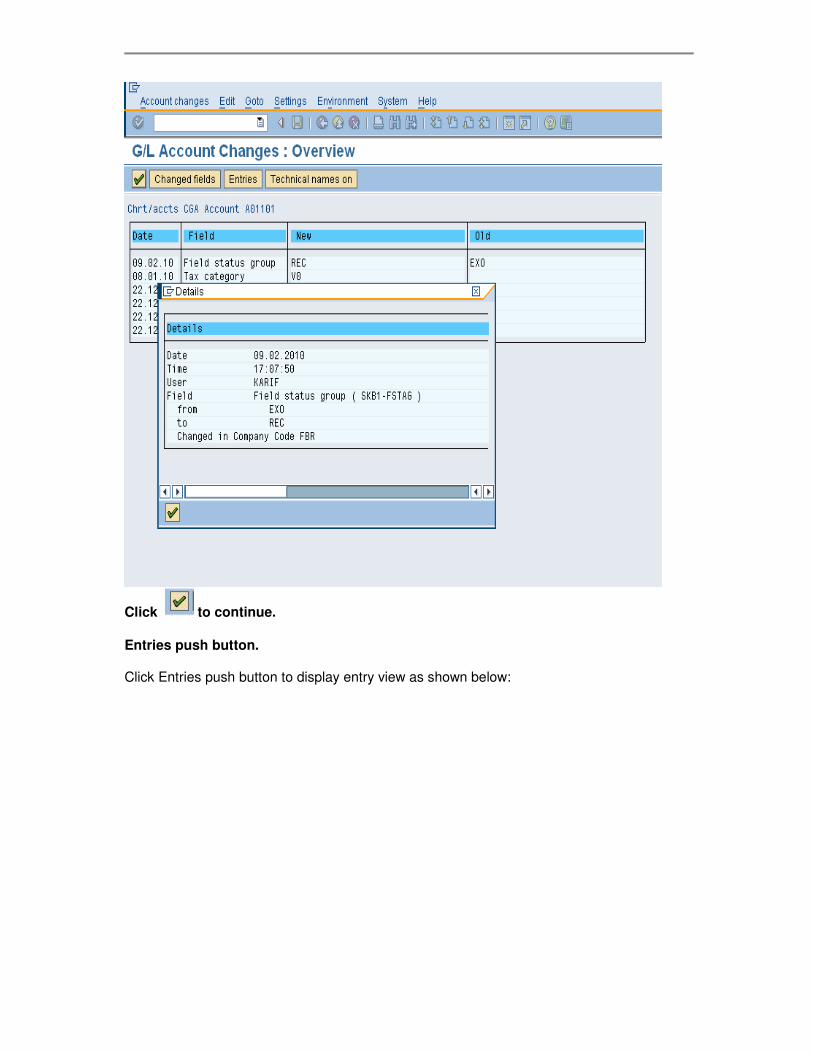
Click to continue.
Entries push button. Click Entries push button to display entry view as shown below:

Technical names on Click on “Technical names on” push button to display technical names of objects entered
Click here
Click here

Technical names display

SECTION 2 GENERAL LEDGER BUSINESS TRANSACTIONS
2.1 Park Document (Single Screen Transaction)
Access transaction by:
Via Menus Accounting ���� Financial Accounting ���� General Ledger ���� Posting ���� Document ���� Park Documents ���� "Post/Delete: Single Screen Transaction
Via Transaction Code FV50
Click on “Post/Delete: Single Screen Transaction”, enter the following information in the field as specified in the table below.

User Input:
Field Name Description R/O Comments
Doc. date Source document date. R Enter a document date.
Currency If a document is in foreign currency, enter the foreign currency code.
O For exchange rate Users are given 3 choices: - User need not enter an exchange rate. The
system determines the exchange rate from the Exchange Rate Table based on the posting date of the Invoice.
- User enters a Translation Date in the Details tab. The system determines the exchange rate from the Exchange Rate Table based on the translation date.
- User manually enters the exchange rate in the Details tab.
Note : Use this Currency field to enter TARP
related Foreign Currency transactions. A warning message will appear at the bottom of the screen if exchange rate deviates from table rate. Press <Enter> to bypass the message.
Posting date Date for posting a document to financial accounting. This will determine which fiscal period (also known as posting period) the transaction is recognized.
R Enter a posting date.
Period This is the posting period. It will change according to the posting date you have entered. There is no requirement to enter or change the period unless
O If you are posting to Special Periods 13 to 16, then enter a period. Otherwise leave as blank.

Field Name Description R/O Comments
posting to special periods i.e. periods 13 to 16. Special periods are often used for year-end adjustments.
Reference One of the key fields that can be used to search for documents at a later retrieval date. Any user-defined text.
R
Short txt The document header text contains explanations or notes which apply to the document, that is, not only for certain line items.
O
Doc. type This field is used by SAP for the following: 1. Determination of
document number to be assigned to the transaction.
2. Can be used to limit the usage for the account types.
Default document type for Post G/L document is SA.
R Select a document type from the drop-down list if you want to change the document type
G/L account Account which is to be posted to.
R Click on the drop-down arrow to view a list of available G/L accounts or use F4 Help.
D/C Debit or Credit. R Enter Debit or Credit.
Amount in Doc. Curr.
Debit or credit amount to be posted.
R
Enter an amount.
Cost center A cost center is required for Profit and Loss accounts.
R/O The cost center is entered only in case if GL account is of Expense nature
Internal Order A Internal Order is required for Profit and Loss accounts where it is marked as required entry.
R/O Internal Order is required field for the transactions related to office accomodation, residential accomodation, Telephone and Vehicles.
Text A 50 character description of the transaction if required.
R/O
Step 01: Enter the document date and posting date.

Step 02: Enter the G/L account, Debit, amount and cost center in required fields.
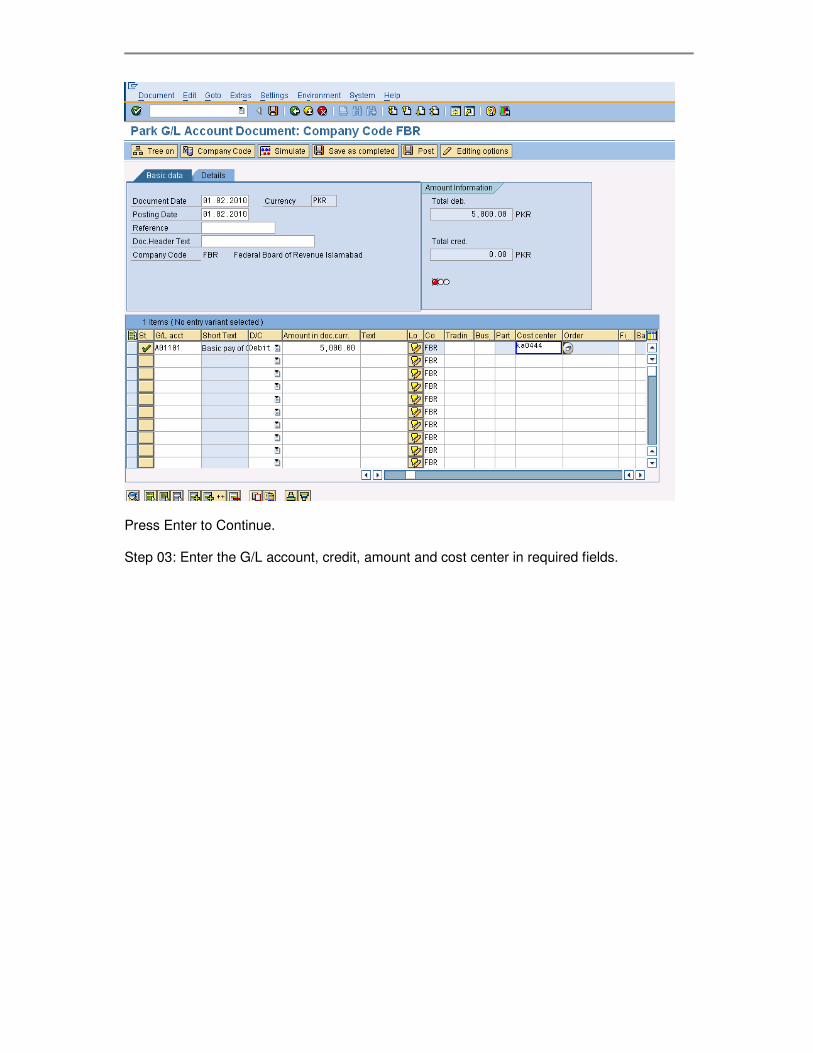
Press Enter to Continue. Step 03: Enter the G/L account, credit, amount and cost center in required fields.

Press Enter or click to Continue
Click to park the Invoice.

2.2 Post/Delete Park Document
Access transaction by:
Via Menus Accounting � Financial Accounting � General Document � Document � Park Documents � Post/Delete
Via Transaction Code FBV0
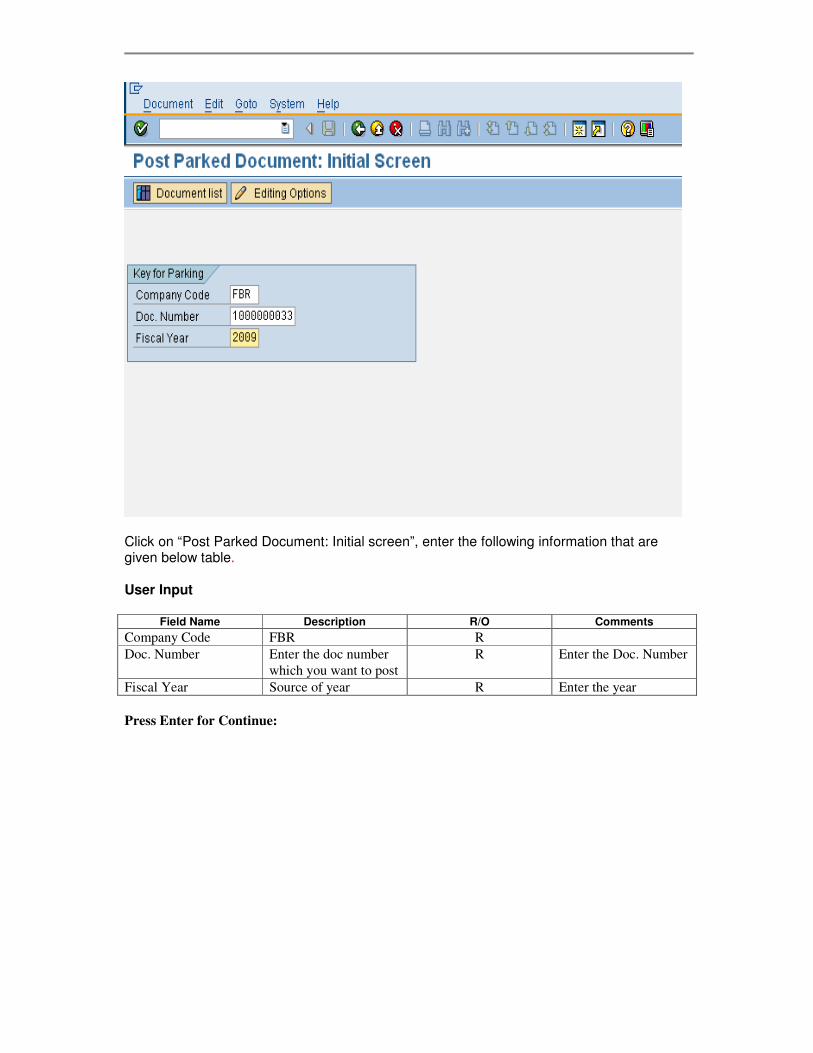
Click on “Post Parked Document: Initial screen”, enter the following information that are given below table. User Input
Field Name Description R/O Comments
Company Code FBR R
Doc. Number Enter the doc number
which you want to post
R Enter the Doc. Number
Fiscal Year Source of year R Enter the year
Press Enter for Continue:

Click on Exit button.
2.3 Display Parked Document
Access transaction by:
Via Menus Accounting ���� Financial Accounting ���� General Document ���� Document ���� Parked Documents ����Display
Via Transaction Code FBV3
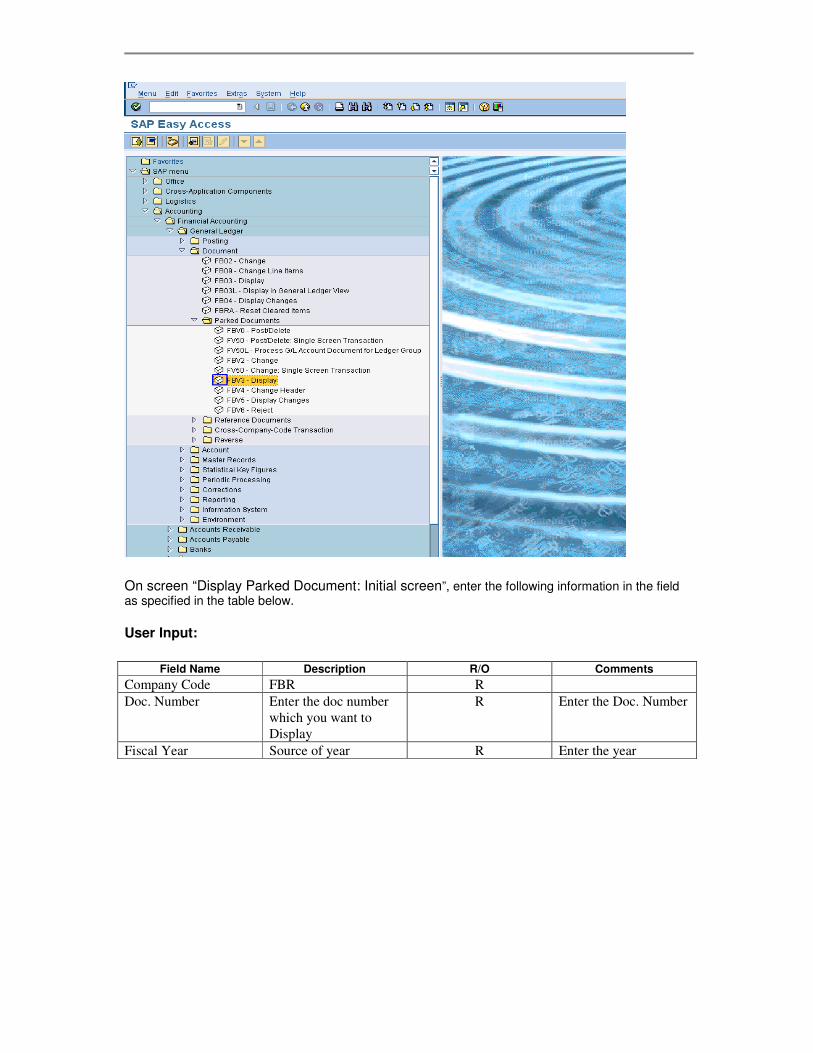
On screen “Display Parked Document: Initial screen”, enter the following information in the field as specified in the table below. User Input:
Field Name Description R/O Comments
Company Code FBR R
Doc. Number Enter the doc number
which you want to
Display
R Enter the Doc. Number
Fiscal Year Source of year R Enter the year

Enter data in specified fields which are mentioned above table.
Press Enter to Continue:

Press Button to Exit.
2.4 Post GL Account Document
Access transaction by:

Via Menus Accounting ���� Financial Accounting ���� General Ledger���� Posting���� Enter G/L Account Document
Via Transaction Code FB50
Step01: “Enter G/L account document: Company code FBR” Basic data Tab Screen

User Input:
Field Name Description R/O Comments
Doc. date Source document date. R Enter a document date.
Currency If a document is in foreign currency, enter the foreign currency code. For exchange rate Users are given 3 choices: - User need not enter an
exchange rate. The system determines the exchange rate from the Exchange Rate Table based on the posting date of the document.
- User enters a Translation Date in the Details tab. The system determines the exchange rate from the Exchange Rate Table based on the translation date.
- User manually enters the exchange rate in the Details tab.
A warning message will appear at the bottom of the screen if exchange rate deviates from table rate. Press <Enter> to bypass the message.
R Enter a currency code.
Posting date Date for posting a document R Enter a posting date.

Field Name Description R/O Comments
to financial accounting. This will determine which fiscal period (also known as posting period) the transaction is recognized.
Period This is the posting period. It will change according to the posting date you have entered. There is no requirement to enter or change the period unless posting to special periods i.e. periods 13 to 16. Special periods are often used for year-end adjustments.
O If you are posting to Special Periods 13 to 16, then enter a period. Otherwise leave as blank.
Reference One of the key fields that can be used to search for documents at a later retrieval date. Any user-defined text.
R
Short txt The document header text contains explanations or notes which apply to the document, that is, not only for certain line items.
O
Doc. type This field is used by SAP for the following: 3. Determination of
document number to be assigned to the transaction.
4. Can be used to limit the usage for the account types.
Default document type for Post G/L document is SA.
R Select a document type from the drop-down list if you want to change the document type
Company code The company code for which the transaction is to be posted.
R To change the company code, go to:
Environment � Change company code.
G/L account Account which is to be posted to.
R Click on the drop-down arrow to view a list of available G/L accounts.
D/C Debit or Credit. R Enter Debit or Credit.
Amount in Doc. Curr.
Debit or credit amount to be posted.
R
Enter an amount.
Cost center A cost center is required for Profit and Loss accounts.
R/O The cost center is entered only in case if GL account is of Expense nature
Internal Order A Internal Order is required for Profit and Loss accounts where it is marked as required entry.
R/O
Text A 50 character description of the transaction if required.
R/O

After you have entered the G/L items, click on to view the accounting entries that will be posted into the system. Additional accounting entries like tax calculation etc.
Go to Step 2.

Verify the accuracy of the data. Once you are ready to post the document, click . The system will automatically assign a document number that appears at the bottom of the screen. Note down the document number.
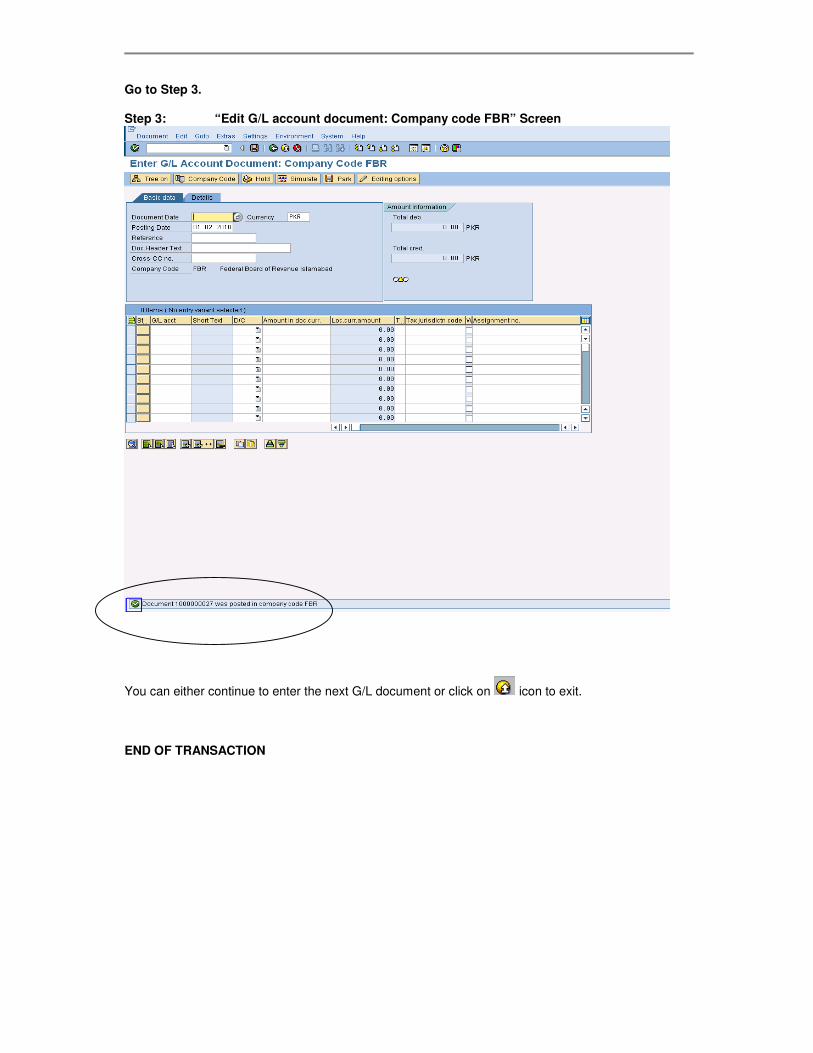
Go to Step 3. Step 3: “Edit G/L account document: Company code FBR” Screen
You can either continue to enter the next G/L document or click on icon to exit.
END OF TRANSACTION

SECTION 3 GENERAL LEDGER REPORTS
3.1 Standard Sap Reports
Via Menus Accounting ���� Financial Accounting ���� General Ledger���� Information system����General Ledger Repost (new)
3.2 Select Individual Reversal

As only limited fields are allowed to change after posting, to amend the critical fields requires the document to be reversed and re-posted with the correct information.
Access transaction by:
Via Menus Accounting���� Financial Accounting ����General Ledger���� Document ���� Reverse���� Individual Reversal
Via Transaction Code FB08
Step “Reverse Document: Header Data” Screen

Field Name Description R/O Comments
Document Number
The SAP generated number of the document to be reversed.
R System also accepts down payment request and partial payment request no.
Company Code FBR R
Fiscal Year Not required O
Reversal Reason
Reason for reversing a document
R From the drop-down list, select the most relevant one.
Posting Date The posting date of the document created for the reverse postings. If you leave it blank, and it will default the reversal document’s posting date to that of the reversed document.
O If you are reversing a document posted many months back and you want the reversal to be effective in that period as well, then that period must be opened for posting, if it had been closed. Otherwise, the system will issue an error message.
Posting Period Defaults based on posting date
O
Enter Document Number, Reversal Reason
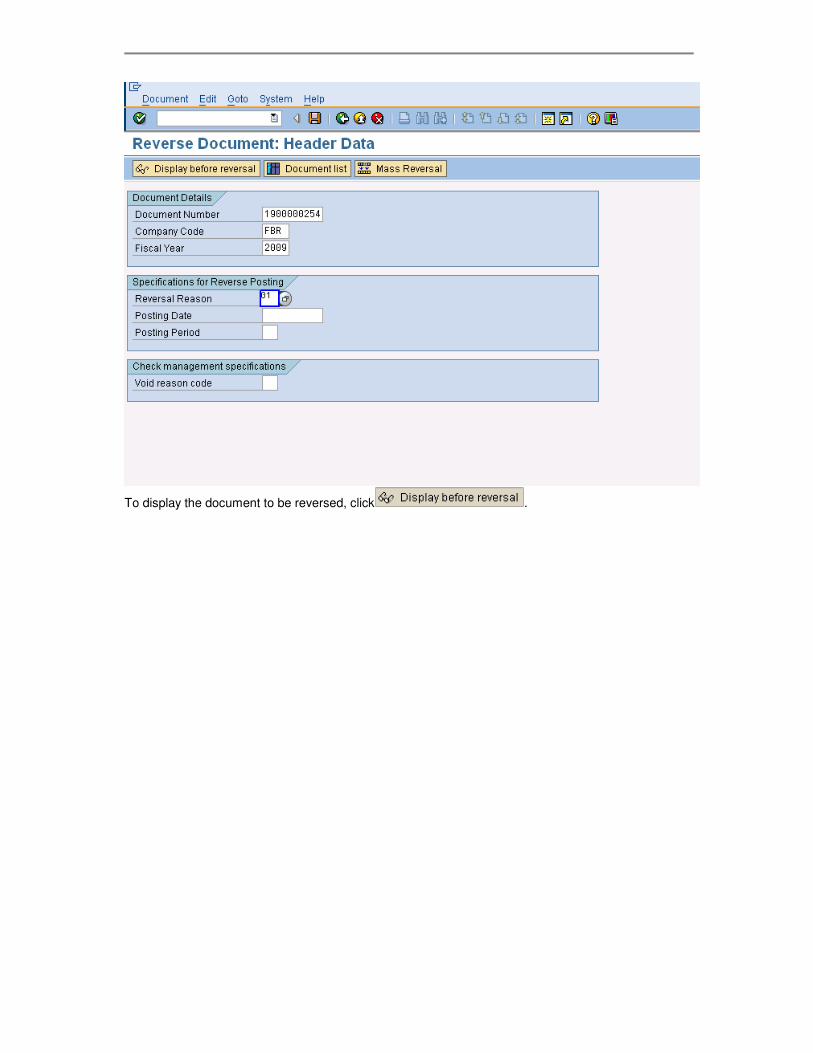
To display the document to be reversed, click .

After verifying the document is the one to be reversed, click on to return to the previous screen
(Step 1) and then click on to reverse the accounting entries. Display Document: Data Entry View
A document number, generated for the reversed postings, is displayed at the bottom of the screen. Note down the reversal document number. Press Exit Button.
Made by Jimstex for http://www.erpdb.info