Gemini · 4 Chapter 2: Installation Installation of the Server will be done for you by a Gemini...
26
1 Titan Users Manual version 1.0 Feb 2017 systems Gemini
Transcript of Gemini · 4 Chapter 2: Installation Installation of the Server will be done for you by a Gemini...

1
Titan Users Manualversion 1.0
Feb 2017
systemsGemini

2
Table of Contents
Chapter Topic Page
1 Introduction 3 2 Installation 43 Interface overview 54 File Browser 65 Top Section 76 Status 87 Tabpanel 107.1 Template 108 Free Layout 139 Wall Art 1610 Template Editor 1711 Art On Demand 1912 Preferences 2213 Color Management 2515 Printing Progress 26
No part of this document can be pusblished, copied or distributed without the specific written permission of Gemini- Systems to do so.
© Gemini-Systems 2017

3
1 Introduction
Welcome to Gemini12, introducing a completely new Client interface named Titan. For those of you upgrad-ing from Gemini 4, you will be happy to know that this will be an easy learning path, as most of Gemini 4’s excellent Client interface options have been built into Titan also.What is Gemini 12? Gemini 12 is a complete turnkey solution for high end photographic and fine-art repro-ductions. Gemini 12 consists of a server (Mac Mini) and one or more Clients, either on Mac or PC.In this manual, all interface parts will be discussed and background information is provided on how to per-form common tasks. We would like to thank you for choosing Gemini 12 and wish you many happy prints!

4
Chapter 2: Installation
Installation of the Server will be done for you by a Gemini Service Engineer.The Titan client for Gemini 12 can be installed on as many workstations as you like.Titan is available for both Mac and Windows. Although this manual mostly shows Mac screenshots,the options are 100% identical on both Platforms.
2.1 Windows Installation
2.1.1 System requirements
Titan can be installed on any Windows PC running Windows 7, 8 or 10. Both 32 and 64 bit versions are available. It is recommend to have at least 100GB of free disk space available on your PC. More Ram will help speed up things, as will a Solid State drive.Windows XP or Vista are not supported.
2.1.2 Windows Installation
The latest version of Titan is available for download at;
http://gemini.systems/Titan32.zip for the 32-bit versionhttp://gemini.systems/Titan64.zip for the 64-bit version
installation is easy; download the right version using the link above and unzip the file.Then copy the entire Titan folder to your Program Files (x86) folder.Titan uses no installer so it will not touch any system files.Once launched Titan can be pinned to your taskbar.
2.2 Mac installation
2.2.1 System requirements
Titan can be installed on any Mac running 10.7 (Snow Leopard) or above.It is recommended to have at least 100GB of free disk space available on your Mac. More Ram will improve speed, as will a Solid State drive.Operating systems below 10.7 are not supported.
2.2.2 Mac installation
The latest version of Titan is available for download at;
http://gemini.systems/Titan.pkg
2.3 Updates
Both Mac and Windows versions of Titan will notify you on launch when a new version is available.The update will download a new version, which can be installed as described above. All custom saved settings will be preserved.
5
Chapter 3: Interface
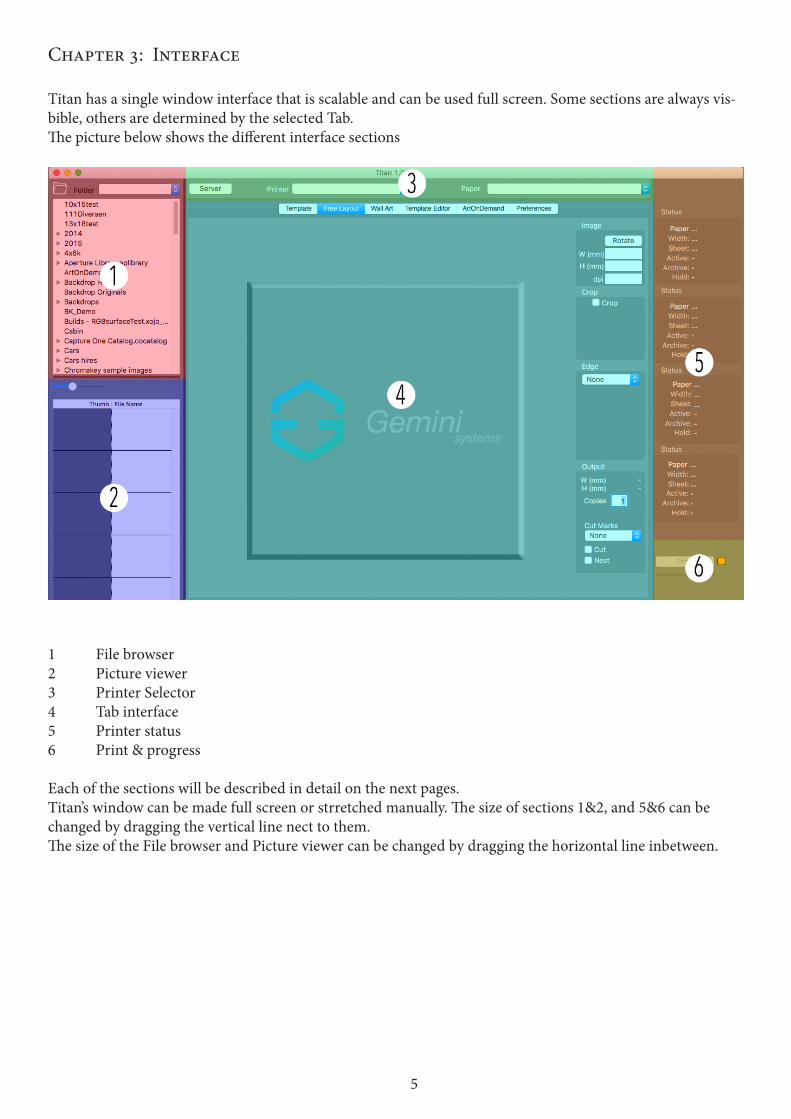
Titan has a single window interface that is scalable and can be used full screen. Some sections are always vis-bible, others are determined by the selected Tab.The picture below shows the different interface sections
1 File browser2 Picture viewer3 Printer Selector4 Tab interface5 Printer status6 Print & progress
Each of the sections will be described in detail on the next pages.Titan’s window can be made full screen or strretched manually. The size of sections 1&2, and 5&6 can be changed by dragging the vertical line nect to them. The size of the File browser and Picture viewer can be changed by dragging the horizontal line inbetween.

6
Chapter 4: File Browser
On the left side of the Titan interface, you will find the File Browser. It consists of two parts; the top part is where you select a folder, the bottom part will then show all printable files in the selected folder.
Selecting a file
By default, the initial folder is the users home folder. When an entry in the browserlist has a triangle, it contains subfolders. By clicking the triangle you open or close the subfolder view.As soon as you click a folder that contains printable images (TIF and JPG) they will show up in the Picture list with a thumbnail displayed.Only files that can be printed will show up in the File Browser.
The Popupmenu allows you to also show File size or dimensions, when the browser window has been made wide enough by dragging the verti-cal line to the right of the File Browser.
To access an external drive or a network connected drive, use the Folder Popupmen at the top.
When you have found the image(s) you want to print, you can drag them to the free layout or Template, depending on which tab panel you are.In Free Layout you can only work with one file at the time.Templates allow you to drag multiple files. You can select multiple files by clicking on one file first, and then shift click on the last file you want to select. All selected files will then turn blue. These files can then be
dragged to a cell on the Template Tab, and they will all be processed.
If you prefer to drag images from a window, you can do that to. Both Template and Freelayout allow you to to drag and drop from external windows.
The slider inbetween the Browser List and the Picture List allows you to scale the thumbnails in the Picture list.
The lines inbetween the Browser List and the Picture List can be dragged to modify their size; you can change the height of the Browser List and the Picture List.
4.1 Favorites
Folders that you often use, can be added to the folder popup at the top left by double clicking a folder.When a folder is a favorite, a heart will be shown in ftont of the folder name. To remove a folder from favor-ites, double click the folder again.

7
Chapter 5: Top Section
In the top center of the Titan interface are three buttons. The Server button allows you to connect to your Gemini 12 Server. Once you have established that connection, the setting will be saved on exit, so the next time you launch Titan it will immediately connect to the Server.
If no Printers are selectable in the Printer Popup meny, you first need to connect to the Gemini12 server.This is done by clicking on the Server button, which will open a window where you select the Gemini12 network share. If you have never connected before it will ask you a username and password. Enter gemini for both and connect to the server and select the Gemini folder on the Gemini12 share as seen below;
Once connected, the Printer Popup Menu fills up with your printers. You can switch printers by simply se-lecting them. When a Printer is selected, the Paper Popup menu will contain the paper types you have avail-able on this printer, like the image below;
You can always change the wanted printer and media type you want to print on in the Top Section.
8
Chapter 6: Status
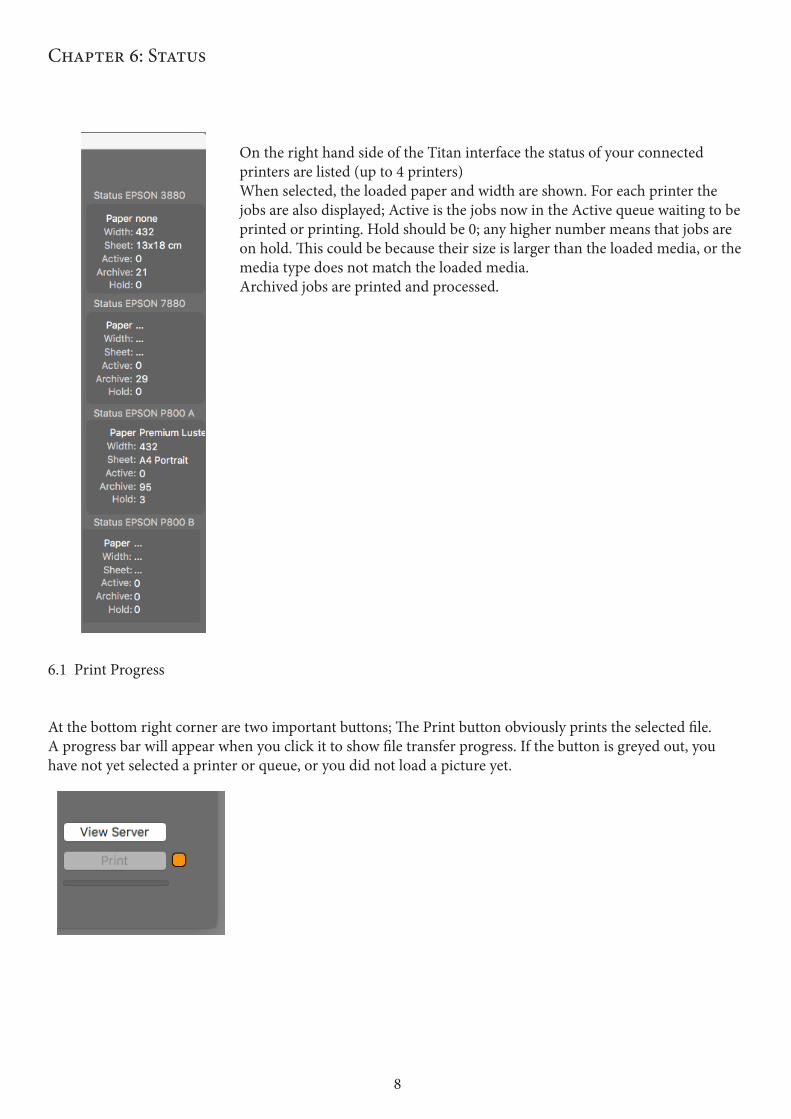
On the right hand side of the Titan interface the status of your connected printers are listed (up to 4 printers)When selected, the loaded paper and width are shown. For each printer the jobs are also displayed; Active is the jobs now in the Active queue waiting to be printed or printing. Hold should be 0; any higher number means that jobs are on hold. This could be because their size is larger than the loaded media, or the media type does not match the loaded media.Archived jobs are printed and processed.
6.1 Print Progress
At the bottom right corner are two important buttons; The Print button obviously prints the selected file. A progress bar will appear when you click it to show file transfer progress. If the button is greyed out, you have not yet selected a printer or queue, or you did not load a picture yet.

9
6.2 View Server
Since Gemini 12 is a Client - Server solution, the server has it’s own interface. There is no need to create a complete workplace to control the server, as the server can be controlled by using a remote screen controller. On Mac, this is built in and can be opened by clicking the View Server button.
On windows, VNC Viewer is installed, which allows the same functionality.
To log in to the server remote screen, you should use the same login information as for the server sharing connection; enter gemini for both the username and password.
On windows, users enter Gemini12 as the server name and then enter gemini as username and password.
This opens up the server view which will look similar to the image below;

10
Chapter 7: TabPanel
The TabPanel allows you to select any of five different interface parts, just like tabs in a browser or Excel.From left to right they are Template, Free Layout, Wall Art,Template Editor, Art On Demand and Preferences.Each tab is explained below:
7.1 Template
Titan supports templates for jobs that are repetitive or multiple file. The template files from Gemini 4 can be used in Titan, so if you have upgraded from Gemini 4, there is no need to re-create your templates. Templates can be imported in the Preferences tab.
On the left side the list of available templates is shown, both by their name as by a thumnail preview.You can set the size of the preview using the Slider.
Filter
If you have many templates, you can filter the list using the Filter PopupMenu.
To start using a template, you click on it in the list.

11
The larger preview on the right then shows the selected template.Each template cell has a blue box indicating its position and size. The letter in the cell indicates which image will be placed there; if all cells are A, they will all receive the same image. When the cell letter is different, a subsequent image will be placed there.To see how this works, drag a few images to the Large Template preview and drop them on the cell you want. They will be loaded immediately.
Template margins
All templates have a 3mm margin on all sides, as this is the non printable area of the printer.
Borderless printing
Templates can also be used for borderless printing; you can choose the wanted paper size, for instance 10x15 and simply drop the images you want printed onto the template that will have one cell in the maximum size, so 3mm less than the paper size. By then checking the Borderless checkbox, your prints will be borderless.The preview give you a fairly accurate preview of the crop that will occur.,which will be not much more than 1.5 mm on all sides.
Template Print Info
Some template have info labels activated (see Template Editor). These are shown as a green box. With the Print Info Popup menu you can determine which information will be printed; None will leave the info label clear, Filename allows you to print the filename. This will always be in black, left aligned.Date allows you to print the current date, Custom allows you to enter your own text in the textbox below the PopupMenu.
Options
You can have the edge of all Cells printed with a colored edge line if you check the box Edge Line. The Popup Menu to the right allows you to set the line thickness in pixels. By clicking on the black box to the right of the line thickness Popup Menu, you can choose any color.
Cutmarks Popup
There are three options for cut marks when using templates. No Cutmarks obviously does not print any cut marks. The second option is Page Edge. Then the template page size will be indicated using inside corner cutmarks. The third option is Cells only. In this case all cells will be printed with cutmarks.For cut sheets you would usually not use cutmarks on Page Edge as these will correspond with your paper size. For roll printing, or printing templates on larger cut sheets than your template, the Page Edge cutmarks are usually used. Cell only cutmarks can be handy when you need to cut the individual cells, especially when the image has a white background.
The lenth of the cutmarks can be selected using the Popup Menu to the right of the CutMarks Popup Menu.

12
Cell Mode
Cells can show the image in two different ways; Fit (see above left) or Fill (see above right) . Fit will scale the image (in proportion) to fit the cell. Fill will expand the image (if needed) to fill the entire cell. You may lose some of the image in Fill mode, but can control the crop of the image using the Fill Slider, after selecting the cell you wish to modify.Templates with single letter cells will modify all cells. On templates with multiple letter cells, each letter can be modified individually.
Auto Rotate
When Auto Rotate is checked (default) the images you drop on a template will be rotated to best fit the cells. This means that a portrait picture will be rotated if dropped onto a landscape cell. You can override this by unchecking the Auto Rotate box, and then use the Rotate Left or Right buttons after clicking the cell you wish to modify. When Auto Rotate is active, the Rotate Left & Right have no effect.
Pages
In the Pages section you can set the number of copies needed. The size of a template page is shown.The Add and Delete buttons allow you to Add or Delete a template page. When there are more than one Pages, the Scroll bar below Add and Delete allows you to select each Page. To the right of the Scroll bar the currently selected and number of pages are shown.
Printing a Template
When you are ready to print your template pages, click the Print button in the bottom right corner.

13
Chapter 8: Free Layout
Free Layout allows you to click any printable image in the Picture list or that you dragged and dropped onto the Square with the Gemini Logo. You can only process one file at the time in Free Layout. If you need to process many files, Templates usually are an easier solution.Once an image has been loaded into Free Layout (either by clicking on a Picture in the Picture List or drop-ping a file onto the Square Drop zone) you will see a large preview. The dimensions and resolution are shown in the top right corner. You can modify the dimension by typing in a new Width or Height.
Rotate
Clicking the Rotate button will rotate the loaded image by 90 degrees.
Cropping can either be done by dragging the red box shown on the big preview or by entering values in the Crop section. Reset will reset the crop to full size.
Supported files
Titan supports several file types; TIF and JPG are preferable, but beta support is also provided for, PDF, PSD, BMP, PNG, EPS, PS and some Raw files, although Raw files are not print ready usually, so use at your own risk. PDF is limited to 1 Page RGB files. Many other bitmap format do not contain icc color information and are not really intended for professional printing and can give errors or unexpected results.

14
Edge Section
By default, the Edge Selection is set to None.There are two other options: Equal and Custom.
Equal Edges
Equal creates an equal edge around the image. You can set the edge size in mm. The preview shows the edge in proportion to the image.
Edge Color
By default the edge color is white. You can change this by checking the Color Checkbox. The default color is black, but by clicking on the black box, you can select any color, or use a pipet to choose a color from the image.
Mirror Edge
For canvas printing, you can check the Mirror Check-box. This will create a mirrored image on all edges which allows for easier canvas framing and avoids cropping.
Custom Edges
For Passe-partout (Mount) printing, Titan offers an easy way to add custom sized edges to an image. These can be specified in mm for the Top, Sides and Bottom. By default the custom edges are white, but by checking the Color Checkbox, they can be any color. Choose a color by clicking on the black box. Using the pipette you can also pick a color from your image.

15
Output Section
The Output Section shows the print size. Here you can also control the number of copies you want to print.Red numbers indicate that your file dimensions exceed the printers maximum print size.
Cut Marks
Cutmarks can be selected and will allow you to cut a white edge of a print accurately.The cutmarks are always inside corner, places just outside your image,so you can easily cut them all away, without losing cutmarks every cut.The length of a cutmark can also be set; from 0.5 to 10 mm.
Cut check box
This option determines if the print will be cut from the roll (if printed from a roll) or not.It has no effect on sheet prints.
Nest check box
Gemini12 can nest multiple jobs from multiple clients onto one roll. Use the next check box to indicate the job is to be nested with oothers, allowing you to save media.
Printing from FreeLayoutOnce you are ready to print, click on the Print button.If the size of the FreeLayout is larger than your loaded media, you will get a popup warning, allowing you to cancel. There is also a check for minimum resolution (Defined in Preferences Tab) so if the file does not meet the set minimum DPI, you will get a warning.
File sizes and DPI
Although your printer can obtain high resolutions like 1440 dpi, it only slows down and creates problems if you upsample images to beyond 360 dpi. For 99.9% of the images, you will not be able to see the difference between a 360 dpi print and a 600 or 720 dpi print. The difference is that the 720 dpi is 4x bigger in file size and will take 4x longer to process, whilst doing almost nothing for sharpness.
For small prints it sometimes can be usefull to use a higher resolution, but large prints can usually not be over 360 dpi.Currently, Titan supports files up to 410 Megapixels. (image width x image height).Images beyond 30000 pixels can create problems, and aren’t even support by slightly older Photoshop ver-sions. If you get a warning from Titan during printing, try sampling the image down to a normal resolution like 360 dpi, and you will be able to print at least 64” portrait photo’s.For Large Format prints, an image resolution of 150 dpi is recommended. For small prints (A4 and below) it is better to use 360 dpi. Using resolutions over 360 dpi is ofcourse possible, but will not add much sharpness, and could cause errors.
16
Chapter 9: Wall Art
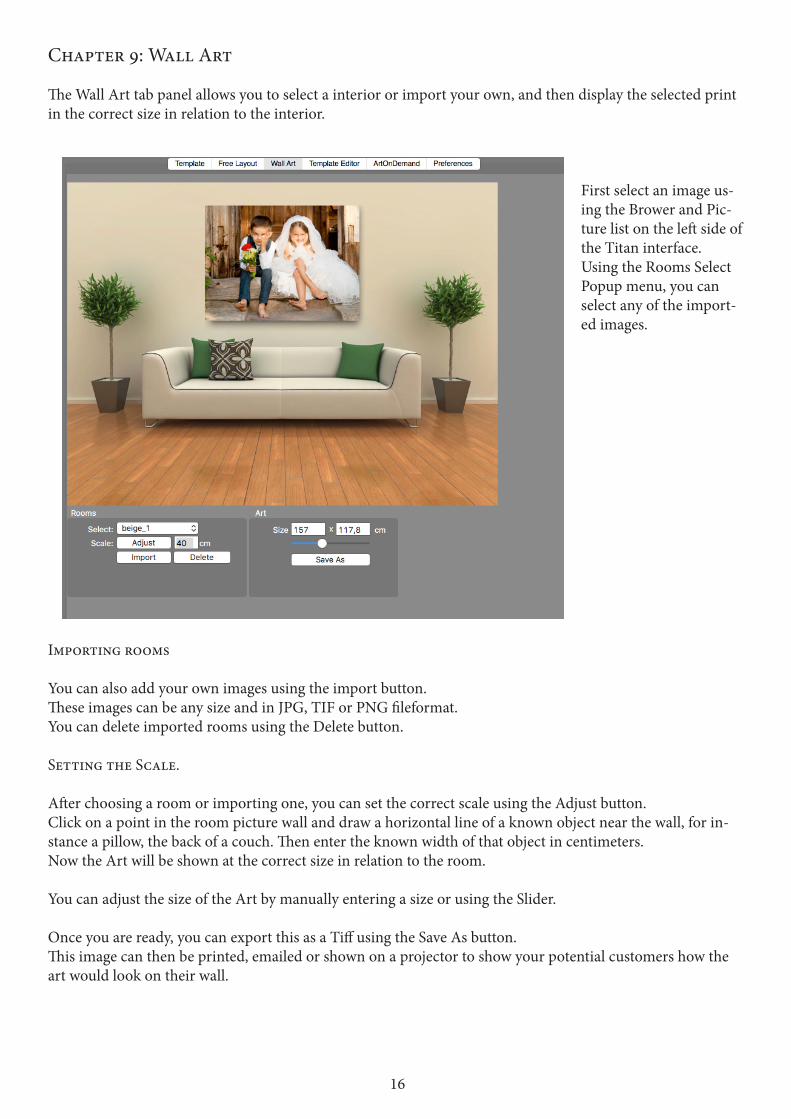
The Wall Art tab panel allows you to select a interior or import your own, and then display the selected print in the correct size in relation to the interior.
First select an image us-ing the Brower and Pic-ture list on the left side of the Titan interface.Using the Rooms Select Popup menu, you can select any of the import-ed images.
Importing rooms
You can also add your own images using the import button.These images can be any size and in JPG, TIF or PNG fileformat.You can delete imported rooms using the Delete button.
Setting the Scale.
After choosing a room or importing one, you can set the correct scale using the Adjust button.Click on a point in the room picture wall and draw a horizontal line of a known object near the wall, for in-stance a pillow, the back of a couch. Then enter the known width of that object in centimeters.Now the Art will be shown at the correct size in relation to the room.
You can adjust the size of the Art by manually entering a size or using the Slider.
Once you are ready, you can export this as a Tiff using the Save As button.This image can then be printed, emailed or shown on a projector to show your potential customers how the art would look on their wall.

17
Chapter 10: Template Editor
New templates can be created or existing ones modified using the Template Editor Tab Panel.
On the left is the list of available templates. With the Filter Popup Menu, you can select a specific size of tem-plates.
Creating a new Template
Enter a name for your new template in the Template Field. Then select a Page Size or enter a custom size.Then click the New button to create the template.
Editing Templates
Start by selecting the template in the Template List.This will show the template in the large previewYou can add new cells by clicking on the New button in the Template editor section.A new cell will show as 50 x 50 mm in the top left, indicated by a blue box.
You can modify this cell in several ways;Highlight a cell by clicking it. It will now show red.Use the arrow keys on your keyboard to move a selected cell by 1 mm.Use Shift+Arrow keys on your keyboard to move a selected cell by 1 cm.

18
To roughly position the cell you can also use the mouse; drag the cell to the desired position.By modifying the X, Y, Width or Height you can change the cell more exact.
By default, a cell will be group A. if you need different images printed on one template, you can modify the group by clicking on the cell and then changing the group letter next to the Group label.The number of the cell is indicated at the top of the editor. By positioning the cells logically, you can arrange the order in which multiple images dropped onto a multi group template are placed.
A new cell be default has no Print info box. You can set a Print info box by checking the Show Print Info checkbox. This will create a green box just below the cell. If you want to position it elsewhere, carefully click the green box and use the arrow keys to reposition.
Duplicating Cells
If you need more identical Cells, use the Duplicate button to create a copy, which will be offset by 5 mm to the right and down.
Matrix
When you need to create a template with multiple rows and colums of cells, you can use the Matrix button.First define the X & Y of the top left cell, and its dimensions, and then enter the wanted number of rows and columns and space inbetween, like shown in this example;
Aligning Cells
Cells can be aligned to 7 preset posi-tions on the page, using the Align icon.Select a cell by clicking it and click on the desired align position. This allows for quick centering and aligning to the edge.
Delete Cells
Select a cell and click the Delete button in the Cell Section to delete a cell.
Saving a Template
When you are done, click the Save button to save the template. Now it is ready for use in the Template Tab Panel
Importing templates
Gemini 4 and Titan templates can be imported using the Import button.If Gemini 4 is installed, clicking Import will open up the folder where your Gemini 4 templates are stored.(/Library/Application Support/EPSON/PPPS/Templates)If you have stored your templates on the server, they can be copied from there.

19
Chapter 11 Art On Demand
Perhaps the most unique feature of Gemini12 is the built in support for Art On Demand support. Users can have access to specifc libraries of Art, visualize these using Wall-Art, and then print directly from Titan, without having to need to have access to the high resolution Art images. Instead, Gemini 12 can retrieve the print job from the cloud directly into the selected print queue. The high resolution images are always safe, as only the print data is streamed from the cloud directly into the printer. This avoids making extra copies (even if your printer has a harddrive); only the purchased number of copies can be printed and the copyright owner of the files (the publisher) retains full control over the images without the need to distribute the files.
11.1 International Graphics
The world renowned International Graphics Art library is available for approved Gemini12 users. Over 3000 artworks are available for printing in custom sizes and on different media types.
The Search field can be used to search for any keyword that is linked to the Artworks. It is also possible to select a category like Abstract Paintings or Photos.The IG Library contains over 100 different Artist, which can also be used as a search parameter. The Orientation allows the user to filter either square, landscape or portrait orientations.
The found Art is shown in a vertical scrollable window, which can have as many items per page as you want and will adjust the pages accordingly.

20
When an artwork is selected, a larger preview is shown to the left of the list;
To give the customer an impression of how the Artwork might look in their own room, when submitted, Ti-tan automatically switches to the Wall Art tab, and shows the image projected onto the wall in proportion to the set dimensions, allowing resizing to help choose the wanted dimensions;
The wanted Media type can then be selected, and for canvas prints, a colored or mirrored edge can be specified.
Then, with a single click, an order can be placed for the se-lected Artwork, and the job will arrive in the server print queue within minutes.
21
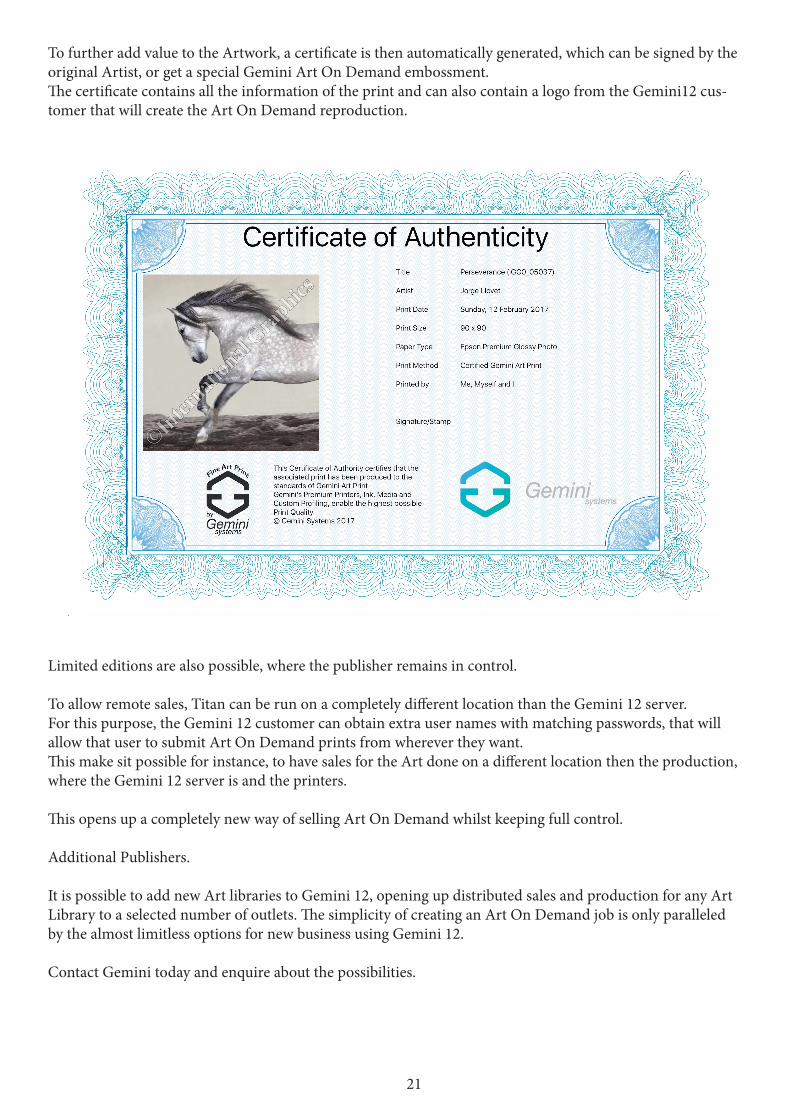
To further add value to the Artwork, a certificate is then automatically generated, which can be signed by the original Artist, or get a special Gemini Art On Demand embossment.The certificate contains all the information of the print and can also contain a logo from the Gemini12 cus-tomer that will create the Art On Demand reproduction.
Limited editions are also possible, where the publisher remains in control.
To allow remote sales, Titan can be run on a completely different location than the Gemini 12 server.For this purpose, the Gemini 12 customer can obtain extra user names with matching passwords, that will allow that user to submit Art On Demand prints from wherever they want.This make sit possible for instance, to have sales for the Art done on a different location then the production, where the Gemini 12 server is and the printers.
This opens up a completely new way of selling Art On Demand whilst keeping full control.
Additional Publishers.
It is possible to add new Art libraries to Gemini 12, opening up distributed sales and production for any Art Library to a selected number of outlets. The simplicity of creating an Art On Demand job is only paralleled by the almost limitless options for new business using Gemini 12.
Contact Gemini today and enquire about the possibilities.
22
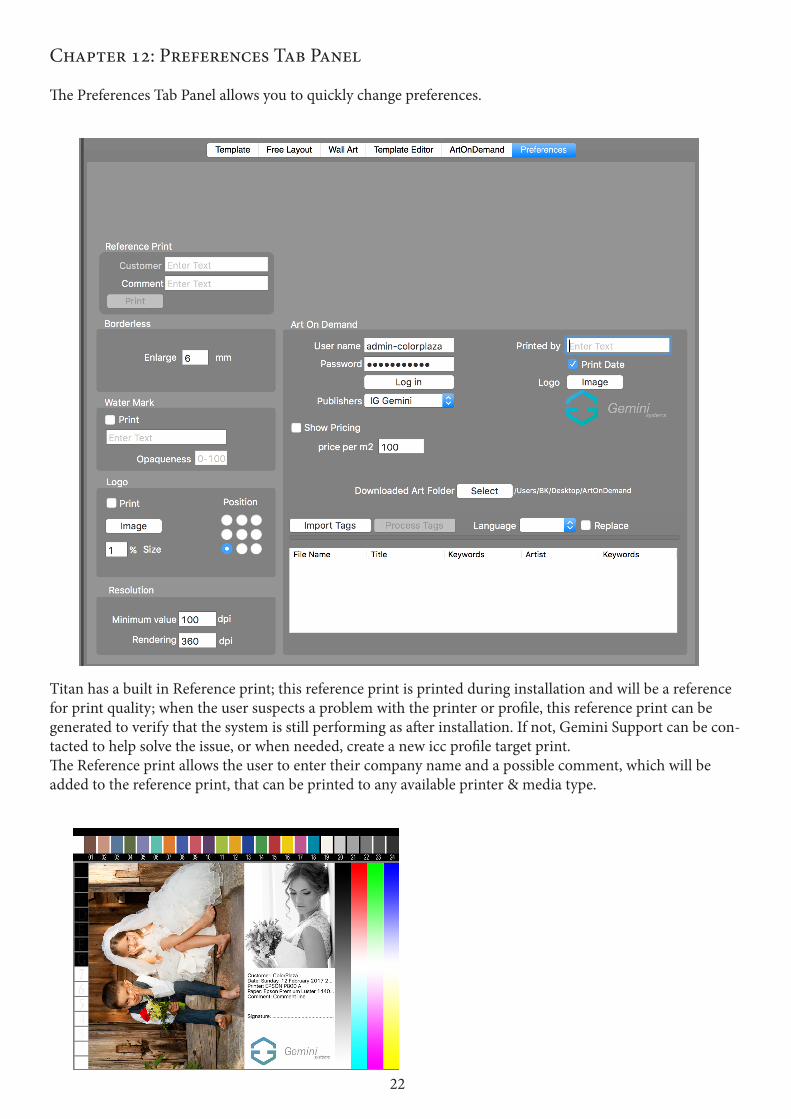
Chapter 12: Preferences Tab Panel
The Preferences Tab Panel allows you to quickly change preferences.
Titan has a built in Reference print; this reference print is printed during installation and will be a reference for print quality; when the user suspects a problem with the printer or profile, this reference print can be generated to verify that the system is still performing as after installation. If not, Gemini Support can be con-tacted to help solve the issue, or when needed, create a new icc profile target print.The Reference print allows the user to enter their company name and a possible comment, which will be added to the reference print, that can be printed to any available printer & media type.

23
Borderless Auto expand
This defines how much the images will be expanden in mm. The minimum is 6mm to prevent white lines.The actual crop of the image is much less; usually not more than 2 mm on each side.
Water Mark
Titan allows you to add a watermark to all cells on a template and on Free Layout.When you check the Print checkbox, the watermark text you enter will be shown on any cell in Template and Freelayout.They are printed diagonally at the opaqness set in Preferences.100 means fully visible, 0 is completely transparent.
Logo
Titan’s logo featutre allows you to print a logo on top of your images, on each Template cell or in FreeLay-out.When you check the Print checkbox, the logo will be printed at the position indicated by the Position icon.You can choose any corner or center.The Size field allows you to set the percentage of the width the logo should be printed at, ranging from 0 to 100. Using the Image button, you can import your own logo. The logo should be RGB PNG format and can have transparency.
Resolution
The Resolution settings have two user defined values; the minimum value determines the dpi under which a warning popup will appear, as the result might be less sharp than required. For small prints, a resolution of 360 dpi is optimal. For large prints, this resolution is not achievable, so a lower value can be used. in gener-al, a print with a resolution of >100 dpi will be perceived sharp by most. (with the exception of small prints like 10x15cm)
Rendering resolution.
In Free layout, the full resolution of your input images is preserved. For practical reasons, this is not the case for Template prints. These are re-sampled (if needed) to the setting for Rendering resolution. By default a value of 360 is used. For specific purposes, a higher resolution can be used such as 720 dpi. As this will qua-druple the memory usage, storage and processing time, the value is not saved on exit, so on launch, Titan always uses 360 dpi.

24
Art On Demand Preferences
As there are many things selectable, the section for Art On Demand preferences is relatively large.
Access to a Art On Demand is restricted to a combination of username and password.By default, you will only see the Demo Publisher, with 4 sample images. When you have been approved for additional Publishers, you will receive a unique user name & password, after which all accessible Publishers can be chosen in the Publishers Popup menu.
The show pricing option allows you to set and display a base price, based on the dimensions. This avoids having to calculate for each possible size of an Art On Demand print.
The certificate generated when an Art On Demand print is ordered, will contain the information entered at Printed by, the date and optionally, the selected logo.(see the Art On Demand section for an example of the certificate)
All downloaded Art will be stored locally at the location specified using the Select button. This allows for quick reprints and browsing in Wall Art.
The bottom section of the Art On Demand Preferences contains the Tags importer. This allows the user to set the Artwork Title, Category, Artist Name and keywords. The keywords can be set per language.A users guide on how to use the importer will be proivided to those Gemini 12 customers that sign up for the Art On Demand option. Contact Gemini-Systems for more information.

25
Colormanagement
Titan is color aware, meaning that it has a built in color engine, based on icc profiles. When no profile is em-bedded in your pictures, sRGB is assumed. On templates, the first image placed determines the icc profile. All subsequent images are converted to that icc profile before print.
Created for photographic and fine-art reproduction, Titan is RGB based, to maintain the largest possible color gamut.
Gemini 12 ensures you will always use a calibrated system that is powerful, easy to use and creates the highest possible quality of prints.

26
Printing Progress
When you click Print, TItan goes through a number of steps, that are indicated by both a progress bar and a text label.
The steps involved are: opening the high resolution file, creating the job file, size and color conversion (if needed), Job ticket and thumbnail creation, compression (lossless LZW in most cases) and copying the file to the server.In template mode, the preview flips through the number of pages in the template.
Error prevention
In order to try prevent printing problems, Titan monitors your job’s dimension and warns if they exceed the loaded media. Titan also warns if you try to print an image at a very low resolution (as set in Preferences).The color indicator next to the print button indicates possible problems; green means everything is ready to go, orange means there might be problems, red means you cannot print yet.
A red light is usually caused by not selecting a printer and paper.An orange light can be caused by the dimension or resolution.