Gateway Guide - ForgeRock Identity Gateway 5 · Gateway Guide ForgeRock Identity Gateway 5 Paul...
213
Gateway Guide / ForgeRock Identity Gateway 5 Latest update: 5.0.0 Paul Bryan Mark Craig Jamie Nelson Guillaume Sauthier Joanne Henry ForgeRock AS 201 Mission St., Suite 2900 San Francisco, CA 94105, USA +1 415-599-1100 (US) www.forgerock.com
Transcript of Gateway Guide - ForgeRock Identity Gateway 5 · Gateway Guide ForgeRock Identity Gateway 5 Paul...

Gateway Guide/ ForgeRock Identity Gateway 5
Latest update: 5.0.0
Paul BryanMark Craig
Jamie NelsonGuillaume Sauthier
Joanne Henry
ForgeRock AS201 Mission St., Suite 2900
San Francisco, CA 94105, USA+1 415-599-1100 (US)
www.forgerock.com

Copyright © 2011-2017 ForgeRock AS.
Abstract
Instructions for installing and configuring the ForgeRock® Identity Gateway.
This work is licensed under the Creative Commons Attribution-NonCommercial-NoDerivs 3.0 Unported License.
To view a copy of this license, visit https://creativecommons.org/licenses/by-nc-nd/3.0/ or send a letter to Creative Commons, 444 Castro Street, Suite 900, Mountain View, California, 94041, USA.
ForgeRock® and ForgeRock Identity Platform™ are trademarks of ForgeRock Inc. or its subsidiaries in the U.S. and in other countries. Trademarks are the property of their respective owners.
UNLESS OTHERWISE MUTUALLY AGREED BY THE PARTIES IN WRITING, LICENSOR OFFERS THE WORK AS-IS AND MAKES NO REPRESENTATIONS OR WARRANTIES OF ANY KIND CONCERNING THE WORK, EXPRESS,IMPLIED, STATUTORY OR OTHERWISE, INCLUDING, WITHOUT LIMITATION, WARRANTIES OF TITLE, MERCHANTABILITY, FITNESS FOR A PARTICULAR PURPOSE, NONINFRINGEMENT, OR THE ABSENCE OF LATENTOR OTHER DEFECTS, ACCURACY, OR THE PRESENCE OF ABSENCE OF ERRORS, WHETHER OR NOT DISCOVERABLE. SOME JURISDICTIONS DO NOT ALLOW THE EXCLUSION OF IMPLIED WARRANTIES, SO SUCHEXCLUSION MAY NOT APPLY TO YOU.
EXCEPT TO THE EXTENT REQUIRED BY APPLICABLE LAW, IN NO EVENT WILL LICENSOR BE LIABLE TO YOU ON ANY LEGAL THEORY FOR ANY SPECIAL, INCIDENTAL, CONSEQUENTIAL, PUNITIVE OR EXEMPLARYDAMAGES ARISING OUT OF THIS LICENSE OR THE USE OF THE WORK, EVEN IF LICENSOR HAS BEEN ADVISED OF THE POSSIBILITY OF SUCH DAMAGES.
DejaVu Fonts
Bitstream Vera Fonts Copyright
Copyright (c) 2003 by Bitstream, Inc. All Rights Reserved. Bitstream Vera is a trademark of Bitstream, Inc.
Permission is hereby granted, free of charge, to any person obtaining a copy of the fonts accompanying this license ("Fonts") and associated documentation files (the "Font Software"), to reproduce and distribute the FontSoftware, including without limitation the rights to use, copy, merge, publish, distribute, and/or sell copies of the Font Software, and to permit persons to whom the Font Software is furnished to do so, subject to the followingconditions:
The above copyright and trademark notices and this permission notice shall be included in all copies of one or more of the Font Software typefaces.
The Font Software may be modified, altered, or added to, and in particular the designs of glyphs or characters in the Fonts may be modified and additional glyphs or characters may be added to the Fonts, only if the fonts arerenamed to names not containing either the words "Bitstream" or the word "Vera".
This License becomes null and void to the extent applicable to Fonts or Font Software that has been modified and is distributed under the "Bitstream Vera" names.
The Font Software may be sold as part of a larger software package but no copy of one or more of the Font Software typefaces may be sold by itself.
THE FONT SOFTWARE IS PROVIDED "AS IS", WITHOUT WARRANTY OF ANY KIND, EXPRESS OR IMPLIED, INCLUDING BUT NOT LIMITED TO ANY WARRANTIES OF MERCHANTABILITY, FITNESS FOR A PARTICULARPURPOSE AND NONINFRINGEMENT OF COPYRIGHT, PATENT, TRADEMARK, OR OTHER RIGHT. IN NO EVENT SHALL BITSTREAM OR THE GNOME FOUNDATION BE LIABLE FOR ANY CLAIM, DAMAGES OR OTHERLIABILITY, INCLUDING ANY GENERAL, SPECIAL, INDIRECT, INCIDENTAL, OR CONSEQUENTIAL DAMAGES, WHETHER IN AN ACTION OF CONTRACT, TORT OR OTHERWISE, ARISING FROM, OUT OF THE USE ORINABILITY TO USE THE FONT SOFTWARE OR FROM OTHER DEALINGS IN THE FONT SOFTWARE.
Except as contained in this notice, the names of Gnome, the Gnome Foundation, and Bitstream Inc., shall not be used in advertising or otherwise to promote the sale, use or other dealings in this Font Software without priorwritten authorization from the Gnome Foundation or Bitstream Inc., respectively. For further information, contact: fonts at gnome dot org.
Arev Fonts Copyright
Copyright (c) 2006 by Tavmjong Bah. All Rights Reserved.
Permission is hereby granted, free of charge, to any person obtaining a copy of the fonts accompanying this license ("Fonts") and associated documentation files (the "Font Software"), to reproduce and distribute the modificationsto the Bitstream Vera Font Software, including without limitation the rights to use, copy, merge, publish, distribute, and/or sell copies of the Font Software, and to permit persons to whom the Font Software is furnished to do so,subject to the following conditions:
The above copyright and trademark notices and this permission notice shall be included in all copies of one or more of the Font Software typefaces.
The Font Software may be modified, altered, or added to, and in particular the designs of glyphs or characters in the Fonts may be modified and additional glyphs or characters may be added to the Fonts, only if the fonts arerenamed to names not containing either the words "Tavmjong Bah" or the word "Arev".
This License becomes null and void to the extent applicable to Fonts or Font Software that has been modified and is distributed under the "Tavmjong Bah Arev" names.
The Font Software may be sold as part of a larger software package but no copy of one or more of the Font Software typefaces may be sold by itself.
THE FONT SOFTWARE IS PROVIDED "AS IS", WITHOUT WARRANTY OF ANY KIND, EXPRESS OR IMPLIED, INCLUDING BUT NOT LIMITED TO ANY WARRANTIES OF MERCHANTABILITY, FITNESS FOR A PARTICULARPURPOSE AND NONINFRINGEMENT OF COPYRIGHT, PATENT, TRADEMARK, OR OTHER RIGHT. IN NO EVENT SHALL TAVMJONG BAH BE LIABLE FOR ANY CLAIM, DAMAGES OR OTHER LIABILITY, INCLUDING ANYGENERAL, SPECIAL, INDIRECT, INCIDENTAL, OR CONSEQUENTIAL DAMAGES, WHETHER IN AN ACTION OF CONTRACT, TORT OR OTHERWISE, ARISING FROM, OUT OF THE USE OR INABILITY TO USE THE FONTSOFTWARE OR FROM OTHER DEALINGS IN THE FONT SOFTWARE.
Except as contained in this notice, the name of Tavmjong Bah shall not be used in advertising or otherwise to promote the sale, use or other dealings in this Font Software without prior written authorization from Tavmjong Bah.For further information, contact: tavmjong @ free . fr.
FontAwesome Copyright
Copyright (c) 2017 by Dave Gandy, http://fontawesome.io.
This Font Software is licensed under the SIL Open Font License, Version 1.1. This license is available with a FAQ at: http://scripts.sil.org/OFL

Gateway Guide ForgeRock Identity Gateway 5 (2018-05-03T07:21:09.993)Copyright © 2011-2017 ForgeRock AS. All rights reserved. iii
Table of ContentsPreface ........................................................................................................................ vii
1. About This Guide ............................................................................................. vii2. Formatting Conventions .................................................................................. viii3. Accessing Documentation Online .................................................................... viii4. Using the ForgeRock.org Site ........................................................................... ix5. Getting Support and Contacting ForgeRock ...................................................... ix
1. About the ForgeRock Identity Gateway ..................................................................... 11.1. About OpenIG ................................................................................................. 11.2. OpenIG Object Model ..................................................................................... 21.3. Configuration Directories and Files ................................................................ 31.4. Routing and Routes ........................................................................................ 31.5. Handlers, Filters, and Chains ......................................................................... 41.6. Configuration Objects ..................................................................................... 81.7. Decorators ...................................................................................................... 91.8. Configuration Parameters Declared as Property Variables .............................. 91.9. Using Comments in OpenIG Configuration Files ............................................. 91.10. Understanding OpenIG APIs With API Descriptors ...................................... 10
2. Getting Started ....................................................................................................... 142.1. Before You Begin ......................................................................................... 142.2. Install OpenIG .............................................................................................. 142.3. Install the Sample Application ...................................................................... 152.4. Configure OpenIG ......................................................................................... 162.5. Configure the Network ................................................................................. 182.6. Try the Installation ....................................................................................... 19
3. Installation in Detail ................................................................................................ 223.1. Configuring Deployment Containers ............................................................. 223.2. Preparing the Network ................................................................................. 283.3. Installing OpenIG ......................................................................................... 293.4. Changing the Default Location of the Configuration Folders ......................... 303.5. Preparing For Load Balancing and Failover .................................................. 303.6. Configuring OpenIG For HTTPS (Client-Side) ............................................... 323.7. Setting Up Keys For JWT Encryption ............................................................ 343.8. Making the Configuration Immutable ........................................................... 35
4. Getting Login Credentials From Data Sources ......................................................... 384.1. Before You Start ........................................................................................... 384.2. Log in With Credentials From a File ............................................................. 384.3. Log in With Credentials From a Database .................................................... 41
5. Getting Login Credentials From Access Management .............................................. 465.1. Detailed Flow ............................................................................................... 465.2. Setup Summary ............................................................................................ 485.3. Preparing the Tutorial .................................................................................. 485.4. Setting Up OpenAM for Password Replay ..................................................... 505.5. Installing the OpenAM Policy Agent ............................................................. 515.6. Setting Up OpenIG for Password Replay ....................................................... 52

Gateway Guide ForgeRock Identity Gateway 5 (2018-05-03T07:21:09.993)Copyright © 2011-2017 ForgeRock AS. All rights reserved. iv
5.7. Testing the Setup ......................................................................................... 546. Enforcing Policy Decisions and Supporting Session Upgrade ................................... 55
6.1. About OpenIG As a PEP With OpenAM As PDP ............................................. 556.2. Enforcing Policy Decisions From OpenAM .................................................... 566.3. Upgrading a Session .................................................................................... 60
7. Acting As a SAML 2.0 Service Provider ................................................................... 647.1. About SAML 2.0 SSO and Federation ........................................................... 647.2. Installation Overview .................................................................................... 657.3. Preparing the Network ................................................................................. 667.4. Configuring OpenAM As an IDP ................................................................... 677.5. Configuring OpenIG As an SP ...................................................................... 687.6. Testing the Configuration ............................................................................. 727.7. Example Federation Configuration Files ....................................................... 74
8. Acting As an OAuth 2.0 Resource Server ................................................................ 808.1. About OpenIG As an OAuth 2.0 Resource Server .......................................... 808.2. Preparing the Tutorial .................................................................................. 818.3. Setting Up OpenAM As an Authorization Server ........................................... 828.4. Configuring OpenIG As a Resource Server ................................................... 838.5. Testing the Configuration ............................................................................. 85
9. Acting As an OAuth 2.0 Client or OpenID Connect Relying Party ............................. 889.1. About OpenIG As an OAuth 2.0 Client .......................................................... 889.2. About OpenIG As an OpenID Connect 1.0 Relying Party ................................ 889.3. Installation Overview .................................................................................... 899.4. Setting Up OpenAM for OpenID Connect ...................................................... 909.5. Setting Up OpenIG As a Relying Party ......................................................... 919.6. Testing the Configuration ............................................................................. 949.7. Adapting the Configuration to Authenticate Automatically to the SampleApplication .......................................................................................................... 959.8. Using OpenID Connect Discovery and Dynamic Client Registration ............... 95
10. Transforming OpenID Connect ID Tokens Into SAML Assertions .......................... 10110.1. About Token Transformation ..................................................................... 10110.2. Installation Overview ................................................................................ 10210.3. Setting Up OpenAM for Token Transformation ......................................... 10310.4. Setting Up OpenIG Routes for Token Transformation ................................ 106
11. Supporting UMA Resource Servers ..................................................................... 11311.1. About OpenIG in the UMA Resource Server Role ...................................... 11311.2. Preparing the Tutorial .............................................................................. 11711.3. Setting Up OpenAM As an Authorization Server ....................................... 11811.4. Setting Up OpenIG As a UMA Resource Server ......................................... 12111.5. Test the Configuration .............................................................................. 12511.6. Editing the Example to Match Custom Settings ........................................ 126
12. Configuring Routers and Routes .......................................................................... 12712.1. Configuring Routers ................................................................................. 12712.2. Configuring Routes ................................................................................... 12812.3. Creating and Editing Routes Through Common REST ............................... 13012.4. Creating Routes Through OpenIG Studio .................................................. 13212.5. Preventing the Reload of Routes ............................................................... 133

Gateway Guide ForgeRock Identity Gateway 5 (2018-05-03T07:21:09.993)Copyright © 2011-2017 ForgeRock AS. All rights reserved. v
12.6. Accessing Reserved Routes ....................................................................... 13313. Configuration Templates ...................................................................................... 134
13.1. Proxy and Capture .................................................................................... 13413.2. Simple Login Form ................................................................................... 13513.3. Login Form With Cookie From Login Page ................................................ 13613.4. Login Form With Password Replay and Cookie Filters ............................... 13713.5. Login Which Requires a Hidden Value From the Login Page ..................... 13913.6. HTTP and HTTPS Application ................................................................... 14113.7. OpenAM Integration With Headers ........................................................... 14213.8. Microsoft Online Outlook Web Access ....................................................... 143
14. Extending the ForgeRock Identity Gateway ......................................................... 14614.1. About Scripting ........................................................................................ 14614.2. Scripting Dispatch .................................................................................... 14714.3. Scripting HTTP Basic Authentication ........................................................ 14914.4. Scripting LDAP Authentication ................................................................. 15114.5. Scripting SQL Queries .............................................................................. 15414.6. Developing Custom Extensions ................................................................. 157
15. Auditing and Monitoring ...................................................................................... 16315.1. Monitoring Routes .................................................................................... 16315.2. Recording Audit Event Messages .............................................................. 166
16. Throttling the Rate of Requests to Protected Applications .................................... 17316.1. Configuring a Simple Throttling Filter ...................................................... 17316.2. Configuring a Mapped Throttling Filter .................................................... 17616.3. Configuring a Scriptable Throttling Filter ................................................. 17816.4. Dynamic Throttling Rate ........................................................................... 181
17. Logging Events .................................................................................................... 18317.1. Default Logging Behavior ......................................................................... 18317.2. Reference Logback Configuration ............................................................. 18317.3. Changing the Logging Behavior ................................................................ 184
18. Troubleshooting ................................................................................................... 18718.1. Troubleshooting the UMA Example ........................................................... 18718.2. Can't Deploy Routes in OpenIG Studio ...................................................... 18818.3. Object not found in heap .......................................................................... 18818.4. Extra or missing character / invalid JSON ................................................. 18818.5. The values in the flat file are incorrect ..................................................... 18818.6. Problem accessing URL ............................................................................ 18918.7. StaticResponseHandler results in a blank page ......................................... 18918.8. OpenIG is not logging users in ................................................................. 18918.9. Read timed out error when sending a request .......................................... 18918.10. OpenIG does not use new route configuration ......................................... 19018.11. Make OpenIG skip a route ...................................................................... 190
A. SAML 2.0 and Multiple Applications ..................................................................... 192A.1. Installation Overview .................................................................................. 192A.2. Preparing the Network ............................................................................... 193A.3. Configuring the Circle of Trust ................................................................... 193A.4. Configuring the Service Provider for Application One ................................. 193A.5. Configuring the Service Provider for Application Two ................................. 199

Gateway Guide ForgeRock Identity Gateway 5 (2018-05-03T07:21:09.993)Copyright © 2011-2017 ForgeRock AS. All rights reserved. vi
A.6. Importing Service Provider Configurations Into OpenAM ............................ 199A.7. Preparing OpenIG Configurations ............................................................... 199A.8. Test the Configuration ................................................................................ 203

Gateway Guide ForgeRock Identity Gateway 5 (2018-05-03T07:21:09.993)Copyright © 2011-2017 ForgeRock AS. All rights reserved. vii
PrefaceForgeRock Identity Platform™ is the only offering for access management, identity management,user-managed access, directory services, and an identity gateway, designed and built as a single,unified platform.
The platform includes the following components that extend what is available in open source projectsto provide fully featured, enterprise-ready software:
• ForgeRock Access Management (AM)
• ForgeRock Identity Management (IDM)
• ForgeRock Directory Services (DS)
• ForgeRock Identity Gateway (IG)
• ForgeRock Identity Message Broker (IMB)
1. About This GuideForgeRock Identity Gateway integrates web applications, APIs, and microservices with theForgeRock Identity Platform, without modifying the application or the container where they run.Based on reverse proxy architecture, it enforces security and access control in conjunction with theAccess Management modules.
This guide is for access management designers and administrators who develop, build, deploy, andmaintain ForgeRock Identity Gateway for their organizations. It helps you to get started quickly, andlearn more as you progress through the guide.
This guide assumes basic familiarity with the following topics:
• Hypertext Transfer Protocol (HTTP), including how clients and servers exchange messages, and therole that a reverse proxy (gateway) plays
• JavaScript Object Notation (JSON), which is the format for ForgeRock Identity Gatewayconfiguration files
• Managing services on operating systems and application servers
• Configuring network connections on operating systems
• Managing Public Key Infrastructure (PKI) used to establish HTTPS connections

Gateway Guide ForgeRock Identity Gateway 5 (2018-05-03T07:21:09.993)Copyright © 2011-2017 ForgeRock AS. All rights reserved. viii
• Access management for web applications
Depending on the features you use, you should also have basic familiarity with the following topics:
• Lightweight Directory Access Protocol (LDAP) if you use ForgeRock Identity Gateway with LDAPdirectory services
• Structured Query Language (SQL) if you use ForgeRock Identity Gateway with relational databases
• Configuring OpenAM if you use password capture and replay, or if you plan to follow the OAuth 2.0or SAML 2.0 tutorials
• The Groovy programming language if you plan to extend ForgeRock Identity Gateway with scripts
• The Java programming language if you plan to extend ForgeRock Identity Gateway with plugins,and Apache Maven for building plugins
2. Formatting ConventionsMost examples in the documentation are created in GNU/Linux or Mac OS X operating environments.If distinctions are necessary between operating environments, examples are labeled with theoperating environment name in parentheses. To avoid repetition file system directory names areoften given only in UNIX format as in /path/to/server, even if the text applies to C:\path\to\server aswell.
Absolute path names usually begin with the placeholder /path/to/. This path might translate to /opt/,C:\Program Files\, or somewhere else on your system.
Command-line, terminal sessions are formatted as follows:$ echo $JAVA_HOME/path/to/jdk
Command output is sometimes formatted for narrower, more readable output even though formattingparameters are not shown in the command.
Program listings are formatted as follows:class Test { public static void main(String [] args) { System.out.println("This is a program listing."); }}
3. Accessing Documentation OnlineForgeRock publishes comprehensive documentation online:

Gateway Guide ForgeRock Identity Gateway 5 (2018-05-03T07:21:09.993)Copyright © 2011-2017 ForgeRock AS. All rights reserved. ix
• The ForgeRock Knowledge Base offers a large and increasing number of up-to-date, practicalarticles that help you deploy and manage ForgeRock software.
While many articles are visible to community members, ForgeRock customers have access to muchmore, including advanced information for customers using ForgeRock software in a mission-criticalcapacity.
• ForgeRock product documentation, such as this document, aims to be technically accurate andcomplete with respect to the software documented. It is visible to everyone and covers all productfeatures and examples of how to use them.
4. Using the ForgeRock.org SiteThe ForgeRock.org site has links to source code for ForgeRock open source software, as well as linksto the ForgeRock forums and technical blogs.
If you are a ForgeRock customer, raise a support ticket instead of using the forums. ForgeRocksupport professionals will get in touch to help you.
5. Getting Support and Contacting ForgeRockForgeRock provides support services, professional services, training through ForgeRock University,and partner services to assist you in setting up and maintaining your deployments. For a generaloverview of these services, see https://www.forgerock.com.
ForgeRock has staff members around the globe who support our international customersand partners. For details, visit https://www.forgerock.com, or send an email to ForgeRock [email protected].

About the ForgeRock Identity GatewayAbout OpenIG
Gateway Guide ForgeRock Identity Gateway 5 (2018-05-03T07:21:09.993)Copyright © 2011-2017 ForgeRock AS. All rights reserved. 1
Chapter 1
About the ForgeRock Identity GatewayThis chapter sets out the essentials of using OpenIG, including:
• What problems OpenIG solves and where it fits in your deployment
• How OpenIG acts on HTTP requests and responses
• How the configuration files for OpenIG are organized
• The roles played by routes, filters, handlers, and chains, which are the building blocks of an OpenIGconfiguration
1.1. About OpenIGMost organizations have valuable existing services that are not easily integrated into newerarchitectures. These existing services cannot often be changed. Many client applications cannotcommunicate as they lack a gateway to bridge the gap. Figure 1.1, "Missing Gateway" illustrates oneexample of a missing gateway.
Figure 1.1. Missing Gateway
OpenIG works as an HTTP gateway, based on reverse proxy architecture. OpenIG is deployed on anetwork so it can intercept both client requests and server responses. Figure 1.2, "OpenIG Deployed"illustrates a OpenIG deployment.

About the ForgeRock Identity GatewayOpenIG Object Model
Gateway Guide ForgeRock Identity Gateway 5 (2018-05-03T07:21:09.993)Copyright © 2011-2017 ForgeRock AS. All rights reserved. 2
Figure 1.2. OpenIG Deployed
Clients interact with protected servers through OpenIG. OpenIG can be configured to add newcapabilities to existing services without affecting current clients or servers.
The list that follows features you can add to your solution by using OpenIG:
• Access management integration
• Application and API security
• Credential replay
• OAuth 2.0 support
• OpenID Connect 1.0 support
• Network traffic control
• Proxy with request and response capture
• Request and response rewriting
• SAML 2.0 federation support
• Single sign-on (SSO)
OpenIG supports these capabilities as out of the box configuration options. Once you understand theessential concepts covered in this chapter, try the additional instructions in this guide to use OpenIGto add other features.
1.2. OpenIG Object ModelOpenIG handles HTTP requests and responses in user-defined chains, making it possible to manageand to monitor processing at any point in a chain. The OpenIG object model provides both access to

About the ForgeRock Identity GatewayConfiguration Directories and Files
Gateway Guide ForgeRock Identity Gateway 5 (2018-05-03T07:21:09.993)Copyright © 2011-2017 ForgeRock AS. All rights reserved. 3
the requests and responses that pass through each chain, and also context information associatedwith each request.
Contexts provide information about the client making the request, the session, the authentication orauthorization identity of the principal, and any other state information associated with the request.Contexts provide a means to access state information throughout the duration of the HTTP sessionbetween the client and protected application, including when this involves interaction with additionalservices.
1.3. Configuration Directories and FilesBy default, OpenIG configuration files are located under $HOME/.openig on Linux, macOS, and UNIXsystems, and %appdata%\OpenIG on Windows systems. For information about how to change the defaultlocations , see Section 3.4, "Changing the Default Location of the Configuration Folders".
OpenIG uses the following configuration directories:
• $HOME/.openig/config, %appdata%\OpenIG\config
OpenIG administration and gateway configuration files. For information, seeAdminHttpApplication(5) in the Configuration Reference and GatewayHttpApplication(5) in theConfiguration Reference.
• $HOME/.openig/config/routes, %appdata%\OpenIG\config\routes
OpenIG route configuration files. For more information see Chapter 12, "Configuring Routers andRoutes".
• $HOME/.openig/SAML, %appdata%\OpenIG\SAML
OpenIG SAML 2.0 configuration files. For more information see Chapter 7, "Acting As a SAML 2.0Service Provider".
• $HOME/.openig/scripts/groovy, %appdata%\OpenIG\scripts\groovy
OpenIG script files, for Groovy scripted filters and handlers. For more information see Chapter 14,"Extending the ForgeRock Identity Gateway".
• $HOME/.openig/tmp, %appdata%\OpenIG\tmp
OpenIG temporary files. This location can be used for temporary storage.
1.4. Routing and RoutesRouters are handlers that perform the following tasks:
• Define the routes directory and loads routes into the OpenIG configuration.

About the ForgeRock Identity GatewayHandlers, Filters, and Chains
Gateway Guide ForgeRock Identity Gateway 5 (2018-05-03T07:21:09.993)Copyright © 2011-2017 ForgeRock AS. All rights reserved. 4
• Depending on the scanning interval, periodically scan the routes directory and updates the OpenIGconfiguration when routes are added, removed, or changed.
• Route requests to the first route in the OpenIG configuration whose condition is satisfied.
Routes are configuration files that you add to OpenIG to manage requests. They are flat files in JSONformat. You can add routes in the following ways:
• Manually into the filesystem. Many of the examples in this guide, use this method.
• Through Common REST commands. For information, see Section 12.3, " Creating and EditingRoutes Through Common REST ".
• For some OpenIG features, through OpenIG Studio. For information, see Section 12.4, "CreatingRoutes Through OpenIG Studio ".
Every route must call a handler to process the request and produce a response to a request.
When a route has a condition, it can handle only requests that meet the condition. When a route hasno condition, it can handle any request.
Routes inherit settings from their parent configurations. This means that you can configure globalobjects in the config.json heap, for example, and then reference the objects by name in any otherOpenIG configuration.
For examples of route configurations see Chapter 12, "Configuring Routers and Routes". Forinformation about the parameters for routers and routes, see Router(5) in the ConfigurationReference and Route(5) in the Configuration Reference.
1.5. Handlers, Filters, and ChainsHandlers and filters are chained together to modify a request, the response, or the context:
• Handler: Either delegates to another handler, or produces a response.
One way to produce a response is to send a request to and receive a response from an externalservice. In this case, OpenIG acts as a client of the service, often on behalf of the client whoserequest initiated the request.
Another way to produce a response is to build a response either statically or based on somethingin the context. In this case, OpenIG plays the role of server, generating a response to return to theclient.
For more information, see Handlers in the Configuration Reference.
• Filter: Either transforms data in the request, response, or context, or performs an action when therequest or response passes through the filter.

About the ForgeRock Identity GatewayHandlers, Filters, and Chains
Gateway Guide ForgeRock Identity Gateway 5 (2018-05-03T07:21:09.993)Copyright © 2011-2017 ForgeRock AS. All rights reserved. 5
A filter can leave the request, response, and contexts unchanged. For example, it can log thecontext as it passes through the filter. Alternatively, it can change request or response. Forexample, it can generate a static request to replace the client request, add a header to the request,or remove a header from a response.
For more information, see Filters in the Configuration Reference.
• Chain: A type of handler that dispatches processing to an ordered list of filters, and then to thehandler.
A Chain can be placed anywhere in a configuration that a handler can be placed. Filters process theincoming request, pass it on to the next filter, and then to the handler. After the handler producesa response, the filters process the outgoing response as it makes its way to the client. Note that thesame filter can process both the incoming request and the outgoing response but most filters doone or the other.
For more information, see Chain(5) in the Configuration Reference.
• Chain of Filters: A type of filter that dispatches processing to an ordered list of filters without thendispatching the request to a handler. Use this filter to assemble a list of filters into a single filterthat you can then use in different places in the configuration.
A ChainOfFilters can be placed anywhere in a configuration that a filter can be placed.
For more information, see ChainOfFilters(5) in the Configuration Reference.
Figure 1.3, "Flow Inside a Chain" shows the flow inside a Chain, where a request filter transforms therequest, a handler sends the request to a protected application, and then a response filter transformsthe response. Notice how the flow traverses the filters in reverse order when the response comesback from the handler.

About the ForgeRock Identity GatewayHandlers, Filters, and Chains
Gateway Guide ForgeRock Identity Gateway 5 (2018-05-03T07:21:09.993)Copyright © 2011-2017 ForgeRock AS. All rights reserved. 6
Figure 1.3. Flow Inside a Chain
The route configuration in Example 1.1, "Chain to a Protected Application" demonstratesthe flow through a chain to a protected application. With OpenIG and the sample applicationset up as described in Chapter 2, "Getting Started", you can access this route on http://openig.example.com:8080.
Example 1.1. Chain to a Protected Application
{ "handler": { "type": "Chain", "comment": "Base configuration defines the capture decorator", "config": { "filters": [ { "type": "HeaderFilter", "comment": "Add a header to all requests", "config": { "messageType": "REQUEST", "add": { "MyHeaderFilter_request": [ "Added by HeaderFilter to request" ]

About the ForgeRock Identity GatewayHandlers, Filters, and Chains
Gateway Guide ForgeRock Identity Gateway 5 (2018-05-03T07:21:09.993)Copyright © 2011-2017 ForgeRock AS. All rights reserved. 7
} } }, { "type": "HeaderFilter", "comment": "Add a header to all responses", "config": { "messageType": "RESPONSE", "add": { "MyHeaderFilter_response": [ "Added by HeaderFilter to response" ] } } } ], "handler": { "type": "ClientHandler", "comment": "Log the request, pass it to the protected application, and then log the response", "capture": "all", "baseURI": "http://app.example.com:8081" } } }}
The chain receives the request and context and processes it as follows:
• The first HeaderFilter adds a header to the incoming request.
• The second HeaderFilter is configured to manage responses, not requests, so it simply passes therequest and context to the handler.
• The ClientHandler captures (logs) the request.
• The ClientHandler passes the transformed request to the protected application.
• The protected application passes a response to the ClientHandler.
• The ClientHandler captures (logs) the response.
• The second HeaderFilter adds a header added to the response.
• The first HeaderFilter is configured to manage requests, not responses, so it simply passes theresponse back to OpenIG.
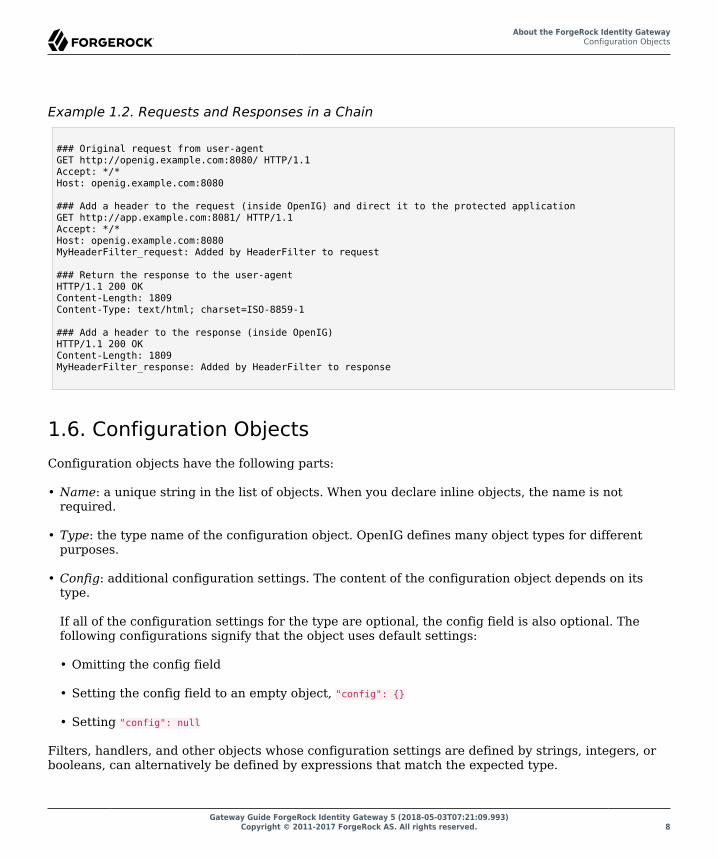
Example 1.1, "Chain to a Protected Application" explained how a chain processes a request andits context. Example 1.2, "Requests and Responses in a Chain" illustrates the HTTP requests andresponses captured as they flow through the chain.
About the ForgeRock Identity GatewayConfiguration Objects
Gateway Guide ForgeRock Identity Gateway 5 (2018-05-03T07:21:09.993)Copyright © 2011-2017 ForgeRock AS. All rights reserved. 8
Example 1.2. Requests and Responses in a Chain
### Original request from user-agentGET http://openig.example.com:8080/ HTTP/1.1Accept: */*Host: openig.example.com:8080
### Add a header to the request (inside OpenIG) and direct it to the protected applicationGET http://app.example.com:8081/ HTTP/1.1Accept: */*Host: openig.example.com:8080MyHeaderFilter_request: Added by HeaderFilter to request
### Return the response to the user-agentHTTP/1.1 200 OKContent-Length: 1809Content-Type: text/html; charset=ISO-8859-1
### Add a header to the response (inside OpenIG)HTTP/1.1 200 OKContent-Length: 1809MyHeaderFilter_response: Added by HeaderFilter to response
1.6. Configuration ObjectsConfiguration objects have the following parts:
• Name: a unique string in the list of objects. When you declare inline objects, the name is notrequired.
• Type: the type name of the configuration object. OpenIG defines many object types for differentpurposes.
• Config: additional configuration settings. The content of the configuration object depends on itstype.
If all of the configuration settings for the type are optional, the config field is also optional. Thefollowing configurations signify that the object uses default settings:
• Omitting the config field
• Setting the config field to an empty object, "config": {}
• Setting "config": null
Filters, handlers, and other objects whose configuration settings are defined by strings, integers, orbooleans, can alternatively be defined by expressions that match the expected type.

About the ForgeRock Identity GatewayDecorators
Gateway Guide ForgeRock Identity Gateway 5 (2018-05-03T07:21:09.993)Copyright © 2011-2017 ForgeRock AS. All rights reserved. 9
1.7. DecoratorsDecorators are additional heap objects to extend what another object can do. For example, aCaptureDecorator extends the capability of filters and handlers to log requests and responses. ATimerDecorator logs processing times. Decorate configuration objects with decorator names as fieldnames.
OpenIG defines the following decorators: audit, baseURI, capture, and timer. You can use thesedecorators without configuring them explicitly.
You can log requests, responses, and processing times by adding decorations as shown in thefollowing example:
{ "handler": { "type": "Router", "capture": [ "request", "response" ], "timer": true }}
For more information, see Decorators in the Configuration Reference.
1.8. Configuration Parameters Declared as Property VariablesConfiguration parameters, such as host names, port numbers, and directories, can be declared asproperty variables in the OpenIG configuration or in an external JSON file. The variables can then beused in expressions in routes and in config.json to set the value of configuration parameters.
Properties can be inherited across the router, so a property defined in config.json can be used in anyof the routes in the configuration.
Storing the configuration centrally and using variables for parameters that can be different for eachinstallation makes it easier to deploy OpenIG in different environments without changing a single linein your route configuration.
For more information, see Properties(5) in the Configuration Reference.
1.9. Using Comments in OpenIG Configuration FilesThe JSON format does not specify a notation for comments. If OpenIG does not recognize a JSONfield name, it ignores the field. As a result, it is possible to use comments in configuration files.
Use the following conventions when commenting to ensure your configuration files are easier to read:
• Use comment fields to add text comments. Figure 1.4, "Using a Comment Field" illustrates aCaptureDecorator configuration that includes a text comment.

About the ForgeRock Identity GatewayUnderstanding OpenIG APIs With API Descriptors
Gateway Guide ForgeRock Identity Gateway 5 (2018-05-03T07:21:09.993)Copyright © 2011-2017 ForgeRock AS. All rights reserved. 10
Figure 1.4. Using a Comment Field
{ "name": "capture", "type": "CaptureDecorator", "comment": "Write request and response information to the logs", "config": { "captureEntity": true }}
• Use an underscore (_) to comment a field temporarily. Figure 1.5, "Using an Underscore" illustratesa CaptureDecorator that has "captureEntity": true commented out. As a result, it uses the defaultsetting ("captureEntity": false).
Figure 1.5. Using an Underscore
{ "name": "capture", "type": "CaptureDecorator", "config": { "_captureEntity": true }}
1.10. Understanding OpenIG APIs With API DescriptorsCommon REST endpoints in OpenIG serve API descriptors at runtime. When you retrieve an APIdescriptor for an endpoint, a JSON that describes the API for that endpoint is returned.
To help you discover and understand APIs, you can use the API descriptor with a tool such asSwagger UI to generate a web page that helps you to view and test the different endpoints.
When you start OpenIG, or add or edit routes, registered endpoint locations for the routes hosted bythe main router are written in $HOME/.openig/logs/route-system.log. Endpoint locations for subroutesare written to other log files. To retrieve the API descriptor for a specific endpoint, append one of thefollowing query string parameters to the endpoint:
• _api, to represent the API accessible over HTTP. This OpenAPI descriptor can be used withendpoints that are complete or partial URLs.
The returned JSON respects the OpenAPI specification and can be consumed by Swagger tools,such as Swagger UI.

About the ForgeRock Identity GatewayUnderstanding OpenIG APIs With API Descriptors
Gateway Guide ForgeRock Identity Gateway 5 (2018-05-03T07:21:09.993)Copyright © 2011-2017 ForgeRock AS. All rights reserved. 11
• _crestapi, to provide a compact representation that is independent of the transport protocol. ThisCREST API descriptor cannot be used with partial URLs.
The returned JSON respects a ForgeRock proprietary specification dedicated to describe CRESTendpoints.
For more information about CREST API descriptors, see Section 5.5, "Common REST APIDocumentation" in the Configuration Reference.
Example 1.3. Retrieving API Descriptors for a Router
With OpenIG running as described in Chapter 2, "Getting Started", run the following query togenerate a JSON that describes the router operations supported by the endpoint:http://openig.example.com:8080/openig/api/system/objects/_router/routes?_api{ "swagger": "2.0", "info": { "version": "OpenIG version", "title": "OpenIG" }, "host": "0:0:0:0:0:0:0:1", "basePath": "/openig/api/system/objects/_router/routes", "tags": [{ "name": "Routes Endpoint" }], . . .
Alternatively, generate a CREST API descriptor by using the ?_crestapi query string.
Example 1.4. Retrieving API Descriptors for the UMA Service
With the UMA tutorial running as described in Chapter 11, "Supporting UMA Resource Servers", runthe following query to generate a JSON that describes the UMA share API:http://openig.example.com:8080/openig/api/system/objects/_router/routes/00-uma/objects/umaservice/share?_api{ "swagger": "2.0", "info": { "version": "OpenIG version", "title": "OpenIG" }, "host": "0:0:0:0:0:0:0:1", "basePath": "/openig/api/system/objects/_router/routes/00-uma/objects/umaservice/share", "tags": [{ "name": "Manage UMA Share objects" }], . . .
Alternatively, generate a CREST API descriptor by using the ?_crestapi query string.

About the ForgeRock Identity GatewayUnderstanding OpenIG APIs With API Descriptors
Gateway Guide ForgeRock Identity Gateway 5 (2018-05-03T07:21:09.993)Copyright © 2011-2017 ForgeRock AS. All rights reserved. 12
Example 1.5. Retrieving API Descriptors for the Monitoring Endpoint of a Route
With monitoring enabled for a route, run a query to generate a JSON that exposes monitoringinformation for the route. For example:http://openig.example.com:8080/openig/api/system/objects/_router/routes/00-uma/monitoring?_api{ "swagger": "2.0", "info": { "version": "OpenIG version", "title": "OpenIG" }, "host": "openig.example.com:8080", "basePath": "/openig/api/system/objects/_router/routes/00-uma/monitoring", "tags": [{ "name": "Monitoring endpoint" }], . . .
Alternatively, generate a CREST API descriptor by using the ?_crestapi query string.
For information about how to set up monitoring for a route, see Procedure 15.1, "To Monitor aRoute".
Example 1.6. Retrieving API Descriptors for the Main Router
Run a query to generate a JSON that describes the API for the main router and its subsequentendpoints. For example:http://openig.example.com:8080/openig/api/system/objects/_router?_api{ "swagger": "2.0", "info": { "version": "OpenIG version", "title": "OpenIG" }, "host": "openig.example.com:8080", "basePath": "/openig/api/system/objects/_router", "tags": [{ "name": "Monitoring endpoint" }, { "name": "Manage UMA Share objects" }, { "name": "Routes Endpoint" }], . . .
Because the above URL is a partial URL, you cannot use the ?_crestapi query string to generate aCREST API descriptor.

About the ForgeRock Identity GatewayUnderstanding OpenIG APIs With API Descriptors
Gateway Guide ForgeRock Identity Gateway 5 (2018-05-03T07:21:09.993)Copyright © 2011-2017 ForgeRock AS. All rights reserved. 13
Example 1.7. Retrieving API Descriptors for an OpenIG Instance
Run a query to generate a JSON that describes the APIs provided by the OpenIG instance that isresponding to a request. For example:http://openig.example.com:8080/openig/api?_api{ "swagger": "2.0", "info": { "version": "OpenIG version", "title": "OpenIG" }, "host": "openig.example.com:8080", "basePath": "/openig/api", "tags": [{ "name": "Internal Storage for UI Models" }, { "name": "Monitoring endpoint" }, { "name": "Manage UMA Share objects" }, { "name": "Routes Endpoint" }, { "name": "Server Info" }], . . .
If routes are added after the request is performed, they are not included in the returned JSON.
Because the above URL is a partial URL, you cannot use the ?_crestapi query string to generate aCREST API descriptor.

Getting StartedBefore You Begin
Gateway Guide ForgeRock Identity Gateway 5 (2018-05-03T07:21:09.993)Copyright © 2011-2017 ForgeRock AS. All rights reserved. 14
Chapter 2
Getting StartedIn this chapter, you will learn to:
• Quickly set up OpenIG on Jetty
• Configure OpenIG to protect a sample application
• Prepare OpenIG so that you can follow all subsequent tutorials in the documentation
This chapter allows you to see how OpenIG works, and provides hands-on experience with a fewkey features. For more general installation and configuration instructions, start with Chapter 3,"Installation in Detail".
2.1. Before You BeginMake sure you have a supported Java Development Kit installed. For details, see Section 2.2, "JDKVersion" in the Release Notes.
2.2. Install OpenIGYou install OpenIG in the root context of a web application container. In this chapter, you use Jettyserver as the web application container.
To perform initial installation, follow these steps:
1. Download and unzip a supported version of Jetty server.
Supported versions are listed in Section 2.3, "Web Application Containers" in the Release Notes.
2. Download IG-5.0.0.war from the ForgeRock BackStage download site .
3. Copy (or move) and rename the .war file as follows:
$ cp IG-5.0.0.war /path/to/jetty/webapps/root.war
Jetty automatically deploys OpenIG in the root context on startup.

Getting StartedInstall the Sample Application
Gateway Guide ForgeRock Identity Gateway 5 (2018-05-03T07:21:09.993)Copyright © 2011-2017 ForgeRock AS. All rights reserved. 15
4. Start Jetty in the background:
$ /path/to/jetty/bin/jetty.sh start
Or start Jetty in the foreground:
$ cd /path/to/jetty/$ java -jar start.jar
5. Make sure that you can see the OpenIG welcome page at http://localhost:8080.
When you start OpenIG without a configuration, requests to OpenIG default to a welcome pagewith a link to the documentation.
6. Make sure that you can see OpenIG Studio at http://localhost:8080/openig/studio.
For more information about OpenIG Studio, see Section 12.4, "Creating Routes Through OpenIGStudio ".
7. Display the product version and build information at http://localhost:8080/openig/api/info.
8. Stop Jetty in the background:
$ /path/to/jetty/bin/jetty.sh stop
Or stop Jetty in the foreground by entering Ctrl+C in the terminal where Jetty is running.
2.3. Install the Sample ApplicationForeRock provides a mockup web application for testing OpenIG configurations. The sampleapplication is used in many of the tutorials in this guide. This section takes you through the steps todownload and run the sample application.
1. Download the sample application, IG-doc-samples-5.0.0.jar, from the ForgeRock BackStagedownload site .
2. Run the sample application:

Getting StartedConfigure OpenIG
Gateway Guide ForgeRock Identity Gateway 5 (2018-05-03T07:21:09.993)Copyright © 2011-2017 ForgeRock AS. All rights reserved. 16
$ java -jar IG-doc-samples-5.0.0.jarPreparing to listen for HTTP on port 8081.Preparing to listen for HTTPS on port 8444.The server will use a self-signed certificate not known to browsers.When using HTTPS with curl for example, try --insecure.Using OpenAM URL: http://openam.example.com:8088/openam/oauth2.Starting server...Sep 09, 2016 9:52:56 AM org.glassfish.grizzly.http.server.NetworkListener startINFO: Started listener bound to [0.0.0.0:8444]Sep 09, 2016 9:52:56 AM org.glassfish.grizzly.http.server.NetworkListener startINFO: Started listener bound to [0.0.0.0:8081]Sep 09, 2016 9:52:56 AM org.glassfish.grizzly.http.server.HttpServer startINFO: [HttpServer] Started.Press Ctrl+C to stop the server.
By default, this server listens for HTTP on port 8081, and for HTTPS on port 8444. If one or bothof those ports are not free, specify other ports:
$ java -jar IG-doc-samples-5.0.0.jar 8888 8889Preparing to listen for HTTP on port 8888.Preparing to listen for HTTPS on port 8889.The server will use a self-signed certificate not known to browsers.When using HTTPS with curl for example, try --insecure.Using OpenAM URL: http://openam.example.com:8088/openam/oauth2.Starting server...Sep 09, 2016 9:55:57 AM org.glassfish.grizzly.http.server.NetworkListener startINFO: Started listener bound to [0.0.0.0:8889]Sep 09, 2016 9:55:57 AM org.glassfish.grizzly.http.server.NetworkListener startINFO: Started listener bound to [0.0.0.0:8888]Sep 09, 2016 9:55:57 AM org.glassfish.grizzly.http.server.HttpServer startINFO: [HttpServer] Started.Press Ctrl+C to stop the server.
If you change the port numbers when starting the server, also account for the differences whenusing the examples.
3. Browse to http://localhost:8081/home to access the home page of the sample application.
Some information about the browser request is displayed.
4. Browse to http://localhost:8081/login to access the login page of the sample application, and thenlog in with username demo and password changeit.
The username, demo, and some information about the browser request is displayed.
2.4. Configure OpenIGNow that you have installed both OpenIG and a sample application to protect, it is time to configureOpenIG.
Follow these steps to configure OpenIG to proxy traffic to the sample application:

Getting StartedConfigure OpenIG
Gateway Guide ForgeRock Identity Gateway 5 (2018-05-03T07:21:09.993)Copyright © 2011-2017 ForgeRock AS. All rights reserved. 17
1. Prepare the OpenIG configuration.
Add the following file as $HOME/.openig/config/config.json. By default, OpenIG looks for config.json inthe $HOME/.openig/config directory:
{ "handler": { "type": "Router", "name": "_router", "baseURI": "http://app.example.com:8081", "capture": "all" }, "heap": [ { "name": "JwtSession", "type": "JwtSession" }, { "name": "capture", "type": "CaptureDecorator", "config": { "captureEntity": true, "_captureContext": true } } ]}
$ mkdir -p $HOME/.openig/config$ vi $HOME/.openig/config/config.json
On Windows, the configuration files belong in %appdata%\OpenIG\config. To locate the %appdata% folderfor your version of Windows, open Windows Explorer, type %appdata% as the file path, and pressEnter. You must create the %appdata%\OpenIG\config folder, and then copy the configuration files.
Important
If you plan to to create routes through OpenIG Studio, make sure that this config.json contains a mainrouter named _router. For information about OpenIG Studio, see Section 12.4, "Creating Routes ThroughOpenIG Studio ".
If you adapt this base configuration for production use, make sure to adjust the log level, and todeactivate the CaptureDecorator that generates several log message lines for each request andresponse. Also consider editing the router based on recommendations described in Section 12.5,"Preventing the Reload of Routes".
2. Add the following default route configuration file as $HOME/.openig/config/routes/zz-default.json.By default, the router defined in the config.json looks for routes in the $HOME/.openig/config/routesdirectory:
{

Getting StartedConfigure the Network
Gateway Guide ForgeRock Identity Gateway 5 (2018-05-03T07:21:09.993)Copyright © 2011-2017 ForgeRock AS. All rights reserved. 18
"handler": "ClientHandler"}
$ mkdir $HOME/.openig/config/routes$ vi $HOME/.openig/config/routes/zz-default.json
On Windows, the file name should be %appdata%\OpenIG\config\routes\zz-default.json.
3. Start Jetty in the background:
$ /path/to/jetty/bin/jetty.sh start
Or start Jetty in the foreground:
$ cd /path/to/jetty/$ java -jar start.jar
2.5. Configure the NetworkBecause OpenIG uses reverse proxy architecture, you must configure the network so that traffic fromthe browser to the protected application goes through OpenIG.
If you followed the installation steps, you are running both OpenIG and the sample applicationon the same host as your browser (probably your laptop or desktop). Keep in mind that networkconfiguration is an important deployment step. To encourage you to keep this in mind, the sampleconfiguration for this chapter expects the sample application to be running on app.example.com, ratherthan localhost.
The quickest way to configure the network locally is to add an entry to your /etc/hosts file on UNIXsystems or %SystemRoot%\system32\drivers\etc\hosts on Windows. See the Wikipedia entry, Hosts (file),for more information on host files. If you are indeed running all servers in this chapter on the samehost, add the following entry to the hosts file:127.0.0.1 openig.example.com app.example.com
If you are running the browser and OpenIG on separate hosts, add the IP address of the host runningOpenIG to the hosts file on the system running the browser, where the host name matches that ofprotected application. For example, if OpenIG is running on a host with IP address 192.168.0.15:192.168.0.15 openig.example.com app.example.com
If OpenIG is on a different host from the protected application, also make sure that the host name ofthe protected application resolves correctly for requests from OpenIG to the application.
Restart Jetty to take the configuration changes into account.

Getting StartedTry the Installation
Gateway Guide ForgeRock Identity Gateway 5 (2018-05-03T07:21:09.993)Copyright © 2011-2017 ForgeRock AS. All rights reserved. 19
Tip
Some browsers cache IP address resolutions, even after clearing all browsing data. Restart the browser afterchanging the IP addresses of named hosts.
The simplest way to make sure you have configured your DNS or host settings properly for remote systemsis to stop OpenIG and then to make sure you cannot reach the target application with the host name and portnumber of OpenIG. If you can still reach it, double check your host settings.
Also make sure name resolution is configured to check host files before DNS. This configuration can be found in/etc/nsswitch.conf for most UNIX systems. Make sure files is listed before dns.
2.6. Try the Installationhttp://openig.example.com:8080/home should take you to the home page of the sample application.
What just happened?
When your browser goes to http://openig.example.com:8080/, it is actually connecting to OpenIGdeployed in Jetty. OpenIG proxies all traffic it receives to the protected application at http://app.example.com:8081/, and returns responses from the application to your browser. It does this based onthe configuration that you set up.
Consider the base configuration file first, config.json. This file specifies a main router named _router.OpenIG calls this handler when it receives an incoming request.
The baseURI decoration in turn changes the request URI to point the request to the sampleapplication to protect. The router captures the request on the way in, and captures the response onthe way out.
The router routes processing to separate route configurations.
For now the only route available is the the default route you added, zz-default.json. The default routecalls a ClientHandler with the default configuration. This ClientHandler simply proxies the requestto and the response from the sample application to protect without changing either the request orthe response. Therefore, the browser request is sent unchanged to the sample application and theresponse from the sample application is returned unchanged to your browser.
Now change the OpenIG configuration to log you in automatically with hard-coded credentials:
1. Add a route to automatically log you in as username demo, password changeit.
Add the following route configuration file as $HOME/.openig/config/routes/01-static.json:
{ "handler": { "type": "Chain",

Getting StartedTry the Installation
Gateway Guide ForgeRock Identity Gateway 5 (2018-05-03T07:21:09.993)Copyright © 2011-2017 ForgeRock AS. All rights reserved. 20
"config": { "filters": [ { "type": "StaticRequestFilter", "config": { "method": "POST", "uri": "http://app.example.com:8081/login", "form": { "username": [ "demo" ], "password": [ "changeit" ] } } } ], "handler": "ClientHandler" } }, "condition": "${matches(request.uri.path, '^/static')}"}
On Windows, the file name should be %appdata%\OpenIG\config\routes\01-static.json.
2. Access the new route, http://openig.example.com:8080/static.
This time, OpenIG logs you in automatically.
Also view the information logged about requests and responses, which shows up in the Jetty log.
What's happening behind the scenes?
With the original configuration, OpenIG does not change requests or responses, but only proxiesrequests and responses, and captures request and response information.
After you change the configuration, OpenIG continues to capture request and response data. Whenyour request does not go to the default route, but instead goes to /static, then the condition on thenew route you added matches the request. OpenIG therefore uses the new route you added.
Using the route configuration in 01-static.json, OpenIG replaces your browser's original HTTP GETrequest with an HTTP POST login request containing credentials to authenticate. As a result, insteadof the login page with a login form, OpenIG logs you in directly, and the application responds with thepage you see after logging in. OpenIG then returns this response to your browser.
Figure 2.1, "Log in With Hard-Coded Credentials" shows the steps.

Getting StartedTry the Installation
Gateway Guide ForgeRock Identity Gateway 5 (2018-05-03T07:21:09.993)Copyright © 2011-2017 ForgeRock AS. All rights reserved. 21
Figure 2.1. Log in With Hard-Coded Credentials
1. The browser host makes a DNS request for the IP address of the HTTP server host, app.example.com.
2. DNS responds with the address for OpenIG.
3. Browser sends a request to the HTTP server.
4. OpenIG replaces the request with an HTTP POST request, including the login form with hard-coded credentials.
5. HTTP server validates the credentials, and responds with the profile page.
6. OpenIG passes the response back to the browser.

Installation in DetailConfiguring Deployment Containers
Gateway Guide ForgeRock Identity Gateway 5 (2018-05-03T07:21:09.993)Copyright © 2011-2017 ForgeRock AS. All rights reserved. 22
Chapter 3
Installation in Detail
This chapter describes how to do the following tasks:
• Prepare a deployment container for use with OpenIG (Section 3.1, "Configuring DeploymentContainers").
• Prepare the network so that traffic passes through OpenIG (Section 3.2, "Preparing the Network").
• Download, deploy, and configure OpenIG (Section 3.3, "Installing OpenIG").
• Change the locations of the configuration files (Section 3.4, "Changing the Default Location of theConfiguration Folders").
• Prepare for load balancing with OpenIG (Section 3.5, "Preparing For Load Balancing and Failover").
• Secure connections to and from OpenIG (Section 3.6, "Configuring OpenIG For HTTPS (Client-Side)").
• Use OpenIG JSON Web Token (JWT) Session cookies across multiple servers (Section 3.7, "SettingUp Keys For JWT Encryption").
• Prevent further updates to the configuration (Section 3.8, "Making the Configuration Immutable").
Before you begin to install or configure OpenIG, make sure that you are using a supported containerand version of Java. For information about requirements for running OpenIG, see Chapter 2, "BeforeYou Install" in the Release Notes.
3.1. Configuring Deployment ContainersThis section provides installation and configuration tips that you need to run OpenIG in supportedcontainers.
For the full list of supported containers see Section 2.3, "Web Application Containers" in the ReleaseNotes.
For further information on advanced configuration for a particular container, see the containerdocumentation.

Installation in DetailAbout Securing Connections
Gateway Guide ForgeRock Identity Gateway 5 (2018-05-03T07:21:09.993)Copyright © 2011-2017 ForgeRock AS. All rights reserved. 23
3.1.1. About Securing Connections
OpenIG is often deployed to replay credentials or other security information. In a real worlddeployment, that information must be communicated over a secure connection using HTTPS,meaning in effect HTTP over encrypted Transport Layer Security (TLS). Never send real credentials,bearer tokens, or other security information unprotected over HTTP.
When OpenIG is acting as a server, the web application container where OpenIG runs is responsiblefor setting up TLS connections with client applications that connect to OpenIG. For details, seeSection 3.1.3.2, "Configuring Jetty For HTTPS (Server-Side)" or Section 3.1.2.2, "Configuring TomcatFor HTTPS (Server-Side)".
When OpenIG is acting as a client, the ClientHandler configuration governs TLS connections fromOpenIG to other servers. For details, see Section 3.6, "Configuring OpenIG For HTTPS (Client-Side)"and ClientHandler(5) in the Configuration Reference.
TLS depends on the use of digital certificates (public keys). In typical use of TLS, the clientauthenticates the server by its X.509 digital certificate as the first step to establishingcommunication. Once trust is established, then the client and server can set up a symmetric key toencrypt communications.
In order for the client to trust the server certificate, the client needs first to trust the certificate ofthe party who signed the server's certificate. This means that either the client has a trusted copy ofthe signer's certificate, or the client has a trusted copy of the certificate of the party who signed thesigner's certificate.
Certificate Authorities (CAs) are trusted signers with well-known certificates. Browsers generallyship with many well-known CA certificates. Java distributions also ship with many well-known CAcertificates. Getting a certificate signed by a well-known CA is often expensive.
It is also possible for you to self-sign certificates. The trade-off is that although there is no monetaryexpense, the certificate is not trusted by any clients until they have a copy. Whereas it is oftenenough to install a certificate signed by a well-known CA in the server keystore as the basis of trustfor HTTPS connections, self-signed certificates must also be installed in all clients.
Like self-signed certificates, the signing certificates of less well-known CAs are also unlikely to befound in the default truststore. You might therefore need to install those signing certificates on theclient side as well.
This guide describes how to install self-signed certificates, which are certainly fine for trying out thesoftware and okay for deployments where you manage all clients that access OpenIG. If you need awell-known CA-signed certificate instead, see the documentation for your container for details onrequesting a CA signature and installing the CA-signed certificate.
Once certificates are properly installed to allow client-server trust, also consider the cipher suitesconfigured for use. The cipher suite used determines the security settings for the communication.Initial TLS negotiations bring the client and server to agreement on which cipher suite to use.Basically the client and server share their preferred cipher suites to compare and to choose. If youtherefore have a preference concerning the cipher suites to use, you must set up your container to

Installation in DetailConfiguring Apache Tomcat For OpenIG
Gateway Guide ForgeRock Identity Gateway 5 (2018-05-03T07:21:09.993)Copyright © 2011-2017 ForgeRock AS. All rights reserved. 24
use only your preferred cipher suites. Otherwise the container is likely to inherit the list of ciphersuites from the underlying Java environment.
The Java Secure Socket Extension (JSSE), part of the Java environment, provides security servicesthat OpenIG uses to secure connections. You can set security and system properties to configure theJSSE. For a list of properties you can use to customize the JSSE in Oracle Java, see the Customizationsection of the JSSE Reference Guide.
3.1.2. Configuring Apache Tomcat For OpenIGThis section describes essential Tomcat configuration that you need in order to run OpenIG.
Download and install a supported version of Tomcat from http://tomcat.apache.org/.
Important
If you use startup scripts to bootstrap the OpenIG web container, the scripts can start the container processwith a different user. To prevent errors, make sure that the location of the OpenIG configuration is correct.Alternatively, adapt the startup scripts to specify the OPENIG_BASE env variable or openig.base system properties,taking care to set file permissions correctly.
If you start and stop the OpenIG web container yourself, the default location of the OpenIG configuration filesis correct. By default, OpenIG configuration files are located under $HOME/.openig on Linux, Mac, and UNIXsystems, and under %appdata%\OpenIG on Windows.
Configure Tomcat to use the same protocol as the application you are protecting with OpenIG. If theprotected application is on a remote system, configure Tomcat to use the same port as well. If yourapplication listens on both an HTTP and an HTTPS port, then you must configure Tomcat to do so,too.
To configure Tomcat to use an HTTP port other than 8080, modify the defaults in /path/to/tomcat/conf/server.xml. Search for the default value of 8080 and replace it with the new port number.
3.1.2.1. Configuring Tomcat Cookie DomainsTo use OpenIG for multiple protected applications running on different hosts, set a cookie domain inTomcat or JwtSession.
To set a cookie domain for an HTTP session (the default if you're not using a JWT session), add acontext element to /path/to/conf/Catalina/server/root.xml, as in the following example, and then restartTomcat to read the configuration changes:
<Context sessionCookieDomain=".example.com" />
To set a cookie domain for a JWT session, set the cookieDomain parameter in JwtSession. For information,see JwtSession(5) in the Configuration Reference. When the domain is set, a JWT cookie can beaccessed from different hosts in that domain. When the domain is not set, the JWT cookie can beaccessed only from the host where the cookie was created.

Installation in DetailConfiguring Apache Tomcat For OpenIG
Gateway Guide ForgeRock Identity Gateway 5 (2018-05-03T07:21:09.993)Copyright © 2011-2017 ForgeRock AS. All rights reserved. 25
3.1.2.2. Configuring Tomcat For HTTPS (Server-Side)
To get Tomcat up quickly on an SSL port, add an entry similar to the following in /path/to/tomcat/conf/server.xml:
<Connector port="8443" protocol="HTTP/1.1" SSLEnabled="true" maxThreads="150" scheme="https" secure="true" address="127.0.0.1" clientAuth="false" sslProtocol="TLS" keystoreFile="/path/to/tomcat/conf/keystore" keystorePass="password"/>
Also create a keystore holding a self-signed certificate:
$ keytool \ -genkey \ -alias tomcat \ -keyalg RSA \ -keystore /path/to/tomcat/conf/keystore \ -storepass password \ -keypass password \ -dname "CN=openig.example.com,O=Example Corp,C=FR"
Notice the keystore file location and the keystore password both match the configuration. By default,Tomcat looks for a certificate with alias tomcat.
Restart Tomcat to read the configuration changes.
Browsers generally do not trust self-signed certificates. To work with a certificate signed instead by atrusted CA, see the Tomcat documentation on configuring HTTPS.
3.1.2.3. Configuring Tomcat to Access MySQL Over JNDI
If OpenIG accesses an SQL database, then you must configure Tomcat to access the database usingJava Naming and Directory Interface (JNDI). To do so, you must add the driver .jar for the database,set up a JNDI data source, and set up a reference to that data source.
The following steps are for MySQL Connector/J:
1. Download the MySQL JDBC Driver Connector/J from http://dev.mysql.com/downloads/connector/j.
2. Copy the driver .jar to /path/to/tomcat/lib/ so that it is on Tomcat's class path.
3. Add a JNDI data source for your MySQL server and database in /path/to/tomcat/conf/context.xml:

Installation in DetailConfiguring Jetty For OpenIG
Gateway Guide ForgeRock Identity Gateway 5 (2018-05-03T07:21:09.993)Copyright © 2011-2017 ForgeRock AS. All rights reserved. 26
<Resource name="jdbc/forgerock" auth="Container" type="javax.sql.DataSource" maxActive="100" maxIdle="30" maxWait="10000" username="mysqladmin" password="password" driverClassName="com.mysql.jdbc.Driver" url="jdbc:mysql://localhost:3306/databasename"/>
4. Add a resource reference to the data source in /path/to/tomcat/conf/web.xml:
<resource-ref> <description>MySQL Connection</description> <res-ref-name>jdbc/forgerock</res-ref-name> <res-type>javax.sql.DataSource</res-type> <res-auth>Container</res-auth></resource-ref>
5. Restart Tomcat to read the configuration changes.
3.1.3. Configuring Jetty For OpenIG
This section describes essential Jetty configuration that you need in order to run OpenIG.
Download and install a supported version of Jetty from https://www.eclipse.org/jetty/download.html.
Configure Jetty to use the same protocol as the application you are protecting with OpenIG. If theprotected application is on a remote system, configure Jetty to use the same port as well. If yourapplication listens on both an HTTP and an HTTPS port, then you must configure Jetty to do so aswell.
To configure Jetty to use an HTTP port other than 8080, modify the defaults in /path/to/jetty/etc/jetty.xml. Search for the default value of 8080 and replace it with the new port number.
3.1.3.1. Configuring Jetty Cookie Domains
If you use OpenIG for more than a single protected application and the protected applications are ondifferent hosts, then you must configure Jetty to set domain cookies. To do this, add a session domainhandler element that specifies the domain to /path/to/jetty/etc/webdefault.xml, as in the followingexample:
<context-param> <param-name>org.eclipse.jetty.servlet.SessionDomain</param-name> <param-value>.example.com</param-value>

Installation in DetailConfiguring Jetty For OpenIG
Gateway Guide ForgeRock Identity Gateway 5 (2018-05-03T07:21:09.993)Copyright © 2011-2017 ForgeRock AS. All rights reserved. 27
</context-param>
Restart Jetty to read the configuration changes.
3.1.3.2. Configuring Jetty For HTTPS (Server-Side)
To get Jetty up quickly on an SSL port, follow the steps in this section.
These steps involve replacing the built-in keystore with your own:
1. If you have not done so already, remove the built-in keystore:
$ rm /path/to/jetty/etc/keystore
2. Generate a new key pair with self-signed certificate in the keystore:
$ keytool \ -genkey \ -alias jetty \ -keyalg RSA \ -keystore /path/to/jetty/etc/keystore \ -storepass password \ -keypass password \ -dname "CN=openig.example.com,O=Example Corp,C=FR"
3. Find the obfuscated form of the password:
$ java \ -cp /path/to/jetty/lib/jetty-util-*.jar \ org.eclipse.jetty.util.security.Password \ passwordpasswordOBF:1v2j1uum1xtv1zej1zer1xtn1uvk1v1vMD5:5f4dcc3b5aa765d61d8327deb882cf99
4. Edit the SSL Context Factory entry in the Jetty configuration file, /path/to/jetty/etc/jetty-ssl.xml:
<New id="sslContextFactory" class="org.eclipse.jetty.http.ssl.SslContextFactory"> <Set name="KeyStore"><Property name="jetty.home" default="." />/etc/keystore</Set> <Set name="KeyStorePassword">OBF:1v2j1uum1xtv1zej1zer1xtn1uvk1v1v</Set> <Set name="KeyManagerPassword">OBF:1v2j1uum1xtv1zej1zer1xtn1uvk1v1v</Set> <Set name="TrustStore"><Property name="jetty.home" default="." />/etc/keystore</Set> <Set name="TrustStorePassword">OBF:1v2j1uum1xtv1zej1zer1xtn1uvk1v1v</Set></New>
5. Uncomment the line specifying that configuration file in /path/to/jetty/start.ini:
etc/jetty-ssl.xml
6. Restart Jetty.

Installation in DetailPreparing the Network
Gateway Guide ForgeRock Identity Gateway 5 (2018-05-03T07:21:09.993)Copyright © 2011-2017 ForgeRock AS. All rights reserved. 28
7. Browse https://openig.example.com:8443.
You should see a warning in the browser that the (self-signed) certificate is not recognized.
3.1.3.3. Configuring Jetty to Access MySQL Over JNDI
If OpenIG accesses an SQL database, then you must configure Jetty to access the database overJNDI. To do so, you must add the driver .jar for the database, set up a JNDI data source, and set up areference to that data source.
The following steps are for MySQL Connector/J:
1. Download the MySQL JDBC Driver Connector/J from http://dev.mysql.com/downloads/connector/j.
2. Copy the driver .jar to /path/to/jetty/lib/jndi/ so that it is on Jetty's class path.
3. Add a JNDI data source for your MySQL server and database in /path/to/jetty/etc/jetty.xml:
<New id="jdbc/forgerock" class="org.eclipse.jetty.plus.jndi.Resource"> <Arg></Arg> <Arg>jdbc/forgerock</Arg> <Arg> <New class="com.mysql.jdbc.jdbc2.optional.MysqlConnectionPoolDataSource"> <Set name="Url">jdbc:mysql://localhost:3306/databasename</Set> <Set name="User">mysqladmin</Set> <Set name="Password">password</Set> </New> </Arg></New>
4. Add a resource reference to the data source in /path/to/jetty/etc/webdefault.xml:
<resource-ref> <description>MySQL Connection</description> <res-ref-name>jdbc/forgerock</res-ref-name> <res-type>javax.sql.DataSource</res-type> <res-auth>Container</res-auth></resource-ref>
5. Restart Jetty to read the configuration changes.
3.2. Preparing the NetworkBecause OpenIG uses reverse proxy architecture, you must configure the network so that that trafficfrom the browser to the protected application goes through OpenIG.
Modify DNS or host file settings so that the host name of the protected application resolves to the IPaddress of OpenIG on the system where the browser runs.

Installation in DetailInstalling OpenIG
Gateway Guide ForgeRock Identity Gateway 5 (2018-05-03T07:21:09.993)Copyright © 2011-2017 ForgeRock AS. All rights reserved. 29
Restart the browser after making this change.
3.3. Installing OpenIGFollow these steps to install OpenIG:
1. Download IG-5.0.0.war from the ForgeRock BackStage download site .
2. Copy (or move) and rename the .war file to the root context of the web application container:
• For Jetty, name the .war file root.war. Jetty automatically deploys OpenIG in the root context onstartup.
• For Tomcat, name the .war file ROOT.war.
Important
If you use startup scripts to bootstrap the OpenIG web container, the scripts can start the containerprocess with a different user. To prevent errors, make sure that the location of the OpenIG configurationis correct. Alternatively, adapt the startup scripts to specify the OPENIG_BASE env variable or openig.basesystem properties, taking care to set file permissions correctly.
If you start and stop the OpenIG web container yourself, the default location of the OpenIG configurationfiles is correct. By default, OpenIG configuration files are located under $HOME/.openig on Linux, Mac, andUNIX systems, and under %appdata%\OpenIG on Windows.
3. Prepare your OpenIG configuration files.
For information about configuration files, see Section 1.3, "Configuration Directories andFiles". For information about how to change the default location of the configuration files, seeSection 3.4, "Changing the Default Location of the Configuration Folders".
If you have not yet prepared configuration files, then start with the configuration described inSection 2.4, "Configure OpenIG".
Copy the template to $HOME/.openig/config/config.json. Replace the baseURI of the DispatchHandlerwith that of the protected application.
On Windows, copy the template to %appdata%\OpenIG\config\config.json. To locate the %appdata% folderfor your version of Windows, open Windows Explorer, type %appdata% as the file path, and pressEnter. You must create the %appdata%\OpenIG\config folder, and then add the configuration file.
4. Start the web container where OpenIG is deployed.
5. Browse to the protected application.
OpenIG should now proxy all traffic to the application.

Installation in DetailChanging the Default Location of the Configuration Folders
Gateway Guide ForgeRock Identity Gateway 5 (2018-05-03T07:21:09.993)Copyright © 2011-2017 ForgeRock AS. All rights reserved. 30
6. Make sure the browser is going through OpenIG.
Verify this in one of the following ways:
• Follow these steps:
1. Stop the OpenIG web container.
2. Verify that you cannot browse to the protected application.
3. Start the OpenIG web container.
4. Verify that you can now browse to the protected application again.
• Check the logs to see that traffic is going through OpenIG.
3.4. Changing the Default Location of the ConfigurationFoldersChange $HOME/.openig (or %appdata%\OpenIG) from the default location in the following ways:
• Set the OPENIG_BASE environment variable to the full path to the base location for OpenIG files:
# On Linux, macOS, and UNIX using Bash$ export OPENIG_BASE=/path/to/openig
# On WindowsC:>set OPENIG_BASE=c:\path\to\openig
• Set the openig.base Java system property to the full path to the base location for OpenIG files whenstarting the web application container where OpenIG runs, as in the following example that startsJetty server in the foreground:
$ java -Dopenig.base=/path/to/openig -jar start.jar
3.5. Preparing For Load Balancing and FailoverFor a high scale or highly available deployment, you can prepare a pool of OpenIG servers with nearlyidentical configurations, and then load balance requests across the pool, routing around any serversthat become unavailable. Load balancing allows the service to handle more load.
Before you spread requests across multiple servers, however, you must determine what to do withstate information that OpenIG saves in the context, or retrieves locally from the OpenIG serversystem. If information is retrieved locally, then consider setting up failover. If one server becomesunavailable, another server in the pool can take its place. The benefit of failover is that a serverfailure can be invisible to client applications.

Installation in DetailPreparing For Load Balancing and Failover
Gateway Guide ForgeRock Identity Gateway 5 (2018-05-03T07:21:09.993)Copyright © 2011-2017 ForgeRock AS. All rights reserved. 31
OpenIG can save state information in several ways:
• Handlers including a SamlFederationHandler or a custom ScriptableHandler can store information inthe context. Most handlers depend on information in the context, some of which is first stored byOpenIG.
• Some filters, such as AssignmentFilters, HeaderFilters, OAuth2ClientFilters, OAuth2ResourceServerFilters,ScriptableFilters, SqlAttributesFilters, and StaticRequestFilters, can store information in the context.Most filters depend on information in the request, response, or context, some of which is firststored by OpenIG.
OpenIG can also retrieve information locally in several ways:
• Some filters and handlers, such as FileAttributesFilters, ScriptableFilters, ScriptableHandlers, andSqlAttributesFilters, can depend on local system files or container configuration.
By default, the context data resides in memory in the container where OpenIG runs. This includes thedefault session implementation, which is backed by the HttpSession that the container handles. Youcan opt to store session data on the user-agent instead, however. For details and to consider whetheryour data fits, see JwtSession(5) in the Configuration Reference.
When you use the JwtSession implementation with a cookieDomain set, be sure to share the encryptionkeys and the sharedSecret across all OpenIG configurations so that any server can read or update JWTcookies from any other server in the same cookieDomain.
If your data does not fit in an HTTP cookie, for example, because when encrypted it is larger than4 KB, consider storing a reference in the cookie, and then retrieve the data by using another filter.OpenIG logs warning messages if the JwtSession cookie is too large. Using a reference can also workwhen a server becomes unavailable, and the load balancer must fail requests over to another serverin the pool.
If some data attached to a context must be stored on the server side, then you have additionalconfiguration steps to perform for session stickiness and for session replication. Session stickinessmeans that the load balancer sends all requests from the same client session to the same server.Session stickiness helps to ensure that a client request goes to the server holding the original sessiondata. Session replication involves writing session data either to other servers or to a data store,so that if one server goes down, other servers can read the session data and continue processing.Session replication helps when one server fails, allowing another server to take its place withouthaving to start the session over again. If you set up session stickiness but not session replication,when a server crashes, the client session information for that server is lost, and the client must startagain with a new session.
How you configure session stickiness and session replication depends on your load balancer and onyour container.
Tomcat can help with session stickiness, and a Tomcat cluster can handle session replication:
• If you choose to use the Tomcat connector (mod_jk) on your web server to perform load balancing,then see the LoadBalancer HowTo for details.

Installation in DetailConfiguring OpenIG For HTTPS (Client-Side)
Gateway Guide ForgeRock Identity Gateway 5 (2018-05-03T07:21:09.993)Copyright © 2011-2017 ForgeRock AS. All rights reserved. 32
In the HowTo, you configure the jvmRoute attribute in the Tomcat server configuration, /path/to/tomcat/conf/server.xml, to identify the server. The connector can use this identifier to achieve sessionstickiness.
• A Tomcat cluster configuration can handle session replication. When setting up a clusterconfiguration, the ClusterManager defines the session replication implementation.
Jetty has provisions for session stickiness, and also for session replication through clustering:
• Jetty's persistent session mechanism appends a node ID to the session ID in the same way Tomcatappends the jvmRoute value to the session cookie. This can be useful for session stickiness if yourload balancer examines the session ID.
• Session Clustering with a Database describes how to configure Jetty to persist sessions over JDBC,allowing session replication.
Unless it is set up to be highly available, the database can be a single point of failure in this case.
• Session Clustering with MongoDB describes how to configure Jetty to persist sessions in MongoDB,allowing session replication.
The Jetty documentation recommends this implementation when session data is seldom written butoften read.
3.6. Configuring OpenIG For HTTPS (Client-Side)For OpenIG to connect to a server securely over HTTPS, OpenIG must be able to trust the server.The default settings rely on the Java environment truststore to trust server certificates. The Javaenvironment default truststore includes public key signing certificates from many well-knownCertificate Authorities (CAs). If all servers present certificates signed by these CAs, then you havenothing to configure.
If, however, the server certificates are self-signed or signed by a CA whose certificate is not trustedout of the box, then you can configure a KeyStore and a TrustManager, and optionally, a KeyManagerto reference when configuring an ClientHandler to enable OpenIG to trust servers when acting as aclient.
For details, see:
• ClientHandler(5) in the Configuration Reference
• KeyManager(5) in the Configuration Reference
• KeyStore(5) in the Configuration Reference
• TrustManager(5) in the Configuration Reference

Installation in DetailConfiguring OpenIG For HTTPS (Client-Side)
Gateway Guide ForgeRock Identity Gateway 5 (2018-05-03T07:21:09.993)Copyright © 2011-2017 ForgeRock AS. All rights reserved. 33
The KeyStore holds the servers' certificates or the CA's signing certificate. The TrustManager allowsOpenIG to handle the certificates in the KeyStore when deciding whether to trust a server certificate.The optional KeyManager allows OpenIG to present its certificate from the keystore when the servermust authenticate OpenIG as client. The ClientHandler references whatever TrustManager andKeyManager you configure.
You can configure each of these either globally, for the OpenIG server, or locally, for a particularClientHandler configuration.
The Java KeyStore holds the peer servers' public key certificates (and optionally, the OpenIGcertificate and private key). For example, suppose you have a certificate file, ca.crt, that holdsthe trusted signer's certificate of the CA who signed the server certificates of the servers inyour deployment. In that case, you could import the certificate into a Java Keystore file, /path/to/keystore.jks:
$ keytool \ -import \ -trustcacerts \ -keystore /path/to/keystore \ -file ca.crt \ -alias ca-cert \ -storepass changeit
You could then configure the following KeyStore for OpenIG that holds the trusted certificate. Noticethat the url field takes an expression that evaluates to a URL, starting with a scheme such as file://:
{ "name": "MyKeyStore", "type": "KeyStore", "config": { "url": "file:///path/to/keystore", "password": "changeit" }}
The TrustManager handles the certificates in the KeyStore when deciding whether to trust the servercertificate. The TrustManager references your KeyStore:
{ "name": "MyTrustManager", "type": "TrustManager", "config": { "keystore": "MyKeyStore" }}
The ClientHandler configuration has the following security settings:
"trustManager"
This references the TrustManager.

Installation in DetailSetting Up Keys For JWT Encryption
Gateway Guide ForgeRock Identity Gateway 5 (2018-05-03T07:21:09.993)Copyright © 2011-2017 ForgeRock AS. All rights reserved. 34
Recall that you must configure this when your server certificates are not trusted out of the box.
"hostnameVerifier"
This defines how the ClientHandler verifies host names in server certificates.
By default, host name verification is turned off.
"keyManager"
This references the optional KeyManager.
Configure this if servers request that OpenIG present its certificate as part of mutualauthentication.
In that case, generate a key pair for OpenIG, and have the certificate signed by a well-known CA.For instructions, see the documentation for the Java keytool command. You can use a differentkeystore for the KeyManager than you use for the TrustManager.
The following ClientHandler configuration references MyTrustManager and sets strict host nameverification:
{ "name": "ClientHandler", "type": "ClientHandler", "config": { "hostnameVerifier": "STRICT", "trustManager": "MyTrustManager" }}
3.7. Setting Up Keys For JWT EncryptionYou can use a JSON Web Token (JWT) session, JwtSession, to configure OpenIG as described inJwtSession(5) in the Configuration Reference. A JwtSession stores session information in JWT cookieson the user-agent, rather than storing the information in the container where OpenIG runs.
In order to encrypt the JWTs, OpenIG needs cryptographic keys. OpenIG can generate its own keypair in memory, but that key pair disappears on restart and cannot be shared across OpenIG servers.Alternatively, OpenIG can use keys from a keystore.
The following procedure prepares a keystore for JWT encryption in a deployment with one OpenIGinstance. For a deployment with more than one OpenIG instance, also configure a "sharedSecret" asdescribed in JwtSession(5) in the Configuration Reference.
Procedure 3.1. To Prepare a Keystore for JWT Encryption
1. Generate the key pair in a new keystore file by using the Java keytool command.

Installation in DetailMaking the Configuration Immutable
Gateway Guide ForgeRock Identity Gateway 5 (2018-05-03T07:21:09.993)Copyright © 2011-2017 ForgeRock AS. All rights reserved. 35
The following command generates a Java Keystore format file, /path/to/keystore.jks, holding a keypair with alias jwe-key. Notice that both the keystore and the private key have the same password:
$ keytool \ -genkey \ -alias jwe-key \ -keyalg rsa \ -keystore /path/to/keystore.jks \ -storepass changeit \ -keypass changeit \ -dname "CN=openig.example.com,O=Example Corp"
2. Add a KeyStore to your configuration that references the keystore file:
{ "name": "MyKeyStore", "type": "KeyStore", "config": { "url": "file:///path/to/keystore.jks", "password": "changeit" }}
For details, see KeyStore(5) in the Configuration Reference.
3. Add a JwtSession to your configuration that references your KeyStore:
{ "name": "MyJwtSession", "type": "JwtSession", "config": { "keystore": "MyKeyStore", "alias": "jwe-key", "password": "changeit", "cookieName": "OpenIG", "cookieDomain": ".example.com" }}
For a deployment with more than one OpenIG instance, also configure a "sharedSecret" asdescribed in JwtSession(5) in the Configuration Reference.
4. Specify your JwtSession object in the top-level configuration, or in the route configuration:
"session": "MyJwtSession"
3.8. Making the Configuration ImmutableOpenIG operates in development mode (mutable mode) and production mode (immutable mode):

Installation in DetailMaking the Configuration Immutable
Gateway Guide ForgeRock Identity Gateway 5 (2018-05-03T07:21:09.993)Copyright © 2011-2017 ForgeRock AS. All rights reserved. 36
Development mode
Use development mode to evaluate or demo OpenIG, or to develop configurations on a singleinstance. This mode is not suitable for production.
In development mode, by default all endpoints are open and accessible. You can create, edit,and deploy routes through OpenIG Studio, and manage routes through Common REST, withoutauthentication or authorization.
To protect specific endpoints in development mode, configure an ApiProtectionFilter in admin.jsonand add it to the OpenIG configuration.
Production mode
After you have developed your configuration, switch to production mode to test the configuration,to run the software in pre-production or production, or to run multiple instances of the softwarewith the same configuration.
In production mode, the /routes endpoint is not exposed or accessible. OpenIG Studio iseffectively disabled, and you cannot manage, list, or even read routes through Common REST.
By default, other endpoints, such as /monitoring, /share, and api/info are exposed to theloopback address only. To change the default protection for specific endpoints, configure anApiProtectionFilter in admin.json and add it to the OpenIG configuration.
Procedure 3.2. To Switch From Development Mode to Production Mode
By default, OpenIG operates in development mode. After creating your configuration in developmentmode, switch to production mode to prevent any unwanted changes:
1. Add the following file to the OpenIG configuration as $HOME/.openig/config/admin.json.
On Windows, add the file to %appdata%\OpenIG\config:
{ "mode": "PRODUCTION"}
The file changes the operating mode from the default value of DEVELOPMENT, used when you don'tprovide an admin.json file, to PRODUCTION.
For more information, see AdminHttpApplication(5) in the Configuration Reference.
2. Prevent routes from being reloaded after startup:
• To prevent all routes in the configuration from being reloaded, edit the main router inconfig.json.
• To prevent individual routes from being reloaded, edit the routers in those routes.

Installation in DetailMaking the Configuration Immutable
Gateway Guide ForgeRock Identity Gateway 5 (2018-05-03T07:21:09.993)Copyright © 2011-2017 ForgeRock AS. All rights reserved. 37
{ "type": "Router", "config": { "scanInterval": "disabled" }}
For more information, see Router(5) in the Configuration Reference.
3. Restart OpenIG.
When OpenIG starts up, the routes endpoint is not available and is not displayed in the log. Whenyou try to access OpenIG Studio on http://openig.example.com:8080/openig/studio, an HTTP 404is returned.

Getting Login Credentials From Data SourcesBefore You Start
Gateway Guide ForgeRock Identity Gateway 5 (2018-05-03T07:21:09.993)Copyright © 2011-2017 ForgeRock AS. All rights reserved. 38
Chapter 4
Getting Login Credentials From Data SourcesIn Chapter 2, "Getting Started" you learned how to configure OpenIG to proxy traffic and capturerequest and response data. You also learned how to configure OpenIG to use a static request to log inwith hard-coded credentials. In this chapter, you will learn to:
• Configure OpenIG to look up credentials in a file
• Configure OpenIG to look up credentials in a relational database
4.1. Before You StartBefore you start this tutorial, prepare OpenIG and the sample application as shown in Chapter 2,"Getting Started".
OpenIG should be running in Jetty, configured to access the sample application as described in thatchapter.
4.2. Log in With Credentials From a FileThis sample shows you how to configure OpenIG to get credentials from a file.
The sample uses a comma-separated value file, userfile:
username,password,fullname,emailgeorge,costanza,George Costanza,[email protected],newman,Kramer,[email protected],hifalutin,Babs Jensen,[email protected],changeit,Demo User,[email protected],bribery,Kirsten Vaughan,[email protected],sprain,Sam Carter,[email protected]
OpenIG looks up the user credentials based on the user's email address. OpenIG uses aFileAttributesFilter to look up the credentials.
Follow these steps to set up log in with credentials from a file:
1. Add the user file on your system:

Getting Login Credentials From Data SourcesLog in With Credentials From a File
Gateway Guide ForgeRock Identity Gateway 5 (2018-05-03T07:21:09.993)Copyright © 2011-2017 ForgeRock AS. All rights reserved. 39
$ vi /tmp/userfile$ cat /tmp/userfileusername,password,fullname,emailgeorge,costanza,George Costanza,[email protected],newman,Kramer,[email protected],hifalutin,Babs Jensen,[email protected],changeit,Demo User,[email protected],bribery,Kirsten Vaughan,[email protected],sprain,Sam Carter,[email protected]
On Windows systems, use an appropriate path such as C:\Temp\userfile.
2. Add a new route to the OpenIG configuration to obtain the credentials from the file.
To add the route, add the following route configuration file as $HOME/.openig/config/routes/02-file.json:
{ "handler": { "type": "Chain", "config": { "filters": [ { "type": "PasswordReplayFilter", "config": { "loginPage": "${true}", "credentials": { "type": "FileAttributesFilter", "config": { "file": "/tmp/userfile", "key": "email", "value": "[email protected]", "target": "${attributes.credentials}" } }, "request": { "method": "POST", "uri": "http://app.example.com:8081/login", "form": { "username": [ "${attributes.credentials.username}" ], "password": [ "${attributes.credentials.password}" ] } } } } ], "handler": "ClientHandler" } },

Getting Login Credentials From Data SourcesLog in With Credentials From a File
Gateway Guide ForgeRock Identity Gateway 5 (2018-05-03T07:21:09.993)Copyright © 2011-2017 ForgeRock AS. All rights reserved. 40
"condition": "${matches(request.uri.path, '^/file')}"}
On Windows, the file name should be %appdata%\OpenIG\config\routes\02-file.json.
Notice the following features of the new route:
• The FileAttributesFilter specifies the file to access, the key and value to look up to retrieve theuser's record, and where to store the results in the request context attributes map.
• The PasswordReplayFilter creates a request by retrieving the username and password from theattributes map and replacing your browser's original HTTP GET request with an HTTP POSTlogin request that contains the credentials to authenticate.
• The route matches requests to /file.
3. On Windows systems, edit the path name to the user file.
Now browse to http://openig.example.com:8080/file.
If everything is configured correctly, OpenIG logs you in as George.
What's happening behind the scenes?
Figure 4.1. Log in With Credentials From a File
OpenIG intercepts your browser's HTTP GET request. The request matches the new routeconfiguration. The PasswordReplayFilter's FileAttributesFilter looks up credentials in a file, and storesthe credentials it finds in the request context attributes map. The PasswordReplayFilter's request pullsthe credentials out of the attributes map, builds the login form, and performs the HTTP POST request
Getting Login Credentials From Data SourcesLog in With Credentials From a Database
Gateway Guide ForgeRock Identity Gateway 5 (2018-05-03T07:21:09.993)Copyright © 2011-2017 ForgeRock AS. All rights reserved. 41
to the HTTP server. The HTTP server validates the credentials, and responds with a profile page.OpenIG then passes the response from the HTTP server to your browser.
4.3. Log in With Credentials From a DatabaseThis sample shows you how to configure OpenIG to get credentials from H2. This sample wasdeveloped with Jetty and with H2 1.4.178.
Although this sample uses H2, OpenIG also works with other database software. OpenIG relies on theapplication server where it runs to connect to the database. Configuring OpenIG to retrieve data froma database is therefore a question of configuring the application server to connect to the database,and configuring OpenIG to choose the appropriate data source, and to send the appropriate SQLrequest to the database. As a result, the OpenIG configuration depends more on the data structurethan on any particular database drivers or connection configuration.
Procedure 4.1. Preparing the Database
Follow these steps to prepare the database:
1. On the system where OpenIG runs, download and unpack H2 database.
2. Start H2:
$ sh /path/to/h2/bin/h2.sh
H2 starts, listening on port 8082, and opens a browser console page.
3. In the browser console page, select Generic H2 (Server) under Saved Settings. This sets theDriver Class, org.h2.Driver, the JDBC URL, jdbc:h2:tcp://localhost/~/test, the User Name, sa.
In the Password field, type password.
Then click Connect to access the console.
4. Run a statement to create a users table based on the user file from Section 4.2, "Log in WithCredentials From a File".
If you have not created the user file on your system, put the following content in /tmp/userfile:
username,password,fullname,emailgeorge,costanza,George Costanza,[email protected],newman,Kramer,[email protected],hifalutin,Babs Jensen,[email protected],changeit,Demo User,[email protected],bribery,Kirsten Vaughan,[email protected],sprain,Sam Carter,[email protected]
Then create the users table through the H2 console:

Getting Login Credentials From Data SourcesLog in With Credentials From a Database
Gateway Guide ForgeRock Identity Gateway 5 (2018-05-03T07:21:09.993)Copyright © 2011-2017 ForgeRock AS. All rights reserved. 42
DROP TABLE IF EXISTS USERS;CREATE TABLE USERS AS SELECT * FROM CSVREAD('/tmp/userfile');
On success, the table should contain the same users as the file. You can check this by runningSELECT * FROM users; in the H2 console.
Procedure 4.2. Preparing Jetty's Connection to the Database
Follow these steps to enable Jetty to connect to the database:
1. Configure Jetty for JNDI.
For the version of Jetty used in this sample, stop Jetty and add the following lines to /path/to/jetty/start.ini:
# ===========================================================# Enable JNDI# -----------------------------------------------------------OPTIONS=jndi
# ===========================================================# Enable additional webapp environment configurators# -----------------------------------------------------------OPTIONS=plusetc/jetty-plus.xml
For more information, see the Jetty documentation on Configuring JNDI.
2. Copy the H2 library to the classpath for Jetty:
$ cp /path/to/h2/bin/h2-*.jar /path/to/jetty/lib/ext/
3. Define a JNDI resource for H2 in /path/to/jetty/etc/jetty.xml:
<New id="jdbc/forgerock" class="org.eclipse.jetty.plus.jndi.Resource"> <Arg></Arg> <Arg>jdbc/forgerock</Arg> <Arg> <New class="org.h2.jdbcx.JdbcDataSource"> <Set name="Url">jdbc:h2:tcp://localhost/~/test</Set> <Set name="User">sa</Set> <Set name="Password">password</Set> </New> </Arg></New>
4. Add a resource reference to the data source in /path/to/jetty/etc/webdefault.xml:
<resource-ref> <res-ref-name>jdbc/forgerock</res-ref-name>

Getting Login Credentials From Data SourcesLog in With Credentials From a Database
Gateway Guide ForgeRock Identity Gateway 5 (2018-05-03T07:21:09.993)Copyright © 2011-2017 ForgeRock AS. All rights reserved. 43
<res-type>javax.sql.DataSource</res-type> <res-auth>Container</res-auth></resource-ref>
5. Restart Jetty to take the configuration changes into account.
Procedure 4.3. Preparing the OpenIG Configuration
Add a new route to the OpenIG configuration to look up credentials in the database:
1. To add the route, add the following route configuration file as $HOME/.openig/config/routes/03-sql.json:
{ "handler": { "type": "Chain", "config": { "filters": [ { "type": "PasswordReplayFilter", "config": { "loginPage": "${true}", "credentials": { "type": "SqlAttributesFilter", "config": { "dataSource": "java:comp/env/jdbc/forgerock", "preparedStatement": "SELECT username, password FROM users WHERE email = ?;", "parameters": [ "[email protected]" ], "target": "${attributes.sql}" } }, "request": { "method": "POST", "uri": "http://app.example.com:8081/login", "form": { "username": [ "${attributes.sql.USERNAME}" ], "password": [ "${attributes.sql.PASSWORD}" ] } } } } ], "handler": "ClientHandler" } }, "condition": "${matches(request.uri.path, '^/sql')}"}

Getting Login Credentials From Data SourcesLog in With Credentials From a Database
Gateway Guide ForgeRock Identity Gateway 5 (2018-05-03T07:21:09.993)Copyright © 2011-2017 ForgeRock AS. All rights reserved. 44
On Windows, the file name should be %appdata%\OpenIG\config\routes\03-sql.json.
2. Notice the following features of the new route:
• The SqlAttributesFilter specifies the data source to access, a prepared statement to look up theuser's record, a parameter to pass into the statement, and where to store the search results inthe request context attributes map.
• The PasswordReplayFilter's request retrieves the username and password from the attributes mapand replaces your browser's original HTTP GET request with an HTTP POST login request thatcontains the credentials to authenticate.
Notice that the request is for username, password, and that H2 returns the fields as USERNAME andPASSWORD. The configuration reflects this difference.
• The route matches requests to /sql.
Procedure 4.4. To Try Logging in With Credentials From a Database
With H2, Jetty, and OpenIG correctly configured, you can try it out:
• Access the new route, http://openig.example.com:8080/sql.
OpenIG logs you in automatically as George.
What's happening behind the scenes?
Figure 4.2. Log in With Credentials From a Database

Getting Login Credentials From Data SourcesLog in With Credentials From a Database
Gateway Guide ForgeRock Identity Gateway 5 (2018-05-03T07:21:09.993)Copyright © 2011-2017 ForgeRock AS. All rights reserved. 45
OpenIG intercepts your browser's HTTP GET request. The request matches the new routeconfiguration. The PasswordReplayFilter's SqlAttributesFilter looks up credentials in H2, and stores thecredentials it finds in the request context attributes map. The PasswordReplayFilter's request pulls thecredentials out of the attributes map, builds the login form, and performs the HTTP POST requestto the HTTP server. The HTTP server validates the credentials, and responds with a profile page.OpenIG then passes the response from the HTTP server to your browser.

Getting Login Credentials From Access ManagementDetailed Flow
Gateway Guide ForgeRock Identity Gateway 5 (2018-05-03T07:21:09.993)Copyright © 2011-2017 ForgeRock AS. All rights reserved. 46
Chapter 5
Getting Login Credentials From AccessManagementOpenIG helps integrate applications with OpenAM's password capture and replay feature. Thisfeature of OpenAM is typically used to integrate with Microsoft Outlook Web Access (OWA) orSharePoint by capturing the password during OpenAM authentication, encrypting it, and adding tothe session, which is later decrypted and used for Basic Authentication to OWA or SharePoint. In thischapter, you will learn:
• How OpenAM password capture and replay works
• To configure OpenIG to obtain credentials from OpenAM authentication
• To use the credentials to log the user in to a protected application
5.1. Detailed FlowThe following figure illustrates the flow of requests for a user who is not yet logged into OpenAMaccessing a protected application. After successful authentication, the user is logged into theapplication with the username and password from the OpenAM login session.

Getting Login Credentials From Access ManagementDetailed Flow
Gateway Guide ForgeRock Identity Gateway 5 (2018-05-03T07:21:09.993)Copyright © 2011-2017 ForgeRock AS. All rights reserved. 47
Figure 5.1. Log in With Credentials Captured by OpenAM
1. The user sends a browser request to access a protected application.
2. The OpenAM policy agent protecting OpenIG intercepts the request.
3. The policy agent redirects the browser to OpenAM.
4. OpenAM authenticates the user, capturing the login credentials, storing the password inencrypted form in the user's session.
5. After authentication, OpenAM redirects the browser...
6. ...back to the protected application.
7. The OpenAM policy agent protecting OpenIG intercepts the request, validates the user sessionwith OpenAM (not shown here), adds the username and encrypted password to headers in therequest, and passes the request to OpenIG.
8. OpenIG retrieves the credentials from the headers, and uses the username and decryptedpassword to replace the request with an HTTP POST of the login form.

Getting Login Credentials From Access ManagementSetup Summary
Gateway Guide ForgeRock Identity Gateway 5 (2018-05-03T07:21:09.993)Copyright © 2011-2017 ForgeRock AS. All rights reserved. 48
9. The application validates the login credentials.
10. The application sends a response back to OpenIG.
11. OpenIG passes the response from the application back to the user's browser.
5.2. Setup Summary
Table 5.1. Tasks for Configuring Policy Enforcement
Task See Section(s)Create a file containing the password that is to becaptured by the policy agent and shared with OpenIG.
Procedure 5.1, "To Create a Password File"
Create a DES shared key to decrypt the passwordshared by OpenAM and OpenIG.
Procedure 5.2, "To Create a DES Shared Key InOpenIG"
Set up a sample user in OpenAM. Procedure 5.3, "To Set Up a Sample User in OpenAM"Create a profile for a J2EE policy agent in OpenAM. Procedure 5.4, "To Create a Policy Agent Profile in
OpenAM"Configure password capture and add the DES key tothe OpenAM configuration.
Procedure 5.5, "To Configure Password Capture inOpenAM"
Install the OpenAM policy agent alongside OpenIG. Procedure 5.6, "To Install the Policy Agent"Create a route in OpenIG to handle the requests. Procedure 5.7, "To Configure OpenIG for Password
Replay"Try the setup. Procedure 5.8, "To Test the Setup"
5.3. Preparing the TutorialBefore you start:
• Prepare OpenIG and the sample application as described in Chapter 2, "Getting Started".
• Install and configure OpenAM on http://openam.example.com:8088/openam, using the defaultconfiguration. If you use a different configuration, substitute in the tutorial accordingly.
Procedure 5.1. To Create a Password File
Create a text file containing the password specified in Procedure 5.4, "To Create a Policy AgentProfile in OpenAM".
1. Create the password file:$ echo password > /tmp/pwd.txt

Getting Login Credentials From Access ManagementPreparing the Tutorial
Gateway Guide ForgeRock Identity Gateway 5 (2018-05-03T07:21:09.993)Copyright © 2011-2017 ForgeRock AS. All rights reserved. 49
On Windows:C:\> echo password > pwd.txt
2. Protect the password file:$ chmod 400 /tmp/pwd.txt
In Windows Explorer, right-click the created password file, select Read-Only, and then select OK.
Procedure 5.2. To Create a DES Shared Key In OpenIG
In this procedure you generate a DES shared key in OpenIG that you then use later in the OpenAMand OpenIG configuration.
When you configure password capture and replay, an OpenAM policy agent shares capturedpasswords with OpenIG. Before communicating passwords to OpenIG, however, OpenAM encryptsthem with a DES shared key. OpenIG uses the DES shared key to decrypt the shared passwords.
The shared key is sensitive information. If it is possible for others to inspect the response, make sureyou use HTTPS to protect the communication.
For more information, see DesKeyGenHandler(5) in the Configuration Reference.
1. Add the following route to the OpenIG configuration as $HOME/.openig/config/routes/04-keygen.json.
On Windows, add the route as %appdata%\OpenIG\config\routes\04-keygen.json:
{ "handler": { "type": "DesKeyGenHandler" }, "condition": "${matches(request.uri.path, '^/keygen') and (matches(contexts.client.remoteAddress, ':1') or matches(contexts.client.remoteAddress, '127.0.0.1'))}"}
2. Call the route to generate a key:
$ curl http://localhost:8080/keygen{"key":"1A+BCdEfGhI="}
In this example, the key is 1A+BCdEfGhI=.
3. Make a note of the key for later.

Getting Login Credentials From Access ManagementSetting Up OpenAM for Password Replay
Gateway Guide ForgeRock Identity Gateway 5 (2018-05-03T07:21:09.993)Copyright © 2011-2017 ForgeRock AS. All rights reserved. 50
5.4. Setting Up OpenAM for Password Replay
Procedure 5.3. To Set Up a Sample User in OpenAM
If you haven't set up the user George Costanza in a previous tutorial, do so now.
1. In the OpenAM console, select the top level realm and browse to Subjects.
2. Click New and create a user with the following values:
• ID: george
• Last Name: costanza
• Full Name: george costanza
• Password: costanza
Procedure 5.4. To Create a Policy Agent Profile in OpenAM
For more information about configuring policy agents in OpenAM, see Configuring Java EE PolicyAgents in the OpenAM Java EE Policy Agent User's Guide.
1. In the top-level realm, select Applications > Agents > J2EE.
2. Add an agent with the following values:
• Name: JavaEE
• Password: password
• Server URL: http://openam.example.com:8088/openam
• Agent URL: http://openig.example.com:8080/agentapp
3. Edit the agent profile to add these settings, making sure to save your changes in each tab:
• On the Global settings tab, select General, and change the Agent Filter Mode from ALL toSSO_ONLY.
• On the Application tab, select Session Attributes Processing, and change the following values:
• Session Attribute Fetch Mode: Change from NONE to HTTP_HEADER.
• Session Attribute Mapping: Add [UserToken]=username and [sunIdentityUserPassword]=password.
Note
If you plan to use ForgeRock Common REST to create or edit routes, on the Application tab, under NotEnforced URI Processing, add /openig/api/*.

Getting Login Credentials From Access ManagementInstalling the OpenAM Policy Agent
Gateway Guide ForgeRock Identity Gateway 5 (2018-05-03T07:21:09.993)Copyright © 2011-2017 ForgeRock AS. All rights reserved. 51
This step adds the URL pattern for Common REST requests to the list of not-enforced URIs. Thepolicy agent bypasses requests that match this URL pattern, granting them access without requiringauthentication.
For information about managing routes through Common REST, see Section 12.3, " Creating and EditingRoutes Through Common REST ".
Procedure 5.5. To Configure Password Capture in OpenAM
For more information about configuring policy agents in OpenAM, see Configuring Java EE PolicyAgents in the OpenAM Java EE Policy Agent User's Guide.
1. Update the Authentication Post Processing Classes for password replay.
a. In the top level realm, select Authentication > Settings > Post Authentication Processing.
b. Add the following class to Authentication Post Processing Classes, and then save the changes:com.sun.identity.authentication.spi.ReplayPasswd.
2. Add the key you created in Procedure 5.2, "To Create a DES Shared Key In OpenIG" to theOpenAM configuration:
a. In the OpenAM console, select DEPLOYMENT > Servers, and then select the OpenAM servername.
In some earlier releases, select Configuration > Servers and Sites.
b. Select Advanced, and add the property com.sun.am.replaypasswd.key with the value of the DESshared key.
3. Restart OpenAM.
5.5. Installing the OpenAM Policy Agent
Procedure 5.6. To Install the Policy Agent
For more information about how to install the OpenAM policy agent, see To Install the Policy Agentinto Jetty in the OpenAM Java EE Policy Agent User's Guide.
1. Make sure that OpenIG is stopped and OpenAM is running.
2. Download and then unzip the OpenAM Java EE policy agent in the directory alongside OpenIG.For example, in the /path/to directory.
A /path/to/j2ee_agents directory is created.

Getting Login Credentials From Access ManagementSetting Up OpenIG for Password Replay
Gateway Guide ForgeRock Identity Gateway 5 (2018-05-03T07:21:09.993)Copyright © 2011-2017 ForgeRock AS. All rights reserved. 52
3. Install the agent with a command similar to this:$ /path/to/j2ee_agents/jetty_v7_agent/bin/agentadmin --install --acceptLicense
You are prompted to enter information about the installation.
4. Answer the prompts with the following hints:
• Jetty Server Config Directory: /path/to/jetty/etc
• Jetty installation directory: /path/to/jetty
• OpenAM server URL: http://openam.example.com:8088/openam
• Agent URL: http://openig.example.com:8080/agentapp
• Agent Profile Name: JavaEE
• Agent Profile Password file name : /tmp/pwd.txt
5. Add the following filter configuration to /path/to/jetty/etc/webdefault.xml:
<filter> <filter-name>Agent</filter-name> <display-name>Agent</display-name> <description>OpenAM Policy Agent Filter</description> <filter-class>com.sun.identity.agents.filter.AmAgentFilter</filter-class></filter>
<filter-mapping> <filter-name>Agent</filter-name> <url-pattern>/replay</url-pattern> <dispatcher>REQUEST</dispatcher> <dispatcher>INCLUDE</dispatcher> <dispatcher>FORWARD</dispatcher> <dispatcher>ERROR</dispatcher></filter-mapping>
6. To test the setup of the policy agent, start OpenIG, and browse to http://openig.example.com:8080/replay.
You should be redirected to OpenAM for authentication, but do not log in yet.
5.6. Setting Up OpenIG for Password Replay
Procedure 5.7. To Configure OpenIG for Password Replay
1. Add the following route to OpenIG configuration as $HOME/.openig/config/routes/04-replay.json:
On Windows, add the route as %appdata%\OpenIG\config\routes\04-replay.json.

Getting Login Credentials From Access ManagementSetting Up OpenIG for Password Replay
Gateway Guide ForgeRock Identity Gateway 5 (2018-05-03T07:21:09.993)Copyright © 2011-2017 ForgeRock AS. All rights reserved. 53
{ "handler": { "type": "Chain", "config": { "filters": [ { "type": "PasswordReplayFilter", "config": { "loginPage": "${true}", "headerDecryption": { "algorithm": "DES/ECB/NoPadding", "key": "DESKEY", "keyType": "DES", "charSet": "utf-8", "headers": [ "password" ] }, "request": { "method": "POST", "uri": "http://app.example.com:8081/login", "form": { "username": [ "${request.headers['username'][0]}" ], "password": [ "${request.headers['password'][0]}" ] } } } }, { "type": "HeaderFilter", "config": { "messageType": "REQUEST", "remove": [ "password", "username" ] } } ], "handler": "ClientHandler" } }, "condition": "${matches(request.uri.path, '^/replay')}"}
2. Edit the route to change DESKEY to the actual key value that you generated in Procedure 5.2, "ToCreate a DES Shared Key In OpenIG".
Notice the following features of the new route:
• The route matches requests to /replay.

Getting Login Credentials From Access ManagementTesting the Setup
Gateway Guide ForgeRock Identity Gateway 5 (2018-05-03T07:21:09.993)Copyright © 2011-2017 ForgeRock AS. All rights reserved. 54
• The PasswordReplayFilter uses the headerDecryption information to decrypt the password thatOpenAM captured and encrypted, and that the OpenAM policy agent included in the headersfor the request.
The headerDecryption object uses the DES shared key value that you generated.
• The PasswordReplayFilter retrieves the username and password from the context and replacesyour browser's original HTTP GET request with an HTTP POST login request that contains thecredentials to authenticate.
• The HeaderFilter removes the username and password headers before continuing to process therequest.
5.7. Testing the Setup
Procedure 5.8. To Test the Setup
1. Log out of OpenAM if you are logged in.
2. Access the route on http://openig.example.com:8080/replay.
You should be redirected to the OpenAM login page.
3. Log in with username george, password costanza.
You should be redirected to the sample application.

Enforcing Policy Decisions and Supporting Session UpgradeAbout OpenIG As a PEP With OpenAM As PDP
Gateway Guide ForgeRock Identity Gateway 5 (2018-05-03T07:21:09.993)Copyright © 2011-2017 ForgeRock AS. All rights reserved. 55
Chapter 6
Enforcing Policy Decisions and SupportingSession UpgradeThis chapter describes how to set up OpenIG as a policy enforcement point, with OpenAM as a policydecision point. It provides an example of how to enforce a policy decision from OpenAM, and anexample of upgrading a session to a higher authentication level.
For more information about authentication and session upgrade, see OpenAM's Authentication andSingle Sign-On Guide .
6.1. About OpenIG As a PEP With OpenAM As PDPThe following terms are used in access management:
• Policy Decision Point (PDP): Entity that evaluates access rights and then issues authorizationdecisions.
• Policy Enforcement Point (PEP): Entity that intercepts a request for a resource and then enforcespolicy decisions from a PDP.
OpenIG as a PEP intercepts requests for a resource, and provides information about the request toOpenAM as a PDP.
OpenAM evaluates requests based on their context and the configured policies. OpenAM then returnsdecisions that indicate what actions are allowed or denied, as well as any advices, subject attributes,or static attributes for the specified resources.
After a policy decision, OpenIG continues to process requests as follows:
• If the request is allowed, processing continues.
• If the request is denied with advice, OpenIG checks whether it can respond to the advice. If OpenIGcan respond to the advice, it processes the advice.
• If the request is denied without advice, or if OpenIG cannot respond to the advice, OpenIG forwardsthe request to a failureHandler declared in the PolicyEnforcementFilter. If there is no failureHandler,OpenIG returns a 403 Forbidden.
• If an error occurs during the process, OpenIG returns 500 Internal Server Error.

Enforcing Policy Decisions and Supporting Session UpgradeEnforcing Policy Decisions From OpenAM
Gateway Guide ForgeRock Identity Gateway 5 (2018-05-03T07:21:09.993)Copyright © 2011-2017 ForgeRock AS. All rights reserved. 56
Attributes and advices returned by the policy decision are stored in the attributes andadvices properties of the ${contexts.policyDecision} context. They are available to thePolicyEnforcementFilter's downstream filters and handlers.
In OpenAM, administrators can maintain centralized, fine-grained, declarative policies to managewho can access what resources, and under what conditions. Policies can be managed separately byOpenAM realm and by OpenAM application.
OpenAM provides a REST API for authorized users to request policy decisions. OpenIG provides aPolicyEnforcementFilter that uses the REST API. For information, see PolicyEnforcementFilter(5) inthe Configuration Reference.
6.2. Enforcing Policy Decisions From OpenAMThis section gives an example of how to set up OpenIG as a PEP, requesting policy decisions fromOpenAM as a PDP.
Table 6.1. Tasks for Configuring Policy Enforcement
Task See Section(s)Set up a policy in OpenAM to allow authenticatedusers to access the sample application.
Procedure 6.1, "To Create a Policy in OpenAM"
Create credentials and privileges in OpenAM for apolicy administrator. When OpenIG requests policydecisions, it must use these credentials.
Procedure 6.2, "To Create a Policy Administrator inOpenAM"
Configure OpenIG as a PEP in OpenIG Studio. Procedure 6.3, "To Set Up OpenIG as a PEP"Test the setup. Procedure 6.4, "To Test the Setup"
6.2.1. Setting Up OpenAM As a PDP
This section describes how to create a policy in OpenAM and configure a user who can request policydecisions.
Before you start, install and configure OpenAM on http://openam.example.com:8088/openam, withthe default configuration. If you use a different configuration, substitute in the tutorial accordingly.
Procedure 6.1. To Create a Policy in OpenAM
1. Log in to the OpenAM console as administrator.
2. In the top-level realm, select Authorization > Policy Sets.
3. Add a new policy set with the following values, and then select Create:

Enforcing Policy Decisions and Supporting Session UpgradeSetting Up OpenIG as a PEP
Gateway Guide ForgeRock Identity Gateway 5 (2018-05-03T07:21:09.993)Copyright © 2011-2017 ForgeRock AS. All rights reserved. 57
• Id: PEP policy set
• Resource Types: URL
4. In the new policy set, add a policy with the following values, and then select Create:
• Name: OpenIG Policy
• Resource Type: URL
• Resource pattern: *://*:*/*
• Resource value: http://app.example.com:8081/home/pep
This policy protects the home page of the sample application.
5. Select the Actions tab, add an action to allow HTTP GET, and then save your changes.
6. Select the Subjects tab, remove any default subject conditions, add a subject condition for allAuthenticated Users, and then save your changes.
Procedure 6.2. To Create a Policy Administrator in OpenAM
1. In the top-level realm, create a subject with ID policyAdmin and password password.
2. Create a policyAdmins group and add the user you created.
3. In the privileges configuration for the policyAdmins group, add the privilege REST calls for policy evaluation.
This privilege allows a subject in that group to request policy decisions.
4. Make sure all the changes are saved.
6.2.2. Setting Up OpenIG as a PEP
This section describes how to set up OpenIG to configure policy enforcement, where the user agent isredirected to OpenAM for authentication.
To configure OpenIG without using OpenIG Studio, add the route in Example 6.1, "Route for OpenIGAs a PEP" to the OpenIG configuration as $HOME/.openig/config/routes/04-pep.json. On Windows, add theroute as %appdata%\OpenIG\config\routes\04-pep.json.
Procedure 6.3. To Set Up OpenIG as a PEP
Before you start, prepare OpenIG and the sample application as described in Chapter 2, "GettingStarted". Make sure that your config.json has a main router named _router.

Enforcing Policy Decisions and Supporting Session UpgradeSetting Up OpenIG as a PEP
Gateway Guide ForgeRock Identity Gateway 5 (2018-05-03T07:21:09.993)Copyright © 2011-2017 ForgeRock AS. All rights reserved. 58
1. Access OpenIG Studio on http://openig.example.com:8080/openig/studio, and select Protect anApplication.
2. In the Create a route window, select Advanced Options and enter the following information, andthen select Create route:
• Base URI: http://app.example.com:8081
• Condition: Path: /home/pep
• Name: 04-pep
3. Select Authentication, and then enable authentication.
4. Select Single Sign-On, enter the following information, and then select Save:
• OpenAM URL: http://openam.example.com:8088/openam
Leave the other fields with their default values.
5. Select Authorization, and then enable authorization.
6. Select the following options to reflect the configuration in Section 6.2.1, "Setting Up OpenAM Asa PDP", and then save the settings:
• OpenAM configuration:
• OpenAM URL: http://openam.example.com:8088/openam
• Policy administrator ID: policyAdmin
• Policy administrator password: password
• OpenAM policy endpoint:
• Policy set: PEP policy set
• OpenAM SSO token ID: ${contexts.ssoToken.value}
Leave the other fields with their default values, or empty if they are empty.
7. On the top-right of the screen, select ⋮ > Display, and review the route. The route inExample 6.1, "Route for OpenIG As a PEP" should be displayed.
Notice the following features of the new route:
• The route matches requests to /home/pep.
• The first filter in the chain is the SingleSignOnFilter. For information, seeSingleSignOnFilter(5) in the Configuration Reference.

Enforcing Policy Decisions and Supporting Session UpgradeSetting Up OpenIG as a PEP
Gateway Guide ForgeRock Identity Gateway 5 (2018-05-03T07:21:09.993)Copyright © 2011-2017 ForgeRock AS. All rights reserved. 59
If the request does not have a valid iPlanetDirectoryPro cookie, the SingleSignOnFilterredirects the request to OpenAM for authentication.
If the request already has a valid iPlanetDirectoryPro cookie, or after authenticating withOpenAM to get a valid iPlanetDirectoryPro cookie, the SingleSignOnFilter passes the request tothe next filter. The SingleSignOnFilter stores the cookie value in an SsoTokenContext.
• The next filter in the chain is the PolicyEnforcementFilter. For information, seePolicyEnforcementFilter(5) in the Configuration Reference.
The PolicyEnforcementFilter retrieves the token value from the SsoTokenContext to identify thesubject making the request, and then calls the OpenAM policy endpoint for a policy decision.
8. Select Deploy to push the route to the OpenIG configuration.
You can check the $HOME/.openig/config/routes folder to see that the route is there.
Example 6.1. Route for OpenIG As a PEP
{ "name": "04-pep", "baseURI": "http://app.example.com:8081", "monitor": false, "condition": "${matches(request.uri.path, '^/home/pep')}", "handler": { "type": "Chain", "config": { "filters": [ { "type": "SingleSignOnFilter", "name": "SingleSignOn", "config": { "openamUrl": "http://openam.example.com:8088/openam", "realm": "/", "cookieName": "iPlanetDirectoryPro" } }, { "type": "PolicyEnforcementFilter", "name": "PEPFilter", "config": { "openamUrl": "http://openam.example.com:8088/openam", "pepUsername": "policyAdmin", "pepPassword": "password", "pepRealm": "/", "realm": "/", "application": "PEP policy set", "ssoTokenSubject": "${contexts.ssoToken.value}" } } ], "handler": "ClientHandler" }

Enforcing Policy Decisions and Supporting Session UpgradeTesting the Setup
Gateway Guide ForgeRock Identity Gateway 5 (2018-05-03T07:21:09.993)Copyright © 2011-2017 ForgeRock AS. All rights reserved. 60
}}
6.2.3. Testing the Setup
Procedure 6.4. To Test the Setup
1. Log out of OpenAM.
2. Browse to http://openig.example.com:8080/home/pep.
Because you have not previously authenticated to OpenAM, the request does not contain a cookiewith an SSO token. The SingleSignOnFilter redirects you to OpenAM for authentication.
3. Log in to OpenAM as user demo, password changeit.
When you have authenticated, OpenAM redirects you back to the request URL, and OpenIGrequests a policy decision using the iPlanetDirectoryPro cookie value.
OpenAM returns a policy decision that grants access to the sample application.
6.3. Upgrading a SessionThis section builds on the example in Section 6.2, "Enforcing Policy Decisions From OpenAM".The authentication level required to access the sample application is increased to level 1. Afterauthenticating with OpenAM, the user must upgrade the session by entering a verification codebefore they can access the sample application.
Table 6.2. Tasks for Configuring Session Upgrade
Task See Section(s)Set up OpenIG as a policy enforcement point andOpenAM as a policy decision point, as described inthe previous section.
Section 6.2, "Enforcing Policy Decisions FromOpenAM"
Add an environment condition to the OpenIG policyto require authentication level 1 to access the sampleapplication.
Procedure 6.5, "To Add an Environment Condition tothe OpenAM Policy"
Create a scripted authentication module and scripts inOpenAM to deliver a token with authentication level1.
Procedure 6.6, "To Set Up an Authentication Module"
Try the setup. Procedure 6.7, "To Test the Setup"

Enforcing Policy Decisions and Supporting Session UpgradeSetting Up OpenAM for Session Upgrade
Gateway Guide ForgeRock Identity Gateway 5 (2018-05-03T07:21:09.993)Copyright © 2011-2017 ForgeRock AS. All rights reserved. 61
6.3.1. Setting Up OpenAM for Session Upgrade
This section provides an example of session upgrade. After authenticating with OpenAM, the usermust also provide a verification code to access the sample application.
To run this example, configure OpenIG and OpenAM as described in Section 6.2, "EnforcingPolicy Decisions From OpenAM". No additional configuration of OpenIG is required; the followingprocedures build on the OpenAM configuration.
Procedure 6.5. To Add an Environment Condition to the OpenAM Policy
This section changes the policy you created in Procedure 6.1, "To Create a Policy in OpenAM".
1. Log in to the OpenAM console as administrator.
2. In the top-level realm, select Authorization > Policy Sets > PEP policy set.
3. In the OpenIG policy, select Environments, and add an environment condition to requireauthentication level greater than or equal to 1.
Procedure 6.6. To Set Up an Authentication Module
This section sets up an OpenAM authentication module and scripts to upgrade a session'sauthentication level to 1.
1. In the top level realm, select Scripts > Scripted Module - Client Side, and replace the defaultscript with the following script:
spinner.hideSpinner();autoSubmitDelay = 60000;$(document).ready(function() { fs = $(document.forms[0]).find("fieldset"); strUI = '<div class="form-group"> \ <label class="sr-only separator" for="answer"> \ Verification Code</label><input onchange="s=$(\'#clientScriptOutputData\')[0]; \ if (!s.value) s.value=\'{}\'; d=JSON.parse(s.value); d[\'answer\']=value; \ s.value=JSON.stringify(d);" id="answer" class="form-control input-lg" type="text" \ placeholder="Enter your verification code" value="" name="answer"></input></div>'; $(fs).prepend(strUI);});
Leave all other values as default.
This client side script adds a field to the OpenAM form, in which the user is required to enter averification code. The script formats the entered code as a JSON object, as required by the serverside script.
2. Select Scripts > Scripted Module - Server Side, and replace the default script with the followingscript:

Enforcing Policy Decisions and Supporting Session UpgradeTesting the Setup
Gateway Guide ForgeRock Identity Gateway 5 (2018-05-03T07:21:09.993)Copyright © 2011-2017 ForgeRock AS. All rights reserved. 62
username = 'demo'logger.error('username: ' + username)
// Test whether the user 'demo' enters the correct validation codedata = JSON.parse(clientScriptOutputData);answer = data.answer;
if (answer !== '123456') { logger.error('Authentication Failed !!') authState = FAILED;} else { logger.error('Authenticated !!') authState = SUCCESS;}
Leave all other values as default.
This server side script tests that the user demo has entered 123456 as the verification code.
3. In the top level realm, select Authentication > Modules, and add a module with the followingcharacteristics:
• Name: VerificationCodeLevel1
• Type: Scripted Module
4. In the authentication module, enable the option for client-side script, and select the followingoptions:
• Client-side Script: Scripted Module - Client Side
• Server-side Script: Scripted Module - Server Side
• Authentication Level: 1
6.3.2. Testing the Setup
Procedure 6.7. To Test the Setup
1. Log out of OpenAM.
2. Browse to http://openig.example.com:8080/home/pep.
If you have not previously authenticated to OpenAM, the SingleSignOnFilter redirects the requestto OpenAM for authentication.
3. Log in to OpenAM as user demo, password changeit.

Enforcing Policy Decisions and Supporting Session UpgradeTesting the Setup
Gateway Guide ForgeRock Identity Gateway 5 (2018-05-03T07:21:09.993)Copyright © 2011-2017 ForgeRock AS. All rights reserved. 63
OpenAM creates a session with an authentication level 0, and OpenIG requests a policy decision.The updated policy requires authentication level 1, which is higher than the session's currentauthentication level.
OpenAM steps up the authentication level by using the authentication module and scripts you justcreated.
4. In the session upgrade window, enter the verification code 123456.
OpenAM returns a policy decision that grants access to the sample application. You can now login to the sample application.

Acting As a SAML 2.0 Service ProviderAbout SAML 2.0 SSO and Federation
Gateway Guide ForgeRock Identity Gateway 5 (2018-05-03T07:21:09.993)Copyright © 2011-2017 ForgeRock AS. All rights reserved. 64
Chapter 7
Acting As a SAML 2.0 Service ProviderThe federation component of OpenIG is a standards-based authentication service used by OpenIGto validate users and log them in to applications that OpenIG protects. The federation componentimplements SAML 2.0. In this chapter, you will learn:
• How OpenIG works as a SAML 2.0 service provider.
• How to configure OpenIG as a service provider for a single application.
Appendix A, "SAML 2.0 and Multiple Applications" describes how to set up OpenIG as a SAML 2.0service provider for two applications, using OpenAM as the identity provider.
7.1. About SAML 2.0 SSO and FederationFederation allows organizations to share identities and services without giving away their identityinformation or the services they provide. Federation depends on standards to orchestrate interactionand exchange information between providers.
SAML 2.0 is a standard that describes the messages that providers exchange and the way thatthey exchanged them. SAML 2.0 enables web single sign-on (SSO), for example, where the servicemanaging the user's identity does not belong to the same organization and does not use the samesoftware as the service that the user wants to access.
The following terms are used for federation and SAML:
• Identity Provider (IDP): The service that manages the user identity.
• Service Provider (SP): The service that a user wants to access.
• Circle of trust (CoT): An identity provider and service provider that participate in the federation.
When an identity provider and a service provider participate in federation, they agree on whatsecurity information to exchange, and mutually configure access to each others' services. Themetadata that identity providers and service providers share is in an XML format defined by theSAML 2.0 standard.
7.1.1. Steps in SSO
SSO can be initiated by the SP (SP initiated SSO) or by the IDP (IDP initiated SSO).

Acting As a SAML 2.0 Service ProviderOpenIG As a SAML 2.0 SP
Gateway Guide ForgeRock Identity Gateway 5 (2018-05-03T07:21:09.993)Copyright © 2011-2017 ForgeRock AS. All rights reserved. 65
Before SSO can be initiated by an IDP, the IDP must be configured with links that refer to the SP, andthe user must be authenticated to the IDP. Instead of accessing app.example.com directly on the SP,the user accesses a link on the IDP that refers to the remote SP. The IDP provides SAML assertionsfor the user to the SP.
When SSO is initiated by the SP, the user attempts to access app.example.com directly on the SP.Because the user's federated identity is managed by the IDP, the SP sends a SAML authenticationrequest to the IDP. After authenticating the user, the IDP provides SAML assertions for the user tothe SP.
In both cases, the SAML assertion sent from the IDP to the SP attests which user is authenticated,when the authentication succeeded, how long the assertion is valid, and so on. The assertions canoptionally contain additional and configurable attribute values, such as user meta-information oranything else provided by the IDP.
The SP uses the SAML assertions from the IDP to make authorization decisions, for example, to letan authenticated user complete a purchase that gets charged to the user's account at the identityprovider.
SAML assertions can optionally be signed and encrypted.
7.1.2. OpenIG As a SAML 2.0 SP
OpenIG acts as a SAML 2.0 SP for SSO, providing users with an interface to applications that don'tsupport SAML 2.0.
When SSO is initiated by the IDP, the IDP sends an unsolicited authentication statement to OpenIG.When SSO is initiated by OpenIG, OpenIG calls the federation component to initiate SSO with theIDP. In both cases, the job of the federation component is to authenticate the user and to pass therequired attributes to OpenIG so that OpenIG can log the user into protected applications.
7.2. Installation OverviewThis tutorial assumes that you are familiar with SAML 2.0 federation and with the componentsinvolved, including OpenAM. For information about OpenAM, read the documentation for yourversion of OpenAM.
This tutorial does not address PKI configuration for validation and encryption, although OpenIG iscapable of handling both, just as any OpenAM Fedlet can handle both.
This tutorial takes you through the steps to set up OpenAM as an IDP and OpenIG as an SP toprotect an application. To set up multiple SPs, read this chapter, work through the samples, and thenconsider the explanation in Appendix A, "SAML 2.0 and Multiple Applications".

Acting As a SAML 2.0 Service ProviderPreparing the Network
Gateway Guide ForgeRock Identity Gateway 5 (2018-05-03T07:21:09.993)Copyright © 2011-2017 ForgeRock AS. All rights reserved. 66
Table 7.1. Tasks for Configuring SAML 2.0 SSO and Federation
Task See Section(s)Prepare the network. Section 7.3, "Preparing the Network"Configure OpenAM As an IDP. Section 7.4.1, " Setting Up OpenAM for This Tutorial "
Section 7.4.2, " Setting Up a Hosted Identity Provider"
Section 7.4.3, " Setting up a Fedlet "Configuring OpenIG as a SP. Section 7.5.1, " Retrieve the Fedlet Configuration
Files "
Section 7.5.2, " Adding a Route for CredentialInjection "
Section 7.5.3, " Adding a Route for SAML Federation "
Table 7.2. Fedlet Configuration Files
File Descriptionfedlet.cot Circle of trust for OpenIG and the identity provider.idp.xml Standard metadata (usually generated by the IDP).idp-extended.xml Metadata extensions (usually generated by the IDP).sp.xml Standard metadata for the OpenIG SP (usually
generated by the IDP).sp-extended.xml Metadata extensions for the OpenIG SP (usually
generated by the IDP).
For examples of the federation configuration files, see Section 7.7, " Example FederationConfiguration Files ". You can copy and edit these files to create new configurations.
7.3. Preparing the NetworkConfigure the network so that browser traffic to the application hosts is proxied through OpenIG. Theexample in this chapter uses the host name sp.example.com.
Add the following address to your hosts file: sp.example.com.
127.0.0.1 localhost openam.example.com openig.example.com app.example.com sp.example.com

Acting As a SAML 2.0 Service ProviderConfiguring OpenAM As an IDP
Gateway Guide ForgeRock Identity Gateway 5 (2018-05-03T07:21:09.993)Copyright © 2011-2017 ForgeRock AS. All rights reserved. 67
7.4. Configuring OpenAM As an IDP
7.4.1. Setting Up OpenAM for This Tutorial
Procedure 7.1. To Set Up OpenAM for This Tutorial
1. Install and configure OpenAM on http://openam.example.com:8088/openam, with the defaultconfiguration. If you use a different configuration, make sure you substitute in the tutorialaccordingly.
2. In the top level realm, browse to Subject and create a user with following credentials:
• ID (Username): george
• Last Name: costanza
• Full Name: george costanza
• Password: costanza
3. Edit the user to add the following information:
• Email Address: george
• Employee Number: costanza
For simplicity, this tutorial uses mail to hold the username, and employeenumber to hold thepassword. Both attributes are in the standard user profile with the default OpenAM configuration,and neither is needed for anything else in this tutorial. In a real deployment, you would use otherattributes to represent real user profiles.
4. Test that you can log in to OpenAM with this username and password.
7.4.2. Setting Up a Hosted Identity Provider
Procedure 7.2. To Set Up a Hosted Identity Provider
1. Select the top level realm and browse to Configure SAMLv2 Provider > Create Hosted IdentityProvider.
A configuration page for the IDP is displayed.
2. In metadata > Name, change http://openam.example.com:8088/openam to openam.
This makes it easier to refer to OpenAM as the IDP later.
3. In metadata > Signing Key, select test.

Acting As a SAML 2.0 Service ProviderSetting up a Fedlet
Gateway Guide ForgeRock Identity Gateway 5 (2018-05-03T07:21:09.993)Copyright © 2011-2017 ForgeRock AS. All rights reserved. 68
4. In Circle of Trust, select an existing circle of trust (CoT) or select Add and enter the name of anew CoT. In this example, the CoT is called Circle of Trust.
5. In Attribute Mapping, map the mail attribute to mail, and map the employeenumber attribute toemployeenumber.
The SAML 2.0 attribute mapping indicates that OpenIG (the SP) wants OpenAM (the IDP) to getthe value of these attributes from the user profile and send them to OpenIG. OpenIG can use theattribute values to log the user in to the application it protects.
6. Select Configure.
A confirmation page is displayed. You can start to create a Fedlet from this page or go back to thetop level realm, as described in the following procedure.
7.4.3. Setting up a Fedlet
A Fedlet is an example web application that acts as a lightweight SAML v2.0 SP. When you createa Fedlet, the federation configuration files are created in a directory similar to this: $HOME/openam/myfedlets/openig-fedlet/Fedlet.zip.
Procedure 7.3. To Set Up a Fedlet
1. In the top level realm, browse to Create Fedlet.
2. In Name, enter a name for the Fedlet. In this tutorial, the Fedlet is named sp.
3. In Destination URL, enter the following URL for the SP: http://sp.example.com:8080/saml.
4. In Attribute Mapping, map the mail attribute to mail, and map the employeenumber attribute toemployeenumber.
5. Select Create.
After successfully creating the Fedlet, OpenAM displays the location of the configuration files.Depending on your version of OpenAM, the configuration files are in a war directory or .zip file.
The .zip file is named something like $HOME/openam/myfedlets/sp/Fedlet.zip on the system whereOpenAM runs.
7.5. Configuring OpenIG As an SPBefore you start, prepare OpenIG and the sample application as shown in Chapter 2, "GettingStarted". Getting the basic setup to work before you configure federation makes it simpler totroubleshoot if anything goes wrong.
Acting As a SAML 2.0 Service ProviderRetrieve the Fedlet Configuration Files
Gateway Guide ForgeRock Identity Gateway 5 (2018-05-03T07:21:09.993)Copyright © 2011-2017 ForgeRock AS. All rights reserved. 69
To test your setup, access the login page of the sample application through OpenIG at http://openig.example.com:8080/login. Log in as username george, password costanza. You should see a pageshowing the username and some information about the request.
7.5.1. Retrieve the Fedlet Configuration Files
Procedure 7.4. To Retrieve the Fedlet Configuration Files
1. Unpack the configuration files from the Fedlet you created in Section 7.4.3, " Setting up a Fedlet". For example, unpack the .zip file as follows:
$ cd $HOME/openam/myfedlets/sp$ unzip Fedlet.zip$ mkdir $HOME/.openig/SAML$ cp conf/* $HOME/.openig/SAML$ ls -l $HOME/.openig/SAML
FederationConfig.propertiesfedlet.cotidp-extended.xmlidp.xmlsp-extended.xmlsp.xml
2. If the following fedlet adapter header is defined in sp-extended.xml, comment it out to preventissues with timeout:
<!-- <Attribute name="fedletAdapter"> <Value>com.sun.identity.saml2.plugins.DefaultFedletAdapter</Value> </Attribute>-->
3. Restart OpenIG.
7.5.2. Adding a Route for Credential Injection
Create the configuration file $HOME/.openig/config/routes/05-saml.json.
On Windows, the file name should be %appdata%\OpenIG\config\routes\05-saml.json.
{ "handler": { "type": "SamlFederationHandler", "config": { "assertionMapping": { "username": "mail", "password": "employeenumber" },

Acting As a SAML 2.0 Service ProviderAdding a Route for SAML Federation
Gateway Guide ForgeRock Identity Gateway 5 (2018-05-03T07:21:09.993)Copyright © 2011-2017 ForgeRock AS. All rights reserved. 70
"subjectMapping": "sp-subject-name", "redirectURI": "/federate" } }, "condition": "${matches(request.uri.path, '^/saml')}", "session": "JwtSession"}
The route injects credentials into the context, based on attribute values from the SAML assertionreturned on successful authentication. Note the following features of the route:
• The route matches requests to /saml.
• The SamlFederationHandler extracts the mail and employee number from the SAML assertion andmaps them to the session fields session.username and session.password.
The handler stores the subject name as a string in the session field session.sp-subject-name, whichis named by the subjectMapping property. By default, the subject name is stored in the session fieldsession.subjectName.
The handler then redirects the request to the /federate route.
• The route uses the JwtSession implementation, meaning it stores encrypted session information in abrowser cookie. The name is a reference to the JwtSession object defined in config.json. For details,see JwtSession(5) in the Configuration Reference.
7.5.3. Adding a Route for SAML Federation
Create the configuration file $HOME/.openig/config/routes/05-federate.json.
On Windows, the file name should be %appdata%\OpenIG\config\routes\05-federate.json.
{ "handler": { "type": "DispatchHandler", "config": { "bindings": [ { "condition": "${empty session.username}", "handler": { "type": "StaticResponseHandler", "config": { "status": 302, "reason": "Found", "headers": { "Location": [ "http://sp.example.com:8080/saml/SPInitiatedSSO" ] } }

Acting As a SAML 2.0 Service ProviderAdding a Route for SAML Federation
Gateway Guide ForgeRock Identity Gateway 5 (2018-05-03T07:21:09.993)Copyright © 2011-2017 ForgeRock AS. All rights reserved. 71
} }, { "handler": { "type": "Chain", "config": { "filters": [ { "type": "StaticRequestFilter", "config": { "method": "POST", "uri": "http://app.example.com:8081/login", "form": { "username": [ "${session.username[0]}" ], "password": [ "${session.password[0]}" ] } } } ], "handler": "ClientHandler" } } } ] } }, "condition": "${matches(request.uri.path, '^/federate')}", "session": "JwtSession"}
Notice the following features of the route:
• The route matches requests to /federate. This is the route you use to test the configuration.
• If the username has not been populated in the context, the user has not yet authenticated with theIDP. In this case,
• The DispatchHandler dispatches requests to the StaticResponseHandler.
• The StaticResponseHandler redirects to the SP-initiated SSO end point to initiate SAML 2.0 webbrowser SSO.
• After authentication is successful, the SamlFederationHandler injects credentials into the session.
If the credentials have been inserted into the context, or after successful authentication in theprevious step, the DispatchHandler dispatches requests to the Chain to log the user in to the protectedapplication.
• The StaticRequestFilter retrieves the first value for the username and password attributes of theSAML assertion.
Acting As a SAML 2.0 Service ProviderTesting the Configuration
Gateway Guide ForgeRock Identity Gateway 5 (2018-05-03T07:21:09.993)Copyright © 2011-2017 ForgeRock AS. All rights reserved. 72
Note
The attributes of a SAML assertion can contain one or more values, which are made available as a list ofstrings. Even if an attribute contains a single value, it is made available as a list of strings.
The StaticRequestFilter then replaces the browser's original HTTP GET request with an HTTP POSTlogin request that contains the credentials to authenticate.
• The route uses the JwtSession implementation, meaning it stores encrypted session information in abrowser cookie. The name is a reference to the JwtSession object defined in config.json. For details,see JwtSession(5) in the Configuration Reference.
Tip
If more dynamic control is needed for the URL where the user agent is redirected, then use the RelayStatequery string parameter in the URL of the redirect Location header. The RelayState query string parameterspecifies where to redirect the user when the SAML 2.0 web browser SSO process is complete. TheRelayState overrides the redirectURI set in the SamlFederationHandler. The RelayState value must beURL-encoded. When using an expression, use the urlEncode() function to encode the value. For example:${urlEncodeQueryParameterNameOrValue(contexts.router.originalUri)}. In the following example, the user isfinally redirected to the original URI from the request:
"headers": { "Location": [ "http://openig.example.com:8080/saml/SPInitiatedSSO?RelayState=${urlEncodeQueryParameterNameOrValue(contexts.router.originalUri)}" ]}
7.6. Testing the Configuration
7.6.1. Testing IDP-initiated SSO
• Log out of the OpenAM console and select this link for IDP-initiated SSO. The OpenAM login page isdisplayed.
• Log in to OpenAM with username george and password costanza. OpenIG returns the response pageshowing that the user has logged in.
The following sequence diagram shows what just happened.

Acting As a SAML 2.0 Service ProviderTesting SP-initiated SSO
Gateway Guide ForgeRock Identity Gateway 5 (2018-05-03T07:21:09.993)Copyright © 2011-2017 ForgeRock AS. All rights reserved. 73
Figure 7.1. IDP-Initiated SSO
7.6.2. Testing SP-initiated SSO
• Log out of the OpenAM console, and browse to the URL for the route at http://openig.example.com:8080/federate. The OpenAM login page is displayed.
• Log in to OpenAM with the username george and password costanza. OpenIG returns the responsepage showing that the user has logged in.
The following sequence diagram shows what just happened.

Acting As a SAML 2.0 Service ProviderExample Federation Configuration Files
Gateway Guide ForgeRock Identity Gateway 5 (2018-05-03T07:21:09.993)Copyright © 2011-2017 ForgeRock AS. All rights reserved. 74
Figure 7.2. SP-Initiated SSO
7.7. Example Federation Configuration Files
7.7.1. Circle of Trust
The following example of $HOME/.openig/SAML/fedlet.cot defines a CoT between OpenAM as the IDP andan OpenIG SP:
cot-name=Circle of Trustsun-fm-cot-status=Activesun-fm-trusted-providers=openam,spsun-fm-saml2-readerservice-url=sun-fm-saml2-writerservice-url=
7.7.2. SAML Configuration File
The following example of $HOME/.openig/SAML/sp.xml defines a SAML configuration file for an OpenIGservice provider, sp:

Acting As a SAML 2.0 Service ProviderExtended Configuration File
Gateway Guide ForgeRock Identity Gateway 5 (2018-05-03T07:21:09.993)Copyright © 2011-2017 ForgeRock AS. All rights reserved. 75
<EntityDescriptor entityID="sp" xmlns="urn:oasis:names:tc:SAML:2.0:metadata"> <SPSSODescriptor AuthnRequestsSigned="false" WantAssertionsSigned="false" protocolSupportEnumeration="urn:oasis:names:tc:SAML:2.0:protocol"> <SingleLogoutService Binding="urn:oasis:names:tc:SAML:2.0:bindings:HTTP-Redirect" Location="http://sp.example.com:8080/saml/fedletSloRedirect" ResponseLocation="http://sp.example.com:8080/saml/fedletSloRedirect"/> <SingleLogoutService Binding="urn:oasis:names:tc:SAML:2.0:bindings:HTTP-POST" Location="http://sp.example.com:8080/saml/fedletSloPOST" ResponseLocation="http://sp.example.com:8080/saml/fedletSloPOST"/> <SingleLogoutService Binding="urn:oasis:names:tc:SAML:2.0:bindings:SOAP" Location="http://sp.example.com:8080/saml/fedletSloSoap"/> <NameIDFormat>urn:oasis:names:tc:SAML:2.0:nameid-format:transient</NameIDFormat> <AssertionConsumerService isDefault="true" index="0" Binding="urn:oasis:names:tc:SAML:2.0:bindings:HTTP-POST" Location="http://sp.example.com:8080/saml/fedletapplication"/> <AssertionConsumerService index="1" Binding="urn:oasis:names:tc:SAML:2.0:bindings:HTTP-Artifact" Location="http://sp.example.com:8080/saml/fedletapplication"/> </SPSSODescriptor> <RoleDescriptor xmlns:xsi="http://www.w3.org/2001/XMLSchema-instance" xmlns:query="urn:oasis:names:tc:SAML:metadata:ext:query" xsi:type="query:AttributeQueryDescriptorType" protocolSupportEnumeration="urn:oasis:names:tc:SAML:2.0:protocol"> </RoleDescriptor> <XACMLAuthzDecisionQueryDescriptor WantAssertionsSigned="false" protocolSupportEnumeration="urn:oasis:names:tc:SAML:2.0:protocol"> </XACMLAuthzDecisionQueryDescriptor></EntityDescriptor>
7.7.3. Extended Configuration File
The following example of $HOME/.openig/SAML/sp-extended.xml defines a SAML configuration file for anOpenIG service provider, sp:
<EntityConfig xmlns="urn:sun:fm:SAML:2.0:entityconfig" xmlns:fm="urn:sun:fm:SAML:2.0:entityconfig" hosted="1" entityID="sp">
<SPSSOConfig metaAlias="/sp"> <Attribute name="description"> <Value></Value> </Attribute> <Attribute name="signingCertAlias">

Acting As a SAML 2.0 Service ProviderExtended Configuration File
Gateway Guide ForgeRock Identity Gateway 5 (2018-05-03T07:21:09.993)Copyright © 2011-2017 ForgeRock AS. All rights reserved. 76
<Value></Value> </Attribute> <Attribute name="encryptionCertAlias"> <Value></Value> </Attribute> <Attribute name="basicAuthOn"> <Value>false</Value> </Attribute> <Attribute name="basicAuthUser"> <Value></Value> </Attribute> <Attribute name="basicAuthPassword"> <Value></Value> </Attribute> <Attribute name="autofedEnabled"> <Value>false</Value> </Attribute> <Attribute name="autofedAttribute"> <Value></Value> </Attribute> <Attribute name="transientUser"> <Value>anonymous</Value> </Attribute> <Attribute name="spAdapter"> <Value></Value> </Attribute> <Attribute name="spAdapterEnv"> <Value></Value> </Attribute> <!-- <Attribute name="fedletAdapter"> <Value>com.sun.identity.saml2.plugins.DefaultFedletAdapter</Value> </Attribute> --> <Attribute name="fedletAdapterEnv"> <Value></Value> </Attribute> <Attribute name="spAccountMapper"> <Value>com.sun.identity.saml2.plugins.DefaultLibrarySPAccountMapper</Value> </Attribute> <Attribute name="useNameIDAsSPUserID"> <Value>false</Value> </Attribute> <Attribute name="spAttributeMapper"> <Value>com.sun.identity.saml2.plugins.DefaultSPAttributeMapper</Value> </Attribute> <Attribute name="spAuthncontextMapper"> <Value>com.sun.identity.saml2.plugins.DefaultSPAuthnContextMapper</Value> </Attribute> <Attribute name="spAuthncontextClassrefMapping"> <Value>urn:oasis:names:tc:SAML:2.0:ac:classes:PasswordProtectedTransport|0|default</Value> </Attribute> <Attribute name="spAuthncontextComparisonType"> <Value>exact</Value> </Attribute> <Attribute name="attributeMap"> <Value>employeenumber=employeenumber</Value> <Value>mail=mail</Value> </Attribute>

Acting As a SAML 2.0 Service ProviderExtended Configuration File
Gateway Guide ForgeRock Identity Gateway 5 (2018-05-03T07:21:09.993)Copyright © 2011-2017 ForgeRock AS. All rights reserved. 77
<Attribute name="saml2AuthModuleName"> <Value></Value> </Attribute> <Attribute name="localAuthURL"> <Value></Value> </Attribute> <Attribute name="intermediateUrl"> <Value></Value> </Attribute> <Attribute name="defaultRelayState"> <Value></Value> </Attribute> <Attribute name="appLogoutUrl"> <Value>http://sp1.example.com:8080/saml/logout</Value> </Attribute> <Attribute name="assertionTimeSkew"> <Value>300</Value> </Attribute> <Attribute name="wantAttributeEncrypted"> <Value></Value> </Attribute> <Attribute name="wantAssertionEncrypted"> <Value></Value> </Attribute> <Attribute name="wantNameIDEncrypted"> <Value></Value> </Attribute> <Attribute name="wantPOSTResponseSigned"> <Value></Value> </Attribute> <Attribute name="wantArtifactResponseSigned"> <Value></Value> </Attribute> <Attribute name="wantLogoutRequestSigned"> <Value></Value> </Attribute> <Attribute name="wantLogoutResponseSigned"> <Value></Value> </Attribute> <Attribute name="wantMNIRequestSigned"> <Value></Value> </Attribute> <Attribute name="wantMNIResponseSigned"> <Value></Value> </Attribute> <Attribute name="responseArtifactMessageEncoding"> <Value>URI</Value> </Attribute> <Attribute name="cotlist"> <Value>Circle of Trust</Value></Attribute> <Attribute name="saeAppSecretList"> </Attribute> <Attribute name="saeSPUrl"> <Value></Value> </Attribute> <Attribute name="saeSPLogoutUrl"> </Attribute> <Attribute name="ECPRequestIDPListFinderImpl"> <Value>com.sun.identity.saml2.plugins.ECPIDPFinder</Value>

Acting As a SAML 2.0 Service ProviderExtended Configuration File
Gateway Guide ForgeRock Identity Gateway 5 (2018-05-03T07:21:09.993)Copyright © 2011-2017 ForgeRock AS. All rights reserved. 78
</Attribute> <Attribute name="ECPRequestIDPList"> <Value></Value> </Attribute> <Attribute name="ECPRequestIDPListGetComplete"> <Value></Value> </Attribute> <Attribute name="enableIDPProxy"> <Value>false</Value> </Attribute> <Attribute name="idpProxyList"> <Value></Value> </Attribute> <Attribute name="idpProxyCount"> <Value>0</Value> </Attribute> <Attribute name="useIntroductionForIDPProxy"> <Value>false</Value> </Attribute> <Attribute name="spSessionSyncEnabled"> <Value>false</Value> </Attribute> <Attribute name="relayStateUrlList"> </Attribute> </SPSSOConfig> <AttributeQueryConfig metaAlias="/attrQuery"> <Attribute name="signingCertAlias"> <Value></Value> </Attribute> <Attribute name="encryptionCertAlias"> <Value></Value> </Attribute> <Attribute name="wantNameIDEncrypted"> <Value></Value> </Attribute> <Attribute name="cotlist"> <Value>Circle of Trust</Value> </Attribute> </AttributeQueryConfig> <XACMLAuthzDecisionQueryConfig metaAlias="/pep"> <Attribute name="signingCertAlias"> <Value></Value> </Attribute> <Attribute name="encryptionCertAlias"> <Value></Value> </Attribute> <Attribute name="basicAuthOn"> <Value>false</Value> </Attribute> <Attribute name="basicAuthUser"> <Value></Value> </Attribute> <Attribute name="basicAuthPassword"> <Value></Value> </Attribute> <Attribute name="wantXACMLAuthzDecisionResponseSigned"> <Value>false</Value> </Attribute> <Attribute name="wantAssertionEncrypted">

Acting As a SAML 2.0 Service ProviderExtended Configuration File
Gateway Guide ForgeRock Identity Gateway 5 (2018-05-03T07:21:09.993)Copyright © 2011-2017 ForgeRock AS. All rights reserved. 79
<Value>false</Value> </Attribute> <Attribute name="cotlist"> <Value>Circle of Trust</Value> </Attribute> </XACMLAuthzDecisionQueryConfig></EntityConfig>

Acting As an OAuth 2.0 Resource ServerAbout OpenIG As an OAuth 2.0 Resource Server
Gateway Guide ForgeRock Identity Gateway 5 (2018-05-03T07:21:09.993)Copyright © 2011-2017 ForgeRock AS. All rights reserved. 80
Chapter 8
Acting As an OAuth 2.0 Resource ServerOpenIG helps integrate applications into OAuth 2.0 deployments. In this chapter, you will learn to useOpenIG as an OAuth 2.0 Resource Server.
This chapter explains how OpenIG acts as an OAuth 2.0 Resource Server, and follows with a tutorialthat shows you how to use OpenIG as a resource server.
8.1. About OpenIG As an OAuth 2.0 Resource ServerThe OAuth 2.0 Authorization Framework describes a way of allowing a third-party application toaccess a user's resources without having the user's credentials. When resources are protected withOAuth 2.0, users can use their credentials with an OAuth 2.0-compliant identity provider, such asOpenAM, Facebook, Google and others to access the resources, rather than setting up an accountwith yet another third-party application.
In OAuth 2.0, there are four entities involved:
• Resource owner: The user who owns protected resources on a resource server.
For example, a resource owner has photos stored in a web service.
• Resource server: Provides the user's protected resources to authorized client applications.
In OAuth 2.0, an authorization server grants the client application authorization based on theresource owner's consent.
For example, a web service holds user's photos.
• Client: The application that needs access to the protected resources.
For example, a photo printing service needs access to the user's photos.
• Authorization server: The service responsible for authenticating resource owners and obtainingtheir consent to allow client applications to access their resources.
For example, OpenAM can act as the OAuth 2.0 authorization server to authenticate resourceowners and obtain their consent. Other services can play this role as well. Google and Facebook, forexample, provide OAuth 2.0 authorization services.
In OAuth 2.0, there are different grant mechanisms whereby the client can obtain authorization. Onegrant mechanism involves the client redirecting the resource owner's browser to the authorization

Acting As an OAuth 2.0 Resource ServerPreparing the Tutorial
Gateway Guide ForgeRock Identity Gateway 5 (2018-05-03T07:21:09.993)Copyright © 2011-2017 ForgeRock AS. All rights reserved. 81
server to complete authentication and authorization. You might have experienced this grantmechanism yourself when logging in with your identity provider account to access a web service,rather than creating a new account directly with the web service. Whatever the grant mechanism, theclient's aim is to get an OAuth 2.0 access token from the authorization server.
Access tokens are the credentials used to access protected resources. An access token is a stringgiven by the authorization server that represents the authorization to access protected resources. Anaccess token, like cash, is a bearer token. This means that anyone who has the access token can useit to get the resources. Access tokens therefore must be protected, so requests involving them mustgo over HTTPS. The advantage of access tokens over passwords or other credentials is that accesstokens can be granted and revoked without exposing the user's credentials.
When the client requests access to protected resources, it supplies the access token to the resourceserver housing the resources. The resource server must then validate the access token. If the accesstoken is found to be valid, then the resource server can let the client have access to the resources.
When OpenIG acts as an OAuth 2.0 resource server, its role is to validate access tokens. How anaccess token is validated is technically not covered in the specifications for OAuth 2.0. Typically theresource server validates an access token by submitting the token to a token information endpoint.The token information endpoint typically returns the time until the token expires, the OAuth 2.0scopes associated with the token, and potentially other information. In OAuth 2.0, the token scopesare strings that can identify the scope of access authorized to the client, but can also be used forother purposes. For example, OpenAM maps them to user profile attribute values by default, and alsoallows custom scope handling plugins.
In the tutorial that follows, you configure OpenIG as a resource server, and use OpenAM as theOAuth 2.0 authorization server.
8.2. Preparing the TutorialChapter 2, "Getting Started" describes how to configure OpenIG to proxy traffic and capture requestand response data. You also learned how to configure OpenIG to use a static request to log in withhard-coded credentials.
You will learn how OpenIG can act as an OAuth 2.0 resource server, validating OAuth 2.0 accesstokens and including token info in the context.
This tutorial relies on OpenAM as an OAuth 2.0 authorization server. As an OAuth 2.0 client ofOpenAM, you get an access token. You then submit the access token to OpenIG, and OpenIG acts asthe resource server.
Before you start this tutorial, prepare OpenIG and the sample application as described in Chapter 2,"Getting Started".
OpenIG should be running in Jetty, configured to access the sample application as described in thatchapter.

Acting As an OAuth 2.0 Resource ServerSetting Up OpenAM As an Authorization Server
Gateway Guide ForgeRock Identity Gateway 5 (2018-05-03T07:21:09.993)Copyright © 2011-2017 ForgeRock AS. All rights reserved. 82
Edit config.json to make sure that the CaptureDecorator also captures the context. After you make thechanges, the object declaration appears as follows:
{ "name": "capture", "type": "CaptureDecorator", "config": { "captureEntity": true, "captureContext": true }}
Restart Jetty for the changes to take effect. This allows you to view the token information thatOpenAM returns.
8.3. Setting Up OpenAM As an Authorization ServerFor more complete information about configuring the OAuth 2.0 authorization service in OpenAM,see Configuring the OAuth 2.0 Authorization Service in the OpenAM OAuth 2.0 Guide.
Before you start, install and configure OpenAM on http://openam.example.com:8088/openam, withthe default configuration. If you use a different configuration, substitute in the tutorial accordingly.
Procedure 8.1. To Set Up OpenAM As an Authorization Server
1. Log in to the OpenAM console as administrator.
2. Configure an OAuth 2.0 Authorization Server:
a. In the top level realm, select Configure OAuth Provider > Configure OAuth 2.0.
b. Accept all of the default values and select Create.
3. Configure an OAuth 2.0 Client profile to request OAuth 2.0 access tokens on behalf of the client:
a. In the top level realm, select Applications > OAuth 2.0.
b. In the Agent table, create an OAuth 2.0 agent with the following values:
• Name: OpenIG
• Password password
The name is the OAuth 2.0 client_id, and the password is the client_secret.
4. Edit the OpenIG client profile to add mail and employeenumber scopes to the Scope(s) list, and thensave your work.

Acting As an OAuth 2.0 Resource ServerConfiguring OpenIG As a Resource Server
Gateway Guide ForgeRock Identity Gateway 5 (2018-05-03T07:21:09.993)Copyright © 2011-2017 ForgeRock AS. All rights reserved. 83
Here, you overload these profile settings to pass credentials to OpenIG. This tutorial uses mail andemployeenumber for the sake of simplicity. Both of those attributes are part of a user's profile out ofthe box with the default OpenAM configuration. Neither of the attributes are needed for anythingelse in this tutorial.
So, this tutorial uses mail to hold the username, and employeenumber to hold the password. In a realdeployment, you would no doubt use other attributes that depend on how the real user profilesare configured.
5. Create a user whose additional credentials you set in the Email Address and Employee Numberfields if you have not already done so for another tutorial:
1. In the top level realm, select Subjects and create a new subject.
2. Set the ID to george, the password to costanza, and fill the other required fields as you likebefore clicking OK.
3. Click the user name to edit the profile again, setting Email Address to george and EmployeeNumber to costanza before clicking Save.
4. When finished, log out of OpenAM console.
8.4. Configuring OpenIG As a Resource ServerTo configure OpenIG as an OAuth 2.0 resource server, you use an OAuth2ResourceServerFilter asdescribed in OAuth2ResourceServerFilter(5) in the Configuration Reference.
The filter expects an OAuth 2.0 access token in an incoming Authorization request header, such as thefollowing:
Authorization: Bearer 7af41ddd-47a4-40dc-b530-a9aa9f7ceda9
The filter then uses the access token to validate the token and to retrieve token information from theauthorization server.
On successful validation, the filter creates a new context for the authorization server response, at${contexts.oauth2}.
The context is named oauth2 and can be reached at contexts.oauth2 or contexts['oauth2'].
The context contains data such as the access token, which can be reached at contexts.oauth2.accessToken or contexts['oauth2'].accessToken.
Filters and handlers placed after the OAuth2ResourceServerFilter in the chain, can access the token infothrough the context.

Acting As an OAuth 2.0 Resource ServerConfiguring OpenIG As a Resource Server
Gateway Guide ForgeRock Identity Gateway 5 (2018-05-03T07:21:09.993)Copyright © 2011-2017 ForgeRock AS. All rights reserved. 84
If no access token is present in the request, or token validation does not complete successfully, thefilter returns an HTTP error status to the user-agent, and OpenIG does not continue processing therequest. This is done as specified in the RFC, OAuth 2.0 Bearer Token Usage.
To configure OpenIG as an OAuth 2.0 resource server, add a new route to the OpenIG configurationby including the following route configuration file as $HOME/.openig/config/routes/06-rs.json:
{ "handler": { "type": "Chain", "config": { "filters": [ { "type": "OAuth2ResourceServerFilter", "config": { "providerHandler": "ClientHandler", "scopes": [ "mail", "employeenumber" ], "tokenInfoEndpoint": "http://openam.example.com:8088/openam/oauth2/tokeninfo", "requireHttps": false }, "capture": "filtered_request", "timer": true }, { "type": "AssignmentFilter", "config": { "onRequest": [ { "target": "${session.username}", "value": "${contexts.oauth2.accessToken.info.mail}" }, { "target": "${session.password}", "value": "${contexts.oauth2.accessToken.info.employeenumber}" } ] }, "timer": true }, { "type": "StaticRequestFilter", "config": { "method": "POST", "uri": "http://app.example.com:8081/login", "form": { "username": [ "${session.username}" ], "password": [ "${session.password}" ] } },

Acting As an OAuth 2.0 Resource ServerTesting the Configuration
Gateway Guide ForgeRock Identity Gateway 5 (2018-05-03T07:21:09.993)Copyright © 2011-2017 ForgeRock AS. All rights reserved. 85
"timer": true } ], "handler": "ClientHandler" } }, "condition": "${matches(request.uri.path, '^/rs')}", "timer": true}
On Windows, the file name should be %appdata%\OpenIG\config\routes\06-rs.json.
Notice the following features of the new route:
• The OAuth2ResourceServerFilter includes a client handler to perform the following tasks:
• Send access token validation requests.
• Provide the list of scopes that the filter expects to find in access tokens.
• Provide the OpenAM token info endpoint used to validate access tokens.
• Set "requireHttps": false to allow testing without having to set up keys and certificates. (Inproduction environments, do use HTTPS to protect access tokens.)
After successfully using the token info endpoint to validate an access token, theOAuth2ResourceServerFilter creates a new context for the authorization server response, at ${contexts.oauth2.accessToken}. The context contains the access token and the other info returned by the tokeninfo endpoint.
• The AssignmentFilter accesses the token info through the context, and injects the credentials fromthe user profile in OpenAM into session.
• The StaticRequestFilter retrieves the username and password from session, and replaces the originalHTTP GET request with an HTTP POST login request that contains the credentials to authenticate.
• The route matches requests to /rs.
8.5. Testing the ConfigurationTo try your configuration you get an access token from OpenAM and use it to access OpenIG, whichuses the OAuth 2.0 resource owner password credentials authorization grant.
Procedure 8.2. To Test the Configuration
1. In a terminal window, use a curl command similar to the following to retrieve the access token:

Acting As an OAuth 2.0 Resource ServerTesting the Configuration
Gateway Guide ForgeRock Identity Gateway 5 (2018-05-03T07:21:09.993)Copyright © 2011-2017 ForgeRock AS. All rights reserved. 86
$ curl \--user "OpenIG:password" \--data "grant_type=password&username=george&password=costanza&scope=mail%20employeenumber" \http://openam.example.com:8088/openam/oauth2/access_token
{"access_token":"aba19a55-468d-45e2-b1c4-decc7202faea","scope":"employeenumber mail","token_type":"Bearer","expires_in":3599}
2. In the following command, replace <access_token> with the access token returned by theprevious step, and then run the command:
$ curl \--header "Authorization: Bearer <access_token>" \http://openig.example.com:8080/rs
...<h1>USER INFORMATION</h1>... <th>Username</th> <td>george</td>...<h1>REQUEST INFORMATION</h1>... <th>Method</th> <td>POST</td>... <th>URI</th> <td>/login</td>... <th>Headers</th> <td><b>content-length</b>: 33<br><b>content-type</b>: ...
What is happening behind the scenes?
After OpenIG gets the curl request, the resource server filter validates the access token withOpenAM, and creates a new context for the authorization server response, at ${contexts.oauth2.accessToken}. If the access token had been missing or invalid, then the resource server filter wouldhave returned an error status to the user-agent, and the OAuth 2.0 client would then have had to dealwith the error.
OpenIG captures the token information into the log, and the AssignmentFilter injects the credentialsinto the session context.

Acting As an OAuth 2.0 Resource ServerTesting the Configuration
Gateway Guide ForgeRock Identity Gateway 5 (2018-05-03T07:21:09.993)Copyright © 2011-2017 ForgeRock AS. All rights reserved. 87
Finally, the StaticRequestFilter uses the credentials to log the user in to the sample application, whichresponds with the user information page.

Acting As an OAuth 2.0 Client or OpenID Connect Relying PartyAbout OpenIG As an OAuth 2.0 Client
Gateway Guide ForgeRock Identity Gateway 5 (2018-05-03T07:21:09.993)Copyright © 2011-2017 ForgeRock AS. All rights reserved. 88
Chapter 9
Acting As an OAuth 2.0 Client or OpenIDConnect Relying PartyOpenIG helps integrate applications into OAuth 2.0 and OpenID Connect deployments. In thischapter, you will:
• Configure OpenIG as an OpenID Connect 1.0 relying party
• Configure OpenIG to use OpenID Connect discovery and dynamic client registration
9.1. About OpenIG As an OAuth 2.0 ClientAs described in Chapter 8, "Acting As an OAuth 2.0 Resource Server", an OAuth 2.0 client is a third-party application that needs access to a user's protected resources.
OpenIG can act as an OAuth 2.0 client when you configure an OAuth2ClientFilter as described inOAuth2ClientFilter(5) in the Configuration Reference. The OAuth2ClientFilter handles the processof allowing the user to select a provider, and redirecting the user through the authenticationand authorization steps of an OAuth 2.0 authorization code grant. The code grant results in theauthorization server returning an access token to the filter.
When an authorization grant succeeds, the OAuth2ClientFilter injects the access token data into aconfigurable target in the context so that subsequent filters and handlers have access to the accesstoken. Subsequent requests can use the access token without reauthentication. If an authorizationgrant fails, the failureHandler is invoked.
If the protected application is an OAuth 2.0 resource server, then OpenIG can send the access tokenwith the resource request.
9.2. About OpenIG As an OpenID Connect 1.0 Relying PartyThe specifications available through the OpenID Connect site describe the OpenID Connect 1.0authentication layer built on OAuth 2.0.
OpenID Connect 1.0 is a specific implementation of OAuth 2.0, where the identity provider holds theprotected resource that the third-party application aims to access.
OpenID Connect 1.0 has the following key entities:

Acting As an OAuth 2.0 Client or OpenID Connect Relying PartyInstallation Overview
Gateway Guide ForgeRock Identity Gateway 5 (2018-05-03T07:21:09.993)Copyright © 2011-2017 ForgeRock AS. All rights reserved. 89
• End user: An OAuth 2.0 resource owner whose user information the application needs to access.
The end user wants to use an application through an existing identity provider account withoutsigning up and creating credentials for another web service.
• Relying Party (RP): An OAuth 2.0 client that needs access to the end user's protected userinformation.
For example, an online mail application needs to know which end user is accessing the applicationin order to present the correct inbox.
As another example, an online shopping site needs to know which end user is accessing the site inorder to present the right offerings, account, and shopping cart.
• OpenID Provider (OP): An OAuth 2.0 authorization server and also resource server that holds theuser information and grants access.
The OP has the end user consent to provide the RP with access to some of its user information.Because OpenID Connect 1.0 defines unique identification for an account (subject identifier +issuer identifier), the RP can use this as a key to its own user profile.
For the online mail application, this key could be used to access the mailboxes and related accountinformation. For the online shopping site, this key could be used to access the offerings, account,shopping cart and others. The key makes it possible to serve users as if they had local accounts.
• UserInfo: The protected resource that the third-party application aims to access. The informationabout the authenticated end-user is expressed in a standard format. The user-info endpoint ishosted on the authorization server and is protected with OAuth 2.0.
When OpenIG acts as an OpenID Connect relying party, its ultimate role is to retrieve userinformation from the OpenID provider, and then to inject that information into the context for use bysubsequent filters and handlers.
9.3. Installation OverviewThis tutorial takes you through the steps to set up OpenAM as an OpenID Connect provider andOpenIG as an OpenID Connect relying party. For an example configuration with two identityproviders, OpenAM and Google, and a login handler, see "Example Configuration For MultipleIdentity Providers" in the Configuration Reference.
Table 9.1. Tasks for Configuring OpenID Connect
Task See Section(s)Set up OpenAM as an OpenID Connect provider. Section 9.4, " Setting Up OpenAM for OpenID
Connect "Set up OpenIG as a relying party for browser requeststo the home page of the sample application.
Section 9.5, "Setting Up OpenIG As a Relying Party"

Acting As an OAuth 2.0 Client or OpenID Connect Relying PartySetting Up OpenAM for OpenID Connect
Gateway Guide ForgeRock Identity Gateway 5 (2018-05-03T07:21:09.993)Copyright © 2011-2017 ForgeRock AS. All rights reserved. 90
Task See Section(s)Test the configuration. Section 9.6, "Testing the Configuration"
9.4. Setting Up OpenAM for OpenID ConnectIn this part, you create a sample user and set up OpenAM as an OpenID Connect provider.
Before you start, install and configure OpenAM on http://openam.example.com:8088/openam, withthe default configuration. If you use a different configuration, substitute in the tutorial accordingly.
Procedure 9.1. To Set Up a Sample User
If you haven't set up the user George Costanza in a previous tutorial, do so now.
1. In the OpenAM console, select the top level realm and browse to Subjects.
2. Click New and create a user with the following values:
• ID: george
• Last Name: costanza
• Full Name: george costanza
• Password: costanza
3. In the User window, select the new user and set Email Address: [email protected].
Procedure 9.2. To Set Up OpenAM as an OpenID Connect Provider
1. Configure OpenAM as an OAuth 2.0 Authorization Server and OpenID Connect Provider.
a. In the OpenAM console, select the top-level realm and browse to Configure OAuth Provider >Configure OpenID Connect.
b. Accept the default values and click Create.
2. Register an OpenID Connect relying party. This step enables OpenIG to communicate as anOAuth 2.0 relying party with OpenAM.
a. In the top level realm, select Applications > OAuth 2.0.
b. In the Agent table, create an OAuth 2.0 agent with the following values:
• Name: oidc_client
• Password: password

Acting As an OAuth 2.0 Client or OpenID Connect Relying PartySetting Up OpenIG As a Relying Party
Gateway Guide ForgeRock Identity Gateway 5 (2018-05-03T07:21:09.993)Copyright © 2011-2017 ForgeRock AS. All rights reserved. 91
You use these values for clientId and clientSecret in Section 10.3.2, " Creating a BearerModule ".
c. Edit the oidc_client profile to add the following values:
• Redirection URIs: http://openig.example.com:8080/home/id_token/callback
• Scope(s): openid, profile, and email.
• ID Token Signing Algorithm: HS256, HS384, or HS512.
Because the algorithm must be HMAC, the value of RS256 is not okay.
d. Click Save and log out of OpenAM.
9.5. Setting Up OpenIG As a Relying PartyThis section describes how to use OpenIG Studio to configure OpenIG as a relying party forbrowser requests to the home page of the sample application. The example refers to the providerconfiguration in Section 9.4, " Setting Up OpenAM for OpenID Connect ".
To configure OpenIG without using OpenIG Studio, add the route in Example 9.1, "Route for OpenIGAs a Relying Party" to the OpenIG configuration as $HOME/.openig/config/routes/07-openid.json. OnWindows, add the route as %appdata%\OpenIG\config\routes\07-openid.json.
Procedure 9.3. To Set Up OpenID Connect in OpenIG Studio
Before you start, prepare OpenIG and the sample application as described in Chapter 2, "GettingStarted". Make sure that your config.json has a main router named _router.
1. Access OpenIG Studio on http://openig.example.com:8080/openig/studio, and select Protect anApplication.
2. In the Create a route window, select Advanced Options and enter the following information:
• Base URI: http://app.example.com:8081
• Condition: Path: /home/id_token
• Name: 07-openid
3. Select Create route.
4. Select Authentication, and then enable authentication.
5. Select OpenID Connect, and then select the following options to reflect the configuration inProcedure 9.2, " To Set Up OpenAM as an OpenID Connect Provider ":

Acting As an OAuth 2.0 Client or OpenID Connect Relying PartySetting Up OpenIG As a Relying Party
Gateway Guide ForgeRock Identity Gateway 5 (2018-05-03T07:21:09.993)Copyright © 2011-2017 ForgeRock AS. All rights reserved. 92
• Client Filter:
• Client Endpoint: /home/id_token
• Require HTTPS: Deselect this option
• Client Registration:
• Client ID: oidc_client
• Client secret: password
• Scopes: openid, profile, email
• Basic authentication: Select this option
• Issuer:
• Well-known Endpoint: http://openam.example.com:8088/openam/oauth2/.well-known/openid-configuration
6. Select Save.
A pencil icon in the OpenID Connect panel indicates that OpenID Connect is configured. Selectthe panel again to edit your settings.
7. On the top-right of the screen, select ⋮ > Display, and review the route. The route inExample 9.1, "Route for OpenIG As a Relying Party" should be displayed.
8. Select Deploy to push the route to the OpenIG configuration.
You can check the $HOME/.openig/config/routes folder to see that the route is there.
Example 9.1. Route for OpenIG As a Relying Party
{ "name": "07-openid", "baseURI": "http://app.example.com:8081", "monitor": false, "condition": "${matches(request.uri.path, '^/home/id_token')}", "handler": { "type": "Chain", "config": { "filters": [ { "type": "OAuth2ClientFilter", "name": "OAuth2Client", "config": { "clientEndpoint": "/home/id_token", "failureHandler": {

Acting As an OAuth 2.0 Client or OpenID Connect Relying PartySetting Up OpenIG As a Relying Party
Gateway Guide ForgeRock Identity Gateway 5 (2018-05-03T07:21:09.993)Copyright © 2011-2017 ForgeRock AS. All rights reserved. 93
"type": "StaticResponseHandler", "config": { "status": 500, "headers": { "Content-Type": [ "text/plain" ] }, "entity": "An error occurred during the OAuth2 setup." } }, "registrations": [ { "name": "oidc-user-info-client", "type": "ClientRegistration", "config": { "clientId": "oidc_client", "clientSecret": "password", "issuer": { "name": "Issuer", "type": "Issuer", "config": { "wellKnownEndpoint": "http://openam.example.com:8088/openam/oauth2/.well-known/openid-configuration" } }, "scopes": [ "openid", "profile", "email" ], "tokenEndpointAuthMethod": "client_secret_basic" } } ], "requireHttps": false } } ], "handler": "ClientHandler" } }}
Notice the following features about the route:
• The route matches requests to /home/id_token.
• The OAuth2ClientFilter enables OpenIG to act as a relying party. It uses a single client registrationthat is defined inline and refers to the OpenAM server configured in Section 9.4, " Setting UpOpenAM for OpenID Connect ".
• The filter has a base client endpoint of /home/id_token, which creates the following service URIs:
• Requests to /home/id_token/login start the delegated authorization process.

Acting As an OAuth 2.0 Client or OpenID Connect Relying PartyTesting the Configuration
Gateway Guide ForgeRock Identity Gateway 5 (2018-05-03T07:21:09.993)Copyright © 2011-2017 ForgeRock AS. All rights reserved. 94
• Requests to /home/id_token/callback are expected as redirects from the OAuth 2.0 AuthorizationServer (OpenID Connect provider). This is why the redirect URI in the client profile in OpenAM isset to http://openig.example.com:8080/home/id_token/callback.
• Requests to /home/id_token/logout remove the authorization state for the end user, and redirect tothe specified URL if a goto parameter is provided.
These endpoints are implicitly reserved. Attempts to access them directly can cause undefinederrors.
• For convenience in this test, "requireHttps" is false. In production environments, set it to true. Sothat you see the delegated authorization process when you make a request, "requireLogin" has thedefault value true.
• The target for storing authorization state information is ${attributes.openid}. This is wheresubsequent filters and handlers can find access tokens and user information.
9.6. Testing the Configuration
Procedure 9.4. To Test the Configuration
1. With OpenIG running, access http://openig.example.com:8080/home/id_token.
The OpenAM login screen is displayed.
2. Log in to OpenAM with the username george and password costanza.
An OpenID Connect request to access private information is displayed.
3. Select Allow.
The home page of the sample application is displayed.
What's happening behind the scenes?
• When OpenIG gets the browser request, the OAuth2ClientFilter redirects you to authenticatewith OpenAM and consent to authorize access to user information. After you authorize access,OpenAM returns an access token to the filter.
• The OAuth2ClientFilter uses the access token to get the user information, and then injects theauthorization state information into attributes.openid.
• The ClientHandler redirects the request to the home page of the sample application.

Acting As an OAuth 2.0 Client or OpenID Connect Relying PartyAdapting the Configuration to Authenticate Automatically to the Sample Application
Gateway Guide ForgeRock Identity Gateway 5 (2018-05-03T07:21:09.993)Copyright © 2011-2017 ForgeRock AS. All rights reserved. 95
9.7. Adapting the Configuration to Authenticate Automaticallyto the Sample ApplicationTo authenticate automatically to the sample application, edit $HOME/.openig/config/routes/07-openid.jsonmanually as follows:
• In OpenAM and OpenIG, change the endpoints from /home/openid to /openid. This endpoint directsrequests to the login page of the sample application instead of the home page.
• Add a StaticRequestFilter like the following to the end of the chain in 07-openid.json:
{ "type": "StaticRequestFilter", "config": { "method": "POST", "uri": "http://app.example.com:8081/login", "form": { "username": [ "${attributes.openid.user_info.sub}" ], "password": [ "${attributes.openid.user_info.family_name}" ] } }}
The StaticRequestFilter retrieves the username and password from the context, and replaces theoriginal HTTP GET request with an HTTP POST login request containing credentials.
9.8. Using OpenID Connect Discovery and Dynamic ClientRegistrationOpenID Connect defines mechanisms for discovering and dynamically registering with an identityprovider that is not known in advance. These mechanisms are specified in OpenID Connect Discoveryand OpenID Connect Dynamic Client Registration. OpenIG supports discovery and dynamicregistration. In this section you will learn how to configure OpenIG to try these features withOpenAM.
Although this tutorial focuses on OpenID Connect dynamic registration, OpenIG also supportsdynamic registration as described in RFC 7591, OAuth 2.0 Dynamic Client Registration Protocol.
9.8.1. Preparing to Try Discovery and Dynamic Client Registration
This short tutorial builds on the previous tutorial in this chapter. If you have not already done so,start by performing the steps described in Section 9.3, "Installation Overview". This tutorial requires

Acting As an OAuth 2.0 Client or OpenID Connect Relying PartyPreparing to Try Discovery and Dynamic Client Registration
Gateway Guide ForgeRock Identity Gateway 5 (2018-05-03T07:21:09.993)Copyright © 2011-2017 ForgeRock AS. All rights reserved. 96
a recent sample application, as the newer versions include a small WebFinger service that is usedhere.
When ready, complete preparations for OpenID Connect discovery and dynamic client registration:
• Procedure 9.5, "Preparing OpenAM for OpenID Connect Dynamic Registration"
• Procedure 9.6, "Preparing OpenIG for Discovery and Dynamic Registration"
Procedure 9.5. Preparing OpenAM for OpenID Connect Dynamic Registration
By default, OpenAM does not allow dynamic registration without an access token.
After carrying out the steps described in Section 9.4, " Setting Up OpenAM for OpenID Connect ",also perform these steps:
1. Log in to OpenAM console as administrator.
2. In the top-level realm, browse to the Services configuration and display the OAuth2 Providerconfiguration.
3. Select Advanced OpenID Connect, and enable Allow Open Dynamic Client Registration.
4. Save your work, and log out of OpenAM console.
Procedure 9.6. Preparing OpenIG for Discovery and Dynamic Registration
Follow these steps to add a route demonstrating OpenID Connect discovery and dynamic clientregistration:
1. Add a new route to the OpenIG configuration, by including the following route configuration fileas $HOME/.openig/config/routes/07-discovery.json:
{ "heap": [ { "name": "DiscoveryPage", "type": "StaticResponseHandler", "config": { "status": 200, "reason": "OK", "entity": "<!doctype html> <html> <head> <title>OpenID Connect Discovery</title> <meta charset='UTF-8'> </head> <body> <form id='form' action='/discovery/login?'> Enter your user ID or email address: <input type='text' id='discovery' name='discovery' placeholder='george or [email protected]' />

Acting As an OAuth 2.0 Client or OpenID Connect Relying PartyPreparing to Try Discovery and Dynamic Client Registration
Gateway Guide ForgeRock Identity Gateway 5 (2018-05-03T07:21:09.993)Copyright © 2011-2017 ForgeRock AS. All rights reserved. 97
<input type='hidden' name='goto' value='${contexts.router.originalUri}' /> </form> <script> // The sample application handles the WebFinger request, // so make sure the request is sent to the sample app. window.onload = function() { document.getElementById('form').onsubmit = function() { // Fix the URL if not using the default settings. var sampleAppUrl = 'http://app.example.com:8081/'; var discovery = document.getElementById('discovery'); discovery.value = sampleAppUrl + discovery.value.split('@', 1)[0]; }; }; </script> </body> </html>" } } ], "handler": { "type": "Chain", "config": { "filters": [ { "name": "DynamicallyRegisteredClient", "type": "OAuth2ClientFilter", "config": { "clientEndpoint": "/discovery", "requireHttps": false, "requireLogin": true, "target": "${attributes.openid}", "failureHandler": { "type": "StaticResponseHandler", "config": { "comment": "Trivial failure handler for debugging only", "status": 500, "reason": "Error", "entity": "${attributes.openid}" } }, "loginHandler": "DiscoveryPage", "metadata": { "client_name": "My Dynamically Registered Client", "redirect_uris": [ "http://openig.example.com:8080/discovery/callback" ], "scopes": [ "openid", "profile" ] } } } ], "handler": { "type": "Chain", "config": { "filters": [

Acting As an OAuth 2.0 Client or OpenID Connect Relying PartyPreparing to Try Discovery and Dynamic Client Registration
Gateway Guide ForgeRock Identity Gateway 5 (2018-05-03T07:21:09.993)Copyright © 2011-2017 ForgeRock AS. All rights reserved. 98
{ "type": "StaticRequestFilter", "config": { "method": "POST", "uri": "http://app.example.com:8081/login", "form": { "username": [ "${attributes.openid.user_info.sub}" ], "password": [ "${attributes.openid.user_info.family_name}" ] } } } ], "handler": "ClientHandler" } } } }, "condition": "${matches(request.uri.path, '^/discovery')}", "baseURI": "http://openig.example.com:8080"}
On Windows, the file name should be %appdata%\OpenIG\config\routes\07-discovery.json.
2. Consider the differences with 07-openid.json:
• For discovery and dynamic client registration, no issuer or client registration is defined. Insteada StaticResponseHandler is used as a login handler for the client filter.
The static response handler serves an HTML page that provides important pieces ofinformation to OpenIG:
• The value of a discovery parameter.
OpenIG uses the value to perform OpenID Connect discovery. Examples from thespecification include acct:[email protected], https://example.com:8080/, and https://example.com/joe.First, OpenIG extracts the domain host and port from the value, and attempts to find a matchin the supportedDomains lists for any issuers that are already configured for the route. If it findsa match, then it can potentially use the issuer's registration end point and avoid an additionalrequest to look up the user's issuer using the WebFinger protocol. If there is no match inthe supported domains lists, OpenIG uses the discovery value as the resource for a WebFingerrequest according to the OpenID Connect Discovery protocol.
On success, OpenIG has either found an appropriate issuer in the configuration, or found theissuer using the WebFinger protocol. OpenIG can thus proceed to dynamic client registration.
The small JavaScript function in the HTML page transforms user input into a useful discoveryvalue for OpenIG. This is not a requirement for deployment, only a convenience for thepurposes of this example. Alternatives are described in the discovery protocol specification.

Acting As an OAuth 2.0 Client or OpenID Connect Relying PartyTrying OpenID Connect Discovery and Dynamic Client Registration
Gateway Guide ForgeRock Identity Gateway 5 (2018-05-03T07:21:09.993)Copyright © 2011-2017 ForgeRock AS. All rights reserved. 99
• The value of a goto parameter.
The goto parameter takes a URI that tells OpenIG where to redirect the end user's browseronce the process is complete and OpenIG has injected the OpenID Connect user informationinto the context. In this case, the user is redirected back to this route so that the innermostchain of the configuration can log the user in to the protected application.
• The OAuth 2.0 client filter specifies a login handler, and dynamic client registration metadata,including a client name, redirection URIs, and scopes.
The login handler points to the login page described above.
OpenIG uses the metadata to prepare the dynamic registration request.
As set out in OAuth2 and OpenID RFCs, the redirection URIs are mandatory for dynamic clientregistration, to represent an array of redirection URIs used by the client. One of the registeredredirection URI values must exactly match the clientEndpoint/callback URI.
OpenIG also needs the scopes that are required for your application.
• 07-discovery.json uses the path /discovery, whereas 07-openid.json uses /home/id_token.
This distinction makes it easy to keep traffic separate on the two routes with a simple conditionas in the following:
"condition": "${matches(request.uri.path, '^/discovery')}"
9.8.2. Trying OpenID Connect Discovery and Dynamic Client Registration
After following the steps described in Section 9.8.1, "Preparing to Try Discovery and Dynamic ClientRegistration", test your configuration by browsing to OpenIG at http://openig.example.com:8080/discovery.
Provide the following email address: [email protected].
When redirected to the OpenAM login page, log in as user george, password costanza, and then allowthe application access to user information.
If successful, OpenIG logs you in to the sample application as George Costanza, and the sampleapplication returns George's page.
What is happening behind the scenes?
After OpenIG gets the browser request, it returns the example page for discovery. You provide a userID or email address, and the page transforms that into a discovery value. The value is tailored to letOpenIG use the sample application as a WebFinger server. (In the real world the WebFinger server ismore likely a service on the issuer's domain, not part of the protected application. For the purposes of
Acting As an OAuth 2.0 Client or OpenID Connect Relying PartyTrying OpenID Connect Discovery and Dynamic Client Registration
Gateway Guide ForgeRock Identity Gateway 5 (2018-05-03T07:21:09.993)Copyright © 2011-2017 ForgeRock AS. All rights reserved. 100
this tutorial the WebFinger service has been embedded in the sample application to avoid leaving youwith another server to manage during the tutorial.)
OpenIG learns from the WebFinger service that OpenAM is the issuer for the user. OpenIG retrievesthe OpenID Provider configuration from OpenAM, and registers itself dynamically with OpenAM,using the redirection URIs and scopes specified in the OAuth 2.0 client filter configuration.
Once the issuer and client registration are properly configured, the OAuth 2.0 client filter redirectsthe browser to OpenAM for authentication and authorization to access to the user information. Therest is the same as the previous tutorial in this chapter. For details, see Section 9.6, "Testing theConfiguration".
OpenIG reuses issuer and client registration configurations that it builds after discovery and dynamicregistration. These dynamically generated configuration objects are held in memory, and do notpersist when OpenIG is restarted.

Transforming OpenID Connect ID Tokens Into SAML AssertionsAbout Token Transformation
Gateway Guide ForgeRock Identity Gateway 5 (2018-05-03T07:21:09.993)Copyright © 2011-2017 ForgeRock AS. All rights reserved. 101
Chapter 10
Transforming OpenID Connect ID Tokens IntoSAML AssertionsOpenIG provides a token transformation filter to transform OpenID Connect ID tokens (id_tokens)issued by OpenAM into SAML 2.0 assertions. The implementation uses the OpenAM REST SecurityToken Service (STS) APIs, where the subject confirmation method is Bearer.
Many enterprises use existing or legacy, SAML 2.0-based SSO, but many mobile and socialapplications are managed by OAuth 2.0/OpenID. Use the OpenIG token transformation filter to bridgeOAuth 2.0 and SAML 2.0 frameworks.
10.1. About Token TransformationThe following figure illustrates the basic flow of information between a request, OpenIG, theOpenAM OAuth 2.0 and STS modules, and an application. For a more detailed view of the flow, seeFigure 10.2, "Flow of Events".
Figure 10.1. Token Transformation

Transforming OpenID Connect ID Tokens Into SAML AssertionsInstallation Overview
Gateway Guide ForgeRock Identity Gateway 5 (2018-05-03T07:21:09.993)Copyright © 2011-2017 ForgeRock AS. All rights reserved. 102
The basic process is as follows:
1. A user tries to access to a protected resource.
2. If the user is not authenticated, the OAuth2ClientFilter redirects the request to OpenAM. Afterauthentication, OpenAM asks for the user's consent to give OpenIG access to private information.
3. If the user consents, OpenAM returns an id_token to the OAuth2ClientFilter. The filter opensthe id_token JWT and makes it available in attributes.openid.id_token and attributes.openid.id_token_claims for downstream filters.
4. The TokenTransformationFilter calls the OpenAM STS to transform the id_token into a SAML 2.0assertion.
5. The STS validates the signature, decodes the payload, and verifies that the user issued thetransaction. The STS then issues a SAML assertion to OpenIG on behalf of the user.
6. The TokenTransformationFilter makes the result of the token transformation available todownstream handlers in the issuedToken property of the ${contexts.sts} context.
10.2. Installation OverviewThis tutorial takes you through the steps to set up OpenAM as an OAuth 2.0 provider and OpenIG asan OpenID Connect relying party.
When a user makes a request, the OAuth2ClientFilter returns an id_token. The TokenTransformationFilterreferences a REST STS instance that you set up in OpenAM to transform the id_token into a SAML2.0 assertion.
You need to be logged in to OpenAM as administrator to set up the configuration for tokentransformation, but you do not need special privileges to request a token transformation. For moreinformation, see TokenTransformationFilter(5) in the Configuration Reference.
Before you start this tutorial:
• Prepare OpenIG as described in Chapter 2, "Getting Started".
• Install and configure OpenAM on http://openam.example.com:8088/openam, with the defaultconfiguration. If you use a different configuration, substitute in the tutorial accordingly.
Table 10.1. Tasks for Configuring Token Transformation
Task See Section(s)Set up OpenAM as an OpenID Connect provider andOpenIG as an an OpenID Connect relying party.
Section 9.4, " Setting Up OpenAM for OpenIDConnect "
Create a Bearer authentication module to validate theid_token and OpenAM user.
Section 10.3.2, " Creating a Bearer Module "

Transforming OpenID Connect ID Tokens Into SAML AssertionsSetting Up OpenAM for Token Transformation
Gateway Guide ForgeRock Identity Gateway 5 (2018-05-03T07:21:09.993)Copyright © 2011-2017 ForgeRock AS. All rights reserved. 103
Task See Section(s)Create an STS REST instance to transform theid_token into a SAML assertion.
Section 10.3.3, "Creating an Instance of STS REST"
Create the routes in OpenIG to send the requests andtest the setup.
Section 10.4, " Setting Up OpenIG Routes for TokenTransformation "
10.3. Setting Up OpenAM for Token Transformation
10.3.1. Setting Up OpenAM as an OpenID Connect Provider
Set up OpenAM as described in Section 9.4, " Setting Up OpenAM for OpenID Connect ". OpenIGauthenticates with OpenAM and retrieves an OpenID Connect ID token (id_token) to be transformedby STS.
10.3.2. Creating a Bearer Module
The OpenID Connect ID token bearer module expects an id_token in an HTTP request header. Itvalidates the id_token, and, if successful, looks up the OpenAM user profile corresponding to the enduser for whom the id_token was issued. Assuming the id_token is valid and the profile is found, themodule authenticates the OpenAM user.
You configure the token bearer module to specify how OpenAM gets the information to validate theid_token, which request header contains the id_token, the identifier for the provider who issued theid_token, and how to map the id_token claims to an OpenAM user profile.
Important
For OpenAM13.0.0, create the bearer with a curl command as described in Procedure 10.1, "To Create aBearer Module for the id_token by Using curl For OpenAM13.0.0". For newer versions of OpenAM, follow theinstructions in Procedure 10.2, " To Create a Bearer Module for the id_token by Using the OpenAM Console ".
Procedure 10.1. To Create a Bearer Module for the id_token by Using curl For OpenAM13.0.0
1. In a terminal window, use a curl command similar to the following to retrieve the SSO token foryour OpenAM installation.

Transforming OpenID Connect ID Tokens Into SAML AssertionsCreating a Bearer Module
Gateway Guide ForgeRock Identity Gateway 5 (2018-05-03T07:21:09.993)Copyright © 2011-2017 ForgeRock AS. All rights reserved. 104
$ curl \--request POST \--header "Content-Type: application/json" \--header "X-OpenAM-Username: amadmin" \--header "X-OpenAM-Password: password" \--data "{}" \http://openam.example.com:8088/openam/json/authenticate
"tokenId": "AQIC5w...NTcy*", "successUrl": "/openam/console" . . .
For more information about using curl for OpenAM authentication, see the OpenAM Developer'sGuide.
2. Replace <tokenId> in the following command with the tokenId returned by the previous step, andthen run the command:
$ curl -X POST -H "Content-Type: application/json" \-H "iplanetDirectoryPro: <tokenId>" \-d \'{"cryptoContextValue": "password","jwtToLdapAttributeMappings": ["sub=uid", "email=mail"],"principalMapperClass": "org.forgerock.openam.authentication.modules.oidc.JwtAttributeMapper","acceptedAuthorizedParties": ["oidc_client"],"idTokenHeaderName": "oidc_id_token","accountProviderClass": "org.forgerock.openam.authentication.modules.common.mapping.DefaultAccountProvider","idTokenIssuer": "http://openam.example.com:8088/openam/oauth2","cryptoContextType": "client_secret","audienceName": "oidc_client","_id": "oidc"}' \http://openam.example.com:8088/openam/json/realm-config/authentication/modules/openidconnect?_action=create
http://openam.example.com:8088/openam/json/realm-config/authentication/modules/openidconnect?_action=create{"principalMapperClass":"org.forgerock.openam.authentication.modules.oidc.JwtAttributeMapper", . . .
The Bearer module is created in OpenAM.
Procedure 10.2. To Create a Bearer Module for the id_token by Using the OpenAM Console
1. Log in to the OpenAM console as administrator.

Transforming OpenID Connect ID Tokens Into SAML AssertionsCreating an Instance of STS REST
Gateway Guide ForgeRock Identity Gateway 5 (2018-05-03T07:21:09.993)Copyright © 2011-2017 ForgeRock AS. All rights reserved. 105
2. In the top level realm, select Authentication > Modules.
3. Select Add Module and create a new bearer module with the following characteristics:
• Module name: oidc
• Type: OpenID Connect id_token bearer
4. In the configuration page, enter the following values and leave the other fields with the defaultvalues:
• Audience name: oidc_client, the name OAuth 2.0/OpenID Connect client.
• List of accepted authorized parties: oidc_client.
• OpenID Connect validation configuration type: client_secret
• OpenID Connect validation configuration value: password.
This is the password of the OAuth 2.0/OpenID Connect client.
• Name of OpenID Connect ID Token Issuer: http://openam.example.com:8088/openam/oauth2
• Client Secret (available from AM 5.0): password
5. Select Save Changes.
10.3.3. Creating an Instance of STS REST
The REST STS instance exposes a preconfigured transformation under a specific REST endpoint.
For more information about setting up a REST STS instance, see the OpenAM Security Token ServiceGuide .
For information about configuring keystores, see Configuring Keystores in the OpenAM Setup andMaintenance Guide.
1. In the top level realm, select STS.
2. Create a Rest STS instance with the following characteristics:
• Deployment Configuration
• Deployment Url Element: openig
This value identifies the STS instance and is used by the instance parameter in theTokenTransformationFilter.
• Issued SAML2 Token Configuration

Transforming OpenID Connect ID Tokens Into SAML AssertionsSetting Up OpenIG Routes for Token Transformation
Gateway Guide ForgeRock Identity Gateway 5 (2018-05-03T07:21:09.993)Copyright © 2011-2017 ForgeRock AS. All rights reserved. 106
• SAML2 issuer Id: OpenAM
• Service Provider Entity Id: openig_sp
• NameIdFormat: Select nameid:format:transient
• Attribute Mappings: Add password=mail and userName=uid.
• Keystore Password: Retrieve the value from your OpenAM installation, at /path/to/openam/openam/.storepass
This property specifies the password used to decrypt the keystore.
• Signature Key Alias: By default, the value is test
This property specifies the private key alias in the keystore used to sign the assertion. It isconfigured in the Certificate Alias field of the OpenAM Security Key Store Tab.
• Signature Key Password: changeit
This property specifies the password of the private key used to sign the assertion.
Note
For STS, it isn't necessary to create a SAML SP configuration in OpenAM.
• OpenIdConnect Token Configuration
• The id of the OpenIdConnect Token Provider: oidc
• Token signature algorithm: The value must be consistent with the one you selected inProcedure 9.2, " To Set Up OpenAM as an OpenID Connect Provider ", HMAC SHA 256
• Client secret (for HMAC-signed-tokens): password
• The audience for issued tokens: oidc_client.
3. Select Create.
4. Log out of OpenAM.
10.4. Setting Up OpenIG Routes for Token TransformationThe following sequence diagram shows what happens when you set up and access routes for tokentransformation.
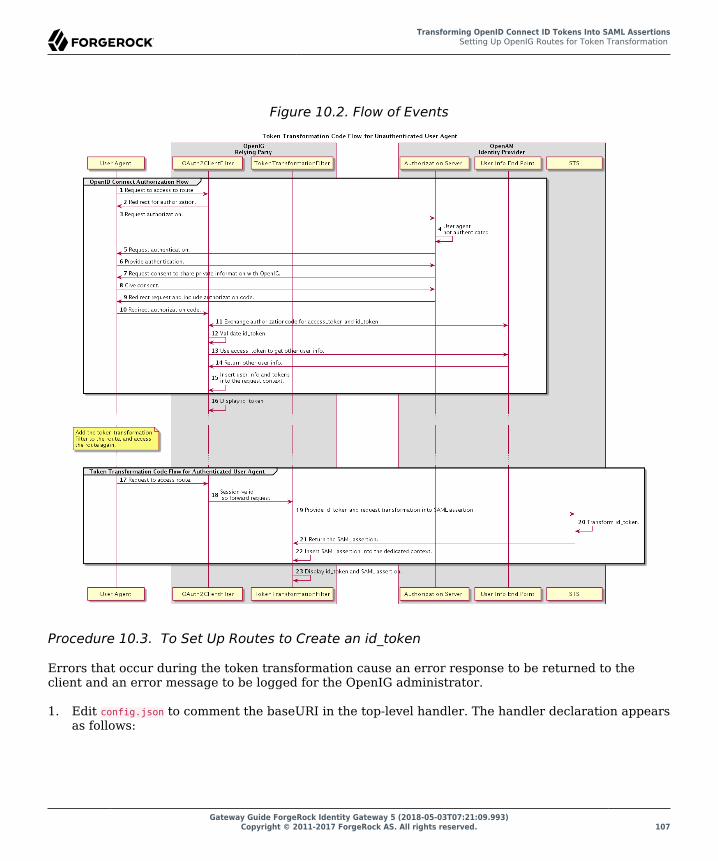
Transforming OpenID Connect ID Tokens Into SAML AssertionsSetting Up OpenIG Routes for Token Transformation
Gateway Guide ForgeRock Identity Gateway 5 (2018-05-03T07:21:09.993)Copyright © 2011-2017 ForgeRock AS. All rights reserved. 107
Figure 10.2. Flow of Events
Procedure 10.3. To Set Up Routes to Create an id_token
Errors that occur during the token transformation cause an error response to be returned to theclient and an error message to be logged for the OpenIG administrator.
1. Edit config.json to comment the baseURI in the top-level handler. The handler declaration appearsas follows:

Transforming OpenID Connect ID Tokens Into SAML AssertionsSetting Up OpenIG Routes for Token Transformation
Gateway Guide ForgeRock Identity Gateway 5 (2018-05-03T07:21:09.993)Copyright © 2011-2017 ForgeRock AS. All rights reserved. 108
{ "handler": { "type": "Router", "name": "_router", "_baseURI": "http://app.example.com:8081", "capture": "all" }}
Restart OpenIG for the changes to take effect.
2. Add the following route to the OpenIG configuration as $HOME/.openig/config/routes/50-idtoken.json
On Windows, add the route as %appdata%\OpenIG\config\routes\50-idtoken.json.
{ "heap": [ { "name": "openam", "type": "ClientRegistration", "config": { "clientId": "oidc_client", "clientSecret": "password", "issuer": { "type": "Issuer", "config": { "wellKnownEndpoint": "http://openam.example.com:8088/openam/oauth2/.well-known/openid-configuration" } }, "scopes": [ "openid", "profile", "email" ] } } ], "handler": { "type": "Chain", "config": { "filters": [ { "type": "OAuth2ClientFilter", "config": { "clientEndpoint": "/home/id_token", "requireHttps": false, "requireLogin": true, "registrations": "openam", "target": "${attributes.openid}", "failureHandler": { "type": "StaticResponseHandler", "config": { "entity": "OAuth2ClientFilter failed...", "reason": "NotFound",

Transforming OpenID Connect ID Tokens Into SAML AssertionsSetting Up OpenIG Routes for Token Transformation
Gateway Guide ForgeRock Identity Gateway 5 (2018-05-03T07:21:09.993)Copyright © 2011-2017 ForgeRock AS. All rights reserved. 109
"status": 500 } } } } ], "handler": { "type": "StaticResponseHandler", "config": { "entity": "{\"id_token\":\n\"${attributes.openid.id_token}\"} \n\n\n{\"saml_assertions\":\n\"${contexts.sts.issuedToken}\"}", "reason": "Found", "status": 200 } } } }, "condition": "${matches(request.uri.path, '^/home/id_token')}"}
Notice the following features of the route:
• The route matches requests to /home/id_token.
• The client registration is defined in the heap. The registration holds configuration parametersprovided during Procedure 9.2, " To Set Up OpenAM as an OpenID Connect Provider ", andOpenIG uses these parameters to connect with OpenAM.
• The OAuth2ClientFilter enables OpenIG to act as an OpenID Connect relying party.
• The client endpoint is set to /home/id_token, so the service URIs for this filter on the OpenIGserver are /home/id_token/login, /home/id_token/logout, and /home/id_token/callback.
• For convenience in this test, "requireHttps" is false. In production environments, set it to true.So that you see the delegated authorization process when you make a request, "requireLogin"is true.
• The target for storing authorization state information is ${attributes.openid}. This is wheresubsequent filters and handlers can find access tokens and user information.
• When the request succeeds, a StaticResponseHandler retrieves and displays the id_token from thetarget {attributes.openid.id_token}.
3. To prevent conflicts with the route you set up in Chapter 9, "Acting As an OAuth 2.0 Client orOpenID Connect Relying Party", rename the route 07-openid.json to 07-openid.json.old
4. With OpenIG running, access http://openig.example.com:8080/home/id_token.
The OpenAM login screen is displayed.
5. Log in to OpenAM with the username george and password costanza.
An OpenID Connect request to access private information is displayed.

Transforming OpenID Connect ID Tokens Into SAML AssertionsSetting Up OpenIG Routes for Token Transformation
Gateway Guide ForgeRock Identity Gateway 5 (2018-05-03T07:21:09.993)Copyright © 2011-2017 ForgeRock AS. All rights reserved. 110
6. Select Allow.
The id_token is displayed above an empty placeholder for the SAML assertion.
{"id_token":"eyAidHlwIjogIkpXVCIsICJhbGciOiAiSFMyNTYiIH0.eyAiYXRfaGFzaCI6ICJ . . ."}
{"saml_assertions":""}
Procedure 10.4. To Edit the Route to Transform the id_token Into a SAML Assertion
1. Add the following filter in the chain of 50-idtoken.json, after the OAuth2ClientFilter. An example ofthe edited route is at the end of this procedure.
{ "type": "TokenTransformationFilter", "config": { "openamUri": "http://openam.example.com:8088/openam", "username": "oidc_client", "password": "password", "idToken": "${attributes.openid.id_token}", "instance": "openig", "ssoTokenHeader": "iPlanetDirectoryPro" }}
Notice the following features of the new filter:
• Requests from this filter are made to http://openam.example.com:8088/openam.
• The username and password are for the OpenAM subject set up in Procedure 9.2, " To Set UpOpenAM as an OpenID Connect Provider ".
• The id_token parameter defines where this filter gets the id_token created by theOAuth2ClientFilter.
The TokenTransformationFilter makes the result of the token transformation available todownstream handlers in the issuedToken property of the ${contexts.sts} context.
• The instance parameter must match the Deployment URL Element for the REST STS instance.
2. With OpenIG running, access http://openig.example.com:8080/home/id_token.
The SAML assertions are displayed under the id_token.
{"id_token":"eyAidHlwIjogIkpXVCIsICJhbGciOiAiSFMyNTYiIH0.eyAiYXRfaGFzaCI6ICJ . . ."}
{"saml_assertions":<"saml:Assertion xmlns:saml="urn:oasis:names:tc:SAML:2.0:assertion" Version= . . ."}

Transforming OpenID Connect ID Tokens Into SAML AssertionsSetting Up OpenIG Routes for Token Transformation
Gateway Guide ForgeRock Identity Gateway 5 (2018-05-03T07:21:09.993)Copyright © 2011-2017 ForgeRock AS. All rights reserved. 111
Example of the final 50_idtoken.json:
{ "heap": [ { "name": "openam", "type": "ClientRegistration", "config": { "clientId": "oidc_client", "clientSecret": "password", "issuer": { "type": "Issuer", "config": { "wellKnownEndpoint": "http://openam.example.com:8088/openam/oauth2/.well-known/openid-configuration" } }, "scopes": [ "openid", "profile", "email" ] } } ], "handler": { "type": "Chain", "config": { "filters": [ { "type": "OAuth2ClientFilter", "config": { "clientEndpoint": "/home/id_token", "requireHttps": false, "requireLogin": true, "registrations": "openam", "target": "${attributes.openid}", "failureHandler": { "type": "StaticResponseHandler", "config": { "entity": "OAuth2ClientFilter failed...", "reason": "NotFound", "status": 500 } } } }, { "type": "TokenTransformationFilter", "config": { "openamUri": "http://openam.example.com:8088/openam", "username": "oidc_client", "password": "password", "idToken": "${attributes.openid.id_token}", "instance": "openig", "ssoTokenHeader": "iPlanetDirectoryPro" } }

Transforming OpenID Connect ID Tokens Into SAML AssertionsSetting Up OpenIG Routes for Token Transformation
Gateway Guide ForgeRock Identity Gateway 5 (2018-05-03T07:21:09.993)Copyright © 2011-2017 ForgeRock AS. All rights reserved. 112
], "handler": { "type": "StaticResponseHandler", "config": { "entity": "{\"id_token\":\n\"${attributes.openid.id_token}\"} \n\n\n{\"saml_assertions\":\n\"${contexts.sts.issuedToken}\"}", "reason": "Found", "status": 200 } } } }, "condition": "${matches(request.uri.path, '^/home/id_token')}"}

Supporting UMA Resource ServersAbout OpenIG in the UMA Resource Server Role
Gateway Guide ForgeRock Identity Gateway 5 (2018-05-03T07:21:09.993)Copyright © 2011-2017 ForgeRock AS. All rights reserved. 113
Chapter 11
Supporting UMA Resource ServersOpenIG provides experimental support for building a User-Managed Access (UMA) resource server.In this chapter, you will learn:
• Where OpenIG fits in the UMA picture
• How to configure OpenIG to allow a resource owner to register UMA resource sets
• How to configure OpenIG to protect access to resources using UMA
11.1. About OpenIG in the UMA Resource Server RoleThis section covers the role OpenIG plays as UMA resource server.
11.1.1. About UMA
User-Managed Access (UMA) Profile of OAuth 2.0 defines a workflow that allows resource owners toshare their protected resources with requesting parties. Figure 11.1, "UMA Workflow" illustrates therelationships where OpenIG protects the resource server.

Supporting UMA Resource ServersAbout UMA
Gateway Guide ForgeRock Identity Gateway 5 (2018-05-03T07:21:09.993)Copyright © 2011-2017 ForgeRock AS. All rights reserved. 114
Figure 11.1. UMA Workflow
The actions that form the UMA workflow are as follows:
1. Manage
The resource owner manages their resources on the resource server.
When using OpenIG to protect the resources, OpenIG creates the resource sets that describewhat the resource owner shares. Resource set registration is covered in OAuth 2.0 Resource SetRegistration.

Supporting UMA Resource ServersSharing Protected Resources
Gateway Guide ForgeRock Identity Gateway 5 (2018-05-03T07:21:09.993)Copyright © 2011-2017 ForgeRock AS. All rights reserved. 115
2. Protect
The resource owner links their resource server and chosen authorization server, such asOpenAM.
The authorization server provides a protection API so that the resource server can register setsof resources. Use of the protection API requires a protection API token (PAT), an OAuth 2.0 tokenwith scope uma_protection.
3. Control
The resource owner controls who has access to their registered resources by creating policies onthe authorization server.
Only a resource owner can create policies for their registered resources.
4. Authorize
The client, acting on behalf of the requesting party, uses the authorization server's authorizationAPI to acquire a requesting party token (RPT). The requesting party or client may need furtherinteraction with the authorization server at this point, for example, to supply identity claims.Use of the authorization API requires an authorization API token (AAT), an OAuth 2.0 token withscope uma_authorization.
5. Access
The client presents the RPT to the resource server, which verifies its validity with theauthorization server and, if both valid and containing sufficient permissions, returns theprotected resource to the requesting party.
11.1.2. Sharing Protected ResourcesWhen acting as a UMA resource server, OpenIG helps the resource owner register resource setswith the authorization server. The resource owner then interacts with the authorization server toauthorize access to registered resources.
This process of sharing protected resources includes the following steps:
1. The OpenIG administrator configures a route with the following:
• An UmaService that describes OpenIG registration as an OAuth 2.0 client of the authorizationserver and the resource sets to share, including resource path patterns and scopes.
The UmaService exposes a REST API to use when managing resource sets.
For details, see UmaService(5) in the Configuration Reference.
• An UmaFilter that acts as a policy enforcement point, protecting access to resources on the route.
For details, see UmaFilter(5) in the Configuration Reference.

Supporting UMA Resource ServersAccessing Protected Resources
Gateway Guide ForgeRock Identity Gateway 5 (2018-05-03T07:21:09.993)Copyright © 2011-2017 ForgeRock AS. All rights reserved. 116
2. The resource owner obtains a PAT from the authorization server.
3. The resource owner provides the PAT and a resource path to OpenIG, which registers acorresponding resource set with the authorization server.
OpenIG responds with the resource set identifier and a link where the resource owner can set upaccess permissions.
4. The resource owner creates policies on the authorization server to authorize requesting parties toaccess protected resources.
11.1.3. Accessing Protected Resources
When acting as an UMA resource server, OpenIG interacts with the UMA client and the authorizationserver. OpenIG challenges the UMA client to gain authorization with the authorization server, andenforces policy for protected resources according to policy decisions by the authorization server.
The process of accessing protected resources can start after the process of sharing resources issuccessfully completed. The process of accessing a protected resource includes the following steps:
1. The requesting party attempts to access the resource without an RPT.
OpenIG responds with an UMA WWW-Authenticate header, and a ticket that the requesting party canuse to get an RPT.
2. The requesting party gets an AAT from the authorization server.
This step lets the authorization server authenticate the requesting party.
3. The requesting party uses AAT from the authorization server, and the ticket from OpenIG toobtain an RPT from the authorization server.
4. The requesting party uses the RPT to access the resource as originally intended.
11.1.4. Understanding the UMA API With an API Descriptor
The UMA share endpoint serves API descriptors at runtime. When you retrieve an API descriptor forthe endpoint, a JSON that describes the API for the endpoint is returned.
You can use the API descriptor with a tool such as Swagger UI to generate a web page that helps youto view and test the endpoint. For information, see Section 1.10, "Understanding OpenIG APIs WithAPI Descriptors".
11.1.5. Limitations of This Implementation
Keep the following points in mind when using OpenIG as an UMA resource server:
Supporting UMA Resource ServersPreparing the Tutorial
Gateway Guide ForgeRock Identity Gateway 5 (2018-05-03T07:21:09.993)Copyright © 2011-2017 ForgeRock AS. All rights reserved. 117
• OpenIG depends on the resource owner for the PAT.
When a PAT expires, no refresh token is available to OpenIG. The resource owner must perform theentire share process again with a new PAT in order to authorize access to protected resources. Theresource owner should delete the old resource and create a new one.
• Data about PATs and shared resources is held in memory.
OpenIG has no mechanism for persisting the data across restarts. When OpenIG stops and startsagain, the resource owner must perform the entire share process again.
• UMA client applications for sharing and accessing protected resources must deal with UMA errorconditions and OpenIG error conditions.
• OpenIG exposes a REST API to manage share objects that is not protected by default.
• When matching protected resource paths with share patterns, OpenIG takes the longest match.
For example, if resource owner Alice shares /photos/.* with Bob, and /photos/vacation.png withCharlie, and then Bob attempts to access /photos/vacation.png, OpenIG applies the sharingpermissions for Charlie, not Bob. As a result, Bob can be denied access.
11.2. Preparing the TutorialThis tutorial guides you through one way to set up OpenIG as an UMA resource server. It usesOpenAM as an authorization server for OAuth 2.0 and for UMA, and uses the sample application as aresource to protect and for files that serve as a basic UMA client.
Table 11.1. Tasks for Configuring Policy Enforcement
Task See Section(s)Modify the OpenAM configuration to allow cross-siteaccess.
Procedure 11.1, "To Enable CORS Support forOpenAM"
Configure OpenAM as an authorization server. Procedure 11.2, "To Configure OpenAM As an OAuth2.0 Authorization Server and UMA AuthorizationServer"
Register client profiles in OpenAM for OAuth 2.0 andUMA.
Procedure 11.3, "To Register Client Profiles inOpenAM"
Create a subject to act as a resource owner and asubject to act as a requesting party.
Procedure 11.4, "To Create a Resource Owner andRequesting Party"
Set up the OpenIG configuration for an UMA resourceserver
Procedure 11.5, "To Set Up OpenIG As a UMAResource Server"
If you use a configuration that is different from thatdescribed in this chapter, adjust the sample to yourconfiguration.
Section 11.6, "Editing the Example to Match CustomSettings"

Supporting UMA Resource ServersSetting Up OpenAM As an Authorization Server
Gateway Guide ForgeRock Identity Gateway 5 (2018-05-03T07:21:09.993)Copyright © 2011-2017 ForgeRock AS. All rights reserved. 118
11.3. Setting Up OpenAM As an Authorization ServerThis section describes the following tasks to set up OpenAM as an authorization server:
• Enabling cross-origin resource sharing (CORS) support in OpenAM
• Configuring OpenAM as an authorization server
• Registering UMA client profiles with OpenAM
• Setting up a resource owner (Alice) and requesting party (Bob)
Before you start, install and configure OpenAM on http://openam.example.com:8088/openam, withthe default configuration. If you use a different configuration, substitute in the tutorial accordingly.
Procedure 11.1. To Enable CORS Support for OpenAM
For information about CORS support, see the OpenAM product documentation. This proceduredescribes how to modify the OpenAM configuration to allow cross-site access.
Caution
The settings in this section are suggestions for this tutorial, and are not intended as documentation for settingup OpenAM CORS support on a server in production.
In production, do not add Content-Type to the list of allowed headers in the CORS filter. Doing so can exposeOpenAM to Cross-Site Request Forgery (CSRF) attacks.
1. In the WEB-INF/web.xml file of OpenAM, edit the URL pattern for CORSFilter to match all endpoints:
<filter-mapping> <filter-name>CORSFilter</filter-name> <url-pattern>/*</url-pattern></filter-mapping>
2. In the same file, edit the CORSFilter configuration to authorize cross-site access for origins, hosts,and headers, as shown in the following excerpt:
<filter> <filter-name>CORSFilter</filter-name> <filter-class>org.forgerock.openam.cors.CORSFilter</filter-class> <init-param> <description> Accepted Methods (Required): A comma separated list of HTTP methods for which to accept CORS requests. </description> <param-name>methods</param-name> <param-value>POST,GET,PUT,DELETE,PATCH,OPTIONS</param-value> </init-param> <init-param> <description>

Supporting UMA Resource ServersSetting Up OpenAM As an Authorization Server
Gateway Guide ForgeRock Identity Gateway 5 (2018-05-03T07:21:09.993)Copyright © 2011-2017 ForgeRock AS. All rights reserved. 119
Accepted Origins (Required): A comma separated list of origins from which to accept CORS requests. </description> <param-name>origins</param-name> <param-value>http://app.example.com:8081,http://openig.example.com:8080,http://openam.example.com:8088</param-value> </init-param> <init-param> <description> Allow Credentials (Optional): Whether to include the Vary (Origin) and Access-Control-Allow-Credentials headers in the response. Default: false </description> <param-name>allowCredentials</param-name> <param-value>true</param-value> </init-param> <init-param> <description> Allowed Headers (Optional): A comma separated list of HTTP headers which can be included in the requests. </description> <param-name>headers</param-name> <param-value> Authorization,Content-Type,iPlanetDirectoryPro,X-OpenAM-Username,X-OpenAM-Password,Accept,Accept-Encoding,Connection,Content-Length,Host,Origin,User-Agent,Accept-Language,Referer,Dnt,Accept-Api-Version,If-None-Match </param-value> </init-param> <init-param> <description> Expected Hostname (Optional): The name of the host expected in the request Host header. </description> <param-name>expectedHostname</param-name> <param-value>openam.example.com:8088</param-value> </init-param> <init-param> <description> Exposed Headers (Optional): The comma separated list of headers which the user-agent can expose to its CORS client. </description> <param-name>exposeHeaders</param-name> <param-value>Access-Control-Allow-Origin,Access-Control-Allow-Credentials,Set-Cookie,WWW-Authenticate</param-value> </init-param> <init-param> <description> Maximum Cache Age (Optional): The maximum time that the CORS client can cache the pre-flight response, in seconds. Default: 600 </description> <param-name>maxAge</param-name> <param-value>600</param-value> </init-param>

Supporting UMA Resource ServersSetting Up OpenAM As an Authorization Server
Gateway Guide ForgeRock Identity Gateway 5 (2018-05-03T07:21:09.993)Copyright © 2011-2017 ForgeRock AS. All rights reserved. 120
</filter>
Procedure 11.2. To Configure OpenAM As an OAuth 2.0 Authorization Server and UMAAuthorization Server
1. Log in to the OpenAM console as administrator.
2. In the top-level realm, select Configure OAuth Provider > Configure OAuth 2.0, accept the defaultvalues, and select Create.
An OpenAM policy named OAuth2ProviderPolicy is created for the authorization end point. The PATand AAT are obtained through the OAuth 2.0 access token endpoint. The RPT is obtained throughthe UMA endpoint.
If you plan to build your own examples or modify the sample clients, consider extending thedefault token lifetimes to 3600 seconds.
3. Select Configure OAuth Provider > Configure User Managed Access, accept the default values,and select Create.
4. Select Services > UMA Provider, deselect Require Trust Elevation, and save the changes.
Procedure 11.3. To Register Client Profiles in OpenAM
Follow these steps to register client profiles for OAuth 2.0 and UMA:
1. In the top level realm, select Applications > OAuth 2.0.
2. In the Agent table, create an agent to use when sharing resources:
• Name (client_id): OpenIG
• Password (client_secret): password
• Scope: uma_protection
3. Create an agent to use when accessing resources, with the following values:
• Name (client_id): UmaClient
• Password (client_secret): password
• Scope: uma_authorization
Procedure 11.4. To Create a Resource Owner and Requesting Party
Follow these steps to create subjects in the top-level realm:
1. In the top-level realm, select Subjects.

Supporting UMA Resource ServersSetting Up OpenIG As a UMA Resource Server
Gateway Guide ForgeRock Identity Gateway 5 (2018-05-03T07:21:09.993)Copyright © 2011-2017 ForgeRock AS. All rights reserved. 121
2. Add a subject to act as a resource owner, with the following values:
• ID: alice
• First Name: Alice
• Last Name: User
• Full Name: Alice User
• Password: password
• User Status: Active
3. Add a subject to act as a requesting party, with the following values:
• ID: bob
• First Name: Bob
• Last Name: User
• Full Name: Bob User
• Password: password
• User Status: Active
11.4. Setting Up OpenIG As a UMA Resource Server
Procedure 11.5. To Set Up OpenIG As a UMA Resource Server
Before you start, prepare OpenIG and the sample application as described in Chapter 2, "GettingStarted".
1. Add the following file as $HOME/.openig/config/admin.json.
On Windows, add the route as %appdata%\OpenIG\config\admin.json:
{ "heap": [ { "name": "ClientHandler", "type": "ClientHandler" }, { "name": "ApiProtectionFilter", "type": "ScriptableFilter", "config": { "type": "application/x-groovy",

Supporting UMA Resource ServersSetting Up OpenIG As a UMA Resource Server
Gateway Guide ForgeRock Identity Gateway 5 (2018-05-03T07:21:09.993)Copyright © 2011-2017 ForgeRock AS. All rights reserved. 122
"file": "CorsFilter.groovy" } } ], "prefix": "openig"}
To allow CORS support for the UMA share API, this route overrides the defaultApiProtectionFilter that protects the reserved administrative route. By default, the administrativeroute is under /openig. For information, see AdminHttpApplication(5) in the ConfigurationReference.
2. Add the following route to the OpenIG configuration as $HOME/.openig/config/routes/00-uma.json.
On Windows, add the route as %appdata%\OpenIG\config\routes\00-uma.json.
{ "heap": [ { "name": "UmaService", "type": "UmaService", "config": { "protectionApiHandler": "ClientHandler", "authorizationServerUri": "http://openam.example.com:8088/openam/", "clientId": "OpenIG", "clientSecret": "password", "resources": [ { "comment": "Protects all resources matching the following pattern.", "pattern": ".*", "actions": [ { "scopes": [ "#read" ], "condition": "${request.method == 'GET'}" }, { "scopes": [ "#create" ], "condition": "${request.method == 'POST'}" } ] } ] } } ], "handler": { "type": "Chain", "config": { "filters": [ { "type": "ScriptableFilter",

Supporting UMA Resource ServersSetting Up OpenIG As a UMA Resource Server
Gateway Guide ForgeRock Identity Gateway 5 (2018-05-03T07:21:09.993)Copyright © 2011-2017 ForgeRock AS. All rights reserved. 123
"config": { "type": "application/x-groovy", "file": "CorsFilter.groovy" } }, { "type": "UmaFilter", "config": { "protectionApiHandler": "ClientHandler", "umaService": "UmaService" } } ], "handler": "ClientHandler" } }, "condition": "${request.uri.host == 'app.example.com'}"}
Notice the following features of the route:
• The UmaService describes the resources that a resource owner can share. It uses OpenAM as theauthorization server, relying on one of the client profiles you created (client_id: OpenIG).
The UmaService provides a REST API to manage sharing of resource sets.
• The handler for the route chains together the CORS filter, the UmaFilter, and the defaulthandler.
The UmaFilter manages requesting party access to protected resources, using the UmaService.Protected resources are on the sample application, which responds to requests on port 8081.
• The route matches requests to app.example.com.
3. Add the following script to the OpenIG configuration as $HOME/.openig/scripts/groovy/CorsFilter.groovy.
On Windows, add the script as %appdata%\OpenIG\scripts\groovy\CorsFilter.groovy.
import org.forgerock.http.protocol.Responseimport org.forgerock.http.protocol.Status
if (request.method == 'OPTIONS') { /** * Supplies a response to a CORS preflight request. * * Example response: * * HTTP/1.1 200 OK * Access-Control-Allow-Origin: http://app.example.com:8081 * Access-Control-Allow-Methods: POST * Access-Control-Allow-Headers: Authorization * Access-Control-Allow-Credentials: true * Access-Control-Max-Age: 3600

Supporting UMA Resource ServersSetting Up OpenIG As a UMA Resource Server
Gateway Guide ForgeRock Identity Gateway 5 (2018-05-03T07:21:09.993)Copyright © 2011-2017 ForgeRock AS. All rights reserved. 124
*/
def origin = request.headers['Origin']?.firstValue def response = new Response(Status.OK)
// Browsers sending a cross-origin request from a file might have Origin: null. response.headers.put("Access-Control-Allow-Origin", origin) request.headers['Access-Control-Request-Method']?.values.each() { response.headers.add("Access-Control-Allow-Methods", it) } request.headers['Access-Control-Request-Headers']?.values.each() { response.headers.add("Access-Control-Allow-Headers", it) } response.headers.put("Access-Control-Allow-Credentials", "true") response.headers.put("Access-Control-Max-Age", "3600")
return response}
return next.handle(context, request)/** * Adds headers to a CORS response. */ .thenOnResult({ response -> if (response.status.isServerError()) { // Skip headers if the response is a server error. } else { def headers = [ "Access-Control-Allow-Origin": request.headers['Origin']?.firstValue, "Access-Control-Allow-Credentials": "true", "Access-Control-Expose-Headers": "WWW-Authenticate" ] response.headers.addAll(headers) }})
This script adds a CORS filter to include headers for cross-origin requests.
The tutorial involves JavaScript clients that are served by the sample application, and so notfrom the same origin as OpenAM or OpenIG. The route uses a CORS filter to include appropriateresponse headers for cross-origin requests.
The CORS filter handles pre-flight (HTTP OPTIONS) requests, and responses for all HTTPoperations. The logic for the filter is provided through the script.
The filter adds the appropriate headers to CORS requests. Pre-flight requests are diverted to adedicated handler, which returns the response directly to the user agent. For all other requests,the headers are added to the response.
For information about scripting filters and handlers, see Chapter 14, "Extending the ForgeRockIdentity Gateway".
4. Restart OpenIG to reload the configuration.

Supporting UMA Resource ServersTest the Configuration
Gateway Guide ForgeRock Identity Gateway 5 (2018-05-03T07:21:09.993)Copyright © 2011-2017 ForgeRock AS. All rights reserved. 125
11.5. Test the ConfigurationFollow these steps to test the configuration and demonstrate OpenIG acting as an UMA resourceserver:
1. Log out of OpenAM.
2. Browse to http://app.example.com:8081/uma/.
If you used the settings described in this chapter and Section 2.3, "Install the SampleApplication", your configuration should match the displayed configuration. If you used othersettings, you might need to edit the sample files to match your settings. For information, seeSection 11.6, "Editing the Example to Match Custom Settings".
3. Select the link to demonstrate Alice sharing resources.
4. On Alice's page, select Share with Bob to simulate Alice sharing resources as described inSection 11.1.2, "Sharing Protected Resources".
The following items are displayed:
• The PAT that Alice receives
• The metadata for the resource set that Alice registers through OpenIG
• The result of Alice authenticating with OpenAM in order to create a policy
• The successful result {} when Alice creates the policy
If the step fails, get help in Section 18.1, "Troubleshooting the UMA Example".
5. Go back to the first page, and select the link to demonstrate Bob accessing resources.
6. On Bob's page, select Get Alice's resources to simulate Bob accessing one of Alice's resources asdescribed in Section 11.1.3, "Accessing Protected Resources".
The following items are displayed:
• The ticket returned initially
• The AAT that Bob gets to obtain the RPT
• The RPT that Bob gets in order to request the resource again
• The final response containing the body of the resource

Supporting UMA Resource ServersEditing the Example to Match Custom Settings
Gateway Guide ForgeRock Identity Gateway 5 (2018-05-03T07:21:09.993)Copyright © 2011-2017 ForgeRock AS. All rights reserved. 126
11.6. Editing the Example to Match Custom SettingsIf you use a configuration that is different to that described in this chapter, consider the followingtasks to adjust the sample to your configuration:
1. Unpack the UMA files from the sample application described in Section 2.3, "Install the SampleApplication" to temporary folder:
$ mkdir /tmp/uma$ cd /tmp/uma$ jar -xvf /path/to/IG-doc-samples-5.0.0.jar uma created: uma/inflated: uma/alice.htmlinflated: uma/bob.htmlinflated: uma/common.jsinflated: uma/index.htmlinflated: uma/style.css
2. Edit the configuration in common.js, alice.html, and bob.html to match your settings.
3. Repack the UMA sample client files and then restart the sample application:
$ jar -uvf /path/to/IG-doc-samples-5.0.0.jar umaadding: uma/(in = 0) (out= 0)(stored 0%)adding: uma/index.html(in = 1698) (out= 880)(deflated 48%)adding: uma/common.js(in = 4265) (out= 1319)(deflated 69%)adding: uma/bob.html(in = 5427) (out= 1811)(deflated 66%)adding: uma/style.css(in = 1403) (out= 696)(deflated 50%)adding: uma/alice.html(in = 5494) (out= 1762)(deflated 67%)
4. If necessary, adjust the CORS settings for OpenAM.

Configuring Routers and RoutesConfiguring Routers
Gateway Guide ForgeRock Identity Gateway 5 (2018-05-03T07:21:09.993)Copyright © 2011-2017 ForgeRock AS. All rights reserved. 127
Chapter 12
Configuring Routers and RoutesOpenIG provides routers and routes to handle requests and their context. In this chapter, you willlearn about:
• How routers and routes are configured
• How to read, create, edit, or delete routes through Common REST or OpenIG Studio
• How to prevent changes to routes when OpenIG is running
12.1. Configuring RoutersWhen you set up the first tutorial, you configured a Router in the top-level config.json file, which isshown here again in the following listing:
{ "handler": { "type": "Router", "name": "_router", "baseURI": "http://app.example.com:8081", "capture": "all" }, "heap": [ { "name": "JwtSession", "type": "JwtSession" }, { "name": "capture", "type": "CaptureDecorator", "config": { "captureEntity": true, "_captureContext": true } } ]}
In this configuration, all requests are passed with the default settings to the router. The router scans$HOME/.openig/config/routes at startup, and rescans the directory every 10 seconds. If routes have beenadded, deleted or changed, the router applies the changes.

Configuring Routers and RoutesConfiguring Routes
Gateway Guide ForgeRock Identity Gateway 5 (2018-05-03T07:21:09.993)Copyright © 2011-2017 ForgeRock AS. All rights reserved. 128
The main router and any subrouters are used to build the monitoring endpoints. For informationabout monitoring endpoints, see Chapter 15, "Auditing and Monitoring". For information about theparameters of a router, see Router(5) in the Configuration Reference.
12.2. Configuring RoutesRoutes are JSON configuration files that handle requests and their context, and then hand off anyrequest they accept to a handler. Another way to think of a route is like an independent dispatchhandler, as described in DispatchHandler(5) in the Configuration Reference.
Routes can have a base URI to change the scheme, host, and port of the request.
For information about the parameters of routes, see Route(5) in the Configuration Reference.
12.2.1. Configuring Objects Inline or In the Heap
If you use an object only once in the configuration, you can declare it inline in the route and do notneed to name it. However, when you need use an object multiple times, declare it in the heap, andthen reference it by name in the route.
The following route shows an inline declaration for a handler. The handler is a router to routerequests to separate route configurations:
{ "handler": { "type": "Router" }}
The following example shows a named router in the heap, and a handler references the router by itsname:
{ "handler": "My Router", "heap": [ { "name": "My Router", "type": "Router" } ]}
Notice that the heap takes an array. Because the heap holds all configuration objects at the samelevel, you can impose any hierarchy or order when referencing objects. Note that when you declareall objects in the heap and reference them by name, neither hierarchy nor ordering are obvious fromthe structure of the configuration file alone.

Configuring Routers and RoutesSetting Route Conditions
Gateway Guide ForgeRock Identity Gateway 5 (2018-05-03T07:21:09.993)Copyright © 2011-2017 ForgeRock AS. All rights reserved. 129
12.2.2. Setting Route Conditions
When a route has a condition, it can handle only requests that meet the condition. When a route hasno condition, it can handle any request.
A condition can be based on almost any characteristic of the request, context, or OpenIG runtimeenvironment. Conditions are defined using OpenIG expressions, as described in Expressions(5) in theConfiguration Reference.
The following example shows a route condition that is met when the request path is /login:
"condition": "${matches(request.uri.path, '^/login')}"
The following example shows a route condition that is met only by requests with api.example.com as thehost portion of the URI:
"condition": "${request.uri.host == 'api.example.com'}"
The following example shows a route with no condition. This route accepts any request:
{ "name": "default", "handler": { "type": "ClientHandler" }}
Because routes define the conditions on which they accept a request, the router does not have toknow about specific routes in advance. In other words, you can configure the router first and thenadd routes while OpenIG is running.
12.2.3. Configuring Route Names, IDs, and Filenames
Route filenames have the extension .json, in lowercase. A router scans the routes folder for files withthe .json extension.
When a route has a name configuration object, the name is used by the router to order the routeslexicographically in the configuration. If the route is not named, the route ID is used.
When you add a route manually to the routes folder or add it through Common REST, the route ID isthe same as the filename of the route you add. When you add a route through OpenIG Studio, you canedit the default route ID.

Configuring Routers and RoutesCreating and Editing Routes Through Common REST
Gateway Guide ForgeRock Identity Gateway 5 (2018-05-03T07:21:09.993)Copyright © 2011-2017 ForgeRock AS. All rights reserved. 130
12.3. Creating and Editing Routes Through Common RESTNote
When OpenIG is in production mode, you cannot manage, list, or even read routes through Common REST. Formore information, see Section 3.8, "Making the Configuration Immutable".
Note
If an OpenAM policy agent is configured in the same container as OpenIG, by default the policy agentintercepts requests to manage routes. When you try to add a route through Common REST, the policy agentredirects the request to OpenAM and the route is not added.
To override this behavior, add the URL pattern /openig/api/* to the list of not-enforced URI in the policy agentprofile. For information, see Procedure 5.4, "To Create a Policy Agent Profile in OpenAM".
Through Common REST, you can read, add, delete, and edit routes on OpenIG without manuallyaccessing the file system. You can also list the routes in the order that they are loaded in theconfiguration, and set fields to filter the information about the routes.
The following examples show some ways to manage routes through Common REST. For moreinformation, see Section 5, "About ForgeRock Common REST" in the Configuration Reference.
Procedure 12.1. To Manage Routes Through Common REST
Before you start, prepare OpenIG as described in Chapter 2, "Getting Started".
1. Add the following route to the OpenIG configuration as $HOME/.openig/config/routes/00-crest.json.
On Windows, add the route as %appdata%\OpenIG\config\routes\00-crest.json.
{ "name": "crest", "handler": { "type": "StaticResponseHandler", "config": { "status": 200, "reason": "OK", "entity": "Hello, world!" } }, "condition": "${matches(request.uri.path, '^/crest')}"}
To check that the route is working, access the route on: http://openig.example.com:8080/crest.
2. To read a route through Common REST:
• Enter the following command in a terminal window:

Configuring Routers and RoutesCreating and Editing Routes Through Common REST
Gateway Guide ForgeRock Identity Gateway 5 (2018-05-03T07:21:09.993)Copyright © 2011-2017 ForgeRock AS. All rights reserved. 131
$ http GET http://openig.example.com:8080/openig/api/system/objects/_router/routes/00-crest
The route is displayed. Note that the route's _id is displayed in the JSON of the route.
3. To add a route through Common REST:
• Move $HOME/.openig/config/routes/00-crest.json to /tmp/00-crest.json.
• Check in $HOME/.openig/logs/route-system.log that the route has been removed from theconfiguration. To double check, access http://openig.example.com:8080/crest. You should getan HTTP 404.
• Enter the following command in a terminal window:
$ http PUT http://openig.example.com:8080/openig/api/system/objects/_router/routes/00-crest < /tmp/00-crest.json
This command posts the file in /tmp/00-crest.json to the routes directory.
• Check in $HOME/.openig/logs/route-system.log that the route has been added to configuration. Todouble-check, access http://openig.example.com:8080/crest. You should see the "Hello, world!"message.
4. To edit a route through CREST:
• Edit /tmp/00-crest.json to change the message displayed by the response handler in the route.
• Enter the following command in a terminal window:
$ http PUT http://openig.example.com:8080/openig/api/system/objects/_router/routes/00-crest If-Match:* < /tmp/00-crest.json
This command deploys the route with the new configuration. Because the changes are persistedinto the configuration, the existing $HOME/.openig/config/routes/00-crest.json is replaced with theedited version in /tmp/00-crest.json.
• Check in $HOME/.openig/logs/route-system.log, that the route has been updated. To double-check,access http://openig.example.com:8080/crest to confirm that the displayed message haschanged.
5. To delete a route through CREST:
• Enter the following command in a terminal window:

Configuring Routers and RoutesCreating Routes Through OpenIG Studio
Gateway Guide ForgeRock Identity Gateway 5 (2018-05-03T07:21:09.993)Copyright © 2011-2017 ForgeRock AS. All rights reserved. 132
$ http DELETE http://openig.example.com:8080/openig/api/system/objects/_router/routes/00-crest
• Check in $HOME/.openig/logs/route-system.log that the route has been removed from theconfiguration. To double-check, access http://openig.example.com:8080/crest. You should getan HTTP 404.
6. To list the routes deployed on the router, in the order that they are tried by the router:
• Enter the following command in a terminal window:
$ http "http://openig.example.com:8080/openig/api/system/objects/_router/routes?_queryFilter=true"
The list of loaded routes is displayed.
12.4. Creating Routes Through OpenIG StudioNote
When OpenIG is in production mode, OpenIG Studio is effectively disabled. For more information, seeSection 3.8, "Making the Configuration Immutable".
OpenIG Studio is a user interface to configure and deploy routes in OpenIG. You can use OpenIGStudio to create routes for tasks such as authenticating users, and authorizing access to APIs,throttling the rate of requests to protected applications, capturing messages, and collecting statistics.New features will be added as OpenIG Studio evolves.
When OpenIG is installed and running as described in this guide, access OpenIG Studio on http://openig.example.com:8080/openig/studio.
For examples of how to use OpenIG Studio to configure routes, see the following sections of thisguide:
• To configure OpenIG to enforce OpenAM policy decisions, see Procedure 6.3, "To Set Up OpenIG asa PEP".
• To configure OpenIG as a relying party for OpenID Connect 1.0, see Section 9.5, "Setting UpOpenIG As a Relying Party".
• To configure a simple throttling filter, see Procedure 16.1, "To Configure a Simple ThrottlingFilter".

Configuring Routers and RoutesPreventing the Reload of Routes
Gateway Guide ForgeRock Identity Gateway 5 (2018-05-03T07:21:09.993)Copyright © 2011-2017 ForgeRock AS. All rights reserved. 133
Important
OpenIG Studio has the current limitations:
• OpenIG Studio deploys and undeploys routes through a main router named _router, which is the name of themain router in the default configuration. If you use a custom config.json, make sure that it contains a mainrouter named _router.
• From OpenIG Studio, you can view and edit only routes that have been created and edited exclusively inOpenIG Studio. You cannot use OpenIG Studio to view or edit other routes in the $HOME/.openig/config/routesfolder.
• After you create and deploy a route in OpenIG Studio, you can continue to edit it in OpenIG Studio and deploythe changed route. However, after you edit the route in the $HOME/.openig/config/routes folder, you can'timport the changed configuration into OpenIG Studio. You must make any further edits in the $HOME/.openig/config/routes folder.
12.5. Preventing the Reload of RoutesTo prevent routes from being reloaded after startup, stop OpenIG, edit the router scanInterval, andrestart OpenIG. When the interval is set to disabled, routes are loaded only at startup:
{ "name": "Router", "type": "Router", "config": { "scanInterval": "disabled" }}
The following example changes the location where the router looks for the routes:
{ "name": "Router", "type": "Router", "config": { "directory": "/path/to/safe/routes", "scanInterval": "disabled" }}
12.6. Accessing Reserved RoutesOpenIG uses an ApiProtectionFilter to protect the reserved routes. By default, the filter allowsaccess to reserved routes only from the loopback address. To override this behavior, declare acustom ApiProtectionFilter in the top-level heap. For an example, see the CORS filter described inProcedure 11.5, "To Set Up OpenIG As a UMA Resource Server".

Configuration TemplatesProxy and Capture
Gateway Guide ForgeRock Identity Gateway 5 (2018-05-03T07:21:09.993)Copyright © 2011-2017 ForgeRock AS. All rights reserved. 134
Chapter 13
Configuration TemplatesThis chapter contains template routes for common configurations.
Before you use one of the templates here, install and configure OpenIG with a router and defaultroute as described in Chapter 2, "Getting Started".
Next, take one of the templates and then modify it to suit your deployment. Read the summary ofeach template to find the right match for your application.
When you move to use OpenIG in production, be sure to turn off DEBUG level logging, and todeactivate CaptureDecorator use to avoid filling up disk space. Also consider locking down the Routerconfiguration.
13.1. Proxy and CaptureIf you installed and configured OpenIG with a router and default route as described in Chapter 2,"Getting Started", then you already proxy and capture both the application requests coming in andthe server responses going out.
The route shown in Example 13.1, "Proxy and Capture" uses a DispatchHandler to change the schemeto HTTPS on login. To use this template change the baseURI settings to match those of the targetapplication.
When connecting to the protected application over HTTPS, the ClientHandler must be configuredto trust the application's public key server certificate. If the certificate was signed by a well-known Certificate Authority, then there should be no further configuration to do. Otherwise, use aClientHandler that references a truststore holding the certificate.
Example 13.1. Proxy and Capture
{ "handler": { "type": "DispatchHandler", "config": { "bindings": [ { "condition": "${request.uri.path == '/login'}", "handler": "ClientHandler", "comment": "Must be able to trust the server cert for HTTPS",
Configuration TemplatesSimple Login Form
Gateway Guide ForgeRock Identity Gateway 5 (2018-05-03T07:21:09.993)Copyright © 2011-2017 ForgeRock AS. All rights reserved. 135
"baseURI": "https://app.example.com:8444" }, { "condition": "${request.uri.scheme == 'http'}", "handler": "ClientHandler", "baseURI": "http://app.example.com:8081" }, { "handler": "ClientHandler", "baseURI": "https://app.example.com:8444" } ] } }, "capture": "all", "condition": "${matches(request.uri.query, 'demo=capture')}"}
To try this example with the sample application, save the file as $HOME/.openig/config/routes/20-capture.json, and browse to http://openig.example.com:8080/login?demo=capture.
To use this as a default route with a real application, remove the route-level condition on the handlerthat specifies a demo query string parameter.
13.2. Simple Login FormThe route in Example 13.2, "Simple Login Form" logs the user into the target application with hard-coded user name and password. The route intercepts the login page request and replaces it with thelogin form. Adapt the uri, form, and baseURI settings as necessary.
Example 13.2. Simple Login Form
{ "heap": [ { "name": "ClientHandler", "type": "ClientHandler", "comment": "Testing only: blindly trust the server cert for HTTPS.", "config": { "trustManager": { "type": "TrustAllManager" } } } ], "handler": { "type": "Chain", "config": { "filters": [ {

Configuration TemplatesLogin Form With Cookie From Login Page
Gateway Guide ForgeRock Identity Gateway 5 (2018-05-03T07:21:09.993)Copyright © 2011-2017 ForgeRock AS. All rights reserved. 136
"type": "PasswordReplayFilter", "config": { "loginPage": "${request.uri.path == '/login'}", "request": { "method": "POST", "uri": "https://app.example.com:8444/login", "form": { "username": [ "MY_USERNAME" ], "password": [ "MY_PASSWORD" ] } } } } ], "handler": "ClientHandler" } }, "condition": "${matches(request.uri.query, 'demo=simple')}"}
The parameters in the PasswordReplayFilter form, MY_USERNAME and MY_PASSWORD, can use strings orexpressions. When connecting to the protected application over HTTPS, the ClientHandler must beconfigured to trust the application's public key server certificate.
To try this example with the sample application, save the file as $HOME/.openig/config/routes/21-simple.json, replace MY_USERNAME with demo and MY_PASSWORD with changeit, and browse to http://openig.example.com:8080/login?demo=simple.
To use this as a default route with a real application, use a ClientHandler that does not blindly trustthe server certificate, and remove the route-level condition on the handler that specifies a demo querystring parameter.
13.3. Login Form With Cookie From Login PageSome applications expect a cookie from the login page to be sent in the login request form. OpenIGcan manage the cookies. The route in Example 13.3, "Login Form With Cookie From Login Page"allows the login page request to go through to the target, and manages the cookies set in theresponse rather than passing the cookie through to the browser.
Example 13.3. Login Form With Cookie From Login Page
{ "handler": { "type": "Chain",

Configuration TemplatesLogin Form With Password Replay and Cookie Filters
Gateway Guide ForgeRock Identity Gateway 5 (2018-05-03T07:21:09.993)Copyright © 2011-2017 ForgeRock AS. All rights reserved. 137
"config": { "filters": [ { "type": "PasswordReplayFilter", "config": { "loginPage": "${request.uri.path == '/login'}", "request": { "method": "POST", "uri": "https://app.example.com:8444/login", "form": { "username": [ "MY_USERNAME" ], "password": [ "MY_PASSWORD" ] } } } }, { "type": "CookieFilter" } ], "handler": "ClientHandler" } }, "condition": "${matches(request.uri.query, 'demo=cookie')}"}
The parameters in the PasswordReplayFilter form, MY_USERNAME and MY_PASSWORD, can use strings orexpressions. A CookieFilter with no specified configuration manages all cookies that are set by theprotected application. When connecting to the protected application over HTTPS, the ClientHandlermust be configured to trust the application's public key server certificate.
To try this example with the sample application, save the file as $HOME/.openig/config/routes/22-cookie.json, replace MY_USERNAME with kramer and MY_PASSWORD with newman, and browse to http://openig.example.com:8080/login?demo=cookie.
To use this as a default route with a real application, remove the route-level condition on the handlerthat specifies a demo query string parameter.
13.4. Login Form With Password Replay and Cookie FiltersThe route in Example 13.4, "Login Form With Password Replay and Cookie Filters" works with anapplication that returns the login page when the user tries to access a page without a valid session.This route shows how to use a PasswordReplayFilter to find the login page with a pattern that matches amock OpenAM Classic UI page.

Configuration TemplatesLogin Form With Password Replay and Cookie Filters
Gateway Guide ForgeRock Identity Gateway 5 (2018-05-03T07:21:09.993)Copyright © 2011-2017 ForgeRock AS. All rights reserved. 138
Note
The route uses a CookieFilter to manage cookies, ensuring that cookies from the protected application areincluded with the appropriate requests. The side effect of OpenIG managing cookies is none of the cookies aresent to the browser, but are managed locally by OpenIG.
Example 13.4. Login Form With Password Replay and Cookie Filters
{ "handler": { "type": "Chain", "config": { "filters": [ { "type": "PasswordReplayFilter", "config": { "loginPageContentMarker": "OpenAM\\s\\(Login\\)", "request": { "comments": [ "An example based on OpenAM classic UI: ", "uri is for the OpenAM login page; ", "IDToken1 is the username field; ", "IDToken2 is the password field; ", "host takes the OpenAM FQDN:port.", "The sample app simulates OpenAM." ], "method": "POST", "uri": "http://app.example.com:8081/openam/UI/Login", "form": { "IDToken0": [ "" ], "IDToken1": [ "demo" ], "IDToken2": [ "changeit" ], "IDButton": [ "Log+In" ], "encoded": [ "false" ] }, "headers": { "host": [ "app.example.com:8081" ] } } } }, { "type": "CookieFilter"
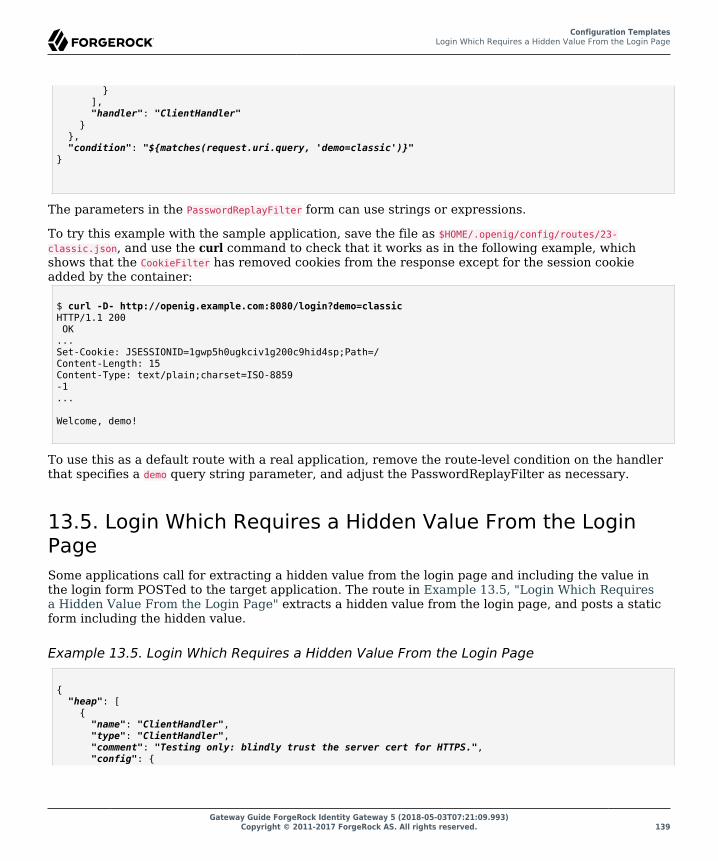
Configuration TemplatesLogin Which Requires a Hidden Value From the Login Page
Gateway Guide ForgeRock Identity Gateway 5 (2018-05-03T07:21:09.993)Copyright © 2011-2017 ForgeRock AS. All rights reserved. 139
} ], "handler": "ClientHandler" } }, "condition": "${matches(request.uri.query, 'demo=classic')}"}
The parameters in the PasswordReplayFilter form can use strings or expressions.
To try this example with the sample application, save the file as $HOME/.openig/config/routes/23-classic.json, and use the curl command to check that it works as in the following example, whichshows that the CookieFilter has removed cookies from the response except for the session cookieadded by the container:
$ curl -D- http://openig.example.com:8080/login?demo=classicHTTP/1.1 200 OK...Set-Cookie: JSESSIONID=1gwp5h0ugkciv1g200c9hid4sp;Path=/Content-Length: 15Content-Type: text/plain;charset=ISO-8859-1...
Welcome, demo!
To use this as a default route with a real application, remove the route-level condition on the handlerthat specifies a demo query string parameter, and adjust the PasswordReplayFilter as necessary.
13.5. Login Which Requires a Hidden Value From the LoginPageSome applications call for extracting a hidden value from the login page and including the value inthe login form POSTed to the target application. The route in Example 13.5, "Login Which Requiresa Hidden Value From the Login Page" extracts a hidden value from the login page, and posts a staticform including the hidden value.
Example 13.5. Login Which Requires a Hidden Value From the Login Page
{ "heap": [ { "name": "ClientHandler", "type": "ClientHandler", "comment": "Testing only: blindly trust the server cert for HTTPS.", "config": {

Configuration TemplatesLogin Which Requires a Hidden Value From the Login Page
Gateway Guide ForgeRock Identity Gateway 5 (2018-05-03T07:21:09.993)Copyright © 2011-2017 ForgeRock AS. All rights reserved. 140
"trustManager": { "type": "TrustAllManager" } } } ], "handler": { "type": "Chain", "config": { "filters": [ { "type": "PasswordReplayFilter", "config": { "loginPage": "${request.uri.path == '/login'}", "loginPageExtractions": [ { "name": "hidden", "pattern": "loginToken\\s+value=\"(.*)\"" } ], "request": { "method": "POST", "uri": "https://app.example.com:8444/login", "form": { "username": [ "MY_USERNAME" ], "password": [ "MY_PASSWORD" ], "hiddenValue": [ "${attributes.extracted.hidden}" ] } } } } ], "handler": "ClientHandler" } }, "condition": "${matches(request.uri.query, 'demo=hidden')}"}
The parameters in the PasswordReplayFilter form, MY_USERNAME and MY_PASSWORD, can have string values,and they can also use expressions. When connecting to the protected application over HTTPS, theClientHandler must be configured to trust the application's public key server certificate.
To try this example with the sample application, save the file as $HOME/.openig/config/routes/24-hidden.json, replace MY_USERNAME with scarter and MY_PASSWORD with sprain, and browse to http://openig.example.com:8080/login?demo=hidden.
To use this as a default route with a real application, use a ClientHandler that does not blindly trustthe server certificate, and remove the route-level condition on the handler that specifies a demo querystring parameter.

Configuration TemplatesHTTP and HTTPS Application
Gateway Guide ForgeRock Identity Gateway 5 (2018-05-03T07:21:09.993)Copyright © 2011-2017 ForgeRock AS. All rights reserved. 141
13.6. HTTP and HTTPS ApplicationThe route in Example 13.6, "HTTP and HTTPS Application" proxies traffic to an application with bothHTTP and HTTPS ports. The application uses HTTPS for authentication and HTTP for the generalapplication features. Assuming all login requests are made over HTTPS, you must add the login filtersand handlers to the chain.
Example 13.6. HTTP and HTTPS Application
{ "handler": { "type": "DispatchHandler", "config": { "bindings": [ { "condition": "${request.uri.scheme == 'http'}", "handler": "ClientHandler", "baseURI": "http://app.example.com:8081" }, { "condition": "${request.uri.path == '/login'}", "handler": { "type": "Chain", "config": { "comment": "Add one or more filters to handle login.", "filters": [], "handler": "ClientHandler" } }, "baseURI": "https://app.example.com:8444" }, { "handler": "ClientHandler", "baseURI": "https://app.example.com:8444" } ] } }, "condition": "${matches(request.uri.query, 'demo=https')}"}
When connecting to the protected application over HTTPS, the ClientHandler must be configured totrust the application's public key server certificate.
To try this example with the sample application, save the file as $HOME/.openig/config/routes/25-https.json, and browse to http://openig.example.com:8080/login?demo=https.
To use this as a default route with a real application, remove the route-level condition on the handlerthat specifies a demo query string parameter.

Configuration TemplatesOpenAM Integration With Headers
Gateway Guide ForgeRock Identity Gateway 5 (2018-05-03T07:21:09.993)Copyright © 2011-2017 ForgeRock AS. All rights reserved. 142
13.7. OpenAM Integration With HeadersThe route in Example 13.7, "OpenAM Integration With Headers" logs the user into the targetapplication using the headers such as those passed in from an OpenAM policy agent. If the headerpassed in contains only a user name or subject and requires a lookup to an external data source, youmust add an attribute filter to the chain to retrieve the credentials.
Example 13.7. OpenAM Integration With Headers
{ "heap": [ { "name": "ClientHandler", "type": "ClientHandler", "comment": "Testing only: blindly trust the server cert for HTTPS.", "config": { "trustManager": { "type": "TrustAllManager" } } } ], "handler": { "type": "Chain", "config": { "filters": [ { "type": "PasswordReplayFilter", "config": { "loginPage": "${request.uri.path == '/login'}", "request": { "method": "POST", "uri": "https://app.example.com:8444/login", "form": { "username": [ "${request.headers['username'][0]}" ], "password": [ "${request.headers['password'][0]}" ] } } } } ], "handler": "ClientHandler" } }, "condition": "${matches(request.uri.query, 'demo=headers')}"}
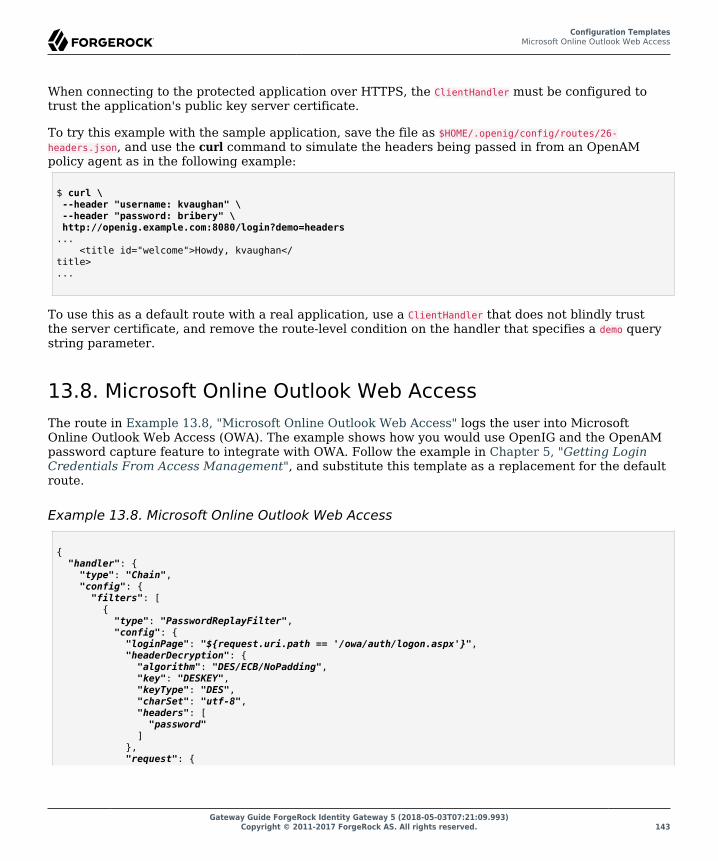
Configuration TemplatesMicrosoft Online Outlook Web Access
Gateway Guide ForgeRock Identity Gateway 5 (2018-05-03T07:21:09.993)Copyright © 2011-2017 ForgeRock AS. All rights reserved. 143
When connecting to the protected application over HTTPS, the ClientHandler must be configured totrust the application's public key server certificate.
To try this example with the sample application, save the file as $HOME/.openig/config/routes/26-headers.json, and use the curl command to simulate the headers being passed in from an OpenAMpolicy agent as in the following example:
$ curl \ --header "username: kvaughan" \ --header "password: bribery" \ http://openig.example.com:8080/login?demo=headers... <title id="welcome">Howdy, kvaughan</title>...
To use this as a default route with a real application, use a ClientHandler that does not blindly trustthe server certificate, and remove the route-level condition on the handler that specifies a demo querystring parameter.
13.8. Microsoft Online Outlook Web AccessThe route in Example 13.8, "Microsoft Online Outlook Web Access" logs the user into MicrosoftOnline Outlook Web Access (OWA). The example shows how you would use OpenIG and the OpenAMpassword capture feature to integrate with OWA. Follow the example in Chapter 5, "Getting LoginCredentials From Access Management", and substitute this template as a replacement for the defaultroute.
Example 13.8. Microsoft Online Outlook Web Access
{ "handler": { "type": "Chain", "config": { "filters": [ { "type": "PasswordReplayFilter", "config": { "loginPage": "${request.uri.path == '/owa/auth/logon.aspx'}", "headerDecryption": { "algorithm": "DES/ECB/NoPadding", "key": "DESKEY", "keyType": "DES", "charSet": "utf-8", "headers": [ "password" ] }, "request": {

Configuration TemplatesMicrosoft Online Outlook Web Access
Gateway Guide ForgeRock Identity Gateway 5 (2018-05-03T07:21:09.993)Copyright © 2011-2017 ForgeRock AS. All rights reserved. 144
"method": "POST", "uri": "https://login.microsoftonline.com", "headers": { "Host": [ "login.microsoftonline.com" ], "Content-Type": [ "Content-Type:application/x-www-form-urlencoded" ] }, "form": { "destination": [ "https://login.microsoftonline.com/owa/" ], "forcedownlevel": [ "0" ], "trusted": [ "0" ], "username": [ "${request.headers['username'][0]}" ], "passwd": [ "${request.headers['password'][0]}" ], "isUtf8": [ "1" ] } } } } ], "handler": { "type": "Chain", "config": { "filters": [ { "type": "HeaderFilter", "config": { "messageType": "REQUEST", "remove": [ "password", "username" ] } } ], "handler": { "type": "ClientHandler" }, "baseURI": "https://login.microsoftonline.com" } } } }, "condition": "${matches(request.uri.query, 'demo=headers')}"}

Configuration TemplatesMicrosoft Online Outlook Web Access
Gateway Guide ForgeRock Identity Gateway 5 (2018-05-03T07:21:09.993)Copyright © 2011-2017 ForgeRock AS. All rights reserved. 145
To try this example, save the file as $HOME/.openig/config/routes/27-owa.json. Change DESKEY to theactual key value that you generated when following the instructions in Procedure 5.5, "To ConfigurePassword Capture in OpenAM".
To use this as a default route with a real application, remove the route-level condition on the handlerthat specifies a demo query string parameter.

Extending the ForgeRock Identity GatewayAbout Scripting
Gateway Guide ForgeRock Identity Gateway 5 (2018-05-03T07:21:09.993)Copyright © 2011-2017 ForgeRock AS. All rights reserved. 146
Chapter 14
Extending the ForgeRock Identity GatewayThis chapter describes how to extend OpenIG, taking you through the steps to:
• Write scripts to create custom filters and handlers
• Plug additional Java libraries into OpenIG for further customization
To extend filter and handler functionality, OpenIG supports the Groovy dynamic scripting languagethrough the use of ScriptableFilter and ScriptableHandler objects.
For when you can't achieve complex server interactions or intensive data transformations with scriptsor existing handlers, filters, or expressions, OpenIG allows you to develop custom extensions in Javaand provide them in additional libraries that you build into OpenIG. The libraries allow you to developcustom extensions to OpenIG.
Important
When you are writing scripts or Java extensions, never use a Promise blocking method, such as get(),getOrThrow(), or getOrThrowUninterruptibly(), to obtain the response.
A promise represents the result of an asynchronous operation. Therefore, using a blocking method to wait forthe result can cause deadlocks and/or race issues.
14.1. About ScriptingScriptable filters and handlers are added to the configuration in the same way as standard filters andhandlers. Each takes as its configuration the script's Internet media type and either a source scriptincluded in the JSON configuration, or a file script that OpenIG reads from a file. The configurationcan optionally supply arguments to the script.
The following example defines a ScriptableFilter, written in the Groovy language, and storedin a file named $HOME/.openig/scripts/groovy/SimpleFormLogin.groovy (%appdata%\OpenIG\scripts\groovy\SimpleFormLogin.groovy on Windows):

Extending the ForgeRock Identity GatewayScripting Dispatch
Gateway Guide ForgeRock Identity Gateway 5 (2018-05-03T07:21:09.993)Copyright © 2011-2017 ForgeRock AS. All rights reserved. 147
{ "name": "SimpleFormLogin", "type": "ScriptableFilter", "config": { "type": "application/x-groovy", "file": "SimpleFormLogin.groovy" } }
Relative paths in the file field depend on how OpenIG is installed. If OpenIG is installed in anapplication server, then paths for Groovy scripts are relative to $HOME/.openig/scripts/groovy.
This base location $HOME/.openig/scripts/groovy is on the classpath when the scripts are executed. Iftherefore some Groovy scripts are not in the default package, but instead have their own packagenames, they belong in the directory corresponding to their package name. For example, a script inpackage com.example.groovy belongs under $HOME/.openig/scripts/groovy/com/example/groovy/.
OpenIG provides several global variables to scripts at runtime. As well as having access to Groovy'sbuilt-in functionality, scripts can access the request and the context, store variables acrossexecutions, write messages to logs, make requests to a web service or to an LDAP directory service,and access responses returned in promise callback methods. For information about scripting inOpenIG, see ScriptableFilter(5) in the Configuration Reference and ScriptableHandler(5) in theConfiguration Reference.
Before trying the scripts shown in this chapter, first install and configure OpenIG as described inChapter 2, "Getting Started".
When developing and debugging your scripts, consider configuring a capture decorator to logrequests, responses, and context data in JSON form. You can then turn off capturing when you moveto production. For details, see CaptureDecorator(5) in the Configuration Reference.
14.2. Scripting DispatchIn order to route requests, especially when the conditions are complicated, you can use aScriptableHandler instead of a DispatchHandler as described in DispatchHandler(5) in the ConfigurationReference.
The following script demonstrates a simple dispatch handler:
/* * Copyright 2014-2017 ForgeRock AS. All Rights Reserved * * Use of this code requires a commercial software license with ForgeRock AS. * or with one of its affiliates. All use shall be exclusively subject * to such license between the licensee and ForgeRock AS. */
/*

Extending the ForgeRock Identity GatewayScripting Dispatch
Gateway Guide ForgeRock Identity Gateway 5 (2018-05-03T07:21:09.993)Copyright © 2011-2017 ForgeRock AS. All rights reserved. 148
* This simplistic dispatcher matches the path part of the HTTP request. * If the path is /mylogin, it checks Username and Password headers, * accepting bjensen:hifalutin, and returning HTTP 403 Forbidden to others. * Otherwise it returns HTTP 401 Unauthorized. */
// Rather than return a Promise of a response from an external source,// this script returns the response itself.response = new Response(Status.OK);
switch (request.uri.path) {
case "/mylogin":
if (request.headers.Username.values[0] == "bjensen" && request.headers.Password.values[0] == "hifalutin") {
response.status = Status.OK response.entity = "<html><p>Welcome back, Babs!</p></html>"
} else {
response.status = Status.FORBIDDEN response.entity = "<html><p>Authorization required</p></html>"
}
break
default:
response.status = Status.UNAUTHORIZED response.entity = "<html><p>Please <a href='./mylogin'>log in</a>.</p></html>"
break
}
// Return the locally created response, no need to wrap it into a Promisereturn response
To try this handler, save the script as $HOME/.openig/scripts/groovy/DispatchHandler.groovy (%appdata%\OpenIG\scripts\groovy\DispatchHandler.groovy on Windows).
Next, add the following route to your configuration as $HOME/.openig/config/routes/98-dispatch.json(%appdata%\OpenIG\config\routes\98-dispatch.json on Windows):
{ "heap": [ { "name": "DispatchHandler", "type": "DispatchHandler", "config": { "bindings": [{ "condition": "${matches(request.uri.path, '/mylogin')}", "handler": {
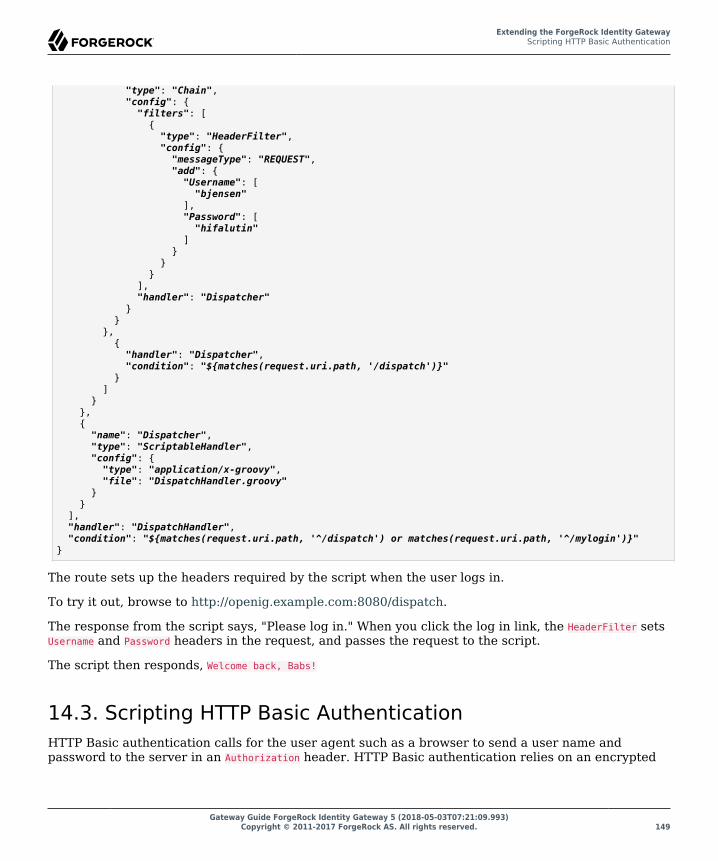
Extending the ForgeRock Identity GatewayScripting HTTP Basic Authentication
Gateway Guide ForgeRock Identity Gateway 5 (2018-05-03T07:21:09.993)Copyright © 2011-2017 ForgeRock AS. All rights reserved. 149
"type": "Chain", "config": { "filters": [ { "type": "HeaderFilter", "config": { "messageType": "REQUEST", "add": { "Username": [ "bjensen" ], "Password": [ "hifalutin" ] } } } ], "handler": "Dispatcher" } } }, { "handler": "Dispatcher", "condition": "${matches(request.uri.path, '/dispatch')}" } ] } }, { "name": "Dispatcher", "type": "ScriptableHandler", "config": { "type": "application/x-groovy", "file": "DispatchHandler.groovy" } } ], "handler": "DispatchHandler", "condition": "${matches(request.uri.path, '^/dispatch') or matches(request.uri.path, '^/mylogin')}"}
The route sets up the headers required by the script when the user logs in.
To try it out, browse to http://openig.example.com:8080/dispatch.
The response from the script says, "Please log in." When you click the log in link, the HeaderFilter setsUsername and Password headers in the request, and passes the request to the script.
The script then responds, Welcome back, Babs!
14.3. Scripting HTTP Basic AuthenticationHTTP Basic authentication calls for the user agent such as a browser to send a user name andpassword to the server in an Authorization header. HTTP Basic authentication relies on an encrypted

Extending the ForgeRock Identity GatewayScripting HTTP Basic Authentication
Gateway Guide ForgeRock Identity Gateway 5 (2018-05-03T07:21:09.993)Copyright © 2011-2017 ForgeRock AS. All rights reserved. 150
connection to protect the user name and password credentials, which are base64-encoded in theAuthorization header, not encrypted.
The following script, for use in a ScriptableFilter, adds an Authorization header based on a usernameand password combination:
/* * Copyright 2014-2017 ForgeRock AS. All Rights Reserved * * Use of this code requires a commercial software license with ForgeRock AS. * or with one of its affiliates. All use shall be exclusively subject * to such license between the licensee and ForgeRock AS. */
/* * Perform basic authentication with the user name and password * that are supplied using a configuration like the following: * * { * "name": "BasicAuth", * "type": "ScriptableFilter", * "config": { * "type": "application/x-groovy", * "file": "BasicAuthFilter.groovy", * "args": { * "username": "bjensen", * "password": "hifalutin" * } * } * } */
def userPass = username + ":" + passworddef base64UserPass = userPass.getBytes().encodeBase64()request.headers.add("Authorization", "Basic ${base64UserPass}" as String)
// Credentials are only base64-encoded, not encrypted: Set scheme to HTTPS.
/* * When connecting over HTTPS, by default the client tries to trust the server. * If the server has no certificate * or has a self-signed certificate unknown to the client, * then the most likely result is an SSLPeerUnverifiedException. * * To avoid an SSLPeerUnverifiedException, * set up HTTPS correctly on the server. * Either use a server certificate signed by a well-known CA, * or set up the gateway to trust the server certificate. */request.uri.scheme = "https"
// Calls the next Handler and returns a Promise of the Response.// The Response can be handled with asynchronous Promise callbacks.next.handle(context, request)
To try this filter, save the script as $HOME/.openig/scripts/groovy/BasicAuthFilter.groovy (%appdata%\OpenIG\scripts\groovy\BasicAuthFilter.groovy on Windows).

Extending the ForgeRock Identity GatewayScripting LDAP Authentication
Gateway Guide ForgeRock Identity Gateway 5 (2018-05-03T07:21:09.993)Copyright © 2011-2017 ForgeRock AS. All rights reserved. 151
Next, add the following route to your configuration as $HOME/.openig/config/routes/09-basic.json(%appdata%\OpenIG\config\routes\09-basic.json on Windows):
{ "handler": { "type": "Chain", "config": { "filters": [ { "type": "ScriptableFilter", "config": { "type": "application/x-groovy", "file": "BasicAuthFilter.groovy", "args": { "username": "bjensen", "password": "hifalutin" } }, "capture": "filtered_request" } ], "handler": { "type": "StaticResponseHandler", "config": { "status": 200, "reason": "OK", "entity": "Hello, Babs!" } } } }, "condition": "${matches(request.uri.path, '^/basic')}"}
When the request path matches /basic the route calls the Chain, which runs the ScriptableFilter. Thecapture setting captures the request as updated by the ScriptableFilter. Finally, OpenIG returns astatic page.
To try it out, browse to http://openig.example.com:8080/basic.
The captured request in the console log shows that the scheme is now HTTPS, and that theAuthorization header is set for HTTP Basic:
GET https://openig.example.com:8080/basic HTTP/1.1Authorization: Basic YmplbnNlbjpoaWZhbHV0aW4=
14.4. Scripting LDAP AuthenticationMany organizations use an LDAP directory service to store user profiles including authenticationcredentials. The LDAP directory service securely stores user passwords in a highly-available, centralservice capable of handling thousands of authentications per second.

Extending the ForgeRock Identity GatewayScripting LDAP Authentication
Gateway Guide ForgeRock Identity Gateway 5 (2018-05-03T07:21:09.993)Copyright © 2011-2017 ForgeRock AS. All rights reserved. 152
The following script, for use in a ScriptableFilter, performs simple authentication against an LDAPserver based on request form fields username and password:
/* * Copyright 2014-2017 ForgeRock AS. All Rights Reserved * * Use of this code requires a commercial software license with ForgeRock AS. * or with one of its affiliates. All use shall be exclusively subject * to such license between the licensee and ForgeRock AS. */
import org.forgerock.opendj.ldap.*
/* * Perform LDAP authentication based on user credentials from a form. * * If LDAP authentication succeeds, then return a promise to handle the response. * If there is a failure, produce an error response and return it. */
username = request.form?.username[0]password = request.form?.password[0]
// For testing purposes, the LDAP host and port are provided in the context's attributes.// Edit as needed to match your directory service.host = attributes.ldapHost ?: "localhost"port = attributes.ldapPort ?: 1389
client = ldap.connect(host, port as Integer)try {
// Assume the username is an exact match of either // the user ID, the email address, or the user's full name. filter = "(|(uid=%s)(mail=%s)(cn=%s))"
user = client.searchSingleEntry( "ou=people,dc=example,dc=com", ldap.scope.sub, ldap.filter(filter, username, username, username))
client.bind(user.name as String, password?.toCharArray())
// Authentication succeeded.
// Set a header (or whatever else you want to do here). request.headers.add("Ldap-User-Dn", user.name.toString())
// Most LDAP attributes are multi-valued. // When you read multi-valued attributes, use the parse() method, // with an AttributeParser method // that specifies the type of object to return. attributes.cn = user.cn?.parse().asSetOfString()
// When you write attribute values, set them directly. user.description = "New description set by my script"
// Here is how you might read a single value of a multi-valued attribute:

Extending the ForgeRock Identity GatewayScripting LDAP Authentication
Gateway Guide ForgeRock Identity Gateway 5 (2018-05-03T07:21:09.993)Copyright © 2011-2017 ForgeRock AS. All rights reserved. 153
attributes.description = user.description?.parse().asString()
// Call the next handler. This returns when the request has been handled. return next.handle(context, request)
} catch (AuthenticationException e) {
// LDAP authentication failed, so fail the response with // HTTP status code 403 Forbidden.
response = new Response(Status.FORBIDDEN) response.entity = "<html><p>Authentication failed: " + e.message + "</p></html>"
} catch (Exception e) {
// Something other than authentication failed on the server side, // so fail the response with HTTP 500 Internal Server Error.
response = new Response(Status.INTERNAL_SERVER_ERROR) response.entity = "<html><p>Server error: " + e.message + "</p></html>"
} finally { client.close()}
// Return the locally created response, no need to wrap it into a Promisereturn response
For the list of methods to specify which type of objects to return, see the OpenDJ LDAP SDK Javadocfor AttributeParser.
To try the LDAP authentication script, follow these steps:
1. Install an LDAP directory server such as ForgeRock Directory Services.
Either import some sample users who can authenticate over LDAP, or generate sample users atinstallation time.
2. Save the script as $HOME/.openig/scripts/groovy/LdapAuthFilter.groovy (%appdata%\OpenIG\scripts\groovy\LdapAuthFilter.groovy on Windows).
If the directory server installation does not match the assumptions made in the script, adjust thescript to use the correct settings for your installation.
3. Add the following route to your configuration as $HOME/.openig/config/routes/10-ldap.json (%appdata%\OpenIG\config\routes\10-ldap.json on Windows):
{ "handler": { "type": "Chain", "config": { "filters": [ { "type": "ScriptableFilter", "config": {

Extending the ForgeRock Identity GatewayScripting SQL Queries
Gateway Guide ForgeRock Identity Gateway 5 (2018-05-03T07:21:09.993)Copyright © 2011-2017 ForgeRock AS. All rights reserved. 154
"type": "application/x-groovy", "file": "LdapAuthFilter.groovy" } } ], "handler": { "type": "ScriptableHandler", "config": { "type": "application/x-groovy", "source": [ "dn = request.headers['Ldap-User-Dn'].values[0]", "entity = '<html><body><p>Ldap-User-Dn: ' + dn + '</p></body></html>'", "", "response = new Response(Status.OK)", "response.entity = entity", "return response" ] } } } }, "condition": "${matches(request.uri.path, '^/ldap')}"}
The route calls the LdapAuthFilter.groovy script to authenticate the user over LDAP. On successfulauthentication, it responds with the the bind DN.
To test the configuration, browse to a URL where query string parameters specify a valid usernameand password, such as http://openig.example.com:8080/ldap?username=user.0&password=password.
The response from the script shows the DN: Ldap-User-Dn: uid=user.0,ou=People,dc=example,dc=com.
14.5. Scripting SQL QueriesYou can use a ScriptableFilter to look up information in a relational database and include the resultsin the request context.
The following filter looks up user credentials in a database given the user's email address, which isfound in the form data of the request. The script then sets the credentials in headers, making sure thescheme is HTTPS to protect the request when it leaves OpenIG:
/* * Copyright 2014-2017 ForgeRock AS. All Rights Reserved * * Use of this code requires a commercial software license with ForgeRock AS. * or with one of its affiliates. All use shall be exclusively subject * to such license between the licensee and ForgeRock AS. */
/* * Look up user credentials in a relational database * based on the user's email address provided in the request form data, * and set the credentials in the request headers for the next handler.

Extending the ForgeRock Identity GatewayScripting SQL Queries
Gateway Guide ForgeRock Identity Gateway 5 (2018-05-03T07:21:09.993)Copyright © 2011-2017 ForgeRock AS. All rights reserved. 155
*/
def client = new SqlClient()def credentials = client.getCredentials(request.form?.mail[0])request.headers.add("Username", credentials.Username)request.headers.add("Password", credentials.Password)
// The credentials are not protected in the headers, so use HTTPS.request.uri.scheme = "https"
// Calls the next Handler and returns a Promise of the Response.// The Response can be handled with asynchronous Promise callbacks.next.handle(context, request)
The previous script demonstrates a ScriptableFilter that uses a SqlClient class defined in anotherscript. The following code listing shows the SqlClient class:
/* * Copyright 2014-2017 ForgeRock AS. All Rights Reserved * * Use of this code requires a commercial software license with ForgeRock AS. * or with one of its affiliates. All use shall be exclusively subject * to such license between the licensee and ForgeRock AS. */
import groovy.sql.Sql
import javax.naming.InitialContextimport javax.sql.DataSource
/** * Access a database with a well-known structure, * in particular to get credentials given an email address. */class SqlClient {
// Get a DataSource from the container. InitialContext context = new InitialContext() DataSource dataSource = context.lookup("jdbc/forgerock") as DataSource def sql = new Sql(dataSource)
// The expected table is laid out like the following.
// Table USERS // ---------------------------------------- // | USERNAME | PASSWORD | EMAIL |...| // ---------------------------------------- // | <username>| <passwd> | <mail@...>|...| // ----------------------------------------
String tableName = "USERS" String usernameColumn = "USERNAME" String passwordColumn = "PASSWORD" String mailColumn = "EMAIL"
/** * Get the Username and Password given an email address. *

Extending the ForgeRock Identity GatewayScripting SQL Queries
Gateway Guide ForgeRock Identity Gateway 5 (2018-05-03T07:21:09.993)Copyright © 2011-2017 ForgeRock AS. All rights reserved. 156
* @param mail Email address used to look up the credentials * @return Username and Password from the database */ def getCredentials(mail) { def credentials = [:] def query = "SELECT " + usernameColumn + ", " + passwordColumn + " FROM " + tableName + " WHERE " + mailColumn + "='$mail';"
sql.eachRow(query) { credentials.put("Username", it."$usernameColumn") credentials.put("Password", it."$passwordColumn") } return credentials }}
To try the script, follow these steps:
1. Follow the tutorial in Section 4.3, "Log in With Credentials From a Database".
When everything in that tutorial works, you know that OpenIG can connect to the database, lookup users by email address, and successfully authenticate to the sample application.
2. Save the scripts as $HOME/.openig/scripts/groovy/SqlAccessFilter.groovy (%appdata%\OpenIG\scripts\groovy\SqlAccessFilter.groovy on Windows), and as $HOME/.openig/scripts/groovy/SqlClient.groovy(%appdata%\OpenIG\scripts\groovy\SqlClient.groovy on Windows).
3. Add the following route to your configuration as $HOME/.openig/config/routes/11-db.json (%appdata%\OpenIG\config\routes\11-db.json on Windows):
{ "handler": { "type": "Chain", "config": { "filters": [ { "type": "ScriptableFilter", "config": { "type": "application/x-groovy", "file": "SqlAccessFilter.groovy" } }, { "type": "StaticRequestFilter", "config": { "method": "POST", "uri": "http://app.example.com:8081/login", "form": { "username": [ "${request.headers['Username'][0]}" ], "password": [ "${request.headers['Password'][0]}" ] } }

Extending the ForgeRock Identity GatewayDeveloping Custom Extensions
Gateway Guide ForgeRock Identity Gateway 5 (2018-05-03T07:21:09.993)Copyright © 2011-2017 ForgeRock AS. All rights reserved. 157
} ], "handler": "ClientHandler" } }, "condition": "${matches(request.uri.path, '^/db')}"}
The route calls the ScriptableFilter to look up credentials over SQL. It then uses calls aStaticRequestFilter to build a login request. Although the script sets the scheme to HTTPS, theStaticRequestFilter ignores that and resets the URI. This makes it easier to try the script withoutadditional steps to set up HTTPS.
To try the configuration, browse to a URL where a query string parameter specifies a valid emailaddress, such as http://openig.example.com:8080/[email protected].
If the lookup and authentication are successful, you see the profile page of the sample application.
14.6. Developing Custom ExtensionsOpenIG includes a complete Java application programming interface to allow you to customizeOpenIG to perform complex server interactions or intensive data transformations that you cannotachieve with scripts or the existing handlers, filters, and expressions described in Expressions(5) inthe Configuration Reference.
14.6.1. Key Extension PointsInterface Stability: Evolving (For information, see Section A.2, "ForgeRock Product InterfaceStability" in the Configuration Reference.)
The following interfaces are available:
Decorator
A Decorator adds new behavior to another object without changing the base type of the object.
When suggesting custom Decorator names, know that OpenIG reserves all field names that useonly alphanumeric characters. To avoid clashes, use dots or dashes in your field names, such as my-decorator.
ExpressionPlugin
An ExpressionPlugin adds a node to the Expression context tree, alongside env (for environmentvariables), and system (for system properties). For example, the expression ${system['user.home']}yields the home directory of the user running the application server for OpenIG.
In your ExpressionPlugin, the getKey() method returns the name of the node, and the getObject()method returns the unified expression language context object that contains the values needed toresolve the expression. The plugins for env and system return Map objects, for example.

Extending the ForgeRock Identity GatewayImplementing a Customized Sample Filter
Gateway Guide ForgeRock Identity Gateway 5 (2018-05-03T07:21:09.993)Copyright © 2011-2017 ForgeRock AS. All rights reserved. 158
When you add your own ExpressionPlugin, you must make it discoverable within your customlibrary. You do this by adding a services file named after the plugin interface, wherethe file contains the fully qualified class name of your plugin, under META-INF/services/org.forgerock.openig.el.ExpressionPlugin in the .jar file for your customizations. When you havemore than one plugin, add one fully qualified class name per line. For details, see the referencedocumentation for the Java class ServiceLoader. If you build your project using Maven, then youcan add this under the src/main/resources directory. As described in Section 14.6.4, "Embeddingthe Customization in OpenIG", you must add your custom libraries to the WEB-INF/lib/ directory ofthe OpenIG .war file that you deploy.
Be sure to provide some documentation for OpenIG administrators on how your plugin extendsexpressions.
Filter
A Filter serves to process a request before handing it off to the next element in the chain, in asimilar way to an interceptor programming model.
The Filter interface exposes a filter() method, which takes a Context, a Request, and theHandler, which is the next filter or handler to dispatch to. The filter() method returns a Promisethat provides access to the Response with methods for dealing with both success and failureconditions.
A filter can elect not to pass the request to the next filter or handler, and instead handle therequest itself. It can achieve this by merely avoiding a call to next.handle(context, request),creating its own response object and returning that in the promise. The filter is also at liberty toreplace a response with another of its own. A filter can exist in more than one chain, thereforeshould make no assumptions or correlations using the chain it is supplied. The only valid use of achain by a filter is to call its handle() method to dispatch the request to the rest of the chain.
Handler
A Handler generates a response for a request.
The Handler interface exposes a handle() method, which takes a Context, and a Request. Itprocesses the request and returns a Promise that provides access to the Response with methodsfor dealing with both success and failure conditions. A handler can elect to dispatch the requestto another handler or chain.
14.6.2. Implementing a Customized Sample Filter
The SampleFilter class implements the Filter interface to set a header in the incoming request and inthe outgoing response. The following sample filter adds an arbitrary header:

Extending the ForgeRock Identity GatewayImplementing a Customized Sample Filter
Gateway Guide ForgeRock Identity Gateway 5 (2018-05-03T07:21:09.993)Copyright © 2011-2017 ForgeRock AS. All rights reserved. 159
package org.forgerock.openig.doc;
import org.forgerock.http.Filter;import org.forgerock.http.Handler;import org.forgerock.http.protocol.Request;import org.forgerock.http.protocol.Response;import org.forgerock.openig.heap.GenericHeaplet;import org.forgerock.openig.heap.HeapException;import org.forgerock.services.context.Context;import org.forgerock.util.promise.NeverThrowsException;import org.forgerock.util.promise.Promise;import org.forgerock.util.promise.ResultHandler;
/** * Filter to set a header in the incoming request and in the outgoing response. */public class SampleFilter implements Filter {
/** Header name. */ String name;
/** Header value. */ String value;
/** * Set a header in the incoming request and in the outgoing response. * A configuration example looks something like the following. * * <pre> * { * "name": "SampleFilter", * "type": "SampleFilter", * "config": { * "name": "X-Greeting", * "value": "Hello world" * } * } * </pre> * * @param context Execution context. * @param request HTTP Request. * @param next Next filter or handler in the chain. * @return A {@code Promise} representing the response to be returned to the client. */ @Override public Promise<Response, NeverThrowsException> filter(final Context context, final Request request, final Handler next) {
// Set header in the request. request.getHeaders().put(name, value);
// Pass to the next filter or handler in the chain. return next.handle(context, request) // When it has been successfully executed, execute the following callback .thenOnResult(new ResultHandler<Response>() { @Override public void handleResult(final Response response) {

Extending the ForgeRock Identity GatewayImplementing a Customized Sample Filter
Gateway Guide ForgeRock Identity Gateway 5 (2018-05-03T07:21:09.993)Copyright © 2011-2017 ForgeRock AS. All rights reserved. 160
// Set header in the response. response.getHeaders().put(name, value); } }); }
/** * Create and initialize the filter, based on the configuration. * The filter object is stored in the heap. */ public static class Heaplet extends GenericHeaplet {
/** * Create the filter object in the heap, * setting the header name and value for the filter, * based on the configuration. * * @return The filter object. * @throws HeapException Failed to create the object. */ @Override public Object create() throws HeapException {
SampleFilter filter = new SampleFilter(); filter.name = config.get("name").as(evaluatedWithHeapProperties()).required().asString(); filter.value = config.get("value").as(evaluatedWithHeapProperties()).required().asString();
return filter; } }}
When you set the sample filter type in the configuration, you need to provide the fully qualified classname, as in "type": "org.forgerock.openig.doc.SampleFilter". You can however implement a class aliasresolver to make it possible to use a short name instead, as in "type": "SampleFilter":package org.forgerock.openig.doc;
import org.forgerock.openig.alias.ClassAliasResolver;
import java.util.HashMap;import java.util.Map;
/** * Allow use of short name aliases in configuration object types. * * This allows a configuration with {@code "type": "SampleFilter"} * instead of {@code "type": "org.forgerock.openig.doc.SampleFilter"}. */public class SampleClassAliasResolver implements ClassAliasResolver {
private static final Map<String, Class<?>> ALIASES = new HashMap<>();
static { ALIASES.put("SampleFilter", SampleFilter.class); }

Extending the ForgeRock Identity GatewayConfiguring the Heap Object for the Customization
Gateway Guide ForgeRock Identity Gateway 5 (2018-05-03T07:21:09.993)Copyright © 2011-2017 ForgeRock AS. All rights reserved. 161
/** * Get the class for a short name alias. * * @param alias Short name alias. * @return The class, or null if the alias is not defined. */ @Override public Class<?> resolve(String alias) { return ALIASES.get(alias); }}
When you add your own resolver, you must make it discoverable within your customlibrary. You do this by adding a services file named after the class resolver interface, wherethe file contains the fully qualified class name of your resolver, under META-INF/services/org.forgerock.openig.alias.ClassAliasResolver in the .jar file for your customizations. When you havemore than one resolver, add one fully qualified class name per line. If you build your project usingMaven, then you can add this under the src/main/resources directory. The content of the file in thisexample is one line:
org.forgerock.openig.doc.SampleClassAliasResolver
The corresponding heap object configuration then looks as follows:
{ "name": "SampleFilter", "type": "SampleFilter", "config": { "name": "X-Greeting", "value": "Hello world" }}
14.6.3. Configuring the Heap Object for the Customization
Objects are added to the heap and supplied with configuration artifacts at initialization time. To beintegrated with the configuration, a class must have an accompanying implementation of the Heapletinterface. The easiest and most common way of exposing the heaplet is to extend the GenericHeapletclass in a nested class of the class you want to create and initialize, overriding the heaplet's create()method.
Within the create() method, you can access the object's configuration through the config field.
14.6.4. Embedding the Customization in OpenIG
After building your customizations into a .jar file, you can include them in the OpenIG .war file fordeployment. You do this by unpacking IG-5.0.0.war, including your .jar library in WEB-INF/lib, and thencreating a new .war file.

Extending the ForgeRock Identity GatewayEmbedding the Customization in OpenIG
Gateway Guide ForgeRock Identity Gateway 5 (2018-05-03T07:21:09.993)Copyright © 2011-2017 ForgeRock AS. All rights reserved. 162
For example, if your .jar file is in a project named sample-filter, and the development version is 1.0.0-SNAPSHOT, you might include the file as in the following example:$ mkdir root && cd root$ jar -xf ~/Downloads/IG-5.0.0.war$ cp ~/Documents/sample-filter/target/sample-filter-1.0.0-SNAPSHOT.jar WEB-INF/lib$ jar -cf ../custom.war *
In this example, the resulting custom.war contains the custom sample filter. You can deploy thecustom .war file as you would deploy IG-5.0.0.war.

Auditing and MonitoringMonitoring Routes
Gateway Guide ForgeRock Identity Gateway 5 (2018-05-03T07:21:09.993)Copyright © 2011-2017 ForgeRock AS. All rights reserved. 163
Chapter 15
Auditing and MonitoringFor each route, OpenIG can collect statistics on the number of requests and responses passedthrough the route since startup, and on throughput time and response time. The information isexposed as JSON format monitoring resource over an HTTP endpoint.
You can add an audit service to a route, and the service can then publish messages to a consumersuch as a CSV file, a relational database, or the Syslog facility. In this chapter, you will learn to:
• Enable monitoring for a route
• Read monitoring statistics for a route as a JSON format monitoring resource
• Add an audit service to a route to integrate with the ForgeRock common audit event framework,sometimes referred to as Common Audit
15.1. Monitoring RoutesTo collect statistics for a route, set the route's monitor attribute to true. Alternatively, use anappropriate boolean expression to enable or disable monitoring with an environment variable orsystem property.
When monitoring is enabled, statistics for the route are exposed as a JSON format monitoringresource that you can access over a Common REST endpoint. For information about what informationis monitored, see "The REST API for Monitoring" in the Configuration Reference.
Monitoring endpoints serve API descriptors at runtime. When you retrieve an API descriptor for amonitoring endpoint, a JSON that describes the API for the endpoint is returned. You can use the APIdescriptor with a tool such as Swagger UI to generate a web page that helps you to view and test theendpoint. For information, see Section 1.10, "Understanding OpenIG APIs With API Descriptors".
When you start OpenIG, or add or edit routes, the endpoints are written in $HOME/.openig/logs/route-system.log. The endpoints are constructed from the base URL of OpenIG, the object name of the mainrouter configured in config.json, and the route ID. When a route contains a subrouter, its endpointincludes the main router and the subrouter.
The routes endpoint is defined by the presence and content of config.json, as follows:
• When config.json is not provided, the routes endpoint includes the name of the main router in thedefault configuration, _router.

Auditing and MonitoringMonitoring Routes
Gateway Guide ForgeRock Identity Gateway 5 (2018-05-03T07:21:09.993)Copyright © 2011-2017 ForgeRock AS. All rights reserved. 164
• When config.json is provided with an unnamed main router, the routes endpoint includes the mainrouter name router-handler.
• When config.json is provided with a named main router, the routes endpoint includes the providedname or the transformed, URL-friendly name.
Procedure 15.1. To Monitor a Route
Before you start, prepare OpenIG and the sample application as described in Chapter 2, "GettingStarted".
1. Access OpenIG Studio on http://openig.example.com:8080/openig/studio, and select Protect anApplication.
2. In the Create a route window, select Advanced Options and enter the following information, andthen select Create route:
• Base URI: http://app.example.com:8081
• Condition: Path: /home/monitor
• Name: 00-monitor
3. Select Statistics, and then enable statistics.
4. In Percentiles, remove the default percentiles, add the percentiles 0.25, 0.5, and 0.75, and thenselect Save.
These are example values. Alternatively, use the default values or other values.
5. On the top-right of the screen, select ⋮ > Display, and review the route. The following routeshould be displayed.
{ "name": "00-monitor", "baseURI": "http://app.example.com:8081", "monitor": { "enabled": true, "percentiles": [ 0.25, 0.5, 0.75 ] }, "condition": "${matches(request.uri.path, '^/home/monitor')}", "handler": "ClientHandler"}
Notice the following features of the new route:
• The route matches requests to /home/monitor.

Auditing and MonitoringMonitoring Routes
Gateway Guide ForgeRock Identity Gateway 5 (2018-05-03T07:21:09.993)Copyright © 2011-2017 ForgeRock AS. All rights reserved. 165
• Each time the route is accessed, the ClientHandler passes the request to the sample applicationand OpenIG collects statistics.
6. Select Deploy to push the route to the OpenIG configuration.
You can check the $HOME/.openig/config/routes folder to see that the route is there.
7. Access the route a few times at http://openig.example.com:8080/home/monitor.
8. Go to the monitoring endpoint for the route, at http://openig.example.com:8080/openig/api/system/objects/_router/routes/00-monitor/monitoring.
The monitoring resource displays statistics for requests and responses, as in the followingexample:
{ "requests": { "active": 0, "total": 3 }, "responseTime": { "mean": 0.108, "median": 0.109, "percentiles": { "0.25": 0.085, "0.5": 0.109, "0.75": 0.13 }, "standardDeviation": 0.018, "total": 0 }, "responses": { "clientError": 0, "errors": 0, "info": 0, "null": 0, "other": 0, "redirect": 0, "serverError": 0, "success": 3, "total": 3 }, "throughput": { "last15Minutes": 0.0, "last5Minutes": 0.0, "lastMinute": 0.0, "mean": 0.1 }}

Auditing and MonitoringRecording Audit Event Messages
Gateway Guide ForgeRock Identity Gateway 5 (2018-05-03T07:21:09.993)Copyright © 2011-2017 ForgeRock AS. All rights reserved. 166
15.2. Recording Audit Event MessagesThe ForgeRock common audit framework is a platform-wide infrastructure to handle audit events byusing common audit event handlers. The handlers record events by logging them into files, relationaldatabases, or syslog.
OpenIG provides audit event handlers to write messages to the following formats:
• JSON audit event handler, to log audit topics to JSON files.
For information about the JSON audit event handler, see JsonAuditEventHandler(5) in theConfiguration Reference.
• The Elasticsearch search and analytics engine.
For an example of how to record audit events in elasticsearch, see Procedure 15.3, " To RecordAudit Events In Elasticsearch ". For information about how to download and install Elasticsearch,see the Elasticsearch Getting Started document.
• CSV files, with support for retention, rotation, and tamper-evident logs.
For an example of how to record audit events in a CSV file, see Procedure 15.2, "To Record AuditEvents In a CSV File".
• Relational databases using JDBC.
• The UNIX system log (Syslog) facility.
• Java Message Service (JMS), to send asynchronous messages between clients.
For an example of how to record audit events with a JMS audit event handler, see Procedure 15.4,"To Record Audit Events With a JMS Audit Event Handler". For more information about JMS auditevent handlers, see JmsAuditEventHandler(5) in the Configuration Reference.
Each audit event is identified by a unique transaction ID that can be communicated across productsand recorded for each local event. By using the transaction ID, requests can be tracked as theytraverse the platform, making it easier to monitor activity and to enrich reports.
Transaction IDs from other services in the ForgeRock platform are sent as X-ForgeRock-TransactionIdheader values.
By default, OpenIG does not trust transaction ID headers from client applications.
Note
If you trust transaction IDs sent by client applications, and want monitoring and reporting systems consumingthe logs to allow correlation of requests as they traverse multiple servers, then set the boolean system property

Auditing and MonitoringRecording Audit Event Messages
Gateway Guide ForgeRock Identity Gateway 5 (2018-05-03T07:21:09.993)Copyright © 2011-2017 ForgeRock AS. All rights reserved. 167
org.forgerock.http.TrustTransactionHeader to true in the Java command to start the container where OpenIGruns.
To enable the audit framework for a route, you specify an audit service and configure an audit eventhandler. The following procedures describe how to record audit events in a CSV file and to theElasticsearch search and analytics engine. For more information about recording audit events, seeAudit Framework in the Configuration Reference.
Procedure 15.2. To Record Audit Events In a CSV File
Before you start, prepare OpenIG and the sample application as shown in Chapter 2, "GettingStarted".
1. Add the following route to the OpenIG as $HOME/.openig/config/routes/30-audit.json.
On Windows, add the route as %appdata%\OpenIG\config\routes\30-audit.json.
{ "handler": "ForgeRockClientHandler", "baseURI": "http://app.example.com:8081", "condition": "${matches(request.uri.path, '^/home/audit')}", "auditService": { "type": "AuditService", "config": { "config": {}, "event-handlers": [ { "class": "org.forgerock.audit.handlers.csv.CsvAuditEventHandler", "config": { "name": "csv", "logDirectory": "/tmp/logs", "buffering": { "enabled": "true", "autoFlush": "true" }, "topics": [ "access" ] } } ] } }}
The route calls an audit service configuration for publishing log messages to the CSV file, /tmp/logs/access.csv. When a request matches audit, audit events are logged to the CSV file.
The route uses the ForgeRockClientHandler as its handler, to send the X-ForgeRock-TransactionIdheader with its requests to external services.
2. Access the route on http://openig.example.com:8080/home/audit.

Auditing and MonitoringRecording Audit Event Messages
Gateway Guide ForgeRock Identity Gateway 5 (2018-05-03T07:21:09.993)Copyright © 2011-2017 ForgeRock AS. All rights reserved. 168
The home page of the sample application should be displayed and the file /tmp/logs/access.csvshould be updated.
Procedure 15.3. To Record Audit Events In Elasticsearch
Before you start, make sure that Elasticsearch is installed and running. For Elasticsearch downloadsand installation instructions, see the Elasticsearch Getting Started document. For informationabout configuring the Elasticsearch event handler, see ElasticsearchAuditEventHandler(5) in theConfiguration Reference.
1. Add the following route to the OpenIG as $HOME/.openig/config/routes/30-elasticsearch.json.
On Windows, add the route as %appdata%\OpenIG\config\routes\30-elasticsearch.json.
{ "MyCapture": "all", "auditService": { "name": "audit-service", "type": "AuditService", "config": { "config": {}, "enabled": true, "event-handlers": [ { "class": "org.forgerock.audit.handlers.elasticsearch.ElasticsearchAuditEventHandler", "config": { "name": "elasticsearch", "topics": [ "access" ], "connection": { "useSSL": false, "host": "localhost", "port": 9200 }, "indexMapping": { "indexName": "audit" }, "buffering": { "enabled": true, "maxSize": 10000, "writeInterval": "250 millis", "maxBatchedEvents": 500 } } } ] } }, "condition": "${matches(request.uri.path, '^/elasticsearch')}", "handler": { "type": "StaticResponseHandler", "config": {

Auditing and MonitoringRecording Audit Event Messages
Gateway Guide ForgeRock Identity Gateway 5 (2018-05-03T07:21:09.993)Copyright © 2011-2017 ForgeRock AS. All rights reserved. 169
"entity": "View audit events in Elasticsearch at\rhttp://localhost:9200/audit/access/_search?q='\"OPENIG-HTTP-ACCESS\"'", "reason": "found", "status": 200, "headers": { "content-type": [ "text/plain" ] } } }}
The route calls an audit service configuration for publishing log messages in Elasticsearch.When a request matches the /elasticsearch route, audit events are logged to theElasticsearchAuditEventHandler.
The URL where you can view the messages logged by Elasticsearch is displayed. The URL isconstructed from the host, port, index name, and topics defined in the event handler.
2. Access the route on http://openig.example.com:8080/elasticsearch.
The audit events are logged in Elasticsearch and the URL where you can view the messages isdisplayed.
3. Access the URL http://localhost:9200/audit/access/_search?q='"OPENIG-HTTP-ACCESS"'.
The audit events logged in Elasticsearch are displayed.
4. Repeat the previous two steps again to access the OpenIG route and then the Elasticsearch URL.
Each time you access the OpenIG route, the audit events logged in Elasticsearch should beupdated.
Procedure 15.4. To Record Audit Events With a JMS Audit Event Handler
Important
This procedure is an example of how to record audit events with a JMS audit event handler configured touse the ActiveMQ message broker. This example is not tested on all configurations, and can be more or lessrelevant to your configuration.
For information about configuring the JMS event handler, see JmsAuditEventHandler(5) in theConfiguration Reference.
Before you start, prepare OpenIG as described in Chapter 2, "Getting Started".
1. Add ActiveMQ client dependencies to OpenIG:
a. Download the following .jar files from Apache ActiveMQ :

Auditing and MonitoringRecording Audit Event Messages
Gateway Guide ForgeRock Identity Gateway 5 (2018-05-03T07:21:09.993)Copyright © 2011-2017 ForgeRock AS. All rights reserved. 170
• geronimo-j2ee-management_1.1_spec-1.0.1.jar
• hawtbuf-1.11.jar
• activemq-client-5.13.3.jar
b. Add the .jar files to the OpenIG container, at /path/to/jetty/webapps/ROOT/WEB-INF/lib.
2. Download and install the ActiveMQ message broker from http://activemq.apache.org/. For help,see the the ActiveMQ documentation on the same site.
3. Create a consumer that subscribes to the audit topic.
From the ActiveMQ installation directory, run the following command:$ ./bin/activemq consumer --destination topic://audit
4. Add the following route to the OpenIG as $HOME/.openig/config/routes/30-jms.json.
On Windows, add the route as %appdata%\OpenIG\config\routes\30-jms.json:
{ "MyCapture" : "all", "auditService" : { "config" : { "event-handlers" : [ { "class" : "org.forgerock.audit.handlers.jms.JmsAuditEventHandler", "config" : { "name" : "jms", "topics" : [ "access" ], "deliveryMode" : "NON_PERSISTENT", "sessionMode" : "AUTO", "jndi" : { "contextProperties" : { "java.naming.factory.initial" : "org.apache.activemq.jndi.ActiveMQInitialContextFactory", "java.naming.provider.url" : "tcp://openam.example.com:61616", "topic.audit" : "audit" }, "topicName" : "audit", "connectionFactoryName" : "ConnectionFactory" } } } ], "config" : { } }, "type" : "AuditService" }, "handler" : { "type" : "StaticResponseHandler", "config" : { "status" : 200, "headers" : {
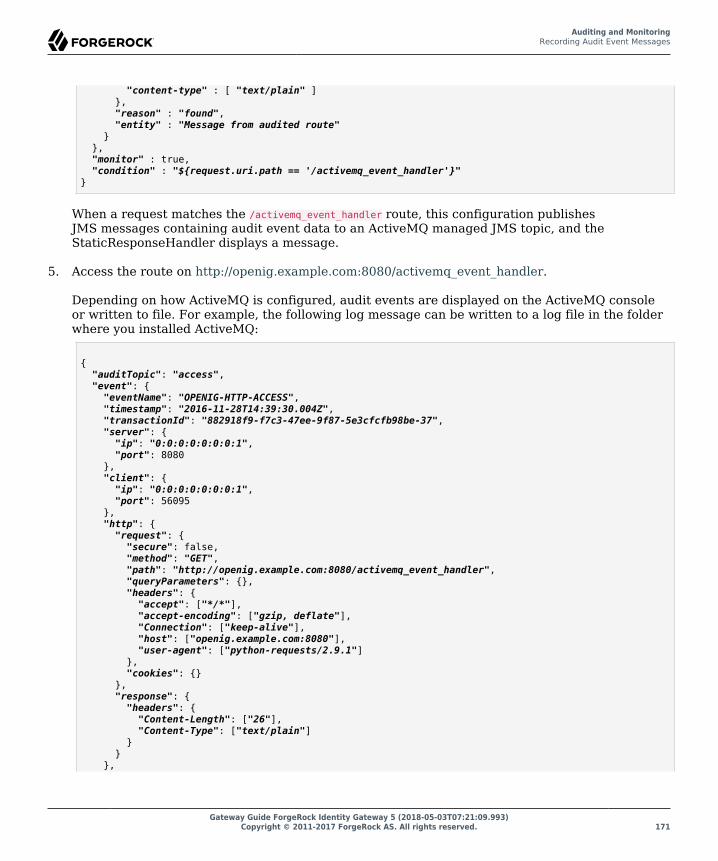
Auditing and MonitoringRecording Audit Event Messages
Gateway Guide ForgeRock Identity Gateway 5 (2018-05-03T07:21:09.993)Copyright © 2011-2017 ForgeRock AS. All rights reserved. 171
"content-type" : [ "text/plain" ] }, "reason" : "found", "entity" : "Message from audited route" } }, "monitor" : true, "condition" : "${request.uri.path == '/activemq_event_handler'}"}
When a request matches the /activemq_event_handler route, this configuration publishesJMS messages containing audit event data to an ActiveMQ managed JMS topic, and theStaticResponseHandler displays a message.
5. Access the route on http://openig.example.com:8080/activemq_event_handler.
Depending on how ActiveMQ is configured, audit events are displayed on the ActiveMQ consoleor written to file. For example, the following log message can be written to a log file in the folderwhere you installed ActiveMQ:
{ "auditTopic": "access", "event": { "eventName": "OPENIG-HTTP-ACCESS", "timestamp": "2016-11-28T14:39:30.004Z", "transactionId": "882918f9-f7c3-47ee-9f87-5e3cfcfb98be-37", "server": { "ip": "0:0:0:0:0:0:0:1", "port": 8080 }, "client": { "ip": "0:0:0:0:0:0:0:1", "port": 56095 }, "http": { "request": { "secure": false, "method": "GET", "path": "http://openig.example.com:8080/activemq_event_handler", "queryParameters": {}, "headers": { "accept": ["*/*"], "accept-encoding": ["gzip, deflate"], "Connection": ["keep-alive"], "host": ["openig.example.com:8080"], "user-agent": ["python-requests/2.9.1"] }, "cookies": {} }, "response": { "headers": { "Content-Length": ["26"], "Content-Type": ["text/plain"] } } },

Auditing and MonitoringRecording Audit Event Messages
Gateway Guide ForgeRock Identity Gateway 5 (2018-05-03T07:21:09.993)Copyright © 2011-2017 ForgeRock AS. All rights reserved. 172
"response": { "status": "SUCCESSFUL", "statusCode": "200", "elapsedTime": 73, "elapsedTimeUnits": "MILLISECONDS" }, "_id": "882918f9-f7c3-47ee-9f87-5e3cfcfb98be-38" }}

Throttling the Rate of Requests to Protected ApplicationsConfiguring a Simple Throttling Filter
Gateway Guide ForgeRock Identity Gateway 5 (2018-05-03T07:21:09.993)Copyright © 2011-2017 ForgeRock AS. All rights reserved. 173
Chapter 16
Throttling the Rate of Requests to ProtectedApplications
To protect applications from being overused by clients, use a throttling filter to limit how manyrequests can be made in a defined time. This section describes how to set up two throttling filters.For more configuration options, see ThrottlingFilter(5) in the Configuration Reference.
The throttling filter limits the rate that requests pass through a filter. The maximum number ofrequests that are allowed in a defined time is called the throttling rate.
By default, the throttling filter uses a strategy based on the token bucket algorithm, which allowssome bursts.
When the throttling rate is reached, OpenIG issues an HTTP status code 429 Too Many Requests and aRetry-After header like the following, where the value is the number of seconds to wait before tryingthe request again:
GET http://openig.example.com:8080/home/throttle-scriptable HTTP/1.1
. . .
HTTP/1.1 429 Too Many RequestsRetry-After: 10
16.1. Configuring a Simple Throttling FilterThis section describes how to use OpenIG Studio to configure a simple throttling filter that appliesa throttling rate of 6 requests/10 seconds to requests. When an application is protected by thisthrottling filter, no more than 6 requests, irrespective of their origin, can access the sampleapplication in a 10 second period.
To configure OpenIG without using OpenIG Studio, add the route in Example 16.1, "Route for SimpleThrottling" to the OpenIG configuration as $HOME/.openig/config/routes/simple-throttling.json. OnWindows, add the route as %appdata%\OpenIG\config\routes\simple-throttling.json.

Throttling the Rate of Requests to Protected ApplicationsConfiguring a Simple Throttling Filter
Gateway Guide ForgeRock Identity Gateway 5 (2018-05-03T07:21:09.993)Copyright © 2011-2017 ForgeRock AS. All rights reserved. 174
Figure 16.1. Simple Throttling Filter
Example 16.1. Route for Simple Throttling
{ "name": "00-throttle-simple", "baseURI": "http://app.example.com:8081", "monitor" : false, "condition": "${matches(request.uri.path, '^/home/throttle-simple')}", "handler": { "type": "Chain", "config": { "filters": [ { "type": "ThrottlingFilter", "name": "Throttling", "config": { "rate": { "numberOfRequests": 6, "duration": "10 s" } } } ], "handler": "ClientHandler" } }}
Procedure 16.1. To Configure a Simple Throttling Filter
This procedure configures a simple throttling filter in OpenIG Studio. The other procedures in thischapter create throttling filters manually, in the file system.
Before you start, prepare OpenIG and the sample application as described in Chapter 2, "GettingStarted". Make sure that your config.json has a main router named _router.

Throttling the Rate of Requests to Protected ApplicationsConfiguring a Simple Throttling Filter
Gateway Guide ForgeRock Identity Gateway 5 (2018-05-03T07:21:09.993)Copyright © 2011-2017 ForgeRock AS. All rights reserved. 175
1. Access OpenIG Studio on http://openig.example.com:8080/openig/studio, and select Protect anApplication.
2. In the Create a route window, select Advanced Options and enter the following information, andthen select Create route:
• Base URI: http://app.example.com:8081
• Condition: Path: /home/throttle-simple
• Name: 00-throttle-simple
3. Select Throttling, and then enable throttling.
4. Select options to allow 6 requests each 10 seconds, and then save the settings.
5. On the top-right of the screen, select ⋮ > Display, and review the route. The route inExample 16.1, "Route for Simple Throttling" should be displayed.
6. Select Deploy to push the route to the OpenIG configuration.
You can check the $HOME/.openig/config/routes folder to see that the route is there.
Procedure 16.2. To Test the Setup
1. With OpenIG and the sample application running, use curl, a bash script, or another tool toaccess the following route in a loop: http://openig.example.com:8080/home/simple-throttle.
Accessing the route in a loop runs the request multiple times in quick succession, allowing you totest the throttling rate.
$ curl -v http://openig.example.com:8080/home/throttle-simple/\[01-10\] \> /tmp/simple-throttle.txt 2>&1
2. Search the output file to see the result:
$ grep "< HTTP/1.1" /tmp/simple-throttle.txt | sort | uniq -c
6 < HTTP/1.1 200 OK4 < HTTP/1.1 429 Too Many Requests
Notice that the first six requests returned a success response, and the following four requestsreturned an HTTP 429 Too Many Requests. This result demonstrates that the throttling filter hasallowed only six requests to access the application, and has blocked the other requests.

Throttling the Rate of Requests to Protected ApplicationsConfiguring a Mapped Throttling Filter
Gateway Guide ForgeRock Identity Gateway 5 (2018-05-03T07:21:09.993)Copyright © 2011-2017 ForgeRock AS. All rights reserved. 176
16.2. Configuring a Mapped Throttling FilterThe following example route uses a mapped throttling policy to map requests from users in theaccounts and sales departments of example.com to different throttling rates. Requests from otherdepartments use the default throttling rate.
The throttling rate is applied to groups according to the evaluation of requestGroupingPolicy. In theexample, this parameter evaluates to the first UserID in the request header, representing each user.
The value of the throttling rate is assigned according to the evaluation of throttlingRateMapper. In theexample, this parameter evaluates to the value of the request header X-Forwarded-For, representing thehostname of the department.
Figure 16.2. Mapped Throttling Filter
{ "handler": { "type": "Chain", "config": { "filters": [ { "type": "ThrottlingFilter", "config": { "requestGroupingPolicy": "${request.headers['UserId'][0]}",

Throttling the Rate of Requests to Protected ApplicationsConfiguring a Mapped Throttling Filter
Gateway Guide ForgeRock Identity Gateway 5 (2018-05-03T07:21:09.993)Copyright © 2011-2017 ForgeRock AS. All rights reserved. 177
"throttlingRatePolicy": { "type": "MappedThrottlingPolicy", "config": { "throttlingRateMapper": "${request.headers['X-Forwarded-For'][0]}", "throttlingRatesMapping": { "accounts.example.com": { "numberOfRequests": 6, "duration": "10 seconds" }, "sales.example.com": { "numberOfRequests": 3, "duration": "10 seconds" } }, "defaultRate": { "numberOfRequests": 1, "duration": "10 seconds" } } } } } ], "handler": "ClientHandler" } }, "condition": "${matches(request.uri.path, '^/home/throttle-mapped')}"}
Procedure 16.3. To Configure a Mapped Throttling Filter
Before you start, prepare OpenIG and the sample application as shown in Chapter 2, "GettingStarted".
1. Add the example route to the OpenIG configuration as $HOME/.openig/config/routes/00-throttle-mapped.json.
On Windows, add the route as %appdata%\OpenIG\config\routes\00-throttle-mapped.json.
2. With OpenIG and the sample application running, access the following route in a loop: http://openig.example.com:8080/home/throttle-mapped.
Accessing the route in a loop runs the request multiple times in quick succession, allowing youto test the throttling rate. You can use a command-line tool such as curl to run the followingcommands in quick succession or in a bash script:

Throttling the Rate of Requests to Protected ApplicationsConfiguring a Scriptable Throttling Filter
Gateway Guide ForgeRock Identity Gateway 5 (2018-05-03T07:21:09.993)Copyright © 2011-2017 ForgeRock AS. All rights reserved. 178
$ curl -v http://openig.example.com:8080/home/throttle-mapped/\[01-10\] \ --header "X-Forwarded-For:accounts.example.com" \ --header "UserId:Alice" \ > /tmp/Alice.txt 2>&1
$ curl -v http://openig.example.com:8080/home/throttle-mapped/\[01-10\] \ --header "X-Forwarded-For:accounts.example.com" \ --header "UserId:Bob" \ > /tmp/Bob.txt 2>&1
$ curl -v http://openig.example.com:8080/home/throttle-mapped/\[01-10\] \ --header "X-Forwarded-For:sales.example.com" \ --header "UserId:Carol" \ > /tmp/Carol.txt 2>&1
$ curl -v http://openig.example.com:8080/home/throttle-mapped/\[01-10\] \ --header "X-Forwarded-For:finance.example.com" \ --header "UserId:Dave" \ > /tmp/Dave.txt 2>&1
3. Search the output files to see the result for each user and each organization:
$ grep "< HTTP/1.1" /tmp/Alice.txt | sort | uniq -c 6 < HTTP/1.1 200 OK 4 < HTTP/1.1 429 Too Many Requests $ grep "< HTTP/1.1" /tmp/Bob.txt | sort | uniq -c 6 < HTTP/1.1 200 OK 4 < HTTP/1.1 429 Too Many Requests $ grep "< HTTP/1.1" /tmp/Carol.txt | sort | uniq -c 3 < HTTP/1.1 200 OK 7 < HTTP/1.1 429 Too Many Requests $ grep "< HTTP/1.1" /tmp/Dave.txt | sort | uniq -c 1 < HTTP/1.1 200 OK 9 < HTTP/1.1 429 Too Many Requests
Notice that the first six requests from Alice and Bob in accounts are successful, and the firstthree requests from Carol in sales are successful, consistent with the mapping in 00-throttle-mapped.json. Requests from finance are not mapped, and therefore receive the default rate.
16.3. Configuring a Scriptable Throttling FilterIn this example, the DefaultRateThrottlingPolicy delegates the management of throttling to thescriptable throttling policy.

Throttling the Rate of Requests to Protected ApplicationsConfiguring a Scriptable Throttling Filter
Gateway Guide ForgeRock Identity Gateway 5 (2018-05-03T07:21:09.993)Copyright © 2011-2017 ForgeRock AS. All rights reserved. 179
The script applies a throttling rate of 6 requests/10 seconds to requests from the accountsdepartment of example.com. For all other requests, the script returns null. When the script returns null,the default rate of 1 request/10 seconds is applied.
Figure 16.3. Scriptable Throttling Policy
{ "handler": { "type": "Chain", "config": { "filters": [ { "type": "ThrottlingFilter", "config": { "requestGroupingPolicy": "${request.headers['UserId'][0]}", "throttlingRatePolicy": { "type": "DefaultRateThrottlingPolicy", "config": { "delegateThrottlingRatePolicy": { "type": "ScriptableThrottlingPolicy", "config": { "type": "application/x-groovy", "source": [ "if (request.headers['X-Forwarded-For'].values[0] == 'accounts.example.com') {", " return new ThrottlingRate(6, '10 seconds')", "} else {", " return null", "}" ] } }, "defaultRate": { "numberOfRequests": 1,

Throttling the Rate of Requests to Protected ApplicationsConfiguring a Scriptable Throttling Filter
Gateway Guide ForgeRock Identity Gateway 5 (2018-05-03T07:21:09.993)Copyright © 2011-2017 ForgeRock AS. All rights reserved. 180
"duration": "10 seconds" } } } } } ], "handler": "ClientHandler" } }, "condition": "${matches(request.uri.path, '^/home/throttle-scriptable')}"}
Procedure 16.4. To Configure a Scriptable Throttling Filter
Before you start, prepare OpenIG and the sample application as shown in Chapter 2, "GettingStarted".
1. Add the example route to the OpenIG configuration as $HOME/.openig/config/routes/00-throttle-scriptable.json.
On Windows, add the route as %appdata%\OpenIG\config\routes\00-throttle-scriptable.json.
2. With OpenIG and the sample application running, access the following route in a loop: http://openig.example.com:8080/home/throttle-scriptable.
Accessing the route in a loop runs the request multiple times in quick succession, allowing youto test the throttling rate. You can use a command-line tool such as curl to run the followingcommands in quick succession or in a bash script:
$ curl -v http://openig.example.com:8080/home/throttle-scriptable/\[01-10\] \ --header "X-Forwarded-For:accounts.example.com" \ --header "UserId:Alice" \ > /tmp/Alice.txt 2>&1
$ curl -v http://openig.example.com:8080/home/throttle-scriptable/\[01-10\] \ --header "X-Forwarded-For:accounts.example.com" \ --header "UserId:Bob" \ > /tmp/Bob.txt 2>&1
$ curl -v http://openig.example.com:8080/home/throttle-scriptable/\[01-10\] \ --header "X-Forwarded-For:sales.example.com" \ --header "UserId:Carol" \ > /tmp/Carol.txt 2>&1
3. Search the output files to see the result for each user and each organization:

Throttling the Rate of Requests to Protected ApplicationsDynamic Throttling Rate
Gateway Guide ForgeRock Identity Gateway 5 (2018-05-03T07:21:09.993)Copyright © 2011-2017 ForgeRock AS. All rights reserved. 181
$ grep "< HTTP/1.1" /tmp/Alice.txt | sort | uniq -c 6 < HTTP/1.1 200 OK 4 < HTTP/1.1 429 Too Many Requests $ grep "< HTTP/1.1" /tmp/Bob.txt | sort | uniq -c 6 < HTTP/1.1 200 OK 4 < HTTP/1.1 429 Too Many Requests $ grep "< HTTP/1.1" /tmp/Carol.txt | sort | uniq -c 1 < HTTP/1.1 200 OK 9 < HTTP/1.1 429 Too Many Requests
Notice that the first six requests from Alice and Bob in accounts are successful, consistent withthe value in ThrottlingScript.groovy. The script returns null for requests from Carol in sales, sothose requests receive the default throttling rate.
16.4. Dynamic Throttling RateIn Section 16.2, " Configuring a Mapped Throttling Filter ", requests from the same user were alwayssent from the same department in example.com. This example shows what happens to the throttling ratewhen a user sends requests from more than one department.
The throttling rate is applied to users according to the evaluation of requestGroupingPolicy, anddifferent throttling rates are mapped to different departments of example.com according to theevaluation of throttlingRateMapper.
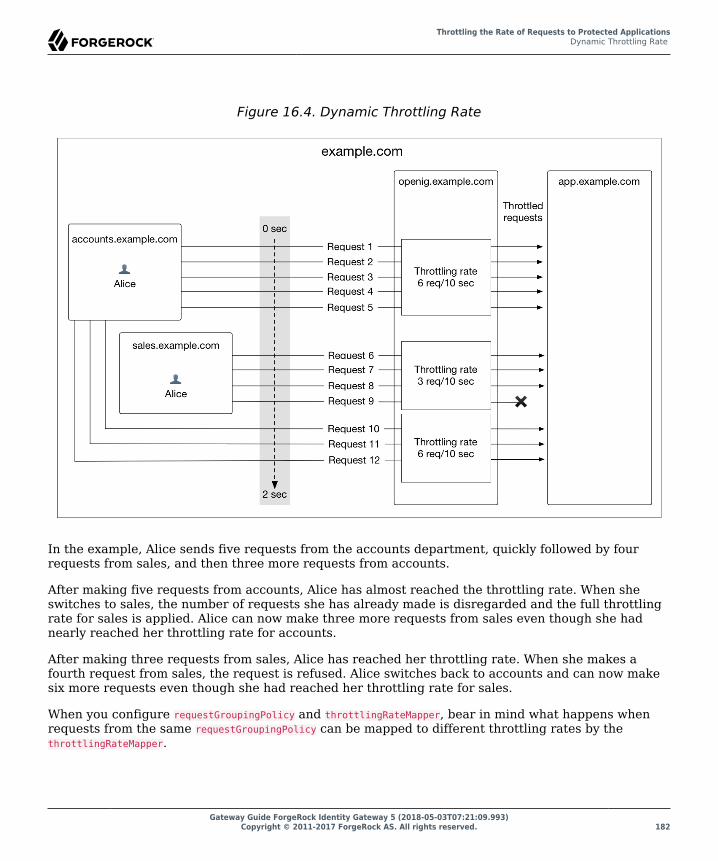
Throttling the Rate of Requests to Protected ApplicationsDynamic Throttling Rate
Gateway Guide ForgeRock Identity Gateway 5 (2018-05-03T07:21:09.993)Copyright © 2011-2017 ForgeRock AS. All rights reserved. 182
Figure 16.4. Dynamic Throttling Rate
In the example, Alice sends five requests from the accounts department, quickly followed by fourrequests from sales, and then three more requests from accounts.
After making five requests from accounts, Alice has almost reached the throttling rate. When sheswitches to sales, the number of requests she has already made is disregarded and the full throttlingrate for sales is applied. Alice can now make three more requests from sales even though she hadnearly reached her throttling rate for accounts.
After making three requests from sales, Alice has reached her throttling rate. When she makes afourth request from sales, the request is refused. Alice switches back to accounts and can now makesix more requests even though she had reached her throttling rate for sales.
When you configure requestGroupingPolicy and throttlingRateMapper, bear in mind what happens whenrequests from the same requestGroupingPolicy can be mapped to different throttling rates by thethrottlingRateMapper.

Logging EventsDefault Logging Behavior
Gateway Guide ForgeRock Identity Gateway 5 (2018-05-03T07:21:09.993)Copyright © 2011-2017 ForgeRock AS. All rights reserved. 183
Chapter 17
Logging EventsLog messages in OpenIG and third-party dependencies are recorded using the Logbackimplementation of the Simple Logging Facade for Java (SLF4J) API.
17.1. Default Logging BehaviorLog messages are recorded with the following default configuration:
• When OpenIG starts, log messages for OpenIG and third-party dependencies, such as theForgeRock Common Audit framework, are displayed on the console and written to $HOME/.openig/logs/route-system.log.
• When a route is accessed, log messages for requests passing through the route are written to aseparate log file. The file is in $HOME/.openig/logs and is named by the route’s name or filename. Aseparate log file is created for each route that is accessed.
• By default, log messages with the level INFO or higher are recorded, with the titles and the top lineof the stack trace. The messages are highlighted with a color related to their logging level.
17.2. Reference Logback ConfigurationThe content and format of logs is defined by the reference logback.xml delivered with OpenIG. This filedefines the following configuration items for logs:
• A root logger to set the overall level to INFO, and to write all log messages to the SIFT and STDOUTappenders.
• A STDOUT appender to define the format of log messages on the console.
• A SIFT appender to separate log messages according to the key routeId, to define when log files arerolled, and to define the format of log messages in the file.
• An exception logger, called LogAttachedExceptionFilter, to write log messages for exceptions attachedto responses.
<?xml version="1.0" encoding="UTF-8"?><!-- Copyright 2016-2017 ForgeRock AS. All Rights Reserved Use of this code requires a commercial software license with ForgeRock AS.

Logging EventsChanging the Logging Behavior
Gateway Guide ForgeRock Identity Gateway 5 (2018-05-03T07:21:09.993)Copyright © 2011-2017 ForgeRock AS. All rights reserved. 184
or with one of its affiliates. All use shall be exclusively subject to such license between the licensee and ForgeRock AS.--><configuration>
<appender name="STDOUT" class="ch.qos.logback.core.ConsoleAppender"> <encoder> <pattern>%nopex[%thread] %highlight(%-5level) %boldWhite(%logger{35}) - %message%n%highlight(%rootException{short})</pattern> </encoder> </appender>
<appender name="SIFT" class="ch.qos.logback.classic.sift.SiftingAppender"> <discriminator> <key>routeId</key> <defaultValue>system</defaultValue> </discriminator> <sift> <!-- Create a separate log file for each <key> --> <appender name="FILE-${routeId}" class="ch.qos.logback.core.rolling.RollingFileAppender"> <file>${openig.base}/logs/route-${routeId}.log</file>
<rollingPolicy class="ch.qos.logback.core.rolling.SizeAndTimeBasedRollingPolicy"> <!-- Rotate files daily --> <fileNamePattern>${openig.base}/logs/route-${routeId}-%d{yyyy-MM-dd}.%i.log</fileNamePattern>
<!-- each file should be at most 100MB, keep 30 days worth of history, but at most 3GB --> <maxFileSize>100MB</maxFileSize> <maxHistory>30</maxHistory> <totalSizeCap>3GB</totalSizeCap> </rollingPolicy>
<encoder> <pattern>%d{HH:mm:ss:SSS} | %-5level | %thread | %logger{20} | %message%n%xException</pattern> </encoder> </appender> </sift> </appender>
<!-- Disable logs of exceptions attached to responses by defining 'level' to OFF --> <logger name="org.forgerock.openig.filter.LogAttachedExceptionFilter" level="INHERITED"/>
<root level="INFO"> <appender-ref ref="SIFT"/> <appender-ref ref="STDOUT"/> </root></configuration>
17.3. Changing the Logging BehaviorThe Logback configuration is very flexible, providing a wide range of options for logging. For a fulldescription of its parameters, see the Logback website. The following examples show some simplechanges that you can make.
To change the logging behavior, create a new Logback file at $HOME/.openig/config/logback.xml. ThisLogback file overrides the default configuration.

Logging EventsFormatting Log Messages
Gateway Guide ForgeRock Identity Gateway 5 (2018-05-03T07:21:09.993)Copyright © 2011-2017 ForgeRock AS. All rights reserved. 185
To take into account edits to logback.xml, stop and restart OpenIG or edit the configuration parameterto add a scan and interval:
<configuration scan="true" scanPeriod="5 seconds">
The configuration scan="true" requires logback.xml to be scanned for changes. The file is scanned afterboth of the following criteria are met:
• The specified number of logging operations have occurred, where the default is 16.
• The scan period has elapsed, where the example specifies 5 seconds.
Note
If your custom logback.xml contains errors, messages like these are displayed on the console but log messagesare not recorded:
14:38:59,667 |-ERROR in ch.qos.logback.core.joran.spi.Interpreter@20:72 ...14:38:59,690 |-ERROR in ch.qos.logback.core.joran.action.AppenderRefAction ...
17.3.1. Formatting Log Messages
You can format log messages in many ways. For example, to add the date to the log message, editlogback.xml to change the pattern of the log messages in the encoder part of the SIFT appender:
%d{yyyyMMdd-HH:mm:ss} | %-5level | %thread | %logger{20} | %message%n%xException
17.3.2. Logging for Different Object Types
You can change the log messages for a single object type without changing them for the rest of theconfiguration.
For example, to record log messages with the level ERROR or higher for the ClientHandler, editlogback.xml to add a logger defined by the fully qualified class name of the ClientHandler, and to setits logging level to ERROR:
<logger name="org.forgerock.openig.handler.ClientHandler" level="ERROR"/>
Log messages with a level lower than ERROR are no longer recorded for the ClientHandler but continueto be recorded for the rest of the configuration.
17.3.3. Logging for the BaseUriDecorator
During setup and configuration, it can be helpful to display log messages from the BaseUriDecorator.

Logging EventsSwitching Off Exception Logging
Gateway Guide ForgeRock Identity Gateway 5 (2018-05-03T07:21:09.993)Copyright © 2011-2017 ForgeRock AS. All rights reserved. 186
For example, to record a log message each time a request URI is rebased, edit logback.xml to add alogger defined by the fully qualified class name of the BaseUriDecorator appended by the name of thebaseURI decorator:
<logger name="org.forgerock.openig.decoration.baseuri.BaseUriDecorator.baseURI" level="TRACE"/>
Each time a request URI is rebased, a log message similar to this is created:
12:27:40| TRACE | http-nio-8080-exec-3 | o.f.o.d.b.B.b.{Router}/handler | Rebasing request to http://app.example.com:8081
17.3.4. Switching Off Exception Logging
To stop recording log messages for exceptions, edit logback.xml to set the level to OFF:
<logger name="org.forgerock.openig.filter.LogAttachedExceptionFilter" level="OFF"/>

TroubleshootingTroubleshooting the UMA Example
Gateway Guide ForgeRock Identity Gateway 5 (2018-05-03T07:21:09.993)Copyright © 2011-2017 ForgeRock AS. All rights reserved. 187
Chapter 18
Troubleshooting
This chapter covers common problems and their solutions.
To help with troubleshooting, get the product version and build information for the running instanceof OpenIG from the /api/info endpoint. If OpenIG is set up as described in Chapter 2, "GettingStarted", access the information at http://openig.example.com:8080/openig/api/info.
18.1. Troubleshooting the UMA ExampleYou have set up and are testing the example in Section 11.1, "About OpenIG in the UMA ResourceServer Role".
If you have problems creating shares for Alice, perform the following steps to see if you can get a PATfrom OpenAM:
1. With OpenAM running, run the following command to get a tokenID:$ curl --request POST \--header "X-OpenAM-Username: alice" \--header "X-OpenAM-Password: password" \--header "Content-Type: application/json" \--data "{}" \http://openam.example.com:8088/openam/json/authenticate
{"tokenId":"AQIC5wM2LY . . . Dg5AAJTMQAA*","successUrl":"/openam/console"}
2. In the following command, replace tokenID with the value you got in the previous step:$ curl -X POST -H "Cache-Control: no-cache" -H "Cookie: iPlanetDirectoryPro=tokenID" \-H "Content-Type: application/x-www-form-urlencoded" \-d 'grant_type=password&scope=uma_protection&username=alice&password=password&client_id=OpenIG&client_secret=password' \http://openam.example.com:8088/openam/oauth2/access_token
{"access_token":"AQIC5wM2LY . . . Dg5AAJTMQAA*","scope":"uma_protection","token_type":"Bearer","expires_in":3599}

TroubleshootingCan't Deploy Routes in OpenIG Studio
Gateway Guide ForgeRock Identity Gateway 5 (2018-05-03T07:21:09.993)Copyright © 2011-2017 ForgeRock AS. All rights reserved. 188
An access token should be displayed. If you fail to get an access token, check that OpenAM isconfigured as described in Section 11.3, "Setting Up OpenAM As an Authorization Server".
If you continue to have problems, make sure that your OpenIG configuration matches that shownwhen you are running the test on http://app.example.com:8081/uma/.
18.2. Can't Deploy Routes in OpenIG StudioOpenIG Studio deploys and undeploys routes through a main router named _router, which is the nameof the main router in the default configuration. If you use a custom config.json, make sure that itcontains a main router named _router.
For information about OpenIG Studio, see Section 12.4, "Creating Routes Through OpenIG Studio ".
18.3. Object not found in heaporg.forgerock.json.fluent.JsonValueException: /handler: object Router2 not found in heap at org.forgerock.openig.heap.HeapImpl.resolve(HeapImpl.java:351) at org.forgerock.openig.heap.HeapImpl.resolve(HeapImpl.java:334) at org.forgerock.openig.heap.HeapImpl.getHandler(HeapImpl.java:538)
You have specified "handler": "Router2" in config.json, but no handler configuration object namedRouter2 exists. Make sure you have added an entry for the handler and that you have correctlyspelled its name.
18.4. Extra or missing character / invalid JSONWhen the JSON for a route is not valid, OpenIG does not load the route. Instead, a description of theerror appears in the log:
16:09:50 | ERROR | openig.example.com-startStop-1 | o.f.o.h.r.RouterHandler |The file '/Users/me/.openig/config/routes/zz-default.json' is not a valid route configuration.
Use a JSON editor or JSON validation tool such as JSONLint to make sure that your JSON is valid.
18.5. The values in the flat file are incorrectEnsure the flat file is readable by the user running the container for OpenIG. Values are allcharacters including space and tabs between the separator, so make sure the values are not paddedwith spaces.

TroubleshootingProblem accessing URL
Gateway Guide ForgeRock Identity Gateway 5 (2018-05-03T07:21:09.993)Copyright © 2011-2017 ForgeRock AS. All rights reserved. 189
18.6. Problem accessing URLHTTP ERROR 500
Problem accessing /myURL . Reason:
java.lang.String cannot be cast to java.util.ListCaused by:java.lang.ClassCastException: java.lang.String cannot be cast to java.util.List
This error is typically encountered when using an AssignmentFilter as described in AssignmentFilter(5)in the Configuration Reference and setting a string value for one of the headers. All headers arestored in lists so the header must be addressed with a subscript.
For example, rather than trying to set request.headers['Location'] for a redirect in the response object,you should instead set request.headers['Location'][0]. A header without a subscript leads to the errorabove.
18.7. StaticResponseHandler results in a blank pageDefine an entity for the response as in the following example:
{ "name": "AccessDeniedHandler", "type": "StaticResponseHandler", "config": { "status": 403, "reason": "Forbidden", "entity": "<html><body><p>User does not have permission</p></body></html>" }}
18.8. OpenIG is not logging users inIf you are proxying to more than one application in multiple DNS domains, you must make sure yourcontainer is enabled for domain cookies. For details on your specific container, see Section 3.1,"Configuring Deployment Containers".
18.9. Read timed out error when sending a requestIf a baseURI configuration setting causes a request to come back to OpenIG, OpenIG never producesa response to the request. You then observe the following behavior.

TroubleshootingOpenIG does not use new route configuration
Gateway Guide ForgeRock Identity Gateway 5 (2018-05-03T07:21:09.993)Copyright © 2011-2017 ForgeRock AS. All rights reserved. 190
You send a request and OpenIG seems to hang. Then you see a failure message, HTTP Status 500 - Read timed out, accompanied by OpenIG throwing an exception, java.net.SocketTimeoutException: Read timed out.
To fix this issue, make sure that baseURI configuration settings use a different host and port than thehost and port for OpenIG.
18.10. OpenIG does not use new route configurationOpenIG loads all configuration at startup. By default, it then periodically reloads changed routeconfigurations.
If you make changes to a route that result in an invalid configuration, OpenIG logs errors, but itkeeps the previous, correct configuration, and continues to use the old route.
OpenIG only uses the new configuration after you save a valid version or when you restart OpenIG.
Of course, if you restart OpenIG with an invalid route configuration, then OpenIG tries to load theinvalid route at startup and logs an error. In that case, if there is no default handler to accept anyincoming request for the invalid route, then you see an error, No handler to dispatch to.
18.11. Make OpenIG skip a routeIf you have copied routes from another OpenIG server, those routes might depend on environment orcontainer configuration that you have not yet configured locally.
You can work around this problem by changing the route file extension. A router ignores route filesthat do not have the .json extension.
For example, suppose you copy route all sample route configurations from the documentation, andthen start OpenIG without first configuring your container. This can result in an error such as thefollowing:

TroubleshootingMake OpenIG skip a route
Gateway Guide ForgeRock Identity Gateway 5 (2018-05-03T07:21:09.993)Copyright © 2011-2017 ForgeRock AS. All rights reserved. 191
/handler/config/filters/0/config/dataSource: javax.naming.NameNotFoundException; remaining name 'jdbc/forgerock'[ JsonValueException] > /handler/config/filters/0/config/dataSource: javax.naming.NameNotFoundException; remaining name 'jdbc/forgerock'[ NameNotFoundException] > null
org.forgerock.json.fluent.JsonValueException: /handler/config/filters/0/config/dataSource: javax.naming.NameNotFoundException; remaining name 'jdbc/forgerock' at org.forgerock.openig.filter.SqlAttributesFilter$Heaplet.create( SqlAttributesFilter.java:211) at org.forgerock.openig.heap.GenericHeaplet.create(GenericHeaplet.java:81) at org.forgerock.openig.heap.HeapImpl.extract(HeapImpl.java:316) at org.forgerock.openig.heap.HeapImpl.get(HeapImpl.java:281)...
This arises from the route in 03-sql.json, which defines an SqlAttributesFilter that depends on a JNDIdata source configured in the container:
{ "type": "SqlAttributesFilter", "config": { "dataSource": "java:comp/env/jdbc/forgerock", "preparedStatement": "SELECT username, password FROM users WHERE email = ?;", "parameters": [ "[email protected]" ], "target": "${attributes.sql}" }}
To prevent OpenIG from loading the route configuration until you have had time to configure thecontainer, change the file extension to render the route inactive:
$ mv ~/.openig/config/routes/03-sql.json ~/.openig/config/routes/03-sql.inactive
If necessary, restart the container to force OpenIG to reload the configuration.
When you have configured the data source in the container, change the file extension back to .json torender the route active again:
$ mv ~/.openig/config/routes/03-sql.inactive ~/.openig/config/routes/03-sql.json

Gateway Guide ForgeRock Identity Gateway 5 (2018-05-03T07:21:09.993)Copyright © 2011-2017 ForgeRock AS. All rights reserved. 192
Appendix A. SAML 2.0 and MultipleApplications
Chapter 7, "Acting As a SAML 2.0 Service Provider" describes how to set up OpenIG as a SAML2.0 service provider for a single application, using OpenAM as the identity provider. This chapterdescribes how to set up OpenIG as a SAML 2.0 service provider for two applications, still usingOpenAM as the identity provider.
Before you try the samples described here, familiarize yourself with OpenIG SAML 2.0 support byreading and working through the examples in Chapter 7, "Acting As a SAML 2.0 Service Provider".Before you start, you should have OpenIG protecting the sample application as a SAML 2.0 serviceprovider, with OpenAM working as identity provider configured as described in that tutorial.
A.1. Installation OverviewIn this chapter you use the Fedlet configuration from Chapter 7, "Acting As a SAML 2.0 ServiceProvider" to create a configuration for each new protected application. You then import the newconfigurations as SAML 2.0 entities in OpenAM. If you subsequently edit a configuration, import itagain.
In the following examples, the first application has entity ID sp1 and runs on the host sp1.example.com,the second application has entity ID sp2 and runs on the host sp2.example.com. To prevent unwantedbehavior, the applications must have different values.

Gateway Guide ForgeRock Identity Gateway 5 (2018-05-03T07:21:09.993)Copyright © 2011-2017 ForgeRock AS. All rights reserved. 193
Table A.1. Tasks for Configuring SAML 2.0 SSO and Federation
Task See Section(s)Prepare the network. Section A.2, "Preparing the Network"Prepare the configuration for two OpenIG serviceproviders.
Section A.3, "Configuring the Circle of Trust"
Section A.4, "Configuring the Service Provider forApplication One"
Section A.5, "Configuring the Service Provider forApplication Two"
Import the service provider configurations intoOpenAM.
Section A.6, "Importing Service ProviderConfigurations Into OpenAM"
Add OpenIG routes. Section A.7.1, "Preparing the Base Configuration File"
Section A.7.2, "Preparing Routes for Application One"
Section A.7.3, "Preparing Routes for Application Two"
A.2. Preparing the NetworkConfigure the network so that browser traffic to the application hosts is proxied through OpenIG.
Add the following addresses to your hosts file: sp1.example.com and sp2.example.com.
127.0.0.1 localhost openam.example.com openig.example.com app.example.com sp1.example.com sp2.example.com
A.3. Configuring the Circle of TrustEdit the $HOME/.openig/SAML/fedlet.cot file you created in Chapter 7, "Acting As a SAML 2.0 ServiceProvider" to include the entity IDs sp1 and sp2, as in the following example:
cot-name=Circle of Trustsun-fm-cot-status=Activesun-fm-trusted-providers=openam,sp1,sp2sun-fm-saml2-readerservice-url=sun-fm-saml2-writerservice-url=
A.4. Configuring the Service Provider for Application OneTo configure the service provider for application one, you can use the example files Example A.1,"Configuration File for Application One" and Example A.2, "Extended Configuration File for

Gateway Guide ForgeRock Identity Gateway 5 (2018-05-03T07:21:09.993)Copyright © 2011-2017 ForgeRock AS. All rights reserved. 194
Application One", saving them as sp1.xml and sp1-extended.xml. Alternatively, follow the steps below touse the files you created in Chapter 7, "Acting As a SAML 2.0 Service Provider".
Procedure A.1. To Configure the Service Provider for Application One By Using Files CreatedIn Chapter 7, "Acting As a SAML 2.0 Service Provider"
1. Copy the SAML configuration files sp.xml and sp-extended.xml you created in Chapter 7, "Acting Asa SAML 2.0 Service Provider", and save them as $HOME/.openig/SAML/sp1.xml and $HOME/.openig/SAML/sp1-extended.xml.
2. Make the following changes in sp1.xml:
• For entityID, change sp to sp1. The entityID must match the application.
• On each line that starts with Location or ResponseLocation, change sp.example.com to sp1.example.com,and add /metaAlias/sp1 at the end of the line.
For an example of how this file should be, see Example A.1, "Configuration File for ApplicationOne".
3. Make the following changes in sp1-extended.xml:
• For entityID, change sp to sp1.
• For SPSSOConfig metaAlias, change sp to sp1.
• For appLogoutUrl, change sp to sp1.
• For hosted=, make sure that the value is 1.
For an example of how this file should be, see Example A.2, "Extended Configuration File forApplication One".
Example A.1. Configuration File for Application One
<!-- - sp1-xml.txt - Set the entityID - Set metaAlias/<sp-name> at the end of each of the following lines: - Location - ResponseLocation - Note that AssertionConsumerService Location attributes include the metaAlias.--><EntityDescriptor entityID="sp1" xmlns="urn:oasis:names:tc:SAML:2.0:metadata"> <SPSSODescriptor AuthnRequestsSigned="false" WantAssertionsSigned="false" protocolSupportEnumeration="urn:oasis:names:tc:SAML:2.0:protocol"> <SingleLogoutService

Gateway Guide ForgeRock Identity Gateway 5 (2018-05-03T07:21:09.993)Copyright © 2011-2017 ForgeRock AS. All rights reserved. 195
Binding="urn:oasis:names:tc:SAML:2.0:bindings:HTTP-Redirect" Location="http://sp1.example.com:8080/saml/fedletSloRedirect/metaAlias/sp1" ResponseLocation="http://sp1.example.com:8080/saml/fedletSloRedirect/metaAlias/sp1"/> <SingleLogoutService Binding="urn:oasis:names:tc:SAML:2.0:bindings:HTTP-POST" Location="http://sp1.example.com:8080/saml/fedletSloPOST/metaAlias/sp1" ResponseLocation="http://sp1.example.com:8080/saml/fedletSloPOST/metaAlias/sp1"/> <SingleLogoutService Binding="urn:oasis:names:tc:SAML:2.0:bindings:SOAP" Location="http://sp1.example.com:8080/saml/fedletSloSoap/metaAlias/sp1"/> <NameIDFormat>urn:oasis:names:tc:SAML:2.0:nameid-format:transient</NameIDFormat> <AssertionConsumerService isDefault="true" index="0" Binding="urn:oasis:names:tc:SAML:2.0:bindings:HTTP-POST" Location="http://sp1.example.com:8080/saml/fedletapplication/metaAlias/sp1"/> <AssertionConsumerService index="1" Binding="urn:oasis:names:tc:SAML:2.0:bindings:HTTP-Artifact" Location="http://sp1.example.com:8080/saml/fedletapplication/metaAlias/sp1"/> </SPSSODescriptor> <RoleDescriptor xmlns:xsi="http://www.w3.org/2001/XMLSchema-instance" xmlns:query="urn:oasis:names:tc:SAML:metadata:ext:query" xsi:type="query:AttributeQueryDescriptorType" protocolSupportEnumeration="urn:oasis:names:tc:SAML:2.0:protocol"> </RoleDescriptor> <XACMLAuthzDecisionQueryDescriptor WantAssertionsSigned="false" protocolSupportEnumeration="urn:oasis:names:tc:SAML:2.0:protocol"> </XACMLAuthzDecisionQueryDescriptor></EntityDescriptor>
Example A.2. Extended Configuration File for Application One
<!-- - sp1-extended.xml - Set the entityID. - Set the SPSSOConfig metaAlias attribute. - Set the value of appLogoutUrl. - Set the value of hosted to 1. - Comment out the attribute "com.sun.identity.saml2.plugins.DefaultFedletAdapter".--><EntityConfig xmlns="urn:sun:fm:SAML:2.0:entityconfig" xmlns:fm="urn:sun:fm:SAML:2.0:entityconfig" hosted="1" entityID="sp1">
<SPSSOConfig metaAlias="/sp1"> <Attribute name="description"> <Value></Value> </Attribute> <Attribute name="signingCertAlias"> <Value></Value> </Attribute> <Attribute name="encryptionCertAlias">

Gateway Guide ForgeRock Identity Gateway 5 (2018-05-03T07:21:09.993)Copyright © 2011-2017 ForgeRock AS. All rights reserved. 196
<Value></Value> </Attribute> <Attribute name="basicAuthOn"> <Value>false</Value> </Attribute> <Attribute name="basicAuthUser"> <Value></Value> </Attribute> <Attribute name="basicAuthPassword"> <Value></Value> </Attribute> <Attribute name="autofedEnabled"> <Value>false</Value> </Attribute> <Attribute name="autofedAttribute"> <Value></Value> </Attribute> <Attribute name="transientUser"> <Value>anonymous</Value> </Attribute> <Attribute name="spAdapter"> <Value></Value> </Attribute> <Attribute name="spAdapterEnv"> <Value></Value> </Attribute> <!-- <Attribute name="fedletAdapter"> <Value>com.sun.identity.saml2.plugins.DefaultFedletAdapter</Value> </Attribute> --> <Attribute name="fedletAdapterEnv"> <Value></Value> </Attribute> <Attribute name="spAccountMapper"> <Value>com.sun.identity.saml2.plugins.DefaultLibrarySPAccountMapper</Value> </Attribute> <Attribute name="useNameIDAsSPUserID"> <Value>false</Value> </Attribute> <Attribute name="spAttributeMapper"> <Value>com.sun.identity.saml2.plugins.DefaultSPAttributeMapper</Value> </Attribute> <Attribute name="spAuthncontextMapper"> <Value>com.sun.identity.saml2.plugins.DefaultSPAuthnContextMapper</Value> </Attribute> <Attribute name="spAuthncontextClassrefMapping"> <Value> urn:oasis:names:tc:SAML:2.0:ac:classes:PasswordProtectedTransport|0|default </Value> </Attribute> <Attribute name="spAuthncontextComparisonType"> <Value>exact</Value> </Attribute> <Attribute name="attributeMap"> <Value>employeenumber=employeenumber</Value> <Value>mail=mail</Value> </Attribute> <Attribute name="saml2AuthModuleName">

Gateway Guide ForgeRock Identity Gateway 5 (2018-05-03T07:21:09.993)Copyright © 2011-2017 ForgeRock AS. All rights reserved. 197
<Value></Value> </Attribute> <Attribute name="localAuthURL"> <Value></Value> </Attribute> <Attribute name="intermediateUrl"> <Value></Value> </Attribute> <Attribute name="defaultRelayState"> <Value></Value> </Attribute> <Attribute name="appLogoutUrl"> <Value>http://sp1.example.com:8080/saml/logout</Value> </Attribute> <Attribute name="assertionTimeSkew"> <Value>300</Value> </Attribute> <Attribute name="wantAttributeEncrypted"> <Value></Value> </Attribute> <Attribute name="wantAssertionEncrypted"> <Value></Value> </Attribute> <Attribute name="wantNameIDEncrypted"> <Value></Value> </Attribute> <Attribute name="wantPOSTResponseSigned"> <Value></Value> </Attribute> <Attribute name="wantArtifactResponseSigned"> <Value></Value> </Attribute> <Attribute name="wantLogoutRequestSigned"> <Value></Value> </Attribute> <Attribute name="wantLogoutResponseSigned"> <Value></Value> </Attribute> <Attribute name="wantMNIRequestSigned"> <Value></Value> </Attribute> <Attribute name="wantMNIResponseSigned"> <Value></Value> </Attribute> <Attribute name="responseArtifactMessageEncoding"> <Value>URI</Value> </Attribute> <Attribute name="cotlist"> <Value>Circle of Trust</Value></Attribute> <Attribute name="saeAppSecretList"> </Attribute> <Attribute name="saeSPUrl"> <Value></Value> </Attribute> <Attribute name="saeSPLogoutUrl"> </Attribute> <Attribute name="ECPRequestIDPListFinderImpl"> <Value>com.sun.identity.saml2.plugins.ECPIDPFinder</Value> </Attribute>

Gateway Guide ForgeRock Identity Gateway 5 (2018-05-03T07:21:09.993)Copyright © 2011-2017 ForgeRock AS. All rights reserved. 198
<Attribute name="ECPRequestIDPList"> <Value></Value> </Attribute> <Attribute name="ECPRequestIDPListGetComplete"> <Value></Value> </Attribute> <Attribute name="enableIDPProxy"> <Value>false</Value> </Attribute> <Attribute name="idpProxyList"> <Value></Value> </Attribute> <Attribute name="idpProxyCount"> <Value>0</Value> </Attribute> <Attribute name="useIntroductionForIDPProxy"> <Value>false</Value> </Attribute> <Attribute name="spSessionSyncEnabled"> <Value>false</Value> </Attribute> <Attribute name="relayStateUrlList"> </Attribute> </SPSSOConfig> <AttributeQueryConfig metaAlias="/attrQuery"> <Attribute name="signingCertAlias"> <Value></Value> </Attribute> <Attribute name="encryptionCertAlias"> <Value></Value> </Attribute> <Attribute name="wantNameIDEncrypted"> <Value></Value> </Attribute> <Attribute name="cotlist"> <Value>Circle of Trust</Value> </Attribute> </AttributeQueryConfig> <XACMLAuthzDecisionQueryConfig metaAlias="/pep"> <Attribute name="signingCertAlias"> <Value></Value> </Attribute> <Attribute name="encryptionCertAlias"> <Value></Value> </Attribute> <Attribute name="basicAuthOn"> <Value>false</Value> </Attribute> <Attribute name="basicAuthUser"> <Value></Value> </Attribute> <Attribute name="basicAuthPassword"> <Value></Value> </Attribute> <Attribute name="wantXACMLAuthzDecisionResponseSigned"> <Value>false</Value> </Attribute> <Attribute name="wantAssertionEncrypted"> <Value>false</Value>

Gateway Guide ForgeRock Identity Gateway 5 (2018-05-03T07:21:09.993)Copyright © 2011-2017 ForgeRock AS. All rights reserved. 199
</Attribute> <Attribute name="cotlist"> <Value>Circle of Trust</Value> </Attribute> </XACMLAuthzDecisionQueryConfig></EntityConfig>
A.5. Configuring the Service Provider for Application Two
Procedure A.2. To Configure the Service Provider for Application Two
1. Copy the SAML configuration files sp1.xml and sp1-extended.xml you created in Section A.4,"Configuring the Service Provider for Application One", and save them as $HOME/.openig/SAML/sp2.xml and $HOME/.openig/SAML/sp2-extended.xml.
2. In both files, replace all incidences of sp1 with sp2. To prevent unwanted behavior. application twomust have different values to application one.
A.6. Importing Service Provider Configurations Into OpenAMFor each new protected application, import a SAML 2.0 entity into OpenAM. If you subsequently edita service provider configuration, import it again.
Procedure A.3. To Import the Service Provider Configurations Into OpenAM
1. Log in to OpenAM console as administrator.
2. On the Federation tab, select the Entity Providers table and click Import Entity.
The Import Entity Provider page is displayed.
3. For the metadata file, select File and upload sp1.xml. For the extended data file, select File andupload sp1-extended.xml.
4. Repeat the previous step to upload sp2.xml and sp2-extended.xml for sp2.
5. Log out of the OpenAM console.
A.7. Preparing OpenIG ConfigurationsFor each new protected application, prepare an OpenIG configuration. The configurations in thissection follow the example in Chapter 7, "Acting As a SAML 2.0 Service Provider".

Gateway Guide ForgeRock Identity Gateway 5 (2018-05-03T07:21:09.993)Copyright © 2011-2017 ForgeRock AS. All rights reserved. 200
Tip
To prevent unspecified behavior, use different keys for session-stored values in the routes for each application.For example, use different keys for session.sp1Username and session.sp2Username.
To prevent configurations from overwriting each others' data, use the subjectMapping property ofSamlFederationHandler to define a different session field for the subject name of each application. The twoapplications must not map data into the same session field.
A.7.1. Preparing the Base Configuration FileEdit the base configuration file, $HOME/.openig/config/routes/config.json, so that it does not rebaseincoming URLs. The following example file differs from that used in earlier tutorials:
{ "handler": { "type": "Router" }, "heap": [ { "name": "capture", "type": "CaptureDecorator", "config": { "captureEntity": true, "captureContext": true } } ]}
Restart OpenIG to put the configuration changes into effect.
A.7.2. Preparing Routes for Application OneSet up the following routes for application one:
• $HOME/.openig/config/routes/05-federate-sp1.json, to redirect the request for SAML authentication.After authentication, this route logs the user in to the application.
• $HOME/.openig/config/routes/05-saml-sp1.json, to map attributes from the SAML assertion into thecontext, and then redirect the request back to the first route.
Example A.3. 05-federate-sp1.json
{ "handler": { "type": "DispatchHandler", "config": { "bindings": [ {

Gateway Guide ForgeRock Identity Gateway 5 (2018-05-03T07:21:09.993)Copyright © 2011-2017 ForgeRock AS. All rights reserved. 201
"condition": "${empty session.sp1Username}", "handler": { "type": "StaticResponseHandler", "config": { "status": 302, "reason": "Found", "headers": { "Location": [ "http://sp1.example.com:8080/saml/SPInitiatedSSO?metaAlias=/sp1" ] } } } }, { "handler": { "type": "Chain", "config": { "filters": [ { "type": "StaticRequestFilter", "config": { "method": "POST", "uri": "http://app.example.com:8081/login", "form": { "username": [ "${session.sp1Username}" ], "password": [ "${session.sp1Password}" ] } } } ], "handler": "ClientHandler" } } } ] } }, "condition": "${matches(request.uri.host, 'sp1.example.com') and not matches(request.uri.path, '^/saml')}"}
Example A.4. 05-saml-sp1.json
{ "handler": { "type": "SamlFederationHandler", "config": { "comment": "Use unique session properties for this SP.", "assertionMapping": { "sp1Username": "mail", "sp1Password": "employeenumber"

Gateway Guide ForgeRock Identity Gateway 5 (2018-05-03T07:21:09.993)Copyright © 2011-2017 ForgeRock AS. All rights reserved. 202
}, "authnContext": "sp1AuthnContext", "sessionIndexMapping": "sp1SessionIndex", "subjectMapping": "sp1SubjectName", "redirectURI": "/sp1" } }, "condition": "${matches(request.uri.host, 'sp1.example.com') and matches(request.uri.path, '^/saml')}"}
A.7.3. Preparing Routes for Application TwoSet up the following routes for application two:
• $HOME/.openig/config/routes/05-federate-sp2.json, to redirect the request for SAML authentication.After authentication, this route logs the user in to the application.
• $HOME/.openig/config/routes/05-saml-sp2.json, to map attributes from the SAML assertion into thecontext, and then redirect the request back to the first route.
Example A.5. 05-federate-sp2.json
{ "handler": { "type": "DispatchHandler", "config": { "bindings": [ { "condition": "${empty session.sp2Username}", "handler": { "type": "StaticResponseHandler", "config": { "status": 302, "reason": "Found", "headers": { "Location": [ "http://sp2.example.com:8080/saml/SPInitiatedSSO?metaAlias=/sp2" ] } } } }, { "handler": { "type": "Chain", "config": { "filters": [ { "type": "StaticRequestFilter", "config": { "method": "POST", "uri": "http://app.example.com:8081/login", "form": { "username": [

Gateway Guide ForgeRock Identity Gateway 5 (2018-05-03T07:21:09.993)Copyright © 2011-2017 ForgeRock AS. All rights reserved. 203
"${session.sp2Username}" ], "password": [ "${session.sp2Password}" ] } } } ], "handler": "ClientHandler" } } } ] } }, "condition": "${matches(request.uri.host, 'sp2.example.com') and not matches(request.uri.path, '^/saml')}"}
Example A.6. 05-saml-sp2.json
{ "handler": { "type": "SamlFederationHandler", "config": { "comment": "Use unique session properties for this SP.", "assertionMapping": { "sp2Username": "mail", "sp2Password": "employeenumber" }, "authnContext": "sp2AuthnContext", "sessionIndexMapping": "sp2SessionIndex", "subjectMapping": "sp2SubjectName", "redirectURI": "/sp2" } }, "condition": "${matches(request.uri.host, 'sp2.example.com') and matches(request.uri.path, '^/saml')}"}
A.8. Test the ConfigurationIf you use the example configurations described in this chapter, try the SAML 2.0 web single sign-onprofile with application one by selecting either of the following links and logging in to OpenAM withusername george and password costanza:
• The link for SP-initiated SSO.
• The link for IDP-initiated SSO.
Similarly, try the SAML 2.0 web single sign-on profile with application two by selecting either of thefollowing links and logging in to OpenAM with username george and password costanza:

Gateway Guide ForgeRock Identity Gateway 5 (2018-05-03T07:21:09.993)Copyright © 2011-2017 ForgeRock AS. All rights reserved. 204
• The link for SP-initiated SSO.
• The link for IDP-initiated SSO.
If you have not configured the examples exactly as shown in this guide, then adapt the SSO linksaccordingly.