
Gated Ramp User Manual - Discount Ramps
24
Gated Ramp User Manual Questions?? You can contact us at 1-866-567-4518 or at [email protected] Page 1 Mar. 30 OWNERS MANUAL AND SAFETY INSTRUCTIONS
Transcript of Gated Ramp User Manual - Discount Ramps

Gated Ramp User Manual
Questions?? You can contact us at 1-866-567-4518 or at [email protected] Page 1
Mar. 30
OWNERS MANUAL AND SAFETY INSTRUCTIONS

Gated Ramp User Manual
Questions?? You can contact us at 1-866-567-4518 or at [email protected] Page 2
Mar. 30
Save this Manual: Keep this manual for Safety Precautions, Warnings, Install Instructions, Safe Operation Practices and Maintenance Procedures.
Visit our website at : http://www.grampsllc.com
For technical support you can contact our service department at: [email protected]
When unpacking product make sure nothing is missing or damaged. If any parts are missing or damaged please call 1-866-567-4518 as soon as possible.
Due to continuing improvements and developments of our products, the actual product may differ slightly from the product described within. Use of additional tools required for assembly and service may not be included.
WARNINGS AND CAUTIONS
WARNING
Make sure to read this material before using and or Installing the Ramp.
Failure to do so can result in serious injury or death.
KEEP THIS MANUAL FOR FUTURE REFERENCE

Gated Ramp User Manual
Questions?? You can contact us at 1-866-567-4518 or at [email protected] Page 3
Mar. 30
The warnings, cautions, and instructions discussed cannot cover all possible conditions or situations that could occur. It must be understood by the operator that the use of common sense as well as caution are factors which cannot be built into this product.
--------------------------------------------------------------------------------------------------------------------------------
Inspect Ramp before each use, do not use if parts are worn or damaged.
Never Exceed recommended weight limits of the ramp or your vehicle.
Load items and equipment slowly.
Be aware of dynamic loading. Vehicle suspension will lower when weight is applied causing the slope of the ramp to change.
Beware of Pinch Points when raising or lowering the ramp.
Keep children and bystanders away while using the ramp.
Make sure no persons or pets are near or under the ramp or vehicle when operating.
Be aware of all power lines, electrical circuits, water pipes and other mechanical hazards in your work area, particularly those hazards below the work surface hidden from the operator’s view that may be unintentionally contacted and may cause personal harm or property damage.
Make sure the area behind the vehicle is clear and visible before raising and lowering the ramp.
Make sure the vehicles ignition is off and the parking brake is set.
Do not ride on equipment when loading or unloading with ramp.
Do not load equipment that is wider than the platform decking.
Only use the ramp on a stable surface.
When ramp is in use both straps and hinge points must be attached securely to the platform.
Ramp surface can become slippery when icy, wet, or debris is present. Extra caution should be used when utilizing the ramp in these conditions.
Do not add to or modify any part of the ramp.
Do not use ramp or any part of the ramp for purposes other than what it was designed for.
Keep proper footing and balance at all times while utilizing the ramp.
INSTALLATION PRECAUTIONS

Gated Ramp User Manual
Questions?? You can contact us at 1-866-567-4518 or at [email protected] Page 4
Mar. 30
Two people are required for install.
Only perform install in a well ventilated area.
Make sure van is on a stable, dry, and level surface.
Turn vehicle off and make sure parking brake is set.
Always use proper jack stands and secure the wheels to prevent vehicle movement before going under a vehicle.
Wear ANSI-approved safety goggles and leather work gloves during installation.
Do not wear loose clothing or jewelry as they could get caught in moving parts.
Wear restrictive hair covering to prevent long hair from getting caught in moving parts.
Non-skid protective toe work boots recommended for install.
Do not route electrical wires near sharp edges, parts that may become hot or near moving parts.
Only connect the electrical wires to a clean and un-corroded battery.
Do not bypass the in-line circuit breaker to power the winch this will result in possible injury, property damage and or death.
Do not use wires thinner than the 10 gauge wires provided for install.
If vehicle chassis grounding is used, attach ground wire in a way that ensures a proper ground has been achieved.
Avoid coming into contact with battery when connecting wires as an electrical shock may occur causing injury, property damage and or death.
Insulate all exposed wiring and terminals after installation.
Before installation be sure to move any wiring, brake lines, fuel lines, fuel tanks, and other vehicle components that may come in contact with and or receive damage from tools or drilling materials.
Sprinter Van Installation Instructions
Gated Ramp User Manual
Questions?? You can contact us at 1-866-567-4518 or at [email protected] Page 5
Mar. 30
Tools Required:
• Wire Cutters • Wire Crimpers • 5/16" wrench • 7/16" wrench • 7/16" wrench • 9/16" wrench • 11/16" wrench • 11/16" wrench • Center Punch • Drill • 1/2" Steel Drill Bit • 5/16" Steel Drill Bit • 3/8" Steel Drill Bit • RTV Silicone 40z tube (optional)
----------------------------------------------------------------------------------------------------------------------
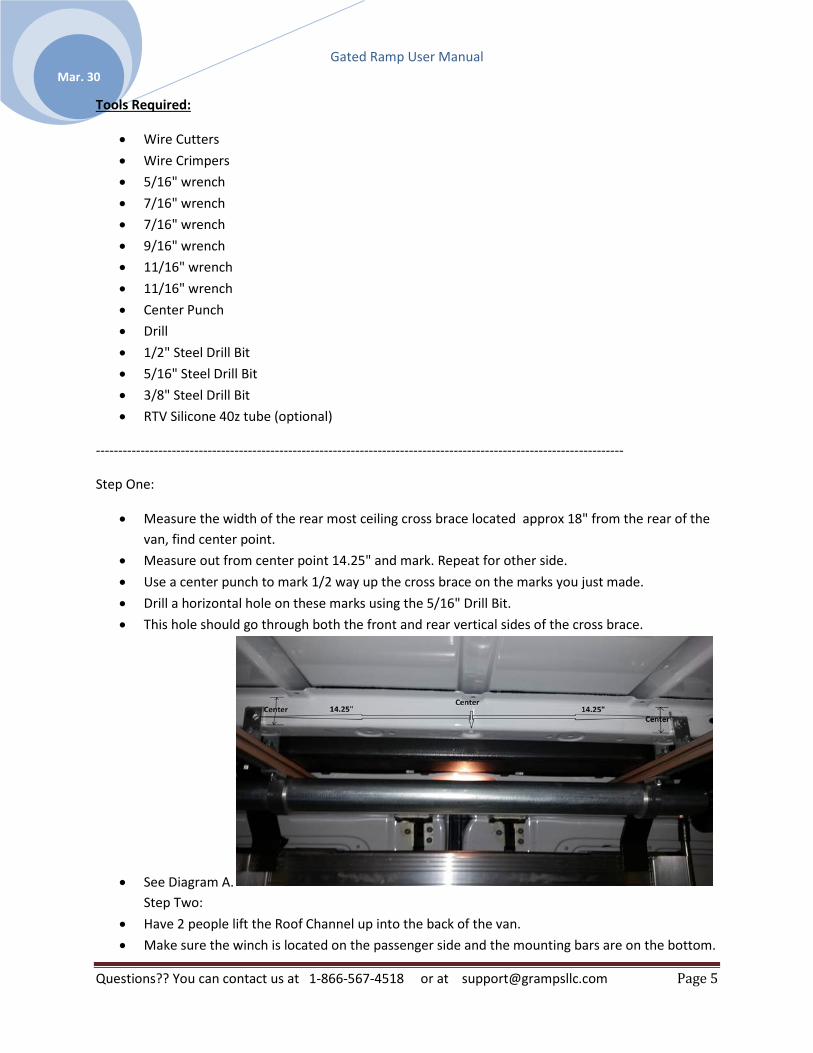
Step One:
• Measure the width of the rear most ceiling cross brace located approx 18" from the rear of the van, find center point.
• Measure out from center point 14.25" and mark. Repeat for other side. • Use a center punch to mark 1/2 way up the cross brace on the marks you just made. • Drill a horizontal hole on these marks using the 5/16" Drill Bit. • This hole should go through both the front and rear vertical sides of the cross brace.
• See Diagram A. Step Two:
• Have 2 people lift the Roof Channel up into the back of the van. • Make sure the winch is located on the passenger side and the mounting bars are on the bottom.

Gated Ramp User Manual
Questions?? You can contact us at 1-866-567-4518 or at [email protected] Page 6
Mar. 30
• Have one person hold the Roof Channel up. • Have a second person insert the bolt through the Mid L bracket - Ceiling Cross Brace - and Rear L
Bracket. Finger tighten a lock nut on the end of this bolt. • Center mounting bars horizontally at the bottom edge of the holes at the rear of the van. • Slide Forward L Brackets to meet the rear wall of door opening on van and mark the holes. Drill
with 1/2" drill bit. Make sure to put it low enough that the Upper Hinge Bracket doesn't bind. • Insert rubber well nuts and attach bracket with supplied screws. • Tighten all bracket bolts in the T-Slot Channels as well as the Ceiling Cross Brace Bolts at this
time. • See Diagram B. • Diagram B:
Step Three:
• Attach Black Wire to side or back wall of the van and make sure that it has a proper ground. • Run the Red Wire inside the vehicles wiring chase to the front of the van. • Continue behind the styro-foam corner and then feed the wire down behind the seatbelt
mounting plastic. • Once to the floor run the wire beneath the vans flooring under the seat and into the battery
box. • Connect Red Wire to battery to the positive terminal at this time.
Step Four:
Gated Ramp User Manual
Questions?? You can contact us at 1-866-567-4518 or at [email protected] Page 7
Mar. 30
• Remove loose portion of the winch straps from the strap boxes at this time. They should hang down approximately 24 inches.
• Using remote control lower winch straps further and attach to the platform. • With assistance of another person raise the platform high enough to place into the back of the
van with the wheels down and the mounting hinges facing the front of the van. • Attach Bottom Mounting Plate to the bottom hinges of the platform making sure to secure the
latch properly . Note, the hinge on the bottom plate should be on the drivers side. • With assistance of another person raise the platform until the Bottom Mounting Plate touches
the floor make sure the ramp stays to the rear of the ramp stop plates. • Center the Bottom Mounting Plate in opening so that winch straps are vertical and the rear of
the Bottom Plate is flush with the front edge of the floor trim located at the rear of the van. • Mark the 4 square mounting holes on the van floor. • Using the winch lower the Platform and move the platform and Bottom Mounting Plate out of
the way. • Be sure to Secure Platform to prevent falling/damage.. • Double check that there is nothing mounted to the bottom of the van that might interfere with
the hole placements. • Drill holes on your marks with a 3/8" Drill Bit through the entirety of the Vans Floor. • Under the van clean the area approximately 1" around each holes you just made of debris dirt
etc.
Step Five:

Gated Ramp User Manual
Questions?? You can contact us at 1-866-567-4518 or at [email protected] Page 8
Mar. 30
• Bring Platform and Bottom Mounting Plate into position and put the 4 Carriage Bolts through the Bottom Mounting Plate and into the 4 holes you just drilled.
• (optional) Apply a 1/4" bead of RTV Silicone circling the bottom of the mounting holes. • Push a fender washer onto the bolts and into the RTV Silicone followed by a lock nut. • Double Check Bottom Mounting Plate Alignment. • Attach and tighten Hinge Collar snug to the hinge to prevent platform from coming off the hinge
rod. • Tighten nuts onto all 4 Bolts to 50ft pounds. • Tighten nuts to 75ft pounds after all nuts have been tightened to 50ft pounds. • Wipe excess RTV Silicone off. • See Diagram C. • Diagram C:
Step Six:
• Align Upper Hinge Bracket to allow Pin Hinge to properly seat. • Close van doors and check that nothing is hitting the unit or binding. • Check the clearance between the ramp and the bumper of the van this distance should be at
least 1/8". Adjust Leg lengths as needed. • Test Unit with caution making sure all features are working properly and without binding. • Make any final adjustments and retest after every adjustment.

Gated Ramp User Manual
Questions?? You can contact us at 1-866-567-4518 or at [email protected] Page 9
Mar. 30
Visual Aids For Bottom Plate Placement:
Ford Transit Installation Instructions

Gated Ramp User Manual
Questions?? You can contact us at 1-866-567-4518 or at [email protected] Page 10
Mar. 30
Tools Required:
• Wire Cutters • Wire Crimpers • 5/16" wrench • 7/16" wrench • 7/16" wrench • 9/16" deep well socket with extensions • 11/16" wrench • 11/16" wrench • Center Punch • Drill • 1/2" Steel Drill Bit • 5/16" Steel Drill Bit • 3/8" Steel Drill Bit • RTV Silicone 40z tube (optional)
----------------------------------------------------------------------------------------------------------------------
Step One:
• Locate the two holes that are the fourth Hole in from the outside on the furthest back ceiling cross brace.
• Ream out both sides of the rib containing this hole with the 5/16" drill bit. Step Two:
• Have 2 people lift the Roof Channel up into the back of the van. • Make sure the winch is located on the passenger side and the mounting bars are on the bottom. • Have one person hold the Roof Channel up. • Have a second person insert the bolt through the Mid L bracket extension - Ceiling Cross Brace -
and Rear L Bracket extension. Finger tighten a lock nut on the end of this bolt. • See Diagram A:

Gated Ramp User Manual
Questions?? You can contact us at 1-866-567-4518 or at [email protected] Page 11
Mar. 30
Diagram A:
• Center mounting bars horizontally at the inside edge of the lights at the rear of the van. • Slide Forward L Brackets to meet the rear wall of door opening on van Mark Holes and drill with
1/2" Drill Bit. Make sure not to put it low enough that the Upper Hinge bracket doesn't bind on the door opening.
• Insert the rubber well nuts and attach bracket with supplied Screws • Tighten all bracket bolts in the T-Slot Channels as well as the ceiling cross brace bolts at this
time. • See Diagram B. • Diagram B:

Gated Ramp User Manual
Questions?? You can contact us at 1-866-567-4518 or at [email protected] Page 12
Mar. 30
Step Three:
• Attach Black Wire to side or back wall of the van and make sure that it has a proper ground. • Run the Red Wire inside the vehicles wiring chase to the front of the van. • Continue behind the styro-foam corner and then feed the wire down behind the seatbelt
mounting plastic. • Once to the floor run the wire beneath the vans flooring under the seat and into the battery
box. • Connect Red Wire to battery to the positive terminal at this time.**
Note Wiring Install** Only connect wires to a clean corrosion free battery. Once installed make sure to insulate all exposed wiring.
Gated Ramp User Manual
Questions?? You can contact us at 1-866-567-4518 or at [email protected] Page 13
Mar. 30
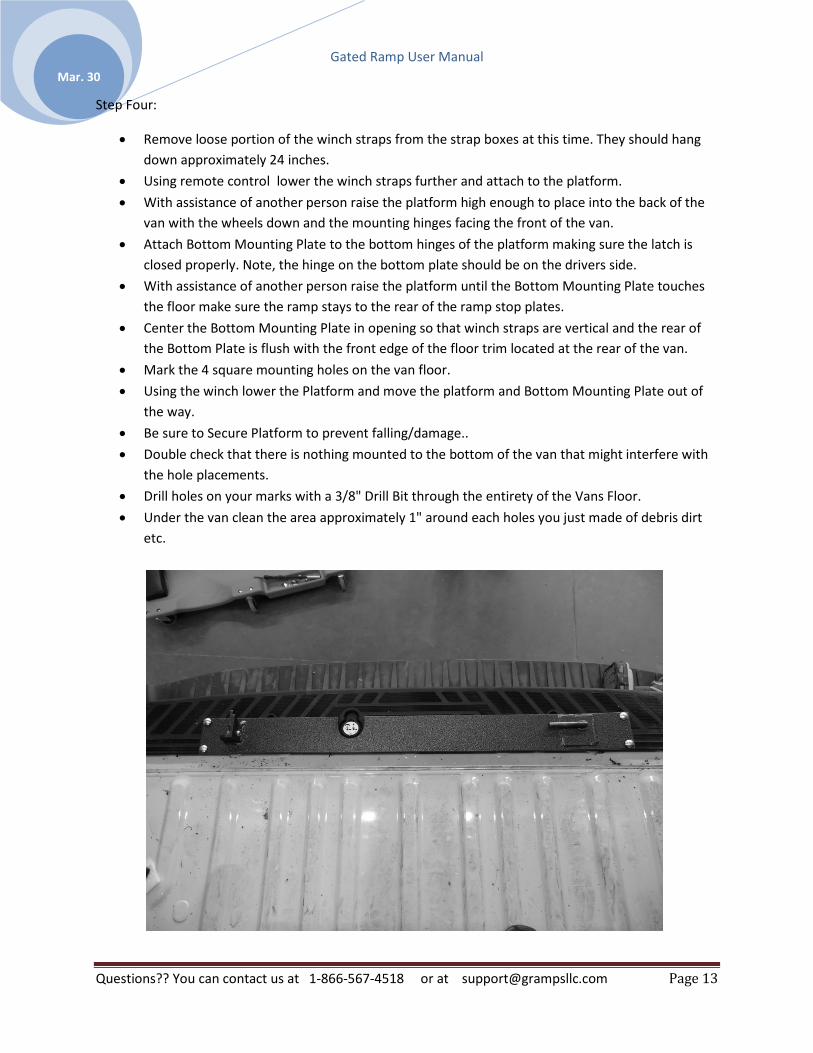
Step Four:
• Remove loose portion of the winch straps from the strap boxes at this time. They should hang down approximately 24 inches.
• Using remote control lower the winch straps further and attach to the platform. • With assistance of another person raise the platform high enough to place into the back of the
van with the wheels down and the mounting hinges facing the front of the van. • Attach Bottom Mounting Plate to the bottom hinges of the platform making sure the latch is
closed properly. Note, the hinge on the bottom plate should be on the drivers side. • With assistance of another person raise the platform until the Bottom Mounting Plate touches
the floor make sure the ramp stays to the rear of the ramp stop plates. • Center the Bottom Mounting Plate in opening so that winch straps are vertical and the rear of
the Bottom Plate is flush with the front edge of the floor trim located at the rear of the van. • Mark the 4 square mounting holes on the van floor. • Using the winch lower the Platform and move the platform and Bottom Mounting Plate out of
the way. • Be sure to Secure Platform to prevent falling/damage.. • Double check that there is nothing mounted to the bottom of the van that might interfere with
the hole placements. • Drill holes on your marks with a 3/8" Drill Bit through the entirety of the Vans Floor. • Under the van clean the area approximately 1" around each holes you just made of debris dirt
etc.

Gated Ramp User Manual
Questions?? You can contact us at 1-866-567-4518 or at [email protected] Page 14
Mar. 30
Step Five: • Bring Platform and Bottom Mounting Plate into position and put the 4 Carriage Bolts through
the Bottom Mounting Plate and into the 4 holes you just drilled. • Remove the small square access panels under the van's Rear Floor Cross Brace on each side to
get at the bolts. • (optional) Apply a 1/4" bead of RTV Silicone circling the bottom of the mounting holes. • Push a fender washer onto the bolts and into the RTV Silicone followed by a lock nut. • Double Check Bottom Mounting Plate Alignment. • Attach and tighten Hinge Collar snug to the hinge to prevent platform from coming off the hinge
rod. • Tighten nuts onto all 4 Bolts to 50ft pounds. • Tighten nuts to 75ft pounds after all nuts have been tightened to 50ft pounds. • Wipe excess RTV Silicone off. • See Diagram C. • Diagram C:

Gated Ramp User Manual
Questions?? You can contact us at 1-866-567-4518 or at [email protected] Page 15
Mar. 30
Step Six:
• Align Upper Hinge Bracket to allow Pin Hinge to properly seat. • Close van doors and check that nothing is hitting the unit or binding. • Check the clearance between the ramp and the bumper of the van this distance should be at
least 1/8". Adjust Leg lengths as needed. • Test Unit with caution making sure all features are working properly and without binding. • Make any final adjustments and retest after every adjustment.
Visual Aid For Bottom Plate Placement:
Gated Ramp User Manual
Questions?? You can contact us at 1-866-567-4518 or at [email protected] Page 16
Mar. 30
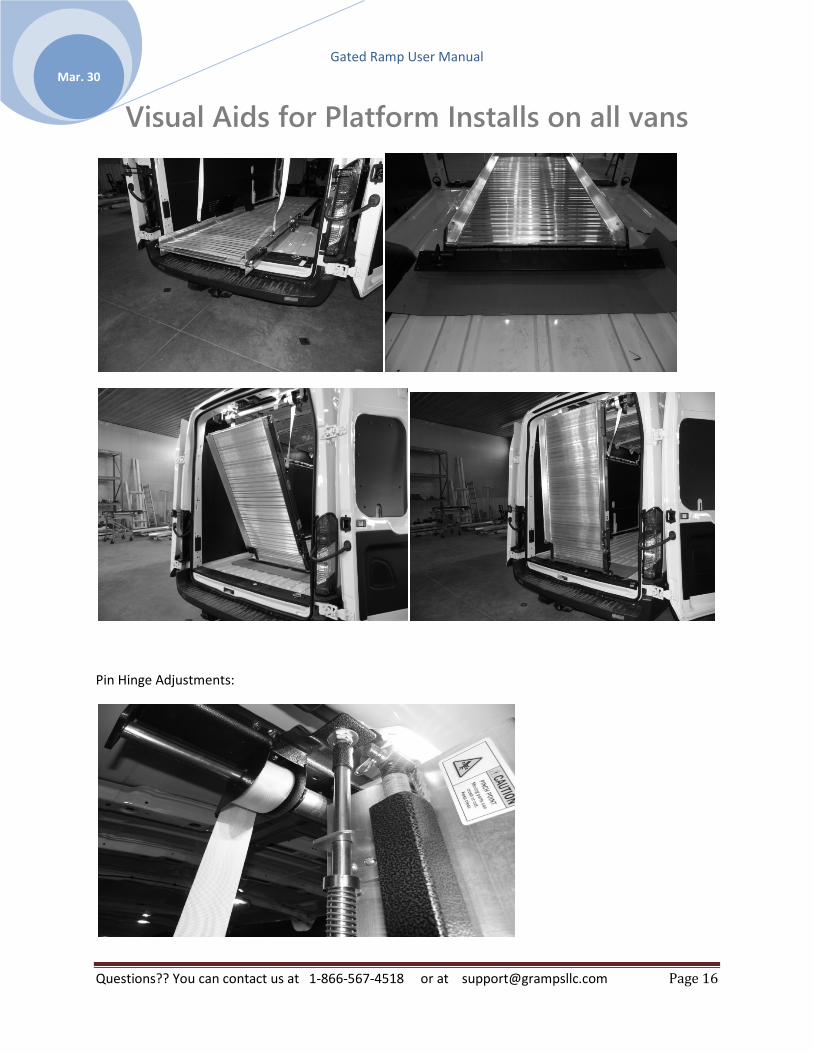
Visual Aids for Platform Installs on all vans
Pin Hinge Adjustments:

Gated Ramp User Manual
Questions?? You can contact us at 1-866-567-4518 or at [email protected] Page 17
Mar. 30
Height Adjustments:

Gated Ramp User Manual
Questions?? You can contact us at 1-866-567-4518 or at [email protected] Page 18
Mar. 30
Gated Ramp Accessory Leg
Attaching and Removing

Gated Ramp User Manual
Questions?? You can contact us at 1-866-567-4518 or at [email protected] Page 19
Mar. 30
Using the Gated Ramp: Remote Control Operation
• Press and hold the On/Off Button for 3 seconds until the LED lights up. • Press EXTEND to Lower the Ramp. • Press RETRACT to raise the ramp. • Press and hold the On/Off Button for 3 seconds until the LED turns off or it will automatically power off in
2 minutes if it is not used.
Reprogramming the Remote
• If the Solenoid or Remote is replaced than the Remote will need to be programmed. • To clear the previous program, press and hold both the EXTEND & RETRACT buttons simultaneously for 20
seconds until the LED flashing turns solid. • Let go of the buttons and press and hold the EXTEND & RECTRACT buttons simultaneously again for 3
seconds until LED turns off and then lights up.
Duty Cycle (Duration of Use)
• The winch used for raising and lowering the ramp has a duty cycle of 5%. • This means that for every 45 seconds of continuous use (with a load) the winch will need to rest
for at least 14 minutes and 15 seconds. • If using the load assist bar to move items up the ramp be sure to abide by this duty cycle as
failure to observe duty cycle limitations can easily over work the winch contributing to premature failure.
• The amount of load placed on the winch for standard ramp use (raising and lowering the ramp) is minimal and operator should only need to limit the raising and lowering of the ramp to once every 3 minutes.
Cleaning, Maintenance and Operation
• Before each use be sure to check the general condition of all ramp components. • Check for loose hardware, misalignment or binding of moving parts. • C heck for cracked or broken parts, damage to electrical wiring and corroded or loose connections. • Do not use if straps are worn, frayed, cut or damaged. • After each use wipe down ramp and re-inspect. • Moving parts can be lubricated occasionally with a light oil if needed. • If winch housing becomes submerged in water, the case will need to be opened, dried and re-lubricated
by a qualified technician as soon as possible.

Gated Ramp User Manual
Questions?? You can contact us at 1-866-567-4518 or at [email protected] Page 20
Mar. 30
Raising and Lowering the ramp
• Read all the warning and cautions on the warning and caution page. • Make sure vehicle is turned off and the Parking Brake is engaged before use. • Never stand in directly in front of ramp. • Make sure the area behind the van including a distance of 12 feet is clear of obstacles and people/pets. • Make sure Ramp straps are attached to the platform and there are no twists in the strap material. • Make sure that the lower hinge on the passenger side is latched. • Release the Rubber platform hold-downs on both sides of the platform. • While applying a forward pressure on the platform, pull the hinge pin release down and secure it onto the
flanged retaining bolt. • Let the ramp lower until the straps are supporting the platforms. (do not stand in front of the ramp) • Hold the center button down on the winch remote until the blue light stays on. • Press the extend button to lower ramp. • The end of the ramp may require assistance to keep the platform from folding under itself. • Adjust support legs so that they are vertical and adjust the height to have pressure on them when the
ramp is fully extended. • Make sure the support legs are high enough that the platform does not bind on the vehicles bumper. • Press the extend button to release tension on the ramp straps. • You can now use the ramp for loading and unloading materials. • To raise the ramp and secure it, just reverse this process. • Do not raise the ramp with objects on the platform.
Opening the ramp as a Gate:
• Read all the warning and cautions on the warning and caution page. • Make sure vehicle is turned off and the Parking Brake is engaged before use. • Never stand in directly in front of ramp. • Make sure the hinge pin is seated properly in the hinge catch. • Make sure that the platform strap on the hinge (drivers) side is attached to the platform • Make sure that the platform latches on both sides of the ramp are attached. • Un-attach the right (passenger) winch strap from the platform. • Un-lock the right (passenger) platform hinge and release the hinge from the latch. • Slowly open the ramp to the left (drivers) side. • Do not let the ramp slam open or shut as this can cause injury and or damage to the vehicle.

Gated Ramp User Manual
Questions?? You can contact us at 1-866-567-4518 or at [email protected] Page 21
Mar. 30
Troubleshooting Winch Motor Overheats:
• Possible Causes 1. Incorrect Power Cords 2. Winch running time too long.
• Possible Solutions 1. Use only supplied power cords. 2. Allow winch to cool down as per Duty Cycle dictates.
Winch motor will not turn on:
• Possible Causes 1. Remote Battery is dead. 2. Ground wire is loose or not connected. 3. Loose battery cable connections. 4. Vehicle battery needs charged. 5. Inline Breaker has blown. 6. Remote Damaged. 7. Solenoid malfunctioning 8. Water in Motor 9. Defective Motor 10. Internal damage or wear.
• Possible Solutions 1. Replace Remote battery. 2. Make sure ground wire has a proper grounded connection. 3. Tighten cable connections to battery and inline breaker. 4. Make sure vehicles battery is fully charged before use. 5. Wait for breaker to cool, it may take up to 15 minutes to reset. 6. Replace Remote. 7. Tap solenoid box to loosen contacts. Repair or replace as needed. 8. Allow to drain and dry. Run in short bursts without any load until completely dry. 9. Check for voltage at armature port with switch pressed. If voltage is present, replace
motor. 10. Have a technician service the winch motor.

Gated Ramp User Manual
Questions?? You can contact us at 1-866-567-4518 or at [email protected] Page 22
Mar. 30
Troubleshooting Winch motor runs slowly or without normal power:
• Possible Causes 1. Insufficient current or voltage. 2. Loose or corroded battery connections. 3. Incorrect power cords.
• Possible Solutions 1. Battery is weak and needs recharged. 2. Clean and tighten or replace battery connections. 3. Use only supplied power cords.
Motor only runs in one direction:
• Possible Causes 1. Relay switch needs adjusted. 2. Remote is damaged. 3. Defective solenoid.
• Possible Solutions 1. Lower Winch System and adjust Relay Switch away from strap. 2. Replace Remote 3. Tap Solenoid box to loosen contacts. Repair or replace as needed.
Caution:
Changes or modifications not approved by the responsible party can void all warranties and liability.
Note:
The electronic equipment was tested and found to be in compliance with the limits for a Class B digital device, pursuant to part 15 of the FCC Rules. These limits are designed to provide reasonable protection against harmful interference in a residential installation. These electronics will generate use and can radiate radio frequency energy and if not installed and used in accordance with the instructions, they may cause harmful interference to radio communications. If these electronics due cause harmful interference to radio and television reception, which can be determined by turning the electronics on and off. The user is encouraged to try and correct the interference by one or more of the following measures.

Gated Ramp User Manual
Questions?? You can contact us at 1-866-567-4518 or at [email protected] Page 23
Mar. 30
• Re-orientate or relocate the receiving antenna. • Increase distance between the electronics and receiver. • Consult dealer or an experienced TV/Radio technician for help.
RETURN SHEET Company Name ________________________________________ Contact Name ________________________________________ Telephone Number ___________________________________ Problems Encountered ______________________________________________________________________________________________________________________________________________________________________________________________________________________________________________________________________________ Return Authorization Number ____________________ Date: ________ Required Contact Gramps LLC
Customer Number _____________________________ If Known
INTERNAL USE ONLY Date Received ____________________________________ Unit Number ____________________________________ Warranty ____________________________________

Gated Ramp User Manual
Questions?? You can contact us at 1-866-567-4518 or at [email protected] Page 24
Mar. 30
Shipping ____________________________________


