garment textiles giftware hardline & soft-line … – small business software for apparel garment...
19
ibuyer.hk – small business software for apparel garment textiles giftware hardline & soft-line products. For exporter factory buying office & merchandising team. software export documentation software textile software costing software sampling software development software invoicing system quality assurance software export shipping software documentation software fiber inventory software fabric costing software export trading company software merchandising management system apparel software clothing factory software fabric mill inventory system cotton mill costing software factory evaluation software AQL inspection system sample & sourcing software product development system yarn woven knit fabric costing inventory software garment merchandising system raw material resources planning system software wholesaler inventory system order system export trading shipping document system catalog software trading invoice software stock management software warehouse movement system garment software for merchandiser production tracking software export shipment system order
Transcript of garment textiles giftware hardline & soft-line … – small business software for apparel garment...

ibuyer.hk – small business software for apparel
garment textiles giftware hardline & soft-line
products. For exporter factory buying office &
m e r c h a n d i s i n g t e a m . s o f t w a r e e x p o r t
documentation software textile software costing
software sampling software devel opment
software invoicing system quality assurance
software export shipping software documentation
software fiber inventory software fabric costing
software export trading company software
merchandising management system apparel
software clothing factory software fabric mill
inventory system cotton mill costing software
factory evaluation software AQL inspection system
sample & sourcing software product development
system yarn woven knit fabric costing inventory
software garment merchandising system raw
material resources planning system software
wholesaler inventory system order system export
trading shipping document system catalog software
trading invoice software stock management
software warehouse movement system garment
software for merchandiser production tracking
s o f t wa re ex p o r t s h i p m e n t s y s t e m o rd e r
Welcome to the ibuyer.hk software technical manual
- This is a technical detail for all of our software V4.38 onward. For earlier version (V3.58) please refer to the old manual.
- For general instruction of our software, please refer to the separate general user manual.
- For the using of individual software, please refer to the specific manual for individual software.
- For the installation of our software, please refer to the installation guide.
Table of content
01. Database platform.
02. Capacity.
03. Source Code.
04. Working environment.
05. MS Access 2013, 2010 & Access 2007.
06. Runtime mode & Full version mode.
07. Design change by end users. (design mode)
08. Table changes.
09. Design view and layout view.
10. Form changes.
11. Report changes.
12. Query & macro changes.
13. Modules & VB code changes.
14. System files.
15. File formats.
16. Sand box mode
Database platform
We are using the Microsoft Access database to develop all of our software products. MS Access is one of the product belongs to
Office Professional. Which is a commonly used database product and is reliable, stable and extremely user friendly? It has
continuously upgrading and updating, best for SME without the requirement of IT department support & maintenance.
Microsoft has different version of MS Access
- Access 2007
- Access 2010
- Access 2013
- Office Professional 2007
- Office professional 2010
- Office professional 2013
- Office enterprise 2013
- Office ultimate 2013
Both of the above products are comparable to using and developing of our software. For version before 3.58, we are using
Microsoft Access 2003 while for onward version we are switching to Access 2007, 2010 & 2013
Capacity
The following list of tables is specific to Microsoft Office Access 2013 databases or our software:
GENERAL
ATTRIBUTE MAXIMUM
Access database (.accdb) file size 2 gigabytes, minus the space needed for system objects
NOTE NOTE: Although the maximum size for a single database file is 2GB, you can work around this limitation
by using a split database. A front-end database file can point to thousands of back-end database files, each of
which could be as large as 2GB. For more information, see the topic, Split a database.
Number of objects in a database 32,768
Number of modules (including forms and
reports that have the HasModule
property set to True)
1,000
Number of characters in an object name 64
Number of characters in a password 20
Number of characters in a user name or
group name
20
Number of concurrent users 255

TABLE
ATTRIBUTE MAXIMUM
Number of characters in a table name 64
Number of characters in a field name 64
Number of fields in a table 255
Number of open tables 2048; the actual number might be smaller because of tables
opened internally by Access
Table size 2 gigabyte minus the space needed for the system objects
Number of characters in a Text field 255
Number of characters in a Memo field 65,535 when entering data through the user interface;
2 gigabytes of character storage when entering data
programmatically
Size of an OLE Object field 1 gigabyte
Number of indexes in a table 32
Number of fields in an index 10
Number of characters in a validation message 255
Number of characters in a validation rule 2,048
Number of characters in a table or field description 255
Number of characters in a record (excluding Memo and OLE Object fields) when the
UnicodeCompression property of the fields is set to Yes
4,000
Number of characters in a field property setting 255
MACRO
ATTRIBUTE MAXIMUM
Number of actions in a macro 999
Number of characters in a condition 255
Number of characters in a comment 255
Number of characters in an action argument 255

QUERY
ATTRIBUTE MAXIMUM
Number of enforced relationships 32 per table, minus the number of indexes that are on the table for fields or combinations of fields that are
not involved in relationships*
Number of tables in a query 32*
Number of joins in a query 16*
Number of fields in a recordset 255
Recordset size 1 gigabyte
Sort limit 255 characters in one or more fields
Number of levels of nested queries 50*
Number of characters in a cell in the query
design grid
1,024
Number of characters for a parameter in a
parameter query
255
Number of AND operators in a WHERE or
HAVING clause
99*
Number of characters in an SQL statement Approximately 64,000*
FORM AND REPORT
ATTRIBUTE MAXIMUM
Number of characters in a label 2,048
Number of characters in a text box 65,535
Form or report width 22 in. (55.87 cm)
Section height 22 in. (55.87 cm)
Height of all sections plus section headers (in Design view) 200 in. (508 cm)
Number of levels of nested forms or reports 7
Number of fields or expressions that you can sort or group on in a report 10
Number of headers and footers in a report 1 report header/footer;
Number of printed pages in a report 65,536
Number of controls and sections that you can add over the lifetime of the form or report 754
Number of characters in an SQL statement that serves as the Recordsource or Rowsource property of a form, report, or control 32,750

Source Code
For version 3.58 and before, we have strip off the source code completely from it. So that user won’t be able to made changes.
While from 4.28 onward, we have only strip off the VB code. (Partially removed) In this connection, end user is able to make
changes on the database software. Especially on the changes of all input forms, all reports, layout, field length, caption or
even complicated design changes of the database software.
Since we have strip off the VB code from it, user won’t be able to upsize the database, integrate our software, upload to
SharePoint server, upsize to SQL server, split the database to front & back end, convert to VB project, convert to .net application,
convert to web base or convert to php with MySQL server.
If user wants to do the above conversion, please contact us to purchase the complete source code copy in order to do so.
If you need to make changes on our database software product, you will need a full version of MS Access 2007, 2010, 2013 or
office professional 2007, 2010, and 2013 in order to do so. The one that you freely download from our site is a runtime version
only. It is only good enough to use, read or write our database software. It won’t be able to use it for any design changes.
Working environment
Since all of our software built on MS Access, it only working on Windows Operating system, Windows Network, Windows Server
and Window Clients network.
It won’t be working on a MAC OS or Linux OS machines. However, user may place the data file on such storage device and open
our database software by a Windows PC. This can be done either by a share folder or remote desktop connection.
The benefit of using our database software is user can use it without a Windows Server; this could save a lot of cost and
maintenance for the end user. Since our database is a desktop database instead of a client & server database infrastructure.
MS Access 2007, Access 2010 & Access 2013
Since our software product is developed by Microsoft Access, it works on both Access 2007, Access 2010 and Access 2013. While
during installation if there is no full version of Microsoft Access, at least a runtime Access 2013 must be installed, since it is the
minimal requirement for installing our software.
If end user only wanted to use our database software (read / write data only), a free version of MS Access runtime is good
enough. The Access runtime can be downloading free from Microsoft site:
Access 2013 Runtime
If end user wanted to do design changes and modification to our database software, they will require a full version of MS Access
2007, 2010 or Access 2013. Since runtime Access do not provide design functions.

Runtime mode & Full version mode
Understand the Access 2013 Runtime
The Access 2013 Runtime is a redistributable program that allows people who do not have Access 2013 installed on their
computers to use Access 2013 database applications. When you open an Access 2013 database by using the Access 2013
Runtime, the database opens in runtime mode.
WHAT IS RUNTIME MODE?
Runtime mode is an Access 2013 operating mode in which certain Access 2013 features are not available by default. Some of
these unavailable features can be made available in runtime mode, however.
Which features are not available in runtime mode?
The following Access 2013 features are not available in runtime mode:
Navigation Pane The Navigation Pane is not available in runtime mode. This helps prevent users from accessing arbitrary
objects in your database application. Only those objects that you expose to users — for example, by providing a switchboard
form — can be opened while using runtime mode. You cannot make the Navigation Pane available in runtime mode.
The Ribbon By default, the Ribbon is not available in runtime mode. This helps prevent users from creating or modifying
database objects, and from performing other potentially harmful actions, such as connecting to new data sources or
exporting data in ways that you do not intend. You can create a custom Ribbon, and then associate that Ribbon with a form
or report. You cannot expose the default Ribbon tabs in runtime mode.
Design view and Layout view Design view and Layout view are not available for any database objects in runtime mode. This
helps prevent users from modifying the design of objects in your database application. You cannot enable Design view or
Layout view in runtime mode.
Help By default, integrated Help is not available in runtime mode. Because you control what functionality is available in your
runtime mode application, some of the standard integrated Access 2013 Help may be irrelevant to people who use your
application, and could potentially confuse or frustrate them. If you are using the Access 2007 Developer Extensions to
package and deploy your database application, you can provide a custom Help file with your runtime mode application.
CAN I OPEN A DATABASE IN RUNTIME MODE WITHOUT USING THE ACCESS 2013 RUNTIME SOFTWARE?
You can run any Access 2013 database in runtime mode on a computer that has the full version of Access 2013 installed. To run
an Access 2013 database in runtime mode, do one of the following:
Change the file name extension of the database file from .accdb to .accdr.
Create a shortcut to the database, and include the /Runtime command-line switch in the shortcut.
DOES RUNTIME MODE MAKE MY DATABASE MORE SECURE?
Although runtime mode limits the availability of navigation and design features, you should not use runtime mode as the
primary means of securing a database application. On a computer that has the full version of Access 2013 installed, it may be
possible for a user to open a runtime database application as a regular database application (that is, with all features available)
and then to change the design or perform other unwanted actions.
Even if you deploy your database application only on computers that do not have the full version of Access 2013 installed, it is
still possible for a user to transfer the application to a computer that does have the full version of Access 2013 installed, and
then open the runtime database application as a regular database application.
While full version of MS Access provide all the functionality so that user can use it as a develop tools.
If you have few user inside you office using our software, only runtime Access is required. Except you want to do design changes
on it, you will need to have one machine that has the full version of MS Access in order to do so.
Design changes by end users
If user has the interest to made changes on our software, they can use the full version of Access to do that. But there is one rule
for user making changes on our database software – Back Up
Every time before and after making changes, do a back up. Since the back-up will save both the data and design into a separate
data file, user can always restore it without losing any vital information. Just in case anything goes wrong during the modification,
user can start over again with the last design and data.
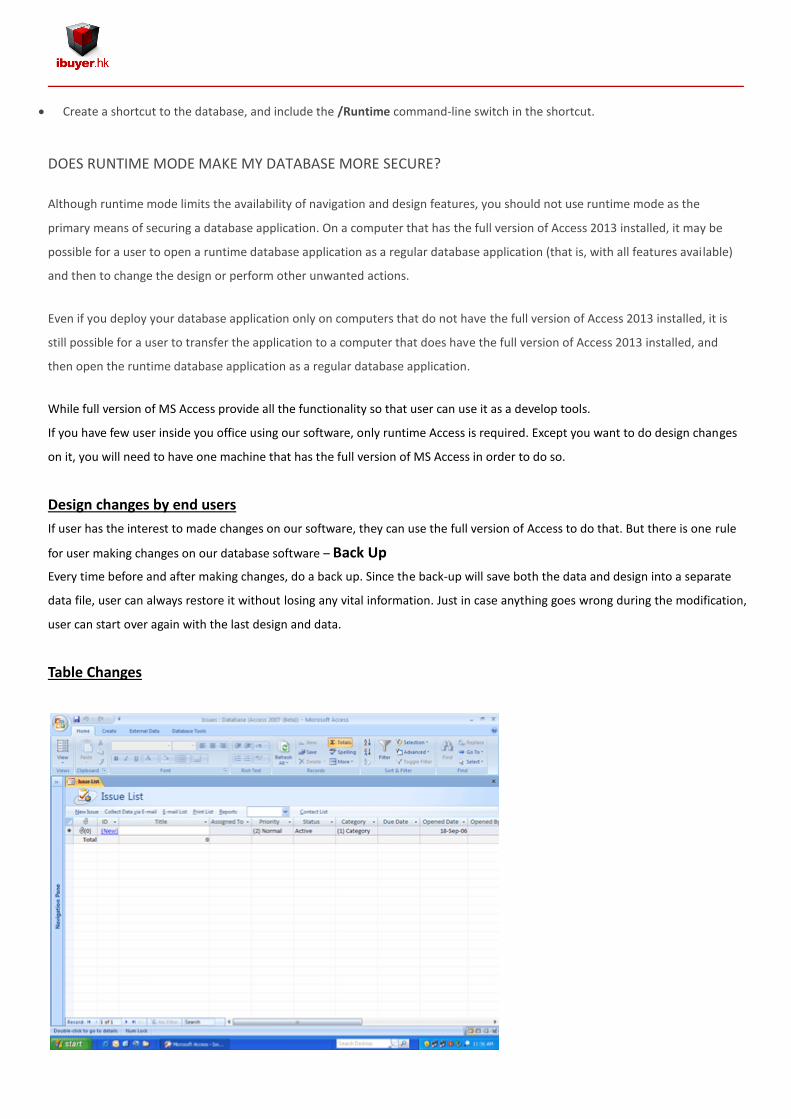
Table Changes
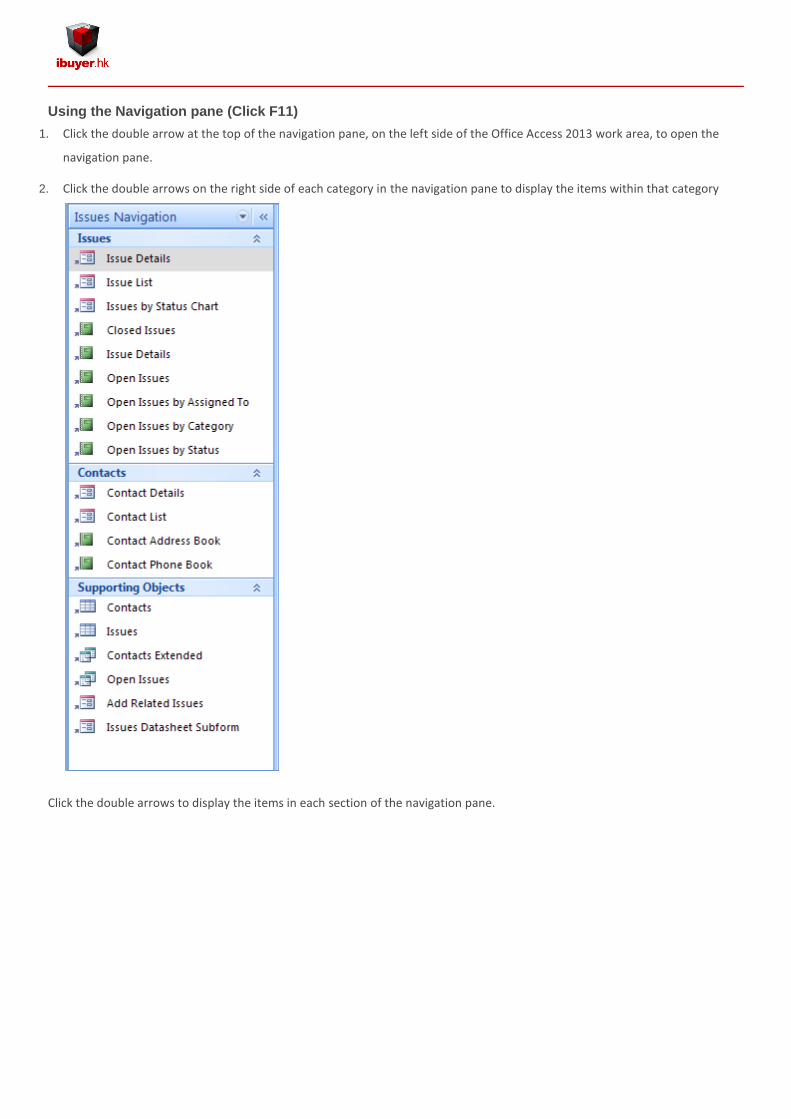
Using the Navigation pane (Click F11)
1. Click the double arrow at the top of the navigation pane, on the left side of the Office Access 2013 work area, to open the
navigation pane.
2. Click the double arrows on the right side of each category in the navigation pane to display the items within that category
Click the double arrows to display the items in each section of the navigation pane.
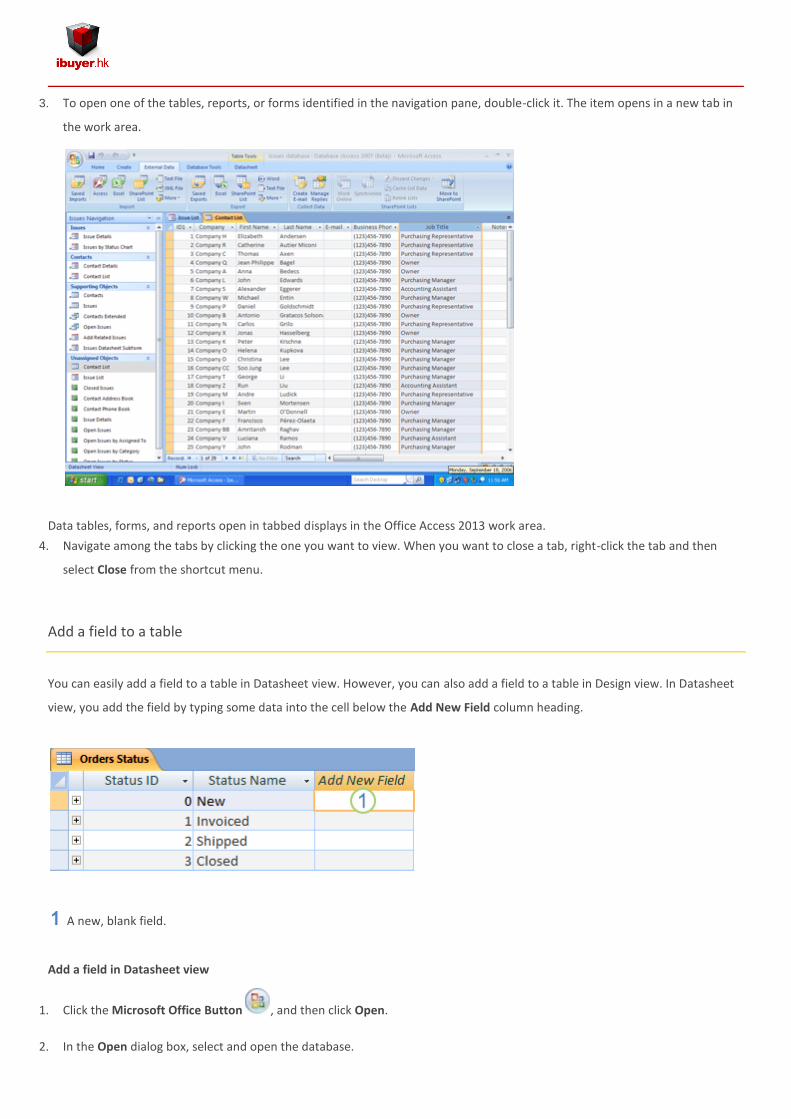
3. To open one of the tables, reports, or forms identified in the navigation pane, double-click it. The item opens in a new tab in
the work area.
Data tables, forms, and reports open in tabbed displays in the Office Access 2013 work area.
4. Navigate among the tabs by clicking the one you want to view. When you want to close a tab, right-click the tab and then
select Close from the shortcut menu.
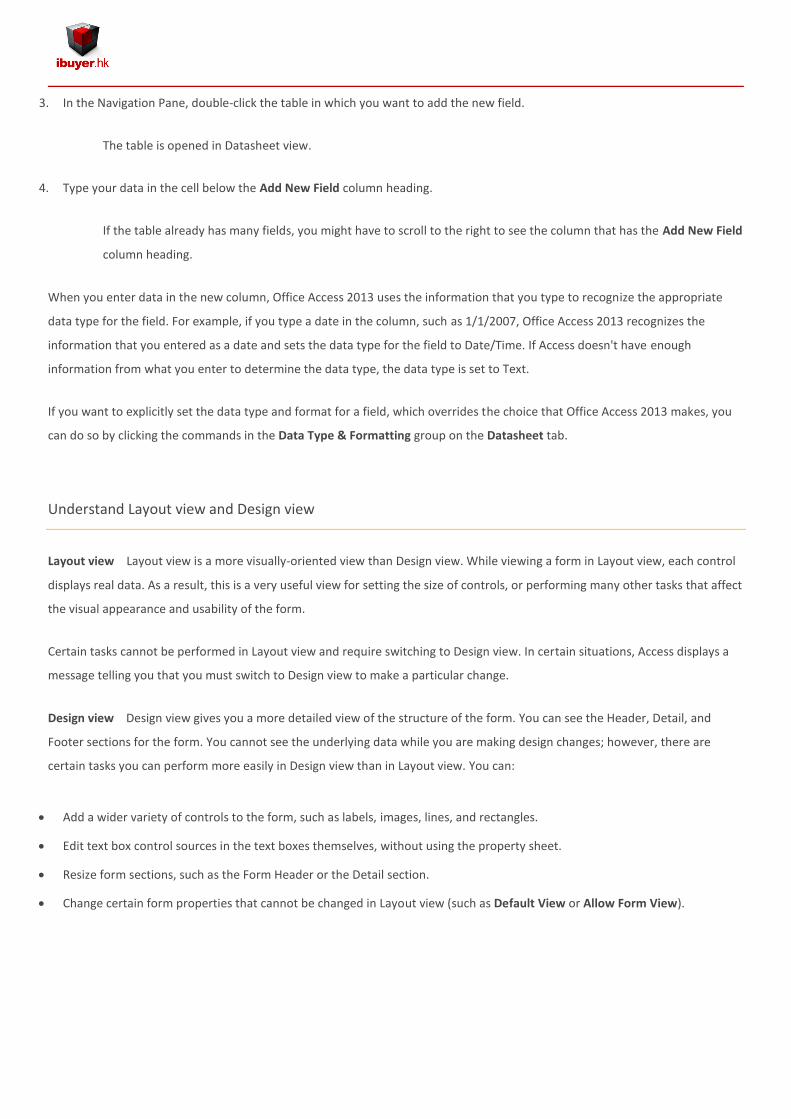
Add a field to a table
You can easily add a field to a table in Datasheet view. However, you can also add a field to a table in Design view. In Datasheet
view, you add the field by typing some data into the cell below the Add New Field column heading.
A new, blank field.
Add a field in Datasheet view
1. Click the Microsoft Office Button , and then click Open.
2. In the Open dialog box, select and open the database.
3. In the Navigation Pane, double-click the table in which you want to add the new field.
The table is opened in Datasheet view.
4. Type your data in the cell below the Add New Field column heading.
If the table already has many fields, you might have to scroll to the right to see the column that has the Add New Field
column heading.
When you enter data in the new column, Office Access 2013 uses the information that you type to recognize the appropriate
data type for the field. For example, if you type a date in the column, such as 1/1/2007, Office Access 2013 recognizes the
information that you entered as a date and sets the data type for the field to Date/Time. If Access doesn't have enough
information from what you enter to determine the data type, the data type is set to Text.
If you want to explicitly set the data type and format for a field, which overrides the choice that Office Access 2013 makes, you
can do so by clicking the commands in the Data Type & Formatting group on the Datasheet tab.
Understand Layout view and Design view
Layout view Layout view is a more visually-oriented view than Design view. While viewing a form in Layout view, each control
displays real data. As a result, this is a very useful view for setting the size of controls, or performing many other tasks that affect
the visual appearance and usability of the form.
Certain tasks cannot be performed in Layout view and require switching to Design view. In certain situations, Access displays a
message telling you that you must switch to Design view to make a particular change.
Design view Design view gives you a more detailed view of the structure of the form. You can see the Header, Detail, and
Footer sections for the form. You cannot see the underlying data while you are making design changes; however, there are
certain tasks you can perform more easily in Design view than in Layout view. You can:
Add a wider variety of controls to the form, such as labels, images, lines, and rectangles.
Edit text box control sources in the text boxes themselves, without using the property sheet.
Resize form sections, such as the Form Header or the Detail section.
Change certain form properties that cannot be changed in Layout view (such as Default View or Allow Form View).

Modify a form in Layout view
After you create a form, you can easily fine-tune its design by working in Layout view. Using the actual form data as your guide,
you can rearrange the controls and adjust their sizes. You can add new controls to the form and set the properties for the form
and its controls.
To switch to Layout view, right-click the form name in the Navigation Pane and then clicks Layout View .
Access shows the form in Layout view.
You can use the property sheet to modify the properties for the form and its controls and sections. To display the property sheet,
press F4.
You can use the Field List pane to add fields from the underlying table or query to the form design. To display the Field List pane,
use one of the following methods:
On the Format tab, in the Controls group, click Add Existing Fields .
Press ALT+F8.
You can then drag fields directly from the Field List pane onto the form.
To add a single field, double-click it or drag it from the Field List pane to the section on the form where you want it displayed.
To add several fields at the same time, hold down CTRL and then click the fields that you want to add. Then, drag the selected
fields onto the form.
Modify a form in Design view
You can also fine-tune your form's design by working in Design view. You can add new controls and fields to the form by adding
them to the design grid. The property sheet gives you access to many properties that you can set to customize the form.
To switch to Design view, right-click the form name in the Navigation Pane and then clicks Design View .
Access shows the form in Design view.
You can use the property sheet to modify the properties for the form and its controls and sections. To display the property sheet,
press F4.
You can use the Field List pane to add fields from the underlying table or query to the form design. To display the Field List pane,
use one of the following methods:
On the Design tab, in the Tools group, click Add Existing Field.
Press ALT+F8.
You can then drag fields directly from the Field List pane onto the form.
To add a single field, double-click it or drag it from the Field List pane to the section on the form where you want it displayed.
To add several fields at the same time, hold down CTRL and then click the fields that you want to add. Then, drag the selected
fields onto the form.
Report Changes
Understand Layout view
Layout view is the most intuitive view to use for report modification, and can be used for nearly all the changes you would want
to make to a report in Office Access 2013. In Layout view, the report is actually running, so you can see your data much as it will
appear when printed. However, you can also make changes to the report design in this view. Because you can see the data while
you are modifying the report, it's a very useful view for setting column widths, add grouping levels, or performing almost any
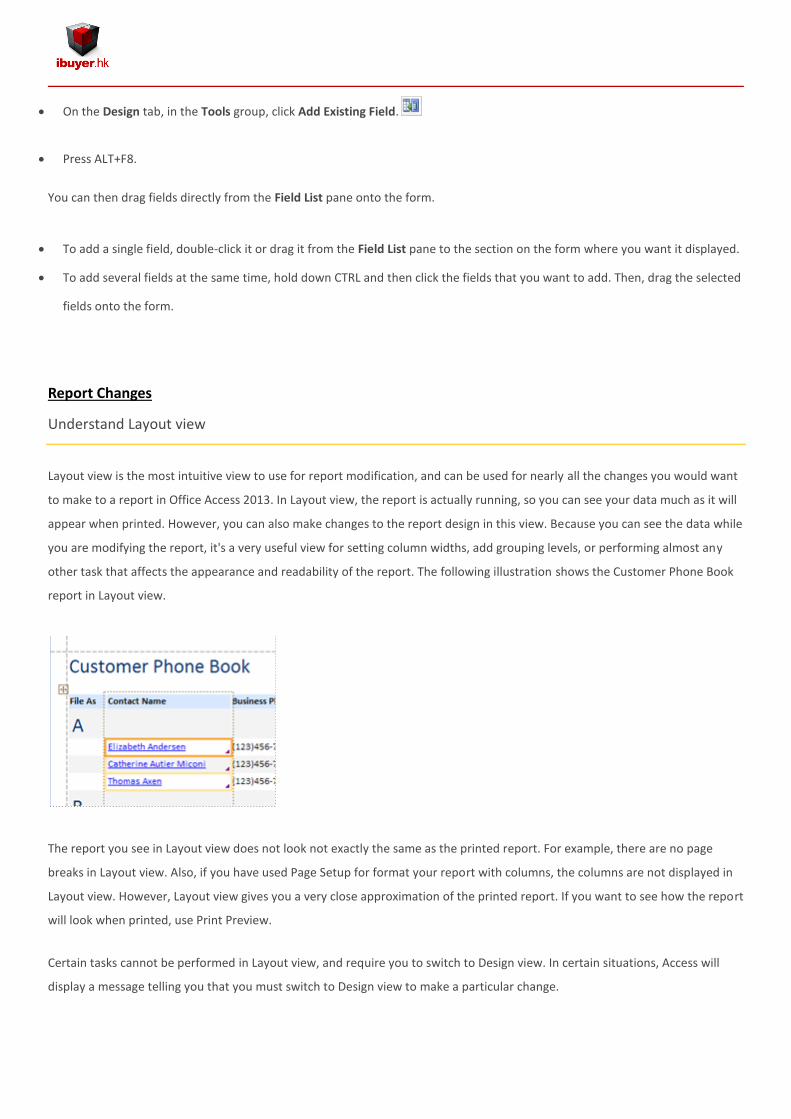
other task that affects the appearance and readability of the report. The following illustration shows the Customer Phone Book
report in Layout view.
The report you see in Layout view does not look not exactly the same as the printed report. For example, there are no page
breaks in Layout view. Also, if you have used Page Setup for format your report with columns, the columns are not displayed in
Layout view. However, Layout view gives you a very close approximation of the printed report. If you want to see how the report
will look when printed, use Print Preview.
Certain tasks cannot be performed in Layout view, and require you to switch to Design view. In certain situations, Access will
display a message telling you that you must switch to Design view to make a particular change.

Understand Design view
Design view gives you a more detailed view of the structure of your report. You can see the header and footer bands for the
report, page, and groups. The report is not actually running in Design view, so you cannot see the underlying data while working;
however, there are certain tasks you can perform more easily in Design view than in Layout view. You can:
Add a wider variety of controls to your report, such as labels, images, lines, and rectangles.
Edit text box control sources in the text boxes themselves, without using the property sheet.
Change certain properties that are not available in Layout view.
The following illustration shows the Customer Phone Book report in Design view.
Query and macro changes
Learn when to use a data-definition query
Unlike other queries, a data-definition query does not retrieve data. Most queries use Data Manipulation Language (DML),
which comprises Structured Query Language (SQL) commands that specify how data from existing database objects is combined
and manipulated to produce the data results that you want. Data-definition queries use Data Definition Language (DDL), which
comprises SQL commands that specify the definition of database objects that store or index data, and SQL commands that
control user access to database objects. In Office Access 2013, a data-definition query defines or changes the definition of a
database object.
In general, you should use the graphical design interfaces that Office Access 2013 provides (for example, Design view and the
Relationships window) to create tables, constraints, indexes, and relationships. However, if you have tables that you regularly
delete and re-create, using these interfaces might become time consuming. By using a data-definition query, you can write a
query once, and then run it again when necessary. Consider using a data-definition query only if you are familiar with SQL
statements and if you plan to delete and re-create particular tables, constraints, or indexes regularly.

IMPORTANT Using data-definition queries to modify database objects can be risky, because the actions are not accompanied
by confirmation dialog boxes. If you make a mistake, you can lose data or inadvertently change the design of a table. Be careful
when you use a data-definition query to modify objects in your database. If you are not responsible for maintaining the
database that you are using, you should consult with the administrator of the database before running a data-definition query.
In addition, it is a good practice to make a backup copy of any tables on which you are about to run such a query.
Learn about the Macro Builder
You use the Macro Builder to create and modify macros. To open the Macro Builder:
On the Create tab, in the Other group, click Macro. If this command is unavailable, click the arrow beneath either the Module
or the Class Module button, and then click Macro.
The Macro Builder is displayed.
In the Macro Builder window, you build the list of actions that you want to carry out when the macro runs. When you first open
the Macro Builder, the Action column, the Arguments column, and the Comment column are displayed.
Under Action Arguments, you enter and edit arguments on the left side for each macro action, if any are required. A description
box that gives you a short description of each action or argument is displayed on the right side. Click an action or action
argument to read the description in the box.
You can use the commands on the Design tab of the Macro Builder to create, test, and run a macro.

The following table describes the commands that are available on the Design tab.
GROUP COMMAND DESCRIPTION
Tools Run Performs the actions listed in the macro.
Single Step Enables single-step mode. When you run the macro in this mode, each action is performed one at a time. After each action is
complete, the Macro Single Step dialog box is displayed. Click Step in the dialog box to advance to the next action. Click
Stop All Macros to stop this and any other running macros. Click Continue to exit single-step mode and to perform the
remaining actions without stopping.
Builder When you enter an action argument that can contain an expression, this button is enabled. Click Builder to open the
Expression Builder dialog box, which you can use to build the expression.
Rows Insert Rows Inserts one or more blank action rows above the selected row or rows.
Delete Rows Deletes the selected action row or rows.
Show/Hide Show All
Actions
Displays more or fewer macro actions in the Action drop-down list.
To display a longer list of macro actions, click Show All Actions. When the longer list of macro actions is available, the Show
All Actions button appears selected. If you select a macro action from this longer list of macro actions, then you may need to
grant the database explicit trust status before you can run the action.
To switch from a longer list of macro actions to a shorter list that displays only those macro actions that can be used in a
database that has not been trusted make sure that the Show All Actions button is not selected.
TIP If the Show All Actions button is selected, click the Show All Actions button to clear the selection. When
the Show All Actions button is not selected, the shorter list of trusted macro actions is available.
Macro Names Shows or hides the Macro Name column. Macro names are required in macro groups to distinguish the individual macros
from each other, but otherwise, macro names are optional. For more information, see the section Create a macro group.
Conditions Shows or hides the Condition column. You use this column to enter expressions that control when an action is performed.
Arguments Shows or hides the Arguments column. This column displays the arguments for each macro action and makes it easier to
read through your macro. If the Arguments column is not displayed, you have to click each action and read the arguments
under Action Arguments. You cannot enter arguments in the Arguments column.
Modules & VB code changes.
Since we have strip off the VB code from all of our software. (Source code removed)
User won’t be able to made any changes and modification on this part of the database software.
System Files.
Starting from version 4.38 onward, we have implement .net and C# modules into our software. This will give greater stability,
durability and security to our database software on top of the Microsoft Access desktop database. If user browses the working
folder, you will notice a lot of .dll, .bpl, security system files, configuration settings files.

Please do not attempt to make changes, rename, and tamper these system files. Otherwise, database will not working.
File Formats.
Our database file format exists in .mdb, .mde, .accdt, .accde, .accdb, .mdw
Sandbox mode
Understand sandbox mode and how it behaves
When you add an expression to a database, Access runs that expression in an operating environment called sandbox mode.
Access does this for databases that were created in either Office Access 2013 or earlier Access file formats that you open in
Office Access 2013. Access enables sandbox mode by default, and the mode always disables unsafe expressions, even after you
enable the content in a database.
If you trust the source of a database and you want to run an expression that sandbox mode disables, you can run that
expression by changing a registry key to disable sandbox mode. Remember that the database must either be located in a trusted
location, or bear a valid trust signature, for it to be possible to disable sandbox mode. If you want to change the setting for
sandbox mode, follow the steps outlined below.
The following drawing shows the decision process that Access follows when it encounters an unsafe expression.
Caution Incorrectly editing the registry may severely damage your operating system, requiring you to reinstall it. Microsoft
cannot guarantee that problems resulting from editing the registry incorrectly can be resolved. Before editing the registry, back
up any valuable data. For the most recent information about using and protecting your computer's registry, see Microsoft
Windows Help.

If you are not familiar with the registry, or you are not comfortable with changing registry keys yourself, ask for help from
someone who is familiar and comfortable with changing the registry. You must have administrator permissions on the computer
to change the registry values.
Disable sandbox mode (run unsafe expressions)
You disable sandbox mode in Office Access 2013 by changing the value of a registry key.
Caution Incorrectly editing the registry may severely damage your operating system, requiring you to reinstall it. Microsoft
cannot guarantee that problems resulting from editing the registry incorrectly can be resolved. Before editing the registry, back
up any valuable data. For the most recent information about using and protecting your computer's registry, see Microsoft
Windows Help.
CHANGE THE REGISTRY KEY
IMPORTANT Following these steps allows unsafe expressions to run in all instances of Access for all users on the computer.
1. Close all instances of Access that are running on the computer for which you want to disable sandbox mode.
2. Do one of the following:
In Windows Vista
1. Click the Start button , point to All Programs, click Accessories, and then click Run.
2. In the Open box, type regedit and then press ENTER.
The Registry Editor starts.
3. Expand the HKEY_LOCAL_MACHINE folder and navigate to the following registry key:
\Software\Microsoft\Office\12.0\Access Connectivity Engine\Engines
4. In the right pane of the registry editor, under Name, double-click SandboxMode.
The Edit DWORD Value dialog box appears.
5. In the Value Data field, change the value from 3 to 2, and then click OK.
6. Close the Registry Editor.
In Microsoft Windows XP or Microsoft Windows Server 2003
1. On the taskbar click Start, and then click Run.
2. In the Open box, type regedit and then press ENTER.

The Registry Editor starts.
3. Expand the HKEY_LOCAL_MACHINE folder and navigate to the following registry key:
\Software\Microsoft\Office\12.0\Access Connectivity Engine\Engines
4. In the right pane of the registry editor, under Name, double-click SandboxMode.
The Edit DWORD Value dialog box appears.
5. In the Value Data field, change the value from 3 to 2, and then click OK.
6. Close the Registry Editor.
IMPORTANT Remember that if you do not first enable the content in the database, Access disables any unsafe expressions
regardless of whether you change this registry setting.
You can set the registry value to the following values, with 0 (zero) being the most permissive and 3 being the least permissive.
SETTING DESCRIPTION
0 Sandbox mode is disabled at all times.
1 Sandbox mode is used for Access, but not for non-Access programs.
2 Sandbox mode is used for non-Access programs, but not for Access.
3 Sandbox mode is used at all times. This is the default value, set when you install Access.
- That’s it for our technical manual; you may refer to our support forum for more FAQ and information’s.