GardenChatter - extension.missouri.eduextension.missouri.edu/laclede/documents/Master...
24
GardenChatter The Official Publication of Laclede County Master Gardeners Laclede County Master Gardeners 186 N. Adams Ave. Lebanon Ph. 532-7126 President Robert “Bob” Smith III, 417-532-5783 [email protected] Secretary Barbara Thompson 417-533-8148 Treasurer Glennie Kinnett Newsletter Editor Robert “Bob” Smith III, 417-532-5783 [email protected] Master Gardeners of Laclede County 186-D N. Adams Ave. Lebanon, Missouri 65536 Phone: 417-532-7126 • Fax: 417-532-4587 University of Missouri Extension does not discriminate on the basis of race, color, national origin, sex, religion, age, disability or status as a Vietnam-era veteran in employment or programs. October` 2017 It's Go Time for Fall Recovery on Lawns Mild temperatures have been screaming "GO!" to tall fescue and Kentucky bluegrass for much of the month of August, well ahead of the revered mid-September date for aerification, fertilization, and overseeding. Average two- inch soil temperatures are hovering around the mid to 70s for much of the state, and we are down to 13 hours of daylight to keep things cool. These cool temperatures of fall provide the best time for building a lawn. The stress and disease potential of the summer is in the rearview mirror instead of the windshield, and even troublesome weeds are either ready to kick the bucket (summer annuals) or are pulling in the reins to make it through the winter. At the same time, cool season grasses are kicking it back into gear, wiping the sweat of their brow after a long workout, and are ready to put on some muscle. Our job is to put food on their plate and give them room to grow. Below are a few bullet points of ways to get a healthy lawn going for next spring. If you use a professional service for lawn care, make sure to discuss with them the routine care needs (particularly irrigation) that will be necessary to ensure success of their efforts. • The first and most crucially important question is "Do you know the size of your lawn?" If not, you shouldn't be a DIYer when it comes to fertilization, seeding, or chemical applications. A new tool, the Missouri Lawn Fertilizer calculator - http://agebb.missouri.edu/fertcalc/ , requires this information and provides a link to a map application that can assist in determining your lawn area. • Fertilization — If nothing else, fertilize the lawn in the next few weeks to put on that "muscle mass" and start competing. Fall is the best time to fertilize because there is much less danger of sparking troublesome warm weather diseases such as brown patch and Pythium blight.
Transcript of GardenChatter - extension.missouri.eduextension.missouri.edu/laclede/documents/Master...

GardenChatter
The Official Publication of Laclede County Master Gardeners
Laclede County Master
Gardeners 186 N. Adams Ave. Lebanon
Ph. 532-7126
President
Robert “Bob” Smith III, 417-532-5783
Secretary
Barbara Thompson 417-533-8148
Treasurer
Glennie Kinnett
Newsletter Editor
Robert “Bob” Smith III, 417-532-5783
Master Gardeners of Laclede County
186-D N. Adams Ave.
Lebanon, Missouri 65536
Phone: 417-532-7126 •
Fax: 417-532-4587
University of Missouri Extension does not
discriminate on the basis of race, color,
national origin, sex, religion, age, disability or
status as a Vietnam-era veteran in
employment or programs.
October` 2017
It's Go Time for Fall
Recovery on Lawns Mild temperatures have been screaming "GO!" to tall
fescue and Kentucky bluegrass for much of the month of
August, well ahead of the revered mid-September date for
aerification, fertilization, and overseeding. Average two-
inch soil temperatures are hovering around the mid to 70s
for much of the state, and we are down to 13 hours of
daylight to keep things cool.
These cool temperatures of fall provide the best time for
building a lawn. The stress and disease potential of the
summer is in the rearview mirror instead of the windshield,
and even troublesome weeds are either ready to kick the
bucket (summer annuals) or are pulling in the reins to
make it through the winter. At the same time, cool season
grasses are kicking it back into gear, wiping the sweat of
their brow after a long workout, and are ready to put on
some muscle. Our job is to put food on their plate and give
them room to grow. Below are a few bullet points of ways
to get a healthy lawn going for next spring. If you use a
professional service for lawn care, make sure to discuss
with them the routine care needs (particularly irrigation)
that will be necessary to ensure success of their efforts.
• The first and most crucially important question is "Do you know the size of your lawn?" If not, you shouldn't be a DIYer when it comes to fertilization, seeding, or chemical applications. A new tool, the Missouri Lawn Fertilizer calculator - http://agebb.missouri.edu/fertcalc/, requires this information and provides a link to a map application that can assist in determining your lawn area.
• Fertilization — If nothing else, fertilize the lawn in the next few weeks to put on that "muscle mass" and start competing. Fall is the best time to fertilize because there is much less danger of sparking troublesome warm weather diseases such as brown patch and Pythium blight.

• On established lawns, plan for at least 1 lb N/1000 sq ft, and for newer lawns a bit more. (again
see the Missouri Lawn Fertilizer Calculator mentioned above). Quick relea se forms such as
urea will serve the purpose, but perhaps split into two applications for a steadier feed (and
remember to water it in). If overseeding a lawn or renovating (i.e. starting from scratch), a
balanced starter fertilizer may be needed. Conduct a soil test prior to renovating to determine
plant needs - http://soilplantlab.missouri.edu. After fertilization (and mowing), use a leaf
blower to get fertilizer & material off impervious surfaces such as driveways and gutters
and back on your lawn . Our lakes, streams, and waterways will be most appreciative this
method of pollution reduction.
• Weed Control — Fall is the best time for long term control of most perennial broadleaves with
herbicides since the plants are pulling in nutrients for storage rather than pushing out new
growth. We need to strategize, however, the best timing for doing this, particularly if we plan
to overseed. If seeding this fall, spot applications of glyphosate may work best for a small area
since reseeding can be done just a few days after. If going after broadleaves with a 3 -way type
herbicide or triclopyr, it may be best to seed now, assess the establishment of the stand, and
apply in mid to late October or wait until next spring. Check the label of your intended product
carefully to determine potential impact on seeding efforts, and follow that plan.
•
After power-raking seeding, and fertilizing. Note the leaf blower used to get fertilizer, seed, and
plant material off the street/driveway and back into lawn!

• Aerification — If letting seed fly, aerification is a great practice to prepare the site.
Aerification also will help produce pathways for water and nutrients to flow down to the
rootzone, and does a good job of opening up the canopy to enable some good seed soil contact.
A power rake, core or spike aerifier (from most to least effective) should be used over the area
prior to seeding.
Example of thatch removal after power-raking (or verticutting) lawn prior to seeding.
• Seeding — If weeds continually produce seeds to establish into bare areas year after year, why
don't we also seed in the same way? We have the distinct advantage of being able to seed tall
fescue and Kentucky bluegrass, and to build density we should use it. Fall is the best time for
seeding, and to do it effectively follow this pattern. Mow low (only time I'll recommend) —
aerify — seed — lightly rake in — fertilize — irrigate.
• Irrigation — Irrigation used to establish tall fescue seed in the fall is perhaps more appropriate
than supplemental irrigation used throughout the summer to keep tall fescue green.
Unfortunately, the only part of the early September weather pattern that doesn't seem to be
cooperating with seeding is the lack of rainfall. Hopefully some rainfall will return in mid -
September, but don't rely exclusively on it and provide supplemental irrigation. This irrigation
will need to be light and frequent, opposite of irrigation practices on an established lawn. In
the words of my recently retired colleague, Dr. Brad Fresenburg "keep the soil dark after
seeding, but don't make it shiny".
Plant Peonies Now
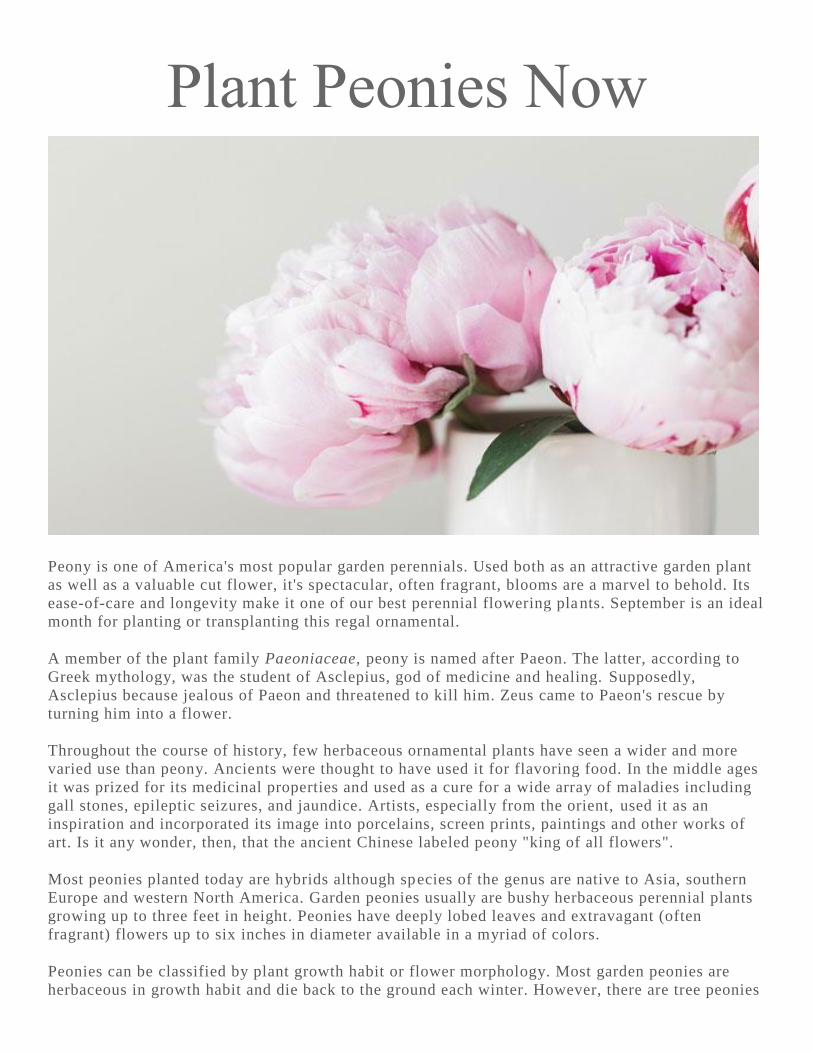
Peony is one of America's most popular garden perennials. Used both as an attractive garden plant
as well as a valuable cut flower, it's spectacular, often fragrant, blooms are a marvel to behold. Its
ease-of-care and longevity make it one of our best perennial flowering plants. September is an ideal
month for planting or transplanting this regal ornamental.
A member of the plant family Paeoniaceae, peony is named after Paeon. The latter, according to
Greek mythology, was the student of Asclepius, god of medicine and healing. Supposedly,
Asclepius because jealous of Paeon and threatened to kill him. Zeus came to Paeon's rescue by
turning him into a flower.
Throughout the course of history, few herbaceous ornamental plants have seen a wider and more
varied use than peony. Ancients were thought to have used it for flavoring food. In the middle ages
it was prized for its medicinal properties and used as a cure for a wide array of maladies including
gall stones, epileptic seizures, and jaundice. Artists, especially from the orient, used it as an
inspiration and incorporated its image into porcelains, screen prints, paintings and other works of
art. Is it any wonder, then, that the ancient Chinese labeled peony "king of all flowers".
Most peonies planted today are hybrids although species of the genus are native to Asia, southern
Europe and western North America. Garden peonies usually are bushy herbaceous perennial plants
growing up to three feet in height. Peonies have deeply lobed leaves and extravagant (often
fragrant) flowers up to six inches in diameter available in a myriad of colors.
Peonies can be classified by plant growth habit or flower morphology. Most garden peonies are
herbaceous in growth habit and die back to the ground each winter. However, there are tree peonies
that maintain woody stems throughout the year. They are not really trees but grow into small -to-
medium sized shrubs that rarely reach more than four to five feet in height in our climate.
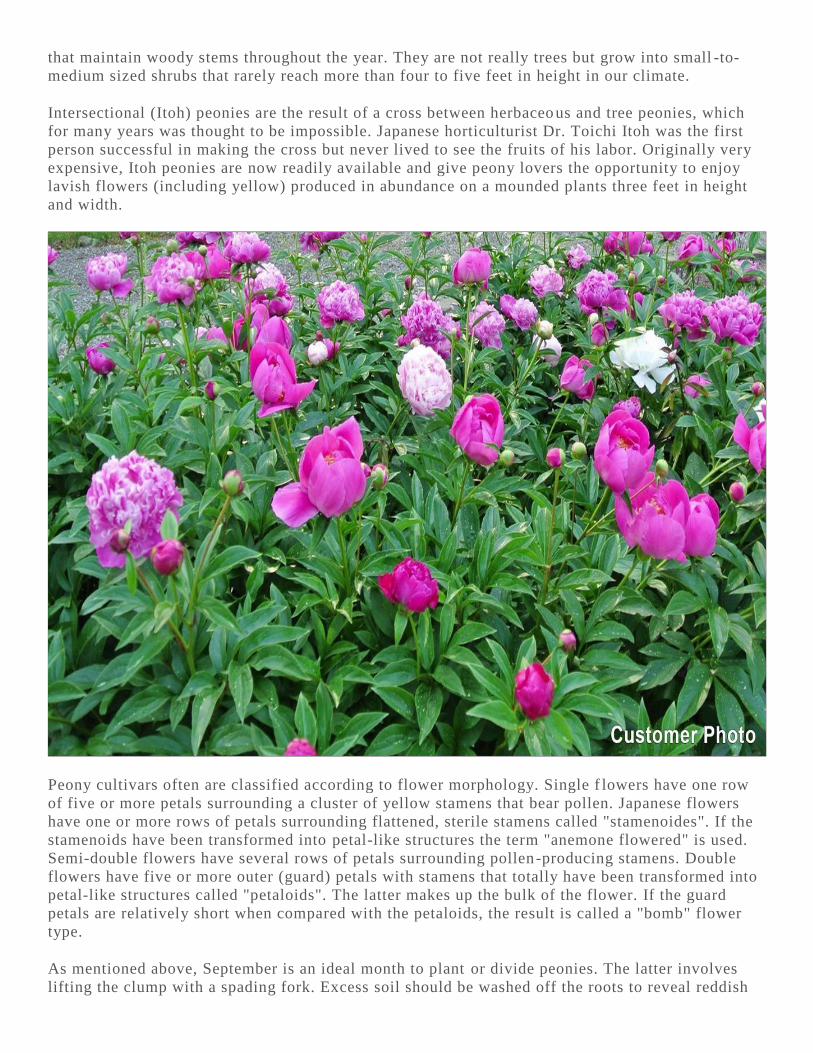
Intersectional (Itoh) peonies are the result of a cross between herbaceo us and tree peonies, which
for many years was thought to be impossible. Japanese horticulturist Dr. Toichi Itoh was the first
person successful in making the cross but never lived to see the fruits of his labor. Originally very
expensive, Itoh peonies are now readily available and give peony lovers the opportunity to enjoy
lavish flowers (including yellow) produced in abundance on a mounded plants three feet in height
and width.
Peony cultivars often are classified according to flower morphology. Single f lowers have one row
of five or more petals surrounding a cluster of yellow stamens that bear pollen. Japanese flowers
have one or more rows of petals surrounding flattened, sterile stamens called "stamenoides". If the
stamenoids have been transformed into petal-like structures the term "anemone flowered" is used.
Semi-double flowers have several rows of petals surrounding pollen-producing stamens. Double
flowers have five or more outer (guard) petals with stamens that totally have been transformed into
petal-like structures called "petaloids". The latter makes up the bulk of the flower. If the guard
petals are relatively short when compared with the petaloids, the result is called a "bomb" flower
type.
As mentioned above, September is an ideal month to plant or divide peonies. The latter involves
lifting the clump with a spading fork. Excess soil should be washed off the roots to reveal reddish
color buds or "eyes" (future growing points). The tops, which probably have started to decline, may
be trimmed back also. The clump then can be divided with a sharp knife or hatchet. It is preferred
to allow at least three eyes per division.
Peonies need plenty of room and should be planted between three and four feet apart in a fertile
garden loam and full sun exposure. Excess shade is a key reason peonies fail to flower.
Since peonies tend to be long lived, adequate soil preparation prior to planting is important.
Incorporate well-decomposed organic matter 10 to 12 inches deep in the general area and make
individual holes wide enough to spread the roots adequately. Incorporate a modest amount of
fertilizer high in phosphorus (e.g. 5-10-5 or bonemeal) and mix it well into the soil.
Planting depth is very important for good growth and flowering of peony. Somewhat shallow
planting is preferred since flowering is reduced or inhibited if the eyes are set more than two inches
below the surface of the soil.
Peonies can often remain undisturbed in the garden for 20 or more years without a decline in
flowering. Vigorous flowering plants have been known to exist in one location for well over 50
years. Division should only be done if growth is poor and plants fail to bloom after years of
performing well.
Fertilize peonies with care. Excessive amounts of fertilizer (especially nitrog en) can lead to poor
flowering. If top growth slows and plant vigor declines, apply several tablespoons of a complete
fertilizer high in phosphorus and potassium (e.g. 6-24-24) about 6 to 18 inches away from the
crown. Fall application is preferred although early spring is satisfactory.
Peonies are relative pest free and rarely require the application of pesticides. Bud blight ( Botrytis
cinerea) is the most troublesome disease and often occurs during cool, wet springs. Strict sanitation
including removal of spent plant debris along with proper plant spacing to increase air circulation
can help. Fungicides labeled for the control of botrytis can be effective preventatives.
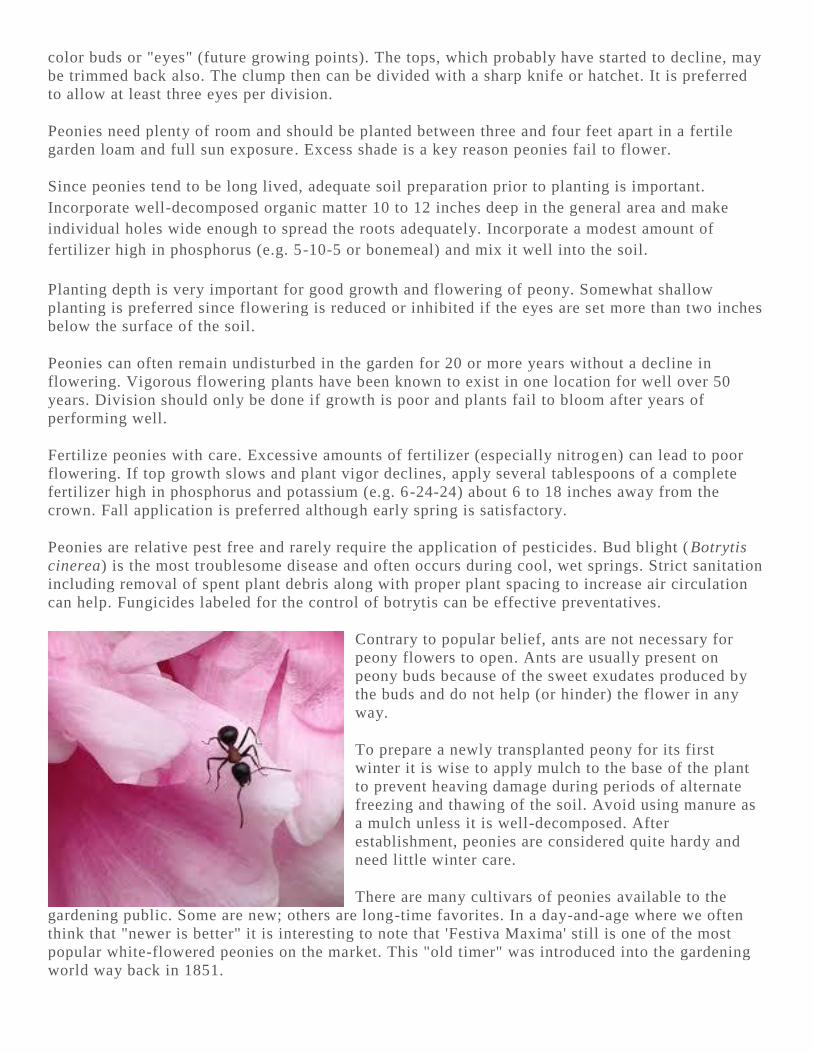
Contrary to popular belief, ants are not necessary for
peony flowers to open. Ants are usually present on
peony buds because of the sweet exudates produced by
the buds and do not help (or hinder) the flower in any
way.
To prepare a newly transplanted peony for its first
winter it is wise to apply mulch to the base of the plant
to prevent heaving damage during periods of alternate
freezing and thawing of the soil. Avoid using manure as
a mulch unless it is well-decomposed. After
establishment, peonies are considered quite hardy and
need little winter care.
There are many cultivars of peonies available to the
gardening public. Some are new; others are long-time favorites. In a day-and-age where we often
think that "newer is better" it is interesting to note that 'Festiva Maxima' still is one of the most
popular white-flowered peonies on the market. This "old timer" was introduced into the gardening
world way back in 1851.
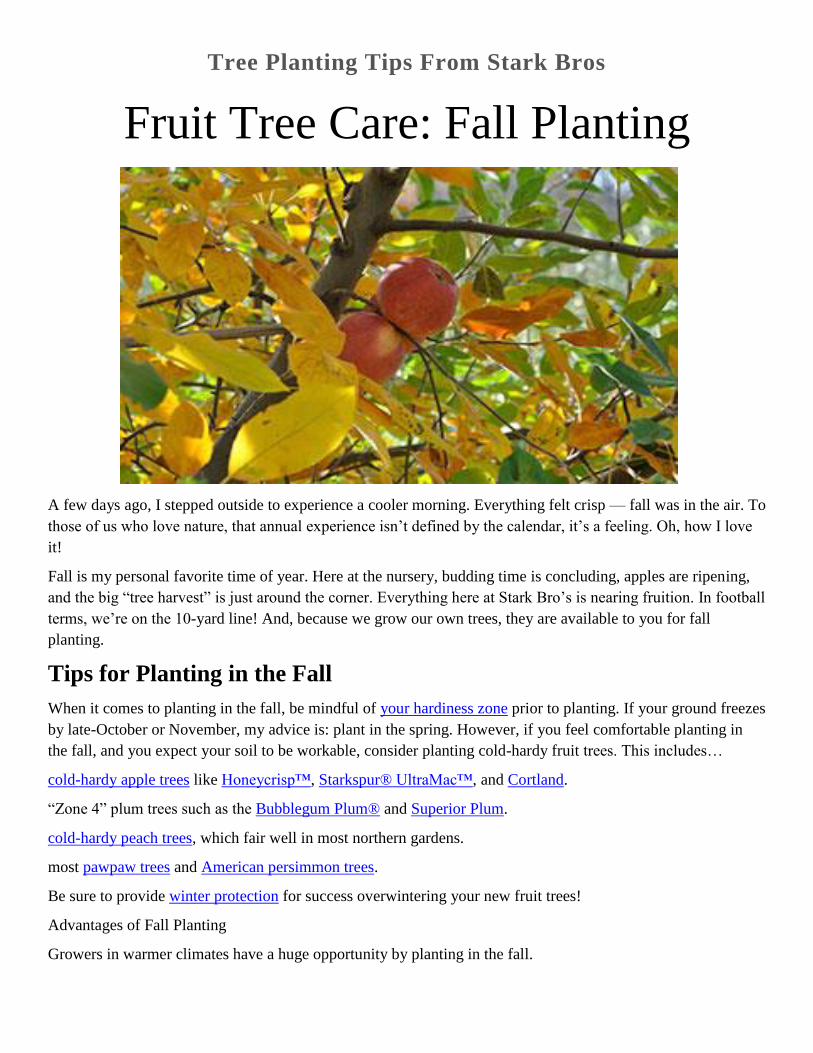
Tree Planting Tips From Stark Bros
Fruit Tree Care: Fall Planting
A few days ago, I stepped outside to experience a cooler morning. Everything felt crisp — fall was in the air. To
those of us who love nature, that annual experience isn’t defined by the calendar, it’s a feeling. Oh, how I love
it!
Fall is my personal favorite time of year. Here at the nursery, budding time is concluding, apples are ripening,
and the big “tree harvest” is just around the corner. Everything here at Stark Bro’s is nearing fruition. In football
terms, we’re on the 10-yard line! And, because we grow our own trees, they are available to you for fall
planting.
Tips for Planting in the Fall
When it comes to planting in the fall, be mindful of your hardiness zone prior to planting. If your ground freezes
by late-October or November, my advice is: plant in the spring. However, if you feel comfortable planting in
the fall, and you expect your soil to be workable, consider planting cold-hardy fruit trees. This includes…
cold-hardy apple trees like Honeycrisp™, Starkspur® UltraMac™, and Cortland.
“Zone 4” plum trees such as the Bubblegum Plum® and Superior Plum.
cold-hardy peach trees, which fair well in most northern gardens.
most pawpaw trees and American persimmon trees.
Be sure to provide winter protection for success overwintering your new fruit trees!
Advantages of Fall Planting
Growers in warmer climates have a huge opportunity by planting in the fall.
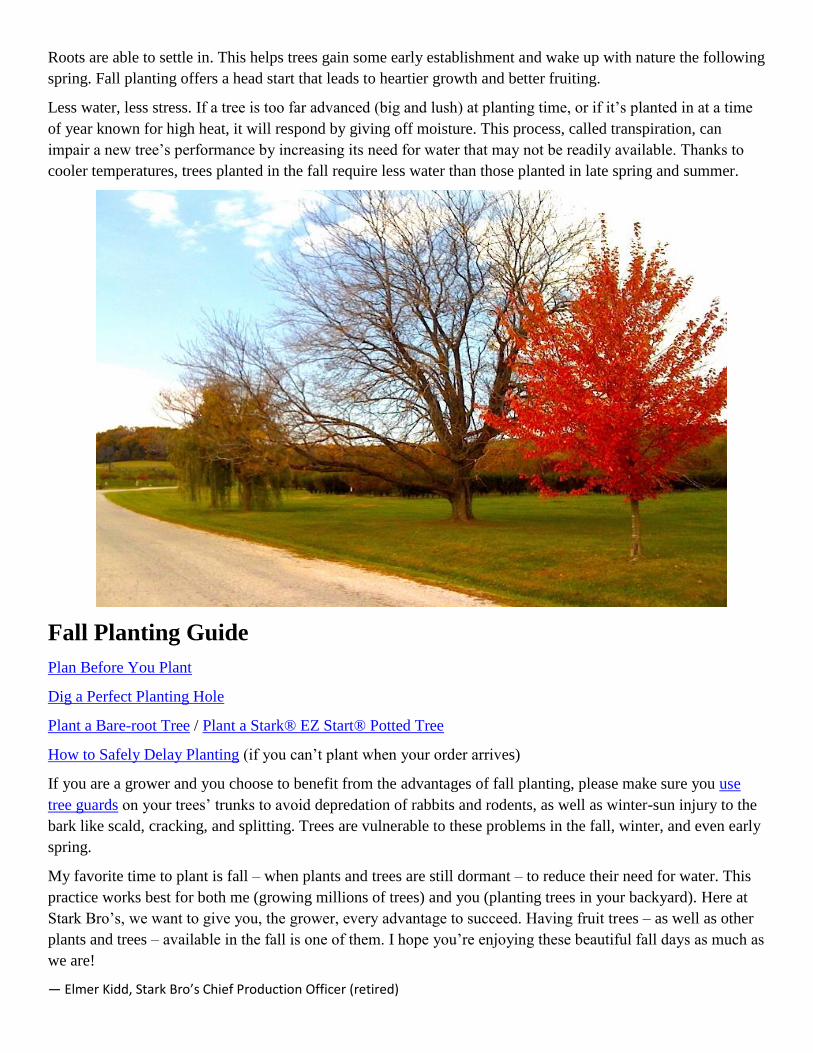
Roots are able to settle in. This helps trees gain some early establishment and wake up with nature the following
spring. Fall planting offers a head start that leads to heartier growth and better fruiting.
Less water, less stress. If a tree is too far advanced (big and lush) at planting time, or if it’s planted in at a time
of year known for high heat, it will respond by giving off moisture. This process, called transpiration, can
impair a new tree’s performance by increasing its need for water that may not be readily available. Thanks to
cooler temperatures, trees planted in the fall require less water than those planted in late spring and summer.
Fall Planting Guide
Plan Before You Plant
Dig a Perfect Planting Hole
Plant a Bare-root Tree / Plant a Stark® EZ Start® Potted Tree
How to Safely Delay Planting (if you can’t plant when your order arrives)
If you are a grower and you choose to benefit from the advantages of fall planting, please make sure you use
tree guards on your trees’ trunks to avoid depredation of rabbits and rodents, as well as winter-sun injury to the
bark like scald, cracking, and splitting. Trees are vulnerable to these problems in the fall, winter, and even early
spring.
My favorite time to plant is fall – when plants and trees are still dormant – to reduce their need for water. This
practice works best for both me (growing millions of trees) and you (planting trees in your backyard). Here at
Stark Bro’s, we want to give you, the grower, every advantage to succeed. Having fruit trees – as well as other
plants and trees – available in the fall is one of them. I hope you’re enjoying these beautiful fall days as much as
we are!
— Elmer Kidd, Stark Bro’s Chief Production Officer (retired)
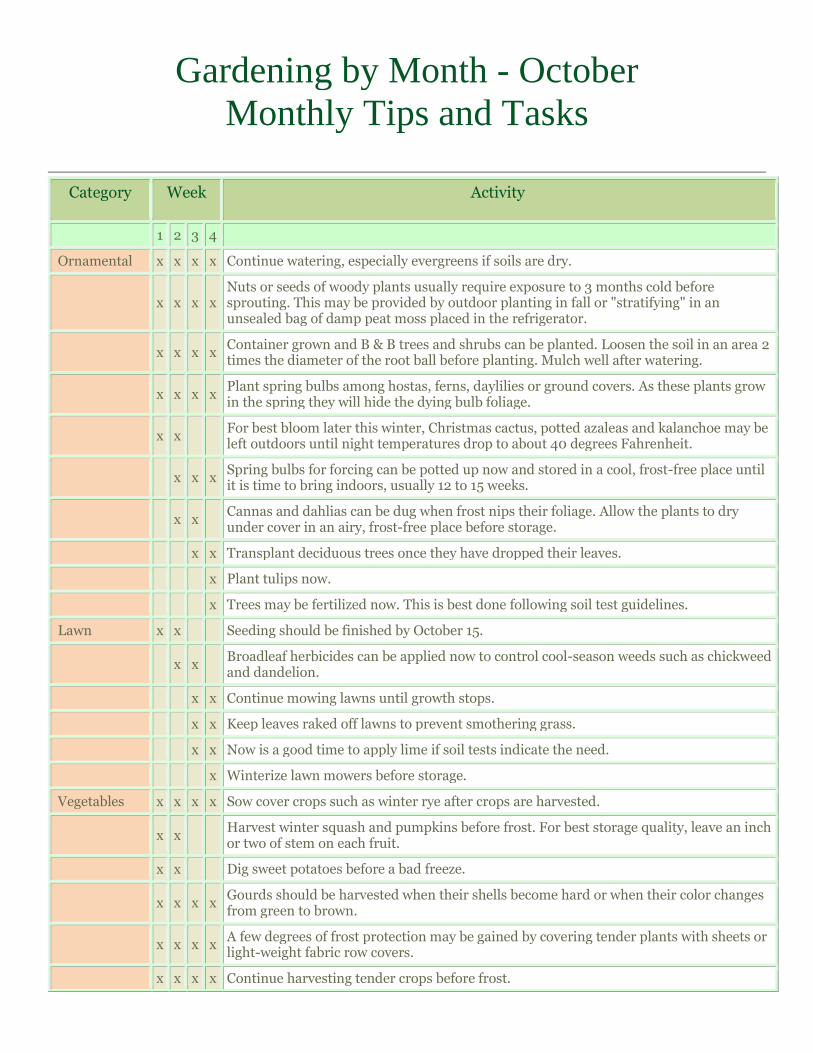
Gardening by Month - October
Monthly Tips and Tasks
Category
Week
Activity
1 2 3 4
Ornamental x x x x Continue watering, especially evergreens if soils are dry.
x x x x Nuts or seeds of woody plants usually require exposure to 3 months cold before sprouting. This may be provided by outdoor planting in fall or "stratifying" in an unsealed bag of damp peat moss placed in the refrigerator.
x x x x Container grown and B & B trees and shrubs can be planted. Loosen the soil in an area 2 times the diameter of the root ball before planting. Mulch well after watering.
x x x x Plant spring bulbs among hostas, ferns, daylilies or ground covers. As these plants grow in the spring they will hide the dying bulb foliage.
x x For best bloom later this winter, Christmas cactus, potted azaleas and kalanchoe may be left outdoors until night temperatures drop to about 40 degrees Fahrenheit.
x x x Spring bulbs for forcing can be potted up now and stored in a cool, frost-free place until it is time to bring indoors, usually 12 to 15 weeks.
x x Cannas and dahlias can be dug when frost nips their foliage. Allow the plants to dry under cover in an airy, frost-free place before storage.
x x Transplant deciduous trees once they have dropped their leaves.
x Plant tulips now.
x Trees may be fertilized now. This is best done following soil test guidelines.
Lawn x x Seeding should be finished by October 15.
x x Broadleaf herbicides can be applied now to control cool-season weeds such as chickweed and dandelion.
x x Continue mowing lawns until growth stops.
x x Keep leaves raked off lawns to prevent smothering grass.
x x Now is a good time to apply lime if soil tests indicate the need.
x Winterize lawn mowers before storage.
Vegetables x x x x Sow cover crops such as winter rye after crops are harvested.
x x Harvest winter squash and pumpkins before frost. For best storage quality, leave an inch or two of stem on each fruit.
x x Dig sweet potatoes before a bad freeze.
x x x x Gourds should be harvested when their shells become hard or when their color changes from green to brown.
x x x x A few degrees of frost protection may be gained by covering tender plants with sheets or light-weight fabric row covers.
x x x x Continue harvesting tender crops before frost.
Category
Week
Activity
x x x x The average first frost usually arrives about October 15-20.
Fruits x x x x Store apples in a cool basement in old plastic sacks that have been perforated for good air circulation.
x x Persimmons start to ripen, especially after frost.
x x Monitor fruit plantings for mouse activity and take steps for their control if present.
x Place wire guards around trunks of young fruit trees for protection against mice and rabbits.
x Fall color season begins.
x Begin peak fall color in maples, hickories and oaks.
x End of peak fall color.
October Pests and Problems
Plant cool-season lawn grasses by October 15. Existing lawn or newly seeded areas that are at least one month old
can also be fertilized at this time. Dig and divide or plant new perennials by October 15 to allow time for the
plants to root in well before winter.
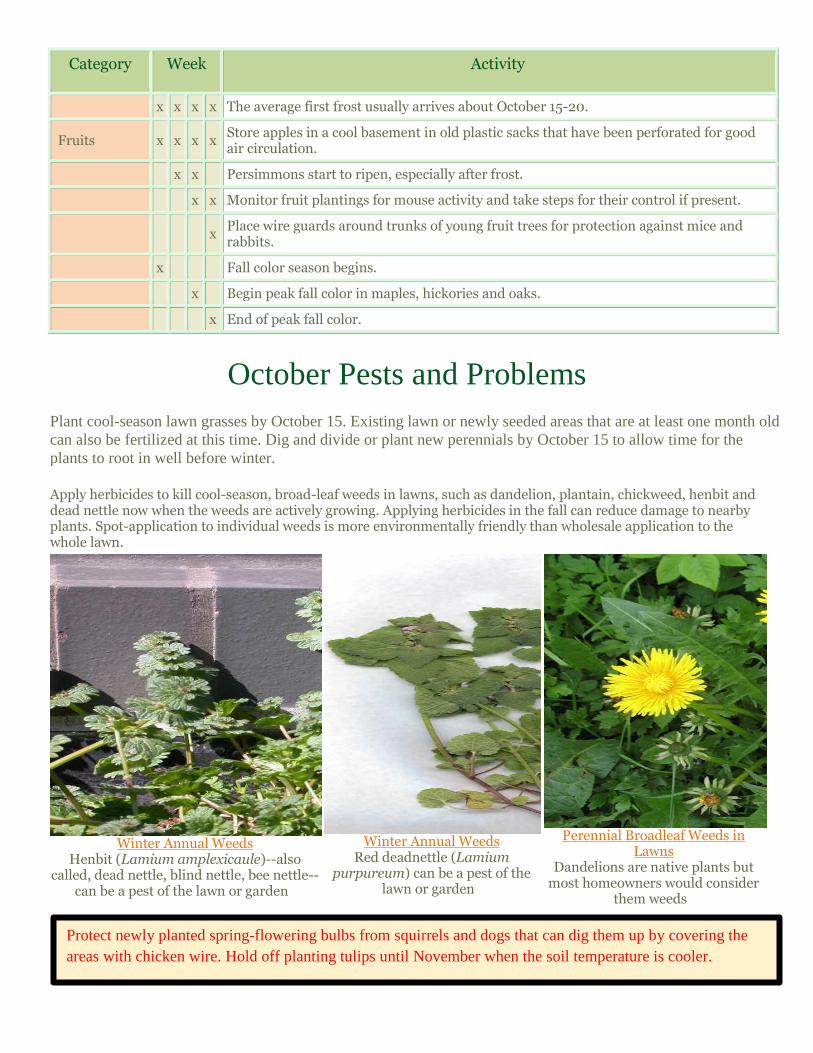
Apply herbicides to kill cool-season, broad-leaf weeds in lawns, such as dandelion, plantain, chickweed, henbit and dead nettle now when the weeds are actively growing. Applying herbicides in the fall can reduce damage to nearby plants. Spot-application to individual weeds is more environmentally friendly than wholesale application to the whole lawn.
Winter Annual Weeds
Henbit (Lamium amplexicaule)--also called, dead nettle, blind nettle, bee nettle--
can be a pest of the lawn or garden
Winter Annual Weeds
Red deadnettle (Lamium purpureum) can be a pest of the
lawn or garden
Perennial Broadleaf Weeds in
Lawns Dandelions are native plants but
most homeowners would consider them weeds
Protect newly planted spring-flowering bulbs from squirrels and dogs that can dig them up by covering the
areas with chicken wire. Hold off planting tulips until November when the soil temperature is cooler.

All About Pawpaws What are pawpaws? Pawpaw trees (Asimina
triloba) are shade-loving understory trees that
grow the largest edible fruit native to North
America. Take a look.
Guest article by Patti Moreno
What are pawpaws?
Also known as the American Custard Apple,
or Indiana Banana, pawpaws were widely eaten
and enjoyed by Native Americans back in the
day. Currently, pawpaw trees can be found
growing wild in the U.S. as a shade-loving,
understory tree.
Pawpaws are actually very large berries,
sometimes growing longer than 6 inches. They
turn from green to yellow (or brown) when ripe.
The fruit has a strong tropical flavor — similar to bananas, pineapples, or mangoes.
Ripe pawpaw fruits have a very short shelf life: about 3-5 days. This has made it impossible for pawpaws to be
sold in most grocery stores, since they can’t be transported to market quickly enough. Growing pawpaws in
your backyard is the best way for you to enjoy this fruit.

Young pawpaw trees can be sensitive to full sunlight and require filtered sun for the first year or two. This is
because, in nature, pawpaw trees grow as “understory trees”, in the shade of other much larger trees. Once
established, pawpaw trees produce the most fruit when grown in full sun. Pawpaws fruit in shade too, but they
may produce less fruit than trees grown in full sun. The solution here is to build a temporary shade cloth
structure over young trees and remove it once they are older and established (you can tell once they start
blooming that they’re ready to fruit!) so that they can take advantage of the full sun exposure.
Pawpaw trees are cold-hardy fruit trees, meaning they grow well in colder climates. This applies to the Asimina
triloba pawpaw, or common pawpaw, which grows from North Florida all the way to Canada.
For proper pollination plant at least two different grafted varieties of pawpaws (two or more grafted trees cannot
cross-pollinate if they are the same variety). Alternately, you can plant two or more seedling pawpaw trees,
which will be able to cross-pollinate one another. Pawpaw trees rely on insects to cross-pollinate the flowers, so
it is important that your landscape is friendly to pollen-moving insects.
Pawpaw fruit forms in clusters, from 2 to 9 fruits per cluster. Pawpaws are low maintenance and, because they
are native to the US, there are very few issues with garden pests making pawpaw trees great to plant if you
practice organic gardening.
Grafted pawpaw trees purchased from Stark Bro’s start fruiting in about 3-5 years!
Begin harvesting pawpaws in mid August through the first frost (generally early- to mid-October). Pawpaws are
great to eat fresh off the tree, but they have a lot of uses in recipes as well! Because of their banana-like taste
and texture, pawpaws make a good banana substitute for recipes like banana bread. They are healthy, too, with
more protein, vitamin C, iron, niacin, calcium, phosphorous, zinc, magnesium, cooper, and manganese than
apples, oranges, or bananas.
Pawpaw fruit is nutritious, making it perfect fruit for healthy, delicious smoothies! Smoothies are quick, easy,
and fun to make, as you can see in my video below. You’ll need to separate the skin and the seeds from the
custardy flesh. The skin is edible, but doesn’t taste good and the seeds should not be eaten. Have fun and mix
them with all sorts of other fruit!

Tips for Growing Garlic
Growing garlic is easy. It starts with a well-prepared planting site so that you can get the most out of your
harvest. Find out more about growing garlic.
Garlic originated in central Asia dating back thousands of years. Humans have long since been enjoying garlic
as a staple food ingredient as well as medicinal remedy with many uses — from fighting infection to improving
digestion. Garlic is a member of the Allium genus, which includes onions, leeks, and shallots.
There are a few things to keep in mind when growing garlic. To start, there are two main types of garlic plants:
Hardneck Garlic
Develops scapes, or flower stalks (see examples here)
More similar to wild garlic
Not intended for long storage
Softneck Garlic
Does not develop scapes
Common; like grocery store garlic
Stores well
Garlic from Stark Bro’s are all softneck varieties, available as half-pound sets.
Garlic bulbs, also called “heads”, contain several cloves which are used in a wide range of culinary dishes.
These cloves also happen to be what you plant when growing garlic. When in the ground, the bulb is where
nutrients are stored for survival during drought or other stressful weather.
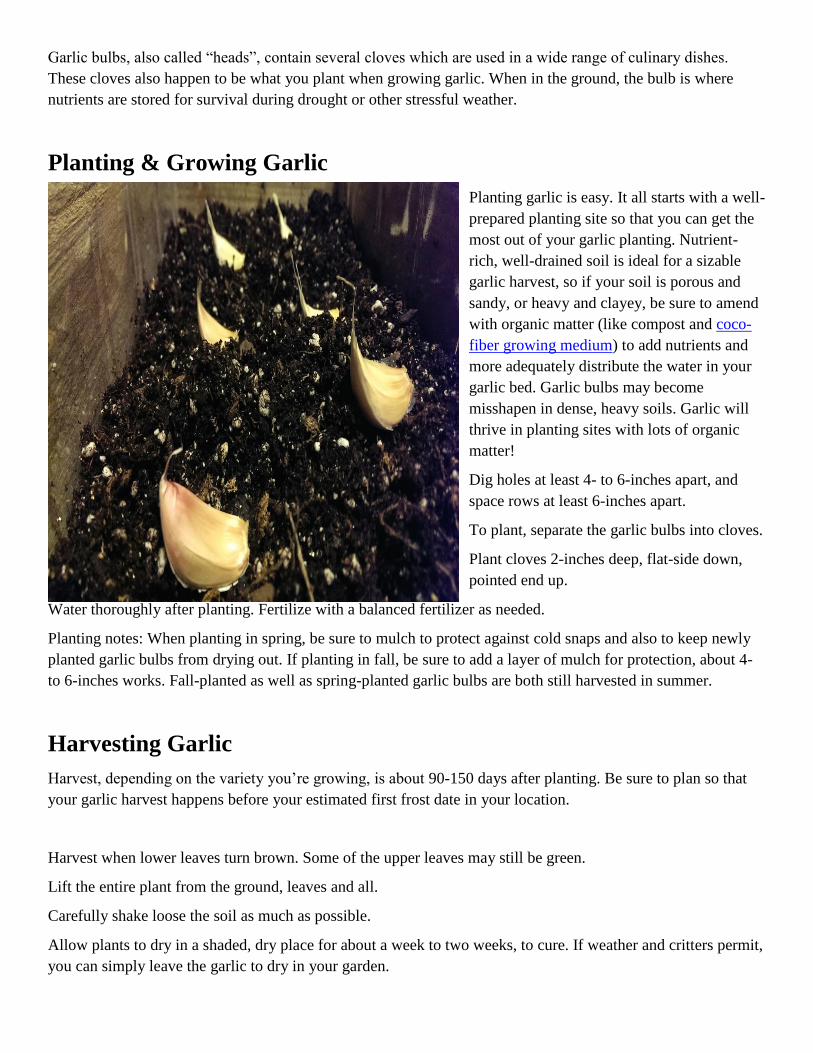
Planting & Growing Garlic
Planting garlic is easy. It all starts with a well-
prepared planting site so that you can get the
most out of your garlic planting. Nutrient-
rich, well-drained soil is ideal for a sizable
garlic harvest, so if your soil is porous and
sandy, or heavy and clayey, be sure to amend
with organic matter (like compost and coco-
fiber growing medium) to add nutrients and
more adequately distribute the water in your
garlic bed. Garlic bulbs may become
misshapen in dense, heavy soils. Garlic will
thrive in planting sites with lots of organic
matter!
Dig holes at least 4- to 6-inches apart, and
space rows at least 6-inches apart.
To plant, separate the garlic bulbs into cloves.
Plant cloves 2-inches deep, flat-side down,
pointed end up.
Water thoroughly after planting. Fertilize with a balanced fertilizer as needed.
Planting notes: When planting in spring, be sure to mulch to protect against cold snaps and also to keep newly
planted garlic bulbs from drying out. If planting in fall, be sure to add a layer of mulch for protection, about 4-
to 6-inches works. Fall-planted as well as spring-planted garlic bulbs are both still harvested in summer.
Harvesting Garlic
Harvest, depending on the variety you’re growing, is about 90-150 days after planting. Be sure to plan so that
your garlic harvest happens before your estimated first frost date in your location.
Harvest when lower leaves turn brown. Some of the upper leaves may still be green.
Lift the entire plant from the ground, leaves and all.
Carefully shake loose the soil as much as possible.
Allow plants to dry in a shaded, dry place for about a week to two weeks, to cure. If weather and critters permit,
you can simply leave the garlic to dry in your garden.

After curing, remove roots and leaves and store in a moisture-free place indoors. Garlic is ready for storage and
use after the curing process!
Garlic may be used straight out of the ground, but it will store for longer periods of time if allowed to dry/cure
first.
Growing garlic is easy, and you reap your rewards in a few short months after planting!
The Different types of Garlic

Crops and Flowers to Grow in October
Plant these varieties now to give your garden a head start in the spring.
Although gardeners will spend much of October picking the last fruits (and vegetables) of the harvest, this
month is also the ideal time to sow some seeds and spring bulbs. Many varieties of flowers and vegetables need
a period of cold before they begin to grow in earnest in the spring. Other varieties can be planted in the ground
in the fall months in temperate regions (i.e. zones 8-10). While you won’t see much growth above the soil, rest
assured there’s a lot going on underground and within the seeds. Many cool-season vegetables and herbs can be
grown well into the early winter months (often with the aid of a cold frame or greenhouse), even in areas whose
temperatures hover around freezing.
Flowers to Sow in a Greenhouse or Cold Frame
The hollyhock, a staple of the cottage garden, is often planted outside about a week before the last frost.
However, you can give yours a head start on spring growth by planting them in a greenhouse or cold frame this
month. While they won’t take off and reach their full height until the spring, planting the seeds now will allow
the flowers to develop strong root systems over the colder months. By the time you plant the starts in the spring,
they’ll be strong and ready to add some
serious color to your garden.
Sweet peas are another good flower to
plant in October. These cold-hardy
flowers may be slow to germinate, but
once they do, they grow well in cool,
moist soil. While you can plant sweet
peas outdoors in the fall if you live in a
temperate region, you can start them
elsewhere in a greenhouse or cold frame
to protect them from winter’s rain,
snow, and wind.
Cheerful Oriental poppies
are perennials that often grow best
when they’re started in a greenhouse or
cold frame. If you’re planting from seed, keep in mind that the seeds will need light to germinate, so sprinkle
them on the top of the soil rather than planting them deeper down. After they've grown a little, thin the
seedlings to six inches apart. Since they may not transplant well, it might be best to direct sow them in a cold
frame. Alternatively, consider covering the seedlings with cloches.
If you want to enjoy stunning blooms in the winter, look no further than hellebores. Also known as Christmas
rose or Lenten rose, this flowering plant is relatively cold-hardy and typically blooms around the end of
November (or beginning of Lent, hence its name) and at the tail-end of winter, after the worst of the snow and
ice has passed. Plant them now, and you’ll enjoy these blooms all throughout the winter and spring months.
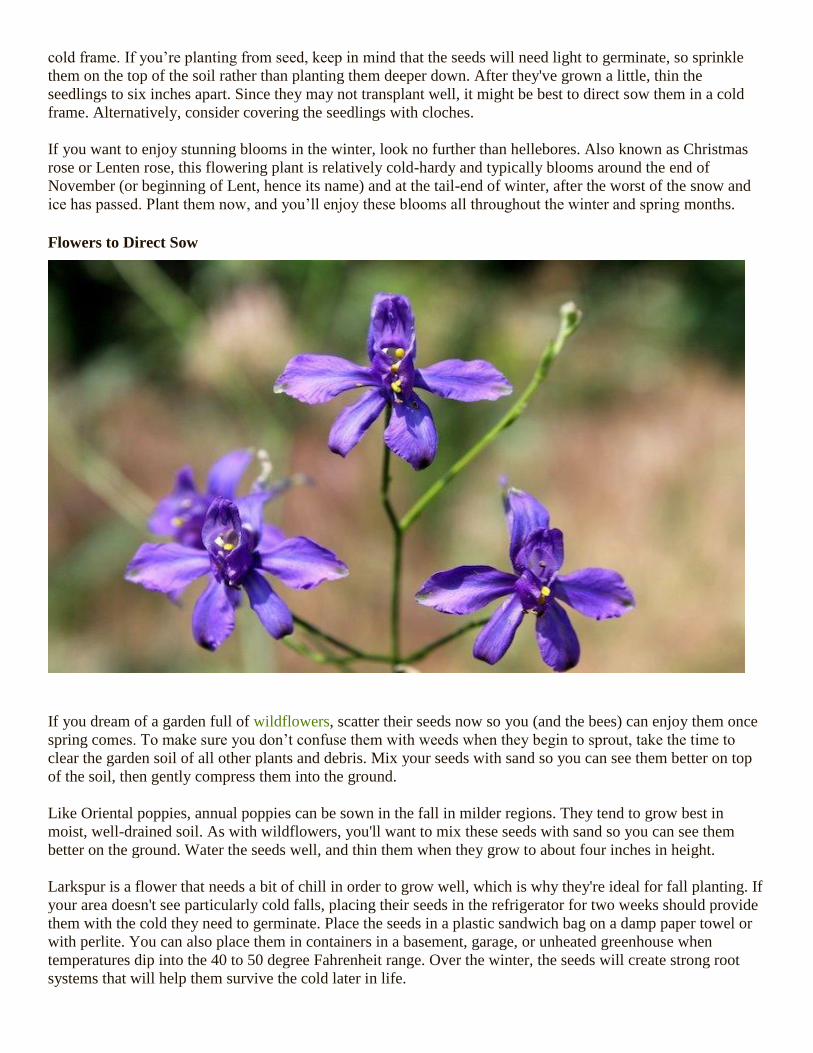
Flowers to Direct Sow
If you dream of a garden full of wildflowers, scatter their seeds now so you (and the bees) can enjoy them once
spring comes. To make sure you don’t confuse them with weeds when they begin to sprout, take the time to
clear the garden soil of all other plants and debris. Mix your seeds with sand so you can see them better on top
of the soil, then gently compress them into the ground.
Like Oriental poppies, annual poppies can be sown in the fall in milder regions. They tend to grow best in
moist, well-drained soil. As with wildflowers, you'll want to mix these seeds with sand so you can see them
better on the ground. Water the seeds well, and thin them when they grow to about four inches in height.
Larkspur is a flower that needs a bit of chill in order to grow well, which is why they're ideal for fall planting. If
your area doesn't see particularly cold falls, placing their seeds in the refrigerator for two weeks should provide
them with the cold they need to germinate. Place the seeds in a plastic sandwich bag on a damp paper towel or
with perlite. You can also place them in containers in a basement, garage, or unheated greenhouse when
temperatures dip into the 40 to 50 degree Fahrenheit range. Over the winter, the seeds will create strong root
systems that will help them survive the cold later in life.

Enjoy Greens All Winter Long
Winter salad greens, such as collard greens, kale,
cabbage, romaine, and arugula, can easily be
grown in a greenhouse, cold frame, or
indoors near a sunny window. In fact, these cool-
season greens grow best when the temperatures dip.
If you have a cold frame, you may also want to
plant spring onions, cauliflower, and broccoli in it to
enjoy in stir-fries and hearty meals all season long.
Sheltering these vegetables in a cold frame,
greenhouse, or indoors will help prevent snow
and wind damage so you can enjoy your harvest
longer.
There are many herbs you can grow indoors or in a
greenhouse, too, including basil, chives, cilantro, and parsley. Make sure they’re quickly accessible from the
kitchen so you can snip off what you need when you need it.
If you live in a more temperate climate, now is also the ideal time to direct sow winter-hardy peas and broad
beans. Doing so will allow you to harvest them come springtime.
Plant Now for Next Year’s Harvest
If your garden beds will be retired for the winter months, sow cover crops now. These so-called "green
manures" will amend your soil and boost its fertility over the winter and early spring months, leaving it good-
as-new for next year's garden.
Additionally, the autumn is the ideal time to plant onions, garlic, shallots, and leeks, as well as rhubarb and
asparagus crowns. While it may be a while before you can enjoy them, planting them now gives them more
time to establish strong root systems and get a jump-start on the growing season.
Spring Blooms in January
If you can’t wait until spring to
enjoy the beauty and color of
tulips, hyacinths, and narcissus,
plant them in pots indoors. Believe
it or not, you can actually “force”
the bulbs, or trick them into
blooming during their off-season,
by replicating the favorable
conditions of early spring in your
home. The good news is, if you
plant the bulbs now, they’ll begin
to flower after the holidays, just in
time to chase those winter blues
away
Growing Hardy Mums for a Beautiful Autumn
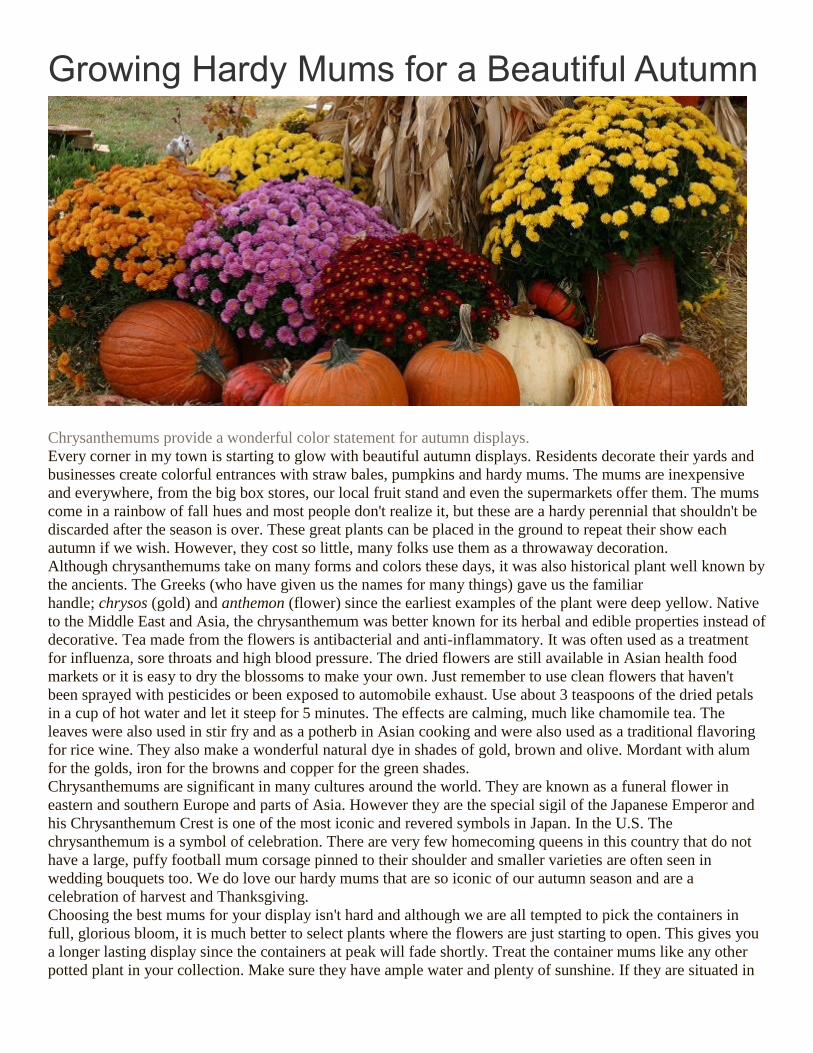
Chrysanthemums provide a wonderful color statement for autumn displays.
Every corner in my town is starting to glow with beautiful autumn displays. Residents decorate their yards and
businesses create colorful entrances with straw bales, pumpkins and hardy mums. The mums are inexpensive
and everywhere, from the big box stores, our local fruit stand and even the supermarkets offer them. The mums
come in a rainbow of fall hues and most people don't realize it, but these are a hardy perennial that shouldn't be
discarded after the season is over. These great plants can be placed in the ground to repeat their show each
autumn if we wish. However, they cost so little, many folks use them as a throwaway decoration.
Although chrysanthemums take on many forms and colors these days, it was also historical plant well known by
the ancients. The Greeks (who have given us the names for many things) gave us the familiar
handle; chrysos (gold) and anthemon (flower) since the earliest examples of the plant were deep yellow. Native
to the Middle East and Asia, the chrysanthemum was better known for its herbal and edible properties instead of
decorative. Tea made from the flowers is antibacterial and anti-inflammatory. It was often used as a treatment
for influenza, sore throats and high blood pressure. The dried flowers are still available in Asian health food
markets or it is easy to dry the blossoms to make your own. Just remember to use clean flowers that haven't
been sprayed with pesticides or been exposed to automobile exhaust. Use about 3 teaspoons of the dried petals
in a cup of hot water and let it steep for 5 minutes. The effects are calming, much like chamomile tea. The
leaves were also used in stir fry and as a potherb in Asian cooking and were also used as a traditional flavoring
for rice wine. They also make a wonderful natural dye in shades of gold, brown and olive. Mordant with alum
for the golds, iron for the browns and copper for the green shades.
Chrysanthemums are significant in many cultures around the world. They are known as a funeral flower in
eastern and southern Europe and parts of Asia. However they are the special sigil of the Japanese Emperor and
his Chrysanthemum Crest is one of the most iconic and revered symbols in Japan. In the U.S. The
chrysanthemum is a symbol of celebration. There are very few homecoming queens in this country that do not
have a large, puffy football mum corsage pinned to their shoulder and smaller varieties are often seen in
wedding bouquets too. We do love our hardy mums that are so iconic of our autumn season and are a
celebration of harvest and Thanksgiving.
Choosing the best mums for your display isn't hard and although we are all tempted to pick the containers in
full, glorious bloom, it is much better to select plants where the flowers are just starting to open. This gives you
a longer lasting display since the containers at peak will fade shortly. Treat the container mums like any other
potted plant in your collection. Make sure they have ample water and plenty of sunshine. If they are situated in

the shade, the blossoms will open, but not with the same numbers as the ones that have at least 6 hours of sun
each day. Once the show is over and the flowers fade, you an incorporate the plants in your perennial beds.
Transplant them as you would any other perennial, making sure to untangle the roots that may be growing
around the edges of the container. Chances are they are pot-bound and spreading the outside roots a bit will
make for a healthier plant. Situate them in moderately fertile ground and in full sun, but remember that if they
are close to street lights or other artificial lighting, those will upset the flowering schedule. The soil shouldn't
dry out, but remember that mums hate wet feet so good drainage is essential. Continue to water as needed until
frost kills the tops back. You can then trim the dead foliage and mulch lightly. Come spring as new shoots
appear dress with an all-purpose 15-15-15 fertilizer to ensure healthy growth and once the plants reach about 6
inches tall pinch the growing tips to encourage branching. Do this every six weeks or so until the end of June to
allow the flower buds to form.
If you have a favorite plant that is especially attractive, mums are easy to propagate. Take cuttings in early
summer from soft, new growth before the flower buds have started to form. The cuttings should be 3 to 4 inches
long and the cut should be just below a set of leaves. Strip the lower half of the stem of leaves and dip the end in
rooting hormone. Place your cuttings in damp perlite and situate in a sheltered area with bright light, but no
direct sun. Full sun will cook your fragile cuttings. Make sure that the perlite stays damp. Some people poke a
couple of sticks or dowels in the soil and lightly cover with a plastic baggie to keep in humidity, but if you do
this, make sure that you leave a small opening or poke a few holes in it so air can circulate. If the conditions are
too damp, mold is a problem. You should see new growth in between 4 to 6 weeks.
Enjoy the season and cooler weather with hardy mums in your gardens. They are inexpensive and easy to grow.
Don’t Forget The Meeting Time
Back To Our Normal Starting Time
6:30

Here Come the Spider Mites! Indoors as Well As Outdoors
Spider mites are tiny pests that you may not initially think to worry about when you see them in your garden.
Spider mites are tiny plant-destroyers that can be hard to eradicate completely. They get their name from their
tendency to leave webs around the leaves of the plants they infest, and they're closely related to spiders, ticks,
and other types of mites.
How Do Spider Mites Attack?
The reason spider mites are such a problem (even though they're so tiny) is that they have very sharp mouths
that allow them to suck out the contents of individual cells in your plants' leaves. They're like little white,
orange, or yellow vampire specks on your plant leaves, and once they become an infestation, they can start to
kill off plants entirely. These pests most commonly pop up when you’re growing in soil but can also be a
problem in hydroponic setups. Spider mites are sosmall, you often won’t notice them until the infestation has
gotten bad enough to wreak havoc in your garden.
Why Are Spider Mites An Issue?
There are a few reasons why spider mites are more painful to deal with than other pests beyond their being so
small. One is that they reproduce at a rapid pace, with one female mite being able to make a million babies in
under a month. Another is that they’ve got an enormous appetite, meaning they can go through your plants
rather quickly. Once your plants are severely infested, spider mites can kill one in a single night. Plus, the silk
webbing they produce can have a negative impact on your plants and attract a lot of dust to them. To make
matters worse, spider mites can often become immune to the things you try to eradicate them with. You may
think that you’ve gotten rid of your pest problem only to find that they've come back stronger than ever.
Spotting Spider Mite Damage
Since spider mites are so tiny, the first apparent sign of them is usually the damage they do to your plants. If
you start noticing yellow spots on your leaves, spider mites could be the cause of them. Leaves that seem
bronze or silver in color when the light hits them are other telltale signs of a potential spider mite infestation.
You may even notice holes, wilting, discoloration, distortion, or deformation among the leaves.
Stop Them Before They Start
Spider mites can be such a hassle that it's beneficial to stop them from even entering your garden in the first
place. This may seem impossible, but it’s not. The key here is to remember that stopping them from getting in
just takes a little effort. Be on the lookout for them in all of your growing areas, so you don’t track them around
to other plants. You also want to inspect any plants that you bring home carefully. Just a few hitchhikers on a
plant can spell major trouble later on.
Early Detection
Early detection is one of the most important things you can do for your plants when it comes to dealing with
spider mites. It can seem like a pain because you’re looking for bugs that are so small they look like specks of
dirt, but you’ll be happy when you spot them before they can take hold of your growing area. A small
infestation is easier to put down than a big one. You’ll just need to use a magnifying glass to inspect your plants
every so often. Spider mites are typically found on the undersides of leaves.
Spider Mite Solutions
To take on a spider mite infestation, you'll want to make the environment feel as unbeneficial to them as
possible. Spider mites don’t like heat or a lot of airflow, so try to create plenty of space between your plants to
stop them from spreading. You can also use water to simply spray spider mites off of leaves.
Once you’ve messed with the environment enough to start getting rid of them, you can then apply a
pesticide, organic or otherwise, to finish off those spider mites. Spinosad products, neem oil, and others are all
good choices for these pests. Just be sure to follow the instructions carefully to make sure you’re not doing
more harm than good to the plants themselves. If you find that an infestation is particularly terrible, you may
want to try switching up the pesticides you use to prevent them from becoming immune to any one.
Also, don’t give up too easily and think you’ve won the battle if they seem to go away. Continue being vigilant
and applying the pesticide even if you think that the problem is solved. Remember that spider mites have a
knack for seeming to go away and then coming back with a vengeance.
Spider mites are a real problem. They are so tiny that they can easily become an infestation before even the
most avid of gardeners notices them. Getting rid of them can be a real hassle, but always be persistent.

The Benefits of Planting Cover Crops
This fall, replenish your soil by planting some cover crops.
A lush garden full of healthy plants begins with great soil. That's why after one growing season ends, it’s
important to replenish your soil so that it can grow healthy crops for you next year, too. One of the best ways to
do this is by planting cover crops in it. Also referred to as “green manure,” cover crops revitalize the soil,
suppress weeds, and help control harmful pests and diseases. Cover crops include legumes and grasses, which
grow quickly and pump nutrients back into the soil.
Planting Cover Crops in Healthy Soil
Once you’ve harvested everything you’ve grown and pulled your annual crops, you can plant cover crops to
prevent weeds from taking over your bare garden plot, no matter its size. Typically, seeds for cover crops are
planted a few weeks before the hard frosts begin. If you live in an area that gets any snow (i.e. zones 5 and
above), you can use cover crops to protect the soil during the winter, making it easier for you to mulch in the
spring.
The benefits of cover crops are many. Not only do they increase the fertility of and amount of organic matter in
your soil, but they also improve airflow and prevent erosion and soil compaction. Plus, they attract beneficial
insects both above and below the soil into your garden, including bees and earthworms. Cover crops can stop
the spread of soil-borne diseases and play an important role in nutrient cycling. Think of them as beneficial
placeholders for the plants you intend to grow later on.
When to Plant Cover Crops
The best time to plant your cover crops is a few weeks before the first hard frost. This will give them enough
time to establish themselves before cold, inclement weather arrives. Planting is easy: rake the topsoil and spread
the seed over it. Then, rake it into the soil and wait for the plants to grow. Keep the ground well-watered,
especially if you live in an area that experiences drought-like conditions.
If you don’t plant cover crops in a particular section of your garden because you'd like to keep it bare or are
planning on cultivating something else there later in the year, you'll probably need to mow that section at least
semi-regularly. This will prevent the cover crops from competing with any flowers and vegetables that might be
growing there.
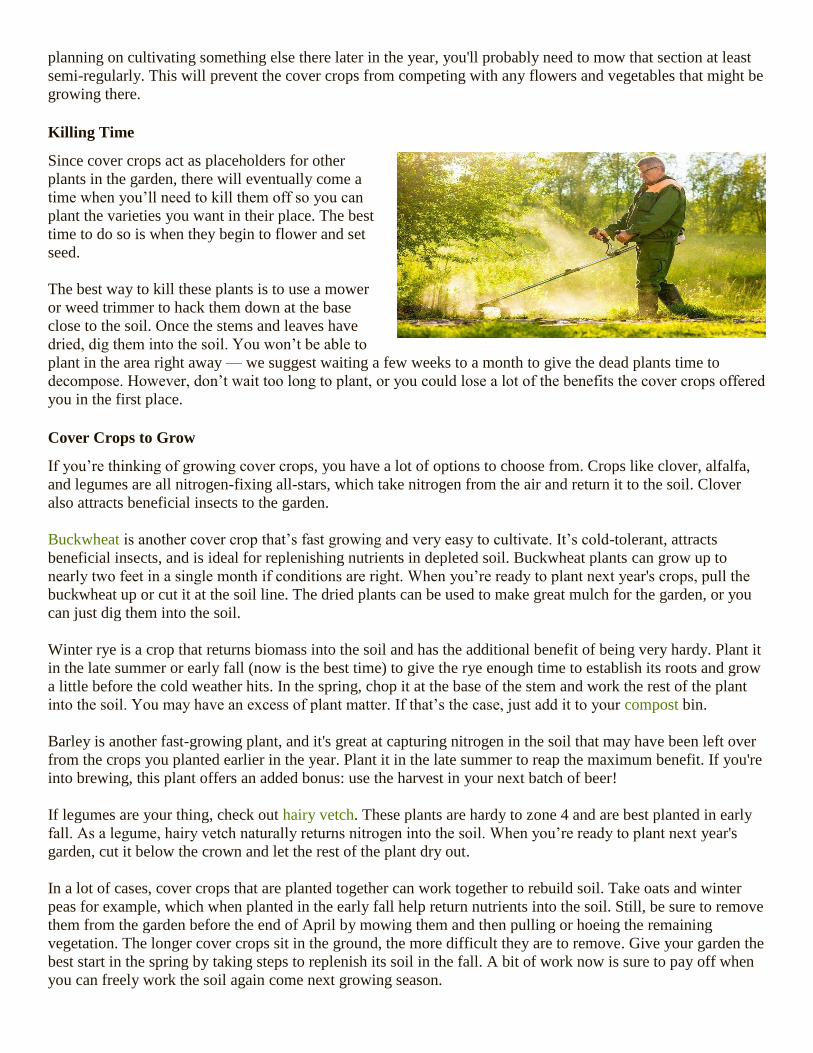
Killing Time
Since cover crops act as placeholders for other
plants in the garden, there will eventually come a
time when you’ll need to kill them off so you can
plant the varieties you want in their place. The best
time to do so is when they begin to flower and set
seed.
The best way to kill these plants is to use a mower
or weed trimmer to hack them down at the base
close to the soil. Once the stems and leaves have
dried, dig them into the soil. You won’t be able to
plant in the area right away — we suggest waiting a few weeks to a month to give the dead plants time to
decompose. However, don’t wait too long to plant, or you could lose a lot of the benefits the cover crops offered
you in the first place.
Cover Crops to Grow
If you’re thinking of growing cover crops, you have a lot of options to choose from. Crops like clover, alfalfa,
and legumes are all nitrogen-fixing all-stars, which take nitrogen from the air and return it to the soil. Clover
also attracts beneficial insects to the garden.
Buckwheat is another cover crop that’s fast growing and very easy to cultivate. It’s cold-tolerant, attracts
beneficial insects, and is ideal for replenishing nutrients in depleted soil. Buckwheat plants can grow up to
nearly two feet in a single month if conditions are right. When you’re ready to plant next year's crops, pull the
buckwheat up or cut it at the soil line. The dried plants can be used to make great mulch for the garden, or you
can just dig them into the soil.
Winter rye is a crop that returns biomass into the soil and has the additional benefit of being very hardy. Plant it
in the late summer or early fall (now is the best time) to give the rye enough time to establish its roots and grow
a little before the cold weather hits. In the spring, chop it at the base of the stem and work the rest of the plant
into the soil. You may have an excess of plant matter. If that’s the case, just add it to your compost bin.
Barley is another fast-growing plant, and it's great at capturing nitrogen in the soil that may have been left over
from the crops you planted earlier in the year. Plant it in the late summer to reap the maximum benefit. If you're
into brewing, this plant offers an added bonus: use the harvest in your next batch of beer!
If legumes are your thing, check out hairy vetch. These plants are hardy to zone 4 and are best planted in early
fall. As a legume, hairy vetch naturally returns nitrogen into the soil. When you’re ready to plant next year's
garden, cut it below the crown and let the rest of the plant dry out.
In a lot of cases, cover crops that are planted together can work together to rebuild soil. Take oats and winter
peas for example, which when planted in the early fall help return nutrients into the soil. Still, be sure to remove
them from the garden before the end of April by mowing them and then pulling or hoeing the remaining
vegetation. The longer cover crops sit in the ground, the more difficult they are to remove. Give your garden the
best start in the spring by taking steps to replenish its soil in the fall. A bit of work now is sure to pay off when
you can freely work the soil again come next growing season.