
Galactic Xtreme Trampoline Installation Manual 13x23 ...
22
Galactic Xtreme Trampoline Installation Manual 13x23 Questions or Help with Installation Email: [email protected] 888-801-4403
Transcript of Galactic Xtreme Trampoline Installation Manual 13x23 ...

Galactic Xtreme
Trampoline Installation Manual 13x23
Questions or Help with Installation Email: [email protected]
888-801-4403

Part #
Quantity
Description
Picture
1 6 L leg frame
Thicker of the L legs
3 2 Corner Frame (bottom left
and top right) 12 spring slots on long side 2 spring slots on short side
2 spring slots on corner
4 2 Corner Frame (bottom left
and top right) 12 spring slots on long side 2 spring slots on short side
2 spring slots on corner
6 2 Side rail
(no net cup)
23 Ft Side 14 spring slots
7 2 Side rail
(net cup at the end)
23Ft Side 16 spring slots
11 2 Side Rail
(Net Cup) 13ft Side of Trampoline 12 spring slots
12 2 Side Rail (NO Net Cup) 13ft Side of Trampoline 12 spring slots
13 3 L leg connector Thicker leg connector

14 6 Leg Extender
15 4 End leg support (L) shaped The thinner of the L legs
16 2 End leg support connector The thinner leg connector
17 12 Net Cups
18 12 Bottom net enclosure poles (square bottom) 4 will be mark yellow (Corner Post)
19 12 Top net enclosure pole
(both ends round)
20 4 Fiber glass net rod
21 1 Net Enclosure
22 1 Jumping Mat

23 12 Net enclosure sleeves Green net sleeves
24 30
2.75” bolt (13mm head)
25 30 13 mm Nut (for trampoline frame)
26 12 ½” Screw to connect 2 net enclosure poles
27 8 2 1/4” leg frame screw (Philips head)
28 20 10 mm Nut (smaller nut) (for net and end trampoline leg)
30 12 1 7/8” Top net pole bolt (Philips Head)
31 2 Short Side Spring Pad L cut on the edge
36 2 Long side spring pad (2 panel)
37 4 Long side spring pad
(3 panel)

Optional Tools Not Provided: 13 mm wrench / socket 10 mm wrench / socket 16 mm wrench / socket Mallet (not hammer, as it may damage/dent trampoline) Step drill bit (or large drill to drill out larger hole if necessary) Philips screw driver Black Electrical Tape Protective Eye Goggles Gloves Ratchet Tie Down Strap Step 1 Setting up The Frame
Part 1, 13 and 14 There be 3 of these legs. NOTE: Part #14 the leg extender is in the middle and not the top of the leg. If you put it on top the leg will be too tall and not fit the frame properly
Bolt together the legs with Part 24 and 25

Step 2: Building the mid frame Use the legs that you have just made in step one for the mid frame. Make sure the spring slots are pointed up and the net cups are on the outside of the frame
Step 3: Finishing up the Frame
Bolt together the frame with 2.75” nut/bolt Part 24 and 25

Add the corners Part 3 and 4 All spring slots must be pointed up and the square net cups on the outside of the frame
The middle rail fort the short side will consist of 2 pieces. Bolt together these 2 pieces with nut/bolt 24 and 25
Connect the End Legs Part 15 and 16 Use nuts/bolt 27 and 28 to connect together

Connect the parts you just made to the corners of the frame. Connecting the end legs to the corner will be very heavy and will require 3 people to lug and pull the frame together. If the corner does not go together it will require a mallet to hammer into place. If you are unable to squeeze the frame together by yourself, you can also use a ratchet tie down strap to squeeze together. When you are done with this part the frame may look un-level and lopsided. This is perfectly normal. Once you install all the springs the frame will suck the frame together and even everything out.
Optional but not provided: Heavy Duty Ratchet Tie Down Strap

Installing the Jumping Mat Now open up the spring boxes. There will be 8 short springs, it will be for the corners.
Please make sure no one is standing on the opposite side of the trampoline while springs are being installed to avoid injury. Due to a lot of tension, springs can and will fly if not properly hooked and handled. Hold spring and spring tool with each hand at all times during the spring installation process. Wear protective eye goggles to prevent any injury
It is very important that you do not go around the trampoline and put all the springs on from left to right. This trampoline has over 100 springs and there will be lots of pressure.
Very important to insert the springs according to the numerical order of the diagram. Insert 2 springs, skip about 3 slots. Go to the opposite side of the trampoline, insert 2 springs, then skip 3 slots. Go to the opposite side of the trampoline, insert 2 springs, then skip 3 slots. Repeat this process until you are finished with the both long sides of the trampoline. Once you are done repeat this process for the short side of the trampoline. Then install the corner springs. This an industrial made frame therefore it is very tight and you may have difficulty putting the springs together with one person. It will require 2 to 3 adults to put together. If you are unable to put the springs on with the spring tool because it is too much tension to pull or too far apart, you can use a heavy duty ratchet tie down strap to temporary hold the frame in place.

Make sure the V ring is flat. If not it could cause premature wear and tear on the fabric tabs
Step 5: Installing Spring Pad

Lay all the spring pads as shown on the diagram. There will be either Velcro strap or cloth loops. Loop the closest springs thru the loop as shown here. Some of the spring pads will have loops on both side. These spring pads are reversible and you should flip them every few months to keep them clean. You should use uv protectant to keep you spring pad from UV ray and sun exposure. If you live in an extremely hot area we recommend you bring in the soft parts (mat, pad, net) during the hot months as the extreme weather will shorten the lifespan of these parts.
Installing the net
Connect the 2 net Enclosure poles. Part 18 (square bottom) and part 19. (Screw part 26) There will be 4 square bottom post that will either be labels with a corner sticker or painted yellow. These 4 post will be for the corner of the trampoline. Very important: Each end of part 19 will have a hole to screw into. The part that connects to part 18 is the end with the single hole. The end with the double hole will be for the net cap later on. Sleeve the net enclosure Pole with part 23. Make sure the black strap is on the rounded side of the pole and not square Then pull the sleeve all the way to cover the entire foam of the pole
Install the black cap to the top with part 17, 30 and 28 If you do not have 2 holes on this side of your net enclosure pole that mean you connected the poles the wrong side.
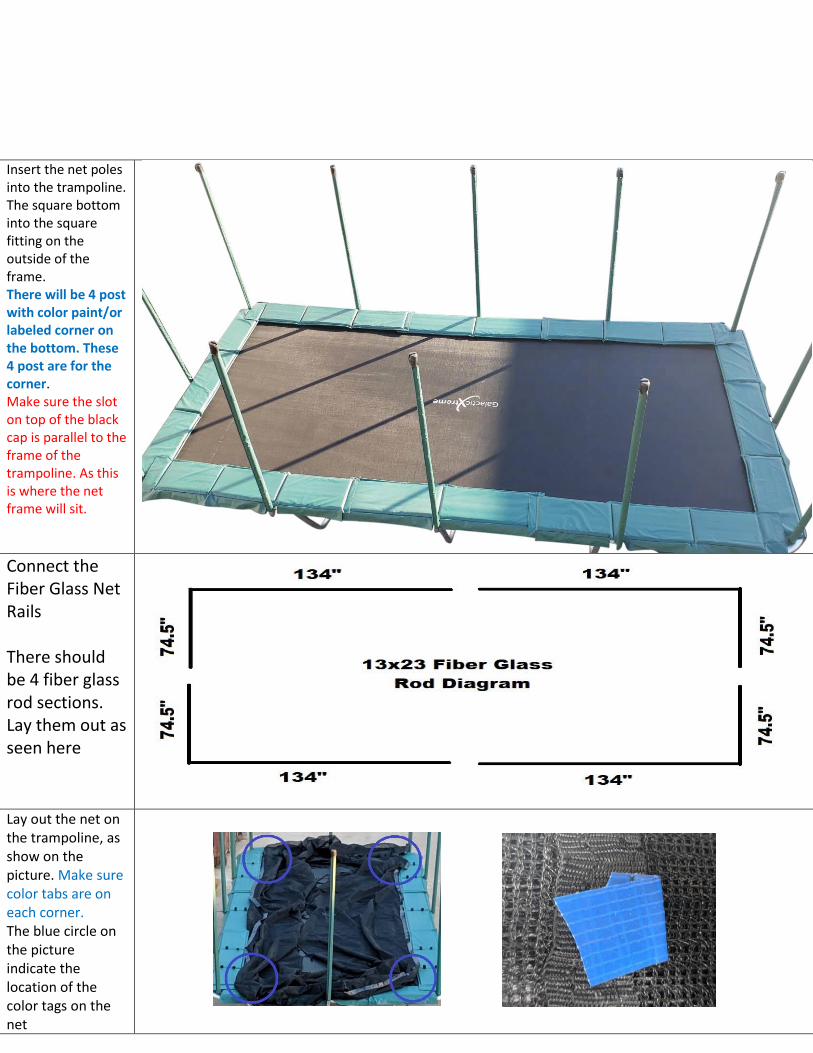
Insert the net poles into the trampoline. The square bottom into the square fitting on the outside of the frame. There will be 4 post with color paint/or labeled corner on the bottom. These 4 post are for the corner. Make sure the slot on top of the black cap is parallel to the frame of the trampoline. As this is where the net frame will sit.
Connect the Fiber Glass Net Rails There should be 4 fiber glass rod sections. Lay them out as seen here
Lay out the net on the trampoline, as show on the picture. Make sure color tabs are on each corner. The blue circle on the picture indicate the location of the color tags on the net

Feed the rod thru the top of the net. Start inserting the rod at each corner. Once all the fiber glass rod are connected and the zipper are in position, secure the rods with the black electrical tap.
Connect all the segments of the rod together so it’s secure. Tape at least 3 inches on each side of the connector. Tape back and forth about 4 – 5 layers. Make sure all the sections with a silver fitting are secure and taped. Even the silver fittings in the middle of the fiberglass rod. Not having enough tape will allow too much play on the rod and the rod will drop when the kids jump. When finish taping you should finish almost all of the roll of tape. If you have a lot left that means you did not use enough tape.
Hang the net into the black cups on top of the trampoline. Secure the net by clipping the straps on the bottom on net to V ring of mat below the frame. The trampoline will flip and fly with wind, we recommend you buy an anchor kit for it.