GABLE END CHIMNEY FITTING INSTRUCTIONS … · careful not to rest the weight of the chimney on the...
10
GABLE END CHIMNEY FITTING INSTRUCTIONS STANDARD LITESTACK CHIMNEY FITTING INSTRUCTIONS. HEALTH & SAFETY WARNING: THESE INSTRUCTIONS ASSUME THAT THE CHIMNEY IS BEING FITTED BY A PROFESSIONAL CONSTRUCTION WORKER FAMILIAR WITH THE HEALTH AND SAFETY ASPECTS OF WORKING ON A BUILDING SITE AND FAMILIAR WITH TIMBER ROOF CONSTRUCTION. WARNING. Parts of the Litestack Chimney maybe sharp and the construction material can cause irritation to the skin. It is recommended that the protective gloves are worn when handling the chimney and a facemask is recommended to avoid inhaling dust when drilling through the saddle. Any warranty will be void if the chimney is not fitted in the manner described in these instructions with the fitting kit provided. Under no circumstances should the saddle be fitted with a nail gun or any attempt be made to pierce the saddle without drilling the correct size hole. Litestack Chimneys should remain attached to their delivery pallets until they are located ready to be lifted into position onto the roof. Only Litestack lifting harness should be used to lift the chimney. NB The chimney saddle is easy to damage once the chimney is removed from the pallet but before it is located on the roof. Care must be taken to avoid sitting the chimney on the ground once this protection has been removed as the saddle is not designed to support the chimney in any position other than its intended location on the roof apex or pitch. WARNING TV aerials or satellite dishes or any similar items cannot be fitted to Litestack Chimneys and doing so will invalidate the warranty. It is the builder’s responsibility to ensure that this information is passed on to the owners or purchasers of the property.
Transcript of GABLE END CHIMNEY FITTING INSTRUCTIONS … · careful not to rest the weight of the chimney on the...

GABLE END CHIMNEY FITTING INSTRUCTIONS
STANDARD LITESTACK CHIMNEY FITTING INSTRUCTIONS.
HEALTH & SAFETY
WARNING:
THESE INSTRUCTIONS ASSUME THAT THE CHIMNEY IS BEING FITTED BY A PROFESSIONAL
CONSTRUCTION WORKER FAMILIAR WITH THE HEALTH AND SAFETY ASPECTS OF WORKING ON A
BUILDING SITE AND FAMILIAR WITH TIMBER ROOF CONSTRUCTION.
WARNING. Parts of the Litestack Chimney maybe sharp and the construction material can cause
irritation to the skin. It is recommended that the protective gloves are worn when handling the
chimney and a facemask is recommended to avoid inhaling dust when drilling through the saddle.
Any warranty will be void if the chimney is not fitted in the manner described in these instructions
with the fitting kit provided. Under no circumstances should the saddle be fitted with a nail gun or
any attempt be made to pierce the saddle without drilling the correct size hole.
Litestack Chimneys should remain attached to their delivery pallets until they are located ready to be
lifted into position onto the roof. Only Litestack lifting harness should be used to lift the chimney.
NB The chimney saddle is easy to damage once the chimney is removed from the pallet but before it
is located on the roof. Care must be taken to avoid sitting the chimney on the ground once this
protection has been removed as the saddle is not designed to support the chimney in any position
other than its intended location on the roof apex or pitch.
WARNING TV aerials or satellite dishes or any similar items cannot be fitted to Litestack Chimneys
and doing so will invalidate the warranty. It is the builder’s responsibility to ensure that this
information is passed on to the owners or purchasers of the property.
NB Litestack Chimneys should be fitted after the rafters are secured in place but before the roof is
felted or the laths are fitted.
STEP 1
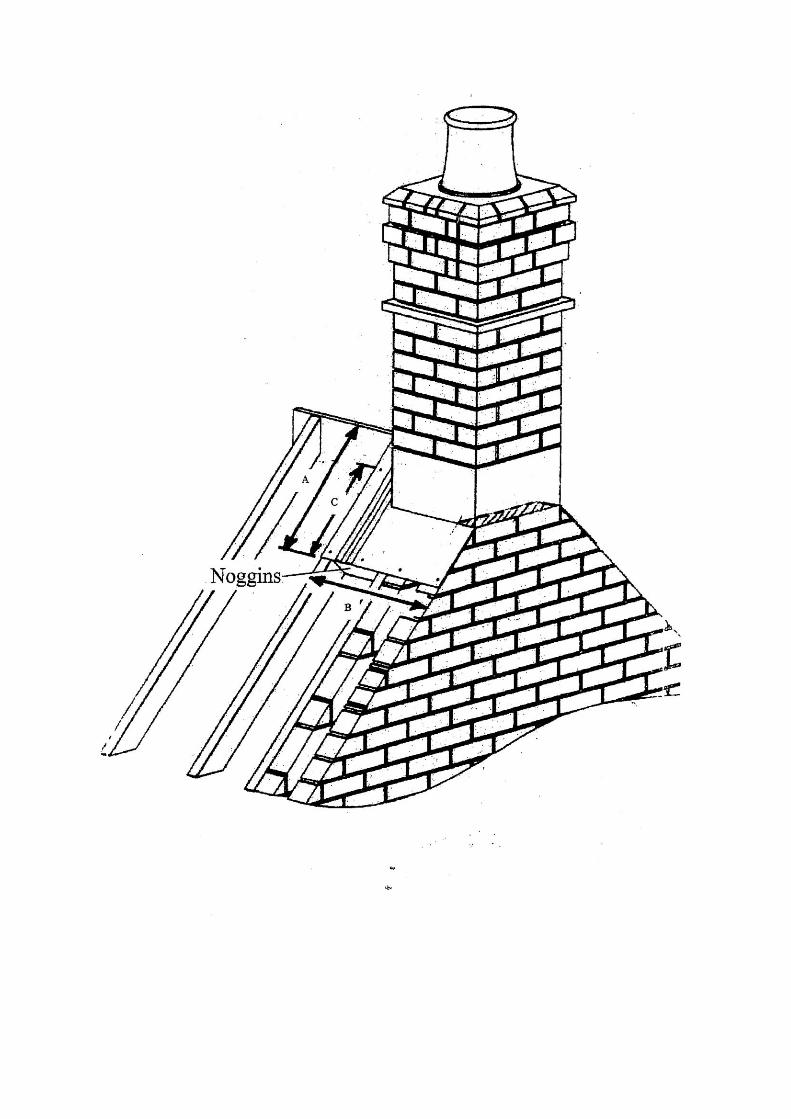
Before the chimney is lifted onto the roof measure the saddle dimensions “A”, “B” and “C”. Fit
75mm x 50mm (3” x 2”) noggins flush with outside edge between the rafters and securely attached
using appropriate size nails or screws (not supplied) in the locations shown in Fig 1. Saddle length
varies with chimney size so the number of noggins required to create length B will depend on the
rafter spacing and the saddle size. Fit the same noggins to both roof pitches in the same locations.
(Not illustrated).
Before lifting the chimney into place apply a MASTIC ADHESIVE to the top of outer brick wall to meet
with the return flange on the saddle, when the chimney is lowered.
NB HARNESS IS DESIGNED FRO USE WITH LITESTACK CHIMNEYS ONLY
STEP 2
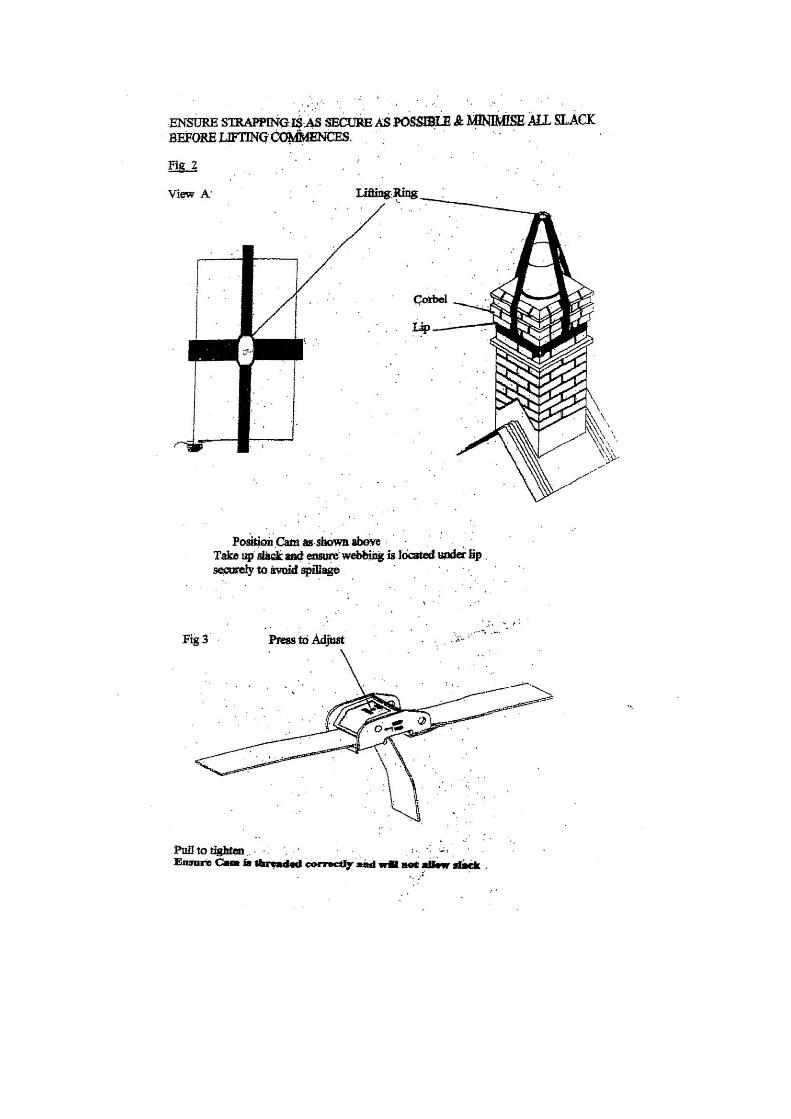
Fit the supplied lifting harness to the chimney pulling the adjustable belt strap loosely around the
lifting course.
Adjust the four lifting straps by sliding them around the lifting belt so that each one is in the centre
of a flat side of the chimney. Fig 2.
Tighten the belt strap with the locking cam located on a corner position tight enough so as not to be
able to slide over the bottom corbelled course.
Make sure the webbing is threaded properly through the clasp so as it will not slip. Fig 3.
The lifting harness is designed to lift a variety of sizes of Litestack Chimneys so there will be a
considerable length of spare belt strap on smaller chimneys. Care should be taken to ensure the
excess belt strap is tucked through the belt loop and any further excess is tied neatly so as not to
catch or trap. The lifting appliance hook should be put through the lifting ring and the saddle should
be cut free from the pallet. The Litestack Chimney can now be lifted and lowered into position being
careful not to rest the weight of the chimney on the saddle until it is supported by the rafters and
noggins.
NB Litestack Chimneys vary in weight depending upon the model. Although they are light by
normal chimney standards, care should be taken to ensure the lifting gear used to raise the
chimney is of sufficient capacity and reach, individual chimney weights are available upon request
from the supplier.
It is recommended that the lift harness is not released until the chimney has been secured to the
noggins and rafters with the coach screws provided.
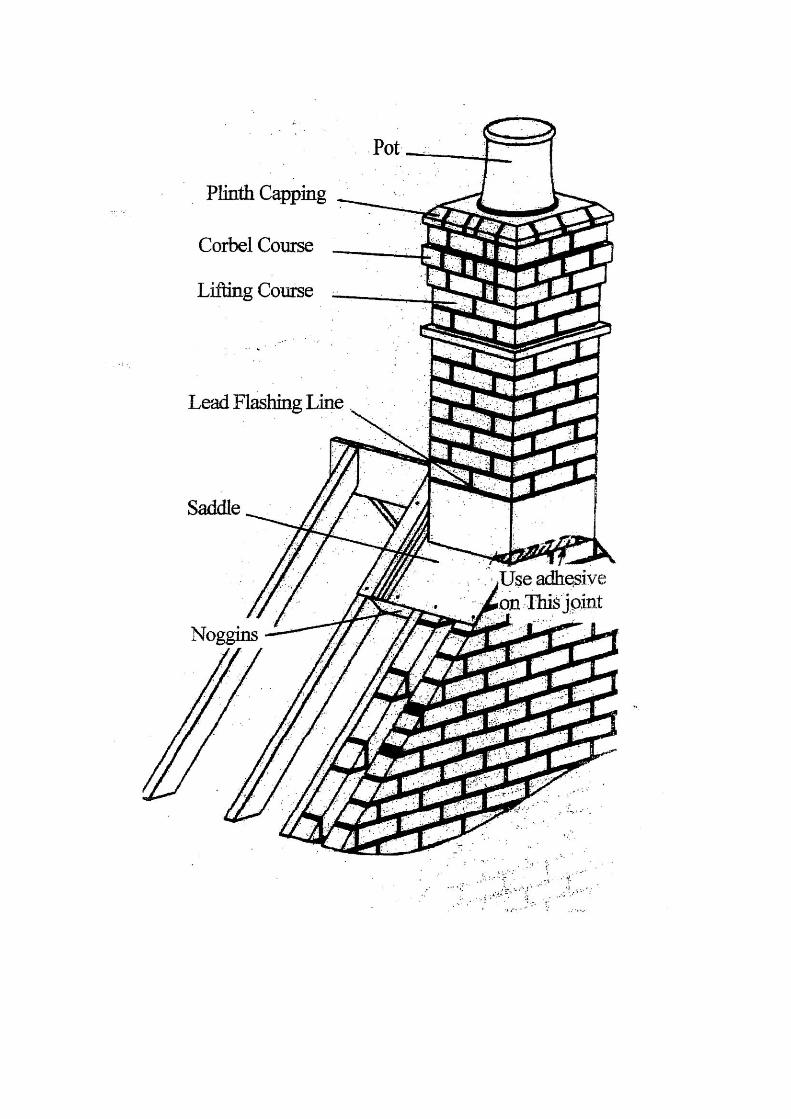
STEP 3
The saddle is pre-drilled to accept roofing bolts and coach screws. For the coach screws drills holes
only 15mm deep using an 8.5mm drill. Fit washer and tap coach screw lightly to bite and screw
home securely using 13mm spanner.
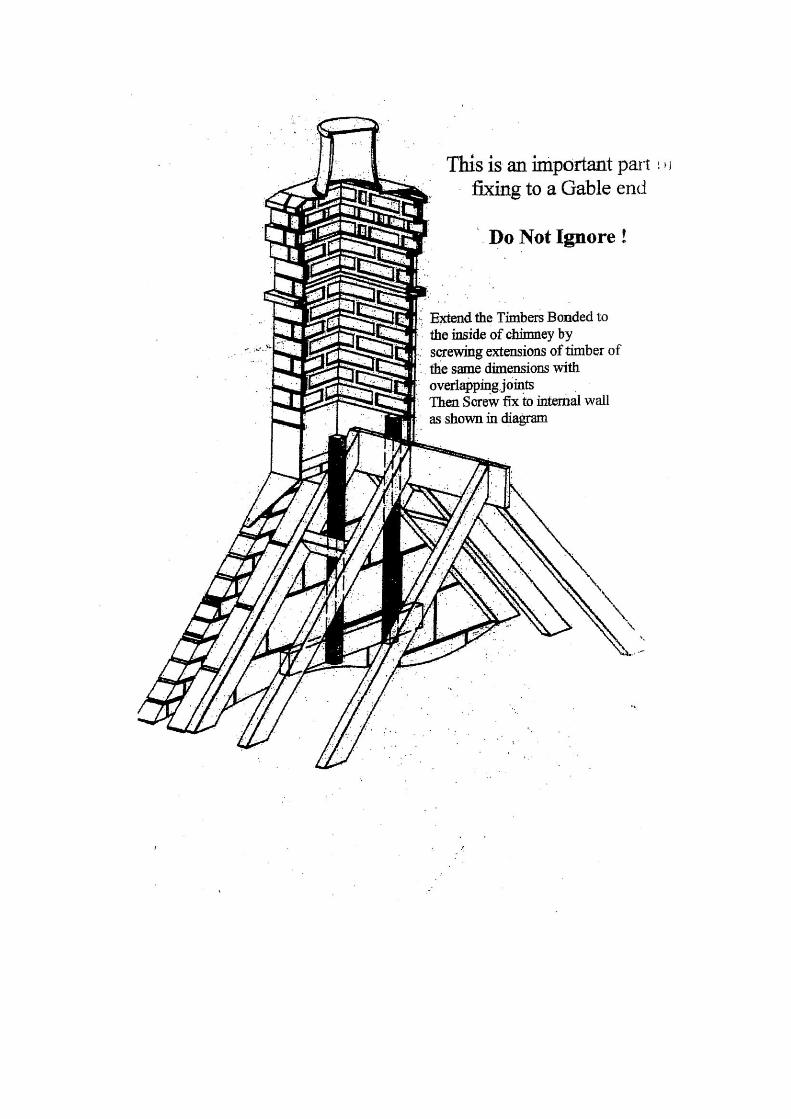
STEP 4
On gable end chimneys there are two timbers bonded to the inside of saddle, hanging down the
“inner” house wall. These should be extended by screwing the same sized extensions to them and
securing into the wall with suitable fixings. This is an important part of securing a gable end fixed
chimney. See attached drawing. “Do not ignore”
SPECIAL FITTINGS
The standard fixing kit provided contains 14 coach screws and washers, which are using to fit most
chimneys. In addition the fixing kit also includes 4 nuts and 150mm bolts for extra security for
chimneys that are higher than 1200mm from the ridge line to the base of the pot. These may also
be use in particularly exposed locations renown for high winds. Additional and more substantial
noggins may be needed if using the nuts and bolts. If in doubt please contact the supplier for
technical advice.
ROOF FELTING
The Litestack Chimney is now secured. Roof felt can be fitted in the conventional manner and laid
over the saddle and cut as around a conventional chimney.
NB Do not nail through the saddle to secure felt.
TILE LATHS
Tile laths should also be located as per a conventional chimney but again only nailed around the
saddle. Laths that go straight across the saddle above or below the chimney should be in one piece
with no joins. Laths should cross drainage humps in the saddle. (They can be notched if preferred
and then screwed into the GRP saddle using supascrews or self tapping screws.
ROOF TILES
Tile as per a roof fitted with a conventional chimney.

LEAD FLASHING
To perfect the authentic look of the Litestack chimney it is designed to be lead flashed in the
traditional manner but using the lead flashing channel line where the brickwork meets the grey
saddle. A proprietary brand of lead flashing mastic should be used and the lead should flash over the
tiles in the conventional manner for a water seal and a traditional appearance.

To perfect the authentic look of the Litestack Chimney it is designed to be lead flashed in the
traditional manner but using the lead flashing channel line where the brickwork meets the grey
saddle. A proprietary brand of lead flashing mastic should be used and the lead should flash over
the tiles in the conventional manner for a water seal and a traditional appearance.


![Catalog section IGC 0690 Class 1 Solenoid Gas Valves ... Actuator.pdf · 220v (screwed] 110v (screwed) 3 complete valves (screwed,rp) replacement actuators type rp new code was new](https://static.fdocuments.in/doc/165x107/5b78aec07f8b9a7f378c0cf5/catalog-section-igc-0690-class-1-solenoid-gas-valves-actuatorpdf-220v-screwed.jpg)