FUSION EMMFusion EMM ManualsSmartLink Fusion … · Fusion EMM (Event Management Module) QUICK...
30
Fusion EMM (Event Management Module) QUICK SETUP GUIDE Fusion EMM Quick Setup Guide Rev3.1
Transcript of FUSION EMMFusion EMM ManualsSmartLink Fusion … · Fusion EMM (Event Management Module) QUICK...

Fusion EMM(Event Management Module)
QUICK SETUP GUIDEFusion EMM Quick Setup Guide Rev3.1
SmartLink Fusion EMM Quick Setup Guide Rev3.1 1
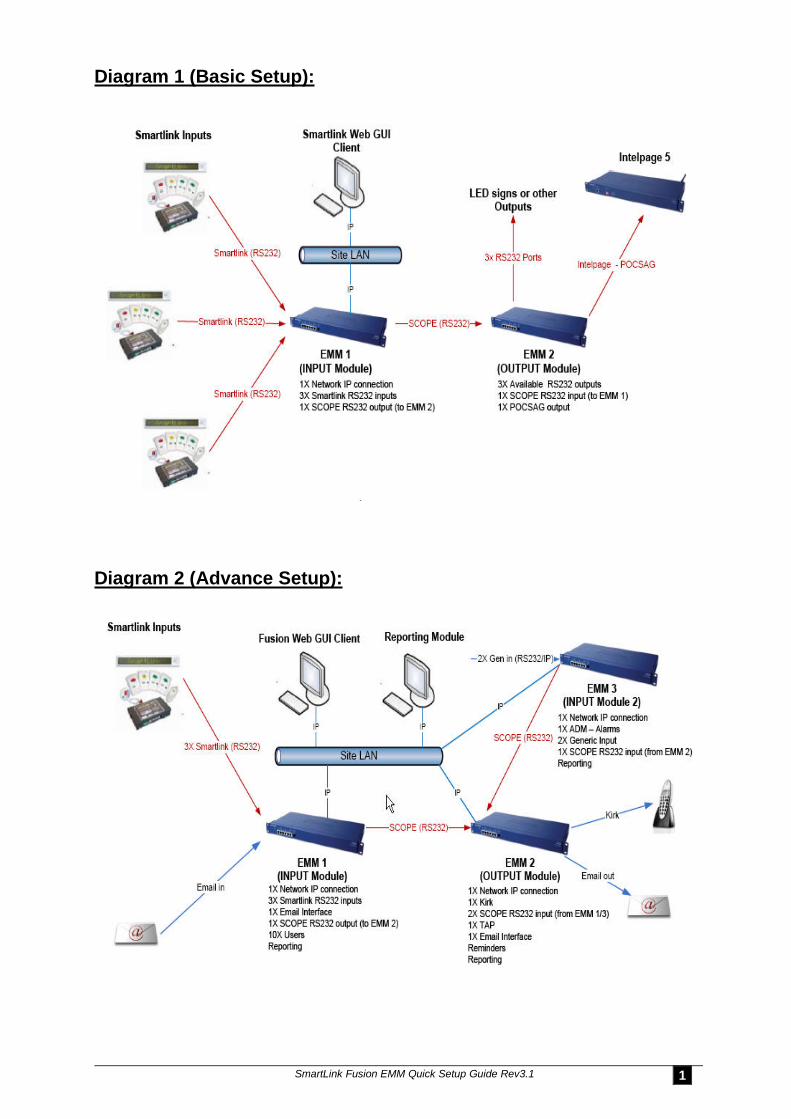
Diagram 1 (Basic Setup):
Diagram 2 (Advance Setup):

SmartLink Fusion EMM Quick Setup Guide Rev3.12
1. Contents
1. Contents.......................................................................................................... 2
2. Introduction.................................................................................................... 3
3. Basic Configuration using IPDiscover....................................................4
4. Logging In (EMM1 & EMM2).......................................................................8
5. Messaging Setup (EMM1 & EMM2)........................................................ 10
6. Scope Setup (EMM1 & EMM2).................................................................11
7. POCSAG Setup (EMM2)............................................................................ 15
8. Recipients/Contacts Setup (EMM1 & EMM2).......................................16
9. SCU2 Setup (EMM1)...................................................................................21
10. SmartWire or SmartLine Setup (EMM1)................................................24
11. SmartLink Residents Setup (EMM1)......................................................26
12. Send Message Screen...............................................................................27
13. Sent Items Screen.......................................................................................28
14. Inbox Screen................................................................................................ 28
15. Active Alarms Screen................................................................................ 29
16. Logging Out................................................................................................. 29

SmartLink Fusion EMM Quick Setup Guide Rev3.1 3
2. Introduction
1. Fusion EMM Kit:
EMM 1 & EMM 2
1 x Green – Crossover Serial Cable (RJ45 to RJ45) for SCOPE (Com1)
2 x Blue – Straight Through Cable (RJ45 to RJ45)
2 x Red – Crossover Ethernet Cable (RJ45 to RJ45)
SmartLink Fusion EMM Software Quick Setup Guide
2. Fusion EMM Unit (19” Rack Mount Version):
3. Fusion EMM Unit (Desktop Version):

SmartLink Fusion EMM Quick Setup Guide Rev3.14
3. Basic Configuration using IPDiscover
In order to view the user interface, you must first connect to the EMM1 and EMM2 via its Ethernet Port. Thereare two ways that you can connect to the units.
1. Directly with a PC or Laptop using the supplied Crossover Ethernet Cable (Red RJ45 ‐ RJ45).
2. By connecting the units to a local area network (LAN) to a spare port or to a Switch/Hub, using thesupplied Straight Through Ethernet Cable (Blue RJ45 ‐ RJ45).
Once you have Connected and Power UP the units, you can use a utility called “IPDiscover” to locate your unitson the network and start a web session with the units. This program is included in the SmartLink Fusion CD. Runthe Program and you will see all Fusion EMM on the network.
NOTE: DHCP is enabled by default. If no DHCP server is found on the network, the default IP of 192.168.0.1will be used.
To configure the IP settings of EMM1 ‐ In the example below, there is two EMM units on the network at IPAddress 192.168.0.227 and 192.168.0.222. Select 192.168.0.227 and Click the “CfgIP” button to configure theIP settings of EMM1 as shown below.

SmartLink Fusion EMM Quick Setup Guide Rev3.1 5
You can then turn off DHCP if it is not required or change the EMM1 IP Address. Type eg Nunawading AgedCare EMM1 as the Host Name and Click the “Send” button to configure the IP settings of EMM1 as shownbelow.
Click the “YES” button to continue as shown below.
Click the “OK” button to continue as shown below.
To configure the IP settings of EMM2 ‐ In the example below, select 192.168.0.222 and Click the “CfgIP” buttonto configure the IP settings of EMM2 as shown below.

SmartLink Fusion EMM Quick Setup Guide Rev3.16
You can then turn off DHCP if it is not required or change the EMM2 IP Address. Type eg Nunawading AgedCare EMM2 as the Host Name and Click the “Send” button to configure the IP settings of EMM2 as shownbelow.
Click the “YES” button to continue as shown below.
Click the “OK” button to continue as shown below.
Click the “Discover” button to continue as shown below.

SmartLink Fusion EMM Quick Setup Guide Rev3.1 7
Wait at least 2 minutes and then Click the “Discover” button again until IP and Given Name has been updatedas shown below.
To open a Browser Window on EMM1 – Click the IP “192.168.2.162” and then “Web” button as shown below.A browser window will open shortly displaying the Login Screen.
To open a Browser Window on EMM2 – Click the IP “192.168.2.163” and then “Web” button as shown below.A browser window will open shortly displaying the Login Screen.

SmartLink Fusion EMM Quick Setup Guide Rev3.18
4. Logging In (EMM1 & EMM2)
At the Login Screen you will be prompted to enter your details. The default login details are:
User name: maint
Password:
To Log In EMM1 – Typemaint as the “User name” and Click the “Log In” button as shown below.
The Send Message Screen will then be shown below.
NOTE: The EMM has many features and protocols that are enabled by license key. As a result not allfeatures explained in the manual may be available on your EMM. For more details contact your place ofpurchase.

SmartLink Fusion EMM Quick Setup Guide Rev3.1 9
To Login EMM2 – Typemaint as the “User name” and Click the “Log In” button as shown below.
The Send Message Screen will then be shown below.
NOTE: The EMM has many features and protocols that are enabled by license key. As a result not allfeatures explained in the manual may be available on your EMM. For more details contact your place ofpurchase.

SmartLink Fusion EMM Quick Setup Guide Rev3.110
5. Messaging Setup (EMM1 & EMM2)
To Setup Messaging on EMM1
Click the “Settings” and then “Messaging” as shown below. Type eg Nunawading Aged Care EMM1 as the SiteName and Click the “Save Changes” button when finished.
To Setup Messaging on EMM2
Click the “Settings” and then “Messaging” as shown below. Type eg Nunawading Aged Care EMM2 as the SiteName and Click the “Save Changes” button when finished.

SmartLink Fusion EMM Quick Setup Guide Rev3.1 11
6. Scope Setup (EMM1 & EMM2)
To Setup Scope Gateway on EMM1 and EMM2 – Connect the Crossover Serial Cable (Green RJ45 toRJ45) from EMM1 (Com1) to EMM2 (Com1)
To Setup Scope on EMM1
Click the “Interfaces”, “Gateways” and then “Add New” button as shown below.
Type eg Output to EMM2 (Com1 – Com1) as the NameSelect “Scope” as the TypeSelect “Yes” box as to Gateway enabledSelect “UTF‐8 (default)” as to Character SetSelect “Com1” as the PortSelect “No” as to Input GatewaySelect “Yes” as to Output gatewayClick the “Save & Close” button when finished as shown below.

SmartLink Fusion EMM Quick Setup Guide Rev3.112
Click the “Start” button as shown below.
Click the “Interfaces”, “Ports” and then “Edit” button as shown below.
Click the “Save & Close” button when finished as shown below.
Click the “X” button to Exit as shown above.

SmartLink Fusion EMM Quick Setup Guide Rev3.1 13
To Setup Scope on EMM2
Click the “Interfaces”, “Gateways” and then “Add New” button as shown below.
Type eg Input from EMM1 (Com1 – Com1) as the NameSelect “Scope” as the TypeSelect “Yes” as to Gateway enabledSelect “UTF‐8 (default)” as to Character SetSelect “Com1” as the PortSelect “Yes” as to Input GatewaySelect “No” as to Output gatewayClick the “Save Changes” button when finished as shown below.

SmartLink Fusion EMM Quick Setup Guide Rev3.114
Click the “Start” button as shown below.
Click the “Interfaces”, “Ports” and then “Edit” button as shown below.
Click the “Save Changes” button when finished as shown below.
Click the “X” button to Exit as shown above.

SmartLink Fusion EMM Quick Setup Guide Rev3.1 15
7. POCSAG Setup (EMM2)
NOTE:
Skip this Section if you are NOT using a IntelPage Paging Transmitter.
To Setup POCSAG Gateway on EMM2 – Connect the Straight Through Cable (Blue RJ45 toRJ45) to EMM2 (TX Ouput) and Power Up the IntelPage Paging Transmitter.
To Setup POCSAG Gateway on EMM2
Click the “Interfaces”, “Gateways” and then “Edit” button as shown below.
Type eg “POCSAG” or “IntelPage Transmitter” as the Name and Click the “Save & Close” button when finishedas shown below.

SmartLink Fusion EMM Quick Setup Guide Rev3.116
Click the “Interfaces”, “Ports” and then “Edit” button as shown below.
Select “Standard Transmitter” as the Preset and Click the “Save & Close” button when finished as shownbelow.
8. Recipients/Contacts Setup (EMM1 & EMM2)
To Setup Contacts on EMM2
Click the “Recipients”, “Contacts” and then “Add New” button as shown below.

SmartLink Fusion EMM Quick Setup Guide Rev3.1 17
Type eg “Pager 1 CC:0050518” as the NameType eg “0050518” as the Address (Pager Cap Code)Click on “Auto” as the Local IDSelect “POCSAG” as the Send viaClick the “Save & Close” button when finished as shown below.
To Test POCSAG (IntelPage Transmitter) on EMM2
Select/Tick the “Pager 1 CC:0050518” and then Click the “Send Message to Selected” button as shown below.
Type eg. “Testing Messages 01234567890” and then Click the “Send” button as shown below.
You should receive a Text Message on the Pager. If NOT, check and make sure that the IntelPage Transmitteris Connected/Powerup or the Pager is ON.

SmartLink Fusion EMM Quick Setup Guide Rev3.118
To Setup Contacts on EMM1
Click the “Recipients”, “Contacts” and then “Add New” button as shown below.
Type eg “Pager 1 CC:0050518” as the NameType eg “1” as the Address (Pager Cap Code)Click on “Auto” as the Local ID (Important! Make sure that the Local ID matches the EMM2 Contacts)Select “Output to EMM2 (Com1 – Com1)” as the Send viaClick the “Save & Close” button when finished as shown below.
To Test Pager using SCOPE Output from EMM1 to EMM2 (Com1 to Com1)
Select/Tick the “Pager 1 CC:0050518” and then Click the “Send Message to Selected” button as shown below.

SmartLink Fusion EMM Quick Setup Guide Rev3.1 19
Type eg. “Testing Messages 01234567890” and then Click the “Send” button as shown below.
You should receive a Text Message on the Pager. If Not, check and make sure that the IntelPage Transmitteris Connected/Powerup and the Pager is turned ON.
To Setup Groups on EMM1
NOTE:
Skip this Section if you are NOT Setting Up Groups.
Click the “Recipients”, “Groups” and then “Add New” button as shown below.

SmartLink Fusion EMM Quick Setup Guide Rev3.120
To Setup Escalations on EMM1
NOTE:
Skip this Section if you are NOT Setting Up Escalations.
Click the “Recipients”, “Escalations” and then “Add New” button as shown below.
To Setup Users on EMM1
NOTE:
Skip this Section if you are NOT Setting Up Users.
Click the “Recipients”, “Users” and then “Add New” button as shown below.

SmartLink Fusion EMM Quick Setup Guide Rev3.1 21
9. SCU2 Setup (EMM1)
NOTE:
Skip this Section if you are NOT using a SCU2 Receiver.
To Setup SCU2 Receiver – Power‐up & Connect the SCU2 Cable to EMM1 (Com2).
To Setup SCU2 on EMM1
Click the “Interfaces”, “Gateways” and then “Add New” button as shown below.
Type eg “SCU2 Receiver” as the NameSelect “Smartlink Alarm Module” as the TypeSelect the “Yes” box as the Gateway enabledSelect available Port eg. “Com2” as the PortClick the “Save & Close” button when finished as shown below.

SmartLink Fusion EMM Quick Setup Guide Rev3.122
Click the “Start” button as shown below.
Click the “Interfaces”, “Ports” and then “Edit” button as shown below.
Select “1200” as the Baud, “8” as the Data Bits, “None” as the Parity, “1” as the Stop Bits, “None” as the FlowControl and then Click “Save & Close” button as shown below.
SmartLink Fusion EMM Quick Setup Guide Rev3.1 23
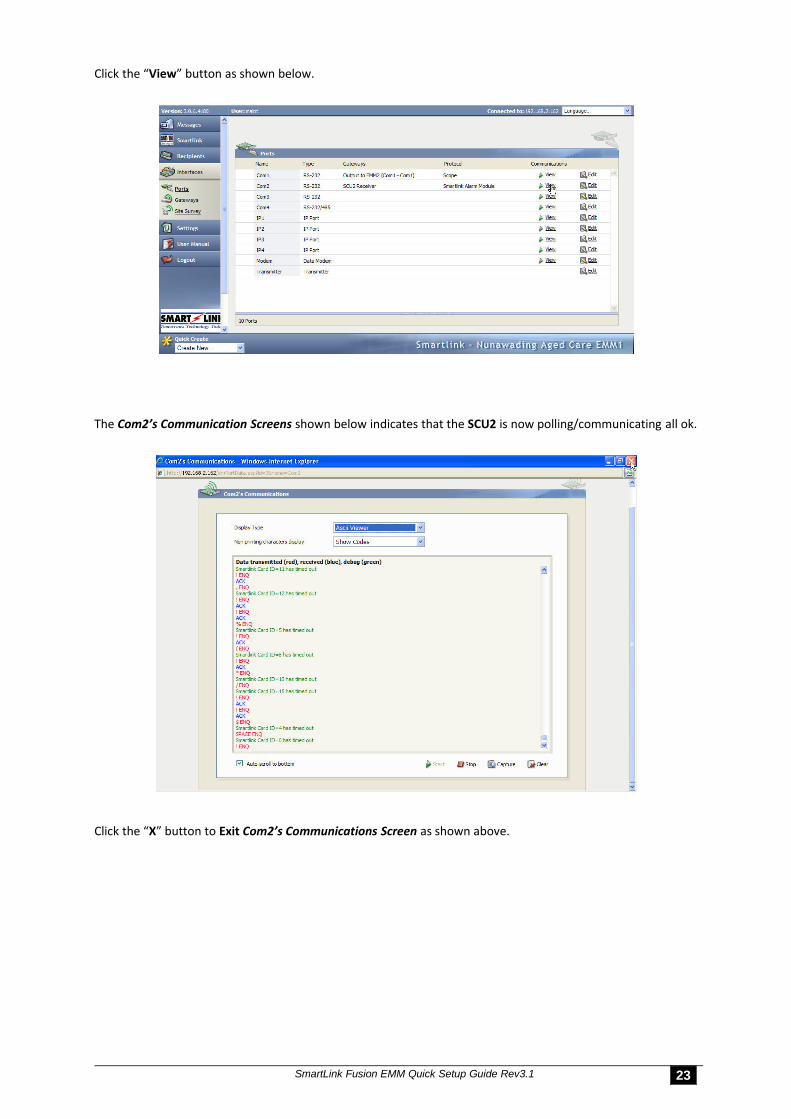
Click the “View” button as shown below.
The Com2’s Communication Screens shown below indicates that the SCU2 is now polling/communicating all ok.
Click the “X” button to Exit Com2’s Communications Screen as shown above.

SmartLink Fusion EMM Quick Setup Guide Rev3.124
10. SmartWire or SmartLine Setup (EMM1)
Skip this Section if you are NOT using SmartWire System or SmartLine Wireless System.
To Setup – Power‐up & Connect the Cable to EMM1 (Com3).
To Setup SmartWire or SmartLine System on EMM1
Click the “Interfaces”, “Gateways” and then “Add New” button as shown below.
Type eg “SmartWire System” or “SmartLine System” as the NameSelect “Smartlink Alarm Module” as the TypeSelect the “Yes” box as the Gateway enabledSelect available Port eg. “Com3” as the PortClick the “Save & Close” button when finished as shown below.
Click the “Start” button as shown below.

SmartLink Fusion EMM Quick Setup Guide Rev3.1 25
Click the “Interfaces”, “Ports” and then “Edit” button as shown below.
Select “9600” as the Baud, “8” as the Data Bits, “None” as the Parity, “1” as the Stop Bits, “None” as the FlowControl and then Click “Save & Close” button as shown below.
The Com3’s Communication Screens shown below indicates that the SmartWire System is nowpolling/communicating all ok.
Click the “X” button to Exit Com3’s Communications Screen as shown above.

SmartLink Fusion EMM Quick Setup Guide Rev3.126
11. SmartLink Residents Setup (EMM1)
To Setup SmartLink Residents List on EMM1
Click the “Smartlink”, “Residents List” and then “Add New” button as shown below.
Type eg “Room 1” or “Mrs Brown” as the NameType eg “1001” as the Code (This is also known as the Client Account Number)Type eg “0398756400” as the Phone Number (or Leave Blank)Click the “Find” button to Search for Recipient as shown below.
Select eg “Pager 1 CC:0050518“ and Click the “Add Selected” button as shown below.

SmartLink Fusion EMM Quick Setup Guide Rev3.1 27
“Pager 1 CC:0050518” now selected in the Recipient field.Click the “Save & New” button or the “Save & Close” button as shown below.
Click the “Add New” button as shown below if you want to continue to ADD more SmartLink Residents.
The SmartLink SCU2 Receiver, SmartWire System or SmartLine System are now ready to be tested as long asyou programmed the Code/Client Account to be 1001.
12. Send Message Screen
Click the “Messages” and then “Send Message”. The Send Message Screen is displayed as shown below.

SmartLink Fusion EMM Quick Setup Guide Rev3.128
13. Sent Items Screen
Click the “Messages” and “Sent Items”. The Sent Items Screen is displayed as shown below.
14. Inbox Screen
Click the “Messages” and “Inbox”. The Inbox Screen is displayed as shown below.

SmartLink Fusion EMM Quick Setup Guide Rev3.1 29
15. Active Alarms Screen
Click the “Messages” and “Active Alarms”. The Active Alarms Screen is displayed as shown below.
16. Logging Out
Click the “Logout” button as shown below.
© Copyright SmartLink“A Division of Ness Corporation Pty Ltd”
November 2015
Unit 4/56 Norcal Rd,Nunawading VIC 3131 Australia
Tel: +61 3 9875 6400 Fax: +61 3 9875 6422Email: [email protected]
Web Site: www.smartlink.com.au
To the best of our knowledge, the information contained in this manual is correct at the time of print. SmartLink “A division
of NESS CORPORATION PTY LTD” reserves the right to make changes to the features and specifications at any time withoutprior notice in the course of product development.