Furniture Project Management - ECi Software...
15
Furniture Project Management Updated July 2016
Transcript of Furniture Project Management - ECi Software...

Furniture Project Management
Updated July 2016

© 2016 ECi Software Solutions, Inc.
ContentsProject Management Reporting ..........................................................................................3Before You Begin ..................................................................................................................3Setting Up Passwords...........................................................................................................3Tracking and Reporting on Furniture Projects...................................................................4
Executing a Template ...................................................................................................................................................5Choosing a Level to View Information ...................................................................................................................6Setting Limits ..................................................................................................................................................................6Viewing the Report .......................................................................................................................................................7Changing the Subtotal By Option ...........................................................................................................................7Viewing Additional Information ...............................................................................................................................8Hiding Details, Showing Global Information, Showing Notes ......................................................................8Customizing the Grid ...................................................................................................................................................9Printing the Report .................................................................................................................................................... 10Saving the Report as a Template ............................................................................................................................11Setting Up Templates .................................................................................................................................................11Setting Up User Groups .............................................................................................................................................13Creating an Event ....................................................................................................................................................... 14Displaying Sales Orders and Purchase Orders ................................................................................................. 14

3
Furniture Project Management
continue to next page
Project Management ReportingECi® has worked diligently to re-design the Furniture Project Management window. Developed with input from a dedicated dealer task force, this new streamlined version includes the new functionality of the EBS SQL database. Using SQL/.NET technology, Project Management tasks display in a brand new, easy to use panel. This panel gives you added flexibility when limiting, filtering, summarizing, sorting, customizing, and updating your project data.
When viewing customers’ data, you can easily show or hide both global and detail information with a single click. You can copy selected columns or notes to the clipboard for pasting into other documents, spread-sheets, or email messages. Information appears in an Excel-style grid with columns that can be fully cus-tomized. Save the report to a template, export to an XLS spreadsheet, or export to a PDF file. Since results are significantly faster, and provide nearly real-time information, reporting has never been easier.
This newly enhanced Project Management window also has significantly improved security. Previously, you had one password which denied or allowed access to the entire Project Management feature. Similar to the SQL Reporting application, we have added the ability to set up User Groups. For example, you can create one user group for your warehouse personnel and another for your salespersons. Each employee can belong to several different groups at once. After you set up your templates with the relative data, you merely assign the templates to specific user groups. If the employee is not a member of the group, the template is not shown in the user’s Template Selection list. By using templates, you can restrict individu-als from viewing confidential customer information such as cost, margin, or GP. Template and User Group functions are also password protected. Passwords can be set in the Furniture Parameters and are accessible through the Keyop Menu.
Note: Before you set up user groups any existing templates display by default in the Template Selection list under the General heading. Additionally, all existing templates are available to all users who have access to Project Management.
Before You BeginBefore you can begin using the new Project Management window, you must:
• Install the latest version of DDMS® software.
• WARNING: Before you can begin using this Project Management tool, you must import your data through the new EBS SQL Import Panel. You must import your file information and then set up a schedule for importing future data. Do NOT proceed with these instructions until you do so. For details, see Using the EBS SQL Import Panel handout on our DDMS Customer Support Center.
Setting Up PasswordsThere are two passwords that you can use with the Furniture Project Management feature. One password restricts access to the Furniture Project Management window. The user must enter the correct password after clicking the Project Management icon in the Furniture menu. The other password is used to prevent unauthorized individuals from setting up templates or user groups.
1. In the Master Menu, double-click and then, double-click .
2. Double-click Furniture and then, double-click Passwords.

4
Furniture Project Management
continue to next page
3. Click the appropriate box to set a password.
• Project Management Password: Enter a password restricting access to the Project Manage-ment window. When users click the Project Management icon in the Furniture menu, they are prompted to enter the password before gaining access.
• Project Management Set Up Password: Enter a password restricting access to the template and user group features. When users click the Set Up Templates or Set Up User Groups options in the Project Management window, they are prompted to enter the correct password before continuing.
4. When finished, click to save your changes.
Tracking and Reporting on Furniture Projects
1. From the DDMS Master Menu, double-click . The Furniture Menu opens.
2. Double-click . The Furniture Project Management window opens, displaying the newly designed Template Selection list. The system defaults to display the templates to which this individu-al is assigned. In the example shown below, the individual is assigned to three user groups: General, Project Managers, and Sales Group 1.

5
Furniture Project Management
continue to next page
Note: By default, until you set up user groups, existing templates appear under the General heading. All existing templates are available to all users who have access to Project Management.
3. Using the Module Tasks section, you can:
• Execute a Template
• Choose a Level to View Information
• Set up Templates
• Set up User Groups.
• See the appropriate heading for details.
Note: The Set Up Templates and Set Up User Groups functions can be password protected, and there-fore, may not be accessible to all users.
Executing a TemplateWhen you first open the Project Management window, the Template Selection list displays first. Once the window is accessed, the Execute a Template feature does not require a password. The template can be opened with just a few clicks.
Note: Those with additional password abilities can also set up templates and groups using the Set Up Template and Set Up User Groups functions. After doing so, access to the templates in the Template Selection list can be further restricted to only assigned users. For further details, see Setting Up Templates.

6
Furniture Project Management
continue to next page
1. To select a template, click the + (plus sign) in Group column to view the available templates.
2. Click the template name to highlight it.
3. You can click Execute to open the template or click Limit to set additional limits.
• To view the report without setting additional limits, click the Execute button. You can subto-tal the report, hide details, and customize the grid. You can also print it without making any changes. See the appropriate headings.
• To open the report and set additional limits, click the Limit button. For details, see Setting Limits.
Choosing a Level to View Information1. If you are not a restricted user, in the Module Tasks section, you can also click the level to view. For
example, to view the gross profit and total cost of all open projects, click the Project View. To display items that have been shipped but not received, click Order View.
Choose from the following:
• Project View: Contains all the information for the project.
• Order View: Displays all the information concerning an order.
• Order Summary (P/O) View: Displays all the summary information for an order. It also in-cludes all the purchase order information for the P/Os that make up the order.
• Item View: Shows all item information for the order, including tag detail (Tag 1 through Tag 5).
• Event View: Shows all the events you have set up in the Furniture Scheduler window.
2. Once the view you selected opens, you can set additional limits. For details, see Setting Limits.
Setting LimitsIn the Available Limits section, limits can be specified for the information to view. When selecting limits, the fields by which you can limit are listed in the Field Name box and include the following: Customer, Project, Sales Order, Sales order Contacts and Addresses, Sales Order Detail, Purchase Order, and Purchase Order Detail options.
Limits let you define the information to view. For example, you could limit to a specific salesperson, atten-tion, or third party billing order. You could also limit to specific vendors or vendor aliases. While several limits can be entered, the information must fall within every range to be included. Also, the more sorts and limits you set, the longer it takes to gather the information.
1. Click the + (plus sign) to the left of each option to view all the limit fields by which you can limit.
2. Click the field to highlight it. For example, to limit by Project Number, click Project Number.
3. In the Set Criteria for Selected Limit section, use the Compare, Range, and Exclusive boxes to set limits.
• Compare: These boxes let you limit to values that are greater than, less than, or equal to the values specified. Suppose a report should include project numbers greater than 100. In this case, you would click the down arrow in the Compare box and choose > (greater than). In the corresponding box, you would type 100. (You can also click to query.)
Or, suppose the report should limit to a specific attention’s name. In this case, you would set the Compare box to = (equals). In the corresponding box, type the attention’s name, Tom, for example. When you add the limit, it appears in the Entered Limit Criteria box.

7
Furniture Project Management
continue to next page
The following table displays the Compare symbols available:
= Equal to
<> Not Equal
> Greater Than
>= Greater than or Equal
< Less Than
<= Less Than or Equal
Like Contains given characters (ex. Search for “smi”would return Smith, Smithfield, etc.)
• Range: These boxes let you enter a range of values by which to limit. Suppose the report should include project numbers from 100 through 200. You would enter 100 in the first box (the From box) and 200 in the corresponding To box. (You can also click to query, or when limiting by dates, you can click the down arrow to display a calendar.)
• Exclusive: This option applies when limiting to a Range. After entering the range, click Exclu-sive to limit by values outside the range you set.
4. After specifying each limit, click Add New. The limit you set appears in the Entered Limit Criteria box.
5. Continue to set as many limits as needed.
6. You can also remove limits.
• To remove a single limit, click the limit to highlight it in the Entered Limit Criteria box. Click Remove Selected.
• To remove all limits, click Clear All. The boxes are cleared so you can begin again.
Viewing the Report1. When you finish setting limits, click Apply. Information for the view you specified opens. For exam-
ple, if you selected Order View, the Order Number through Third Party Billing columns open.
Note: If you click Apply without setting any limits, the No Limits Have Been Selected warning message opens.
2. When finished viewing information, click Exit to close the Furniture Project Management window.
Changing the Subtotal By Option1. In the View window, you can easily change the default subtotal view.
• Project View: defaults to subtotal by project. You can choose to subtotal by salesperson or customer.
• Order View: defaults to subtotal by order. You can choose to subtotal by project, salesperson, and customer.
• Order Summary (P/O) View: defaults to subtotal the information by order. You can choose to subtotal by acknowledgment number, project, vendor purchase order, project, vendor, or vendor order P/O.
• Item View: defaults to subtotal by item. You can also subtotal by project, order, vendor, ven-dor purchase order, vendor acknowledgment, and manufacturer (vendor alias).

8
Furniture Project Management
continue to next page
2. To change the default, click the down arrow in the Subtotal By box to resort the data.
Viewing Additional Information1. After the level opens, click a line item to view. You can select several different lines by holding the
Ctrl key and clicking each individual line. You can also select several lines in a row by clicking the first line, holding the Shift key and clicking the last line. You can also click the Select All link to highlight all lines.
2. Once the lines are selected, right-click.
3. When the context menu opens, shown in Figure 4, click the level to view. For example, if the Project View is open, when you right-click, you can choose Order, Item, or Order Summary (P/O) views.
4. The system displays the information in the new view you specified. Continue to drill down to view additional information by right-clicking.
5. You can easily return to previous views by clicking the Back button. Likewise, click the Forward but-ton to re-display views.
Hiding Details, Showing Global Information, Showing Notes1. After the view opens, you can specify to hide details, show global information and show notes.
• Hiding Details: By default, the system lets you view additional detail concerning the project, order or item. This check box lets you remove the default data from the view.
• Showing Global Information: View additional global order detail specified when the order was placed. This includes the shipping address information, third party billing detail, the at-tention assigned to the order, the purchase order shipping address information, the individual who called to place the order, and so on. When checked, global information displays on the right side of the window. You can also right-click the information and select Copy.
• Showing Notes: View line item notes specified in Order Entry. When checked, the notes ap-pear in the Item Description column.

9
Furniture Project Management
continue to next page
2. To hide detail, global information or notes, click the appropriate check box to de-select it. The infor-mation is removed.
Customizing the Grid1. You can move columns of information from one area of the window to another. You can also remove
columns of information from displaying in the window.
2. There are different ways you can customize the grid in the Project Management window.
• Dragging and Dropping: You can click a column of information and drag it to a different area of the window. For example, to move the Salesperson Name column before Salesperson Num-ber, click the Salesperson Name column and drag it before the Salesperson Number column.
• Customizing the Grid: Click the Customize Grid link. In the Grid Configuration Editor dialog box, you can drag columns of information from one area to another. You can also remove col-umns. To remove a displayed column, highlight it and right-click. Click Hide Column. For ex-ample, to remove the Margin column, click Margin to highlight it, right-click, and select Hide Column. The system displays a check mark, indicating the column is hidden. Click OK to close the dialog box. When you return to Project Management, the Margin column is no longer dis-played. To replace a hidden column, click the Customize Grid link and click the Show Hidden Columns check box to display all currently hidden columns. Click the column not displayed and right-click. Click the Hide Column check box to de-select it. The check box is removed. An additional feature lets you click the down arrow in the Grid Options box to choose whether to display the line information in the grid using alternate colors.
• Re-sorting the Data: Click a column heading to resort the data. This lets you more easily find the information you need. For example, if you click the Total Cost column, you can sort by cost amount, from highest to lowest. If you click a date column, you can sort the data from the most recent to the latest, and so on.

10
Furniture Project Management
continue to next page
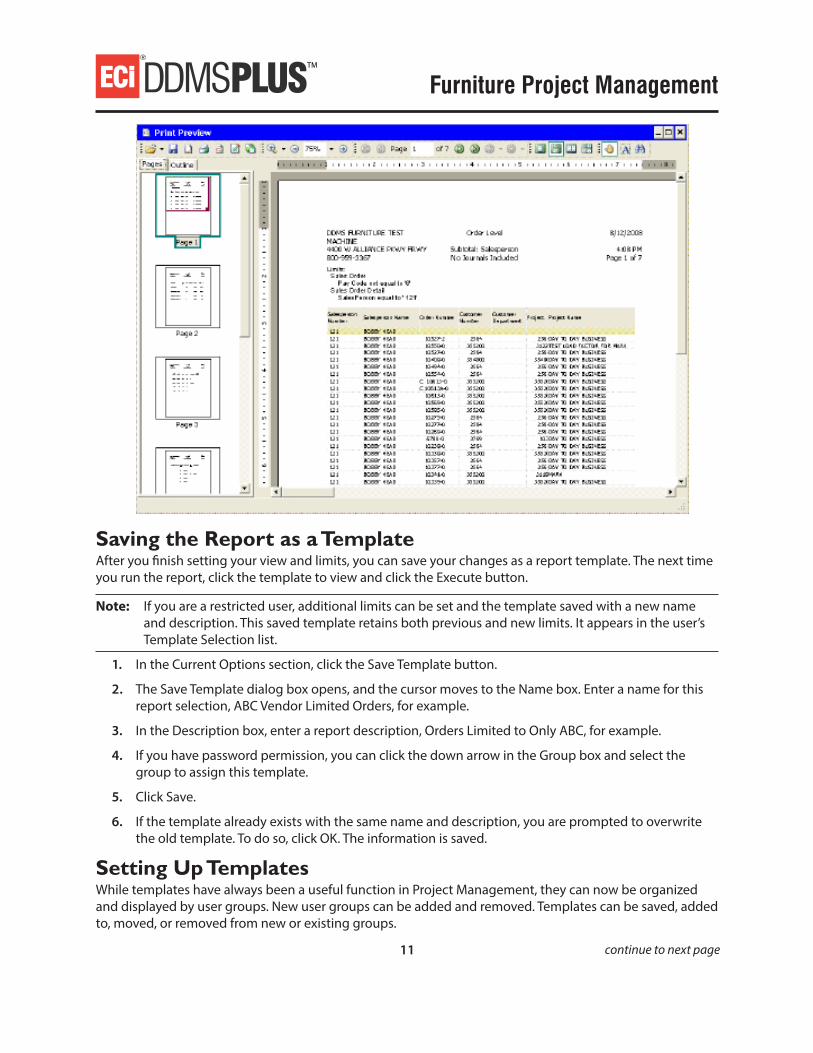
Printing the Report1. To preview or print report information, click the Print button.
2. The Print Preview dialog box opens. In this dialog box, you can view the information before you print it, print the report, or save the report to a file.
• To print, click .
• If you make changes to the information, click to apply the changes.
• To export to a file, click . You can save the file as a pdf, htm, rtf, xls, or emf.
11
Furniture Project Management
continue to next page
Saving the Report as a TemplateAfter you finish setting your view and limits, you can save your changes as a report template. The next time you run the report, click the template to view and click the Execute button.
Note: If you are a restricted user, additional limits can be set and the template saved with a new name and description. This saved template retains both previous and new limits. It appears in the user’s Template Selection list.
1. In the Current Options section, click the Save Template button.
2. The Save Template dialog box opens, and the cursor moves to the Name box. Enter a name for this report selection, ABC Vendor Limited Orders, for example.
3. In the Description box, enter a report description, Orders Limited to Only ABC, for example.
4. If you have password permission, you can click the down arrow in the Group box and select the group to assign this template.
5. Click Save.
6. If the template already exists with the same name and description, you are prompted to overwrite the old template. To do so, click OK. The information is saved.
Setting Up TemplatesWhile templates have always been a useful function in Project Management, they can now be organized and displayed by user groups. New user groups can be added and removed. Templates can be saved, added to, moved, or removed from new or existing groups.

12
Furniture Project Management
continue to next page
This report security can be maintained for each individual user or group of users. Users can be assigned to specific templates individually or within groups. Users not assigned to an existing template do not have access to the template in the Template Selection list.
Note: The Set Up Templates and Set Up User Groups functions can be password protected, and therefore, may not be accessible to all users.
1. In the Module Tasks section, click Set Up Templates.
2. If prompted for a password, enter the password from the Furniture Parameter Passwords. Click OK.
3. The available options open in the Current Options section of the window.
You can perform each of the following functions:
• Delete Selected Template: To delete an existing template, click the template to highlight and click Delete Selected Template. At the Permanently Delete Template prompt, click Yes.
• Move Template: You can easily move an existing template from one user group to another. Click the template to highlight and click Move Template. When the Move Template dialog box opens, click the down arrow and select the group to which this template belongs. Click Apply.
• View Template Limits: To view all the limits you have saved for an existing template, click the template to highlight and click View Template Limits. The Current Template Limits dialog box opens, showing the limits you have set. When finished viewing, click OK.
• Add Group: This option lets you add a new template group name to the existing list. Click Add Group. In the Template Group Name dialog box, enter the name and click OK.
13
Furniture Project Management
continue to next page
• Delete Group: This option removes an existing template name and all its assigned templates. Click the template to highlight and click Delete Group. (You can also highlight the group and right-click and select Delete Group.) At the Remove Template Group prompt, click OK. The template name and all templates is removed from the template list.
• Set Allowed Users: This option lets you specify the allowed users for this template name. Click the template to highlight and click Set Allowed Users. (You can also highlight the group and right-click and select Set Allowed Users.) Select the users and click OK.
• Set User Restrictions: This option lets you limit users to only their assigned templates. While restricted users can set additional view limits and save their template selections, they cannot remove the original template limits, nor can they add columns that do not exist in the original template. Instead, the system saves the original and additional limits as a new template with a different name and description. Along with the new template name, description, and creation date, the user’s number appears in the Who Created column in the Template Selection list. This helps quickly identify the user who added this new template.
• Click the group name or template and click Set User Restrictions. In the Set User Restrictions dialog box, click the name of the user to restrict. To select more than one, hold the Ctrl key and click each user’s name. When finished, click Apply.
Setting Up User GroupsYou can set up user groups and assign individuals to the group. When you do, only templates to which this individual is a member can be viewed. If the individual is not a member of the group, the template is not shown in the user’s Template Selection list.
1. In the Module Tasks section, click Set Up User Groups.
2. If prompted for a password, enter the password from the Furniture Parameter Passwords. Click OK.
3. The available options open in the Current Options section of the window. You can perform the fol-lowing functions:
• Add Group: This option lets you add a new group to the existing list. Click Add Group. In the Set User Group dialog box, enter the group name and description, Warehouse and Warehouse Report, for example. Click OK.
• Remove Group: This option removes an existing user group and all its assigned users, with one exception: the General Group cannot be deleted. Click the group to highlight and click Remove Group. (You can also highlight the group, right-click and select Remove Group.) At the Remove User Group prompt, click OK. The group and its users are removed from the list.
• Add User: This option lets you add a new user to an existing user group. Click the group to highlight and click Add User. (You can also highlight the group name, right-click, and select Add User.) In the Select Users dialog box, click each user to add. The name is highlighted. To select more than one user, hold the Ctrl key and click each user’s name. When finished select-ing users, click OK.
• Remove User: This option lets you remove a user from an existing group list. Click the user’s name to highlight and click Remove User. (You can also highlight the user and right-click and select Remove User.) The user is immediately removed from the list of users within the group. The removed user cannot view the assigned templates in the group list.

14
Furniture Project Management
continue to next page
Creating an EventYou can easily view and create a new scheduled event from within Project Management. This applies when using Order, Summary, and Item Level views.
1. Open the Event Detail dialog box.
Click the order or item for which to create a new event. Under Current Options, click Create Event.
Right-click the order or item and choose Create Event.
2. The Event Detail dialog box opens, displaying information for the order or item you selected. You can change event details as needed.
3. When finished, click Save and Close.
Displaying Sales Orders and Purchase OrdersFrom within the Project Management window, you can view sales order as well as purchase order informa-tion and details. This is a useful feature when you need to view additional information without the necessity of leaving Project Management.

15
Furniture Project Management
1. To view sales order detail, select Order View, Order Summary P/O View, or Item View.
To view purchase order detail, select the Order Summary P/O View or Item View.
2. Click the order to view.
3. Under Current Options, click Display Sales Orders or Display Purchase Orders. You can also right-click and choose Display Sales Orders or Display Purchase Orders.
4. The Sales Order or Purchase Order dialog box opens, displaying detail for the order or purchase order selected.
• Click Print to print, email, or fax the information shown.
• Click Hide/Show Specials to view order notes.
• Click Customize Grid to modify the grid details.
5. When finished, close the dialog box.