
Full Document-Aus Outback om RevG Oct08 1289 · Outback 5 II. SAFETY PRODUCT SAFETY SYMBOLS The...
43
OUTBACK
Transcript of Full Document-Aus Outback om RevG Oct08 1289 · Outback 5 II. SAFETY PRODUCT SAFETY SYMBOLS The...

OUTBACK

S A F E T Y G U I D E L I N E S
Copyright © 2008Pride Mobility Products Australia Pty. Ltd.INFMANU1289/Rev G/October 2008
NOTE: This owner’s manual is compiled from the latest specifications and product information avail-able at the time of publication. We reserve the right to make changes as they become necessary. Anychanges to our products may cause slight variations between the illustrations and explanations in thismanual and the product you have purchased. The latest/current version of this manual is available onour website.
This product is manufactured by:Pride Mobility Products Corporation182 Susquehanna AvenueExeter, PA 18643-2694USA
Please fill out the following information for quick reference:
WARNING! An authorised Pride Provider or qualified technician must perform the initialsetup of this scooter and must perform all of the procedures in this manual.
The symbols below are used throughout this owner's manual and on the scooter to identify warnings andimportant information. It is very important for you to read them and understand them completely.
WARNING! Indicates a potentially hazardous condition/situation. Failure to followdesignated procedures can cause either personal injury, component damage, ormalfunction. On the product, this icon is represented as a black symbol on a yellowtriangle with a black border.
MANDATORY! These actions should be performed as specified. Failure to performmandatory actions can cause personal injury and/or equipment damage. On the product,this icon is represented as a white symbol on a blue dot.
PROHIBITED! These actions are prohibited. These actions should not be performed atany time or in any circumstances. Performing a prohibited action can cause personalinjury and/or equipment damage. On the product, this icon is represented as a blacksymbol with a red circle and a red slash.
Pride Provider:_____________________________________________________________________
Address:__________________________________________________________________________
Phone Number:__________________________
Purchase Date:__________________________ Serial Number:____________________________
088 609 661

3Outback www.pridemobility.com
C O N T E N T S
I. INTRODUCTION ................................................................................................ 4
II. SAFETY ................................................................................................................. 5
III. YOUR SCOOTER .............................................................................................. 19
IV. BATTERIES AND CHARGING ................................................................... 23
V. OPERATION ...................................................................................................... 28
VI. COMFORT ADJUSTMENTS ....................................................................... 30
VII. DISASSEMBLY AND ASSEMBLY ........................................................... 33
VIII. BASIC TROUBLESHOOTING .................................................................. 34
IX. CARE AND MAINTENANCE ...................................................................... 35
X. WARRANTY ....................................................................................................... 38
APPENDIX I - SPECIFICATIONS ......................................................................39

4 www.pridemobility.com Outback
I . I N T R O D U C T I O N
SAFETYWelcome to Pride Mobility Products Australia Pty. Ltd. (Pride). The scooter you have purchased combinesstate-of the-art components with safety, comfort, and styling in mind. We are confident the design featureswill provide you with the conveniences you expect during your daily activities. Understanding how tosafely operate and care for this scooter should bring you years of trouble-free operation and service.
Read and follow all instructions, warnings, and notes in this manual and all other accompanying literaturebefore attempting to operate this product for the first time. In addition, your safety depends upon you, aswell as your dealer, carer, or healthcare professional in using good judgement. If there is any information in this manual which you do not understand, or if you require additional assis-tance for setup or operation, please contact your authorised Pride Provider. Failure to follow the instruc-tions, warnings, and notes in this manual and those located on your scooter can result in personalinjury or product damage and will void Pride’s product warranty.
PURCHASER’S AGREEMENT By accepting delivery of this product, you promise that you will not change, alter, or modify this productor remove or render inoperable or unsafe any guards, shields, or other safety features of this product; fail,refuse, or neglect to install any retrofit kits from time to time provided by Pride to enhance or preserve thesafe use of this product.
SHIPPING AND DELIVERYBefore using your scooter, make sure your delivery is complete as some components may be individuallypackaged. If you do not receive a complete delivery, please contact your authorised Pride Provider imme-diately. Where damage has occurred during transport, either to the packaging or content, please contactthe delivery company responsible.
INFORMATION EXCHANGEWe want to hear your questions, comments, and suggestions about this manual. We would also like to hearabout the safety and reliability of your new scooter, and about the service you received from your autho-rised Pride Provider. Please notify us of any change of address, so we can keep you apprised of importantinformation about safety, new products, and new options that can increase your ability to use and enjoyyour scooter. Please feel free to contact us at the address below:
Pride Mobility Products Australia Pty. Ltd. 21 Healey Road
Dandenong, 3175 Victoria, Australia
NOTE: If you ever lose or misplace your product registration card or your copy of this manual, contact us and we will be glad to send you a new one immediately.

5Outback www.pridemobility.com
I I . S A F E T Y
PRODUCT SAFETY SYMBOLSThe symbols below are used on the scooter to identify warnings, mandatory actions, and prohibitedactions. It is very important for you to read and understand them completely.
Pinch/Crush points created during assembly.
Corrosive chemicals contained in battery.
EMI-RFI- This product has been tested and passed at an immunity level of 20 V/m.
Do not lift the mobility vehicle while seated in it.
Do not lift the mobility vehicle while seated in it.
Explosive conditions exist!
Read and follow the information in the owner’s manual.

6 www.pridemobility.com Outback
I I . S A F E T Y
Maximum seating weight.
Do not remove anti-tip wheels.
Wear safety goggles.
Use only AGM or Gel-Cell batteries to reduce the risk of leakage or explosiveconditions.
Do not use a cell phone, walkie/talkie, laptop, or other radio transmitter whileoperating.
Do not place scooter in freewheel mode on a decline.
Do not place scooter in freewheel mode on an incline.

7Outback www.pridemobility.com
I I . S A F E T Y
Avoid exposure to rain, snow, ice, salt, or standing water whenever possible.Maintain and store in a clean and dry condition.
Removal of grounding prong can create electrical hazard. If necessary, properlyinstall an approved 3-pronged adapter to an electrical outlet having 2-prongedplug access.
Do not connect an extension lead to the AC/DC converter or the battery charger.
Keep tools and other metal objects away from battery terminals. Contact withtools can cause electrical shock.
Do not allow unsupervised children to play near the scooter while the batteriesare charging.
Do not use batteries with different amp-hour (Ah) capacities. Do not mix old andnew batteries. Always replace both batteries at the same time.
Keep your hands away from the tyres when driving. Be aware that loose fittingclothing can become caught in drive tyres.

8 www.pridemobility.com Outback
Battery charger for indoor use only.
Disposal and recycling - Contact your authorised Pride Provider for information onproper disposal and recycling of your Pride product and its packaging.
Contains Lead.
I I . S A F E T Y

9Outback www.pridemobility.com
I I . S A F E T Y
GENERAL
Your scooter is a state-of-the-art life-enhancement device designed to increase mobility. Pride providesan extensive variety of products to best fit the individual needs of the scooter user. Please be aware thatthe final selection and purchasing decision regarding the type of scooter to be used is the responsibility ofthe scooter user, who is capable of making such a decision, and his/her healthcare professional (i.e., med-ical doctor, physical therapist, etc.).
The contents of this manual are based on the expectation that a mobility device expert has properly fittedthe scooter to the user and has assisted the prescribing healthcare professional and/or the authorised PrideProvider in the instruction process for the use of the product.
There are certain situations, including some medical conditions, where the scooter user will need to prac-tice operating the scooter in the presence of a trained attendant. A trained attendant can be defined as afamily member or care professional specially trained in assisting a scooter user in various daily-livingactivities.
As you begin using your scooter during daily activities, you will probably encounter situations in whichyou will need some practice. Simply take your time and you will soon be in full and confident control asyou manoeuvre through doorways, on and off lifts, up and down ramps, and over moderate terrain.
Below are some precautions, tips, and other safety considerations that will help you become accustomedto operating the scooter safely.
MODIFICATIONSPride has designed and engineered your scooter to provide maximum mobility and utility. A wide rangeof accessories are available from your authorised Pride Provider to further customise your scooter to bettersuit your needs and/or preferences. However, under no circumstances should you modify, add, remove,or disable any feature, part, or function of your scooter.
MANDATORY! Do not operate your new scooter for the first time without completelyreading and understanding this owner’s manual.
WARNING! Do not modify your scooter in any way not authorised by Pride. Do not useaccessories if they have not been tested or approved for Pride Products.
REMOVABLE PARTS
WARNING! Do not attempt to lift or move your scooter by any of its removable parts,including the armrests, seat, or shroud.
PRE-RIDE SAFETY CHECKGet to know the feel of your scooter and its capabilities. Pride recommends that you perform a safety check before each use to make sure your scooter operates smoothly and safely.

10 www.pridemobility.com Outback
I I . S A F E T Y
Perform the following inspections prior to using your scooter:Check for proper tyre inflation. Maintain but do not exceed the psi/bar/kPa air pressure rating indicatedon each tyre if equipped with pneumatic tyres.Check all electrical connections. Make sure they are tight and not corroded.Check all harness connections. Make sure they are secured properly.Check the brakes.Check battery charge.
If you discover a problem, contact your authorised Pride Provider for assistance.
WEIGHT LIMITATIONSYour scooter is rated for a maximum weight capacity. Refer to the specifications table for information.
WARNING! It is critically important that the psi/bar/kPa air pressure rating indicated onthe tyre be maintained in pneumatic tyres at all times. Do not underinflate or overinflateyour tyres. Low pressure may result in loss of control, and overinflated tyres may burst.Failure to maintain the psi/bar/kPa air pressure rating indicated on pneumatic tyres at alltimes may result in tyre and/or wheel failure.
WARNING! Inflate your scooter tyres from a regulated air source with an availablepressure gauge. Inflating your tyres from an unregulated air source could overinflatethem, resulting in a burst tyre.
MANDATORY! Stay within the specified weight capacity for your scooter. Exceeding theweight capacity voids your warranty. Pride will not be held responsible for injuries and/orproperty damage resulting from failure to observe weight limitations.
WARNING! Do not carry passengers on your scooter. Carrying passengers on your scootermay affect the centre of gravity, resulting in a tip or fall.
NOTE: If the tyres on your scooter list the psi rating only, use the following conversion formulas to findthe bar or kPa rating: bar = psi x 0.06895; kPa = psi x 6.89476.
TYRE INFLATIONIf your scooter is equipped with pneumatic tyres, you should check or have the air pressure checked at leastonce a week. Proper inflation pressures will prolong the life of your tyres and help ensure the smoothoperation of your scooter.
INCLINE INFORMATIONMore and more buildings have ramps with specified degrees of inclination, designed for easy and safeaccess. Some ramps may have turning switchbacks (180-degree turns) that require you to have good cor-nering skills on your scooter.
Proceed with extreme caution as you approach the downgrade of a ramp or other incline.Take wide swings with your scooter around any tight corners. If you do that, the scooter’s rear wheelswill follow a wide arc, not cut the corner short, and not bump into or get hung up on any railing corners.When driving down a ramp, keep the scooter’s speed adjustment set to the slowest speed setting toensure a safely controlled descent. Avoid sudden stops and starts.
11Outback www.pridemobility.com
I I . S A F E T Y
When climbing an incline, try to keep your scooter moving. If you must stop, start up again slowly, andthen accelerate cautiously. When driving down an incline, do so by setting the speed adjustment dial to theslowest setting and driving in the forward direction only. If your scooter starts to move down the inclinefaster than you anticipated or desired, allow it to come to a complete stop by releasing the throttle controllever. Then push the throttle control lever forward slightly to ensure a safely controlled descent.
WARNING! Any attempt to climb or descend a slope steeper than what is shown in figure1 may put your scooter in an unstable position and cause it to tip.
WARNING! When on any sort of an incline or decline, never place the scooter infreewheel mode, especially while seated on it or standing next to it.
WARNING! When climbing an incline, do not zigzag or drive at an angle up the faceof the incline. Drive your scooter straight up the incline. This greatly reduces thepossibility of a tip or a fall. Always exercise extreme caution when negotiating anincline.
WARNING! Do not drive your scooter across the side of an incline or diagonallyup or down an incline; do not stop, if possible, while driving up or down an incline.
WARNING! You should not travel up or down a potentially hazardous incline (i.e.,areas covered with snow, ice, cut grass, or wet leaves).
WARNING! Even though your scooter is capable of climbing slopes greater thanthose illustrated in figure 1, do not, under any circumstances, exceed the inclineguidelines or any other specifications presented in this manual. Doing so couldcause instability in your scooter.
WARNING! Never carry an oxygen tank weighing more than 6.8 kg (15 lbs.). Never fill therear basket with contents exceeding 6.8 kg (15 lbs.).
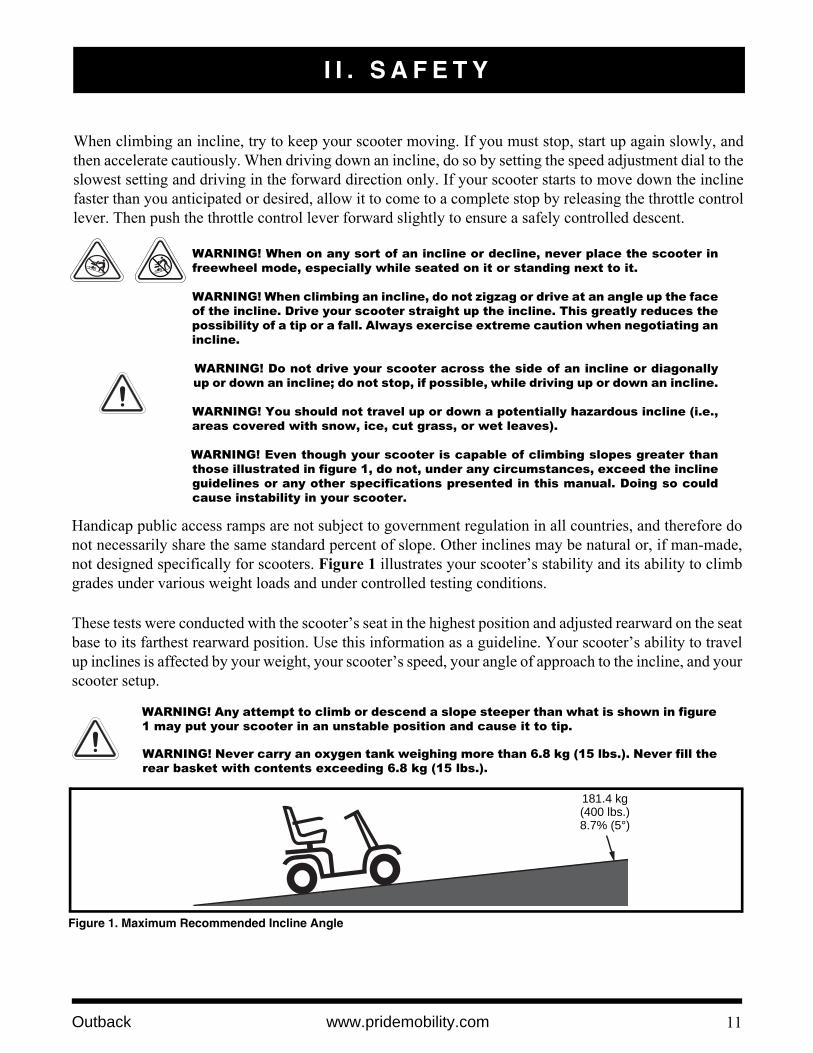
Handicap public access ramps are not subject to government regulation in all countries, and therefore donot necessarily share the same standard percent of slope. Other inclines may be natural or, if man-made,not designed specifically for scooters. Figure 1 illustrates your scooter’s stability and its ability to climbgrades under various weight loads and under controlled testing conditions.
These tests were conducted with the scooter’s seat in the highest position and adjusted rearward on the seatbase to its farthest rearward position. Use this information as a guideline. Your scooter’s ability to travelup inclines is affected by your weight, your scooter’s speed, your angle of approach to the incline, and yourscooter setup.
Figure 1. Maximum Recommended Incline Angle
181.4 kg (400 lbs.)8.7% (5°)

12 www.pridemobility.com Outback
CORNERING INFORMATIONExcessively high cornering speeds can create the possibility of tipping. Factors which affect the possibilityof tipping include, but are not limited to, cornering speed, steering angle (how sharply you are turning),uneven road surfaces, inclined road surfaces, riding from an area of low traction to an area of high traction(such as passing from a grassy area to a paved area - especially at high speed while turning), and abruptdirectional changes. High cornering speeds are not recommended. If you feel that you may tip over in acorner, reduce your speed and steering angle (i.e., lessen the sharpness of the turn) to prevent your scooterfrom tipping.
WARNING! When cornering sharply, reduce your speed and maintain a stable centre ofgravity. When using your scooter at higher speeds, do not corner sharply. This greatlyreduces the possibility of a tip or fall. Always exercise extreme caution when cornering.
When you approach an incline, it is best to lean forward. See figures 2 and 2A. This shifts the centre ofgravity of you and your scooter toward the front of the scooter for improved stability.
NOTE: When negotiating ramps, if the throttle control lever is released while moving forward, thepowered scooter may "roll back" approximately 30.48 cm (1 foot) before the brake engages. If thethrottle control lever is released while moving in reverse, the powered scooter may "roll back" approx-imately 1 metre (3 feet) before the brake engages.
BRAKING INFORMATIONYour scooter is equipped with two powerful brake systems:
Regenerative: Uses electricity to rapidly slow the vehicle when the throttle control lever returns to the centre/stop position.Disc Park Brake: Activates mechanically after regenerative braking slows the vehicle to near stop, or when power is removed from the system for any reason.
Figure 2A. Increased Stability Driving PositionFigure 2. Normal Driving Position
I I . S A F E T Y

I I . S A F E T Y
OUTDOOR DRIVING SURFACESYour scooter is designed to provide optimum stability under normal driving conditions - dry, level surfacescomposed of concrete, blacktop, or tarmac. However, Pride recognises that there will be times when youwill encounter other surface types. For this reason, your scooter is designed to perform admirably onpacked soil, grass, and gravel. Feel free to use your scooter safely on lawns and in park areas.
Reduce your scooter’s speed when driving on uneven terrain and/or soft surfaces.Avoid tall grass that can become tangled in the running gear.Avoid loosely packed gravel and sand.If you feel unsure about a driving surface, avoid that surface.
STREETS AND ROADWAYS
WARNING! You should not operate your scooter on public streets and roadways. Beaware that it may be difficult for traffic to see you when you are seated on your scooter.Obey all local pedestrian traffic rules. Wait until your path is clear of traffic, and thenproceed with extreme caution.
13Outback www.pridemobility.com
KERB
Figure 3. Correct Kerb Approach
STATIONARY OBSTACLES (STEPS, KERBS, ETC.)
WARNING! Do not drive near raised surfaces, unprotected ledges, and/or drop-offs (kerbs,porches, stairs, etc.).
WARNING! Do not attempt to have your scooter climb or descend an obstacle that isinordinately high.
WARNING! Do not attempt to have your scooter proceed rearward down any step, kerb,or other obstacle. This may cause the scooter to tip.
WARNING! Be sure your scooter is traveling perpendicular to any kerb you may berequired to ascend or descend. See figures 3 and 4.
WARNING! Do not attempt to negotiate a kerb that has a height greater than 5 cm (2 in.).
Figure 4. Incorrect Kerb Approach
KERB

I I . S A F E T Y
INCLEMENT WEATHER PRECAUTIONSExposure of your scooter to inclement weather conditions should be avoided whenever possible. If sud-
denly caught up in rain, snow, severe cold or heat while operating your scooter, proceed to shelter at the earliest opportunity. Thoroughly dry your scooter before storing, charging, or operating your scooter.PROHIBITED! Operating in rain, snow, salt, mist/spray conditions, and on icy/slipperysurfaces can cause damage to the scooter and electrical system. Maintain and storeyour scooter in a dry and clean condition.
WARNING! Prolonged exposure to hot or cold conditions may affect the temperature ofupholstered and non-upholstered items on the scooter, possibly resulting in skinirritation. Exercise caution when using your scooter in extremely hot or cold conditionsor when exposing your scooter to direct sunlight for prolonged periods of time.
14 www.pridemobility.com Outback
FREEWHEEL MODEYour scooter is equipped with manual freewheel levers that, when pushed down, allow the scooter to bepushed. For more information about how to place your scooter into and out of freewheel mode, see III.“Your Scooter.”
WARNING! When your scooter is in freewheel mode, the braking system is disengaged.Disengage the drive motors only on a level surface. Ensure the key is removed from the key switch. Stand to the side of the scooter to engage or disengage freewheel mode. Never sit ona scooter to do this.After you have finished pushing your scooter, always return it to the drive mode tolock the brakes.
An added feature built into the scooter is “push-too-fast” protection, which safeguards the scooter againstgaining excessive speed while in freewheel mode.
“Push-too-fast” operates differently depending on which of two conditions exists: If the key is switched “off” while in freewheel mode, the scooter’s controller activates regenerativebraking when the scooter is pushed faster than a maximum threshold which has been preprogrammed.In this case, the controller is acting as a speed governor.If the key is switched “on” while in freewheel mode, you will encounter considerable resistance at anyspeed. This prevents the scooter from gaining unwanted momentum should the manual freewheel leverinadvertently be released while driving the scooter.
STAIRS AND ESCALATORSScooters are not designed to travel up or down stairs or escalators. Always use a lift.
DOORSDetermine if the door opens toward or away from you.Use your hand to turn the knob or push the handle or push-bar.Drive your scooter gently and slowly forward to push the door open. Or drive your scooter gently andslowly rearwards to pull the door open.
WARNING! Do not use your scooter to negotiate steps or escalators.

I I . S A F E T Y
LIFTSModern lifts have a door edge safety mechanism that, when pushed, reopens the door(s).
If you are in the doorway of a lift when the door(s) begin to close, push on the rubber door edge orallow the rubber door edge to contact the scooter and the door will reopen.Use care that handbags, packages, or scooter accessories do not become caught in lift doors.
NOTE: If your scooter’s turning radius is greater than 152.4 cm (60 in.), it may be difficult to manoeu-vre in lifts and building entrances. Use caution when attempting to turn or manoeuvre your scooter in small spaces, and avoid areas that might pose a problem.
LIFT/ELEVATION PRODUCTSIf you will be traveling with your scooter, you may find it necessary to use a lift/elevation product to aidin transportation. Pride recommends that you closely review the instructions, specifications, and safetyinformation set forth by the manufacturer of the lift/elevation product before using that product.
BATTERIESIn addition to following the warnings below, be sure to comply with all other battery handling information.
MANDATORY! Battery posts, terminals, and related accessories contain lead andlead compounds. Wear goggles and gloves when handling batteries and washhands after handling.
WARNING! Scooter batteries are heavy. See specifications table. If you are unableto lift that much weight, be sure to get help. Use proper lifting techniques andavoid lifting beyond your capacity.
WARNING! Never sit on your scooter when it is being used in connection with anytype of lift/elevation product. Your scooter was not designed with such use inmind, and any damage or injury incurred from such use is not the responsibility ofPride.
WARNING! Always protect the batteries from freezing and never charge a frozen
battery. Charging a frozen battery may result in damage to the battery.WARNING! Connect the battery harnesses in the proper manner. RED (+) cablesmust be connected to positive (+) battery terminals/posts. BLACK (-) cables mustbe connected to negative (-) battery terminals/posts. Protective caps should beinstalled over all battery terminals. REPLACE cables immediately if damaged.
BATTERY DISPOSAL AND RECYCLINGIf you encounter a damaged or cracked battery, immediately enclose it in a plastic bag. Contact your localwaste disposal agency or your authorised Pride Provider for instructions on disposal and battery recycling,which is our recommended course of action.
PREVENTING UNINTENDED MOVEMENT
WARNING! If you anticipate being seated in a stationary position for an extended periodof time, turn off the power. This will prevent unexpected motion from inadvertent throttlecontrol lever contact.
15Outback www.pridemobility.com

MOTOR VEHICLE TRANSPORTPride recommends that you do not remain seated in your scooter while traveling in a motor vehicle. Thescooter should be stowed in the boot of a car or in the back of a truck or van with batteries removed andproperly secured. In addition, all removable scooter parts, including the armrests, seat, and shroud shouldbe removed and/or properly secured during motor vehicle transport.
WARNING! Although your scooter may be equipped with a positioning belt, this belt is notdesigned to provide proper restraint during motor vehicle transport. Anyone traveling ina motor vehicle should be properly secured in the motor vehicle seat with safety beltsfastened securely.
WARNING! Do not sit on your scooter while it is in a moving vehicle.
WARNING! Always be sure your scooter and its batteries are properly secured when it isbeing transported. Batteries should be secured in an upright position and protective capsshould be installed on the battery terminals. Batteries should not be transported with anyflammable or combustible items.
I I . S A F E T Y
GETTING ONTO AND OFF OF YOUR SCOOTERGetting onto and off of your scooter requires a good sense of balance. Please observe the following safetytips when getting onto and off of your scooter:
Remove the key from the key switch.Ensure that your scooter is not in freewheel mode. See III. “Your Scooter.”Make certain that the seat is secured into place. Pivot the armrests up to make getting onto and off of the scooter easier.
WARNING! Position yourself as far back as possible in the scooter seat to prevent thescooter from tipping.
WARNING! Avoid putting all your weight on the scooter armrests and do not use thearmrests for weight bearing purposes, such as transfers. Such use may cause thescooter to tip, resulting in a fall from the scooter and personal injury.
WARNING! Avoid putting all of your weight on the floorboard. Such use may cause thescooter to tip.
REACHING AND BENDINGAvoid reaching or bending while driving your scooter. When reaching, bending, or leaning while seatedon your scooter, it is important to maintain a stable centre of gravity and keep the scooter from tipping.Pride recommends that the scooter user determine his/her personal limitations and practice bending andreaching in the presence of a qualified healthcare professional.
WARNING! Do not bend, lean, or reach for objects if you have to pick them up from thescooter deck or from either side of the scooter. Movements such as these may changeyour centre of gravity and the weight distribution of the scooter and cause your scooterto tip.
PROHIBITED! Keep your hands away from the drive tyres when driving. Be aware thatloose fitting clothing can become caught in drive tyres.
16 www.pridemobility.com Outback

17Outback www.pridemobility.com
PRESCRIPTION DRUGS/PHYSICAL LIMITATIONSThe scooter user must exercise care and common sense when operating his/her scooter. This includesawareness of safety issues when taking prescribed or over-the-counter drugs or when the user has specificphysical limitations.
WARNING! Consult your physician if you are taking prescribed or over-the-countermedication or if you have certain physical limitations. Some medications and limitationsmay impair your ability to operate your scooter in a safe manner.
ALCOHOL/SMOKINGThe scooter user must exercise care and common sense when operating his/her scooter. This includesawareness of safety issues while under the influence of alcohol or while smoking.
WARNING! Do not operate your scooter while you are under the influence of alcohol, asthis may impair your ability to drive safely.
WARNING! Pride strongly recommends that you do not smoke cigarettes while seated inyour scooter, although the scooter has passed the necessary testing requirements forcigarette smoking. You must adhere to the following safety guidelines if you decide tosmoke cigarettes while seated in your scooter.
Do not leave lit cigarettes unattended.Keep ashtrays a safe distance from the seat cushions.Always make sure cigarettes are completely extinguished before disposal.
ELECTROMAGNETIC AND RADIO FREQUENCY INTERFERENCE (EMI/RFI)
WARNING! Laboratory tests have shown that electromagnetic and radio frequencywaves can have an adverse affect on the performance of electrically-powered mobilityvehicles.
Electromagnetic and Radio Frequency Interference can come from sources such as cellular phones, mobiletwo-way radios (such as walkie-talkies), radio stations, TV stations, amateur radio (HAM) transmitters,wireless computer links, microwave signals, paging transmitters, and medium-range mobile transceiversused by emergency vehicles. In some cases, these waves can cause unintended movement or damage tothe control system. Every electrically-powered mobility vehicle has an immunity (or resistance) to EMI.The higher the immunity level, the greater the protection against EMI. This product has been tested andhas passed at an immunity level of 20 V/M.
POSITIONING BELTSYour authorised Pride Provider, therapist(s), and other healthcare professionals are responsible for deter-mining your requirement for a positioning belt in order to operate your scooter safely.
WARNING! If you require a positioning belt to safely operate your scooter, make sure itis fastened securely.
I I . S A F E T Y

18 www.pridemobility.com Outback
I I . S A F E T Y
WARNING! Be aware that cell phones, two-way radios, laptops, and other types of radiotransmitters may cause unintended movement of your electrically-powered mobilityvehicle due to EMI. Exercise caution when using any of these items while operating yourmobility vehicle and avoid coming into close proximity of radio and TV stations.
WARNING! The addition of accessories or components to the electrically-poweredmobility vehicle can increase the susceptibility of the vehicle to EMI. Do not modify yourscooter in any way not authorised by Pride.
WARNING! The electrically-powered mobility vehicle itself can disturb the performanceof other electrical devices located nearby, such as alarm systems.
NOTE: For further information on EMI/RFI, visit the Resource Center on www.pridemobility.com. Ifunintended motion or brake release occurs, turn your scooter off as soon as it is safe to do so. Contactyour authorised Pride Provider to report the incident.

19Outback www.pridemobility.com
I I I . Y O U R S C O O T E R
Figure 5. Control Console Assembly
BATTERY CONDITION METER
KEY SWITCH
HORN BUTTON
LIGHT SWITCH
SPEED ADJUSTMENT DIAL
TILLER ADJUSTMENT LEVER
8-16 KM/H SWITCH
KEY
The control console assembly, located on the front section, houses all of the controls you need to operateyour scooter, including the speed adjustment dial, throttle control lever, battery condition meter, hornbutton, and key switch. See figure 5.
PROHIBITED! Do not expose the control console assembly to moisture. In the event thatthe control console assembly does become exposed to moisture, do not attempt tooperate your scooter until the control console assembly has dried thoroughly.
CONTROL CONSOLE ASSEMBLY
Key SwitchFully insert the key into the key switch to power up your scooter.Pull the key out to power down your scooter.
WARNING! If the key is removed from the key switch while your scooter is in motion,the electronic brakes will engage and your scooter will come to an abrupt stop!
Tiller Adjustment LeverThis lever allows you to adjust the tiller between four different positions. For tiller adjustment instruc-tions, see VI. “Comfort Adjustments.”
Horn ButtonThis button activates a warning horn. Your scooter must be powered up for the horn to be operational.Do not hesitate to use the warning horn when doing so may prevent accident or injury.
Hazard Light Switch This switch enables you to control your scooter’s front and rear (amber) hazard lights. Toggle thisswitch to turn the hazard lights on and off.
THROTTLE CONTROL LEVER (FORWARD)
THROTTLE CONTROL LEVER (REVERSE)
HAZARD LIGHT SWITCH
RIGHT TURN INDICATOR
LEFT TURN INDICATOR

I I I . Y O U R S C O O T E R
Battery Condition MeterWhen the key is fully inserted into the key switch, this meter indicates the approximate battery voltagestrength. For further information on battery charging, see IV. “Batteries and Charging.”
8-16 KM/H SwitchThis switch limits the top speed of your scooter to either 8 km/h (5 mph) or 16 km/h (10 mph). Toggle thisswitch to either 8 or 16 km/h.
NOTE: When driving indoors, it is recommended you set the switch to 8 km/h (5 mph).
Light SwitchThis switch turns your scooter’s headlight on and off.
Toggle this switch to the right to turn the light on.Toggle this switch to the left to turn the light off.
Throttle Control LeverThis lever allows you to control the forward speed and the reverse speed of your scooter up to the maxi-mum speed you preset with the speed adjustment dial.
Place your right hand on the right handgrip and your left hand on the left handgrip.Use your right thumb to push the right side of the lever to disengage the scooter brakes and moveforward.Release the lever and allow your scooter to come to a complete stop before pushing the left side of thelever to move in reverse.When the throttle control lever is completely released, it automatically returns to the centre “stop”position and engages the scooter brake.
Handbrake Lever (Not Shown)Your scooter is equipped with a handbrake lever, located on the tiller handle. This lever provides you withadditional stopping power. Release the throttle control lever and gently squeeze the handbrake lever tocome to a stop.
NOTE: If you do not release the throttle before using the handbrake, your scooter may not come to acomplete stop.
NOTE: The handbrake lever may require periodic adjustment to maintain proper operation. Contactyour authorised Pride Provider for more information.
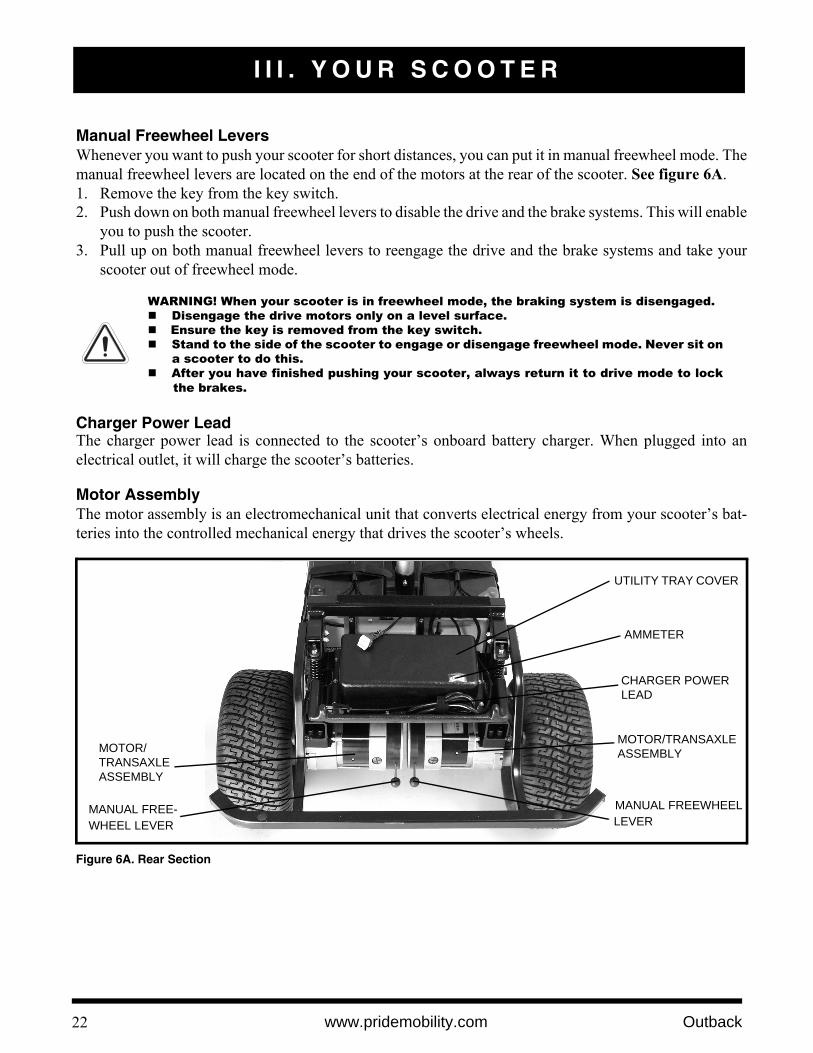
REAR SECTIONThe electronic controller module, batteries, main circuit breaker, power charger lead, freewheel levers,and the motor assemblies are located on the rear section of your scooter. See figures 6 and 6A.
BatteriesThe batteries store the electrical energy that powers your scooter. See IV. “Batteries and Charging” forinformation on how to charge your scooter’s batteries.
20 www.pridemobility.com Outback

I I I . Y O U R S C O O T E R
Left and Right Turn Indicator ButtonsUse these buttons to turn on the left and right turn indicator (amber) lights. Press the appropriate turnindicator button once to turn on the indicator light before turning your scooter. Your scooter’s turn indi-cators are timed to shut off automatically.
Electronic Controller Module (Not Shown)This module is located on the scooter’s rear section, under the utility tray cover. The controller assemblyreceives electrical signals from the console controls and sends power to the motor, the brakes, and thelighting system.
NOTE: Only authorised Pride service personnel should ever remove the utility tray cover.
PROHIBITED! Do not expose the electronic controller module to moisture. If it doesbecome exposed to moisture, do not attempt to operate your scooter until it has driedthoroughly.
Main Circuit Breaker (Reset Button)When the voltage in your scooter’s batteries becomes low or your scooter is heavily strained because ofexcessive loads, the main circuit breaker may trip to protect your scooter’s motor and electronics fromdamage. See figure 6.
The main circuit breaker is mounted between the two batteries. When the breaker trips, the entire electrical system of your scooter is shut down.The main circuit breaker is designed to manually reset after one minute.If the breaker trips frequently, you may need to charge your batteries more often or have your PrideProvider perform a load test on your scooter’s batteries.If the main circuit breaker trips repeatedly, see your authorised Pride Provider for service.
Battery ChargerThe scooter comes with its own onboard battery charger. When the charger is plugged into an electricaloutlet, it charges the scooter’s batteries. See IV. “Batteries and Charging.”
21Outback www.pridemobility.com
Figure 6. Rear Section
BATTERIES
BATTERY CHARGER
MAIN CUIRCUIT BREAKER
I I I . Y O U R S C O O T E R
Manual Freewheel LeversWhenever you want to push your scooter for short distances, you can put it in manual freewheel mode. Themanual freewheel levers are located on the end of the motors at the rear of the scooter. See figure 6A.1. Remove the key from the key switch.2. Push down on both manual freewheel levers to disable the drive and the brake systems. This will enable
you to push the scooter.3. Pull up on both manual freewheel levers to reengage the drive and the brake systems and take your
scooter out of freewheel mode.
WARNING! When your scooter is in freewheel mode, the braking system is disengaged.Disengage the drive motors only on a level surface.Ensure the key is removed from the key switch.Stand to the side of the scooter to engage or disengage freewheel mode. Never sit ona scooter to do this.After you have finished pushing your scooter, always return it to drive mode to lockthe brakes.
Charger Power LeadThe charger power lead is connected to the scooter’s onboard battery charger. When plugged into anelectrical outlet, it will charge the scooter’s batteries.
Motor AssemblyThe motor assembly is an electromechanical unit that converts electrical energy from your scooter’s bat-teries into the controlled mechanical energy that drives the scooter’s wheels.
22 www.pridemobility.com Outback
Figure 6A. Rear Section
UTILITY TRAY COVER
MANUAL FREE-WHEEL LEVER
CHARGER POWER LEAD
MOTOR/TRANSAXLE ASSEMBLY
MANUAL FREEWHEEL LEVER
AMMETER
MOTOR/TRANSAXLE ASSEMBLY

I V . B A T T E R I E S A N D C H A R G I N G
CHARGING YOUR BATTERIES
PROHIBITED! Removal of grounding prong can create electrical hazard. If necessary,properly install an approved 3-pronged adapter to an electrical outlet having 2-prongedplug access.
PROHIBITED! Never use an extension lead to plug in your battery charger. Plug thecharger directly into a properly wired standard electrical outlet.
PROHIBITED! Do not allow unsupervised children to play near the scooter while thebatteries are charging. Pride recommends that you do not charge the batteries whilethe scooter is occupied.
MANDATORY! Read the battery charging instructions in this manual and in the manualsupplied with the battery charger before charging the batteries.
WARNING! Explosive gases may be generated while charging the batteries. Keep thescooter and battery charger away from sources of ignition such as flames or sparks andprovide adequate ventilation when charging the batteries.
WARNING! Inspect the battery charger, wiring, and connectors for damage before eachuse. Contact your authorised Pride Provider if damage is found.
WARNING! Do not attempt to open the battery charger case. If the battery charger doesnot appear to be working correctly, contact your authorised Pride Provider.
WARNING! If the battery charger is equipped with cooling slots, then do not attempt toinsert objects through these slots.
Figure 7. AmmeterREADING YOUR BATTERY VOLTAGEThe battery condition meter on the control console assembly indicates the approximate strength of yourbatteries. (The meter reads 24 volts when your batteries are fully charged.) To check the charge, you mustfirst unplug the onboard battery charger and insert the key into the key switch. To ensure the highestaccuracy, the battery condition meter should be checked while operating your scooter at full speed on alevel surface.
You can also use the ammeter to check your batteries’ charge. The ammeter is located on the utility trayunder the rear shroud. See figure 7. The amperage reading should be at or near zero (0) when the batteriesare fully charged. The battery charger must be plugged into a standard electrical outlet to obtain anammeter reading.
BATTERIES AND CHARGINGYour scooter requires two long-lasting, 12-volt, deep-cycle batteries thatare sealed and maintenance free. Recharge the batteries with the conve-nient onboard battery charger.
Charge your scooter’s batteries prior to using for the first time.Keep your batteries fully charged to keep your scooter runningsmoothly.
NOTE: Use only the onboard battery charger supplied with yourscooter.
23Outback www.pridemobility.com

I V . B A T T E R I E S A N D C H A R G I N G
WARNING! If your battery charger has not been tested and approved for outdooruse, then do not expose it to adverse or extreme weather conditions. If the batterycharger is exposed to adverse or extreme weather conditions, then it must beallowed to adjust to the difference in environmental conditions before use indoors.Refer to the manual supplied with the battery charger for more information.
Follow these steps to safely charge your batteries: 1. Position your scooter close to a standard electrical outlet.2. Remove the key from the key switch.3. Ensure both freewheel levers are in the drive position.4. Extend the charger power lead (see figure 6A) and plug it into the electrical outlet. We recommend
you charge your scooter’s batteries for 8 to 14 hours.5. When the batteries are fully charged (indicated by the ammeter reading 0), unplug the onboard charger
power lead from the electrical outlet.
There are two LED indicators (red and green) on the front of the battery charger. When lit, the red LED indicates that the batteries are being charged. When lit, the green LED indicates that the batteries are fully charged.When the green and red LEDs are simultaneously lit, it indicates charging is nearly complete.
NOTE: There is a charger inhibit on your scooter. Your scooter does not run and the battery conditionmeter does not operate while the batteries are charging.
FREQUENTLY ASKED QUESTIONS (FAQs) How does the charger work?When your scooter’s battery voltage is low, the charger works harder and sends more electrical current tothe batteries to bring up their charge. As the voltage of the batteries approaches a full charge, the chargersends less electrical current to the batteries. When the batteries are fully charged, the current sent to themfrom the charger is at nearly zero amperage. Therefore, when the charger is plugged in, it maintains thecharge on your scooter’s batteries but does not overcharge them. Even though the charging maintenancefeature is built into your scooter’s onboard charger, we do not recommend that you charge your scooter’sbatteries for more than 24 consecutive hours.
Can I use a different charger?For the safest, most efficient and balanced charging of your scooter’s batteries, you should simultaneouslycharge both batteries using only the manufacturer-supplied onboard battery charger.
How often must I charge the batteries?Two major factors must be considered when deciding how often to charge your scooter’s batteries:
All day scooter use on a daily basis. Infrequent or sporadic scooter use.
24 www.pridemobility.com Outback

I V . B A T T E R I E S A N D C H A R G I N G
With these considerations in mind, you can determine just how often and for how long you should chargeyour scooter’s batteries. We designed the onboard charger so that it does not overcharge your scooter’sbatteries; however, you may encounter some problems if you do not charge your batteries often enoughand if you do not charge them on a regular basis. Following the guidelines below will provide safe andreliable battery operation and charging:
If you use your scooter daily, charge its batteries as soon as you finish using it for the day. Your scooterwill be ready each morning to give you a “full day” of service. We recommend you charge yourscooter’s batteries for 8 to 14 hours after daily use.If you use your scooter once a week or less, charge its batteries at least once a week for 12 to 14 hoursat a time.Keep your scooter’s batteries fully charged.Avoid deeply discharging your scooter’s batteries.Do not charge your scooter’s batteries for more than 24 consecutive hours.
25Outback www.pridemobility.com
What if my scooter doesn’t arrive with batteries?If your scooter does not come with batteries already installed from Pride, you have chosen to purchase thebatteries separately. Carefully follow the instructions below for proper wire placement and battery installation.
MANDATORY! Battery posts, terminals, and related accessories contain leadand lead compounds. Wear goggles and gloves when handling batteries andwash hands after handling.
WARNING! Always use two batteries of the exact same type, chemistry, andamp-hour (Ah) capacity. Refer to the specifications table in this manual and inthe manual supplied with the battery charger for recommended type andcapacities.
WARNING! Contact your authorised Pride Provider if you have any questionsregarding the batteries in your scooter.
WARNING! Do not replace the batteries while the scooter is occupied.
WARNING! Do not mix old and new batteries. Always replace both batteries atthe same time.
WARNING! The batteries on your scooter should only be serviced or replaced byan authorised Pride Provider or a qualified technician.
Figure 8. Placing and Removing Batteries
AU
XB
AT
REAR RED CABLEREAR BLACK CABLE
BATTERY
MAIN CIRCUIT BREKAER
BATTERY TIE-DOWN STRAP

I V . B A T T E R I E S A N D C H A R G I N G
To install the batteries in your scooter:1. Remove the seat and rear shroud from the scooter.2. Place the batteries into the battery wells with the terminals facing away from the seat post. Be sure that
the positive (+) terminal of the left side battery and the negative (-) terminal of the right side batteryare facing forward. See figure 8.
3. Connect the main circuit breaker to the front battery terminals.4. Connect the rear black cable to the negative (-) battery terminal.5. Connect the rear red cable to the positive (+) battery terminal.6. Fasten the battery tie-down straps.7 Reinstall the rear shroud and seat.
To remove the batteries: 1. Remove the seat and rear shroud.2. Disconnect all the cables from the battery terminals.3. Unfasten the battery tie-down straps. 4. Remove the batteries.
How can I get maximum range or distance per charge?Rarely will you have ideal driving conditions - smooth, flat, hard driving surfaces with no wind or curves.You will often face hills, pavement cracks, uneven and loosely packed surfaces, curves, and wind. All ofthese driving conditions affect the distance or running time per battery charge. Below are a few sugges-tions for obtaining the maximum range per battery charge.
Always fully charge your scooter’s batteries prior to your daily use.Maintain but do not exceed the psi/bar/kPa air pressure rating indicated on each tyre.Plan your route ahead to avoid as many hills, cracked, broken, or soft surfaces as possible.Limit your baggage weight to essential items.Try to maintain an even speed while your scooter is in motion.Avoid stop-and-go driving.
What type and size of battery should I use?We recommend deep-cycle batteries that are sealed and maintenance free. Both AGM and Gel-Cell aredeep-cycle batteries that are similar in performance in your scooter. Do not use wet-cell batteries, whichhave removable caps.
WARNING! Corrosive chemicals are contained in batteries. Use only AGM or Gel-Cell batteries to reduce the risk of leakage or explosive conditions.
NOTE: Sealed batteries are not serviceable. Do not remove the caps.
26 www.pridemobility.com Outback
I V . B A T T E R I E S A N D C H A R G I N G
Why do my new batteries seem weak?Deep-cycle batteries employ a different chemical technology than that used in car batteries, nickel-cad-mium batteries (nicads), or in other common battery types. Deep-cycle batteries are specifically designedto provide power, drain down their charge, and then accept a relatively quick recharge.
We work closely with our battery manufacturer to provide batteries that best suit your scooter’s specificelectrical demands. Fresh batteries arrive daily at Pride and are shipped fully charged to our customers.During shipping, the batteries may encounter temperature extremes that may influence their initial perfor-mance. Heat diminishes the charge on the battery; cold slows the available power and extends the timeneeded to recharge the battery.
It may take a few days for the temperature of your scooter’s batteries to stabilise and adjust to their newroom or ambient temperature. More importantly, it takes a few charging cycles (a partial drain followedby a full recharge) to establish the critical chemical balance that is essential to a deep-cycle battery’s peakperformance and long life.Please follow these steps to properly break in your scooter’s new batteries for maximum efficiency andservice life:1. Fully recharge any new battery prior to its initial use. This initial charging cycle brings the batteries up to about 88% of their peak performance level.2. Operate your new scooter in familiar and safe areas. Drive slowly at first, and do not travel too far from
your home or familiar surroundings until you have become accustomed to your scooter’s controls andhave properly broken in your scooter’s batteries.
3. Fully recharge the batteries. This recharge should bring the batteries up to about 90% of their peakperformance level.
4. Operate your scooter again.5. Fully recharge the batteries again.6. After four or five charging cycles, the batteries are able to receive a charge of 100% of their peak
performance level and are able to last for an extended period of time.
How can I ensure maximum battery life?Fully charged deep-cycle batteries provide reliable performance and extended battery service life. Keepyour scooter’s batteries fully charged whenever possible. Batteries that are deeply discharged, infrequentlycharged, or stored without a full charge may be permanently damaged and cause unreliable performanceand limited service life.
For prolonged storage, you may wish to place several boards under the frame of your scooter to raise it offthe ground and take the weight off the tyres. This reduces the possibility of flat spots developing on theareas of the tyres contacting the ground.
What about public transportation?If you intend to use public transportation while using your scooter, you must contact the transportationdealer in advance to determine their specific requirements.
27Outback www.pridemobility.com

V . O P E R A T I O N
BEFORE GETTING ONTO YOUR SCOOTERHave you fully charged the batteries? See IV. “Batteries and Charging.”Are the manual freewheel levers in the drive position? See III. “Your Scooter.” Never leave the free-wheel levers pushed down unless you are manually pushing your scooter.
GETTING ONTO YOUR SCOOTER1. Make certain that the key is removed from the key switch.
WARNING! Never attempt to get onto or off of your scooter without first removing the keyfrom the key switch. This will prevent the scooter from moving if accidental throttlecontrol lever contact is made.
2. Stand at the side of your scooter.3. Push down on the seat rotation lever to disengage the seat and rotate the seat until it faces you; release
the seat rotation lever to secure the seat in place.4. Position yourself comfortably and securely in the seat.5. Push down on the seat rotation lever and rotate the seat until you face forward; release the seat rotation
lever to secure the seat in place.6. Make certain that your feet are safely on the floorboard.
PRE-RIDE ADJUSTMENTS AND CHECKSAre you positioned comfortably in the seat? Is the seat at the proper height? See VI. “Comfort Adjustments.”Is the seat fixed securely in place? See VI. “Comfort Adjustments.”Is the tiller at a comfortable setting and locked securely in place? See VI. “Comfort Adjustments.”Is the key fully inserted into the key switch? See III. “Your Scooter.”Does your scooter’s horn work properly?Is your proposed path clear of people, pets, and obstacles?Have you planned your route to avoid adverse terrain and as many inclines as possible?
OPERATING YOUR SCOOTER
WARNING! The following can adversely affect steering and stability while operating yourscooter, resulting in loss of control, tipping and/or personal injury:
Holding onto or attaching a leash to walk your petCarrying passengers (including pets)Hanging any article from the tillerTowing or being pushed by another motorised vehicle
Set the 8-16 km/h switch to your desired maximum speed of 8 or 16 km/h (5 or 10 mph); then set thespeed adjustment dial to your desired speed. We recommend you initially set the 8-16 km/h switch to8 km/h (5 mph) and the speed adjustment dial to the tortoise (slowest speed setting). Insert the key into the key switch.With your hands on the handgrips, use your thumb to gently push the right side of the throttle controllever to disengage the brakes and move forward; the electronic brake automatically disengages and thescooter accelerates smoothly to the speed you set with the speed adjustment dial.Pull on the left handgrip to steer your scooter to the left, or pull on the right handgrip to steer yourscooter to the right.
28 www.pridemobility.com Outback

V . O P E R A T I O N
Move the tiller to the centre position to drive straight ahead.Gently release the throttle control lever to decelerate and come to a complete stop. The electronic brakeautomatically engages when your scooter comes to a stop.To move in reverse, use your thumb to gently push the left side of the throttle control lever to disengageyour scooter’s brakes and move rearward.
NOTE: Your scooter’s reverse speed is slower than the speed you set with the speed adjustment dial andthe 8-16 km/h (5-10 mph) switch.
GETTING OFF OF YOUR SCOOTER1. Bring your scooter to a complete stop.2. Remove the key from the key switch.3. Push down on the seat rotation lever to disengage the seat and rotate the seat until you are facing toward
the side of your scooter; release the seat rotation lever to secure the seat in place.4. Carefully and safely get out of the seat and stand to the side of your scooter.5. You can leave the seat facing to the side to facilitate boarding your scooter next time.
POWER DOWN TIMER FEATUREYour scooter is equipped with an energy saving power down timer feature that is designed to preserve yourscooter’s battery life. If you mistakenly leave the key in your scooter but do not use the scooter for approx-imately 20 minutes, the scooter automatically shuts down.
If your scooter power down timer feature takes effect, perform the following steps to resume normal operation:Remove the key from the key switch.Reinsert the key to power up your scooter.
29Outback www.pridemobility.com

V I . C O M F O R T A D J U S T M E N T S
Figure 9. Tiller Adjustment Lever
Figure 10. Seat Removal
TILLER ANGLE ADJUSTMENT
You can adjust the tiller angle to four different positions.1. Pull up on the tiller adjustment lever. See figure 9.2. Move the tiller to a comfortable position.3. Release the tiller adjustment lever. The tiller will remain in
that position.
NOTE: In order to lower the tiller to its lowest position, youmust first remove the seat and both batteries.
SEAT HEIGHT ADJUSTMENTYour scooter’s seat can be repositioned to one of three differ-ent heights.1. Remove the seat from your scooter. See figure 10.2. Use the attached ring to pull and remove the ball detent pin
from the lower seat post. See figure 11.3. Raise or lower the upper seat post to the desired seat
height.4. While holding the upper seat post at that height, match up
the holes in the upper seat post and the lower seat post.5. Fully insert the ball detent pin.6. Replace the seat.
WARNING! Remove the key from the keyswitch before adjusting the tiller or theseat. Never attempt to adjust the tiller orthe seat while the scooter is in motion.
30 www.pridemobility.com Outback
LOCATING HOLESUPPER SEAT POST
Figure 11. Seat Height Adjustment
LOWER SEAT POST
BALL DETENT PIN

V I . C O M F O R T A D J U S T M E N T S
LUMBARSUPPORT ADJUSTMENT DIAL
HEADREST
SEATBACK ADJUSTMENTLEVER
Figure 12. Seatback and Headrest Adjustments
SEAT ROTATION LEVER
SEAT SLIDING LEVER
HIGH-BACK SEAT HEADREST ADJUSTMENTIf your scooter is equipped with a high-back seat, the head-rest height can be adjusted to several positions.1. Pull up on the headrest to raise its position. See figure 12.2. Push down on the headrest to lower its position.3. Pull the headrest forward or push it rearward to adjust
the headrest angle. SEATBACK ADJUSTMENTTo adjust your scooter’s reclining seat, perform these steps(see figure 12):1. While pulling up on the seatback adjustment lever, lean
forward or rearward to adjust the seatback.2. Release the seatback adjustment lever once the seat is
in a comfortable riding position.
LUMBAR SUPPORT ADJUSTMENT DIALThe lumbar support is inside the lower part of the seatback.Turn the lumbar support adjustment dial anticlockwise tomove the support into a comfortable position. See figure 12.
WARNING! Always keep your backpressed firmly against the seatback whileadjusting the angle.
WARNING! Do not operate the scooterwith the seat in the reclined position.
31Outback www.pridemobility.com
Figure 13. Sliding Seat AdjustmentFRONT-TO-BACK SEAT ADJUSTMENTYou can reposition the scooter’s seat forward or rearwardto adjust the distance between the seat and the tiller. Seefigure 13.1. Pull up on the seat sliding lever.2. While holding the lever up, slide the seat forward or
rearward.3. Release the seat sliding lever once the seat is in the
desired position.
SEAT ROTATION ADJUSTMENTThe seat rotation lever secures the seat in one of four posi-tions. See figure 13.1. Push down on the seat rotation lever to disengage the
seat.2. Rotate the seat to the desired position.3. Release the seat rotation lever to secure the seat in
place.

V I . C O M F O R T A D J U S T M E N T S
ADJUSTMENT DIAL
ARMREST ANGLE ADJUSTMENTThe armrests of your scooter can be adjusted upward or downward by turn-ing the adjustment dial. See figure 14.
The armrests also pivot upward to make getting on and off of your scootereasier.
NOTE: If your scooter is not equipped with a reclining high-back seat,as shown in figure 12, you will be able to adjust the height and width ofthe armrest by following the directions below.
ARMREST HEIGHT ADJUSTMENT
Figure 14. Armrest Angle Adjustment
You will need the following tools to adjust the height of the armrests: • 5/32” Hex Key •1/8” Hex Key • 7/16” Spanner
1. Loosen the setscrew on the side of the height adjustment tube with the 1/8” hex key.2. Loosen and remove the acorn nut and screw holding the height adjustment tube in place.3. Raise or lower the height adjustment tube to the desired height.4. Align the holes in the adjustment tube with the holes in the armrest upright.5. Insert the screw through the holes in both the height adjustment tube and the armrest upright.6. Install and tighten the acorn nut.7. Tighten the setscrew on the side of the height adjustment tube.8. Repeat for the other armrest.
ARMREST WIDTH ADJUSTMENTThe armrest width of your scooter can be adjusted inward or outward.1. Loosen the armrest adjustment knobs at the back of the seat frame. See figures 15 and 16.2. Slide the armrests in or out to the desired width.3. Tighten the armrest adjustment knobs.
32 www.pridemobility.com Outback
Figure 15. Armrest Height Adjustment Figure 16. Armrest Adjustments
ARMREST ADJUSTMENTS KNOBS
SETSCREW
HEIGHT ADJUSTMENT TUBE
ARMREST ADJUSTMENT KNOB
ACORN NUT

33Outback www.pridemobility.com
V I I . D I S A S S E M B L Y A N D A S S E M B L Y
SeatTo remove the scooter’s seat, see VI. “Comfort Adjustments.”
Rear ShroudTo remove the rear shroud:1. Remove the seat from your scooter. See figure 10. 2. Lift the shroud up and over the seat post.
BatteriesTo remove the batteries from you scooter, see IV. “Batteries and Charging.”
DISASSEMBLY You can disassemble the scooter into sixcomponents. See figure 17. No tools arerequired to disassemble or assemble yourscooter, but keep in mind that the disassem-bled sections of the scooter take up morefloor space than the assembled unit. Alwaysdisassemble or assemble your scooter on alevel, dry surface with sufficient room foryou to work and move around your scooter–about 1.5 metres (5 feet) in all directions.Remember that some scooter components areheavy and you may need assistance when lift-ing them.
Figure 17. Outback Components
MAIN FRAMESEAT
REAR SHROUD
FRONT BASKETBATTERIES
WARNING! Do not lift beyond your physical capability. Ask for assistance when necessary while disassembling and assembling your scooter.

34 www.pridemobility.com Outback
V I I I . B A S I C T R O U B L E S H O O T I N G
Any electromechanical device occasionally requires some troubleshooting. However, most of the prob-lems that may arise can usually be solved with a bit of thought and common sense. Many of these problemsoccur because the batteries are not fully charged or because the batteries are worn down and can no longerhold a charge.
What if all of my scooter systems appear to be “dead?”Ensure the key is fully inserted in the key switch.Ensure the batteries are fully charged.Push in the main circuit breaker reset button.Ensure the 9-pin connector is firmly attached.Ensure both battery harnesses are firmly connected to the electronic controller and to the battery terminals.
What if my scooter’s battery condition meter shows a full charge, but my scooter does not movewhen I push the throttle control lever?Ensure your scooter was not left in freewheel mode. (Pull up on the freewheel lever to restore normal operation.)
NOTE: When the freewheel lever is pushed down, your scooter’s brakes are disengaged and all power to the transaxle is cut.
What if my scooter’s main circuit breaker trips repeatedly? Charge your scooter’s batteries more frequently. Have both of your scooter’s batteries load tested by your authorised Pride Provider. Obtain a battery load tester at most automotive parts stores; follow the directions supplied with the
load tester.
What if my scooter’s battery condition meter dips way down and the motor surges or hesitates whenI press the throttle control lever? Fully charge your scooter’s batteries. Have your authorised Pride Provider load test each battery. Obtain a battery load tester at most automotive parts stores; follow the directions supplied with the
load tester.
If you experience any problems with your scooter that you are unable to resolve, immediately contact yourauthorised Pride Provider for information, maintenance, and service.

35Outback www.pridemobility.com
I X . C A R E A N D M A I N T E N A N C E
Your scooter requires a minimal amount of care and maintenance. If you do not feel confident in yourability to perform the maintenance listed below, you may schedule inspection and maintenance at yourauthorised Pride Provider. The following areas require periodic inspection and/or care and maintenance.
TYRE PRESSUREIf equipped with pneumatic tyres, always maintain the psi/bar/kPa air pressure rating indicated on eachtyre for pneumatic tyres.
WARNING! It is important that the psi/bar/kPa air pressure rating indicated on each tyrebe maintained in pneumatic tyres at all times. Do not underinflate or overinflate yourtyres. Low pressure may result in loss of control, and overinflated tyres may burst.Failure to maintain the psi/bar/kPa air pressure rating indicated on pneumatic tyres at alltimes may result in tyre and/or wheel failure.
Regularly inspect your scooter’s tyres for signs of wear.
WHEEL REPLACEMENTIf your scooter is equipped with pneumatic tyres and you have a flat tyre, you can have the tube replaced.If your scooter is equipped with a solid tyre insert, either the solid insert or the entire wheel must bereplaced depending on the model. Contact your authorised Pride Provider for information regardingreplacement wheels for your scooter.
WARNING! Wheels on your scooter should only be serviced/replaced by an authorisedPride Provider or qualified technician.
WARNING! Completely deflate pneumatic tyres before dismantling the rim or attemptingrepair.
WARNING! When changing a tyre, remove only the centre lug nut, then remove the wheel.If any further disassembly is required, deflate the tyre completely or it may explode.
EXTERIOR SURFACESBumpers, tyres, trim, and the tiller boot can benefit from an occasional application of rubber or vinylconditioner.
WARNING! Do not use a rubber or vinyl conditioner on the scooter’s vinyl seat, floorboard,or tyre tread, as this may cause them to become dangerously slippery.
BATTERY TERMINAL CONNECTIONSMake certain that the terminal connections remain tight and uncorroded.The batteries must sit flat in the battery wells.The battery terminals should face the rear of the scooter.
ABS PLASTIC SHROUDSThe front tiller shroud, front shroud, and the rear shroud are formed from durable ABS plastic and arecoated with an advanced formula urethane paint.A light application of car wax will help the shrouds retain their high gloss.
AXLE BEARINGS AND THE MOTOR/TRANSAXLE ASSEMBLYThese items are all prelubricated, sealed, and require no subsequent lubrication.
36 www.pridemobility.com Outback
I X . C A R E A N D M A I N T E N A N C E
WIRING HARNESSESRegularly check all wiring connections.Regularly check all wiring insulation, including the charger power lead, for wear or damage.Have your authorised Pride Provider repair or replace any damaged connector, connection, or insula-tion that you find before using your scooter again.
PROHIBITED! Even though the scooter has passed the necessary testing requirementsfor ingress of liquids, you should keep electrical connections away from sources ofdampness, including direct exposure to water or bodily fluids and incontinence. Checkelectrical components frequently for signs of corrosion and replace as necessary.
MOTOR BRUSHESThe motor brushes are housed inside of the motor transaxle/assembly. They should be inspected periodi-cally for wear by your authorised Pride Provider.
CONSOLE, CHARGER, AND REAR ELECTRONICSKeep these areas free of moisture.Allow these areas to dry thoroughly if they have been exposed to moisture before operating yourscooter again.
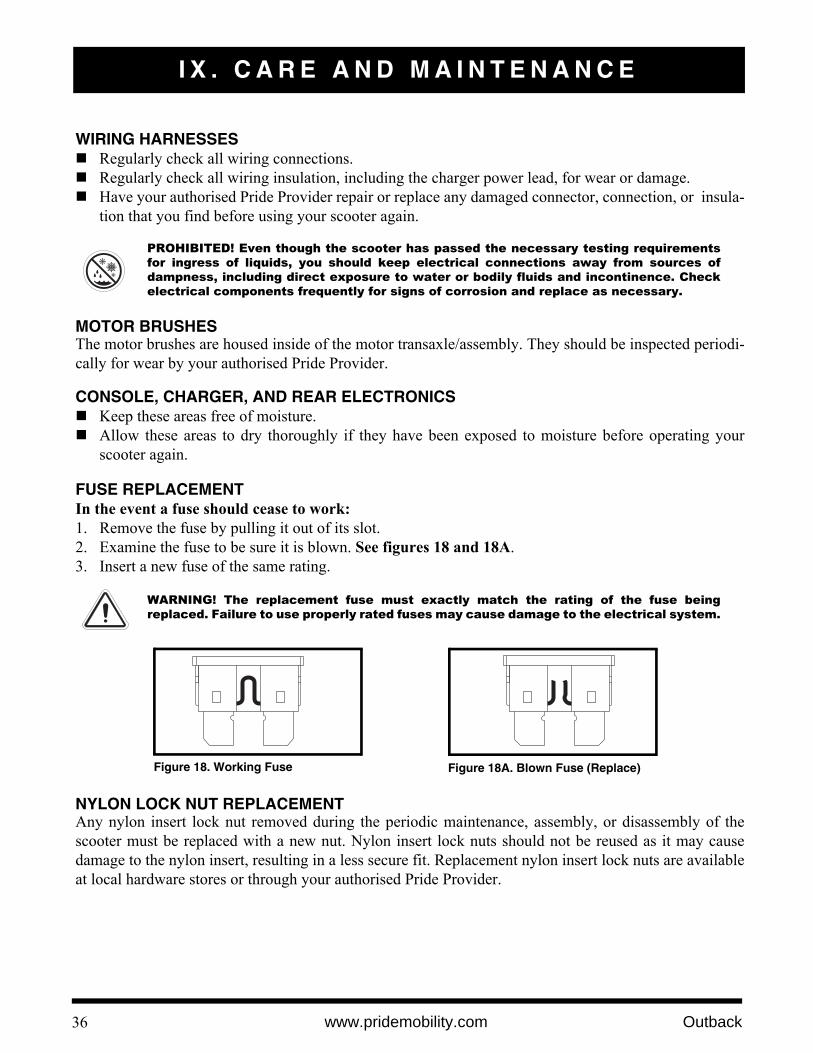
FUSE REPLACEMENTIn the event a fuse should cease to work:1. Remove the fuse by pulling it out of its slot. 2. Examine the fuse to be sure it is blown. See figures 18 and 18A.3. Insert a new fuse of the same rating.
WARNING! The replacement fuse must exactly match the rating of the fuse beingreplaced. Failure to use properly rated fuses may cause damage to the electrical system.
NYLON LOCK NUT REPLACEMENTAny nylon insert lock nut removed during the periodic maintenance, assembly, or disassembly of thescooter must be replaced with a new nut. Nylon insert lock nuts should not be reused as it may causedamage to the nylon insert, resulting in a less secure fit. Replacement nylon insert lock nuts are availableat local hardware stores or through your authorised Pride Provider.
Figure 18. Working Fuse Figure 18A. Blown Fuse (Replace)

37Outback www.pridemobility.com
I X . C A R E A N D M A I N T E N A N C E
STORING YOUR SCOOTERIf you plan on not using your scooter for an extended period of time, it is best to:1. Fully charge its batteries prior to storage.2. Disconnect the batteries from the scooter. 3. Store your scooter in a warm, dry environment.4. Avoid storing your scooter where it will be exposed to temperature extremes.
WARNING! Always protect batteries from freezing temperatures and never charge afrozen battery. Charging a frozen battery can result in damage to the battery.
Batteries that are regularly and deeply discharged, infrequently charged, stored in extreme temperatures,or stored without a full charge may be permanently damaged, causing unreliable performance and limitedservice life. It is recommended that you charge the scooter batteries periodically throughout periods ofprolonged storage to ensure proper performance.
You may wish to place several boards under the frame of your scooter to raise it off of the ground duringperiods of prolonged storage. This takes the weight off the tyres and reduces the possibility of flat spotsdeveloping on the areas of the tyres contacting the ground.
DISPOSAL OF YOUR SCOOTERYour scooter must be disposed of according to applicable local and national statutory regulations. Contactyour local waste disposal agency or authorised Pride Provider for information on proper disposal of pack-aging, metal frame components, plastic components, electronics, and batteries.

38 www.pridemobility.com Outback
X . W A R R A N T Y
TWO-YEAR LIMITED WARRANTYStructural frame components, including: platform, fork, seat post, and frame welds.Drivetrain, including: differential, motor, and brake.
ONE-YEAR LIMITED WARRANTYYour Pride scooter is fully guaranteed for twelve (12) months from the date of purchase against faultsarising due to defects in manufacture or materials. This warranty does not detract from, but is in additionto, your legal rights.
All electronic parts, including controllers and battery chargers, have a one (1) year warranty. Servicing tothe controller or battery charger must be carried out by your authorised Pride Provider. Any attempt toopen or dismantle these items renders the guarantee void on that item.
NOT COVERED UNDER WARRANTYThis guarantee does not extend to those items which may need replacement due to normal wear and tear(tyres, belts, bulbs, upholstery, plastic shrouds, motor brushes, fuses, and batteries) or damage to the prod-uct caused by misuse or accident for which Pride or its agent cannot be held responsible. This warrantydoes not include labour or service calls.
BATTERIESBatteries are covered by a six (6) month warranty from the original manufacturer.
Gradual deterioration in performance due to being left in a discharged state, left in cold conditions for longperiods of time, or worn out through heavy use is not covered.
SERVICE CHECKS AND WARRANTY SERVICEWarranty service can be performed by an authorised Pride Provider. Please contact your authorised PrideProvider for advice on the current cost affecting the service visit.
REPLACEMENT UNITSThe availability of replacement units is subject to the discretion of the provider, not the manufacturer. Formore information regarding replacement units, contact your authorised Pride Provider.

39Outback www.pridemobility.com
A P P E N D I X I - S P E C I F I C A T I O N S
Model Number PMV600
Overall Length2 See figure 19.
Overall Width2 See figure 19.
Tyres Type: Pneumatic Front: 15 x 33 cm, Rear: 15 x 33 cm (6 x 13 in.)
Wheels Aluminum alloy wheels in Black
Weight Capacity 181.4 kg, (400 lbs.) maximum
Battery Type3 (not included) Two 12V, 100 Ah
Horsepower 3.0 hp (peak)
Charger Onboard 8-amp charger
Speed (Max)1 Variable up to 16 km/h (60% reverse)
Maximum Grade See figure 1.
Range1 Up to 30-35 miles per charge with 100 Ah batteries
Turning Radius2 See figure 19.
Seating Style: High-back with headrest and slidersDimensions: See figure 19.Seat Cover Material: Vinyl; Black, Grey, Tan, or Brown Armrests: Match seat cover materialUser adjustable seat height from ground: 70.49-80.65 cm (27.75 - 31.75 in.)User adjustable seat height from deck: See figure 19.
Brakes Electronic regenerative braking and electromechanical disc brake
Rear Wheel Drive 2-24 VDC motors
Weight Total weight with batteries: w/two 12V, 100 Ah batteries: 156.4 kg (345 lbs.)Total weight without batteries: seat and rear shroud: 97.98 kg (216 lbs.)Component Breakdown:Rear Plastic Shroud:1.59 kg (3.5 lbs.)Seat: 16.78 kg (37 lbs.)Batteries: 28.58 kg each (63 lbs.)
Ground Clearance2 See figure 19.
1 Varies with user weight, terrain type, battery amp-hour (Ah), battery charge, battery condition, and tyre condition. Thisspecification can be subject to a variance of (+ or -) 10%.
2 Due to manufacturing tolerances and continual product improvement, this specification can be subject to a variance of (+or - ) 3 %.
3 AGM or Gel-Cell type required. See IV. “Batteries and Charging.”
NOTE: This product conforms to all applicable ANSI-RESNA testing requirements and ISO 7176 SeriesEN12184 standards. All specifications subject to change without notice.

40 www.pridemobility.com Outback
A P P E N D I X I - S P E C I F I C A T I O N S
Figure 19. Outback Dimensions
196 cm (77”)
41 cm (16”)
46 cm (18”)
64 cm (25”)
79 cm (31”)
160 cm (63”)
Turning Radius
18 cm (7”)5 cm (2”)
63-71 cm (25-28”)
20 cm (8”) 133 cm (52.5”)
80°
48-58 cm (19-23”)

41Outback www.pridemobility.com
N O T E S

42 www.pridemobility.com Outback
N O T E S

Mobility Products Australia Pty. Ltd.
*INFMANU1289