Fujitsu Mobile Color Scanner User’s Manual Mobile Color Scanner User’s Manual ... Do not use the...
65
i Fujitsu Mobile Color Scanner User’s Manual Fujitsu endeavours to ensure that the information in this document is correct, but accepts no liability for any error or omission in the same. Any procedures described in this document for operating Fujitsu products should be read and understood by the operator before such products are used. To ensure that Fujitsu products function without risk to safety and health, such procedures should be strictly observed by the operator. The development of Fujitsu products and services is continuous and published information may not be up to date. Any particular issue of a product may contain facilities not described herein. It is important to check the current position with Fujitsu. Specifications and statements as to performance in this document are Fujitsu estimates intended for general guidance. They may require adjustment in particular circumstances and should therefore not be taken as formal offers or commitments. Microsoft, Windows, Windows 98, Windows Me and Windows 2000 Professional are registered trademarks of Microsoft Corporation in the United States and other countries. Microsoft Internet Explorer is the name of a product of Microsoft Corporation of the U.S. Other company and product names mentioned in this manual are the trademarks or registered trademarks of their respective owners. All Rights Reserved, Copyright © 2001 FUJITSU LIMITED No part of this publication may be copied, reproduced, or translated without the prior written consent of Fujitsu Limited. No part of this publication may be stored or transmitted in any electronic form without the written consent of Fujitsu Limited. Website: www.fujitsu-pc-asia.com
Transcript of Fujitsu Mobile Color Scanner User’s Manual Mobile Color Scanner User’s Manual ... Do not use the...

i
Fujitsu Mobile Color Scanner User’s Manual
Fujitsu endeavours to ensure that the information in this document is correct, but acceptsno liability for any error or omission in the same. Any procedures described in this documentfor operating Fujitsu products should be read and understood by the operator before suchproducts are used. To ensure that Fujitsu products function without risk to safety andhealth, such procedures should be strictly observed by the operator. The development ofFujitsu products and services is continuous and published information may not be up todate. Any particular issue of a product may contain facilities not described herein. It isimportant to check the current position with Fujitsu. Specifications and statements as toperformance in this document are Fujitsu estimates intended for general guidance. Theymay require adjustment in particular circumstances and should therefore not be taken asformal offers or commitments.
Microsoft, Windows, Windows 98, Windows Me and Windows 2000 Professional areregistered trademarks of Microsoft Corporation in the United States and other countries.Microsoft Internet Explorer is the name of a product of Microsoft Corporation of the U.S.Other company and product names mentioned in this manual are the trademarks orregistered trademarks of their respective owners.
All Rights Reserved, Copyright© 2001 FUJITSU LIMITED
No part of this publication may be copied, reproduced, or translated without the priorwritten consent of Fujitsu Limited. No part of this publication may be stored or transmittedin any electronic form without the written consent of Fujitsu Limited.
Website: www.fujitsu-pc-asia.com
01_Scanner (Intro) 8/15/01, 8:34 AM1

ii
About this User’s ManualThis user’s manual contains important information on the safe use of the Mobile ColorScanner. Before attempting to use the scanner, read this guide thoroughly, paying particularattention to the “Notes on Safety.”Be sure to keep this guide handy in a safe and convenient location for quick referenceduring use.
About VCCI requirements
This equipment is class B information technology equipment that complies with thestandard of the Voluntary Control Council for Interference by Information TechnologyEquipment (VCCI). Although the equipment is intended for use in residentialenvironments, it may create interference if placed near a radio or television. Handle theequipment in accordance with this User’s Manual.
Using this product in mission-critical situations
This product is designed and manufactured for general use in applications such asoffice automation equipment, personal devices, and household appliances. It is notintended for mission-critical use.Customers considering the use of these products for mission-critical applications musthave safety-assurance measures in place beforehand.“Mission-critical” uses are special applications, such as those listed below, whereparticularly high reliability requirements exist. If the pertinent levels of safety are notguaranteed, a failure or operational error could threaten lives or cause physical injury.– Atomic energy control systems, aeronautic or space systems, mass transportation
control systems, medical devices for life support, or weapons firing controls
Safe Operation
01_Scanner (Intro) 8/15/01, 8:34 AM2

iii
Preface
Thank you for purchasing the Fujitsu Mobile Color Scanner.The scanner can scan high-resolution color images.Follow the instructions written in this user’s manual so that you will use the scanner properly.
Abbreviations used in this guideThe product names in this manual are abbreviated as follows:
Product name Name used in this manual
Microsoft® Windows® Millennium Edition Windows Me
Windows Microsoft® Windows® 98 operating system Windows 98 Windows
Microsoft® Windows® 2000 Professional Windows 2000
Fujitsu Mobile Color Scanner unit or scanner
Symbols used in the textThe following symbols are used in the text of this manual.
Indicates precautions and prohibited items regarding the use of the scanner. Besure to read the information.
Indicates items related to operation.
Prohibition of reproductionThe act of scanning certain items or reproducing certain items with a scanner may bepunishable by law. Give special attention to the following items when using a scanner:
[Acts prohibited by law]• The reproduction of bills, coins, government securities and bonds, local bonds, and
others is prohibited. Even if any of the above is stamped with the word “sample,”reproduction thereof is still prohibited. (Law against forging currency and securities,law regulating securities similar to bills)
• The reproduction of bills, coins, securities, and others circulating in foreign countries isalso prohibited. (Law against forging and counterfeiting coins, bills, bank bills, andsecurities circulating in foreign countries)
• The reproduction of unused postage stamps, postal cards, and others withoutgovernment permission is prohibited. (Law against forging postal stamps and others)
• The reproduction of government stamps, certificates regulated by the Liquor Tax Act andCommodity Tax Act, and others is also prohibited. (Regulation of Stamps Counterfeit Act)
� Guide
� Notes
01_Scanner (Intro) 8/15/01, 8:34 AM3

iv
WARNING
CAUTION
[Acts requiring caution]• Under government guidelines, business companies are warned against reproducing
anything beyond their minimum required number of private securities (such as stockcertificates, bills, and checks), commutation tickets, coupon tickets, and others.
• Also prohibited is the unauthorized reproduction of passports issued by the government,licenses and ID cards issued by public institutions and private organizations, and passes,meal coupons, and other tickets.
[Items protected by copyright]• The reproduction of publications, music, pictures, paints, maps, drawings, movies,
photographs, and others that are protected by copyright is prohibited except on a limitedbasis for personal use, use within one’s home, or equivalent use.
Warning LabelsThis manual uses the following conventions to indicate the warning messages. Thesemarkings are intended to prevent users and bystanders from being injured or from sufferingdamage to their property. A warning signal consists of a warning symbol and a signalword or just a signal word.
The following are the warning levels and their meanings:
Icon Meaning
This indicates a hazardous situation that could result in death orserious personal injury if the user does not perform the procedurecorrectly.
This indicates a hazardous situation that could result in personal injuryif the user does not perform the procedure correctly. This warningsignal also indicates that damage to the product or other property,may occur if the user does not perform the procedure correctly.
Examples of warning labels and their meanings
Symbols Meaning
A symbol indicated with a ∆ indicates that there is something aboutwhich a warning or caution should be given. Each symbol is accompa-nied by a drawing indicating a specific warning. (The picture on the leftis a caution regarding electric shocks.)
A symbol indicated with a indicates acts (prohibited acts) that mustnot be committed. A picture indicating acts that must not be committedis specifically drawn inside or next to the symbol. (The picture on theleft indicates that disassembly is prohibited.)
A symbol indicated with a indicates an action that must becomplied with. The image in the symbol provides more specificinformation. (The picture on the left indicates that the plug should bedisconnected from the outlet).
01_Scanner (Intro) 8/15/01, 8:34 AM4

v
Notes on Safety
Do not place the device in locations exposed to high temperatures, humidity, ordust, or with poor ventilation.Otherwise, it could lead to electric shock or fire.
Do not install the scanner near a heating source such as a stove or heater, ornear flammable materials such as volatile substances or a curtain.Otherwise, it could lead to fire.
Do not place the scanner on an unstable surface such as one subject to strongshock or vibration or one that is uneven.Otherwise, the scanner may fall or tip over, resulting in injuries.
Do not leave the device for a long time in locations where the temperature mayrise sharply or in locations where the device is exposed to direct sunlight (e.g., ina car with the windows closed on a sunny day).Otherwise, the cover may overheat, deform, or melt or the scanner may overheat,resulting in a fire.
Do not use the device in locations where water can be splashed such as bathroomsand shower rooms.Otherwise, it could lead to electric shock or fire.
Precautions to Follow when Installing or Moving the Scanner
CAUTION
01_Scanner (Intro) 8/15/01, 8:34 AM5

vi
Do not place on or near the device vessels containing water, such as “vases,flowerpots, and cups” or metallic objects such as clips and pins.Otherwise, it could lead to electric shock or fire.
Do not splash water on the device or moisten it with water.Otherwise, it could lead to electric shock or fire.
If you drop the scanner or the cover is damaged, contact the store where youpurchased the scanner or Fujitsu service representative related to Fujitsu products.Continuing to use the scanner may cause a fire or electric shock.
Never open any panel or cover secured with screws. High voltage inside thescanner may cause an electric shock.
Do not modify the scanner or replace any part.Otherwise, it could lead to fire.
Do not use a highly flammable spray near the scanner.Otherwise, it could lead to fire.
Read this guide carefully to ensure that the cable is correctly connected.
If you use the scanner with the cable incorrectly connected, the scanner orperipheral device may be damaged.
Precautions to Follow when Using the Scanner
CAUTION
WARNING
01_Scanner (Intro) 8/15/01, 8:34 AM6

vii
Handling Precautions
This scanner is precision electronic equipment. Follow the precautions below when handingthe scanner.
• Do not put any object on the scanner.Otherwise, the scanner could be scratched or could fail.
• Do not insert any foreign objects into the scanner.Do not spray a liquid such as water or disassemble the scanner and insert any foreignobjects into the scanner.
• Do not use the scanner under any abnormal condition.If you become aware of any abnormalities such as smoke coming from the scanner, orunusual smells or sounds, immediately turn off the power to the computer and disconnectthe scanner from the computer. Then, contact the store where you purchased the scanneror Fujitsu service representative in charge of Fujitsu products.
• Put the scanner in the carrying case supplied with it when carrying or storing the scanner.
• If a failure occurs
– If you become aware of a failure, immediately turn off the power to the computer,disconnect the scanner from the computer, and contact the store where you purchasedthe scanner or Fujitsu service representative in charge of Fujitsu products.
– Do not disassemble or repair the scanner.
• Do not install the scanner in a location exposed to direct sunlight for long periods oftime or locations subject to abrupt temperature changes, such as in locations near anair conditioner.Install the scanner in an environment where the temperature and humidity arerespectively within the following ranges:
Temperature: Operating: 5 to 35°C Not operating: 0 to 50°CHumidity: Operating: 20 to 80% RH Not operating: 10 to 80% RH
(no condensation allowed)
• Do not use the scanner in a location exposed to dust, corrosive gas, or sea breezes.
• Do not use the scanner near any source of strong magnetic fields such as a TV set orspeaker as well as a magnet. A source of strong magnetic fields may cause a failure ormalfunction of the scanner and may also cause interference to radio or televisionreception.
• Connect the scanner to a USB hub with an internal power supply (hub to which poweris supplied from the power cable or AC adapter) and use up to two-stage serialconnection when required.
01_Scanner (Intro) 8/15/01, 8:34 AM7

viii
Contents
Safe Operation................................................................................................ ii
Preface ........................................................................................................... iii
Notes on Safety .............................................................................................. v
Handling Precautions .................................................................................. vii
Contents....................................................................................................... viii
Features of the Mobile Color Scanner ......................................................... x
Checking the Packing Contents ................................................................... 1Names and Functions of Parts on the Top of the Scanner ................................................. 2Names and Functions of Parts on the Bottom of the Scanner ........................................... 2Mounting the core for electromagnetic interference ........................................................... 2
Work Flow ....................................................................................................... 3
Installing the Scanner Driver ........................................................................ 4
Preparations ................................................................................................... 5
Using the Mobile Color Scanner ................................................................. 13
Setting Operation Performed when Pressing the Scan Button ............... 15FUJITSU Launch .............................................................................................................. 15Coordinating Processing with FUJITSU Launch .............................................................. 16
Screens Displayed during Use of the Scanner ......................................... 18
Conditions for Originals the Scanner Can Scan ....................................... 21
Scanning an Original ................................................................................... 21Scanning an Original ........................................................................................................ 22Original Sizes the Scanner Can Scan .............................................................................. 22Scanning start position ..................................................................................................... 23
Scanning a Large Original ........................................................................... 28Checking Whether the Scanner Can Scan the Original You Want to Scan ...................... 28Before Scanning an Original ............................................................................................ 28Scanning a Large Original ................................................................................................ 31Images of an original cannot be stitched successfully ..................................................... 33
Maintenance ................................................................................................. 34Cleaning the Surfaces ...................................................................................................... 34Cleaning the Optical Unit .................................................................................................. 35Cleaning the Rollers ......................................................................................................... 35Disconnecting the Scanner from the Computer ............................................................... 35Carrying or Storing the Scanner ....................................................................................... 35Performing Calibration ...................................................................................................... 35
01_Scanner (Intro) 8/15/01, 8:34 AM8

ix
Uninstalling Software .................................................................................. 36Reinstallation .................................................................................................................... 36Uninstalling the Scanner Driver ........................................................................................ 36Uninstalling Software Supplied with the Scanner ............................................................. 37
Troubleshooting ........................................................................................... 38Checking the Connection ................................................................................................. 38Error Messages ................................................................................................................ 41Submessages ................................................................................................................... 44Before Assuming that the Scanner is Faulty .................................................................... 45Problems after scanning ................................................................................................... 48
Specifications ............................................................................................... 50Hardware Specifications ................................................................................................... 50
Operating Environment ............................................................................... 51Scanner Driver Operating Environment ........................................................................... 51Use Environmental Requirements .................................................................................... 51Before Making Inquiries .................................................................................................... 52
Glossary ........................................................................................................ 53
01_Scanner (Intro) 8/15/01, 8:34 AM9

x
AAAAAAAA
BBBBBBBBBBBBBBBBBBBBB
BBBBBBCCCCCCCCCCCCCCC
CCDDDDDDD
EEEEEEEEEEEEEEEEEEEEEEE
FFFFFFFFFFFFFFFFFFFFFFFFF
GGGGGGGGGGGGGGGGGGG
HHHHHHHHHHHHHHHHHHH
IIIIIIIIIIIIIIIIIIIIIIIIIIIIIIIIIIIIIIIII
JJJJJJJJJJJJJJJJJJJJJJJJJJJJJJJJJJJ
KKKKKKKKKKKKKKKKKKK
LLLLLLLLLLLLLLLLLLLLLL
AAAAAAAAAAA
BBBBBBBBBBB
CCCCCCCCCCC
DDDDDDDDDD
EEEEEEEEEEEEEEEEEEEEEEE
FFFFFFFFFFFFFFFFFFFFFFFFFF
GGGGGGGGGGGGGGGGGGGG
HHHHHHHHHHHHHHHHHHHH
I I I I I I I I I I I I I I I I I I I I I
J J J J J J J J J J J J J J J J J J J J
KKKKKKKKKKKKKKKKKKKK
LLLLLLLLLLLLLLLLLLLLLL
AAAAAAAAAAA
BBBBBBBBBBB
CCCCCCCCCCC
DDDDDDDDDD
EEEEEEEEEEEEEEEEEEEEEEE
FFFFFFFFFFFFFFFFFFFFFFFFFF
GGGGGGGGGGGGGGGGGGGG
HHHHHHHHHHHHHHHHHHHH
I I I I I I I I I I I I I I I I I I I I I
J J J J J J J J J J J J J J J J J J J J
KKKKKKKKKKKKKKKKKKKK
LLLLLLLLLLLLLLLLLLLLLL
Features of the Mobile Color Scanner
The Mobile Color Scanner has the following features:
Compact and lightweightThe scanner is compact and lightweight - measuring 142 mm wide, 30 mm high, and 30mm deep, and weighing only about 100 g.
High scan resolutionThe basic scan resolution is 600 x 600 dpi at maximum. You can select output resolutionfrom 100 to 600 dpi using software. The scanner can provide optimum image data to suitthe output device such as a printer.
Character image stitching/photograph image stitchingThe image stitching function can read with ease a large original which cannot be scannedat one time as one image.
Character image stitching
First scan Second scan
Photograph image stitching
To stitch character images,an overlappingarea of two or three lines is required.
The scanned images areautomatically stitched.
First scan Second scan The scanned images areautomatically stitched.
01_Scanner (Intro) 8/15/01, 8:34 AM10

xi
Correction of orientationThe automatic skew correction function automatically corrects the result of scanning anoriginal on the skew, sideways, or upside down to place the result in position.
Scan result The scan result has been placed in position.
If an original is scanned sidewaysIf an original is scanned on the skew
If an original is scanned upsidedown.
Scanning an image independently of the scanning speedThis scanner uses the automatic resolution adjustment function to scan a fine imagewithout distortion or dropouts independently of the scanner operation speed.
01_Scanner (Intro) 8/15/01, 8:35 AM11

xii
Scanning facilitated by linking the scan button to FUJITSU launchAfter you install the scanner driver, FUJITSU launch automatically appears on the taskbarat the lower right of the screen each time you start the computer. When you press thescanner button in this status, the screen for scanning appears, allowing you to start scanningan original right away.
Connectthe cable.
Start the computer.
Press the scan button.Start scanning.
Install the scannerdriver,then restart thecomputer. FUJITSU launch is
resident on the taskbar.
Conformance with TWAINThe scanner conforms to TWAIN, which is a standard for scanner drivers, and can directlyscan images from numerous applications. (For details of TWAIN, see “scanner driver” inthe Glossary.)
01_Scanner (Intro) 8/15/01, 8:35 AM12

1
%(
Checking the Packing Contents
If any part is defective, contact the store where you purchased the scanner.
Packing Box
Mobile Color Scanner
Accessory pack
Calibration sheetUser ’s Manual(this manual)
Core forelectromagnetic
interference
Original holder
Carrying caseSetup CD with Scanner Driver
Ready lampWhen this lamp is on,scanning is enabled.
Scan buttonPressing this button starts scanning. Pressing thisbutton once again stops scanning.
Cable
USB connector
02_Scanner (01-14) 8/15/01, 8:36 AM1
2
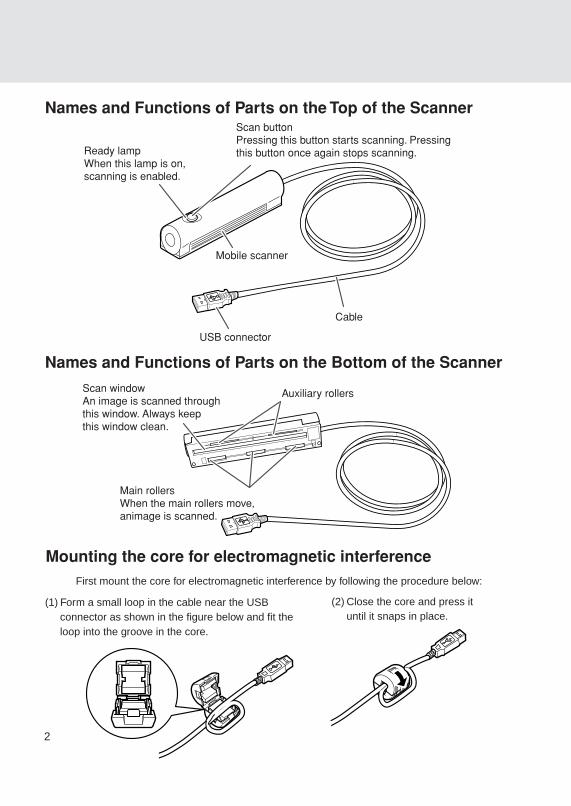
Names and Functions of Parts on the Top of the Scanner
Names and Functions of Parts on the Bottom of the Scanner
Mounting the core for electromagnetic interferenceFirst mount the core for electromagnetic interference by following the procedure below:
(1) Form a small loop in the cable near the USBconnector as shown in the figure below and fit theloop into the groove in the core.
(2) Close the core and press ituntil it snaps in place.
Ready lampWhen this lamp is on,scanning is enabled.
Scan buttonPressing this button starts scanning. Pressingthis button once again stops scanning.
USB connector
Mobile scanner
Cable
Main rollersWhen the main rollers move,animage is scanned.
Scan windowAn image is scanned throughthis window. Always keepthis window clean.
Auxiliary rollers
02_Scanner (01-14) 8/15/01, 8:36 AM2

3
Preparations are now complete.The scanner is now ready for use.
Work Flow
1 Check the packing contents.Open the packing box and check the contents.
2 Insert the driver setup CD into CD-ROM drive.Turn the power to the computer on and insert the setup disk in the disk drive.
3 Proceed in accordance with the messages displayed onthe screen and restart the computer.
4 Connect the scanner to the computer.Connect the scanner to the computer.
5 Perform calibration.To use the scanner, first perform calibration operation (to determine the white and blacklevel values). Use the calibration sheet supplied with the scanner.
(
Calibration sheet
02_Scanner (01-14) 8/15/01, 8:36 AM3

4
When you insert the setup disk into the CD-ROM drive, the following screen automaticallyappears.This start screen for installation is called the “main menu” of the installation utility.
ReadmeDisplays easy-to-understandexplanations and noteson installation whenexecuting installationusing the main menu.
INSTALL SOFTWAREDisplays the software for operating the scanner. Click the name of the software to beinstalled. Installation starts.
– Scanner DriverProgram required to use the scanner
This area displays an explanation ofthe item at the cursor under“INSTALL SOFTWARE.”
EXITTerminates the mainmenu.
Installing the Scanner Driver
If the main menu does not appear after you insert the setup disk in the disk drive, startExplorer and double-click Instmenu.exe on the setup disk.
� Guide
02_Scanner (01-14) 8/15/01, 8:36 AM4

5
The following details each item introduced in “Work Flow.” Proceedwith preparation by following the procedural sequence below.
If you have connected the scanner, disconnect the scanner, then install the scanner driverand connect the scanner by following the procedure below.
Insert the Scanner Driver CD into CD-ROM drive.
Preparations
Turn on the computer.
� Notes
� Guide
Do not connect the scanner at this time.
02_Scanner (01-14) 8/15/01, 8:36 AM5

6
Click on Scanner Driver.
Click Next.
Click Next.
02_Scanner (01-14) 8/15/01, 8:37 AM6

7
Wait until the files havebeen copied.
Click on EXIT.
Click Start > Shut Down Windows.
02_Scanner (01-14) 8/15/01, 8:37 AM7

8
If you have inadvertently connected the scanner to the computer before installing thescanner driver, check the connection, referring to “Checking the Connection”.
Click Restart > OK.
Connect the scanner for the first time at this step.
After the computer restarts, connect the scanner to the computer.
� Notes
� Guide
02_Scanner (01-14) 8/15/01, 8:37 AM8

9
Click Yes.
Press the scan button.
The following screen appears:
If the above screen does not appear, check the connection, referring to “Checking theConnection”.
� Guide
Caution
In a Windows 2000 environment, when you connectthe scanner to the computer, the following screen appears:
02_Scanner (01-14) 8/15/01, 8:37 AM9

10
Place the scanner on the white area ofthe calibration sheet, then click OK.
Be sure not to move the scanner while the following screen is being displayed.
When the above screen appears, slowlymove the scanner from the white area tothe black area.
Move the scanner while ensuring that it does not become separated from the sheet.
� Notes
� Guide
02_Scanner (01-14) 8/15/01, 8:37 AM10

11
When this screen appears, click OK.
If the calibration termination screen does not appear after you move the scanner to thebottom, move the scanner to the top again. Continue scanning the sheet until the terminationscreen appears.
Scanning is complete.
� Guide
02_Scanner (01-14) 8/15/01, 8:37 AM11

12
The following screen appears:
You can now use the scanner.
If this error message is displayed, click OK, slowly move the scanner fromthe black area to the white area of the calibration sheet again.When the scanner reaches the end of the sheet, continue scanning bymoving the scanner in the opposite direction on the sheet.
Caution
02_Scanner (01-14) 8/15/01, 8:37 AM12

13
Using the Mobile Color Scanner
Have ready the original of the material you want to scan.
For details of the scanning range of this scanner, see “Original Sizes the Scanner Can Scan”.
Place the scanner on the original.
Press the scan button.
02_Scanner (01-14) 8/15/01, 8:37 AM13

14
When the light around the scan button becomes green, slowly movethe scanner to scan the original material.
Move the scanner while ensuring that it does not become separated from the sheet.
Press the scan button again atthe position you want to stopscanning.
The scanned image isautomatically saved on thescreen of your computer underthe following icon:
To change the data savedestination, see “CoordinatingProcessing with FUJITSULaunch”.
� Guide
02_Scanner (01-14) 8/15/01, 8:37 AM14

15
Setting Operation Performed whenPressing the Scan Button
You can use FUJITSU launch to set the operation performed when the scan button of thisscanner is pressed. FUJITSU launch is a resident icon on the taskbar after installation ofthe scanner driver.
FUJITSU LaunchWhen you install the scanner driver, FUJITSU launch is automatically displayed on thetaskbar at the lower right of the screen of the computer as the following icon:
FUJITSU launch periodically monitors the status of this scanner to check such items aswhether the scanner is scanning. After the scanner scans an original, data is saved as afile or copied onto the Clipboard and software is started in accordance with the settingsmade using FUJITSU launch.
Click the right mouse button on the icon on the taskbar. The following menu appears. Inthis menu, select Save to.... The next menu appears.
The icon is always displayed unless you click the right mouse button on the icon andselect Exit.
03_Scanner (15-27) 8/15/01, 8:38 AM15

16
Coordinating Processing with FUJITSU Launch
Specify how processing is performed when clicking the Transfer button on the driver screenor which software program is to be started after an image is scanned. (See “ScreensDisplayed during the Use of the Scanner”.)Select Save to... from the FUJITSU launch menu and click a desired option. Save to file isselected as the initial setting.
Save to... options
Save to file
Save to Clipboard
Launch application
Saves the scanned image to the file specified for Savefolder in the Detailed setting dialog box.
Copies the scanned image onto the Clipboard.
Saves the scanned image to the file specified for Savefolder in the Detailed setting dialog box and automaticallystarts the application specified for Application in the dialogbox.
Delete the file in the specified folder if it is not required.
03_Scanner (15-27) 8/15/01, 8:38 AM16

17
Detailed setting
This option is used to set the folder used when you select Save to file for Save to... and theapplication to be started when you select Launch application for it. Click Detailed settingin the menu.The following dialog box appears:
On Windows 98/Me
For Application, you can select from up to 16 applications that were set.
On Windows 2000The Application field is left blank.Click the Browse button. A dialog box appears. In this dialog box, you can specify thedestination folder and application.
Specify the file type with which an image is to be scanned and data is to be saved, forSave file type. When specifying saving in JPEG, you can select Normal or Fine.
Click the Quick scan check box to turn it on to start scanning using the settings made inthe dialog box.
ExitThis option terminates FUJITSU launch.To start FUJITSU launch again, select Start > Programs > FUJITSU Mobile Color Scannerand click FUJITSU launch.
03_Scanner (15-27) 8/24/01, 2:41 PM17

18
The following outlines the names and functions of the items on the scanner driver screen.For details, see Online Help of the scanner driver.
Main TabThis screen is displayed on the left when the scanner driver starts.
You can bring up the screen by pressing the scanner button.
Screens Displayed during Use of theScanner
Doc.TypeSelects the type oforiginal to be scanned.
Image TypeSets the type of scannedimage.
HalftoneSelects the halftonepattern to be used forhalftone processing.
File SizeDisplays the size of thefile for the scannedimage in MB.
Adjust Image checkboxWhen turned on, doesnot immediately transferthe image to theapplication, but transfersit when the Transferbutton on the previewscreen is clicked.
DirectionSpecifies whether toautomatically recognizethe direction of thescanned image ormanually set thescanning direction.
ResolutionSpecifies the number ofpixels (dots) per inch.
Image Size (scan length)Selects the size of theoriginal to be scanned.
UnitSelects the unit to be usedin the preview window.
Reverse B/W check boxTurn this check box on toinvert the scanned image.
Stitching ModeSelect this mode to scan alarge document or imageoriginal that cannot bescanned at one time.
ThresholdSpecifies the threshold to beused as the reference valuefor distinguishing white fromblack.
Calibrate buttonScans the calibrationsheet to update whiteand black level values.
BrightAdjusts the brightnessof halftones.
Reset buttonReturns the settingsto those at installation.
� Guide
03_Scanner (15-27) 8/15/01, 8:38 AM18

19
Image Adjustment tab
Original screenDisplays the image scannedusing the settings previouslysaved.
Undo buttonReturns the settings on theImage Adjustment page to thosepreviously saved.
Automatic check boxWhen turned on,automatically sets eachadjustment item.
ShadowAdjusts the image shadow.
ToneAdjusts the tone of each of R(red), G (green), and B(blue).
ICM (Image ColorManagement) check boxWhen turned on, adjustscolors using the Windowscolor management system.
Sample screenDisplays the image onwhich the settings on theImage Adjustment pageare reflected.
Apply buttonReflects image processingfor the Sample image inthe preview window.
GammaAdjusts the density curvefor the entire screen.
BrightnessAdjusts the brightness ofthe entire screen.
ContrastAdjusts the imagecontrast.
HighlightAdjusts the imagehighlight.
03_Scanner (15-27) 8/15/01, 8:38 AM19

20
Preview window
Displays the scanned image.
Preview ScreenThe preview screen, which is displayed on the right of the screen regardless of whetherthe Main or Image Adjustment tab is selected, displays the scanned image in the previewwindow.
Scan buttonScans an original using the setvalues.
Transfer buttonTransfers the adjusted imageto the application.
Zoom in iconScales up the image.
Zoom out iconScales down the image.
Rotate iconRotates the image 90 degreesclockwise at one time.
Help iconDisplays Online Help.
End buttonTerminates the driverscreen withoutscanning.
Select Area iconSelects an area to betransferred to theapplication.
Move Image iconMoves the image anddisplays another area.
Mirroring iconFlips the imagehorizontally so that theresulting image is amirror image of theoriginal.
Status barThis area displays thefunction of the item onwhich the mousecursor is positioned.
03_Scanner (15-27) 8/15/01, 8:38 AM20

21
This scanner can scan an original with a smooth surface such as a photograph or printedmatter. Check the conditions and sizes of originals the scanner can scan before scanningan original. To scan a large original, see “Scanning a Large Original”.
Conditions for Originals the Scanner Can ScanThis scanner may not successfully scan certain types of original. Note the following:
• Use an original with a smooth surface.• If an original with uneven thickness such as one with a sticker or label affixed to it is
scanned, a line may appear at the boundary where different surface levels converge orthe sticker or label may come off.
• This scanner cannot scan transparent originals such as photographic film. It can,however, scan an OHP film original that is clearly visible when placed on white paper.
• If a thin original is scanned when placed on top of another form, the image on that otherform may also end up being scanned together with the original image.
• Always remove clips and staples because they cause scanner failures.• If ink on an original has not dried, be sure to wait until the ink is completely dry before
attempting to scan it.• Do not use the following originals:
– Wet original– Original with surface treatment or special coating applied– Original made of a material other than paper, such as cloth or metallic sheet– Original whose surface to be scanned is sticky
• Do not directly scan an original written in pencil because the rollers and sensor maybecome dirty. To scan an original written in pencil, first place the original in the originalholder.
Scanning an Original
� Notes
03_Scanner (15-27) 8/15/01, 8:38 AM21

22
Original Sizes the Scanner Can Scan
The following table lists the original sizes this scanner can scan.
Size
A6
Two A6-size sheets in portrait orientation
A4 in portrait orientation
Business card
Postcard
Photograph
Free
Custom
Length (mm)
148
297
297
55
148
127
Up to 364 (*2)
13~364 (*2)
Width (mm) (*1)
105
105
210
91
100
88
Up to 105
13~105
*1 The width (mm) in the above table indicates the value including margins. To use thephotograph image stitching function, an area of at least 20 mm must be scanned twice.For this reason, the maximum width for stitching is 190 mm.
*2 When scanning at 600 dpi, the maximum length of an original the scanner can scan is346 mm.
Scanning an OriginalTo scan an original, use software that supports TWAIN.
For information on the conditions and sizes of originals to be scanned, see “Conditions forOriginals the Scanner Can Scan” and “Original Sizes the Scanner Can Scan”.For information on the driver screen, see “Screens Displayed during Use of the Scanner”.
� Guide
03_Scanner (15-27) 8/15/01, 8:38 AM22

23
1 Make sure that the power to the computer is on and set thisscanner on an original.
Make sure that the original area to be scanned is within the scanning range of the scannerand the beginning of the original is at the scanning start position. The following figureshows the scanning range.
Scanning start position
[Top view]
[Side view]
During scanning from the edge of an original, the edge may come into contact with thescanning window or a main roller for scanning may slip off from the original. In this case,use the original holder supplied with the scanner or change the scanningdirection and scan the original. When scanning a small original such as a business card,a thin original, an original that tears easily, or an original you do not want to soil, scan theoriginal after inserting it in the original holder.
From here
From here
From here
Original
Scanning range(up to 105 mm)
Scanning range(up to 105 mm)
03_Scanner (15-27) 8/15/01, 3:48 PM23

24
2 Start scanning the original.
Follow the procedure below to scan the original. Perform steps 2) and 3) only when youuse the scanner with the software for the first time.
For information on how to start the scanner from software, see the manual for the softwareyou are using.
1) Start software supporting TWAIN.
2) Click Select TWAIN Source... or another item in the File menu.
3) Select FUJITSU Mobile Color Scanner from the Source list in the displayed dialog andclick the Select button.
4) Click Acquire ... or another item in the File menu.
5) The driver screen appears. Set the items required for scanning. If you want to adjustscanned image before transfering it to the software, turn the Adjust image check boxon.
6) Click the Scan button or press the scan button of this scanner to start scanning.
Main tab Image Adjustment tab Preview screen
Adjust Imagecheck box
� Guide
Preview window
03_Scanner (15-27) 8/24/01, 2:41 PM24

25
3 Move the scanner as follows.
• When Auto is checked under Direction on the driver screenThe scanner automatically recognizes orientation of scanned characters and convertsthem into right orientation. You can scan the original without considering the scanningdirection.If either of the following settings is made, the scanner cannot detect the scanningdirection:– Resolution: 150 dpi or less– Image Type: Halftone
The scanner may not be able to convert scanned characters depending on the charactersize, design, or contained image data. In this case, check Manual under Direction andscan the original again.
• When Manual is checked under Direction on the driver screenScan the original as follows:
If you move the scanner in the direction opposite to the direction indicated by the abovearrow, the scanning result is flipped vertically or horizontally.
When scanning, move the scanner using something square as the guide for fine scanning.
When L->R is setWhen R->L/U->D is set
� Guide
� Guide
03_Scanner (15-27) 8/15/01, 8:38 AM25

26
4 Terminate scanning.
When the scanner scans the specified size of the original, it automatically terminatesscanning.
When the Adjust Image check box is off, scanning is now complete. The scanned image isdisplayed on the software.
When the Adjust Image check box is on, a reduced image is displayed in the previewwindow. Go to step 5.
To stop scanning in progressPress the scan button of this scanner. Data that has been scanned is saved.To cancel scanning in progressClick the Cancel button in the Scanning dialog. Data that has been scanned is not saved.
If you move the scanner too quickly, the scanner cannot normally scan the original. Toproperly scan the original, move the scanner at an appropriate speed.
If the scanned image shrinksIf the speed at which the scanner moves is fast, this scanner automatically adjusts thescanned resolution so that the scanned image does not shrink. If the speed is excessivelyfast, the scanner may not be able to adjust the resolution and the scanned image mayshrink. If the scanned image shrinks, scan the original again by moving the scanner moreslowly.
� Guide
03_Scanner (15-27) 8/15/01, 8:38 AM26

27
� Guide
5 Click the Image Adjustment tab. On the Image Adjustmentpage, adjust the image, and rotate, horizontally flip, and cutthe image on the preview screen if required.
6 Click the Transfer button on the driver screen to transfer theimage to the software.
During scanning or calibration of this scanner, do not place the computer in the suspend,not operating, or standby state.
03_Scanner (15-27) 8/15/01, 8:38 AM27

28
AAAAAAAAAAAAAAAAAAAA
BBBBBBBBBBBBBB
CCCCCCCCCCCCCCCCCCCCC
DDDDDDDDDDDDDDDDDDDD
EEEEEEEEEEEEEEEEEEEEEEE
FFFFFFFFFFFFFFFFFFFFFFFFFF
GGGGGGGGGGGGGGGGGGGG
HHHHHHHHHHHHHHHHHHHH
I I I I I I I I I I I I I I I I I I I I I I I I I I
J J J J J J J J J J J J J J J J J J J J J J J J J J
KKKKKKKKKKKKKKKKKKKK
AAAAAAAAAAAAAAAAAAAA
BBBBBBBBBBBBBBBBBBBBB
CCCCCCCCCCCCCCCCCCCCC
DDDDDDDDDDDDDDDDDDDD
EEEEEEEEEEEEEEEEEEEEEEE
FFFFFFFFFFFFFFFFFFFFFFFFF
EEEEEEEEEEEEEEEEEEEEEEE
FFFFFFFFFFFFFFFFFFFFFFFFFF
GGGGGGGGGGGGGGGGGGGG
HHHHHHHHHHHHHHHHHHHH
I I I I I I I I I I I I I I I I I I I I I I I I I I
J J J J J J J J J J J J J J J J J J J J J J J J J J
KKKKKKKKKKKKKKKKKKKK
The following explains how to scan a large original the scanner cannot scan at one time.This scanner stitches the images of an original mainly consisting of text (called a documentbelow) using the character image stitching function, and photographic and picture imagesusing the photograph image stitching function.
Checking Whether the Scanner Can Scan the Original YouWant to ScanFor information on the conditions and sizes for originals this scanner can scan, see“Conditions for Originals the Scanner Can Scan” and “Original Sizes the Scanner CanScan”.
Before Scanning an OriginalRequirement for target imagesIt takes time to stitch color or gray-scale images because the amount of data is very large.Your computer must have at least 64 MB of memory. (Recommended memory: 128 MB)
For character image stitchingScan the document so that the images to be stitched overlap each other and the overlappingarea contains at least two or three lines.
Scanning a Large Original
Original
Character images
� Guide
04_Scanner (28-33) 8/15/01, 8:39 AM28

29
• If you scan a document on the skew, black dots and others may be displayed on astitching boundary. In this case, remove them using image processing software.
• If you scan a document containing a drawing or photograph, the drawing or photographin the stitching result may be misaligned. Scan a document so that a drawing orphotograph is scanned at one time.
• Only images scanned from the top to bottom (document orientation) can be stitched. Inhorizontal line orientation, scan a document horizontally (solid line) and move the penscanner vertically (dotted line). In vertical line orientation, scan a document vertically(solid line) and move the pen scanner horizontally (dotted line).
• Do not scan a document in horizontal line orientation together with that in vertical lineorientation.
• Scan two documents to be stitched by aligning the beginning of the lines.
ABCDEFGHIJKLMNOPQRSTUVWX
YZABCDEFGHIJKLMNOPQRSTUV
WXYZABCDEFGHIJKLMNOPQRST
UVWXYZABCDEFGHIJKLMNOPQR
STUVWXYZABCDEFGHIJKLMNOP
QRSTUVWXYZABCDEFGHIJKLMN
OPQRSTUVWXYZABCDEFGHIJKL
MNOPQRSTUVWXYZABCDEFGHIJ
KLMNOPQRSTUVWXYZABCDEFG
HIJKLMNOPQRSTUVWXYZABCDE
FGHIJKLMNOPQRSTUVWXYZABC
DEFGHIJKLMNOPQRSTUVWXYZA
AB
CD
EFG
HIJK
LM
NO
PQR
STU
VW
XY
ZA
BC
D
EFG
HIJK
LM
NO
PQR
STU
VW
XY
ZA
BC
DE
FGH
IJKL
MN
OPQ
RST
UV
WX
YZ
AB
CD
EFG
HIJK
L
MN
OPQ
RST
UV
WX
YZ
AB
CD
EFG
HIJK
LM
NO
PQR
STU
VW
XY
ZA
BC
DE
FGH
IJKL
MN
OPQ
RS
TU
VW
XY
ZA
BC
DE
FGH
IJKL
MN
OPQ
RST
UV
WX
YZ
AB
CD
EFG
HIJK
LM
NO
PQR
STU
VW
XY
ZA
BC
DE
FGH
IJKL
MN
OPQ
RST
UV
WX
YZ
AB
C
DE
FGH
IJKL
MN
OPQ
RST
UV
WX
YZ
AB
CD
EFG
HIJK
LM
NO
PQR
STU
VW
XY
ZA
BC
DE
FGH
IJKL
Document in horizontalline orientation
Document in verticalline orientation
04_Scanner (28-33) 8/15/01, 8:39 AM29

30
Images which can be stitched
Image 1
Image 2
Images which cannot be stitched
Image 1
Image 2
For photograph image stitchingScan a photograph or picture image original so that an area of at least 20 mm must bescanned twice.
Scan an original from the top to the bottom. Scan the left side of the original for the firstpass, and then scan the right side for the second pass.
Second scanFirst scan
ABCDEFGHIJKLMNOPQRSTUVWX ABCDEFGHIJKLMNOPQRSTUVWX
ABCDEFGHIJKLMNOPQRSTUVWX NOPQRSTUVWX
The overlapping area mustbe at least 20 mm.
� Guide
04_Scanner (28-33) 8/15/01, 8:39 AM30

31
Scanning a Large OriginalFor a large original, select Character Image for Stitching Mode and scan the originalseveral times. For a photograph or picture image original, select Photograph Image.
The following explains how to make settings on the driver screen. For details of the driverscreen, see “Screens Displayed during Use of the Scanner”.
1 Set the desired stitching mode on the driver screen.
If one of the following settings is made, the scanner cannot scan the originaland displays an error message. Scan the original after changing the setting.
For character image stitching• Resolution: 150 dpi• Image Type: Halftone• Direction: Manual
For photograph image stitching• Image Type: Halftone• Direction: Manual
2 Specify a size for Image Size.Select one of the following image sizes for Image Size:A4 Portrait (*1), A4 Landscape, B4 Portrait, B4 Landscape, Letter Portrait, LetterLandscape, and Free (*2)
*1 Initial value for character image stitching*2 Initial value for photograph image stitching
� Guide
04_Scanner (28-33) 8/15/01, 8:39 AM31

32
3 Specify a value for Scan Times.
For character image stitchingSpecify 2 to 6 for Scan Times as the number of times the original is to be scanned.For photograph image stitching2 is fixed for Scan Times.
4 Start scanning.Press the scan button of this scanner or click the Scan button on the driverscreen to start scanning. When scanning is complete, the reduced image thatwas scanned is displayed in the preview window.
When the first image has been scanned successfully, the message “1 scancomplete” is displayed on the bar indicating the scanning progress.
5 Scan the second and subsequent images.Using the same method as that followed in scanning the first image, to startscanning, press the scan button of the pen scanner or click the Scan button onthe driver screen.When the second or subsequent image has been scanned, the image is stitchedto the previous image.
When stitching is successfully completedThe following message is displayed under Scan Times:“X scan complete, stitching succeeded.” X: Number of scanned imagesContinue with scanning.
When stitching is not successfully completedA dialog appears that asks you whether to scan the image again.Click the Yes button. The following message is displayed under Scan Times. Scan thesame portion of the original again.“X scan failed, rescan”
04_Scanner (28-33) 8/15/01, 8:39 AM32

33
6 Terminate stitching.When the specified number of images have been scanned and stitched, scanningterminates, the driver screen is closed, and the image of the stitching result isdisplayed on the software.If you want to terminate scanning before the specified number of images havebeen scanned, click the Stop Stitching button. The images that have beenscanned and stitched are displayed on the software.
Images of an original cannot be stitched successfully
• If the scanner moving speed is too fast, images may shrink and not be stitchedsuccessfully. Move this scanner at an appropriate speed to scan the original.
• Scan characters straight instead of on the skew.• If a stitched portion contains, in addition to characters, noncharacters such as tables,
drawings, or pictures, images may not be stitched successfully if the number ofcharacters in such stitched portion is small. Scan the original so that the stitched portioncontains numerous characters.
• For photograph image stitching, if a stitched portion contains no objects (such as aperson, mountains, trees, etc.) or the original is blurred and unclear, images may notbe successfully stitched. Scan the original so that the stitched portion containscontrasting images.
04_Scanner (28-33) 8/15/01, 8:39 AM33

34
To keep the scanner in good condition, clean the scanner about once a month.
BurnsElectric shock• Before cleaning the scanner, always disconnect the pen scanner from the computer.• Cleaning the scanner without disconnecting it from the computer may result in burns or
electric shock.
Note the following points when cleaning the scanner:• Use only water or neutral detergent. Use of a such volatile liquids such as benzene or
thinner may result in the discoloration or deformation of the cover.• You need not apply oil. Do not lubricate.
Cleaning the SurfacesWipe any dirt on the surface of the scanner with a cloth dampened with water or watereddown neutral detergent and squeezed dry. Then, wipe the surface with a soft dry cloth.
Maintenance
Warning
� Notes
05_Scanner (34-49) 8/15/01, 8:40 AM34
35
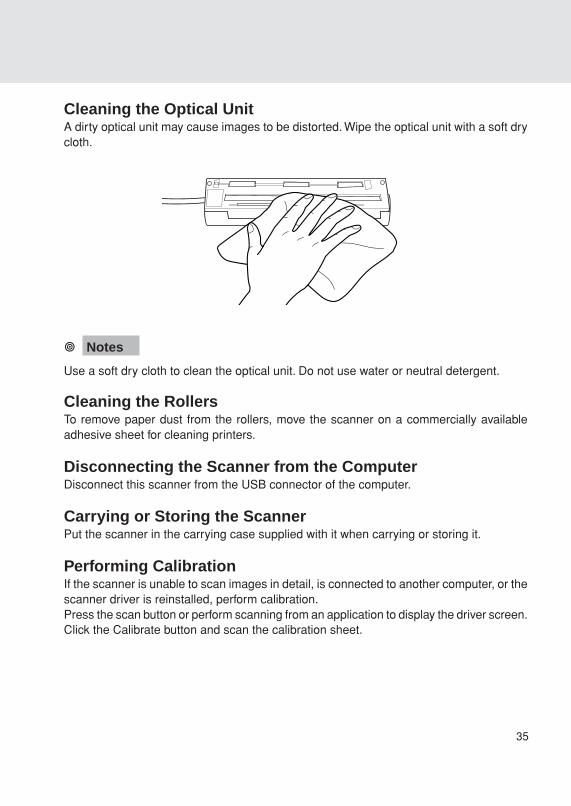
Cleaning the Optical UnitA dirty optical unit may cause images to be distorted. Wipe the optical unit with a soft drycloth.
Use a soft dry cloth to clean the optical unit. Do not use water or neutral detergent.
Cleaning the RollersTo remove paper dust from the rollers, move the scanner on a commercially availableadhesive sheet for cleaning printers.
Disconnecting the Scanner from the ComputerDisconnect this scanner from the USB connector of the computer.
Carrying or Storing the ScannerPut the scanner in the carrying case supplied with it when carrying or storing it.
Performing CalibrationIf the scanner is unable to scan images in detail, is connected to another computer, or thescanner driver is reinstalled, perform calibration.Press the scan button or perform scanning from an application to display the driver screen.Click the Calibrate button and scan the calibration sheet.
� Notes
05_Scanner (34-49) 8/15/01, 8:40 AM35

36
The following explains how to uninstall the scanner driver and software supplied with thescanner.To uninstall software in a Windows 2000 environment, you must log on as Administrator.
ReinstallationBefore reinstalling the scanner driver, first delete the existing files.
Uninstalling the Scanner DriverBefore reinstalling or upgrading the scanner driver for the purpose of using it properly, firstuninstall the currently installed scanner driver.
1 Select Settings from the Start menu and click Control Panel.The Control Panel dialog appears.
2 Double-click Add/Remove Programs.The Add/Remove Programs Properties dialog appears.
3 On Windows 98/Me, select FUJITSU Mobile Color Scannerfrom the list on the Install/Uninstall page and click the Add/Remove button.On Windows 2000, Click the Change/Remove Programsbutton, select FUJITSU Mobile Color Scanner from thedisplayed list, and click Change/Remove button.A confirmation dialog appears. Click Yes.
Uninstalling Software
05_Scanner (34-49) 8/15/01, 8:40 AM36

37
4 Restart the computer.After completion of uninstallation, restart the computer.The scanner driver is now uninstalled.
Uninstalling Software Supplied with the Scanner
1 Select Settings from the Start menu and click Control Panel.The Control Panel dialog appears.
2 Double-click Add/Remove Programs.The Add/Remove Programs Properties dialog appears.
3 On Windows 98/Me, select a software program to beuninstalled from the list on the Install/Uninstall page and clickthe Add/Remove button.On Windows 2000, Click the Change/Remove Programsbutton, select a software program to be uninstalled from thedisplayed list, and click Change/Remove button.A confirmation dialog appears. Click Yes.
4 Restart the computer.After completion of uninstallation of the software program, restart the computer.The software program is now uninstalled.
05_Scanner (34-49) 8/15/01, 8:40 AM37

38
Read the following if an error message is displayed or you cannot operate the scanner asexpected while using the scanner.
Checking the ConnectionAfter connecting this scanner to the computer, check whether the scanner driver hasbeen installed successfully, following the procedure below:
1 Select Settings from the Start menu and click Control Panel.
Troubleshooting
2 Double-click System in the Control Panel.
05_Scanner (34-49) 8/15/01, 8:40 AM38

39
3 On Windows 98/Me:Click the Device Manager tab in the System Properties dialog.On Windows 2000:
Click the Device Manager button on the Hardware tab in the System Propertiesdialog.
Verify that FUJITSU Mobile Color Scanner has been created under ImagingDevices in the displayed Device Manager page.
This completes the checking procedure.
05_Scanner (34-49) 8/15/01, 8:40 AM39
40
If FUJITSU Mobile Color Scanner has not been created and USB Device is displayedunder Other Devices or USB Device under Imaging Devices is marked with an exclamationmark (!) on Windows 98/Me/2000, the scanner driver has not been installed successfully.
Reinstall the scanner driver by following the procedure below:
• When you have not installed the scanner driverOn Windows 98/Me, select USB Device under Other Devices by clicking the left mousebutton and click the Remove button to uninstall it. (See “Uninstalling Software”.)On Windows 2000, click the right mouse button on FUJITSU Mobile Color Scanner inthe Device Manager dialog box. A menu appears. Click Remove to uninstall FUJITSUMobile Color Scanner. (See “Uninstalling Software”.)After completion of uninstallation, disconnect the scanner if connected, install the scannerdriver, and then connect the scanner to the computer. (See “Preparations”.)
• When you have installed the scanner driverUninstall the device (USB Device) following the procedure described in “When youhave not installed the scanner driver” above. Then, disconnect the scanner if connectedand connect the scanner to the computer again.For details on how to uninstall a device, see “Uninstalling Software”.
05_Scanner (34-49) 8/15/01, 8:40 AM40

41
Error MessagesIf an error message is displayed during the use of this scanner, scan the original againand check whether the error recurs before assuming that the scanner is faulty.
If the error recurs, take appropriate action in accordance with the explanations givenbelow. If the error still occurs after you take action following the procedure describedabove, contact a Fujitsu service representative in charge of Fujitsu personal computersand peripheral products.
Error message
The default value data file has an incorrect value.A standard value has been set.
An error occurred during scanning.
Explanation and action to be taken
A value outside the range or anunappropriate character was found in anitem in the initial value data file.
(Item XXXXX indicated by Entry=XXXXX)
If the file has been rewritten intentionally,the setting may be invalid for the item.
If it has not been rewritten, the file mayhave been destroyed for some reason.
In this case, the value itself is set to thedefault. Periodically check the hard disk(chkdsk/scandsk) and viruses.
– Check whether the scanner driver hasbeen installed.
– Check whether this scanner is selectedfor the software. If it is not selected,select FUJITSU Mobile Color Scanner,referring to the software manual.
05_Scanner (34-49) 8/15/01, 8:40 AM41

42
Error message
The specified scanner is being used.
An input-output error occurred in the scanner.
The memory is insufficient.
– Parameter error (internal)
– The calling procedure is invalid (internal).
– A range specification is invalid (internal).
– The calculation result exceeded the value thatcan be expressed (internal).
– A user definition is not registered (internal).
General fault related to response toMSG_XXXXXX
General fault related to response to DAT_XXXXXX
Explanation and action to be taken
– Check whether this scanner is beingused by another software program.
– Check whether the scanner driver hasbeen started twice.
– Terminate all software programs, thenstart them and perform scanning.
A failure occurred during a scan operationusing this scanner. The failure may haveoccurred in the image scanner.
Turn off the power to all devices once. Then,turn on the power to the computer and thenturn the power on to other devices.
Then, try scanning again.
Memory used for scanning is insufficient.
Memory may be insufficient due to thenumber of programs operating in thebackground and registered device drivers,or because of a software program such as aphotopaint program for which a largecapacity of GDI memory is allocated bysetting.
Change the software setting, cancel theregistration of device drivers having nodirect bearing on scanning, or stopoperating background programs.
This program error occurs during exchangeof a command between the scanner driverand this scanner.
Restart the computer and retry.
This program error occurs during transmis-sion of an internal message.
A submessage shown on page 44 is alsodisplayed.
This program error occurs during transmis-sion of an internal message.
05_Scanner (34-49) 8/15/01, 8:40 AM42

43
Error message
Because the scanner was stopped, scan opera-tion was aborted.
You cannot select “Automatic” in “Direction” if“Halftone” is selected in “Image Type.” Select“Manual” in “Direction,” or select a setting otherthan “Halftone” in “Image Type.”
Image data was missed.
The USB scanner device cannot be found.
Character images could not be stitched. Do youwant to scan them again?
Photograph images could not be stitched. Do youwant to scan them again?
Photograph image stitching stopped because itspreprocessing could not be performed success-fully.
Explanation and action to be taken
This message is displayed when at least 2minutes have elapsed after start ofscanning. Scan an original within 1 minuteat a time.
Uncheck Auto for Direction or set an itemother than Halftone Image Type, then makethe setting again.
Image data transfer could not catch up withthe scanning speed of this scannerbecause the system processing speed waslow, and image data dropouts occurred.Terminate running software programs toimprove system performance or slowlymove the scanner for scanning.
Check whether the scanner is connectedproperly. Check whether the scanner isproperly selected for the application.
Check whether the scanning direction andspeed are proper. Refer to “Scanning aLarge Original”.
Check whether the scanning direction andspeed are proper. Refer to “Scanning aLarge Original”.
Memory may be insufficient. Terminateother applications. (Recommendation: Haveavailable at least 128 MB of extendedmemory). Alternatively, the scanned imageis too short. Scan at least 30 mm of animage.
05_Scanner (34-49) 8/15/01, 8:40 AM43

44
SubmessagesError message
– Undefined error
– Processing cannot be continued becausememory is insufficient.
– The data source could not be found.
– The maximum allowed number of connectionswas exceeded.
– An operator error occurred.
– An invalid function was specified.
– Invalid MSG DG DAT combination
– An invalid value was specified.
– An invalid DG DAT MSG procedure wasspecified.
Explanation and action to be taken
Submessages following error messages“General fault related to response toMSG_XXXXXX (internal)” and “Generalfault related to response to DAT_XXXXXX(internal)” These submessages indicate thedetails of individual program errorsoccurring during message/data processing.
05_Scanner (34-49) 8/15/01, 8:40 AM44

45
Before Assuming that the Scanner is FaultyIf you cannot operate the scanner as expected or an error occurs, check the followingitems before assuming that the scanner is faulty.Problems are divided into the following two types in accordance with their nature here:• Problems related to operation• Problems after scanning
Problems related to operationThe scanner does not operate when you press the scan button.• Check whether the scanner driver has been installed properly, referring to “Checking
the Connection” in the User’s Manual.• If you press the scan button of the scanner after establishing a dial-up connection for
Internet or mail communication, but the scanner does not operate, start FUJITSU launchand correct the error by following the procedure below:
1 Click the right mouse button on the icon at the lower right ofthe screen. A menu appears. On the menu, click Exit.
2 Click Start > Programs > FUJITSU Mobile Color Scanner >FUJITSU launch.
• The scanner normally operates only when Windows is restarted and the scanner isconnected to the computer as described in “Preparations” in the User’s Manual. Performthe operation below before connecting the scanner to the computer. (See “Checkingthe Connection”.)
05_Scanner (34-49) 8/15/01, 8:40 AM45

46
1 Select Settings from the Start menu and click Control Panel.
3 On Windows 98/Me, click the Device Manager tab in theSystem Properties dialog.On Windows 2000, click the Device Manager button on theHardware page in the System Properties dialog.
4 Check that USB Device is displayed under Other Devices onthe Device Manager page.
2 Double-click System in the Control Panel dialog.
05_Scanner (34-49) 8/15/01, 8:40 AM46

47
5 Select USB Device and click the Remove button.
6 Connect the scanner to the computer.
Although the setup disk is inserted, the main menu does not appear.
Start Explorer and double-click Instmenu.exe on the setup disk.
05_Scanner (34-49) 8/15/01, 8:41 AM47

48
Problems after scanning
The scanned image contains streaks.• The optical unit of the scanner may be dirty or there may be foreign matter on the unit.
Clean the optical unit. (Refer to “Maintenance” and “Cleaning the Optical Unit”.)• Perform calibration again. This problem may be solved. (See “Preparations” in the User’s
Manual and “calibration” in the Glossary.)
The scanned image is blurred or distorted or colors run.• The original may not have been scanned straight. Scan the original again straight with
using a ruler as a guide.• Check whether the original satisfies the conditions described in “Conditions for Originals
the Scanner Can Scan” and “Original Sizes the Scanner Can Scan”. If the original doesnot satisfy any condition, the scanned image may be affected.
• Check the original for wrinkles and creases.
The scanned image is dark.• The optical unit of the scanner may be dirty. Clean the optical unit. (Refer to “Cleaning
the Optical Unit”.)• Perform calibration. (See “Preparations”.)
A commercial software program cannot read scanned images.• Check whether the software program supports this scanner. If the software program
does not support this scanner, but supports TWAIN, it may be possible to use thisscanner. In this case, however, some functions of this scanner may be unavailable.
• Check whether the correct scanner model is selected for the software program. If theselected model is incorrect, select a correct scanner model, referring to the softwaremanual.
05_Scanner (34-49) 8/15/01, 8:41 AM48
49
Aliasing in the image is noticeable.• If the scanning resolution is low, aliasing may become noticeable depending on the
image. Specify a higher resolution and scan the original again.• Although an original is scanned at high resolution, aliasing may become noticeable
when the image is scaled up. Make an enlarged copy of the original itself and scan thecopy.
The margins of the original are not white.• Areas which look white differ in the degree of whiteness in fact. For this reason, a white
area may be scanned as data with a specific degree of whiteness. In this case, set ahigh value for Brightness on the Image Adjustment page on the driver screen. (Refer to“Screens Displayed during the Use of the Scanner”.)
• For an original consisting of monochrome text, set a low value for Threshold on theMain page on the driver screen. (Refer to “Screens Displayed during the Use of theScanner”.)
It takes time to scan an image.When an original is scanned at high resolution, the computer’s response may becomeslow. In this case, scan the image at low resolution.
The scanner cannot be used when operation is resumed.If the scanner is connected to a USB hub such as a liquid crystal display, connect it to thecomputer.
05_Scanner (34-49) 8/15/01, 8:41 AM49

50
Specifications
Hardware Specifications
Scanning method
Resolution
Scanning device
Scanning speed
Interface
Original
Specified form sizes
Scanned image
Dimensions
Weight
Input power
Power consumption
Hand-held
600 x 600 dpi
Contact image-sensor
3.9 ms/line (at 600 dpi)
USB
Maximum scanning sizewithout stitching105 mm wide x 364 mm longwith stitching420 mm wide x 364 mm longMinimum scanning size13 mm wide x 13 mm long
A6, two A6-size sheets in portrait orientation, businesscards, postcards, photographs, free, and custom
In Stitching mode
A4 Portrait, A4 Landscape, B4 Portrait,B4 Landscape, Letter Portrait, LetterLandscape, and Free
Color (16,770,000 colors), gray scale (256 shades of gray),halftone (dither matrix mode, 64 shades of gray), and black& white
142 mm wide x 30 mm deep x 30 mm high
About 100 g
Via the USB cable
2.5 W
06_Scanner (50-53) 8/15/01, 8:43 AM50

51
Operating Environment
Scanner Driver Operating EnvironmentCompatible operating systems
CPU
Memory (*1)
Hard disk
Connection port
Windows 98/Me, Windows 2000 Professional
Recommended: Pentium/266 MHz or higher
At least 64 MB (Windows 98/Me)
Recommended: At least 128 MB
(scanning at 600 dpi on Windows 2000)
At least 5 MB of available space
USB Port
*1: Stitching images of a large original requires at least 64 MB of memory.
Environmental Requirements
Dust Environment equivalent to an ordinary office or home Avoidusing the scanner in an environment where there isexcessive dust.
Illumination Avoid using the scanner in a location exposed to directsunlight or an external light source.
Ambient temperature Operating: 5 to 35°C
Not operating: 0 to 50°C
Ambient humidity Operating: 20 to 80%
RH Not operating: 10 to 80% RH
Connect the scanner to a USB hub with an internal power supply (hub to which power issupplied from the power cable or AC adapter) and use up to a two-stage serial connectionwhen required.
� Guide
06_Scanner (50-53) 8/15/01, 8:43 AM51

52
Before Making InquiriesIf you want to consult Fujitsu about the scanner or have any inquiries thereon, check thefollowing items and contact a Fujitsu service representative.
The information in the list below will allow us to respond to you more quickly.
Model name of the connected :
computer :
Type of operating system in use :
Built-in memory capacity :
Hard disk capacity :
Version of scanner software :
Application and its version :
Settings for scanning :
Connection :
Connection cable in use :
Error message or details of the inquiry
Manufacturer name ( )
Model name ( )
M Windows 98 M Windows Me
M Windows 2000
MB
MB
M Directly connected to a computer
M Network (Write as many details aspossible.)
Manufacturer name ( )
Model name ( )
06_Scanner (50-53) 8/15/01, 8:43 AM52

53
Glossary
Terms that may be unfamiliar to beginners are described below.
CalibrationOperation for determining the reference values for black and white areas, so that thecomputer can accurately identify each information item in an image scanned by the scanner.For the Mobile Color Scanner, use the calibration sheet supplied with it for calibration. Besure to perform calibration before using this scanner for the first time.
InstallTo incorporate software and hardware information into a computer and make the informationready.To use this scanner, software called the scanner driver must be installed. The scannercannot scan images just by connecting it to a computer with the cable.
ResolutionResolution is expressed as the number of pixels (dots) per inch (dpi). If the resolution ishigher, the image can be read in greater detail, but the memory requirement also increases.Select a suitable resolution for the digitized image.
Scanner driverProgram for making this Mobile Color Scanner available for software compatible withscanners. This scanner driver conforms to TWAIN, which is a standard for interfacesbetween an image input-output device such as a scanner and digital cameras and software.
Stitching ModeSelect this mode to scan a large document or image original that cannot be scanned atone time. This driver automatically stitches adjoining images while reading the printeddocument and sends one image to the application.
TWAINThe standard for interfaces between an image input-output device such as a scanner anddigital cameras and software.
06_Scanner (50-53) 8/15/01, 8:43 AM53