ftp.ipswitch.comftp.ipswitch.com/ipswitch/manuals/Imail406.pdfIn the hosts file on each of the mail...
309
This online guide provides up-to-date information about your IMail Server for Windows NT software. You can click one of the links below or use the bookmarks in the left margin to navigate this guide. IMail Server for Windows NT Version 4.06 Addendum IMail Server for Windows NT Version 4.03 Addendum IMail Server for Windows NT User’s Guide IMail Server for Windows NT Options Guide
Transcript of ftp.ipswitch.comftp.ipswitch.com/ipswitch/manuals/Imail406.pdfIn the hosts file on each of the mail...

������������
���������
������������
This online guide provides up-to-date informationabout your IMail Server for Windows NT software.You can click one of the links below or use thebookmarks in the left margin to navigate thisguide.
IMail Server for Windows NT Version 4.06 Addendum
IMail Server for Windows NT Version 4.03 Addendum
IMail Server for Windows NT User’s Guide
IMail Server for Windows NT Options Guide

1Addendum to User’s Guide
IMail Server for Windows NT
Addendum to the IMail Server ManualsIMail Server Version 4.06
This document describes three important changes in Version 4.06 ofIMail Server for Windows NT. Read and keep this document withyour IMail Server User’s Guide and IMail Server Options Guide.
• The IMail List Server program has a new name and alias.
• The Web Messaging and Mail to Pager/Beeper options are nowpart of the IMail Server standard license.
• The new installation procedure installs the Web Messaging andMail to Pager/Beeper software.
Important Note to Upgraders: If you already have the WebMessaging with Online Advertisements option installed, theIMail Server Version 4.06 installation program will overwrite itwith the Web Messaging application. You will have to reinstallthe Web Messaging with Online Advertisements application.
Web Messaging and Mail to Pager/Beeper
IMail Server Version 4.06 now includes the following applicationsas part of the standard license. These applications are installed whenyou install IMail Server Version 4.06.
• Web Messaging — lets users read and send mail from any webbrowser. This enhances e–mail access by “web enabling” theIMail Server. It is especially helpful to users who are awayfrom the office and need quick and easy access to theirmessages. Web Messaging also lets system administratorsmonitor system activity and manage user accounts remotelyfrom a web browser.
Web Messaging with Online Advertisements is available as aseparately purchased option. This option is targeted at InternetService Providers who want to display banner ads at the top ofthe Web Messaging mail screens. See note above.
• Mail to Pager/Beeper — lets you set up IMail aliases that canreceive mail from a mail client and forward it to a pager ornotify you by beeper.

2 Addendum to User’s Guide
IMail Server for Windows NT
The Mail to Fax application, which lets you set up mail accountsthat can receive mail from a mail client and forward it to a faxmachine, is available as a separately purchased option.
For information on using these applications, see the IMail ServerOptions Guide or the application’s help system.
IMail List Server Changes
We have changed the name of the IMail List Server program toimailsrv.exe and the related alias (used to subscribe and unsubscribeto lists) to imailsrv. This was necessary due to a trademark conflictfor the previous name (listserv). If you are using the listserv alias,you do not have to change occurrences of the alias because wehave modified the IMail Server to allow all old aliases to workproperly. However, all aliases will return imailsrv in place oflistserv. If you are setting up a new list, use the imailsrv alias.
The new IMail List Server help file (imailsrv.hlp) reflects thesename changes. To display help topics, select Help–>Contents fromthe IMail List Server window.
The IMail Server User’s Guide will be updated in a future release toreflect the name changes. Note that in Chapter 13, “List Server,” allreferences to listserv.exe should be changed to imailsrv.exe and allreferences to the listserv alias should be changed to imailsrv.
Installing IMail Server V4.06
The IMail Server Version 4.06 installation program installs thecomplete IMail Server software, Web Messaging, and Mail toPager/Beeper applications. For procedures for installing thesoftware, see Chapter 2 in the IMail Server User’s Guide.
Note: If you already have the Web Messaging with OnlineAdvertisements option installed, see the Important Note toUpgraders on the previous page.
Note: Before users can use the Web Messaging feature, you muststart the Web Messaging server. For information on setting up WebMessaging, see Chapter 1 in the IMail Server Options Guide.

1Addendum to User’s Guide
IMail Server for Windows NT
Addendum to IMail Server 4.0 Manual
Overview
This addendum describes the new features and enhancements inVersion 4.0.3 of IMail Server for Windows NT. Please read thefollowing changes and additions and keep this addendum with yourIMail Server manual.
New features
This version of IMail Server contains the following new features:
• SMTP — Using virtual hosts to allow one IMail Server PC toreceive mail addressed to multiple domains. See the section“Setting Up Virtual Hosts” for more information.
• SMTP — Running “peer” IMail Servers to allow users for aspecific domain to be spread across multiple physical systems.See the section “Running Peer IMail Servers” for informationon setting up peer servers.
• SMTP — Enables ESMTP support for ETRN and SIZE.
• POP3 — Allows clients to read more than 1000 messages in amailbox without affecting the service or the client.
• IMONITOR — Enhanced pager and beeper notificationroutines to support SMS protocol (for Europe) and NTTprotocol (for Japan).
• POP3D32, SMTPD32, IMONITOR, IMAIL.CPL — removedthe address limit for access control lists.
Bug fixes
See the “Bug Fixes” section for a summary of the changes. Adetailed list of bug fixes is provided in the changes.txt file (found inthe directory where you installed IMail).
2 Addendum to User’s Guide
IMail Server for Windows NT
Documentation notes
See the “Documentation Notes” section for corrections to the IMailServer for Windows NT User’s Guide.
System requirements and capacities
See the “System Requirements and Capacities” section for changesin the latest release.
Setting Up Virtual Hosts
IMail Server allows you to set up two types of virtual hosts, asdescribed on page 24 of the manual. Virtual Hosts allow one IMailServer PC to receive mail addressed to multiple domains. There aretwo types of virtual hosts:
• Virtual Hosts with IP Addresses
• Virtual Hosts without IP Addresses
This section explains more about the differences between the twotypes of virtual hosts and when each is recommended.
Virtual Hosts with IP Addresses: This is usually the recommendedway to set up virtual hosts, because all of the capabilities of regularIMail Server hosts are available to virtual hosts with IP addresses.The only limitations of virtual hosts with IP addresses are:
Each virtual host requires its own unique IP address. This requiresthe extra step of adding an IP address in the NT TCP/IPconfiguration in the Control Panel.

3Addendum to User’s Guide
IMail Server for Windows NT
Virtual Hosts without IP Addresses: Virtual hosts without IPaddresses are easier to set up than those with IP addresses. All youhave to do is go into the IMail Server host configuration dialog boxand click the Add button. There are, however, several limitations ofvirtual hosts without IP addresses:
• Some mail clients (such as Eudora, Netscape, and MicrosoftInternet Explorer) will not be able to connect to the virtual hostto read mail. This problem exists because some mail clientseither have length restrictions for userids, or they clip the useridat the “@” sign.
To fix this problem, a new registry string variable has beenadded:
HKEY_LOCAL_MACHINE\Software\Ipswitch\IMail\Global\HostDelimiters
The default value of this string is: %*:$&
This allows a user to log in to the virtual host by substitutingone of the above characters for the “@” sign when identifyingthe virtual domain and using the “@” sign to delimit theprimary domain only. For example, to log in to a virtual hostwithout an IP address, the user would enter a userid with thefollowing syntax:
userid%virtualdomain@primarydomain
• The LDAP, Whois and Finger servers do not work with virtualhosts without IP addresses.
• Remote management of lists does not work completely.
• Cannot use a virtual host without IP address as a “peer” mailserver.
Virtual hosts without IP addresses are recommended when you havea shortage of IP addresses or when you wish to forward all mail fora domain to a user at another domain. As an example of the latter:
• Your primary domain is called abracadabra.com
• You want all mail sent to merlin.com to be forwarded [email protected]
• To accomplish this, set up a virtual host without an IP addressfor merlin.com and do not create any users for merlin.com

4 Addendum to User’s Guide
IMail Server for Windows NT
• Set up a “nobody” alias in the IMail User Manager formerlin.com pointing to a userid on abracadabra.com
• All mail to any user at merlin.com will be sent to the specifieduser at abracadabra.com.
Running “Peer” IMail Servers
IMail Server now lets you set up “peer” servers to allow users for aspecific domain to be spread across multiple physical systems. Youwill need to purchase and install a copy of IMail Server Version4.0.3 or later on each peer server.
To add one or more “peer” servers for an IMail Server domain:
1. Install a IMail Server Version 4.0.3 or later on each machinethat will function as a “peer” mail server.
2. In your Domain Name System (DNS) server, add mailexchanger records for the peer servers. (See the example thatfollows this procedure.)
3. In the hosts file on each of the mail servers, make entries for allthe mail servers.
4. On each mail server, set up the Peer List in the IMail Serversoftware.
a. From the Start menu, select Settings–>Control Panel, andthen click the IMail Server icon. Click the Global tab, andthen click the Virtual Host Admin button. The VirtualHost Configuration dialog box appears.
b. If you have more than one domain, select the domain forwhich you want to add peer servers.
c. Click Peer List. The Peer List dialog box appears.

5Addendum to User’s Guide
IMail Server for Windows NT
d. Enter the IP addresses of the peer servers. IP addresses fora peer server must represent a real host or a virtual hostthat is assigned an IP address.
Enter an IP address and click Add to add it to the peer list.To delete an IP address from the peer list, select it andthen click Delete.
The server does not have to be restarted after editing thepeer list.
Make sure that the peer list exists on each system that receivesmail for a domain. Note that you do not add the local machine’sIP address in the peer list. You need to enter only the otherpeers. (See the example that follows this procedure.)
5. On each mail server, in the Alias box (in the Virtual HostConfiguration dialog box), make sure the primary domain (forexample, ipswitch.net) is entered. This alias names the primarydomain used to send and receive mail. Note that this aliascannot be a primary domain associated with a particular host.Do not enter IP addresses in the Alias box.
6. On each mail server, make sure the Default Mail Host box (inControl Panel–>IMail Server–>SMTP tab) is empty when usingpeer lists.
Example of Setting up Peer Servers
For example, suppose you have one domain (called ipswitch.net)and three servers. All three servers accept incoming mail on apriority basis and all have a portion of the user database. You wouldmake the following entries in your DNS:
DNS entries:–––––––––––––
ipswitch.net
IN MX 10 mail.ipswitch.netIN MX 20 mail1.ipswitch.netIN MX 30 mail2.ipswitch.net
mail IN A xxx.xxx.xxx.2mail1 IN A xxx.xxx.xxx.9mail2 IN A xxx.xxx.xxx.14

6 Addendum to User’s Guide
IMail Server for Windows NT
You create the following peer lists in the IMail Server software onthe three servers:
mail xxx.xxx.xxx.9xxx.xxx.xxx.14
mail1 xxx.xxx.xxx.2xxx.xxx.xxx.14
mail2 xxx.xxx.xxx.2xxx.xxx.xxx.9
In the hosts file on each of the three servers, make the three entries:
mail.ipswitch.net xxx.xxx.xxx.2mail1.ipswitch.net xxx.xxx.xxx.9mail2.ipswitch.net xxx.xxx.xxx.14
On each of the three machines, make sure the domain (ipswitch.net)is the only entry in the Alias box in (in the Virtual HostConfiguration dialog box).
On each of the three machines, make sure the Default Mail Hostbox (in Control Panel–>IMail Server–>SMTP tab) is empty whenusing peer lists.
Bug Fixes
This section provides a summary of the bug fixes in this IMailServer release. See the changes.txt file (found in the directory whereyou installed IMail) for a list of all the bug fixes.
Changes to the IMAP4 Server (IMAP4D32)
Many fixes to allow correct operations with many IMAP4 clients,including:
• Fixed commands to handle spaces in filenames properly.
• Fixed problem with BODY and BODYSTRUCTURE fetches toeliminate possible loop condition and high CPU utilization.

7Addendum to User’s Guide
IMail Server for Windows NT
• Fixed problem with LIST command returning INBOX in everysubdirectory.
• Fixed problems with UID file.
Changes to IMail Administrator tool (IADMIN)
Miscellaneous fixes and minor enhancements, including:
• Delete Msg’s by Date dialog box is now limited to 6 charactersto eliminate crash when text is too long for date functions.
• Modified standard alias editing to replace CR/LF with commaswhen alias is less than 127 characters.
• Fixed bug that caused the Alias list box to disappear on NT3.51 when a program alias is the first alias selected whenentering the alias tree.
• User forwarding field removed from Vacation tab.
• Alias edit box now accepts RETURN and has a scroll bar.
Changes to the SMTP server (SMTPD32)
• Now allows use of dashes (–) in mailbox names so digestprocessing for lists with a dash (–) will now work properly.
• More accurately assesses number of times a message has beensent to this host by looking for “Received: From” and “byhostname.domain” on a single line.
• Added CRLF to the NOOP response to work with MicrosoftExchange Server.
Changes to the POP3 server (POP3D32)
Many minor fixes, including:
• Now allows use of dashes (–) in mailbox names so digestprocessing for lists with a dash (–) will now work properly.
• Removed 1000 message limit for clients.
• Modified UIDL validity checking and reconstruction routines.

8 Addendum to User’s Guide
IMail Server for Windows NT
Changes to the IMail delivery program (SMTP32)
• Fixed rules processing, including bug with automated responseswhen mail is sent via rules processing to “nul” mailbox, andpossible crash when the source message contained multiplelarge To: lines in the header.
• Forwarding routine now strips CRLF from the address in theforwarding file.
• Now adds a From: line, if none exists, to make Lotus Notescomply with RFC 1123.
Changes to the LDAP server (ILDAP)
• Fixed CPU utilization problem when running this service.
• Now returns users while using the NT User Database.
Changes to the Setup program (SETUP)
Setup was modified so that a service not running prior to updating itwill copy the new executable, but not install it. If a service is notinstalled, an Install button appears on its properties tab in the IMailServices program in the Control Panel. Also eliminated the need forall .LRC files.
Documentation Notes
This section contains corrections to the IMail Server for WindowsNT User’s Guide.
• Page 21. In “Performing an Initial Setup and Test,” Step 2states “Make sure that the user root is defined in the UserRegistration window. If it is not, you need to add root as auser.” This is true when you are using the IMail user databasefor a domain. The setup creates a user named root and an aliasnamed postmaster and points the alias to the user administrator.However, if you choose to use the NT user database, the setupdoes not create the user root. Instead, it creates an alias namedroot and points the alias to the username administrator. So inthis case, you do not need to add root as a user.

9Addendum to User’s Guide
IMail Server for Windows NT
• Page 25. In the section “Setting Up Multiple Domains,” Step 2states “Click the Hosts button.” Replace this instruction with“Click the Global tab, and then click the Virtual Host Adminbutton.”
• Page 29. In the section “Setting up a Gateway for a SingleDomain,” the third paragraph refers to the hosts file. This pathshould be \{NT_directory} \system32\drivers\etc\hosts.
• Page 48. In the section “Adding an Alias,” Step 3 states thatalias names “must be created from the character set of A–Z,a–z, 0–9, _ (underline), and – (hyphen). Alias names andusernames can also contain the period (.), or dot, character.
• Page 51. In the section “Setting Up Delivery Rules,” the list ofmessage header fields in the first paragraph should include theTo: field.
• Page 53. In the “Rule Syntax” section, the rules for processingmail should include the following:
T=string:mailbox (Case sensitive match in To: header)T~string:mailbox (Case insensitive match in To:header)
And the example should include the following line:
T~help:support (send mail addressed to help to thesupport mailbox)
• Page 61. In the “IMail User Utility –Delivery Rules” section,make the same changes to the rules and example as in theprevious bulletted item.
• Page 67. In the “System Administration” section, add thefollowing item: List Administration — If you are the owner ofa mailing list or you have List Administrator access, you canaccess the list maintenance functions. To have ListAdministrator access, you must have both List Administratorand Host Administrator access, or you must have both HostAdministrator and IMail System Administrator access. Only theIMail System Administrator can assign access.
• Page 68. In the “Host Administration” section, add the sametext as in the previous bulletted item.

10 Addendum to User’s Guide
IMail Server for Windows NT
System Requirements and Capacities
• For NT 4.0, we recommend 64 MB of RAM, with a minimumof 32 MB.
• The Web Messaging with Advertising Option now supports upto 1,000 rotating banner ads.

IMail Server for Windows NT
User’s Guide
Software Version 4
Ipswitch, Inc.

81 Hartwell Ave. Phone: 617-676-5700Lexington, MA 02173 USA FAX: 617-676-5710
Web: http://www.ipswitch.com
The information in this document is subject to change without notice and should not be construed as acommitment by Ipswitch, Inc. While every effort has been made to assure the accuracy of the informa-tion contained herein, Ipswitch, Inc. assumes no responsibility for errors or omissions. Ipswitch, Inc.assumes no liability for damages resulting from the use of the information contained in this document.
The software described in this document is furnished under a license and may be used or copied onlyin accordance with the terms of that license.
Copyright 1995–1997 by Ipswitch, Inc. All rights reserved. IMail, WhatsUp, the WhatsUp logo,WS_FTP, the WS_FTP logo, Ipswitch, and the the Ipswitch logo are trademarks of Ipswitch, Inc. Oth-er products or company names are or may be trademarks or registered trademarks and are the propertyof their respective holders.
No part of this publication may be reproduced, photocopied, stored on a retrieval system, or trans-ferred without the express prior written consent of Ipswitch, Inc.
RESTRICTED RIGHTS LEGEND
USE, DUPLICATION, OR DISCLOSURE BY THE GOVERNMENT IS SUBJECT TO RESTRIC-TIONS AS SET FORTH IN SUBPARAGRAPH (C) (1) (ii) OF THE RIGHTS IN TECHNICALDATA AND COMPUTER SOFTWARE CLAUSE AT DFARS 52.227–7013.
Printing History
March 1995 First Edition.March 1996 Second Edition.August 1996 Third Edition.June 1997 Fourth Edition.August 1997 Revised.

3Contents
IMail Server for Windows NT
Contents
Preface 9. . . . . . . . . . . . . . . . . . . . . . . . . . . . . . . . . . . . . . . . . . . . . . . . . . . . . . . . . . In this Document 9. . . . . . . . . . . . . . . . . . . . . . . . . . . . . . . . . . . . . . . . . . . . . . What This Package Includes 10. . . . . . . . . . . . . . . . . . . . . . . . . . . . . . . . . . . . . The Ipswitch Products 10. . . . . . . . . . . . . . . . . . . . . . . . . . . . . . . . . . . . . . . . . Visit our Web Site 11. . . . . . . . . . . . . . . . . . . . . . . . . . . . . . . . . . . . . . . . . . . . . Please Send Us Your Comments 11. . . . . . . . . . . . . . . . . . . . . . . . . . . . . . . . . . Contacting Ipswitch or Your Reseller for Technical Support 12. . . . . . . . . . . . Downloading IMail Server Software Patches 12. . . . . . . . . . . . . . . . . . . . . . . .
1. Overview 13. . . . . . . . . . . . . . . . . . . . . . . . . . . . . . . . . . . . . . . . . . . . . . . . . . . . What is IMail Server for Windows NT? 13. . . . . . . . . . . . . . . . . . . . . . . . . . . . The IMail Server for Windows NT Family 14. . . . . . . . . . . . . . . . . . . . . . . . . System Requirements 15. . . . . . . . . . . . . . . . . . . . . . . . . . . . . . . . . . . . . . . . . . New in Version 4 15. . . . . . . . . . . . . . . . . . . . . . . . . . . . . . . . . . . . . . . . . . . . . Optional IMail Server Capabilities 16. . . . . . . . . . . . . . . . . . . . . . . . . . . . . . . . IMail Client for Windows 17. . . . . . . . . . . . . . . . . . . . . . . . . . . . . . . . . . . . . . . User Registration and Maintenance 18. . . . . . . . . . . . . . . . . . . . . . . . . . . . . . .
IMail User Manager 19. . . . . . . . . . . . . . . . . . . . . . . . . . . . . . . . . . . . . . IMail Administrator 19. . . . . . . . . . . . . . . . . . . . . . . . . . . . . . . . . . . . . . IMail User Utility 20. . . . . . . . . . . . . . . . . . . . . . . . . . . . . . . . . . . . . . . .
Remote Administration Tools 20. . . . . . . . . . . . . . . . . . . . . . . . . . . . . . . . . . . . User Mail Functions 21. . . . . . . . . . . . . . . . . . . . . . . . . . . . . . . . . . . . . . . . . . .
Mail Forwarding 21. . . . . . . . . . . . . . . . . . . . . . . . . . . . . . . . . . . . . . . . . Vacation Support 21. . . . . . . . . . . . . . . . . . . . . . . . . . . . . . . . . . . . . . . . . Finger “Plan” Support 22. . . . . . . . . . . . . . . . . . . . . . . . . . . . . . . . . . . . . Mail Delivery Rules 22. . . . . . . . . . . . . . . . . . . . . . . . . . . . . . . . . . . . . .
Automated Mail Accounts 22. . . . . . . . . . . . . . . . . . . . . . . . . . . . . . . . . . . . . . List Server Support 23. . . . . . . . . . . . . . . . . . . . . . . . . . . . . . . . . . . . . . . . . . . . Monitoring and Notification Tools 23. . . . . . . . . . . . . . . . . . . . . . . . . . . . . . . . Antispamming Features 24. . . . . . . . . . . . . . . . . . . . . . . . . . . . . . . . . . . . . . . . Domain Name System MX Support 26. . . . . . . . . . . . . . . . . . . . . . . . . . . . . . . Multiple Domain Support 26. . . . . . . . . . . . . . . . . . . . . . . . . . . . . . . . . . . . . . . Privacy Enhanced POP Support 27. . . . . . . . . . . . . . . . . . . . . . . . . . . . . . . . . . Route Inbound Mail to an External Program 27. . . . . . . . . . . . . . . . . . . . . . . . Special Unknown Local User Processing 28. . . . . . . . . . . . . . . . . . . . . . . . . . .

4 User’s Guide
IMail Server for Windows NT
2. Installing and Setting Up the IMail Server 29. . . . . . . . . . . . . . . . . . . . . . . . . . Installation, Upgrade, and Removal Instructions 29. . . . . . . . . . . . . . . . . . . . . Uninstalling IMail Server for Windows NT 32. . . . . . . . . . . . . . . . . . . . . . . . . Notes for Upgrading to IMail Server 4 32. . . . . . . . . . . . . . . . . . . . . . . . . . . . . Performing an Initial Setup and Test 33. . . . . . . . . . . . . . . . . . . . . . . . . . . . . . Setting Up Multiple Domains (Virtual Hosts) 37. . . . . . . . . . . . . . . . . . . . . . .
Virtual Hosts with IP Addresses 37. . . . . . . . . . . . . . . . . . . . . . . . . . . . . Virtual Hosts without IP Addresses 38. . . . . . . . . . . . . . . . . . . . . . . . . .
Setting Up IMail Server as a Mail Gateway for a Proprietary Mail System 41Setting up a gateway for a single domain 43. . . . . . . . . . . . . . . . . . . . . . Setting up a gateway for multiple domains 43. . . . . . . . . . . . . . . . . . . . .
Setting up a Dial–up Internet Connection 45. . . . . . . . . . . . . . . . . . . . . . . . . . Receiving Mail From an Internet Service Provider 45. . . . . . . . . . . . . . Setting Up the Server for Dial–up Access 46. . . . . . . . . . . . . . . . . . . . .
IMail Services 49. . . . . . . . . . . . . . . . . . . . . . . . . . . . . . . . . . . . . . . . . . . . . . . . IMail Services – Global 50. . . . . . . . . . . . . . . . . . . . . . . . . . . . . . . . . . . IMail Services – Log Server 51. . . . . . . . . . . . . . . . . . . . . . . . . . . . . . . . IMail Services – Queue 52. . . . . . . . . . . . . . . . . . . . . . . . . . . . . . . . . . . .
3. Creating and Maintaining Mail Accounts 53. . . . . . . . . . . . . . . . . . . . . . . . . . . IMail User Manager 53. . . . . . . . . . . . . . . . . . . . . . . . . . . . . . . . . . . . . . . . . . .
IMail User Manager – Main Screen 54. . . . . . . . . . . . . . . . . . . . . . . . . . Adding, Modifying, and Deleting User Mail Accounts 55. . . . . . . . . . . . . . . .
Adding a User Mail Account 55. . . . . . . . . . . . . . . . . . . . . . . . . . . . . . . Modifying a User Mail Account 59. . . . . . . . . . . . . . . . . . . . . . . . . . . . . Deleting a User Mail Account 60. . . . . . . . . . . . . . . . . . . . . . . . . . . . . . .
Adding and Deleting Users with the Command Line Program 60. . . . . . . . . . Adding, Modifying, and Deleting Aliases 61. . . . . . . . . . . . . . . . . . . . . . . . . .
Adding an Alias 61. . . . . . . . . . . . . . . . . . . . . . . . . . . . . . . . . . . . . . . . . . Modifying an Alias 64. . . . . . . . . . . . . . . . . . . . . . . . . . . . . . . . . . . . . . . Deleting an Alias 64. . . . . . . . . . . . . . . . . . . . . . . . . . . . . . . . . . . . . . . . .
Setting Up Mail Forwarding 64. . . . . . . . . . . . . . . . . . . . . . . . . . . . . . . . . . . . . Setting Up Delivery Rules 65. . . . . . . . . . . . . . . . . . . . . . . . . . . . . . . . . . . . . .
Rule Syntax 67. . . . . . . . . . . . . . . . . . . . . . . . . . . . . . . . . . . . . . . . . . . . . Example rules.ima file: 67. . . . . . . . . . . . . . . . . . . . . . . . . . . . . . . . . . . .
Setting Up a Vacation Message 67. . . . . . . . . . . . . . . . . . . . . . . . . . . . . . . . . . Setting Up a Finger Plan 69. . . . . . . . . . . . . . . . . . . . . . . . . . . . . . . . . . . . . . . . Setting Up an Automated Response with the Info Manager 70. . . . . . . . . . . . Entering LDAP Directory Information (Attributes) 72. . . . . . . . . . . . . . . . . . . IMail User Utility 73. . . . . . . . . . . . . . . . . . . . . . . . . . . . . . . . . . . . . . . . . . . . .
IMail User Utility – Logging On 74. . . . . . . . . . . . . . . . . . . . . . . . . . . . IMail User Utility – Main Screen 74. . . . . . . . . . . . . . . . . . . . . . . . . . . .

5Contents
IMail Server for Windows NT
IMail User Utility – Changing Your Password 74. . . . . . . . . . . . . . . . . . IMail User Utility – Forwarding Mail 75. . . . . . . . . . . . . . . . . . . . . . . . . IMail User Utility – Delivery Rules 75. . . . . . . . . . . . . . . . . . . . . . . . . . Example RULES.IMA: 76. . . . . . . . . . . . . . . . . . . . . . . . . . . . . . . . . . . . IMail User Utility – Vacation Processing 76. . . . . . . . . . . . . . . . . . . . . . IMail User Utility – Finger Plan 76. . . . . . . . . . . . . . . . . . . . . . . . . . . . .
Backup and Restore IMail Database 77. . . . . . . . . . . . . . . . . . . . . . . . . . . . . . . Importing NT Users 77. . . . . . . . . . . . . . . . . . . . . . . . . . . . . . . . . . . . . . . . . . . Remote Administration Utilities 77. . . . . . . . . . . . . . . . . . . . . . . . . . . . . . . . . .
Running the IRADMEN Utility 78. . . . . . . . . . . . . . . . . . . . . . . . . . . . . Setting up the Web Remote Administration Utility 78. . . . . . . . . . . . . . Using the Web Remote Administration Utility 80. . . . . . . . . . . . . . . . . .
4. Using the IMail Administrator 83. . . . . . . . . . . . . . . . . . . . . . . . . . . . . . . . . . . IMail Administrator 83. . . . . . . . . . . . . . . . . . . . . . . . . . . . . . . . . . . . . . . . . . .
IMail Administrator – Main Screen 84. . . . . . . . . . . . . . . . . . . . . . . . . . Viewing the Local System Configuration 85. . . . . . . . . . . . . . . . . . . . . . . . . . . Adding and Deleting Virtual Domains 86. . . . . . . . . . . . . . . . . . . . . . . . . . . . .
Adding a Mail Domain 87. . . . . . . . . . . . . . . . . . . . . . . . . . . . . . . . . . . . Deleting a Mail Domain 90. . . . . . . . . . . . . . . . . . . . . . . . . . . . . . . . . . .
Adding, Modifying, and Deleting User Mail Accounts 90. . . . . . . . . . . . . . . . Setting Global User Properties 90. . . . . . . . . . . . . . . . . . . . . . . . . . . . . . Adding a User Mail Account 91. . . . . . . . . . . . . . . . . . . . . . . . . . . . . . . Modifying a User Mail Account 96. . . . . . . . . . . . . . . . . . . . . . . . . . . . . Deleting a User Mail Account 96. . . . . . . . . . . . . . . . . . . . . . . . . . . . . . . Finding Orphan Mail Accounts 97. . . . . . . . . . . . . . . . . . . . . . . . . . . . . .
Adding, Modifying, and Deleting Aliases 97. . . . . . . . . . . . . . . . . . . . . . . . . . Adding an Alias 98. . . . . . . . . . . . . . . . . . . . . . . . . . . . . . . . . . . . . . . . . . Modifying an Alias 100. . . . . . . . . . . . . . . . . . . . . . . . . . . . . . . . . . . . . . . Deleting an Alias 101. . . . . . . . . . . . . . . . . . . . . . . . . . . . . . . . . . . . . . . . .
Setting Up Mail Forwarding 101. . . . . . . . . . . . . . . . . . . . . . . . . . . . . . . . . . . . . Setting Mailbox Directory Limits 102. . . . . . . . . . . . . . . . . . . . . . . . . . . . . . . . . Setting Up a Finger Plan 104. . . . . . . . . . . . . . . . . . . . . . . . . . . . . . . . . . . . . . . . Setting Up Delivery Rules 105. . . . . . . . . . . . . . . . . . . . . . . . . . . . . . . . . . . . . .
Rule Syntax 106. . . . . . . . . . . . . . . . . . . . . . . . . . . . . . . . . . . . . . . . . . . . . Example rules.ima file: 106. . . . . . . . . . . . . . . . . . . . . . . . . . . . . . . . . . . .
Setting Up a Vacation Message 107. . . . . . . . . . . . . . . . . . . . . . . . . . . . . . . . . . Setting Up an Automated Response with the Info Manager 108. . . . . . . . . . . . Entering LDAP Directory Information (Attributes) 111. . . . . . . . . . . . . . . . . . . Adding, Deleting, and Managing Mailing Lists 112. . . . . . . . . . . . . . . . . . . . . .
6 User’s Guide
IMail Server for Windows NT
5. SMTP Server 115. . . . . . . . . . . . . . . . . . . . . . . . . . . . . . . . . . . . . . . . . . . . . . . . SMTP Service 115. . . . . . . . . . . . . . . . . . . . . . . . . . . . . . . . . . . . . . . . . . . . . . . . SMTP Service Security 115. . . . . . . . . . . . . . . . . . . . . . . . . . . . . . . . . . . . . . . . . Configuring the SMTP Server 116. . . . . . . . . . . . . . . . . . . . . . . . . . . . . . . . . . .
SMTP Options 117. . . . . . . . . . . . . . . . . . . . . . . . . . . . . . . . . . . . . . . . . . . Using a Remote Mail Gateway 119. . . . . . . . . . . . . . . . . . . . . . . . . . . . . .
Setting SMTP Security 119. . . . . . . . . . . . . . . . . . . . . . . . . . . . . . . . . . . . . . . . . Setting Mail Relay Options 121. . . . . . . . . . . . . . . . . . . . . . . . . . . . . . . . . Setting List Access Options 123. . . . . . . . . . . . . . . . . . . . . . . . . . . . . . . . Validating Incoming Mail 123. . . . . . . . . . . . . . . . . . . . . . . . . . . . . . . . . . Setting Access to the SMTP Server 124. . . . . . . . . . . . . . . . . . . . . . . . . .
Copying Inbound and Outbound Mail 126. . . . . . . . . . . . . . . . . . . . . . . . . . . . . Notes 127. . . . . . . . . . . . . . . . . . . . . . . . . . . . . . . . . . . . . . . . . . . . . . . . . . . . . . . Registry Values 128. . . . . . . . . . . . . . . . . . . . . . . . . . . . . . . . . . . . . . . . . . . . . . . SMTP Deliver Program for Windows NT 129. . . . . . . . . . . . . . . . . . . . . . . . . .
6. POP3 Server 131. . . . . . . . . . . . . . . . . . . . . . . . . . . . . . . . . . . . . . . . . . . . . . . . . POP3 Service 131. . . . . . . . . . . . . . . . . . . . . . . . . . . . . . . . . . . . . . . . . . . . . . . . POP3 Service Security 132. . . . . . . . . . . . . . . . . . . . . . . . . . . . . . . . . . . . . . . . . Configuring the POP3 Server 133. . . . . . . . . . . . . . . . . . . . . . . . . . . . . . . . . . . .
POP3 Options 134. . . . . . . . . . . . . . . . . . . . . . . . . . . . . . . . . . . . . . . . . . . Setting Access to the POP3 Server 135. . . . . . . . . . . . . . . . . . . . . . . . . . .
Notes 136. . . . . . . . . . . . . . . . . . . . . . . . . . . . . . . . . . . . . . . . . . . . . . . . . . . . . . . Registry Values 137. . . . . . . . . . . . . . . . . . . . . . . . . . . . . . . . . . . . . . . . . . . . . . .
7. IMAP4 Server 139. . . . . . . . . . . . . . . . . . . . . . . . . . . . . . . . . . . . . . . . . . . . . . . . The IMail Server IMAP4 Implementation 139. . . . . . . . . . . . . . . . . . . . . . . . . .
IMAP4 Server Support 139. . . . . . . . . . . . . . . . . . . . . . . . . . . . . . . . . . . . Full IMAP4 Client Support 140. . . . . . . . . . . . . . . . . . . . . . . . . . . . . . . . . Mailbox Management 141. . . . . . . . . . . . . . . . . . . . . . . . . . . . . . . . . . . . . Public Mailboxes 141. . . . . . . . . . . . . . . . . . . . . . . . . . . . . . . . . . . . . . . . .
IMAP4 Service 142. . . . . . . . . . . . . . . . . . . . . . . . . . . . . . . . . . . . . . . . . . . . . . . IMAP4 Service Security 142. . . . . . . . . . . . . . . . . . . . . . . . . . . . . . . . . . . . . . . . Configuring the IMAP4 Server 143. . . . . . . . . . . . . . . . . . . . . . . . . . . . . . . . . . Configuring an IMAP4 Client 145. . . . . . . . . . . . . . . . . . . . . . . . . . . . . . . . . . . Notes 145. . . . . . . . . . . . . . . . . . . . . . . . . . . . . . . . . . . . . . . . . . . . . . . . . . . . . . . Registry Values 146. . . . . . . . . . . . . . . . . . . . . . . . . . . . . . . . . . . . . . . . . . . . . . .
8. LDAP Server 147. . . . . . . . . . . . . . . . . . . . . . . . . . . . . . . . . . . . . . . . . . . . . . . . The IMail Server LDAP Implementation 147. . . . . . . . . . . . . . . . . . . . . . . . . . .
Full LDAP Directory Support 149. . . . . . . . . . . . . . . . . . . . . . . . . . . . . . . LDAP Service 149. . . . . . . . . . . . . . . . . . . . . . . . . . . . . . . . . . . . . . . . . . . . . . . .

7Contents
IMail Server for Windows NT
LDAP Service Security 150. . . . . . . . . . . . . . . . . . . . . . . . . . . . . . . . . . . . . . . . . Configuring the LDAP Server 151. . . . . . . . . . . . . . . . . . . . . . . . . . . . . . . . . . . Configuring the LDAP Client 152. . . . . . . . . . . . . . . . . . . . . . . . . . . . . . . . . . . . Notes 153. . . . . . . . . . . . . . . . . . . . . . . . . . . . . . . . . . . . . . . . . . . . . . . . . . . . . . . Registry Values 154. . . . . . . . . . . . . . . . . . . . . . . . . . . . . . . . . . . . . . . . . . . . . . .
9. Whois Server 155. . . . . . . . . . . . . . . . . . . . . . . . . . . . . . . . . . . . . . . . . . . . . . . . Whois Service 155. . . . . . . . . . . . . . . . . . . . . . . . . . . . . . . . . . . . . . . . . . . . . . . . Whois Service Security 155. . . . . . . . . . . . . . . . . . . . . . . . . . . . . . . . . . . . . . . . . Configuring the Whois Server 156. . . . . . . . . . . . . . . . . . . . . . . . . . . . . . . . . . . Notes 157. . . . . . . . . . . . . . . . . . . . . . . . . . . . . . . . . . . . . . . . . . . . . . . . . . . . . . . Registry Values 158. . . . . . . . . . . . . . . . . . . . . . . . . . . . . . . . . . . . . . . . . . . . . . .
10. Finger Server 159. . . . . . . . . . . . . . . . . . . . . . . . . . . . . . . . . . . . . . . . . . . . . . . . Finger Service 159. . . . . . . . . . . . . . . . . . . . . . . . . . . . . . . . . . . . . . . . . . . . . . . . Finger Service Security 159. . . . . . . . . . . . . . . . . . . . . . . . . . . . . . . . . . . . . . . . . Configuring the Finger Server 160. . . . . . . . . . . . . . . . . . . . . . . . . . . . . . . . . . . Notes 161. . . . . . . . . . . . . . . . . . . . . . . . . . . . . . . . . . . . . . . . . . . . . . . . . . . . . . . Registry Values 162. . . . . . . . . . . . . . . . . . . . . . . . . . . . . . . . . . . . . . . . . . . . . . .
11. Password Server 163. . . . . . . . . . . . . . . . . . . . . . . . . . . . . . . . . . . . . . . . . . . . . . Password Service 163. . . . . . . . . . . . . . . . . . . . . . . . . . . . . . . . . . . . . . . . . . . . . Password Service Security 163. . . . . . . . . . . . . . . . . . . . . . . . . . . . . . . . . . . . . . Configuring the Password Server 164. . . . . . . . . . . . . . . . . . . . . . . . . . . . . . . . . Notes 165. . . . . . . . . . . . . . . . . . . . . . . . . . . . . . . . . . . . . . . . . . . . . . . . . . . . . . . Registry Values 166. . . . . . . . . . . . . . . . . . . . . . . . . . . . . . . . . . . . . . . . . . . . . . .
12. Monitor Server 167. . . . . . . . . . . . . . . . . . . . . . . . . . . . . . . . . . . . . . . . . . . . . . . Monitor Service 167. . . . . . . . . . . . . . . . . . . . . . . . . . . . . . . . . . . . . . . . . . . . . . Monitor Service Security 168. . . . . . . . . . . . . . . . . . . . . . . . . . . . . . . . . . . . . . . Configuring the Monitor Server 169. . . . . . . . . . . . . . . . . . . . . . . . . . . . . . . . . . Monitoring Services 170. . . . . . . . . . . . . . . . . . . . . . . . . . . . . . . . . . . . . . . . . . .
Viewing Service Status from a Web Browser 172. . . . . . . . . . . . . . . . . . . Viewing Service Status with the IMail Monitor 173. . . . . . . . . . . . . . . . .
Setting Up Notifications 174. . . . . . . . . . . . . . . . . . . . . . . . . . . . . . . . . . . . . . . . Defining Beeper Notification 175. . . . . . . . . . . . . . . . . . . . . . . . . . . . . . . Using an External Beeper Program 177. . . . . . . . . . . . . . . . . . . . . . . . . . . Defining Pager Notification 178. . . . . . . . . . . . . . . . . . . . . . . . . . . . . . . . Defining E–mail Notification 180. . . . . . . . . . . . . . . . . . . . . . . . . . . . . . . Updating Notification 181. . . . . . . . . . . . . . . . . . . . . . . . . . . . . . . . . . . . . Testing Notification 181. . . . . . . . . . . . . . . . . . . . . . . . . . . . . . . . . . . . . . . Enabling Notifications 182. . . . . . . . . . . . . . . . . . . . . . . . . . . . . . . . . . . .

8 User’s Guide
IMail Server for Windows NT
Configuring the Web Server 183. . . . . . . . . . . . . . . . . . . . . . . . . . . . . . . . . . . . . Setting Access to the Web Server 184. . . . . . . . . . . . . . . . . . . . . . . . . . . .
13. List Server 187. . . . . . . . . . . . . . . . . . . . . . . . . . . . . . . . . . . . . . . . . . . . . . . . . . . . List Server Implementation 187. . . . . . . . . . . . . . . . . . . . . . . . . . . . . . . . . . . . . Installation 188. . . . . . . . . . . . . . . . . . . . . . . . . . . . . . . . . . . . . . . . . . . . . . . . . . Creating a List 188. . . . . . . . . . . . . . . . . . . . . . . . . . . . . . . . . . . . . . . . . . . . . . . .
Setting Advanced Options 191. . . . . . . . . . . . . . . . . . . . . . . . . . . . . . . . . . Setting Mailing List Security 193. . . . . . . . . . . . . . . . . . . . . . . . . . . . . . . Setting Up Digest Mode 195. . . . . . . . . . . . . . . . . . . . . . . . . . . . . . . . . . .
List Server Commands 198. . . . . . . . . . . . . . . . . . . . . . . . . . . . . . . . . . . . . . . . . Adding, Removing Subscribers by Forwarding a Message 200. . . . . . . . . . . . . Sending Mail to a List 202. . . . . . . . . . . . . . . . . . . . . . . . . . . . . . . . . . . . . . . . . .
14. Technical Information 203. . . . . . . . . . . . . . . . . . . . . . . . . . . . . . . . . . . . . . . . . . File Locks 203. . . . . . . . . . . . . . . . . . . . . . . . . . . . . . . . . . . . . . . . . . . . . . . . . . . IMAIL.EXE 204. . . . . . . . . . . . . . . . . . . . . . . . . . . . . . . . . . . . . . . . . . . . . . . . . IMAIL1.EXE 205. . . . . . . . . . . . . . . . . . . . . . . . . . . . . . . . . . . . . . . . . . . . . . . . SMTP32.EXE 206. . . . . . . . . . . . . . . . . . . . . . . . . . . . . . . . . . . . . . . . . . . . . . . .
Appendix A – Files and Directories 209. . . . . . . . . . . . . . . . . . . . . . . . . . . . . . . . . . . . Distributed Programs 209. . . . . . . . . . . . . . . . . . . . . . . . . . . . . . . . . . . . . . . . . . Distributed Files 210. . . . . . . . . . . . . . . . . . . . . . . . . . . . . . . . . . . . . . . . . . . . . . Directories 210. . . . . . . . . . . . . . . . . . . . . . . . . . . . . . . . . . . . . . . . . . . . . . . . . . . Created Files 211. . . . . . . . . . . . . . . . . . . . . . . . . . . . . . . . . . . . . . . . . . . . . . . . . Installing and Removing Services 211. . . . . . . . . . . . . . . . . . . . . . . . . . . . . . . .
Glossary 213. . . . . . . . . . . . . . . . . . . . . . . . . . . . . . . . . . . . . . . . . . . . . . . . . . . . . . . . .
Index 219. . . . . . . . . . . . . . . . . . . . . . . . . . . . . . . . . . . . . . . . . . . . . . . . . . . . . . . . . . .

9Preface
IMail Server for Windows NT
Preface
IMail Server for Windows NT is an Internet standards based mailserver system for Microsoft Windows NT 3.5 and later. IMail Serverprovides Simple Mail Transfer Protocol (SMTP) for sending and re-ceiving mail over the Internet or in an internal TCP/IP network.
IMail Server for Windows NT supports any mail client that uses thePost Office Protocol, Version 3 (POP3) or Internet Message AccessProtocol (IMAP4).
IMail Server for Windows NT is self–monitoring — a monitor serverlets you monitor the SMTP, POP3, IMAP4 and other services, receivenotification when a service is down, and automatically restart theservice. The IMail Server product includes a list server for creatingand managing a mail discussion group, and servers to provide LDAP,Finger and Whois information.
Remote administration utilities let the system administrator monitorthe IMail Server system from a remote system and perform user andsystem maintenance functions.
As options, you can purchase the following software to run withIMail Server for Windows NT:
• Mail to Pager option
• Mail to Fax option
• Web Messaging option
For more information about these options, see Chapter 1.
In this Document
This guide describes how to install, set up, and run the IMail Serverfor Windows NT and its services. Each of the add–on options toIMail Server for Windows NT are documented in their own separateuser’s guides.

10 User’s Guide
IMail Server for Windows NT
What This Package Includes
IMail Server for Windows NT includes the following:
• Three IMail Server for Windows NT diskettes.
• One IMail Client for Windows 3.x diskette.
• One IMail Client for Windows 95 diskette.
• License agreement.
• This manual, the IMail Server for Windows NT User’s Guide.
• An IMail Client for Windows User’s Guide.
See Appendix A for a list of the files installed by IMail Server forWindows NT.
The Ipswitch Products
Other Ipswitch products include:
• WhatsUp Gold Network Monitoring Tool
WhatsUp Gold is an inexpensive, graphical network monitoringtool that initiates both visual and audible alarms when networkelements do not respond to polling. WhatsUp Gold can alsonotify you of a network problem by digital beeper, alphanumericpager, and e–mail. WhatsUp Gold runs on Windows 95 or Win-dows NT on the Intel, PowerPC, and DEC Alpha platforms andcan monitor any device on a TCP/IP or NetBEUI network.
• WS_FTP Professional FTP Client
WS_FTP Professional provides an intuitive, powerful Windowsinterface for connecting to remote hosts and transferring files.WS_FTP Professional provides drag and drop file transfer, andsupport for more than 20 remote file systems.

11Preface
IMail Server for Windows NT
• VT320 Terminal Emulator for Windows
VT320 provides high–quality DEC VT320 terminal emulationand Telnet communications program for accessing VMS andUNIX host applications. This terminal emulator supports VT320,VT220, VT100, and VT52 terminals. VT320 provides 80– andtrue 132–column modes with double height and double widthcharacters and is easily customized via keyboard mapping, defin-able hotspots, and changeable toolbars. It supports XMODEM,YMODEM, ZMODEM, and Kermit communications.
• TN3270 Terminal Emulator for Windows
TN3270 provides IBM 3270 Models 2, 3, 4, and 5 terminalemulation and communications programs for accessing yourIBM mainframe and minicomputer hosts. Advanced featuresinclude drag–and–drop keyboard mapping and text editing, de-finable hotspots, customizable toolbars, scalable fonts, multiplesession support, and support for EHLLAPI and Visual Basic.
Visit our Web Site
For more information about Ipswitch products or to purchase ourproducts online, visit the Ipswitch web site at:http://www.ipswitch.com
In our technical support pages, you can read answers to FrequentlyAsked Questions (FAQs) about our products and keep up–to–date onproduct news.
Please Send Us Your Comments
We welcome your feedback on this product. Please send the results ofyour evaluation and your comments and suggestions to the followinge–mail address: [email protected]

12 User’s Guide
IMail Server for Windows NT
Contacting Ipswitch or Your Reseller forTechnical Support
Please use the following procedure to ask questions or report prob-lems.
1. Locate your IMail Server for Windows NT serial number, whichis printed on Disk 1 of your IMail Server for Windows NT kit.
2. Contact your designated IMail Server for Windows NT supportprovider.
Downloading IMail Server Software Patches
If a software patch is created to fix a bug in the currently shippingversion of IMail Server, Ipswitch will make it available on our Website. You can check our download directory on our Web site for cur-rent software patches.
To download software from the Ipswitch Web site:
1. In your Web browser, go to: http://www.ipswitch.com
2. Click on the download directory link.
3. Under IMail Server Patch Files (if any exist), click on the link.
4. Select Save to save the patch file in your directory. Run the patchfile to update the software.

13Overview
IMail Server for Windows NT
1. Overview
This chapter introduces IMail Server for Windows NT and describesits components, capabilities, and optional add–on products.
What is IMail � Server for Windows NT?
IMail Server for Windows NT is a comprehensive electronic mailsolution designed for today’s evolving Internet and corporate intranetmessaging requirements. Easy to install and administer, IMail Serversignificantly reduces both the initial cost of mail implementation andthe on–going cost of administration. Its built–in, easy–to–use featuresimprove user productivity and provide a robust alternative to propri-etary systems or complicated UNIX based Internet mail.
IMail Server for Windows NT consists of a series of special programsthat run as services on the Windows NT system. These services en-able the Windows NT system to receive mail through the Simple MailTransfer Protocol (SMTP) and subsequently allow access to it by cli-ent systems using Post Office Protocol version 3 (POP3) or the Inter-net Message Access Protocol version 4 (IMAP4) .
IMail Server can be used with Ipswitch’s IMail Client for Windowsor any other POP3 or IMAP4 mail client. This Internet standards–based client/server architecture provides system administrators withcomplete flexibility in setting up a total mail solution that easily ac-commodates disparate and/or geographically dispersed mail clients.
IMail Server provides scalability from one to more than 15,000 users,capacity of over 200,000 messages a day, and full integration with theWindows NT user database.

14 User’s Guide
IMail Server for Windows NT
The IMail Server for Windows NT Family
IMail Server for Windows NT is the foundation of an integrated fam-ily of Internet server software products. In addition to SMTP, POP3,and IMAP4 servers, IMail Server for Windows NT also provides thefollowing server programs that run as services on Windows NT:
• A Lightweight Directory Access Protocol (LDAP) server whichprovides remote access (through an LDAP client) to IMail userinformation. The IMail user database has been extended to in-clude standard LDAP information, such as the user’s last name,organization, mailing address, and telephone number.
• A list server, which lets you set up automated mailing lists on theIMail Server. The List server provides many options, such as theability to have moderated and unmoderated lists, and the abilityto group messages sent to the list into a digest and send the di-gest as a single message.
• A Monitor server that lets you monitor services (such as SMTP,POP3, IMAP4, DNS, WWW) and receive notification when aservice goes down.
You can configure a Web server that lets you access the IMailServer system remotely via a Web browser to view the status ofmonitored services and perform administration functions.
• Finger and Whois servers, through which you can publish andlook up user information on the Internet.
• A Password server, which lets users of Eudora, IMail Client forWindows, and NuPOP mail clients change their IMail Server forWindows NT password from the mail client.
Each of the servers is described in the chapters that follow.

15Overview
IMail Server for Windows NT
System Requirements
IMail Server for Windows NT is designed for the Windows NT oper-ating system. Installation under Windows 95 or Win32s will not workcorrectly and may cause problems with IMail Client for Windows.
The system requirements for IMail Server for Windows NT are:
• Intel (Pentium or higher)
• Microsoft Windows NT 3.51 or later
• Network interface card installed and configured to use Micro-soft’s TCP/IP for Windows NT
• 200 MB disk space (for a 30 user workgroup)
• At least 32 MB of memory (64 MB is recommended)
New in Version 4
Version 4 of IMail Server for Windows NT offers many new capabili-ties, including the following:
• New IMAP4 server for increased user flexibility in accessing andmanaging mail. IMAP4 lets users create mailboxes and leavetheir mail on the IMail Server, which means they can access mailfrom multiple machines.
• LDAP server for publishing user information in a directory thatis available to any LDAP client.
• Antispamming features to help prevent unauthorized mailingsand unauthorized use of your mail server as mail relay.
• New Administrator utility, which provides a Windows Explorertype tree view of the IMail user database and provides mailboxmanagement functions for mailboxes.
• Extended List Server capabilities including security settings, andthe ability to group messages into a digest and periodically sendthe digest to list users.
16 User’s Guide
IMail Server for Windows NT
• Expanded IMail Monitor application lets you configure servicemonitoring and view service status on the Windows NT console.
• Expanded remote administration capabilities via the Web Re-mote Administration utility such as the ability to change SMTPserver settings and to configure service monitoring.
• Optimized performance (over 260,000 messages per day on adual processor 120 Mhz Pentium with 64 Mb of RAM)
• Web Messaging now supports receiving MIME attachments.
Optional IMail Server Capabilities
You can also purchase the following add–on capabilities to run withthe IMail Server for Windows NT.
• An optional Mail to Pager/Beeper capability which lets you setup an aliases on the IMail Server system that can receive mailfrom a mail client and forward it to preconfigured pager or beep-er addresses.
• An optional Mail to Fax capability which lets you set up mailaccounts on the IMail Server system that can receive mail from amail client and forward it to preconfigured Fax phone numbers.This option also supports “dynamic aliasing.” which lets usersenter the FAX phone number when they create the message.
• The Web Messaging option which lets users access their mail onthe IMail Server system from any Web browser on the Internet.This option, rather than replacing the function of a standard mailclient, enhances e–mail access by “Web enabling” the IMailServer. It is especially helpful to users who are away from theoffice and need quick and easy access to their mail messages.
The Web Messaging option is also available in an enhanced ver-sion that supports online advertising. This feature lets you dis-play banner ads (in HTML text and/or graphics, includinghyperlinks) at the top of the Web Messaging mail screens. It cancycle through up to 30 ads, changing the displayed ad every 30seconds. This feature is very useful to Internet Service Providers(ISPs) and other mail service providers who would like to sellonline advertising space on their mail server.
17Overview
IMail Server for Windows NT
IMail Client for Windows
IMail Client for Windows is an electronic mail client application de-signed for use with Microsoft Windows 3.1, Windows 95, and Win-dows NT 3.5 or later.
Note:A special version of IMail Client for Windows is in-cluded for use on the IMail Server for Windows NTworkstation. See the IMail Client for Windows guide forinformation on using the mail client.
IMail Client for Windows provides a user interface for reading andcreating mail. The underlying mail transport programs allow com-plete interconnection with the current Internet world and any systemthat is based on SMTP and POP3.
IMail Client for Windows includes a POP3 client for reading mailand an SMTP Client for sending mail.

18 User’s Guide
IMail Server for Windows NT
User Registration and Maintenance
IMail Server for Windows NT supports an unlimited number of useraccounts and user mailboxes. Users need to be registered in order tohave a local mailbox and to allow remote POP or IMAP4 clients toconnect to the system and retrieve mail stored in those mailboxes.
You can register users and maintain user account information by us-ing any of the following tools:
• IMail User Manager
• IMail Administrator
• Web Remote Administration utility
• Web Messaging option
• IMail Remote Administration utility (IRADMEN)
• The command line program, adduser.exe, to add users from theDOS command line or within a batch file.
Users can maintain their own user account information by using thefollowing tools:
• Web Remote Administration utility
• IMail User Utility (IMUTIL)
• Web Messaging option
Access to IMail Server functions from the Web utilities is determinedby the access settings for the login userid. System administrators haveaccess to all functions; host administrators have access to functionsfor a particular mail domain; and users have access to their accountinformation.
The following sections provide an overview of each tool.
19Overview
IMail Server for Windows NT
IMail User Manager
The IMail User Manager (REGIST32) lets the system administratordo the following:
• Add, modify, and delete domain information (virtual hosts)
• Add, modify, and delete users
• Add, modify, and delete system aliases
• Change passwords
• Change user information (for LDAP entries)
• Change inbound mail processing rules for users
• Set up vacation processing
• Set up mail forwarding
• Update the user’s plan file that is distributed by Finger
• Set up an automated response
Chapter 3 describes how to use the IMail User Manager.
IMail Administrator
The IMail Administrator (IADMIN) provides a Windows Explorertype tree view of the IMail user database. The IMail Administratorincludes all of the functionality of the IMail User Manager and pro-vides the following additional functions:
• View, add, and delete mailbox (.mbx) files and delete messagesby date (for IMAP4 mailboxes created on the server)
• Add, delete, and manage mailing lists
• Find and list orphan user mail accounts
Chapter 4 describes how to use the IMail Administrator.

20 User’s Guide
IMail Server for Windows NT
IMail User Utility
The IMail User Utility (IMUTIL) lets users make changes to theirmail account from their own system. IMUTIL is licensed for an un-limited number of users, regardless of the mail client used. Users canuse IMUTIL to do the following:
• Change their password (Conversations with the host system areencoded but not encrypted.)
• Change inbound mail processing rules
• Set up vacation processing
• Set up mail forwarding
• Update their Finger protocol PLAN file
Chapter 3 describes how to use the IMail User Utility.
Remote Administration Tools
IMail Server for Windows NT provides two tools that system admin-istrator’s can use to access the user mail account information from aremote system.
The IMail Remote Administration utility (IRADMEN) is an execut-able program that can be copied to any Windows NT system. (Theprogram is in MAILDIR\iradmen.exe. The IMail Remote Administra-tion utility lets you add, modify, and delete users and aliases, changepasswords, and monitor services.
The Web Remote Administration utility (configured in Set-tings–>Control Panel–>IMail Server–>Web) provides remote accessto the user registration functions from any forms–capable Webbrowser. From a Web browser, you can perform user administrationfunctions (add users, change passwords, etc.), configure and monitorservices, change IMail Server configuration, and view log files.

21Overview
IMail Server for Windows NT
For each user, the system administrator can define the level of accessto the Web remote administration functions. In this way, individualusers can be given remote access to their own account information.
The “Remote Administration Utilities” section in Chapter 3 describeshow to enable these utilities.
User Mail Functions
In addition to sending and receiving mail, the IMail Server providesthe following mail functions that can be set up for each user mail ac-count. These functions can be set up or modified by the system ad-ministrator by using either the IMail User Manager or IMail Admin-istrator on the Windows NT console or the remote administrationutilities. Or, individual users can access these functions for their ac-count by using the IMail User Utility, the Web Remote Administra-tion utility, or the Web Messaging option on a remote system.
Mail Forwarding
If a file named forward.ima exists in a user’s home directory, all ofthe user’s incoming mail will be forwarded to the mail address speci-fied in the file. Note this must be a complete mail address. Only thefirst line of the file is read and must not contain quotes, spaces orangle brackets (<>).
Vacation Support
If a file named vacation.ima exists in a user’s home directory, thecontents of the file will be mailed once to each person that sends mailto the user. The people who receive these messages are listed in thevacation.snt file in the user’s directory. Once a person’s e–mail ad-dress has been added to vacation.snt, they will not receive the vaca-tion notice in response to subsequent messages. (A single notificationis usually sufficient.) This allows people to send many messages tosomeone on vacation without being flooded with notices that the re-cipient is away.
22 User’s Guide
IMail Server for Windows NT
Finger “Plan” Support
If the file named plan.ima exists in a user’s home directory, the con-tents of that file are returned to Finger requests from other hosts.
The system administrator can disable the transmission of any in-formation about a user through the Finger protocol by using the IMailUser Manager or IMail Administrator.
Mail Delivery Rules
If the file named rules.ima exists in a user’s home directory, all in-coming mail for that user is sorted according to the rules in the file.The rules can be used to sort mail into mailboxes based on the con-tents of the From:, Subject:, and Sender: headers. The rules.ima file isread from top to bottom until a match is found. Only incoming mailintended for the user’s main mailbox is effected by the rules.
Automated Mail Accounts
The Info Manager feature lets you set up an automated e–mail in-formation system. When mail is received for a user that has enabledthe Info Manager, a prepared message is sent back to the sender.
The Info Manager lets you set up subcategories of a particular useraccount and enter an automated response specific to each category.For example, you may want to set up an info user account for yourorganization. When someone sends mail to the info account, the sys-tem can return a response that describes the subcategories of the infoaccount in which they can obtain further information. They couldthen send a message to info–sales and receive back a different mes-sage related to sales, or to info–classes and receive back a messageabout classes you offer. There is no limit to the number of subcatego-ries that you can set up in the Info Manager.

23Overview
IMail Server for Windows NT
List Server Support
IMail Server for Windows NT includes a list server for creating andmanaging electronic mail discussion groups. The List server lets youset up automated mailing lists on the IMail Server. A mailing list canreceive mail and resend the mail to all the users on the mailing list.Mailing lists are used widely on the Internet as a means of sharinginformation about a topic.
The List server for IMail Server for Windows NT is a simple listserver that provides two distinct functions:
• A user interface for creating and maintaining mailing lists (fromthe Start menu, select Programs–>IMail–>IMail List Server).
• A way to process mail messages addressed to “listserv” on theIMail Server for Windows NT workstation.
The List server supports a set of commands that can be used from amail client to subscribe or unsubscribe to a discussion group, get a listof available discussion groups, and get help on a discussion group.
The List server includes the ability to group messages into a digestand periodically send the digest to list users, and to approve or denyaccess to a mailing list.
Monitoring and Notification Tools
IMail Server for Windows NT provides self–monitoring via a Moni-tor server that polls each of the IMail services and notifies you whena service has gone down. The Monitor server can monitor the IMailSMTP, POP3, IMAP4, LDAP, PServ, Whois, Finger, and Syslog ser-vices. In addition, you can monitor DNS, NNTP, WWW, Telnet, andFTP services on either the local or a remote system. The Monitorserver can automatically restart a service that has gone down.
You can set up the Monitor server to send an e–mail, beeper, or pagernotification when it detects a service going down or up. You can alsoset up the Monitor server to display the service status to a Web pagethat can be accessed from a forms–capable Web browser.

24 User’s Guide
IMail Server for Windows NT
You can configure service monitoring and view the status of moni-tored services by using either of the following tools:
• Monitor server (from the Start menu, select Settings–>ControlPanel–>IMail Server, and then select the Monitor tab)
• IMail Monitor (from the Start menu, select Programs–>IMail–>IMail Monitor)
• Web Remote Administration utility. You must configure the Webutility properties (from the Start menu, select Settings–>ControlPanel–>IMail Server, and then select the Web tab).
Chapter 12 describes how to set up and use the Monitor server, theIMail Monitor, and the Web Remote Administration utility.
Antispamming Features
IMail Server’s built–in messaging controls can prevent unauthorizedmailings from passing through IMail as a relay or gateway. You canset up the server to only accept mail that originates from local usersor that is destined for local users. (IMail Server lets you define thesystems or address blocks that you want to consider as local.) In addi-tion, you can block incoming messages from specified IP addresses ifthose addresses have been a source of unwanted e–mail.
See the “Setting SMTP Security” section in Chapter 5 for informationon setting up these security features.
If you are unfamiliar with “spamming” and “spoofing,” the followingparagraphs provide some background.
The SMTP standard for Internet messaging allows electronic mail tomake its way across a network in “hops” by passing from one com-puter system to another, repeating this process until the mail arrivesat its final destination. This is part of the original design of SMTPand was necessary in the early days of the Internet in order for e–mailto travel between various networks. In the current Internet this is notnecessary and mail usually is delivered directly from the sending hostto the receiving host. Exceptions to this include application gatewaysthat are used to bridge firewalls.

25Overview
IMail Server for Windows NT
This inherent design of SMTP allows a host computer that needs todeliver a message to another computer (or even hundreds or thou-sands of recipients) to make a connection (or multiple connections) tosome other SMTP server and ask that server to relay the message(s)on its behalf.
Recently there has been a lot of controversy over unwanted e–mail.Many companies and ISPs have been blocking the receipt of this mailfrom known sources, as it is possible to deny access to a sending ma-chine with a firewall or some other method. Once a bulk mailer’shome mail server is known and blocked, senders of bulk e–mail —taking advantage of SMTP’s open design — may attempt to delivertheir mail through someone else’s computer by asking the other com-puter to route that mail for them. Senders of unsolicited e–mail canalso use this method to try to hide their real identity by manipulatingthe headers in the message in a certain way and then sending the mes-sage through your system for delivery to its final destination — mak-ing it appear as if the message originated from the relaying server.This is known as “spoofing.” (IMail Server, however, will alwaysinclude the IP address of the source in the message headers.)
When a bulk mailer chooses your computer to deliver unsolicitedmail to thousands of other people (known as “spamming”), your sys-tem immediately becomes busy delivering messages that didn’t origi-nate with your users, tying up your valuable system resources.
IMail Server protects your system against this type of abuse in twoways. First, IMail Server allows administrators to configure the sys-tem to only accept mail that originates from local users or that is des-tined for local users. (IMail Server allows you to define the systemsor address blocks that you wish to consider as local.) Second, IMailServer allows you to define the systems from which you never wantto receive mail, allowing administrators to block mail from knownsources of spam mail.

26 User’s Guide
IMail Server for Windows NT
Domain Name System MX Support
Domain Name System (DNS) Mail eXchange (MX) record support isimportant when using the IMail Server to create a mail message orwhen processing messages in the outbound queue. IMail Server forWindows NT uses the domain name server that is defined in the Win-dows NT TCP/IP configuration.
To check the domain name for your local network, click on the Net-work icon in the Control Panel, select the Protocols tab, then selectTCP/IP Protocol, and then click Properties. The TCP/IP Configura-tion window appears. Click DNS to view the domain information.
You need to make the proper entries (MX records) in the DNS foreach mail domain that you create. See your DNS documentation formore information.
Multiple Domain Support
If you want to receive mail for more than one e–mail domain on thesame Windows NT system, you can set up a virtual host for each do-main. For example, if your mail server provides mail service for yourlocal e–mail domain, mail.ipswitch.com, and you also want it to pro-vide mail service for another e–mail domain, mail.acme.com, you cancreate a virtual host for mail.acme.com.
Each virtual host must have a unique IP address. You can use either areal IP address or a virtual IP address. To use a real IP address, the IPaddress must be set in the the Control Panel’s Network applet, underProtocols–>TCP/IP Advanced properties. You can add IP addressesin the Network applet.
Note:
If you are using Windows NT 3.51, you can add up tofive IP addresses in the Network applet. If you need toadd more than five addresses, refer to the documentationfor the Windows NT Resource Kit.

27Overview
IMail Server for Windows NT
A virtual IP address can be assigned to the domain (virtual host) bythe IMail Server system. This allows you to have a virtual host with-out an IP address. You can then use an MX record in your DNS topoint the virtual domain to an actual IP address.
If you use a virtual IP address for a mail domain, users must log in tomail accounts in the domain by specifying their userid as:userid@virtualhost, where userid is the userid and virtualhost is thedomain name, and entering their password. If you use an IP addressthat is set up on your IMail Server system, this method of login is notnecessary.
For information on setting up virtual hosts, see Chapter 2.
Privacy Enhanced POP Support
When used with the IMail Client for Windows software, Version 3 orlater, client conversations with the POP3 server are encoded and arenot in plain text. This should not be confused with security. Thismeans that standard sniffer programs will not show the communica-tions without additional programming.
Route Inbound Mail to an External Program
To route inbound mail to an external program, IMail Server for Win-dows NT can use an alias to determine the program destination. Rout-ing is handled by using an alias that starts with “ | ” (pipe) and con-tains a program name. The program must be a simple name located ina PATH directory or in the mail executables directory. The alias mustnot contain a path. The complete mail message is made available tothe destination program as a filename argument at the end of thealias. (It is not sent in with STDIN.)
For example, the following defines the program alias named ips-witch:
ipswitch=| listserv send ipswitch
28 User’s Guide
IMail Server for Windows NT
Sending mail to this alias will result in the following command:
listserv send ipswitch c:\mail\spool\file.tmp
Special Unknown Local User Processing
IMail Server for Windows NT can perform special processing of mailaddressed to users that are not registered on the local host. This isaccomplished through a special alias, “nobody”. If the “nobody” aliasexists, all incorrectly addressed mail is sent to a specified program oranother user’s mailbox.

29Installing and Setting Up the Mail Server
IMail Server for Windows NT
2. Installing and Setting Up the IMail Server
This chapter describes how to install and set up IMail Server forWindows NT.
If you are doing an initial installation of IMail Server, we suggest thatyou create a few mail accounts as part of the installation. The installa-tion program will ask if you want to create mail accounts. You canthen perform some simple tests to check that the IMail Server is setup correctly. See “Performing an Initial Setup and Test” in this chap-ter for more information.
If you are upgrading an existing IMail Server installation (Version 2.9or earlier), you need to complete some tasks to migrate existing datato the new installation. See “Notes for Upgrading to IMail Server4.0” for more information.
Installation, Upgrade, and Removal Instructions
To install IMail Server for Windows NT:
1. Read Chapter 1 of this manual to get an understanding of instal-lation and configuration options and to learn about the capabili-ties of IMail Server for Windows NT.
2. Log on as System Administrator or to an account with SystemAdministrator privileges.
3. Back up your Windows NT registry.
Note: UpgradesIf you are upgrading from IMail Server Version 2.9 orearlier, the installation program will convert your exist-ing IMail database to use the Windows NT registry. Ifyou revert to an earlier version of IMail, you will loseany new accounts added with this version and aliaseswill have to be rebuilt.

30 User’s Guide
IMail Server for Windows NT
Note: UpgradesWhen upgrading from a previous IMail version, as aprecaution, in the Windows NT registry (regedt32), savethe SOFTWARE\Ipswitch\IMail registry key to a file. Ifyou need to go back to the previous IMail Server ver-sion, you can restore this registry key.
4. Insert the IMail Server for Windows NT diskette in a diskettedrive.
5. Select Run from the File menu, and then enter the diskette pathfollowed by setup.exe. For example:
a:setup.exe
6. Select the desired installation option:
Initial InstallationUpdate previous installationRemove from system
Select “Initial Installation” if you have never installed IMailServer for Windows NT before, or if you have changed directorylocations, or if the installation notes tell you that you must. An“Initial Installation” will reset program defaults for the serversand may result in a loss of mail accounts.
Select “Update previous installation” if you have previouslyinstalled and do not wish to lose configuration parameters for theservice. For example, you may want to save the Service owneror Allow service to interact with desktop options.
Select “Remove from system” if you want to remove the currentIMail Server installation from your system. (This option does notinstall the new version of IMail Server.)
7. Enter the primary official host name of your system. This hostname is used in greeting messages and in message headers inoutgoing messages. This name must be registered in the DomainName System (DNS) if you want remote hosts to be able to com-municate with your system.

31Installing and Setting Up the Mail Server
IMail Server for Windows NT
8. Select the user database option you prefer.
NT User DatabaseIMAIL User Database
This option defines where users are registered and how user au-thentication takes place for the primary host.
Select “NT User Database” if you want to use the Windows NTUser Database to create user mail accounts. The Windows NTuser database stores userids and passwords for logging on to theWindows NT system. If you select this option, IMail Server willcreate a user mail account for each user listed in the NT UserDatabase. The mail accounts for these users are created as neces-sary when a mail message for the user is received by the mailserver or when a user accesses the mailbox through a mail client.
Select “IMAIL User Database” if you want to store user mailaccount information apart from the Windows NT User Database.If you select this option, userids and passwords for mail accountswill be separate from userids and passwords for logging on to theWindows NT system.
Note:
You can set up virtual hosts to support multiple e–maildomains on your mail server. For each virtual host thatyou create, you select whether or not to use the Win-dows NT User Database for that host.
9. Enter the directory where IMail Server for Windows NT will beinstalled. This must be your existing IMail directory if you havean existing installation of IMail Server on your system. This di-rectory name should never be changed after initial installation. Inthe event that you do change the directory after an initial installa-tion, re–run the setup program and select “Initial Installation.”You will then have to move the user directories to back to theIMail directory.
32 User’s Guide
IMail Server for Windows NT
10. If you are installing IMail Server for Windows NT on your sys-tem for the first time, you will be prompted to add a user andpassword. You can add users now, or exit the installation and addusers using the IMail User Manager.
The userid of “root” is automatically registered.
11. (Optional.) Open the Control Panel and run the IMail Server ap-plication and verify or modify the configurations for each of theservices (SMTP server, POP3 server, IMAP4 server, LDAP serv-er, Finger server, Whois server, List server, Monitor server). Ifyou change any parameters, stop the service, wait 5–10 secondsand then start the service or reboot the system after the comple-tion of all changes.
12. We recommend that you reboot your system after installation.
Uninstalling IMail Server for Windows NT
To uninstall IMail Server for Windows NT, run setup and select the“Remove from system” option. The Uninstall program deletes ser-vices, registry entries, and Control Panel application, but does notdelete the mail directory or files.
Notes for Upgrading to IMail Server 4
If you are upgrading an existing IMail Server installation to IMailServer 4, note the following:
• As a precaution, in the Windows NT registry (regedt32), save theSOFTWARE\Ipswitch\IMail registry key to a file. If you need togo back to the previous IMail Server version, you can restore thisregistry key.
• When updating the IMail Server for Windows NT product, werecommend rebooting the Windows NT system after installation.

33Installing and Setting Up the Mail Server
IMail Server for Windows NT
• If you are upgrading from IMail Server Version 2.9 or earlier, theinstallation program will convert your existing IMail database touse the Windows NT registry. If you revert to an earlier versionof IMail, you will lose any new accounts added with this versionand aliases will have to be rebuilt.
• If upgrading from an earlier version, you need to verify that anyhost aliases are correct in the Host Configuration. An example ofa host alias is where the official host name is imail.ipswitch.com,and you set a host alias of ipswitch.com so that the IMail Serverwill accept mail addressed to both imail.ipswitch.com andipswitch.com.
• If you are upgrading from IMail Server Version 2.9 or earlier,you should edit any existing lists with the new list server pro-gram, reset any parameters and click OK in the modify box foreach list. You must do this in order for the lists to work properlyin the new version, as Aliases have to be modified to include thevirtual hostname.
Performing an Initial Setup and Test
If you are installing IMail Server for the first time, we suggest thatyou perform a minimal initial setup and then test that you can sendand receive mail.
1. In the IMail Server for Windows NT program group, click theIMail User Manager icon. The User Registration window appears.

34 User’s Guide
IMail Server for Windows NT
2. If you are using the IMail database (rather than the NT database),make sure that the user root is defined in the User Registrationwindow. If it is not, you need to add root as a user.
If you are using the NT database, make sure the alias root is de-fined. If it is not, you need to add root as an alias.
3. Add one or two user mail accounts. (If you added some user mailaccounts as part of the installation, you can skip this step.)
In the User Registration window, click the Add button. The NewUser dialog box appears.
Enter a user name (this will be the userid for the mail account)and click OK . The User Properties dialog box appears.
A userid is limited to 30 characters and must be created from thecharacter set of digits and letters. The userid can contain dashes.It cannot contain spaces. The userid must be unique within thesystem.

35Installing and Setting Up the Mail Server
IMail Server for Windows NT
In the Full Name text box, enter the user’s full name.
The User Directory text box displays the directory where the useraccount information is stored. You cannot edit this field.
In the Password text box, enter a password for the user.
Confirm the password you entered by entering it again in theConfirm Password text box
Click OK to add the user. The userid is added to the list of regis-tered users.
4. Check your e–mail domain name.
Any users you have added can now receive mail through IMailServer for Windows NT at the domain name specified in yourWindows NT TCP/IP parameters.
For example, if you added the user arnie and the domain name isipswitch.com, the user can now receive mail addressed [email protected].
36 User’s Guide
IMail Server for Windows NT
Note:
To check the domain name for your local network, clickon the Network icon in the Control Panel, select the Pro-tocols tab, then select TCP/IP Protocol, and then clickProperties. The TCP/IP Configuration window appears.Click DNS to view the domain information.
You need to make the proper entries (MX record) for your maildomain in your Domain Name System (DNS). See your DNSdocumentation for more information.
5. Check that the mail servers are running. In the Control Panel,click on the IMail Server icon. In the IMail Server window, thestatus of the SMTP, POP3, and IMAP4 servers should be “Ser-vice running.”
6. Start the IMail Client, log on using one of the user accounts youcreated in IMail Server, and send mail to the userid and checkthat the mail appears in the user’s Main mailbox.
7. If you are connected to the Internet, you can send mail to [email protected] to test mail service to remote systems.We will reply to your mail. Or, send mail to a user on anotherdomain and ask them to reply.
When you are satisfied that the mail server works properly, youcan finish adding user mail accounts, add aliases, and add anyspecial processing such as delivery rules, vacation processing,and a Finger PLAN. See Chapter 3 for information on complet-ing these tasks.

37Installing and Setting Up the Mail Server
IMail Server for Windows NT
Setting Up Multiple Domains (Virtual Hosts)
If you want to receive mail for more than one e–mail domain on thesame Windows NT system, you need to set up a virtual host for eachdomain. For example, if your mail server provides mail service foryour local e–mail domain, mail.ipswitch.com, and you also want it toprovide mail service for another e–mail domain, mail.acme.com, youneed to create a virtual host for mail.acme.com.
There are two types of virtual hosts:
• Virtual hosts with IP Addresses
• Virtual hosts without IP addresses
Note:Whether you use a virtual host with IP address or avirtual host without IP address, you need to make theproper DNS entries for your mail domain(s). See yourDNS documentation for information on creating theseentries.
Virtual Hosts with IP Addresses
This is usually the recommended way to set up virtual hosts, becauseall of the capabilities of regular IMail Server hosts are available tovirtual hosts with IP addresses. The only limitations of virtual hostswith IP addresses are:
• Each virtual host requires its own unique IP address.
• Requires the extra step of adding an IP address in the WindowsNT TCP/IP configuration in the Control Panel (Protocols–>TCP/IP Advanced properties.
Note:
If you are using Windows NT 3.51, you can add up tofive IP addresses in the Network applet. If you need toadd more than five addresses, refer to the documentationfor the Windows NT 3.51 Resource Kit.

38 User’s Guide
IMail Server for Windows NT
Virtual Hosts without IP Addresses
Virtual hosts without IP addresses are easier to set up than those withIP addresses. All you have to do is go into the IMail Server host con-figuration dialog box and click on the Add button (see step 4 in thefollowing procedure). The IMail Server system will assign a virtualIP address for the selected domain. You can then use an MX record inyour DNS to point the virtual domain to an actual IP address. Thereare, however, several limitations of virtual hosts without IP addresses:
• Some mail clients will not be able to connect to the virtual hostto read mail. This problem exists because some mail clients ei-ther have length restrictions for userids, or they clip the userid atthe “@” sign. (So that IMail Server can tell which virtual hostthe user is associated with, we require the entire “[email protected]” string when logging in to virtual hosts without IPaddresses.
• The LDAP, Whois, and Finger servers do not work with virtualhosts without IP addresses.
• Remote management of lists does not work completely.
Virtual hosts without IP addresses are recommended when you have ashortage of IP addresses, or when you want to forward all mail for adomain to a user at another domain. As an example of the latter:
• Your primary domain is called abracadabra.com
• You want all mail sent to merlin.com to be forwarded [email protected]
• To accomplish this, set up a virtual host without an IP address formerlin.com and do not create any users for merlin.com
• Set up a nobody alias for merlin.com pointing to a userid onabracadabra.com
• All mail to any user at merlin.com will be sent to the specifieduser at abracadabra.com

39Installing and Setting Up the Mail Server
IMail Server for Windows NT
To configure a virtual host:
1. In the Control Panel, double–click the IMail Server icon. TheIMail Server window appears.
2. Click the Hosts button.
3. The Virtual Host Configuration dialog box appears.
The Local Addresses list box shows all IP addresses set up in theWindows NT TCP/IP properties as well as any virtual IP ad-dresses assigned by the IMail Server.
4. Select the IP address for the virtual host (in the Local Addresseslist box) or click the Add button to assign a new virtual IP ad-dress to use for the new mail domain.
5. In the Official Host Name text box, enter the name of the mailhost.
The name you enter here will be used to address mail to the userson the virtual host. For example, if you enter mail.acme.com asthe mail host name, any users you add to the virtual host willreceive mail at [email protected].

40 User’s Guide
IMail Server for Windows NT
6. In the Aliases text box, specify alternate host names for whichyou want the system to accept mail. For example, if your mailhostname is mail.acme.com, you can set an alias of acme.com sothat the IMail Server will accept mail addressed [email protected] and also [email protected]. Multiple aliasesare separated by a space.
7. In the Top Directory Name text box, enter the name of the direc-tory where the user information (userids and passwords) for thisvirtual host will be stored.
In most cases, you will want to use a different directory for eachvirtual host that you create. It is possible for virtual hosts to sharea single directory but then users that have the same names willactually share the same mailbox.
Select the Use local NT User Database for this host option ifyou want IMail Server to create user mail accounts for this hostby using the userids and passwords in the Windows NT UserDatabase. The mail accounts for these users are created as neces-sary when a mail message for the user is received by the mailserver or when a user accesses the mailbox through a POP3 mailclient.
Do not select the Use local NT User Database option, if youwant userids and passwords for mail accounts to be separatefrom userids and passwords for logging on to the Windows NTsystem.
8. Enter the parameters for mailboxes and messages. These parame-ters apply to all users on the virtual host. Enter zero for any ofthese parameters to provide an unlimited size.
Default Max Mailbox Size
The default maximum size (in bytes) for each mailbox created ina user’s mail account. If a mailbox exceeds the maximum, anynew mail for the mailbox is returned to the sender.
Default Max Messages
The default maximum number of messages (the total for all mail-boxes created in the user’s mail account). If the maximum is ex-ceeded, any new mail for the user is returned to the sender.

41Installing and Setting Up the Mail Server
IMail Server for Windows NT
Single Message Max Size
The default maximum size (in bytes) for a single message sent tothe server. If a message exceeds the maximum, it is returned tothe sender.
Maximum User Count
The maximum number of users that can be registered for the do-main. Enter 0 for an unlimited number of users. (Note that thisdoes not apply to virtual domains that use the NT user database.The displayed counts of users for domains that use the NT userdatabase may not be correct).
9. Click Save to save the new virtual host configuration. Click Exitto close the Virtual Host Configuration window.
10. After you’ve created the virtual host, you need to add user mailaccounts. See Chapter 3 for information on creating and modify-ing user mail accounts.
Setting Up IMail Server as a Mail Gateway for aProprietary Mail System
You can set up IMail Server to function as an SMTP mail gateway forproprietary mail systems such as MS–Mail or CC:Mail.
Note that IMail Server for Windows NT works over TCP/IP and usesthe SMTP protocol. If your proprietary mail system does not run onTCP/IP and use the SMTP protocol, IMail Server for Windows NTwill not work with your system directly. In this case, you’ll need anSMTP gateway for your proprietary system to translate your mail soit will work over TCP/IP with the SMTP protocol.
IMail Server can function as the Internet mail gateway to proprietarySMTP mail gateways or servers from any e–mail systems vendor. Forexample, Microsoft’s MS–Mail and IBM/Lotus’s CC:Mail SMTPgateway products can both receive mail from the Internet and redis-tribute it to MS–Mail or CC:Mail users.
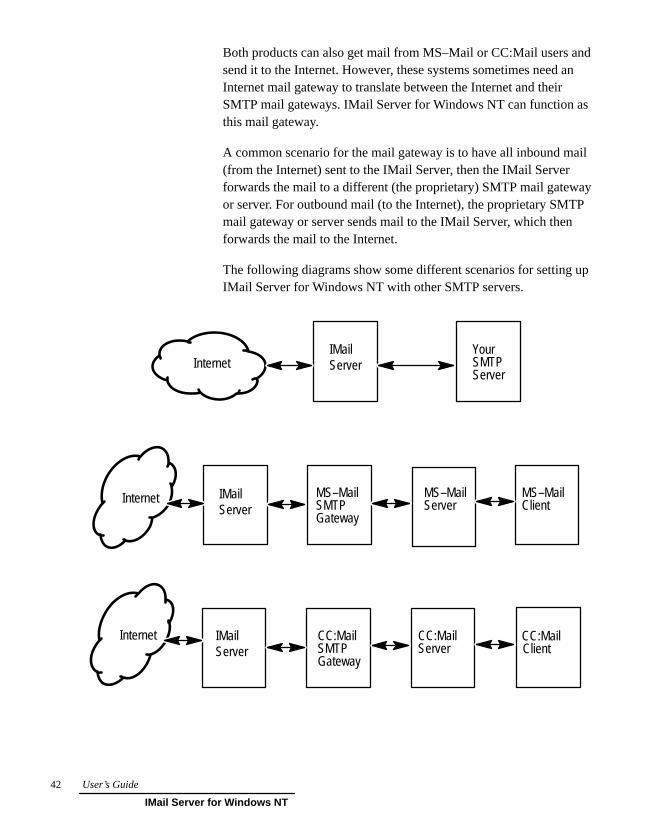
42 User’s Guide
IMail Server for Windows NT
Both products can also get mail from MS–Mail or CC:Mail users andsend it to the Internet. However, these systems sometimes need anInternet mail gateway to translate between the Internet and theirSMTP mail gateways. IMail Server for Windows NT can function asthis mail gateway.
A common scenario for the mail gateway is to have all inbound mail(from the Internet) sent to the IMail Server, then the IMail Serverforwards the mail to a different (the proprietary) SMTP mail gatewayor server. For outbound mail (to the Internet), the proprietary SMTPmail gateway or server sends mail to the IMail Server, which thenforwards the mail to the Internet.
The following diagrams show some different scenarios for setting upIMail Server for Windows NT with other SMTP servers.
IMailServer
YourSMTPServer
IMailServer
IMailServer
MS–MailClient
MS–MailServer
MS–MailSMTPGateway
CC:MailClient
CC:MailServer
CC:MailSMTPGateway
Internet
Internet
Internet
43Installing and Setting Up the Mail Server
IMail Server for Windows NT
Setting up a gateway for a single domain
The following example shows how you can set up IMail Server toaccept mail for a single domain (domain1.com) and forward all mailfor this domain to another SMTP server. Assume the following:
Your domain name domain1.com
Hostname of IMail Server system: my_imail_machineIP address of IMail Server system: 156.21.50.10
Hostname of your SMTP server: your_SMTP_serverIP address of your SMTP server: 156.21.50.240
You can replace “your SMTP server” hostname and IP address withyour MS–Mail, or CC:Mail, or other SMTP gateway’s hostname andIP address.
When Windows NT looks up a domain name, it first searches the\winnt\system32\drivers\hosts file, then, if there is no matching do-main name, Windows NT asks a Domain Name Server (DNS) for theIP address for the domain name. So, in the DNS, you can point yourdomain name to your IMail Server system:
domain1.com 156.21.50.10 (my_imail_system)
In the hosts file point your domain name to your SMTP server:
156.21.50.240 domain1.com (your_SMTP_server)
Setting up a gateway for multiple domains
The following example shows how you would set up IMail Server toaccept mail for two domains. One mail domain will stay on the IMailServer system (domain1.com) and mail for the other mail domain willbe forwarded to another SMTP server. Assume the following:
Domain name for IMail Server domain1.comHostname of IMail Server system: my_imail_machineIP address of IMail Server system: 156.21.50.10
44 User’s Guide
IMail Server for Windows NT
Domain name for your SMTP server domain2.comHostname of your SMTP server: your_SMTP_serverIP address of your SMTP server: 156.21.50.240
You can replace “your SMTP server” hostname and IP address withyour MS–Mail, or CC:Mail, or other SMTP gateway’s hostname andIP address.
When Windows NT looks up a domain name, it first searches the\winnt\system32\drivers\hosts file, then, if there is no matching do-main name, Windows NT asks a Domain Name Server (DNS) for theIP address for the domain name. So, in the DNS, you can set up thedomains as follows:
domain1.com 156.21.50.10 (my_imail_system)domain2.com 156.21.50.10 (my_imail_system)
In the hosts file point your domain name to your SMTP server:
156.21.50.10 domain1.com (my_imail_system)156.21.50.240 domain2.com (your_smtp_server)
If you need to add more domains, you just need to decide which mailserver you want to receive the mail addressed to the domain. If youset up a domain and you want the mail destination to be the IMailServer system, then add that domain to the DNS and hosts file andpoint it to the IP address of the Windows NT machine running theIMail Server.
If you want mail for a domain to go through the IMail Server systemand then on to another SMTP server, add the domain to the DNS andpoint it to the NT machine running the IMail Server. Then, add thedomain to the hosts file and point it to the other SMTP server.

45Installing and Setting Up the Mail Server
IMail Server for Windows NT
Setting up a Dial–up Internet Connection
You can create a dial–up Internet connection from IMail Server forWindows NT to your Internet Service Provider (ISP), allowing you toreceive mail from an account with your ISP.
IMail Server for Windows NT does not perform any dial–up func-tions or spawn off any dialing commands. To start your RAS/PPPconnection to your ISP, you need to either use a scheduling programor manually start the connection.
IMail Server for Windows NT uses the TCP/IP transport on WindowsNT; it does not configure Windows NT’s TCP/IP transport. If youneed to set up your RAS/PPP connection, refer to your Windows NTOnline Help.
Receiving Mail From an Internet Service Provider
IMail Server for Windows NT was designed to work on a 7–day, 24–hour Internet connection, but you can also set up IMail Server to sup-port dial–up connections.
When using a dial–up connection, your inbound mail from the Inter-net has to be stored somewhere on the Internet. Usually, your ISPdoes this for you. Your ISP can store your mail in several ways.
Three of the more popular ways that ISP’s store mail for users are:
• Method 1: The ISP sets up individual mail accounts on the ISPmachines. This method can include using the popular POP3 mailprotocol to read or retrieve your mail, or some other means. Withthis method, each user has to dial up to the ISP and either read ordownload their individual mail.
• Method 2: The ISP sets up individual mail accounts on the ISPmachines, but the ISP forwards all the mail for your users to yourmail server when your dial–up connection is up. This methoduses the ISP’s Internet domain name.
46 User’s Guide
IMail Server for Windows NT
• Method 3: You have a registered Internet domain of your own,and you register your domain to point to the ISP machine. YourISP stores your incoming mail and forwards it to your mail serv-er when your dial–up connection is up.
To register your own domain, contact your ISP. In most cases, theywill do all the work for you. All you have to do is come up with aname!
If you use Method 1, then in order to use IMail Server for WindowsNT, you will have to change to either Method 2 or 3 to receive mailfrom your ISP. IMail Server for Windows NT cannot log into indi-vidual mail accounts on your ISP mail server, retrieve the mail andthen parse the mail correctly. An Internet standard for this does notexist.
Setting Up the Server for Dial–up Access
Setting up the IMail Server for Windows NT when using a dial–upconnection is the same for both methods 2 and 3. Use the followingprocedure to set up your IMail server machine:
1. Create mail accounts for users on the IMail Server for WindowsNT machine by using the IMail User Manager. See the IMailUser Manager section in Chapter 3.
Note that if you are using Method 2, you need to make sure thatthe users’ names are the same on both the ISP’s machine andyour IMail Server for Windows NT machine.
2. You then need to inform Windows NT about your e–mail domainname.
When Windows NT looks up a domain name, it first searches the\WINNT35\SYSTEM32\DRIVERS\HOSTS file, then, if there isno matching domain name, Windows NT asks a Domain NameServer (DNS) for the IP address for the domain name.

47Installing and Setting Up the Mail Server
IMail Server for Windows NT
This creates a problem, as your Windows NT machine has a dif-ferent IP address than your ISP’s machine. When IMail Serverfor Windows NT looks at the incoming mail, it will look up thedomain name to which the e–mail is addressed. If the domainname points to your ISP’s machine (your ISP’s IP address), thenIMail Server for Windows NT will send the mail back to yourISP’s machine (which it thinks is correct). Mail will be bouncedback and forth until one of the machines sends the mail messageback to the original sender.
To avoid this problem, set up the domain as a virtual host, thenadd the domain name to which your incoming mail is addressed(either your ISP’s if Method 2 ,or your own if Method 3) to theAliases text box in the Virtual Host Configuration dialog box,and make this domain name point to your NT machine’s IP num-ber.
For example, if you are using Method 2, and the machines in-volved have the following addresses and names:
ISP’s IP address: 156.21.50.1ISP’s domain name: isp_are_us.comWindows NT IP address: 156.21.50.240Windows NT Name: my_nt_machine
you would make the following entries in the \WINNT\SYS-TEM32\DRIVERS\HOSTS file:
156.21.50.240 my_nt_machine156.21.50.240 isp_domain_name.com
You can have multiple names pointing to the same IP address.This also helps if your machine is receiving mail for multipledomains. Just place each domain name in the hosts file pointingto your NT machine’s IP address.

48 User’s Guide
IMail Server for Windows NT
If you are using Method 3, and the machines involved have thefollowing addresses and names:
ISP’s IP address: 156.21.50.1Your Domain Name: my_domain_name.comIP address for my_domain_name.com: 156.21.50.1Windows NT Name: my_nt_machineWindows NT IP address: 156.21.50.240
you would make the following entries in the \WINNT\SYS-TEM32\DRIVERS\HOSTS file:
156.21.50.240 my_nt_machine156.21.50.240 my_domain_name.com
3. Unless you plan on maintaining a 24–hour/7–day dial–up Inter-net connection, you need to have your ISP spool all the mail foryour company. Then, have your ISP set up their mail machine totry periodically sending mail to the IMail Server for WindowsNT system.
How often the ISP attempts to send mail to your server will de-pend on how often your dial–up connection is up. You need toconsider several factors in determining queue times. The firstfactor is the most important.
– How long will your dial–up connection last (10, 20, 30 min-utes)?
– How often will your ISP’s machine try to send the spooledmail to your NT machine?
– How often will your NT machine try to send mail to the In-ternet?
– How much mail will you receive and send when you makeyour dial–up connection?
For example, if the connection time will be 20 minutes, and youwill have relatively light traffic (50 received and 50 sent) andrelatively short messages (no attachments, or large files), youcould set up the queue times as follows:
Connection Time: 20ISP Queue Time: 15

49Installing and Setting Up the Mail Server
IMail Server for Windows NT
IMail Queue Time: 15Email Quantity: 50 received/50 sent (short messages)
In this example, the Connection Time is the amount of time yourIMail server is connected to the ISP’s machine. The ISP QueueTime determines how often the ISP mail machine tries to sendmail to the IMail. The IMail Queue Time determines how oftenthe IMail server tries to send mail to the ISP or Internet.
To ensure that you send and receive all your mail, regardless ofthe connection time, make the queue times less than the connec-tion time. If you expect to receive or send greater numbers ofmessages, or more lengthy mail than in the example, you shouldeither increase the connection time, or decrease both queuetimes.
Remember that IMail Server for NT does not do scheduling. Youneed to obtain a scheduler to have the connection automatically dial,connect, and disconnect.
IMail Services
Configuration of the various services is performed through a Win-dows NT Control Panel application. After installation, a new iconcalled “IMail Server” appears in the Control Panel.

50 User’s Guide
IMail Server for Windows NT
Click the IMail Server icon. The Status properties appear.
Current status of each of the servers is displayed. Chapters 5 through13 describe the configuration options available for each of theseservers.
IMail Services – Global
You can click the Global tab to show the directory structure for theservices. You cannot change the directory entries.

51Installing and Setting Up the Mail Server
IMail Server for Windows NT
In the Log Server text box, you can enter an IP address to which anyof the IMail services set up to use the log server will send messages.
In the Timezone text box, you can enter your local time zone.
Click the Virtual Host Admin button to display the Virtual HostConfiguration dialog box. The section “Setting Up MultipleDomains” in this chapter describes how to add, modify, or delete avirtual host (mail domain).
IMail Services – Log Server
You can click the Log Server tab to display the log files in the IMailspool directory. Log files are named with the format log MMDD.txtwhere MM is the month and DD is the date.
The Current log box shows the currently active log file. Click Viewnext to this box to view the file in the Windows Notepad.
The Existing Logs box lists recent log files. You can select a log filein the list and click View to open it in the Windows Notepad. To de-lete a log file, select it and click Delete.

52 User’s Guide
IMail Server for Windows NT
IMail Services – Queue
You can click the Queue tab to display the files in the outbound mailqueue.
Each of the messages waiting to be delivered will have a file. Theseare listed in the Filename listbox. Selecting one of these files willdisplay information about that message. You can then remove (delete)the message from the outbound queue or force delivery of one or allof the messages. Note that you cannot modify any of the displayedinformation.

53Creating and Maintaining Mail Accounts
IMail Server for Windows NT
3. Creating and Maintaining Mail Accounts
IMail Server for Windows NT provides two interfaces that systemadministrators can use to create and maintain user mail accounts:
• IMail User Manager — provides all user and alias administrationfunctions. The IMail User Manager is described in this chapter.
• IMail Administrator — provides a Windows Explorer–type treeview interface to the user and alias administration functions. Thisutility provides all of the functionality of the IMail User Manag-er plus mailbox management functions for maintaining mail-boxes created on the server system for mail clients. Chapter 4describes how to use the IMail User Administration utility.
You can use either one or both of these interfaces to add, modify, anddelete users and aliases. A command line program, adduser.exe, isavailable for adding and deleting users from the command line.
A companion program, the IMail User Utility (IMUTIL) lets usersmodify their mail accounts from a remote system.
In addition, both the system administrator and users can have remoteaccess to the mail account functions by using the IMail Remote Ad-ministration Utility or the Web Remote Administration utility.
This chapter describes how to use these utilities to create and main-tain user mail accounts.
IMail User Manager
The IMail User Manager (REGIST32) lets the system administratorperform the following:
• Add, delete, and modify users
• Add, delete, or modify system aliases
• Change passwords
54 User’s Guide
IMail Server for Windows NT
• Change user information in LDAP directory
• Change inbound mail processing rules for users
• Set up vacation processing
• Set up mail forwarding
• Update the user’s PLAN file that is distributed by Finger
• Set up an automated response
The companion program, IMail User Utility (IMUTIL), is designed tobe distributed to users to allow them to modify their mail accountsfrom their own system. See the IMail User Utility section in thischapter for more information.
IMail User Manager – Main Screen
To start the IMail User Manager, do one of the following:
• From the Start menu, select Programs–>IMail–>IMail UserManager.
• Run the REGIST32.EXE program.
If you have set up more than one mail domain, the Select Virtual Hostdialog box appears. (For information on setting up virtual hosts, see“Setting Up Multiple Domains” in Chapter 2.) Select the host andclick OK .
The User Registration window appears. This window shows all regis-tered IMail users. You (the system administrator) can add new users,modify user properties, and delete users.

55Creating and Maintaining Mail Accounts
IMail Server for Windows NT
(If you click on the Aliases button, the window shows all registeredsystem aliases. You can add new aliases, modify alias properties, anddelete aliases.)
The sections that follow describe how to perform these functions.
Adding, Modifying, and Deleting User Mail Ac-counts
You can add, modify, and delete user mail accounts by using theIMail User Manager.
Note:
When you first install IMail Server, or when you create avirtual host, you can select to use the Windows NT UserDatabase to generate user mail accounts. See Chapter 2for more information.
Adding a User Mail Account
For an initial installation of IMail Server for Windows NT, you needto add the user mail accounts for your domain. (If you set up virtualhosts, you need to add users for each host.) After the initial installa-tion, you may need to add, modify, or delete user mail accounts whenchanges are made on your network.

56 User’s Guide
IMail Server for Windows NT
To add users using the IMail User Manager:
1. Start the IMail User Manager.
If you have created virtual hosts, you are prompted to select theHost (domain) to which you want to add user(s). Select a hostand click OK .
The User Registration window appears.
2. Click the New button. The New User dialog box appears.
Enter a userid. A userid is limited to 30 characters and must becreated from the character set of digits and letters. The userid cancontain dashes. It cannot contain spaces. The userid must beunique within the system.
When sending mail to a userid, a mailbox name can be appendedto the userid by using a dash. The mailbox name cannot containdashes. If a userid contains a dash, IMail Server will check to seeif it is a valid userid. If it is not a userid, the characters followingthe dash are read as a mailbox name.
Note:
You can change the character used to delimit the mail-box name in a userid. In the Windows NT registry, add aGLOBAL IMail key of “MailBoxSplitChar” and specifythe new character as the first character of the string val-ue.

57Creating and Maintaining Mail Accounts
IMail Server for Windows NT
3. Enter a user name (this will be the userid for the mail account)and click OK . The User Properties dialog box appears.
The User Properties dialog box lets you modify a users name,their user directory, password, vacation file, plan file, mail deliv-ery rules, automated response, and set options for the account.You can also modify a user’s LDAP directory information (suchas organization name, telephone number).
4. In the Full Name text box, enter the user’s full name.
5. The User Directory text box shows the directory where the useraccount information is stored. You cannot edit this field.
6. In the Password text box, enter a password for the user.
Confirm the password you entered by entering it again in theConfirm Password text box
7. Optionally, in the Forward text box, enter a different userid towhich all of this user’s mail will be sent. See “Setting Up MailForwarding” in this chapter for more information.

58 User’s Guide
IMail Server for Windows NT
8. Enter any of the following options:
Max Mailbox Size
The maximum size (in bytes) for each mailbox created in theuser’s mail account. If a mailbox exceeds the maximum, any newmail for the mailbox is returned to the sender. Enter 0 to use theHost default value (entered in the Virtual Host Configurationdialog box).
Max Messages
The maximum number of messages (the total for all mailboxescreated in the user’s mail account). If the maximum is exceeded,any new mail for the user is returned to the sender. Enter 0 to usethe Host default value (entered in the Virtual Host Configurationdialog box).
Current Size
The current size (in bytes) of the Main mailbox.
Current Msgs
The current total of all messages in the Main mailbox in theuser’s account.
User Cannot Change Password
This option controls whether or not the user can change theirpassword remotely by using the IMail User Utility or the WebRemote Administration utility.
POP3 Access Disabled
Prohibit the user from accessing the account remotely throughPOP3 or IMAP4. Lets the system administrator disable the ac-count without changing the user’s password or removing themfrom the system.
Disable Finger Info and Whois Info
Allows you to disable the distribution of any information aboutthis user through Finger if you have the Finger server runningand through Whois if you have the Whois server running.
Allow Web Access
Allows this user access to their account via the Web Remote Ad-ministration utility (provided the utility is configured) and theWeb Messaging option.

59Creating and Maintaining Mail Accounts
IMail Server for Windows NT
Host Administrator
Allows this user to add, modify, or delete users in their currentdomain by using IRADMEN or the Web Remote Administrationutility. To use the Web utility, Allow Web Access must also beselected.
IMail System Administrator
Allows this user to use all services configuration provided by theIRADMEN or Web Remote Administration utilities. To use theWeb utility, Allow Web Access must also be selected.
9. Optionally, set up any special processing for this user, such asdelivery rules, a vacation message, a Finger Plan file, an auto-mated response, or enter LDAP attribute information. See thefollowing sections for information on setting up these options.
10. Click OK to add the user. The userid is added to the list of regis-tered users.
Any users you have added can now receive mail through IMailServer for Windows NT at the specified host (domain name). Forexample, if you added the user arnie to the virtual host for thedomain ipswitch.com, the user can now receive mail addressed [email protected].
Modifying a User Mail Account
To modify a user mail account:
1. Select the user name from the list of users.
2. Click the Modify button. The User Properties dialog box ap-pears.
3. Make any change to the User Properties, Vacation Processing,Rules Processing, Finger Plan, Forwarding, Information Manag-er, or Attributes. See the description of User Properties in “Ad-ding User Mail Accounts” and the following sections on othermail options.
4. Click OK to apply the changes.

60 User’s Guide
IMail Server for Windows NT
You can also click the Modify button when no user is selected andyou will be prompted for the userid of the user that you want tomodify. You can also modify a user’s properties by double–clickingon the user name in the list.
Deleting a User Mail Account
To delete a user mail account:
1. Select the user name from the list of users.
2. Click the Delete button.
A dialog box asks if you want to delete the user account and allsubdirectories and files.
3. Click Yes to delete the user mail account and all related files (allof this user’s mail will be deleted). Click No to delete just theuser mail account but retain the subdirectories and files.
You can also click the Delete button when no user is selected and youwill be prompted for the userid of the user that you want to delete.
Adding and Deleting Users with the CommandLine Program
You can also use the command line program, adduser.exe, to add anddelete users. To view the syntax for the command line program, typeeither adduser or adduser /? at the DOS prompt. This com-mand returns the following:
adduser –u userid [–h hostname] [–n ”full name”] [–p password]
– u userid is the IMail user name (e.g. Maggie)– h hostname is the name of the virtual host (e.g. mail.acme.com)– n “full name” is the user’s full name (e.g. Margaret Smith)– p password is the user’s password (e.g. magmail)– k userid is the userid of a user account to be deleted

61Creating and Maintaining Mail Accounts
IMail Server for Windows NT
The adduser program can be used from the command line, in a batchfile, or in a script file.
Adding, Modifying, and Deleting Aliases
IMail Server for Windows NT supports three types of aliases:
• Standard aliases that point to a mail address on the local system,a remote system, or another alias.
• List aliases that point to a file containing a list of mail addresses.This is not an automated mailing list such as those that can be setup with the List server. It is a simple distribution list with no au-tomated subscribe, unsubscribe, or digest functions.
• Program aliases that point to an executable program on the hostsystem.
Adding an Alias
To add an alias:
1. In the IMail User Manager, click the Aliases button. All regis-tered aliases are displayed in the window.
If you are installing IMail Server for Windows NT for the firsttime, you will see only the postmaster=root alias, which was setup automatically. To comply with the Internet mail RFC specifi-cation, you need a postmaster alias so Internet mail users cansend mail to postmaster@your_domain_name. You can changethe postmaster alias to point to a different mail account.
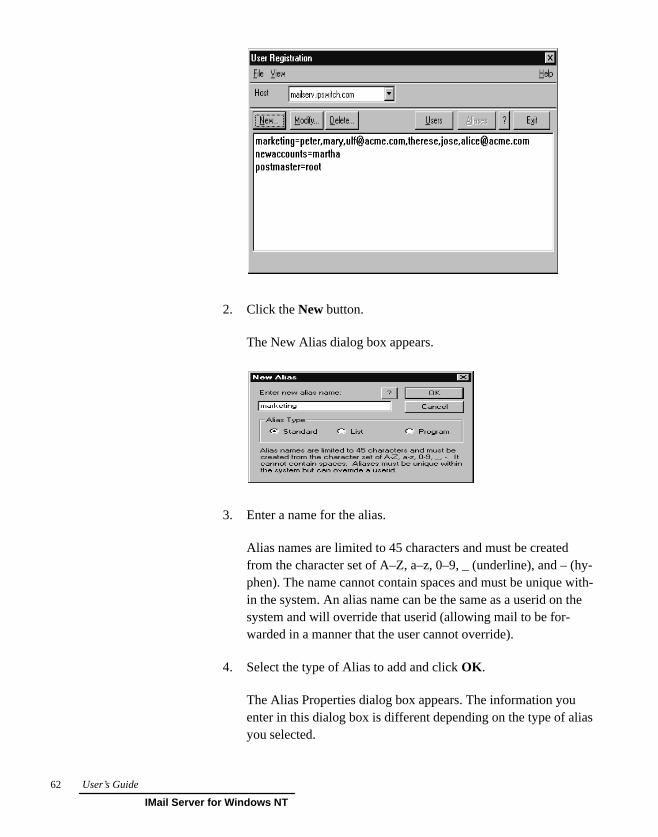
62 User’s Guide
IMail Server for Windows NT
2. Click the New button.
The New Alias dialog box appears.
3. Enter a name for the alias.
Alias names are limited to 45 characters and must be createdfrom the character set of A–Z, a–z, 0–9, _ (underline), and – (hy-phen). The name cannot contain spaces and must be unique with-in the system. An alias name can be the same as a userid on thesystem and will override that userid (allowing mail to be for-warded in a manner that the user cannot override).
4. Select the type of Alias to add and click OK .
The Alias Properties dialog box appears. The information youenter in this dialog box is different depending on the type of aliasyou selected.

63Creating and Maintaining Mail Accounts
IMail Server for Windows NT
Standard Aliases
A standard alias can point to a single userid on the same system,multiple userids on the same system, a remote mail address, mul-tiple mail addresses, another alias, or any combination of thesame. In the Alias Properties dialog box, you should place onecomplete mail address per line (no spaces), as shown below. Ifyou create an alias that is longer than is allowed, the alias will beconverted to a list alias.
List Aliases
A list alias points to a file that contains a list of valid mail ad-dresses, one per line. The dialog box allows you to define thelocation of the list by manually typing the name of the file orthrough the use of the browse button.
List aliases are affected by two SMTP Security settings (Set-tings–>Control Panel–>IMail Server–>SMTP Security): the Al-low remote mail to local lists and Allow remote view of locallists options. See Chapter 5 for more information.
Program Aliases
A program alias points to a program that can accept the mailmessage for further processing. The message is passed to theprogram by passing the full pathname of a temporary file as thelast argument on the command line when the program is in-voked. Other required command line parameters can be placed inthe edit box that defines the program to execute.

64 User’s Guide
IMail Server for Windows NT
5. After entering the alias properties, click OK to add the alias. Thenew alias is added to the list of registered aliases.
Modifying an Alias
To modify an alias:
1. Select the alias from the list of aliases.
2. Click the Modify button. The Alias Properties dialog box ap-pears.
3. Make any changes to the properties associated with the alias.
4. Click OK to apply the changes.
You can also click the Modify button when no alias is selected andyou will be prompted for the alias that you want to modify. You canalso modify an alias by double–clicking on the alias in the list.
Deleting an Alias
To delete an alias:
1. Select the alias from the list of aliases.
2. Click the Delete button.
3. Click OK to apply the change.
You can also click the Delete button when no alias is selected andyou will be prompted for the alias that you want to delete.
Setting Up Mail Forwarding
You can have IMail Server for Windows NT automatically forward auser’s mail to another account or system.
To set up mail forwarding for a user:
1. In the User Properties dialog box, enter a complete mail addressin the Forward text box.

65Creating and Maintaining Mail Accounts
IMail Server for Windows NT
The address that you enter in this text box must be a completemail address that is valid from the IMail Server for Windows NThost system.
If you want to send the user’s mail to a different user on the samehost, you can enter the simple userid. If you want to send theuser’s mail to a different system, you must enter a complete mailaddress including the userid and the full domain name, for exam-ple: ([email protected])
To leave a copy in the user’s mailbox and forward a copy toanother user, enter the address using the following format:
To forward to multiple users, separate each mail address with acomma.
You can also access the same mail forwarding function throughthe vacation feature.
2. Click OK to apply the change.
To turn mail forwarding off, make sure the text box is empty andclick OK .
Setting Up Delivery Rules
You can create delivery rules to direct incoming mail to differentmailboxes based on the contents of the From:, Subject:, and Sender:fields in the message header. The rules effect only incoming mail sentto the user’s Main mailbox.
When you add delivery rules, IMail creates a rules.ima file in theuser’s home directory on the IMail Server for Windows NT host sys-tem. This file is read top down until a match is found. The rules.imafile is a text file that can be copied to any user’s home directory.
To create a delivery rule:
1. In the User Properties dialog box, click Rules. The Mail Deliv-ery Rules dialog box appears.

66 User’s Guide
IMail Server for Windows NT
2. Click the Add button.
3. Select the Contains option to apply the rule to messages thatcontain the search string, or select Doesn’t Contain to apply therule to those that do not contain the search string.
4. Enter a search string in the text box below the Contains option.
Optionally, select the Match Case option. When this option isenabled, the search string must match the find string in both up-per and lower case.
5. Select the header field (From, Subject, Sender) that you want tosearch.
6. Enter the name of the mailbox to which you want to route themessages that meet the rule criteria.
7. Click OK to save the rule.
The list box shows the new rule, along with any other rules youhave created. See the “Rule Syntax” section below for informa-tion on the syntax used to define rules.
To delete a rule:
1. In the list box, select the rule you want to delete.
2. Click the Delete button.

67Creating and Maintaining Mail Accounts
IMail Server for Windows NT
Rule Syntax
The syntax used to define rules in the rules.ima file specifies thesearch type, the search string, and the destination mailbox. When youcreate a rule in the Mail Delivery Rules dialog box, it is entered in therules.ima file in this format. You can use the following rules for pro-cessing mail:
F=string : mailbox (Case sensitive match in From: header)F~string : mailbox (Case insensitive match in From: header)S=string : mailbox (Case sensitive match in Subject: header)S~string : mailbox (Case insensitive match in Subject: header)N=string : mailbox (Case sensitive match in Sender: header)N~string : mailbox (Case insensitive match in Sender: header)
where string is the search string and mailbox is the destination mail-box.
Example rules.ima file:
F=ipswitch:internal (send mail from ipswitch to mailbox ”internal”)N~53list:53list (send mail from 53listserver to mailbox ”53list”)S~ftp:ftp (send mail with ftp in subject to ”ftp” mailbox)S~mail:mail (send mail with mail in subject to ”mail” mailbox)
Setting Up a Vacation Message
You can create a vacation.ima file in the user’s home directory on theIMail Server for Windows NT host system that will be mailed once toeach user that sends mail to the user.
To create a vacation message:
1. In the User Properties dialog box, click Vacation. The VacationMessage dialog box appears.

68 User’s Guide
IMail Server for Windows NT
2. Enter the message that you want to send as a reply to mail whileyou (the user) are away.
When the vacation message is sent, IMail Server for WindowsNT lists the e–mail address of the recipient in the vacation.sntfile. The presence of the address in this file is what stops thesender from receiving a second message.
3. Select the Enable Vacation option.
When the you (the user) returns from vacation, you can disablethe vacation message by making sure the Enable Vacation op-tion is not checked.
4. Optionally, select the Delete old recipients option. IMail Servermaintains a file (vacation.snt) that lists users to whom the vaca-tion message has been sent. If you do not select this option, thevacation message will not be sent to any users in the vacation.sntfile. If you select the option, the vacation.snt file is deleted whenyou click OK , thus deleting the list of old recipients.
5. Optionally, enter a mail address to which IMail will forward yourmail while you are away.
The address that you enter in this text box must be a completemail address that is valid from the IMail Server for Windows NThost system. If you want to send the user’s mail to a differentuser on the same host, you can enter the simple userid.

69Creating and Maintaining Mail Accounts
IMail Server for Windows NT
If you want to send the user’s mail to a different system, youmust enter a complete mail address including the userid and thefull domain name, for example: ([email protected])
To leave a copy in the user’s mailbox and forward a copy toanother user, enter the address using the following format:
To forward to multiple users, separate each mail address with acomma.
6. Click OK .
When the vacation message is sent, IMail Server for Windows NTlists the e–mail address of the recipient in the vacation.snt file. Thepresence of the address in this file is what stops the sender from re-ceiving a second message.
Setting Up a Finger Plan
You can create a plan.ima file in the user’s home directory on theIMail Server for Windows NT host system to provide Finger informa-tion. The contents of the file are returned to Finger requests from oth-er hosts, provided the system administrator enables Finger and allowsthe users plan to be presented. The Plan contents are displayed inaddition to the login username of the user, login times, and other in-formation displayed by the Finger server.
The system administrator can disable the transmission of any in-formation about any user through the Finger protocol by checking theDisable Finger Info option in the User Properties dialog box.
To create or modify a Finger Plan:
1. In the User Properties dialog box, click Plan. The Finger dialogbox appears.
2. Enter any information you desire to make publicly available toFinger clients.
3. Click OK .

70 User’s Guide
IMail Server for Windows NT
Setting Up an Automated Response with the InfoManager
The Info Manager feature lets you set up an automated e–mail in-formation system. When mail is received for a user that has enabledthe Info Manager, a prepared message is sent back to the sender.
The Info Manager lets you set up subcategories of a particular useraccount and enter an automated response specific to each category.For example, you may want to set up an info user account for yourorganization. When someone sends mail to the info account, the sys-tem can return a response that describes the subcategories of the infoaccount in which they can obtain further information. They couldthen send a message to info–sales and receive back a different mes-sage related to sales, or to info–classes and receive back a messageabout classes you offer. There is no limit to the number of subcatego-ries that you can set up in the Info Manager.
To create an automated response for a mail account:
1. In the User Properties dialog box, click the Info Mgr button. TheInfo Manager dialog box appears.
2. Create a new subarea or select an existing subarea to which theresponse message will apply.

71Creating and Maintaining Mail Accounts
IMail Server for Windows NT
The default subarea is main. The message you enter for this areawill be returned to users’ who send mail to the account but do notspecify a mailbox. For example, if a user sends mail to [email protected], they will receive the response entered for the mainsubcategory. If a user sends mail to the info–[email protected], they will receive the response entered for the sales sub-category of the info mail account.
3. Enter the message to be returned to all users who send mail tothis subarea.
The first line of the body of the message is used as the subjectline for the automated response. It must be less than 80 charac-ters long.
The response message is contained in the subcategory.inf file inthe user’s mail directory.
4. Select the Enable info manager for this subarea option.
To disable the automated response, make sure the Enable infomanager for this subarea option is not checked.
5. Optionally, enter a mail address to which IMail will forward mailsent to the subarea (in addition to sending the response to thesender).
The address that you enter in this text box must be a completemail address that is valid from the IMail Server for Windows NThost system. If you want to send the user’s mail to a differentuser on the same host, you can enter the simple userid. If youwant to send the user’s mail to a different system, you must entera complete mail address including the userid and the full domainname, for example: ([email protected])
6. Click Save to save the message and enable the Info Manager.
When a user sends mail to a mail account with Info Manager enabled,the user’s mail address is listed in the subcategory.snt file in the maildirectory. To view this file, click the View Recipients button.
Info Manager messages are not returned if the original message con-tains the Precedence: bulk header or contains listserv in the mail ad-dress.

72 User’s Guide
IMail Server for Windows NT
It is recommended that you do not send mail from an account forwhich the Info Manager is enabled because the recipient of the mes-sage will receive an automated response if they reply.
You can use the Info Manager and the Rules features together. Youcan use the rules processing feature to search incoming messages fora string and route the mail to a mail account for which you have setup an automated response.
The Info Manager is checked after the Rules Manager and before theVacation Manager.
Entering LDAP Directory Information (Attributes)
You can add attribute information to the user’s account record forpublishing via the LDAP server. IMail Server provides an LDAP in-terface to the IMail user database. The IMail user database is ex-tended to include standard LDAP attributes (such as name, address,organization name, phone number). These attributes are made avail-able (through the LDAP server) to any LDAP–enabled client. SeeChapter 8 for more information on the LDAP server and LDAP data.
To enter LDAP information for a user:
1. In the User Properties dialog box, click the Attribs button. TheUser Attributes dialog box appears.

73Creating and Maintaining Mail Accounts
IMail Server for Windows NT
2. Select an attribute from the list or define a new attribute by enter-ing it in the text box at the top of the list.
The list contains the most common attributes used in an LDAPentry. Other attributes can be defined by the system administratoror the user.
The text box at the top of the list shows the currently selectedattribute. The text box to the right of the list shows the entry forthe currently selected attribute.
3. Enter or modify the entry for the selected attribute, and then clickthe Set button to save the change.
4. Select or enter another attribute to change.
5. When you have finished making entries, click OK .
IMail User Utility
The IMail User Utility (IMUTIL) is designed to be used only with theIMail Server for Windows NT. Any valid licensee of IMail Server forWindows NT is authorized to make an unlimited number of copies ofIMUTIL for use with IMail Server for Windows NT.
The IMail User Utility lets users change their password, change in-bound mail processing rules, set up vacation processing, set up mailforwarding, and update their PLAN file that is distributed by Finger.The IMUTIL (imutil.exe) program is designed to be distributed to anyusers, regardless of client.
The utilities in the IMail User Utility match those in the IMail UserManager (REGIST32) with a few exceptions. A user cannot changetheir name, userid or other user properties. They can change theirpassword and enable mail forwarding.
IMUTIL is a 16–bit application and can be used on the Windows NThost, as well as on any Winsock 1.1 compliant network stack.
System administrators who want to limit these functions can elect notto distribute the IMUTIL program.

74 User’s Guide
IMail Server for Windows NT
IMail User Utility – Logging On
To start the IMail User Utility, do one of the following:
• In the IMail Server for Windows NT program group, click theIMail User Utility icon.
• Run the imutil.exe program.
The Login dialog box appears.
When you enter your profile/userid name and press TAB, the remain-der of the dialog box will fill in from the last use. Multiple profile/us-erids may exist on a system. The information used to maintain this isfound in the imail.ini file in the Windows directory.
To use the IMail User Utility on the same system that contains thePOP server, you will need to use a host name of 127.0.0.1.
The password is saved in the .ini file provided that, in the User sec-tion of the .ini file, the parameter OPT_SAVEPWD is set equal to 1.Note that the password is saved in plain text if this option is set!
IMail User Utility – Main Screen
The main screen of IMail User Utility has a menu bar, a button bar,and a conversation window. You can access functions by either se-lecting from the menu or by clicking the buttons. The conversationwindow, below the button bar, displays a record of the “conversa-tion,” or communications, with the server. This provides feedback tothe user on the success of a function. (Note that a special mailboxcalled IMUTIL is used to access the remote functions of IMail Serverfor Windows NT.)
IMail User Utility – Changing Your Password
You can change your password on the remote host (if the administra-tor allows) by selecting Change Password from the File menu, or byclicking the ChgPass button. You must enter your old passwordagain, and then enter the desired new password twice. Note that apassword can be from 4 to 30 characters and cannot contain a space,hyphen, or equal sign.

75Creating and Maintaining Mail Accounts
IMail Server for Windows NT
IMail User Utility – Forwarding Mail
You can cause IMail Server for Windows NT to automatically for-ward your mail to another account or system by selecting Forwardingfrom the File menu, or by clicking the Forward button.
The address that you enter in the Forwarding field must be a com-plete mail address that is valid from the IMail Server for WindowsNT host system. If you want to send your mail to a different user onthe same host, you only have to enter the simple userid. If you wantto send your mail to a different system, you must enter a completemail address including the userid and the full domain name ([email protected]).
To leave a copy in the user’s mailbox and forward a copy toanother user, enter the address using the following format:
To forward to multiple users, separate each mail address with acomma.
You can also access the same mail forwarding function through thevacation feature. To turn mail forwarding off, ensure the edit box isempty and click OK .
IMail User Utility – Delivery Rules
You can create a RULES.IMA file in your home directory on theIMail Server for Windows NT host system to perform rules–basedprocessing on incoming mail. This file is read top down until a matchis found when the destination mailbox is MAIN. You can use this fileto direct mail to different mailboxes based on the contents of theFrom, Subject, Sender, and To headers.
You can use the following rules for processing mail:
F=string:mailbox (Case sensitive match in From: header)F~string:mailbox (Case insensitive match in From: header)S=string:mailbox (Case sensitive match in Subject: header)S~string:mailbox (Case insensitive match in Subject: header)N=string:mailbox (Case sensitive match in Sender: header)N~string:mailbox (Case insensitive match in Sender: header)

76 User’s Guide
IMail Server for Windows NT
Example RULES.IMA:
F=ipswitch:internal (send mail from ipswitch to mailbox ”internal”)N~53list:53list (send mail from 53listserver to mailbox ”53list”)S~ftp:ftp (send mail with ftp in subject to ”ftp” mailbox)S~mail:mail (send mail with mail in subject to ”mail” mailbox)
Alternate mailboxes may be accessed by any POP3 client by append-ing the mailbox name at the end of the userid, following a hyphen:(userid–mailbox). The alternate mailboxes can be accessed directlywith an IMAP4 client.
You can have incoming mail sent directly to an alternate mailbox byaddressing mail to userid–[email protected]. When subscribingto a mailing list, you can use the userid–mailbox as your userid sothat mail from the list will be sent to the mailbox. The default mail-box for a user is userid–[email protected].
IMail User Utility – Vacation Processing
You can create a VACATION.IMA file in your home directory on theIMail Server for Windows NT host system that will be mailed once toeach user that sends mail to the user.
When the vacation message is sent, IMail Server for Windows NTlists the email address of the recipient in the VACATION.SNT file.The presence of the address in this file is what stops the sender fromreceiving a second message.
IMail User Utility – Finger Plan
You can create a PLAN.IMA file in the your home directory on theIMail Server for Windows NT host system to provide Finger informa-tion. The contents of the file are returned to Finger requests from oth-er hosts, provided the system administrator enables Finger and allowsthe users plan to be presented.
The system administrator can disable the transmission of any in-formation about any user through the Finger protocol.
77Creating and Maintaining Mail Accounts
IMail Server for Windows NT
Backup and Restore IMail Database
Whenever you exit from the IMail User Manager, it attempts to back-up the IMail Server section of the Windows NT registry to the fileimailreg. After you complete the initial IMail Server installation, theIMail registry data is written to the file reginit.
You can perform a backup manually by selecting Backup IMail Reg-istry from the File menu. A dialog box prompts you to specify a file-name to which it will back up the IMail Server section of the registry.
You can restore these backup files to the registry by selecting RestoreIMail Registry from the File menu. A dialog box displays a list ofthe backup files. If you select to restore a backup file, you will loseany changes made between the time of the backup and the time of therestore.
Importing NT Users
If you did not select to use the Windows NT User Database for usermail accounts, you can use the Import NT Users feature (from theFile menu) to add users to the IMail database. Selecting this optiondisplays a dialog box that lists the users in the NT User Database.You can select the users you want to add to the IMail database andIMail Server will create accounts using the userid and the user’s fullname. You are prompted to enter a password for each user or you canspecify an initial password for all users.
Remote Administration Utilities
IMail Server provides two remote administration utilities:
• The Remote Administration utility (IRADMEN) lets you add,modify, and delete IMail Server user accounts from a remotesystem.You can copy the IRADMEN program to a remote ma-chine and use it to log on to the mail server and make anychanges.

78 User’s Guide
IMail Server for Windows NT
• The Web Remote Administration utility lets you add, modify,and delete IMail Server user accounts from a Web browser on aremote system.
Running the IRADMEN Utility
You can copy the IRADMEN utility (iradmen.exe) from the IMailproduct directory (default is C:\IMail ) and put it on any remote Win-dows NT system.
To run the Remote Administration utility:
1. Select Run from the File menu, then enter c:\imail\iradmen andpress Return. A Logon dialog box appears.
2. Make sure the Password server is running. (See Chapter 11 formore information).
3. Set the appropriate access options (Host Administrator, IMailSystem Administrator) in the User Properties for the userid youwill use to log in to IRADMEN.
See “Adding a User Mail Account” in this chapter for informa-tion.
4. Enter your userid and password, then click OK . The IRADMENwindow appears.
See the online help for information on using IRADMEN.
Setting up the Web Remote Administration Utility
You can access the Web Remote Administration utility from any Webbrowser.
To set up the Web Remote Administration utility:
1. Configure the IMail Server Web server as described in the “Con-figuring the Web Server” section of Chapter 12.
Note:
You should use a Web browser that supports frames asthe IMail Server Web server uses frames to display ser-vice status. The most recent Netscape Navigator andMicrosoft Internet Explorer browsers support frames.

79Creating and Maintaining Mail Accounts
IMail Server for Windows NT
2. Set the appropriate access options (Allow Web Access, Host Ad-ministrator, IMail System Administrator) in the User Propertiesfor the userid you will use to login.
You must enable the Allow Web Access option. See “Adding aUser Mail Account” in this chapter for information on these op-tions.
3. Start a Web browser and open the URL address for the Web serv-er. The address is:
http:://your_imail_server_system:8181
where your_imail_server_system is the hostname of the Win-dows NT system on which you installed the IMail Server and8181 is the port number for the Web server.
You are prompted for your IMail Server userid and password.
4. Enter your IMail userid and password.
Note:
The IMail userid and password use base64 encoding forsending this information via the HTTP protocol.

80 User’s Guide
IMail Server for Windows NT
Using the Web Remote Administration Utility
The following screen shows an example of the Web page display. Inaddition to providing access to the user mail accounts, the Web pagecan display the status of services monitored by the Monitor server.
In the left panel, the Monitor shows the status of monitored services.Services shown in green are running; services shown in red arestopped.
The right panel shows the menu of administration functions. Thefunctions that are available to the user depend on the access assignedto the userid. (Access is set in the user properties for the userid.) Allusers will see the functions listed under Personal Information. HostAdministrators will also see the Host Administration functions. Sys-tem Administrators will also see the System Administration functions.
Personal Information
All users have access to these menu items:
• Change Password — can change and confirm the user’s pass-word.
• Change User Information — change the user information thatgets published in a directory by the LDAP server.
• Change Finger Information — change the information in theuser’s plan file. This information is provided in response to aFinger request.

81Creating and Maintaining Mail Accounts
IMail Server for Windows NT
• Change Mail Forwarding Information — set a forwarding e–mailaddress to which all the user’s mail is sent.
• Change Vacation Message — enter a vacation message that willbe sent once to each user that send’s mail to this user’s account.The presence of a message in the text window activates the vaca-tion message. If the text window is left empty, the vacation mes-sage is disabled. If the vacation message is enabled, you canview the vacation.snt file to see who has received the message.
System Administration
Users who have System Administrator access enabled (in the userproperties) will see these menu items:
• Service Administration — stop and start the IMail services andconfigure service monitoring.
• List Administration — If you are the owner of a mailing list, youcan access the list maintenance functions.
• Current Host Configuration — view and modify the host config-uration.
• SMTP Settings — change the configuration settings for theSMTP server. See Chapter 5 for a description of each setting.
• Local Address Table — modify the Local Address table whichdetermines the IP addresses that the SMTP server will considerto be local hosts. See Chapter 5 for more information on the mailrelay capabilities.
• SMTP Access Table — modify the SMTP access table whichdetermines the IP addresses that the SMTP server will allow toconnect to it. See Chapter 5 for more information on the SMTPaccess capabilities.
• POP3/IMAP4 Access Table — modify the POP3/IMAP4 accesstable which determines the IP addresses that the POP3 andIMAP4 servers will allow to connect to it. See Chapters 6 and 7for more information on these access capabilities.
• Web Access Table — modify the Web access table which deter-mines the IP addresses that the Web server for the Remote Ad-
82 User’s Guide
IMail Server for Windows NT
ministration utility will allow to connect to it. See Chapter 12 formore information on these access capabilities.
• View Monitor Database — shows all service monitoring events.
• View Spool Directory — shows all IMail Server send and re-ceive mail transactions that are in process and provides access tolog files.
• Edit Welcome Message — enter up to 1000 characters of plaintext and/or raw HTML code in this edit box. The message will bedisplayed in the main logon screen above the logon form. Themessage persists across reboots.
• Recent IMail News — displays the Web page where Ipswitchreports information on new releases, bug fixes, and workarounds.
Host Administration
Users who have Host Administrator access enabled (in the userproperties) will see these menu items:
• User Administration — lets you add, modify, and delete usersand aliases. See the appropriate sections of this chapter for moreinformation.
• List Administration — If you are the owner of a mailing list, youcan access the list maintenance functions.
• View Monitor Access Log — shows each access attempt to theIMail Web Messaging server and to the IMonitor web server.
• View Monitor System Log — shows logons to the mail serverand to the IMonitor web server and shows the status of services.
• View IMail System Log — shows IMail Server send and receivemail transactions. This shows the contents of syslog.txt.
• View IMail Syslog Log — records transaction and debug in-formation when enabled in each of the servers (for example,POP3 and SMTP). This shows the contents of lognnnn.txt, theSystem Log Service file.

83Using the IMail Administrator
IMail Server for Windows NT
4. Using the IMail Administrator
IMail Server for Windows NT provides two interfaces that systemadministrators can use to create and maintain user mail accounts:
• IMail User Manager — provides all user and alias administrationfunctions. The IMail User Manager is described in Chapter 3.
• IMail Administrator — provides a Windows Explorer–type treeview interface to the user and alias administration functions. Thisutility provides all of the functionality of the IMail User Manag-er plus mailbox management functions for maintaining mail-boxes created on the server system for IMAP4 clients. You canalso add, delete, and manage mailing lists. This chapter describeshow to use the IMail Administrator.
You can use either one or both of these interfaces to add, modify, anddelete users and aliases. A command line program, adduser.exe, isalso available for adding and deleting users from the command line.See Chapter 3 for information on using the command line program.
A companion program, the IMail User Utility (IMUTIL) lets usersmodify their mail accounts from a remote system.
In addition, both the system administrator and users can have remoteaccess to the mail account functions by using the IMail Remote Ad-ministration Utility or the Web Remote Administration utility.
See Chapter 3 for information about these utilities.
IMail Administrator
The IMail Administrator (IADMIN) lets the system administratorperform the following:
• Add, modify, and delete mail domains
• Add, modify, and delete users

84 User’s Guide
IMail Server for Windows NT
• Change passwords
• Find and delete orphan mail accounts
• Add, modify, and delete system aliases
• Add, delete, and manage mailing lists
• Change user information for the LDAP directory
• View, add, and delete mailbox (.mbx) files and delete messagesby date (for IMAP4 mailboxes created on the server)
• Change inbound mail processing rules for users
• Set up vacation processing
• Set up mail forwarding
• Update the user’s PLAN file that is distributed by Finger
• Set up an automated response
IMail Administrator – Main Screen
To start the IMail Administrator, do one of the following:
• From the Start menu, select Programs–>IMail–>IMail Adminis-trator.
• Run the IADMIN.EXE program.
The IMail Administrator window appears. This split window workslike the Windows Explorer. The tree view in the left panel providesaccess to your mail domains and the user database.

85Using the IMail Administrator
IMail Server for Windows NT
To expand the tree, click the plus sign (+) next to an item. When youclick on an item in the tree, its properties are displayed in the rightpanel.
You can resize either the left or right panel by clicking and draggingthe border between them.
Click on Local System to display the IMail Server configuration.
Mail domains are listed by IP address under IP Addresses in the treeview. Mail domains are listed by domain name under Virtual Do-mains in the tree view. Users, aliases, and mailing lists are found un-der the virtual domain name.
The sections that follow describe how to use the IMail Administratorto add and delete mail domains, and to add, modify, and delete theusers, aliases, and mailing lists in a domain.
Viewing the Local System Configuration
In the tree view, click on Local System to display the IMail Serverconfiguration.
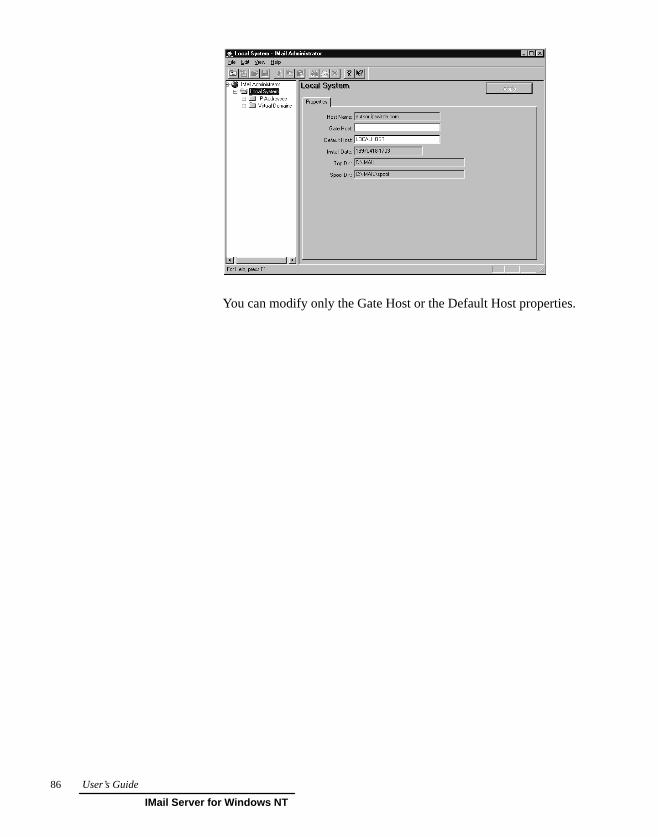
86 User’s Guide
IMail Server for Windows NT
You can modify only the Gate Host or the Default Host properties.

87Using the IMail Administrator
IMail Server for Windows NT
Host Name
The primary official host name of the IMail Server system, This wasspecified during installation.
Default Host
The name of the host to send mail to if only a user ID is specified inthe mail message and that user ID is not found on the local system.Normally this field should be blank. This field can be useful whenmultiple systems are required to work as one system.
Gate Host
The name of another host to send mail to for further delivery whenthat mail cannot be delivered directly to the destination host. This canalso be used in conjunction with the Send all remote mail throughgateway option to force delivery of mail through the gateway host.Since IMail Server for Windows NT should be able to reach all hostsdirectly, this field should typically be left blank. See Chapter 5,“SMTP Server,” for more information.
Install Date
Date the IMail Server system was installed.
Top Dir
Directory where IMail Server files are installed. This is specified dur-ing installation.
Spool Dir
Temporary directory where messages are spooled while awaiting pro-cessing and where log files are kept.
Adding and Deleting Virtual Domains
If you want to receive mail for more than one e–mail domain on thesame Windows NT system, you need to set up a virtual host for eachdomain. For example, if your mail server provides mail service foryour local e–mail domain, mail.ipswitch.com, and you also want it toprovide mail service for another e–mail domain, mail.acme.com, youneed to create a virtual host for mail.acme.com.

88 User’s Guide
IMail Server for Windows NT
Each virtual host must have a unique IP address. You can use either areal IP address or a virtual IP address. To use a real IP address, the IPaddress must be set in the the Control Panel’s Network applet, underProtocols–>TCP/IP Advanced properties. You can add IP addressesin the Network applet.
Note:
If you are using Windows NT 3.51, you can add up tofive IP addresses in the Network applet. If you need toadd more than five addresses, refer to the documentationfor the Windows NT 3.51 Resource Kit.
A virtual IP address can be assigned to the domain (virtual host) bythe IMail Server system. This allows you to have a virtual host with-out an IP address. You can then use an MX record in your DNS topoint the virtual domain to an actual IP address.
If you use a virtual IP address for a mail domain, users must log in tomail accounts in the domain by specifying their userid in their mailclient as: userid@virtualhost, where userid is the userid and virtual-host is the domain name, and entering their password. If you use anIP address that is set up on your IMail Server system, this method oflogin is not necessary.
Note:
Whether you use a real IP address or a virtual IP ad-dress, you need to make the proper DNS entries for yourmail domain(s). If you use a virtual IP address, the MXrecord (in DNS) for the domain should point to a real IPaddress. See your DNS documentation for informationon creating these entries.
Adding a Mail Domain
To add a virtual mail domain:
1. In the tree view, click on Virtual Domains. The Virtual Domainsproperties appear in the right panel.
2. Click the Add Virtual Host button. The Create New VirtualHost wizard appears.

89Using the IMail Administrator
IMail Server for Windows NT
3. Click Next. The New Host Name screen appears.
Enter the official host name. The name you enter here will beused to address mail to the users on the virtual host. For example,if you enter mail.acme.com as the mail host name, any users youadd to the virtual host will receive mail [email protected].
4. Click Next. The Virtual Host Alias screen appears.
Enter other host names for which you want the system to acceptmail. For example, if your mail hostname is mail.acme.com, youcan set an alias of acme.com so that the IMail Server will acceptmail addressed to [email protected] and [email protected].
5. Click Next. The Directory screen appears.
Enter the name of the directory where the user information (user-ids and passwords) for this virtual host will be stored.
In most cases, you will want to use a different directory for eachvirtual host that you create. It is possible for virtual hosts to sharea single directory but then users that have the same names willactually share the same mailbox.
6. Click Next. The Database screen appears.
Select the Use local NT User Database for this host option ifyou want IMail Server to create user mail accounts for this hostby using the userids and passwords in the Windows NT UserDatabase. The mail accounts for these users are created as neces-sary when a mail message for the user is received by the mailserver or when a user accesses the mailbox through a POP3 mailclient.
Do not select the Use local NT User Database option, if youwant userids and passwords for mail accounts to be separatefrom userids and passwords for logging on to the Windows NTsystem.
7. Click Next. The Create New Virtual Host screen appears.
8. Click Finish to create the virtual host.
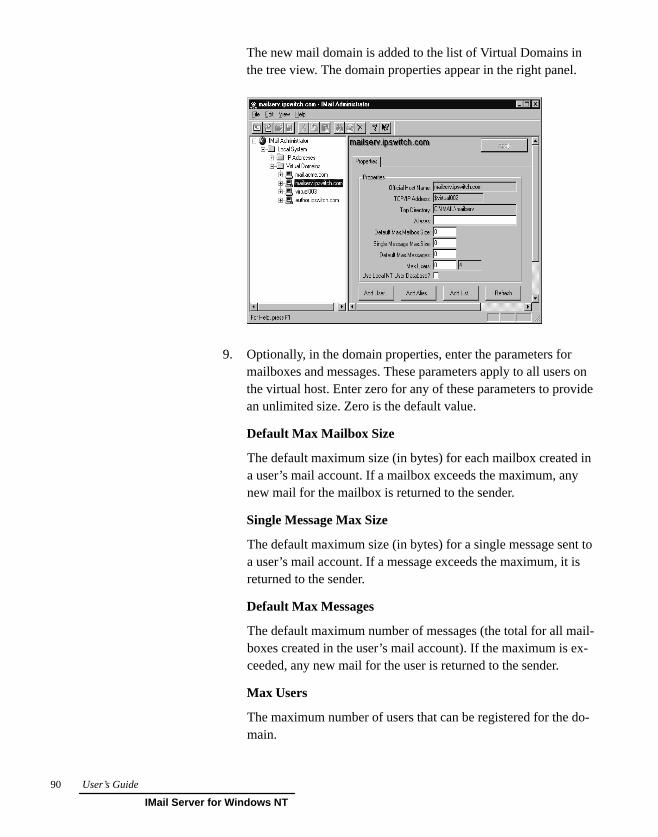
90 User’s Guide
IMail Server for Windows NT
The new mail domain is added to the list of Virtual Domains inthe tree view. The domain properties appear in the right panel.
9. Optionally, in the domain properties, enter the parameters formailboxes and messages. These parameters apply to all users onthe virtual host. Enter zero for any of these parameters to providean unlimited size. Zero is the default value.
Default Max Mailbox Size
The default maximum size (in bytes) for each mailbox created ina user’s mail account. If a mailbox exceeds the maximum, anynew mail for the mailbox is returned to the sender.
Single Message Max Size
The default maximum size (in bytes) for a single message sent toa user’s mail account. If a message exceeds the maximum, it isreturned to the sender.
Default Max Messages
The default maximum number of messages (the total for all mail-boxes created in the user’s mail account). If the maximum is ex-ceeded, any new mail for the user is returned to the sender.
Max Users
The maximum number of users that can be registered for the do-main.
91Using the IMail Administrator
IMail Server for Windows NT
10. Click Apply to save any changes.
11. After you’ve created the virtual host, you can add user mail ac-counts (described in the following section).
Deleting a Mail Domain
To delete a mail domain:
1. In the tree view, select the mail domain.
2. In the tree view, right–click to display the pop–up menu, andthen select Delete Host from the menu.
You are asked to confirm the delete request.
3. Click Yes to delete the host and related files.
Adding, Modifying, and Deleting User Mail Ac-counts
You can add, modify, and delete user mail accounts by using theIMail Administrator.
Note:
When you first install IMail Server, or when you create avirtual host, you can select to use the Windows NT UserDatabase to generate user mail accounts. See Chapter 2for more information.
Setting Global User Properties
You can specify settings to be used by all user mail accounts that youcreate. In the tree view, click on the virtual domain name. The do-main properties (such as default maximum message size, and maxi-mum number of messages) appear in the right panel. These settingswill be used by all mail accounts created in that domain. See the pre-vious section, “Adding a Mail Domain,” for a description of eachproperty.

92 User’s Guide
IMail Server for Windows NT
To set defaults for user access options, in the tree view, select the do-main, and then click on the Users folder. The default user settingsappear in the right panel. These settings will be used by all mail ac-counts created in that domain. See the following section, “Adding aUser Mail Account,” for a description of each property.
Adding a User Mail Account
For an initial installation of IMail Server for Windows NT, you needto add the user mail accounts for your domain. (If you set up virtualhosts, you need to add users for each host.) After the initial installa-tion, you can add, modify, or delete user mail accounts when changesare made on your network.
To add users using the IMail Administrator:
1. Start the IMail Administrator. From the Start menu, select Pro-grams–>IMail–>IMail Administrator.
2. In the tree view, expand the Virtual Domains list and select thedomain to which you want to add users.
3. Click the Add User button. The New User ID dialog box ap-pears.
Enter a userid (this will be the userid for the mail account).Auserid is limited to 30 characters and must be created from thecharacter set of digits and letters. The userid can contain dashes.It cannot contain spaces. The userid must be unique within thesystem.

93Using the IMail Administrator
IMail Server for Windows NT
When sending mail to a userid, a mailbox name can be appendedto the userid by using a dash. The mailbox name cannot containdashes. If a userid contains a dash, IMail Server will check to seeif it is a valid userid. If it is not a userid, the characters followingthe dash are read as a mailbox name.
Note:
You can change the character used to delimit the mail-box name in a userid. In the Windows NT registry, add aGLOBAL IMail key of “MailBoxSplitChar” and specifythe new character as the first character of the string val-ue.
4. Click Next. The Full Name screen appears.
In the First Name text box, enter the user’s first name. In the LastName text box, enter the user’s last name.
Select the Show Advanced Settings option if you want to enterthe settings (such as address, organization, telephone number)and the access flags while setting up this account. If you do notselect this option, you will be prompted only for the requiredentries (userid, first and last name, password) needed to createthe account.

94 User’s Guide
IMail Server for Windows NT
5. Click Next. The Password screen appears.
In the Password text box, enter a password for the user.
Confirm the password you entered by entering it again in theConfirm Password text box. Select the User cannot changepassword option if you do not want the user to be able to changetheir password from the IMail User Utility, the Web Remote Ad-ministration Utility, or the Web Messaging option.
6. Click Next. The Detailed Information screen appears.
This screen lets you enter the user’s LDAP directory information(such as address, organization, telephone number). The informa-tion entered here can be published via the LDAP server.

95Using the IMail Administrator
IMail Server for Windows NT
The list contains the most common attributes used in an LDAPentry. Other attributes can be defined by the system administratoror the user. These attributes are made available (through theLDAP server) to any LDAP–enabled client. See Chapter 8 formore information on the LDAP server and LDAP data.
7. Click Next. The Advanced Settings screen appears.
Enable any of the following advanced settings:
User Cannot Change Password
This option controls whether or not the user can change theirpassword remotely by using the IMail User Utility or the WebRemote Administration utility.
Account Access Disabled
Prohibits the user from accessing the account remotely throughPOP3 or IMAP4. Lets the system administrator disable the ac-count without changing the user’s password or removing themfrom the system.
Hide from information services
Allows you to disable the distribution of any information aboutthis user through Finger if you have the Finger server runningand through Whois if you have the Whois server running andthrough LDAP if you have the LDAP server running.
User can’t modify LDAP attributes
Prohibits the user from modifying their LDAP attributes (name,address, organization, etc).

96 User’s Guide
IMail Server for Windows NT
Allow Web access
Allows this user to access their account via the Web Remote Ad-ministration utility (provided the utility is configured) and theWeb Messaging option.
Host administrator
Allows this user to add, modify, or delete users in their currentdomain by using IMail Remote Administration utility, the WebRemote Administration utility, or the Web Messaging option. Touse the Web utilities, Allow Web Access must also be selected.
IMail system administrator
Allows this user to use the services configuration functions pro-vided by the IMail Remote Administration utility, the Web Re-mote Administration utility, or the Web Messaging option. Touse the Web utilities, Allow Web Access must also be selected.
8. Click Finish to add the user. The userid is added to the list ofregistered users for the domain. The user record appears in theright panel.

97Using the IMail Administrator
IMail Server for Windows NT
Any users you have added can now receive mail through IMailServer for Windows NT at the specified host (domain name). Forexample, if you added the user fred to the virtual host for the do-main ipswitch.com, the user can now receive mail addressed [email protected].
9. Optionally, set up any special processing for this user, such asmail forwarding, mailbox directory limits, a Finger Plan file,delivery rules, a vacation message, an automated response, orenter new LDAP attribute information. See the following sec-tions for information on setting up these options.
Modifying a User Mail Account
To modify a user mail account:
1. In the tree view, select the mail domain, and then select the username from the list of users.
2. Make any change to the user properties, mail forwarding, mail-box directory limits, Finger plan, delivery rules, a vacation mes-sage, an automated response, or LDAP attribute information..See the description of the user properties in “Adding User MailAccounts” and the following sections on other mail options.
3. Click Apply to apply the changes.
Deleting a User Mail Account
To delete a user mail account:
1. In the tree view, select the mail domain, and then select the username from the list of users.
To select multiple users for deletion, you can select the checkbox next to each user that you want delete.
2. In the tree view, right–click to display the pop–up menu, andthen select Delete Users.
A dialog box asks if you want to delete the user account and allsubdirectories and files.
98 User’s Guide
IMail Server for Windows NT
3. Click Yes to delete the user mail account and all related files(which means all of this user’s mail will be deleted). Click No tocancel the delete request.
Finding Orphan Mail Accounts
An orphan mail account is one for which there is a directory structurein the IMail users directory but the user has been deleted from the listof users.
To find orphans:
1. In the tree view, select the virtual domain name, and then clickon the Users folder. The Users properties appear in the right pan-el.
2. Click the Find Orphans button.
The Orphans dialog box lists any orphan user mail accounts.
To delete an orphan account, click on a user name to select it,and then click Delete.
To delete all orphan accounts, click Delete All.
3. Click Close to close the dialog box.
Adding, Modifying, and Deleting Aliases
IMail Server for Windows NT supports three types of aliases:
• Standard aliases that point to a mail address on the local system,a remote system, or another alias.
• List aliases that point to a file containing a list of mail addresses.This is not an automated mailing list such as those that can be setup with the List server. It is a simple distribution list with no au-tomated subscribe, unsubscribe, or digest functions.
• Program aliases that point to an executable program on the hostsystem.

99Using the IMail Administrator
IMail Server for Windows NT
The postmaster=root alias is set up automatically by the IMail Serverinstallation. To comply with the Internet mail RFC specification, youneed a postmaster alias so Internet mail users can send mail to post-master@your_domain_name. You can change the postmaster alias topoint to a different mail account.
Adding an Alias
To add an alias:
1. Start the IMail Administrator. From the Start menu, select Pro-grams–>IMail–>IMail Administrator.
2. In the tree view, expand the Virtual Domains list and select thedomain to which you want to add aliases.
3. Click the Add Alias button. The New Alias ID screen appears.
Enter a name for the alias.
Alias names are limited to 45 characters and must be createdfrom the character set of A–Z, a–z, 0–9, _ (underline), and – (hy-phen). The name cannot contain spaces and must be unique with-in the system. An alias name can be the same as a userid on thesystem and will override that userid (allowing mail to be for-warded in a manner that the user cannot override).
4. Click the Next button. The Type of Alias screen appears.

100 User’s Guide
IMail Server for Windows NT
Select the type of Alias to add.
Standard Aliases
A standard alias can point to a single userid on the same system,multiple userids on the same system, a remote mail address, mul-tiple mail addresses, another alias, or any combination of thesame.
List Aliases
A list alias points to a file that contains a list of valid mail ad-dresses, one per line. List aliases are affected by two SMTP Se-curity settings (Settings–>Control Panel–>IMail Server–>SMTPSecurity): the Allow remote mail to local lists and Allow re-mote view of local lists options. See Chapter 5 for more in-formation.
Program Aliases
A program alias points to a program that can accept the mailmessage for further processing. The message is passed to theprogram by passing the full pathname of a temporary file as thelast argument on the command line when the program is in-voked. Other required command line parameters can be placed inthe edit box that defines the program to execute.
5. Click Next. A text entry box appears. If you selected the Stan-dard type, you should place one complete mail address per line(no spaces), as shown below. If you create an alias that is longerthan is allowed, the alias will be converted to a list alias.

101Using the IMail Administrator
IMail Server for Windows NT
If you selected the list type, enter the location of the list bymanually typing the name of the file. You can use the Browsebutton to search for a file.
If you selected the Program type, enter the name of the execut-able program. You can also enter any required command lineparameters for the program. You can use the Browse button tosearch for a file.
6. After entering the alias properties, click Next, and then clickFinish to add the alias. The new alias is added to the list of regis-tered aliases. The Alias properties appear in the right panel.
Modifying an Alias
To modify an alias:
1. In the tree view, select the domain name, and then select the aliasfrom the list of aliases. The Alias Properties appear in the rightpanel.
2. Make any changes to the properties associated with the alias.
3. Click Apply to apply the changes.

102 User’s Guide
IMail Server for Windows NT
Deleting an Alias
To delete an alias:
1. In the tree view, select the domain name, and then select the aliasfrom the list of aliases.
2. In the tree view, right–click to display the pop–up menu., andthen select Delete.
You are prompted to confirm the delete request.
3. Click Yes to apply the change.
Setting Up Mail Forwarding
You can have IMail Server for Windows NT automatically forward auser’s mail to another account or system.
To set up mail forwarding for a user:
1. In the tree view, select the mail domain, and then select a userfrom the list of users. The user properties appear in the right pan-el. Enter a complete mail address in the Forward text box.
The address that you enter in this text box must be a completemail address that is valid from the IMail Server for Windows NThost system. If you want to send the user’s mail to a differentuser on the same host, you can enter the simple userid. If youwant to send the user’s mail to a different system, you must entera complete mail address including the userid and the full domainname, for example: ([email protected])
To leave a copy in the user’s mailbox and forward a copy toanother user, enter the address using the following format:
To forward to multiple users, separate each mail address with acomma.
You can also access the same mail forwarding function throughthe vacation feature.
103Using the IMail Administrator
IMail Server for Windows NT
2. Click Apply to apply the change.
To turn mail forwarding off, make sure the text box is empty andclick Apply.
Setting Mailbox Directory Limits
You can manage the user’s mailboxes by setting limits on mailboxsize and message count, and deleting messages older than a specifieddate.
To view mailbox directories and set limits:
1. In the tree view, select a mail domain, and then select a user fromthe list of users. The user properties appear in the right panel.
2. Click the Directory tab to display the mailboxes and mailboxproperties.
3. You can change the following settings:
User Directory
The user’s directory name in the IMail user database.

104 User’s Guide
IMail Server for Windows NT
Max Mailbox Size
The maximum size (in bytes) for each mailbox created in theuser’s mail account. If a mailbox exceeds the maximum, any newmail for the mailbox is returned to the sender. Enter 0 to use thehost defaults.
Max Messages
The maximum number of messages (the total for all mailboxescreated in the user’s mail account). If the maximum is exceeded,any new mail for the user is returned to the sender. Enter 0 to usethe host defaults.
The following text boxes are informational only, you cannotchange them.
Total Size
The current total size (in bytes) of the all mailboxes in the user’saccount.
Total Msgs
The current total number of messages in all mailboxes in theuser’s account. Enter 0 for an unlimited number.
Files
The current total number of files in the user’s account.
4. Click Apply to save any changes.
The Directory properties also list all mailboxes (.mbx) in the user’sdirectory. For each mailbox, the list shows the .mbx file name, thesize (in bytes), the number of messages it contains, and the last modi-fied and first modified dates. You can delete or rename mailboxes,delete messages by date, or refresh the mailbox list information. Touse the mailbox functions:
1. Select a mailbox in the list.
2. Right–click to display the pop–up menu.
3. Select one of the pop–up menu items:
Delete Mailbox

105Using the IMail Administrator
IMail Server for Windows NT
Deletes the currently selected mailbox.
Delete Msg’s by Date
Automatically deletes message from the mailbox according to aspecified date or number of days old. Displays a dialog box inwhich you can either enter the number of days old or a specificdate. Any messages older than the specified days or date are de-leted.
Rename Mailbox
Displays a dialog box in which you can enter a new name for themailbox.
Refresh
Refreshes the list of mailboxes and the mailbox information.
Setting Up a Finger Plan
You can create a plan.ima file in the user’s home directory on theIMail Server for Windows NT host system to provide Finger informa-tion. The contents of the file are returned to Finger requests from oth-er hosts, provided the system administrator enables Finger and allowsthe users plan to be presented. The Plan contents are displayed inaddition to the login username of the user, login times, and other in-formation displayed by the Finger server.
The system administrator can disable the transmission of any in-formation about any user through the Finger protocol by checking theDisable Finger Info option in the User Properties dialog box.
To create or modify a Finger Plan:
1. In the tree view, select a mail domain, and then select a user fromthe list of users. The user properties appear in the right panel.
2. Click the Plan tab. The Finger properties appear.
3. Enter any information you desire to make publicly available toFinger clients.
4. Click Apply.

106 User’s Guide
IMail Server for Windows NT
Setting Up Delivery Rules
You can create delivery rules to direct incoming mail to differentmailboxes based on the contents of the From:, Subject:, and Sender:fields in the message header. The rules effect only incoming mail sentto the user’s Main mailbox.
When you add delivery rules, IMail creates a rules.ima file in theuser’s home directory on the IMail Server for Windows NT host sys-tem. This file is read top down until a match is found. The rules.imafile is a text file that can be copied to any user’s home directory.
To create a delivery rule:
1. In the tree view, select a mail domain, and then select a user fromthe list of users. The user properties appear in the right panel.
2. Click the Rules tab. The Mail Delivery Rules properties appear.
3. Click the Add button.
4. In the Rule section at the bottom of the screen, select the headerfield (From, Subject, Sender. To) that you want to search.
5. Select the Contains option to apply the rule to messages thatcontain the search string, or select Doesn’t Contain to apply therule to those that do not contain the search string.

107Using the IMail Administrator
IMail Server for Windows NT
6. In the sub–area text box, enter a search string in the text box tothe right of the Contains/Doesn’t Contain option.
Optionally, select the Match Case option. When this option isenabled, the search string must match the find string in both up-per and lower case.
7. Enter the name of the mailbox to which you want to route themessages that meet the rule criteria.
8. Click Apply to save the rule.
The list box shows the new rule, along with any other rules youhave created. See the “Rule Syntax” section below for informa-tion on the syntax used to define rules.
To delete a rule, select it in the list, and click Delete. To delete allrules click Delete All.
To move a rule up or down in the list, select it and click Move Up orMove Down.
Rule Syntax
The syntax used to define rules in the rules.ima file specifies thesearch type, the search string, and the destination mailbox. When youcreate a rule in the Mail Delivery Rules dialog box, it is entered in therules.ima file in this format. You can use the following rules for pro-cessing mail:
F=string : mailbox (Case sensitive match in From: header)F~string : mailbox (Case insensitive match in From: header)S=string : mailbox (Case sensitive match in Subject: header)S~string : mailbox (Case insensitive match in Subject: header)N=string : mailbox (Case sensitive match in Sender: header)N~string : mailbox (Case insensitive match in Sender: header)
where string is the search string and mailbox is the destination mail-box.
Example rules.ima file:
F=ipswitch:internal (send mail from ipswitch to mailbox ”internal”)N~53list:53list (send mail from 53listserver to mailbox ”53list”)S~ftp:ftp (send mail with ftp in subject to ”ftp” mailbox)S~mail:mail (send mail with mail in subject to ”mail” mailbox)

108 User’s Guide
IMail Server for Windows NT
Setting Up a Vacation Message
You can create a vacation.ima file in the user’s home directory on theIMail Server for Windows NT host system that will be mailed once toeach user that sends mail to the user.
To create a vacation message:
1. In the tree view, select a mail domain, and then select a user fromthe list of users. The user properties appear in the right panel.
2. Click the Vacation tab. The Vacation Message properties appear.
3. Enter the message that you want to send as a reply to mail whileyou (the user) are away.
When the vacation message is sent, IMail Server for WindowsNT lists the e–mail address of the recipient in the vacation.sntfile. The presence of the address in this file is what stops thesender from receiving a second message.
4. Select the Enable Vacation option.
When the you (the user) returns from vacation, you can disablethe vacation message by making sure the Enable Vacation op-tion is not checked.

109Using the IMail Administrator
IMail Server for Windows NT
5. Optionally, select the Delete old recipients option. IMail Servermaintains a file (vacation.snt) that lists users to whom the vaca-tion message has been sent. If you do not select this option, thevacation message will not be sent to any users in the vacation.sntfile. If you select the option, the vacation.snt file is deleted whenyou click OK , thus deleting the list of old recipients.
6. Optionally, enter a mail address to which IMail will forward yourmail while you are away.
The address that you enter in this text box must be a completemail address that is valid from the IMail Server for Windows NThost system. If you want to send the user’s mail to a differentuser on the same host, you can enter the simple userid.
If you want to send the user’s mail to a different system, youmust enter a complete mail address including the userid and thefull domain name, for example: ([email protected])
7. Click Apply.
When the vacation message is sent, IMail Server for Windows NTlists the e–mail address of the recipient in the vacation.snt file. Thepresence of the address in this file is what stops the sender from re-ceiving a second message.
Setting Up an Automated Response with the InfoManager
The Info Manager feature lets you set up an automated e–mail in-formation system. When mail is received for a user that has enabledthe Info Manager, a prepared message is sent back to the sender.
The Info Manager lets you set up subcategories of a particular useraccount and enter an automated response specific to each category.

110 User’s Guide
IMail Server for Windows NT
For example, you may want to set up an info user account for yourorganization. When someone sends mail to the info account, the sys-tem can return a response that describes the subcategories of the infoaccount in which they can obtain further information. They couldthen send a message to info–sales and receive back a different mes-sage related to sales, or to info–classes and receive back a messageabout classes you offer. There is no limit to the number of subcatego-ries that you can set up in the Info Manager.
To create an automated response for a mail account:
1. In the tree view, select a mail domain, and then select a user fromthe list of users. The user properties appear in the right panel.
2. Click the Info Manager tab. The Information Manager proper-ties appear.
3. Create a new subarea or select an existing subarea to which theresponse message will apply.
The default subarea is main. The message you enter for this areawill be returned to users’ who send mail to the account but do notspecify a mailbox. For example, if a user sends mail to [email protected], they will receive the response entered for the mainsubcategory. If a user sends mail to the info–[email protected], they will receive the response entered for the sales sub-category of the info mail account.

111Using the IMail Administrator
IMail Server for Windows NT
4. Enter the message to be returned to all users who send mail tothis subarea.
The first line of the body of the message is used as the subjectline for the automated response. It must be less than 80 charac-ters long.
The response message is contained in the subcategory.inf file inthe user’s mail directory.
5. Select the Enable info manager for this subarea option.
To disable the automated response, make sure the Enable infomanager for this subarea option is not checked.
6. Optionally, enter a mail address to which IMail will forward mailsent to the subarea (in addition to sending the response to thesender).
The address that you enter in this text box must be a completemail address that is valid from the IMail Server for Windows NThost system. If you want to send the user’s mail to a differentuser on the same host, you can enter the simple userid. If youwant to send the user’s mail to a different system, you must entera complete mail address including the userid and the full domainname, for example: ([email protected])
7. Click Apply to save the message and enable the Info Manager.
When a user sends mail to a mail account with Info Manager enabled,the user’s mail address is listed in the subcategory.snt file in the maildirectory. To view this file, click the View Recipients button.
Info Manager messages are not returned if the original message con-tains the Precedence: bulk header or contains listserv in the mail ad-dress.
It is recommended that you do not send mail from an account forwhich the Info Manager is enabled because the recipient of the mes-sage will receive an automated response if they reply.

112 User’s Guide
IMail Server for Windows NT
You can use the Info Manager and the Rules features together. Youcan use the rules processing feature to search incoming messages fora string and route the mail to a mail account for which you have setup an automated response.
The Info Manager is checked after the Rules Manager and before theVacation Manager.
Entering LDAP Directory Information (Attributes)
To enter LDAP information for a user:
1. In the tree view, select a mail domain, and then select a user fromthe list of users. The user properties appear in the right panel.
2. Click the Attribute tab. The Attributes properties appear.
3. Select an attribute from the list or define a new attribute by click-ing Add and entering it in the text box that appears.
The Name box at the bottom of the list shows the currently se-lected attribute. The Value box shows the entry for the currentlyselected attribute.
4. Enter or modify the entry for the selected attribute.

113Using the IMail Administrator
IMail Server for Windows NT
5. Select or enter another attribute to change.
6. When you have finished making entries, click Apply.
To delete an attribute, select it, and then click Delete.
Adding, Deleting, and Managing Mailing Lists
You can add, delete, and manage mailing lists using the IMail Admin-istrator. The same functionality is also available by using the IMailList Server (from the Start menu, select Programs–>IMail–>IMailList Server).
To add a mailing list:
1. In the tree view, select a mail domain. The mail domain proper-ties appear in the right panel.
2. Click the Add List button. The Add List screen appears.
Enter a name for the list. The name must be from 3 to 23 charac-ters in length, with no spaces between characters. This is thename used to send mail to the list. For example, if you enter thename “IMailinfo,” users will send mail to the list by specifyingthe To address: [email protected].
3. Click Next. The Title screen appears.
Enter the title to appear on the mailing list.
4. Click Next. The Names screen appears.
Enter the mail account that the list runs under. You must enter thefull mail address.
Enter the local mail userid that is allowed access to the mail ac-count that the list runs under.
5. Click Next. The Security screen appears.
Select any of the security options to determine who can post mailto the list.

114 User’s Guide
IMail Server for Windows NT
You can let any user post mail, let only the subscribers post mail,or let only the list owner post mail.
Select Let only the list owner post mail, if you want the list tobe moderated. The list owner can review all messages beforethey are posted to the list.
Select Disallow subscriptions if you want the mailing list to beprivate. A Subscribe request to the mailing list will be refused.The owner or administrator must add new users either by editingthe Users file, or through the Web Remote Administration utility.Note that Unsubscribe requests are always enabled.
6. Click Next. The Create New List screen appears.
Click Finish to create the mailing list. The mailing list name isadded to the Lists folder for the domain (in the tree view). Themailing list properties appear in the right panel.
7. You can enter or modify any of the settings in the mailing listproperties. See Chapter 13 for a description of all mailing listproperties.

115SMTP Server
IMail Server for Windows NT
5. SMTP Server
The SMTP server sends and receives mail from other Internet hostsusing the Simple Mail Transfer Protocol (SMTP). The SMTP serverprocesses all incoming and outgoing mail. Outgoing mail is spooleduntil the SMTP server can confirm it has arrived at its destination;incoming mail is spooled until users access it by using a POP3 orIMAP4 mail client. Spooling allows the transfer from client and serv-er to occur in the background.
This chapter describes how to configure the SMTP server and howyou can set options to provide security for the SMTP server.
See Request for Comments (RFCs) 821 and 822 for information onSMTP.
SMTP Service
As a Windows NT service, the SMTP server program will continue torun when you log off the Windows NT system. This service can runcompletely hidden or with some feedback.
The SMTP server uses the smtpd32.exe program and gets most of itssettings, including the directories it needs to work in, from the NTRegistry. Registry values can be modified by using the IMail Servicesapplication in the Control Panel.
SMTP Service Security
By default, the SMTP service runs from the System account andstarts automatically. You can change these settings by using the Con-trol Panel’s Services application.
Windows NT allows you to specify a user ID for the service to rununder. In this way, you can limit access to the service. To select thisoption:

116 User’s Guide
IMail Server for Windows NT
1. In the Control Panel, select the Services application.
The Services dialog box appears and displays each service, itsoperating status, and whether it uses automatic or manual startup.
2. Select the IMail SMTP Server service and click the Startupbutton.
3. Enter the settings and click OK .
Make sure the specified user has full control of the users directo-ry tree in the IMail directory and any mailboxes that will receivemail.
Note that if you set the Allow service to interact with desktopoption, the SMTP service will run under the current logged onuser account. (Refer to the Windows NT documentation for moreinformation.)
Make sure you send two or three test messages after installation andlook in the syslog file and in the event log. If the SMTP service can-not create the lock file, the permissions are probably set incorrectly.
Configuring the SMTP Server
To configure the SMTP server:
1. In the Control Panel, double–click the IMail Server icon.
The IMail services dialog box appears.
2. Click the SMTP tab. The SMTP Service properties appear.

117SMTP Server
IMail Server for Windows NT
3. Enter the options you want to use to configure the SMTP server.
Each option is described in the “SMTP Options” section at theend of this procedure.
4. After making changes, stop the SMTP service, wait 5–10 se-conds and restart the service. Any changes that you make aresaved automatically as soon as you press the Stop/Start Servicebutton.
5. Click OK to exit the dialog box.
SMTP Options
You can use the following options to configure the SMTP server.
Logging Options
In the Log To box, select the file that you want to use for loggingSMTP events.
The default setting, SYSMMDD.TXT, causes all inbound and out-bound mail to be logged in the file: MAILDIR/spool/sysmmdd.txt , where mm is the month and dd is the day the logwas written.

118 User’s Guide
IMail Server for Windows NT
Logging can be disabled by selecting No Log. If App Log is selected,inbound mail is logged in the Application Log, which is viewed withWindows NT’s Event Viewer. If Log Server is selected, messages aresent to the Log Server IP address specified in the Control Panel–>IMail Server–>Global configuration.
Debug Messages
When enabled, writes debug messages to the log file.
Default Mail Host
The name of the host to send mail to if only a user ID is specified inthe mail message and that user ID is not found on the local system.Normally this field should be blank. This field can be useful whenmultiple systems are required to work as one system.
Domain Name Server address
The IP address of the system that provides domain name service foryour network.
Tries before returning to sender
Defines the number of times that delivery is attempted before givingup and returning the mail to the sender. Each time the Queue Timerreaches 0, a delivery attempt is made. Thus, if the Queue Timer isset to 30 (minutes) and you want to attempt delivery for up to 3 days,this field should contain 144. The default value of 20 with the defaultQueue Timer value of 30 will cause the message to be returned afterabout 10 hours.
Queue Timer
How often, in minutes, the SMTP server will check the outboundqueue for queued mail. (See also the Tries before returning tosender option.)
Server Status
A status message to the left of the Start/Stop Service button showswhether or not the service is running.
Start/Stop Service
This button toggles between Start service and Stop service dependingon whether the service is running.

119SMTP Server
IMail Server for Windows NT
Using a Remote Mail Gateway
You can use the Gateway Options to configure your mail server touse a remote mail gateway.
Remote Mail Gateway Host
The name of another host to send mail to for further delivery whenthat mail cannot be delivered directly to the destination host. This canalso be used in conjunction with the Send all remote mail throughgateway option to force delivery of mail through the gateway host.Since IMail Server for Windows NT should be able to reach all hostsdirectly, this field should typically be left blank.
Send all remote mail through gateway
Causes all mail to be sent to the Remote Mail Gateway Host, whichwill forward it on to the addressee’s mail host. If this option is notselected, mail is sent directly to the addressee’s mail host.
Tries before sending to gateway
The number of times that delivery directly to a remote host should beattempted before giving up and delivering to the gateway host. Properfunction of this value is dependent on the validity of the RemoteMail Gateway Host name and the Send all remote mail throughgateway option.
Setting SMTP Security
You can set who has access to your mail server and control SMTPsecurity in several ways:
• Set Mail Relay Options that determine how your server can beused by other Internet mailers and protect your server from massmailings (spam mail).
See “Antispamming Features” in Chapter 1 for backgroundinformation on how bulk mailers use SMTP to send mail.
• Set access to your local mailing lists.
• Validate incoming mail to check that it was sent from a valid usermail account or to deny access to specified mail addresses.

120 User’s Guide
IMail Server for Windows NT
• Specify an IP address or set of IP addresses that are eithergranted access to the mail server or denied access.
• Send a copy of every inbound and outbound message to a speci-fied mailbox.
To set any of these options for the SMTP server:
1. In the Control Panel, double–click the IMail Server icon.
The IMail services dialog box appears.
2. Click the SMTP Security tab. The SMTP Security propertiesappear.
3. Enter any of the options (described in the following sections) youwant to use to set security for the SMTP server.
4. Click Apply to save your changes. Click OK to save yourchanges and exit the dialog box.
Note:
If you make changes to the IP addresses that can use theSMTP server, you must stop and restart the SMTP ser-vice for changes to take affect.
121SMTP Server
IMail Server for Windows NT
Setting Mail Relay Options
You can use the Mail Relay Options to prevent unauthorized mail-ings, such as mass promotional mailings (known on the Internet asspam mail) from passing through the IMail Server as a relay orgateway. The Relay mail for option lets you configure IMail Serverto only accept mail that originates from local users or that is destinedfor local users. You can define the systems or address blocks that youwant to consider local.
Relay mail for anyone
Allows the SMTP server to accept mail destined for other hosts andredeliver that mail to the proper host (i.e, become a mail gateway).This is the default setting.
Relay mail for
Allows the SMTP server to accept mail destined for other hosts onlyif the mail is received from the specified IP addresses (which the mailserver will consider to be local addresses).
If you use this option, you need to specify any host that you receivemail for and you need to create a matching entry in the \winnt\sys-tem32\drivers\etc\hosts file. For example, if your DNS is set up toreceive mail for a primary domain, mailer1.ipswitch.com, and also foranother domain, mailer2.acme.com, the MX record will look likethis:
MX 10 mailer1.ipswitch.com 20 mailer2.acme.com
To relay mail for the mailer2.acme.com domain, you need to specifyits IP address in the Relay mail for option and also enter its host-name and IP address in the hosts file on your mail server.

122 User’s Guide
IMail Server for Windows NT
To specify the valid IP addresses, click the addresses button. TheAccess Control dialog box appears.
1. Click the Add button. The Accept as Local dialog box appears.
2. In the IP Address box, enter the IP address of the computer to beconsidered local to the IMail Server.
To add a group of computers, select the Group of Computersoption. In the IP Address and Subnet Mask boxes, enter the IPaddress and subnet mask for the group to be considered local.
For example, if you have a class C address space of 156.21.50.0,enter a group address of 156.21.50.0 and a subnet mask of255.255.255.0. This will allow those 254 systems to be consid-ered the same as the local system and they can use the mail serv-er to send mail to the outside world.
3. Click OK to add the IP address(es) to the list.

123SMTP Server
IMail Server for Windows NT
IMail Server will relay mail for all the computers listed.
4. Click OK to save the changes. Note that you must stop and re-start the service for the changes to take affect.
A “non–local” system that attempts to send mail through the IMailServer system will receive the following message:
550 unknown local host %s, not a gateway
No Mail Relay
The SMTP server will refuse to accept mail destined for other hosts.
Setting List Access Options
You can use the following options to set access to distribution lists(aliases of type List) on your mail server. (These options do not affectmailing lists created with the List server.
Allow remote mail to local lists
When selected, the SMTP server will accept mail addressed to analias that was defined as a List alias and will resend the message tothe list contents.
Allow remote view of local lists
When selected, the SMTP server will reveal the contents of a Listalias in response to an EXPN SMTP command.
Validating Incoming Mail
You can use the following options to check that incoming mail wassent from a valid user mail account or to deny access to specifiedmail addresses. IMail Server will always include the IP address of thesource of a message in the message header.
Refuse NULL <> Senders
If enabled, refuses to accept mail if the null address (<>) is specifiedin the MAIL FROM line of an incoming message. Note that MicrosoftExchange uses the null address for messages from the postmaster.
124 User’s Guide
IMail Server for Windows NT
Check valid sender
If enabled, requires that the user mail address (user@host) is spe-cified in the MAIL FROM line of an incoming mail message. Notethat a null address (< > ) in the MAIL FROM line is handled sepa-rately by enabling or disabling the Refuse NULL < > Sendersoption.
Edit kill file
The kill file lets you specify a mail address or a particular mail hostthat you do not want to accept mail from. To specify a mail address orhost in the kill file, click the Edit kill file button.
The file kill.lst appears in the Windows Notepad. In the kill.lst file,enter one entry per line in either of the following formats:
userid@host
@host
For example, to deny access from a user mail account, you could en-ter: [email protected] To deny access to all users from the mailhost widget.com, you can enter: @widget.com .
IMail Server checks the incoming message’s MAIL FROM:<user@host> line. When it receives mail from an address listed inthe kill file, IMail Server returns the message:
501 unacceptable mail address
The kill.lst resides in the IMail directory and applies to the primarydomain and all virtual domains.
Setting Access to the SMTP Server
You can specify an IP address or set of IP addresses that are eithergranted access to the SMTP server or denied access. Systems that donot have access to the SMTP server system will not be allowed tocreate a connection. This is useful when you know the IP address(es)of a mail sender that is making unauthorized use of your mail server.

125SMTP Server
IMail Server for Windows NT
To deny access to a specific computer or group of computers:
1. Click the Control access button. The Access Control propertiesappear.
2. Select the Granted Access option.
3. Click the Add button. The Deny Access On dialog box isdisplayed.
4. In the IP Address box, enter the IP address of the computer to bedenied access to the SMTP server.
To deny access to a group of computers, select the Group ofComputers option. In the IP Address and Subnet Mask boxes,enter the IP address and subnet mask for the group to be deniedaccess. For example, if you have a class C address space of156.21.50.0, enter a group address of 156.21.50.0 and a subnetmask of 255.255.255.0. This will deny access to those 254systems.
5. Click OK to add the IP address(es) to the list.
Access will be granted to all computers except those listed.
6. Click OK to save the changes. Note that you must stop and re-start the service for the changes to take affect.
To grant access to a specific computer or group of computers:
1. Click the Control access button. The Access Control propertiesappear.
2. Select the Denied Access option.
3. Click the Add button. The Grant Access On dialog box isdisplayed.
4. In the IP Address box, enter the IP address of the computer to begranted access to the SMTP server.

126 User’s Guide
IMail Server for Windows NT
To grant access to a group of computers, select the Group ofComputers option. In the IP Address and Subnet Mask boxes,enter the IP address and subnet mask for the group to be grantedaccess. For example, if you have a class C address space of156.21.50.0, enter a group address of 156.21.50.0 and a subnetmask of 255.255.255.0. This will grant access to those 254systems.
5. Click OK to add the IP address(es) to the list.
Access will be denied to all computers except those listed.
6. Click OK to save the changes. Note that you must stop and re-start the service for the changes to take affect.
Copying Inbound and Outbound Mail
You can send a copy of every inbound and outbound message to aspecified mailbox as follows:
1. In the Copy All Mail options, in the Mail address box, enter afull e–mail address where you want to send a copy of eachmessage.
2. Click the Enable option (make sure it is checked) to enable co-pying of all mail.
If you want to turn off the Copy All Mail feature, uncheck theEnable option.
3. Click Apply to save your changes.

127SMTP Server
IMail Server for Windows NT
Notes
If you want to see the icon for the service, in the Control Panel’s Ser-vices application, you can enable the Allow service to interact withdesktop option. (See the Security section in this chapter for how toaccess the Services options.)
The SMTP service will continue to run even if you log off. The iconwill disappear but will reappear the next time you log on as the sameuser.
Note that you must remove and re–install the SMTP server if youmove it to a new location! This is because the full path to the applica-tion is stored in the NT Registry.
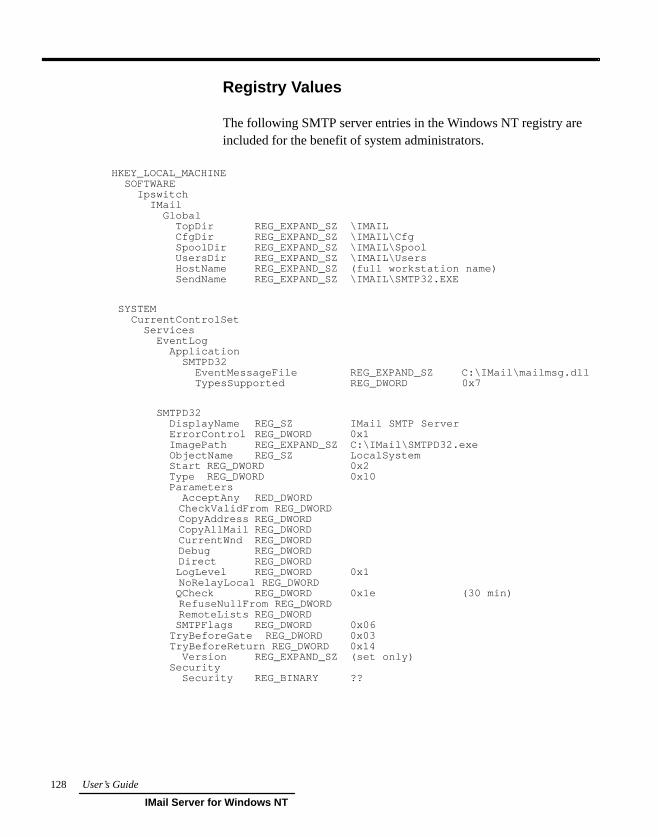
128 User’s Guide
IMail Server for Windows NT
Registry Values
The following SMTP server entries in the Windows NT registry areincluded for the benefit of system administrators.
HKEY_LOCAL_MACHINE SOFTWARE Ipswitch IMail Global TopDir REG_EXPAND_SZ \IMAIL CfgDir REG_EXPAND_SZ \IMAIL\Cfg SpoolDir REG_EXPAND_SZ \IMAIL\Spool UsersDir REG_EXPAND_SZ \IMAIL\Users HostName REG_EXPAND_SZ (full workstation name) SendName REG_EXPAND_SZ \IMAIL\SMTP32.EXE
SYSTEM CurrentControlSet Services EventLog Application SMTPD32 EventMessageFile REG_EXPAND_SZ C:\IMail\mailmsg.dll TypesSupported REG_DWORD 0x7
SMTPD32 DisplayName REG_SZ IMail SMTP Server ErrorControl REG_DWORD 0x1 ImagePath REG_EXPAND_SZ C:\IMail\SMTPD32.exe ObjectName REG_SZ LocalSystem Start REG_DWORD 0x2 Type REG_DWORD 0x10 Parameters AcceptAny RED_DWORD
CheckValidFrom REG_DWORD CopyAddress REG_DWORD CopyAllMail REG_DWORD CurrentWnd REG_DWORD Debug REG_DWORD Direct REG_DWORD
LogLevel REG_DWORD 0x1 NoRelayLocal REG_DWORD
QCheck REG_DWORD 0x1e (30 min) RefuseNullFrom REG_DWORD RemoteLists REG_DWORD
SMTPFlags REG_DWORD 0x06 TryBeforeGate REG_DWORD 0x03 TryBeforeReturn REG_DWORD 0x14 Version REG_EXPAND_SZ (set only) Security Security REG_BINARY ??

129SMTP Server
IMail Server for Windows NT
SMTP Deliver Program for Windows NT
The smtp32.exe program is the 32–bit SMTP send program for usewith SMTPD32 SMTP Service for Windows NT. This program con-tains the DNS Mail Exchanger (MX) support as well as the supportfor list servers, etc. smtp32.exe is the program actually responsible fordelivery of the mail.
smtp32.exe is responsible for processing messages left in the spooldirectory by other processes and attempting final delivery both tolocal addresses and remote addresses by way of SMTP.
smtp32.exe does not parse any headers that are contained in the mes-sage itself and expects to find properly formatted information in thequeue control file, thus there are no size restrictions on line lengths.Whatever is passed to it, smtp32.exe passes along to the final system.(No input checking.) Recipients are sorted by hostname and are sentas a single message to multiple recipients to a single system.
smtp32.exe supports the following command line options:
SMTP32 With no options, SMTP32 will attempt to deliverall messages in the mail queue.
SMTP32 queue_filenameCause SMTP32 to process the single messagespointed to by the queue_filename.
SMTP32–qr –x Cause SMTP32 to attempt to deliver all mes-sages in the mail queue.
SMTP32–v Activate full display of the conversation(verbose).

130 User’s Guide
IMail Server for Windows NT

131POP3 Server
IMail Server for Windows NT
6. POP3 Server
The POP3 Server lets any POP3 (Post Office Protocol, Version3)mail client communicate with IMail Server for Windows NT. Sup-ported POP3 clients include IMail Client, Internet Explorer, NetscapeNavigator or Communicator, Eudora, Pegasus, NuPOP, Z–Mail, andUNIX mail.
POP3 clients typically use the “offline” method of accessing the mailserver, though they can also provide “online” access. In the “offline”method, mail messages are delivered to the IMail Server system andthe mail client periodically connects to the server and downloads theuser’s mail to the client system. Mail messages are automatically de-leted from the server system. Thus, mail messages are stored onlytemporarily on the mail server. This method of access is best suited tousers who always read their mail from the same client system.
In the “online” method of access, mail messages are left on the mailserver system and users can read mail on the server without down-loading. This method allows users to access their mail from mailclients on different systems — from a laptop on the road or from aworkstation in the office.
IMail Server also offers mail client access via the IMAP4 (InternetMessage Access Protocol version 4). The IMAP4 server providesboth “online” and “offline” methods of access. See Chapter 6 formore information on the IMAP4 server.
See Request for Comments (RFC) 1725 for a description of the POP3protocol.
POP3 Service
As a Windows NT service, the POP3 server will continue to run whenyou log off the Windows NT system. This service can run completelyhidden or with some feedback.
The POP3 server gets most of its settings from the Windows NT Reg-istry. Registry values can be modified by using the IMail Servicesapplication in the Control Panel.
132 User’s Guide
IMail Server for Windows NT
POP3 Service Security
By default, the POP3 service runs from the System account and startsautomatically. You can change these settings by using the ControlPanel’s Services application.
Windows NT allows you to specify a user ID for the service to rununder. To select this option:
Note:
If you are using the Windows NT User Database optionto define where users are registered and how user au-thentication takes place, this service must run as a sys-tem service.
1. In the Control Panel, select the Services application.
The Services dialog box appears and displays each service, itsoperating status, and whether it uses automatic or manual startup.
2. Select the IMail POP3 Server service and click the Startupbutton.
3. Enter the settings and click OK .
Make sure the specified user has full control of the users directo-ry tree in the IMail directory and any mailboxes that will receivemail.
Note that if you set the Allow service to interact with desktopoption, the POP3 service will run under the current logged onuser account. (Refer to the Windows NT documentation for moreinformation.)

133POP3 Server
IMail Server for Windows NT
Configuring the POP3 Server
To configure the POP3 server:
1. In the Control Panel, double–click the IMail Server icon.
The IMail Server for Windows NT services dialog box appears.
2. Click the POP3 tab. The POP3 Service properties appear.
3. Enter the options you want to use to configure the POP3 server.
Each option is described in the POP3 Options section at the endof this procedure.
4. After making changes, stop the service, wait 5–10 seconds andrestart the service. Any changes that you make are saved auto-matically as soon as you press the Stop/Start Service button.
5. Click OK to exit the dialog box.

134 User’s Guide
IMail Server for Windows NT
POP3 Options
You can use the following options to configure the POP3 server.
Logging Options
In the Log To box, select the file that you want to use for loggingPOP3 events.
If SYSMMDD.TXT is selected, POP3 information is logged in the file:MAILDIR/spool/sysmmdd.txt , where mm is the month and ddis the day the log was written.
Logging can be disabled by selecting No Log. If App Log is selected,information is logged in the Application Log, which is viewed withWindows NT’s Event Viewer. If Log Server is selected, messages aresent to the Log Server IP address specified in the Control Panel–>IMail Server–>Global configuration.
Debug Messages
When enabled, writes debug messages to the log file.
Enable XTND XMIT command
Causes the server to accept outbound mail sent via XTND XMIT.Clients such as WinQVT/Net require this functionality.
Enable UIDL Command
Causes the server to accept the recent UIDL POP command to sup-port Netscape Navigator or any other POP3 client that uses UIDL.
Allow remote password changes
Enable the use of internal commands that allow the remote changingof passwords. The IMUTIL Windows client program is required toactually change passwords remotely.
Server Status
A status message to the left of the Start/Stop Service button showswhether or not the service is running.

135POP3 Server
IMail Server for Windows NT
Start/Stop Service
This button toggles between Start service and Stop service dependingon whether the service is running.
Setting Access to the POP3 Server
You can specify an IP address or set of IP addresses that are eithergranted access to the POP3 server or denied access. Systems that donot have access to the POP3 server system will not be allowed tocreate a connection.
To deny access to a specific computer or group of computers:
1. Click the Control access button. The Access Control propertiesappear.
2. Select the Granted Access option.
3. Click the Add button. The Deny Access On dialog box isdisplayed.
4. In the IP Address box, enter the IP address of the computer to bedenied access to the POP3 server.
To deny access to a group of computers, select the Group ofComputers option. In the IP Address and Subnet Mask boxes,enter the IP address and subnet mask for the group to be deniedaccess. For example, if you have a class C address space of156.21.50.0, enter a group address of 156.21.50.0 and a subnetmask of 255.255.255.0. This will deny access to those 254systems.
5. Click OK to add the IP address(es) to the list.
Access will be granted to all computers except those listed.
6. Click OK to save the changes. Note that you must stop and re-start the service for the changes to take affect.

136 User’s Guide
IMail Server for Windows NT
To grant access to a specific computer or group of computers:
1. Click the Control access button. The Access Control propertiesappear.
2. Select the Denied Access option.
3. Click the Add button. The Grant Access On dialog box isdisplayed.
4. In the IP Address box, enter the IP address of the computer to begranted access to the POP3 server.
To grant access to a group of computers, select the Group ofComputers option. In the IP Address and Subnet Mask boxes,enter the IP address and subnet mask for the group to be grantedaccess. For example, if you have a class C address space of156.21.50.0, enter a group address of 156.21.50.0 and a subnetmask of 255.255.255.0. This will grant access to those 254systems.
5. Click OK to add the IP address(es) to the list.
Access will be denied to all computers except those listed.
6. Click OK to save the changes. Note that you must stop and re-start the service for the changes to take affect.
Notes
If you want to see the icon for the service, in the Control Panel’s Ser-vices application you can enable the Allow service to interact withdesktop option. (See the Security section in this chapter for how toaccess the Services options.)
The POP3 service will continue to run even if you log off. The iconwill disappear but will reappear the next time you logon as the sameuser.
Note that you must remove and re–install the program if you move itto a new location! This is because the full path to the application isstored in the NT Registry.

137POP3 Server
IMail Server for Windows NT
Registry Values
The following POP3 server entries in the Windows NT registry areincluded for the benefit of system administrators.
HKEY_LOCAL_MACHINE SOFTWARE Ipswitch IMail Global TopDir REG_EXPAND_SZ \IMAIL CfgDir REG_EXPAND_SZ \IMAIL\Cfg SpoolDir REG_EXPAND_SZ \IMAIL\Spool UsersDir REG_EXPAND_SZ \IMAIL\Users HostName REG_EXPAND_SZ (full workstation name) SendName REG_EXPAND_SZ \IMAIL\SMTP32.EXE
SYSTEM CurrentControlSet Services EventLog Application POP3D32 EventMessageFile REG_EXPAND_SZ C:\IMail\mailmsg.dll TypesSupported REG_DWORD 0x7 POP3D32 DisplayName REG_SZ POP3 Server ErrorControl REG_DWORD 0x1 ImagePath REG_EXPAND_SZ C:\IMail\POP3D32.exe ObjectName REG_SZ LocalSystem Start REG_DWORD 0x2 Type REG_DWORD 0x10 Parameters IdleTime REG_DWORD 0x3a2 (930 sec. = 15 min.) LogLevel REG_DWORD 0x0 POP3Flags REG_DWORD 0x3 Port REG_DWORD 0x6e (110) Version REG_EXPAND_SZ (set only)

138 User’s Guide
IMail Server for Windows NT

139IMAP4 Server
IMail Server for Windows NT
7. IMAP4 Server
With more and more users finding they need access to their mail frommultiple computers, IMAP4 (Internet Message Access Protocol, Ver-sion 4) is rapidly becoming a mandatory feature for Internet–stan-dards–based mail servers. By incorporating IMAP4, IMail Serverprovides mail users with the added flexibility of being able to accessand manipulate their mail folders — anytime, anywhere. Now,whether in the office, at home, or on the road, mail users can refer tomessages in all of their folders regardless of when or where they wereoriginally read or saved. This translates to increased efficiency forthose working from a “virtual office.”
The IMail Server IMAP4 Implementation
The IMAP4 Server lets any IMAP4 mail client communicate withIMail Server for Windows NT. Supported IMAP4 clients includeNetscape Communicator and Internet Explorer 4.0. Many mail clientvendors are adding IMAP4 support.
IMAP4 Server Support
IMAP4 handles mail access only, and relies on SMTP for sending andreceiving mail over the Internet. The IMAP4 server allows an IMAP4client to do the following:
• Access remote mailboxes as if they were local
• Read mail from more than one computer because mail is storedon the server system
• Access mail “offline” or “online”
“Offline” access is the same as using POP3 to access mail on theserver. Mail messages are delivered to the IMail Server systemand the mail client periodically connects to the server and down-loads the user’s mail to the client system, and deletes the mailfrom the server system.

140 User’s Guide
IMail Server for Windows NT
Note:
If your users will access mail from a single system, the“offline” method of access may be sufficient and willuse less server and network resources than IMAP4.IMail Server’s POP3 server provides offline access. SeeChapter 5 for more information.
In “online” access, messages are left on the mail server. Thismethod maintains an interactive session between the server andclient systems. Using an IMAP4 mail client, users can read theirmail, move or delete mail, create mailboxes — all on the serversystem.
The IMAP4 “online” method of access lets users access andmanage their mail messages from more than one computer. Also,if mailbox size is large or links are slow, IMAP4 can be fasterthan the “offline” method of access.
The mail client may support switching between IMAP4 and POP3methods, both of which are supported by IMail Server.
Full IMAP4 Client Support
The IMAP4 client can access remote message stores (on the mailserver) as if they were local. Users can:
• View message headers before downloading
• Select a message or part of a message for downloading
• Leave messages on the server for archiving and sharing
• Send and receive MIME–based attachments
• Manipulate remote mailboxes other than the MAIN (or INBOX)mailbox
141IMAP4 Server
IMail Server for Windows NT
Mailbox Management
When a user creates a mailbox using an IMAP4 client, the mailbox iscreated on the IMail Server system. As the IMail Server will be thepermanent store for IMAP4 users mail, you will want to configure theserver with appropriate disk space and you will want to manage thedisk space by monitoring mailbox disk usage.
You (the system administrator) can view, delete, or rename the mail-box directories (.mbx files) by using the new IMail Administrator(IAdmin.exe), which provides an alternate interface to the IMail UserManager.
You can also set maximum mailbox size and maximum number ofmessages for each user, or on a global basis. Mail messages can alsobe automatically deleted by specifying a date or number of days forwhich messages older than the date will be deleted. See Chapter 4 forinformation on using the IMail Administrator to maintain user mail-boxes.
Administrators can set an option that determines whether users mustsubscribe to a private mailbox before they can read it. See “Configur-ing the IMAP4 Server” section in this chapter for more information.
Public Mailboxes
The IMAP4 server provides a means of creating a public mailbox inwhich you can post messages for reading by IMAP4 clients. To createa public mailbox, use the IMail User Manager (or IMail Administra-tor) to create a userid named “public”. Any mailboxes in this user’sdirectory will be available for reading by IMAP4 clients.
Administrators can use the “public” userid to post messages. Usersother than “public” can only read the public mailboxes. Administra-tors can set an option that determines whether users must subscribe toa public mailbox before they can read it. See “Configuring theIMAP4 Server” section in this chapter for more information.

142 User’s Guide
IMail Server for Windows NT
IMAP4 Service
As a Windows NT service, the IMAP4 server will continue to runwhen you log off the Windows NT system. This service can run com-pletely hidden or with some feedback.
The IMAP4 server gets most of its settings from the Windows NTRegistry. Registry values can be modified by using the IMail Serverapplication in the Control Panel.
IMAP4 Service Security
By default, the IMAP4 service runs from the System account andstarts automatically. You can change these settings by using the Con-trol Panel’s Services application.
Windows NT allows you to specify a user ID for the service to rununder. To select this option:
Note:
If you are using the Windows NT User Database optionto define where users are registered and how user au-thentication takes place, this service must run as a sys-tem service.
1. In the Control Panel, select the Services application.
The Services dialog box appears and displays each service, itsoperating status, and whether it uses automatic or manual startup.
2. Select the IMail IMAP4 Server service and click the Startupbutton.
3. Enter the settings and click OK .
Make sure the specified user has full control of the usersdirectory tree in the IMail directory and any mailboxes that willreceive mail.

143IMAP4 Server
IMail Server for Windows NT
Note that if you set the Allow service to interact with desktopoption, the IMAP4 service will run under the current logged onuser account. (Refer to the Windows NT documentation for moreinformation.)
Configuring the IMAP4 Server
To configure the IMAP4 server:
1. In the Control Panel, double–click the IMail Server icon.
The IMail services dialog box appears.
2. Click the IMAP4 tab. The IMAP4 Service properties appear.
3. Enter the options you want to use to configure the IMAP4 server.
Each option is described at the end of this procedure.
4. After making changes, stop the service, wait 5–10 seconds andrestart the service. Any changes that you make are saved auto-matically as soon as you press the Stop/Start Service button.
5. Click OK to exit the dialog box.
144 User’s Guide
IMail Server for Windows NT
Logging Options
In the Log To box, select the file that you want to use for loggingIMAP4 events.
If SYSMMDD.TXT is selected, IMAP4 information is logged in thefile: MAILDIR/spool/sysmmdd.txt , where mm is the monthand dd is the day the log was written.
Logging can be disabled by selecting No Log. If App Log is selected,information is logged in the Application Log, which is viewed withWindows NT’s Event Viewer. If Log Server is selected, messages aresent to the Log Server IP address specified in the Control Panel–>IMail Server–>Global configuration.
Debug Messages
When enabled, writes debug messages to the log file.
Force subscribe to public mailboxes
When enabled, requires that the IMAP4 client is subscribed to use apublic mailbox. If the user is not a subscriber, they are refused access.
Force subscribe to private mailboxes
When enabled, requires that the IMAP4 client is subscribed to use aprivate mailbox. If the user is not a subscriber, they are refusedaccess.
Server Status
A status message to the left of the Start/Stop Service button showswhether or not the service is running.
Start/Stop Service
This button toggles between Start service and Stop service dependingon whether the service is running.

145IMAP4 Server
IMail Server for Windows NT
Configuring an IMAP4 Client
You need an IMAP4 enabled client to communicate with IMail Serv-er’s IMAP4 server. Supported IMAP4 enabled clients include:
• Netscape Communicator Pre–release 2
• Internet Explorer 4.0
You may need to select IMAP4 in your mail client’s setup options.See your mail client’s documentation for information on setting upand using the client.
Notes
If you want to see the icon for the service in the Control Panel’s Ser-vices application you can enable the Allow service to interact withdesktop option. (See the Security section in this chapter for how toaccess the Services options.)
The IMAP4 service will continue to run even if you log off. The iconwill disappear but will reappear the next time you log on as the sameuser.
Note that you must remove and re–install the program if you move itto a new location! This is because the full path to the application isstored in the NT Registry.

146 User’s Guide
IMail Server for Windows NT
Registry Values
The following IMAP4 server entries in the Windows NT registry areincluded for the benefit of system administrators.
HKEY_LOCAL_MACHINE SOFTWARE Ipswitch IMail Global TopDir REG_EXPAND_SZ \IMAIL CfgDir REG_EXPAND_SZ \IMAIL\Cfg SpoolDir REG_EXPAND_SZ \IMAIL\Spool UsersDir REG_EXPAND_SZ \IMAIL\Users HostName REG_EXPAND_SZ (full workstation name) SendName REG_EXPAND_SZ \IMAIL\SMTP32.EXE
SYSTEM CurrentControlSet Services EventLog Application IMAP4D32 EventMessageFile REG_EXPAND_SZ C:\IMail\mailmsg.dll TypesSupported REG_DWORD 0x7 IMAP4D32 DisplayName REG_SZ IMail IMAP4 Server ErrorControl REG_DWORD 0x1 ImagePath REG_EXPAND_SZ C:\IMail\IMAP4D32.exe ObjectName REG_SZ LocalSystem Start REG_DWORD 0x2 Type REG_DWORD 0x10 Parameters IdleTime REG_DWORD 0x3a2 (930 sec. = 15 min.) LogLevel REG_DWORD 0x0 IMAP4Flags REG_DWORD 0x3 Version REG_EXPAND_SZ (set only)

147LDAP Server
IMail Server for Windows NT
8. LDAP Server
By creating a standard way for applications to request and managedirectory information, LDAP (or Lightweight Directory Access Pro-tocol) has become another popular feature for standards–based mailservers. A simplified subset of the much more elaborate X.500 Direc-tory Access Protocol, LDAP is more appropriate for many of today’sapplications — on both the client and server sides — since it makesfewer demands on system resources.
LDAP implementations use a client/server architecture to publishdirectory information (such as address books) on the server and pro-vide access to that directory information from LDAP enabled clients.
For more information about LDAP, see the Internet Requests forComments (RFCs) that describe the protocol. The IMail Server forWindows NT implementation of LDAP is based on RFC–1777.
The IMail Server LDAP Implementation
IMail Server provides an LDAP interface to the IMail user database.The IMail user database is extended to include standard LDAP attrib-utes (such as name, address, organization name, phone number) andany other attributes that a site defines. The user database is flat; itdoes not support a tree hierarchy of users.
Each user with an account on the IMail Server system has an LDAPentry. When a user is added to the IMail user database, an LDAPentry is defined with the following attributes:
ObjectClass The type of entry. The value would be“Person.”
CN CommonName The full name of the user.
Mail The IMail Server e–mail address for theuser. This is constructed from the userID and the hostname.
UID The IMail Server user ID.
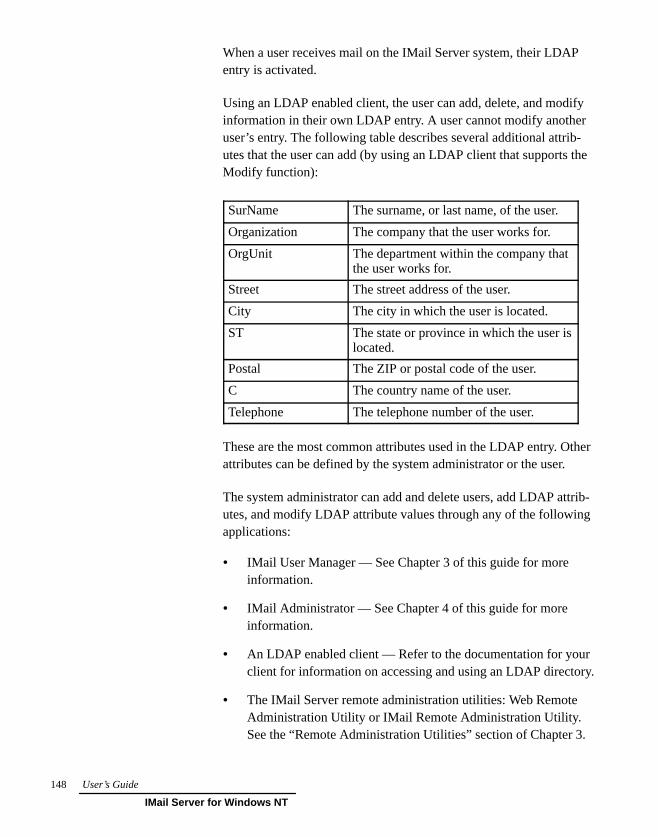
148 User’s Guide
IMail Server for Windows NT
When a user receives mail on the IMail Server system, their LDAPentry is activated.
Using an LDAP enabled client, the user can add, delete, and modifyinformation in their own LDAP entry. A user cannot modify anotheruser’s entry. The following table describes several additional attrib-utes that the user can add (by using an LDAP client that supports theModify function):
SurName The surname, or last name, of the user.
Organization The company that the user works for.
OrgUnit The department within the company thatthe user works for.
Street The street address of the user.
City The city in which the user is located.
ST The state or province in which the user islocated.
Postal The ZIP or postal code of the user.
C The country name of the user.
Telephone The telephone number of the user.
These are the most common attributes used in the LDAP entry. Otherattributes can be defined by the system administrator or the user.
The system administrator can add and delete users, add LDAP attrib-utes, and modify LDAP attribute values through any of the followingapplications:
• IMail User Manager — See Chapter 3 of this guide for moreinformation.
• IMail Administrator — See Chapter 4 of this guide for moreinformation.
• An LDAP enabled client — Refer to the documentation for yourclient for information on accessing and using an LDAP directory.
• The IMail Server remote administration utilities: Web RemoteAdministration Utility or IMail Remote Administration Utility.See the “Remote Administration Utilities” section of Chapter 3.
149LDAP Server
IMail Server for Windows NT
Full LDAP Directory Support
IMail Server supports LDAP version 2, which provides the followingcapabilities:
• Allows users of LDAP enabled clients such as Netscape’sCommunicator to:
– Locate LDAP directory information that may include name,phone number, e–mail address, organization, department, andaddress.
– List all users at a site.
– Browse for users who meet certain criteria.
– Modify their own user information in the LDAP directory.
• Authenticates LDAP login by using the IMail userid andpassword.
• Host Administrators and System Administrators can use anLDAP enabled client to add, delete, and modify user accounts,including any LDAP directory information.
• You can monitor the LDAP server and receive notification whenit goes down. See Chapter 12 for more information.
LDAP Service
As a Windows NT service, the LDAP server will continue to runwhen you log off the Windows NT system. This service can run com-pletely hidden or with some feedback.
The LDAP server gets most of its settings from the Windows NTRegistry. Registry values can be modified by using the IMail Serverapplication in the Control Panel.

150 User’s Guide
IMail Server for Windows NT
LDAP Service Security
By default, the LDAP service runs from the System account andstarts automatically. You can change these settings by using theControl Panel’s Services application.
Windows NT allows you to specify a user ID for the service to rununder. To select this option:
Note:
If you are using the Windows NT User Database optionto define where users are registered and how user au-thentication takes place, this service must run as a sys-tem service.
1. In the Control Panel, select the Services application.
The Services dialog box appears and displays each service, itsoperating status, and whether it uses automatic or manual startup.
2. Select the IMail LDAP Server service and click the Startupbutton.
3. Enter the settings and click OK .
Make sure the specified user has full control of the usersdirectory tree in the IMail directory and any mailboxes that willreceive mail.
Note that if you set the Allow service to interact with desktopoption, the LDAP service will run under the current logged onuser account. (Refer to the Windows NT documentation for moreinformation.)

151LDAP Server
IMail Server for Windows NT
Configuring the LDAP Server
To configure the LDAP server:
1. In the Control Panel, double–click the IMail Server icon.
The IMail services dialog box appears.
2. Click the LDAP tab. The LDAP Service properties appear.
3. Enter the options you want to use to configure the LDAP server.
Each option is described at the end of this procedure.
4. After making changes, stop the service, wait 5–10 seconds andrestart the service. Any changes that you make are saved auto-matically as soon as you press the Stop/Start Service button.
5. Click OK to exit the dialog box.

152 User’s Guide
IMail Server for Windows NT
Logging Options
In the Log To box, select the file that you want to use for loggingLDAP events.
If SYSMMDD.TXT is selected, LDAP information is logged in thefile: MAILDIR/spool/sysmmdd.txt , where mm is the monthand dd is the day the log was written.
Logging can be disabled by selecting No Log. If App Log is selected,information is logged in the Application Log, which is viewed withWindows NT’s Event Viewer. If Log Server is selected, messages aresent to the Log Server IP address specified in the Control Panel–>IMail Server–>Global configuration.
Allow queries only
When enabled, an LDAP client can query the server for LDAP in-formation and read the results, but cannot enter or modify LDAP in-formation.
Server Status
A status message to the left of the Start/Stop Service button showswhether or not the service is running.
Start/Stop Service
This button toggles between Start service and Stop service dependingon whether the service is running.
Configuring the LDAP Client
You need an LDAP enabled client to communicate with IMail Serv-er’s LDAP server. Supported LDAP enabled clients include:
• Netscape Communicator Pre–release 2
Communicator supports the LDAP URL format from the mainbrowser window and simple LDAP queries from the AddressBook. Communicator is available from: www.netscape.com

153LDAP Server
IMail Server for Windows NT
To configure Communicator to use IMail Server’s LDAP server:
In the main browser window, in the Location edit box, enter
LDAP://your_mailserver_name/ (for example, LDAP://mail.acme.com/ )
This command will add your LDAP server to the internal list thatCommunicator maintains.
• SWIX
This is a Windows–based LDAP client application which can beobtained from: ftp.umu.se/pub/pc/swix
Refer to the SWIX documentation for information on setting upand using the LDAP client.
Notes
If you want to see the icon for the service in the Control Panel’s Ser-vices application you can enable the Allow service to interact withdesktop option. (See the Security section in this chapter for how toaccess the Services options.)
The LDAP service will continue to run even if you log off. The iconwill disappear but will reappear the next time you log on as the sameuser.
Note that you must remove and re–install the program if you move itto a new location! This is because the full path to the application isstored in the NT Registry.
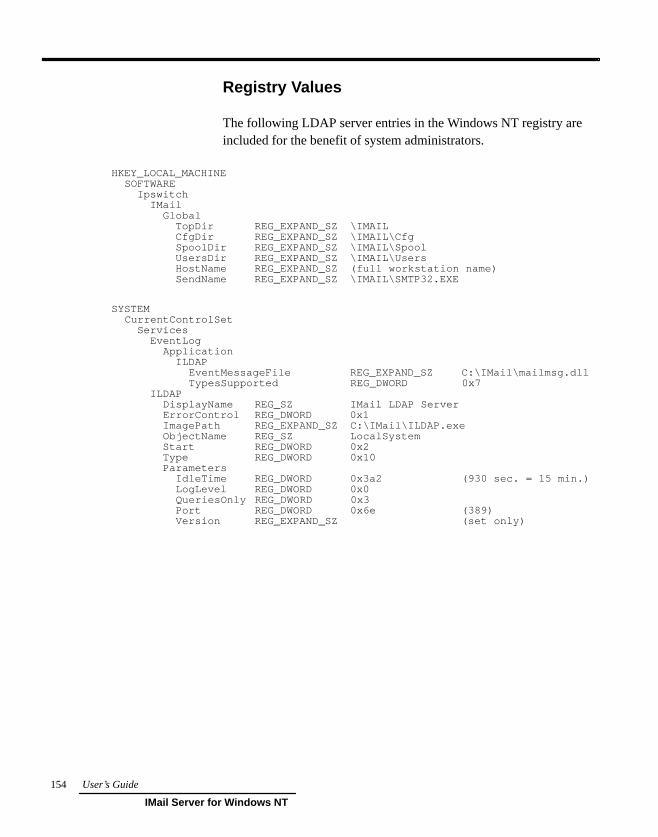
154 User’s Guide
IMail Server for Windows NT
Registry Values
The following LDAP server entries in the Windows NT registry areincluded for the benefit of system administrators.
HKEY_LOCAL_MACHINE SOFTWARE Ipswitch IMail Global TopDir REG_EXPAND_SZ \IMAIL CfgDir REG_EXPAND_SZ \IMAIL\Cfg SpoolDir REG_EXPAND_SZ \IMAIL\Spool UsersDir REG_EXPAND_SZ \IMAIL\Users HostName REG_EXPAND_SZ (full workstation name) SendName REG_EXPAND_SZ \IMAIL\SMTP32.EXE
SYSTEM CurrentControlSet Services EventLog Application ILDAP EventMessageFile REG_EXPAND_SZ C:\IMail\mailmsg.dll TypesSupported REG_DWORD 0x7 ILDAP DisplayName REG_SZ IMail LDAP Server ErrorControl REG_DWORD 0x1 ImagePath REG_EXPAND_SZ C:\IMail\ILDAP.exe ObjectName REG_SZ LocalSystem Start REG_DWORD 0x2 Type REG_DWORD 0x10 Parameters IdleTime REG_DWORD 0x3a2 (930 sec. = 15 min.) LogLevel REG_DWORD 0x0 QueriesOnly REG_DWORD 0x3 Port REG_DWORD 0x6e (389) Version REG_EXPAND_SZ (set only)

155Whois Server
IMail Server for Windows NT
9. Whois Server
The Whois server lets a Whois client look up information about IMailServer users. Whois information can include the user’s full name,mailing address, telephone number, and a network mailbox. When theWhois server receives a lookup request about a particular user, it willsend the information about the user that it finds in the IMail database.
Whois Service
As a Windows NT service, the Whois server will continue to runwhen you log off the Windows NT system. This service can run com-pletely hidden or with some feedback.
The Whois server gets most of its settings from the Windows NTRegistry. Registry values can be modified by using the IMail Serverapplication in the Control Panel.
Whois Service Security
By default, the Whois service runs from the System account and mustbe started manually. You can change these settings by using the Con-trol Panel’s Services application.
Windows NT allows you to specify a user ID for the service to rununder. To select this option:
1. In the Control Panel, select the Services application.
The Services dialog box appears and displays each service, itsoperating status, and whether it uses automatic or manual startup.
2. Select the IMail Whois Server and click the Startup button.
3. Enter the settings and click OK .

156 User’s Guide
IMail Server for Windows NT
Note that if you set the Allow service to interact with desktopoption, the Whois service will run under the current logged onuser account. (Refer to the Windows NT documentation for moreinformation.)
Configuring the Whois Server
To configure the Whois server:
1. In the Control Panel, double–click the IMail Server icon.
The IMail Server for Windows NT services dialog box appears.
2. Click the Whois tab. The Whois Service properties appear.
3. Enter the options you want to use to configure the Whois server.
Each option is described at the end of this procedure.
4. After making changes, stop the service, wait 5–10 seconds andrestart the service. Any changes that you make are saved auto-matically as soon as you press the Stop/Start Service button.
5. Click OK to exit the dialog box.
The version date of the Whois server is displayed in the upperright corner of the screen.
Logging Options
In the Log To box, select the file that you want to use for loggingWhois events.
If SYSMMDD.TXT is selected, Whois information is logged in thefile: MAILDIR/spool/sysmmdd.txt , where mm is the monthand dd is the day the log was written.
Logging can be disabled by selecting No Log. If App Log is selected,information is logged in the Application Log, which is viewed withWindows NT’s Event Viewer. If Log Server is selected, messages aresent to the Log Server IP address specified in the Control Panel–>IMail Server–>Global configuration.

157Whois Server
IMail Server for Windows NT
Database
The full pathname of the Whois database file.
Server Status
A status message to the left of the Start/Stop Service button showswhether or not the service is running.
Start/Stop Service
This button toggles between Start service and Stop service dependingon whether the service is running.
Notes
If you want to see the icon for the service, in the Control Panel’s Ser-vices application, you can enable the Allow service to interact withdesktop option. (See the Security section in this chapter for how toaccess the Services options.)
Note that you must remove and re–install the Whois server if youmove it to a new location! This is because the full path to the applica-tion is stored in the NT Registry.

158 User’s Guide
IMail Server for Windows NT
Registry Values
The following Whois server entries in the Windows NT registry areincluded for the benefit of system administrators.
HKEY_LOCAL_MACHINE SYSTEM CurrentControlSet Services EventLog Application WHOISD32 EventMessageFile REG_EXPAND_SZ C:\IMail\mailmsg.dll TypesSupported REG_DWORD 0x7 WHOISD32 DisplayName REG_SZ WHOIS Server ErrorControl REG_DWORD 0x1 ImagePath REG_EXPAND_SZ C:\IMail\WHOISD32.exe ObjectName REG_SZ LocalSystem Start REG_DWORD 0x2 Type REG_DWORD 0x10 Parameters Database REG_EXPAND_SZ C:\IMAIL\cfg\whois.db LogLevel REG_DWORD 0x0 Port REG_DWORD 0x2b (43) Version REG_EXPAND_SZ (set only)

159Finger Server
IMail Server for Windows NT
10. Finger Server
In response to Finger requests from other hosts, the Finger serverreturns the full name of the specified user, their complete e–mail ad-dress and the date and time that they last read their mail. If there is aplan.ima file in the user’s home directory or a “PLAN=file name”line defined in the user’s configuration, the information in the Planfile is returned as well.
If an alias is specified in a Finger request from another host, the Fin-ger server returns the expansion of that alias.
In response to Finger requests that do not specify a user, the Fingerserver reports that it will not display the current logged in user. To dootherwise is considered by many to be a security breach.
Finger Service
As a Windows NT service, this program will continue to run whenyou log off the Windows NT system. This service can run completelyhidden or with some feedback.
The Finger server gets most of its settings from the Windows NTRegistry. Registry values can be modified by using the IMail Serverapplication in the Control Panel.
Finger Service Security
By default, the Finger service runs from the System account and mustbe started manually. You can change these settings by using the Con-trol Panel’s Services application.
Windows NT allows you to specify a user ID for the service to rununder. To select this option:
1. In the Control Panel, select the Services application.
160 User’s Guide
IMail Server for Windows NT
The Services dialog box appears and displays each service, itsoperating status, and whether it uses automatic or manual startup.
2. Select the IMail Finger Server service and click the Startupbutton.
3. Enter the settings and click OK .
Make sure the specified user has read access to the user directo-ries.
Note that if you set the Allow service to interact with desktopoption, the Finger service will run under the current logged onuser account. (Refer to the Windows NT documentation for moreinformation.)
Configuring the Finger Server
To configure the Finger server:
1. In the Control Panel, double–click the IMail Server icon.
The IMail Server for Windows NT services dialog box appears.
2. Click the Finger tab. The Finger Service properties appear.
3. Enter the options you want to use to configure the Finger server.
Each option is described at the end of this procedure.
4. After making changes, stop the service, wait 5–10 seconds andrestart the service. Any changes that you make are saved auto-matically as soon as you press the Stop/Start Service button.
5. Click OK to exit the dialog box.
The version date of the Finger server is displayed in the upperright corner of the screen.

161Finger Server
IMail Server for Windows NT
Logging Options
In the Log To box, select the file that you want to use for loggingFinger events.
If SYSMMDD.TXT is selected, Finger information is logged in thefile: MAILDIR/spool/sysmmdd.txt , where mm is the monthand dd is the day the log was written.
Logging can be disabled by selecting No Log. If App Log is selected,information is logged in the Application Log, which is viewed withWindows NT’s Event Viewer. If Log Server is selected, messages aresent to the Log Server IP address specified in the Control Panel–>IMail Server–>Global configuration.
Server Status
A status message to the left of the Start/Stop Service button showswhether or not the service is running.
Start/Stop Service
This button toggles between Start service and Stop service dependingon whether the service is running.
Notes
If you want to see the icon for the service, in the Control Panel’s Ser-vices application, you can enable the Allow service to interact withdesktop option. (See the Security section in this chapter for how toaccess the Services options.)
Note that you must remove and re–install the Finger server if youmove it to a new location! This is because the full path to the applica-tion is stored in the NT Registry.

162 User’s Guide
IMail Server for Windows NT
Registry Values
The following Finger server entries in the Windows NT registry areincluded for the benefit of system administrators.
HKEY_LOCAL_MACHINE SYSTEM CurrentControlSet Services EventLog Application FINGRD32 EventMessageFile REG_EXPAND_SZ C:\IMail\mailmsg.dll TypesSupported REG_DWORD 0x7 FINGRD32 DisplayName REG_SZ FINGER Server ErrorControl REG_DWORD 0x1 ImagePath REG_EXPAND_SZ C:\IMail\FINGRD32.exe ObjectName REG_SZ LocalSystem Start REG_DWORD 0x2 Type REG_DWORD 0x10 Parameters LogLevel REG_DWORD 0x0 Port REG_DWORD 0x4f (79) Version REG_EXPAND_SZ (set only)

163Password Server
IMail Server for Windows NT
11. Password Server
The Password server allows Eudora and NuPOP mail clients tochange their IMail Server for Windows NT password without loggingin to the NT server. It also allows the system administrator to changeany users password through the IMail Remote Administration utility(IRADMEN).
Password Service
As a service, the Password server program will continue to run whenyou log off the Windows NT system. This service can run completelyhidden or with some feedback. IMail Server for Windows NT doesnot require the Password server to be running for normal operations.
The Password server gets most of its settings, including the directo-ries it needs to work in, from the Windows NT Registry. Registryvalues can be modified by using the IMail Services application in theControl Panel.
Password Service Security
By default, the Password service runs from the System account andstarts automatically. You can change these settings by using the Con-trol Panel’s Services application.
Windows NT allows you to specify a user ID for the service to rununder. To select this option:
1. In the Control Panel, select the Services application.
The Services dialog box appears and displays each service, itsoperating status, and whether it uses automatic or manual startup.
2. Select the IMail Password Server service and click the Startupbutton.

164 User’s Guide
IMail Server for Windows NT
3. Enter the settings and click OK .
Make sure the specified user has full control of the cfg directory.
Note that if you set the Allow service to interact with desktopoption, the Password service will run under the current logged onuser account. (Refer to the Windows NT documentation for moreinformation.)
Configuring the Password Server
To configure the Password server:
1. In the Control Panel, double–click the IMail Server icon.
The IMail NT Mail Services dialog box appears.
2. Click the Password tab. The Password Service properties appear.
3. Enter the options you want to use to configure the Passwordserver.
Each option is described at the end of this procedure.
4. After making changes, stop the service, wait 5–10 seconds andrestart the service. Any changes that you make are saved auto-matically as soon as you press the Stop/Start Service button.
5. Click OK to exit the dialog box.
The version date of the Password server is displayed in the upperright corner of the screen.
Logging Options
In the Log To box, select the file that you want to use for loggingPassword server events.
If SYSMMDD.TXT is selected, Password information is logged in thefile: MAILDIR/spool/sysmmdd.txt , where mm is the monthand dd is the day the log was written.

165Password Server
IMail Server for Windows NT
Logging can be disabled by selecting No Log. If App Log is selected,information is logged in the Application Log, which is viewed withWindows NT’s Event Viewer. If Log Server is selected, messages aresent to the Log Server IP address specified in the Control Panel–>IMail Server–>Global configuration.
Server Status
A status message to the left of the Start/Stop Service button showswhether or not the service is running.
Start/Stop Service
This button toggles between Start service and Stop service dependingon whether the service is running.
Notes
If you want to see the icon for the service, in the Control Panel’s Ser-vices application, you can enable the Allow service to interact withdesktop option. (See the Security section in this chapter for how toaccess the Services options.)
Note that you must remove and re–install the Password server if youmove it to a new location! This is because the full path to the applica-tion is stored in the NT Registry.

166 User’s Guide
IMail Server for Windows NT
Registry Values
The following password server entries in the Windows NT registryare included for the benefit of system administrators.
HKEY_LOCAL_MACHINE SOFTWARE Ipswitch IMail Global TopDir REG_EXPAND_SZ \IMAIL CfgDir REG_EXPAND_SZ \IMAIL\Cfg SpoolDir REG_EXPAND_SZ \IMAIL\Spool UsersDir REG_EXPAND_SZ \IMAIL\Users HostName REG_EXPAND_SZ (full PC name) SendName REG_EXPAND_SZ \IMAIL\SMTP32.EXE
SYSTEM CurrentControlSet Services EventLog Application PSERVE EventMessageFile REG_EXPAND_SZ C:\IMail\mailmsg.dll TypesSupported REG_DWORD 0x7 PSERVE DisplayName REG_SZ Password Server ErrorControl REG_DWORD 0x1 ImagePath REG_EXPAND_SZ C:\IMail\PSERVE.exe ObjectName REG_SZ LocalSystem Start REG_DWORD 0x2 Type REG_DWORD 0x10 Parameters LogLevel REG_DWORD 0x1 (1) Port REG_DWORD 0x6a (106) Version REG_EXPAND_SZ (set only)

167Monitor Server
IMail Server for Windows NT
12. Monitor Server
IMail Server for Windows NT provides several tools for monitoringthe SMTP, POP3, and IMAP4 mail servers and other services on yourIMail Server system. The Monitor service lets you:
• Monitor IMail services (such as SMTP, POP3, IMAP4, LDAP,PServ, Whois, Finger, Syslog) and disk space on the IMail Serversystem and display the status of services.
• Monitor DNS, NNTP, WWW, FTP, and Telnet services on eitherthe local or a remote system, and monitor your default gatewaysystem.
• Set up notifications for the monitored services and have the mon-itor program send e–mail to a user, or send notification to a pag-er, or beeper when a service is down.
• Configure a Web server to provide remote access via a Webbrowser to IMail Server functions (such as viewing service sta-tus, adding or deleting users, or changing a password).
Monitor Service
As a Windows NT service, the Monitor server will continue to runwhen you log off the Windows NT system. This service can run com-pletely hidden or with some feedback.
The Monitor server gets its settings from the Windows NT Registryand two .ini files found in the winnt directory: imonitor.ini and ipnoti-fy.ini. These .ini files are used to maintain compatibility with Ips-witch’s WhatsUp network monitoring tool, which may be installed onyour system.
Registry values can be modified by using the IMail Server applica-tion in the Control Panel.

168 User’s Guide
IMail Server for Windows NT
Monitor Service Security
By default, the Monitor service runs from the System account andstarts automatically. You can change these settings by using the Con-trol Panel’s Services application.
Note:
We recommend that you run the Monitor service underthe System account. If you use an account other than theSystem account, all functions may not work properly.
Note:
If you are using the Windows NT User Database optionto define where users are registered and how user au-thentication takes place, this service must run as a sys-tem service.
Windows NT allows you to specify a user ID for the service to rununder. To select this option:
1. In the Control Panel, select the Services application.
The Services dialog box appears and displays each service, itsoperating status, and whether it uses automatic or manual startup.
2. Select the IMail Monitor Service and click the Startup button.
3. Enter the settings and click OK .
Note that if you set the Allow service to interact with desktopoption, the Monitor service will run under the current logged onuser account. (Refer to the Windows NT documentation for moreinformation.)

169Monitor Server
IMail Server for Windows NT
Configuring the Monitor Server
To configure the Monitor server:
1. In the Control Panel, double–click the IMail Server icon.
The IMail Server for Windows NT services dialog box appears.
2. Click the Monitor tab. The Monitor properties appear.
3. Configure the Monitor, Notifications, and Web server capabilitiesthat you want to use.
Click the Notifications tab to display the Notificationsproperties.
Click the Web tab to display the Web server properties.
The following sections describe the configuration of each of thecapabilities.
4. After making changes, stop the service, wait 5–10 seconds andrestart the service. Any changes that you make are saved auto-matically as soon as you press the Stop/Start Service button.
5. Click OK to exit the dialog box.

170 User’s Guide
IMail Server for Windows NT
Monitoring Services
You can select to monitor services on the IMail Server system, andhave the Monitor program notify you when a service is down. Youcan also select to monitor some services on other systems, such as thestatus of a router. You can view the status of monitored services byusing the IMail Monitor (Programs–>IMail–>IMail Monitor) fromthe Windows NT console, or by using a Web browser (the IMail Webserver must be configured and running). Services displayed in greenare up and running; services displayed in red are down. You can alsoset up a notification for the monitored services to receive an e–mail,pager, or beeper notification if the service goes down.
To monitor services:
1. In the IMail Services dialog box, click the Monitor tab. TheMonitor properties appear.
2. Select the services that you want to monitor.
Click the check box next to a service to select it (make sure it ischecked).
For each service that you select, you can click the associated ar-row button to access configuration options. For example, if youclick the arrow button for the SMTP service, the following dia-log box appears.

171Monitor Server
IMail Server for Windows NT
Make sure the Monitor this service option is selected. If youwant the service to automatically restart after going down, selectthe Auto Restart this Service option.
You do not need to set the service name and IP address for theservices that are part of the IMail Server for Windows NT. Theseservices are SMTP, POP3, IMAP4, Whois, Finger, LDAP, DNS,Syslog, and PServe.
For services that are not part of the IMail Server for WindowsNT system, you can enter a service name if it is local or an IPaddress if the service is on a remote system.
3. By default, monitored services will be displayed in green (ser-vice is up) or red (service is down). In addition to this visualalarm, you can define and enable e–mail, pager, and beeper noti-fications to alert you when a service is down, or comes back up.See the “Setting Up Notifications” section in this chapter formore information.
In the Monitor configuration properties, the Notify if Down andthe Notify when Up after Down options apply to any e–mail,pager, and beeper notifications that you have enabled. See the“Enabling Notifications” section for more information.
4. You can select to monitor the default gateway or disk space onthe IMail Server system.
For the default gateway, click the arrow button to display config-uration options and then enter an IP address.
To monitor disk space on the IMail Server system, click the ar-row button to display configuration options and then enter theamount of free disk space (in Megabytes) below which you wantto be notified.
5. In the Check How Often section, specify how often (in seconds)the monitor program should poll the services.
6. Click OK . Your changes are applied immediately.

172 User’s Guide
IMail Server for Windows NT
Viewing Service Status from a Web Browser
You can view the status of the monitored services from any Webbrowser. To set up this capability, you need to:
1. Configure the IMail Server Web server as described in the “Con-figuring the Web Server” section of this chapter.
Note:
You should use a Web browser that supports frames asthe IMail Server Web server uses frames to display ser-vice status. The most recent Netscape Navigator andMicrosoft Internet Explorer browsers support frames.
2. Set the appropriate access options (Allow Web Access, Host Ad-ministrator, IMail System Administrator) in the User Propertiesfor the userid you will use to login. This determines which Re-mote Administration functions will be available to you.
You must enable the Allow Web Access option. See “Adding aUser Mail Account” in Chapter 3 for information on theseoptions.
3. Start a Web browser and open the URL address for the Webserver. The address is:
http:://your_imail_server_system:8181
where your_imail_server_system is the hostname of the Win-dows NT system on which you installed the IMail Server and8181 is the port number for the Web server.
You are prompted for your IMail Server userid and password.
4. Enter your IMail userid and password.
The Remote Administration web page appears.
The Monitor application (in the left side frame) shows the statusof services that you selected to monitor. Monitored services thatare running appear in green. Monitored services that are downappear in red. A status message (such as “Service running”) ap-pears next to the service name.
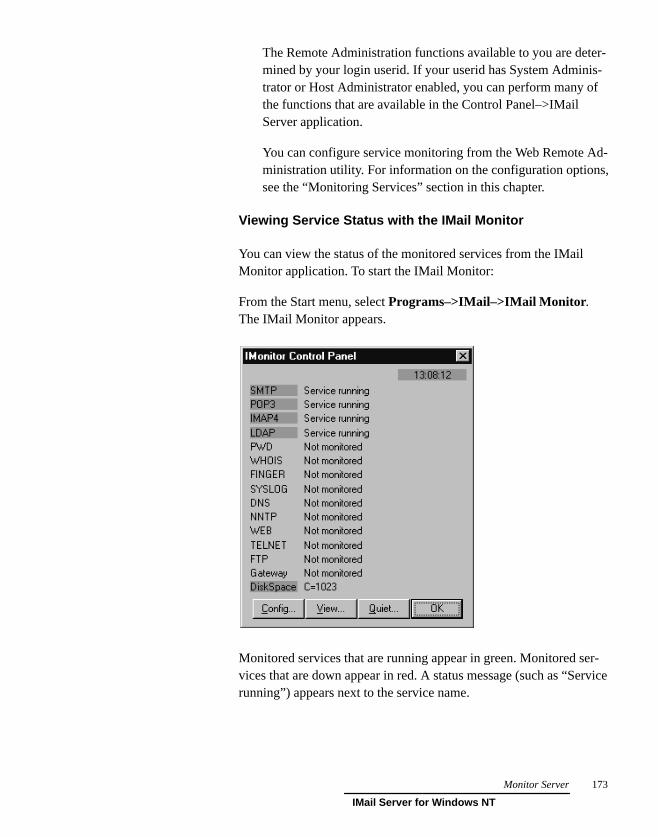
173Monitor Server
IMail Server for Windows NT
The Remote Administration functions available to you are deter-mined by your login userid. If your userid has System Adminis-trator or Host Administrator enabled, you can perform many ofthe functions that are available in the Control Panel–>IMailServer application.
You can configure service monitoring from the Web Remote Ad-ministration utility. For information on the configuration options,see the “Monitoring Services” section in this chapter.
Viewing Service Status with the IMail Monitor
You can view the status of the monitored services from the IMailMonitor application. To start the IMail Monitor:
From the Start menu, select Programs–>IMail–>IMail Monitor .The IMail Monitor appears.
Monitored services that are running appear in green. Monitored ser-vices that are down appear in red. A status message (such as “Servicerunning”) appears next to the service name.

174 User’s Guide
IMail Server for Windows NT
You can configure service monitoring, set up notifications, and con-figure the Web server from the IMail Monitor. Click the Config but-ton to display these configurations options. For information on theconfiguration options, see the following sections in this chapter:“Monitoring Services,” “Setting Up Notifications,” “Configuring theWeb server.”
Click the View button to display IMail Monitor debug log. The debuglog shows each service, its IP address, and a status message.
Click the Quiet button to turn off a sound alarm triggered by a moni-tored service going down, or coming back up after being down.
Setting Up Notifications
When a service does not respond to polling, the Monitor program cansend notification via a beeper, a pager message, or an e–mail mes-sage. This is in addition to the visual (red, green) status and the op-tional sound alarm. Setting up notification for services involves twosteps:
1. You first need to define the notification actions that you willwant to use, such as activating a network administrator’s beeperor sending e–mail to an individual.
2. Then, you can enable notification actions for services, which isjust a matter of selecting from the defined notifications.
See the section “Enabling Notifications” for information on en-abling notification actions for a service.
To define a Notification action:
1. In the IMail Services dialog box, click the Notification tab. TheNotification properties appear.
2. Click the New button. The Add Notification dialog box appears.
3. Click Configure Notifications. The Notifications dialog boxappears.
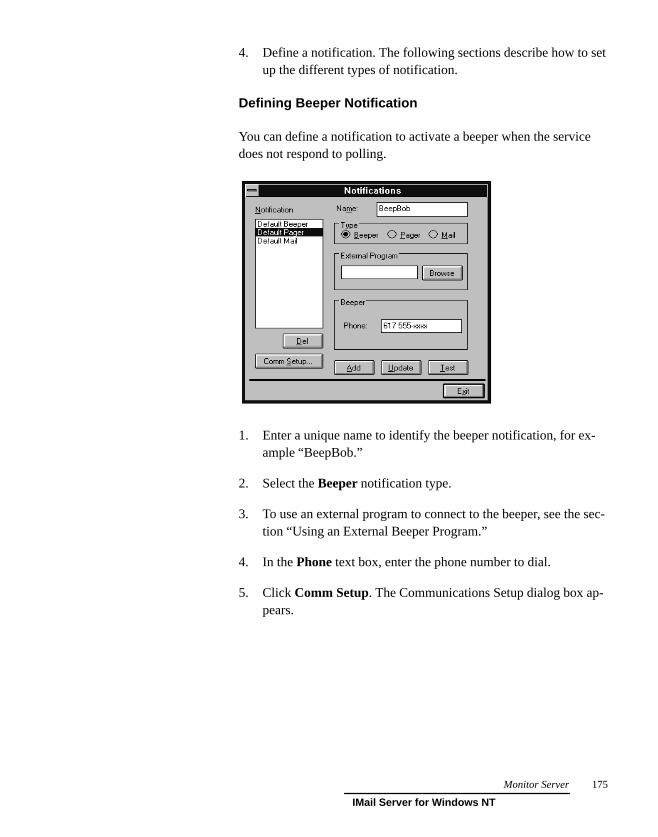
175Monitor Server
IMail Server for Windows NT
4. Define a notification. The following sections describe how to setup the different types of notification.
Defining Beeper Notification
You can define a notification to activate a beeper when the servicedoes not respond to polling.
1. Enter a unique name to identify the beeper notification, for ex-ample “BeepBob.”
2. Select the Beeper notification type.
3. To use an external program to connect to the beeper, see the sec-tion “Using an External Beeper Program.”
4. In the Phone text box, enter the phone number to dial.
5. Click Comm Setup. The Communications Setup dialog box ap-pears.

176 User’s Guide
IMail Server for Windows NT
Enter the information in the Beeper section of the dialog box::
Dial String
The default dial string is: ATDT%s,,,,%s# The first %s is replaced by the phone number and the second %sis replaced by the beeper code. Most modems and beepers sup-port the use of ’#’ to terminate the message and ’* ’ to print out adash. You may find a need to increase the number of commas inthe dial string if it dials the code too soon or decrease the numberof commas if it waits too long.
Baud Rate
Select the speed (measured in bits per second) at which the serialport will communicate with the modem.
COM Port
Select the port to which your modem is attached.
Modem Init String
The default string is ATEOQOV1X4. What is expected in thisstring are the modem commands for “Command Echo Off” (EO),“Result Codes On” (QO), “Verbal Results” (V1), and “ResultCodes Displayed” (X4). The recommended string to use is:ATEO QO V1 X4
Timeout
The timeout value determines how long the system waits aftersending the last character before it hangs up the phone, if a tran-sition is not recognized.

177Monitor Server
IMail Server for Windows NT
When you have entered the information, click OK .
6. Click the Add button to add the new beeper notification.
7. The beeper notification appears in the list of Notifications.
Click the Test button to test the notification.
Using an External Beeper Program
You can also use an external program of your own to handle beepernotification. The presence of an external program name in the Exter-nal Program text box enables the external program.
The following information is made available to the external programvia the command line.
arg 1: either DN or UP
arg 2: the phone number entered in the Notification options
arg 3: the beeper code as specified in the Notification options
arg 4: the IP address of the host
External program example arguments:
0: beeper.exe 1: DN 2: 8694297 3: 3333 4: 127.0.0.1
0: beeper.exe 1: DN 2: 8694297 3: 2222 4: 127.0.0.1
0: beeper.exe 1: UP 2: 8694297 3: 2222 4: 127.0.0.1
The external program is executed with SW_SHOWMINNOACTIVE.
The external beeper program will not be activated if someone si-lenced the alarm before the system check is reached.
The UP message will only be sent if the packets lost is greater thansystem checks when the service comes back up.

178 User’s Guide
IMail Server for Windows NT
Defining Pager Notification
You can define pager notification to send a message to a pager whena service does not respond to polling. The notification message sentto the pager is predefined. It is a simple message, such as: SMTPdown, SMTP up. IMail Server supports Motorola PageNet and otherTAP (Telocator Alphanumeric Protocol) pagers.
To define a pager notification action:
1. Enter a unique name to identify the pager notification, for exam-ple “PageFred.”
2. Select the Pager notification type.
3. Enter the following information:
Terminal
Enter the phone number to dial.
Password
Enter the pager password, if required.
Pager ID
Enter the pager identification number.
4. Click Comm Setup. The Communications Setup dialog boxappears.

1791Monitor Server
IMail Server for Windows NT
Enter the information in the Alpha Pager section of the dialogbox:
Modem Initialization String ( ATEO)
The default string is ATEO. What is expected in this string arethe modem commands for “Command Echo Off” (EO), “ResultCodes On” (QO), “Verbal Results” (V1), “Result Codes Dis-played” (X4), and “Local Echo OFF” (F1). The recommendedstring to use is: ATEO QO V1 X4 F1
Baud Rate
Select the speed (measured in bits per second) at which the serialport will communicate with the modem.
COM Port
Select the port to which your modem is attached.
When you have entered the information, click OK .
5. Click the Add button to add the new pager notification.
The pager notification appears in the list of Notifications.
Click the Test button to test the notification.

180 User’s Guide
IMail Server for Windows NT
Defining E–mail Notification
You can define e–mail notification to send a message to an e–mailaddress when a service does not respond to polling. The notificationmessage sent to the mail recipient is predefined. It is a simple mes-sage, such as: SMTP down, SMTP up. To define an e–mail notifica-tion action:
1. Enter a unique name to identify the e–mail notification, for ex-ample “Mail to Netadmin.”
2. Select the Mail notification type.
Enter the following information:
Address
Enter an e–mail address that is accepted by the Gate IP. (This canbe a simple name.) The Address should not contain brackets,braces, quotes, or parentheses.
Gate IP
Enter an IP address of a host running SMTP.
3. If you need to change the Mail From Address, click Comm Set-up. The Communications Setup dialog box appears.

1813Monitor Server
IMail Server for Windows NT
The Mail From Address defines the sender of an e–mail notifica-tion as: <imonitor@%s >, where %s is the local hostname. Inmost cases, you will not need to change this address. If you dochange the address, be sure to keep the angle brackets (< >) inplace.
When you have entered the information, click OK .
4. Click the Add button to add the new mail notification.
The mail notification appears in the list of Notifications.
Click the Test button to test the notification.
Updating Notification
To update an existing notification action, select it in the list of Notifi-cations, edit any of the options, and then click the Update button.
Testing Notification
You can test a notification action by selecting it in the list of Notifica-tions and clicking the Test button. The test results are displayed in theright side of the Notifications page. To return to the original display,click on a Notification Type.

182 User’s Guide
IMail Server for Windows NT
Enabling Notifications
After you define notification actions, you can enable them in theNotifications properties. These notifications can activate a beeper,send a message to a pager, or send an e–mail message when a serviceis down or up. For each service that you select to monitor, you can setwhether you want to be notified when the service goes down, comesback up after being down, or both.
1. Select the Notifications tab. The Notifications properties appear.
2. In the Monitor Notifications section, enable any of the notifica-tions that you have created. (See “Setting Up Notifications” forinformation on creating notifications.)
To enable a notification action, click the New button. The AddNotification dialog box appears. All notification actions that havebeen defined are available from the Notify drop–down list. Selectan action, such as Default Beeper or Default Pager, from this list.You can select to receive notification 24 hours a day, or betweencertain hours. Click OK to enable the notification action. Anynotifications you add are displayed in the Monitor Notificationslist box.
To edit an existing notification action, select it and click theModify button. To delete a notification action so that it is notapplied for the services, select it and click the Del button.

183Monitor Server
IMail Server for Windows NT
3. Make sure the Enable Notifications option is checked. This en-ables any beeper, pager, or e–mail notifications, console, andsound notifications. You can un–check this option to disable allnotifications.
Check the Enable Beeper/Pager/Mail option if you want to useany of the beeper, pager, or e–mail notifications defined in thelist box.
Check the Enable Console Dialog option to display the notifica-tion in a message box on the console (the IMail Server system).
Check the Enable Sounds option to play a .wav file when amonitored service goes up or down. (Your system must have asound card installed.)
4. In the Notifications properties, click Apply to save your changes.
5. In the Monitor properties (click the Monitor tab), for each ser-vice that you selected to monitor, specify when you want to benotified by checking the appropriate options. (You can use thisoption to enable and disable notification on a per service basis.)
To display the configuration options, click the arrow button tothe right of the monitored service. A dialog box appears. Selecteither Notify if down , Notify when Up after Down, or both.Click OK to exit the dialog box.
6. In the Monitor properties, click Apply to save your changes.
Configuring the Web Server
The Web server lets you use the Web Remote Administration utilityto view the status of monitored services, modify IMail Server userregistration data, and view log data.
To configure the Web server:
1. Click the Web tab. The Web Access properties appear.
2. Make sure the Enable Web Server option is checked.

184 User’s Guide
IMail Server for Windows NT
3. Enter the following information:
Port
The port number for the Web server. The default is 8181.
Title
Enter the title that you want to appear on the Web page whenaccessed from a Web browser.
Web Dir
The directory where you can place additional files to be servedby the Web server.
Hide User List Button
When enabled, the Web server will not display a list of users inthe host administrator functions.
Start/Stop Service
This button toggles between Start service and Stop service de-pending on whether the Monitor service is running.
4. Click OK to apply the settings. The Monitor server must bestopped and restarted for changes to take affect.
Setting Access to the Web Server
You can specify an IP address or set of IP addresses that are eithergranted access to the Web server or denied access. Systems that donot have access to the Web server system will not be allowed tocreate a connection.
To deny access to a specific computer or group of computers:
1. Click the Control access button. The Access Control propertiesappear.
2. Select the Granted Access option.
3. Click the Add button. The Deny Access On dialog box isdisplayed.
4. In the IP Address box, enter the IP address of the computer to bedenied access to the Web server.

185Monitor Server
IMail Server for Windows NT
To deny access to a group of computers, select the Group ofComputers option. In the IP Address and Subnet Mask boxes,enter the IP address and subnet mask for the group to be deniedaccess. For example, if you have a class C address space of156.21.50.0, enter a group address of 156.21.50.0 and a subnetmask of 255.255.255.0. This will deny access to those 254systems.
5. Click OK to add the IP address(es) to the list.
Access will be granted to all computers except those listed.
6. Click OK to save the changes. Note that you must stop and re-start the service for the changes to take affect.
To grant access to a specific computer or group of computers:
1. Click the Control access button. The Access Control propertiesappear.
2. Select the Denied Access option.
3. Click the Add button. The Grant Access On dialog box isdisplayed.
4. In the IP Address box, enter the IP address of the computer to begranted access to the Web server.
To grant access to a group of computers, select the Group ofComputers option. In the IP Address and Subnet Mask boxes,enter the IP address and subnet mask for the group to be grantedaccess. For example, if you have a class C address space of156.21.50.0, enter a group address of 156.21.50.0 and a subnetmask of 255.255.255.0. This will grant access to those 254systems.
5. Click OK to add the IP address(es) to the list.
Access will be denied to all computers except those listed.
6. Click OK to save the changes. Note that you must stop and re-start the service for the changes to take affect.

186 User’s Guide
IMail Server for Windows NT

187List Server
IMail Server for Windows NT
13. List Server
The List server lets you set up automated mailing lists on the IMailServer. A mailing list can receive mail and resend the mail to all theusers on the mailing list. Mailing lists are used widely on the Internetas a means of sharing information about a topic.
This chapter describes how to set up and maintain mailing lists.
List Server Implementation
The List server for IMail Server for Windows NT is a simple listserver that provides two distinct functions:
• A user interface for creating and maintaining mailing lists (fromthe Start menu, select Programs–>IMail–>IMail List Server).
• A way to process queries addressed to “imailsrv” on the IMailServer for Windows NT workstation.
The List server provides the following mailing list functions:
• User subscribe and unsubscribe requests are handled automati-cally by the list server.
• Mailing lists can be unmoderated (any message sent to the list isimmediately posted to all users on the list) or moderated (allmessages are viewed by a human moderator before being postedto the list).
• Mailing lists can be public or private. A private list will not ac-cept a Subscribe command.
• Messages to the mailing list can be accumulated and regularlyposted as a digest. (A digest contains a group of messages sentto the list.) Mailing lists that receive a large volume of messagescan give subscribers the option of periodically receiving a digestrather than being interrupted every few minutes with a new mes-sage sent to a list.

188 User’s Guide
IMail Server for Windows NT
• You can enter an identifying text string to appear on the Subjectline of all messages (or a digest) posted to the mailing list.
• You can enter header or trailer text (with information such as thesubscribe and unsubscribe instructions) to appear with all mes-sages (or a digest) posted to the mailing list.
• Supports the standard mailing list commands, including: Sub-scribe, Unsubscribe, Help, List.
Installation
To install the List Server, simply execute imailsrv.exe. It will automati-cally install itself and create the following files, directories, andaliases:
• The directory lists under the main mail directory.
• The files lists.txt, nolist.txt and syntax.txt in the lists directory.The lists.txt file is maintained by the imailsrv.exe program. Youcan tailor syntax.txt and nolist.txt for your use. Note that you canedit these files through the File menu in the imailsrv.exe program.
• The alias “imailsrv” that points to “| IMAILSRV.EXE hostname”where hostname is the name for your IMail Server system, forexample:
imailsrv=| imailsrv mailserver.acme.com
Creating a List
To create a list after installing the List server:
1. From the Start menu, select Programs–>IMail–>IMail ListServer.
The List Server window appears and displays each list name, ifany lists were yet created.
2. If you have created virtual hosts to support multiple domains, inthe Host drop–down list, select the host (domain) to which youwant to add a mail list.

189List Server
IMail Server for Windows NT
3. From the Lists menu, select New or click the New button. TheCreate New List dialog box appears.
4. Enter a name for the list and click OK .
The name must be from 3 to 23 characters in length, with nospaces between characters. This is the name used to send mail tothe list. For example, if you enter the name “IMailinfo,” userswill send mail to the list by specifying the To address: [email protected].
Note:
Do not use the name “imailsrv” for a mailing list as thisname is reserved for the alias that points to the List serv-er executable program.
The List Settings dialog box appears.
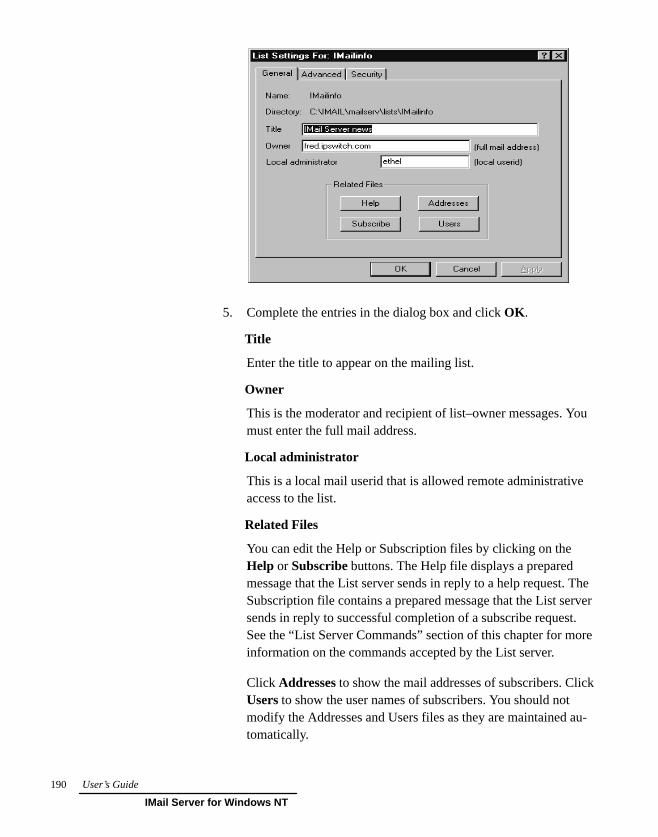
190 User’s Guide
IMail Server for Windows NT
5. Complete the entries in the dialog box and click OK .
Title
Enter the title to appear on the mailing list.
Owner
This is the moderator and recipient of list–owner messages. Youmust enter the full mail address.
Local administrator
This is a local mail userid that is allowed remote administrativeaccess to the list.
Related Files
You can edit the Help or Subscription files by clicking on theHelp or Subscribe buttons. The Help file displays a preparedmessage that the List server sends in reply to a help request. TheSubscription file contains a prepared message that the List serversends in reply to successful completion of a subscribe request.See the “List Server Commands” section of this chapter for moreinformation on the commands accepted by the List server.
Click Addresses to show the mail addresses of subscribers. ClickUsers to show the user names of subscribers. You should notmodify the Addresses and Users files as they are maintained au-tomatically.

191List Server
IMail Server for Windows NT
6. From a different system, send a test mail message to“imailsrv@your_IMail_server_hostname”. In the body of themessage, place the lines:
subscribe list_name your_full_namehelphelp list_namelistlist list_name
See the “List Server Commands” section of this chapter for adescription of the commands accepted by the List server.
7. You should get five messages back from the system.
The List server support directory is the directory lists created underyour main imail directory. Each list is created as a separate directoryunder that directory and there is an alias created for each list.
Setting Advanced Options
You can use the Advanced options to further define the operation of amailing list. To set Advanced options:
1. In the List Settings dialog box, click the Advanced tab. TheAdvanced options appear.
2. Select the options you want to use. Each option is describedbelow.

192 User’s Guide
IMail Server for Windows NT
Reply–To list (vs. sender)
Have replies sent from subscribers (or users) go to the list ratherthan to the sender of the original message.
Enable Digest Mode
When enabled, the list server will group the messages sent to thelist into a digest, which is then sent to digest subscribers as asingle message. You schedule the digest to be sent on a particulartime–basis (for example daily or weekly). When list users re-ceive a digest, it will contain all the messages sent to the list forthe specified period.
When you select Enable Digest Mode, the Digest and DigestScheduling tabs appear in the List Settings dialog box. You needto define how the digest will operate by setting the options underthese tabs. See “Setting Up Digest Mode” in this chapter formore information.
Enable Subject Modification
When enabled, displays the text string (entered in the Edit box)at the beginning of the subject line of every message sent to thelist. For example, if you enter [IMail–info] as the defined textstring, the subject line of messages will appear as follows:
Subject: re:[IMail–info] How do you receivemail?
The default string is the name of the mailing list.
Enable Header/Enable Trailer
When enabled, displays text information (entered in the Editfunction) at the beginning or end of every message sent to thelist. To enter the header information, select the Enable Headeroption, click Edit , and then enter the text information. This in-formation is entered in the header.txt file. To enter the trailerinfo, select the Enable Trailer option, click Edit , and then enterthe text information. This information is entered in the trailer.txtfile.
For example, you can enter the subscribe/unsubscribe informa-tion for the list and have it appear at the beginning or end ofevery message.

193List Server
IMail Server for Windows NT
Max message size in bytes (0 = unlimited)
The maximum size (in bytes) of a message that can be sent to thelist. Enter 0 if you want the size to be unlimited.
Number of recipients per message
The maximum number of recipients per message.
3. Click OK to save your changes.
Setting Mailing List Security
You can use the Security options to determine whether you want themailing list to be moderated or unmoderated, and to set access to thelist.
1. In the List Settings dialog box, click the Security tab. The Secu-rity options appear.
2. Select the options you want to use. Each option is describedbelow.
Allow posting by
Determines who can post mail to the list. Select Anyone to letany user post mail. Select Subscribers to let only the subscriberspost mail. Select Moderator to let only the list owner post mail.Moderator is used when you want the list owner to review allmessages before they are posted to the list.

194 User’s Guide
IMail Server for Windows NT
Allow List Unsubscribes based on Subject line
When a user wants to unsubscribe from the mailing list, most listservers expect the Unsubscribe command to be specified in thebody of mail message. If you want the mailing list to also acceptan Unsubscribe command specified in the Subject line of themessage, select this option.
When enabled, the list will accept the following commands in theSubject line to unsubscribe: unsubscribe, remove, signoff
Note:
We recommend enabling this command, but do not ad-vertise that the list server supports it because these mes-sages are sent to the list address and will go out to thelist if the command is misspelled.
Disallow Subscriptions
When enabled, refuses a Subscribe request to the mailing list.The owner or administrator must add new users either by editingthe Users file, or through the Web Remote Administration utility.Note that Unsubscribe requests are always enabled.
Disable List Command
A user can obtain a list of the users subscribed to a mailing listby addressing a message to the list server (for example, [email protected]) and entering the List listname commandin the body of the message. If you do not want users to receive alist of the subscribers to your mailing list, select this option.
If the list is set to Subscribers or Moderated, subscribers can stillsend the help/list command to obtain a list of subscribers.
Edit Kill File
The kill file lets you specify a mail address or a particular mailhost that you do not want to accept mail from. To specify a mailaddress or host in the kill file, click the Edit kill file button. Thefile kill.lst appears in the Windows Notepad. In the kill.lst file,enter one entry per line in either of the following formats:
userid@host@host

195List Server
IMail Server for Windows NT
For example, to deny access from a user mail account, you couldenter: [email protected] To deny access to all users from themail host widget.com, you can enter: @widget.co m.
The List Server checks the incoming message’s MAIL FROM:<user@host> line. The List Server denies access to any mailaddress listed in the kill file.
The kill.lst file resides in the IMail\lists\list_name directory(where list_name is the directory for the particular list) and ap-plies only to the specified list.
3. Click OK to save your changes.
Setting Up Digest Mode
You can offer your mailing list subscribers a digest of messages sentto the mailing list. The list server will “archive” messages sent to thelist to a digest mailbox. The accumulated messages are then sent todigest subscribers as a single message. You schedule the digest to besent on a time–basis (for example daily or weekly) or when the sizeof the digest reaches a specified number of bytes. When list usersreceive a digest, it will contain all the messages sent to the list sincethe last digest was sent.
The digest is written to a special mailbox that you define. List userscan choose between receiving a digest and receiving all messages asthey are sent. To receive the digest, list users must send mail to theList server imailsrv@your_IMail_server_hostname) and enter thefollowing command in the body of the message:
set mode digest listname
where listname is the mailing list name. A confirmation message willbe sent to the user. To cancel digest mode, users can enter the follow-ing command in the body of the message:
set mode standard listname
where listname is the mailing list name.
To set up digest mode for a mailing list:
1. In the List Settings dialog box, click the Advanced tab. The Ad-vanced options appear.

196 User’s Guide
IMail Server for Windows NT
2. Enable the Enable Digest Mode option (make sure it ischecked).
When Enable Digest Mode is enabled, the Digest and DigestSchedule tabs appear in the List Settings dialog box.
3. Click the Digest tab. The options appear.
4. Select the options you want to use. Each option is describedbelow.
Digest Mailbox
Enter the name of the mailbox where postings get stored beforethe digest mailing is sent out.
A copy of all postings will be sent to:
list_administrator– mailboxname @yourdomain.com
After a posting is sent to the digest list, the Digest Mailbox isemptied and a copy is made in the format:
digestmail boxMMDD.mbx
where digestmailbox is the name of the Digest Mailbox, MM isthe month, and DD is the day of the posting.
The list owner/moderator can view the mailbox by using the WebRemote Administration utility and can delete or add messagesbefore the posting is sent. The list owner/moderator can alsoview posted digests by the MMDD format.
Subject Line for Digest Postings
Enter the text that you want to appear as the Subject line on di-gest postings.
Include Headers/Trailers When Posting to Digest Mailbox
When enabled, the messages posted in the digest will include theheader and or trailer messages. We recommend disabling thisoption as it will make the digest larger and the digest has its ownheader and trailer.
Strip Non–Text Attachments before Posting
When enabled, strips non–text attachments from messages whenthe digest posting is sent.

197List Server
IMail Server for Windows NT
Enable Message Separators
Lets you enter lines or characters to automatically separate mes-sages in the digest posting. When you select this option, the Editbutton is enabled. Click the Edit button and then enter the linesor characters that you want to use as a separator.
Enable Digest Header/Enable Digest Trailer
When enabled, displays text information (entered in the Editfunction) at the beginning or end of every digest posting. To en-ter the header information, select the Enable Digest Header op-tion, click Edit , and then enter the text information. This in-formation is entered in the digest_header.txt file. To enter thetrailer info, select the Enable Digest Trailer option, click Edit ,and then enter the text information. This information is enteredin the digest_trailer.txt file.
For example, you can enter the subscribe/unsubscribe informa-tion for the digest and have it appear at the beginning or end ofevery digest.
Digest Subscribers
Click this button to edit the list of users (digest.lst) subscribed tothe digest.
5. Click Apply to save your changes.
6. Set the scheduling method (and date/time, if necessary) to deter-mine how often and when the digest will be posted.
Click the Digest Scheduling tab. The scheduling options appear.
From the Periodicity drop–down list, select how often you wantto post the digest. If you select Daily, Weekly, Bi–Weekly (every 2weeks), or Monthly, you can then set the date and time to post thedigest. For example, if you select Daily and set the Next Proces-sing Date/Time to 07/10/1997 3:00 AM, then the digest willinitially be posted on that date and time, and then every weekthereafter at the same time.
Select User–Defined and enter the number of days if you want topost the digest every nn days. This controls both how often thedigest is posted and how it is rescheduled for the next posting.

198 User’s Guide
IMail Server for Windows NT
Select Size–Exceeds and enter the number of Kilobytes to specifya size limit that when reached causes the digest to be published.This controls both how often the digest is posted and how it isrescheduled for the next posting.
Select Manual if you want the digest to be posted only when youclick the Process/Send Now button.
The Last Processing Date/Time shows the date and time of thelast digest posting.
You can click the Process/Send Now button at any time to postthe digest now and reschedule according to the selected periodic-ity.
7. Click Apply to save your settings. Click OK to save the settingand exit the dialog box.
List Server Commands
The List server will accept the following commands from the body ofan email message:
• Subscribe listname your_name
• Unsubscribe listname your_name
• Unsubscribe listname [email protected] (this command isavailable only to the list owner)
• Help
• Help listname
• List
• List listname
• Set mode digest listname
• Set mode standard listname
When sending email to the List server to perform any of these com-mands, you must always address the email to “imailsrv@your_IMail_server_hostname”.

199List Server
IMail Server for Windows NT
The following examples assume there is a list called “beer” on theIMail Server for Windows NT server:
To subscribe to the “beer” list located on ipswitch.com, you send mailto the listserver and enter the Subscribe command in the body of themessage, as follows:
TO: [email protected]:
Subscribe beer Fred Farkle
To unsubscribe from the list:
TO: [email protected]:
Unsubscribe beer Fred Farkle
For the list owner only, to unsubscribe a user from the list:
TO: [email protected]:
Unsubscribe beer [email protected]
To get general help from the List server:
TO: [email protected]:
help
To get help for a specific list:
TO: [email protected]:
help beer
To display all of the “lists” on the IMail server:
TO: [email protected]:
list

200 User’s Guide
IMail Server for Windows NT
To get a list of users subscribed to a specific list:
TO: [email protected]:
list beer
To receive a digest of messages sent to the list (the user must alreadybe a subscriber to the list):
TO: [email protected]:
set mode digest beer
To cancel digest mode and receive messages as they are sent to thelist (the user must already be a subscriber to the list):
TO: [email protected]:
set mode standard beer
Adding, Removing Subscribers by Forwarding aMessage
The host or system administrator can create special aliases that allowa user to subscribe or remove another user from the list by forwardinga message from the user to the alias. The user specified in the Reply–To header (or the From header if Reply–To is not found) of the mes-sage will be added to or removed from the list. The body of the mes-sage is ignored. Note that the message must be forwarded unmodified(with the headers unchanged), otherwise the forwarder will add orremove himself from the list.
To set up a special alias for adding a user by forwarding amessage:
1. In the IMail User Manager or IMail Administrator, select theAdd Alias function.
2. Enter an alias name, for example: Imailinfo–add

201List Server
IMail Server for Windows NT
3. Select the Program alias type.
4. Enter the alias properties using the following format:
imailsr v –add domain_name listname
For example:
imailsr v –add mailer.ipswitch.com IMailinfo
You can then forward a message to the alias (Imailinfo–add) and theoriginal sender of the message will be subscribed.
To create an alias for removing a user by forwarding mail to thelist:
Create a new program alias and use the following format to specifythe alias properties:
imailsr v –remove domain_name listname
For example:
imailsr v –remove mailer.ipswitch.com IMailinfo
You can then forward a message to the alias and the original sender ofthe message will be removed.
To create an alias for removing a user based on an unknown useror unknown host message:
Create a new program alias and use the following format to specifythe alias properties:
imailsr v –ruhost domain_name listname
For example:
imailsr v –ruhost mailer.ipswitch.com IMailinfo
A message is sent to the list owner to verify these add or removefunctions. When adding a user, a verification message is also sent tothe subscriber.

202 User’s Guide
IMail Server for Windows NT
Sending Mail to a List
List subscribers can send a message to a list by addressing it to themailing list name. For example, to send a message to the “beer” liston ipswitch.com:
TO: [email protected]: india Pale Ale
... body of message ...
When the list receives your message, the message is resent to all listsubscribers, or it is archived to a digest and sent to the list subscribersin the digest.

203Technical Information
IMail Server for Windows NT
14. Technical Information
This chapter describes IMail Server’s file–locking system and pro-vides additional information about the following IMail Serverprograms:
imail This is the main user interface for reading mailand for interfacing with the IMail system.
imail1 This is the main user interface for creating mailand is normally invoked from a button or menuoption in imail.exe.
smtp32 This is the Simple Mail Transfer Protocol deliv-ery program. This program is called by smtpd32to do the final delivery of any received messagesand to perform queue runs to clear the outboundmail queues.
File Locks
IMail employs a built–in locking system to eliminate concurrencyproblems. Locks are created by modifying the first character of a filename and creating a special file in the same directory as the lockedfile. Files are only locked while critical reads or writes are being per-formed on the file. Old locks are removed if they are more than onehour old. This means a user may be locked out of accessing a file or aservice for up to one hour as a result of a system crash during a criti-cal time period.
It is possible to manually remove a lock file if you are positive that noprocess is actually accessing that file. One reason for the long timeperiod is to allow for the time required to transmit large files overslow links. For example, the timeout should be long enough to trans-mit a 2+ megabyte file across a 2400 baud dial–up connection withprocessing delays caused by the remote end.

204 User’s Guide
IMail Server for Windows NT
IMAIL.EXE
imail includes a POP3 client that operates either of two modes.
• It retrieves and deletes all mail from the remote host and closesthe connection. This is the “offline” method of access.
• It retrieves headers only and then retrieves the body on demandand deletes messages on demand, leaving the connection openfor the duration of the client session. This is the “online” methodof access.
imail will not retrieve a message if there is not enough available diskspace for that message.
imail limits are based on the physical memory available on a system,the number of processes running on the system, and available diskspace. Other limits in imail are caused by limitations in the Windowsoperating environment or the MS–DOS operating system. In mostcases, innovative methods were used to extend these limitations.
imail can hold 900 messages on a system configured with 8 Mb ofmemory, and 1550 on a system configured with 16 Mb of memory.
imail is designed to be used by multiple users on a single system orby a single user on multiple systems. When imail is used as a POP3client leaving mail on the host system, it does not read any local mail-boxes or store any non–temporary information on the local systemunless specifically told to do so. It is assumed that a user operatingthe system in this manner is using multiple systems, thus mail in-formation retained on the host is intentionally not saved on the localsystem.
imail currently requires that a user be registered through ICONF (orthe IMail Server program in Windows 95) before they can use thesystem. It is possible to work around this, but you probably will haveproblems. Three things must be present for a user to be valid on thesystem:
• The user must be entered in the users.sys file.
• The user must have a directory under the users directory

205Technical Information
IMail Server for Windows NT
• The users must have a return mail address in imail.ini (or in theWindows 95 registry).
One of the most likely problems to occur with imail is caused bysome other process modifying a mailbox (.mbx) (doing somethingother than appending to the end of the mailbox) without removing theindex (.idx) file. If it is necessary to change the contents of a mailbox,delete the index.
imail can display multiple messages at the same time. Power usersshould have no problem working with multiple windows. One poten-tial problem with this is in holding a message window open and sub-sequently changing the mailbox that you are in.
imail currently understands all the defined Content–types from RFC1521 and currently treats text as a US–ASCII character set and ig-nores external references. As per RFC 1521, imail treats all typesexcept text as application/octet–stream. imail currently understandsthe encoding method defined for MIME, base64. Base 64 encodedtext is decoded to the display. Headers, etc. are treated in accordancewith RFC 1521.
IMAIL1.EXE
imail1 is the primary user interface for creating mail messages and isalso responsible for final delivery of the created message either to alocal mailbox or to the remote host(s) by way of SMTP. (SMTP de-livery is covered under ISMTP1.EXE as it is a subset of imail1.)
imail1 currently has a limitation of the body size of a created mes-sage (in the editor only) of 32K or less depending on availablememory. Final message size (including attachments) is limited onlyby available disk space.
imail1 can currently create multi–part MIME messages with Con-tent–transfer–encoding of binary and base64 and Content–types oftext, multi–part and application.

206 User’s Guide
IMail Server for Windows NT
imail1 supports the following command line options:
imail1 –a filename Specify the name of a file to attach ( in MIMEformat) to a mail message.
imail1 –f filename Specify the name of a file to send without edit-ing (provided a recipient is also specified on thecommand line).
imail1 –i filename Specify the name of a file to send with editing.Displays a Create Mail window.
imail1 –s “subject” Specify a subject line.
imail1 –t “recipient1[,recipient2][,...]”Specify primary recipients (the TO: field)
imail1 –c “recipient1[,recipient2][,...]”Specify carbon copy recipients (the CC: field)
imail1 –b “recipient1[,recipient1][,...]”Specify blind carbon copy recipients (the BCC: field)
imail1 –u user Specify the registered user to send the messagefrom.
imail1 –r Add an Army “Registered:” header.
SMTP32.EXE
smtp32 duplicates the functions contained within imail1 without anyuser interface nor the ability to create a message. smtp32 is responsi-ble for processing of messages left in the SPOOL directory by otherprocesses and attempting final delivery both to local addresses as wellas remote addresses by way of SMTP.
smtp32 will only deliver mail to addresses found in the users.sys andaliases.sys file. Aliases are expanded, though aliases that resolve tofilenames are considered invalid and were/are the responsibility ofthe program that placed the message in the SPOOL directory.

207Technical Information
IMail Server for Windows NT
(smtp32.exe will expand lists on receipt of the message and imail1will expand lists on creation of a new message. Thus it is not possibleto dump a message into the queue that references a list without doingthe expansion yourself.)
smtp32 (and imail1) has a probable limitation of 100 recipients in amessage but is determined by length of the recipient addresses, num-ber of duplicates, etc.. This is in accordance with RFC 821 section4.5.3. (It has actually been tested with much more than this.) smtp32does not parse any headers that are contained in the message itselfand expects to find properly formatted information in the queue con-trol file, thus there are no size restrictions on line lengths, etc. What-ever is passed to it is passed along to the final system with no inputchecking. Recipients are sorted by hostname and are sent as a singlemessage to multiple recipients to a single system.
Processing rules for smtp32 (and imail1):
1. Check to see if recipient host is the local host.
a. If so, strip host name if present and add a host ofLOCALHOST.
b. If no host is specified and the user is listed in users.sys,set the hostname to LOCALHOST.
c. If the user is not listed in users.sys, set the host to the“Default host name.”
2. Sort all recipients by hostname.
3. Deliver to all local recipients.
4. If any recipients left in the list, if the send direct option is en-abled, for each of the hosts, connect to that host and deliver themail to all recipients located on that host.
a. If the delivery succeeds, remove from the list.
b. If the connection fails, leave in the list.

208 User’s Guide
IMail Server for Windows NT
5. If any recipients left in the list, connect to the “Smart gateway”and deliver to all remaining addresses
a. If the delivery succeeds, remove from the list.
b. If the connection fails, leave it in the queue.
6. Return any invalid recipients to sender.
smtp32 supports the following command line options:
smtp32 With no options, smtp32 attempts to deliver allmessages in the mail queue.
smtp32 queue_filenameCause smtp32 to process the single messagespointed to by the queue_filename.
smtp32 –qr –x Cause smtp32 to attempt to deliver all messagesin the mail queue.

209Appendix A
IMail Server for Windows NT
Appendix A – Files and Directories
Distributed Programs
MAILDIR\fingrd32.exe Finger server program, 32 bit. (optional)
MAILDIR\iadmin.exe IMail Administrator, 32–bit
MAILDIR\ildap.exe LDAP server program, 32–bit
MAILDIR\imail.exe IMail message reading user interface, 16bit. (optional)
MAILDIR\imail1.exe IMail message creation user interface, 32bit. (optional)
MAILDIR\imap4d32.exe IMAP4 server program, 32 bit.
MAILDIR\imonitor.exe IMail monitor server, 32 bit. (optional)
MAILDIR\imutil.exe IMail user utility, 16 bit. (optional)
MAILDIR\iradmen.exe IMail remote administration utility(optional)
MAILDIR\imailsrv.exe IMail List server, 32 bit. (optional)
MAILDIR\pop3d32.exe POP3 server program, 32 bit.
MAILDIR\pserve.exe Eudora Password server program, 32 bit.
MAILDIR\regist32.exe IMail user manager, 32 bit.
MAILDIR\smtp32.exe IMail delivery program, 32 bit.
MAILDIR\smtpd32.exe IMail SMTP server program, 32 bit.
MAILDIR\syslogd.exe IMail log server

210 User’s Guide
IMail Server for Windows NT
MAILDIR\whoisd32.exe Whois server, 32 bit. (optional)
WINNT\SYSTEM\imail.cpl IMAIL control panel applet, 32 bit.
Distributed Files
MAILDIR\iadmin.hlp IMail Administrator help file
MAILDIR\imailsec.dll IMail security dynamic link library
MAILDIR\imutil.hlp IMUTIL help file
MAILDIR\mailmsg.dll Event log messages
MAILDIR\regist32.hlp REGIST32 help file
MAILDIR\smtpcnt.dll SMTP helper dynamic link library
MAILDIR\svccpl.hlp Control Panel Application help file
MAILDIR\*.lrc Language resource files
Directories
MAILDIR\cfg Configuration directory where databasesare stored
MAILDIR\lists List server working directory
MAILDIR\spool Temporary directory where messages arespooled while awaiting delivery and wherethe log file is kept.
MAILDIR\users Users directories parent directory
MAILDIR\Web Web server working directory

211Appendix A
IMail Server for Windows NT
Created Files
MAILDIR\spool\syslog.txtSystem log file (this file SHOULD bemanually removed as required)
MAILDIR\spool\d*.* Body file
MAILDIR\spool\q*.* Queue header file, contains 4 lines:Qfilename_of_body_fileTnumber_of_delivery_attempts (digit)S<sender_email_address>R<recipient_email_address> (lines)
MAILDIR\spool\t*.* Queue header file created during receipt ofa message, renamed to q*.* after completereceipt
MAILDIR\spool\*.tmp Temporary file
Installing and Removing Services
You can manually remove or install any of the services provided byIMail Server for Windows NT by using the –install and –remove switches from the DOS command prompt.
For example to remove the POP3 service, run the following program:
pop3d32 –remove
To install the POP3 service, run the following program:
pop3d32 –install
After installation, you must either restart the system or manually startthe server through the Control Panel’s Services application.

212 User’s Guide
IMail Server for Windows NT
The following services can be installed and removed using thisprocedure:
fingrd32.exe
ildap.exe
imap4d32.exe
imonitor.exe
pop3d32.exe
pserve.exe
smtpd32.exe
syslog.exe
whoisd32.exe

213Glossary
IMail Server for Windows NT
Glossary
aliases
An alias is another name assigned to a hostname that can be used inplace of the hostname (plus domain name). Aliases are often used toshorten long hostnames for convenience.
cache
Each time a Domain Name Server processes a lookup request for ahost not in its domain, it must query another name server for the in-formation. When a reply is received, the Domain Name Server savesthis address information in a cache. The next time it receives a queryfor the same information, it does not have to query another nameserver for the information. Because address data in the Domain NameSystem changes frequently, the system administrator assigns a Timeto Live (TTL ), usually a number of days, after which the cache iscleared.
client
A client is a program running on a networked computer that requestsservices from a server program, which is usually running on anothernetworked computer. The client communicates with the server usinga protocol. For example, an FTP client communicates with an FTPserver using the FTP protocol.
domain
A term used to refer to the subdivisions of the Internet network. Do-main can mean the major subdivision of which your network is a part(for example, .com, ,edu, .gov, .net, .us, .uk,) or it can refer to yourpart of the network (for example, ipswitch.com). See also DomainName System.

214 User’s Guide
IMail Server for Windows NT
Domain Name System
A distributed database system that translates hostnames (for example,tortoise.ipswitch.com) to IP addresses (for example, 156.21.50.10).All hosts on the Internet are named using the conventions specifiedby the Domain Name System. Hostnames are used because they areeasier to remember than numerical addresses (IP addresses). An ex-ample host and domain name is tortoise.ipswitch.com, where tortoiseis the hostname, and ipswitch.com is the domain name. The domainrepresents the network where the host is located.
domain name server
A host that keeps a table of hostnames and IP addresses and providesthe lookup service for client programs. A domain name server is usedby client programs to look up the IP address of a given host. A do-main name server provides hostname to IP address mapping for thelocal network and provides access to the Domain Name System tolook up hosts in other domains.
A primary name server contains all the information for the domain inits database files. If you add a second name server for backup or tooffload the primary server, you can set it up as a secondary server. Asecondary name server obtains its domain information by copying thedatabase files from the name server that is primary for that domain.The advantage of using secondary servers is that you can maintain thedomain information on one name server (the primary). You can speci-fy how often any secondary servers should “refresh” their data.
electronic mail
Electronic mail is a term used to describe the process that allows in-formation to be passed electronically from one person to one or moreother persons on a network.
See also POP3 and SMTP.

215Glossary
IMail Server for Windows NT
Finger
The Finger protocol is a common Internet language that allows re-mote users to see information about users registered on a system. Thisincludes the last time a user read their mail and a “plan” file provideby the user that contains any additional information the user wishes toprovide in response to Finger requests.
FAQ
A document that lists and answers Frequently Asked Questions abouta Web site, newsgroup, or other Internet resource. A good source ofinformation for new users.
FTP
FTP stands for File Transfer Protocol. This is one of the standardprotocols defined for use on a TCP/IP network and used to transferfiles between systems.
IMAP4
Internet Message Access Protocol version 4 (IMAP4) is a method ofaccessing electronic mail messages that are kept on a (possiblyshared) mail server. It permits a client e–mail application to accessremote message stores as if they were local.
in–addr.arpa domain
A special domain on the Internet that maps IP addresses to domainnames. This domain is used to do reverse lookups, where the IP ad-dress is known and the application is querying for the hostname.
Internet
A distributed network of computer systems that uses a set of rulesbased on the TCP/IP protocol to handle communications betweensystems.
IP
Internet Protocol; the protocol that determines how packets (bundlesof data) traverse the Internet network to find their destination. Seealso TCP.

216 User’s Guide
IMail Server for Windows NT
IP address
All hosts on the Internet are identified by a unique numeric code,called the IP address. 156.21.50.1 is an IP address. The DomainName System is used to map the IP address to a name.
LDAP
Lightweight Directory Access Protocol (LDAP) is a method of acces-sing directory information stored on a server. It permits an LDAP–en-abled client to search for and view user information stored in anLDAP directory.
list server
A List server provides an automated way to manage mail discussiongroups. All messages for a mail discussion group received by a Listserver are sent to all the members of that mail discussion group.
The List server manages the adding and removing of users from thesubscriber list as well as the distribution of messages to all subscribedusers. Users subscribe to a list by mailing a subscription request tothe List server, which automatically adds them to the list.
List servers are popular for running customer technical support fo-rums and many other kinds of discussion groups.
name server
See domain name server.
namespace
Synonymous with domain.
POP3
Post Office Protocol version 3 (POP3) is the most common protocolfor communicating with a mail server (otherwise known as a postoffice) to retrieve messages for a user. Since POP3 servers are al-ways available to receive incoming mail, individual users do not haveto have their PCs turned on at all times. POP3 servers hold mail forusers until they connect to download their messages. IMail Server forWindows NT is a POP3 mail server.

217Glossary
IMail Server for Windows NT
protocol
A set of rules that define how computers will exchange information.
Request for Comments (RFC)
A set of documents that define the Internet standards. RFCs are alsoused to propose new standards, or extensions to existing standards.
reverse Lookups
When the client program requests the hostname of a given IP address,the DNS server does a reverse lookup. This is the reverse of the nor-mal DNS lookup procedure, where the IP address for a given host-name is sought. Reverse lookups use a special domain, the in–addr.arpa domain, which maps IP addresses to domain names.
server
A server is a program running on a networked computer that pro-cesses requests for services from a client program, which is usuallyrunning on another networked computer. The client and server com-municate using a protocol. For example, an FTP client communicateswith an FTP server using the FTP protocol.
service
“Service” is a formal Windows NT term for an executable object thatis installed in a registry database maintained by NT’s Service ControlManager. A service is a program that can be automatically startedwhen the system is booted and will continue to run until the system isshut down. The service will continue to run even when no one islogged on the system.
SMTP
Simple Mail Transfer Protocol (SMTP) is designed to efficiently andreliably transfer mail across TCP/IP networks, including the Internet.SMTP defines the interaction between mail systems to facilitate thetransfer of electronic mail even when the mail systems are on differ-ent types of computers or running different operating systems. SMTPis required to send or receive mail over the Internet. IMail Server forWindows NT is an SMTP server.

218 User’s Guide
IMail Server for Windows NT
Spamming
When a bulk mailer sends unsolicited mail to thousands of otherpeople, it is known as “spamming.” Spam mailers may try to use yoursystem to relay their messages to other Internet mail users, tying upyour valuable system resources. IMail Server provides antispammingfeatures.
TCP
Transmission Control Protocol; the protocol that controls how data isassembled and disassembled in packets. See also IP.
TTL
The Time to Live (TTL) specifies an amount of time (usually in se-conds) for which a secondary name server can use the DNS databasefiles that it copied from the primary server before it needs to refreshthe data.
UDP
User Datagram Protocol; a transmission protocol for uses that do notrequire the control and error checking of TCP.
Whois
The Whois protocol is a common Internet language that allows re-mote users to search for mail addresses of users.
Winsock
WinSock is a specification that developers of TCP/IP network soft-ware for Microsoft Windows use as a guideline for the standard ap-plication programming interface to their network software.

219Index
IMail Server for Windows NT
�
add–on products, 16
aliases, 61, 97
antispamming, overview, 24
antispamming feature, 119,121
�
changing password, 74
Control Panel, 49
�
dial–up connections, 45– 50
distribution lists, see lists, 123
DNS MX support, 26, 27
domains, mail. See maildomains
�
file locks, 203
Finger server, 14�'&�" ,)"& � ��*��,)"+/� ���
Finger support, 22, 69, 76,104
forwarding mail, 21, 64,75, 101
�
gateways, sending mail, 86,119
�
IADMIN, 19
IMAIL Administrator, 19
IMail Administrator, 83– 89
IMail client, definition, 17
IMail registry���#,(� )�*+')��
IMail server���"&"+"'&� ��"&*+�$$�+"'&� ��
IMail server files, 209– 211
IMail Services, 49– 51�"& �) *�)-�)� ���� �� *�)-�)� ���0 ���� � *�)-�)� ���0 ����' *�)-�)� ����**.')� *�)-�)� ������ *�)-�)� ���0 ���,�,�� ������ *�)-�)� ��0 ����!'"* *�)-�)� ��
IMail User Manager, 53– 59
IMAIL User Utility, 19
IMail User Utility, 20, 73–76
IMail utilities �%"&"*+)�+')� ��0 ��)�%'+� ��%"&"*+)�+"'&�
��*�)-"��*� ��0 ���*�) ��&� �)� ��� ��0
���*�) �+"$"+/� ��� �0
imail.exe, 204
imail1.exe, 205
IMAP4 server, 13�'&�" ,)"& � ���0 ��
*��,)"+/� ���
IMUTIL, 20
Information Manager, 70, 108
installation���"$ *�)-�)� ���"*+ *�)-�)� ���
Internet service provider, seedial–up connections, 45
IP addresses, virtual, 27, 38,87
Ipswitch products, 10
IRADMIN, 20
�
kill file%�"$"& $"*+*� �������� ���
�
LDAP information, 72, 111
LDAP server, 14�'&�" ,)"& � ���0 ���*��,)"+/� ���
limits, 203– 207
List server, 14, 23�'%%�&�*� ����').�)�"& %�"$� ���"&*+�$$�+"'&� ���()' )�% �$"�*�*� ���*�+,(� ���
lists����** +'� ����"*+)"�,+"'&� ���
listserv, 23
locks, file, 203
Log server, 51

220 User’s Guide
IMail Server for Windows NT
�
mail delivery rules, 22, 65,75, 105
mail domains%,$+"($�� �-")+,�$ !'*+*� �
mail gateways, 24, 86, 119,121
Mail to Fax option, 16
Mail to Pager/Beeper option,16
mailing lists, kill file, 194
Monitor server, 14, 23
monitoring, 23
multiple domains, 26, 37
MX records, 26, 27, 38,87
�
new features, 15
notification, 23
�
optional products, 16��"$ +' ��/� ���"$ +' �� �)����(�)� ���� ��**� "& � �
�
Password server, 14�'&�" ,)"& � ��*��,)"+0� ��
POP3 client, 204
POP3 server, 13�'&�" ,)"& � ���1 ��*��,)"+0� ���� ��
POP3 support, 27
PPP connections, see dial–upconnections, 45
�
Queue, 52
�
RAS connections, see dial–upconnections, 45
REGIST32, 19
remote administration, 20
�
security����** +' ���� *�)-�)� ������** +' ���� *�)-�)�
���� ����&+"*(�%%"& ���+,)��
��� ����!��#"& *�&��)� �����&0"& *�&��)� ���"&�'%"& %�"$� ���%�"$ $"*+*� ���&,$$ *�&��)� ������� #"$$ �"$�� ������� *�)-�)� �� 1 ���"&�'%"& %�"$� ���
servers, 14�"& �)� � 1 ������� �� 1 �������� ���1 ���"*+ *�)-�)� ���1 � �
��**.')�� ��1 ������ ���1 ������� ��1 ����!'"*� �1 ��
services, monitoring, 23
SMTP, kill file, 124
SMTP server, 13�'&�" ,)"& � ��1 �� *��,)"+0� ��
��� ���� *��,)"+0
smtpd32.exe, 206
spam mail, 24, 119, 121
system requirements, 15
�
tools, user registration, 18
user mail accounts, remoteaccess, 20
user mail functions, 21–23
User Manager, see IMail UserManager, 53
user registration, 18
User Utility, see IMail UserUtility, 73
vacation support, 21, 67,76, 107
virtual hosts, 26, 37– 39
virtual IP address, 27, 38,87

221Index
IMail Server for Windows NT
�
Web access, 20
Web Messaging option, 16
Web server, 14
Whois server, 14� ����$!���� ���
"��$!�#'� ���
Windows NT services�����! "�!%�!� ���� ���
����� "�!%�!� ���� �������� ���
� �� "�!%�!� ��� �����""& !� "�!%�!� ���� ������� "�!%�!� ���� ������ "�!%�!� ���� ���� �" "�!%�!� ���� ��

222 User’s Guide
IMail Server for Windows NT

IMail Server for Windows NT
Options: Web Messaging Mail to PagerMail to Fax
Software Version 4
Ipswitch, Inc.

Ipswitch, Inc.81 Hartwell Ave., Lexington, MA 02173
The information in this document is subject to change without notice and should not be construed as acommitment by Ipswitch, Inc. While every effort has been made to ensure the accuracy of the inform–ation contained herein, Ipswitch, Inc. assumes no responsibility for errors or omissions. Ipswitch, Inc.assumes no liability for damages resulting from the use of the information contained in this document.
The software described in this document is furnished under a license and may be used or copied onlyin accordance with the terms of that license.
Copyright 1997 by Ipswitch, Inc. All rights reserved. IPing, the IPing logo, WS_FTP, the WS_FTPlogos, Ipswitch, and the Ipswitch logo are trademarks of Ipswitch, Inc. Other products or companynames are or may be trademarks or registered trademarks and are the property of their respective companies.
No part of this publication may be reproduced, photocopied, stored on a retrieval system, or transferred without the express prior written consent of Ipswitch, Inc.
Printing History
July 1997

iiiCopyrights/Contents
IMail Server for Windows NT
Contents
Preface v. . . . . . . . . . . . . . . . . . . . . . . . . . . . . . . . . . . . . . . . . . . . . . . . . . . . . . . . . . In this Document vi. . . . . . . . . . . . . . . . . . . . . . . . . . . . . . . . . . . . . . . . . . . . . . The Ipswitch Family of TCP/IP Products vi. . . . . . . . . . . . . . . . . . . . . . . . . . . Visit our Web Site vii. . . . . . . . . . . . . . . . . . . . . . . . . . . . . . . . . . . . . . . . . . . . . Please Send Us Your Comments vii. . . . . . . . . . . . . . . . . . . . . . . . . . . . . . . . . . Contacting Ipswitch or Your Reseller for Technical Support viii. . . . . . . . . . . . Downloading IMail Server Software Patches viii. . . . . . . . . . . . . . . . . . . . . . . .
Part 1: Web Messaging Option . . . . . . . . . . . . . . . . . . . . . . . . . . . . . . . . . . . . . . . .
1. Getting Started 1. . . . . . . . . . . . . . . . . . . . . . . . . . . . . . . . . . . . . . . . . . . . . . . What is the Web Messaging Option? 1. . . . . . . . . . . . . . . . . . . . . . . . . . . . . .
Web Access to Mail Accounts 2. . . . . . . . . . . . . . . . . . . . . . . . . . . . . . System Administration via the Web 2. . . . . . . . . . . . . . . . . . . . . . . . . . Web Messaging Manager 2. . . . . . . . . . . . . . . . . . . . . . . . . . . . . . . . . . Web Messaging with Online Advertisements 3. . . . . . . . . . . . . . . . . . .
System Requirements 3. . . . . . . . . . . . . . . . . . . . . . . . . . . . . . . . . . . . . . . . . . Installing or Upgrading the Web Messaging Option 3. . . . . . . . . . . . . . . . . . Files Installed 4. . . . . . . . . . . . . . . . . . . . . . . . . . . . . . . . . . . . . . . . . . . . . . . . Removing the Web Messaging Option 5. . . . . . . . . . . . . . . . . . . . . . . . . . . . . Setting Up Web Messaging 6. . . . . . . . . . . . . . . . . . . . . . . . . . . . . . . . . . . . . .
Setting the Port Number for the Web Messaging Server 6. . . . . . . . . . Setting Access to Web Messaging Functions 7. . . . . . . . . . . . . . . . . . .
Notes for the System Administrator 9. . . . . . . . . . . . . . . . . . . . . . . . . . . . . . .
2. User Mail Functions 11. . . . . . . . . . . . . . . . . . . . . . . . . . . . . . . . . . . . . . . . . . . Logging on/off Web Messaging 11. . . . . . . . . . . . . . . . . . . . . . . . . . . . . . . . . . Reading Mail 13. . . . . . . . . . . . . . . . . . . . . . . . . . . . . . . . . . . . . . . . . . . . . . . .
Reading a Message with an Attachment 16. . . . . . . . . . . . . . . . . . . . . . Displaying Web Pages 16. . . . . . . . . . . . . . . . . . . . . . . . . . . . . . . . . . . . . Deleting Messages 16. . . . . . . . . . . . . . . . . . . . . . . . . . . . . . . . . . . . . . .
Sending Mail 17. . . . . . . . . . . . . . . . . . . . . . . . . . . . . . . . . . . . . . . . . . . . . . . . . Adding Web–based Text and Graphics to a Mail Message 18. . . . . . . . .
Creating a Mailbox 19. . . . . . . . . . . . . . . . . . . . . . . . . . . . . . . . . . . . . . . . . . . . Changing your Password 20. . . . . . . . . . . . . . . . . . . . . . . . . . . . . . . . . . . . . . .

iv Options User’s Guide
IMail Server for Windows NT
Changing User Information 20. . . . . . . . . . . . . . . . . . . . . . . . . . . . . . . . . . . . . Entering Finger Information 21. . . . . . . . . . . . . . . . . . . . . . . . . . . . . . . . . . . . . Setting Mail Forwarding 21. . . . . . . . . . . . . . . . . . . . . . . . . . . . . . . . . . . . . . . . Entering a Vacation Message 22. . . . . . . . . . . . . . . . . . . . . . . . . . . . . . . . . . . .
3. Administration Functions 23. . . . . . . . . . . . . . . . . . . . . . . . . . . . . . . . . . . . . . . Adding, Modifying, and Deleting User Mail Accounts 24. . . . . . . . . . . . . . . . Adding, Modifying, and Deleting Aliases 26. . . . . . . . . . . . . . . . . . . . . . . . . . Viewing Monitor and System Logs 27. . . . . . . . . . . . . . . . . . . . . . . . . . . . . . .
Viewing the Spool Directory 28. . . . . . . . . . . . . . . . . . . . . . . . . . . . . . . . Reading Recent IMail Server News 28. . . . . . . . . . . . . . . . . . . . . . . . . .
Customizing the Web Messaging Option 28. . . . . . . . . . . . . . . . . . . . . . . . . . . Editing the Welcome Message, Title, and Tail 29. . . . . . . . . . . . . . . . . . Editing the News of the Day 31. . . . . . . . . . . . . . . . . . . . . . . . . . . . . . . . Editing the “No Page Error” Message 33. . . . . . . . . . . . . . . . . . . . . . . .
Displaying Online Advertisements 33. . . . . . . . . . . . . . . . . . . . . . . . . . . . . . . .
Part 2: Mail to Pager/Beeper Option 35. . . . . . . . . . . . . . . . . . . . . . . . . . . . . . . . . . .
4. Setting Up and Using the Mail to Pager/Beeper Option 37. . . . . . . . . . . . . . . . Installing IMail Pager/Beeper Support 37. . . . . . . . . . . . . . . . . . . . . . . . . . . . . Removing the Mail to Pager/Beeper Option 38. . . . . . . . . . . . . . . . . . . . . . . . Setting Communications Properties 39. . . . . . . . . . . . . . . . . . . . . . . . . . . . . . . Adding, Modifying, and Deleting Pager/Beeper Aliases 41. . . . . . . . . . . . . . . Sending a Message to a Pager/Beeper 43. . . . . . . . . . . . . . . . . . . . . . . . . . . . .
Part 3: Mail to Fax Option 45. . . . . . . . . . . . . . . . . . . . . . . . . . . . . . . . . . . . . . . . . . .
5. Setting Up and Using the Mail to Fax Option 47. . . . . . . . . . . . . . . . . . . . . . . Installing IMail Fax Support 47. . . . . . . . . . . . . . . . . . . . . . . . . . . . . . . . . . . . . Setting the Modem Port 48. . . . . . . . . . . . . . . . . . . . . . . . . . . . . . . . . . . . . . . . Adding a Mail to Fax Alias 49. . . . . . . . . . . . . . . . . . . . . . . . . . . . . . . . . . . . . Creating and Modifying Fax Cover Pages 51. . . . . . . . . . . . . . . . . . . . . . . . . . Setting Up and Using Dynamic Dialing Aliases 53. . . . . . . . . . . . . . . . . . . . .
Setting Global Properties for All Dynamic Aliases 56. . . . . . . . . . . . . . Setting Access and Dialing Restrictions for Dynamic Aliases 57. . . . . .
Sending Mail to a Fax Alias 60. . . . . . . . . . . . . . . . . . . . . . . . . . . . . . . . . . . . . Attachments 60. . . . . . . . . . . . . . . . . . . . . . . . . . . . . . . . . . . . . . . . . . . . . Sending Mail to a Dynamic Dialing Alias 61. . . . . . . . . . . . . . . . . . . . .
Viewing the Fax Queue Files 61. . . . . . . . . . . . . . . . . . . . . . . . . . . . . . . . . . . .
Index 63. . . . . . . . . . . . . . . . . . . . . . . . . . . . . . . . . . . . . . . . . . . . . . . . . . . . . . . . . . .

vPreface
IMail Server for Windows NT
Preface
IMail Server for Windows NT is an Internet standards based mailserver system for Microsoft Windows NT 3.5 and later. IMail Serverprovides Simple Mail Transfer Protocol (SMTP) for sending and re-ceiving mail over the Internet or in an internal TCP/IP network.
IMail Server for Windows NT supports any mail client that uses thePost Office Protocol, Version 3 (POP3) or Internet Message AccessProtocol (IMAP4).
As options, you can purchase the following software to run withIMail Server for Windows NT:
• The Web Messaging option which lets users access their mail onthe IMail Server system from any Web browser on the Internet.This option, rather than replacing the function of a standard mailclient, enhances e–mail access by “Web enabling” the IMailServer. It is especially helpful to users who are away from theoffice and need quick and easy access to their mail messages.
The Web Messaging option is also available in an enhanced ver-sion that supports online advertising. This feature lets you dis-play banner ads (in HTML text and/or graphics, including hy-perlinks) at the top of the Web Messaging mail screens. It cancycle through up to 1000 ads, changing the displayed ad every 30seconds. This feature is very useful to Internet Service Providers(ISPs) and other mail service providers who would like to sellonline advertising space on their mail server.
• An optional Mail to Pager/Beeper capability which lets you setup an aliases on the IMail Server system that can receive mailfrom a mail client and forward it to a preconfigured pager ad-dress or notify you by beeper when a message arrives.
• An optional Mail to Fax capability which lets you set up mailaccounts on the IMail Server system that can receive mail from amail client and forward it to preconfigured Fax phone numbers.This option also supports “dynamic aliasing.” which lets usersenter the FAX phone number when they create the message.

vi OptionS User’s Guide
IMail Server for Windows NT
In this Document
This guide describes how to install, set up, and run the optional prod-ucts for IMail Server for Windows NT.
Part 1 describes how to install, set up, and use the Web Messagingoption
Part 2 describes how to install, set up, and use the Mail to Pager/Beeper option.
Part 3 describes how to install, set up, and use the Mail to Fax option.
The Ipswitch Family of TCP/IP Products
IMail Server for Windows NT is one of a family of TCP/IP productsfrom Ipswitch. Other Ipswitch products include:
• WhatsUp Gold Network Monitoring Tool
WhatsUp Gold is an inexpensive, graphical network monitoringtool that initiates both visual and audible alarms when networkelements do not respond to polling. WhatsUp Gold can alsonotify you of a network problem by digital beeper, alphanumericpager, and e–mail. WhatsUp Gold runs on Windows 95 or Win-dows NT on the Intel, PowerPC, and DEC Alpha platforms andcan monitor any device on a TCP/IP or NetBEUI network.
• WS_FTP Professional FTP Client
WS_FTP Professional provides an intuitive, powerful Windowsinterface for connecting to remote hosts and transferring files.WS_FTP Professional provides drag and drop file transfer, andsupport for more than 20 remote file systems.

viiPreface
IMail Server for Windows NT
• VT320 Terminal Emulator for Windows
VT320 provides high–quality DEC VT320 terminal emulationand Telnet communications program for accessing VMS andUNIX host applications. This terminal emulator supports VT320,VT220, VT100, and VT52 terminals. VT320 provides 80– andtrue 132–column modes with double height and double widthcharacters and is easily customized via keyboard mapping, defin-able hotspots, and changeable toolbars. It supports XMODEM,YMODEM, ZMODEM, and Kermit communications.
• TN3270 Terminal Emulator for Windows
TN3270 provides IBM 3270 Models 2, 3, 4, and 5 terminalemulation and communications programs for accessing yourIBM mainframe and minicomputer hosts. Advanced featuresinclude drag–and–drop keyboard mapping and text editing, de-finable hotspots, customizable toolbars, scalable fonts, multiplesession support, and support for EHLLAPI and Visual Basic.
Visit our Web Site
For more information about Ipswitch products or to purchase ourproducts online, visit the Ipswitch web site at: http://www.ips-witch.com
In our technical support pages, you can read answers to FrequentlyAsked Questions (FAQs) about our products and keep up–to–date onproduct news.
Please Send Us Your Comments
We welcome your feedback on this product. Please send the results ofyour evaluation and your comments and suggestions to the followinge–mail address: [email protected]

viii OptionS User’s Guide
IMail Server for Windows NT
Contacting Ipswitch or Your Reseller for Techni-cal Support
Please use the following procedure to ask questions or report prob-lems.
1. Locate your IMail Server for Windows NT serial number, whichis printed on Disk 1 of your IMail Server for Windows NT kit.
2. Contact your designated IMail Server for Windows NT supportprovider.
Downloading IMail Server Software Patches
If a software patch is created to fix a bug in the currently shippingversion of IMail Server, Ipswitch will make it available on our Website. You can check our download directory on our Web site for cur-rent software patches.
To download software from the Ipswitch Web site:
1. In your Web browser, go to: http://www.ipswitch.com
2. Click on the download directory link.
3. Under IMail Server Patch Files (if any exist), click on the link.
4. Select Save to save the patch file in your directory. Run the patchfile to update the software.
Part 1: Web Messaging Option
This section describes the Web Messaging Option, which isan add–on capability for IMail Server for Windows NT.

Options User’s Guide
IMail Server for Windows NT

1Web Messaging Option
IMail Server for Windows NT
1. Getting Started
This chapter provides an overview of the capabilities of the WebMessaging Option and describes how to install the option.
What is the Web Messaging Option?
The IMail Server Web Messaging Option is an add–on capability thatallows users to check their electronic mail using any Web browser onthe World–Wide Web. Web Messaging is an added convenience fore–mail users — rather than replacing the function of a standard mailclient, it enhances e–mail access by “Web enabling” IMail Server forWindows NT. The IMail Server Web Messaging capability isespecially helpful to users who are away from the office and needquick and easy access to their e–mail messages.
online advertising
Web access to mail
In addition to the messaging capabilities, the Web Messaging Optionoffers an extended menu from which system administrators canmonitor the mail server and manage user accounts remotely.
The Web Messaging Option is also available in an enhanced versionthat supports online advertising.

2 Options User’s Guide
IMail Server for Windows NT
Each of the Web Messaging capabilities is described below.
Web Access to Mail Accounts
From a Web browser on any system, users can connect to the IMailWeb Messaging server and log in to their mail account using theirIMail userid and password. Once logged in, users can read, send,delete, reply to, and print e–mail directly from the browser. They canalso change their passwords, user information (such as last name,organization name, telephone number), Finger information, mailforwarding information, and vacation messages.
The section “Using Web Messaging Mail Functions” describes howto use the mail functions.
System Administration via the Web
The Web Messaging Option also lets the system administratormonitor system activity and manage user accounts remotely from aWeb browser.
Accessible through an extended menu screen, system administratorscan view the spool directory or a variety of system logs, edit the newsmessage presented to users, edit the welcome message that appearson the logon screen, check on recent IMail Server news fromIpswitch, or perform a wide variety of user administration tasks (suchas adding or deleting users and aliases or changing passwords andother account information).
Security is provided by the IMail userid and password. In addition,the system administrator can set user access to the various mailaccount functions.
Web Messaging Manager
The Web Messaging Manager lets the system administrator performWeb Messaging functions on the IMail Server host. Using the WebMessaging Manager (selected from the IMail Server for Windows NTprogram group), the system administrator can set the port number forthe Web Messaging server, display server status, edit the newsmessage presented to users, and edit the messages that appear on thelogon screen.
3Web Messaging Option
IMail Server for Windows NT
Web Messaging with Online Advertisements
The Web Messaging Option is available in an enhanced version thatsupports online advertising. This feature is very useful to InternetService Providers (ISPs) and other mail service providers who wouldlike to sell online advertising space on their mail server. With thisfeature, the advertising is displayed the entire time end–users arereading their mail via the browser interface. Ads are displayed at thetop of the mail screen and consist of HTML text and/or graphics,including hyperlinks. Multiple ads are also supported on atime–sharing basis. IMail Server cycles through up to 1000 ads,changing the displayed ad every 30 seconds.
System Requirements
The Web Messaging Option must be installed on the host where theIMail Server for Windows NT software is installed.
The Web Messaging Option requires a frames–capable browser suchas the latest versions of Microsoft’s Internet Explorer or Netscape’sNavigator. Older versions of browsers may not support frames.
Installing or Upgrading the Web MessagingOption
You install the Web Messaging Option on the system that containsyour IMail Server for Windows NT installation.
To install the Web Messaging Option:
1. Log on as System Administrator or to an account with SystemAdministrator privileges.
2. Insert the IMail Server Web Messaging Option diskette in adiskette drive.

4 Options User’s Guide
IMail Server for Windows NT
3. Select Run from the File menu, and then enter the diskette pathfollowed by install.exe. For example:
a:install.exe
Follow the on–screen instructions.
4. Select the destination directory. The default is: c:\IMail andshould be the same directory in which you installed IMail Serverfor Windows NT.
5. Select the desired installation option.
Initial InstallationUpdate previous installation
Select “Initial Installation” if you have never installed the WebMessaging Option.
Select the “Update previous installation” option if you havepreviously installed the Web Messaging Option and do not wantto lose configuration parameters for the service.
The installation program copies the files, installs the Web Messagingserver and starts the server. It also installs the Web MessagingManager and creates an icon for it in the IMail Server for WindowsNT program group.
Files Installed
The Web Messaging Option installation places the following files onyour system:
iwebmsg.exe The Web Messaging server.
iwebmsg.txt Release notes for the Web Messaging Option.
iwebmgr.exe Executable file for the Web Messaging Manager.
iwebmgr.hlp Help file for the Web Messaging Manager.
iwebmgr.exe Executable file for the Web Messaging Manager.
web Directory for Web Messaging support files.

5Web Messaging Option
IMail Server for Windows NT
Removing the Web Messaging Option
To remove the Web Messaging Option:
1. Log on as System Administrator or to an account with SystemAdministrator privileges.
2. Insert the IMail Server Web Messaging Option diskette in adiskette drive.
3. Select Run from the File menu, and then enter the diskette pathfollowed by install.exe. For example:
a:install.exe
The installation program states that you are installing the WebMessaging Option and asks if you want to continue.
4. Click Yes to continue (though you will not be installing theoption again).
5. Select the Remove installation option.
The Web Messaging entries are removed from the Windows NTregistry and services database.
6. Delete the associated files from the IMail Server directory. Seethe section “Files Installed” for a list of the files. Select anddelete the Web Messaging icons in the IMail Server for WindowsNT program group.

6 Options User’s Guide
IMail Server for Windows NT
Setting Up Web Messaging
To set up the Web Messaging Option, you need to:
• Set the port number for the Web Messaging server
• Set user access to Web Messaging
Setting the Port Number for the Web Messaging Server
The Web Messaging Option creates a Web server on the IMail Serverhost. The Web server is assigned a Web address that can be used toopen the Web Messaging page from any browser. This Web addressconsists of the hostname of the IMail Server host and a Web serverport number. The default port number is 8383 . For example, if yourIMail Server host is named mailhost1.ipswitch.com, then the Webaddress will be: http://mailhost1.ipswitch.com:8383
If you are not running a Web server on the same host, you can set theport number to the normal HTTP (Web) server port of 80 .
If you have set up multiple virtual hosts on your IMail Server forWindows NT system, you will have a different Web address for eachvirtual host. For example, if you have set up the virtual hosts:
mail.acme.com 156.21.50.78mail.widget.com 156.21.50.80
the Web address for the respective hosts would be:
mail.acme.com:8383mail.widget.com:8383
If you want to change the default port number:
1. In the IMail Server for Windows NT program group,double–click the Web Messaging Manager icon.
The IMail Server Web Messaging dialog box appears.
2. Click the Web Server tab to display the Web Serverconfiguration page.

7Web Messaging Option
IMail Server for Windows NT
3. In the Web Server Port text box, enter a new port number.
This is the port on the local system on which the IMail WebMessaging server will operate. If you change the port, the WebMessaging server must be stopped and restarted.
4. Click the Stop button to stop the Web Messaging server. TheStop button toggles to Start. Click Start to restart the server.
Ipswitch recommends that you enable the Auto Restart Server onExit option. This will cause the Web server to be stopped andrestarted automatically when you click OK (in the WebMessaging dialog box), whenever you make a change thatrequires restarting the server.
Setting Access to Web Messaging Functions
The Web Messaging Option provides access to mail functions basedon the user access assigned in the IMail User Manager. Access to theWeb Messaging Option can be assigned for each individual mailaccount or globally, for all users. A user can be assigned one or all ofthe following access rights:
Allow Web Access
Allows this user access to their account via any Web browser.
Host Administrator
Allows this user to add, modify, or delete users in their currentdomain by using the Web remote administration functions. Host

8 Options User’s Guide
IMail Server for Windows NT
Administrators can also view log files remotely. Allow WebAccess must also be selected.
IMail System Administrator
Allows this user to remotely view the spool directory, edit thenews and welcome messages displayed when users log on toWeb Messaging, and read recent IMail Server news posted byIpswitch product development. Allow Web Access must also beselected.
To set access to the Web Messaging Option for an individual usermail account:
1. In the IMail Server for Windows NT program group,double–click the IMail User Manager icon.
The IMail User Manager window appears.
2. Select the userid from the list of users. The User Propertiesdialog box appears.
3. Click the Allow Web Access option (make sure it is checked).and then click OK to apply the change and close the window.
4. Optionally, click the Host Administrator or IMail SystemAdministrator options to allow this user access to the extendedmenu options associated with each.
5. Click OK to apply the changes and close the window.
To set Allow Web Access for all users:
1. In the IMail Server for Windows NT program group,double–click the IMail User Manager icon.
The IMail User Manager window appears.
2. From the File menu, select Global User Change. The GlobalChange User Properties dialog box appears.
3. In the Allow user to change information with web front–endsection, select the Yes option (make sure it is checked), and thenclick the Change ALL accounts button to apply the change andclose the dialog box.
9Web Messaging Option
IMail Server for Windows NT
Note:If you change an option within the User Properties dia-log box after you have set a global setting, the changewill override the global setting.
Notes for the System Administrator
The system administrator for the Web Messaging Option should notethe following:
• The Web Messaging Option requires a frames–capable browsersuch as the latest versions of Microsoft’s Internet Explorer orNetscape’s Navigator. Older versions of browsers may notsupport frames.
• Users should be aware that the Web Messaging server connectionmay time out when the mail account has been inactive. A sessionthat is inactive for 12 minutes is placed in a rollover queue thatholds up to 50 users. Thus, on low use systems, essentially theuser’s mail session will never time out.
Because the rollover queue is used, users must click on Logoutto be sure they have logged out of the Web Messaging session.The Logout function will remove the user from the rolloverqueue and the standard connect tables. Users can also clear thebrowser’s history if the browser is in a common use area.
If the server times out while a user is creating a message, the usermay not realize it until clicking the Send button. If they clickSend and the server has timed out, the logon screen will appearand the message will not be sent.

10 Options User’s Guide
IMail Server for Windows NT
• Security for the Web Messaging Option is provided by each mailuser’s userid and password. After reading mail in the browserand then logging off, a user cannot click the browser’s Backbutton to return to a mail message. However, in some browsers,the user could return to a mail message by clicking in the Historylist. In this case, the user could not edit the mail message, butthey could read it.
• The Web Messaging Option is not a mail client and will notdisplay mailboxes that a user has created on their POP3 client.Mailboxes created with an IMAP4 client or the Web MessagingOption will appear.

11Web Messaging Option
IMail Server for Windows NT
2. User Mail Functions
If Allow Web Access is enabled for your mail account, you can logon to the Web Messaging page on the mail server and do thefollowing:
• Display a list of your mailboxes
Mailboxes created from an IMAP4 client or from WebMessaging will appear (as they reside on the server). Mailboxescreated from a POP3 client will not appear, as they reside on theclient system.
• Display a summary of the messages (message headers) in amailbox
• Read, send, delete, forward, reply–to, and print e–mail
• Change your password
• Enter or change finger information
• Set up mail forwarding
• Enter or change your vacation message
Logging on/off Web Messaging
To log on to Web Messaging:
1. In your Web browser, open the Web Messaging page for yourmail server.
Your IMail system administrator can provide the Web address forthe page. The following is an example Web Messaging address: http://mailhost1.ipswitch.com:8383
Note:After opening the Web Messaging page in your Webbrowser, you can save it as a favorite (or hotlist ) item.

12 Options User’s Guide
IMail Server for Windows NT
2. In the UserID text box, enter your mail userid.
3. In the Password text box, enter your mail password.
4. Click Logon.
If there is a news message, it appears on a separate page. You canread the news and then scroll to the bottom of the page and clickContinue when you are ready.
Your mailbox list and the menu for accessing mail functionsappear. See the “Reading Mail” section for more information.
Note:If your mail account is inactive for more than 12 min-utes, your session is placed in a rollover queue thatholds up to 50 users. On low use systems, your mailsession is not likely to time out, but if there are manyusers on your system, it may time out.
To log out of your mail account at any time, click Logoff.

13Web Messaging Option
IMail Server for Windows NT
Because the rollover queue is used, users must click on Logoff to besure they have logged out of the Web Messaging session. The Logoutfunction will remove the user from the rollover queue and thestandard connect tables. Users can also clear the browser’s history ifthe browser is in a common use area.
Reading Mail
The Web Messaging menu screen lists your mailboxes and shows themenu items available to you. If you have mail in a mailbox, themailbox name is highlighted.
mailbox list
menu items
The Size shows the total size in bytes for all messages in a mailbox.The Message Count shows the number of messages in a mailbox.Last Modified shows the date and time when the mailbox was lastupdated with new mail.
To display a list of your messages in the current mailbox, click theSummary button. To display messages in another mailbox, click thehighlighted mailbox name. The summary screen appears.

14 Options User’s Guide
IMail Server for Windows NT
The summary screen (shown above) lists messages in the order theywere received. Information provided includes an assigned messagenumber, the number of lines in the message, and From, Date, andSubject fields.
The summary screen displays up to 25 messages. If there are morethan 25 messages, you can click the NextPage button to display thenext 25 messages. Use the PriorPage button to return to the previouslist of 25 messages.
Click the highlighted message number or subject to read a particularmessage.
The read screen (shown below) appears and displays the headerinformation (Date, From, To, Subject) and the contents of the mailmessage.

15Web Messaging Option
IMail Server for Windows NT
When you have finished reading a message, you can:
• Return to the summary by clicking Summary
• Go to the next message in the mailbox by clicking Next
• Go to the previous message in the mailbox by clicking Prior
• Forward the message to another user by clicking Forward andthen entering a forwarding e–mail address
• Reply to the sender of the message by clicking Reply and thenentering a reply
• Delete the current message by clicking Delete
• Display the menu screen by clicking Menu
• Log off of Web Messaging by clicking Logoff
• Print the message by selecting Print from the File menu

16 Options User’s Guide
IMail Server for Windows NT
Reading a Message with an Attachment
The Web Messaging Option lets you receive a message with anattached file and open and read the attachment. The message willdisplay the attached file as a link. You can click the link to open it inthe browser window, or right–click to display the pop–up menu. Youcan use your browser’s Save As function to save the attachment as afile. To return to the mail summary, click your browser’s Backbutton.
You can decode and read a message that has been translated touuencode or MIME formats. These formats are used to translate abinary file to text (ASCII) format in order to send the file using ane–mail system. The Web Messaging Option will decode the message(convert it back to binary) so you can read it in its original form.
Supported formats for attachments include uuencoded,quoted–printable, and base64.
Displaying Web Pages
If a mail message contains a full Internet address, it will be displayedas a highlighted hyperlink, which you can click to go to the linkedWeb page. The Web page displays within the Web Messaging page.You can click your browser’s Back button to return to the mailmessage.
Deleting Messages
To delete the current message, click Delete while reading themessage.
To delete multiple messages:
1. Display the summary screen to list the messages in the mailbox.
2. Click the check box (make sure it is checked) next to eachmessage that you want to delete, and then click Delete.

17Web Messaging Option
IMail Server for Windows NT
Sending Mail
When creating a mail message, be aware that the Web Messagingserver connection may time out after 12 minutes (depending on thenumber of users on your system). If the server times out while youare creating a message, you may not realize it until you click theSend button. If you click Send and the server has timed out, thelogon screen will appear and the message will not be sent.
To send a mail message:
1. Click the Send button. The send mail screen appears.
2. In the To: text box, enter one or more recipients. Separate eachrecipient with a comma.
For each recipient, you need to enter either an IMail Serveruserid or a full Internet e–mail address, depending on whetherthe recipient is on your local system or network or on a remotesystem.
3. In the CC: text box, enter any recipients to whom you want tosend a copy of the message.

18 Options User’s Guide
IMail Server for Windows NT
4. In the Subject: text box, enter a brief description of the subject .
The description you enter in this text box will appear in themessage header that gets displayed in the recipient’s mailbox.
5. In the edit window below the Subject: text box, enter the bodyof the message.
The edit window supports cut, copy, and paste through theright–mouse popup menu and by the cut (Ctrl–X), copy(Ctrl–C), and paste (Ctrl–V) keystrokes.
The edit window can handle a message size approximately equalto 18 pages of a word processing document. You cannot attachdocuments or files to a message.
You can add Web–based text and graphics to your message. Seethe following section for more information.
6. Click the Send button below the edit window. A confirmationmessage is displayed.
Adding Web–based Text and Graphics to a Mail Message
You can use HTML code to add Web–based text and graphics to ane–mail message. If you enter a complete Web address in the text ofyour message, the address will display as a highlighted hyperlink.The recipient of this message can click on the hyperlink to go to theassociated Web page.
You can also enter any HTML code, identified by the start and endtags (<HTML> ... </HTML>) in a mail message to display the textand graphics as they appear on a Web page. Graphics files must be in.gif format. If the graphics file contains a link, the recipient can clickon the graphic to display the associated Web page.
For example, the following code was used to embed the IMail logo inthe Web message shown below:
<HTML><IMG SRC=”HTTP://www.ipswitch.com/images/imails.gif”></HTML>

19Web Messaging Option
IMail Server for Windows NT
If you want to embed HTML source code and have it viewable assource code, you can replace the start and end tags with <!––HTML>and <––/HTML>.
Creating a Mailbox
Your Main mailbox is available when you first log on to WebMessaging. Other mailboxes created from an IMAP4 client or fromWeb Messaging will appear (as they reside on the server). Mailboxescreated from a POP3 client will not appear, as they reside on theclient system.
You can create a new mailbox on the IMail Server host by specifyinga mailbox name when you send a message. When creating a mailmessage, you can enter a userid and mailbox name in the To: text boxin the format userid–mailbox (for example, fred–web). If the webmailbox does not exist for userid fred, it will be created. Anymailboxes created through Web Messaging will be available throughWeb Messaging or an IMAP4 client. You will not see the mailbox ina POP3 mail client.

20 Options User’s Guide
IMail Server for Windows NT
Changing your Password
To change your password:
1. Click the Change Password item.
2. In the Password text box, enter a new password. The passwordcan be from 4 to 30 characters and cannot contain spaces.
3. In the Confirm password text box, enter the password again toconfirm it.
4. Click Save.
Changing User Information
The User information you enter is provided in response to an LDAPrequest, if the LDAP server is enabled. The LDAP server provides adirectory service in which remote users can look up the informationthat you provide (such as username, full name, organization, andtelephone number).
To change user information:
1. Click the Change User Information item.
The User Information page appears.
2. Enter or change any of the information.
3. Click the Hide User From Info Services if you do not want thisinformation to be available to remote users (through an LDAPclient).
4. Click Save.
21Web Messaging Option
IMail Server for Windows NT
Entering Finger Information
The Finger information you enter (known as the Finger Plan) isprovided in response to a Finger request, if the Finger server isenabled. To enter or change Finger information:
1. Click the Change Finger item.
2. Enter or edit any information for the Finger Plan in the textwindow.
3. Click Save.
The presence of information in the text window activates the FingerPlan. If the text window is left empty, the Finger Plan is disabled.
Setting Mail Forwarding
You can set a forwarding e–mail address to which all of your mailwill be sent.
1. Click the Change Mail Forwarding Information item.
2. Enter an e–mail address.
You can enter either an IMail Server userid or a full Internete–mail address, depending on whether the forwarding address ison your local system or network or on a remote system. Thee–mail address must be a complete mail address that is validfrom the IMail Server host system.
3. Click Save.
This feature is disabled if the text box is empty.

22 Options User’s Guide
IMail Server for Windows NT
Entering a Vacation Message
The vacation message will be sent once to each use that sends youmail. To enter or change a vacation message:
1. Click the Change Vacation Message item.
2. Enter a message. You can enter up to 1000 characters.
3. Click Save.
The presence of a message in the text window activates the vacationmessage. If the text window is left empty, the vacation message isdisabled.

23Web Messaging Option
IMail Server for Windows NT
3. Administration Functions
An extended menu containing remote administration functions isavailable to you if your mail account has Host Administrator and/orIMail System Administrator access enabled. See “Setting Access toWeb Messaging Functions” for how to set access for users.
• Host Administrator Functions
If your mail account has Host Administrator and Allow WebAccess enabled, you can display a list of mail users and aliases,and add, delete, and modify users and aliases. You can also viewlog files remotely.
• IMail System Administrator Functions
If your mail account has IMail System Administrator andAllow Web Access enabled, you can view the spool directory,edit the news and welcome messages displayed when users logon to Web Messaging, and read recent IMail Server news postedby Ipswitch product development.
IMail System Administratorfunctions
Host Administratorfunctions
The following section describes how to use the remote administrationfunctions.
24 Options User’s Guide
IMail Server for Windows NT
Adding, Modifying, and Deleting User MailAccounts
You can add, modify, and delete user mail accounts via the Webbrowser.
To add a user mail account:
To add users using remote administration from a Web browser, youruser mail account must have both IMail System Administrator andAllow Web Access enabled.
1. In your Web browser, open the Web Messaging page for yourmail server and log on to your mail account.
2. Click the User Administration item.
The User and Alias Administration screen appears.
3. Click the Add User button.
4. In the UserID text box, enter a user name (this will be the useridfor the mail account).
A userid must be from 3 to 30 characters and must be createdfrom the character set of digits and letters. It cannot containspaces. The userid must be unique within the system.
5. In the Fullname text box, enter the user’s full name.
6. In the Password text box, enter a password for the user.
Passwords can be from 4 to 30 characters and cannot containspaces.
Confirm the password you entered by entering it again in theConfirm Password text box.

25Web Messaging Option
IMail Server for Windows NT
7. In the Max Mailbox Size text box, enter the maximum size (inbytes) for each mailbox created in the user’s mail account. If amailbox exceeds the maximum, any new mail for the mailbox isreturned to the sender. Entering zero means the size will beunlimited.
8. In the Max Num Messages text box, enter the maximum numberof messages (the total for all mailboxes created in the user’s mailaccount). If the maximum is exceeded, any new mail for the useris returned to the sender. Entering zero means the number will beunlimited.
9. Click Save to add the user. The userid is added to the list ofregistered users.
Any users you have added can now receive mail through IMailServer for Windows NT at the specified host (domain name). Forexample, if you added the user fred to the virtual host for thedomain ipswitch.com, the user can now receive mail addressed [email protected].
To modify or delete a user mail account:
1. Select a mail account by doing one of the following:
• Enter a userid and click the Display User button
• Click List Users to display a list of registered users, and thenselect a user name from the list and click Display
The user mail account information is displayed.
2. Select one of the menu items to make changes:
Click the Change Password item to change the user’s password.
Click the Change User Information item to modify the user’sFullname, Max Mailbox Size, or Max Num Messages.
Click the Delete user item to delete the mail account.

26 Options User’s Guide
IMail Server for Windows NT
Adding, Modifying, and Deleting Aliases
IMail Server for Windows NT supports three types of aliases:
• Standard aliases that point to an e–mail address on the localsystem, a remote system, or another alias
• List aliases that point to a file containing a list of mail addresses
• Program aliases that point to an executable program on the hostsystem
To add an alias:
1. Click the User Administration item.
The User and Alias Administration screen appears.
2. Click the Add Alias button.
3. In the Alias text box, enter a name for the alias.
Alias names are limited to 45 characters and must be createdfrom the character set of digits and letters. The underline (_) andhyphen (–) characters are valid. The name cannot contain spacesand must be unique within the system.
4. In the Destination text box, enter one of the following:
Standard Alias
A standard alias can point to a single userid on the same system,multiple userids on the same system, a remote e–mail address,multiple e–mail addresses, another alias, or any combination ofthe same.
List Alias
A list alias points to a file that contains a list of valid mailaddresses, one per line.

27Web Messaging Option
IMail Server for Windows NT
Program Alias
A program alias points to a program that can accept the mailmessage for further processing. The message is passed to theprogram by passing the full pathname of a temporary file as thelast argument on the command line when the program isinvoked.
5. After entering the alias properties, click OK to add the alias. Thenew alias is added to the list of registered aliases.
To modify or delete an alias:
1. Select an alias by doing one of the following:
• Enter an alias name and click the Display Alias button
• Click the List Aliases button to display a list of the definedaliases, and then select an alias from the list and clickDisplay.
The alias information is displayed.
2. In the Destination text box, make any changes to the alias.
3. Click Save to apply the changes.
Click the Delete alias item to delete the selected alias.
Viewing Monitor and System Logs
If you have Host Administrator access, you can view the followingIMail Server log files.
• Monitor Access Log — shows each access attempt to the IMailWeb Messaging server and to the IMonitor web server.
• Monitor System Log — shows logons to the mail server and tothe IMonitor web server and shows the status of services.

28 Options User’s Guide
IMail Server for Windows NT
• IMail System Log — shows IMail Server send and receive mailtransactions. This shows the contents of syslog.txt.
• IMail Syslog Log — records transaction and debug informationwhen enabled in each of the servers (for example, POP3 andSMTP). This shows the contents of lognnnn.txt, the System LogService file.
Viewing the Spool Directory
If you have IMail System Administrator access, you can view theIMail Server spool directory to check on mail activity. The spooldirectory shows all IMail Server send and receive mail transactionsthat are in process. Click the View Spool Directory menu icon todisplay the spool information.
Reading Recent IMail Server News
If you have IMail System Administrator access, you can click theRecent IMail News menu item to display the Web page whereIpswitch reports information on new releases, bug fixes, andworkarounds.
Customizing the Web Messaging Option
You can customize the Web Messaging Option by changing the textand graphics displayed on some of the Web Messaging screens. Youcan edit the Welcome Message, Title and Tail on the logon screen.
You can also edit the News of the Day, which appears on a separatepage before the menu screen.
You can make these changes from the Web Messaging Manager,which is installed in the IMail Server for Windows NT programgroup on the IMail Server host.
You can also make changes to the Welcome Message and the NewsMessage remotely from a Web browser. These capabilities are part ofthe extended menu displayed to Web Messaging users who haveIMail System Administrator access enabled.
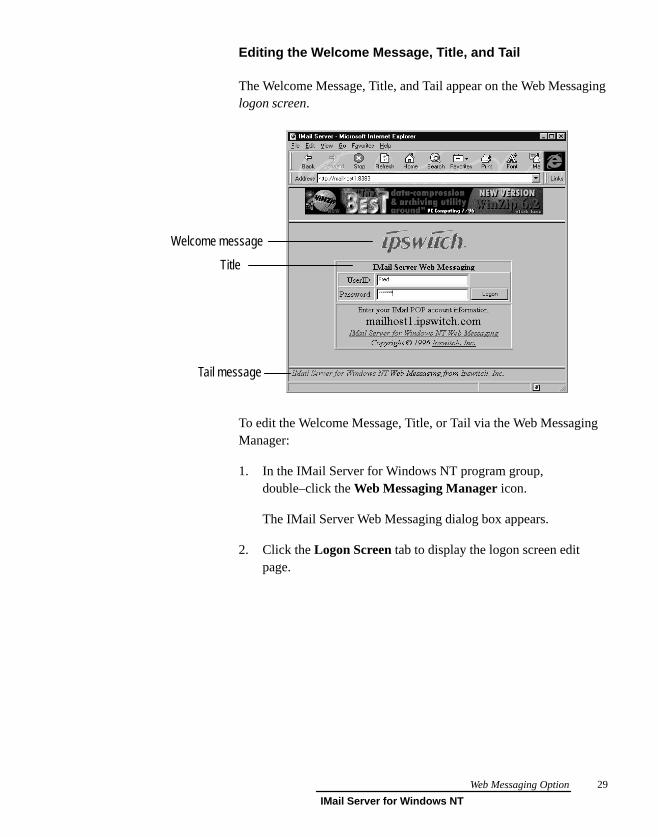
29Web Messaging Option
IMail Server for Windows NT
Editing the Welcome Message, Title, and Tail
The Welcome Message, Title, and Tail appear on the Web Messaginglogon screen.
Welcome message
Title
Tail message
To edit the Welcome Message, Title, or Tail via the Web MessagingManager:
1. In the IMail Server for Windows NT program group,double–click the Web Messaging Manager icon.
The IMail Server Web Messaging dialog box appears.
2. Click the Logon Screen tab to display the logon screen editpage.

30 Options User’s Guide
IMail Server for Windows NT
3. Make any changes to Welcome Message, Title, or Tail.
Welcome Message
You can enter up to 1000 characters of plain text and/or rawHTML code in this edit box. The message will be displayed inthe main logon screen above the logon form. The messagepersists across reboots. The contents of this edit box are saved inthe file mailwelc.txt on the IMail Server host.
A nice screen can be created with the following HTML code:
<center><p><h1><img src=”my_logo.gif”alt=”My Company”></h1><p>
User <center> to center everything on the screen. User <br>to cause line breaks in your message.
Note:
Both the size of the Welcome Message and the HTMLcode you use (such as <center> ) affect the placementof the login form on the logon screen.
Title
You can enter up to 100 characters of plain text, limited to oneline, in this edit box. The Title is displayed as a single lineimmediately above the logon form and on some other screens.
Tail
This message will be displayed in the frame at the bottom of themain logon screen if you have Ad Support enabled.
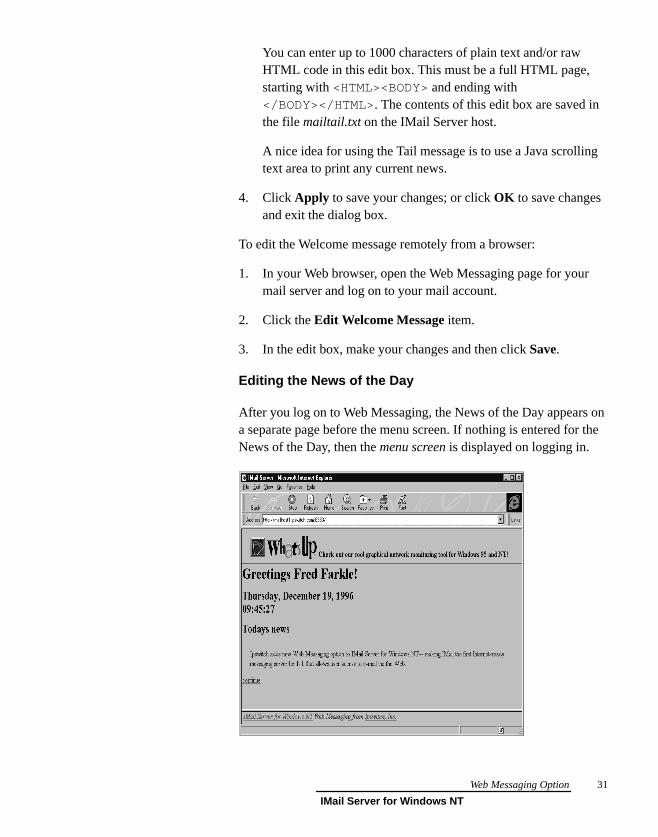
31Web Messaging Option
IMail Server for Windows NT
You can enter up to 1000 characters of plain text and/or rawHTML code in this edit box. This must be a full HTML page,starting with <HTML><BODY> and ending with</BODY></HTML>. The contents of this edit box are saved inthe file mailtail.txt on the IMail Server host.
A nice idea for using the Tail message is to use a Java scrollingtext area to print any current news.
4. Click Apply to save your changes; or click OK to save changesand exit the dialog box.
To edit the Welcome message remotely from a browser:
1. In your Web browser, open the Web Messaging page for yourmail server and log on to your mail account.
2. Click the Edit Welcome Message item.
3. In the edit box, make your changes and then click Save.
Editing the News of the Day
After you log on to Web Messaging, the News of the Day appears ona separate page before the menu screen. If nothing is entered for theNews of the Day, then the menu screen is displayed on logging in.

32 Options User’s Guide
IMail Server for Windows NT
To edit the News of the Day via the Web Messaging Manager:
1. In the IMail Server for Windows NT program group,double–click the Web Messaging Manager icon.
The IMail Server Web Messaging dialog box appears.
2. Click the News of the Day tab to display the News of the Dayedit page.
You can enter up to 1000 characters of plain text and/or rawHTML code in this edit box. The contents of this edit box aresaved in the file mailnews.txt. This News message will appearimmediately after logon, on a separate page, before the menuscreen. The News message persists across logons.
3. Click Apply to save your changes; or click OK to save changesand exit the dialog box.
To edit the News message remotely from a browser:
1. In your Web browser, open the Web Messaging page for yourmail server and log on to your mail account.
2. Click the Edit News Message item.
3. In the edit box, make your changes and then click Save.

33Web Messaging Option
IMail Server for Windows NT
Editing the “ No Page Error” Message
While reading a mail message with the Web Messaging Option, youcan click a hyperlink to display the linked Web page. If the linkedWeb page is unavailable or not found, the browser displays a “NoPage Error” message. You can enter text or HTML code to beappended to this error message. This may be used to inform users togo to a different server or different port for standard pages.
To edit the “No Page Error” message:
1. In the IMail Server for Windows NT program group,double–click the Web Messaging Manager icon.
The IMail Server Web Messaging dialog box appears.
2. Click the No Page Error tab to display the No Page Error editpage.
You can enter up to 1000 characters of plain text and/or rawHTML code in this edit box. The contents of this edit box aresaved in the file mailerr.txt. The message persists across logons.
3. Click Apply to save your changes; or click OK to save changesand exit the dialog box.
Displaying Online Advertisements
If you purchased Web Messaging with Online Advertisements, youcan set up the Web Messaging page to display advertising the entiretime end–users are reading mail via the browser interface.
Ads are displayed at the top of the mail screen and consist of HTMLtext and/or graphics, including hyperlinks. Multiple ads are alsosupported on a time–sharing basis. With Ad Support enabled, IMailServer cycles through up to 1000 ads, changing the displayed adevery 30 seconds.
To enable ad support:
1. In the IMail Server for Windows NT program group,double–click the Web Messaging Manager icon. The WebMessaging Manager dialog box appears.

34 Options User’s Guide
IMail Server for Windows NT
2. Click the Ad Support tab to display the Ad Support page.
3. Click the Enable Ad Support check box (make sure it ischecked).
Uncheck this box to disable ad support.
To create or edit an online advertisement:
1. In the Ad Support page in the IMail Messaging Manager, use theslider to select the ad you want to create or edit (ads arenumbered 1 through the number of the last ad).
2. Enter the HTML code and text for the ad in the text box andclick Apply.
The ad can contain up to 500 characters of HTML code. It candisplay a .gif file and can link to a Web address (URL).
If the ad is larger than the frame size, a scroll bar will appear onthe right side of the frame. Thus, an ad can be a full Web page.
You can enter up to 1000 ads using the interface. The ad displayed onthe Web Messaging page will be changed every 30 seconds.
The ads you entered are saved in the file ads.txt. If you prefer to usean editor rather than the Web Messaging Manager interface, you canenter and edit ads by opening ads.txt in an editor. There is no imposedlimit to the number of ads if you enter them manually in the ads.txtfile.

Part 2: Mail to Pager/Beeper Option
This section describes the Mail to Pager/Beeper Option, which is an add–on capability for IMail Server for Windows NT.

36 Options User’s Guide
IMail Server for Windows NT
37Mail to Pager/Beeper Option
IMail Server for Windows NT
4. Setting Up and Using the Mail to Pager/Beeper Option
You can purchase the Mail to Pager/Beeper option as a separate add–on capability to IMail Server for Windows NT.
The Mail to Pager/Beeper option lets you create aliases on the IMailServer that your mail users can then use to send a message to a pageror notify you by beeper when a message arrives. For example, youcan create an alias named “PageFred” and define a pager ID andphone number for the alias. Users can then address mail to to thealias“PageFred” and the IMail Server will route the message to thespecified pager.
This chapter describes how to set up and use this option on the IMailServer for Windows NT system.
Installing IMail Pager/Beeper Support
To install IMail Pager/Beeper Support:
1. Log on as System Administrator or to an account that has SystemAdministrator privileges.
2. Insert the IMail Pager/Beeper Support diskette in a drive.
3. Select Run from the File menu, and then enter the diskette pathfollowed by install.exe. For example:
a:install.exe
4. Select the Install/upgrade installation option.
5. Select the Program folder in which you want to install the IMailPager/Beeper Support programs. The default is the IMail folder.

38 Options User’s Guide
IMail Server for Windows NT
The setup program installs the IMail Pager/Beeper Support filesin the IMail directory and creates icons for the IMail Pager/Beep-er Support program, the release notes, and help file.
6. Click Finish to exit the installation program.
Removing the Mail to Pager/Beeper Option
To remove the Mail to Pager/Beeper Option:
1. Log on as System Administrator or to an account with SystemAdministrator privileges.
2. Insert the IMail Server Mail to Pager/Beeper Option diskette in adiskette drive.
3. Select Run from the File menu, and then enter the diskette pathfollowed by install.exe. For example:
a:install.exe
The installation program states that you are installing the Mail toPager/Beeper Option and asks if you want to continue.
4. Click Yes to continue (though you will not be installing the op-tion again).
5. Select the Remove installation option.
The Mail to Pager/Beeper entries are removed from the WindowsNT registry and services database.

39Mail to Pager/Beeper Option
IMail Server for Windows NT
Setting Communications Properties
Before using an alias for a pager or beeper message, you need to setthe communications properties for connecting to a modem.
1. In the IMail Server for Windows NT folder, click the IMail PagerClient icon. The first time you run the program, the Beeper/PagerClient window appears and displays the Communications Setupdialog. Subsequently, you can access the Communications Setupdialog by selecting Properties from the File menu.
2. Make sure the communications properties for your modem areset correctly. When you have set the properties, click OK .
In the top half of the Communications Setup dialog box, youconfigure the beeper communications. In the bottom half, youconfigure the pager communications.
For beepers, enter the information in the Beeper section of thedialog box:
Dial String
The default dial string is: ATE1QOV1DT%s,,,,%s# The first 10 characters are modem commands for “CommandEcho Off” (EO), “Result Codes On” (QO), and “Verbal Results”(V1). The first %s is replaced by the phone number and the se-cond %s is replaced by the beeper code.
40 Options User’s Guide
IMail Server for Windows NT
Most modems and beepers support the use of ’#’ to terminate themessage and ’* ’ to print out a dash. Each comma specifies a onesecond wait. You may find a need to increase the number ofcommas in the dial string if it dials the code too soon or decreasethe number of commas if it waits too long.
Baud Rate
Select the speed (measured in bits per second) at which the serialport will communicate with the modem.
COM Port
Select the port to which your modem is attached.
Timeout
The timeout value determines how long the system waits aftersending the last character before it hangs up the phone, if a tran-sition is not recognized.
For pagers, enter the information in the Alpha Pager section ofthe dialog box:
Modem Initialization String (ATEOQOV1)
The default string is ATEOQOV1X4F1. What is expected in thisstring are the modem commands for “Command Echo Off” (EO),“Result Codes On” (QO), and “Verbal Results” (V1). The recom-mended string to use is: ATEO QO V1
Baud Rate
Select the speed (measured in bits per second) at which the serialport will communicate with the modem.
COM Port
Select the port to which your modem is attached.
Maximum Size
This sets the maximum number of characters in the pager mes-sage.
Parity
The TAP protocol requires the 7,E,1 setting for communications,but if your pager uses 8,N,1 you can select the setting.

41Mail to Pager/Beeper Option
IMail Server for Windows NT
Adding, Modifying, and Deleting Pager/BeeperAliases
You add, modify, and delete pager or beeper aliases from the Beeper/Pager Client main screen.
To add an alias for a beeper or pager:
1. If you have multiple e–mail domains, use the Host drop–downlist to select the virtual host to which you want to add the alias.
2. Click the New button. The New dialog box appears.
3. Enter an alias for the beeper or pager address and click OK . ThePager/Beeper Definition dialog box appears.

42 Options User’s Guide
IMail Server for Windows NT
4. Select the alias type: Pager or Beeper
The properties that appear in the Pager/Beeper Definition dialogbox are different depending on the alias type selected. If you se-lect Beeper, the Password property is replaced by the NumericMessage property.
5. Enter the following beeper/pager information.
Phone number
Enter the phone number to dial.
Password
Enter the pager password, if required.
Pager ID
Enter the pager identification number.

43Mail to Pager/Beeper Option
IMail Server for Windows NT
Numeric Message
Enter a numeric code to send to the beeper. This can be any codethat you want to use for identifying that a message has arrived.When the recipient receives this beeper code, they will know tocheck their e–mail for a message. (You specify where the e–mailis sent in the Deliver Copy To property.)
Deliver Copy To
Check this option and enter an e–mail address if you want tosend a copy of the message to a user mailbox.
If a message is sent to a beeper alias, you must use this option todeliver the message to the user. The beeper code will alert theuser that they have a new mail message.
If a message is sent to a pager alias, the message is forwarded toa pager up to the Maximum Size (number of characters) speci-fied in the Communications Setup dialog box. To ensure the re-cipient has access to the full message, you can use the DeliverCopy To option.
6. Click OK to add the alias to the list.
To modify an alias for a beeper or pager, select the beeper or pageralias in the list, and click the Modify button.
To delete an alias for a beeper or pager, select the beeper or pageralias in the list, and click the Delete button.
Sending a Message to a Pager/Beeper
After the alias is set up, any user can send a message to a pager byentering the specified alias in the To: field of the message. The pagerwill receive up to the Maximum Size (number of characters) of amail message. The maximum Size is specified in the Communica-tions Setup dialog box (1024 characters is the default).
If a user sends a mail message to an alias defined for a beeper, thepredefined beeper code is sent to the beeper, alerting the recipient thatthey have received a new mail message.

44 Options User’s Guide
IMail Server for Windows NT

Part 3: Mail to Fax Option
This section describes the Mail to Fax Option, which is an add–on capability for IMail Server for Windows NT.

46 Options User’s Guide
IMail Server for Windows NT

47Mail to Fax Option
IMail Server for Windows NT
5. Setting Up and Using the Mail to Fax Option
You can purchase the Mail to Fax option as a separate add–on capa-bility to IMail Server for Windows NT.
The Mail to Fax option lets you set up a mail account on the IMailServer system that can receive mail from a mail client and forwardit to a preconfigured Fax address. For example, you can create analias named “FaxHome” and define a pager ID and phone numberfor the alias. Users can then address mail to “FaxHome” and theIMail Server will route the message to the specified Fax.
The Mail to Fax option also supports “dynamic aliasing,” which letsusers enter a Fax phone number when they create the mail message.
This chapter describes how to set up and use this option on the
IMail Server for Windows NT system.
Installing IMail Fax Support
To install IMail Fax Support:
1. Log on as System Administrator or to an account that has Sys-tem Administrator privileges.
2. Insert the IMail Fax Support diskette in a diskette drive.
3. Select Run from the File or Start menu, and then enter the dis-kette path followed by install.exe. For example:
a:install.exe
The IMail Fax Support installation wizard appears.
4. Click Next to display the installation options.
InstallUpgradeRemove from system

48 Options User’s Guide
IMail Server for Windows NT
5. Select the Install option for a new installation or the Up-grade option if you are upgrading a previous installation.
6. Click Next.
The setup program installs the IMail Fax Support files andcreates an icon for the IMail Fax Support program in the IMailfolder.
7. Click Finish to exit the installation program.
8. Connect a Fax modem on the IMail Server system.
Before your IMail Server can send a mail message to a Fax, youneed to connect and turn on a Fax modem for the IMail Serversystem.
Setting the Modem Port
The first time you start up IMail Fax Support, it displays a dialogthat prompts you to select the modem port to which your fax mo-dem is attached. You can also access this dialog box at any time tochange the port by selecting Ports from the Settings menu.
1. In the IMail Server for Windows NT folder, click the IMail FaxSupport icon. The Fax Server window appears and displays theModem Ports dialog box.

49Mail to Fax Option
IMail Server for Windows NT
2. Select the port to which your fax modem is attached, and thenclick the Check button.
The IMail Fax Support program checks to make sure a fax mo-dem is available on the port. If a Fax modem is not connectedfor your IMail Server system, IMail Server cannot send mail toa Fax machine.
Adding a Mail to Fax Alias
To add an alias for a Fax:
1. In the IMail Server for Windows NT folder, click the IMail FaxSupport icon. The Fax Server window appears.
If a Fax modem is not connected, IMail Server cannot sendmail to a fax.
2. If you have multiple e–mail domains, select the virtual host towhich you want to add the alias.
3. Click the New button. The New dialog box appears.

50 Options User’s Guide
IMail Server for Windows NT
4. Enter the alias that you want users to send mail to (for Faxtransmission) and click OK .
The Modify FAX Alias dialog box appears.
5. Enter the following Mail to Fax information:
Alias name
This is the alias name you entered in the New Alias dialog box.
Fax number
Enter the phone number of the Fax machine to dial when thisalias receives mail. Do not use spaces, dashes, or parentheses inthe Fax phone number.
Use Dynamic Sending
You use this option to make the alias a dynamic dialing alias.The Advanced button is used to set access to the dynamic dial-ing alias. See the section, “Setting Up and Using DynamicDialing Aliases” for more information.
This option is only available for the primary host. You cannotcreate dynamic dialing aliases on a virtual host.

51Mail to Fax Option
IMail Server for Windows NT
Maximum number of retries
Enter the maximum number of times to retry sending the Faxmessage when a send error (such as number busy, line error, nodial tone) is received. When maximum is reached, IMail Serverstops resending and notifies the sender of the failure.
Use Cover Page
Select this option and enter or select the file name of the faxcover page that you want to send with all messages sent to thefax alias. You can click the Create/Edit button to use the CoverPage Editor to create or modify a fax cover page. See the sec-tion “Creating and Modifying Fax Cover Pages” for more in-formation.
Deliver copy of message to
If you want to send an e–mail copy of the Fax message, checkthis option and enter an e–mail address. You can select localusers from the drop–down list.
Include from header
Check the mail message header items that you want to includein the Fax message.
6. Click OK to add the alias to the list.
To modify an alias for a Mail to Fax, select the alias in the list, andthen click the Modify button.
To delete an alias for a Mail to Fax, select the alias in the list, andthen click the Delete button.
Creating and Modifying Fax Cover Pages
The Cover Page Editor provides an interface for creating and edit-ing Fax cover pages. When you define a Fax alias, you can specify acover page to be attached at the beginning of any message sent tothat Fax alias.
The cover page is converted to a tif image file before being sent to aFax machine.

52 Options User’s Guide
IMail Server for Windows NT
To create or modify a cover page:
1. Create a new alias or modify an existing alias.
The Modify Fax Alias dialog box appears.
2. Check the Use Cover Page option, and then click the Create/Edit button. The Cover Page Editor screen appears.
3. In the Cover Page File Name box, enter a name for the coverpage.
The file extension .cpg will be appended to the name you enter.
4. Optionally, in the Use Graphic box, enter the name of a file tobe used as a background graphic on the cover page. Click theBrowse button to search your system for a file.
The graphics file will be positioned in the lower left corner ofthe cover page. The graphic is placed in the background so thatany cover page text prints over the graphic.
The graphic file must be a monochrome (black and white, orgreyscale) BMP, TIF, or PCX file. The maximum size for thebackground graphic is 1728 by 1600 pixels (200 dpi verticalresolution).
5. Select the Current Section from the drop–down list, and enterthe information you want to appear in that section in the editwindow.

53Mail to Fax Option
IMail Server for Windows NT
The Fax Cover Page is divided into five sections: Top, UpperMiddle, Middle, Lower Middle, Bottom. You can enter up tofive lines per section. Within a section, you can enter text orany of the cover page variables listed below the edit window.
For example, if you want the To, From, and Subject lines of themessage sent to the Fax alias to appear at the top of the page,select the Top section, and then enter the following variables inthe edit window:
%r%s%u
Use the Alignment options (Left, Center, Right) to set how theinformation in the Current Section is aligned. (Note that theseoptions do not affect the background graphic.)
6. Click Ok. The cover page file name appears next to the UseCover Page option.
Setting Up and Using Dynamic Dialing Aliases
If the host for which you are creating a Mail to Fax alias is the “pri-mary host ,” you can use the dynamic dialing alias option to set upan alias and let users enter the Fax dial–up number when they createa mail message. The “primary host” is the host name associatedwith your Windows NT system’s IP address.
Note:
You cannot set up a dynamic dialing alias for a virtualhost. Dynamic dialing can only be used on the primaryhost.
After you set up dynamic dialing aliases, users can create a mailmessage and enter the Fax phone number in the subject line or inthe first line of the body of the message to send mail to a particularFax.

54 Options User’s Guide
IMail Server for Windows NT
To set up a dynamic dialing alias:
1. Create a new alias, or if you want to modify an existing alias tomake it a dynamic dialing alias, select it and click Modify.
The Modify Fax Alias dialog box appears.
2. Check the Use Dynamic Sending option.
When this option is selected, users must specify a Fax numberin either the subject line or the first line of the body of the mes-sage using the following syntax:
FAXNUM=telephone_number
where FAXNUM is all capitals and there are no spaces betweenFAXNUM and the last digit of the specified telephone number.
3. Optionally, click the Advanced button and set up the Fax prop-erties to be used for this dynamic dialing alias. The DynamicSending Options dialog box appears.
55Mail to Fax Option
IMail Server for Windows NT
Password
Enter a password here to restrict access to the dynamic dialingalias. Users must supply this password on the same line as theFAXNUM entry, using the following syntax:
PASSWD=password
where PASSWD is in all capitals and there are no spaces be-tween the work PASSWD and the end of the specified pass-word. (Spaces are used as field delimiters here).
Files to be attached
Enter the file names for any files that you want to send withevery fax that is sent to this alias. You must enter the full pathfile name and separate multiple file names with a plus sign (+)character. No spaces are allowed in this text box.
You can use only files with the following extensions: .bmp,.pcx, .dcx, .tif, .txt, .tmp, .fmf and .fmp. Files with .bmp, .pcx,.dcx, .tif extensions must be monochrome graphics. Files with.txt, .tmp extensions must be ASCII text files. Files with .fmfand .fmp extensions are files that are already in fax format.
Files with extensions other than those described above willcause the entire fax to fail and an error message will be re-turned to the sender. If you have set this alias up to send an e–mail copy of the fax to a user mail account, the attached fileswill not be sent with the mail message.
You can set up Access Restrictions and Dialing Restrictionsfor this alias by clicking on either button. See the section “Set-ting Access and Dialing Restrictions for Dynamic Aliases.”
4. Click OK to save your changes.

56 Options User’s Guide
IMail Server for Windows NT
Setting Global Properties for All Dynamic Aliases
There are some properties you can set up as the host default for alldynamic aliases. To display these properties, select Dynamic Dial-ing from the Settings menu. The Dialing Properties for DynamicDialing Aliases dialog box appears.
You can set the following global properties:
Access Number
If you have to dial an access number to get an outside line beforedialing the fax number, enter it here. This number will be dialedbefore any number received dynamically is dialed. Note that theAccess Number applies only to dynamic dialing aliases, you muststill specify an access number within the Fax phone number fornon–dynamic aliases.
Long distance prefix
Enter a prefix to match against a dynamic dialing number to deter-mine if the call is long distance or not. Dialing numbers that matchany of the prefixes specified here will be denied.
Local area code
Enter a prefix to match against a dynamic dialing number to deter-mine if the call is within the local area code. If the Use area codecalls in local area code option is not checked, then area codesmatching the local area code are removed from the dynamic dialingnumber before it is dialed. If the option is checked, then the dynam-ic dialing number is left intact.

57Mail to Fax Option
IMail Server for Windows NT
Setting Access and Dialing Restrictions for DynamicAliases
You can set up access and dialing restrictions to be used as the de-fault for all dynamic dialing aliases, or you can set restrictions on aper alias basis. Any properties set up for a particular dynamic dial-ing alias will override the global defaults.
To set up restrictions for all dynamic dialing aliases, select Dynam-ic Dialing from the Settings menu. The Alias Properties dialog boxappears. In this dialog box, you can select Access Restrictions andDialing Restrictions.
To set up restrictions for a specific dynamic dialing alias, select thealias and click the Modify button. In the Modify Fax Alias dialogbox, click the Advanced button. The Dynamic Sending Optionsdialog box appears. In this dialog box, you can select Access Re-strictions and Dialing Restrictions.
Access Restrictions let you restrict access to dynamic aliases bysetting the domain names that the alias will accept messages fromor deny messages from. For example, you can enter “com” in the“Deny Access for these domain names” list to deny messages fromsenders in any .com domain, and enter ipswitch.com to the “Per-mitted Access to these domain names” list to let any senders fromipswitch.com send to this alias while denying all other .com ad-dresses. Setting the default action will tell the server what to dowith other domains, such as .edu or .net. These matches are gooddown the hostname, but will not check userids.
To set access restrictions:
1. Click the Access Restrictions button. The Access Restrictionsdialog box appears.
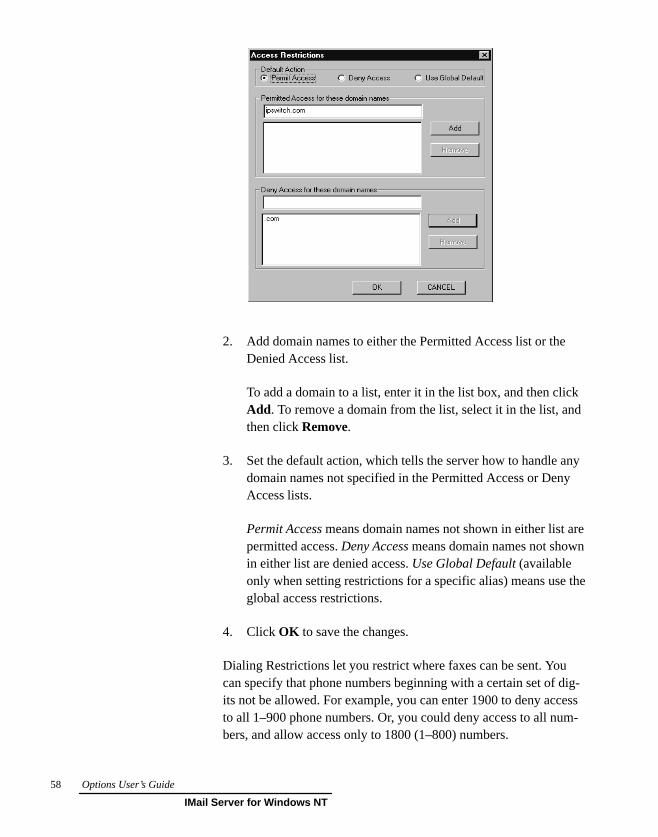
58 Options User’s Guide
IMail Server for Windows NT
2. Add domain names to either the Permitted Access list or theDenied Access list.
To add a domain to a list, enter it in the list box, and then clickAdd. To remove a domain from the list, select it in the list, andthen click Remove.
3. Set the default action, which tells the server how to handle anydomain names not specified in the Permitted Access or DenyAccess lists.
Permit Access means domain names not shown in either list arepermitted access. Deny Access means domain names not shownin either list are denied access. Use Global Default (availableonly when setting restrictions for a specific alias) means use theglobal access restrictions.
4. Click OK to save the changes.
Dialing Restrictions let you restrict where faxes can be sent. Youcan specify that phone numbers beginning with a certain set of dig-its not be allowed. For example, you can enter 1900 to deny accessto all 1–900 phone numbers. Or, you could deny access to all num-bers, and allow access only to 1800 (1–800) numbers.

59Mail to Fax Option
IMail Server for Windows NT
To set dialing restrictions:
1. Click the Dialing Restrictions button. The Dialing Restrictionsdialog box appears.
2. Add phone numbers to either the Permitted Dialing list or theDenied Dialing list.
To add a phone number to a list, enter it in the list box, and thenclick Add. To remove a phone number from the list, select it inthe list, and then click Remove.
3. Set the default action, which tells the server how to handle anyphone numbers not specified in the Permitted Dialing or DenyDialing lists.
Permit Number means phone numbers not shown in either listare permitted access. Deny Number means phone numbers notshown in either list are denied access. Use Global Default(available only when setting restrictions for a specific alias)means use the global access restrictions.

60 Options User’s Guide
IMail Server for Windows NT
4. Set the Long Distance Dialing action.
Allow Long Distance means allow dialing of all long distancenumbers. Deny All Long Distance means deny dialing of alllong distance numbers. Use Global Permissions (available onlywhen setting restrictions for a specific alias) means use theglobal dialing permissions.
5. Click OK to save the changes.
Sending Mail to a Fax Alias
After you have set up a fax alias on the IMail Server for WindowsNT system, users can send mail from any mail client to the alias,and the mail message will automatically be routed to the Fax (pro-vided a Fax modem is configured for the IMail Server system). Theuser needs only to specify the Fax alias in the To: field when creat-ing the mail message.
Attachments
Users can attach MIME–encoded and UUENCODE files to the mailmessage and IMail Server will translate them for fax transmission.You can use only files with the following extensions: .bmp, .pcx,.dcx, .tif, .tmp, .fmf, and .fmp. Files with .bmp, .pcx, and .tif exten-sions must be monochrome graphics. Files with .txt, .tmp extensionsmust be ASCII text files. Files with .fmf and .fmp extensions arefiles that are already in fax format.
If an encoded attachment has an unsupported file name, it will notbe included in the fax, but a notice to this effect will appear in thetext portion of the message. If an encoded attachment has a sup-ported file name extension, but is in fact an unsupported type (i.e. acolor graphic), the entire fax will fail.

61Mail to Fax Option
IMail Server for Windows NT
Sending Mail to a Dynamic Dialing Alias
To send mail to a dynamic dialing alias, users must do the follow-ing:
• Specify the Fax alias in the To: field when creating a message.
• Enter the Fax dial–up number in the Subject: field or in the firstline of the body of the message using the following syntax:
FAXNUM=telephone_number
where FAXNUM is all capitals and there are no spaces betweenFAXNUM and the last digit of the specified telephone number.
• If you created a password for the dynamic dialing alias, enterthe password on the same line as the FAXNUM entry, using thefollowing syntax:
PASSWD=password
where PASSWD is in all capitals and there are no spaces be-tween PASSWD and the end of the specified password. (Spacesare used as field delimiters here.)
Viewing the Fax Queue Files
To view the faxes in the queue, select Queue from the View menu.
If there are faxes in the queue, you can select one to display theheader information. You can select one or all faxes in the queue andselect to send them. Only one instance can try to send a fax at atime, so if the fax process has already started, you will receive amessage. Each time a fax is successfully sent, the current processchecks the queue for another fax to send.
You can select a fax in the queue and select to remove it.
If there are no messages in the queue, a message states that there areno messages.

62 Options User’s Guide
IMail Server for Windows NT

63Index
IMail Server for Windows NT
Index
�
�""/#00� ��� 4# �""/#00
�"3#/1'0#*#+10� ��� ,+)'+#�"0
�)'�0#0� ���""'+%� ��"#)#1'+%� ��*,"'$6'+%� ��
�11�!&*#+10� ��
�
##-#/� �����') 1, ##-#/�-�%#/ ,-1',+
/,40#/0 02--,/1#"� �
�
!&�+%'+% -�004,/"� ��
�
"#)#1'+% *�')� �� ��
�
���� �����') 1, ��� ,-1',+
$')#0 '+01�))#"�
�'+%#/ '+$,/*�1',+� !&�+%'+%���
$,/4�/"'+% *�')� �� ��
$/�*#0� �
�
%), �) 20#/ !&�+%#�
%/�-&'!0� '+ *�') *#00�%#0��
�
�,01 �"*'+'01/�1,/� �� ��
����0#+"'+% 0,2/!# !,"#� ��20'+% '+ *�') *#00�%#0� � 20'+% '+ �#40 *#00�%#� ��20'+% '+ �, ��%# �//,/� ��20'+% '+ ,+)'+# �"0� �20'+% '+ ��') *#00�%#� ��20'+% '+ �#)!,*# *#00�%#�
��
&6-#/)'+(0� ��
�
���') �#/3#/ �#40� �
���') �601#* �"*'+'01/�1,/� � ��
���') �0#/ ��+�%#/�
'+01�))�1',+� �/#*,3'+%� 2-%/�"'+%� �
�-04'1!& -/,"2!10� 3'
���� '+$,/*�1',+� !&�+%'+%���
),% $')#0� 3'#4'+%� ��
),%,$$� ��
),%,+� ��
),%,+ 0!/##+��')� ����') *#00�%#� ���'1)#� ��� ���#)!,*# *#00�%#� ��� ��
*�') �!!,2+10�""'+%� �"#)#1'+%� �*,"'$6'+%� �
*�') 02**�/6� ��
��') 1, ##-#/�-�%#/� -/,-#/71'#0� ��
��') 1, ##-#/�-�%#/ ,-1',+�""'+% �+ �)'�0� ��� �0#12-� ��
��') 1, ��� ,-1',+� �8 ��""'+% �+ �)'�0� �8 �'+01�))'+% ��� 02--,/1� �0#11'+% �!!#00� �0#11'+% %), �) -/,-#/1'#0�
�0#11'+% 1&# *,"#* -,/1� 0#11'+% 2- "6+�*'! "'�)'+%�
�3'#4'+% .2#2# $')#0� ��
��') 1, ��5 ,-1',+� 3
��') 1, ��%#/��##-#/ ,-1',+�3
*�') ,5 )'01� ��
*�') ,5#0� !/#�1'+%� ��

64 Options User’s Guide
IMail Server for Windows NT
�
(�0%#�.%(# '�%& '!--�#!-� �
�!1- )" .$! ��3! %.%(#� ��! %.%(# ,!').!&3� ��
�) ��#! �,,), '!--�#!� ! %.4%(#� ��
�
)(&%(! � -� ��5 � !-�,%*.%)(� �
�(&%(! � - �*.%)(� ��
)*.%)(�& *,) /�.-��%& .) ��2� 0��%& .) ��#!,��!!*!,� 0�!� �!--�#%(#� 0
�
*�#!,� �����%& .) �!!*!,�*�#!, )*.%)(
*�#!, %(-.�&&�.%)(� ,!')0%(#���
*�--1), � �$�(#%(#� ��
*),. (/'�!,�
*,%(.%(# � '!--�#!� �
�
,!� %(# '�%&� ���..��$'!(.-� �
,!').! � '%(%-.,�.%)(� ��5��
"!�./,!-� �
,!')0%(# %(-.�&&�.%)(�
,!*&3 .) '�%&� �
�
-!�/,%.3� �� ��-!..%(# /-!, ���!--� �
-!( %(# '�%&� ��
-!./*�
-*))& %,!�.),3� 0%!1%(#� ��
-/''�,3� ���'�%& -/''�,3
-3-.!' � '%(%-.,�.%)(� ��� ,!4').! � '%(%-.,�.%)(��!� �!--�#%(# ��(�#!,
-3-.!' ,!+/%,!'!(.-� �
�
��%& '!--�#!� ! %.%(#� �
.%'!)/.� � ��
�%.&!� ! %.%(#� �
�
/*#,� %(# %(-.�&&�.%)(� �
/-!, ���!--� �
�-!, %("),'�.%)(� �$�(#%(#���
/-!, '�%& ���)/(.-� ���'�%&���)/(.-
�
0���.%)( '!--�#!� �$�(#%(#���
0%!1%(# �!� *�#!- ",)' '�%&��
0%,./�& $)-.-�
1!� � ,!--�
�!� �!--�#%(# ��(�#!,
!-�,%*.%)(� �
�)#)( ��,!!(� �
�!� �!--�#%(# �*.%)(
!-�,%*.%)(� �
%(-.�&&%(#� �
-!..%(# /*�
-!..%(# /-!, ���!--� �
.%'!)/.� ��
�!� �!--�#%(# )*.%)(� 0
1!� *�#!-� 0%!1%(#� �
�!&�)'! '!--�#!
! %.%(#� �
! %.%(# ,!').!&3� ��