F.rs.ttsblad + flikregister - Coinwash.com – Your Coin … Manual W620, W630, W640, W655, W675...
132
DOC. NO. 438.9205-85/07 EDITION 49.2004 W620, W630, W640, W655, W675 Classic SERVICE MANUAL
-
Upload
hoangthien -
Category
Documents
-
view
213 -
download
0
Transcript of F.rs.ttsblad + flikregister - Coinwash.com – Your Coin … Manual W620, W630, W640, W655, W675...
DOC. NO. 438.9205-85/07 EDITION 49.2004
W620, W630, W640,
W655, W675
Classic
SERVICE MANUAL


NOTICE TO SERVICE PERSONNEL
INSTALLATIONImproper installation of Wascomat laundry and wet cleaning equipment can result inpersonal injury and severe damage to the machine.REFER INSTALLATION TO QUALIFIED PERSONNEL!
RISK OF ELECTRIC SHOCKThe equipment utilizes high Voltages. Disconnect electric power before servicing.The use of proper service tools and techniques, and the use of proper repair procedures,is essential to the safety of service personnel and equipment users.REFER SERVICING TO QUALIFIED SERVICE PERSONNEL!
RISK OF PERSONAL INJURYThis equipment contains moving parts, and some components that may have sharp edges.Improper or careless service procedures may result in serious injury to service personnel.REFER SERVICING TO QUALIFIED SERVICE PERSONNEL!
ABOUT THIS MANUALThis manual is intended to provide service guidance to qualified service personnel.Wascomat and its authorized dealers make no determination regarding the qualification ofindividuals requesting this service manual. The service provider assumes all risks inherentto the servicing of this equipment and any risks that arise as result of the lack ofknowledge or ability of any person servicing this equipment.REFER SERVICING TO QUALIFIED SERVICE PERSONNEL!
NOTE:Improper installation or servicing of Wascomat equipment will void themanufacturer's warranty!

Intentionally blank

Service Manual
W620, W630, W640, W655, W675
Classic
WARNING: ALL OPERATING AND MAINTENANCE PROCEDURES SHOWN ON THE NEXTPAGE OF THIS MANUAL MUST BE FOLLOWED DAILY FOR PROPER OPERATION OFYOUR WASCOMAT MACHINE.
PLEASE ENTER THE FOLLOWING INFORMATION AS IT APPEARS ON THE MACHINE(S)DATA PLATE(S).
MAKE CERTAIN TO KEEP THIS MANUAL IN A SECURE PLACE FOR FUTUREREFERENCE.
MACHINE TYPE OR MODEL
MACHINE SERIAL NUMBER(S)
ELECTRICAL CHARACTERISTICS: ________ VOLTS, _______ PHASE, _______ HZ.

Intentionally blank

SAFETY AND WARNINGS SIGNSReplace If Missing Or Illegible
One or more of these signs must be affixed on each machine as indica-ted, when not included as part of the front instruction panel.
LOCATED ON THE OPERATING INSTRUCTION SIGN OF THE MACHINE:
CAUTION1. Do not attempt to open door unitl "Door unlocked" indicator
is lit.
2. Machine must not be used by children.
3. Do not use flammable liquids in this machine.
MACHINE MUST NOT BE USED BY CHILDREN
PRECAUCION1. No intente abrir la puerta hasta que la luz indicadora este
encendida.
2. La maquina no debe ser operado por ninos.
3. No use liquidos inflamable en la lavadora.
LAS MÁQUINAS NO DEBEN SER USADAS POR NIÑOS

IMPORTANT SAFETY INSTRUCTIONSIMPORTANTES MESURES DE SECURITEWARNING -To reduce the risk of fire, electric chock, or injury to persons when using your appliance:
AVERTISSEMENT -Pour réduire les risques d´incendie, de choc électrique ou de blessure quand, I´appareil est utilisé:
1. Read all instructions before using the appliance.Lire toutes les instructions avant d’utiliser l’appareil.
2. This machine must be securely bolted to the floor according to the installation instructions.Ce machine doit être visseé sur le plancher selon les instructions d’installation.
3. This machine MUST be serviced and operated in compliance with manufacturers instructions. CHECK DOORLOCKS EVERY DAY FOR PROPER OPERATION TO PREVENT INJURY OR DAMAGE. IF THE DOOR LOCKFAILS TO OPERATE PROPERLY, PLACE THE MACHINE OUT OF ORDER UNTIL THE PROBLEM ISCORRECTED.IL FAUT QUE cette appareil soit entretenue et actionnée conformement aux instructions du fabriquant. CONTROLEZ LASERRURE DE PORTE TOUS LES JOURS AFIN DE EVITER DES DOMMAGES OU DES RISQUES PERSONNELLES. SI LASERRURE DE PORTE NE FONCTIONNE PAS, IL FAUT METTRE LA MACHINE HORS SERVICE JUSQU’Á LEPROBLEME SOIT CORRIGÉ.
4. Do not wash articles that have been previously cleaned in, washed in, soaked in, or spotted with gasoline,drycleaning solvents, or other flammable or explosive substances, as they give off vapors that could ignite orexplode.Ne pas laver des articles qui ont été nettoyés ou lavés avec de l’essence, des solvants pour nettoyage à sec ou d’autressubstances inflammables ou explosives, ou que l’on a fait tremper dans ces produits. Ces substances dégagent des vapeurs quipeuvent s’enflammer ou exploser.
5. Do not add gasoline, dry-cleaning solvents, or other flammable or explosive substances to the wash water. Thesesubstances giveoff vapours that could ignite or explode.Ne pas ajouter d’essence, de solvants pour nettoyage à sec ou d’autres substances inflammables ou explosives à l’eau delavage. Ces substances dégagent des vapeurs qui peuvent s’enflammer ou exploser.
6. Under certain conditions, hydrogen gas may be produced in a hot-water system that has not been used for 2 weeksor more. HYDROGEN GAS IS EXPLOSIVE. If the hot-water system has not been used for such a period, beforeusing a washing machine, turn on all hot-water faucets and let the water flow from each for several minutes. Thiswill release any accumulated hydrogen gas. As the gas is flammable, do not smoke or use an open flame duringthis time.De l’hydrogène peut être produit dans un système à eau chaude qui n’a pas été utilisé depuis deux semaines ou plus.L’HYDROGÈNE EST EXPLOSIF. Si le système à eau chaude n’a pas été utilisé depuis un certain temps, ouvrir tous lesrobinets d’eau chaude et laisser l’eau couler pendant plusieurs minutes avant d’utiliser une laveuse, l’hydrogène accumulé, lecas échéant, s’échappera. L’hydrogène étant inflammable, ne pas fumer ou utiliser un appareil à flamme nue pendant que l’eaucoule.
7. Do not allow children to play on or in the appliance. Close supervision of children is necessary when the applianceis used near children.Ne pas permettre aux enfants de jouer sur ou dans l’appareil. Surveiller ètriotement les enfants lorsqu’ils se trou vent près del’appareil qui fonctionne.
8. Before the appliance is removed from service or discarded, remove the door.Avant de mettre l’appareil hors service ou de jeter, retirer la porte.
9. Do not reach into the appliance if the tube is moving.Ne pas mettre la main dans l’appareil lorsque la cuve bougent.
10. Do not install or store this appliance where it will be exposed to the weather.Ne pas installer ou placer cet appareil dans un endroit où il sera exposé aux intempéries.
11. Do not tamper with controls.Ne pas trafiquer les commandes.
12. Do not repair or replace any part of the appleance or attempt any servicing unless specifically recommanded in theuser-maintenance instructions or in published user-repair instructions that you understand and have the skills tocarry out.Ne pas réparer ou remplacer les pièces de l’appareil ou procéder à l’entretien de celui-ci sauf si les instructions visantl’entretien et les réparations qui doivent être effectués par l’utilisateur le spécifient, si vous comprenez bien ces instructions etsi vous possédez lesconnaissances nécessaires.
MANUFACTURED BY WASCATORDISTRIBUTED BY WASCOMAT INWOOD, NEW YORK, USA

NOTICE TO: OWNERS, OPERATORS AND DEALERS OF WASCOMAT MACHINES
II
IMPROPER INSTALLATION AND INADEQUATE MAINTENANCE, POOR HOUSEKEEPING AND WILLFULNEGLECT OR BYPASSING OF SAFETY DEVICES MAY RESULT IN SERIOUS ACCIDENTS OR INJURY.TO ASSURE THE SAFETY OF CUSTOMERS AND/OR OPERATORS OF YOUR MACHINE, THE FOLLO-WING MAINTENANCE CHECKS MUST BE PERFORMED ON A DAILY BASIS.
NOTICE À L’ATTENTION DES PROPRIÉTAIRES, UTILISATEURS ET REVENDEURSDE MACHINES WASCOMATUNE INSTALLATION INCORRECTE ET UN ENTRETIEN INADÉQUAT, DE MÊME QUE LA NÉGLIGENCEOU LA NEUTRALISATION DÉLIBÉRÉES DES DISPOSITIFS DE SÉCURITÉ, PEUVENT ÊTRE CAUSESDE BLESSURES OU D’ACCIDENTS SÉRIEUX. POUR ASSURER LA SÉCURITÉ DES CLIENTS ET/OUDES UTILISATEURS DE VOTRE MACHINE, IL EST INDISPENSABLE DE PROCÉDER CHAQUE JOURAUX CONTRÔLES DE ROUTINE CI-APRÈS.
1. Prior to operation of the machine, check to make certain that all operating instructions andwarning signs are affixed to the machine and legible. (See the following page of this manualfor description and location of the signs.) Missing or illegible ones must be replaced imme-diately. Be sure you have spare signs and labels available at all times. These can be obtai-ned from your dealer or Wascomat.
2. Check the door safety interlock, as follows:
(a) OPEN THE DOOR of the machine and attempt to start in the normal manner:
For coin-operated models, insert the proper coins to start the machine.
For manually operated models, place the ON-OFF switch in the ON position andpress the Start switch.
THE MACHINE(S) MUST NOT START !
(b) CLOSE THE DOOR to start machine operation and, while it is operating, attempt toopen the door without exerting extreme force on the door handle. The door shouldremain locked!
If the machine can start with the door open, or can continue to operate with the doorunlocked, the door interlock is no longer operating properly. The machine must beplaced out of order and the interlock immediately replaced.(See the door interlock section of the manual.)
3. DO NOT UNDER ANY CIRCUMSTANCES ATTEMPT TO BYPASS OR REWIRE ANY OFTHE MACHINE SAFETY DEVICES AS THIS CAN RESULT IN SERIOUS ACCIDENTS.
4. Be sure to keep the machine(s) in proper working order: Follow all maintenance andsafety procedures. Further information regarding machine safety, service and parts can beobtained from your dealer or from Wascomat through its Teletech Service Hotline - 516/371-0700.
All requests for assistance must include the model, serial number and electrical characteristics asthey appear on the machine identification plate. Insert this information in the space provided on theprevious page of this manual.
5. WARNING: DO NOT OPERATE MACHINE(S) WITH SAFETY DEVICES BYPASSED, REWIRED ORINOPERATIVE! DO NOT OPEN MACHINE DOOR UNTIL DRUM HAS STOPPED ROTATING!
AVERTISSEMENT: NE PAS FAIRE FONCTIONNER LA (LES) MACHINE(S) AVEC UN DISPOSITIFDE SÉCURITÉ NEUTRALISÉ, RECÂBLÉ OU NON OPÉRATIONNEL! NE PAS OUVRIR LAMACHINE TANT QUE LE TAMBOUR NE S’EST PAS IMMOBILISÉ!

Intentionally blank

Safety precautions
Technical data
Machine presentation
Regular matintenace
Control unit
Level control
Thermostat
Door and door lock
Motor
Drain valve
Detergent compartment
Heating
Coin-meter
Instruction for pulley and replacing bearings
1
2
3
4
5
11
12
21
22
23
24
25
26
27
28
29
30
31
32
33
34
35
36
37
38
39
40
41
42
43
44
45
46
47
48
49
Overview
Serviceinstructions
Machinecomponents
and parts

Intentionally blank

1
11. Safety precautionsServiceManual
Contents
Safety precautions .................................................................................... 3

Intentionally blank

3
11. Safety precautionsServiceManual
Safety Precautions• The machine is only intended for washing with water.
• Do not allow minors to operate the machine.
• Installation and maintenance work should only be done by authorizedpersons.
• Do not bypass the door lock of the machine.
• Any leaks, e.g. a worn-out door seal, should be repaired immediately.
• Prior to repairs or maintenance, be sure to read the correspondinghandbooks and service manuals.
• Do not flush the machine with water.

Intentionally blank

2. Technical data
Contents
Technical data........................................................................................... 3Connections ......................................................................................... 3

Intentionally blank

3
22. Technical dataServiceManual
W620 W630 W640 W655 W675
85/3.0 130/4.6 180/6.4 250/8.8 330/11.7520/20 1/2 595/23 7/16 650/25 9/16 725/28 9/16 795/31 5/16
52 49 44 44 42528 494 471 446 427
5.4/7.5 7.5/10 13 10.7/18 11/23x x x x xx x x x x
81 81 81 81 81
136/300 175/386 228/503 287/633 330/727
W620 W630 W640 W655 W675
DN20 DN20 DN20 DN20 DN203/4" 3/4" 3/4" 3/4" 3/4"
30-90 30-90 30-90 30-90 30-90200-600 200-600 200-600 200-600 200-600
8-145 8-145 8-145 8-145 8-14550-1000 50-1000 50-1000 50-1000 50-1000
5 5 5 15 1520 20 20 60 60
3 3 3 3 375 75 75 75 75
45 45 45 45 45170 170 170 170 170
DN15 DN15 DN15 DN15 DN151/2" 1/2" 1/2" 1/2" 1/2"
45-90 45-90 45-90 45-90 45-90300-600 300-600 300-600 300-600 300-600
8-115 8-115 8-115 8-115 8-11550-800 50-800 50-800 50-800 50-800
Water valvesconnection
Rec. water pressure psikPa
Functioning limits psifor water valve kPa
Capacity at 45 psi(300 kPa) gallon/min
l/min
Drain valve inchouter Ø mm
Draining gallon/mincapacity l/min
Steam valveconnection
Rec. steam pressure psikPa
Functioning limits for psisteam valve kPa
Connections
Technical data
Innerdrumvolume litres/ft3
diameter mm/inch
Drum speedwash rpmextraction rpm
Heatingelectricity kWsteamhot water
G-factor
Weight, net kg/lbs

2 2. Technical data
4
ServiceManual
in mm A B C D E F G H I K L M N O P R
W620 660 730 1115 355 765 825 45 1030 215 1010 130 830 385 – 100 210
W630 720 790 1200 365 825 910 45 1115 215 1095 130 910 420 – 100 235
W640 750 880 1325 435 915 1035 45 1245 130 1225 210 1040 325 295 100 225
W655 830 955 1410 495 990 1120 45 1330 160 1290 245 1125 325 325 100 265
W675 910 1040 1445 500 1075 1155 45 1365 160 1325 245 1155 280 325 100 210
1 Electrical connection2 Cold water
3 Hot water
4 Steam connection5 Drain
6 Liquid detergent supply
7 Control panel8 Soap box9 Water reuse
10 Door opening, W620: ø 310 mm/12 3/16", W630: ø 395 mm/15 9/16", W640, W655, W675:ø 435 mm/17 1/8"
A
D
C
8
10
7B
E
N
P
R
F
LG
I
1
2
394
5
6
5281 5282 5283
KM
H
5
W620-630
5459
N
G
3L
O
I2
P
69
KM
H
R
F
1
4
5
Rear side
Right sideFront Rear side
W640-675

5
22. Technical dataServiceManual
in inch A B C D E F G H I K
W620 26 28 3/4 43 7/8 14 30 1/8 32 1/2 1 3/4 40 9/16 8 7/16 39 3/4
W630 28 3/8 31 1/8 47 1/4 14 3/8 32 1/2 35 13/16 1 3/4 40 7/8 8 7/16 43 1/8
W640 29 1/2 34 5/8 52 3/16 17 1/8 36 40 3/4 1 3/4 49 5 1/8 48 1/4
W655 32 11/16 37 5/8 55 1/2 19 1/2 39 44 1/8 1 3/4 52 3/8 6 5/16 50 13/16
W675 35 13/16 40 15/16 56 7/8 19 11/16 42 5/16 45 1/2 1 3/4 53 3/4 6 5/16 52 3/16
in inch L M N O P R
W620 5 1/8 32 11/16 15 3/16 – 3 15/16 8 1/4
W630 5 1/8 35 13/16 16 9/16 – 3 15/16 9 1/4
W640 8 1/4 40 15/16 12 13/16 11 5/8 3 15/16 8 7/8
W655 9 5/8 44 5/16 12 13/16 12 13/16 3 15/16 10 7/16
W675 9 5/8 45 1/2 11 12 13/16 3 15/16 8 1/4
A
D
C
8
10
7B
E
N
P
R
F
LG
I
1
2
394
5
6
5281 5282 5283
KM
H
5
W620-630
5459
N
G
3L
O
I2
P
69
KM
H
R
F
1
4
5
Rear side
Right sideFront Rear side
W640-675

2 2. Technical data
6
ServiceManual
Frequency of thedynamic force Hz
Max floor load lbs forceat extraction kN
9.3 8.7 7.9 8.3 7.5
289±747 410±988 675±1277 530±1133 916±22651.2±3.1 1.7±4.1 2.8±5.3 2.2±4.7 3.8±6.0
W620 W630 W640 W655 W675

7
22. Technical dataServiceManual
E/W620
120 V 1 AC 0.65 16200 V 3 AC 0.95 10230-240 V 1 AC 0.75 10240 V 3 AC 0.95 10220 V 3 AC 6.6 20230 V 1 AC 7.2 35230 V 3 AC 7.2 25240 V 1 AC 7.8 35240 V 3 AC 7.8 25
Heating Voltage Total Fusealternative alternative kW A
No heatingor Steamheating
El heating

2 2. Technical data
8
ServiceManual
E/W630
200 V 3 AC 1.3 10220 V 1 AC 0.95 10230 V 1 AC 0.95 10240 V 3 AC 1.3 10440-480 V 3 AC 1.3 10200 V 3 AC 7.3 25230 V 3 AC 3.2 16230 V 3 AC 6.9 25230 V 3 AC 7.3 25230 V 3 AC 9.6 35240 V 3 AC 3.4 16240 V 3 AC 7.9 25240 V 3 AC 10.4 35380 V 3N AC 2.9 10380 V 3N AC 6.3 16380 V 3N AC 6.7 16380 V 3N AC 8.8 16400 V 3/3N AC 3.2 10400 V 3/3N AC 6.9 16400 V 3/3N AC 7.3 16400 V 3/3N AC 9.7 16415 V 3N AC 3.4 10415 V 3N AC 7.9 16415 V 3N AC 10.4 16440 V 3 AC 10.4 16
Heating Voltage Total Fusealternative alternative kW A
No heatingor Steamheating
El heating

9
22. Technical dataServiceManual
E/W640
200 V 3 AC 2.0 10240 V 1 AC 1.7 16240 V 3 AC 1.5 10415 V 3/3N AC 1.5 10200 V 3 AC 9.5 35230 V 1 AC 4.9 25240 V 1 AC 5.3 25230 V 3 AC 12.4 50230 V 3 AC 4.9 20230 V 3 AC 9.8 35240 V 3 AC 5.3 20240 V 3 AC 13.5 50380 V 3N AC 4.5 10380 V 3N AC 8.9 16380 V 3N AC 11.3 20400 V 3/3N AC 4.9 10400 V 3/3N AC 9.9 20400 V 3/3N AC 12.5 25415 V 3N AC 5.3 10415 V 3N 13.4 25440-480 V 13.5 20
Heating Voltage Total Fusealternative alternative kW A
No heatingor Steamheating
El heating

2 2. Technical data
10
ServiceManual
E/W655
200 V 3 AC 2.3 10230 V 3 AC 2.3 10240 V 1 AC 2.1 16240 V 3 AC 2.3 10230 V 3 AC 17.2 50240 V 3 AC 18.7 50380 V 3/3N AC 15.7 35400 V 3/3N AC 17.3 35415 V 3/3N AC 18.6 35440-480 V 3 AC 18.7 35
Heating Voltage Total Fusealternative alternative kW A
No heatingor Steamheating
El heating

11
22. Technical dataServiceManual
E/W675
200 V 3 AC 1.4 10230-240 V 3 AC 1.6 10400 V 3/3N AC 1.4 10
230 V 3 AC 22 63240 V 3 AC 23.9 63380 V 3N AC 20.1 35400 V 3/3N AC 22.2 35415 V 3/3N AC 23.8 35440-480 V 3 AC 23.9 35
Heating Voltage Total Fusealternative alternative kW A
No heatingor Steamheating
El heating

Intentionally blank

3. Machine presentation
Contents
Description ................................................................................................ 3General ................................................................................................ 3
Function .................................................................................................... 4General ................................................................................................ 4Programme unit .................................................................................... 5Door lock .............................................................................................. 6Heating ................................................................................................. 7Water connections ............................................................................... 7Rear control unit ................................................................................... 7Detergent compartment ....................................................................... 8Drain valve ........................................................................................... 8

Intentionally blank

3. Machine presentation 3
3
ServiceManual
5203 A
Fig.
1
1Description
General
The machines covered in this manual include thefollowing models:
Drum volume Model name
(litres) (ft3)
85 3 W620
130 4.6 W630
180 6.4 W640
250 8.8 W655
330 11.7 W675
The machines feature an electromechanicalprogramme unit with fixed washing programmes.
The machines are supplied to customerspecifications with e.g. electric or steam heatingor no heating.
The machines are designed for installation inhotels, laundries (such as apartment buildingsand coin laundries), factories, hospitals, variousinstitutions, etc.

3 3. Machine presentation
4
ServiceManual
5916
Fig.
2
2
Function
General
This section presents a general overview of the functions of the machine.Most functions are then presented in detailed in separate chapters in thisservice manual.
Detergent compartment
Programme unit
Control panel
Door
Door lock
Heating elements
Drain valveFrame
Outer drum
Motor relays
Rear control unit
Motor
Water inlet valves

3. Machine presentation 3
5
ServiceManual
5916
5190
Fig.
3
Fig.
4
3
4
Programme unit
The control panel has a rotary switch forselection of fixed machine programmes and acombined start/pause button with rapid advance.
The programme unit controls the water valves,drain valve and heating via the communicationcard in the rear control unit. This unit can also beconnected to send control signals to externalunits for detergent pumps.
The programme unit of the machine is describedin detail in section 23. Programme unit.
Programme unit
Heatingelement
Voltagesupply
K21
Programme unitA1
Communication card A21
Watervalves
Drainvalve
Drain, water, detergent

3 3. Machine presentation
6
ServiceManual
Fig.
5
Fig.
6
Door lock
The door lock is an electro-mechanical type withdouble safety switches. The lock is bi-stable, i.e.,it needs to receive an active pulse from thecontrol in order both to lock and unlock the door.
A separate printed circuit board, called door lockcontrol, can be fitted onto the programme unit.This board controls locking and unlocking. Thecard has separate checks for empty drum andstopped drum. Together with the checks built intothe programme unit, this guarantees that thedoor cannot be opened by a mistake.
The door lock on the machine is described indetail in section 29. Door and door lock.
6
5191
Door lockcontrol
A31
Levelguard
B2
M1
Door lockA41
Programme unitA1
Motormodule A107
Rotation sensor B3
5
6108
Door lock control
Door lock

3. Machine presentation 3
7
ServiceManual
7Fig.
7
Fig.
7
Fig.
7
Heating
When using electric heating, the water forwashing is heated by three heating elementsaccessible from the front of the machine.
The machine can also be fitted with steamheating using a steam valve fitted on the rear ofthe machine.
The heating system of the machine is describedin detail in section 40. Heating.
Water connections
Depending on the machine size and customerspecifications, the machine has one, two, threeor four inlet valves.
This unit also holds eight connectors for externaldetergent supply.
Rear control unit
This box contains the main power switch or aconnection block for the input voltage, heatingcontactor and a communication card with outputsthat control the water and drain valves of themachine as well as the heating. There are alsoconnection blocks for connection to e.g., anexternal detergent supply.
The rear electric box of the machines isdescribed in detail in section 21. Control unit.
5182, 5916
Water connections
Rear control unit
Heating elements
T1 T2 T3
L1
N
NL2 L3
Main power switch Contactor K21 (heating)
Communicationcard
Supply voltageconnection
3 3. Machine presentation
8
ServiceManual
8Fig.
8
Fig.
8
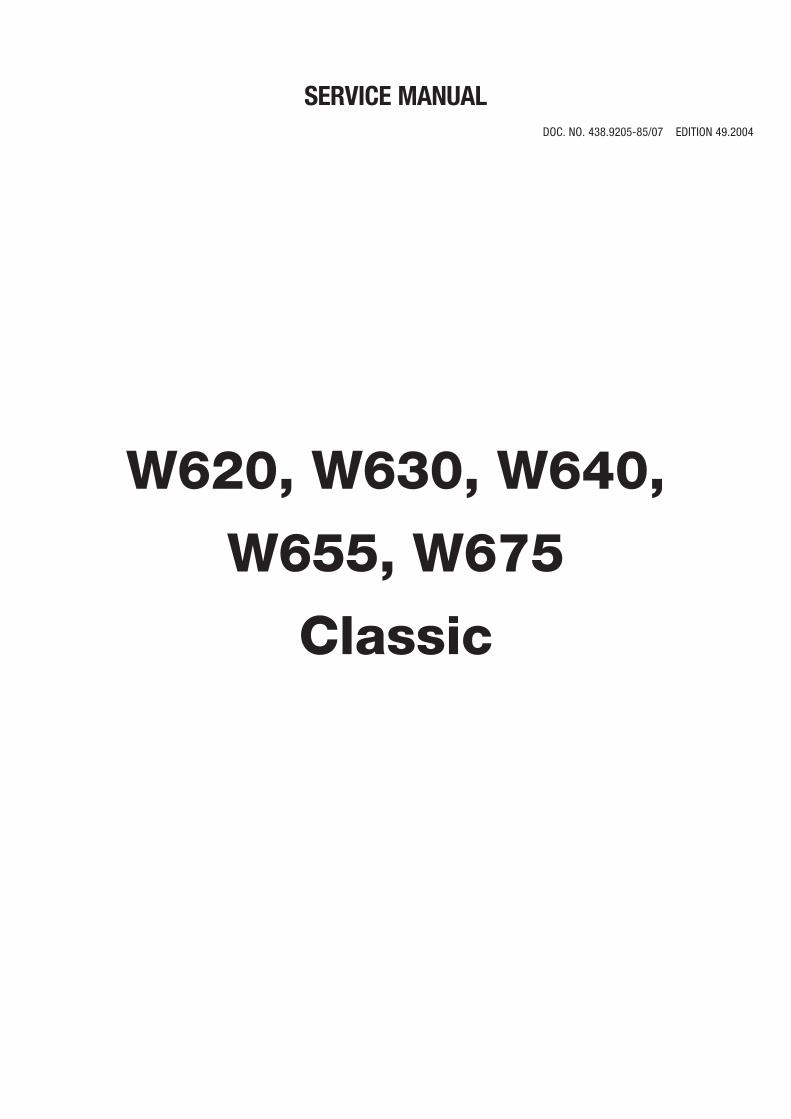
Detergent compartment
The compartment is divided into four for pre-wash, main wash, rinse and bleaching-agent/liquid detergent.
The detergent compartment of the machine isdescribed in detail in section 39. Detergentcompartment.
Drain valve
This valve is a diaphragm valve that opens andcloses by way of the water pressure. The controlvalve is situated next to the water valves.
The drain valve of the machine is described indetail in section 38. Drain valve.
Drain valve
Detergent compartment
5185

11. Regular maintenance
Contents
Daily .......................................................................................................... 3Every third month ...................................................................................... 3

Intentionally blank

11. Regular maintenance 11
3
ServiceManual
To keep your machine in proper working order, follow the preventive maintenancerecommendations provided below.
The maintenance interval should be adjusted according to machine usage. Thesuggested schedule assumes an 8 hour work day, and a 5 day work week..
Daily• Check the door and door lock:
- Open the door and try starting the machine. The machine MUST NOT START.
- Close the door, start the machine and try opening the door. It MUST NOT BEPOSSIBLE TO OPEN THE DOOR WHILE THE MACHINE IS OPERATING!
- Check that the door does not leak.
- Clean the door seal, removing any detergent and fluff.
• Check that the drain valve does not leak during the wash cycle.
• Clean out any detergent remaining in the detergent compartment. Rapid advancethrough a program and let the water rinse the compartment.
• Inspect liquid chemical tubing and connections for leaks. Repair as necessary.
Every third month (refer this service to qualified personnel)
May only be carried out by authorized personnel.
• Check that the door does not leak.
• Check the drain valve and remove any lint.
• Inspect the interior of the machine (during an actual wash cycle to ensure that noleaks are noticed) by:
- Turning of the main power switch of the machine.
- Remove the top cover and the protective front and rear plates.
- Cover the detergent dispenser to prevent water from splashing inside themachine.
- Start a wash program.
- KEEP CLEAR OF MOVING PARTS WHILE MACHINE IS OPERATING!!

11. Regular maintenance11
4
ServiceManual
- Inspect all internal hoses, seals and gaskets for signs of leakage.Repair as necessary.
- Check that water inlet screens are clean of debris. Dirty screensresult in longer fill times, which reduce productivity.
- Inspect the drive belt. Adjust the tension or replace if necessary (seesection 30. Motor).
- Check that there are no signs of leakage on the floor beneath themachine. Locate and repair any leak.
- On heated machines, if the heating time is unusually long, check theheating elements (see section 40. Heating). If the water is very hard,check whether there are lime deposits on the heating elements.Decalcify the elements if necessary. Adapt the amount of delimingagent to the manufacturer’s guidelines.
- Never switch on the heating elements when there is no water in themachine. This will cause the slow-blow fuse to trigger.
- Inspect the shock absorbers and coil springs. (Only EX- andH-model).

21. Control unit
Contents
Description ............................................................................................... 3Function ................................................................................................... 4
Front control unit ................................................................................. 4Program OL02 ..................................................................................... 7Program OL03 ..................................................................................... 9Rear control unit ................................................................................ 11

Intentionally blank

3
2121. Control unitServiceManual
1
Fig.
1
DescriptionThe control unit of the machine consists of the following parts:
• Front control unitThis unit contains an electro-mechanical programme unit A1, a safetycontrol card for the door lock (door lock control A31), thermostat B1,level switch B2 and 4 and rotary switch S5.
• Rear control unitThis module contains the main power switch Q1 with a connection forreceived voltage, the heat contactor K21 and the communication cardA21 with outputs for e.g. external detergent supply.
5925, 5182, 5916
T1 T2 T3
L1
N
NL2 L3
Front control unit
Rear control unit
Q1Main power switch
K21 Heater contactor
A21Communication card
K22 Heater contactor(only larger machines)
X30
X38
X39
X37X28 X31 X27 X33 X34X21
X20
X24
X26
X11 X12 X13 X14
X92 X97X91X90
X93
X95
X96
X94
X99
X98
X161 X160 X36
X111 X112 X113 X114
A31Door lockcontroller
S5Rotary switchprogram selector
B1Thermostat
A1Programme unit
B2Level switch
B4Level switchwash program

21 21. Control unit
4
ServiceManual
2
5925
Front control unit
X30
X38
X39
X37X28 X31 X27 X33 X34X21
X20
X24
X26
X11 X12 X13 X14
X92 X97X91X90
X93
X95
X96
X94
X99
X98
X161 X160 X36
X111 X112 X113 X114
A31Door lockcontroller
S5Rotary switch program selector
B1Thermostat
A1Programmeunit
B2Levelswitch
B4Level switch wash program
Function
Front control unit
Programme unit A1
The programme unit is electromechanical andhas up to 10 fixed programmes (depending onprogram).
The programme unit is described in detail insection 23. Programme unit.
Level guard B2
Control of the water level and turning of the drumare controlled with a backup guard, to ensurethat the door will not open with water in the drumor when the drum rotates.
Apart from a level guard on the programme unitcard, there is a level guard B2, connected to thedoor lock control A31. This card controls doorlocking action as well as the level and drum rpmspeed.
Level guard B4
Controls the water level for low and high level inwash programs.
Thermostat B1
Controls the wash temperature and closes theheating relay or steam valve when selectedtemperature is reached.
Rotary switch S5
Rotary switch for selecting wash program.
Fig.
2
Fig.
2
Fig.
2
Fig.
2

5
2121. Control unitServiceManual
3
5471
Program selector card
Jumpers on program selector cardJumpers are assembled on the program selectorcard. These jumpers can be moved or removedto obtain new functions for the wash programs.
Program OG01
Jumper on A gives a correct function of valveY25 (W3180-3330N, W640-675). Y25 will flush inboth pre wash and in main wash.
Jumper B gives a correct function of valve Y25(W375-3130N, W620-630). Y25 will flush only inpre wash and not main wash.
Jumper on C is bleaching function. It isrecommended when compartment 4 is used forbleaching agent or if bleaching agent is suppliedfrom a pump unit. There will be a flushing incompartment 4 during 30 seconds, 3.5 minutesafter selected temperature is reached. Note! Thepump signal, on connection X72:5 will appear 30seconds before the flushing of compartment 4.
Jumper on D is main wash function. It isrecommended when compartment 4 is used formain wash detergent or if main wash detergent issupplied from pump.
Jumper on F gives a correct function of valveY12 (W3180-3330N, W640-675). There are noY22 valve on these machines.
Jumper on G. (W3180-3330N, W640-675 withonly cold water inlet). The signal for Y25 (hotinlet) will give cold inlet (Y15) instead.
Jumper on H for the machines (W3180-3330N,W640-675) without inlet valve Y35 will give coldinlet (Y15) instead and for the machines (W375-3130N, W620-630) without inlet valve Y35 willgive cold inlet (Y11) in compartment 1 instead.
Jumper I (no heat). On machines without heatingor machines with support heating. The washprogram will not stop and wait for the selectedtemperature.
Fig.
3
Fig.
4

21 21. Control unit
6
ServiceManual
4
6053, 5477
OFF
A
BC
D
60
40
40
40
40
90
60 60
90
30
Program OG01
I H F D C BA
TERMOSTAT
X23 X36 X35 X191
WATERN
O H
EA
T
NO
Y22
NO
Y35
BL
EA
CH
SM
AL
L
DE
T 2
BIG
1 2 3 4 5 6
BOX4 Y25Y35 Y25 Y22 Y14 Y15 Y13 Y12 Y11
1 2 3 4 5 6 1 2 1 2
K21Y51
1 2 3 4 5 6 71 2 3 4 5 1 2 3 4 1 2 3 4 5 6
12X
391
X111 X112 X114X113
NO
Y25
G3
12
X29
1
75 6 76 7
P1

7
2121. Control unitServiceManual
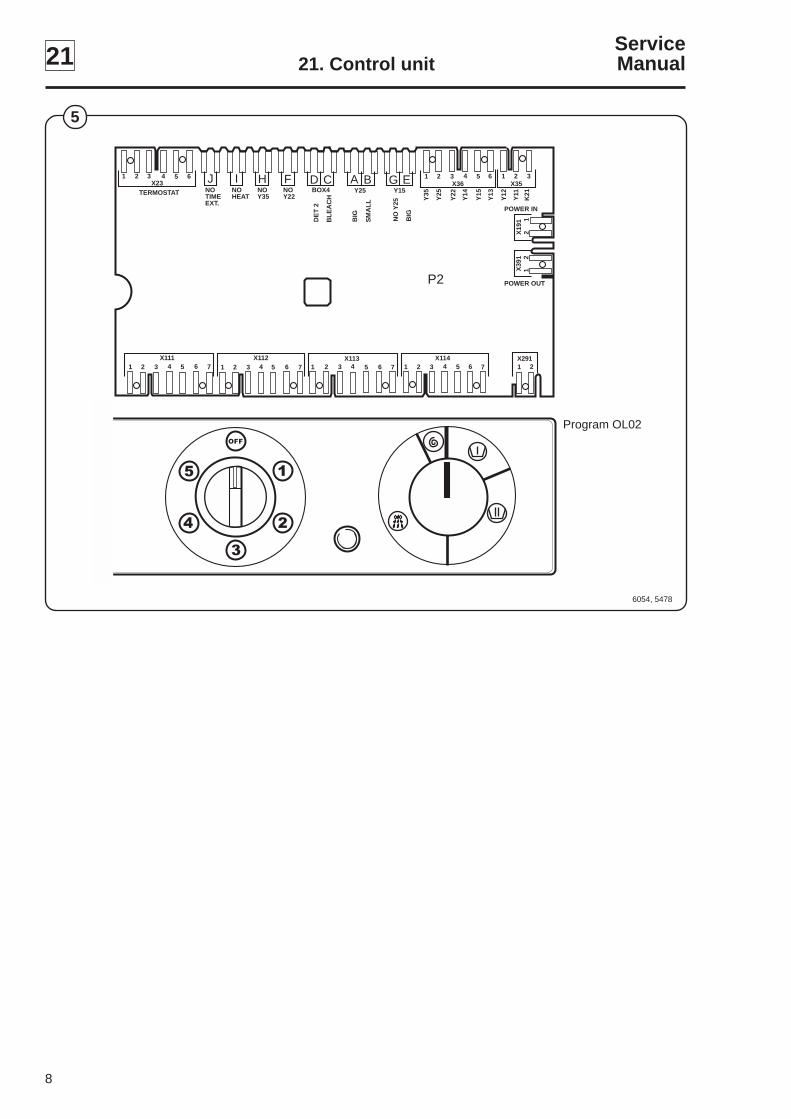
Program OL02
Jumper on A gives correct function of Y25 (W3180-3330N, W640-675).Y25 will flush in pre-wash and in main wash.
Jumper B gives correct function of Y25 (W375-3130N, W620-630). Y25 willflush in pre wash and not main wash.
Jumper on C is bleaching function. It is recommended when compartment4 is used for bleaching agent or if bleaching agent is supplied from a pumpunit. There will be a flushing in compartment 4 during 30 seconds, 3.5minutes after selected temperature is reached. Note! The pump signal, onconnection X72:5 will appear 30 seconds before the flushing ofcompartment 4.
Jumper on D is main wash function. It is recommended when compartment4 is used for main wash detergent of if main wash detergent is suppliedfrom pump.
Jumper on E gives a correct function of valve Y15 (cold water). The valveY15 will open in main wash (W3180-3330N, W640-675).
Jumper on F gives a correct function of valve Y12 (W3180-3330N, W640-675). There are no Y22 valve on these machines.
Jumper on G. (W3180-3330N, W640-675 with only cold water inlet). Thesignal for Y25 (hot inlet) will give cold inlet (Y15) instead.
Jumper on H for the machines (W3180-3330N, W640-675) without inletvalve Y35 will give cold inlet (Y15) instead and for the machines (W375-3130N, W620-630) without inlet valve Y35 will give cold inlet (Y11) incompartment 1 instead.
Jumper I (no heat). On machines without heating or machines with supportheating. The wash program will not stop and wait for the selectedtemperature.
Jumper J (short program). If the jumper isn’t connected the agitation time inthe wash program will be twice as long. Pre wash will be changed from 3 to6 minutes, main wash from 6 to 12 minutes and rinsing time from 1 to 2minutes.
Fig.
5
21 21. Control unit
8
ServiceManual
5
6054, 5478
4
3
15
OFF
2
Program OL02
F BATERMOSTAT
X23 X36
POWER OUT
NO
Y25
BL
EA
CH
SM
AL
L
DE
T 2
BIG
1 2 3 4 5 6
Y25
Y35
Y25
Y22
Y14
Y15
Y13
Y12
Y11
1 2 3 4 5 6 1 2
K21
1 2 3 4 5 6 71 2 3 4 5 1 2 3 4 1 2 3 4 5 6 1 2X111 X112 X113 X114 X291
12
G EY15
D CBOX4
HIJNOY35
NOY22
NOHEAT
NOTIMEEXT.
BIG
X19
1
P2
76 7 5 6 7
12
X39
1
POWER IN
X353

9
2121. Control unitServiceManual
Program OL03
Jumper on A gives correct function of Y25 (W3180-3330N, W640-675).Y25 will flush in pre-wash and in main wash.
Jumper B gives correct function of Y25 (W375-3130N, W620-630). Y25 willflush only in pre wash and not main wash.
Jumper on C is bleaching function. It is recommended when compartment4 is used for bleaching agent or if bleaching agent is supplied from a pumpunit. There will be a flushing in compartment 4 during 30 seconds, 3.5minutes after selected temperature is reached. Note! The pump signal, onconnection X72:5 will appear 30 seconds before the flushing ofcompartment 4.
Jumper on D is main wash function. It is recommended when compartment4 is used for main wash detergent of if main wash detergent is suppliedfrom pump.
Jumper on E gives correct function of valve Y15 (cold water). The valveY15 will open in main wash (W3180-3330N, W640-675).
Jumper on F gives a correct function of valve Y12 (W3180-3330N, W640-675). There are no Y22 valve on these machines.
Fig.
6

21 21. Control unit
10
ServiceManual
6
6055, 5475
washla
vado
rinse
acla
rado
DelicatoPrendasdelicadas
Perm.press Cold
Frio
WarmTemplado
Hot Caliente extractcentrifugado soak pre-lava
do
Program OL03
FX161 X36
1 2 3 4 5 6 1 2 3 4 5 6 7 8
1 2 3 4 5 6 71 2 3 4 5 1 2 3 4 1 2 3 4 5 6X111 X112 X113 X114
DC
P03
EBA1 2 3 4
X160
OPTIONS OPTIONS DISTRIB. CARD
DE
T 2
BO
X4
BL
EA
CH
BO
X4
Y25
SM
AL
L
Y15
BIG
Y25
BIG
76 7 5 6 7
NO
Y22

11
2121. Control unitServiceManual
7
T1 T2 T3
L1
N
NL2 L3
Main power switch Q1 Heating contactor K21
Voltage supplyconnector
Heating contactor K22(only larger machines withsix heating elements)
5182
Front control unit
Main power switch Q1
The main power switch interrupts all receivedpower phases and is placed on the outside of theconnection box cover.
The cover cannot be removed unless the mainpower switch is turned to the 0 position.
The received voltage supply is connected to thelower screw post of the main power switch, alt.the terminal connection.
Heating contactor K21
This contactor is only featured on machines withelectric heating.
It activates the three heating elements at thefront, lower part of the outer drum. It is controlledby the programme unit A1 and thermostat B1.
Heating contactor K22
This contactor is only featured on largermachines.
It activates the three heating elements, with atotal of four circuits, situated at the front, lowerpart of the outer drum. It is controlled by theprogramme unit A1 and thermostat B1.
Fig.
7
Fig.
7
Fig.
7

21 21. Control unit
12
ServiceManual
8
T1 T2 T3
L1
N
NL2 L3
Communication card
5182
Communication card
This communication card contains:
• Fuses F11 and F12 (1.25 A)These protect the received voltage supply forthe programme unit and door lock controller.
• Output connection blocksControl signals for connection to externalsystem such as detergent supply.
Card No. Function
Outputs (110V AC)
X70 see Payment system
X71:1 0 V Door locked (common)
X71:2 L1 Door locked
X72:1 Common
X72:2 Liquid supply 1 (Pre wash)
X72:3 Liquid supply 2 (Main wash)
X72:4 Liquid supply 3 (Softener)
X72:5 Liquid supply 4 (Bleach)
Fig.
8
Fig.
9
9
6052
Card A
X53
X52
X51
X50
X41
X42
X43
X44
X45
X46
X72
X50
X51
Y35
Y25
Y24
Y15
Y13
Y12
Y11
Y14
X71
X70
X81
X47 X48 X49
X81

13
2121. Control unitServiceManual
Fig.
10
Option card
The option card is only available on machineswith programme OL03
10
T1 T2 T3
L1
N
NL2 L3
Option card
5182, 5475
washla
vado
rinse
acla
rado
DelicatoPrendasdelicadas
Perm.press Cold
Frio
WarmTemplado
Hot Caliente extractcentrifugado soak pre-lava
do

21 21. Control unit
14
ServiceManual
5600
11
12
5601, 5602
There are some possibilities to alter the standardparameters in the wash programs by moving oradding jumpers on the option card.
• When adding a jumper on N or M gives warmrinses instead of cold. M shall be used onW375-W3130N, W620-630 and N onW3180N-W3330N and W640-675.
3 spare jumpers
Fig.11
Fig.12

15
2121. Control unitServiceManual
13
5603
14
5604
15
5605
• When adding a jumper on O there will be noprewash in the programs.The timer rapid advances the prewashautomatically. Remember that "Delicate" isalways without prewash.
• When adding a jumper on P there will be tworinses instead of three. The timer rapidadvances the first rinse.
• If the jumper on Q is removed the main washwill be extended by three minutes to nineminutes instead of six.
Fig.13
Fig.14
Fig.15

21 21. Control unit
16
ServiceManual
16
5606
• In standard position on R, low level is used inprewash, main wash and high level in rinses. Ifjumper is moved to S it will be high level also inprewash and mainwash.
Fig.16

26. Level control
Contents
Control and fault tracing ........................................................................... 3Water level check ................................................................................ 4Water level is too high ......................................................................... 4

Intentionally blank

3
2626. Level controlServiceManual
1
1198
The level switch is a pressure sensor controllingtwo different drum water levels by sensing airpressure in a hose connected to the drum’sbottom. When the water rises in the drum andhose, the air in the hose compresses and, at twopreset pressure levels (shut-off levels), twodifferent alternating contacts in the pressuresensor are activated.
When the water drains from the drum, thecontacts switch back to original position, but nowat lower water levels than was required toactivate the contacts when the drum wasbeing filled. These levels are called minimumlevels. If the water level during washing fallsbelow the minimum level, water will be addeduntil the shut-off level is again reached.
Control and fault tracingAll level sensors are factory-set for the variousmachines. As a rule, this setting should not bechanged. For that reason, the level controls aresealed with enamel paint.
A faulty level switch can not be repaired andshould be replaced.
The machine guarantee ceases to be validif the level sensor is tampered with.
Fig.
1
Fig.
2

26 26. Level control
4
ServiceManual
1417
2
2124
2211
12
14
Low levelHigh level
Water level check
Start the machine and select a standardprogram. Check low water level for prewash andmain wash according to the illustration. Advancethe program using the START button andcheck high water level for rinsing.
Water level is too high
• Check that the hose connecting the levelswitch and the drain valve is not obstructed.When necessary and when the machine isempty of water, clean the hose bydisconnecting it from the level switch andblowing air through it.
• Check the hose for holes which can becaused by the hose rubbing against thepulley.
• Overfilling can also be caused by burntcontacts in the level switch. If this is the case,replace the level switch.
Fig.
2

27. Thermostat
Contents
Data ......................................................................................................... 3Description ............................................................................................... 3Repair instructions ................................................................................... 4
Replacing the thermostat .................................................................... 4

Intentionally blank

3
2727. ThermostatServiceManual
1453
16
X123
5977
1DataRange off-on approx. 4°C
Max. temperature for sensor 150°C
Sensor medium Liquid
DescriptionThe thermostat monitors the temperature whilethe machine carries out a program. The heatingelement contactor is controlled using open andclosed contacts.
The thermostat sensor is located at the lowestpoint of the outer drum to the left of the heatingelement. A liquid-filled cable (capillary tube) runsfrom the sensor to the thermostat, located in theautomatic control unit. The water temperaturecontrols the liquid expansion and thereby theactivation of the various thermostat contacts.
Temperature selection (contact selection) (90°C,60°C, 40°C or 30°C) is controlled by theprogrammer and the program selector.
Fig.
1
B1
21
X123 3 4 2 5
31 411130° 40° 60° 90°
14 24 3412 22 32 42 44
16X123

27 27. Thermostat
4
ServiceManual
Repair instructionsAll thermostats are factory-set for the variousmachines. As a rule, this setting should not bechanged. For that reason, the thermostats aresealed with enamel paint.
The machine guarantee ceases to be validif the thermostat is tampered with.
Replacing the thermostat
• Remove the front panel and pull out thethermostat sensor.
• Undo the capillary tube strapping and replacethe thermostat. Install the new capillary tubein the same way as the old one.

29. Door and door lock
Contents
Description ................................................................................................ 3General ................................................................................................ 3
Function .................................................................................................... 4The door lock locks the door ................................................................ 4The door lock unlocks the door ............................................................ 5Error codes ........................................................................................... 6Reset button ......................................................................................... 7Door lock control inputs/outputs ........................................................... 7
Repairs.................................................................................................... 10Emergency opening of door lock ........................................................ 10Replacing the door lock ...................................................................... 11

Intentionally blank

3
2929. Door and door lockServiceManual
Fig.
1
Fig.
2
Description
General
The door locks consists of the following:
• Door lock A111, which contains
- An actuator that locks the door lock andalso has two built-in micro switches, S4aand S4b. The actuator is bi-stable, i.e., ithas two stable positions: locked door andunlocked door. The actuator must receive apulse to lock and unlock the door lock. S4aand S4b are both closed when the door islocked.
- A micro switch S3 that is closed when thedoor is closed.
- An emergency opening arm/emergencyopening button that can be used to openthe door lock in an emergency.
• Door lock controller A31 situated in the frontcontrol unit of the machine. This card controlsthe door lock function and supervises whetherthe drum is empty and not turning. It locks andunlocks the door lock when the programmeunit requests door locking or unlocking.
Actuator (withmicro switch S4aand S4b)
Micro switch S3
X96 (to door lock control A31)
5368, 6112
Emergency opening arm1
X30 (to programmeunit A1)
Emergency opening button
X96 (to door lockcontrol A31)
X30 (to programmeunit A1)
2Door lock controller A31
5184, 5916

29 29. Door and door lock
4
ServiceManual
Fig.
3
3Function
The door lock locks the door
When the door is closed (closed door lock switchS3), the programme unit may request doorlocking by applying a voltage of 110-240 V on thedoor lock controller A31 input X92.
The following check is made by the A31 cardprior to locking of the door:
• No water in drum - input X93 from levelguard B2 is closed = 0 V
• Motor not engaged - input X94 from motorcontrol A107 open = 5 V
• Drum not turning - no pulses on input X95from rotation sensor B3.
When the above conditions are met, the cardA31 outputs a closing pulse on output X96 to thedoor lock actuator/coil, which then locks the door.The micro switches S4a and S4b in the actuator/door lock are closed when the door is locked.These micro switches feed voltage to:
• The output switches on the programme unit.The switches control the machine’s drain andwater valves as well as heater switch-on.
• Interlock signal enables motor operation.
Programme operation is now possible.
Door lockcontrol
A31
Levelguard
B2
M1
Door lockA41
Programmeunit A1
X92 X31
X96X95X93 X30X94
MotormoduleA107
Rotation sensor B3
X304
X302
X27
5191 B
X24

5
2929. Door and door lockServiceManual
Fig.
4
4The door lock unlocks the door
The programme unit requests door unlocking byapplying 0 V on input X92 of the door lockcontroller.
The following check is made prior to unlocking ofthe door:
• No water in drum - input X93 from levelguard B2 is closed = 0 V
• Motor not engaged - input X94 from motorcontroller A107 open = 5 V
• Drum not turning - no pulses on input X95from rotation sensor B3.
When the above conditions are met, the doorlock controller outputs an opening pulse onoutput 96 to the door lock actuator/coil, whichthen unlocks the door. Micro switches S4a andS4b now interrupt the relays/switches. The drain,water valves, heater and motor cannot now beswitched on.
Door lockcontrol
A31
Levelguard
B2
M1
Door lockA41
Programmeunit A1
X92 X31
X96X95X93 X30X94
MotormoduleA107
Rotation sensor B3
X304
X302
X27 X24

29 29. Door and door lock
6
ServiceManual
Fig.
5
5Error codes
The door lock control has three LEDs that showwhether the door lock operates normally orwhether an error has been detected. Duringnormal operation, the LEDs blink when the drumis not turning and are off when the drum rotates.In case of an error, the three LEDs will show theerror condition according to the table below. If anerror disappears, the error code conditiondisappears. If the error is still present at theprogramme end, the error is automaticallycleared after 5 minutes and the door is unlocked.
LEDs Normal operationA B C
● ● ● No error. The drum is not turning(LEDs blinking)
❍ ❍ ❍ No error. The drum is rotating
LEDs Error stateA B C
● ● ❍ Level guard B2 indicates water in drumwhen the door lock is open (input X93not closed).
❍ ● ● Motor control indicates that motor isoperating when door lock is open(input X94 not open).
● ❍ ❍ No signal from rotation sensor B3(frequency input X95 < 0.4 Hz) in spiteof the motor control indicating motoroperation (input X94 open).
❍ ● ❍ No signal from motor control (inputX94 not open) in spite of rotationsensor B3 indicating motor operation(frequency input X95 > 0.4 Hz).
● ❍ ● Error in drive circuits for door lock(output X96) or error in door lock/cableharness for the door lock.
❍ ❍ ● Internal error in the door lock control.
❍ = no lit, ● = lit
LEDsA B C
Reset button
5184

7
2929. Door and door lockServiceManual
Fig.
6
Fig.
5
6Reset button
The door lock control features a reset buttonused to reset the programme routines stored inthe computer. When pressed, any error codesare erased.
Door lock control inputs/outputs
X90: AC 110-240 V AC feed
X91: Transfer of voltage supplyFeeds the voltage to programme unit A1.
X92: Input from programme unit:Lock doorPrior to the door lock control locking the door(output X96), a check is made for any water leftin the drum (input X93 closed) and whether thedrum is not rotating (input X94 open).
Input voltage X96 Function
110-240 V AC: Programme unit requests door locking
0 V: Programme unit requests dooropening
5193
Door lock control A31X90
X91
1
2
1
2
200-240 V
Voltagesupply to A1
Level guardB2
1
2
1 2
1
2
X93
X94
X92
1 2
X31
Programme unitA111
1 3
X304
Motor relays
B3
X95

29 29. Door and door lock
8
ServiceManual
Fig.
7
5193
7X93: Input from level guard
If the input indicates “Water in drum” when thedoor is not locked, the door cannot be locked.The LEDs then show the error code ● ● ❍ .
Input voltage Function X93
5 V DC: Water in drum (level guard open)
0 V: Drum empty (level guard closed)
X94: Input from motor control
If the input indicates “Motor operating”, the doorcannot be locked. The LEDs then show the errorcode ❍ ● ● .
The input signal from X94 is compared with thesignal from the rotation sensor B3 (input X95).
If the motor signal is operating, but the rotationsensor does not provide a signal, the error code● ❍ ❍ is shown.
If the rotation sensor indicates motor rotationwhen there is no motor signal, the error code❍ ● ❍ is shown.
Input voltage Function X94
5 V DC: Motor not operating (input closed)
0 V: Motor operating (input open)
Door lock control A31X90
X91
1
2
1
2
200-240 V
Voltagesupply to A1
Level guardB2
1
2
1 2
1
2
X93
X94
X92
1 2
X31
Programme unitA111
1 3
X304
Motor relays
B3
X95

9
2929. Door and door lockServiceManual
Door lock control A31
X95 1
2
3
Rotation sensorB3
X96
1 2
Door lock A41
Y80
Unlocks + -Locks - +
X96 X95
5184
5194
Fig.
9
Fig.
88
9
X95: Input from rotation sensor on motorshaft
When the motor is operating, a pulse train isapplied on the input.
Input Function
Pin 1: DC 4-10 V feed
Pin 2: 0V
Pin 3: DC 5 V pulse input
X96: Output to door lock
Locks the door lock when the following conditionsare met:
• DC 110-240 V AC on input X92 (programmeunit requests door locking).
• DC 0 V on input X93 (no water in drum).
• DC +5 V on input X94 (motor not operating).
• No pulses on input X95 (drum not rotating).
• No error code present.
Unlocks the door lock when the followingconditions are met:
• DC 0 V on input X92 (programme unitrequests door unlocking).
• DC 0 V on input X93 (no water in drum).
• DC +5 V on input X94 (motor not activated).
• No pulses on input X95 (drum not rotating).
• No error code present.
Voltage Function
17 - 31 V DC, + on pin 1, - on pin 2 Unlocks the door
17 - 31 V DC - on pin 1, + on pin 2 Locks the door

29 29. Door and door lock
10
ServiceManual
Repairs
Repair work on the machine should only bedone by specially trained personnel.
Emergency opening of door lock
1. Take down power from the machine by turningthe main power switch to the 0 position.
2. Remove the front cover or top cover. Whenreplacing the door lock, it is recommended toremove the front cover.
3. Pull the emergency opening arm to the side.This retracts the spring-loaded locking pin andthe door lock opens.Alt. Press down the emergency openingbutton.
4. Reset the emergency opening correctly.
Fig.
10
5369, 6111
10

11
2929. Door and door lockServiceManual
Replacing the door lock
1. Take down power from the machine by turning the main power switch tothe 0 position.
2. Remove the front cover alt. side pole.
3. Remove the door (two screws in each hinge).
4. Remove the front panel.
5. Remove the door lock (three holding screws).
6. Verify the strap positions on the cable for the lock. Cut the necessarystraps to undo the cables leading to the lock.
7. Undo the connectors.
8. Replace the door lock.
9. Reconnect the new (door) lock.
10. Assemble in reverse order.
11. Strap the cables for the lock according to the notes made in step 6.

Intentionally blank

30. Motor
Contents
Warnings ................................................................................................... 3Description ................................................................................................ 4
Motor .................................................................................................... 4Principle wiring ..................................................................................... 5Motor overload protector ...................................................................... 6
Repairs ..................................................................................................... 7Motor replacement ............................................................................... 7
Adjustments .............................................................................................. 8Drive belt tension ................................................................................. 8

Intentionally blank

3
3030. MotorServiceManual
Warnings
DANGERBe careful when measuring capacitors and filter.

30 30. Motor
4
ServiceManual
Fig.
1
1DescriptionMotor
The motor is fitted in a bridge carrier under theouter drum. It drives the washing drum using adrive belt.
The motor is controlled by contactors.
The motor winding is protected againstoverloads using a thermal overheating protectorthat is automatically reset.
The motor is connected directly to the motormodule via a cable with quick connectors.
5467, 5465
Motor
Rotation sensorB3
2
5975
Programme unitA1
Rotationcontrol card
A31
X24
X94 X97
X95
B3
Motor
Contactors
A107
1 or 3-phase
Thermalprotection
X27 X26

5
3030. MotorServiceManual
3
5973
5974
Single phase
Three phase
1K1 2 4
1343
2K2 K4 413
2
Black
Blue
White
21
22
C1-2
K4 White
Black
Blue
21
22
C3-6
C3-6
Aux
Mai
n
Wash speed (18-pole) Extract speed (2-pole)
A Only machines with start switchNote! Some machines may hav overcurrent protection.
This is not shown here.
A
Principle wiring
43
65
21
43
65
21
K1 K2Black
Blue
White
Black
Blue
White
43
65
21
K4
Note! Some motors are possible to change from Y to D-connection to accomodate different voltages.

30 30. Motor
6
ServiceManual
Motor overload protector
The motor is equipped with one or more thermaloverload protectors. The protectors areconnected in series and will trip at atemperature of 150 ± 5°C.
A burned out motor can be re-wound.
Some single-phase machines are also equippedwith a manual resettable overload protectormounted on the extract relay in the motormodule. This overload protector protects themotor during the start-up of the extraction.
4
0304
Fig.
4

7
3030. MotorServiceManual
5
Fig.
5
6
Fig.
6
Repairs
Repair work on the machine should only bedone by specially trained personnel.
Motor replacement
Disassembly
1. Take down power from the machine by turningthe main power switch to the 0 position.
2. Remove the rear cover.
3. Undo the bracket for the drain hose connectorfrom the lower rear piece, then remove therear cover.
4. Undo the ground connection from the motor.
5. Remove the drive belt by pulling the belttowards you while rotating the drum by hand.
6. Undo the motor cable from motor.
7. Undo and remove the motor mounting bolts.
8. Lift out the motor.
Assembly
1. Fit the new motor without locking themounting bolts.
2. Fit the drive belt and adjust the belt tensionwith the tensioner on one side of the motor.Se section Adjustments - Drive belt tension fordetails.
Main power switch
5916
5465
Rotation sensorB3

30 30. Motor
8
ServiceManual
4741
5466
B, C
A
Adjust drive belt tension if values exceedthose shown in the table.
Retaining screw for drive belt tension
Locking nut
Fig.
7
Fig.
8
7
8
3. Connect the new motor to the cable and usestraps to secure the cable.
4. Connect the motor cable to the motor.
5. Fit the lower rear piece and secure the drainhose connection with screws.
6. Fit the upper rear piece.
7. Connect the voltage supply and verify that themotor operates normally.
Adjustments
Drive belt tension
The drive belt is pre-tensioned upon deliveryfrom the factory.
The drive belt tension should be as follows:
Model Force A Post tensioning B New belt C(N) (mm) (mm)
W375N 35 8 6W385N 35 9 8W3105N 40 8 7W3130N 40 8 7W3180N 60 9 7W3250N 68 8 7W3330N 45 8 6
To adjust drive belt tension, first undo the motorretaining screw a couple of turns, then pressdown on the motor to achieve proper tensioning.Lock the locking nut when the tension is correct.Then lock the retaining screw.
Inspection of the drive belt tension is animportant part of general maintenance.
Adjusting screw

38. Drain valve
Contents
Description ................................................................................................ 3Function .................................................................................................... 3Repairs...................................................................................................... 4
Disassembly ......................................................................................... 4Assembling ........................................................................................... 5

Intentionally blank

3
3838. Drain valveServiceManual
DescriptionThe drain valve is situated on a flange at thebottom of the outer drum and can be accessedfrom the front after removing the front cover.The drain valve consists of the following principalparts:
• Lower part with rubber diaphragm.
• Piston and cylinder.
• Pressure plate and recoil springs.
• Rubber diaphragm with drain connection.
• Upper part with connection for outer drum.
FunctionThe drain valve uses the water pressure in thecold-water inlet to close the valve. A feed hose isconnected between the water inlet and thecontrol valve.
When the control valve operates (drain valveshould be closed), the control valve opens thewater pressure onto the feed hose, which isconnected to the lower part of the drain valve.When the lower part is filled with water, the lowerpart diaphragm pushes up the piston. The pistonlifts the pressure plate against the drain valverubber diaphragm, which in turn forms a sealagainst the outer drum, effectively closing thevalve.
When the drain valve should be opened, thecontrol valve changes position to allow the waterpressure to the lower part of the drain valve toclose, instead opening the return hose to thedrain. The pressure plate recoil springs pull thepressure plate back, upon which the piston ispressed back into the cylinder. The water fromthe lower part is fed through the feed hose andthe control valve to the drain.
3359
Cylinder
Feed hose
Control valve
Feed hose
Lower part
Diaphragm
Piston
Pressure plate
Rubberdiaphragmwith drainconnection
Return hose
Recoil springs
Drain valve
5916
Principaldiagram
Fig.
1
Fig.
2
1
2

38 38. Drain valve
4
ServiceManual
Repairs
Repair work on the machine should only bedone by specially trained personnel.
Disassembly
For repair works on the drain valve, there isa risk that water still left in the machine mayflood onto the floor. Be sure to dry up anyspilled water since it may cause people toslip and hurt themselves.
1. Take down power from the machine by turningthe main power switch to the 0 position.
2. Remove the front cover.
3. Disconnect the drain hose from upper part ofthe valve.
4. Undo the hose clamp holding the valve rubberbellows against the sleeve coupling of theouter drum.
5. Loosen and unscrew the 4 retaining nuts ofthe valve a couple of turns (use a socket,extender and ratchet wrench). Turn the valveand unhook it from the bolts.
6. Disconnect the pressure hose from the lowerpart of the valve.
7. Replace the valve with a new one or replacethe defective part.
Lower part
5916
Main power switch
5222
Fig.
3
Fig.
4
Fig.
5
3
4Upper part
Piston
Rubberdiaphragmwith drainconnection
Pressure plate
101772
Cylinder
Diaphragm
Recoil spring
Nipple forconnection offeed hose fromcontrol valve
5

5
3838. Drain valveServiceManual
Assembling
1. Connect the pressure hose to the lower part of the valve. Verify that thehose is not bent or pinched.
2. Fit the rubber bellows onto the sleeve coupling.
3. Hook the valve onto the bolts and turn the valve into position. Secure the4 retaining bolts of the valve.
4. Secure the hose clamp at the connection of the rubber bellows on thesleeve coupling.
5. Connect the drain hose to the upper part of the valve.
6. Turn the main power switch to position 1 and verify correct valveoperation and that it does not leak.
7. Reattach the front cover.
Fig.
4
Fig.
5
Fig.
3

Intentionally blank

39. Detergent compartment
Contents
Description ................................................................................................ 3

Intentionally blank

3
3939. Detergent compartmentServiceManual
DescriptionThe detergent compartment of the machine isdesigned for use with powder and liquiddetergent. The compartment is divided into foursub-compartments as follows:
• Compartment 1 - For pre wash with powder orliquid detergent.
• Compartment 2 - For main wash withdetergent powder.
• Compartment 3 - Rinse.
• Compartment 4 - Main wash with liquiddetergent or, bleaching-agent.
The connections for incoming water are situatedon the rear side of the compartment.Compartments 3 and 4 each have oneconnector, while compartments 1 and 2 eachhave two connectors, one for cold water, theother for warm water.
The detergent is routed from the bottom of thecompartment to the outer drum through thecombo module immediately behind thecompartment.
To safeguard against overfilling, e.g., due to ablocked hose on its way to the drum, the combomodule features an overflow drain directlyconnected to the drain of the machine.
Detergent compartment
5916
Compartment 2: Main wash, powder detergentCompartment 1: Pre-washwith powder or liquiddetergent
Compartment 3; Rinse
Compartment 4: Main wash,liquid detergent or bleaching-agent
Overflow drain
To washing drum
Water connections
5209
Water connections
Fig.
1
1
Fig.
2
2

Intentionally blank

40. Heating
Contents
Description ................................................................................................ 3Electric heating ..................................................................................... 3
Function .................................................................................................... 4Electric heating ..................................................................................... 4Steam heating ...................................................................................... 4
Repairs...................................................................................................... 5Replacing the heating elements ........................................................... 5

Intentionally blank

3
4040. HeatingServiceManual
1
Fig.
1
Description
Electric heating
The heating system of the machine consists of:
• Three heating elements for heating the waterin the drum.
• A temperature sensor to detect the watertemperature in the drum.
• One or two heating contactors for switch-on/switch-off of the heating elements.
The heating elements and the temperaturesensor are situated at the bottom of the outerdrum close to the edge. They can be accessedfront the front after the front plate is removed.
The contactor(s) is(are) placed in the rear controlunit.
Depending on the size of the machine, thefollowing heating elements are available:
Machine Heating element size
model (kW)
W375N 3x0,665, 3x1, 3x1,8, 3x2,5
W385N, W620 3x0,665, 3x1, 3x1,8, 3x2,5
W3105N 3 x 3,3
W3130N, W630 3 x 3,3
W3180N, W640 3 x 4,33
W3250N, W655 3 x 6
W3330N, W675 3 X 7,66 Heating elements andtemperature sensor
5182, 5916
Heatingcontactor
T1 T2 T3
L1
N
NL2 L3

40 40. Heating
4
ServiceManual
2
3
5205
Programmeunit Al
CardA21
Heatingelements
TemperaturesensorVoltage supply
K21
5202
Heatingelements
Voltage supply
K21K22
Programmeunit A1
CardA21
Temperaturesensor
Programmeunit A1
CardA21
5208
Rear control unit
Steamvalve
Y51
Temperature sensor
Fig.
2
Fig.
3
Function
Electric heating
The three heating elements in the machine areconnected to separate phases and are switchedon and off using one or two heating contactors,K.21 and K22 (two contactors are used for higherheating power). The heating contactors arecontrolled by the programme unit and thermostatB1.
The programme unit receives information on thewater temperature in the machine from thethermostat situated in the outer drum. Theprogramme unit controls the heating contactorsto achieve the set water temperature for thecurrent washing programme.
When there is no water in the drum, theprogramme unit prevents switch-on of theheating elements. If an error would neverthelesscause the elements to switch on, a slow-blowfuse triggers to switch them off again.Then theheating element has to be changed.
Steam heating
The steam valve is controlled by the programmeunit A1. The control signal goes via thecommunication card A21.

5
4040. HeatingServiceManual
Repairs
Repair work on the machine should only bedone by specially trained personnel.
Replacing the heating elements
Wen replacing the heating elements, thereis a risk that water still left in the machinemay flood onto the floor. Be sure to dry upany spilled water since it may cause peopleto slip and hurt themselves.
1. Take down power from the machine by turningthe main power switch to the 0 position.
2. Remove the front cover.
3. Make a note of how the heating elements areconnected.
4. Disconnect the connection to the heatingelement to be replaced.
5. Unscrew the nut between the connectionsapprox. 1 cm.
6. Push on the nut and bolt to undo theexpansion bracket from the outer drum.
7. Remove the old heating element and installthe new one. Be sure that the rear edge isfitted into the element holder at the rear of theouter drum.
8. Assemble in reverse order.
Fig.
4
Fig.
5
4
5
5916
Main power switch
5204
Heating element
Temperature sensor

Intentionally blank

41. Coin-meter
Contents
Price programming.................................................................................... 3Setting wash price ................................................................................ 3Programming the current price ............................................................. 5Price reduction ..................................................................................... 6

Intentionally blank

3
4141. Coin-meterServiceManual
1
57181
2
3
5 4
Price programming
Setting wash price
• Pull out the coin box.
• From inside of the coin meter casette the different settings can bereached.
Fig.3
6
7
1. is the switch S1 for setting the ratio between coin 1 and 2 if the coinmeter has two slots. If only one coin, all switches shall be set in OFFposition.
2. is the switch S2 for setting the price.
3. is the switch S3 for price reduction.
4. is coin one, input for coin sensor one.
5. is coin two, input for coin sensor two.
6. Yellow LED flashes with frequency 3 Hz, the value left to insert andindicates accepted coin, lit 1 second.
7. Green LED flashes, relation coin 1 and coin 2. Continously lit when startrelay is activated.

41 41. Coin-meter
4
ServiceManual
2
5720
1 2 3 4
OFF
ON
Switch S1 is used for setting the ratio betweenthe two coins. If the coin meter only have slot forone coin, all switches shall be placed in OFFposition.
The following combination is available (ON = 1).
Switch 1 2 3 4 Ratio0 0 0 0 1:11 0 0 0 1:20 1 0 0 1:4
1 1 0 0 1:50 0 1 0 1:101 0 1 0 1:200 1 1 0 2:5
ExampleRatio 1:2 Value 2 is twice the value of 1.Ratio 1:4 Value 4 is four times the value of 1.Ratio 2:5 Value 5 is two and half times the
value of 2.
Fig.2

5
4141. Coin-meterServiceManual
3
5721 A
4
5721 B
OFF
ON
1 2 3 4 5 6 71 2 4 8 16 32 64
OFF
ON
1 2 3 4 5 6 71 2 4 8 16 32 64
Programming the current price
Programming is carried out on the switch unit,where the switches correspond to values from 1to 64 when they are set on position ON.
First calculate the value I which the switches willgive together and then set the switches so thatthey will give this number.
I = (P x A)/V where
P = price per program,
A = first number in coin ratio. When counter unitis for single coin insertion A is always 1.
V = value of coin. When counter unit is fordouble slot, the lower value.
Ex. 1P = 2 EURO 50 cent
Ratio 1:2 (1 EURO and 50 cent coins)
A = 1
V = 50
I = (250 x 1)/50 = 5The switch should be set to 5 which can beachieved by setting switches 1 and 3 inposition ON (1 + 4 = 5).
Ex. 2P = 1 EURO 50 cent
Ratio 2:5 (10 cent and 25 cent coins)
A = 2
V = 10
I = (150 x 2)/10 = 30The switch should be set to 30 which canbe achieved by setting switches 2, 3, 4 and5 in position ON (2 + 4 + 8 + 16 = 30).
Ex. 3P = 90 pence
Ratio 2:5 (20 and 50 pence)
A = 2
V = 20
I = (90 x 2)/20 = 9The switches should be set to 9 which canbe achieved by setting switches 1 and 4in position ON (1 + 8 = 9).
Fig.3
Fig.4
5
5721 C
OFF
ON
1 2 3 4 5 6 71 2 4 8 16 32 64
Fig.5
41 41. Coin-meter
6
ServiceManual
5
5722
OFF
ON
1 2
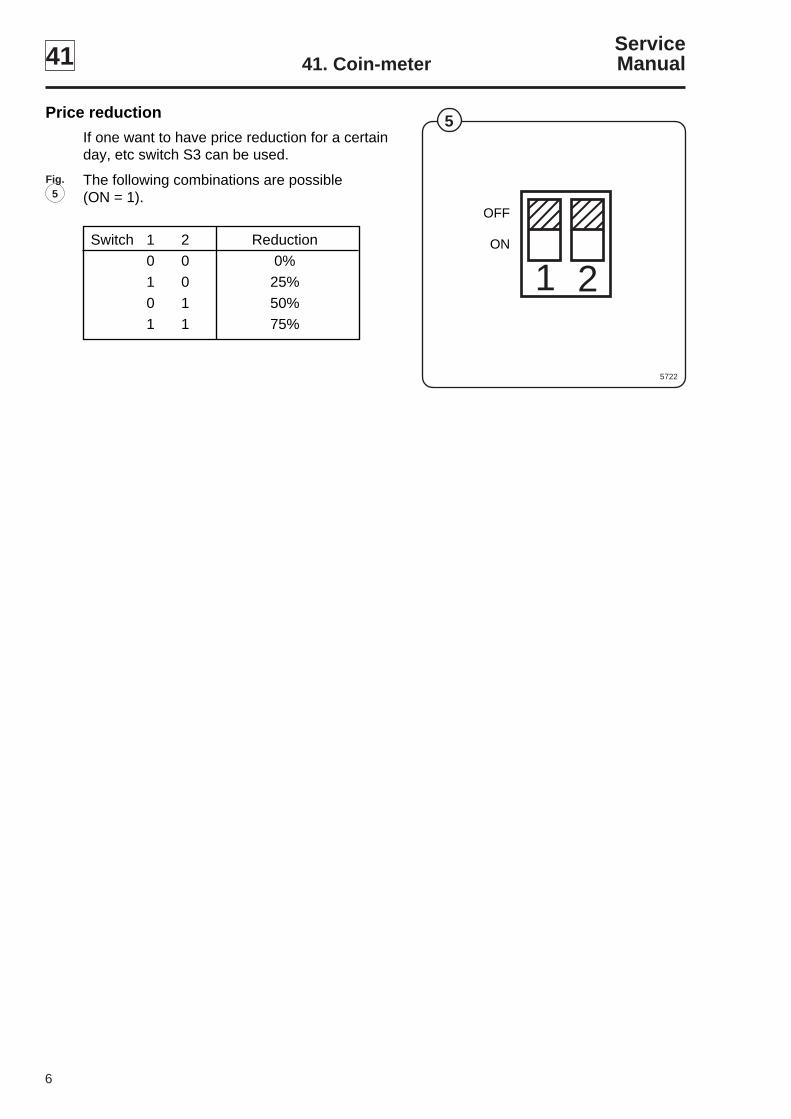
Price reduction
If one want to have price reduction for a certainday, etc switch S3 can be used.
The following combinations are possible(ON = 1).
Switch 1 2 Reduction0 0 0%1 0 25%
0 1 50%1 1 75%
Fig.5

42. Instruction for pulley and replacing bearings
Instruktion för remskiva
Instruction for pulley
W365H/N/M – W3330H/N/MEX618-EX670, E/W/SU620-675
438 9041-5304.21

Intentionally blank

ServiceManual
3
4242. Instruction for pulley and replacing bearings
Instruktion/InstructionKomplett verktygssats, art. nr: 472 9913-57Complete tool kit, part No: 472 9913-57
1
374
Pos. Art. nr./Part No Beskrivning/Description Antal/Qty
1. 432 1725-01 Avdragare/Puller 1
2. 432 1728-01 Avdragare remskiva/Pulley drag 23. 432 1717-01 Adaptor/Adaptor G1/2"/M10 14. 432 1720-01 Bricka/Washer 15. 438 6031-02 Mutter/Nut G 1/2" 16. 432 1721-01* Hylsa/Sleeve 48 x 42 L = 80 17. 432 1721-02** Hylsa/Sleeve 60 x 54 L = 90 1
8. 432 1721-03*** Hylsa/Sleeve 75 x 69 L = 100 1438 8002-02 Gängtapp/Thread tap M12 1438 8001-02 Borr/Drill 1
* For W365-385H/N/M** For W3105H/N, 3130H/N/M, 3180N/M*** For W3180H, 3240H, 3250N/M, 3300H, 3330N/M
Fig.
1
1 8 7
4 5 3
6
2

ServiceManual42 42. Instruction for pulley and replacing bearings
4
2
336
Fig.
2
• Tag bort segersäkringen från trumaxeln.• Remove the C-clamp from the drum shaft.
• Fixera avdragsklackarna och avdragarna på axeln och remskivan.• Mount the puller with puller drags on shaft and pulley.
3
337
• Värm med värmepistol på remskivan vid axelinfästningen så attaluminiumet utvidgar sig något. Det går då lättare att dra av remskivan.
• Warm the pulley around the shaft so that the aluminium expands slightly.Then it is easier to pull off the pulley.
Fig.
3

ServiceManual
5
4242. Instruction for pulley and replacing bearings
Fig.
4
• Gänga axeländan M12 och 20 mm djupt.• Thread the shaft end with M12 and 20 mm deep.
5
367
• Montera adapter G 1/2"/M12 i axeländan. Gänga ner den i botten.• Mount adaptor G 1/2"/M12 in the shaft end. Thread it to the bottom.
Fig.
5
Montering av remskiva/Mounting pulley
4
362
• Drag loss remskivan.• Pull off the pulley.
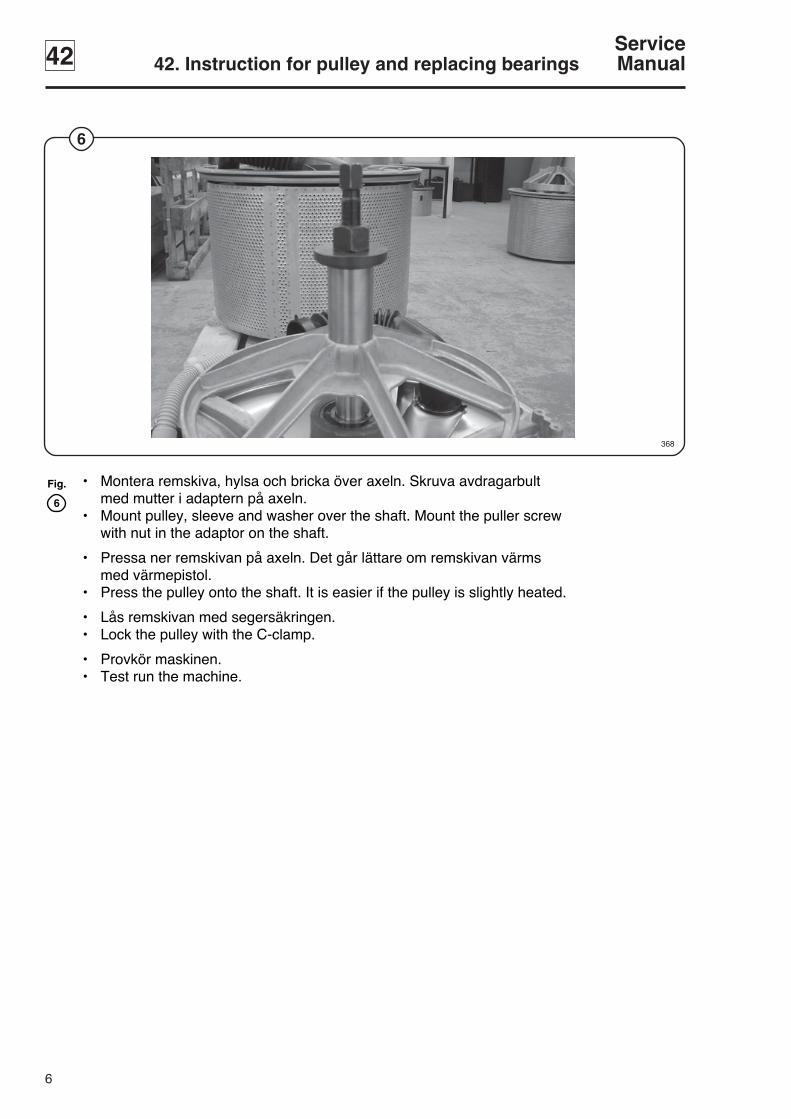
ServiceManual42 42. Instruction for pulley and replacing bearings
6
6
368
Fig.
6
• Montera remskiva, hylsa och bricka över axeln. Skruva avdragarbultmed mutter i adaptern på axeln.
• Mount pulley, sleeve and washer over the shaft. Mount the puller screwwith nut in the adaptor on the shaft.
• Pressa ner remskivan på axeln. Det går lättare om remskivan värmsmed värmepistol.
• Press the pulley onto the shaft. It is easier if the pulley is slightly heated.
• Lås remskivan med segersäkringen.• Lock the pulley with the C-clamp.
• Provkör maskinen.• Test run the machine.

42. Instruction for pulley and replacing bearings
Instruktion för lagerbyte
Instruction for replacing bearings
W365H/N/M – W3330H/N/MEX618-EX670, E/W620-675
438 9041-61/0204.21

Intentionally blank

ServiceManual
9
4242. Instruction for pulley and replacing bearings
Instruktion/InstructionKomplett verktygssats, art. nr: 472 9913-60Complete tool kit, part No: 472 9913-60
1
378
Fig.
1
7 8 9 10 1 2
11 13 12 14 15
6
5
4
3
Pos. Art. nr./Part No Beskrivning/Description Antal/Qty1. 432 1723-01 Dorn för tätningar/Drift for gaskets 1
(W365-3105H/N/M, W3130N/M, EX618, 625, E/W630)2. 432 1723-02 Dorn för tätningar/Drift for gaskets 1
(W3130-3300H, W3180-3330N/M, EX630-670, E/W640-675)3. 432 1716-01 Distans/Spacer (W365-385H/N/M, EX618, E/W620) 14. 432 1716-02 Distans/Spacer (W3105H/N/M, W3130N/M, EX625, E/W630) 15. 432 1716-03 Distans/Spacer (W3130H, W3180N/M, EX630, E/W640) 16. 432 1716-04 Distans/Spacer (W3180-3300H, W3250-3330N/M,
EX640-670, E/W655-675) 17. 432 1719-01 Dorn, stora lagret/Drift, large bearing (W365-385H/N/M,
EX618, E/W620) 18. 432 1719-02 Dorn, stora lagret/Drift, large bearing 1
(W3105H/N/M, W3130N/M, EX625, E/W630)9. 432 1719-03 Dorn, stora lagret/Drift, large bearing 1
(W3130H, W3180N/M, EX630, E/W640)10. 432 1719-04 Dorn, stora lagret/Drift, large bearing
(W3240-3300H, W3250-3330N/M, EX655-670, E/W655-675) 111. 432 1730-01 Pressdorn/Presser (W365-3105H/N/M, EX618-625, E/W620) 112. 432 1730-02 Pressdorn/Presser (W3130-3300H, W3180-3330N/M,
EX630-670, E/W640-675) 113. 432 1722-01 Bricka/Washer 114. 432 1727-01 Förlängare/Extender 215. 432 1729-01 Avdragsklackar, stora lagret/Puller block, large bearing 2

ServiceManual42 42. Instruction for pulley and replacing bearings
10
2
Fig.
2
• Avmontering av remskiva, se instruktion 438 9041-53.• Removal of pulley, see instruction 438 9041-53.
• Tag bort kilen från axeln.• Remove wedge from shaft.
• Mät avståndet A mellan lager och axelända.• Measure the distance A between bearing and end of shaft.
AxelShaft
A
LagerBearing

ServiceManual
11
4242. Instruction for pulley and replacing bearings
Fig.
3
• Skruva loss bultarna i lagerhuset.• Loosen the bolts in the bearing house.
4
339
• Montera två bultar i lagerhusets gängade hål och pressa losslagerhuset.
• Mount two bolts in threaded holes and press until the bearing house isloose.
Fig.
4
3
338

ServiceManual42 42. Instruction for pulley and replacing bearings
12
5
341, 342, 343
Fig.
5
• Om det främre lagret sitter kvar på axeln, drag av det med avdragarenoch de två avdragarklackarna (på de större maskinerna använd ocksåförlängarna). Försök ej dra av bakgaveln när det främre lagret sitter kvar,då förstörs klädselplåten.
• If the front bearing is still on the shaft, use the puller to remove it. Inorder to be able to put the puller blocks under the bearing, push the reargable a little. Do not attempt to remove the rear gable when the bearingis still on the shaft. It will result in a damaged lining.
• Tag bort tätningarna och därefter bakgavel.• Remove the sealings and then the rear gable.

ServiceManual
13
4242. Instruction for pulley and replacing bearings
Fig.
6
• Alt. 1. Knacka på bussningen på tre ställen (ca 120° mellan).Ibland räcker det för att den skall släppa.
• Alt. 1. Tap the bushing in three places (with about 120° in between).Sometimes it is sufficient to loosen it from the shaft.
• Alt. 2. Mejsla eller slipa bort bussningen från axeln.• Alt. 2. Chisel or grind the bushing off the shaft.
6
346

ServiceManual42 42. Instruction for pulley and replacing bearings
14
Fig.
7
• Knacka ur lagren ur lagerhuset.• Tap the bearings from the bearing house.
• Rengör lagerhuset noggrant.• Clean the bearing house thoroughly.
7
347

ServiceManual
15
4242. Instruction for pulley and replacing bearings
Fig.
8
Fig.
9
8
386
9
384
• Lagersats• Bearing kit.
W365H, W375H/N, W385N/M, EX618, E/W620 472 9913-12W3105H/N/M, W3130N/M, EX625, E/W630 472 9913-13W3250N/M, E/W655 472 9913-15W3180N/M, E/W640 472 9913-14W3330N, E/W675 472 9913-19W3330N/M 472 9913-16
• Lagersats• Bearing kit.
W3130H, EX630 472 9913-17W3180H, EX640 472 9913-18W3240H, EX655 472 9913-19W3300H, EX670 472 9913-64

ServiceManual42 42. Instruction for pulley and replacing bearings
16
Fig.
10
• Fyll främre lagret med fett och knacka försiktigt ner lagerhuset med hjälpav dorn och bricka.
• Fill the front bearing with grease and tap it gently into the housing withdrift and washer.
11
350
• Fyll lite fett i lagerhuset• Put some grease into the housing.
Fig.
11
10
348, 349

ServiceManual
17
4242. Instruction for pulley and replacing bearings
Fig.
12
• Vänd på lagerhuset och knacka försiktigt ned det bakre lagret med hjälpav pressdornet.
• Turn the housing around and gently tap the rear bearing into the housingusing the presser.
13
• Montering av tätningsringar.• Mounting of sealings.
Fig.
13
12
351, 352
LagerhusBearing housing
TätningsringarSealing rings

ServiceManual42 42. Instruction for pulley and replacing bearings
18
Fig.
14
• Smörj lagerhusets innersida med lite fett så går det lättare att monteratätningarna.
• Put some grease on the inside of the bearing housing. Then it is easierto mount the sealing rings.
14
354

ServiceManual
19
4242. Instruction for pulley and replacing bearings
Fig.
15
• Fyll den första tätningen med fett.• Fill the first sealing with grease.
• Placera tätningen på dornet med tätningens öppning uppåt. Knackaförsiktigt ned den i lagerhuset. Tätningen skall ned tills det tar stopp.
• Place the sealing on the drift with the opening up. Tap carefully it downin the bearing housing. Push it down until it stops.
15
353, 355

ServiceManual42 42. Instruction for pulley and replacing bearings
20
Fig.
16
• Fyll den andra tätningen med Amblygon fett. Placera distansring ochtätning på dornet. Pressa ner dornet i botten på lagerhuset.
• Fill the second sealing with Amblygon grease. Place the spacer andsealing on the drift. Press down the drift to the bottom.
16
356, 357, 359

ServiceManual
21
4242. Instruction for pulley and replacing bearings
Fig.
17
• Montera den tredje tätningen. Läppen skall ligga an mot lagerhuset.Tryck ej för långt, tätningsläppen kan gå sönder.
• Mount the third sealing. The lip shall lay against the housing. Don't pushtoo far as the lip can break.
17
361

ServiceManual42 42. Instruction for pulley and replacing bearings
22
Fig.
18
• Om maskinen är försedd med oljesmörjning, kontrollera att slang ochnippel är hela. Om inte, byt.
• If the machine is equipped with oil lubrication, check that the hose andnipple are OK. If not, replace.
• Gänga axeländan med M10 och min 20 mm djupt.• Thread the shaft end with M10 and min 20 mm deep.
19
364
• Montera lagerhuset på bakgaveln och korsdrag bultarna.OBS! Markering (Up) på lagerhuset skall peka upp när bakgavel ärmonterat på maskinen.
• Mount the bearing housing to the rear gable and tighten the boltcrosswise.NOTE! The marking (Up) shall be pointing up when rear gable are inplace on the machine.
Fig.
19
18
371

ServiceManual
23
4242. Instruction for pulley and replacing bearings
Fig.
20
• Montera bakgavelpaketet över axeln. Var noga med att hålla gavelnhorisontellt och var uppmärksam på att tätningarna inte skadas på axeln.
• Mount the rear gable over the drum shaft. Be sure to put it onhorizontally so that the sealings don't get damaged on the shaft.
• Montera adapter på axeländan och skruva ner den i botten.• Mount the adaptor on the shaft end and thread it down to the bottom.
21
366
• Montera pressdorn, bricka, mutter och avdragarbult. Pressa ner gaveln ibotten. Kontrollera måttet mellan axelända och bakre lagerbana somuppmättes vid isärtagningen.
• Mount presser, washer, nut and puller bolt. Press down the rear gableuntil stop. Check the measure between the shaft end and bearing race.This measure was taken before removing the rear gable from the shaft.
Fig.
21
20
365

ServiceManual42 42. Instruction for pulley and replacing bearings
24
Fig.
22
• Montera kilen på axeln.• Mount the wedge on the shaft.
• Montera remskiva, hylsa, bricka, mutter och avdragarbult på axeln.Skruva avdragaren i adaptern på axeln. Pressa ned remskivan på axeln.Det går lättare om remskivan värms.
• Mount pulley, sleeve, washer, nut and puller bolt onto the shaft. Threadthe bolt to the adaptor on the shaft. Press the pulley onto the shaft. It iseasier if the pulley is heated.
23
369
• Lås remskivan med segersäkringen.• Lock the pulley with the C-clamp.
• Byt tätningen runt bakgavelns ytterkant.• Replace the gasket around the circumference of the rear gable.
Fig.
23
22
373

ServiceManual
25
4242. Instruction for pulley and replacing bearings
• Lyft in trumpaketet i yttertrumman.OBS! Texten"Up" på bakgaveln skall peka uppåt.
• Lift the drum package into the outer drum.NOTE! The text "Up" on the rear gable must be pointing upwards.
• Återmontera övriga detaljer.• Remount other parts in their proper places.
• Provkör maskinen.• Test run the machine.